


For those of you like me who grew up in the 1980s, you remember the Polaroid instant camera. Models like the Spectra and the OneStep were common, shooting instant photographs with Polaroid’s familiar white border. If you are a little older, you might remember the collapsible SX-70, but no matter your age, the idea of instant photography involved some type of Polaroid photograph that developed before your eyes.
The earliest Polaroids however, used a different type of instant film that came on a roll. This Polaroid roll film was unlike the roll film used in non-instant cameras made by everyone else.
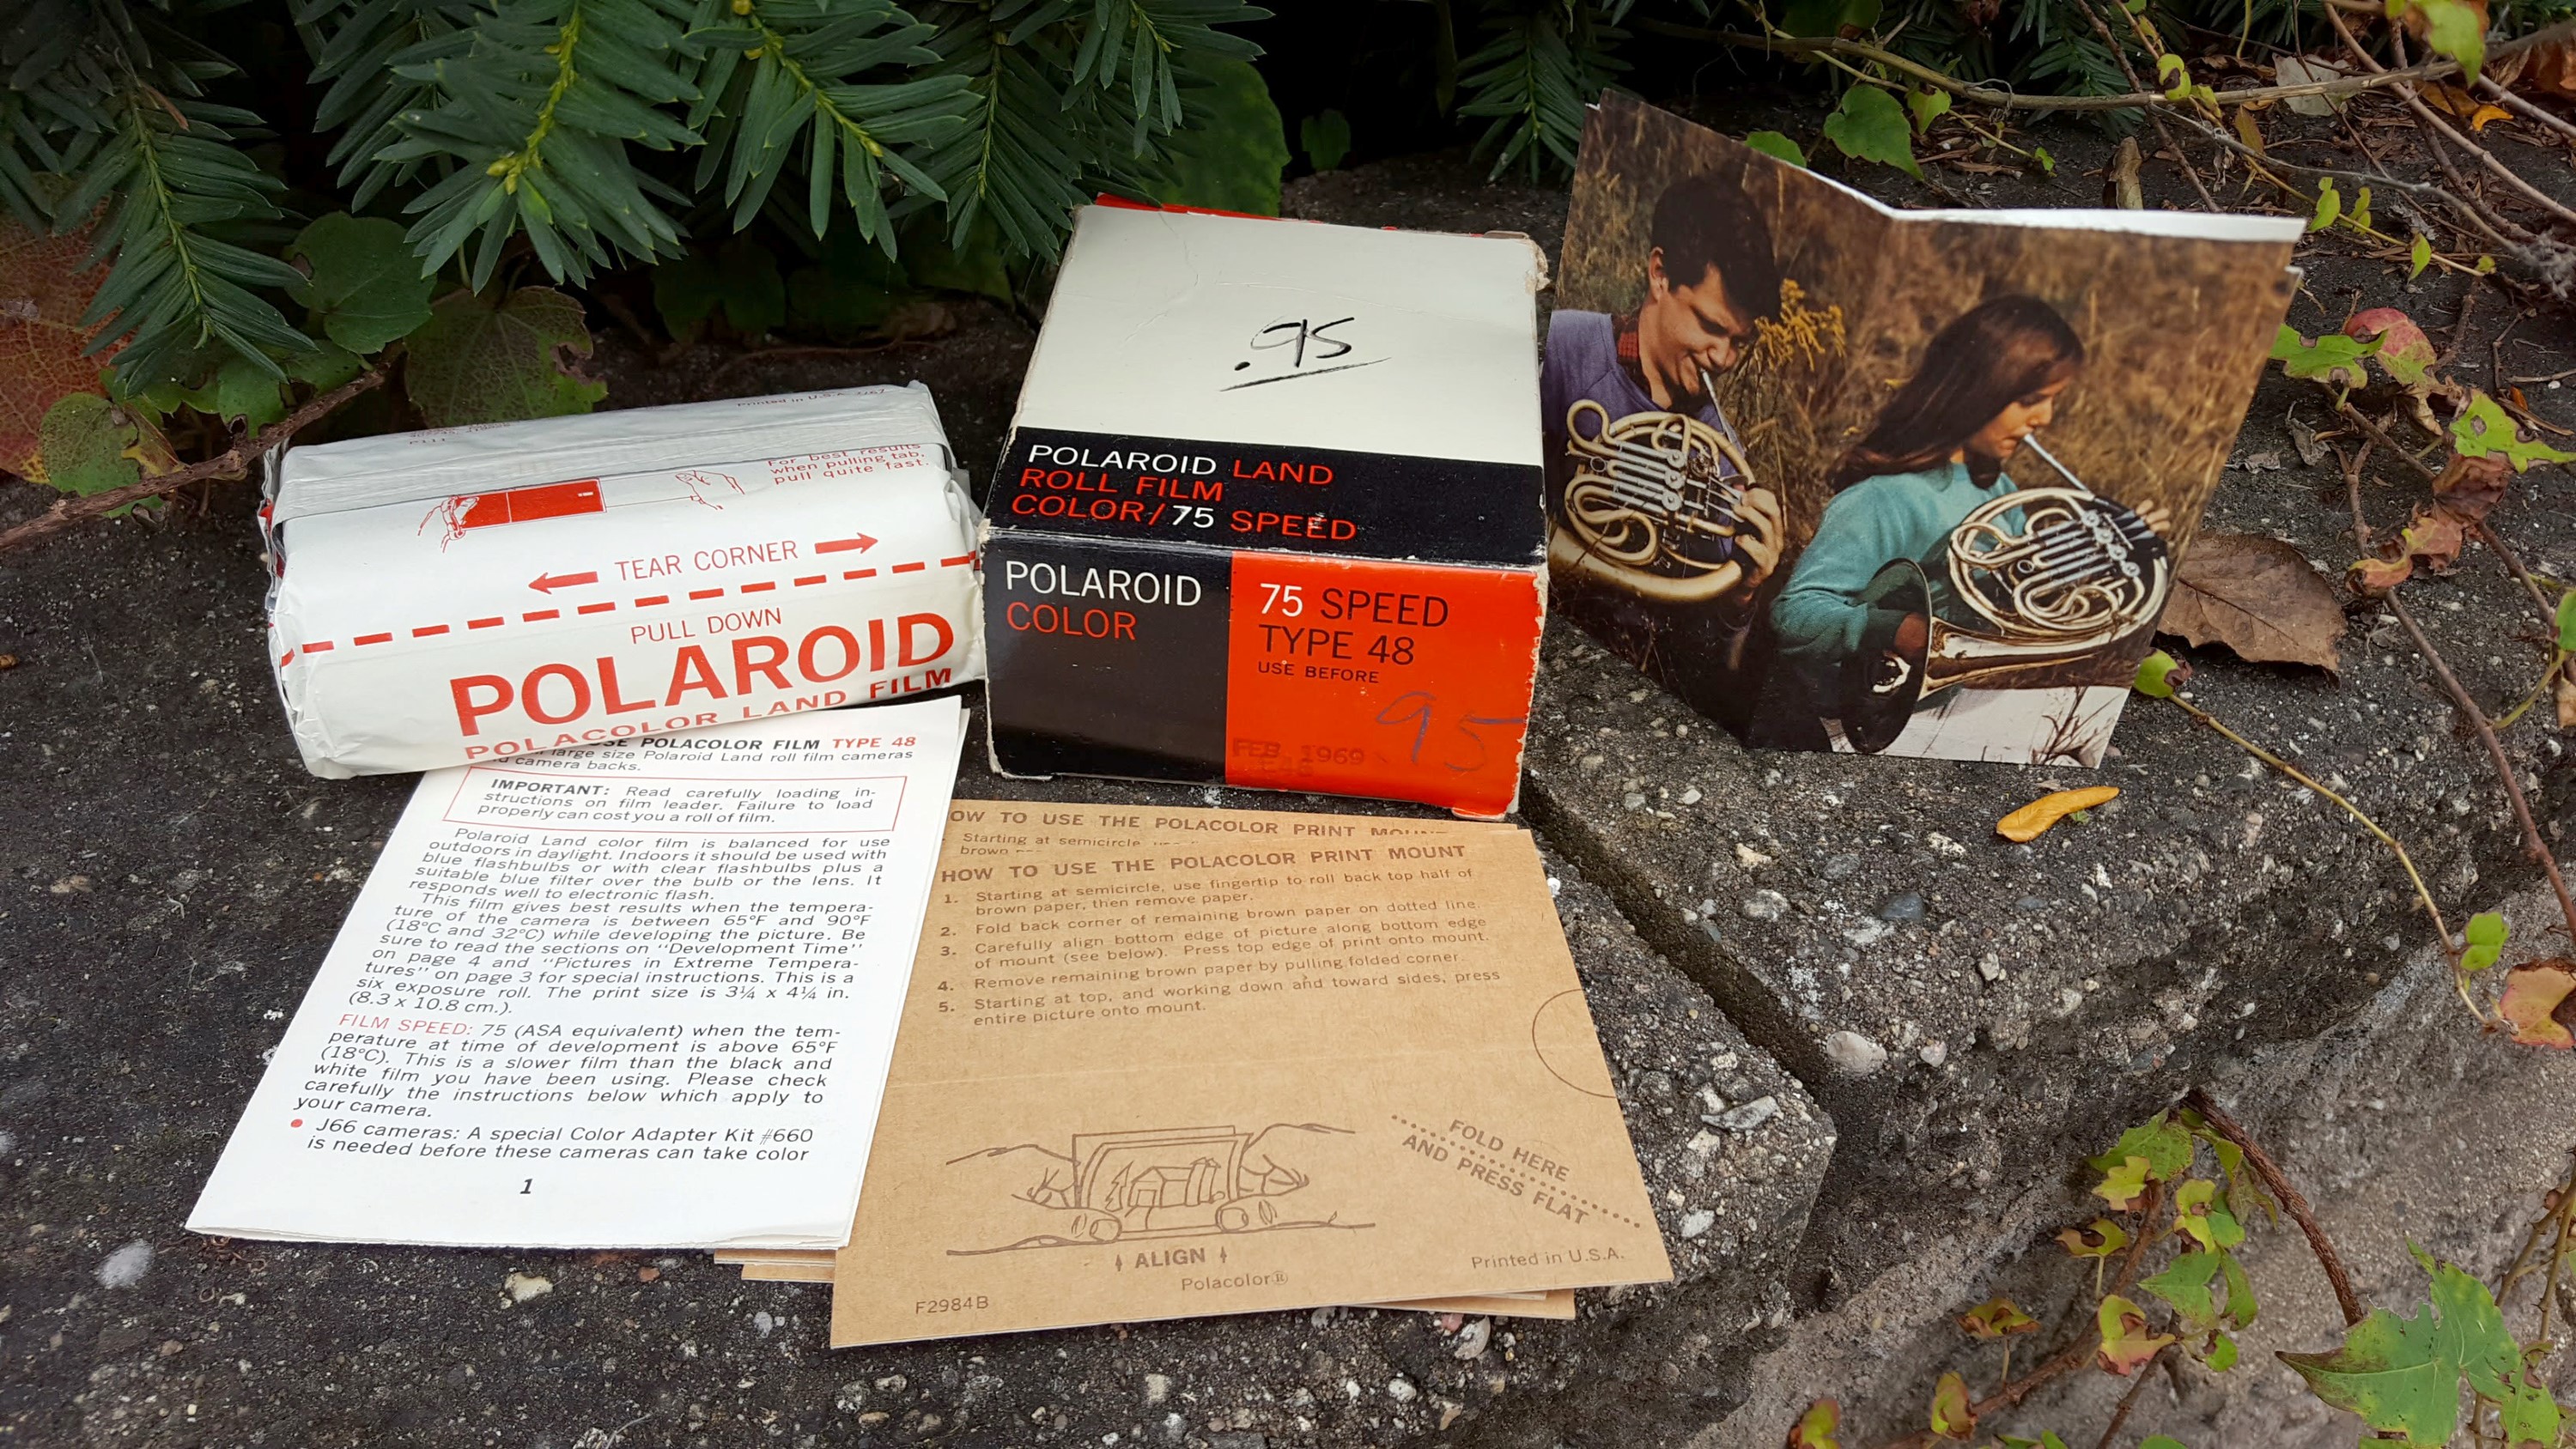
Each time you bought a new roll, there was the roll film itself, and attached to it was a roll of chemically backed developing paper, and a bottle of finisher. I’ll admit to not fully understanding how the whole process worked, but basically you’d open the camera and load in two rolls. One would be the light sensitive negative film, the other would be the photographic positive paper that would eventually be your photograph. The light sensitive film would pass over the film gate in the camera so that the photo could be captured, and then by pulling on a cardboard leader which zig zagged through the camera, the developed image and the photographic paper would come together and get squished between two metal rollers, activating a chemical developer which caused a photographic negative image from the film to develop onto the positive paper.
When the finished photo was first pulled out of the camera, you would have to wait at least a minute for the photograph to finish developing. The camera would have a built in cutter on the side which you would use to tear it away from the rest of the roll. Once it was done, you were supposed to use the tube of finisher that came included with the film to protect it, ensuring your image wouldn’t fade away. I’m not sure how many people actually did this last step as I imagine the tubes often got misplaced.
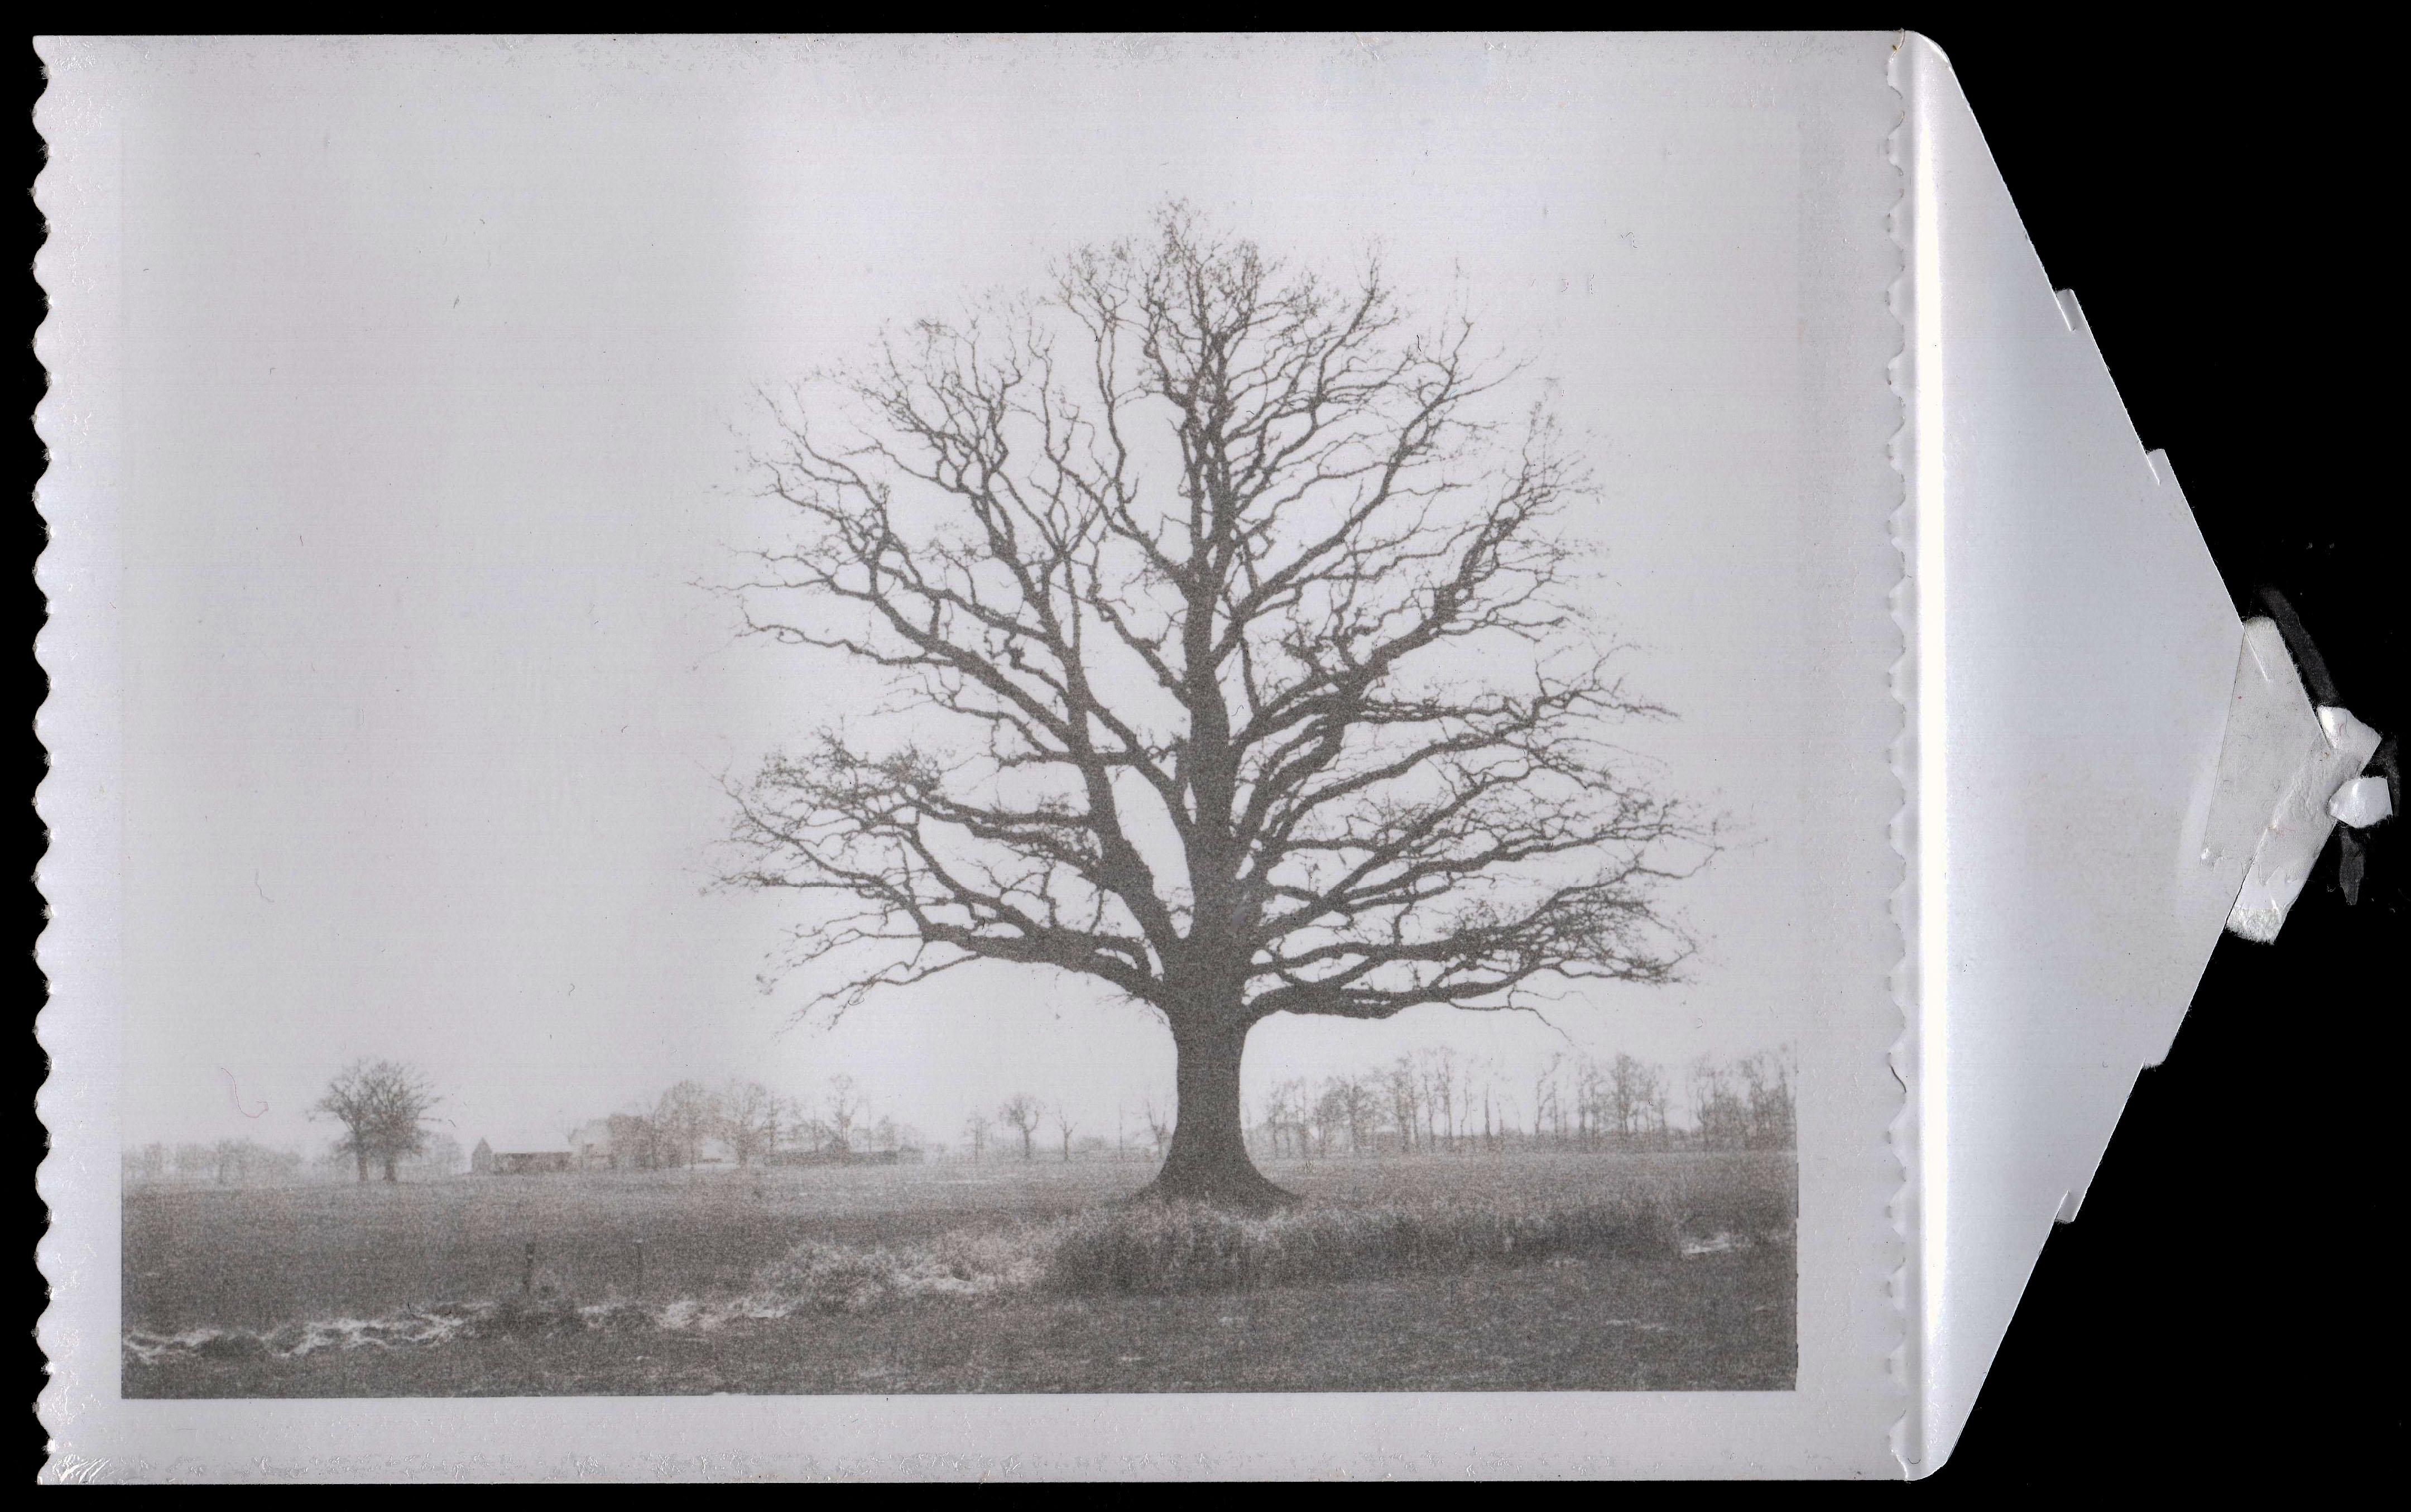
This probably sounds pretty complicated (it was), but it was state of the art stuff in the mid 20th century. It’s entirely plausible that you’ve encountered a Polaroid roll film photograph before, perhaps in a drawer in your grandparent’s home, or at an estate sale. The perforations of the resulting photographs are very distinct and look like the image to the right.
The problem with these roll film Polaroids was that once newer and simpler forms of instant film became available, people stopped using them. In the late 1970s and 80s, supplies of Polaroid roll film dwindled, and by 1992 had gone completely extinct.
While discontinued formats have been an issue for fans of non-Instant film, Polaroid film is different in that it requires chemical developers to actually “make” the image. Non instant formats that use E6, C41, or black and white chemicals are often still viable decades after they were made because the chemicals needed to develop them are separate from the film. I’ve had luck developing rolls of Kodak Verichrome Pan that expired in 1972 because even though the film was old, I used fresh developer. Polaroid film on the other hand, starts to seriously degrade as soon as 5 years after it’s expiration date, and in most cases is completely unusable after 10, meaning that as of this writing its been at least a decade and a half since any viable Polaroid roll film has existed. Making matters even more discouraging is that there are currently no upstart companies looking to recreate this type of Polaroid film as the chemicals needed to make it are also no longer made.
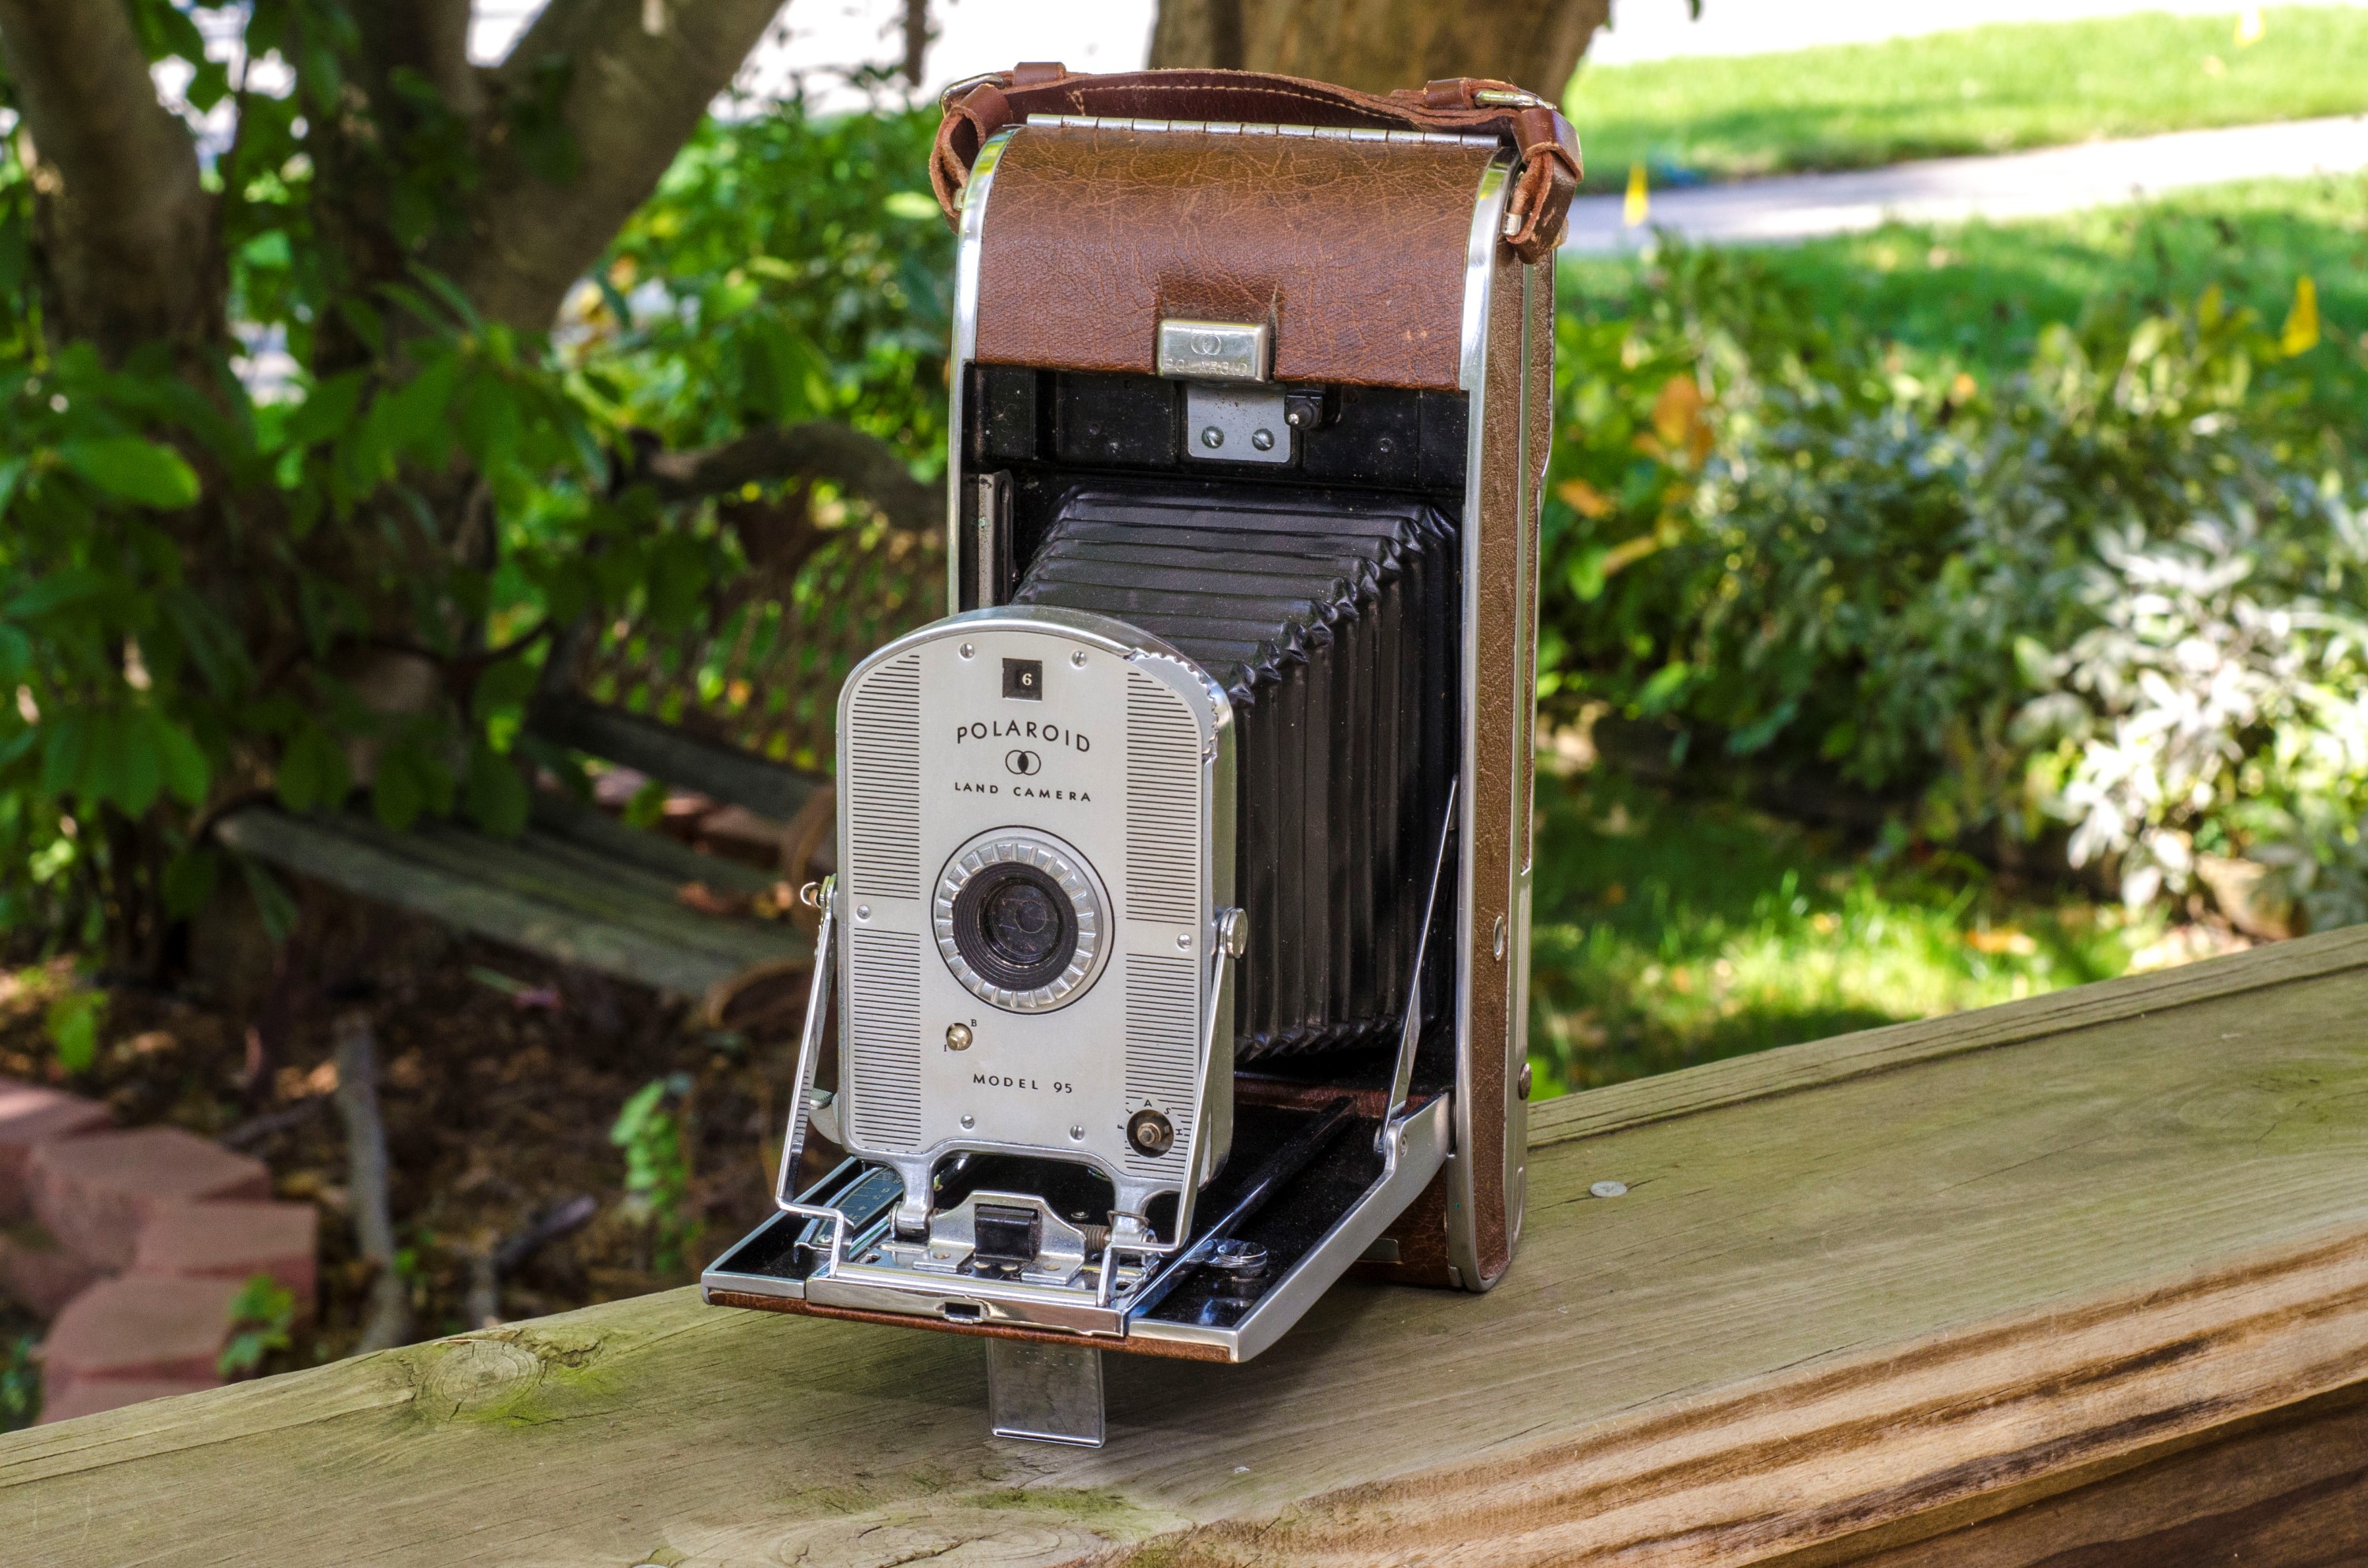
With the discouraging thought of all of those beautiful Polaroid cameras starting with the original Model 95/95a through the many later models being nothing more than shelf-queens, fans of these cameras had to get creative.
While it might seem impossible to use non-instant film in an instant camera, keep in mind that a Polaroid is after all, still a camera. It has a lens, a shutter, and a light tight compartment, so why couldn’t you use negative film?
Many creative fans of these cameras have come up with ways to modify almost any Polaroid roll film model to accept modern roll or sheet film by drilling a hole somewhere in the camera to add a wind knob, and adding additional light proofing material. The most common modifications are for 120, but there are others for 4×5 and even Fuji Instax film.
Here is a partial list of articles for various Polaroid conversion projects:
Polaroid 80-series to 120 (Second Method)
Polaroid Model 95a to 120 using Legos
Polaroid Pathfinder 110A to 4×5 Sheet Film
Each of these articles go over the necessary modifications to use modern film in an old roll film Polaroid, but each of them requires some level of permanent modification to the camera which cannot be easily reversed. To someone with the time and means, this likely isn’t a big issue, but what if you wanted to try it on a camera while preserving it’s original state, no drilling or cutting required?
Recently, I stumbled upon an article written by Les Smith on lomography.com which I initially dismissed as yet another conversion project, but upon reading the whole thing, the author suggests a way to roll 120 film through the camera without any modifications of any kind. Color me intrigued!
In the article, the author uses a Polaroid Pathfinder Model 120 with a Yashica Yashinon lens. There is nothing fundamentally wrong with this approach, but the Pathfinder was a top of the line model in Polaroid’s lineup, and is still one of the more expensive cameras to buy on the used market today. Sold prices on eBay range from as low as $25 to well over $100 for an unmolested copy.
In addition to being expensive, the Pathfinder is a physically large camera that used Polaroid Series 40 film which produced images that were 72mm x 95mm. The width of the film gate in these cameras is much wider than the width of 120 film (even wider than 116 film) which means that as the film rolls through the camera, it is suspended over the film gate with no support on the sides.
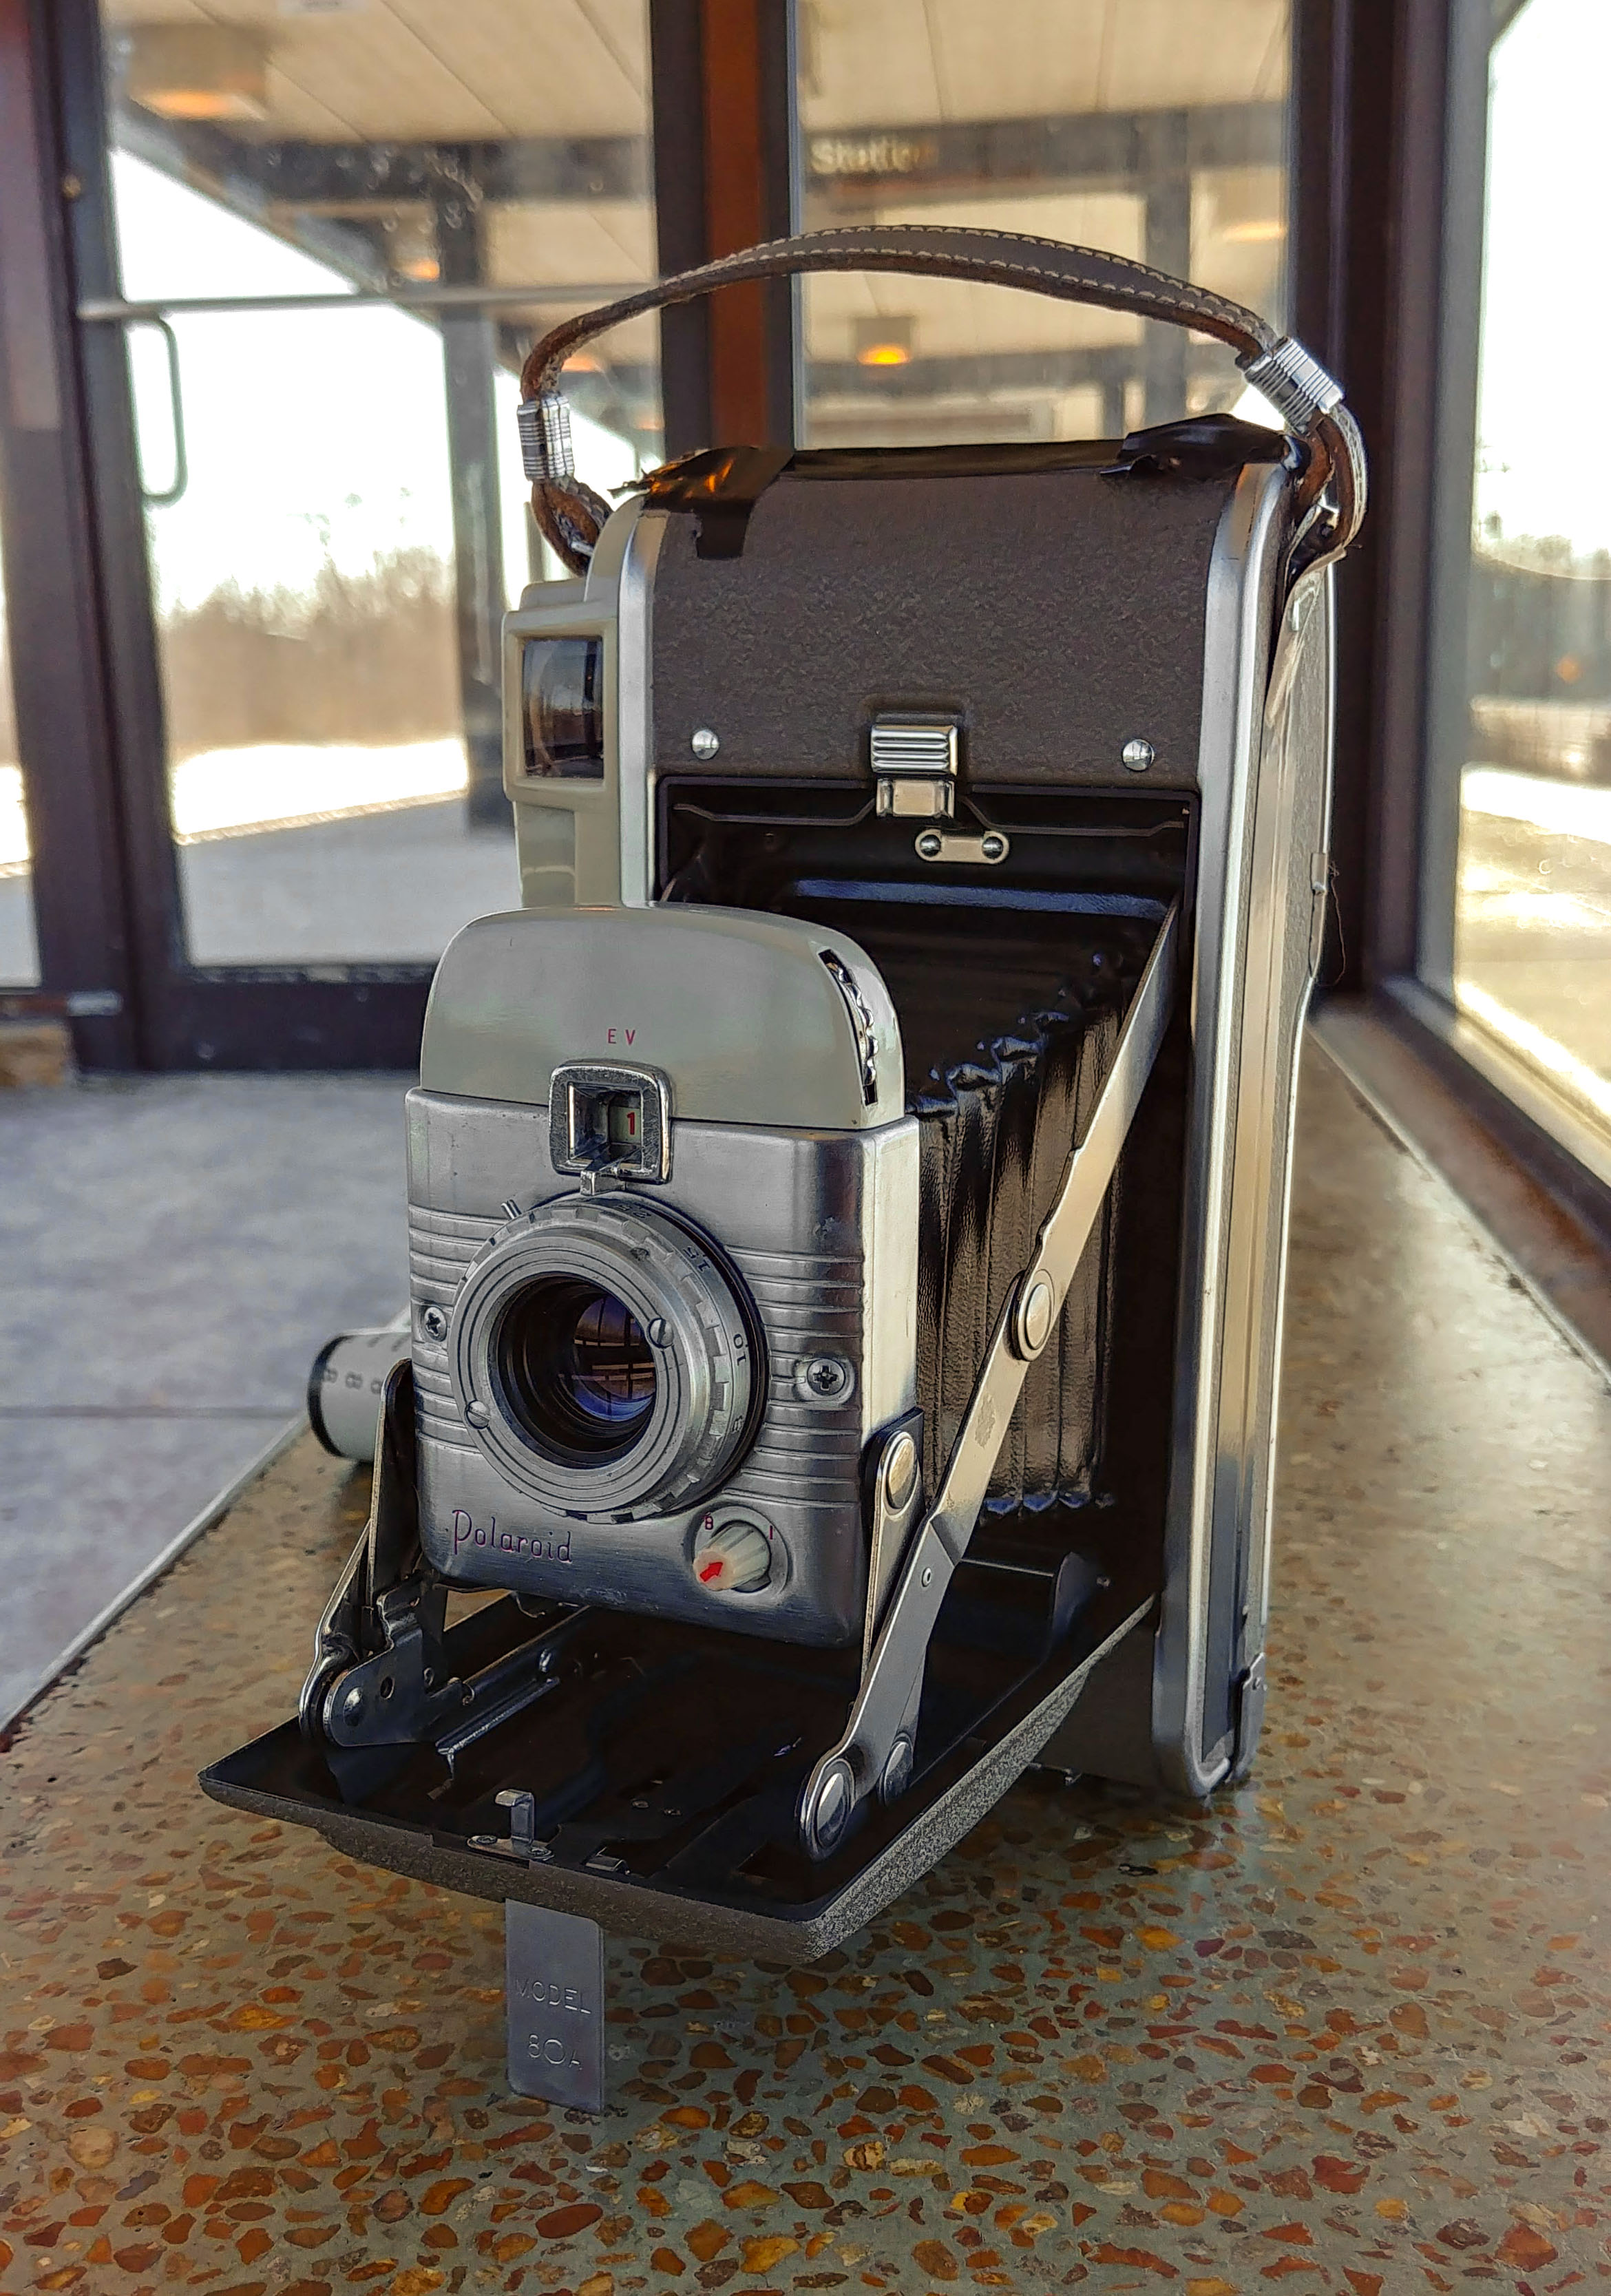
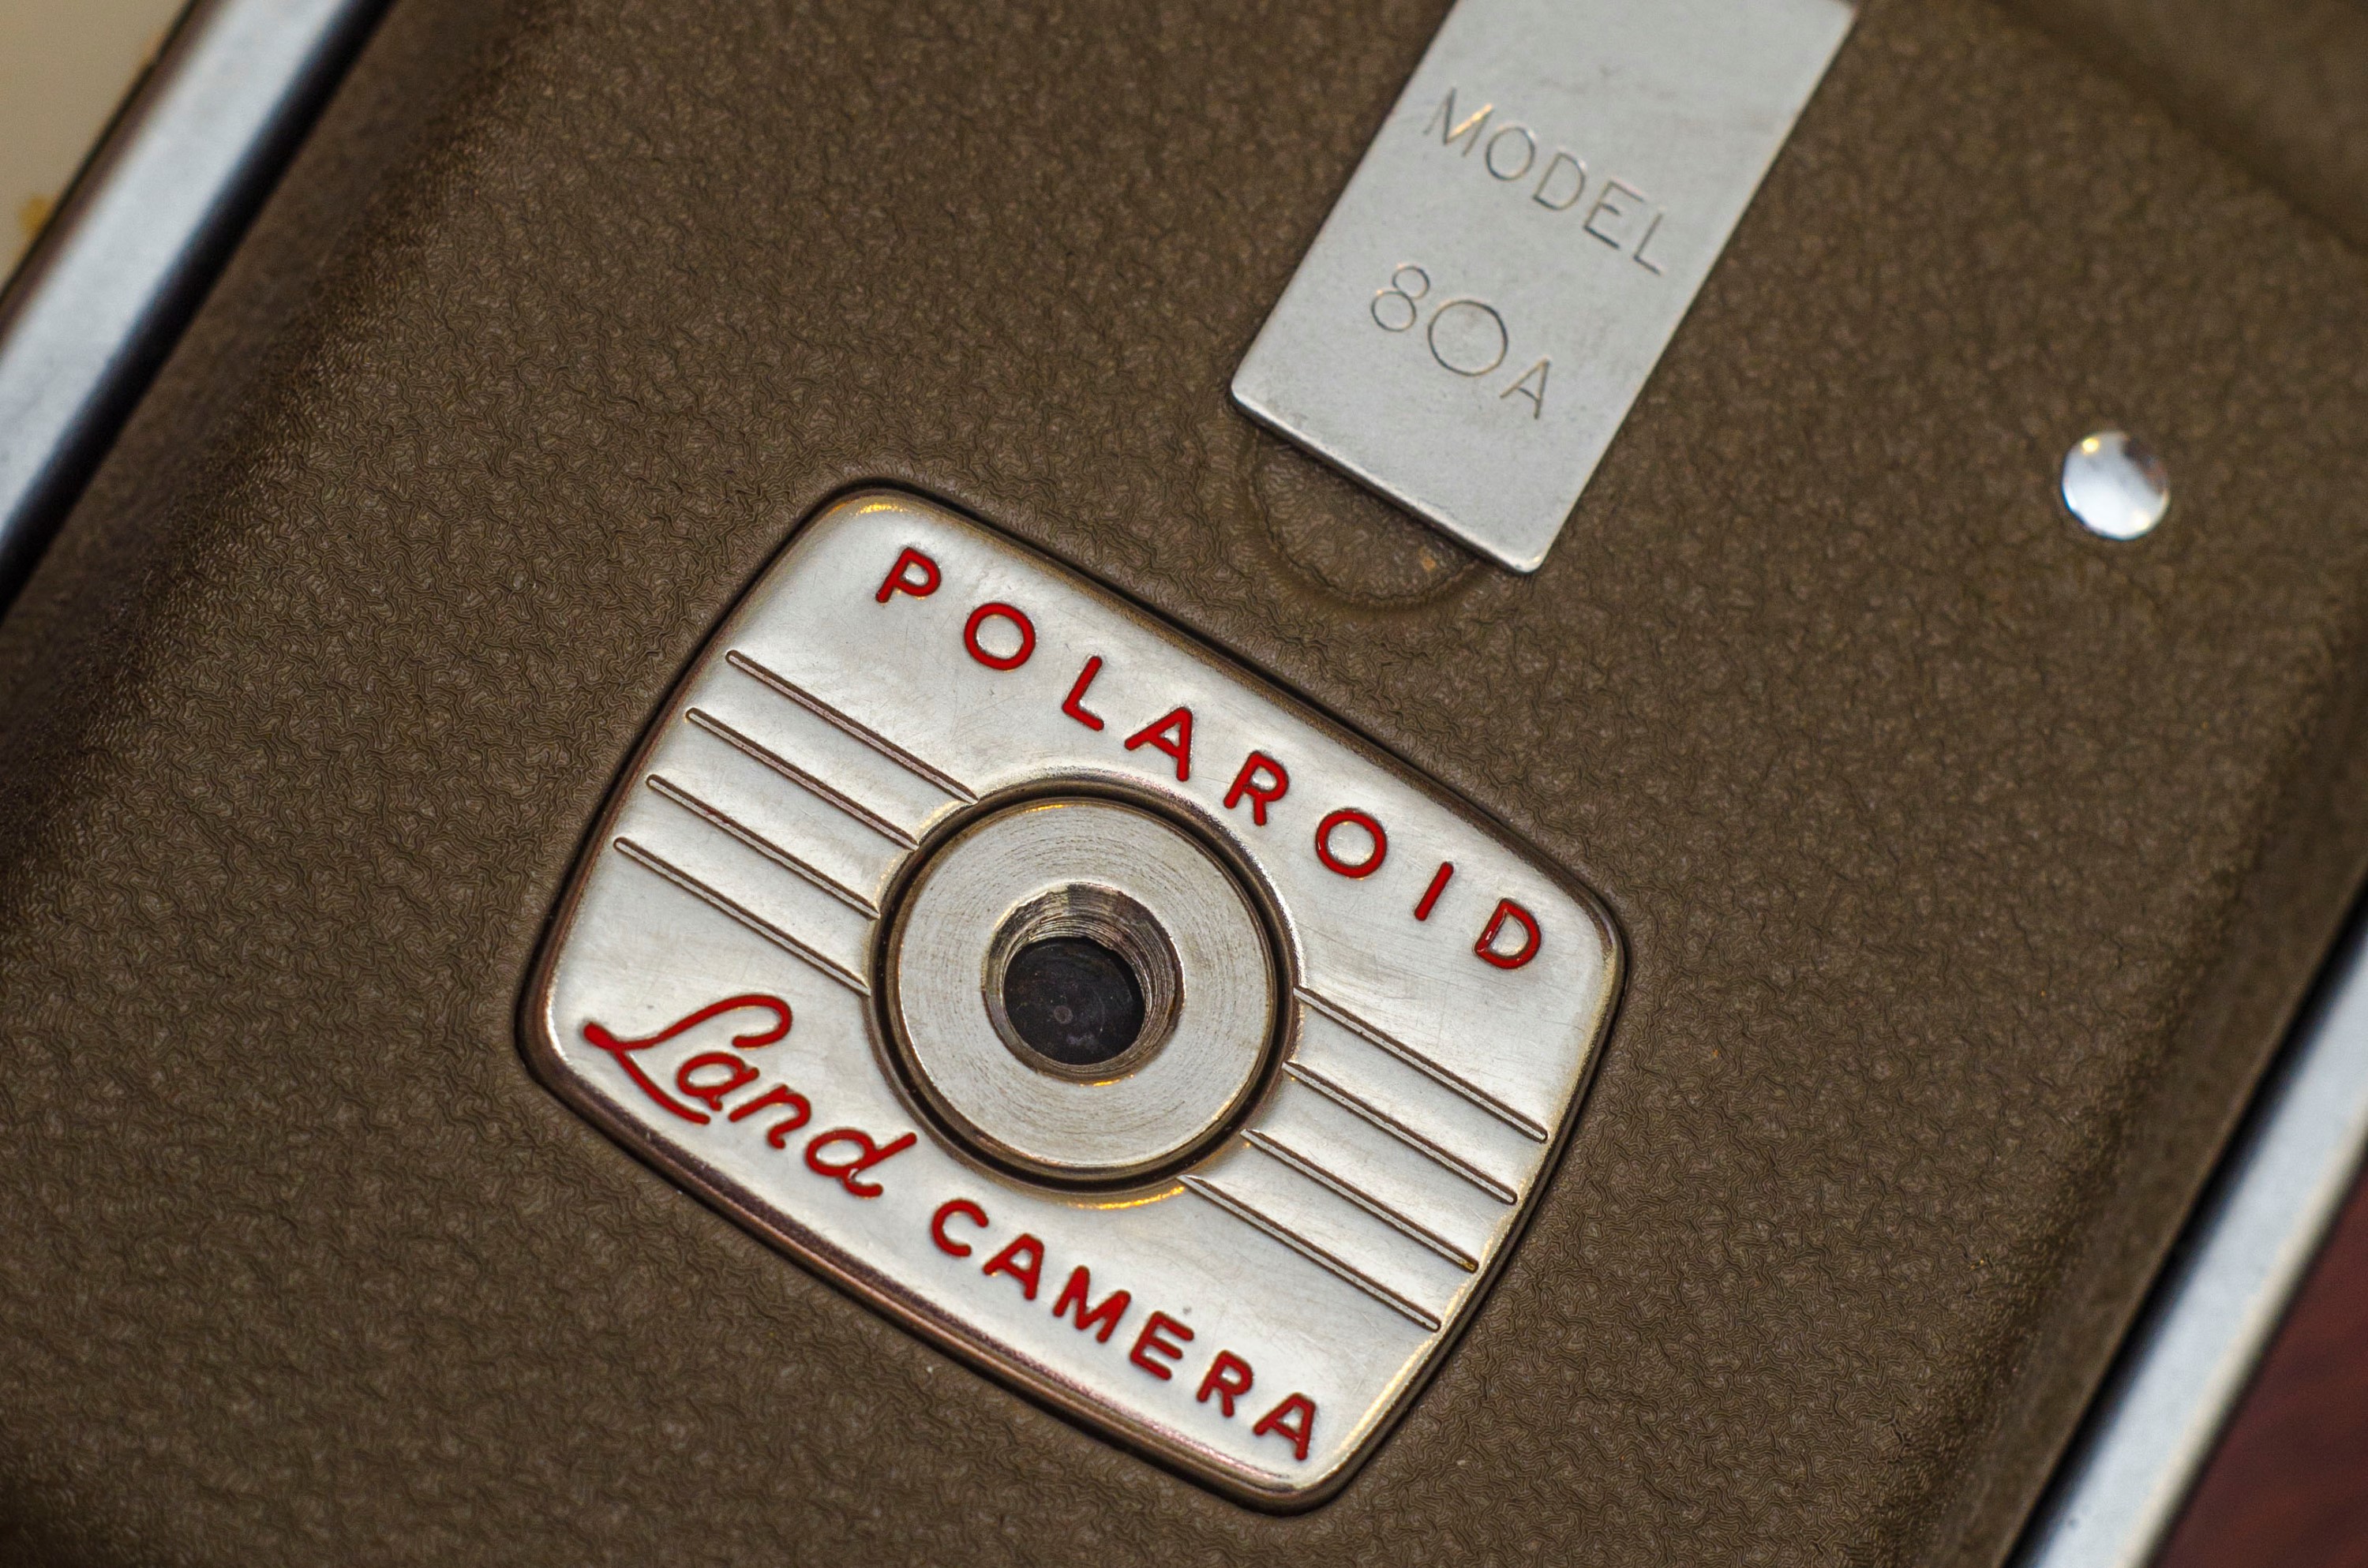
Knowing that roll film Polaroids were made in varying sizes and that I had a smaller Polaroid called the Model 80A in my basement, I dug out the camera and measured the film gate and voila! A near perfect match.
The Polaroid 80-series cameras were nicknamed “the Highlander” due to that model’s packaging containing a plaid pattern resembling Scottish Kilts that stereotypical Scottish Highlanders would wear. They were designed for Polaroid Series 30 film which produced images that were 54mm x 73mm, which is almost identical to the 56mm x 77mm image that a 6×8 medium format camera would make. The 60mm width of 120 film means that there is just enough of the film to glide across the edge of the film gate to ensure that the film is supported on the sides, maintaining it’s flatness across the film plane.
Armed with a newfound enthusiasm for this Model 80A and some information about rolling film into the camera, I cleared off the kitchen table and got to work.
 Disclaimer: It is my sincere goal with any article I write on this site to not take credit for someone else’s work or plagiarize anything already available online. I take no credit for coming up with this process as what I am about to type is already documented by Les Smith on lomography.com. I do not even know if he is the originator of this method as it’s possible someone came up with it before him. If that person is you, and you’d like to receive an acknowledgement from me, please let me know.
Disclaimer Two: While this method has the advantage of making no changes to the camera, it is far from a “load film and go” method. It requires some additional supplies and a bit of work in a darkroom (or in my case, a dark bathroom) before and after shooting the camera. There are likely those who will get this far and be disappointed at all of the prep work that is necessary. All I can say to that is that whether you choose to modify your camera to natively accept 120 film, or go with this method, you are going to have to do some work!
Things You’ll Need
Aside from an actual camera, you’ll need a few things. For the rest of this article, I used a Polaroid Highlander Model 80A as it most closely matches the size of 120 film, but any roll film Polaroid would work. The only difference is in the size of the spacer you’ll need to create in order to fit the 120 spool into the much larger chamber. You’ll also get less exposures per roll using one of the larger Polaroids.
- 120 Film – I got excellent results from Kodak TMax 100 film, but I believe that any film in the ASA 50 – 400 range will work well. Although Polaroid film was widely available in a 3200 speed, I do not recommend using 120 film that fast.
- An empty metal 620 spool – A spool from any camera designed for Kodak’s 620 format would work. You need to use an actual metal spool too, and not a 3D printed plastic one that you can sometimes find on eBay.
- Seven pennies (for a larger Polaroid camera, you’ll need a lot more) – I used US pennies, but I’m pretty sure Canadian and British pennies would work too. These are needed to take up some slack in the width of a 620 spool, so you can use any kind of coin, as long as its not much bigger than the width of a 620 spool’s flange.
- A 4×5 post card, recipe card, or any kind of rigid paper that can be cut down.
- A marker, pen, pencil, crayon, ladies mascara, or anything that can draw a line.
- (Optional) Black electrical tape
- (Optional) A paper clip
- A dark room – It doesn’t have to be a proper photography dark room, it can be a dark bathroom, basement, closet, or even a large film changing bag.
Step 1
The basis for how this method works is to “pull” the film through the camera using the backing paper from that runs parallel to the film. For anyone who has developed their own 120 film before or even dissected a roll to see what it looks like, you’ll know that the beginning of the 120 film is taped to the backing paper to keep it in position, but the end is not. Since you need to separate the film from it’s backing paper as the film travels through the camera, you need to start at the end of the roll, not the beginning.
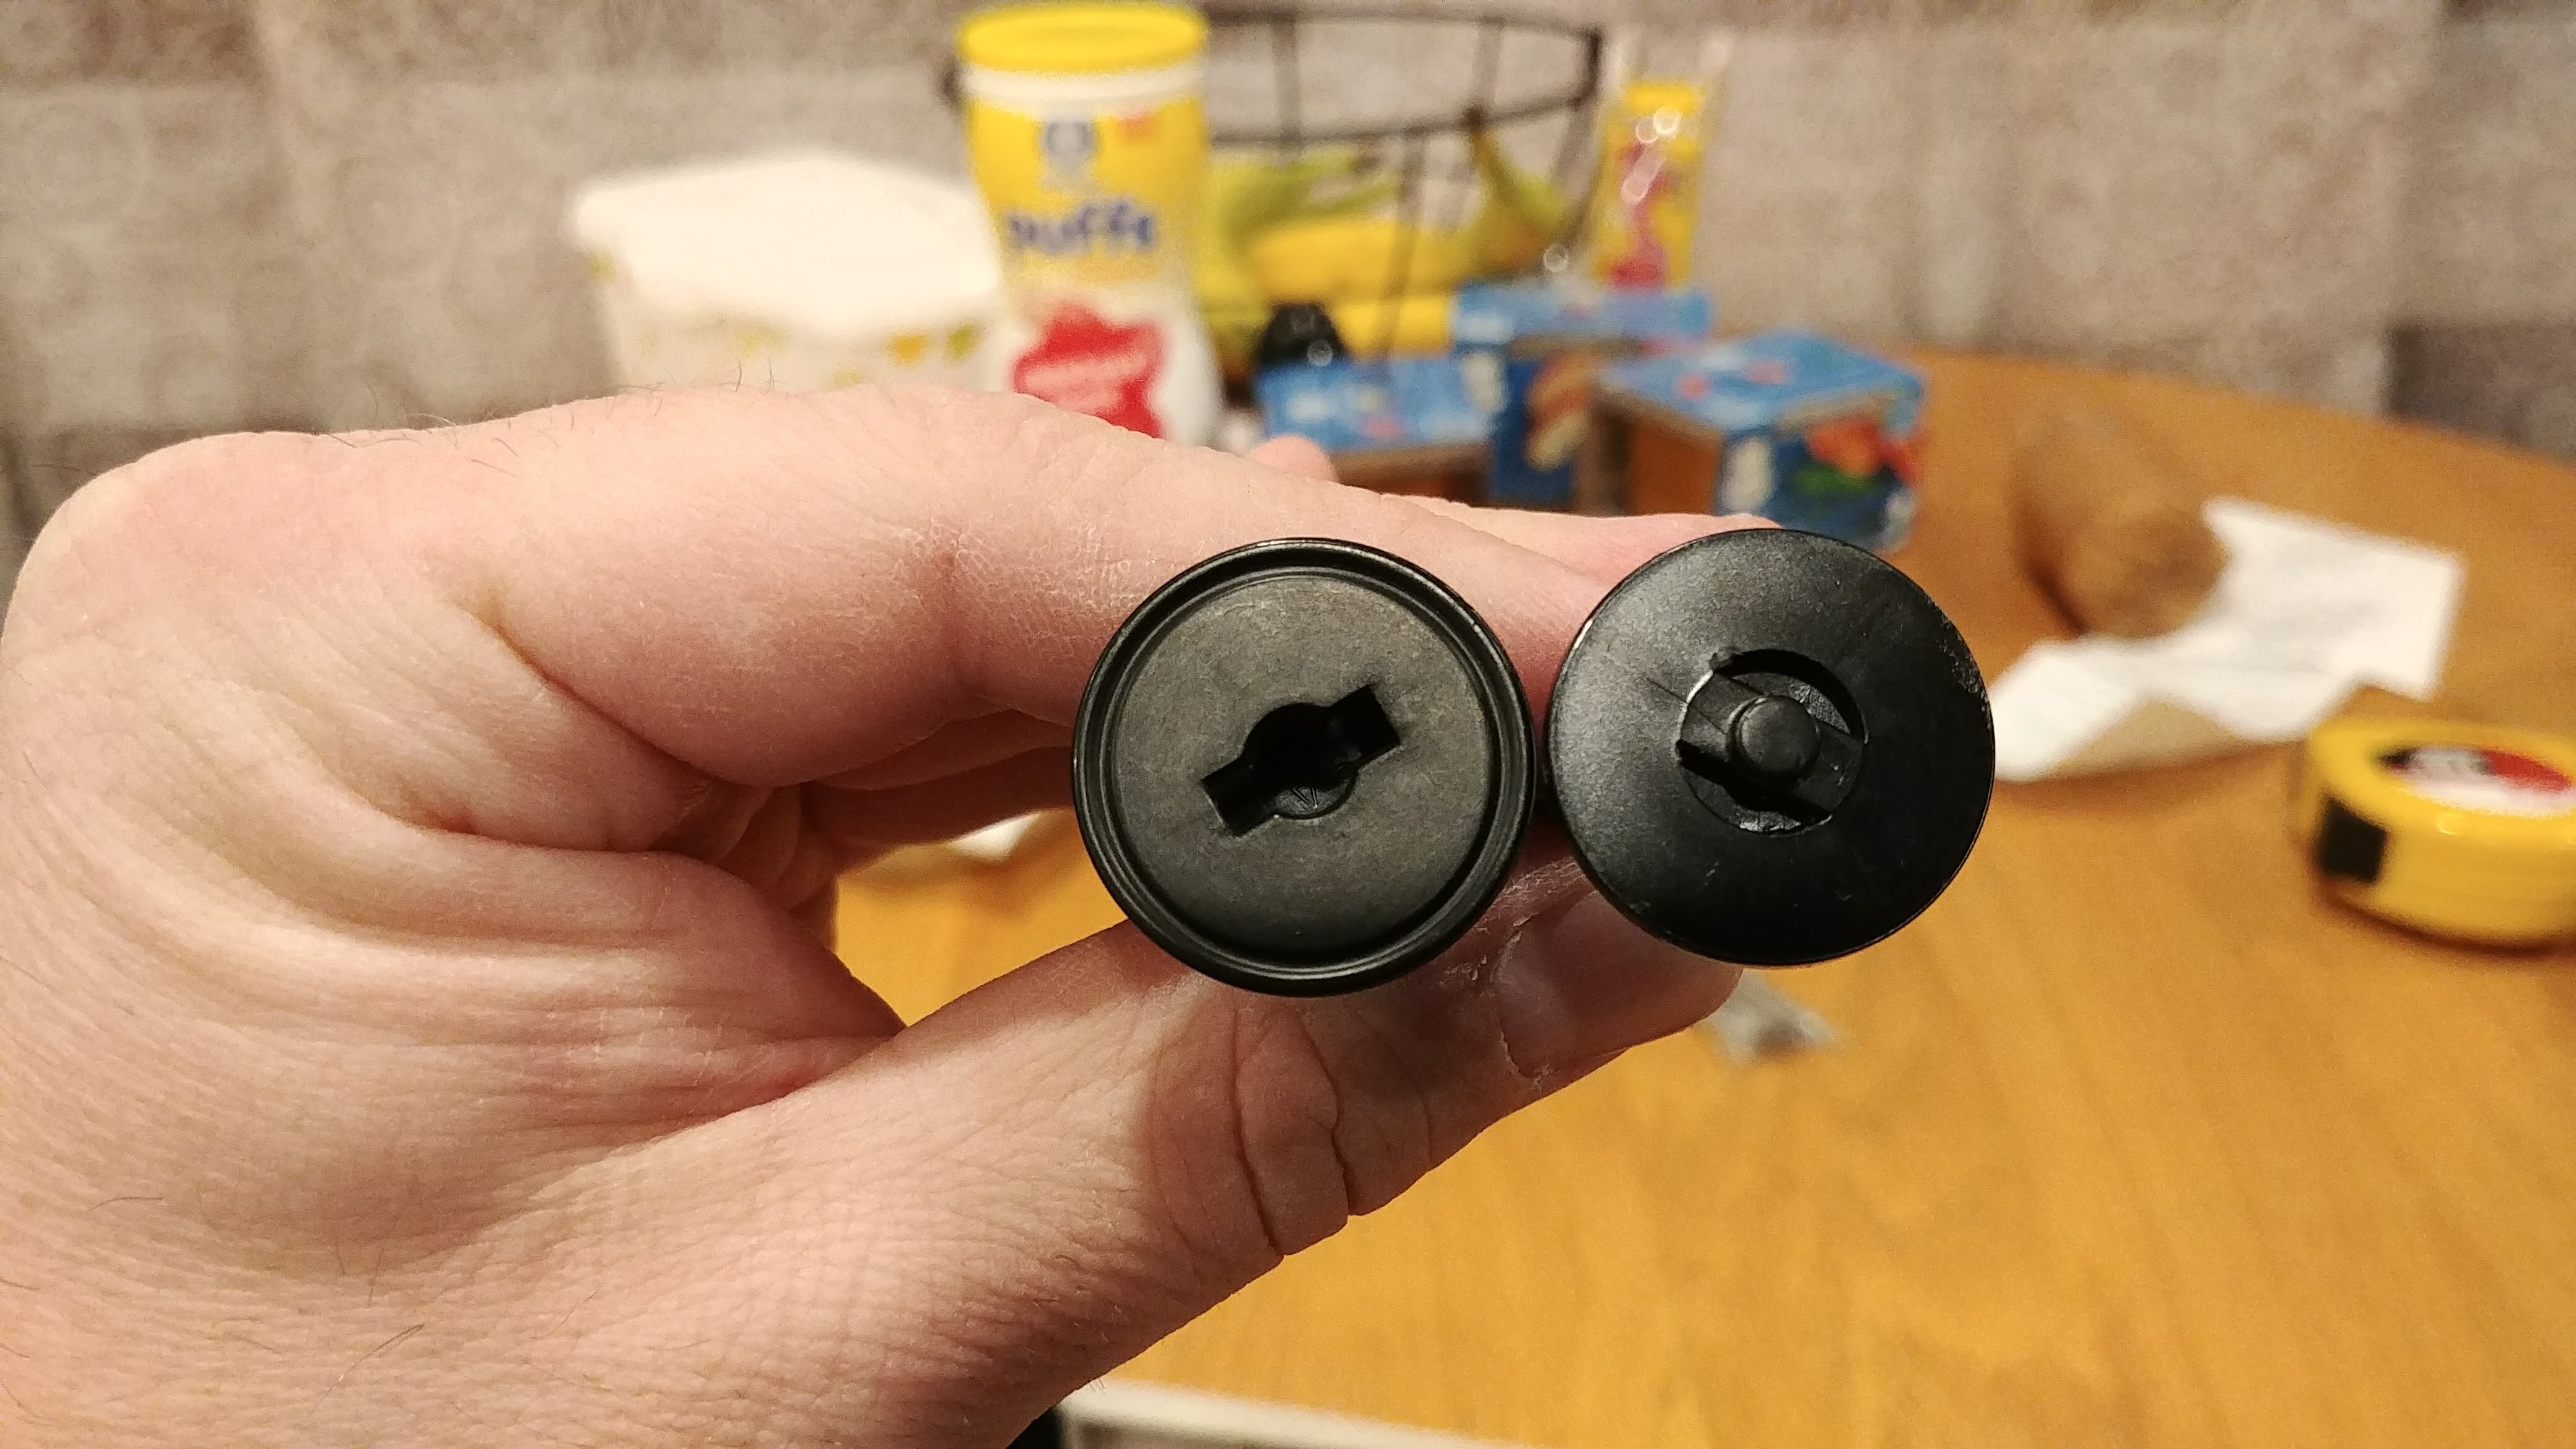
In order to do this, you need to re-spool your fresh 120 roll onto a 620 spool. The reason for the 620 spool is that I discovered that modern plastic 120 spools are just a hair too thick to smoothly rotate in the camera. In the image to the right, I am holding a regular plastic 120 spool on the left and the original Series 30 film spool on the right. They look almost identical, but the 120 spool is a fraction of a millimeter wider. An older 120 metal spool might work, but I did not try that. A 620 spool works perfectly.
Re-spooling 120 onto a 620 spool is very easy to do, but must be done in total darkness. All you do is, with the lights on, attach the leader of the 120 spool to the 620 spool, then turn out the lights, and using your hands, keeping feeding the film from the 120 spool to the 620 spool until you reach the end. In the video below, I’ll show how it’s done with the lights on using a practice roll that has already been exposed to light. I leave the lights on so you can see what I’m doing, but I should repeat, you have to do this step in total darkness! The total time it took me to re-spool the film was less than a minute and is very easy to do.
Step 2
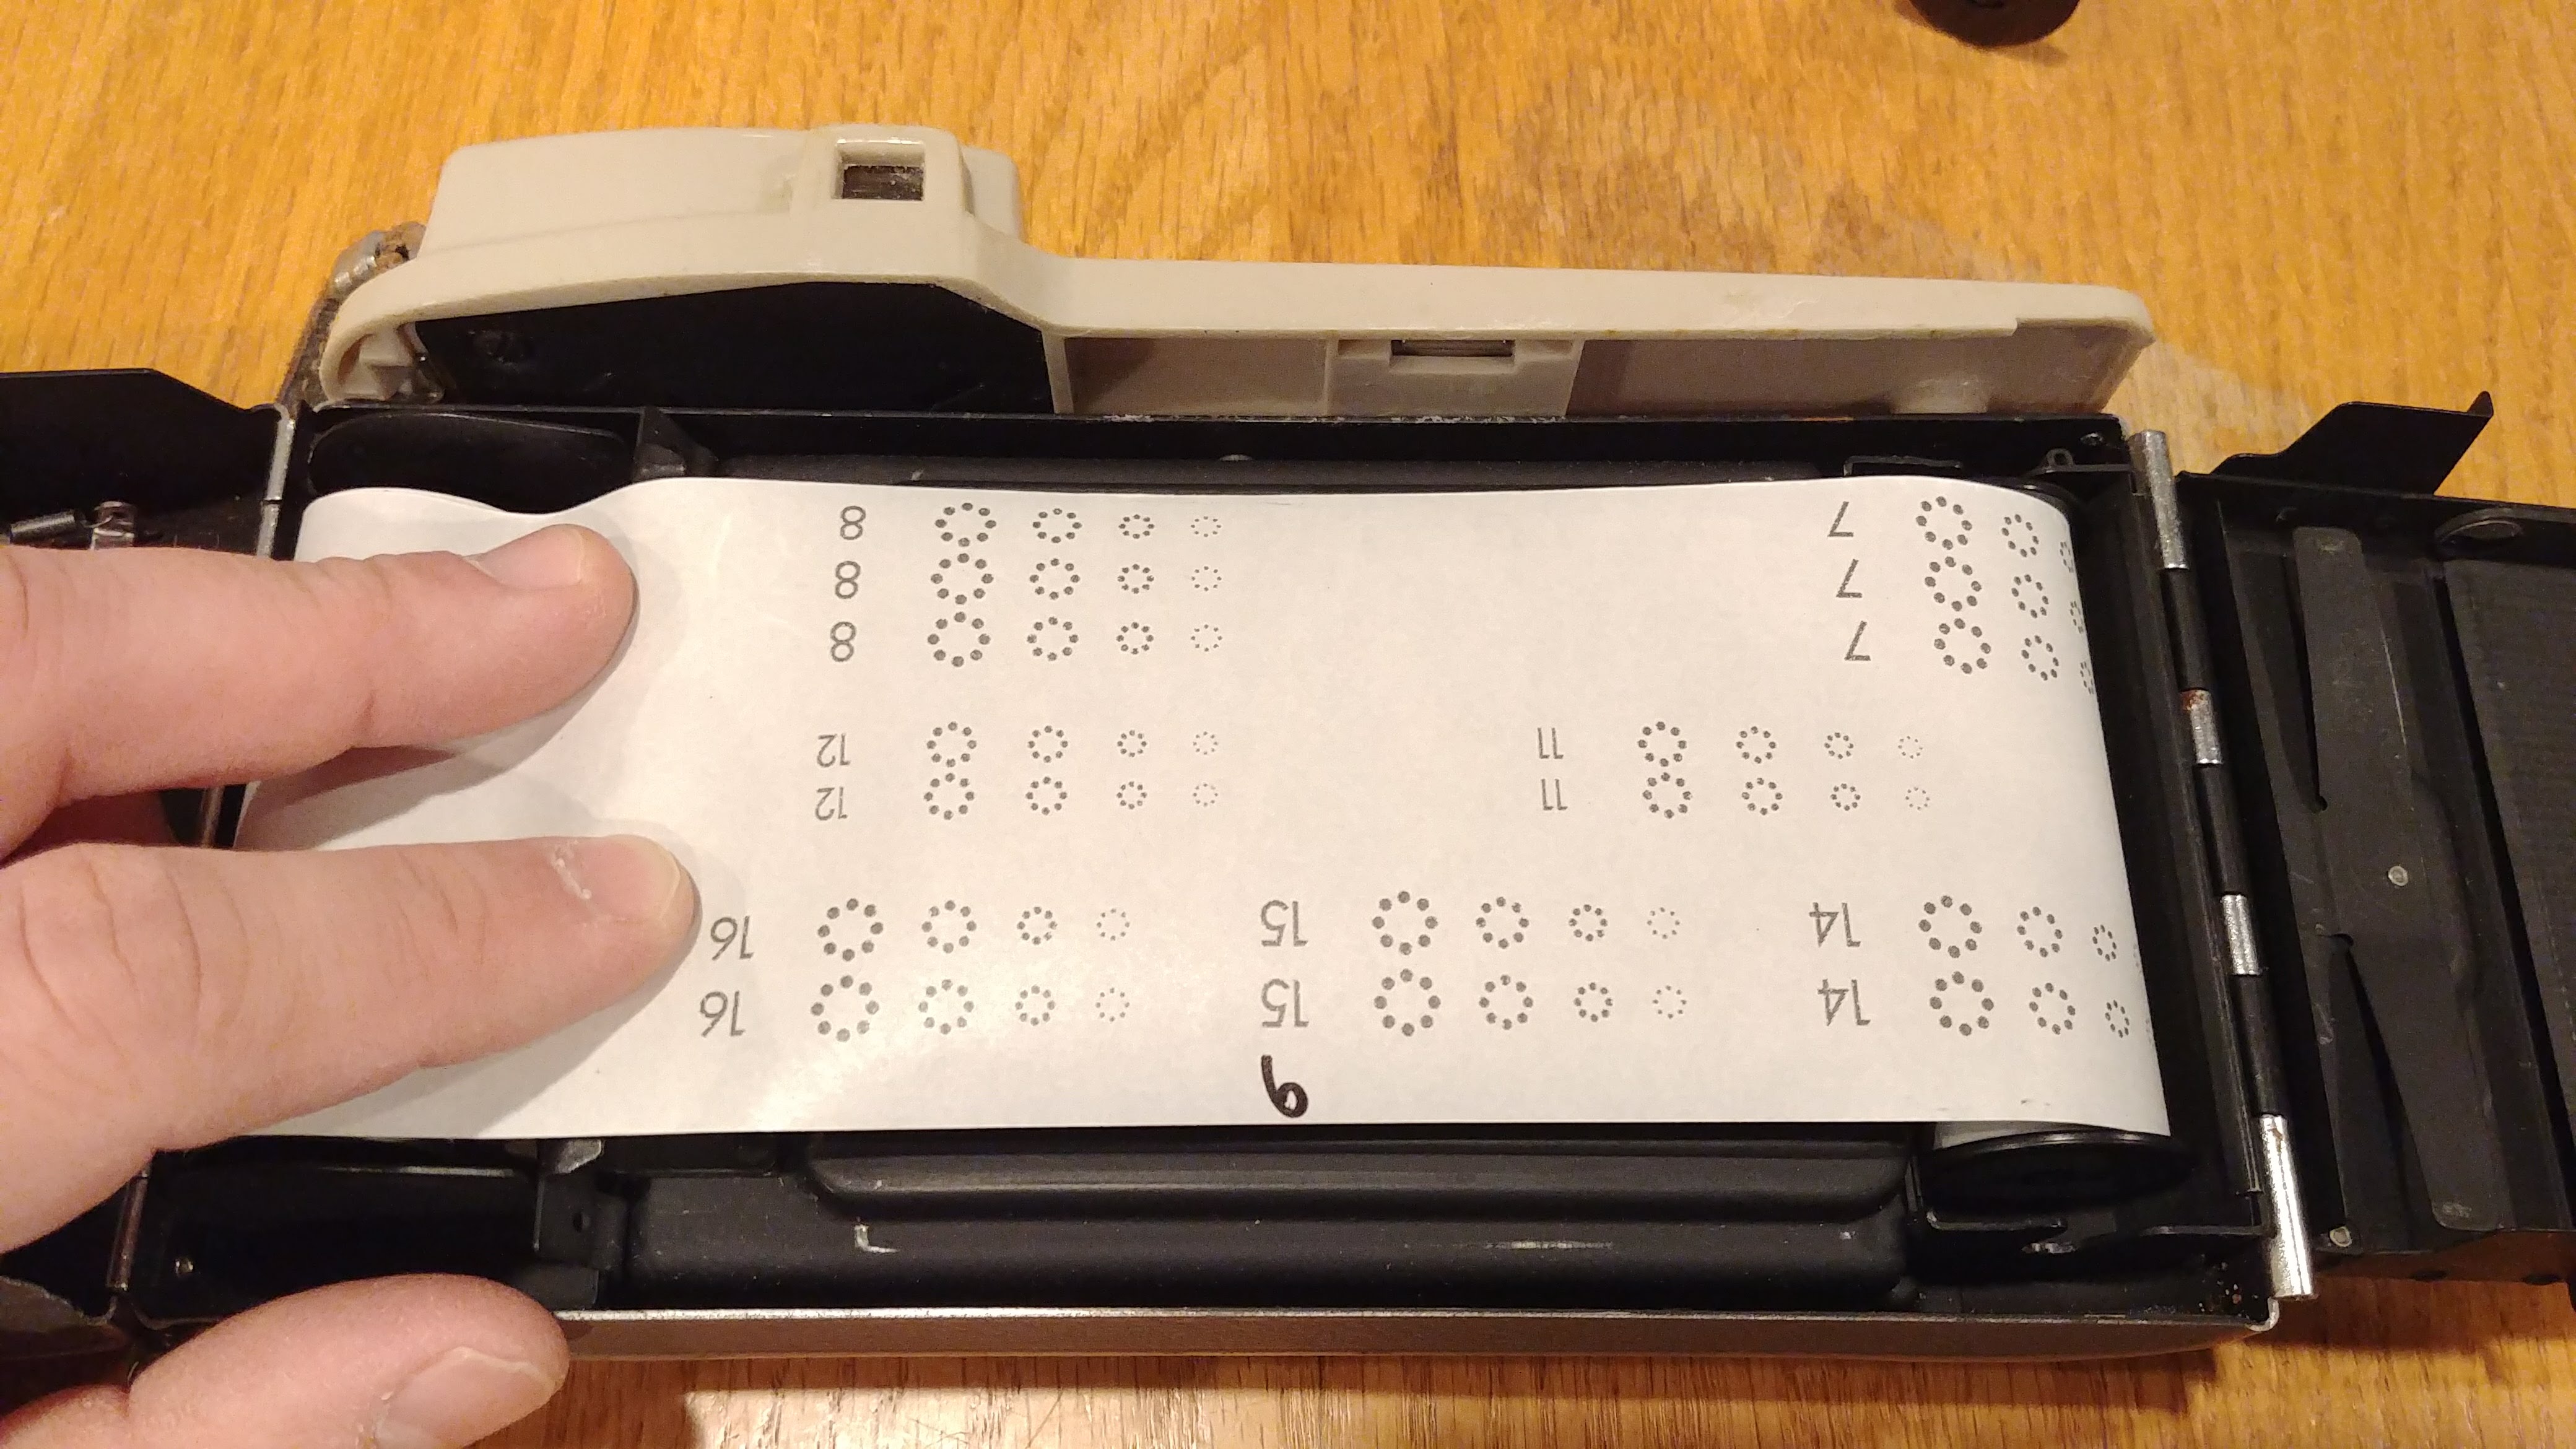
The next step is optional, but I strongly recommend it as a means for knowing how much film to pull out once the camera is loaded as there is no way to use the numbers on the backing paper to know when to stop pulling. There’s two reasons for this, the first is that you’re pulling the film through backwards, but also, the image size that you’ll get from the Highlander is roughly the same size as a 6×8 exposure, and none of the numbers on the backing paper match that type of frame spacing.
I did some measurements, and if you pull the film perfectly, you can get 10 images on a roll of 120, but the first time you do this, I would aim for 8 or 9.
While coming up with this tutorial, I tried to come up with a better way to measure how much you needed to pull by looking at the markings on the backing paper trying to come up with some semblance of a pattern, but I couldn’t find one. Making matters worse, I learned that all of the extra markings on the backing paper vary depending on brand and type of film. For the example in this article I am using an Ilford film (probably Delta 400, but I can’t remember). I compared a roll of Kodak TMax, and the markings were not the same.
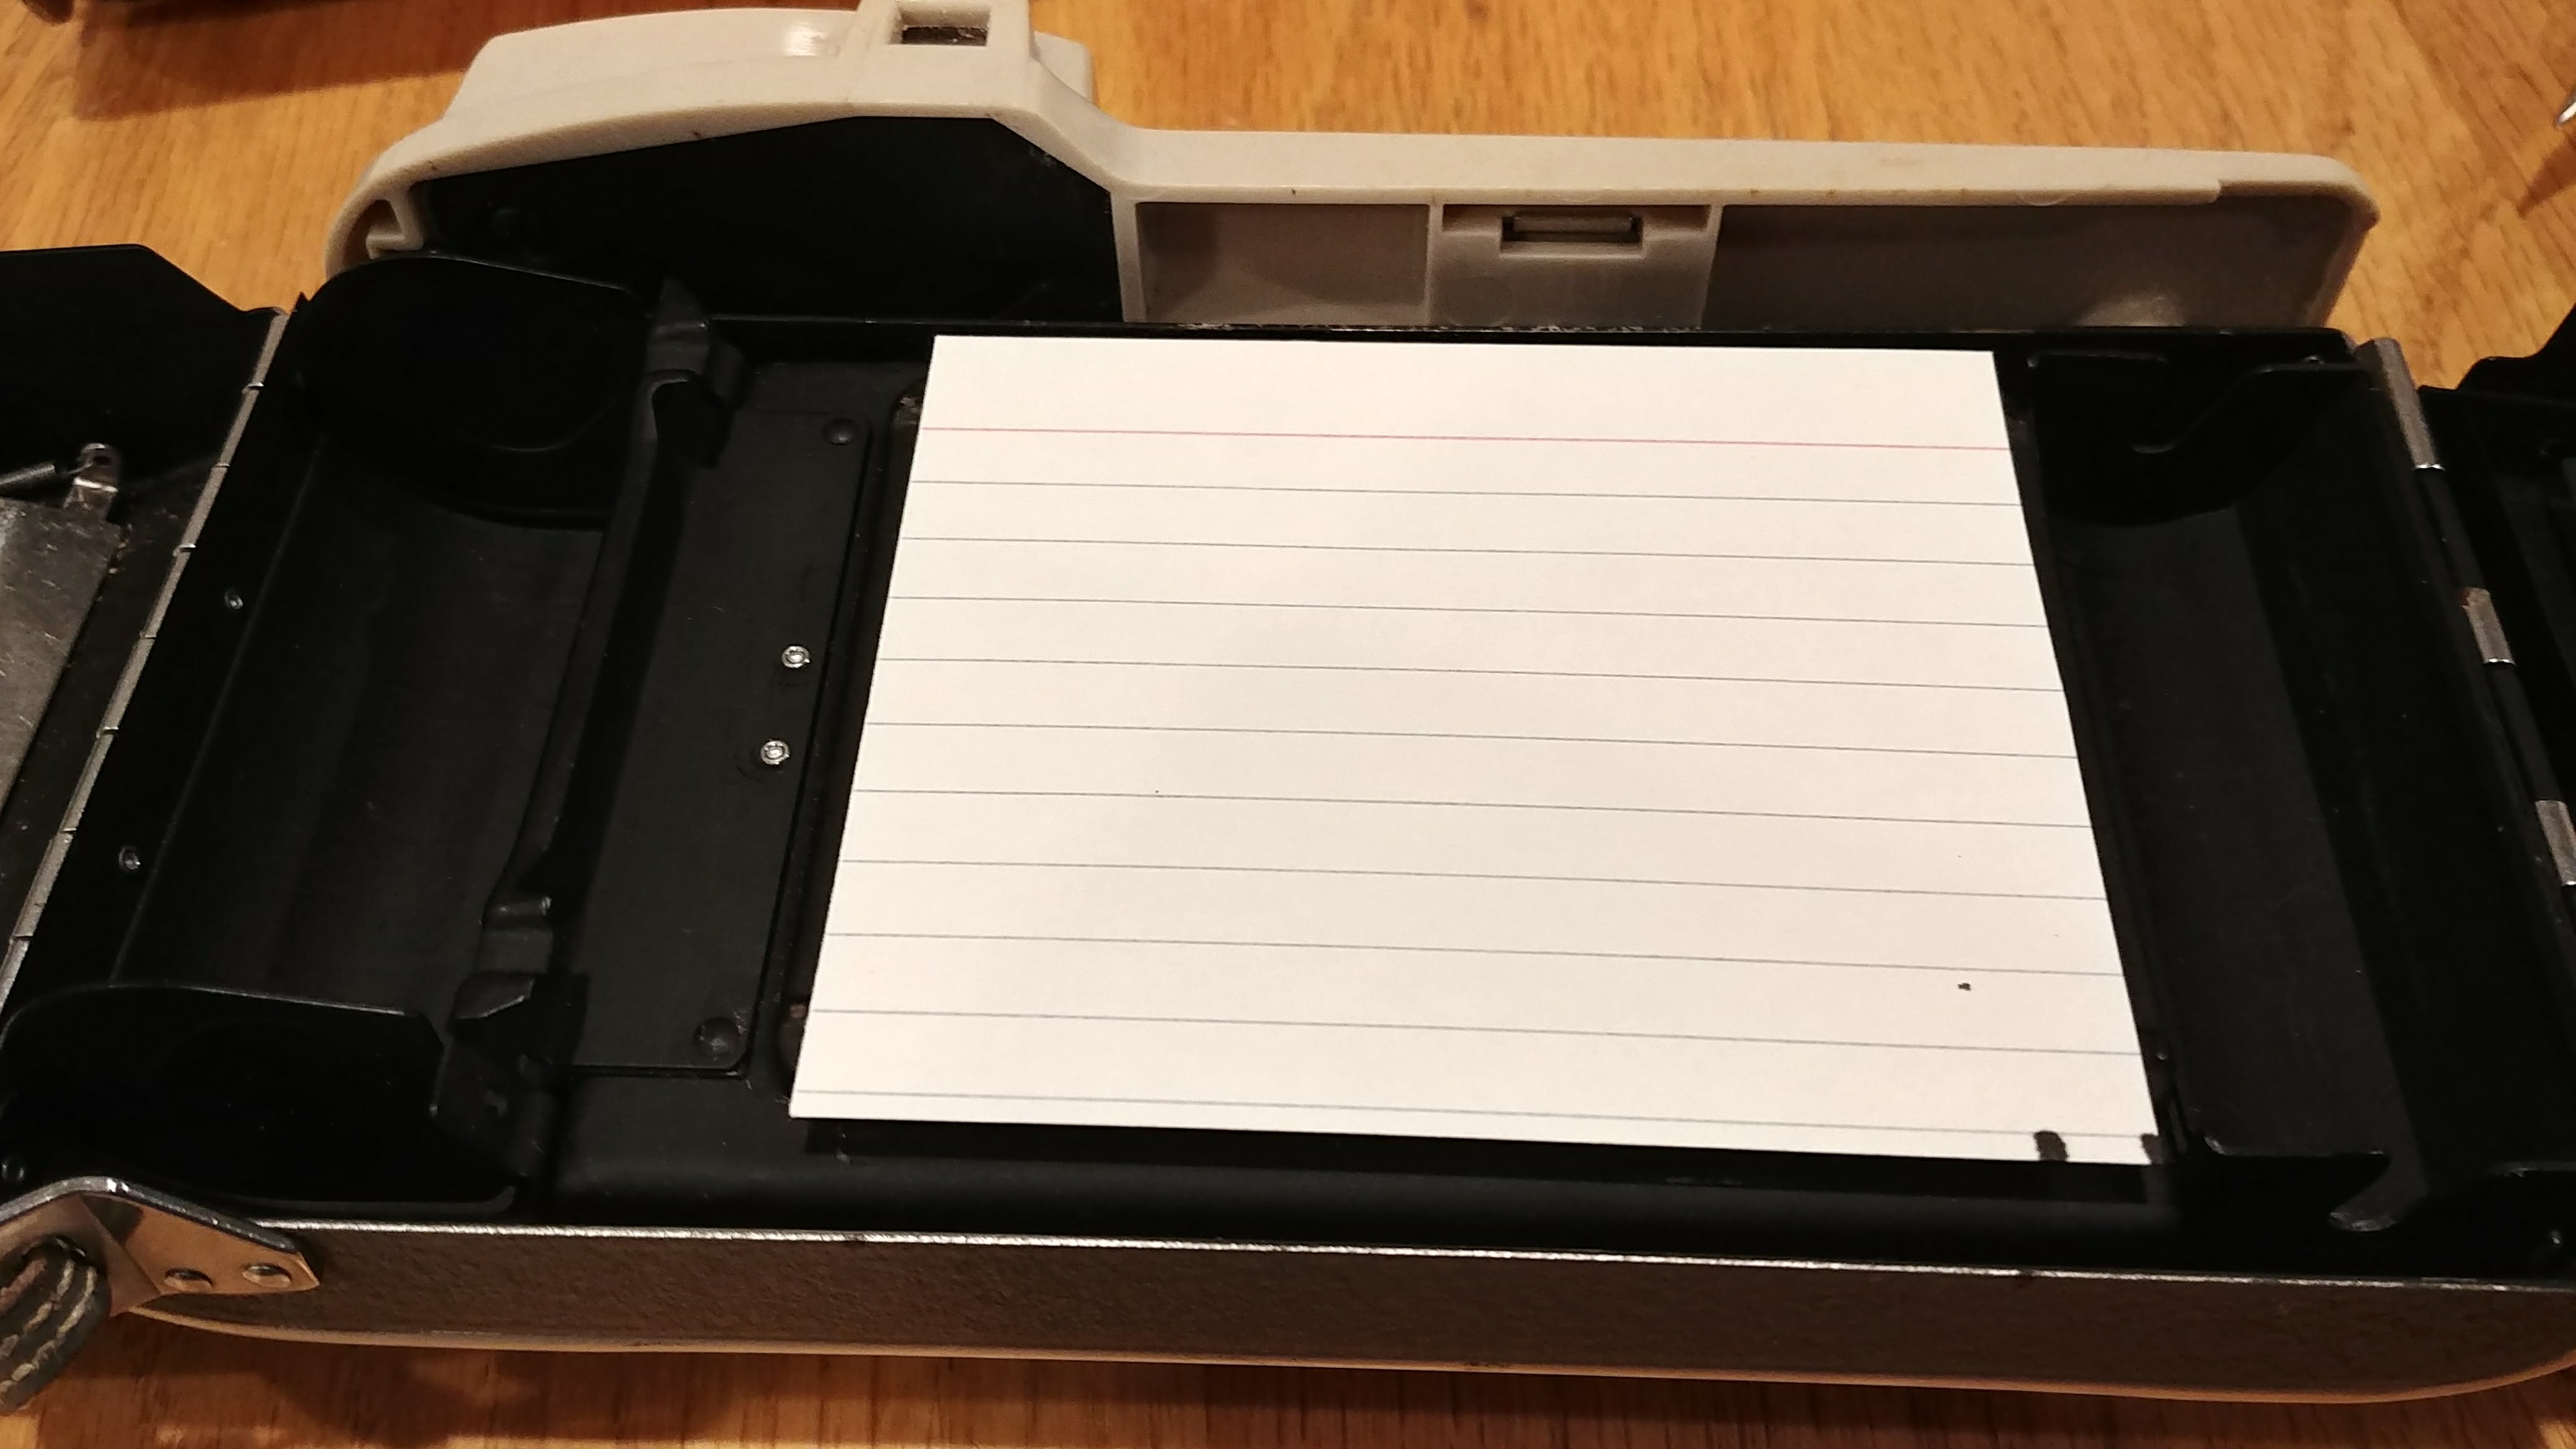
My solution turned out to be very rudimentary, which was to cut a piece of paper roughly the size of the film gate out of an old recipe card to use as a measuring stick.
To do this, lay your rigid paper of choice, and draw a line indicating a cut line that is the width of the film gate, plus the border of the film gate. Don’t make your line the exact width of the film gate opening because then you’ll have no wiggle room for frame spacing.
Once you have your measuring stick cut, set it aside for later.
Step 3
With your fresh 120 film spooled onto a 620 spool, you can temporarily turn the lights back on just so you can get things setup for the next step which involves getting the film started in the camera.
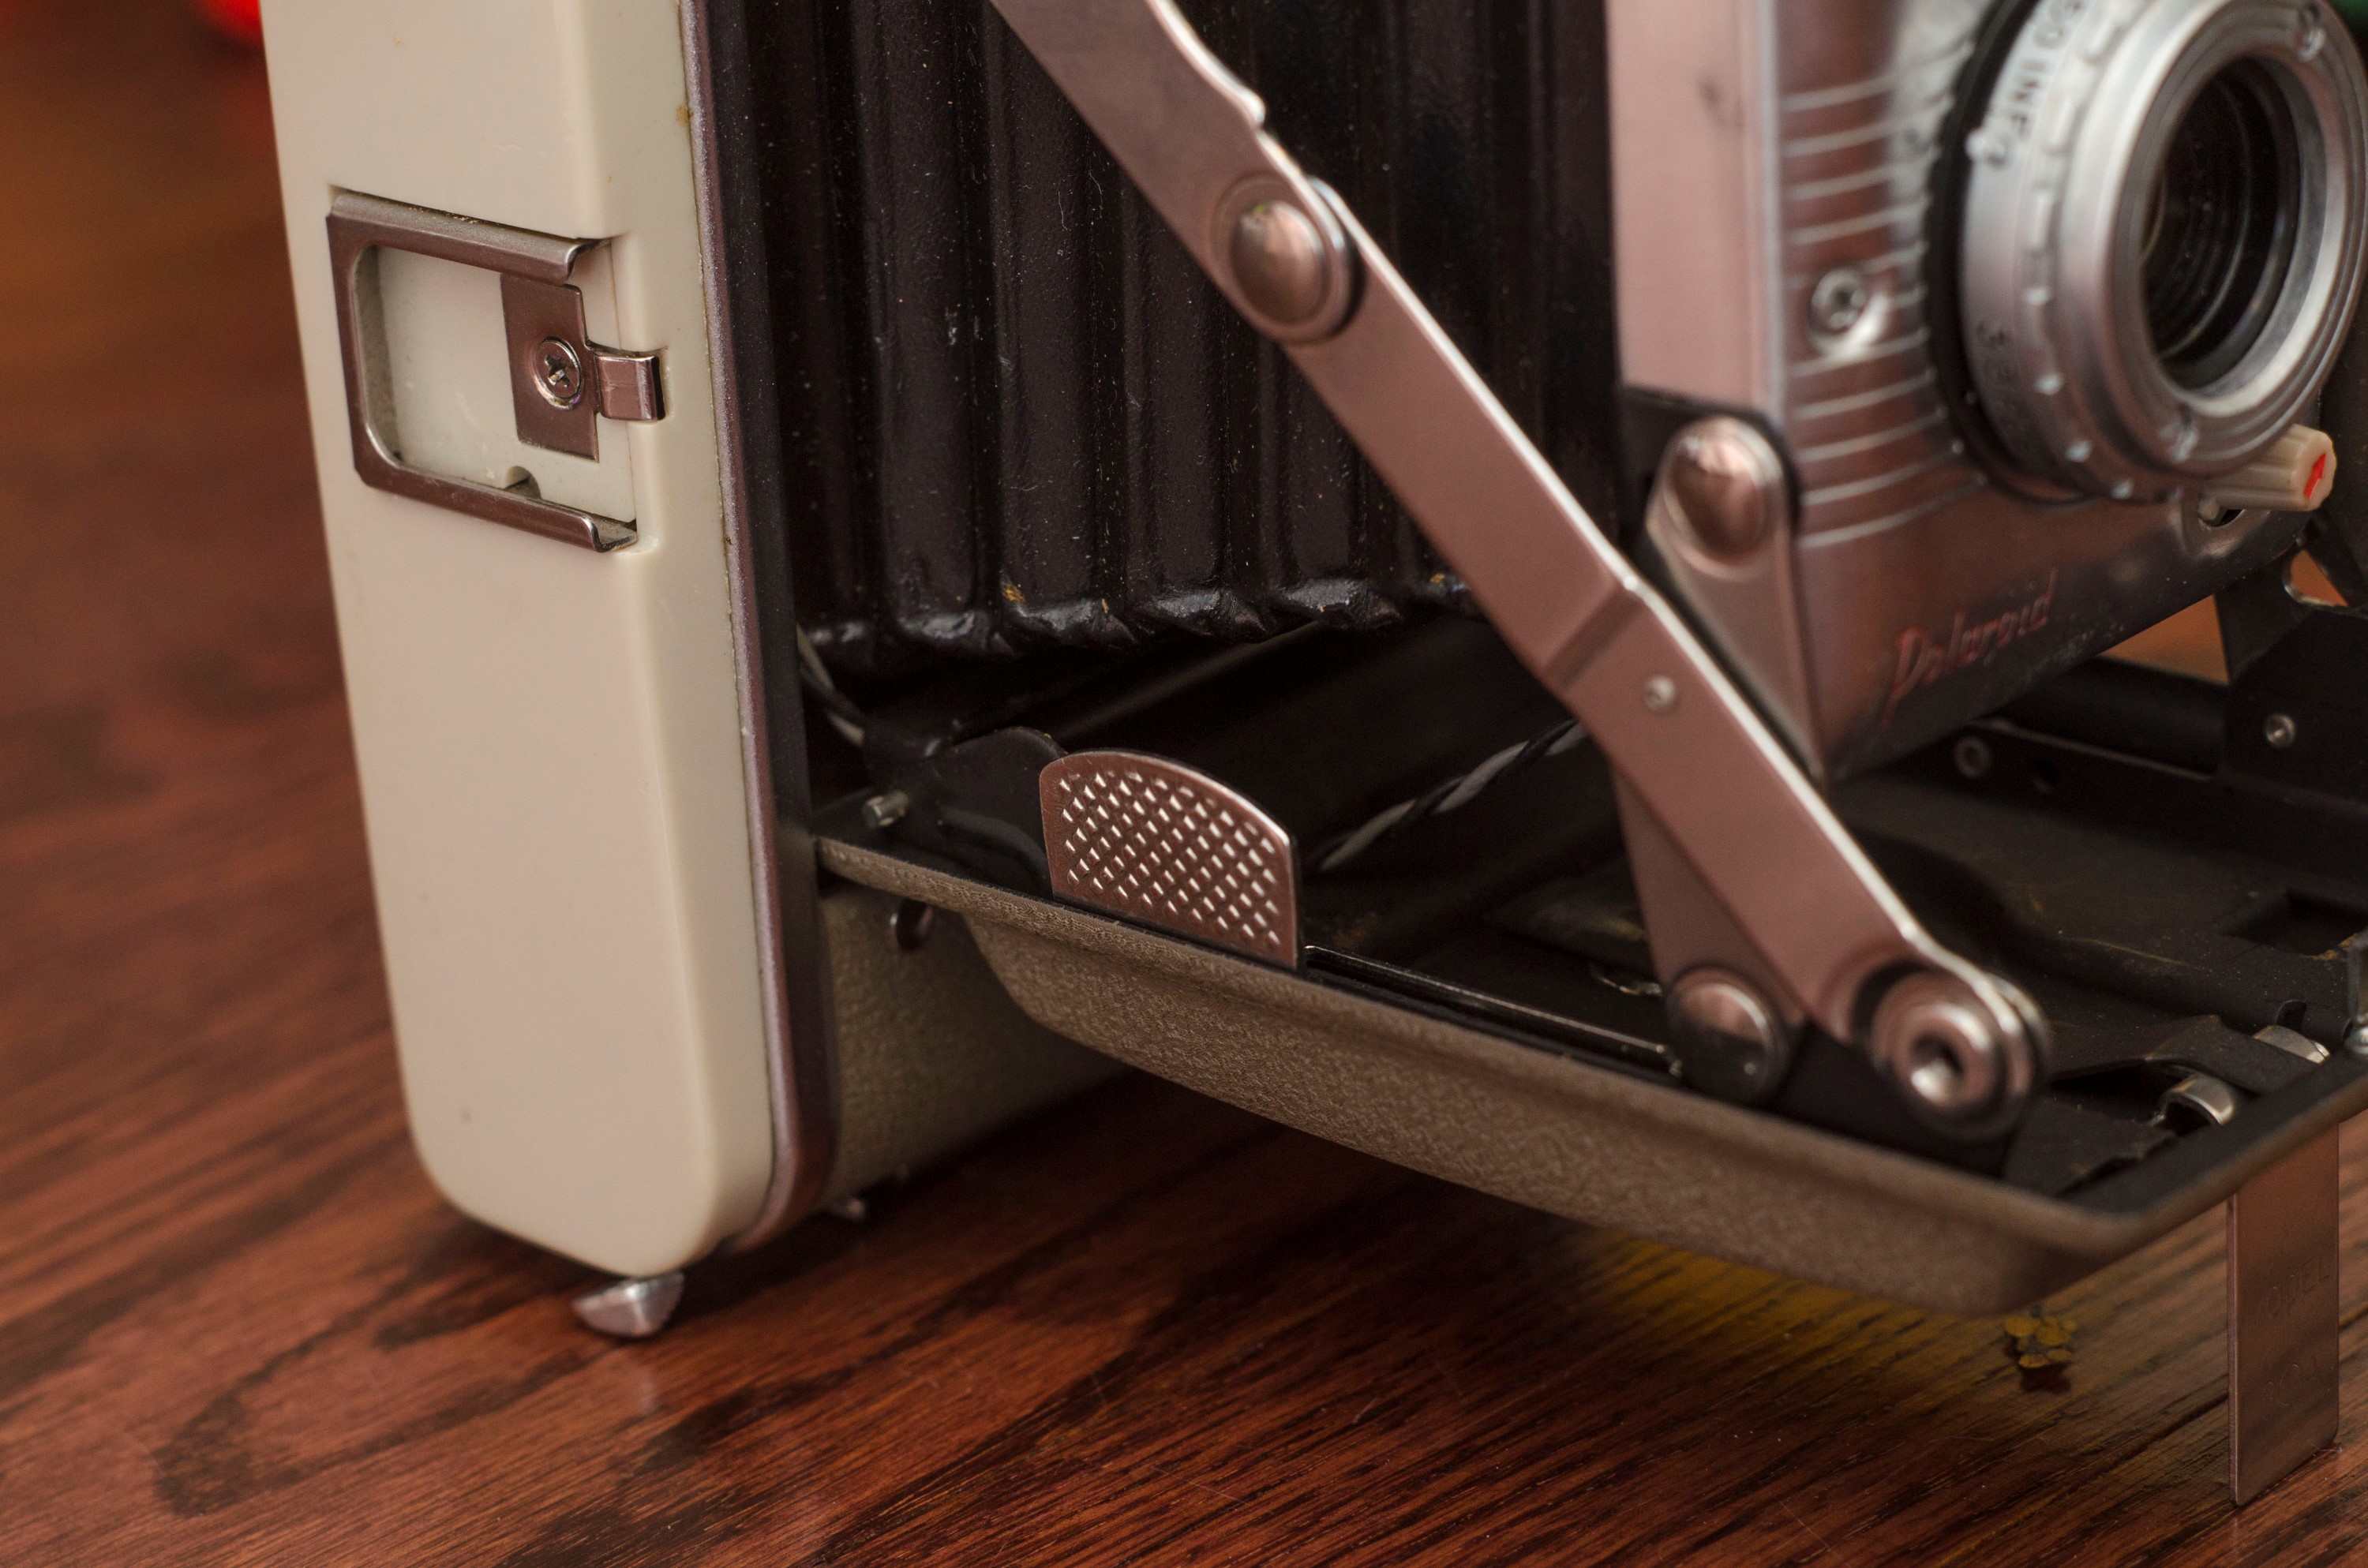
Place your camera lens side down on a table and open the back so you can see inside the film compartment. When using Polaroid roll film, the spooled film would go into the chamber on the right, and a roll of undeveloped photographic paper would go in the chamber to the left. Using 120 film, the spool film still goes into the chamber on the right, but you’ll want to separate the film from it’s backing paper so that it makes a 180 degree turn at the roller and travels out of the right side of the camera, and the exposed film curls around itself in the chamber on the left.
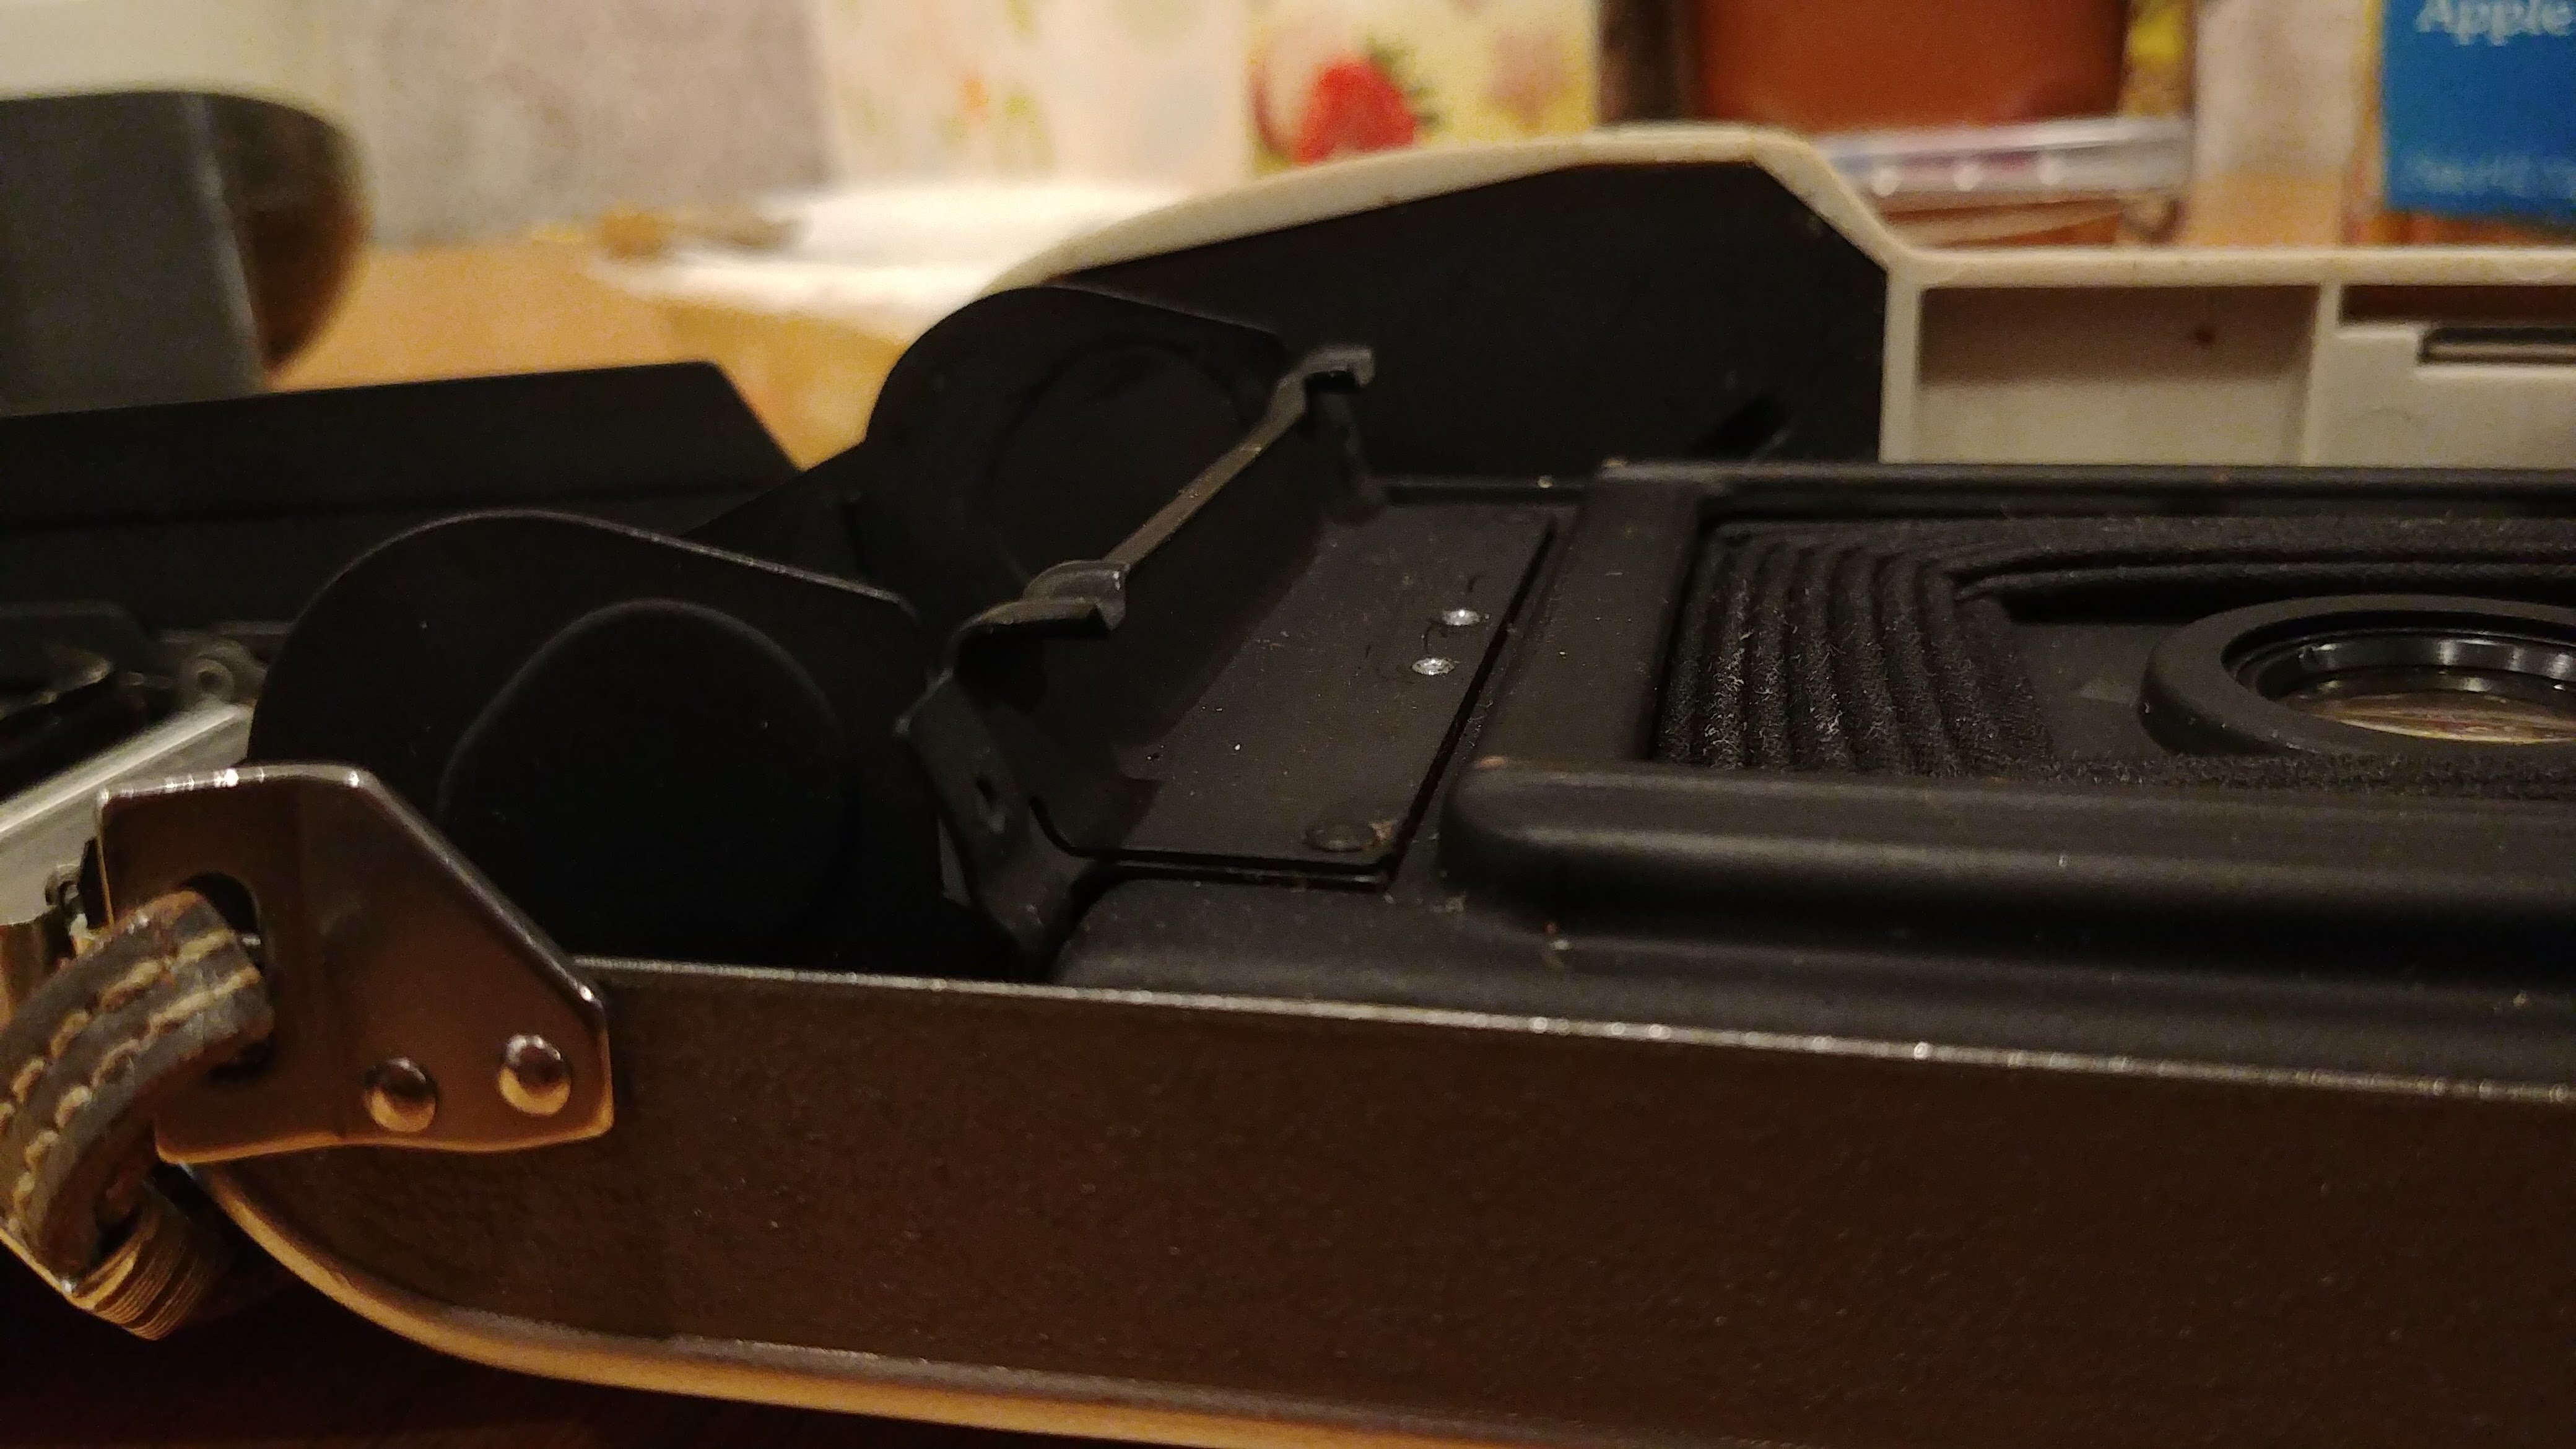
When I first loaded film in my camera, I was concerned with a raised metal “ridge” that requires the film to travel up and over it from the film plane into the left chamber. Les Smith’s original article made no mention of this ridge, and I checked other roll film Polaroids in my collection and they all had it. In the image to the right, you can see a metal ridge blocking a direct path from the film plane to the left chamber. This proved to be a non issue, but it’s worth mentioning if you have concerns about it.
Step 4
Turn off the lights.
These new few images show the path the film will take through the camera once it’s loaded. I am showing these images with the lights on using a sacrificed roll of film, but you’ll need to do the loading in complete darkness to avoid exposing the film to light.
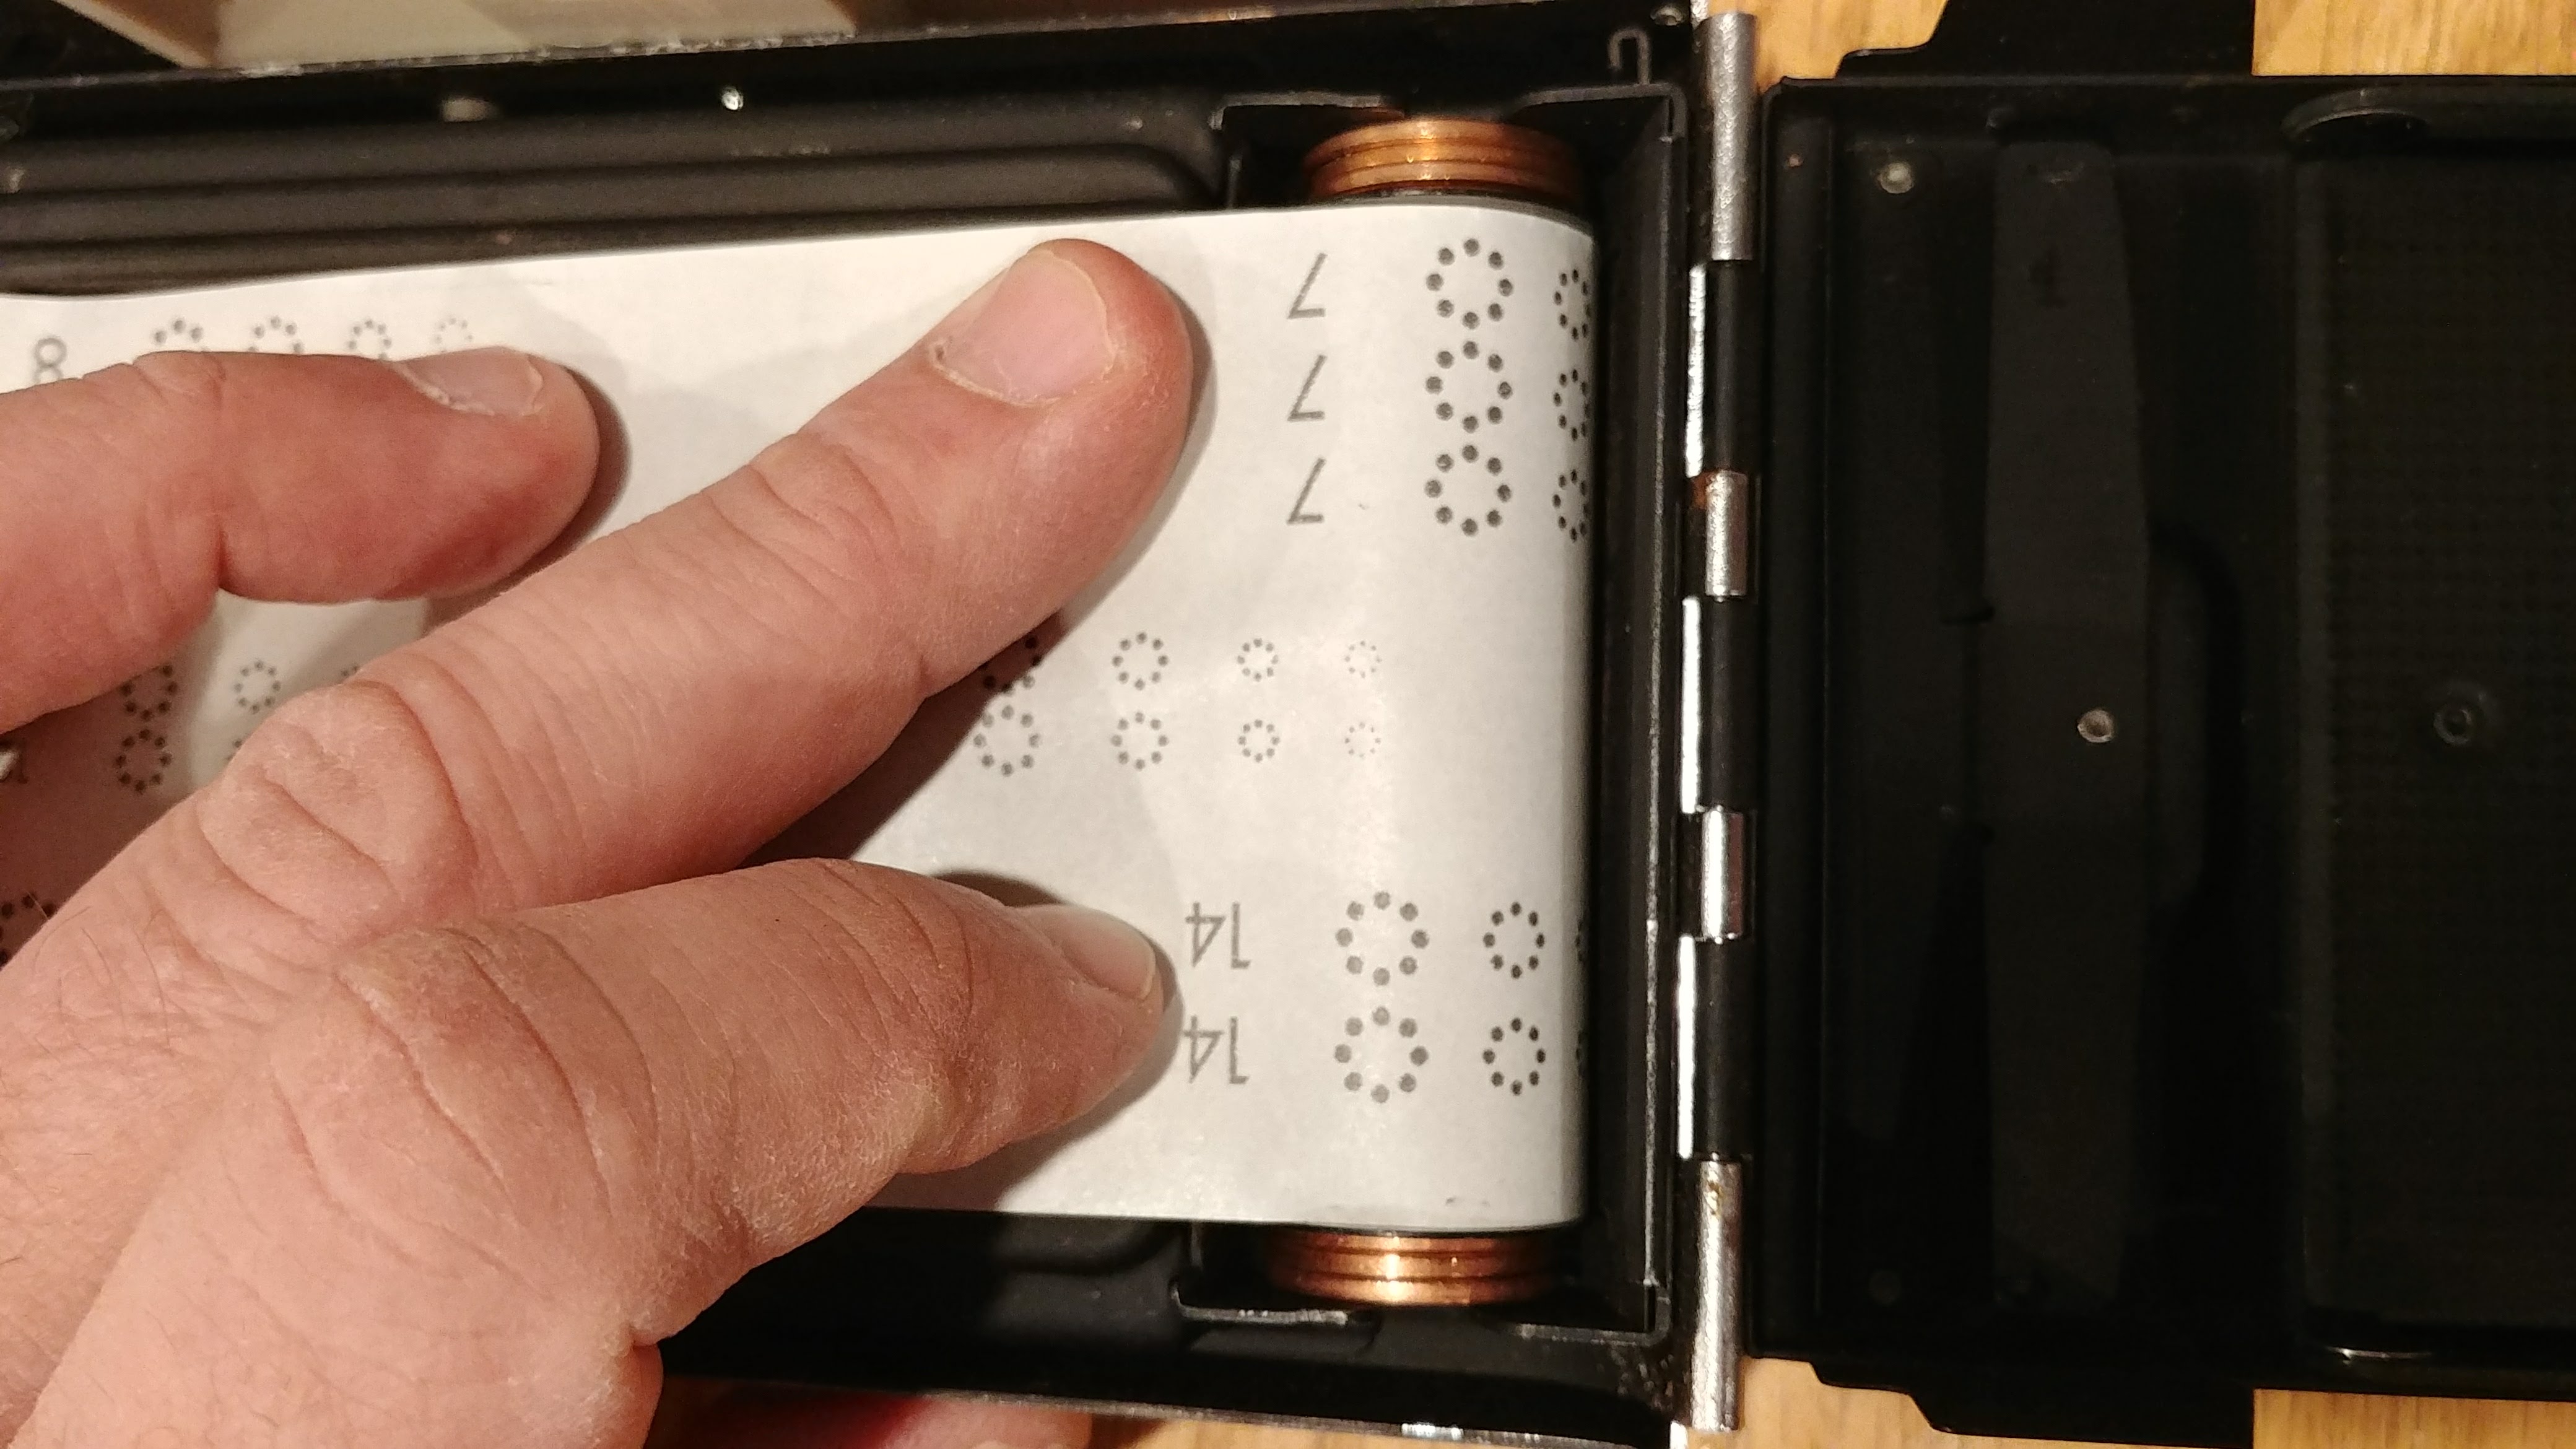
Insert your backwards roll of 120 film on the 620 spool into the chamber on the right. Make sure the film has the numbers upside down like in the image to the left. The 620 spool is narrower than the original 30-series Polaroid film so you’ll need to use your pennies to make a spacer on both sides of the film. I found that 7 pennies was the right fit. I put 4 on top and 3 on the bottom. You could do 3 on top and 4 on the bottom and it’ll still work fine. Just don’t put all 7 on one side or else the film won’t be centered above the film gate. If you do not have access to US pennies, just put whatever combination of coins or metal washers takes up the right amount of space. If you need to error on the side of too tight or too loose, make it too loose. If you are using a larger Polaroid than the Highlander, you’ll need extra pennies.
Step 5
Lights are still off!
Start to pull out the paper leader of the film and feel for where the actual film starts. As a reminder for those of you who have never looked at a roll of 120 film, the paper leader extends beyond the end of the film so you can wrap up the finished roll and keep it protected from light. So you’ll need to pull out a good 6-7 inches of paper before you’ll get to the film.
Once you are sure you have found the film, try not to touch it too much with your fingers as oil from your hands can show up on the emulsion side. A little bit of contact near the very edge is fine, but don’t manhandle the film.
 Pull just enough of the film over the ridge I showed you in step 3, so that the film is headed towards the left chamber and fold the pressure plate over the film, trapping it in the camera. Although you’re in complete darkness, the film should look like the image to the left.
With one hand holding the pressure plate down, take your other hand and fold the backing paper over the metal roller and lay it on top of the pressure plate so that it is headed towards the right side of the camera. The backing paper is much longer than the film is, and although the lights are off, you should be able to feel an inch or two of actual film sticking up above the metal roller headed towards the left chamber, and the backing paper folded over headed towards the right side.
I made a video with the lights on showing the whole film loading process and what you should be doing in the dark. Notice that I fumble around with it even with the lights on, so it is highly likely you’ll fumble in the dark. All I can say is be patient and go slow, and if you need to sacrifice a roll of film like I did to see it in the light, go for it.
Step 6
Once you are sure an inch or two of film is extended beyond the roller, headed towards the chamber on the left, and the backing paper is folded over the pressure plate and past the right side of the camera, close the rear door of the camera and lock it. At this point, the film is already ready for the first exposure, so take care to not to continue pulling on the paper or you will waste your film.
Roll film Polaroids have a second door in the back of the camera that will allow you to see the backing paper, but it will serve no purpose here. so make sure it is closed and locked shut.
Step 7
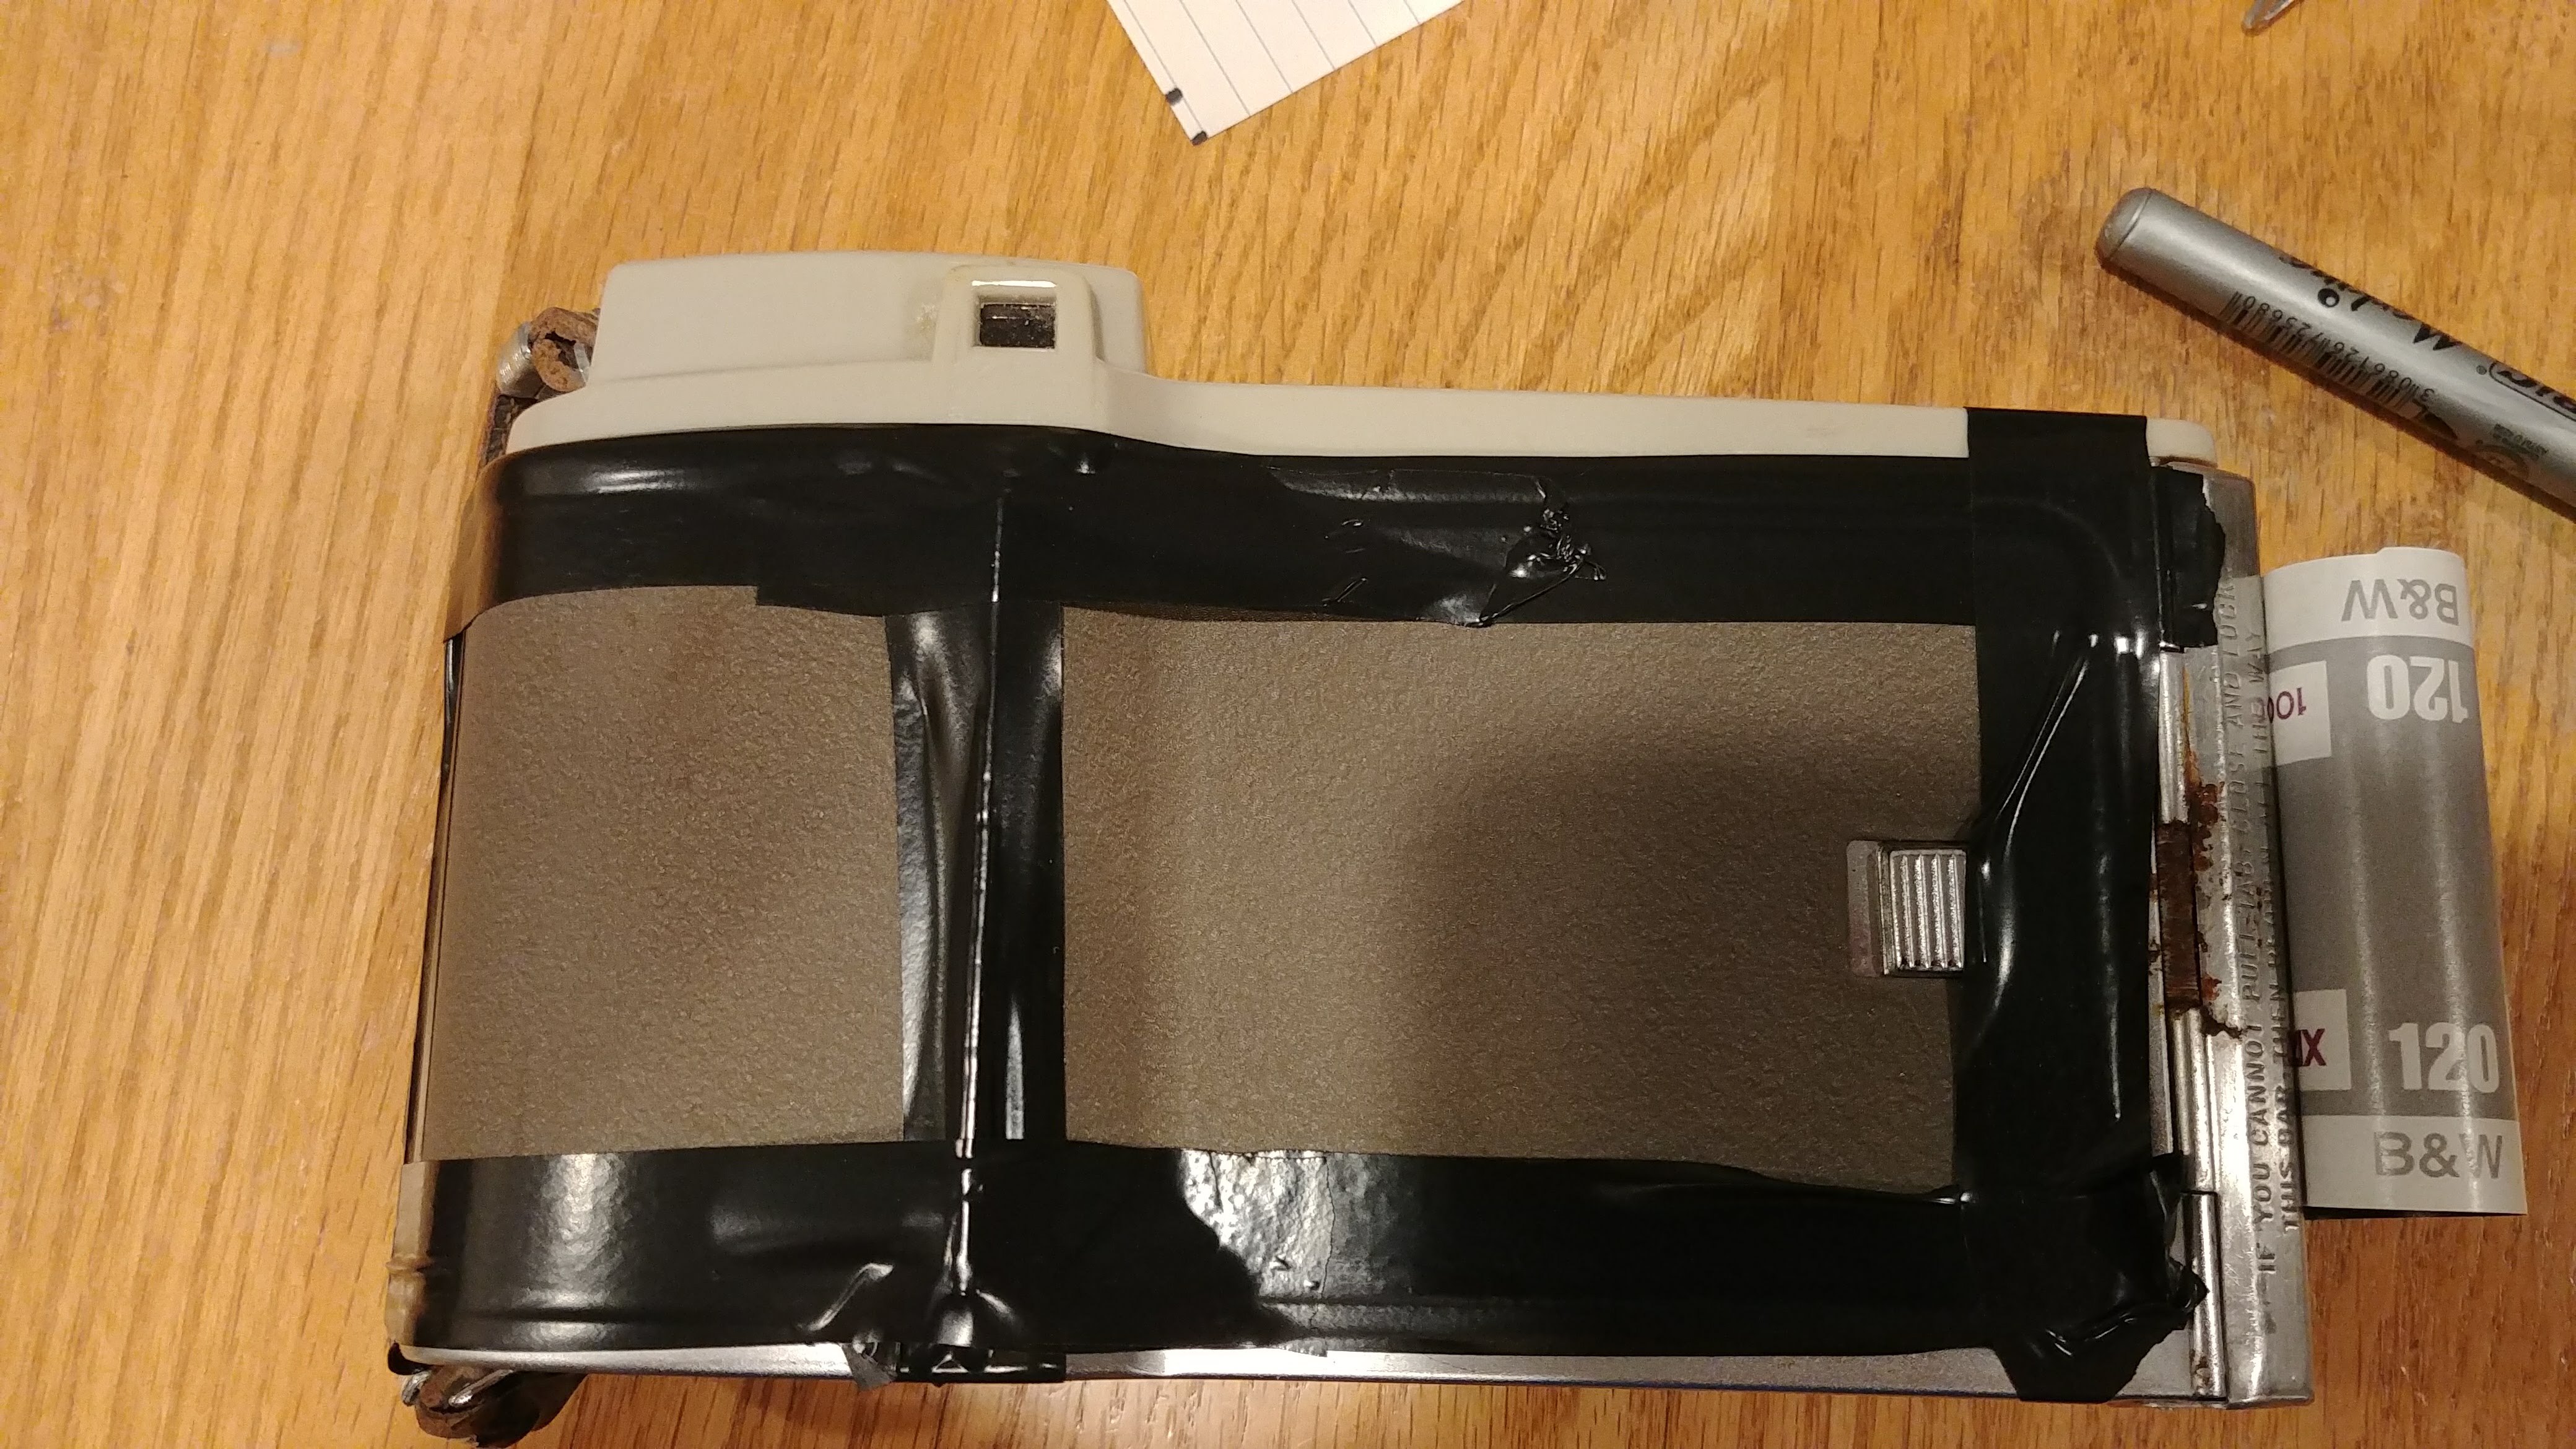
This next step is also optional, but I highly recommend it. Since roll film Polaroids have so many moving parts, and your exposed film will remain curled up within the camera until you finish the roll, there are a lot more opportunities for light leaks than when this camera was used with it’s intended film. As a result, I highly recommend using electrical tape to seal up all of the hinges and edges where light could get in. Electrical tape is cheap, so it’s better to be safe than sorry and just cover everything.
Shooting the Camera – Correct Exposure
None of the Highlander cameras have full manual controls for the shutter speed and iris. Instead, the Models 80A and B have a dial on front showing EV numbers from 11 – 18. The original model 80 has the original “Polaroid” LV numbers of 2 – 9. If you have an original Model 80, just add 9 to the numbers to get the same EV scale as the models 80A and B.
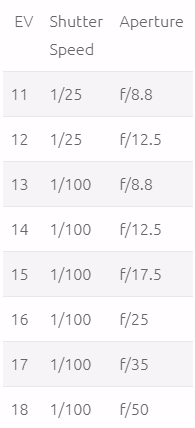 The EV numbers used by Polaroid on the models 80A and B are the same as used by every other manufacturer of the day, and they correctly match up to film you’d use today. According to both the original user manual and research I found online, the following chart shows the shutter speed and iris of each EV number.
Earlier in this article, I recommended using a 100 speed film like Kodak TMax 100, but you can use other film stocks as long as you know how to properly convert their speeds on an EV scale to get the correct exposure settings. You could optionally use a handheld light meter that shows EV values if you don’t like doing the calculations yourself. If this sounds confusing to you, just use a 100 speed film like I did, and I’ll tell you what I used.
I employed the use of the Sunny 16 rule, which states that given the film speed, with the shutter speed at 1/(film speed), on a bright and sunny day, f/16 will give you a properly exposed shot. So, if you were using 100 speed film, 1/100 @ f/16 is correct for a bright and sunny day.
Since Polaroid doesn’t use a standard f/stop numbering system, you can just pick whatever number is closest. Since f/17.5 is close enough to f/16, we’ll just use that and say that EV 15 is the correct setting to use with 100 speed film on a bright and sunny day. As your lighting changes, you should change the EV number to reflect the new light. Here is another table.
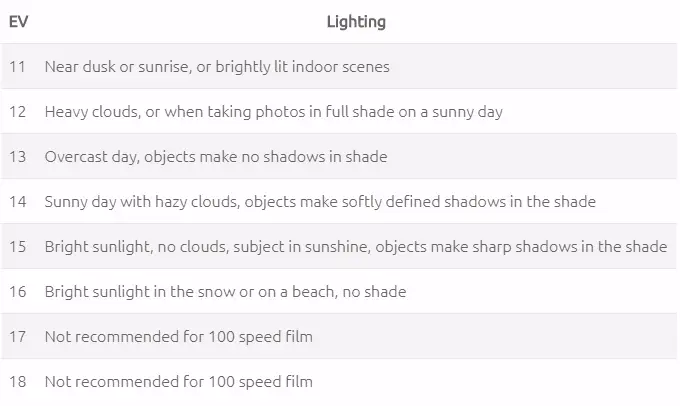 If you want to use a speed of film other than 100, you need to shift these lighting situations up or down in the chart above. For every stop of film faster (ASA 200, 400, etc), shift everything up the scale (i.e. 16 becomes 15, etc). For every stop of film slower (ASA 25, 50, etc), shift everything down the scale, (i.e. 16 becomes 17, etc).
Whenever I am experimenting with an old camera, I try to stick to lighting conditions that have the best chances to give me good results. I realize that any novices that have made it this far into the article are probably overwhelmed with info, but I can tell you that when shooting outside, I chose 13 for shady shots and 15 for sunlit shots and my pictures all came out fine.
In an effort to consolidate this and make it as simple as possible, just do this:
Use 100 speed film and shoot the camera outside on a nice day. Set the shutter to either EV 13 for shady shots or 15 for sunlit shots and you should be fine.
Shooting the Camera – Advancing the Film
Once you are ready to start shooting some photographs, the Polaroid Model 80A works generally like any other folding camera. It’s a bit ungainly, but the viewfinder is generally large and easy to use. I found the throw of the shutter release to be a bit long, but again, it works.
It is important that you remember to resist the urge to tug on the backing film paper that is now sticking out of the camera as your unexposed film is already in position for your first shot. You do not need to start pulling on the paper until after you take your first shot.
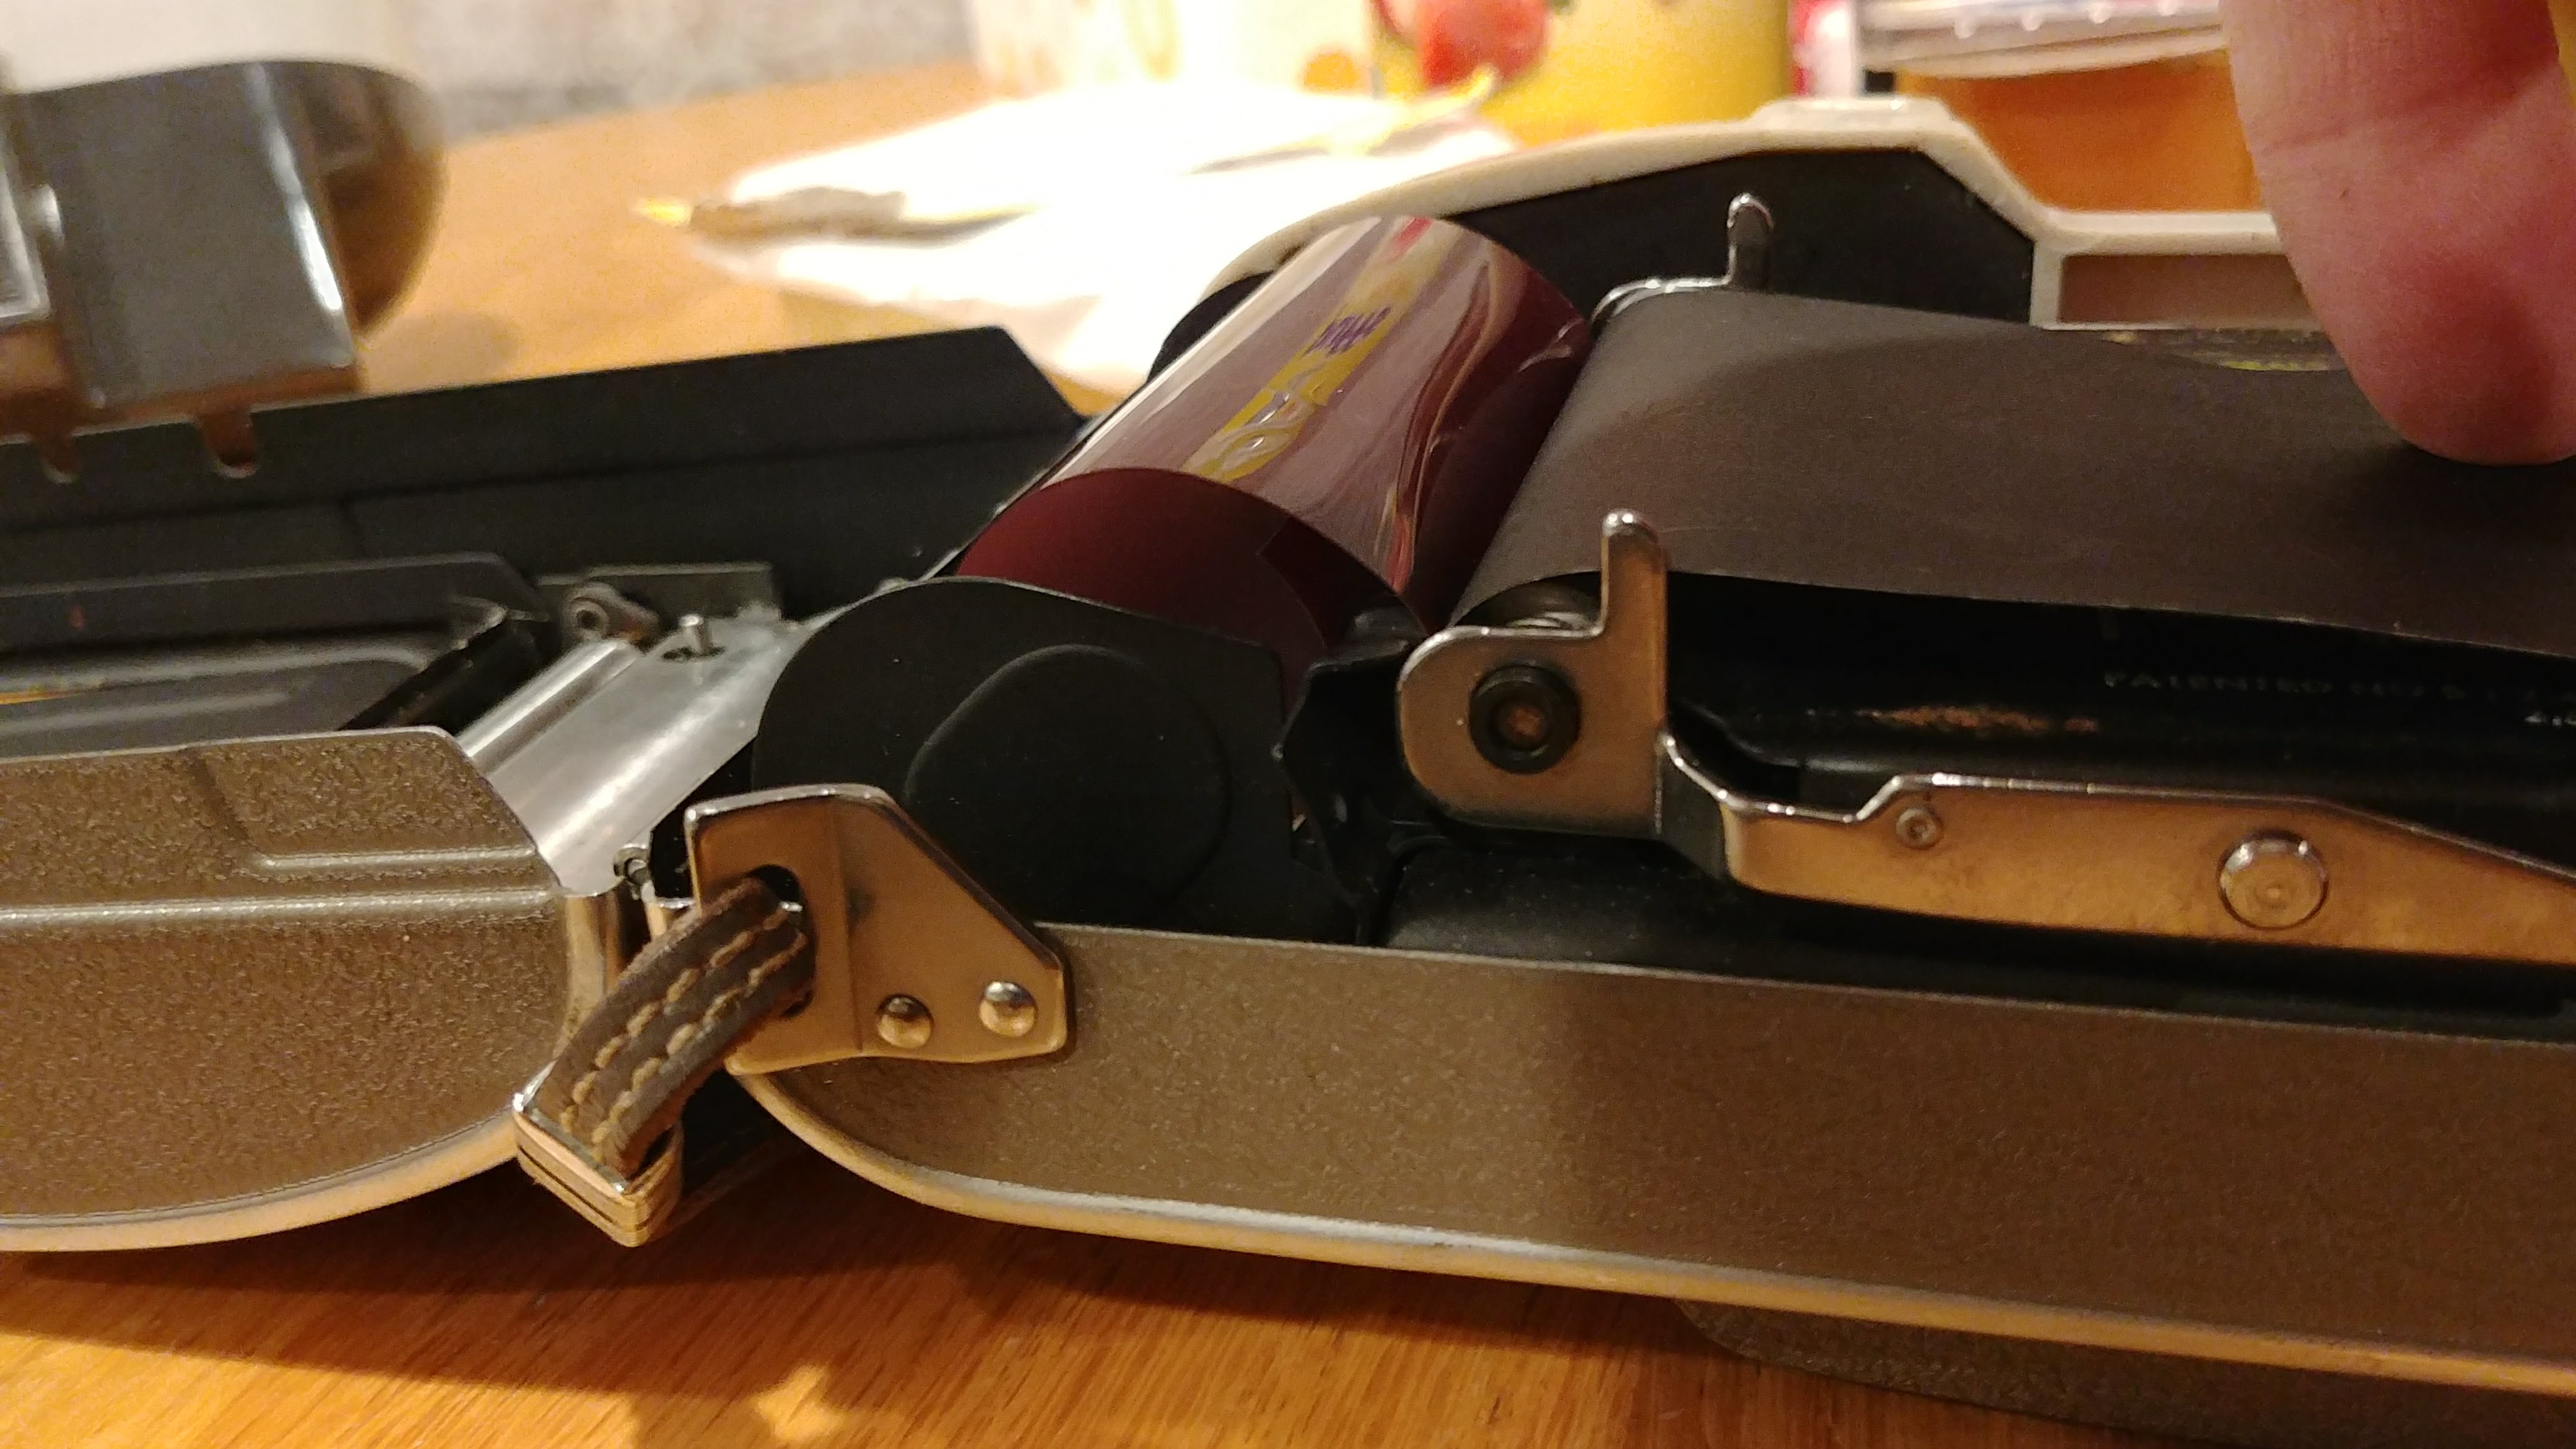
To advance the film, you must first unlock the film cutter, which is that folding metal bar that runs along the side of the camera. This cutter was used with original Polaroid film to help tear each exposed image from the rest of the roll. It serves no purpose here other than to prevent the backing paper from being pulled out.

Swing out the film cutter using the little catch near the top of the hinge. The image to the right shows the cutter in the open position. Don’t worry, opening this part of the camera will not expose your film.
Once the film cutter is open, take your “measuring stick” that you made in Step 2 above, and hold it against the leading edge of the camera and pull out enough of the backing paper so that it travels the same distance as the length of your measuring stick. If you need a visual marker, you can draw a line on the backing paper at the leading edge of the camera so you can clearly see when you’ve pulled out enough paper.
Remember that you won’t actually see the film come out of the camera as it should be rolling up in that chamber that you saw when the camera was open.
As you take more exposures, keep pulling out more paper so as to advance the film and get it ready for the next shot. You’ll start to find that as you pull out more paper, it starts to get in the way, so its a good idea to use a simple paper clip to keep the paper in a tidy roll.
If at any point while pulling out the paper, it starts to feel like something is jammed, or obstructing the paper, give it a little jiggle from side to side and see if that frees it up. If that doesn’t work, I recommend taking the camera back into a dark room and slowly open it up, taking care not to let the film unravel, and see if you can “feel” what the obstruction is. It’s possible the film isn’t rolling properly in the chamber to the left of the film gate.
I mentioned earlier that if you load the film perfect and advance the film exactly the length of the film gate, you can get as many as 10 exposures on a roll. Since your only indicator that you’ve reached the end of the roll is that the backing paper has reached the taped edge of the film, if you find that you’re on the 9th or even 8th exposure and you feel a significant amount of resistance, just stop and don’t continue to pull it, or you risk damaging the film.

Unloading the Film
Once you’ve reached the end of the roll, make sure you resist the urge to open the camera! Nothing is protecting your exposed film from light as it sits in the camera. You must take the camera into a dark room and open the back and swing open the pressure plate to remove the film.
If you are going to develop the film right away, you can pull out the exposed film and load it directly into a reel. If you are going to have someone else develop your film, you must rewind the film back onto the spool. Assuming you didn’t tear the tape or the backing paper, rewinding the film should be just as simple as winding it on there in the first place.
If you do rewind the film onto the spool, remember that you’re using a 620 spool, so if you send the film to a lab, ask them to send you back your 620 spool so you can reuse it.
Results
The steps I’ve typed for you in this article were based off my very first attempt at rolling 120 film through the camera. Although my practice roll fed through the camera fine, I must have done something incorrect with my “real” film as it jammed after the third exposure. Sadly, I could not resolve this without having to open the camera again, and I ended up with only 3 usable images from my inaugural roll.
I wasn’t discouraged, especially not after seeing the results. The Polaroid triplet lens on the Highlander is magnificent. I have never seen any type of lens sharpness analysis done on these old Polaroids, but after seeing the results of what they can do on a fine grain black and white film like Tmax 100, I am very impressed. This triplet is very good with sharpness across the frame, even in the corners. My images had excellent contrast and I saw no vignetting or any other type of sharpness issue. Since I used black and white film, I can’t comment on chromatic aberrations or any other color related issue, but if my results are any indicator of it’s performance, I am sure that it would do well with color film as well.
Once spring returns and I have more opportunities to shoot colorful images outside, I will try another roll of film in the Highlander and I will be sure to update this review with more sample images.
For now, here are the 3 images from my first roll.


As you can see, the entire 54mm x 73mm image fits on the width of the 120 film with only a little crossover to the manufacturers information near the edges of the film. I actually quite like the rounded corners, which give the viewer a clue that something is different about these photos.
 There are some light leaks here in various locations on all three images which suggest I didn’t seal the camera enough. The film also has a lot of dust and scratches which is likely due to all of the excessive handling that the film goes through during the loading and unloading process. I don’t have a proper dark room at my home, so I do all of my work in the basement which is hardly dust proof.
Still, with all of the “issues”, there is a lot to like here, and certainly enough to keep me going.
There you have it. These are likely the first three images shot and developed in this Polaroid Highlander in at least 3 decades. Perhaps it’s not as straightforward or as easy as you had hoped, but its far from hard, and best of all, the camera has not been modified in any way shape or form.
Excellent! Now I kind of wish I still had my old rollfilm Polaroid camera.
Hi Jim, I bought one in a job lot. You can have it if you want. Postage if needed at cost. Bruce
Thanks for sharing a more in depth of this roll film method. I am “all in” in that I have always wanted to shoot the classic Polaroids. So far I have used this method on un-hacked Polaroid 800, 900, and 110A cameras. I have hacked a Graflex roll film back to a Polaroid 250 but only did that just to see if it works. And just like you, after I scanned in my negatives I could not believe how good the lenses are with film. BTW, don’t worry about color problems with these lenses.
Wow! You’ve been more ambitious than I! I’ve still only tried this mod on the Model 80A. I would like to try it on my 95, but just haven’t gotten around to it. Do you have the images you shot available online somewhere to see?
https://www.flickr.com/photos/rkeithfarrar/29083743043/in/dateposted-public/
At this time the above link is the only online post from a film converted Polaroid 250. I am currently shooting my Polaroids with film and will be posting on flickr my results. The initial results from my test rolls were great except for some light leaks and yes, I had a 2 rolls to jam on me, but I modified the supply side with felt which smoothed and straightened film advance. BTW, I am now following you on Facebook.
Just shot test roll in an 80A today. Posted results at:
https://www.flickr.com/photos/rkeithfarrar/41987915230/in/dateposted-public/
https://www.flickr.com/photos/rkeithfarrar/41987918640/in/dateposted-public/
https://www.flickr.com/photos/rkeithfarrar/43080256254/in/dateposted-public/
Hey! That’s ME!
I came up with the backwards-film trick all by my lonesome, and I’m delighted to see that someone has picked it up. It’s a shame for these nice old cameras to sit on shelves.
The Pathfinder I used is such a gem that I felt it would be criminal to hack on it; I’ve shot a bunch of 4×5 with it and that lens is very very nice.
…And yes. Do tape up the gaps and hinges, I later realised that some of what I thought were bellows leaks were actually caused by light coming through at the hinge.
Best regards,
Les Smith
Les, thanks for your response! I am happy that you found my article and for your kind words! One of these days, I definitely want to try this on a Pathfinder, but finding one in my budget has proven to be difficult as people pay big bucks for these to convert to sheet film. The Highlander is still an excellent choice as the triplet lens is still quite good, and the film size almost perfectly matches 120 film. I am curious, how did you find my article? Did you stumble upon it, or did someone alert it to you?
Thank you so much for this!! I’m totally a beginner when it comes to film cameras, especially old ones. I picked up a J33 Land Camera at an antique store and was heartbroken to find they didn’t make film for it anymore. This seems pretty easy, even for me. Can’t wait to give it a try!
…Actually I was looking to see if anyone had recently commented on the article I sent to Lomography (They mixed up the accompanying photos a bit when they published it, but I’m sure no-one got confused by that). Your article just came up in my search.
When the Pathfinders were new, they cost as much as a small car. and the lenses are exceptionally fine. In fact, such a good lens would make no sense at all in a Polaroid (the positive image is produced by the diffusion of dyes from the negative, so is pretty low-resolution), but for the fact that you could recover the negative from the roll film (and peel-apart pack film), and print from it at a much greater resolution.
It’s cool to see my name mentioned, but much cooler to think that the idea is getting used.
Intrigued to find this mention of using 120 on an old Polaroid. Years ago I picked up a 110a with the idea of doing a 4×5 conversion on it, but it sat on the shelf and I was really reluctant to hack the body about, despite knowing that film for it would never be made again.
This article, and seeing the 120 conversion on the 250 has sparked the idea of using an old rollfilm holder on the 110a.
Opening the back up and offering the 120 rollfilm holder to the space immediately behind the bellows, shows that the 120 holder (a 6×9) sits almost exactly in register top to bottom and side to side. I’m fairly sure it’s very close to being in film focal register, too.
However, that particular 120 holder fits a couple of older cameras here, so I don’t want to lose it to one application, as I’d probably fix it in place permanently.
So, the hunt is on for another 120 rollfilm back, preferably 6×9.
They used to be dirt cheap. I should have picked up a couple more ten years ago.
Referencing your tutorial I converted the Polaroid I have to shoot 35mm panoramas. It’s more like a cropped image of the center of the original frame. I cut guides out of mat board for the film plane and I left the sprockets in the shot so it functions as a high quality sprocket rocket with x pan like wide shots. Additionally, I had to use washers for spacers on the 35 mm canister and run the film backwards through the camera. I tapped a rewind into the bottom of the camera. I call it the “polaramic”. I’ve gotten a few nice pictures with it but I plan to experiment with some better hardware and some faster film. I would love to have another one of these cameras to do some more tinkering
Very cool Stan! As you can see, there are a lot of options for converting these cameras to still use film today. Your method using 35mm certainly is cool! Keep looking at these Highlanders are still pretty common on eBay and other sites.