


 I made my first old camera post in August 2014. At that time, I had no idea where this hobby would take me. I already had an interest in digital photography, but acquiring 100 year old film cameras wasn’t something I had ever considered. I was on my third Nikon DSLR and had already started to acquire some extra Nikkor lenses and accessories, but never did I think that I would become so interested in this “subculture” of photography, and certainly would have never thought I would one day be a resource for other people to learn about these wonderful devices or how to repair them.
Eighteen months have passed since that first post, and while I still would never consider myself to be an authority on old cameras or their repair, I have learned a few things along the way that I think are worth sharing. I’ve taken apart 20-30 cameras and in most cases, have been able to put them back together in better shape than when I started. Sure, there have been some failures like my attempt at replacing curtains on a Soviet made FED 2 camera, or correcting a mirror problem on a junk box Pentax Spotmatic, but my successes greatly outnumber my failures and I feel the time has come to try and pass on what I’ve learned.
Of course I cannot continue this article without a couple of different disclaimers. I’ll start with the most important one:

With that out of the way, I should also mention that cameras have been around for nearly 200 years. In that time, there have been thousands of different designs, models, sub-models, variants, and sub-variants. The differences between all of these cameras is vast and as such there is no way for anyone to make a comprehensive guide for cleaning or restoring every possible model. What follows in this article are just some general guidelines that should help you bring back most of the more common models to a usable state.
Usable state? Whats that?
 You should also realize that many of the cameras that I talk about on this site are very old. I generally don’t talk about models any newer than from the 1980s, with many being much older than that. That means that the newest cameras in my collection are already over 35 years old. It’s probably safe to say that neither George Eastman, Oskar Barnack, or August Nagel ever imagined that their designs would still be in demand 50, 75, or even 100 years after they were built.
For that reason, you should have realistic expectations of what these cameras are capable of. While they might still be able to make wonderful photographs, they rarely function like they did when they were new. Shutter speed tolerances will be a little off, lenses will have some dust or debris in them, hinges will be a little loose, and there will most likely be some form of cosmetic issue. None of these issues should be deal breakers, however. In most cases, minor issues rarely prevent the camera from performing it’s intended purpose. You’ll just need to work around them and use the camera to it’s strengths. If you absolutely demand a camera to be in pristine condition, you will definitely want to seek out the expertise of a respected repair person. I have a large list of reputable repair people, along with their areas of expertise, at the bottom of this article.
 Finally, as the saying goes, “There’s more than one way to skin a cat”, there’s also more than one way to clean or repair a camera, and my methods might not always be the best. As I mentioned above, I am just a guy who likes cameras and I want to pass on the things I’ve learned. They may not be what a pro does, but I am not trying to be a pro. My goal is to get these cameras back up into a usable state so that you can shoot film in them again. Will my repairs double the life of the camera? Probably not, but they’re good enough for me, and in every case where I’ve cleaned my own cameras, they have stayed working so far.
So with all of that out of the way, lets get to some useful information!
The rest of this article functions as sort of a followup to Mike’s Guide to Buying Old Cameras. If you don’t already have some old cameras to work on and need to know where to start, that’s a pretty good article that teaches you the basics.
If you’ve come here specifically for information on how to clean your shutter, replace light seals, or collimate a lens, here are direct links to jump to that section of this review. If not, I encourage you all to read this entire guide at least once.
Adjusting or Collimating Focus
Vetting a Camera Before Using it
Before shooting with a new “vintage” camera, you should always spend some time to check it’s condition. As we all know, how a seller describes a camera might not be exactly how it really is once you have it. Rarely is a camera ready to go without any kind of work, immediately after getting it. Like you would when buying a used car, you need to “kick the tires” and check the condition of the following things:
Cosmetics – Check the body for dirt, debris, gunk, goo, and any other unknown substances. Does it smell musty or moldy? A stinky camera isn’t very appealing to use, but it could also indicate internal moisture or corrosion inside of the camera that might hint at more critical problems. Most external grime won’t prevent a camera from working, but you should always see what can be easily cleaned out with some Q-tips and cotton swabs and some high concentration of rubbing alcohol. Be careful when using cleaners such as window cleaner that has a high water content. While water is an effective cleaning solution by itself, you want to make sure it does not get inside of the camera. Using rubbing alcohol with a content of 91% or higher is ideal because the less water, the quicker it evaporates and the less likely moisture will get inside of the camera.
 Whenever wiping down a camera, its always best to start with the least “caustic” solution and work your way up from there.
Glass Cleaners like Windex or Sparkle are usually OK for lenses and even the bodies of a camera, as long as you pay attention to not get any inside of the camera.
Rubbing Alcohol (Isopropyl Alcohol) is a little better at absorbing grime and due to it’s less concentration of water, is more suited to the insides of a camera, as long as it remains well ventilated when drying.
Lighter fluid such as Ronsonol or Naphtha Oil is a great solution for cleaning sticky residue out of various parts of a camera. Naphtha Oil evaporates quickly and doesn’t leave any residue so it is ideal for cleaning things like shutters and other internal components.
Baking Soda and Warm Water is a very useful combination to clean out the blue/green corrosion inside of battery compartments. Old cameras used Mercury batteries that can leak if left in the camera for an extended period of time. If you encounter an old camera with a corroded battery compartment, it might just need a cleaning. Use a bunch of Q-tips dipped in the wet baking soda and wipe away as much of the corrosion as possible.
Finally, in some very rare cases, Acetone (nail polish remover) can be used to remove residue from stickers on the outside surfaces of cameras. Many Japanese cameras came with a gold foil JCII sticker that almost always leaves sticky residue behind. I’ve also seen former owners tape “cheat sheets” to the backs of their cameras that leaves residue from the tape. A very small amount of acetone on a Q-tip or cotton swab can remove that residue, but you must be very careful to not let the acetone touch any glass or interior surfaces of the camera.
An observation that I’ve noticed when buying old cameras is that ones that come with a leather case (often called an ‘ever ready’ case) can actually add to the smell of an old camera. While it makes sense to seek out cameras in their original cases, these cases often trap moisture allowing mold and mildew to grow. The snaps and buckles on old cases were often made out of brass, which has copper in it. When copper corrodes, it turns green, and I’ve seen many cameras where some of the green corrosion from a case has transferred to the body of the camera. I won’t say don’t buy a camera with a case, but don’t automatically assume that just because a camera comes in it’s original case that it will always be in better condition.
If you encounter a smelly camera, depending on how bad it is, it might just need good ventilation to “air out”. I’ve left stinky cameras in my garage for a couple of months and that has worked. Other suggestions I’ve read online are to put the camera in a Zip Lock bag with dryer sheets, silica gel, coffee grounds, and even chalk. I am sure to some degree these can work, but in severe cases, if a camera smells bad enough, there might still be actively growing mold or mildew inside of the camera that needs to be wiped away.
Lens Glass – All lenses will have some degree of dust or scratches on them. It is completely unrealistic for anyone to buy a camera and expect it’s lens to be in mint condition. Many minor dust or dirt specks will have little to no impact on photographs. You should not obsess over small particles, but larger ones need to be cleaned off with a proper lens or glass cleaning solution. You might be surprised at how many things can be wrong with a lens and it still takes nice pictures. Check out this article which shows exactly how much it takes for lens defects to actually affect an image.
 More concerning are lenses with fungus, haze, or deep scratches in or on the glass elements. The next two images show examples of a lens with fungus on the inside surface of the outer element, and one with it growing from the outer edge. Fungus can show up as small circular splotches in the glass that looks like a tiny fuzzy ball, or it may grow from the outer edges of the glass elements looking like tiny little hairs. Because fungus is almost always inside of the lens, it is not easily wiped off. It is possible to open up a lens and wipe the fungus off, how you do this varies wildly depending on the lens and is beyond the scope of this article. Plus, even if you manage to clean all of the fungus off the lens, many times the fungus has etched the glass or the anti-reflective coating, which leaves a permanent scar even after the fungus is gone. You should check all of the glass elements of a lens for fungus, as it isn’t always on the outer element, it can be on the rear or inner elements too.
 A lens with fungus isn’t always a deal breaker, and like the article mentioned above that show small scratches don’t always impact the quality of the image, small amounts of fungus might not have an immediate impact either. The biggest problem with fungus however, is that since it is a living organism, it will continue to grow and get worse. A lens with a small amount of fungus now could grow into a completely unusable lens in a couple of years.
Some people have suggested that subjecting a lens with fungus to Ultra Violet light for an extended amount of time will kill the fungus. This won’t remove it, but it should stop it from growing. If you have access to a UV light, put the lens under the light for a week or two and that should work. You can also use direct sunlight, but you need to make sure it is exposed to direct sunlight and not through a window, as most windows have anti-UV coatings in them which will block the useful rays.
 Lens haze is a generic term used to describe any type of “hazy” coating on one of more glass elements. Some types of haze can be simply wiped off with a clean towel and glass cleaner. Sometimes just letting a lens sit unused for decades can cause a layer of dust to form on the glass which is easily wiped off. Sadly, other types of haze form internally in between lens elements. The source of some types of haze stems from the use of balsam as a sort of glue to hold lens elements together. As balsam is an organic material, it can decay over time leaving a sheen of haze inside of the lens. This type of haze is extremely difficult to clean because it involves not only disassembling a lens, but also separating glass elements which is something best left to a professional.
Lens haze is sometimes confused with fungus and vice versa, but as a general rule, haze will be evenly spread across the entire surface of the glass element and not just in one area. It is also possible for a lens to have both haze and fungus at the same time. If you are unsure whether your lens has haze or fungus, an easy way to tell is to shine a flashlight through it and look at the light coming out of the other side. If the entire glass element has a cloudy look to it, its probably internal haze.
In my time collecting cameras, I’ve heard a variety of strange suggestions involving using Athlete’s Foot anti-fungal cream, ketchup, car polish, and even toothpaste to help remove haze. I doubt that any of these suggestions work very well, and I would only think about trying some of the more radical suggestions if the lens is already beyond repair and you have nothing to lose. If your lens has only a very small amount of haze, it’s better if you just leave it alone. Hazy lenses usually are still capable of sharp and colorful shots, but they may have reduced contrast, especially those shot in bright sunlight.
 Lens Stiffness / Oil on the Blades – In addition to issues with the lens glass, there are other internal issues that can plague a lens such as stiffness. Most lenses have adjustable focus via a ring or lever that becomes stiff over time. This almost always is a result of the original lubricants that have dried up and turned into a thick sludge over the decades. In severe cases, sometimes the original lubricants can completely dry, turning into a hard glue that renders the lens immovable. Forcing a stuck lens could cause even further damage as you might end up breaking some other internal part of the lens.
It’s not just the focus, the aperture and zoom rings (assuming the lens has these) can also become stiff as well. While it is possible to relieve the stiffness by simply using the lens, the only real solution to this is to disassemble the lens, clean off the old lube, and put something else on it.
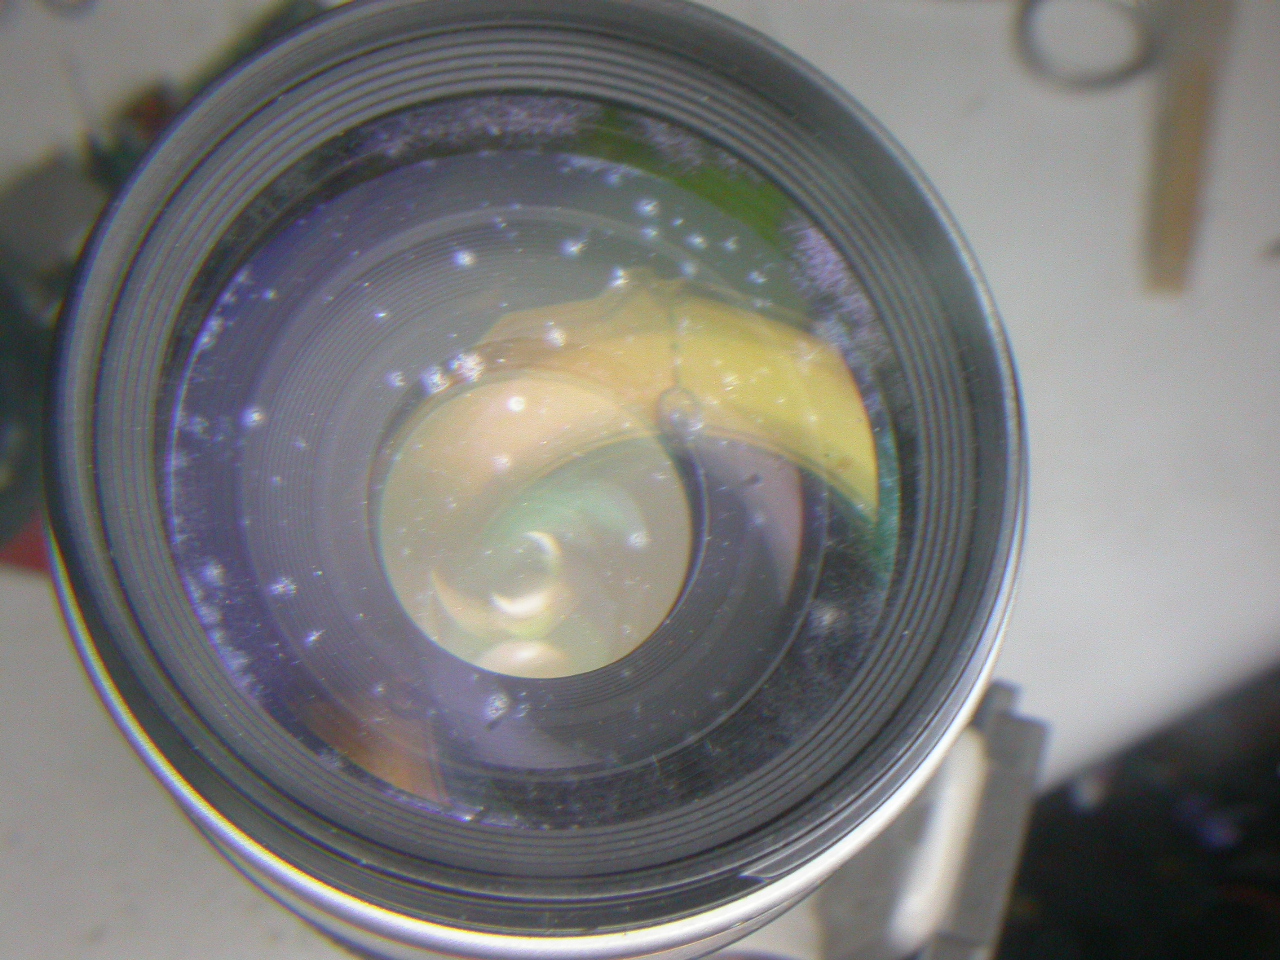
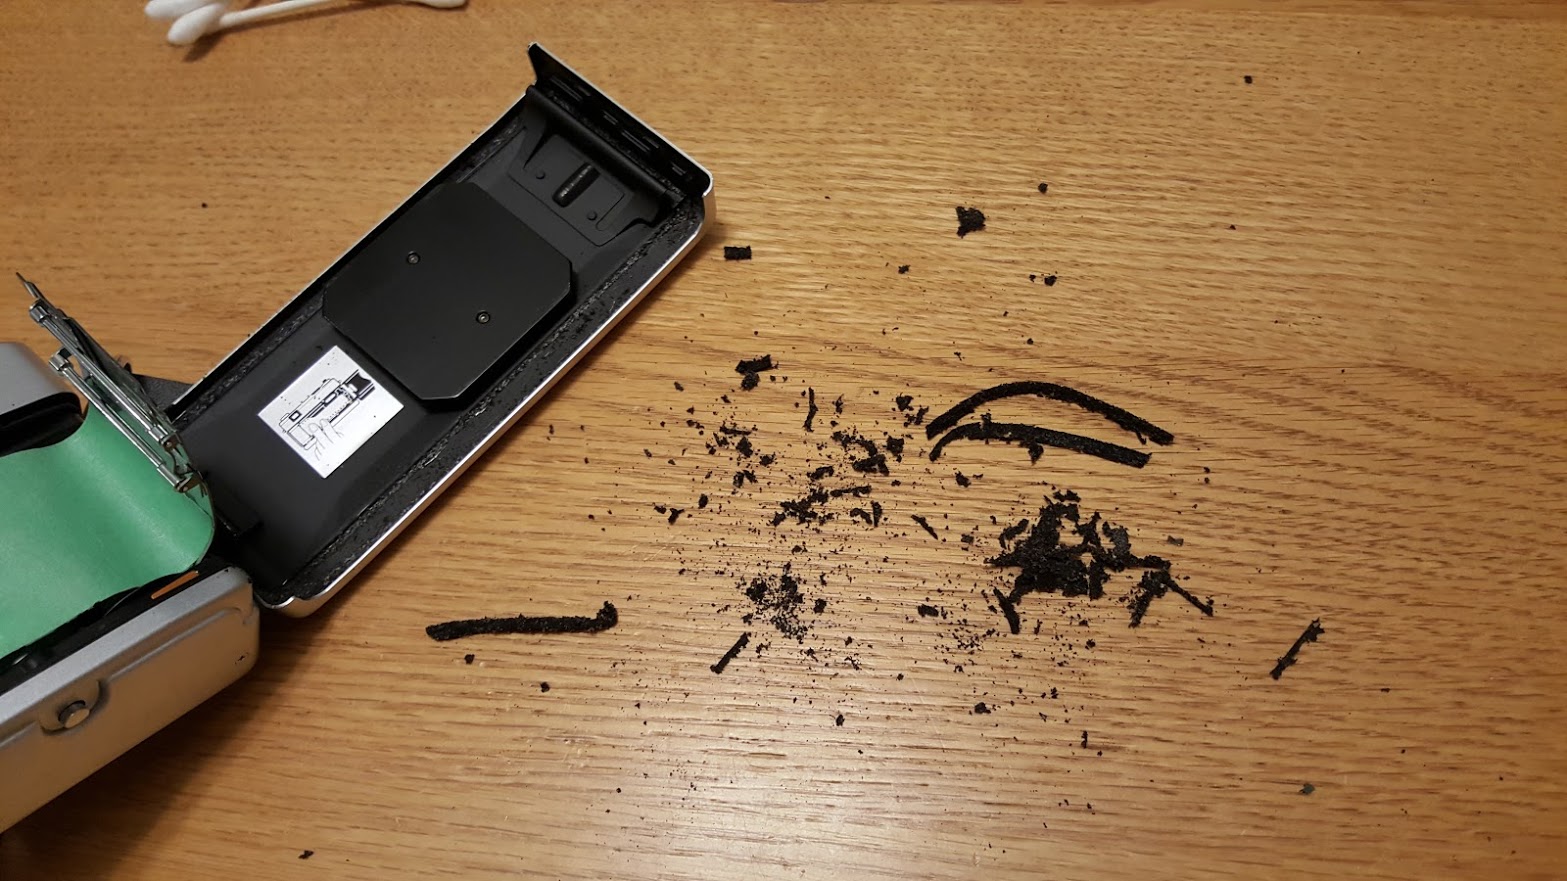
Sometimes a lens doesn’t feel stiff at all, but you’ll notice that the aperture or shutter blades have visible oil on them which can slow down or even stop movement of the thin metal blades inside of the camera. In minor cases, you might see a tiny amount of oil on the blades, and it could still work OK, but in most cases, cleaning the oil off the blades requires the lens to be disassembled. To the right is an example of a lens with very oily aperture blades
Disassembling lenses is easier on some cameras than others. As a general rule, the older camera, and the simpler it’s design, the easier this is to do. There are also some fixed lens rangefinders from the 50s through the 70s that can have this done by removing the front lens elements. While it is a little more involved, it is doable with some patience and the right tools.
Shutter Speeds – Other than general cosmetic issues, shutter issues are probably the most common problem you’ll encounter on older cameras. Sometimes the shutters work fine on the fast speeds, but are slow or even inoperable on the slow ones. On other cameras such as the Canonet rangefinder series, the shutters usually either work perfectly, or not at all, there’s little in between.

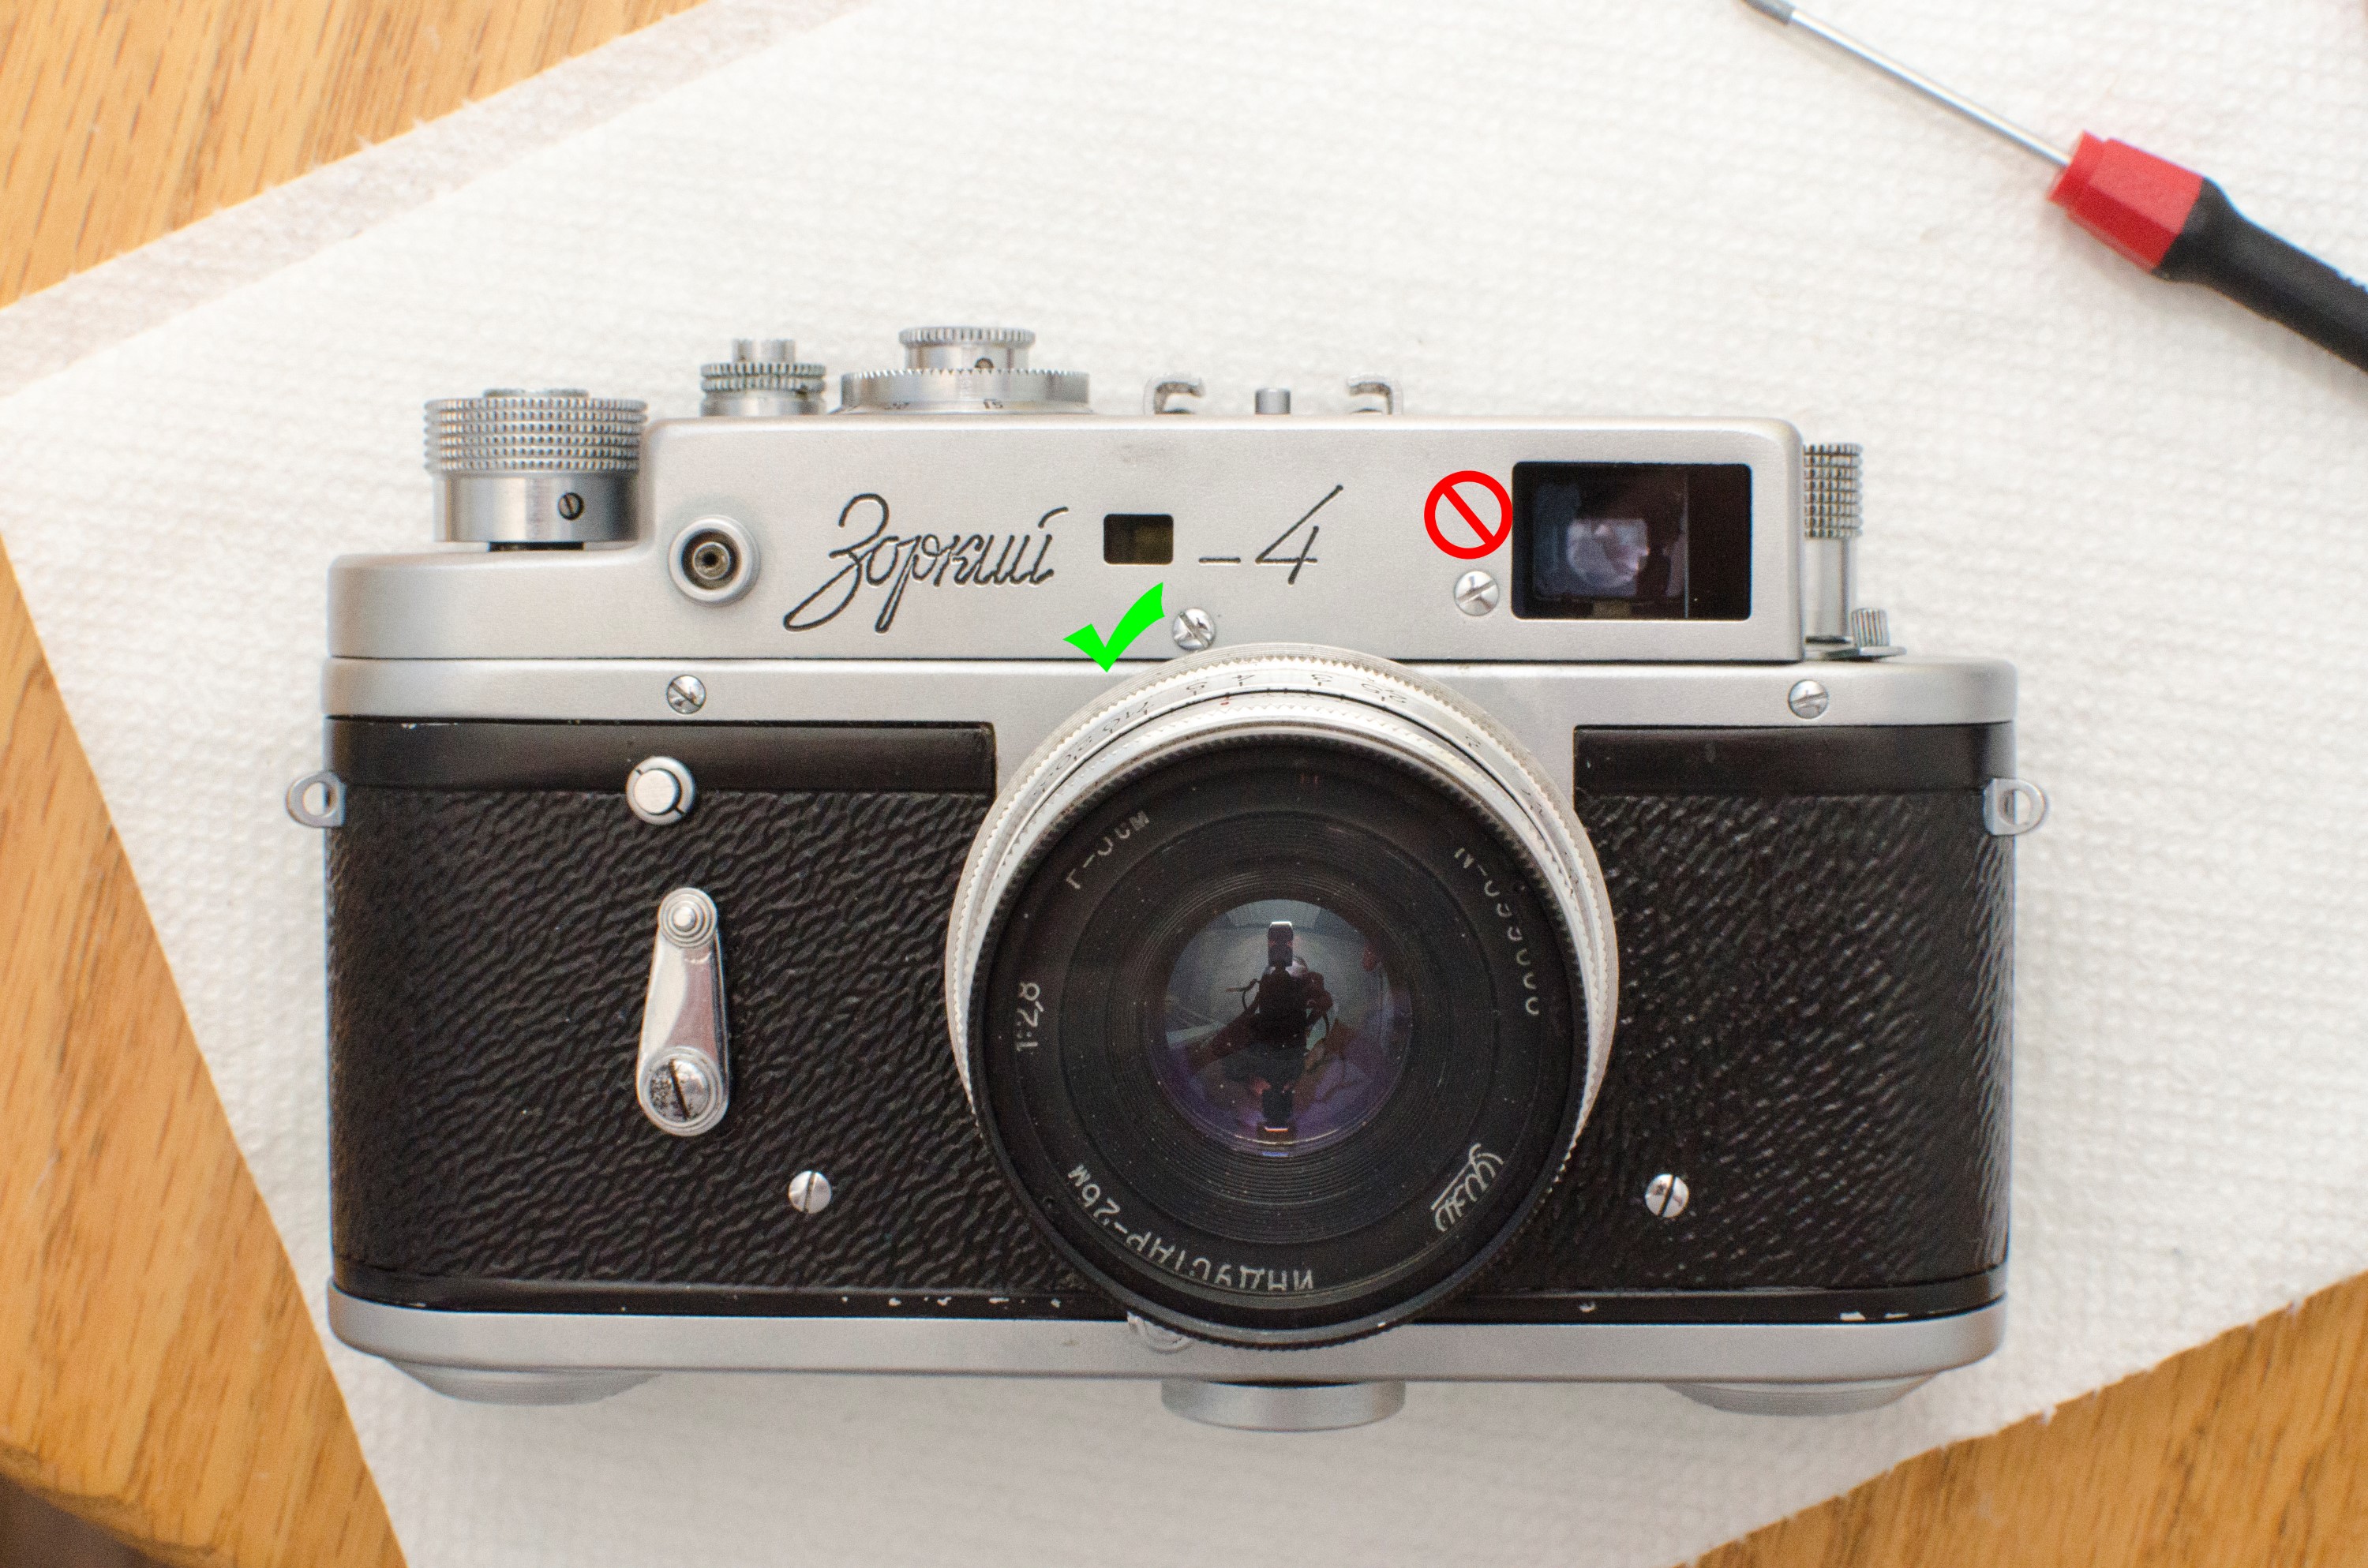
The reason the slow speeds are often more problematic than the fast ones are because almost every shutter ever made has some type of gear-driven “governor” that slows down the shutter. This gear driven governor usually has many very tiny parts and small coil springs in them that don’t like any kind of debris. Even the slightest bit of stickyness can cause the slow speed governor to not work properly. The image to the left shows the slow speed governor from a Zorki 4 rangefinder.
Like lens stiffness, sticky or slow shutters are almost always caused by oil or other lubricants that have either dried up over time or have seeped into places they don’t belong. Also like lens stiffness, the only proper fix is to disassemble the shutter and clean it.
Although there have been many designs of shutters made over the years, you can group every shutter made into two general categories, leaf shutters, and focal plane shutters. The easiest way to tell the difference is to open the film compartment in the back of the camera and look at the opening. A focal plane shutter will have either a solid piece of black cloth, or a variety of horizontal metal blades like a garage door. Focal plane shutters are generally more reliable over time, but can still have issues. Sadly, resolving most issues on focal plane shutters is beyond my skill level, or that of a typical novice. I have only tried to fix one focal plane shutter and I failed miserably. As a result, I only mess with leaf shutters which in my opinion are easier to work on.
Leaf shutters have multiple shutter blades that look like leaves from a tree (hence their name). Leaf shutters are often much closer to the lens and in many cases, are sandwiched between the glass elements of the lens. You can often see the shutter blades on interchangeable lens cameras by removing the lens and looking into the camera.
Cleaning leaf shutters isn’t really as hard as it seems. There are some cameras like the Argus C3 and older German folding cameras that make the job quite easy. I’ll cover this in greater detail later in this article.
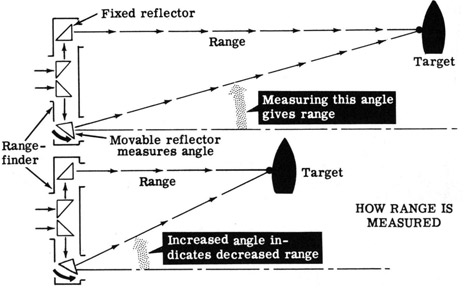 Rangefinder Accuracy (if equipped) – A rangefinder is a pretty basic device that has been in use for hundreds of years to help sailors and aviators judge the distance of a far away object. The basic concept is that by having 2 different windows that are a known distance apart, you can measure the distance of an object by aligning images from each of the two windows on top of one another.
Rangefinder cameras are any camera with a rangefinder equipped. Some rangefinders are coupled and some are uncoupled. The difference is whether or not the rangefinder moves in sync with the focal distance of the lens. Uncoupled rangefinders work independently of the lens settings. You measure the distance of an object on the rangefinder, take a reading from it, and then transfer that reading to the lens.
Regardless if a rangefinder is coupled or not, they are prone to being out of alignment either horizontally or vertically. A rangefinder that is out of alignment horizontally will give you out of focus images, but one that is vertically misaligned can still be accurate, they’re just harder to use.
Although all rangefinders have adjustment screws, I wont spend a lot of time talking about rangefinder accuracy because how you go about adjusting the rangefinder varies wildly depending on the camera. Some cameras have an easy to access screw on the top or black plate of the camera, sometimes there are hidden screws behind a cover or under the accessory shoe, and sometimes you need to remove the entire top plate of the camera to gain access to these screws. If you need help locating the adjustment screws for your camera, my best advice is to Google it. You’d be surprised at how many people have taken the time to explain how to adjust the rangefinder on various cameras.
The good news is, that once you locate the adjustment screws, all that’s required is for you to set the lens to infinity and find a vertical object like a tree or utility pole that is more than 100 feet away. Point the camera to the far away object and adjust the rangefinder screw until the far away object is correctly aligned at infinity. Once you have infinity correct, all of the other distances should be correct also. If a rangefinder is accurate at infinity, but not at other distances, this could mean a defect in the rangefinder, or some other type of internal damage that would be beyond the scope of this article.
Light Seals – Film cameras, by their very design are supposed to focus light on a plane of light sensitive film. While this sounds easy in theory, only allowing the correct amount of light for a given scene to hit that film plane at the exact moment, for the exact duration, all while in focus is quite difficult to accomplish. Any amount of unwanted light, even for a fraction of a second can ruin the film and cause streaks of red or white light in part of, or over the entire image. A red/orange light leak indicates it came through the back of the camera, and a white light leak means it hit the emulsion (front) side of the film.
As a result, it is of the utmost importance to keep all stray light out of a camera at all times. Older cameras were designed in a way where the tolerances between the movable parts of the camera were deeper and more robust and did a good enough job of keeping light out, that additional seals weren’t necessary. As cameras got more advanced and film became more sensitive to light, the need for extra measures to keep light out increased.

Early attempts at light seals were made out of wool yarn and thick pieces of fabric such as velvet or felt. In many cases, these types of light seals are still effective today assuming they haven’t been damaged or removed. The problem is, that sometime around the early 1960s, it became common for manufactures to use a type of foam or sponge material instead of more durable products like yarn and velvet. At the time, the foam light seals were probably a more cost effective way of sealing film compartments from unwanted light. The problem is that the foam that was used is made out of petroleum byproducts and over time, tends to decay to a sticky and crumbly mess.
Almost any camera made after 1960 will have decayed light seals that must be replaced. Even if an old light seal is still effective at keeping out unwanted light, the seal will continue to decay and if it crumbles inside of the camera, pieces of the seal can get lodged inside of the shutter or on the film itself, damaging the camera or the film. As a result, you should always replace light seals on old cameras that originally had foam seals. I’ll even go one step further and say that its a good idea to add light seals to some older cameras even if they didn’t originally have them. As long as the light seal doesn’t get in the way of closing the film compartment, you can never be too safe.
Replacing light seals is not hard. Its just messy and tedious. There are already several excellent tutorials on the Internet showing you how to do this yourself, but I’ll cover it in greater detail later on in this article.
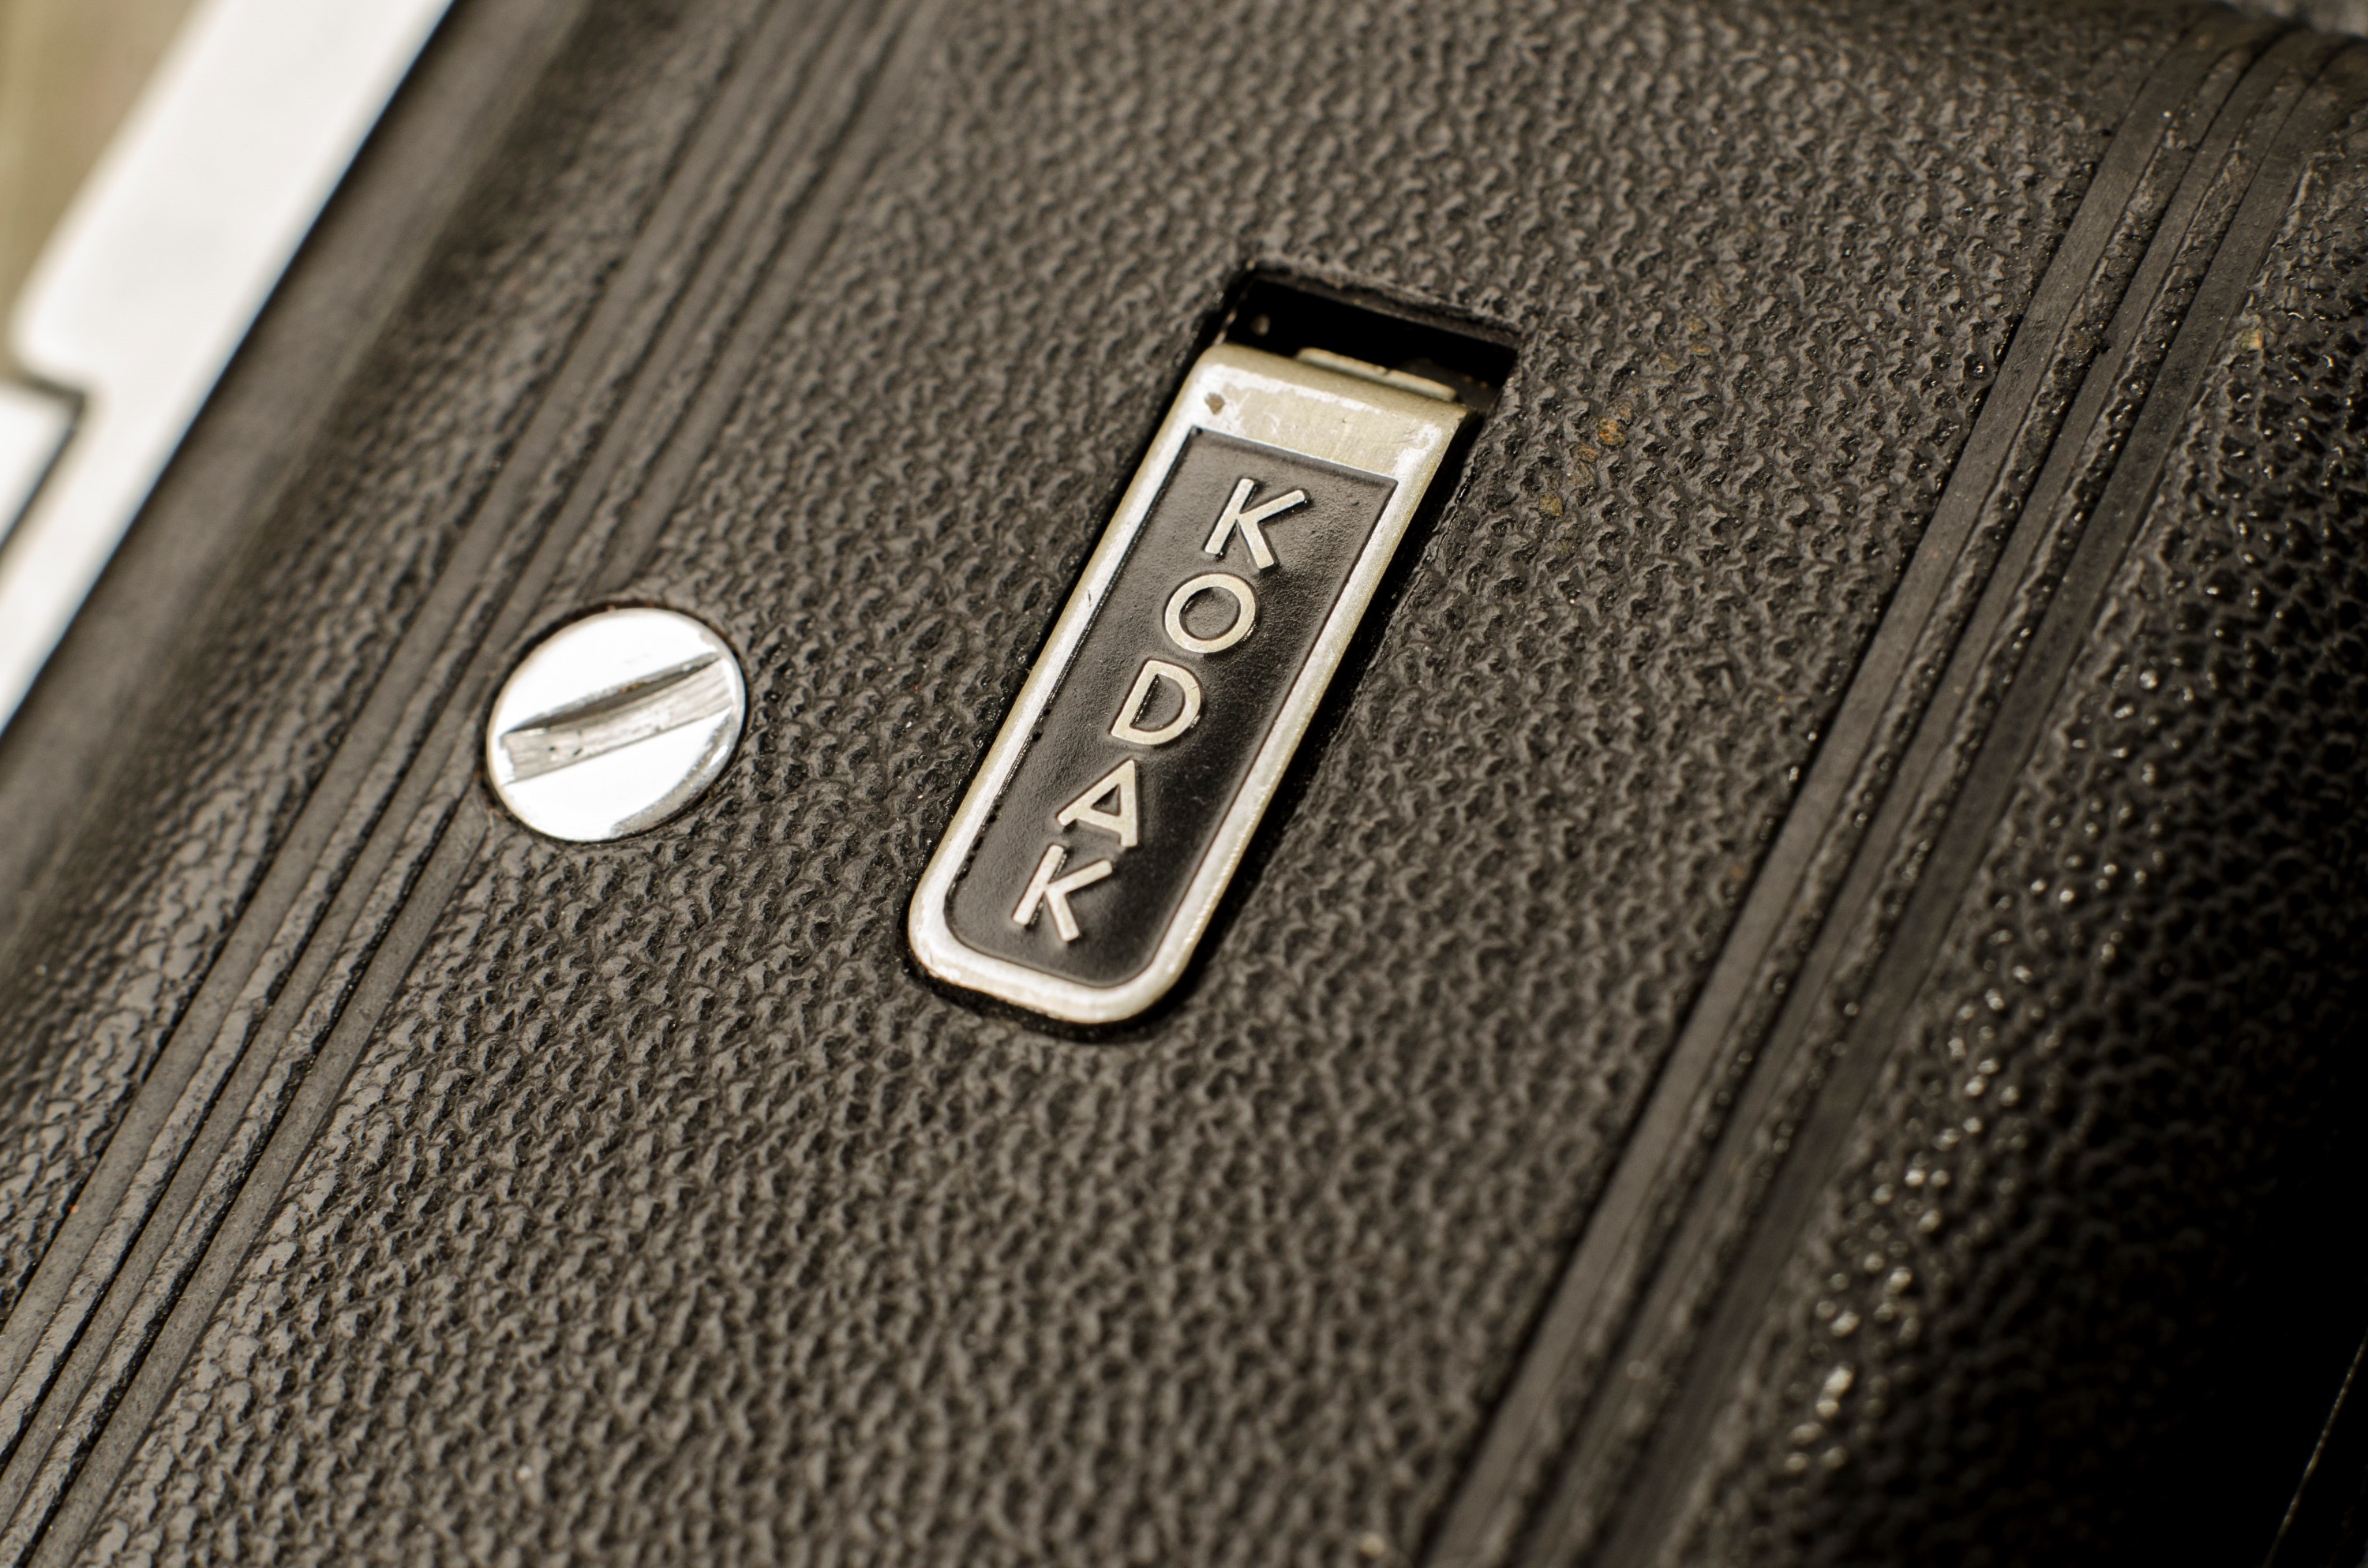
Bellows – Almost every folding camera ever made has bellows which are flexible, accordion shaped pieces of fabric or leather that are sandwiched between the lens and the film compartment. Bellows are almost always black, but some earlier Kodaks had colored bellows. The earliest cameras had bellows made of leather which is pretty durable and assuming the camera has been stored properly and taken care of, can still be effective 100+ years after they were made.
 Around 1930, Kodak switched to a synthetic coated paper-like material which I assume was to keep costs down. Japanese folders of the late 40s and 50s also had a similar paper-like material. Sadly, these types of bellows are often in very poor shape today and have many holes in the corners that let light leak into the camera. To be fair, these non-leather bellows served their purpose for what most would agree is a reasonable amount of time. You can’t really criticize Kodak for making the switch to cheaper bellows in 1930 because they haven’t held up after 75+ years.
German made cameras, even those by Kodak AG like the entire Retina line, generally have higher quality bellows that hold up better over time, but if your goal is to shoot with a folding camera, your odds of getting usable bellows are much better if you stick wither either pre-1930 Kodaks or German made ones. That certainly doesn’t guarantee that all German folding cameras will have usable bellows, because there are a lot of conditional factors as well, but your chances are much higher of having good ones.

Whenever you get a folding camera, it is good practice to check the bellows for holes. The easiest way to do this is to get a flashlight and take your camera into a completely dark room. Open the camera and shine the flashlight inside of the bellows and look all around the outside of the camera. Even one tiny speck of light can damage your film and need to be addressed. Take a look at the image to the right of what good bellows looks like on an incredibly rare Leica/Hasselblad/Nikon solid gold folding camera.
You can patch minor holes in bellows by using fabric paint or very small amounts of liquid electric tape, but these kind of repairs are always temporary. The bellows will continue to degrade and if you really want to use the camera reliably for any length of time, you must replace the entire bellows which is both an expensive and difficult thing to do. I received a quote of $140 to replace the bellows on my Kodak Monitor Six-20. While it is doable, the cost to replace the bellows is often much higher than the camera was in the first place.
Focus Accuracy – One of the primary functions of a camera’s lens is to accurately focus light rays onto a fixed plane (called the focal plane) where the film will “see” the image. If a lens is not accurate in it’s ability to properly focus light rays, your images will come out blurry. Under normal circumstances, a camera’s lens should always have accurate focus, but over time it might need some type of adjustment. The process of adjusting the focus on a lens is called “collimating” the lens.
There are two reasons why a lens might be out of adjustment. On folding cameras, the hinges or the shutter’s mounting plate (called the standard) might be loose or slightly out of position from where it should be. Solid bodied cameras are less likely to have this happen, but its still possible. The other reason is that at some point in the past, someone might have attempted to repair a camera and took something apart and did not put it back together. Maybe that person is even you. There are many repairs such as cleaning a shutter which involve removing one or more lens elements and getting those elements back into the exact required positions can be difficult. Even a variance of a fraction of a millimeter can have dire consequences for focus.
Of all the repairs mentioned in this article, checking for proper focus is actually pretty easy, but it requires a few specialized tools. I will cover this in greater detail later in this article.
The idea of cleaning a shutter can be a pretty ambitious job on certain models of cameras. For this reason, I hesitate to even write this part of the article, but I’ve done it enough times on certain types of cameras that I think it is a pretty repeatable process. There have been many designs of shutters over the years, some of which are very complex. If you have little to no experience opening a camera, I strongly advise against messing with any type of focal plane shutter or any kind of electronic shutter like that on a Yashica Electro.
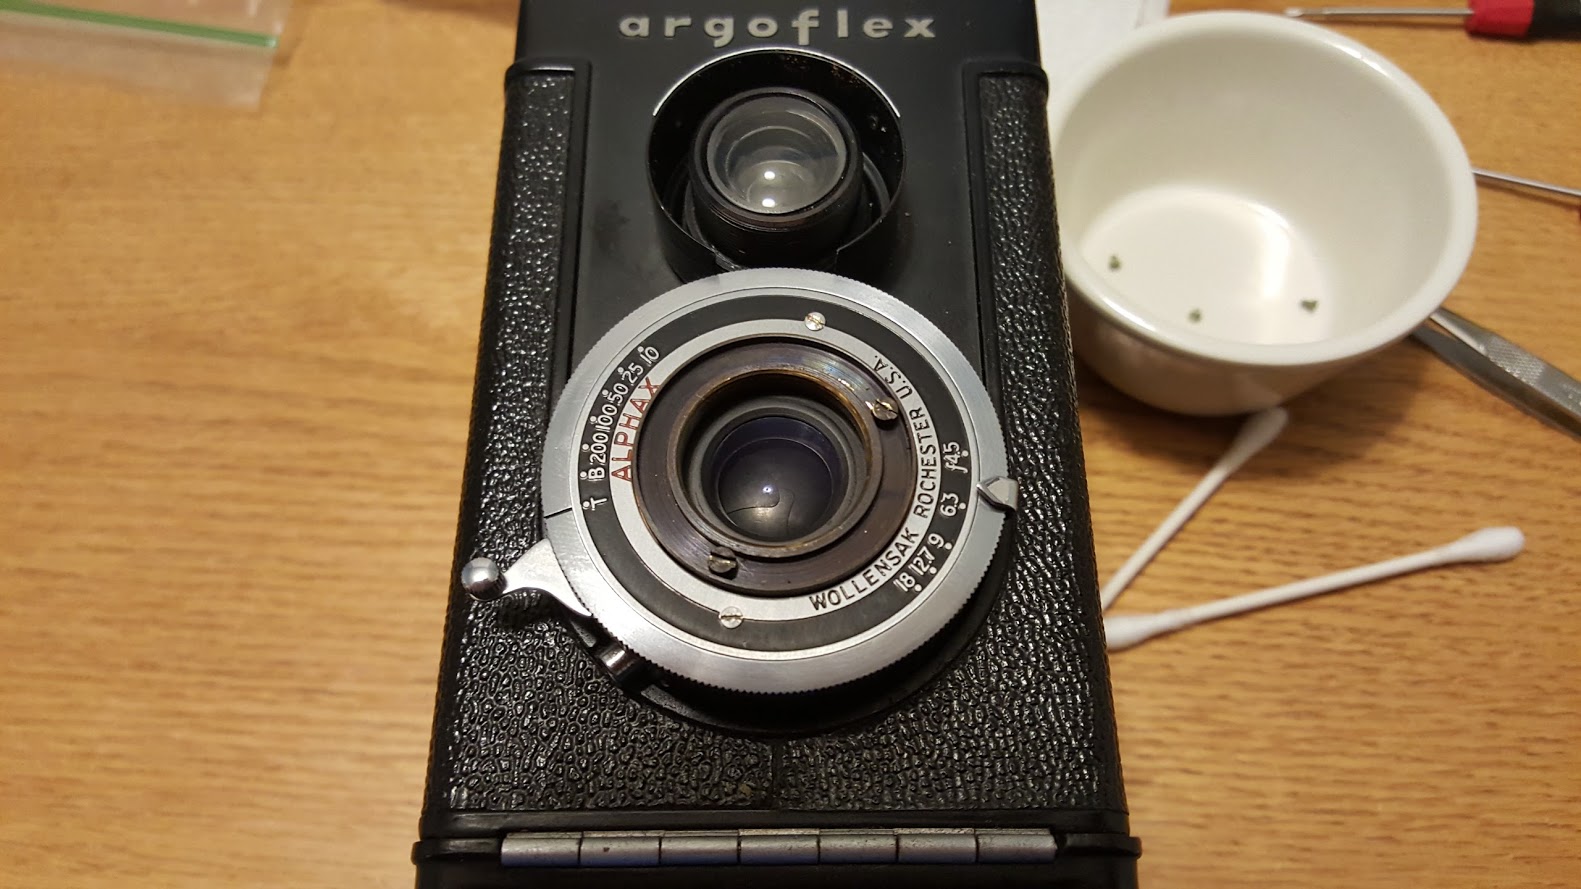
I’ll go even further and specifically say that if you’ve never done this before, you should stick with mechanical leaf shutters like the Alphax, Rapax, Vario, Prontor (I and II) and Compur (Rapid and non Rapid) shutters. Many of the German shutters like the Compur have been cloned by Soviet and Japanese companies, and I’ll include those in the list of “OK” shutters. My Kuribayashi Karoron has a Carperu shutter which is nearly identical to a Compur shutter and was simple to clean.
These shutters are often found in TLRs and folding cameras. The great thing about these kinds of cameras is that in most cases, the shutter is really easy to remove from the camera. You can still clean a shutter while mounted to a camera, but you want to avoid excessive cleaner on the bellows. A little bit is fine, but you definitely won’t want to douse the shutter while still attached to the camera.
For the rest of this article, I’ll assume you’re working on one of the many hundreds of different folding cameras made from the 1920s through the 1950s. If you want to do this on a non folding camera like a Canonet rangefinder or Argus C3, you can still do it, but you’ll usually need to go through the front of the camera. Look for instructions specific to those models for help.
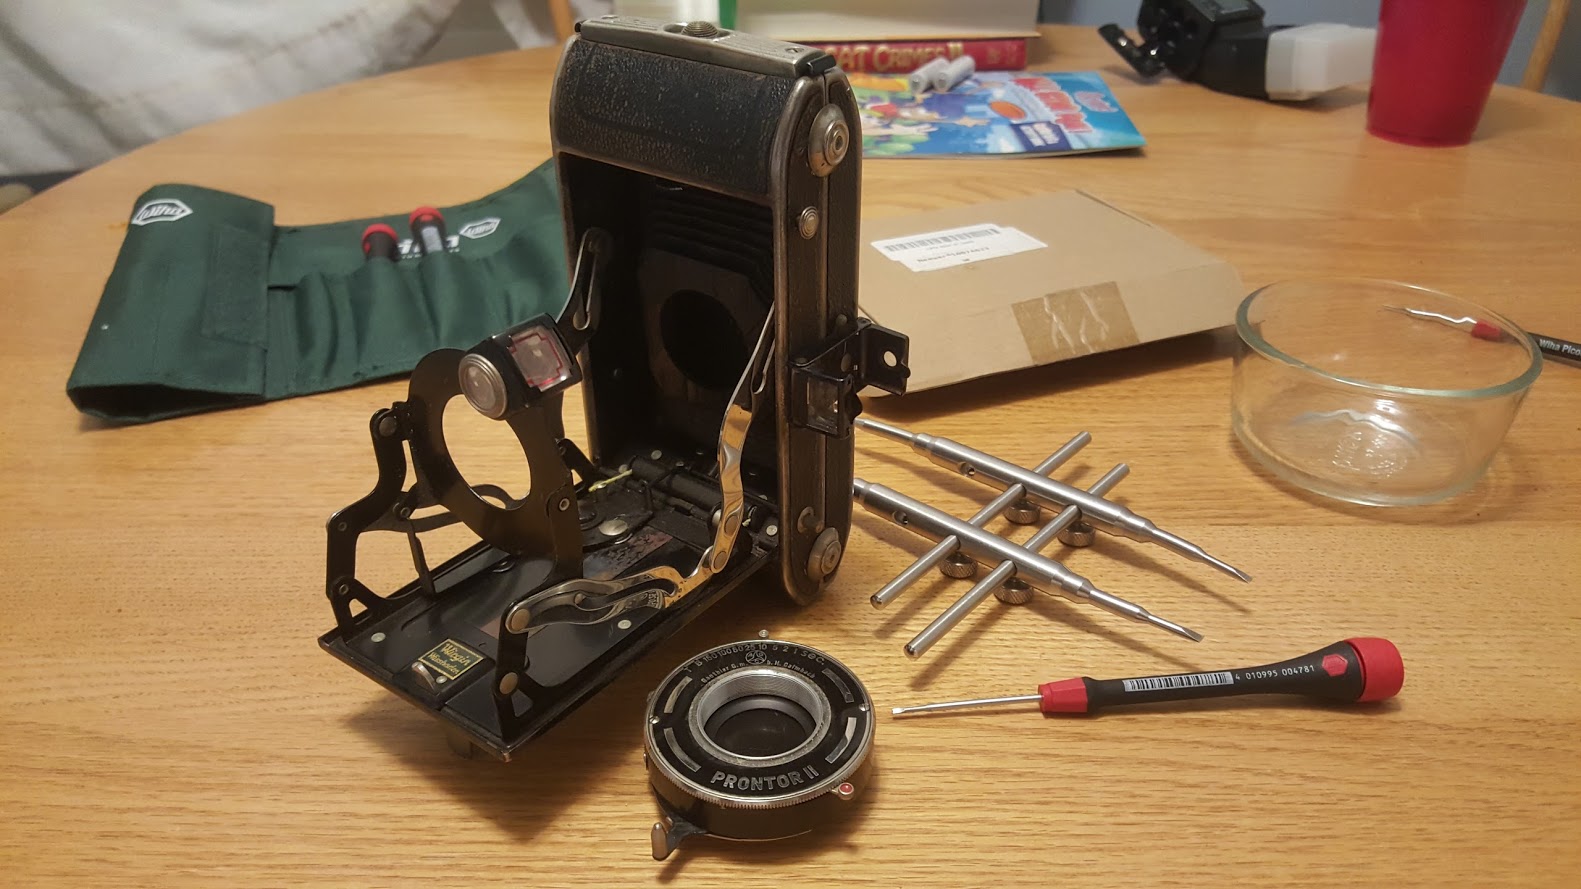
Before thinking about cleaning a shutter, you will need a few specialized tools like a lens spanner and some precision screwdrivers.
Amazon sells the Neweer Curved Tipped Professional Lens Spanner for about $15. The product description says its for DSLR cameras, but it works fine on any camera.
There are quite a few options when it comes to precision screwdrivers, but the set I use is the Wiha 26193 which can also be found at Amazon for about $45.
You’ll also need something to clean the shutter with. The product that I use and is often recommended by many other collectors is Ronsonol lighter fluid. Ronsonol is made of something called naphtha oil that you can actually buy in bulk from a hardware store, but I prefer the brand name stuff because it comes in a sequeezable bottle with a precision nozzle that makes it really easy to apply where you want it. You can buy a 12 ounce bottle from Amazon for about $8.


In addition to the Ronsonol, lens spanner, and good screwdrivers, you’ll also need the following things.
- Many Q-Tips (I prefer the brand name ones as they tend to hold up better)
- Paper Towels
- Something to hold small parts like a 7-day pill box or something similar
- A small glass bowl large enough to hold the entire shutter, but not too big that it would waste space (I use a small Pyrex dish)
- A smartphone or some kind of digital camera
Once you have everything you need, find a spacious and well lit area to work. The key to any type of camera repair is to always take your time and have some kind of organization system. Some people will go the extra effort to get a shallow Tupperware container and put the camera in the container while working on it. That way, if a spring or screw falls out, it will land in the container instead of on the floor. I probably don’t need to tell you that camera parts can be incredibly small and if you lose a screw, its unlikely you’ll find a suitable replacement.
Speaking of screws, one other bit of caution is that most (not all) camera screws are made out of brass. This is bad for two reasons. For one, brass is a softer metal, so it it easier to strip the threads or mangle the screw head, but secondly, brass is not magnetic, so you do not have the benefit of using a magnetized screwdriver.
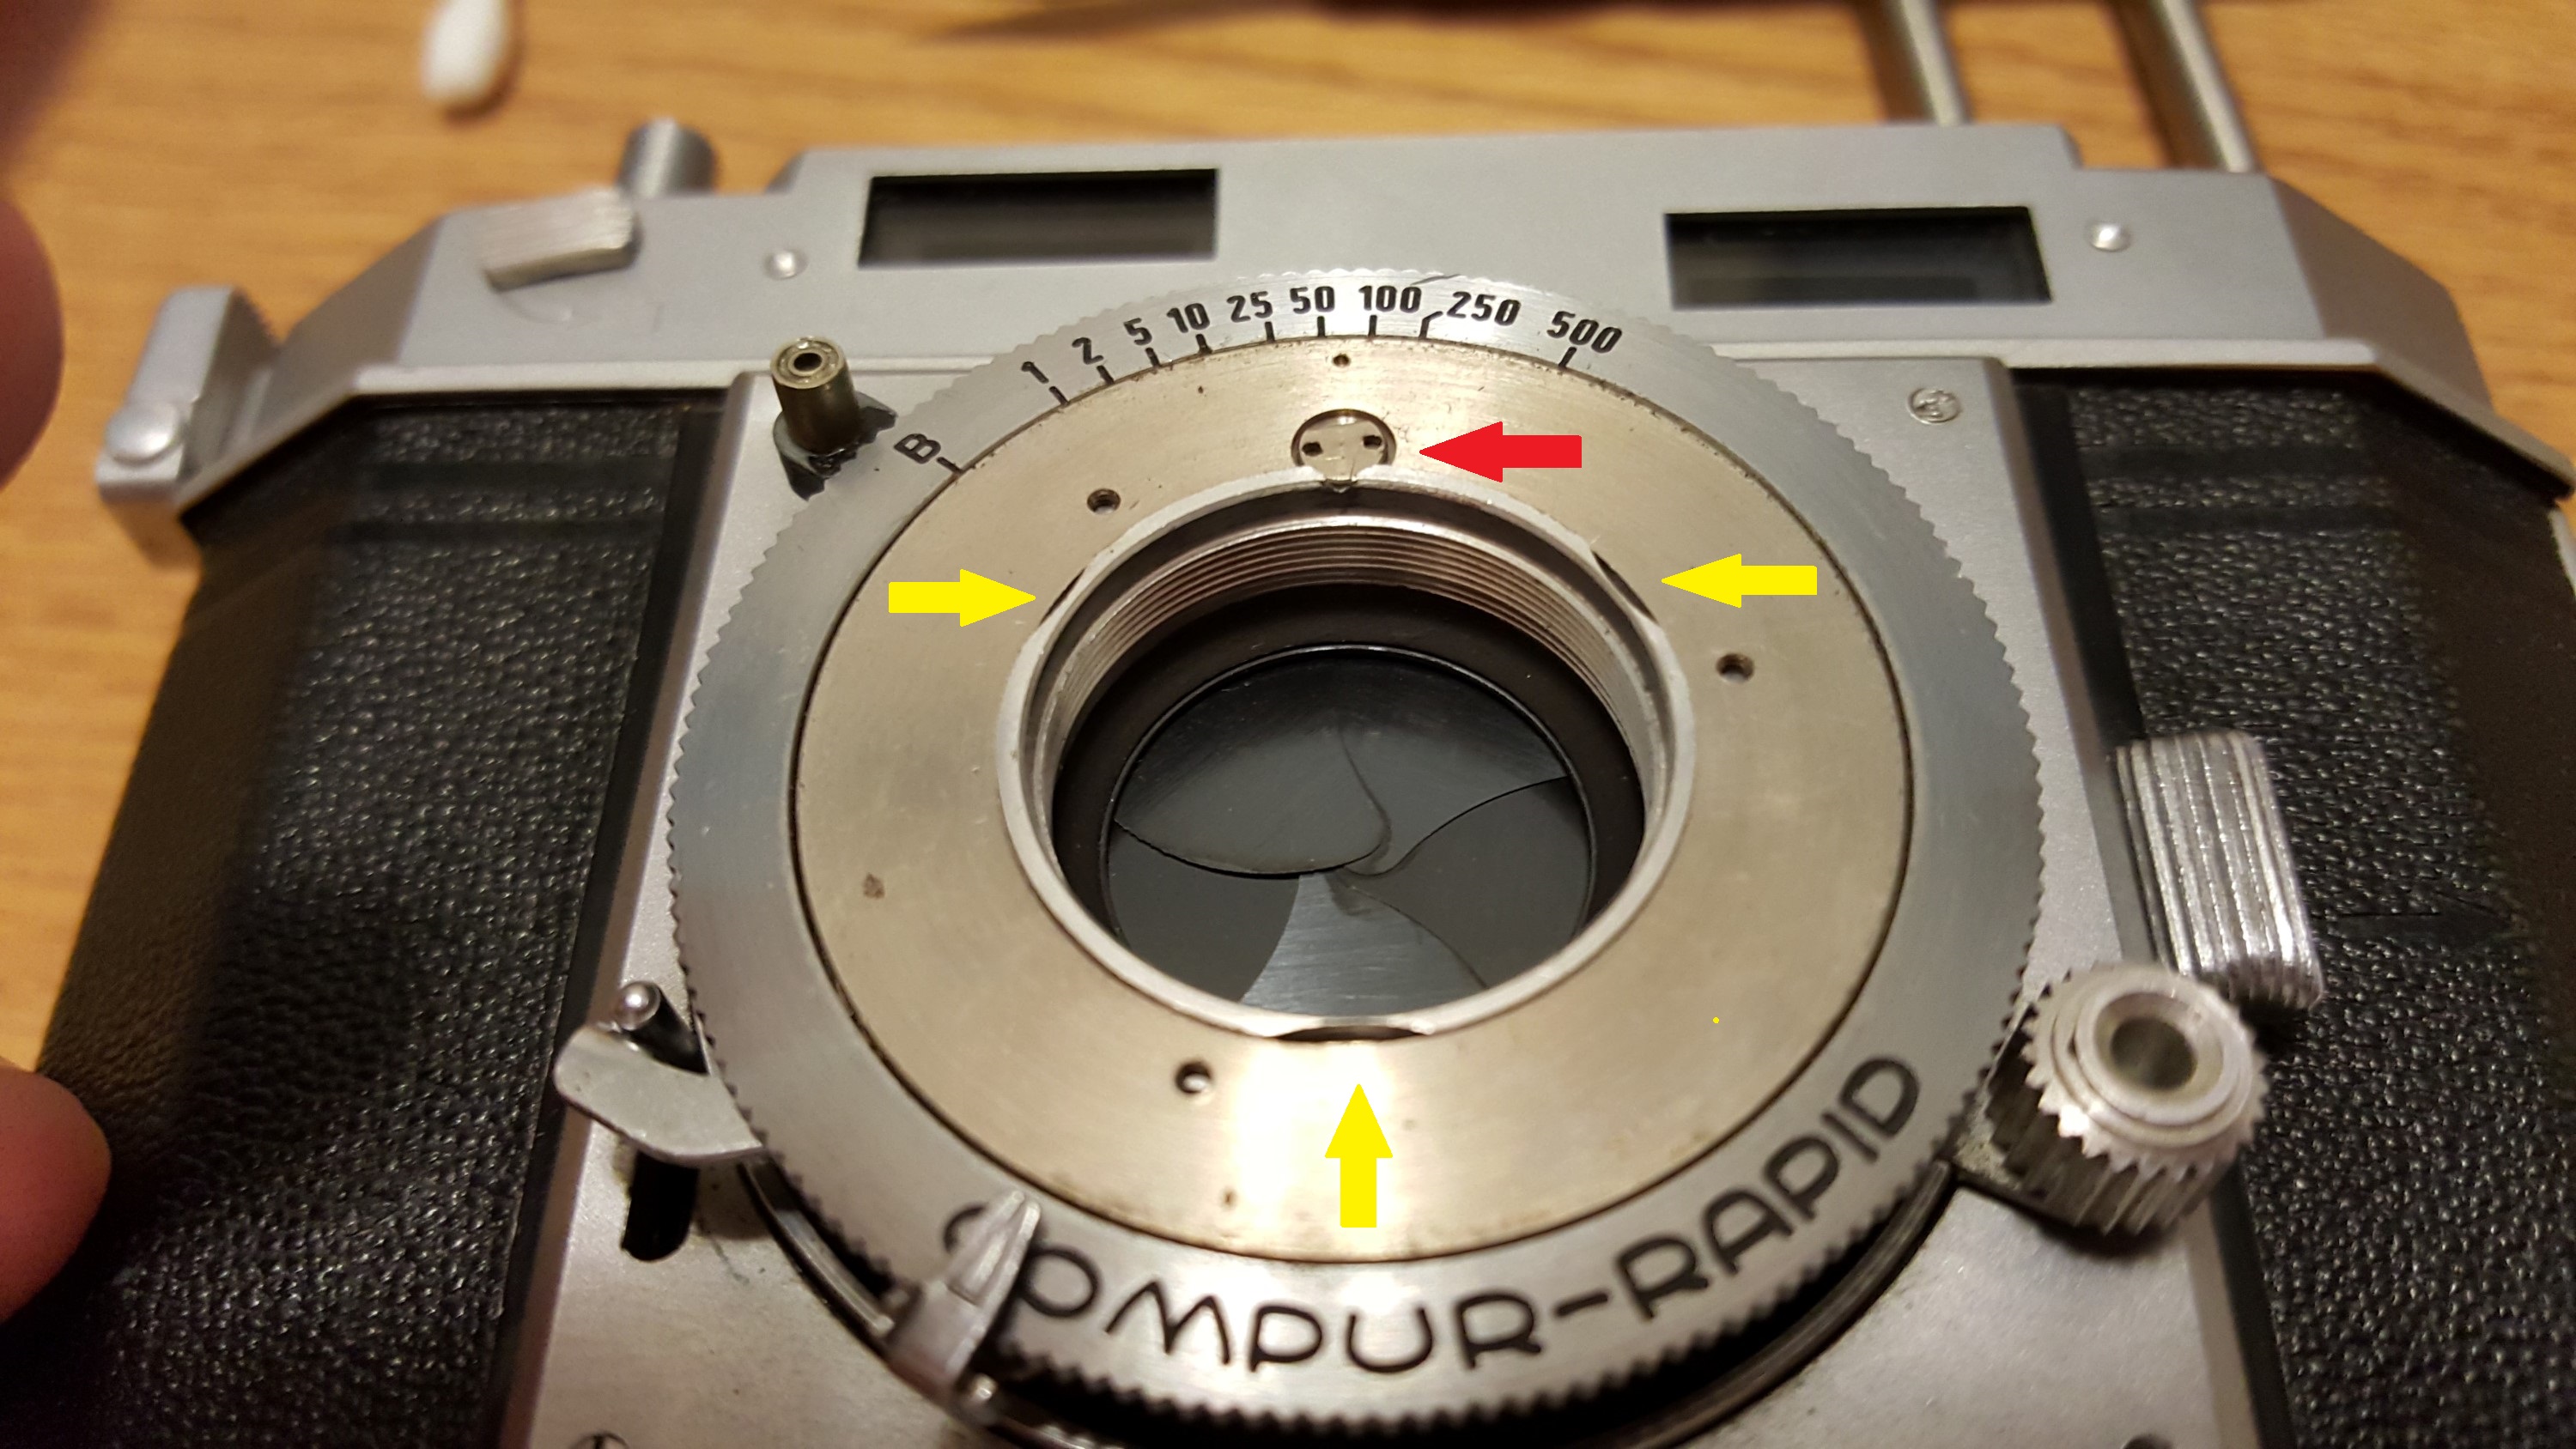
Almost all folding cameras have the lens attached by a large threaded ring on the inside of the film compartment. It is much easier to do this on medium format roll film cameras like the Certo Super Sport Dolly, Zeiss Icarette, AGFA Isolette, and any of the hundreds of variants of these cameras. It can still be done on smaller 35mm, 127, or 828 film folding cameras, but since the film compartment is smaller, you have less space to work with.
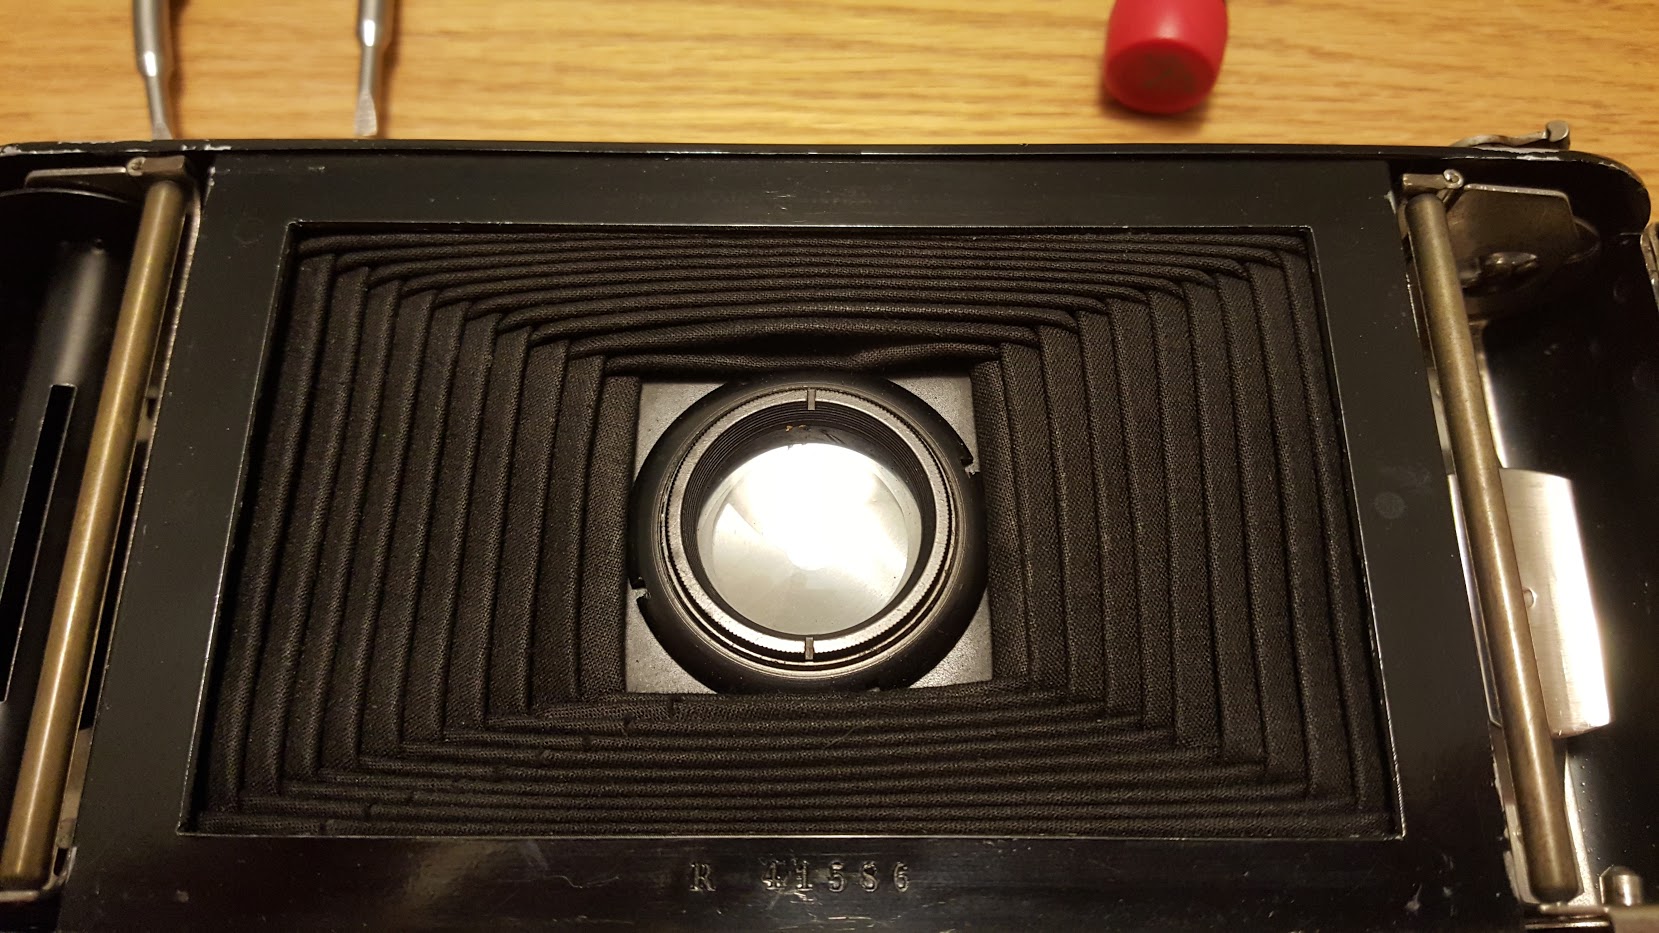
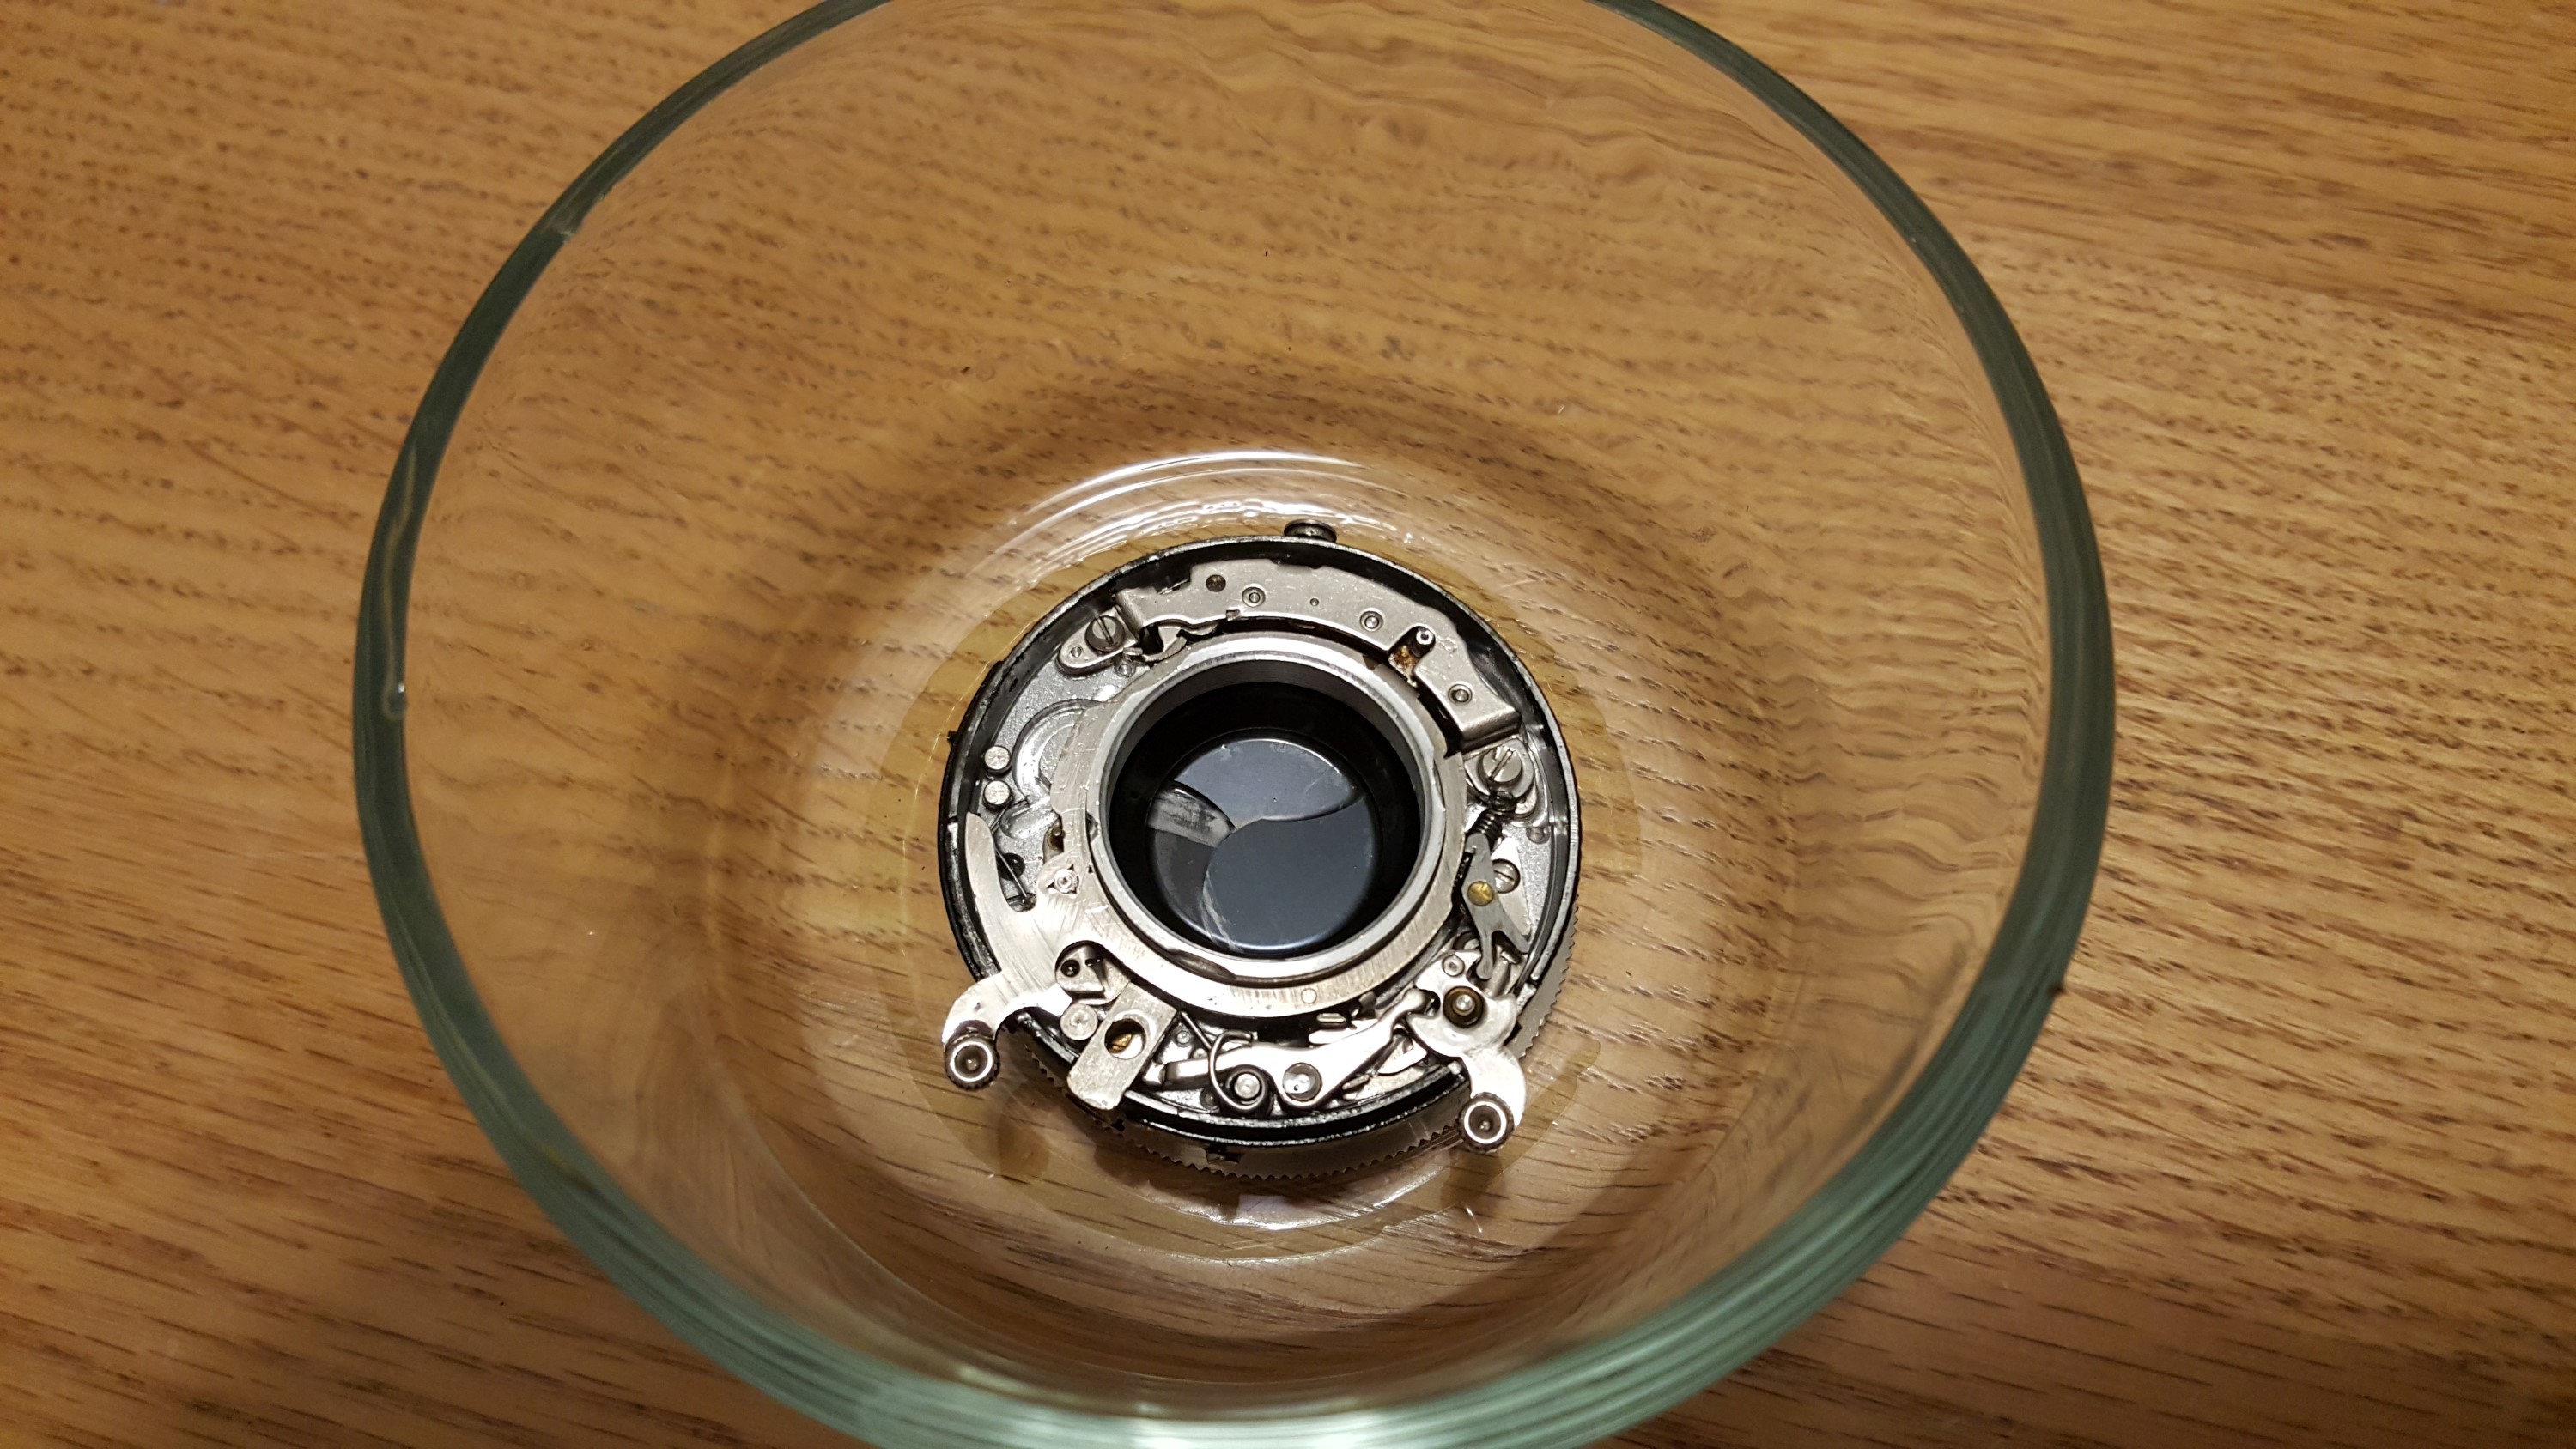
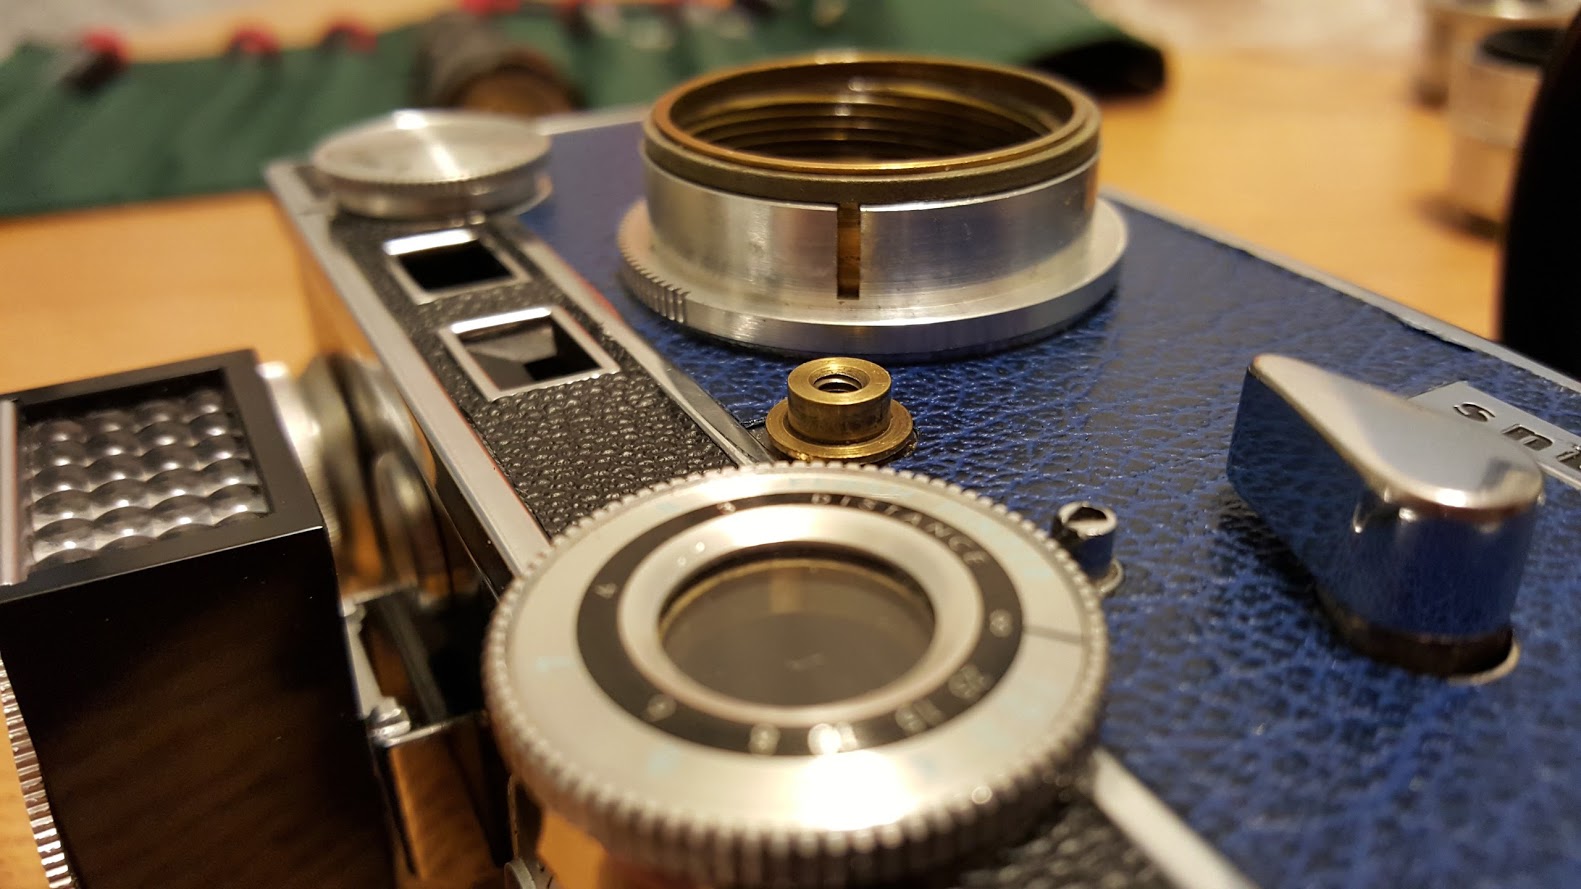
With the camera folded shut, open the film compartment and look for where the back of the shutter comes into the film compartment. Most cameras have a rear glass element that is here. Sometimes it is easier to remove the rear glass element first, but on other cameras it’s not necessary. There should be a very obvious ring around the shutter that is holding it into position. In the image to the left, the shutter ring is the outer ring. You can see a second ring with notches, but that’s the inner lens element.
In every folding camera I’ve cleaned, the shutter ring has notches in it for a lens spanner. Using your lens spanner, loosen the ring, but be very careful to not let it slip out of your hands and nick either the bellows or glass element. Usually once you loosen this ring, you don’t need the spanner tool anymore. It should spin pretty freely with your fingers.
Once this ring is removed, the shutter is now loose inside of the camera, so you’ll need to be careful when opening the front of the camera as the shutter can fall out. Also, on some cameras there may be small round spacers in between the shutter and the metal plate it was mounted to. These spacers can be made out of metal or paper. Be careful that you don’t lose these spacers, or anything else when opening the door.
Assuming the shutter came out of the camera without any issues, you’ll notice the bellows stays retracted in the camera. Here is your chance to clean the insides of the camera that aren’t easy to reach. There is usually a large spring for the camera door that is covered in dust and grime. Use your Q-tips and rubbing alcohol or glass cleaner and clean the inside of the camera of any excess gunk.
Once you start working with the shutter, here is where that digital camera comes in handy. Take lots of pictures! I cannot stress enough how important it is to remember exactly how the shutter looked before you took it apart. As you remove each piece, take another picture. Its a digital camera, you can delete them later.
I cannot stress enough how important it is to remember exactly how the shutter looked before you took it apart. As you remove each piece, take another picture. Its a digital camera, you can delete them later.
Before you can clean the shutter, you need to remove all of the glass elements. Most shutter/lens combinations on folding cameras have lenses in 3 groups. There is a front, middle, and rear element. The rear element is usually the easiest to remove. On most cameras, it just unscrews. You might need to use your lens spanner to break it loose, but it should not be hard to remove.
The front element usually unscrews also, but depending on the design of the camera, there might be a metal post that sticks out of the lens housing that acts like a stop so what then you are changing focus, it does not continue to turn. These posts sometimes have slots in them to be loosened by a screwdriver, but I have also seen them without the slot. In that case, they need to be unscrewed by gripping them with needle nose pliers.
If there is no post to remove the outer element, there might be set screws which are very tiny screws around the perimeter of the metal ring around the outer glass element. If you see these set screws do NOT remove them all the way. You merely need to loosen them about half a turn and then the glass element should lift off. If you cannot lift the glass element out, turn the set screws another half turn, but like I said, you do not want to remove set screws as they are EXTREMELY tiny, and very hard to get back in their holes.
Once the front element is out, you may or may not see a middle lens element. If there is, the middle element usually is the hardest to remove. On some cameras, it can be unscrewed by hand, but more times than not, it requires help from either your lens spanner, or a grippy tool. If you are having trouble getting the middle element out of your camera, its best to do some research online and find solutions specific to your model.
Now that you have all of the glass elements removed from the shutter, you can put them aside for cleaning and safe keeping. The entire process of cleaning a shutter takes about 3 days, so make sure the glass elements stay somewhere safe.
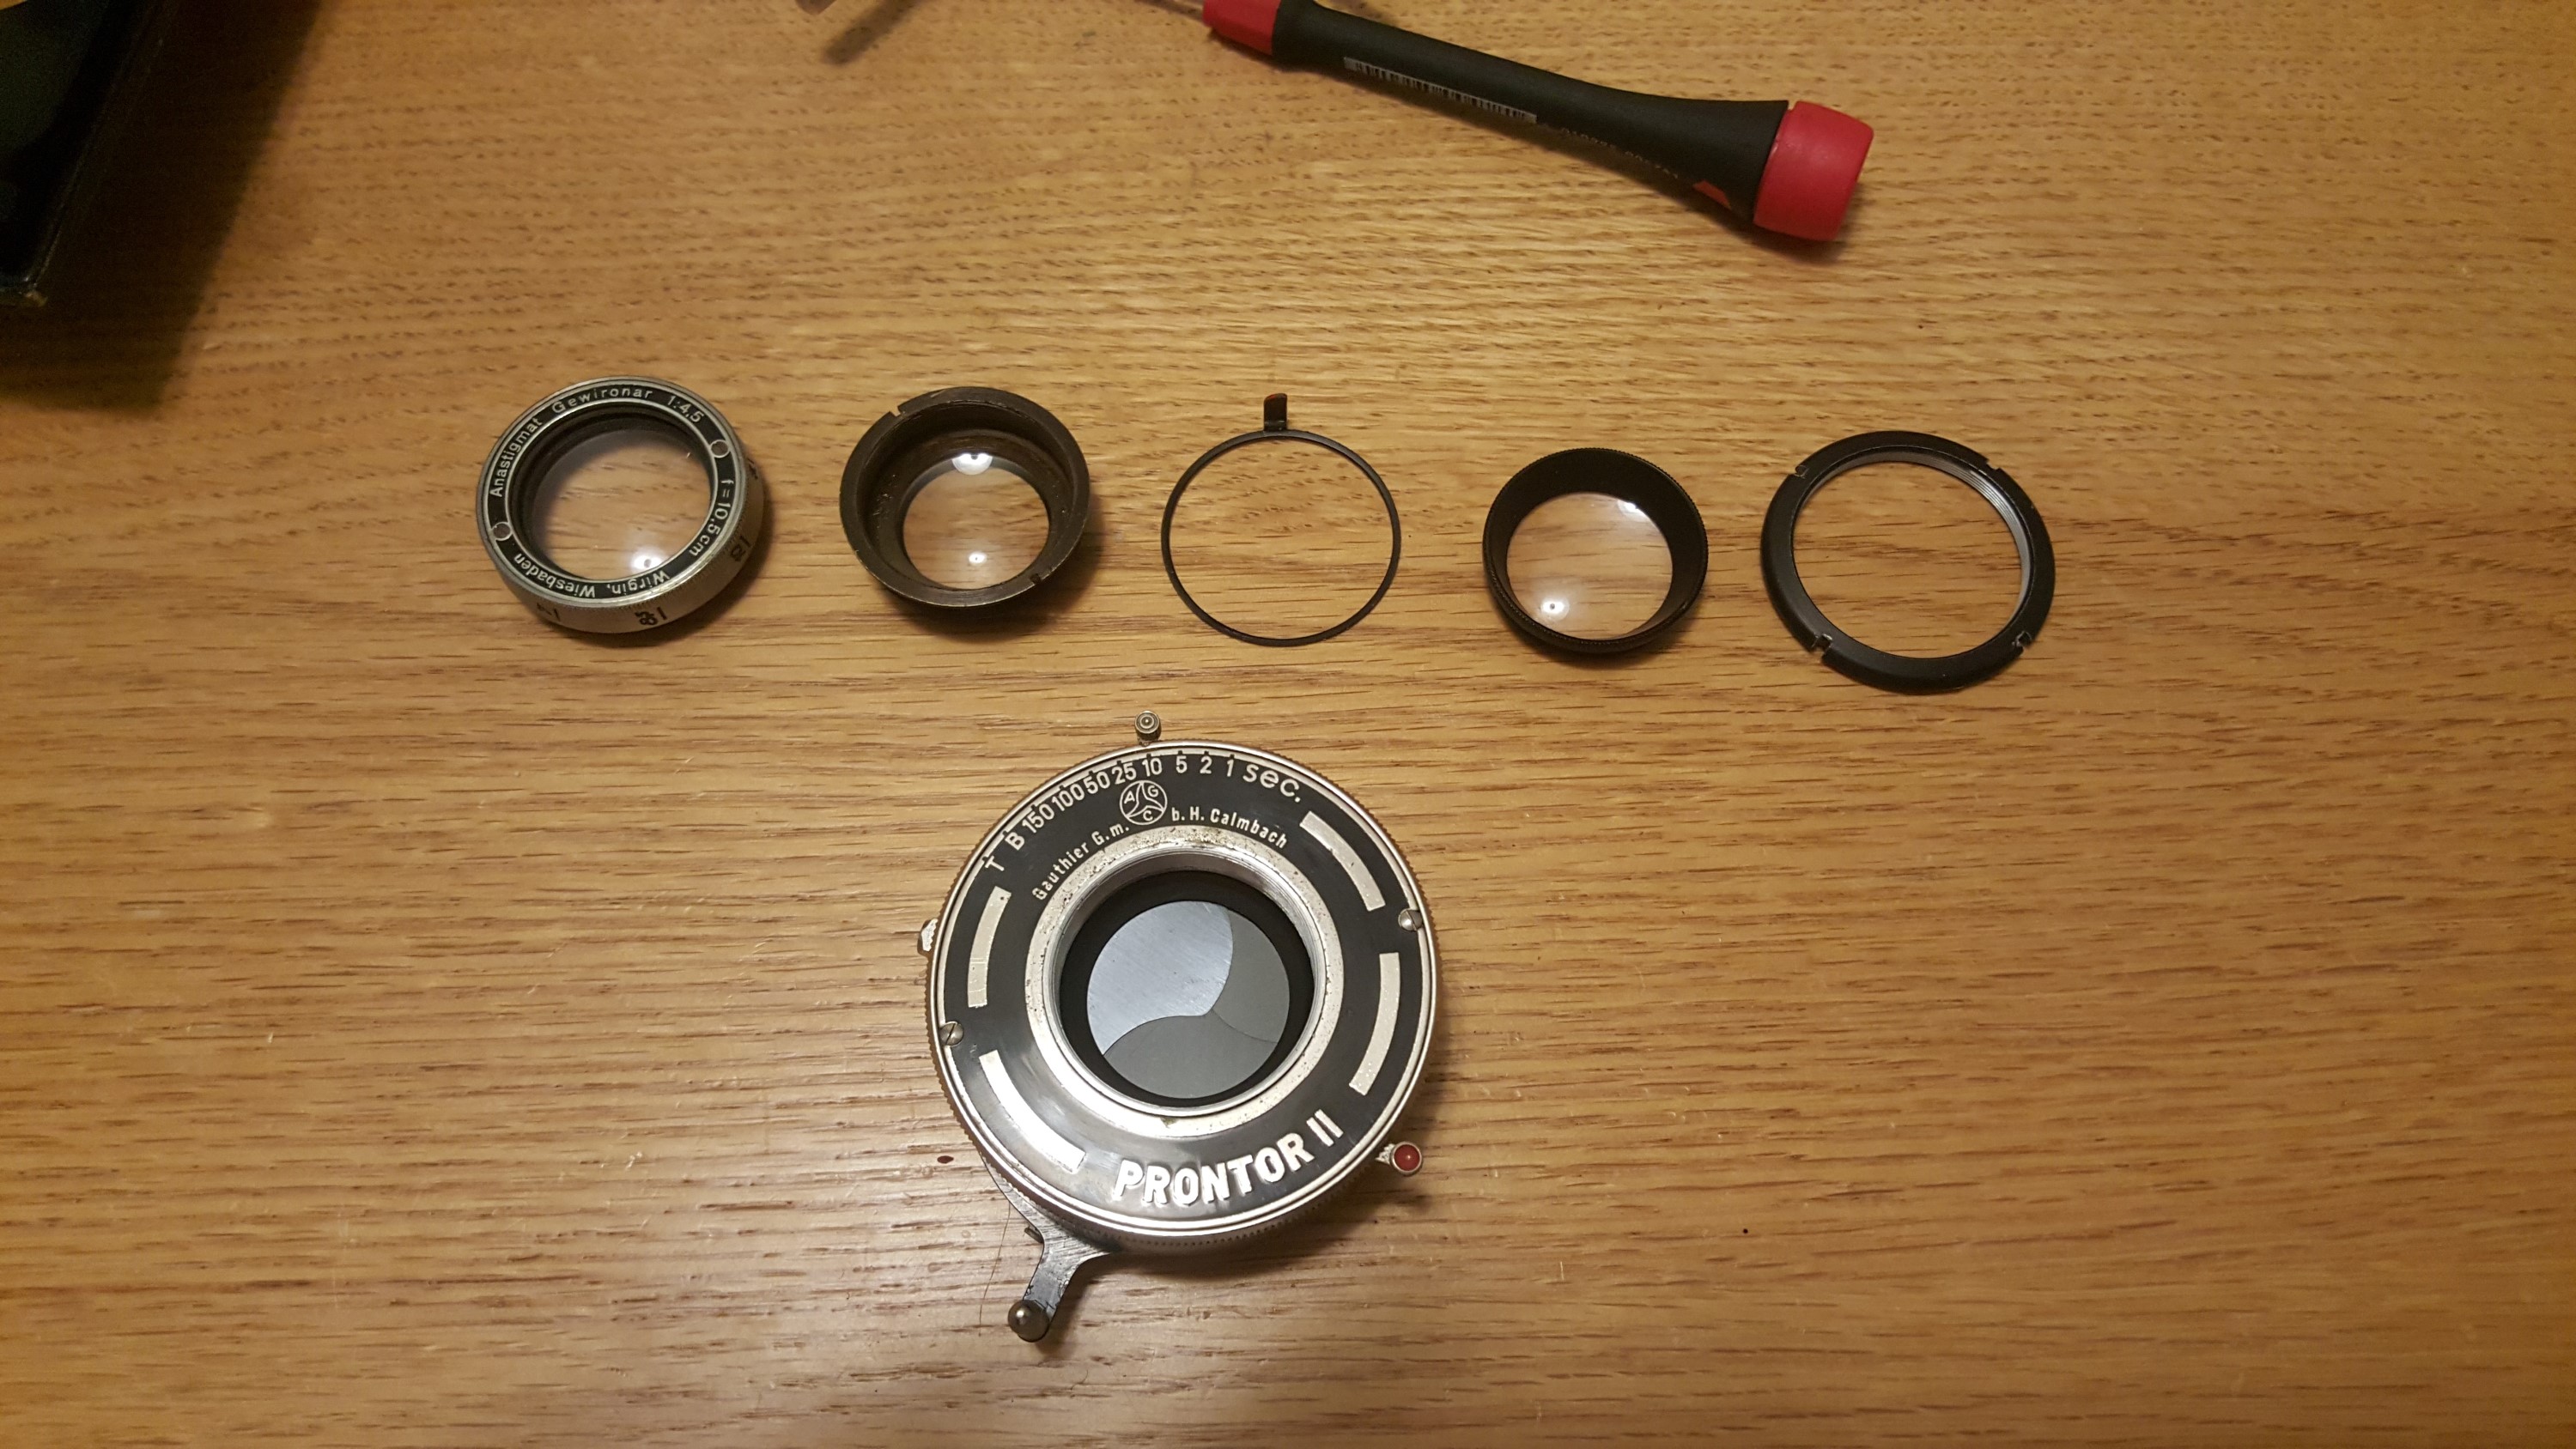
The picture above shows a Prontor II shutter from a Wirgin Auta folding camera. I labeled all of the pieces in the caption above. Even if you are not working with a Prontor II shutter, you should see most of the same parts. As long as you keep taking pictures with your digital camera in between each piece, you should have no problem putting everything back together.
 Next, you’ll need to remove the cosmetic front plate on the shutter. On the Prontor, there are two screws at the 9 and 3 o’clock positions. These screws are very long, so be careful when removing them.
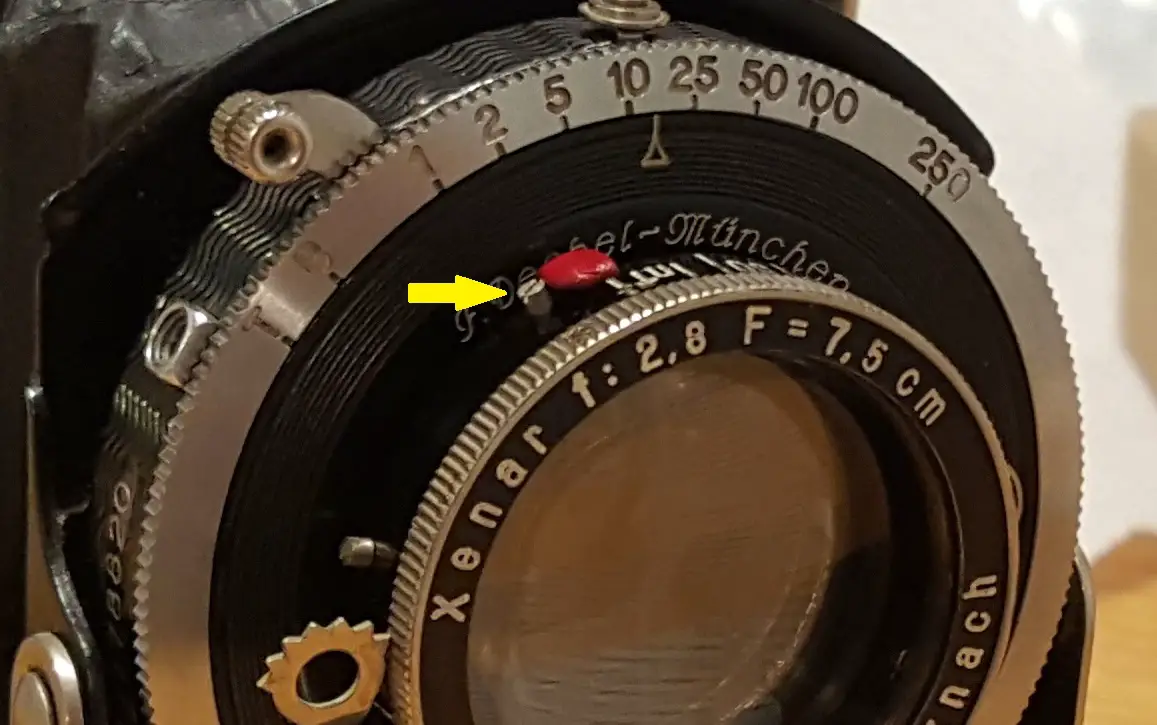
If you are working with a Compur shutter (or one of it’s clones), there are usually two plates. An outer plate which is usually held in by 2 or 3 screws, and then an inner plate that has a small rotating “lock” in the 12 o’clock position. This lock has two small divots which need to be rotated 180 degrees to unlock the inner plate. You can use your lens spanner to rotate the lock. The image to the left indicates the circular lock with a red arrow.
Once this lock is turned 180 degrees, the entire inner plate can be rotated counter clockwise. You’ll notice that there are 3 circular indentations in the inner ring. In the previous image, yellow arrows point to these indentations. These 3 indentations must line up with 3 similarly sized protrusions on the inner plate. You’ll only need to rotate the inner plate about 20 degrees counterclockwise and you’ll see that these protrusions line up. Once they are lined up, the inner plate lifts off.


Once you’ve made it this far, there’s only one more piece to remove from the shutter. I don’t know the proper name for it, but I call it the “speed ring”. On both Prontor and Compur shutters, this ring sets the speed of the of the shutter by moving various pins and springs. The catch with this piece is that the shutter will not properly work without this ring in position. You’ll still be able to fire the shutter, but only at one speed. Also, on Compur shutters, this ring holds other things in place so be careful when removing it. I’ve said it a number of times, take many pictures. Getting this ring back into position is not difficult, but it must go in a very specific way so having multiple “before” pictures will come in handy.
Go ahead and lift the speed ring out and you are now done taking things apart. I mentioned earlier about how some of my methods are controversial. Some will tell you that you shouldn’t stop here and that you should remove everything to properly clean it. While I won’t argue that point, I feel that this is the point where removing and reinstalling pieces gets exponentially more difficult. I feel as though you can still do a very good job cleaning the shutter by stopping here whereas if you were to keep going and mess something up, you’ve just permanently damaged the shutter.
Now comes the fun part! Cleaning. You’ll want to clean any old residue off any of the parts you’ve already removed, including the speed ring. Its not necessary to stick Q-tips into any of the gears inside of the shutter since you are going to soak the whole thing.
 Take your small dish and put the entire shutter inside and generously squirt Ronsonol over the entire shutter. You are literally dousing the entire thing. There is nothing left in this shutter that could be damaged by the lighter fluid, so don’t hold back. While dousing the shutter, cock and fire it a couple of times. Without the speed ring, it will only fire at one speed, but thats OK. You just want to get the pieces moving. I will swish the excess fluid all around the shutter in the dish and count to 20, let it sit for 5 minutes, then do it again and repeat a couple more times.
Once you feel you have liberally soaked the shutter in the lighter fluid, pour the excess out and put the dish and the shutter pieces on a shelf and let it dry overnight. Repeat this process again the next day, and once again on the third day. After 3 complete cycles of cleaning and drying, test fire the shutter a dozen or so times at each speed and if you are satisfied that the speeds are working correctly, you can move onto the next step.
Sometimes, some debris will get on the shutter or aperture blades themselves. You can wipe the blades with a Ronsonol soaked Q-tip by gently dragging the Q-tip in the direction of the blades. You’ll notice that both shutter and aperture blades overlap each other in one direction. Always go “down” from the higher blade to the lower one, because if you go the other direction, your Q-tip could snag on the edges of the blade. It is common for the Ronsonol to slightly discolor the surface of the blades while drying. As long as you are sure that the discoloration is not debris, you don’t need to worry about it.
Once everything is clean and the shutter is working correctly, direct your attention to the glass elements. Clean them as you would any lens, with a soft microfiber or cotton rag and some glass cleaner. Keep in mind that all vintage lenses have some degree of dust or imperfections inside the glass. Although it is good to be thorough when cleaning the glass elements, do not be a perfectionist here. Minor specks of dust or slight surface scratches will not have any impact on the images.
Keep in mind that all vintage lenses have some degree of dust or imperfections inside the glass. Although it is good to be thorough when cleaning the glass elements, do not be a perfectionist here. Minor specks of dust or slight surface scratches will not have any impact on the images.
Refer back to your digital images you took while disassembling the shutter when putting it back together. I’ve noticed that on Compur shutters specifically, there is an inner ring that sometimes pops out of position. This ring also has a long spring that acts as a tensioner. Make sure this spring has not come off it’s posts. If it has, use your smallest flat head screwdriver to reseat it. Keep firing the shutter while putting it back together to make sure it is working correctly. The last thing you want is to get the camera entirely back together, only to have to take it apart again.
 So that’s it? If the shutter originally had lubrication in it that was the cause of the dried up goo in the first place, shouldn’t I add new oil?
That seems like a pretty straightforward question, but the answer isn’t quite so straightforward. Yes, shutters were oiled when they were new and yes, soaking them in lighter fluid removes that oil, so logically it makes sense to put the oil back after cleaning it. This is where my opinion differs from some.
Any time you have any mechanical device where there is metal on metal contact, you should have some kind of lubrication to keep those parts from wearing down. The mere fact that we have these half-century old plus cameras still in good working order means they were designed to last a long time. As much as I am a proponent of using old cameras and not letting them sit on the shelf. I neither have the time, nor the income to consistently shoot these old models. I shoot a roll or two of film in them, get some results, post my reviews and then they sit on a shelf. In the 18 months I’ve been building my collection, I’ve only ever shot the same camera maybe 4 times.
I choose not to put new oil in my shutters because the proper amount is so small, that even a normal sized drop in the wrong location could be too much. I believe that the risk is much higher of doing more harm to the shutter by over-oiling it, than not oiling it at all. I read somewhere where Compur shutters were designed to run completely dry. Their service life was reduced sure, but they certainly can handle a few rolls of film here and there.
The only time I ever put any kind of new lubrication in a camera is when I am cleaning a lens helical for sticky focus. I’ve cleaned a couple AGFA cameras that had a nearly frozen focus ring, and that required the removal of the old green goo, and I replaced it with a tiny amount of white lithium grease. Otherwise, I do not put new oil in my shutters. Like I said at the top of this article, I know some people wont agree with me, but all I can say is that of the shutters I’ve cleaned, they’ve remained functional so far.
The good news is, if I ever have to go back and lube them, opening them back up again isn’t hard, so I can just add some oil in the future if I have enough reason to change my stance on this.
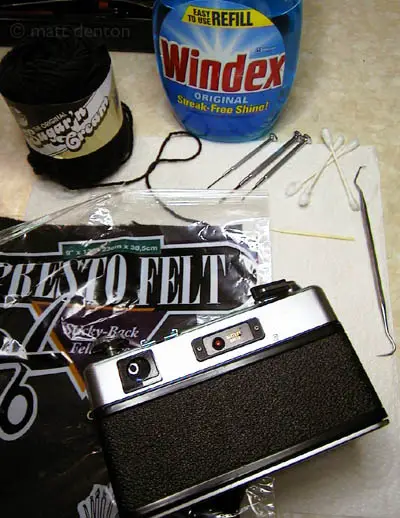
Replacing light seals is not difficult, but it is tedious and messy, so while its definitely not fun to do, it is something that the average person should be able to accomplish themselves. Matt Denton has an excellent write up on his site on how to do this. Rather than repeat the entire process here, I’ll just give a quick summary, but I recommend reading his entire tutorial.
On SLRs, the outer edge of the mirror often has a foam or sponge “bumper” that helps soften the movement of the mirror when the shutter is released. Although this piece of foam has nothing to do with sealing light out of the camera, it can decay and should be replaced as well.
There are many kits online that are pre-made for specific models. If you’d like to order one of these, it will make the installation easier, but at a greater cost. It’s worth mentioning that it doesn’t really matter what your new light seals are made of. You don’t have to use the same exact open-cell foam that the camera originally came with. As long as what you use is black, close to the right shape, and blocks out light, it will work fine.
For my cameras, I used a combination of black wool yarn and adhesive backed black felt. I purchased a roll of black yarn and a single 8.5″ x 11″ sheet of adhesive backed black felt from an arts and crafts store when I did my first light seal replacement about a year and a half ago. I spent $5 total on the supplies and since then I have done light seal replacement on at least a dozen or more cameras and still have a majority of the materials left.
Before you get started, make sure you have everything on this list (or at least something comparable).
- Many Q-tips
- Many Flat wooden toothpicks or something similar like bamboo skewers
- Windex or some other alcohol based cleaner
- 100% cotton or wool black yarn (do not use acrylic yarn)
- Adhesive backed black felt
- Some type of rubberized adhesive like Pliobond or contact cement (do not use Crazy Glue or anything similar)
- Piece of paper or masking tape cut to the size of the film opening on the back of the camera
- Scotch tape
- (Optional) A metal pick or small flat head screwdriver
The very first step is to protect the shutter and lens opening in the back of your camera. Cut a small piece of paper to the size of the opening and use your tape to seal it off so that no debris can get inside of the camera.
Many cameras have a felt or velvet strip on the outer edge of the door that is still in good shape. If yours has this strip and it doesn’t look damaged, leave it alone. If it is damaged or peeling, then you’ll want to replace it with a piece of black adhesive felt. Cut the felt to approximately the size of the old piece and stick it in the same location once the old material is completely cleaned off. Using your flat wooden toothpicks, or for the really tough stuff, use a pick or small flat head screwdriver to remove all of the old material. Try to use the wooden toothpicks as much as possible as the metal scrapers may scrape away some of the black paint inside of the film compartment. Keep going back and forth between scraping and cleaning with the Q-tips. Like I mentioned earlier, this is tedious, so take your time. Its better to do it right than rush the job and screw it up.
Once everything is clean, cut a piece of the yarn to the length of the channel in which it will be inserted. You’ll probably need to use one of your toothpicks to help shove the yarn into the channel. To assure that the yarn stays still, you want to use a couple of drops of Pliobond (or comparable adhesive) on the ends of the yarn to keep it in place. You do not need to glue the entire length of yarn down. Just a drop on each end is enough to do the job. If you ever need to redo this, you’ll appreciate only having a small amount of adhesive to clean off.
Many cameras have a small metal tab inside of the top light seal channel that resets the film counter when the door is opened. If your camera has this, you’ll need to cut the yarn to go under this tab. Do not cover it up or else it may prevent proper operation of the film counter.
For the SLR mirror, clean off the old stuff using Q-tips and Windex. Remember the mirror is very fragile, so do not use force. It may be unavoidable to put a couple of scratches in the mirror where you are cleaning the old material off, and if that happens, its not a big deal since that part of the mirror is not used when composing your shots, so just be careful. Once the mirror is clean, cut a piece of the self adhesive felt to the same size as the old stuff and stick it in position.
Now that you have everything in place, close and reopen the film door a couple of times to help seat the new material. You may notice that the door is a little more difficult to close than before. It is OK if its just a little bit tighter, but if you find that you have to use excessive force to close the door, or if the door won’t stay latched, then you may need to trim some of your new felt or yarn.
Once everything is done, leave your camera open in a well ventilated area overnight to be sure that the contact cement and cleaning products have had enough time to completely dry and evaporate.
Adjusting or Collimating Focus
To a novice, the idea of collimating a lens probably seems intimidating. I know it seemed that way to me the first time I heard someone talk about it, but checking the focus is actually quite easy if you have the right equipment. The hard part comes in doing something about it if the focus is off. In the case of a folding camera where something is out of alignment, it might be as simple as tightening a screw or even bending a strut to get the lens and shutter perfectly parallel to the film plane.
If however, someone has opened a lens and not put the glass elements back in the correct position, the repair is much more involved. In many of my reviews on this site where I clean a shutter, I talk about how important it is to count how many rotations of a lens element is required to remove it. If you do not install any piece of glass in a lens in the exact position that it was, your focus could be off. Often, I don’t actually worry about this because I always collimate the lens afterwards. In those articles, I refer to a future article where I explain how this is done, and this is that article.
First, we need to talk about what is needed to accomplish this.
Any camera with a large and easy to use viewfinder or LCD display and that has the ability to manually control aperture. You could use a film camera, but I find a digital SLR with a large rear LCD screen and live view works the best. I use a Nikon D7000 DSLR with live view enabled and the mode set to Aperture Priority.
A lens with a focal length of at least 100mm. The longer the better. For this I use a manual focus Nikkor 100-300 zoom lens. If you only have short lenses, those will work too, its just easier to use a long lens. This lens should also be known to have accurate focus. I find that older manual focus Nikkor lenses work the best because the infinity position is very easy to find. Newer autofocus lenses are often wishy-washy about what is infinity focus. If your camera has automatic focus, make sure it is turned off.
Some type of rigid ground glass with either a texture or some clearly defined markings. The idea of the ground glass is to act as a see-through film plane. It has to be something semi-transparent so that light will pass through it, but also with a texture or marking that you can focus on. I used a piece of acrylic from a cheap photo frame I bought at Target for $1.49 and cut it to the size roughly the size of a 35mm negative and another the size of a 120 medium format negative. I used some 200 grit sandpaper to dull the acrylic and apply a texture to one side of the acrylic. It is important that you only do this to one side of the acrylic. I used a Sharpie to make a circle with an X through the middle of it on the same side of the acrylic that I sanded. Do not put any markings on the non-textured side of the acrylic. Some people have suggested using tape or wax paper would work, but those are not rigid enough for precision focus adjustment. It is extremely difficult to make sure that the tape or wax paper is perfectly flat like film would be. Even the slightest ripple or curve will throw off the collimation.
A bright light source such as a flashlight or a bright lamp. You don’t need anything ridiculously bright, but ambient room light won’t be enough.
Scotch tape for securing the ground glass to the back of the camera.
(Optional depending on camera) Collimating a camera requires the shutter to remain wide open for an extended period of time. Older cameras have a “T” mode in which the shutter remains open for as long as you want. If your camera does not have a “T” mode, and only “B” mode, you can use a locking shutter release cable, or have an assistant who can hold down the shutter release button while you work.
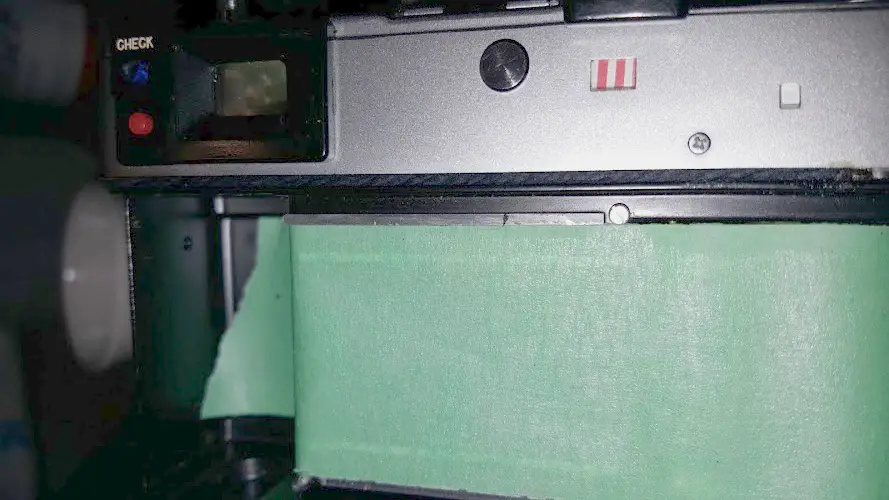
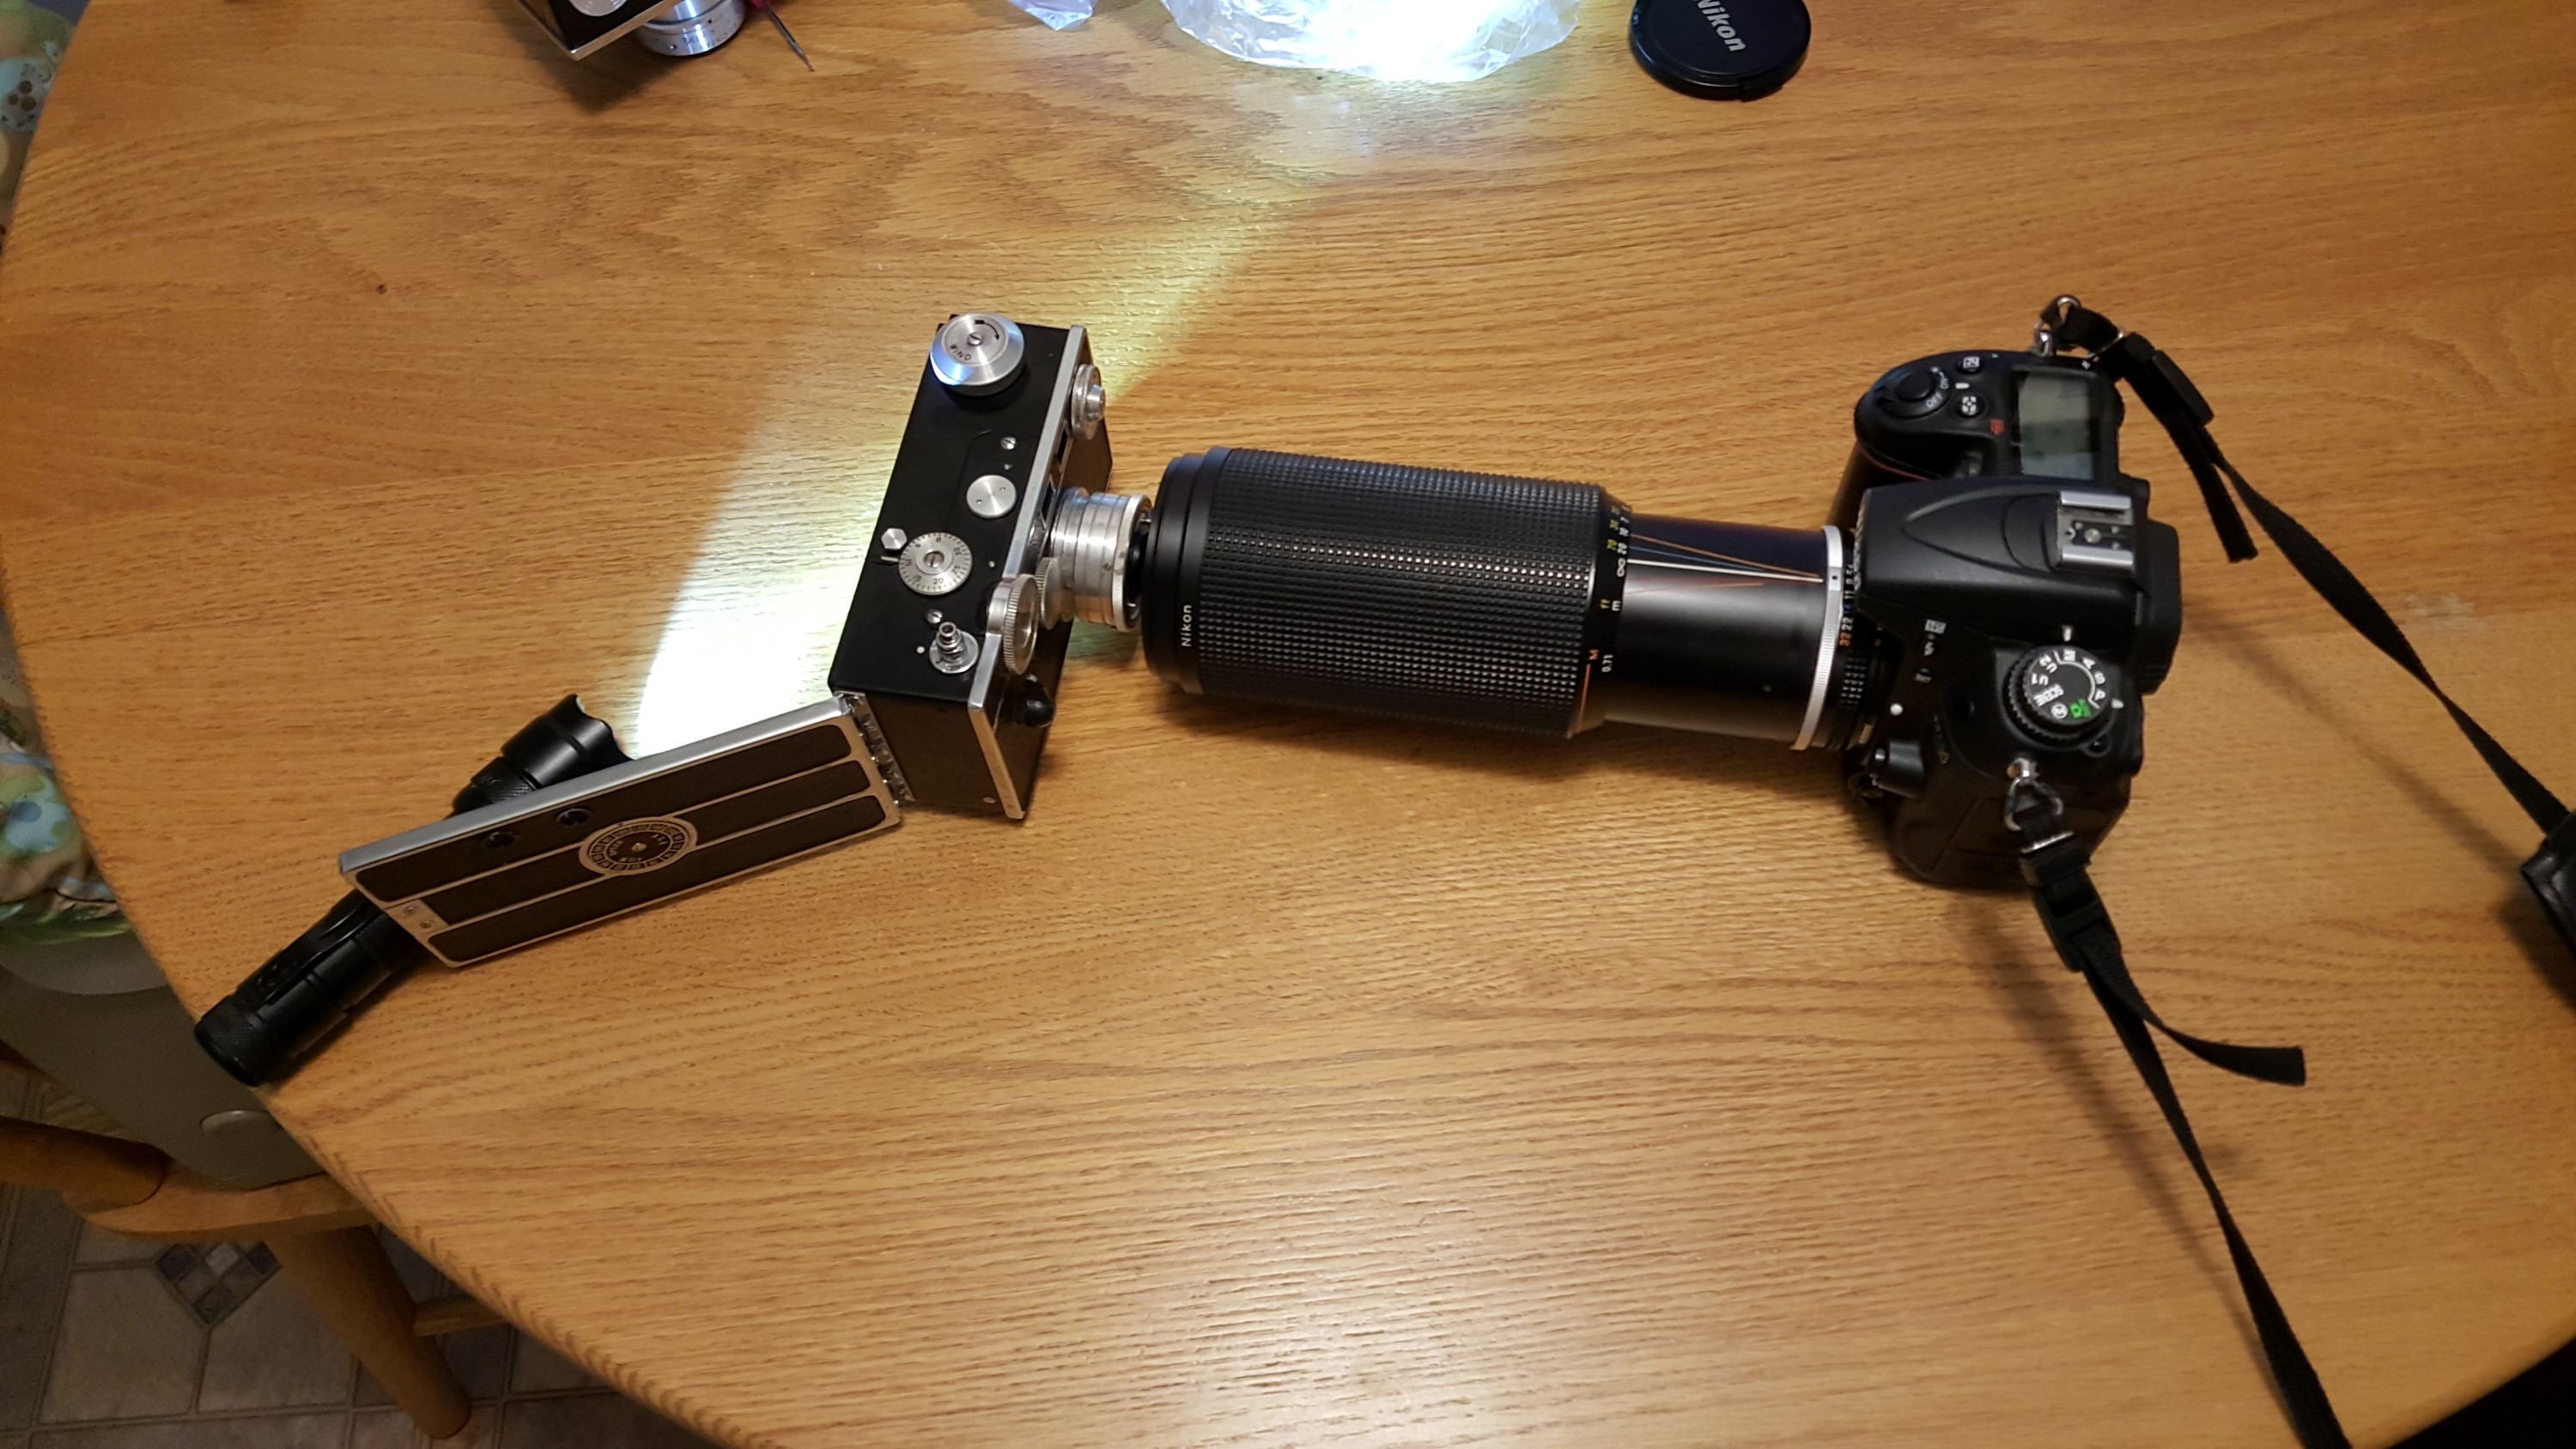 Once you have everything you need, find a wide open space on a table or countertop where you can work. Setup everything like the image to the left. You will have your digital camera with long lens on the right, facing the film camera that is being collimated. The distance between the lenses is not super important, but the height is. If the lenses of the two cameras have significantly different diameters, the center of one lens will not be aligned with the other. Simply find a pad of paper or something to elevate the smaller camera so that the center of the two lenses are roughly equal.
The film camera needs to have the film door open and the ground glass taped into the film plane position. Remember that your ground glass needs to act exactly the same as an actual piece of film, so it must be as flat as possible. If you made your own out of acrylic like I did, the thickness of the acrylic matters. Make absolute sure that the textured (sanded) side of the ground glass is facing into the camera. The side of the acrylic facing outward must not be textured.
Again, the exact position of the ground glass is really, really important. I have done cameras that I adjusted and were correct and then mysteriously weren’t and it turns out all that had happened was the tape I used to secure the ground glass into position had become loose and the ground glass pulled back about half of a millimeter. Many cameras have a raised lip that the edges of the film ride across. Remember that 35mm film has sprockets that travel above and below the lens opening. Your ground glass must rest on those same lips exactly like the film would.
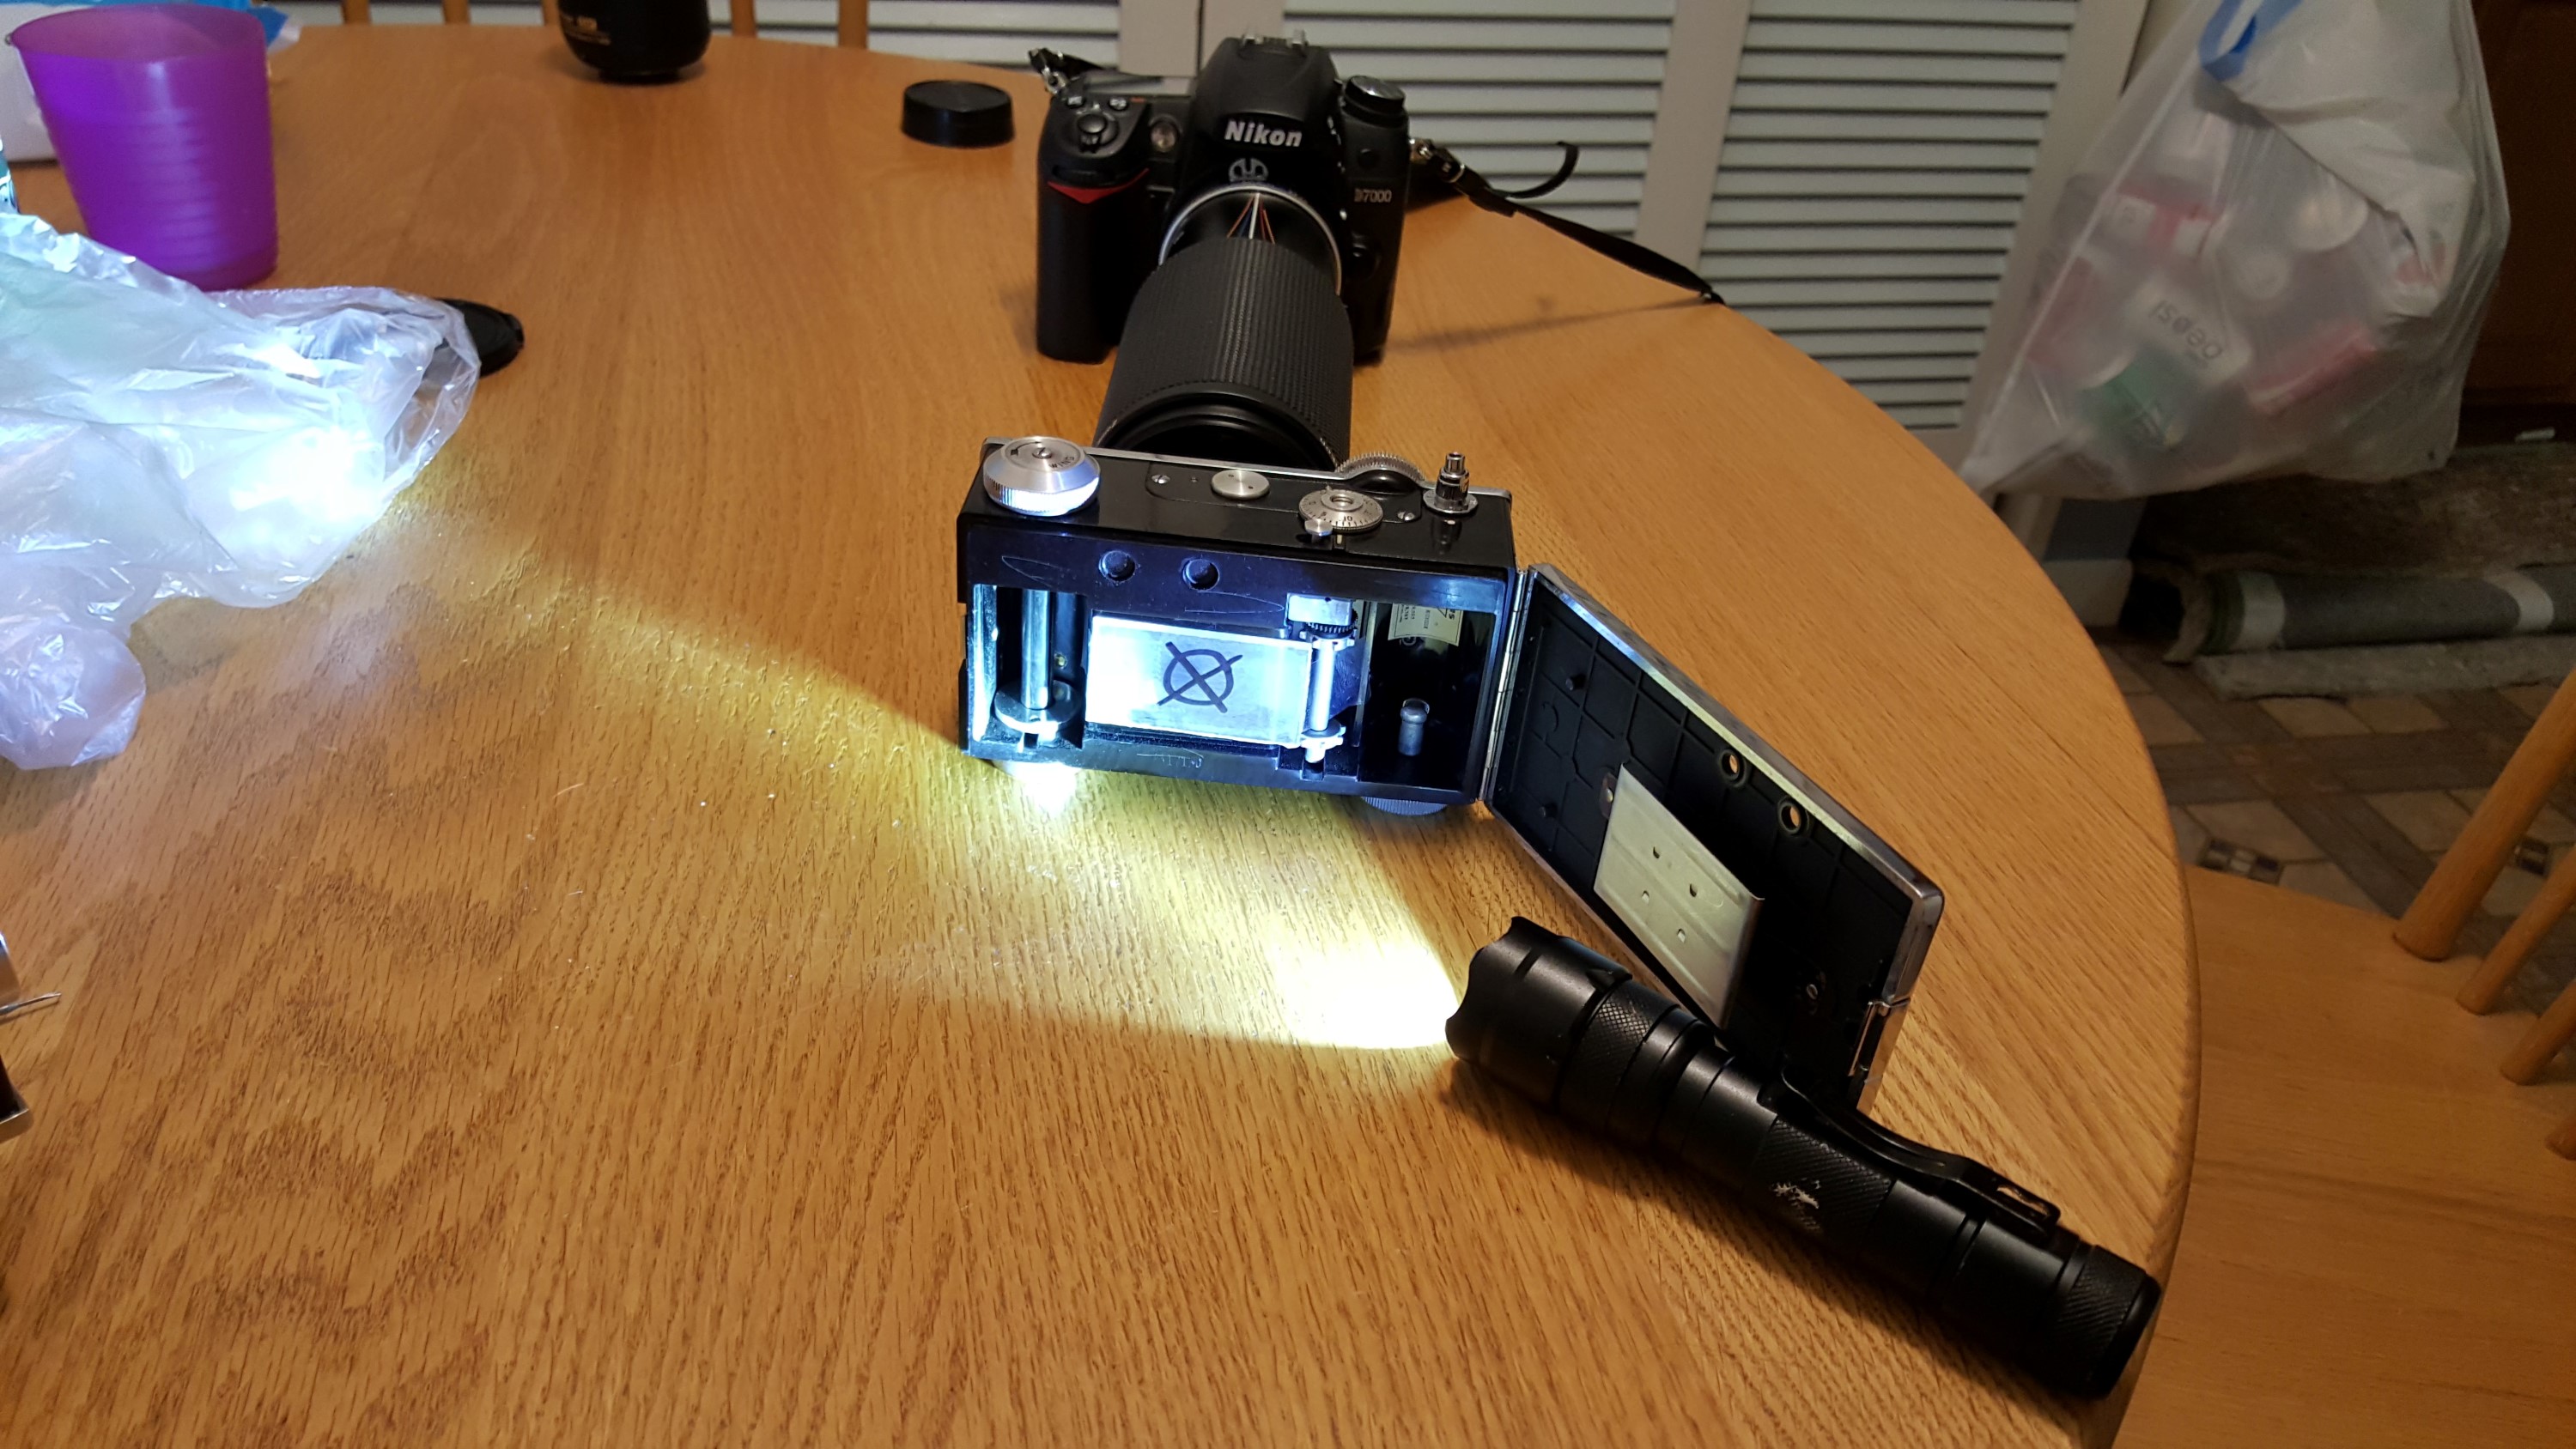 Get your flashlight and shine it onto the back of the ground glass. In my example, I angle the flashlight because I am using one that is extremely bright and shining dead center into the camera actually makes it hard to see on the LCD screen of the digital camera. Find a position of your flashlight that doesn’t make the image on the LCD screen too bright or too dark.
Finally, you must set the lens aperture on both cameras as wide open as they go and set both lenses to infinity. The narrower the depth of view for each lens, the more precise you’ll be. As I mentioned above, it is very important that the digital camera’s lens is manually set to infinity. If the lens has an autofocus feature, make sure it is disabled.
There is a science for why you need both lenses set to infinity. Someone explained it to me with a diagram explaining that at infinity, all light rays are parallel and I only slightly understood. The good news is that you don’t need to understand why this works, just accept that it does and move on. 🙂
When you are ready to begin, you need to open the shutter on the film camera so that it stays wide open. I mention above that if your camera has a “T” mode, use that, but if it doesn’t you’ll need to use “B” mode with a locking shutter release cable, or have someone who can stand there holding the shutter release button down while you work.


Now that everything is in position and you have the shutter open, look at the LCD panel on the digital camera and look for your markings. If everything is correct, the image should be sharply in focus. If there is any doubt, move the focus on the film camera (not the digital) until the image is sharp.
The images to the left and right show an example of what you might see when the lens is correctly and incorrectly collimated. I have the digital camera’s zoom at 100mm in both of these images, but if you move it to 300mm, it’s even easier to see the fine detail in the ground glass.
Here is where the easy part ends. At this point, if you can confirm that your image in the LCD is sharply in focus when both lenses are at infinity, you are done. You can put everything back together and know that your film camera is accurate.
If however, you find that the sharpest image is seen before the film camera’s lens is at infinity, or if that even at infinity, you cannot get the image to be sharp, then you need to figure out what is causing the issue. This may involve opening the lens and seeing if any of the glass lenses are out of position. In the case of front cell focus cameras, the entire front element might need to be tightened or loosened 360 degrees. In the case of the Argus C3, the issue could be that the lens helical is on the wrong “tooth” (this makes more sense when you are working on a C3, so I won’t get into the specifics here).
In the case of a folding camera, it might be as simple as straightening out a strut or tightening a screw to make sure that the lens is in it’s correct position. Many early 20th century folding cameras have a fine focus adjustment screw somewhere on the camera. The image to the left shows the front door of a Kodak Monitor Six-20 which has the adjustment screw to the left of the kickstand. On some models the screw is under the kickstand and on some others, the screw is hidden somewhere on the inside of the door underneath the track.
I find that when doing this, its best to check your work several times. Make sure that your ground glass is in position and has not come loose while working. Once you are sure everything is correct, you are done. Congratulations, you have just collimated your first lens!
It is worth noting that a lens can only be collimated at infinity. You could technically do it at other focal positions, but then a precise orientation of the two film planes must be measured which dramatically increases the difficulty of doing this. You can safely assume that if a lens is correct at infinity, all other focal positions will be as well.
Wrap Up
I started out this article saying that this was not meant to be a comprehensive “Camera Repair Guide”. To make such a guide would be nearly impossible due to the vast number of differences between every camera ever made. Not to mention a guide like that would be impossibly large.
My intent here is to share what I’ve learned about bringing back old cameras to life and give people a starting point. Like I said earlier, I am not a camera repair technician. I learned all of what I know by reading other people’s comments online and experimenting with my own cameras. I have not always been successful. I have a few cameras that are more broke than they were when I got them, but at the very least, I learned something from those failed repair jobs.
This brings me to another really great tip. There are many people out there like me who have tinkered with their cameras and have taken the time to post how-to articles for various models. I have been successful more times than not searching the Internet, forums, or even Camera Collector groups on Facebook looking for information from other people. If you have a specific question about a particular model, look it up. There is a very good chance that you’ll find information from someone who already posted it.
 If you’ve never cleaned an old camera before, do not start on something valuable or complicated. Do not make your first attempt on a Nikon F4, or a Leica. Electronic cameras make very poor choices for a repair project by a novice. An Argus C3 is a great introduction to repairing cameras because they’re easy to work on and cheap. If you mess up a C3, you can just pick up another for very little cost.
Hopefully if you’ve made it this far into this article, you have learned something and are willing to give it a shot. Even if all you ever do is replace light seals, at least that’s something. You’ve done your part to restore functionality to at least one camera. Remember, cameras were built to make photographs, not sit on a shelf. Anything you can do to keep these things working and serving their purpose, the longer we keep film photography alive!
Remember, cameras were built to make photographs, not sit on a shelf. Anything you can do to keep these things working and serving their purpose, the longer we keep film photography alive!
Where to Get My Camera Repaired
Edit 3/24/2023: In an earlier version of this article, I used to have a list of people who could service your camera. I hadn’t updated that list in quite some time, but rather than keep updating it here, I turned it into it’s own post called the Worldwide Directory of Camera Repair. I will do my best to maintain that post as the need to get old cameras repaired has only grown since I wrote this guide back in 2016.
Mike, thanks for putting this guide together! I’m sure it will be a most helpful reference for anyone considering working on an old camera for the first time.
Out of curiosity, who gave you the quote for replacing the bellows on the Monitor?
Jurgen Kreckel from certo6. That price was for making a new bellows, installing it, and return postage. Its a fair price considering how large this camera is. I’ll most likely take him up on it eventually, I just dont have an extra $140 laying around at the moment.
Oh I completely agree about the price – worth every penny! I say that having long toyed with the idea of learning bellows construction, an idea only entertained precisely because of the lack of good options for replacement bellows for my Monitors. In the process I’ve figured out enough about Monitor bellows to know that construction and installation are both going to be particularly challenging – more so than for most folders I would say, due to Kodak’s quirky design.
So it’s good to know that Jurgen is willing to tackle the job at least, just in case I finally give up this crazy pipe dream of trying to build my own. 🙂
Great stuff Mike!
You can order new bellows from Sandeha Lynch, see http://www.sandehalynch.com/camerawork/bellows.php
Full disclosure: I have bought 2 bellows from Sandeha.
You have no idea how much you helped me. Thank you very much for sharing your knowledge
I am glad you found some helpful information!
Regarding the cleaning of leaf shutters, if you ever wondered what was the grey residue coming out after a bath in lighter fluid, is powdered graphite, the original factory lubricant! Servicing manuals refer to that usualy. Those shutters realy need to be disasembled and properly cleaned and lubricated to leav them as new.
You’re right, graphite was a common lubricant, but I’ve found that trying to re-apply it myself is a very difficult and messy job. I fully realize that my procedure of flushing a shutter dry, and then putting it back together without any new lubricant is not the “proper” thing to do, and not something a professional would likely do. However, I feel its good enough for a couple of rolls of film to try out a camera and use it on occasion. Sadly, almost none of these cameras will ever be in regular use ever again, so the need to properly restore them to original factory specifications isn’t necessary. If I can free a stuck shutter and get it working enough to shoot a couple rolls of film, I am happy!
You can precisely apply the graphite with a sharp soft pencil! Recently i serviced a camera filled with a dense oil. It was so sticky that everything needed to be disassembled and cleaned individually.
Is time consuming, but not very difficult. I allways aply graphit in every metal to metal friction point and above and below shutter blade position.
https://www.facebook.com/pg/oficinaanalogica/photos/?tab=album&album_id=420159941704459
https://www.facebook.com/pg/oficinaanalogica/photos/?tab=album&album_id=395241540862966
Great post. When I clean mechanical shutters with Naphta I find sometimes they stick or freeze. Hence, after cleaning them with Naphta I give them a last bath in Naphta with a few drops of My oil as a very light lubricant. Thanks again for rekindlingmy passion of restoring old cameras.
Yeah, a single naphtha bath usually isnt enough. Usually I have to soak them 2-3 times before they stop sticking. In some occasions, even after the shutter appears to be firing correctly, I dip the very end of a Q-tip in naphtha and drag it over the shutter blades one last time to get any discoloration off that sometimes appears when the naphtha dries.
Mike: Have been really enjoying and learning from your posts. I have enjoyed photography for 45 years and have recently started repairing some of the old beauties I find on ebay and flea markets.
Thanks for your guidance and great images.
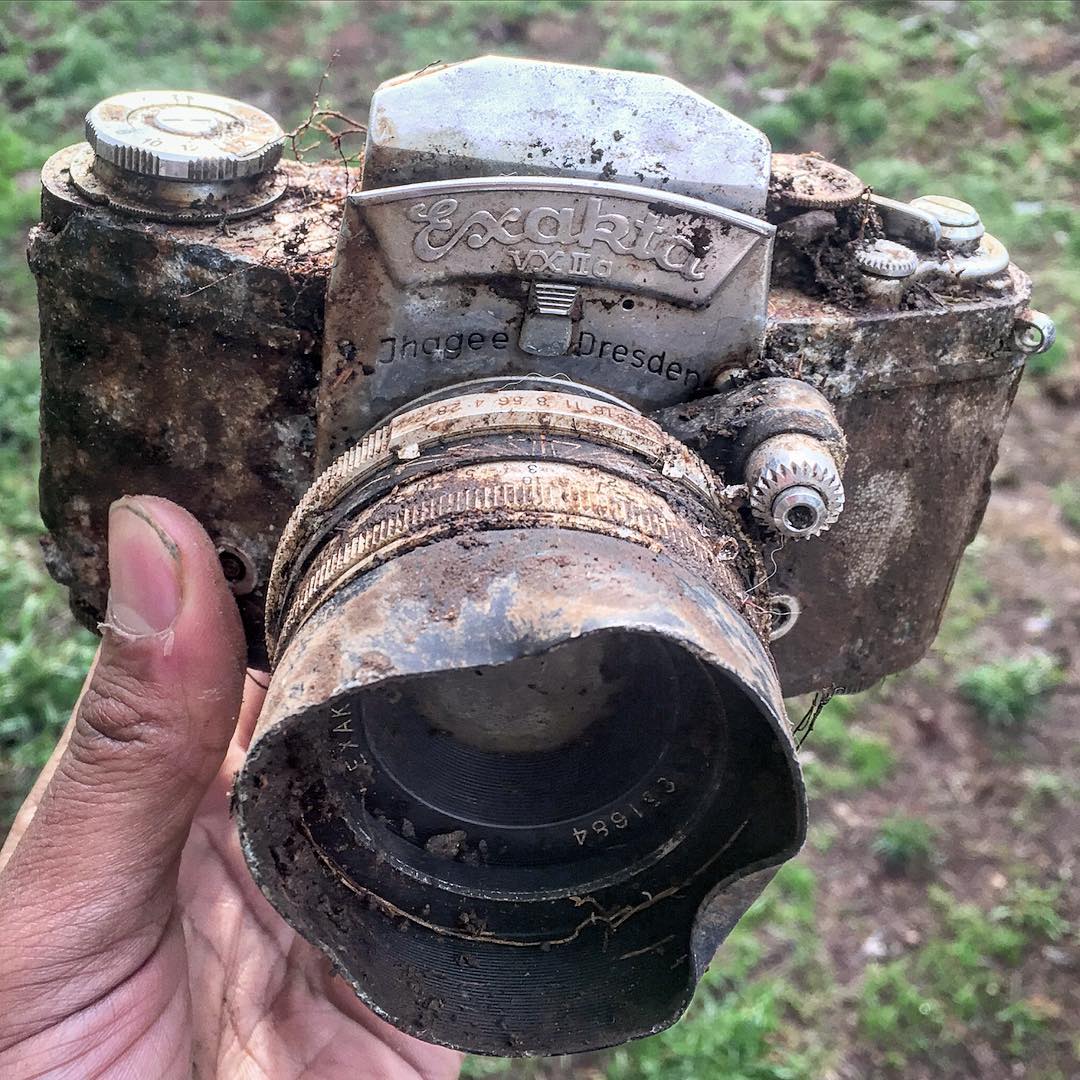
Just one thing- I can’t find the page where you illustrate how you refurbished that lovely Exacta IIa at the top of this page. Would love to see that….. : )
Thanks for the compliments Wolfgang! That’s why I write these posts, to help other people.
Regarding my Exakta writeup about that camera, wouldn’t you know it?! Shortly after posting it, North Korean hackers broke into my system and deleted that one post! Ugh! 🙂
Really enjoyed and learned from this! Thanks.
I can recommend Robin Gowing in the UK for Pentax repairs. I even wrote him up here: http://www.peterferenczi.com/blog/2017/10/2/harrow-technical-the-robin-gowing-interview
Mike, Many thanks for this site, especially the guide to collimation. I did it to my Balda Baldix and collimated with with a Pentax MX and 135mm lens. I didn’t use a diffuse mask though. I mounted a strip of exposed 35mm slide film (negs would do) through two 120 film spools with one end secured with Scotch tape, and wound the other end tight across the film gate.
I reckoned this would be as close as I could get to the position of the 120 film. With the back of the Baldix open, I positioned it in front of my light box, standing on its side. The transparency that I was using had defined edges that I could bring into line to set the Baldix lens.
Thank you for this! Saved me.
I have the Prontor II. The self timer and lower speeds ( 1s, 1/2s and sometimes 1/5s) didn’t work, so I decided to lubricate a little and things went south… Now I’ve soaked the shutter properly and it’s getting there.
Cheers!
N
Hey again,
must say that the shutter needed some specs of lubricant at certain places. After drying up from the ronsnol it worked great, but in a few hours the slower speeds didn’t work – it just fired at about 1/10th when set to 1/5, 1/2 and 1s. So I went in again and with a needle put some drops here and there and now it works flawlessly.
Cheers,
N
What a fantastic article. You really know your stuff. Huge help. Cheers Sean
Thanks, Sean!
I was browsing across YouTube, when I came across this video: https://www.youtube.com/watch?v=dcIusrw50PM
Apparently, he also learned by trial and error how to repair film cameras.
“That Canon Guy” on That Auction Site taught me a trick to kill – not remove – fungus on interior lens elements. This applies ONLY to lenses that are not mounted to camera bodies and that do not have shutters between the elements. Place the lens in a freezer-grade ziplok bag, squish all the air out, and seal the bag. Place the bagged lens in a second freezer-grade ziplok bag and repeat the squish/seal steps. Now place the double-bagged lens in your household freezer for 48 to 72 hours. The temperature should be 0 degrees F or lower. When you remove the bagged lens from the freezer, allow it to come back to room temperature at its own rate BEFORE you open either ziplok bag. This method kills the fungus and seems to prevent further growth. It’s appropriate for lenses that have only small dots of fungus growth, or growth just on the periphery of elements.
Mike, the screw next to the kickstand on the Monitor, and other folders, is the tripod lug? is it not?
You could be right as many folding cameras have a second tripod lug on the door. Truth be told, I have never tried to unscrew that, but I’d be willing to bet that’s what it is!
best article I’ve read online in ages…