

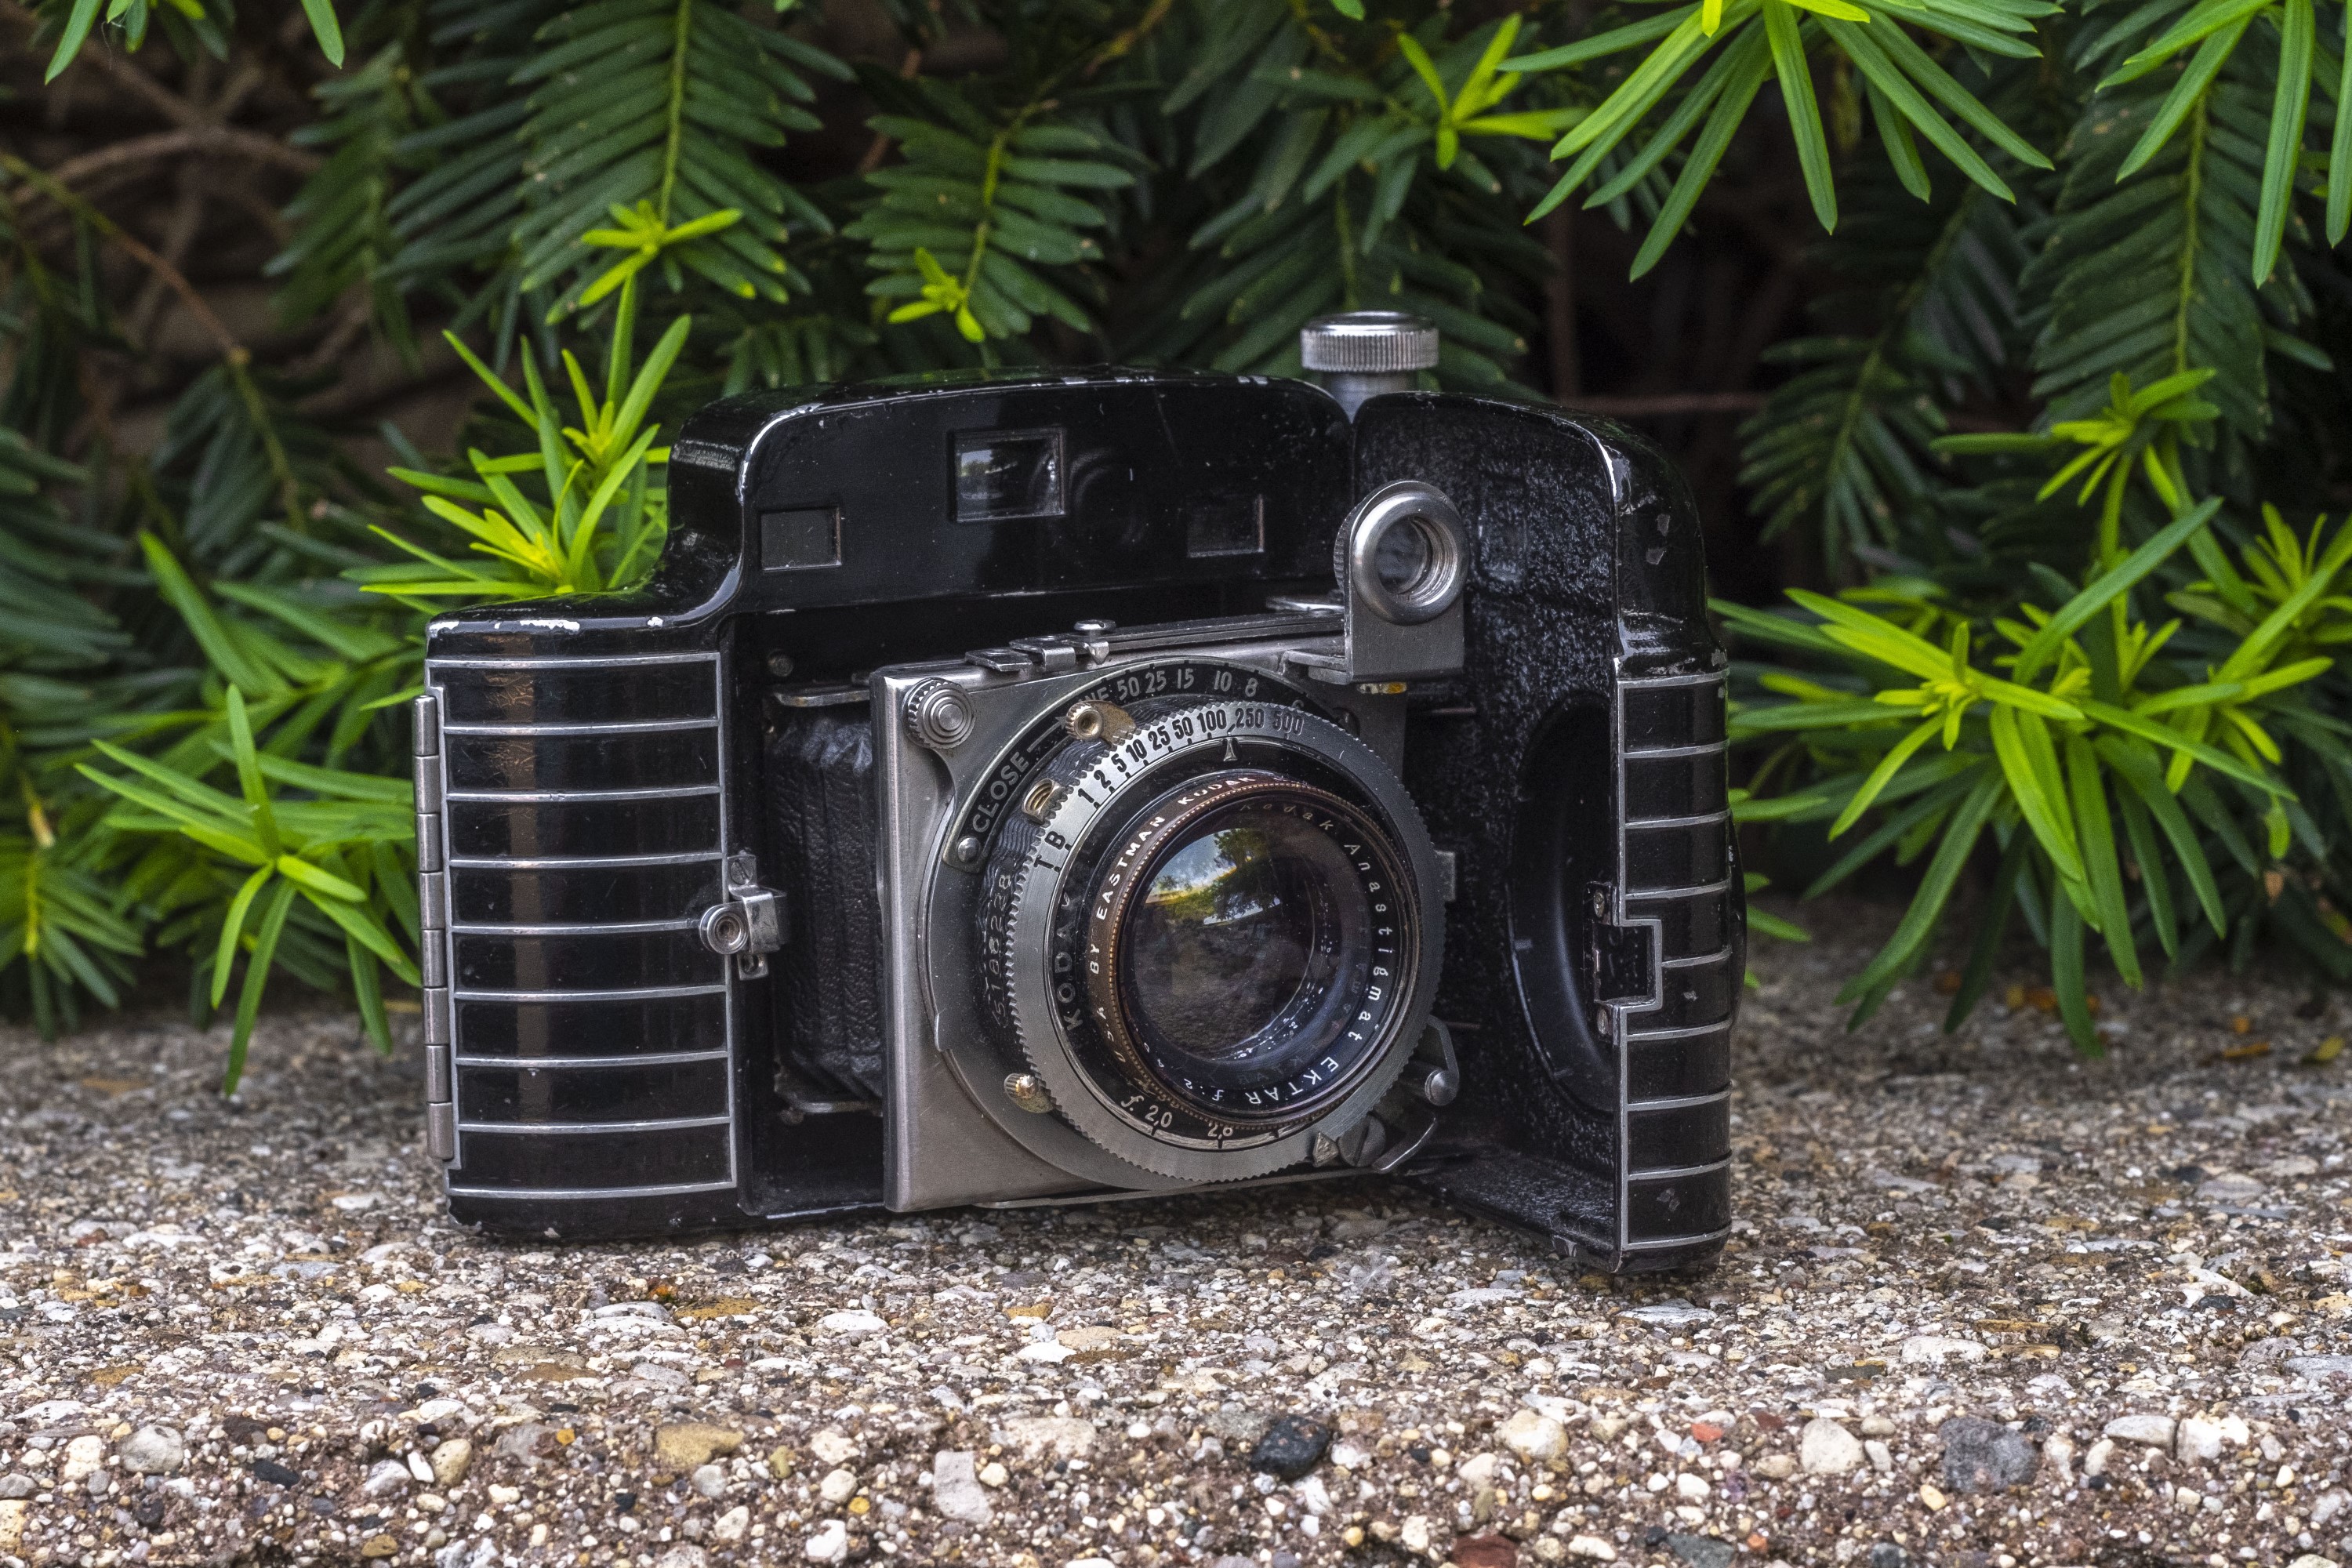
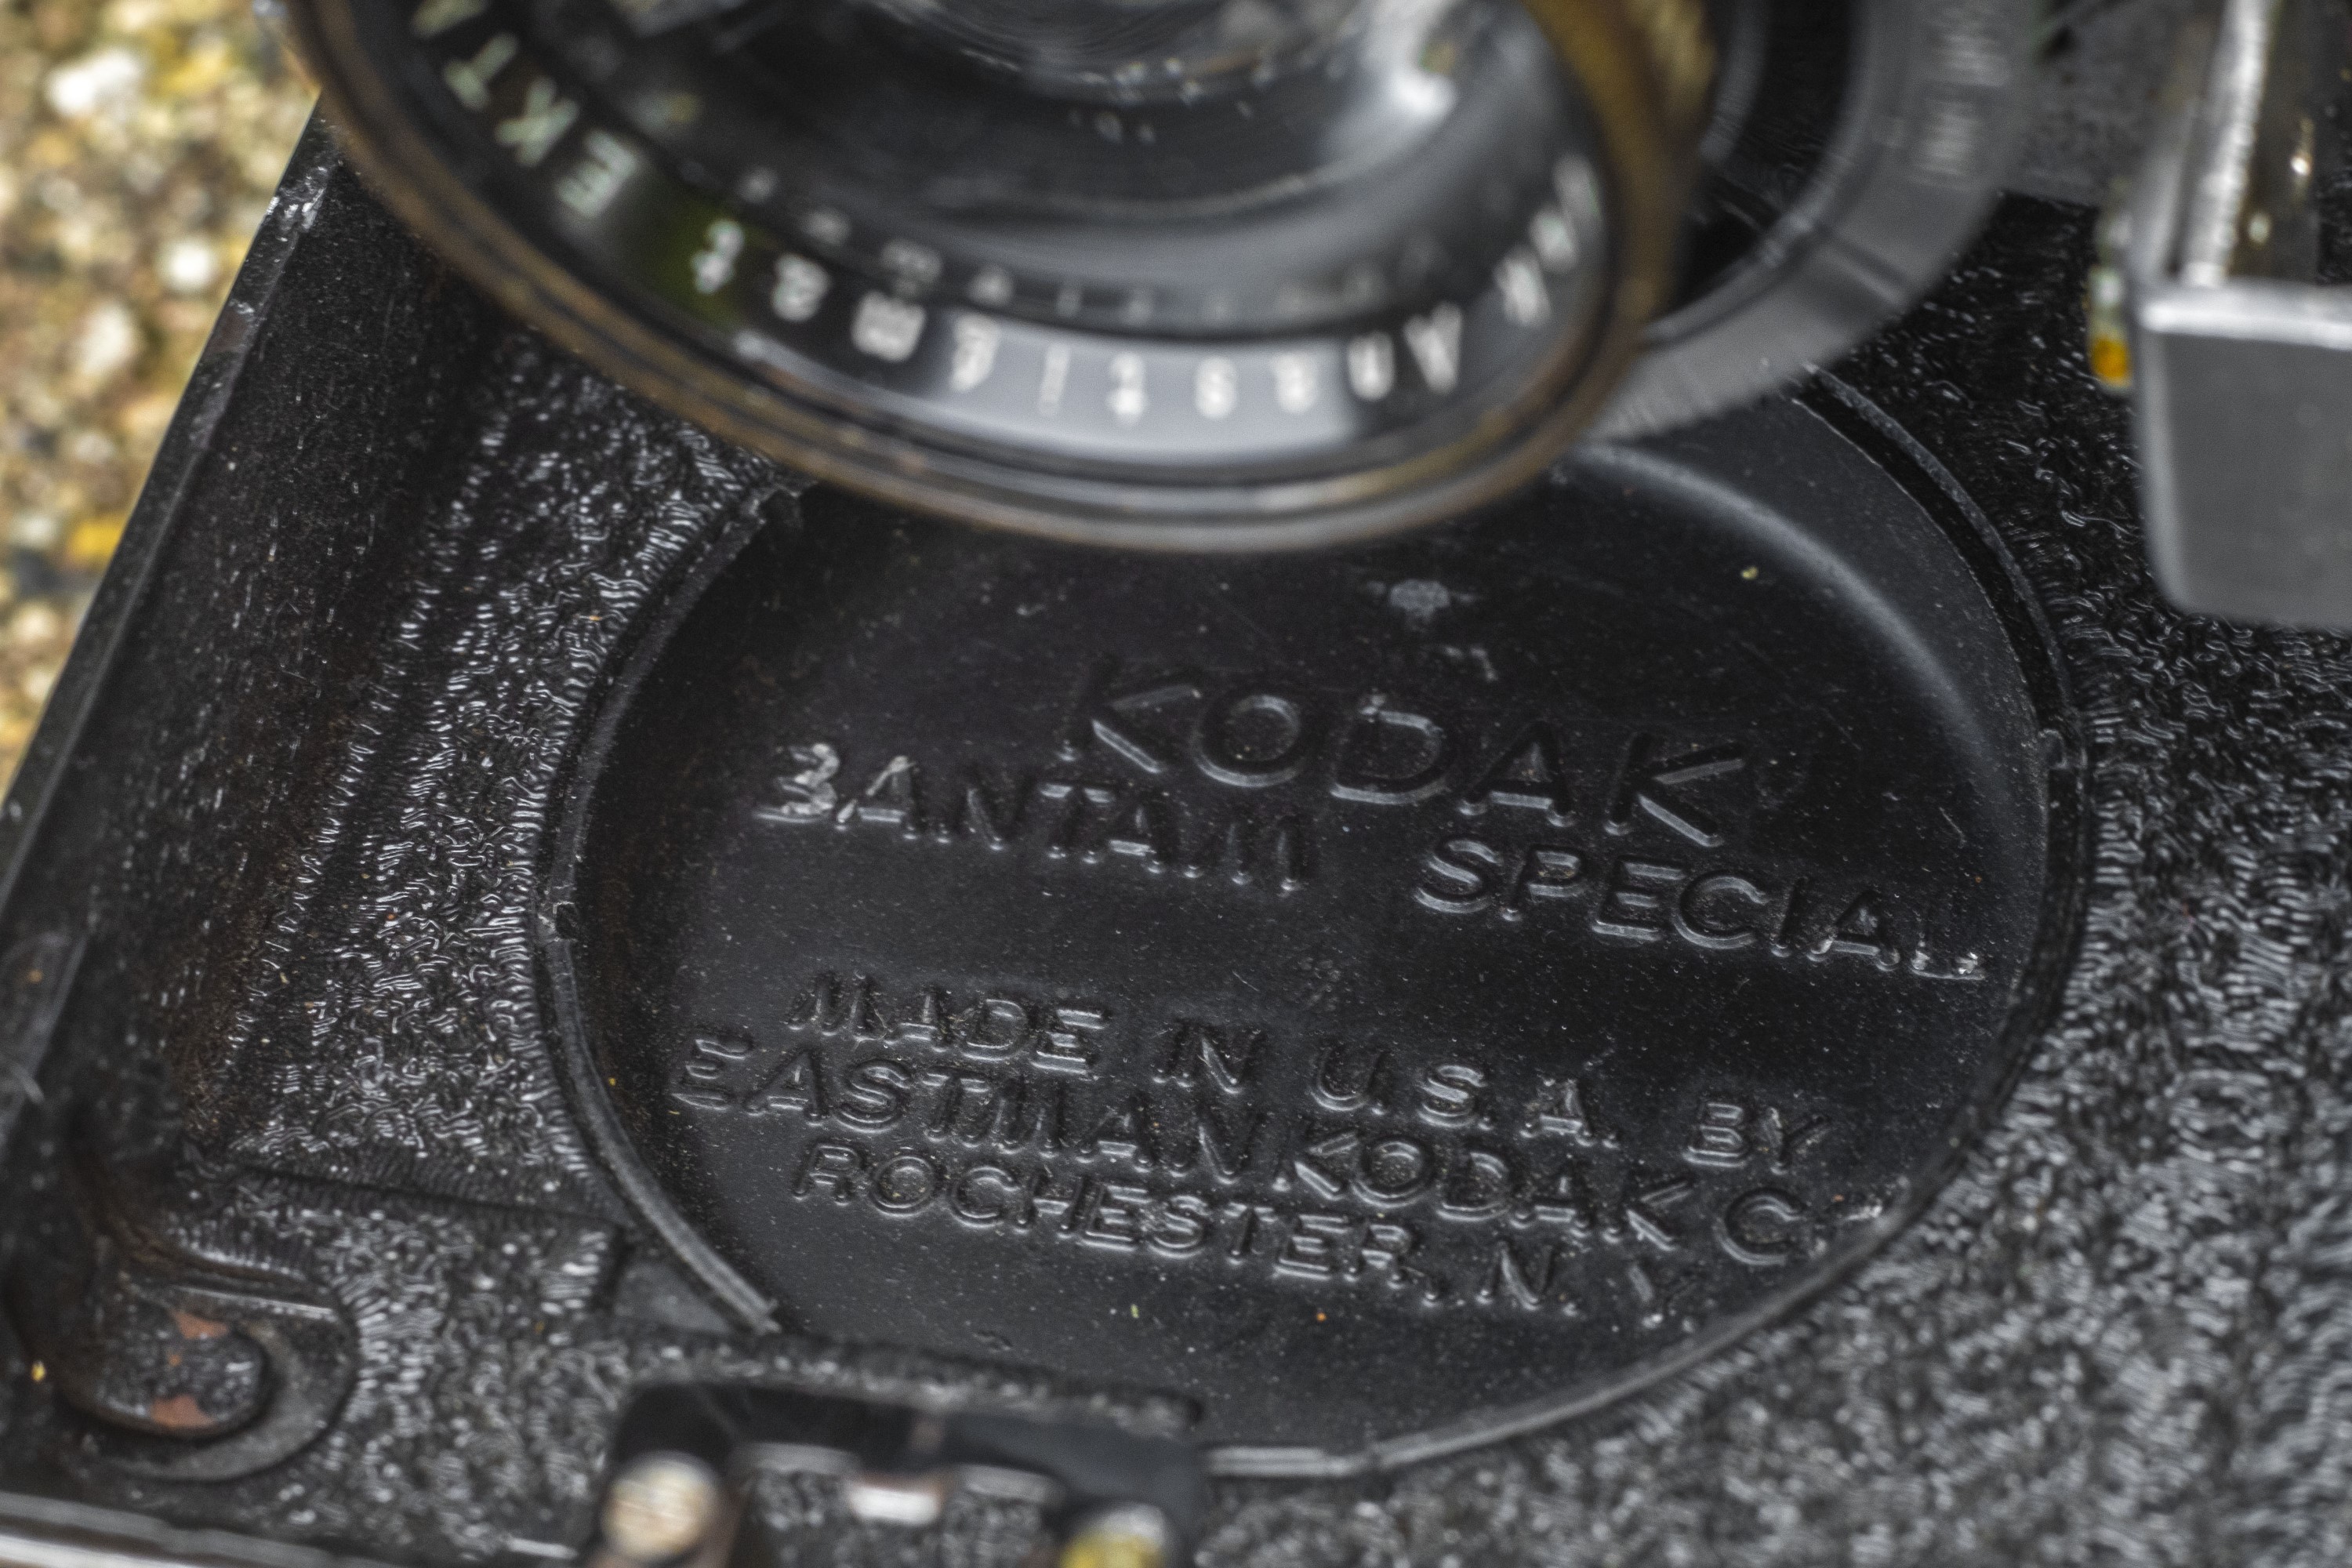
This is a Kodak Bantam Special, made by the Eastman Kodak Corporation in Rochester, NY between the years 1936 and 1948. The camera was the top of the line in Kodak’s Bantam series which used 828 roll film and made 28mm x 40mm exposures which were 30% larger than standard 35mm film. The Bantam Special was a high end camera featuring German made Compur-Rapid shutters, and a coupled rangefinder, two things not often found on American cameras of the day. The body was designed by famed industrial designer Walter Dorwin Teague, and made of cast aluminum with distinctive pinstripes in the art deco style and has since become a prized possession for collectors. The camera was very expensive upon it’s release, and although it was in production for 12 years, it did not sell well.
Film Type: 828 Roll Film (eight 28mm x 40mm exposures per roll)
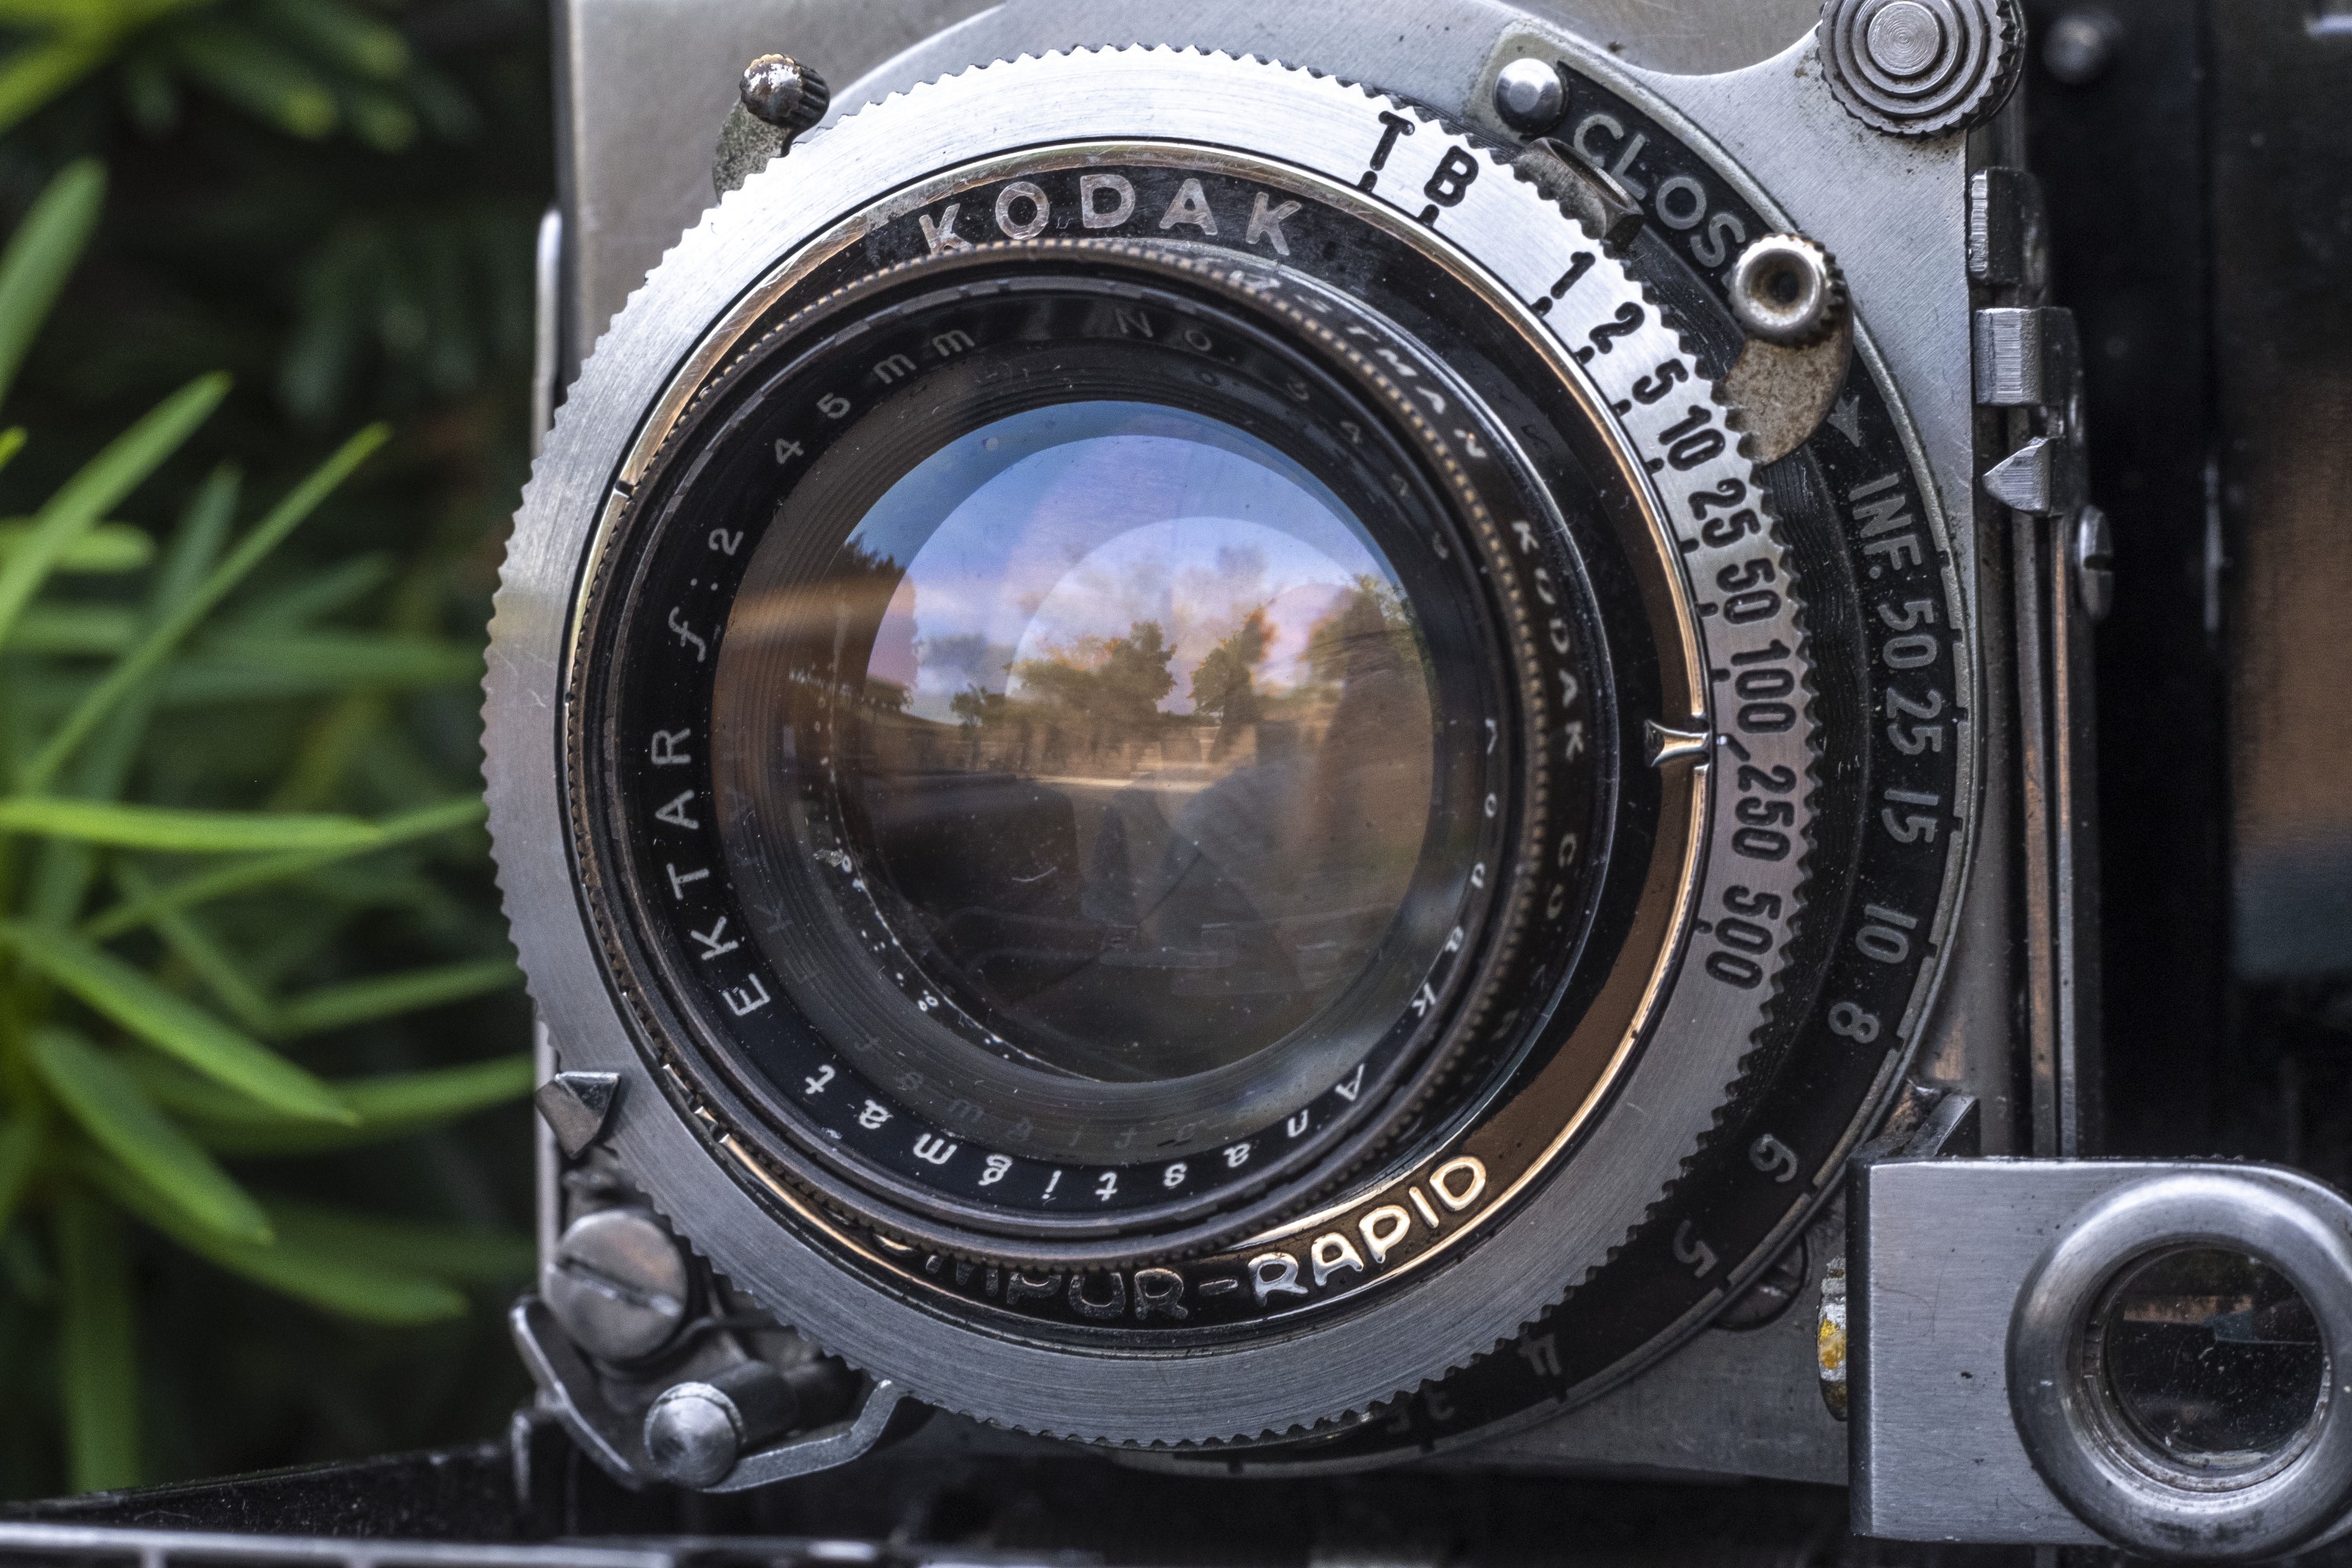
Lens: 45mm f/2 Kodak Anastigmat Ektar uncoated 6-elements
Focus: 3 feet to Infinity
Viewfinder: Separate Viewfinder and Coupled Split Image Rangefinder
Shutter: Compur-Rapid Leaf
Speeds: T, B, 1 – 1/500 seconds
Exposure Meter: None
Battery: None
Flash Mount: None
Weight: 464 grams
Manual: http://www.cameramanuals.org/kodak_pdf/kodak_bantam_special.pdf
How these ratings work |
The Kodak Bantam Special is a gorgeous camera with impressive specs on paper, but is a classic example of form over function. The rangefinder system and right hinged folding door on the example in this review have not held up to the rigors of time. In better condition, perhaps my opinion would differ, but I’ve heard from other people who have attempted to use one of these cameras and their opinion is similar to mine. This is a beautiful camera that is highly desirable by collectors for it’s looks, but sadly, nothing more. If you want a Bantam Special to display on a shelf, then by all means buy one, but as a user there are far better examples of compact folding cameras from the 1930s. | ||||||
| Images | Handling | Features | Viewfinder | Feel & Beauty | History | Age | |
| 1 | 0 | 1 | 1 | 2 | 0 | 40% | |
| Bonus | none | ||||||
| Final Score | 7.0 | ||||||
Updated Review: This original review from 2018 was done using a less than perfect version of the Bantam Special. In 2021, a reader of this site disagreed with many of my conclusions enough that he sent me another camera that had recently had a CLA and was in perfect working order. In July 2021, I would post a Second Look of this camera using fresh film and a perfectly working example. I will keep this original review here as it contains a lot more background info than that second look does, but I recommend checking out that second review if you want to see what using a perfectly working Bantam Special is like.
History
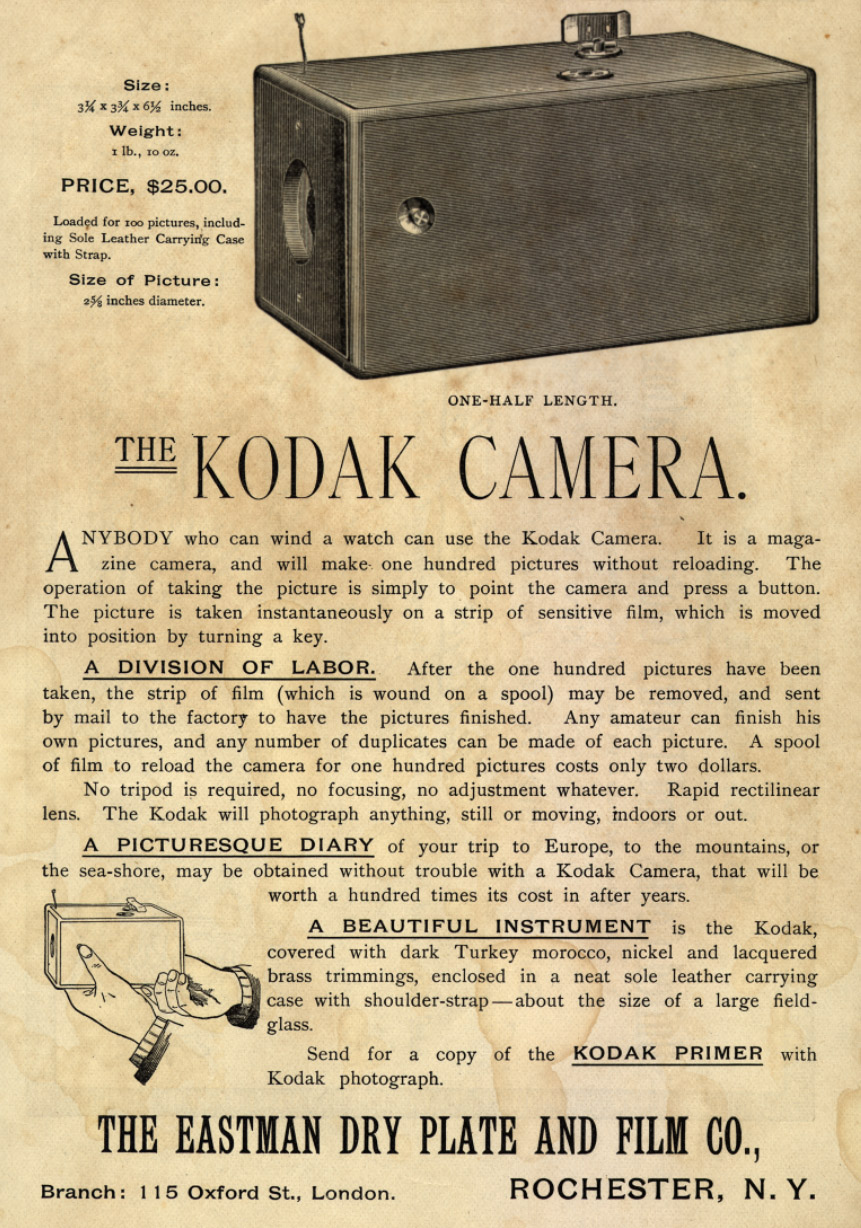
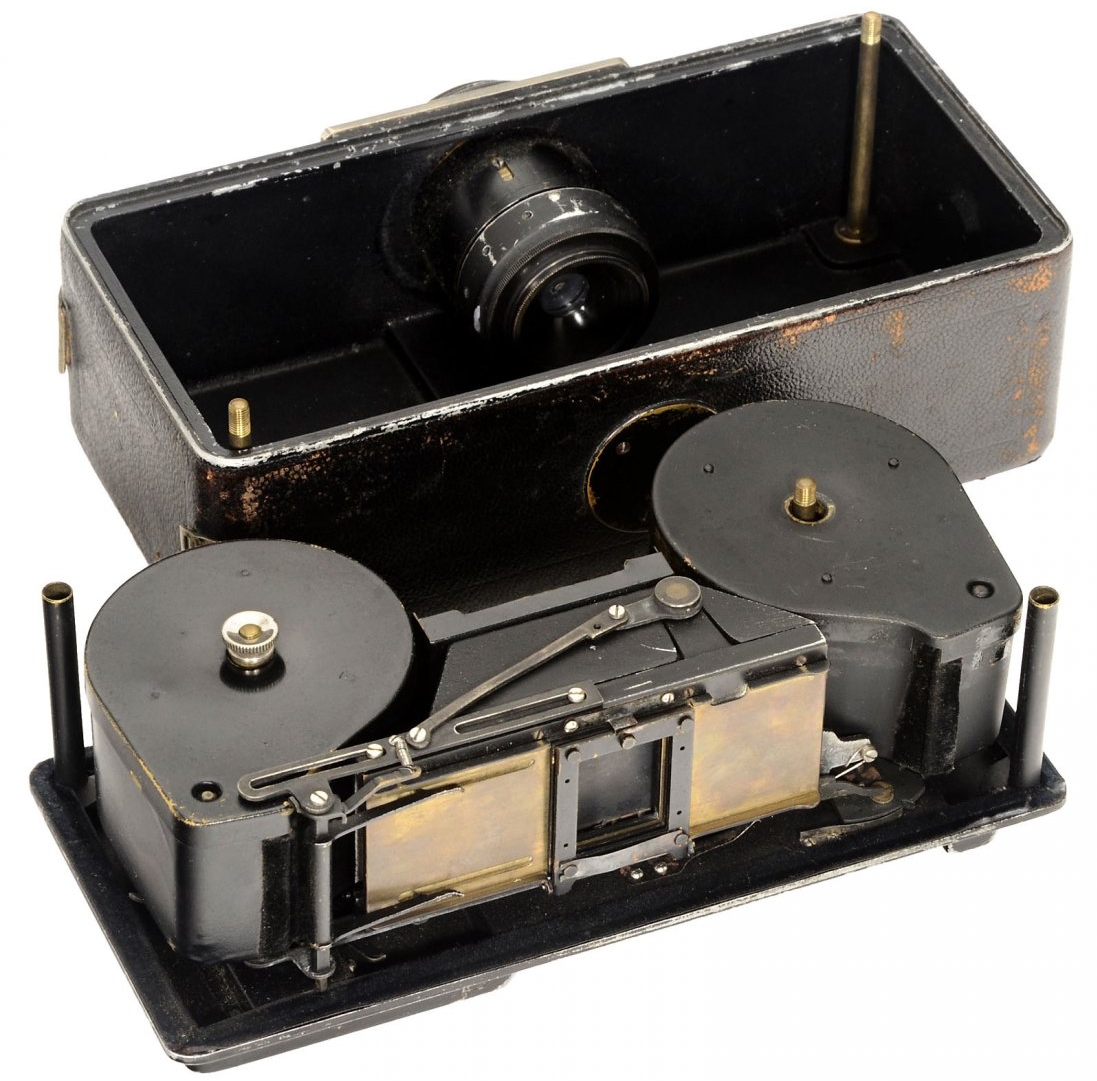
Prior to the 20th century, cameras were largely stationary devices. Made of heavy wood and metal, the typical photographer would have a studio to which customers would come to get their photographs taken. With the invention of the original Kodak camera in 1888 by the George Eastman Company, we started to see the first portable cameras.
By the start of the next century, portable or “pocket” cameras became very popular. Most portable cameras were either box shaped, or were one of many different folding designs. All of these cameras used some type of roll film that allowed six or more exposures per roll. This was a huge convenience for the amateur photographer as opposed to stationary “large format” cameras that could shoot only single sheets of film at a time.
In the years that would follow, camera makers would find more ways to shrink cameras and make them even more portable and attractive to people who wanted to make photographs on the go. One of the earliest ways to accomplish this, was by using 35mm “cinema” film which was already available for motion picture cameras. By using cinema film, cameras could make “miniature” photographs that were 18mm x 24mm in size. Today, an 18×24 image is considered to be “half-frame” but that wasn’t always so. Originally this was the normal exposed size for these miniature “cine” cameras. It wouldn’t be until a few years later, that cameras would expose “double cine” images of 24mm x 36mm. Although he wasn’t the first to do it, Oskar Barnack helped to popularize the 24×36 size with the original Leica camera.
Throughout the 1920s and early 30s, cameras that used perforated 35mm cinema film became very popular. Although many were primitive designs that were made cheaply and in low numbers, the Leitz Leica and the Zeiss-Ikon Contax were both top of the line, high quality cameras that used the format.
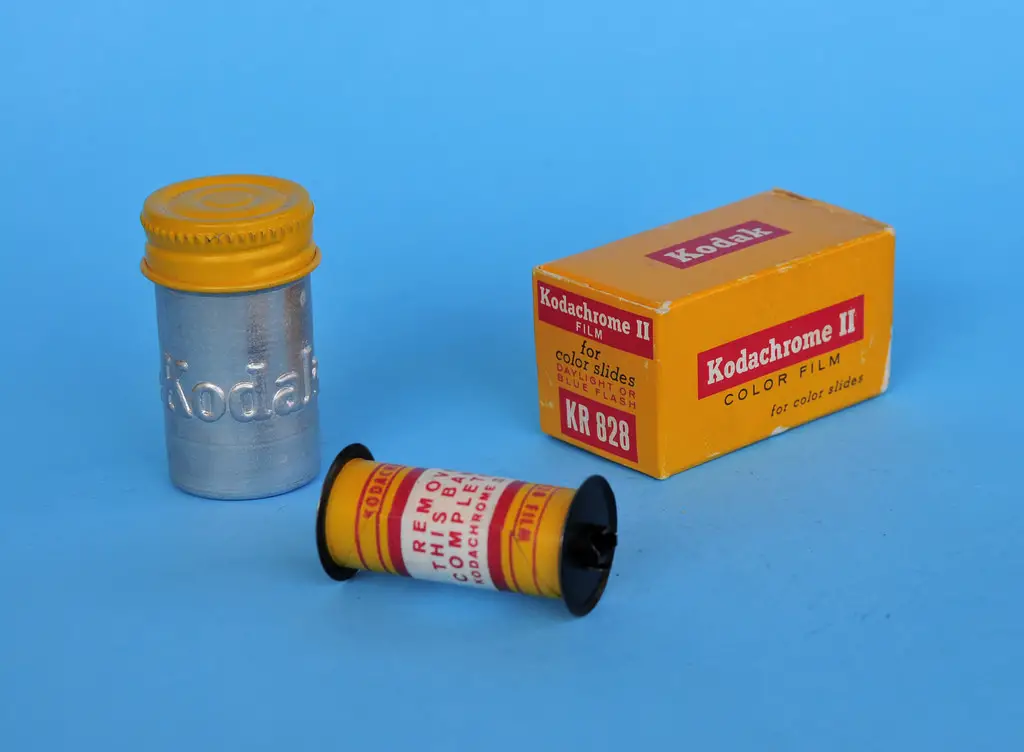
Despite the increased popularity of 35mm film, there was no single standard for how the film would be produced and sold. These cameras required cinema film to be purchased in bulk and loaded in special reusable cassettes in a dark room before it could be installed into the camera. In 1934, the Eastman-Kodak company would attempt to take advantage of the demand for 35mm film by releasing a new film standard called 135 format 35mm film which used a velvet lined metal cassette that would allow the film to be loaded into a camera in daylight. The film would be wound onto a take up spool while shooting in the camera, and upon reaching the end of the roll, would be rewound back into the original cassette so it could be removed in daylight and sent in for developing.
135 format film turned out to be wildly popular and by the end of World War II became the most commonly used “miniature” film format in the world. It would continue it’s popularity to this very day and is one of only two film formats still widely available.
While 135 format film was extremely popular, it wasted space on the film stock by having two rows of sprocket holes above and below the exposed image. These sprocket holes were designed for cinema cameras that needed to continuously move, but in a still camera, they weren’t actually necessary. These sprocket holes limited the usable width of the 35mm film to only 24mm. Despite this legacy inclusion of both rows of sprocket holes, the format was still highly successful.
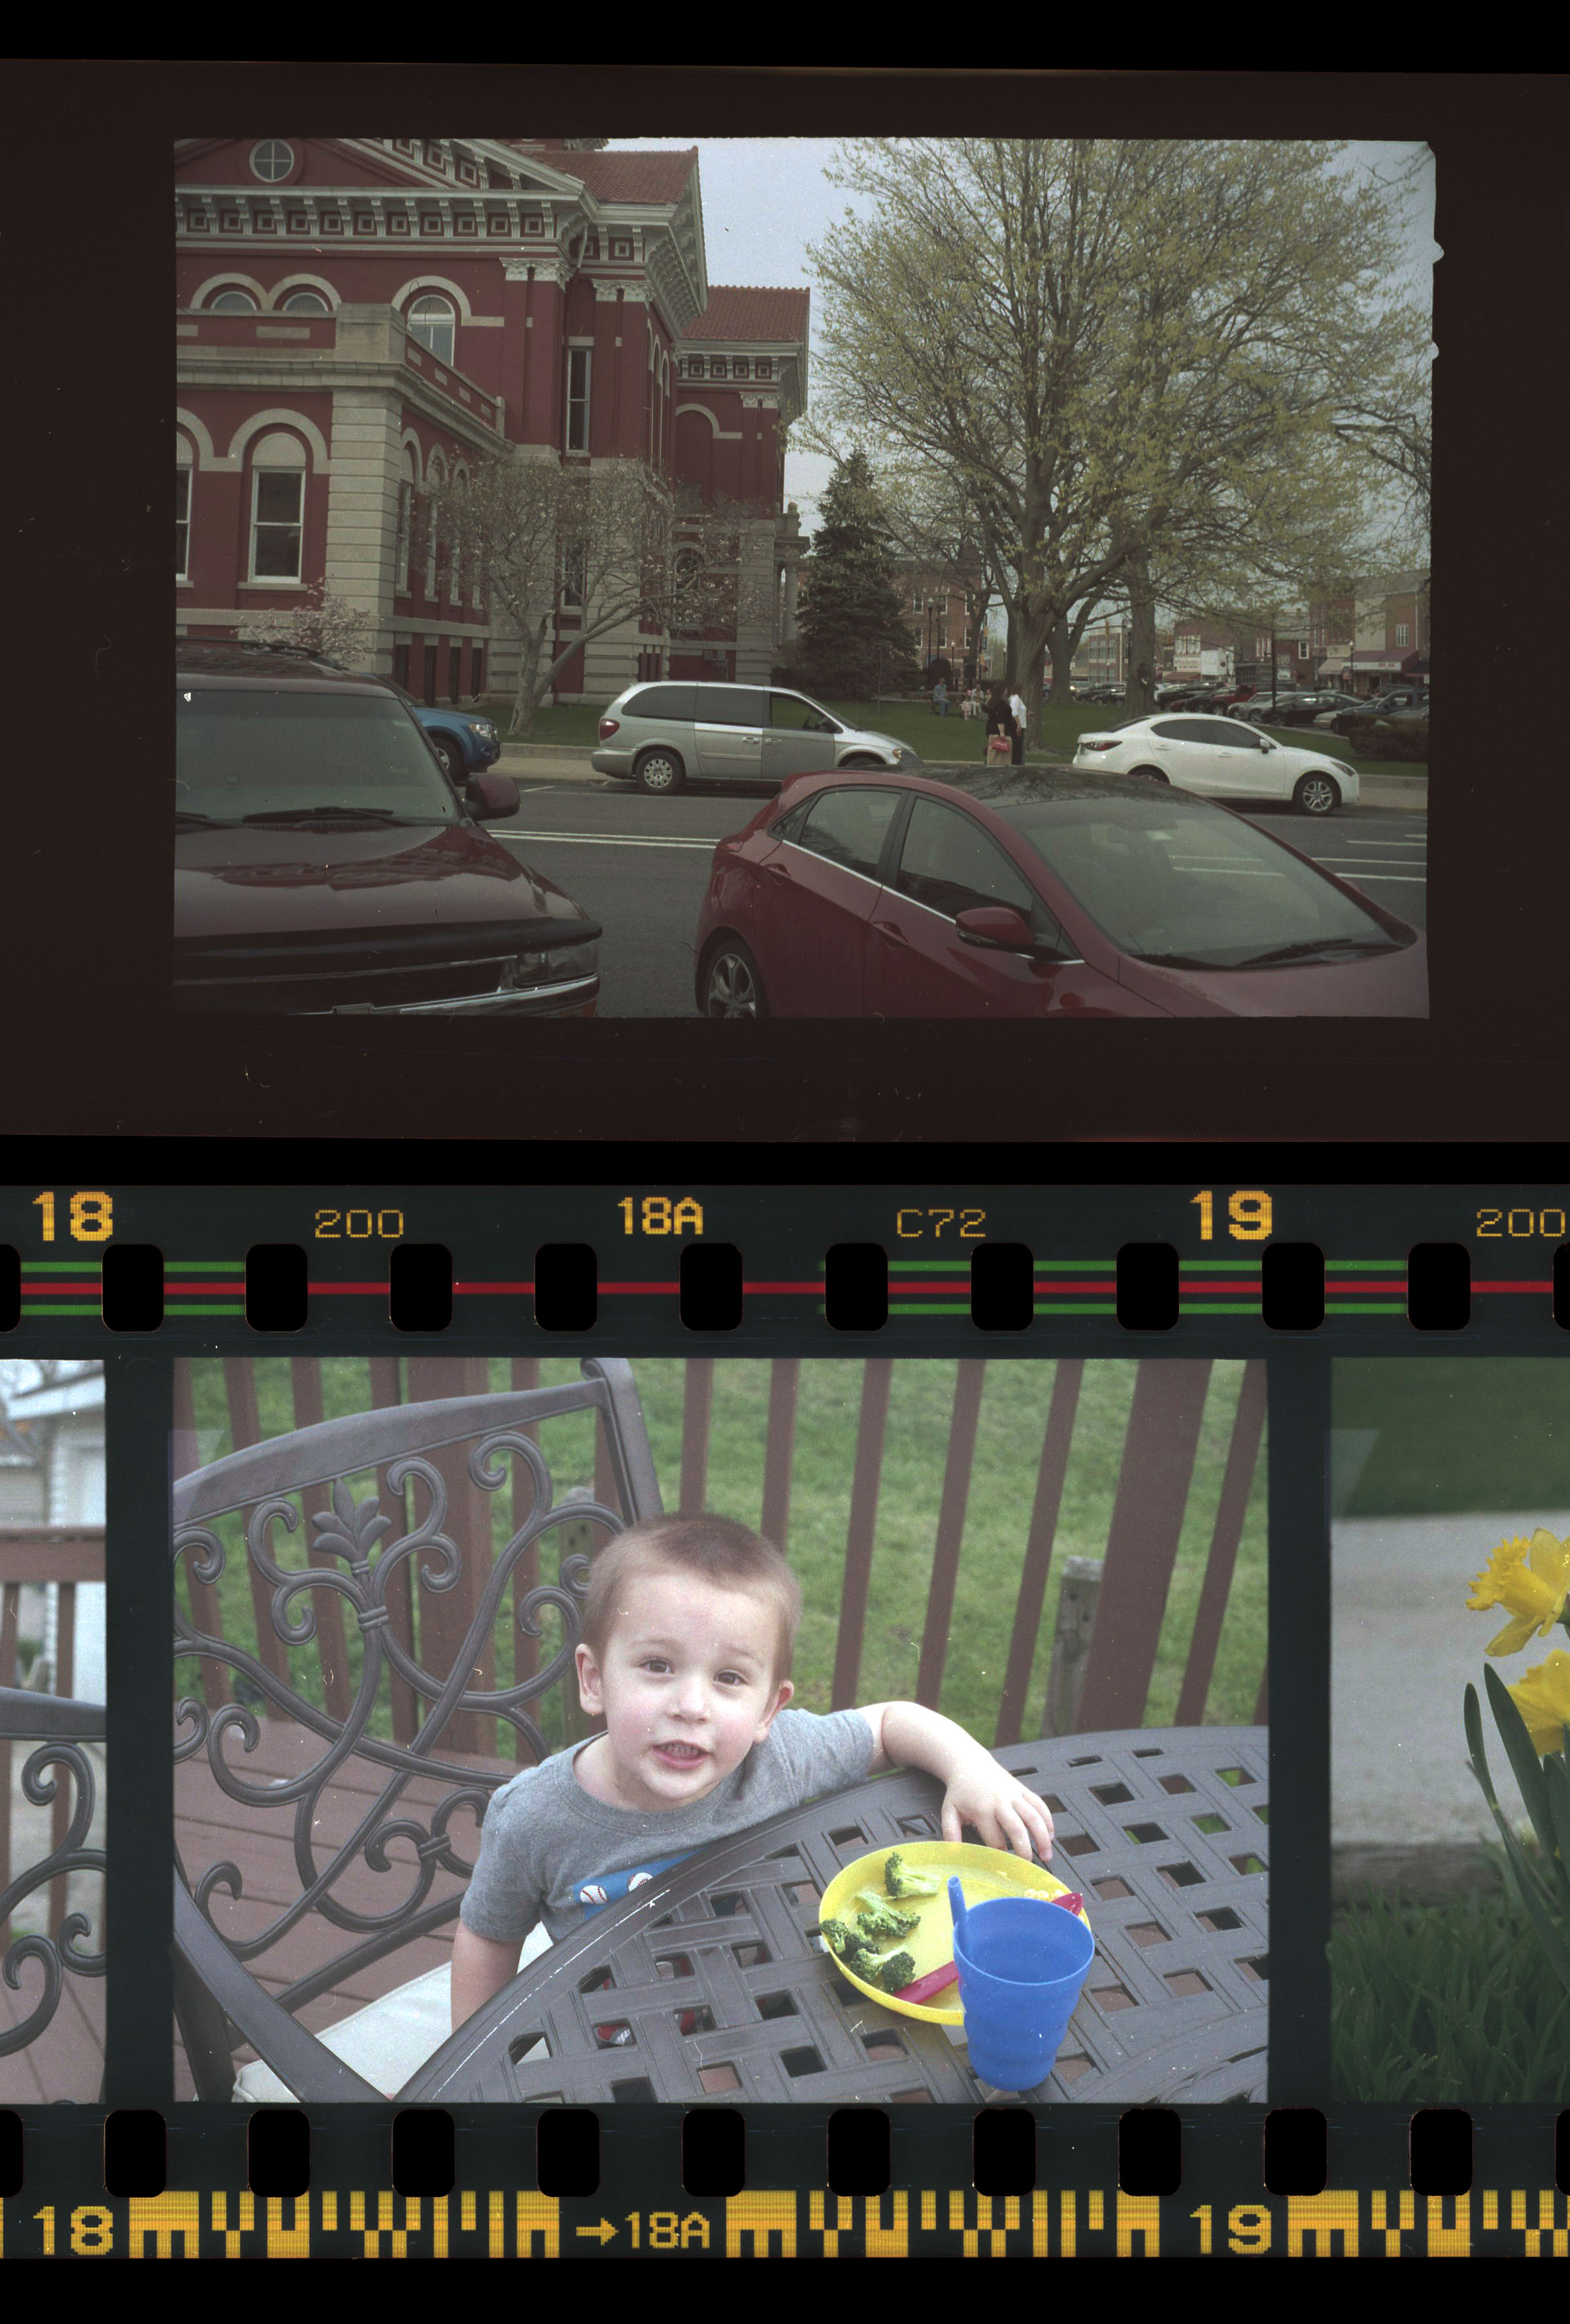
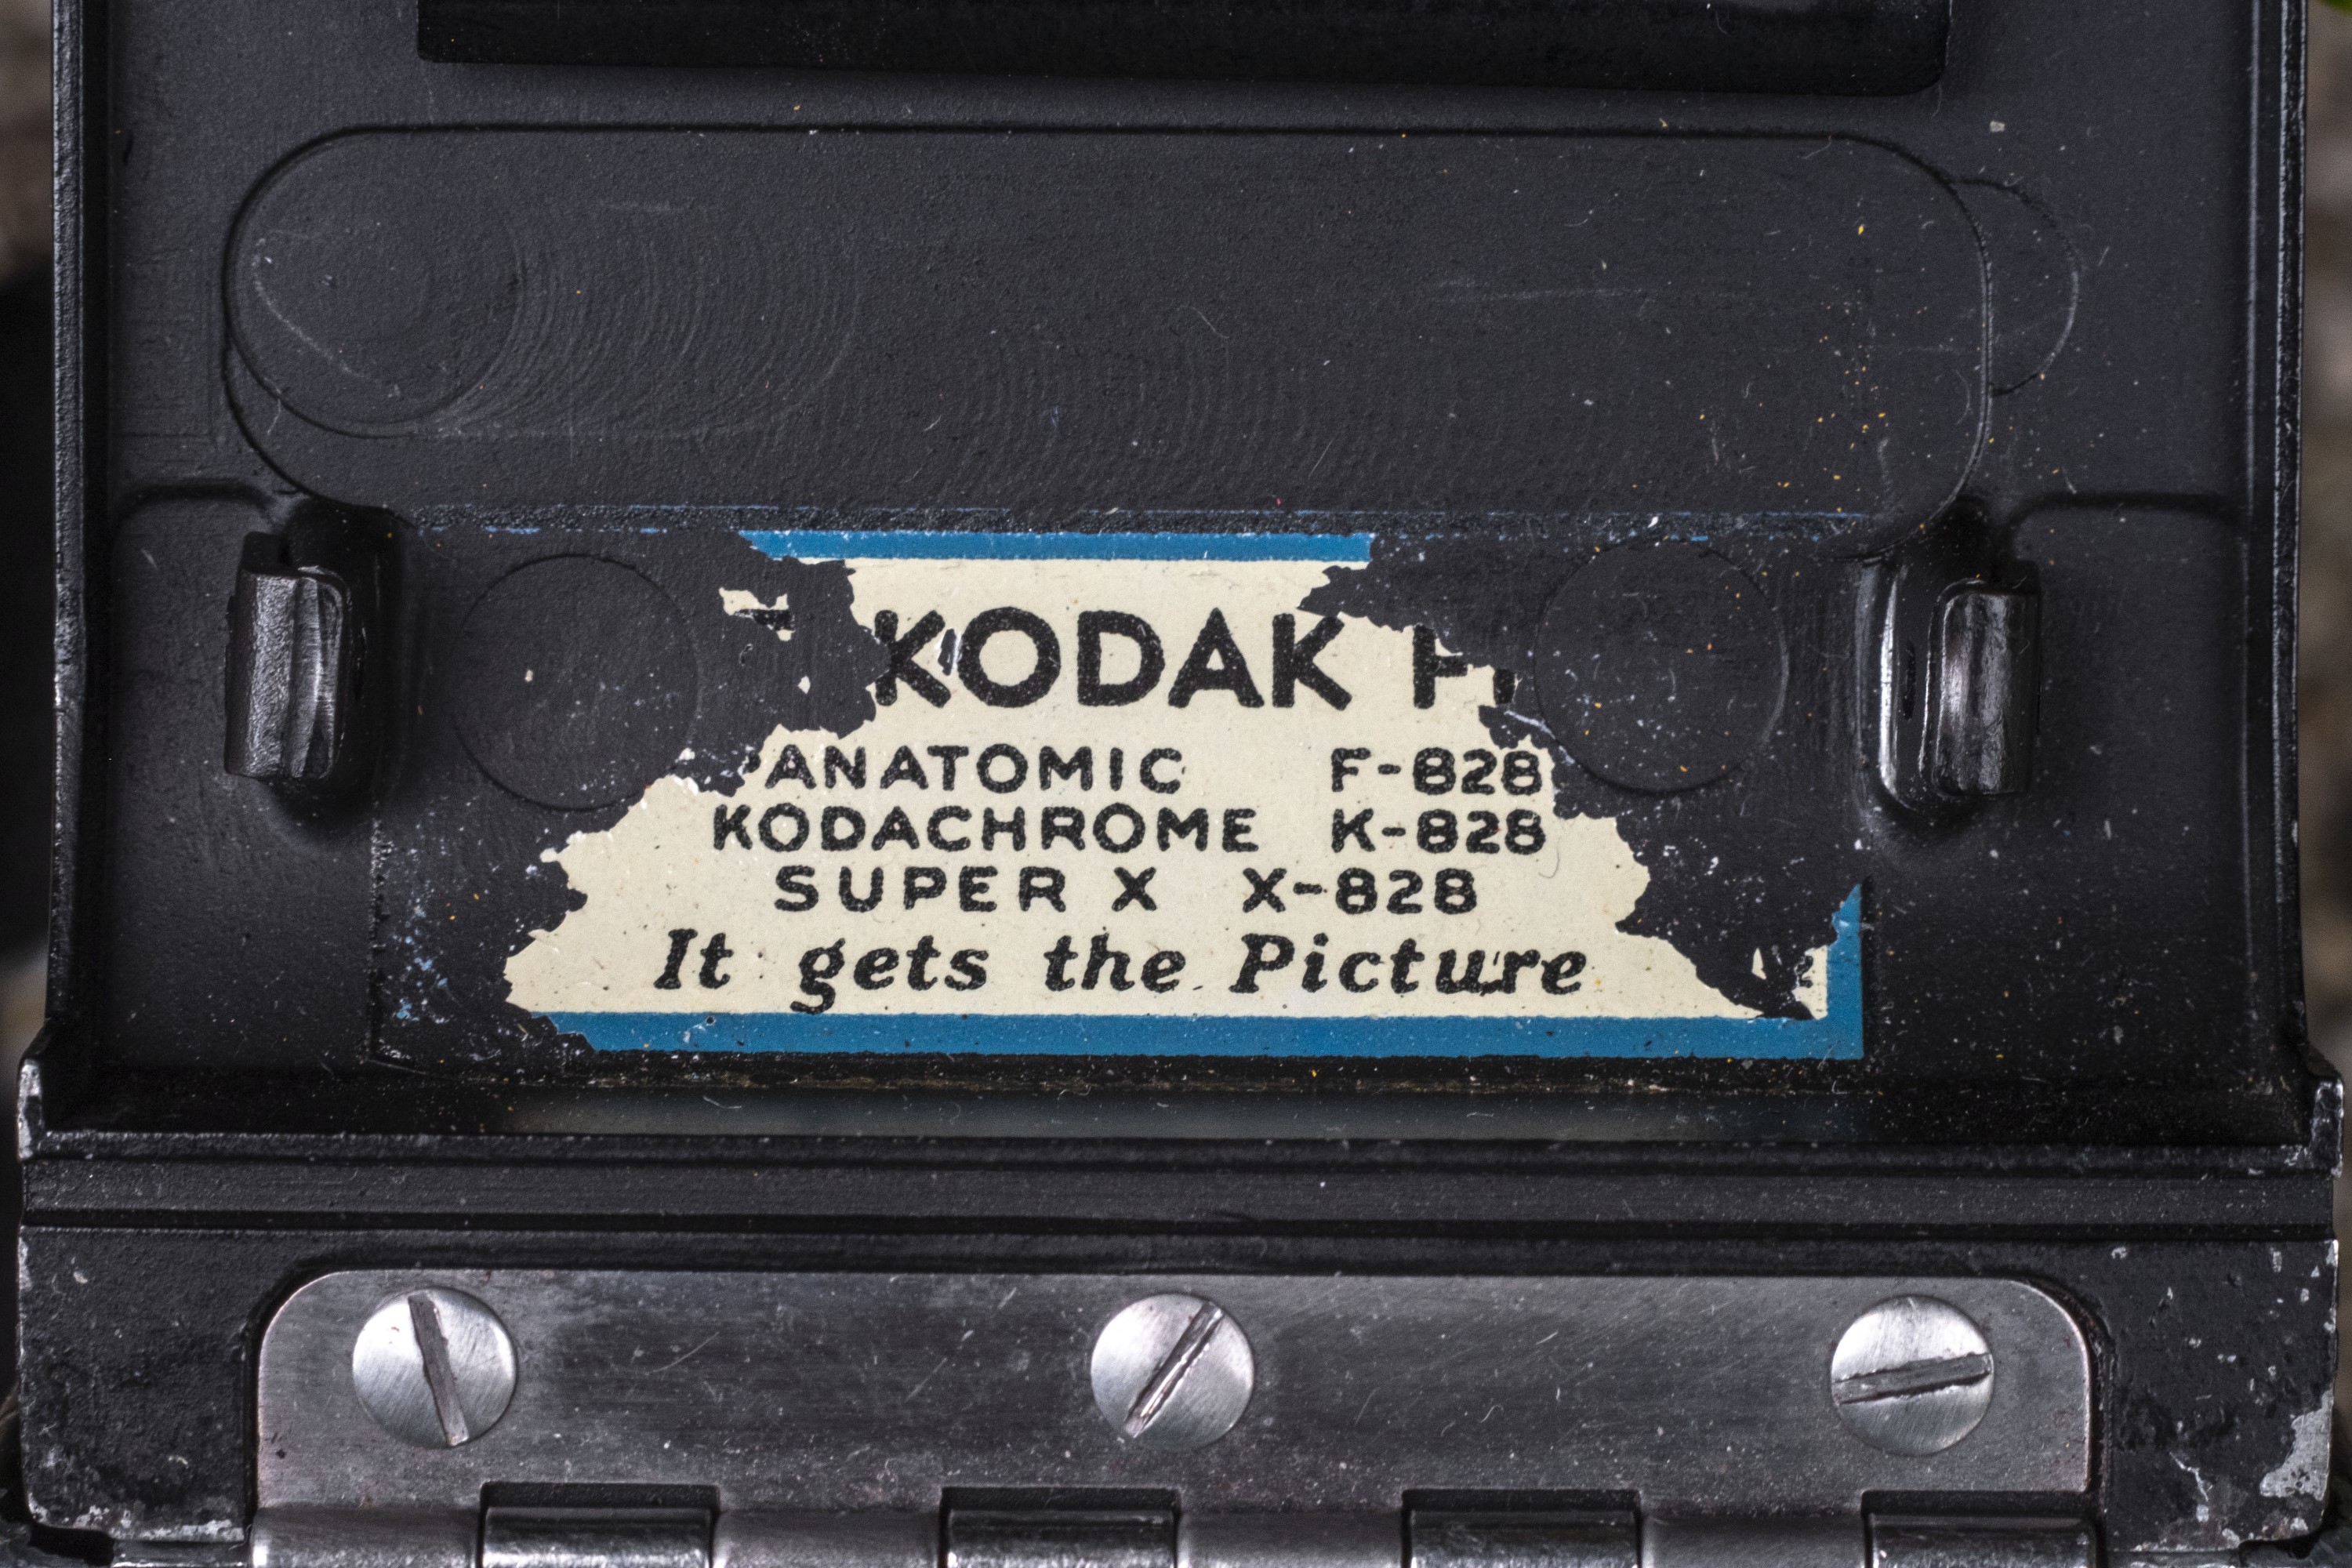
In 1935, Kodak made an attempt to popularize a variant of 35mm film without the sprocket holes which would allow for a larger 28mm x 40mm negative. This increased size allowed for a nearly 30% larger exposed negative which meant that photographs could be printed in larger sizes, while retaining more detail. 828 format film would be the same overall width as 135 format film but instead of two rows of sprocket holes, there would only be a single hole in between each frame on the film stock, so a camera would know when it had reached the next frame. 828 film was a paper backed roll film and did not come in a daylight loaded cassette. This likely was done to keep the costs low as Kodak probably didn’t want to eat into it’s own profits from their newly released 135 format. See the image to the left of a 28mm x 40mm image on 828 film compared to a normal 24 x 36mm image on standard 35mm film.
Along with their new 828 format, Kodak would release a series of cameras called the Bantam which would exclusively use 828 film. The first model, simply called the Bantam was a compact folding camera made entirely of Bakelite and came with either a fixed f/12.5 or f/6.3 lens. Later models would become more ambitious such as the Bantam 4.5 with a 4 speed shutter, full focus ability, and a 4-element Kodak Anastigmat Special lens, and the rangefinder equipped Bantam RF from 1954. Kodak was the primary maker of 828 film cameras, but there were 828 cameras made by other companies such as the Argus Model M and Photavit 828.
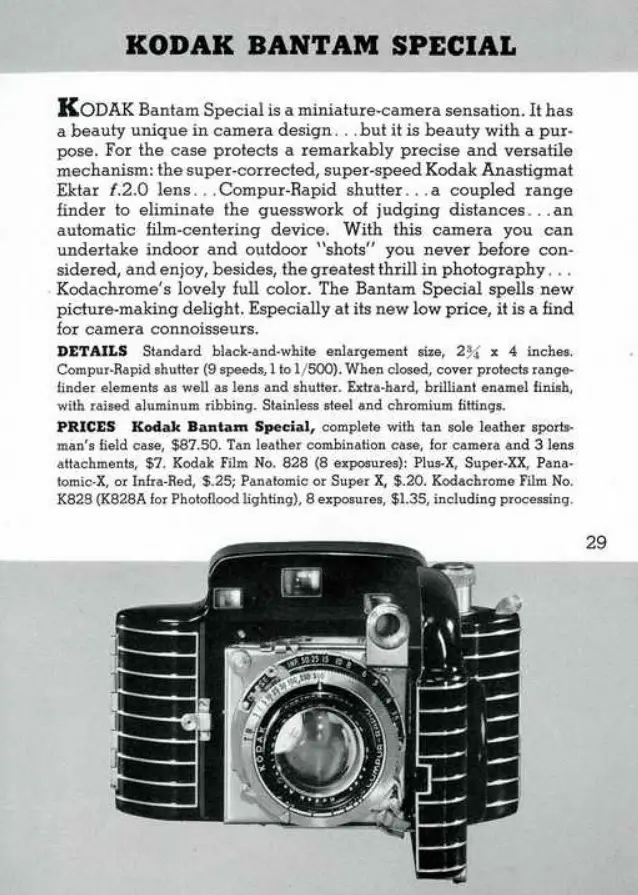
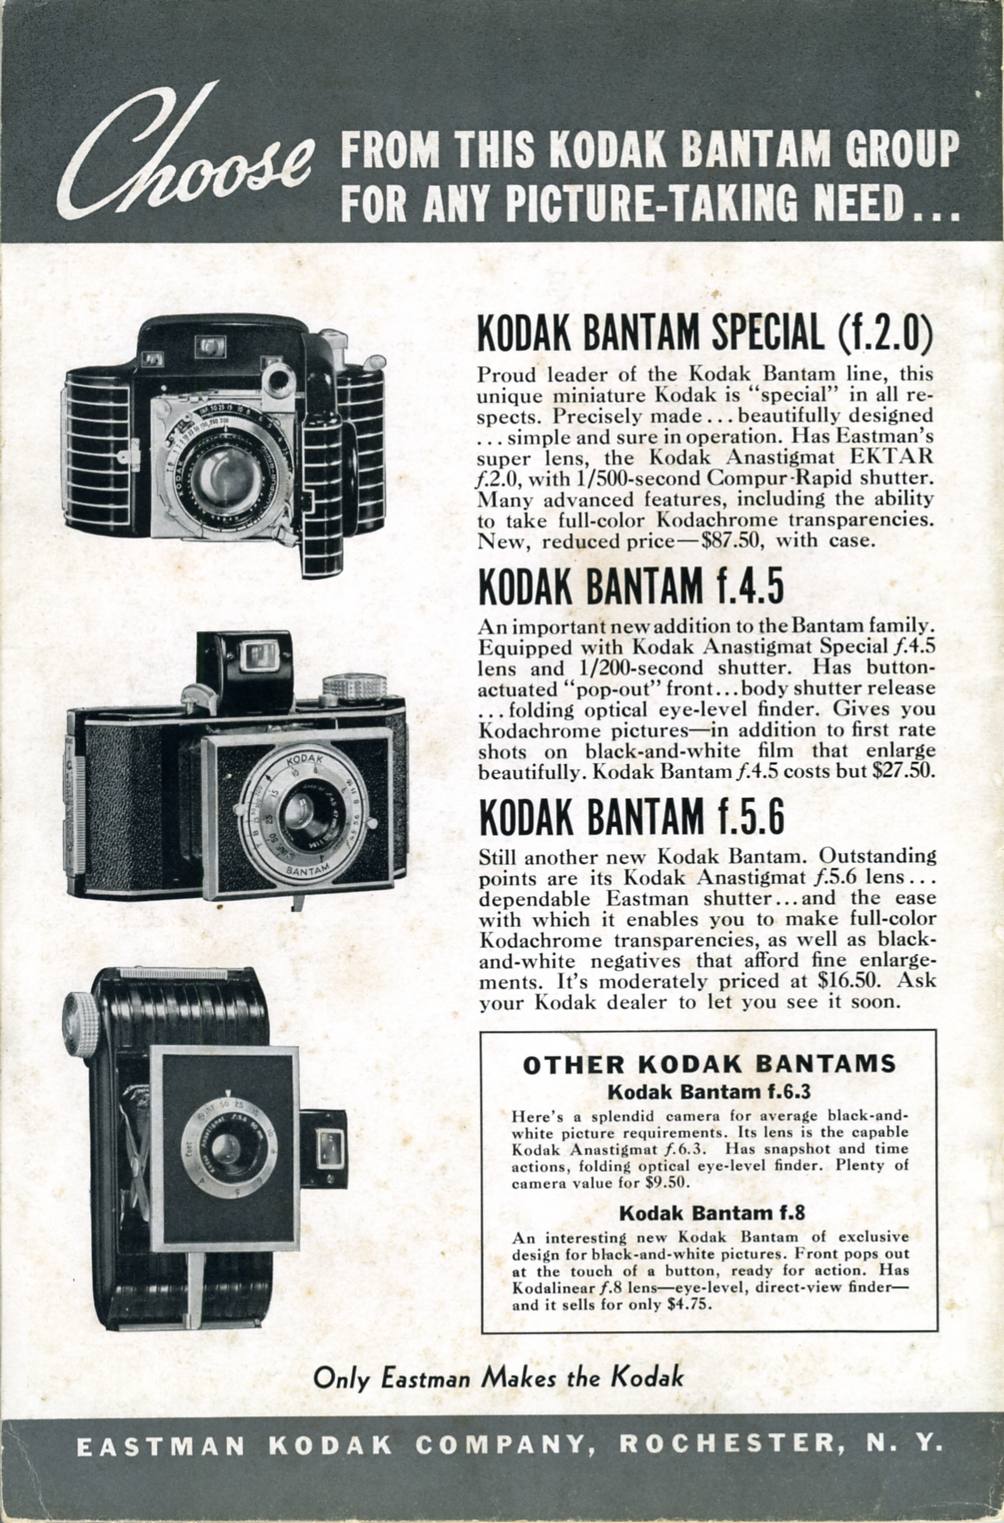 Although most Bantam models were aimed at the low to mid level of the market, there was one that aimed much higher, featuring a German shutter and Kodak’s top of the line 6-element Ektar lens. Consistent with Kodak’s naming conventions of the time, this top of the line Bantam was called the Bantam Special and it had a list price in 1936 of $87.50 which when adjusted for inflation is comparable to $1580 today!. The Special was designed by industrial designer, Walter Dorwin Teague who had a long history designing cameras for Kodak and other companies. He helped create the unique lines of the Bantam series, along with the Kodak Jiffy, Baby Brownie Special, and Medalist.
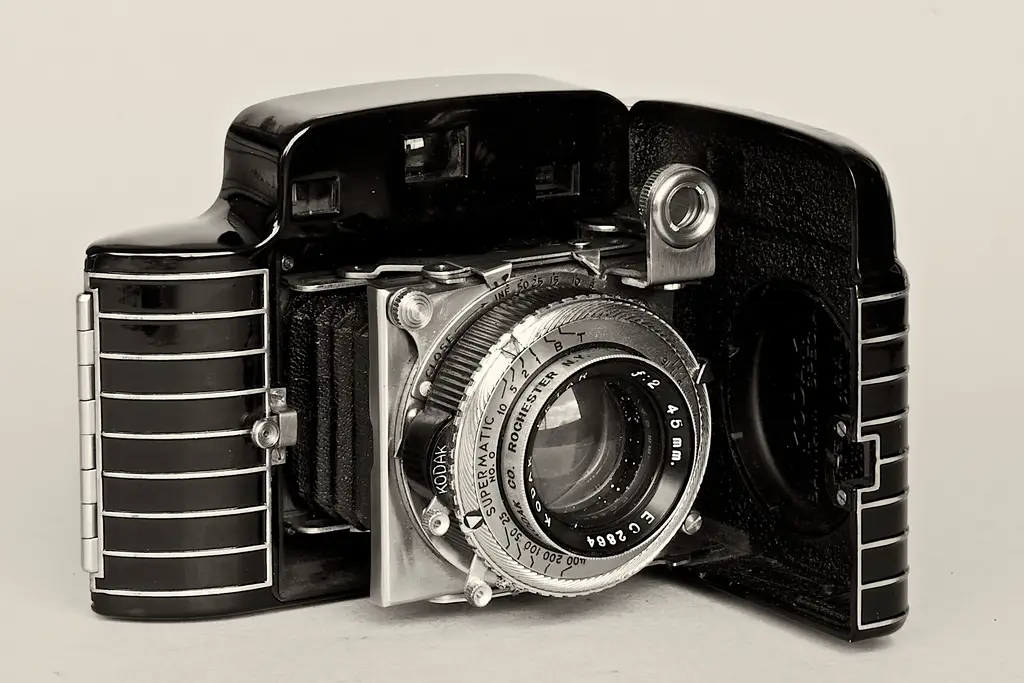
The Bantam Special had an elegant all aluminum folding shell that more closely resembled the design of a Kodak Retina, and it’s “art deco” pin stripe design has earned high praise from many collectors, some calling it one of the most handsomest cameras ever made.
The Bantam Special would remain in production until 1948 and would mostly stay the same throughout it’s run with the only major change being that around 1940, the camera came with a Kodak Supermatic shutter, instead of the German Compur. After the war, the price rose to $110 which when adjusted for inflation is around $1400 which because of the better post-war economy, the camera was cheaper than it was before the war. I could find no sales figures of the Bantam Special, but the later Supermatic models are far less common suggesting that fewer were sold.
Kodak would continue to produce 828 format cameras until the early 1960s, at which time the company would stop making new models. Despite no longer releasing any new cameras, it continued to support the film standard until 1985.
During my research for this article, I could not find any conclusive evidence at how well 828 film sold. On one hand, it was made for nearly 50 years, but based on the lack of many models that supported it, I just don’t think that 828 really caught on that well. Aside from the Bantam Special there were no other high end cameras that used the format.
Today, the Bantam Special is highly collectible with prices easily exceeding $200 for models in nice cosmetic condition. Most of these cameras end up being shelf pieces by collectors who want them for their looks, rather than their use. The limited number of people who both collect and use their cameras are usually turned off by the 828 film format. It can be hard to find one of these cheaply, but if you do, buy it!
Repairs
This Bantam Special didn’t require much in the way of repairs, although the viewfinder was incredibly dirty and the rangefinder seemed to be horizontally misaligned. To clean the viewfinder and rangefinder windows, you only need to remove 3 screws to get the top plate off the camera. The rangefinder in the Bantam Special uses all prisms, and no mirrors, so cleaning them is relatively easy once you get the top plate off. I couldn’t see any sort of obvious rangefinder adjustment, so I just decided to leave it be. I cleaned up the surfaces of the glass and prisms with a Q-tip and some glass cleaner and put it back together.
My Thoughts
You only need to be a camera collector for a few minutes to discover the models that are out of the price reach of bargain hunters such as myself. While not to the level of high end cameras like Leicas, Rolleiflexes, or Hasselblads, the Kodak Bantam Special is one of the most valuable cameras ever made by Kodak.
Why is that, you might ask? Perhaps its the very distinctive pinstripe “art-deco” styling that reminds people of a fancy pin-striped suit, perhaps it’s the reputation of the 6-element f/2 Kodak Ektar lens and Compur Shutter, or perhaps people just like to spend gobs of money on an uncommon camera with a unique feature set that uses film you can’t get anymore.
Whatever the reason, the Kodak Bantam Special is one that is hard to find for under $200 and depending on condition can go for quite a bit more than that. So it was with a level of excitement when fellow collector Adam Paul came across this Bantam Special in well worn, but working condition at a local estate sale. He said that he’d shoot a couple of rolls of film through it and then send it my way to hear my thoughts.
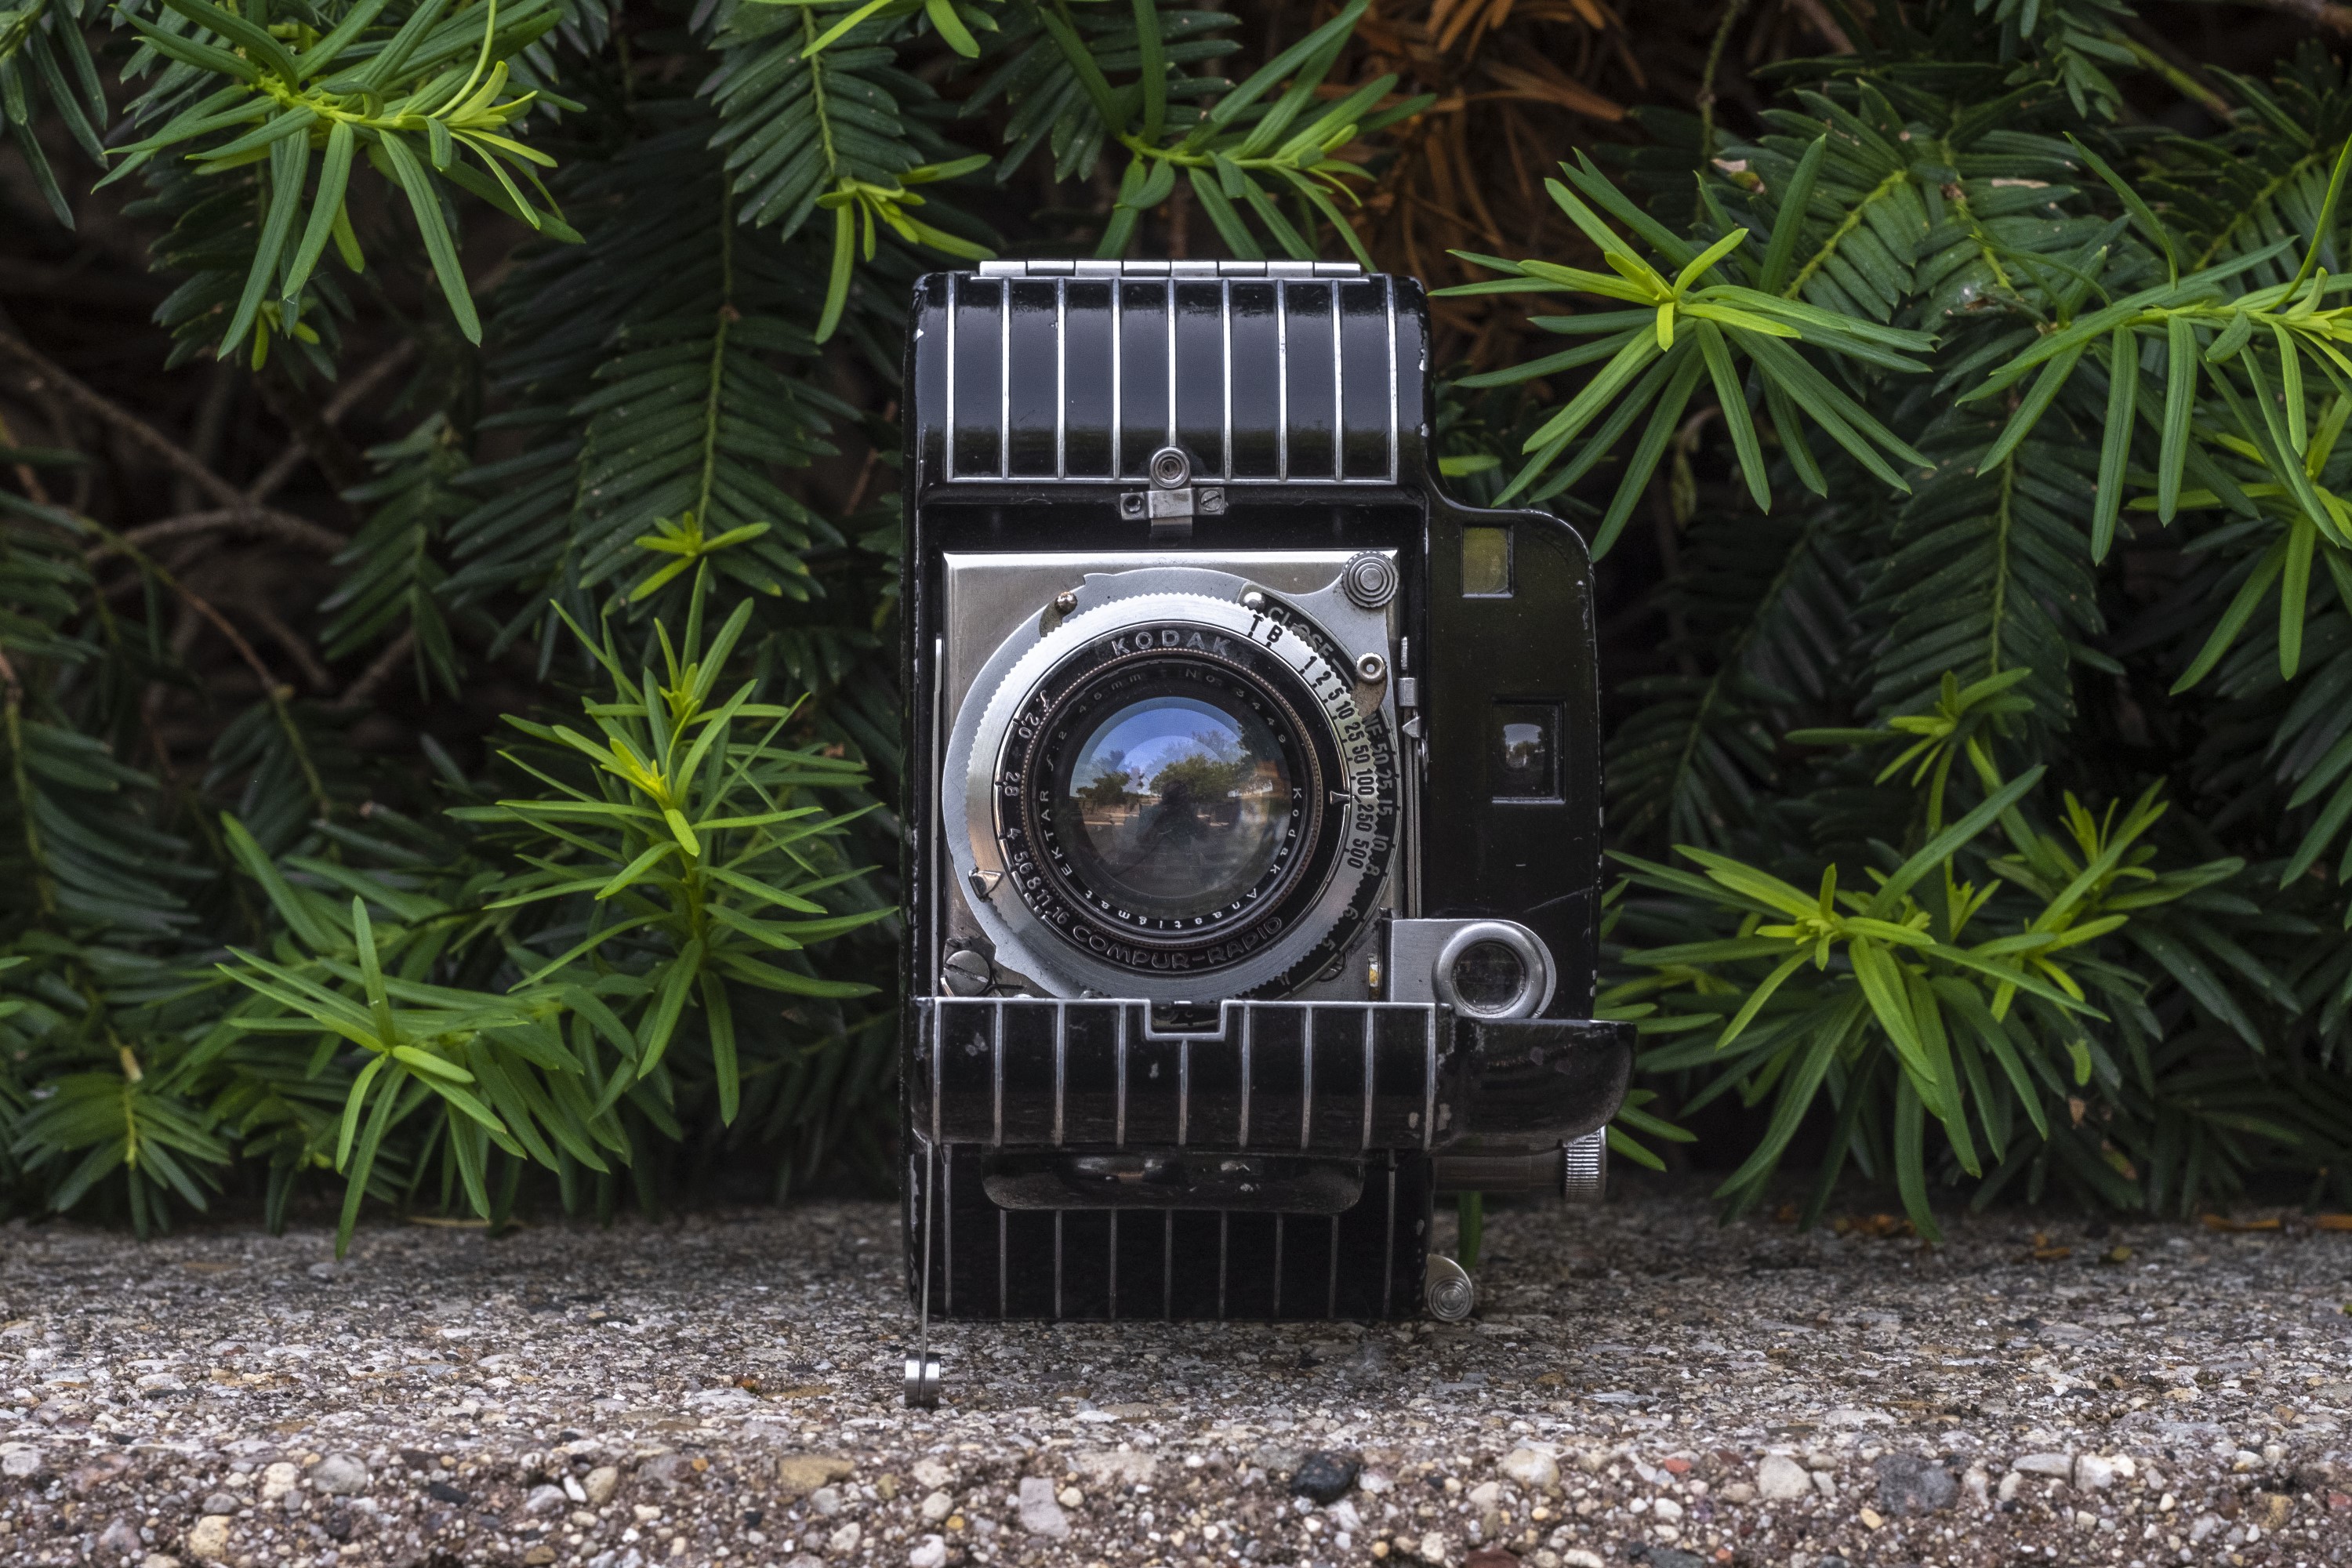
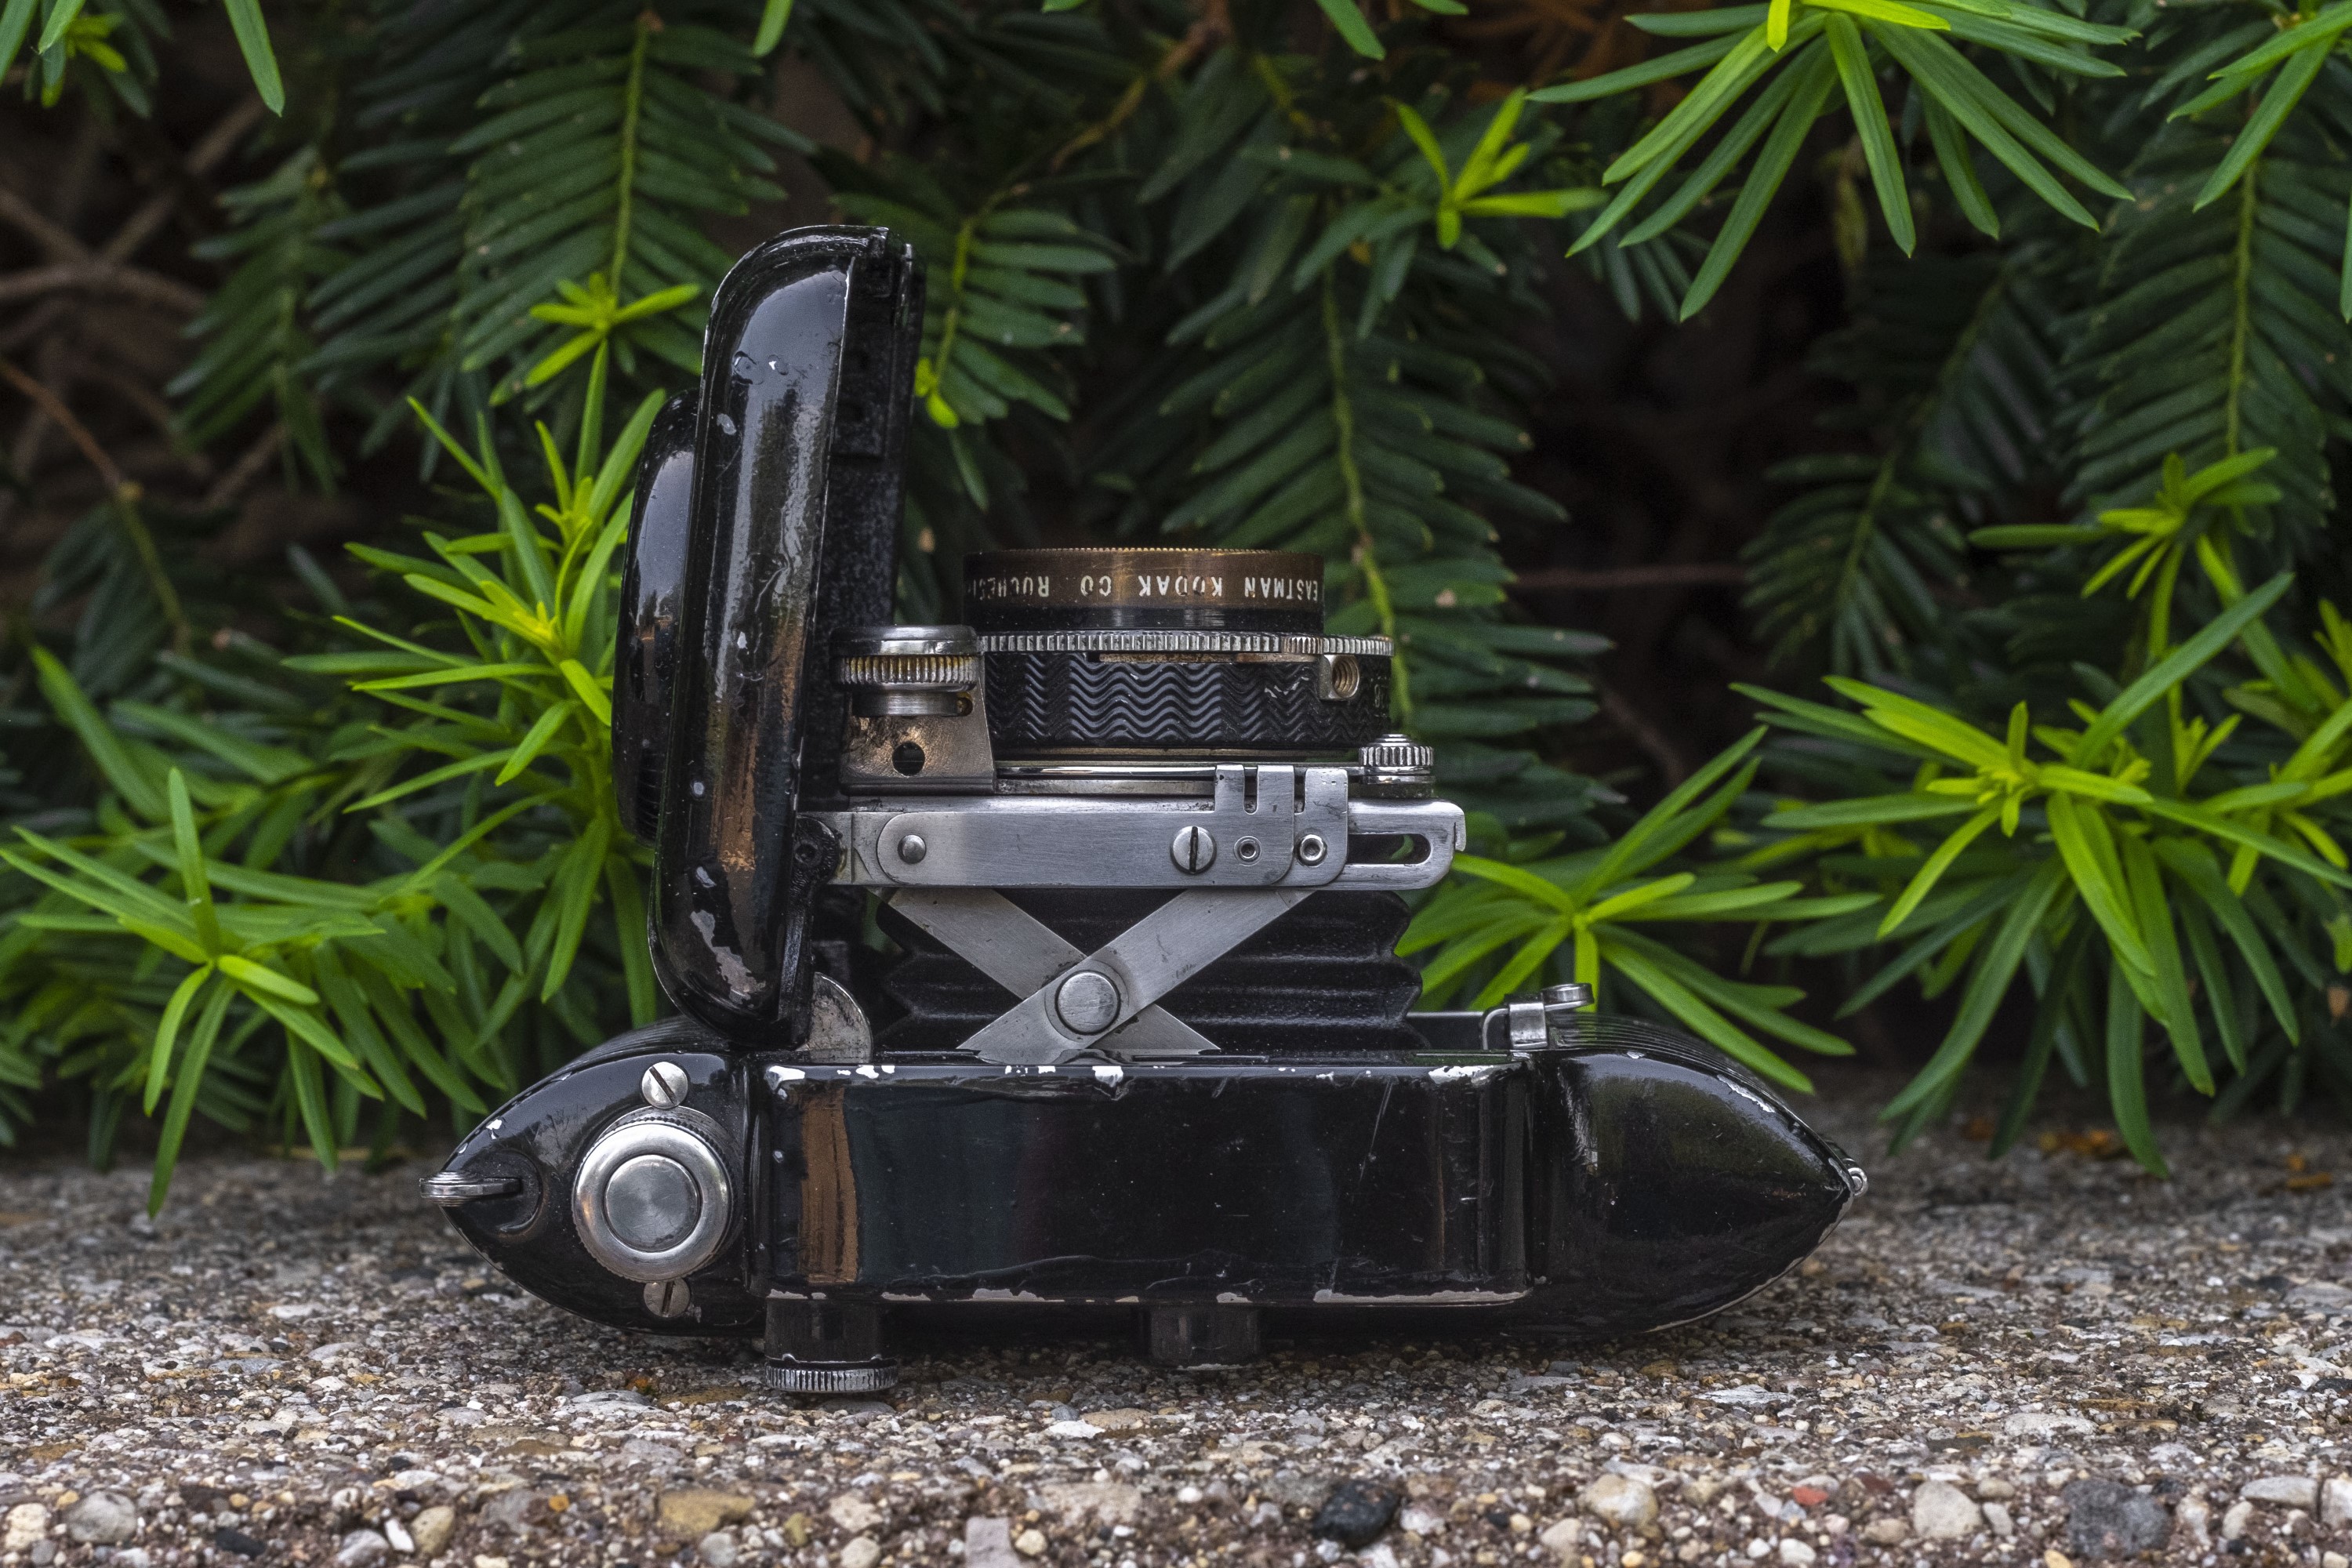
Upon it’s arrival, I could see why so many people are enamored by the camera. It’s looks are unlike that of any camera ever made. The aluminum clam shell body has a glossy piano black enamel along with contrasting bare aluminum stripes all over the body. Each of the camera’s knobs and little latches that open the front and back of the camera are bare aluminum with a strong, yet elegant design pattern to them. It is common knowledge that Walter Dorwin Teague helped design this camera, but I do not know if he was responsible for the whole thing or just parts of it, but whoever was in control of the final design of this camera clearly had an eye for elegance.
From a technical standpoint, you can’t argue with a Compur Rapid shutter as they were some of the best made in the world. The 6-element Kodak Ektar lens is no slouch either. Although most everyone was focused on German lenses made by Zeiss and others, Kodak made some of the best lenses of the era, and the Ektar was no exception.
With a strikingly beautiful body, a coupled rangefinder, and a quality lens and shutter, this must be one of the best cameras ever made, right? Read on.
The first step to using the camera is to open it. This is accomplished by pressing on the little release latch near the 9 o’clock position of the shutter cover with the camera on it’s side. This will release the lock on the right hinged door. The camera is not self-erecting so it will need a little help to fully open. In it’s fully open position the door isn’t quite 90 degrees to the body, its more like 80-85. If this looks strange to you, don’t worry, it’s normal, and whatever you do, don’t try to force it open a full 90 degrees as you’ll damage the camera. There is a kickstand that slides out of the door, for propping up the camera in a portrait orientation on a table.
Edit 11/15/2019: Since writing this review, I have learned that the Bantam Special should open a full 90 degrees, and whatever was causing the example I tested for this review to only open part way is definitely not normal. This defect also negatively affected my ability to properly focus my images, which you’ll see later in this review. If I ever have an opportunity to review another Bantam Special, I will be sure to update this review.
Edit: 7/22/2021: I did have a chance to re-review a better working Bantam Special, which rather than update this review, I created an entirely new post about it. Check it out here if you’d like to read that one.
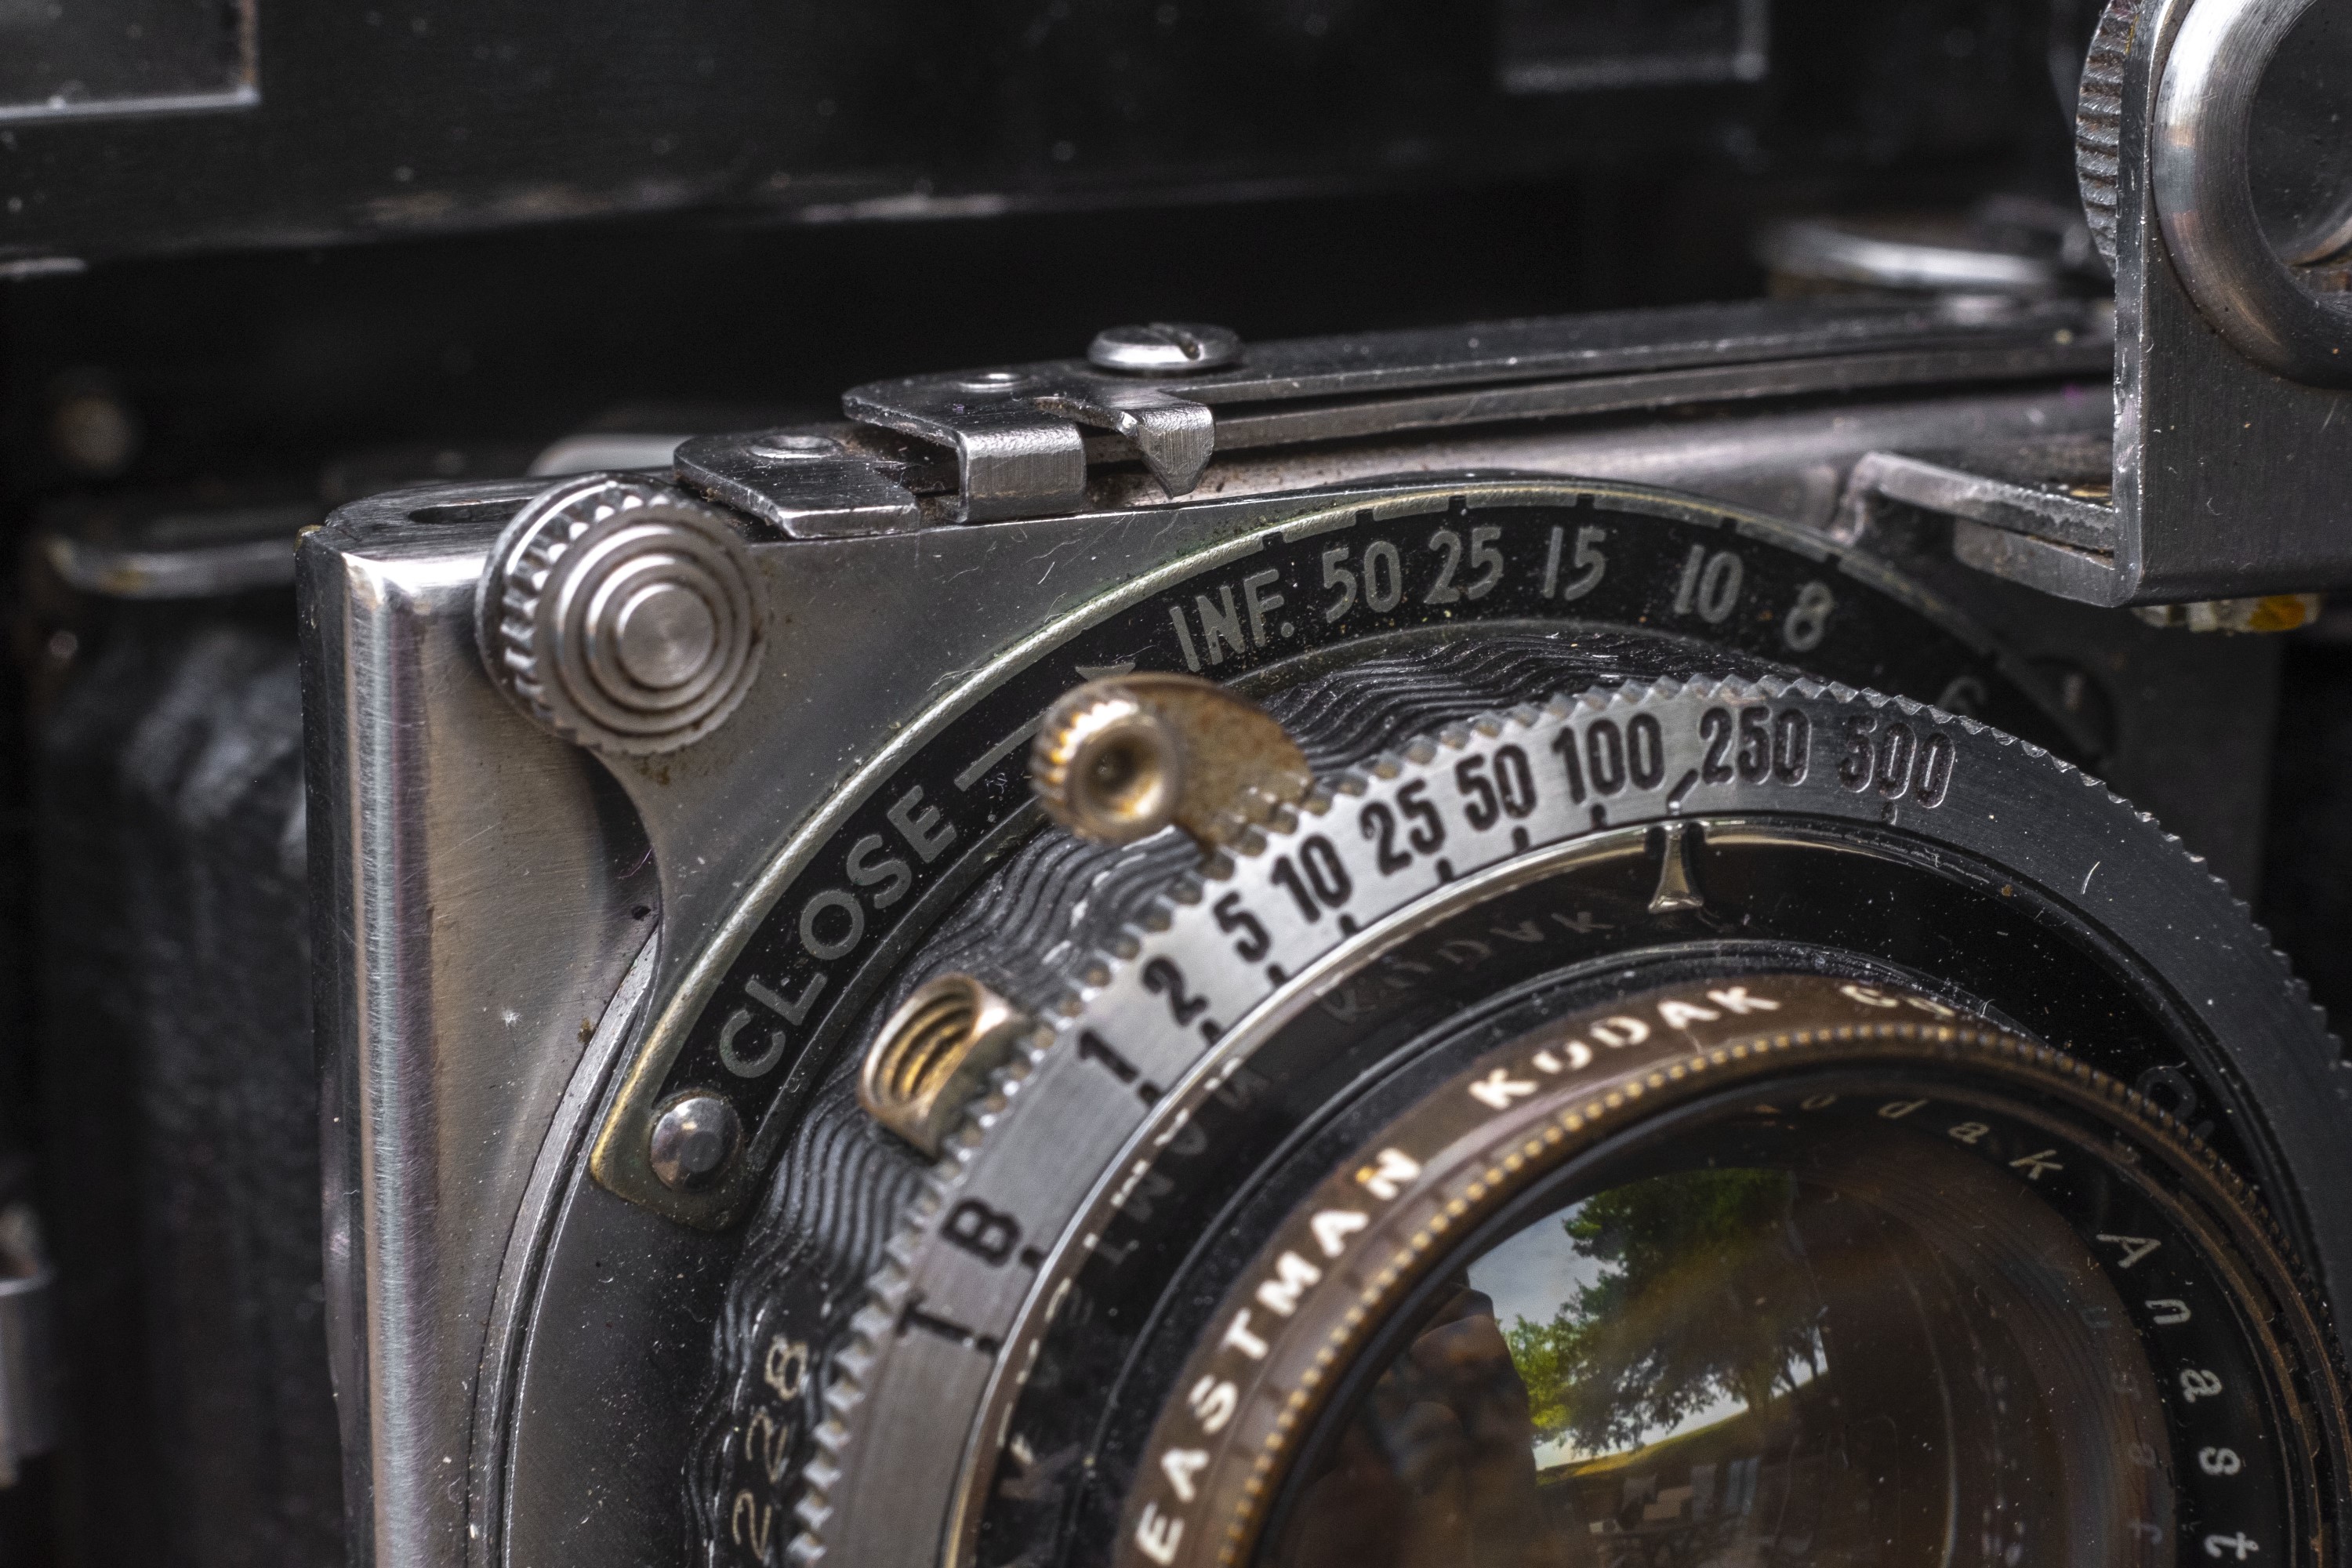
Once the camera is open, you should probably know how to close it, and this is where having the original owners manual (or this review) is useful as it is not obvious. Strangely, the release latch to close the camera is triggered using the focusing arm. You’ll notice the word “CLOSE” to the left of the infinity indicator and what this is trying to tell you is that by moving the focusing arm beyond infinity, it will put upward pressure on a locking latch and allow you to close the camera. In the image to the right, I am putting upward pressure on the focusing arm and you can see the edge of the arm making contact with the locking latch (above the letter “E” in “CLOSE”). Without doing this, the front door remains open. I have to wonder how many Bantam Specials have been forced closed by unknowing users over the past 80 or so years.
Looking at the top plate of the camera, there’s not much to see. Like all Bantam cameras, nearly all of the controls like the shutter speed, aperture, cocking lever, and shutter release are on the shutter itself. Being an 828 roll film camera, there is only an advance knob on the left, but with no provision for rewinding like on 35mm cameras. From this angle, the Bantam looks very similar to a Kodak Retina of the same period, except the door is on the other side.
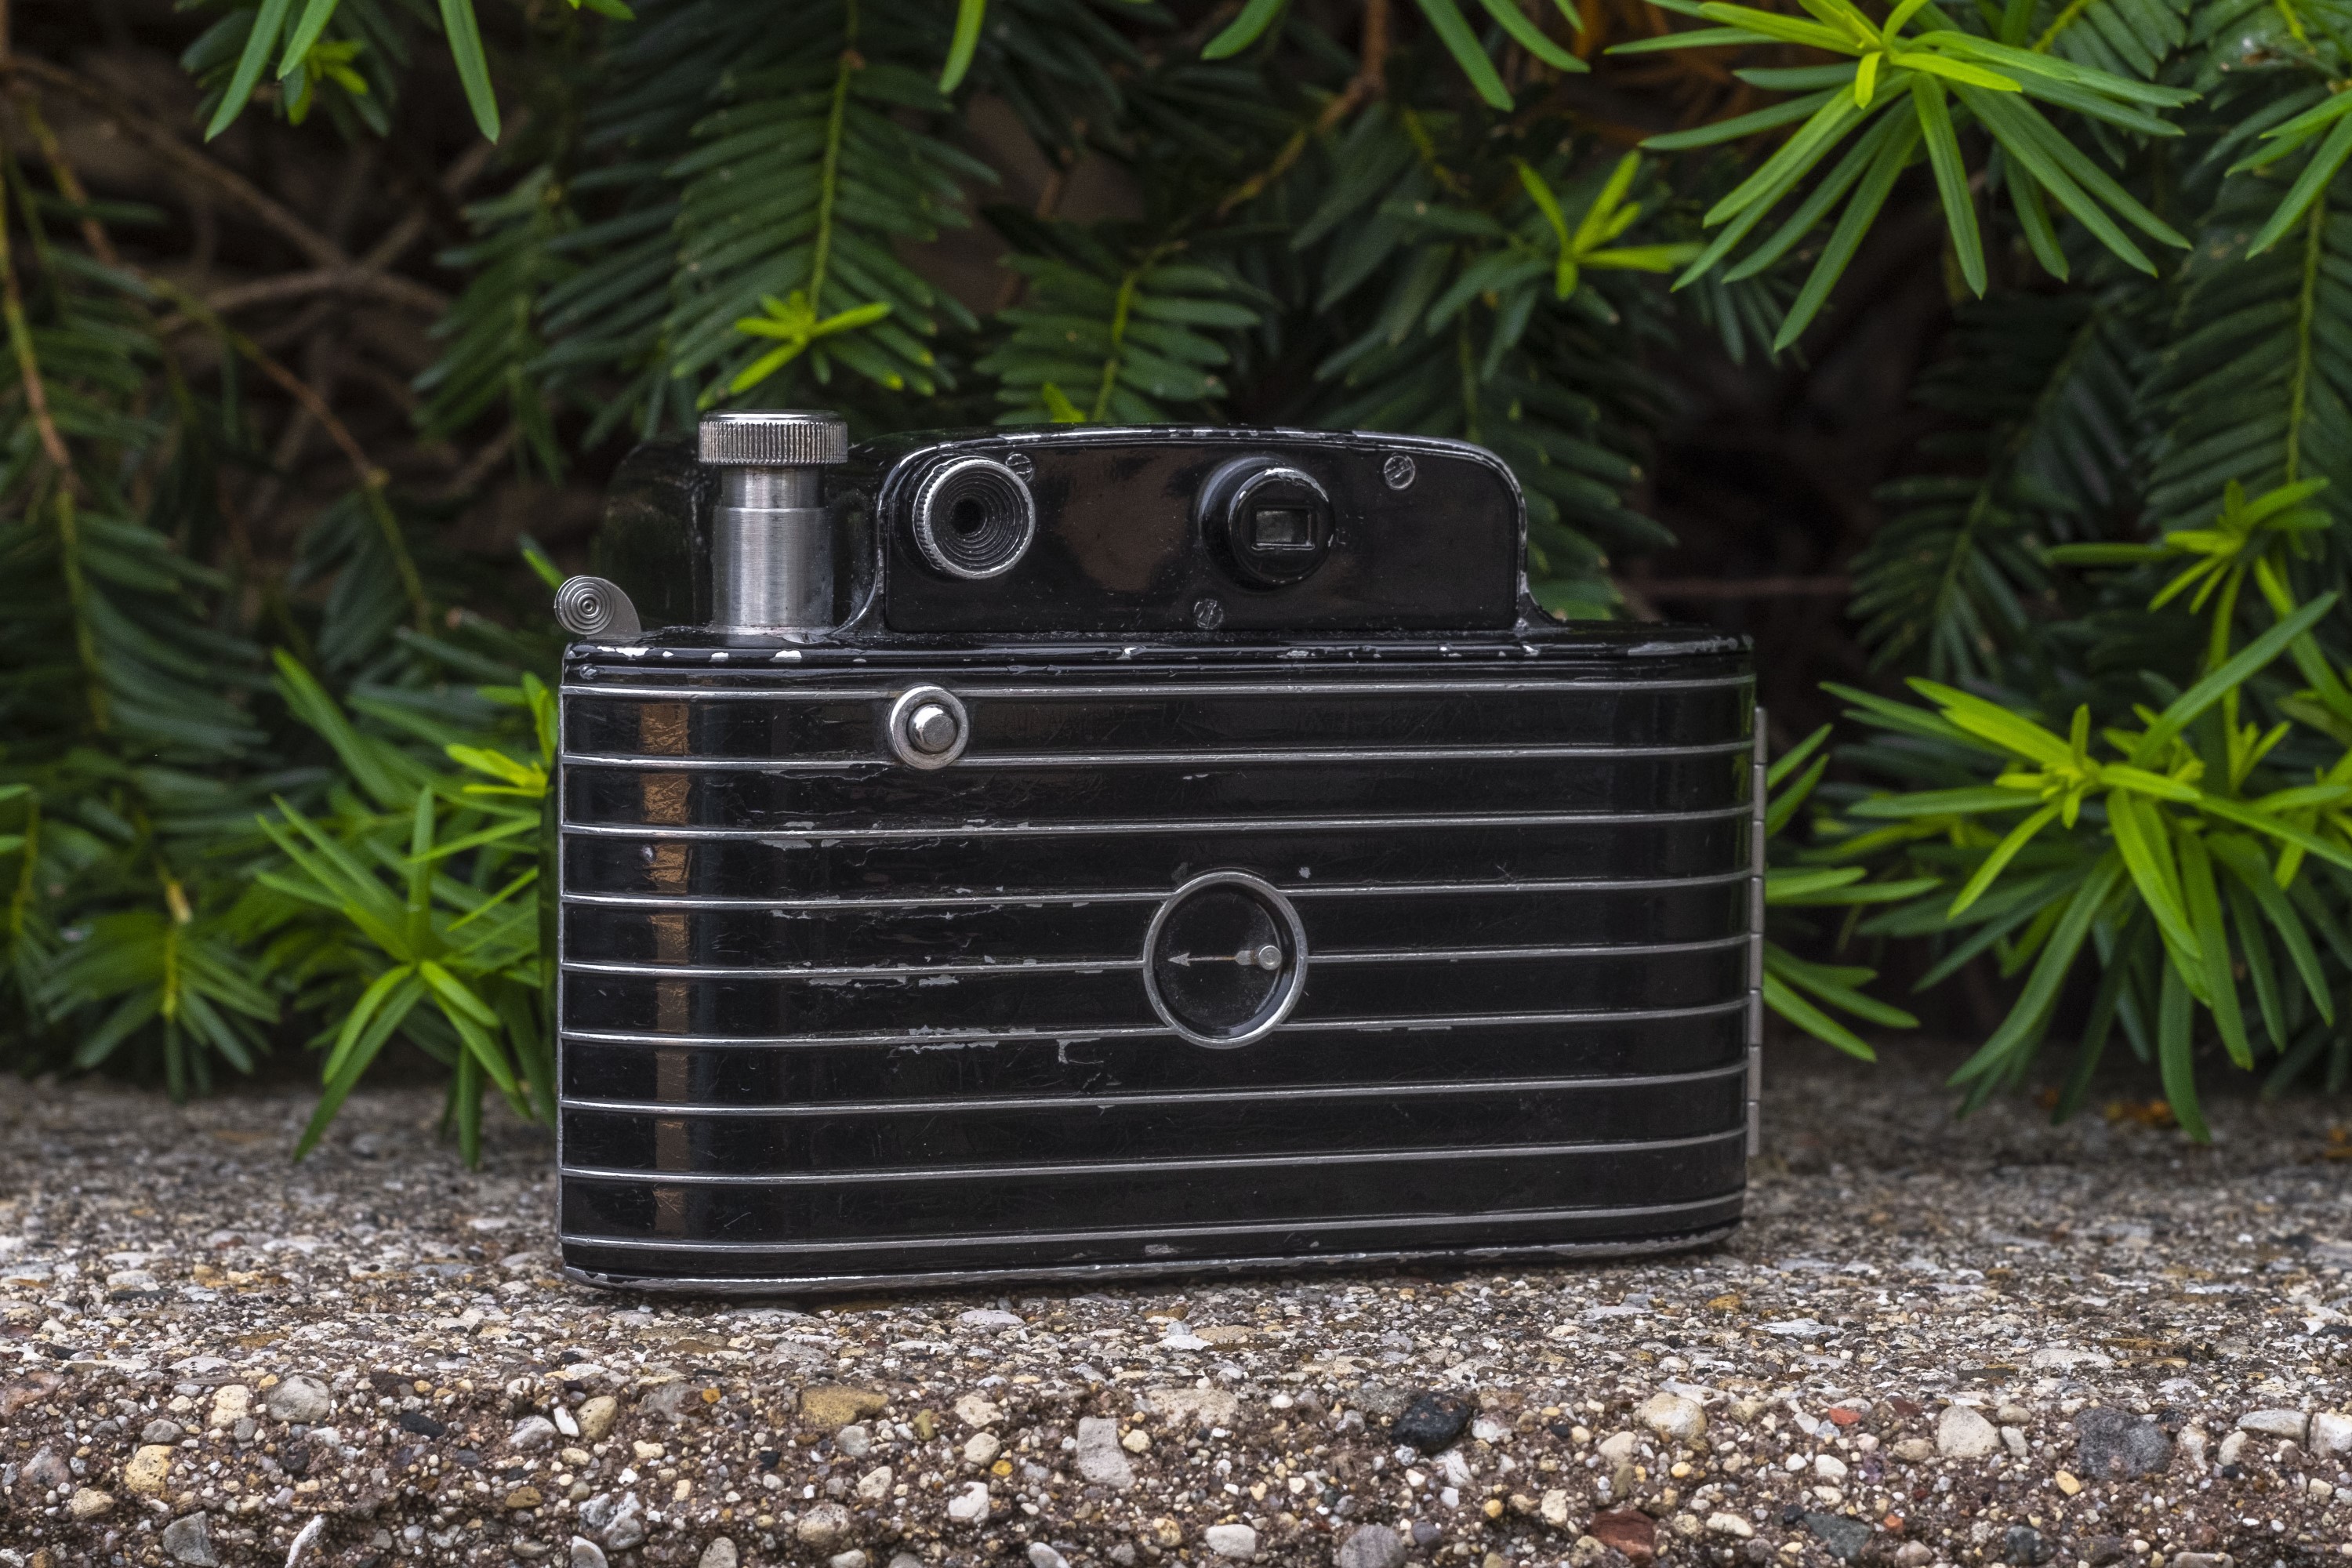
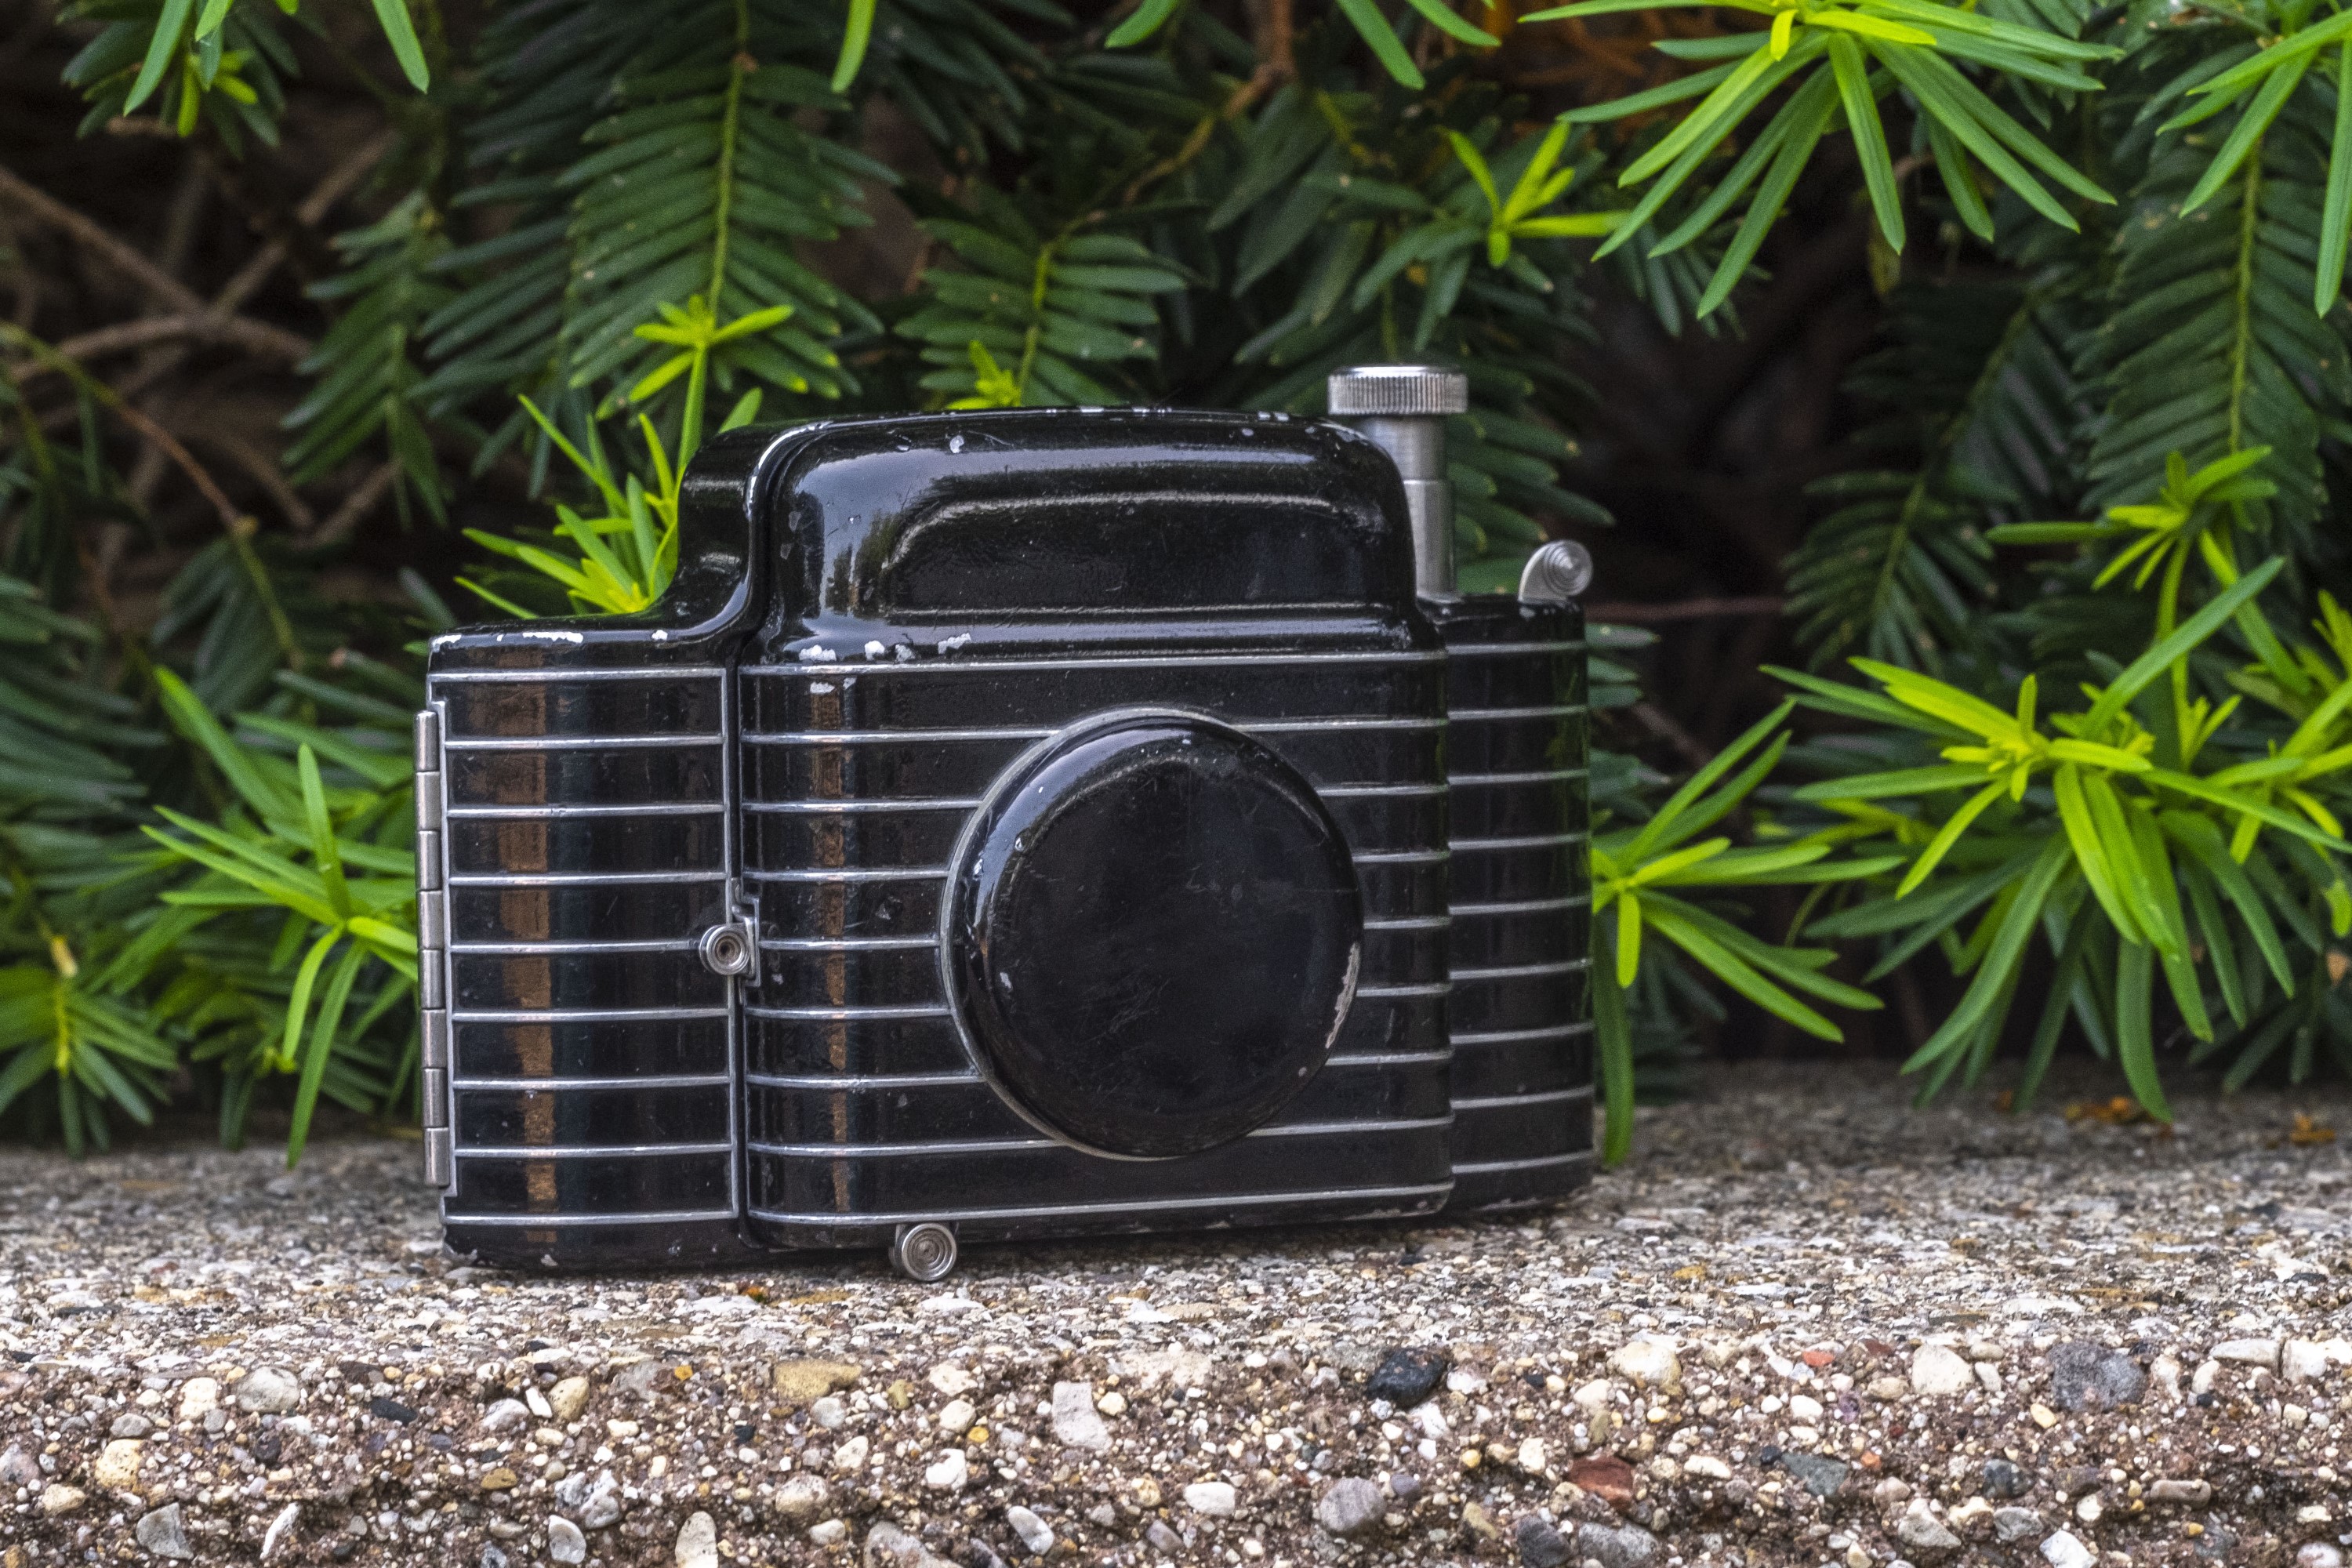
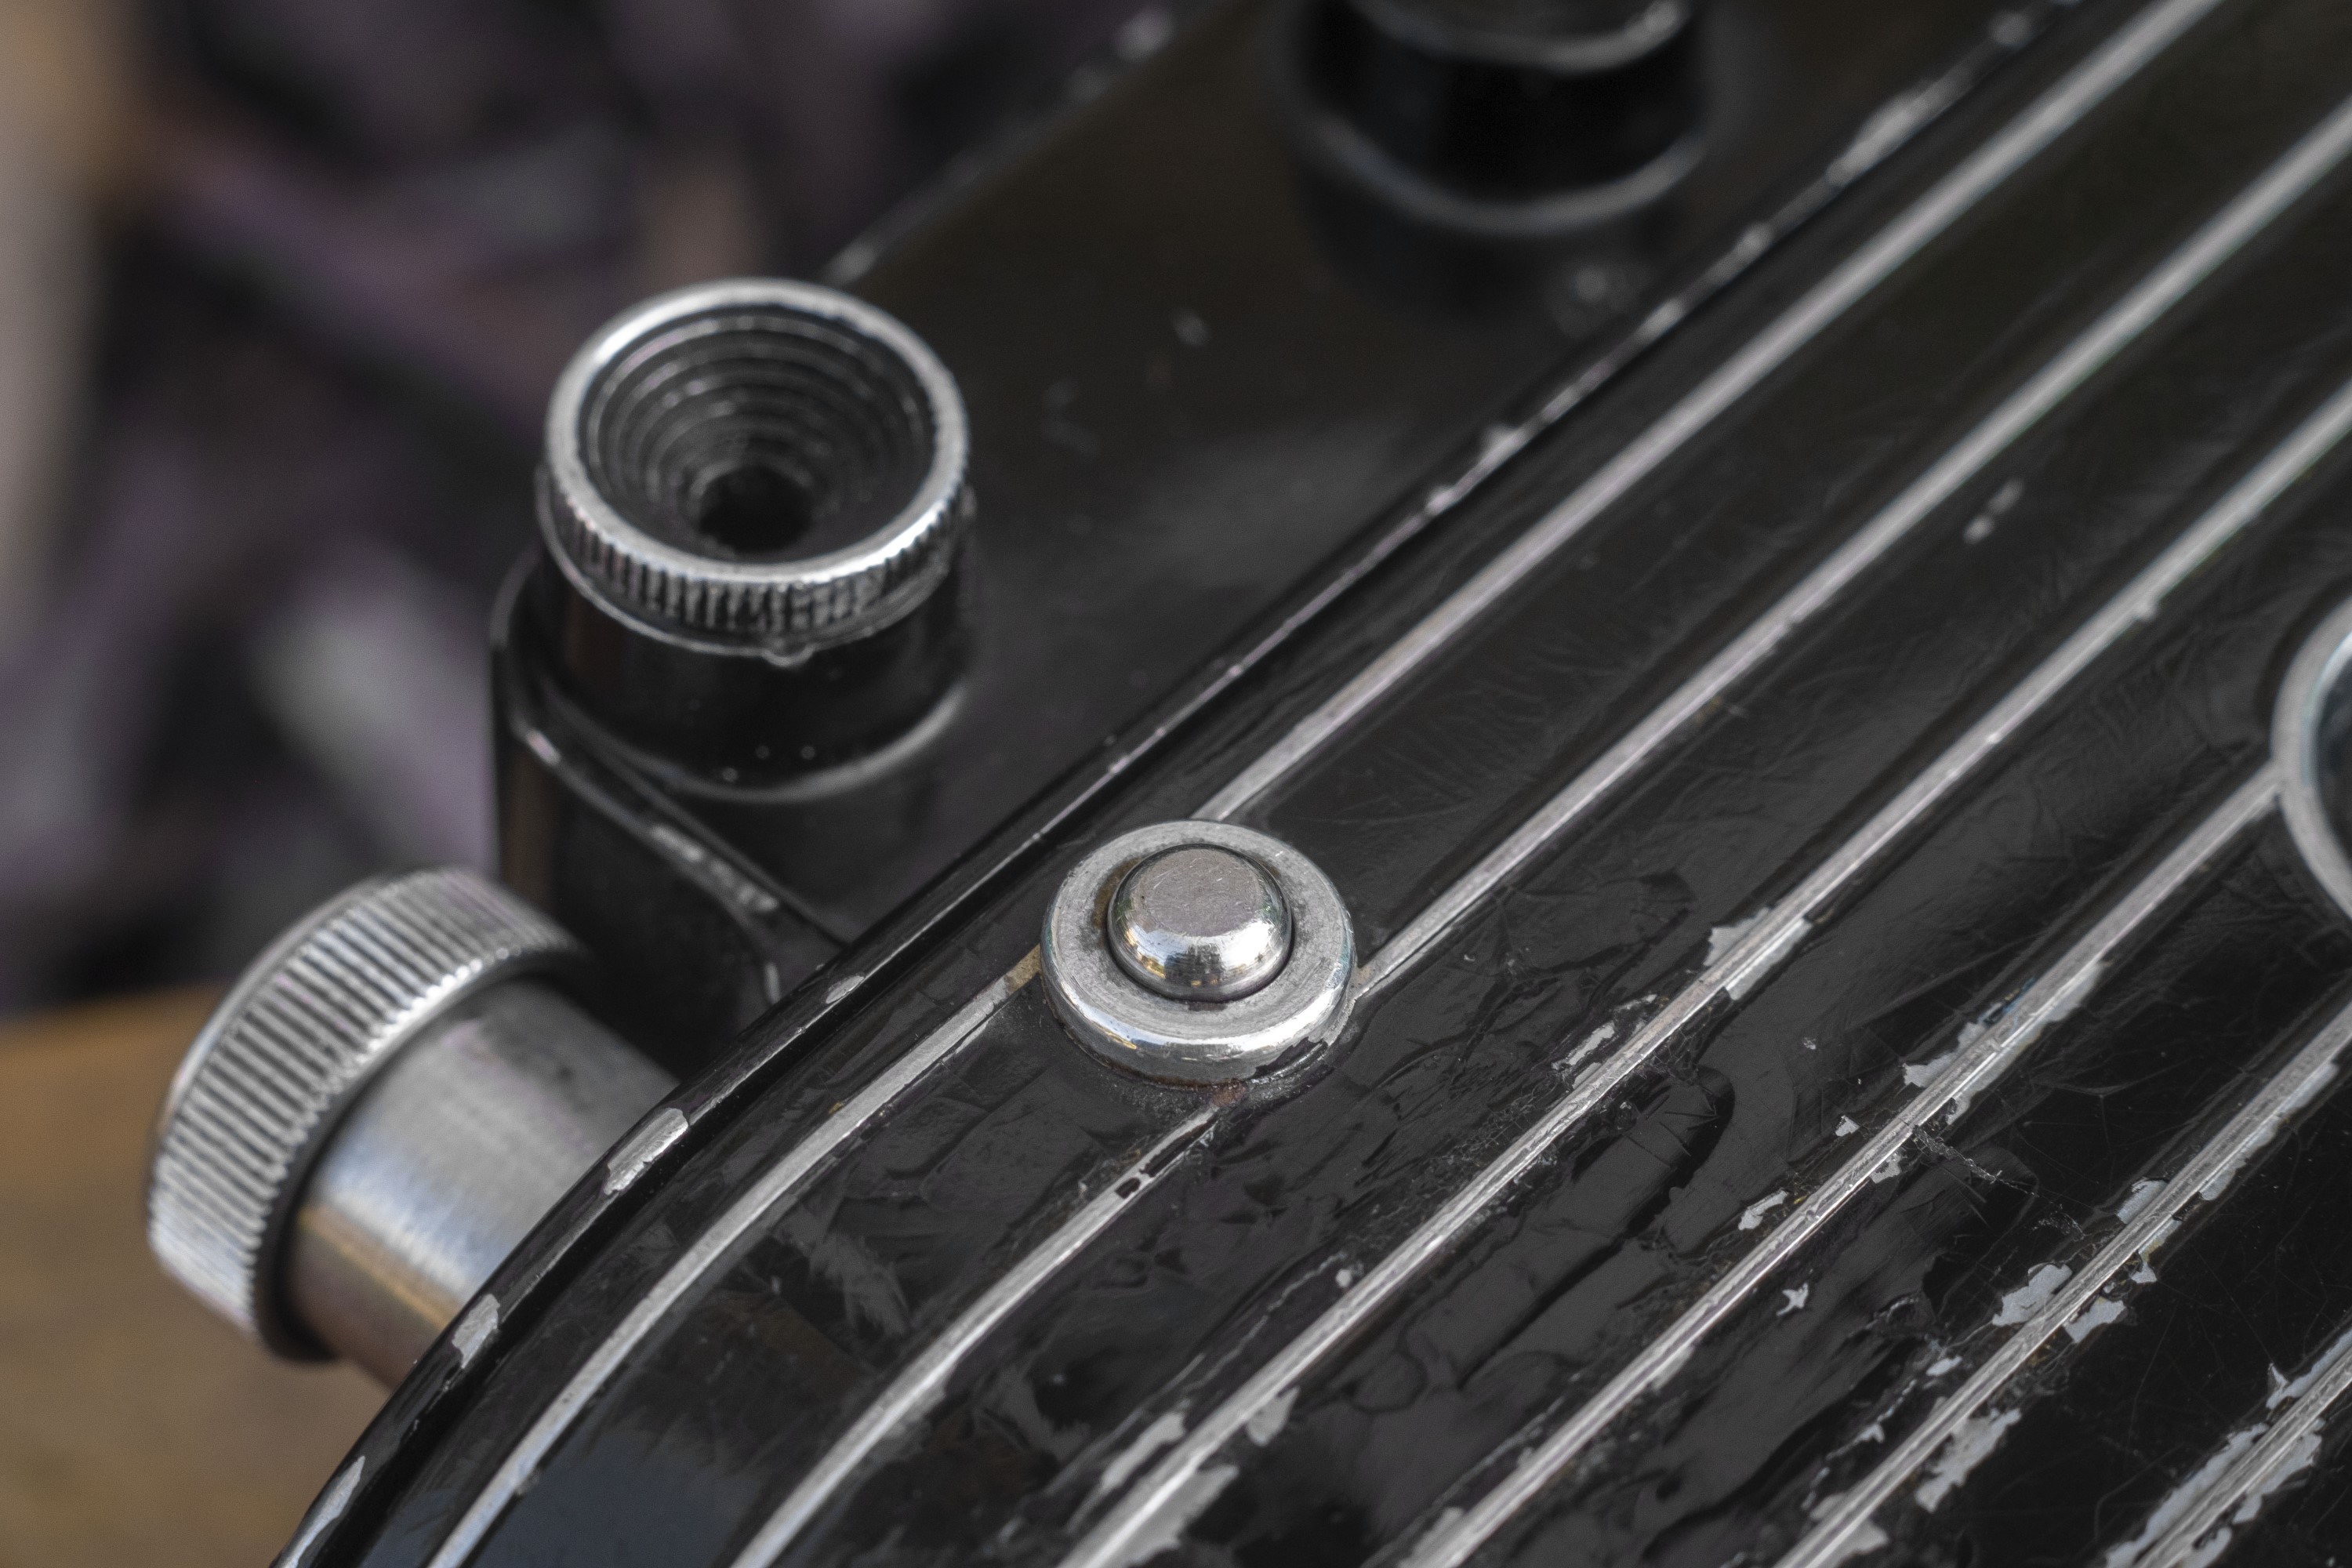
The back of the camera continues the pin stripe theme from the front. In the center of the back is a circular window for viewing the exposure numbers on the backing paper of the 828 film. There is a sliding metal door to cover this window for when it is not needed. To the left and above the exposure window is a small metal button which is found on all 828 film cameras which is a release that must be pressed to advance the film after each exposure. 828 film has a single perforation hole after each exposure that hits a pin and prevents you from advancing the film beyond the next frame. Pressing this button while turning the advance knob overrides this pin.
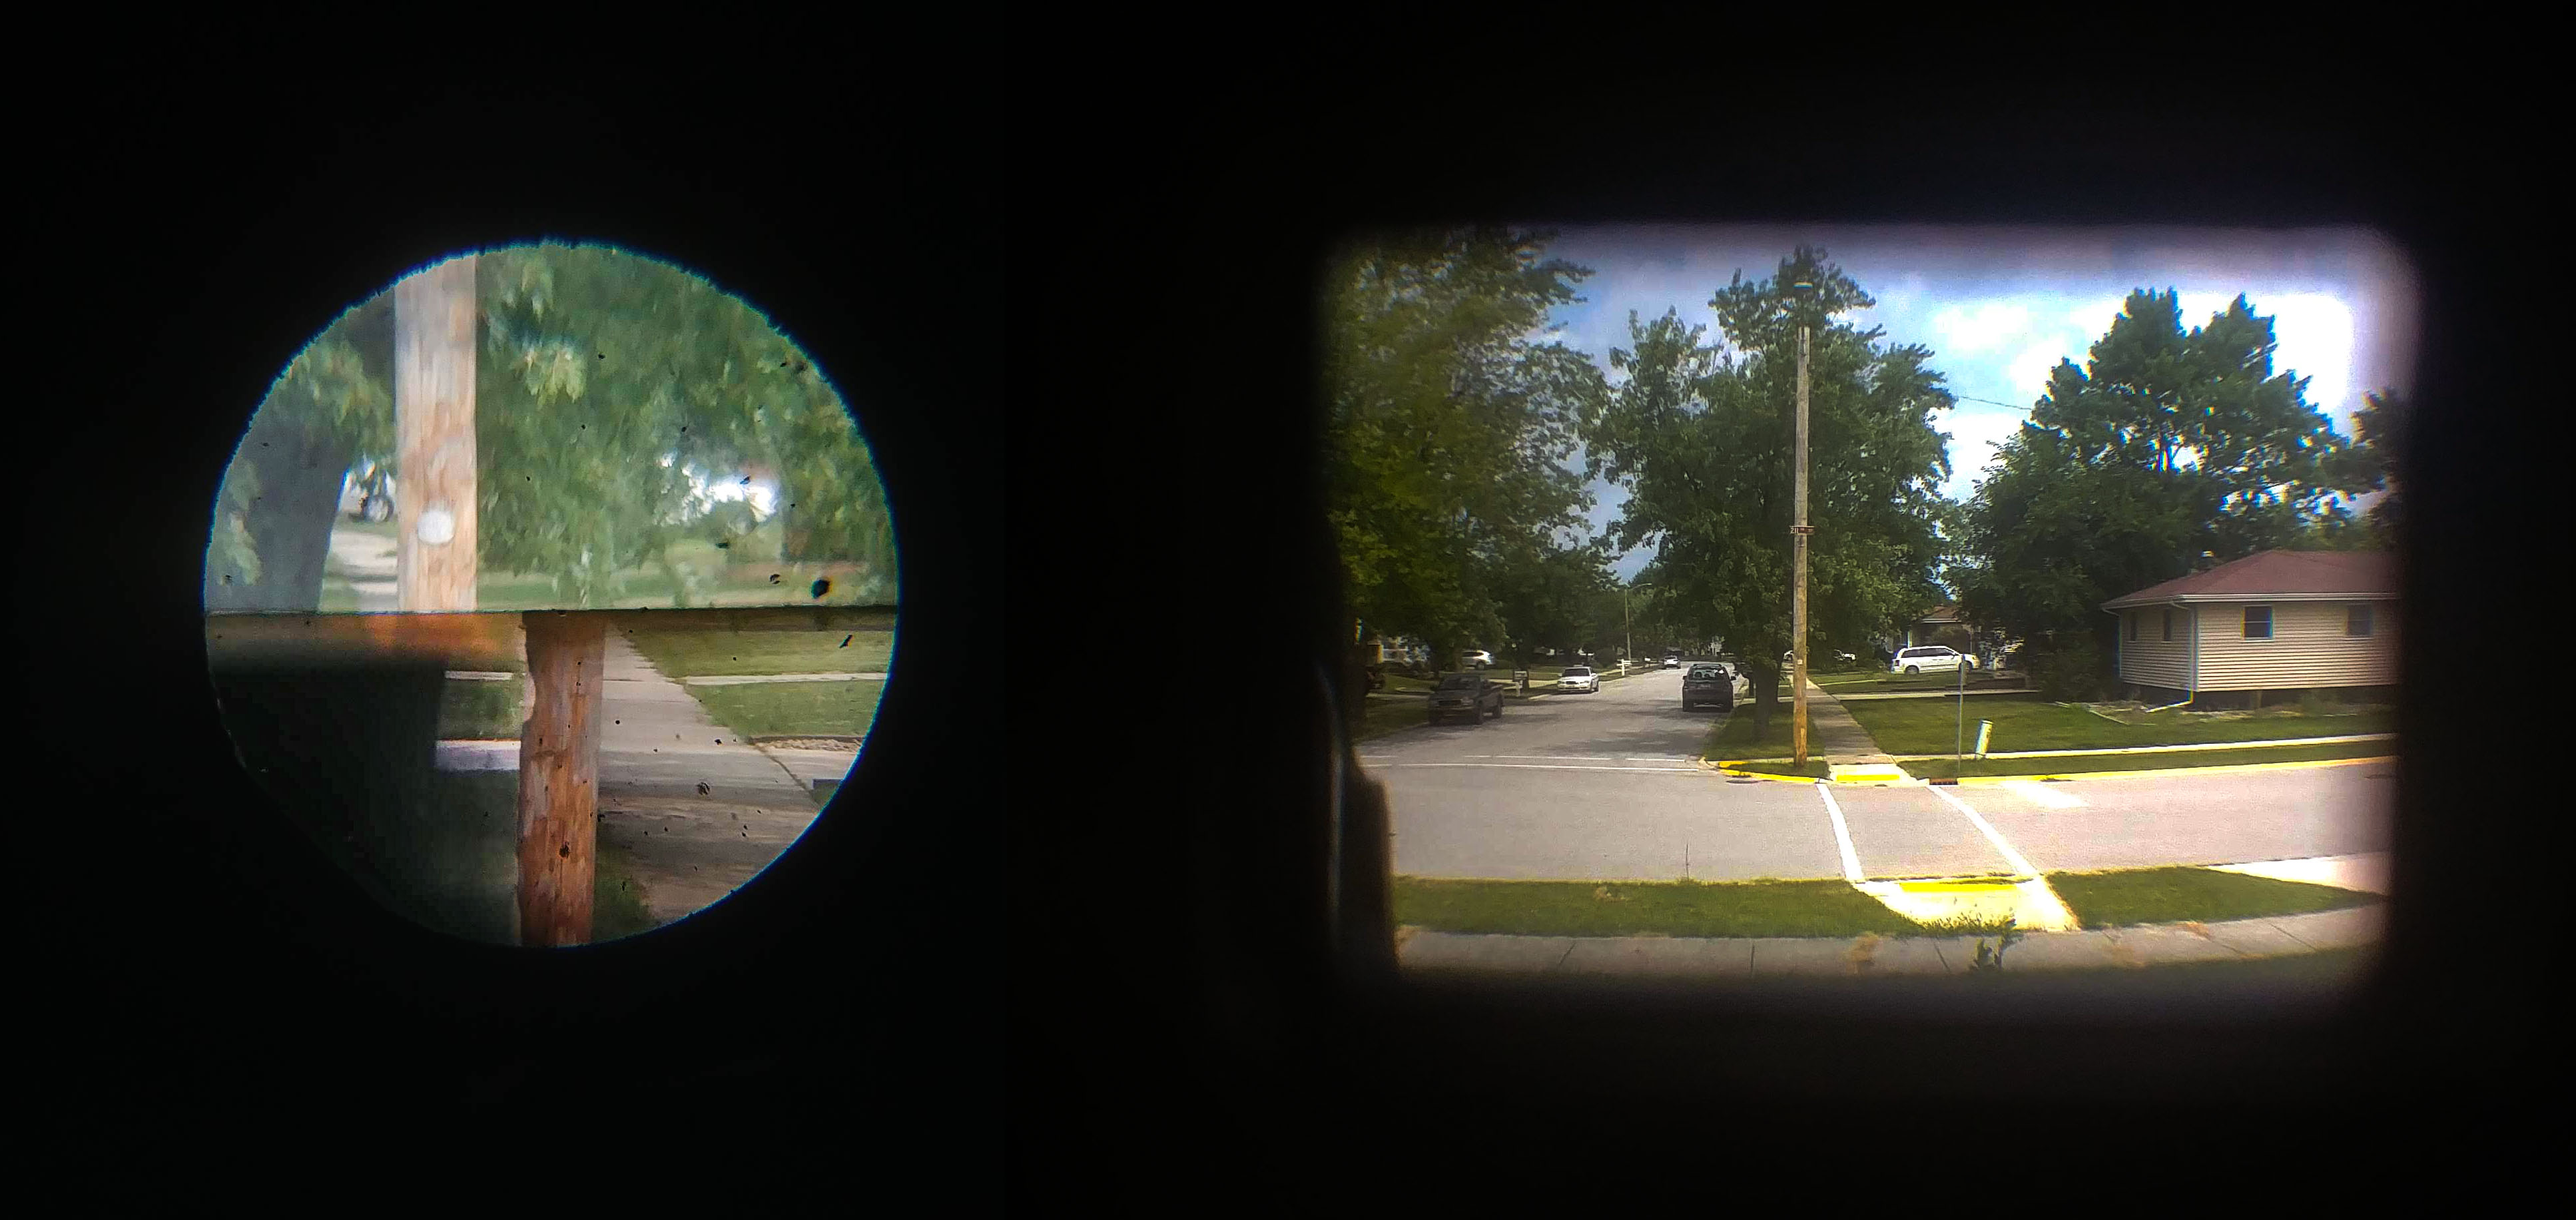
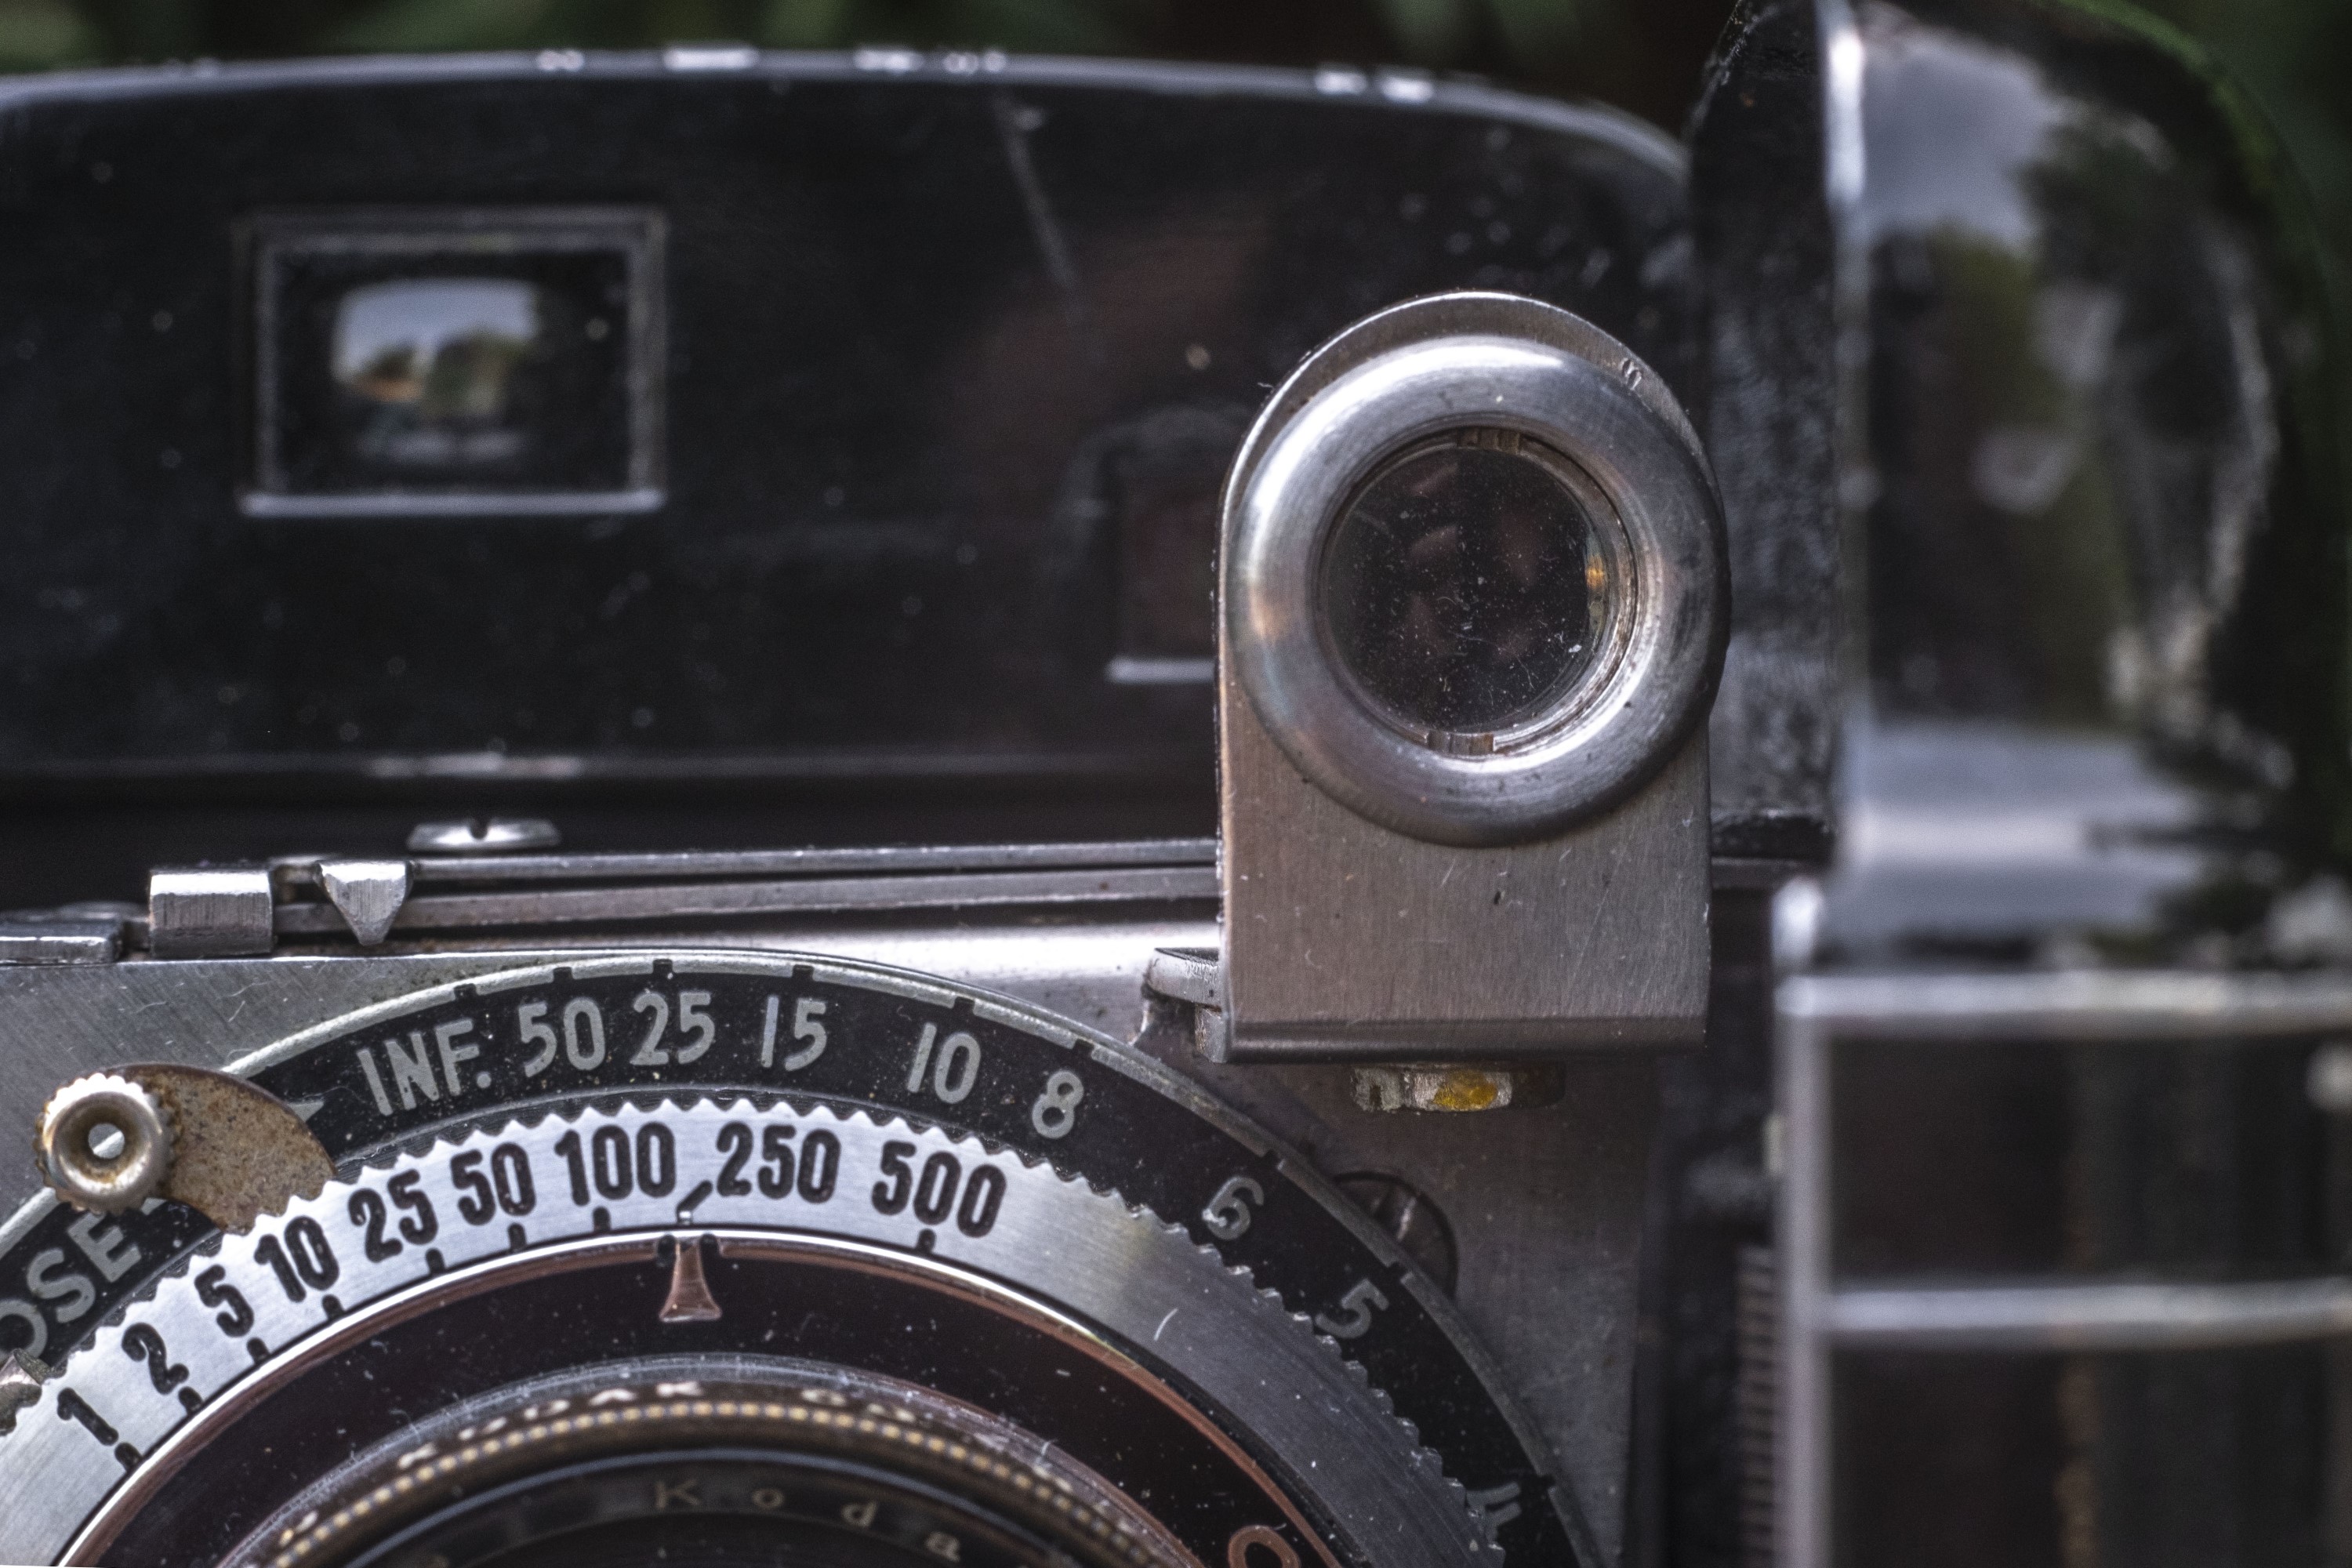
Near the top of the camera are the rangefinder and viewfinder windows. Like all rangefinder equipped cameras from the 1930s, the two windows are separate requiring you to measure focus on the window to the left, then move your eye to the viewfinder window on the right to compose your image. It’s not as hard as it sounds, but it definitely slows you down. To aide in focusing, the rangefinder window gives a highly magnified view of the viewfinder window, allowing you to only see the very center of the frame. The image to the left is a composite image I took of both windows and edited together. In real life, you cannot see both windows at the same time.
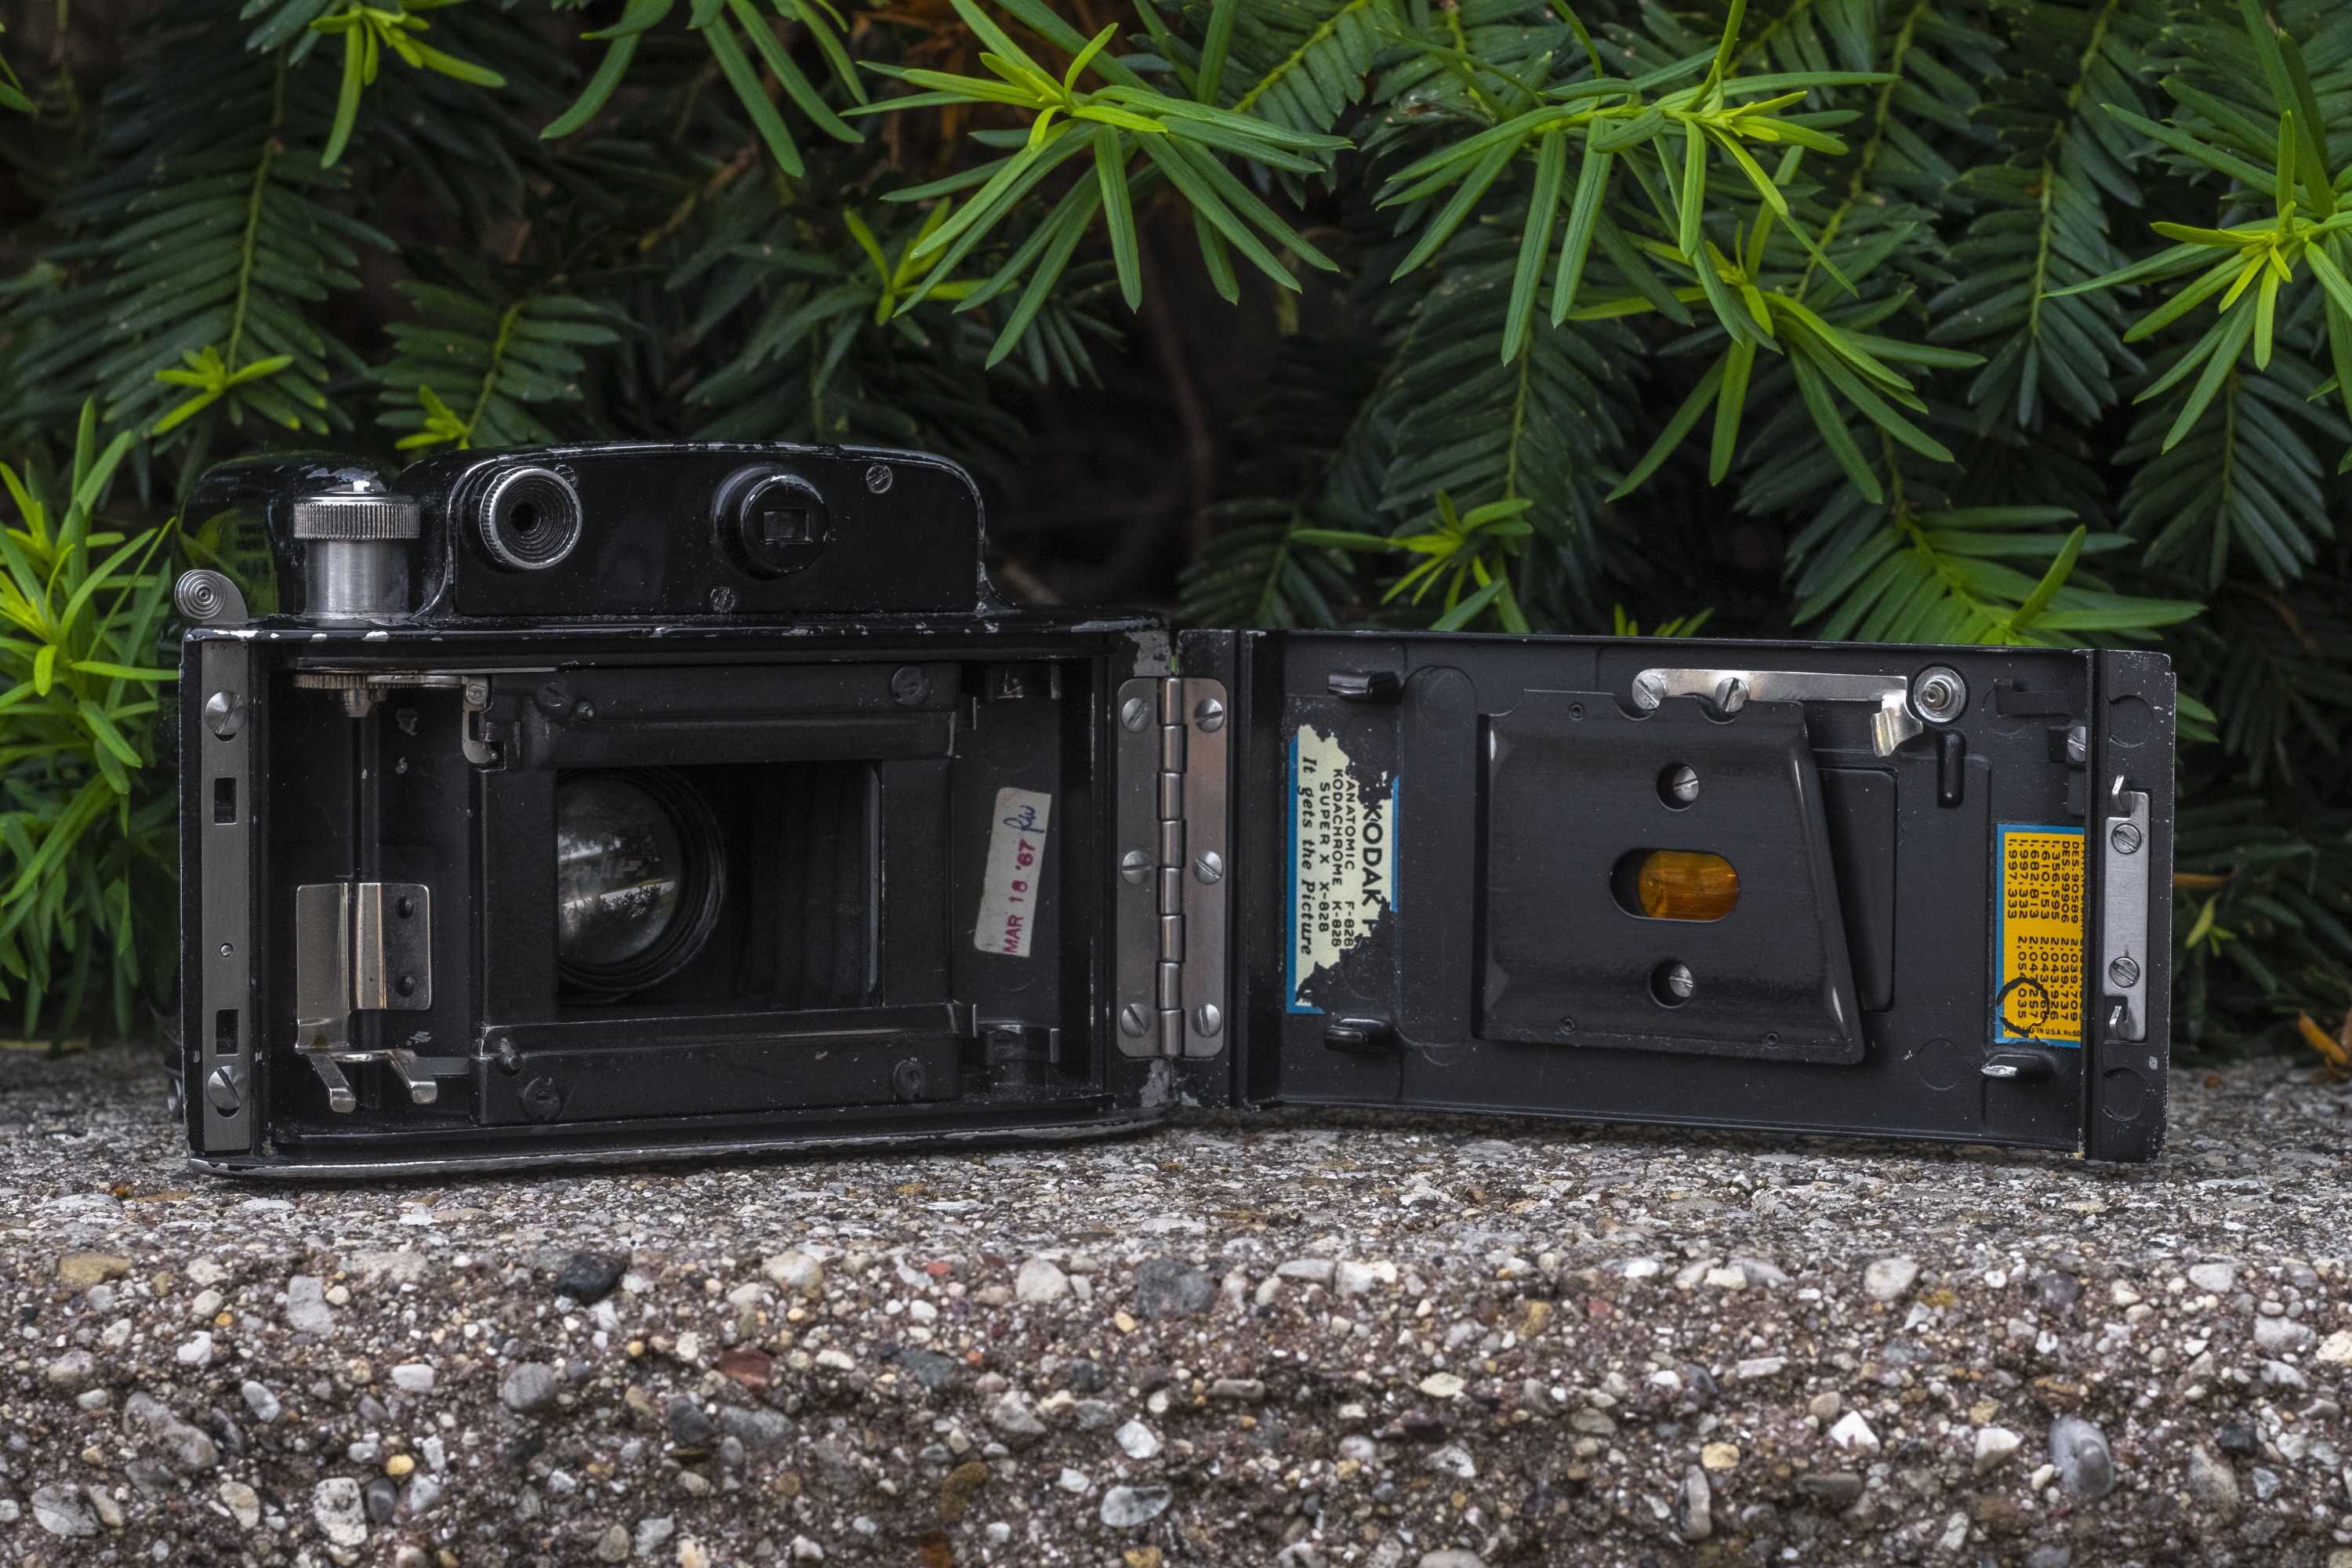
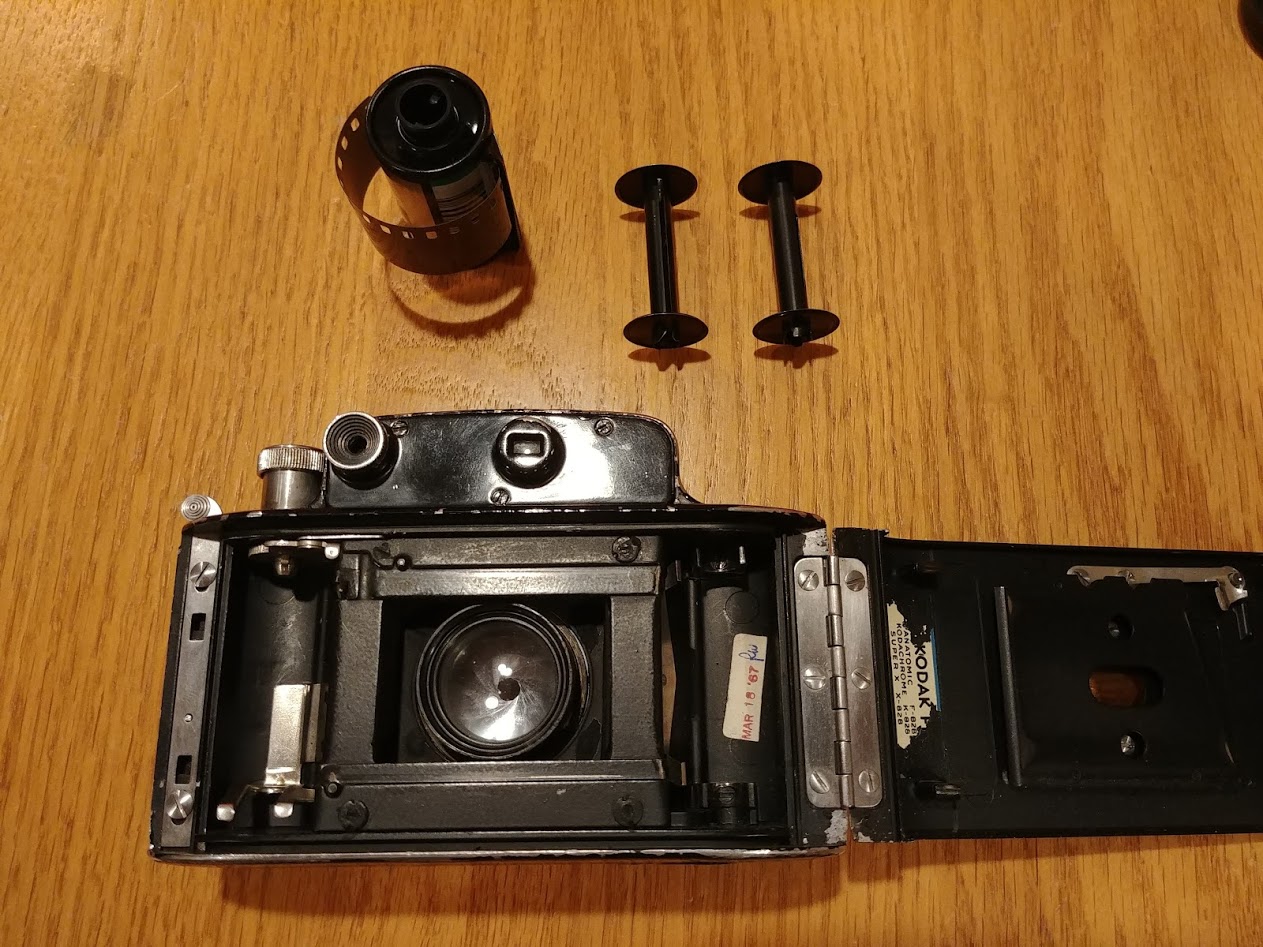
Loading film in the camera requires you to pull up on a metal lever on the top plate of the camera next to the advance knob. This releases the right hinged film door allowing you to see the film compartment. If you’ve never seen the film compartment of an 828 camera, it looks like a miniaturized 127 or 120 format camera. The supply side is on the right where you install a fresh roll of film, and then you stretch the backing paper across the film plane and then thread the end into the slit of a spool on the take up side on the left. In the image to the right, I do not have a spool inserted, but try to imagine a small 120 spool and you’ll get the idea. Unlike a 35mm camera, there is no room for a cassette, and no need for a sprocketed shaft.
Using 35mm Film
For those of you who are interested in shooting a Bantam Special (or any camera designed for 828 film), you might wonder if it is possible to load regular 35mm film in it, and that answer is yes.
The type of film we commonly refer to as “35mm film” is really called 135 format and was developed by the Eastman Kodak Company in 1934 for the first Retina camera. Unsure whether the new perforated 135 format would be a success, Kodak also created an unperforated paper backed version which they called 828. The lack of perforations (sprocket holes) meant that more of the film could be exposed for a slightly larger image. Standard exposures on 135 format film are 24x36mm whereas the exposures on 828 were 28x40mm.
Despite these differences, 828 is the same exact overall width of 135 format, and because of this, 135 can be used as a replacement for 828 film, with some additional effort.
 Since 828 film had a paper backing to it, you can optionally make your own 828 backing paper using some left over from a 120 spool and drawing your own exposure numbers on it. This has the advantage of advancing the film easier, but obviously requires more effort and some type of device for slitting film. The other option is to simply do it without backing paper which is what I did. Before you get started, you’ll need the following:
- A 12 or 24 exposure roll of 35mm Film – You won’t be able to use a 36 exposure roll as the roll is too long to fit onto an 828 spool. With a 24 exposure roll, you should be able to fit about 18 exposures on the roll. This is pretty good considering real 828 film only ever came in 8 exposure lengths.
- Two Empty 828 Spools – Hopefully your Bantam Special came with an empty spool inside of it, but you’ll still need another. They can be found by themselves on eBay, but an often cheaper option is to buy another camera designed for 828 film and hope there is a spool in there. My advice is to search for lesser Bantams to save money, or perhaps even cameras like the Traid Fotron whose cassettes have two 828 spools in them each. I know some people 3D print spools, which might be an option too, but I’ve never tried it.
- Black Electric (or Gaffer’s) Tape – Since regular 35mm film will not have backing paper, you’ll need to take extra precaution to seal the camera from light leaks. You’ll also need this to attach the film to the spools.
- A Dark Room or Film Changing Bag – You can even use a dark bathroom, basement, or any place that allows you to freely work in complete darkness.
- Scissors – For cutting the film and tape.
- (Optional) Cotton or Film Changing Gloves – Since you will be handling unexposed film, you want to avoid touching the emulsion side of the film with bare skin as oil from your fingers can ruin the film. As long as your hands are clean and dry and you’re careful, you can get away without gloves, but some people may want to make the extra precaution.
Step 0: (Optional)
Since the loading of the spools has to be done in complete darkness, it might be a good idea to practice loading and unloading empty 828 spools in and out of the camera with the lights on. 828 spools load a little differently than 120 spools since there is a toothed protrusion that extends beyond the flange, unlike 120 roll film that has a flat flange. Also keep in mind that loading the spool on the takeup (left) side and the supply (right) side is often different too, so make sure you practice doing both sides with the lights on so that you can do this without struggling when you are in the dark. It’s also worth noting that unlike what you see on TV or in Movies, unless you’re working with something called “Ortho” film, you cannot have a red light on while doing this. You really need to be in complete darkness.
 Step 1:
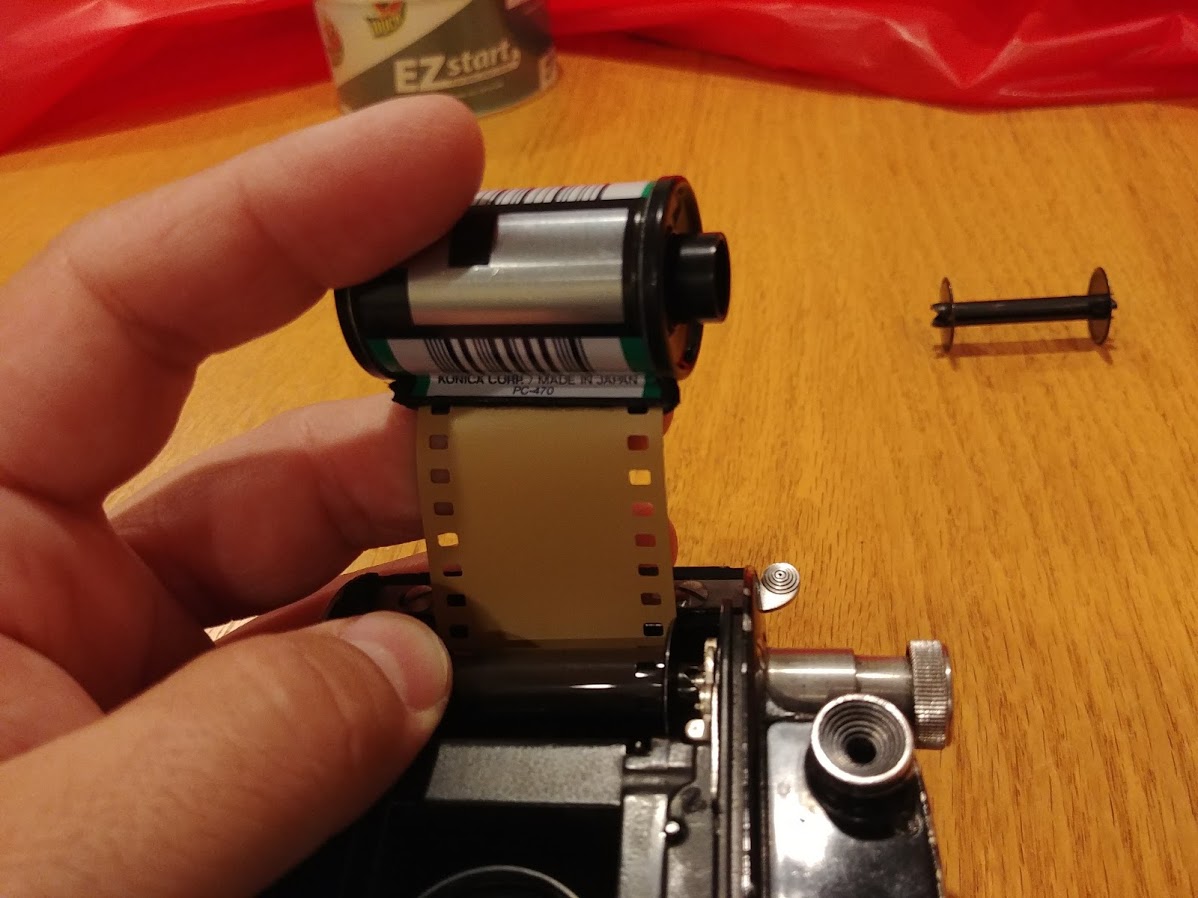
This first step can be done with the lights on. Take the leader from your new 35mm film cassette and cut off the tongue so you have a flat edge and tape it to the inside shaft of your 828 spool. 828 spools are like shorter versions of 127 and 120 spools and have a slit through the center which was originally used for the backing paper. You can attempt to cut the film to fit into this slit, but I just use a small piece of electric tape to secure it to the spool. With the leader securely attached to the spool, insert the spool into the left film chamber inside of the film compartment.
 Step 2:
You’ll need to turn off the lights now as you’ll be removing the unexposed 35mm film out of the cassette. Make sure you have your scissors, tape, and the other 828 spool in a location that you can easily find with the lights off.
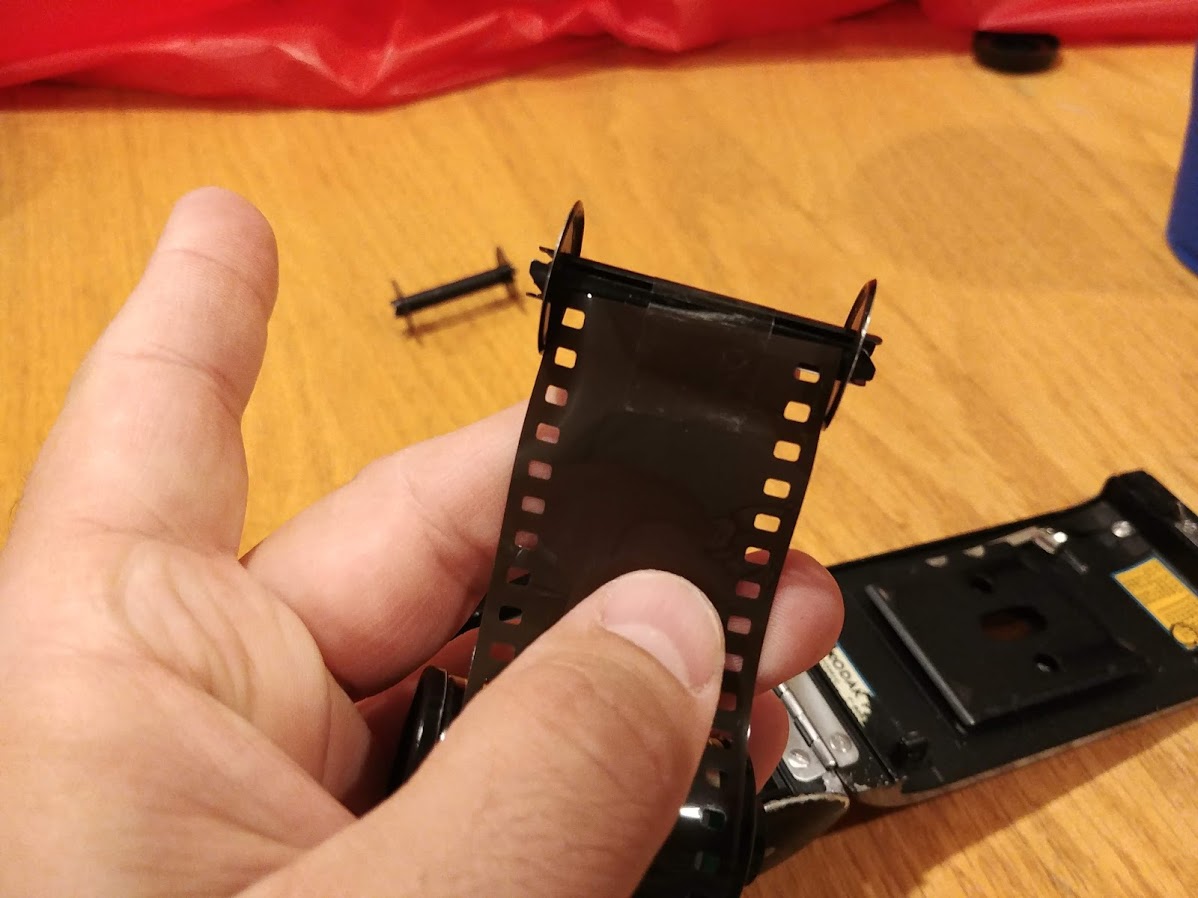
With your first 828 spool loaded on the take up (left) side, use the advance knob on the top plate of the camera to pull the entire length of 35mm film onto the 828 spool. You shouldn’t have to worry about the locking pin that is supposed to stop the film after each exposure, since the door wont be closed when you’re doing this. The image to the right shows what you should be doing. I have the lights on for this example, because I am using a roll of already exposed film.
Step 3:
With the lights still off, when you reach the end of the 35mm roll of film, remove the now loaded 828 spool from the take up (left) side, and install it on the supply (right) side. You’ll need to rotate the spool 180 degrees when installing the spool in the other side to make sure that the film is facing the correct direction.
 Step 4:
With the lights still off, take your scissors and cut the 35mm film so that it is no longer connected to the 35mm cassette. Make sure you maintain grip on the 35mm film so that it doesn’t unwind on your loaded 828 spool. If you are handling the film with your bare skin, try to minimize where you’re touching the film. A little bit of the film is going to be unused on the spool anyway, so if you touch the emulsion side near the end of the film, it’s not a big deal.
 Step 5:
With the film cut away from the 35mm cassette, take a small piece of tape and secure the film to the other 828 spool. Although this was the end of the original 35mm roll, this is now the beginning of your new 828 roll. Insert this spool into the take up (left) side of the camera and rotate the film advance knob at least one full turn to make sure that the film is securely attached, and assuming it is, close the back of the camera.
 Step 6:
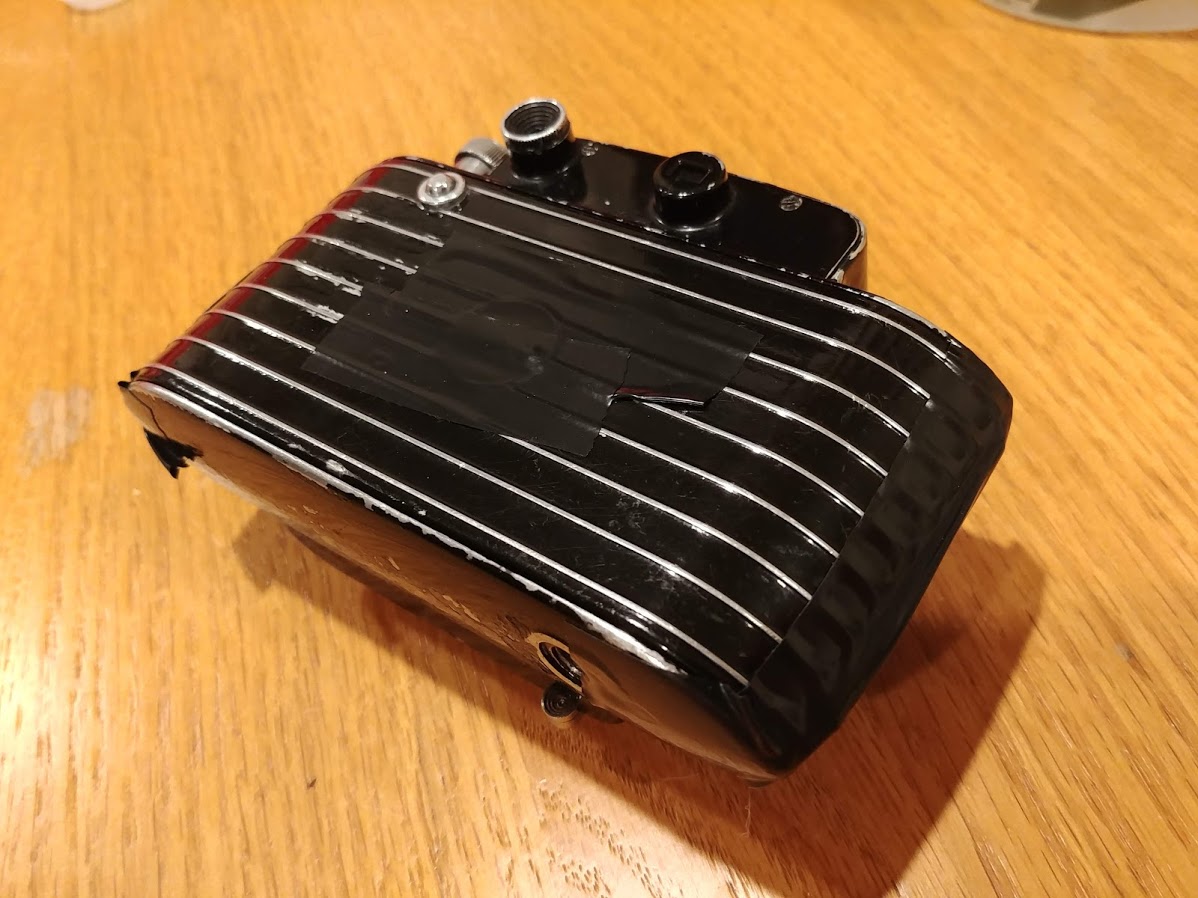
Turn on the lights. Take your electric (or Gaffer’s) tape and tape over the round window on the back of the camera. Since you have no backing paper, you would not be able to use this, and all it will do is allow light to exposure your film. It’s also a good idea to tape the seams and edges of the entire back of the camera to eliminate any chance of light leaking into the film compartment and expose your film.
Step 7:
Once the camera is securely taped up, you’ll need to advance the film two full rotations of the advance knob. Since the knob doesn’t have any sort of markings on it, you might want to take a marker or pencil and put a small dot somewhere around the edge of the advance knob so you can easily tell how much you are turning it.
Normal 828 film has a single perforation (a hole) after each exposure that a little finger inside of the camera uses to know when to stop advancing the film. This little finger will find each and every perforation on normal 35mm film, so you’ll need to make sure you keep your finger pressed on the little metal button on the film door the entire time while you are advancing the film in the camera to prevent the finger from getting caught.
Step 8:
When shooting the film, there is no way to easily tell which exposure you are on, so you’ll just have to keep track in your head. You need to advance the film enough so that you don’t overlap your exposures, but without wasting film. I’ve found the best way to do this is to turn the film advance knob two full rotations for your first 6 exposures. Since the take-up spool will increase in diameter as you wind more and more film, you don’t need to turn the knob as much after the 6th exposure, so once you get to the 7th exposure, one and a half turns is enough. As you gain experience shooting 35mm film in your Bantam, you may tweak the number of times you turn this knob to minimize wasted film and maximize exposures, but these guidelines should be good to get you started.
You should also remember that part of your exposed image will overlap the sprocket holes on the 35mm film. If this is the look you want, then feel free to compose using the entire viewfinder. If however, you want to crop out the sprocket holes, you’ll need to make sure that you compose your images using the center of the horizontal space in the viewfinder (you’ll see examples of this later).
Step 9:
When you’ve reached the end of the film and it’s time to remove it for developing, you must remember to open the camera in complete darkness as there is nothing protecting the film from light. You’ll need to peel off the tape you used when you originally attached the film to your supply spool, or take some scissors and cut it. If you cut it, be sure to cut it as close to the spool as possible so that you don’t accidentally cut through an exposure.
If you develop your own film, you can transfer the 35mm film straight to your development tank and develop it as normal. If you will be sending this film to a lab, find something you can stick the whole 828 spool and film into and protect it from light. I’ve used the plastic containers that new rolls of film come in, and then wrap that in foil. If you do this, make sure to include a note for your lab letting them know there is unprotected 35mm film on an 828 spool and that you would like your spool back. If you had to spend extra money to get an 828 spool, you certainly don’t want to lose it.
My Results – 35mm
Since anyone reading this article is more likely to load 35mm into their Bantam Special (or any 828 camera for that matter) than use real 828 film, I thought I’d share results from what that looks like first. In the chronology of writing this review, the adapted 35mm film was done after I shot the 828 film, and I purposely used expired Fuji 400 film, as I was more interested in showing some results of what was possible than trying to get great images.


In the gallery above, I show the full negative scan along with a crop of the usable image using regular 35mm film holders. The 40mm width of an exposed 828 image, means the cropped images are a slightly panoramic 24mm x 40mm which I find pleasing. This is an aspect ratio of 1.66:1 which is close to the 16:9 widescreen format used widely today on televisions and digital cameras. If you intend on cropping your images, make sure you account for the wasted sprocket hole space when composing your images in the viewfinder.
If you wanted to regularly use your Bantam Special with regular 35mm film, this is a pretty easy way to shoot it. Other than taping up the outside of the camera, there was no modifications to the camera needed. The hardest part will be finding two empty 828 spools, but otherwise loading the film in darkness is very easy. I didn’t get the best results with these images from an image quality standpoint, but that doesn’t mean that you couldn’t with a different camera and better film.
My Results – 828
Finding usable 828 film is a bit of a challenge these days as there are no sources of new film available online. You can find fresh rolls for extinct formats like 127 and 116 film easier than 828, so your only options are shooting expired film, finding someone who has the ability (and desire) to cut film to the correct width for 828 and roll it on a spool with the correct backing paper, or roll regular 35mm film into your Bantam as mentioned earlier in this article.
Conveniently, the same person who loaned me this Bantam Special, Adam Paul, is also someone who enjoys hacking extinct film formats. Adam provided me with not one, but two new rolls of 828 that he had created. Both rolls used Kodak Portra 160, but one was fresh, and one was expired.


The Kodak Bantam Special is one of those cameras that collectors are willing to pay big money for. As this one was a loaner to me, and I had $0 invested in it, I felt as though I could reflect upon it with an ambivalence that someone who plunked down $250 for might not have had. Whether I loved or hated this camera, it cost me nothing.
I realize that not everyone who comes to this site has the desire (or time, or money, or something else) to shoot as many different cameras as I do, but for those of you who do come here, I like to think that my thoughts and my results are useful to you in gauging whether or not you want to be the next person to plunk down whatever amount of money it costs for the same camera.
I took the time to shoot three rolls of film in this camera not only because I knew that once I sent it back, I’d likely never have another chance, but also because I wanted to make sure I was thorough in any conclusions I’d draw from the camera. With that said, looking at the images from the three rolls, I can say I was very underwhelmed. Kodak is no stranger to making good lenses. German Kodaks like the Retina series all use quality optics, but even American Kodaks like the Medalist, Chevron, Signet series, and even the later 700 and 800 Instamatics have very good lenses. The 6 element 45mm f/2 Ektar lens on this camera is the highest spec’d lens Kodak ever put on a compact camera, and was one that I fully expected would make the most out of the 28x40mm images that 828 film allowed for.
Sadly, that didn’t happen. Colors were routinely washed out (likely due to the lack of a good lens coating), but there was also a softness in the middle of every image I shot. Usually when an image is soft in the middle and sharper on the edges, its due to either a film flatness issue, or that the lens elements are out of order. Not being my camera, I didn’t want to risk taking it apart to find out, but I can say that I could not find any obvious problems with the camera. The film plane looked good, the film pressure plate was in tact and had a nice amount of pressure to it. I inspected the lens elements and even placed a piece of ground glass in the film gate and attempted to inspect the image projected on it and everything looked okay.
The problems with this camera did not stop there. The rangefinder was way off on both the vertical and horizontal axis. Furthermore, the bottom half of the split rangefinder window was slanted, as if some piece of glass in there had been rotated. I took the top plate off the camera and could not find any way of adjusting this. Through trial and error, I was able to get the rangefinder a “little” better, but it still didn’t look right. Images 9-14 in the gallery above are from the first roll of film where I attempted to use the rangefinder to get focus, and as you can see, in most of those images, I didn’t quite get it right. For the second roll (images 1-8 above), I didn’t use the rangefinder at all, instead relying on the focus scale and guessing. These images turned out better.
But even the images where I didn’t use the rangefinder, there is still that softness in the center. Now of course, this camera is over 80 years old. The cosmetics of the camera are rough, and its certainly not a stretch of the imagination to think that it’s been mishandled or otherwise fallen out of service in the years since it was last inspected by a technician. I won’t blame a camera for poor images if they are the result of age. Had I been so inclined, I might have been able to send this to a repair person and had it cleaned up and adjusted to where the lens performed correctly, or that the obvious light leaks present in every image were corrected.
I’ll acknowledge that a Bantam Special in better shape would have returned better images than I got here, but what I don’t think would be any different would be the usage of the camera which I also didn’t care for. I am no stranger to pre-war folding 35mm cameras. I’ve shot many different styles of Retinas, Weltas, and Certos that have a similar feel, but never before have I really disliked the experience.
With the Bantam Special, the ergonomics of this camera are terrible. I did not care for the left hinged door, the location of the shutter release, or the way you have to use the focus lever to close the camera. I’ve shot cameras with Compur shutters where the shutter release was on the shutter itself, but for a top of the line camera like this, I thought Kodak could have done a better job of this. Folding cameras existed before this camera, and I am in disbelief that anyone at the Eastman Kodak Corporation thought it was a good idea to use the focus lever as a lock for closing the camera. Even the little levers on the outside of the camera that open both the front and the door are non intuitive. Do I press on them or do I pull them?
I get that people don’t buy these cameras to use them anymore. The Kodak Bantam Special is a very good looking camera, and I’d be a liar if I said I wouldn’t appreciate one on my shelf, but I can say that for anyone curious about what it’s like to use one, I’ll say, not very good. I spoke to the owner of this camera and asked for his thoughts and he had many of the same complaints as I did. We’re not alone, as there are other reports online from users who say that this camera isn’t too great to use, which is a shame because someone clearly had a lot of interest in making this camera good. It’s pretty, it has the fastest lens Kodak ever put on a compact camera, it has a good shutter, and it supports film that has 30% more detail than 35mm film, yet it’s not a joy to use.
I am glad that this camera was a loaner to me as if I had spent $200 – $250 as others have recently done for one, I would have had a serious case of buyer’s remorse. I will never tell someone how to spend their own money. There are many different types of ornaments or decorations that cost a lot more than $250 that you could buy and for someone this might be a worthwhile investment. For the frugal collector who is looking for a fun and interesting camera to use, this isn’t it. Save your money and use it to buy a Kodak Retina (a good example of an early folding camera), a Flash Bantam 4.5 (a good example of an 828 format camera) and use what’s left over to buy a whole bunch of film. I promise you, that’s a better use of $250.
Additional Resources
http://www.bnphoto.org/bnphoto/KodakBantamSp.htm
https://www.cameraquest.com/superban.htm
https://photojottings.com/kodak-bantam-special-review/
http://aboutphotography-tomgrill.blogspot.com/2015/03/legends-kodak-bantam-special-art-deco.html
http://www.brennanprobst.com/2015/05/spotlight-kodak-bantam-special.html
https://retinarescue.com/kodakbantamspecial.html
http://redbellows.co.uk/CameraCollection/Kodak/BantamSpecial_gen.htm
http://www.collection-appareils.fr/x/html/page_standard.php?id_appareil=1511
I own my father’s Bantam Special which I inherited on his death in 1978. I used it until the film was no longer available. I find none of your comments accurate. The separate rangefinder and viewfinder windows was standard in almost all rangefinder cameras before World War II (the later Contax was an exception). Mine is still clear and the rangefinder accurate. The method of closing the camera follows the Retina design and was fairly common in that era. As to your “test” — without the thickness of a paper backing the film will not lie flat on the film plane. Both my father and myself used that camera almost exclusively with Kodachrome with excellent results. I found the lens one of the best of the uncoated prewar lenses. To judge the performance of a camera on a model which was obviously in need of CLA is, at best, irresponsible. I have come to expect far better from your blog.
Thanks for the comments, I appreciate all feedback, even if its not positive.
It’s worth mentioning that my results with the 35mm film didn’t have a paper backing like you pointed out, but both of the 828 rolls I shot did. The difference in the lack of backing paper didn’t make any difference in the sharpness of the images.
I also note several times that this is a poor example but it was the only one I had access to. I absolutely agree that the 6-element Ektar should be capable of better results than I got, but my biggest issues were in the design of the camera, not it’s lens. Even if I had a mint example that delivered razor sharp images, my opinion of the camera likely wouldn’t have changed much.
I never complained about the separate rangefinder and viewfinder windows. As you noted, nearly every pre-war camera (Barnack Leica, Argus C-series, etc) had it. My issue was with the front mounted circular rangefinder glass. This style of rangefinder requires a perfectly parallel shutter to film plane. When the camera was new, this likely was never a problem, but in an 80 year old folding camera, the chances of both planes no longer being parallel is extremely high and something that should be considered by anyone looking to buy and shoot a Bantam Special.
Finally, your comment about how the camera closes follows the Retina design is not true at all. I’ve handled nearly every variant of the Retina (except the original 117) and none of them require you to move the focus lever to push on a locking pin to close the camera. I have types 118 and 119 in my collection and both open and close very easily. I’ve read several other reviews of the Bantam Special and this comes up in every single one of them.
Believe me, I wanted to like this camera. It’s gorgeous and I’m a huge fan of Kodak’s cameras (I’ll post another next week), the Medalist, Chevron, and Monitors are three of my favorite cameras of the mid 20th century. I’ve gotten fantastic results from “simple” cameras like the Kodak 35, Motormatic, and even an Instamatic 804.
I’m really happy that you have a really nice example, and nothing I say takes away any enjoyment you’ll get from yours, but I just think its worthwhile for people to know that if they want to buy one of these to shoot film in them, it’s important to taper expectations.
Anyway, thanks for the comment. I really do appreciate it. Hopefully my next review will restore your faith in my reviews! 🙂
Every Retina, including the Retina I Type 117 require the focusing lever to be at infinity before it can be closed. Admittedly they do not use the focusing lever to complete the closing process. Actually, the Bantam’s method is a little simpler than the the Retinas’ which requires two separate actions.
It hurts (especially as I’m an industrial designer) to agree with you on this, but you’re right. I had a mint Bantam Special and bought a brick of film for it as that’s the only way you could buy 828. I only shot one 8-exposure roll. One of the surprises was the 460 gram weight – I think my OM-1 SLR weighed less. You could put the BS in your shirt pocket, but it would tear your shirt off you back with the weight. The lens, like most f/2 lenses from 1936, was very low in contrast. I kept the camera for a while because it was so pretty, but sold it after seeing the pictures it took and the price I could get for it. WD Teague was a great designer but it was definitely form over function in the Streamline Era.
rick oleson
I’m suprised Kodak didn’t offer a slightly cheaper version with a 3.5 lens. Would have helped sales, but maybe they didn’t want to dilute their “flagship” product. A similar Ektar 2.0 lens was used in the Kardon cameras, and on some Kodak Retinas made just after the war before the German lens makers got back into full production.
Count me among those who wanted to like this camera, but, well… couldn’t.
The design and lines are wickedly striking, the feature set is numbing for the era, and the build quality of the materials is top notch.
But the use, as you point out is kludgy, and the results leave something to be desired. And I don’t think it’s simply this example. I have 828 Kodachrome slides taken in 1938 and 1939 (at a time when this was the only 828 model yet available that had the settings needed to shoot Kodachrome), and these images, taken in near full sun, also show softness and indistinct images. Yes, Kodachrome was very slow back then, but it is evident that the issues are in the rendering of the lens.
The Bantam Special is definitely more of a shelf queen for me, while the 4.5 and RF models see frequent use.
For over a year I have been confused by your review of the Bantam Special. After my father’s death in 1978 I inherited his camera which was purchased in the year of my birth (1938). I used it occasionally, usually with Kodachrome, until 828 film was discontinued. My results like my father’s were excellent, sharp, good contrast and color despite an uncoated lens.
I reread your review today and believe I have discovered the problem. You stated that the model you used only opened to 80-85 degrees. Actually one in proper condition opens to 90 degrees. Since the one you used did not, the lens was not in proper relation to the film plane resulting in the poor results that you obtained. Had you had access to Bantam Special in good condition I am sure you would have come to a different conclusion.
Edwin, I believe you are correct. The camera I shot obviously had a fault that prevented the door from completely opening and allowing for the lens to fully extend, as a result every single image was off by enough to throw off my measurements.
The guy who this camera belongs to still has it, and I actually talked about it with him recently, and the next time he gets around to finding it, he’s going to send it to me and I’ll take another look at it to see if I can find out what’s preventing the lens from fully extending. Assuming I can get it working correctly, I’ll definitely shoot another roll and update this review!
Dear Mike,
You say, about closing the camera: “..Strangely, the release latch to close the camera is triggered using the focusing arm. You’ll notice the word “CLOSE” to the left of the infinity indicator and what this is trying to tell you is that by moving the focusing arm beyond infinity, it will put upward pressure on a locking latch and allow you to close the camera”.
No, no, no: the word CLOSE, and the arrow beside it, is there to remind you to -g-e-n-t-l-y-push the focusing lever UP towards infinity so that the focusing lever itself doesn’t catch against the latch which holds the front of the camera shut. That was standard practice with many bellows cameras.
To actually close the front of the camera, there’s a little lever catch at the BOTTOM, near the front hinge, which holds open the front of the camera at 90 degrees. If yours didn’t open as wide as 90 degrees, then you probably couldn’t see that little catch, or latch – and maybe THAT – having been previously damaged – was what was preventing the camera opening properly! To close the front, move the focusing lever in the direction of CLOSE, then flip up the little spring-loaded bottom catch that holds the front cover open, and the front can then be swung shut.
It sounds like the camera you were using had been FORCED shut (probably by using the focusing lever to force-close it!) and so that had damaged the little bottom sprung latch which normally holds the camera front OPEN, and which you’d normally squeeze in order to close the front (..after moving the focusing lever towards infinity so that it doesn’t catch on the little latch which holds the front shut!) ..Phew!
That’s a DOUBLE-mistake: forcing the cover shut – and thus damaging the bottom latch which is there to hold it open! – and then being unable to open it completely, because the damaged bottom latch won’t then LET it open properly!
Look before you leap, Mike! ..But thanks anyway for the (..slightly damaged.. and possibly damaging..) review!
Thanks for the tips David. Another reader also pointed out the flaw in my test on that Bantam Special. It was a loaner that did not actually belong to me, and not having shot another, I wasn’t sure exactly of how it was supposed to work. I agree though that this example was damaged as there was no way it was opening a full 90 degrees which is why I got such soft images from it.
Since posting this review, I’ve actually come across a second in better condition and my intent is to shoot it and update (or replace) this review, but with COVID-19, that’s put a significant delay in this update as I don’t currently have my source for 828 film. I know I could run some regular 35mm in there and just deal with the sprockets, but I’d much prefer to use the real thing.
Stay tuned as I’ll do this camera justice eventually.
P.S: On some models, the little latch at the bottom can be pushed, and un-latched, by a small cam on the BOTTOM of the circular focus lever, so a gentle upward push on the focus lever MAY un-latch the separate catch at the bottom which holds the front cover open.