

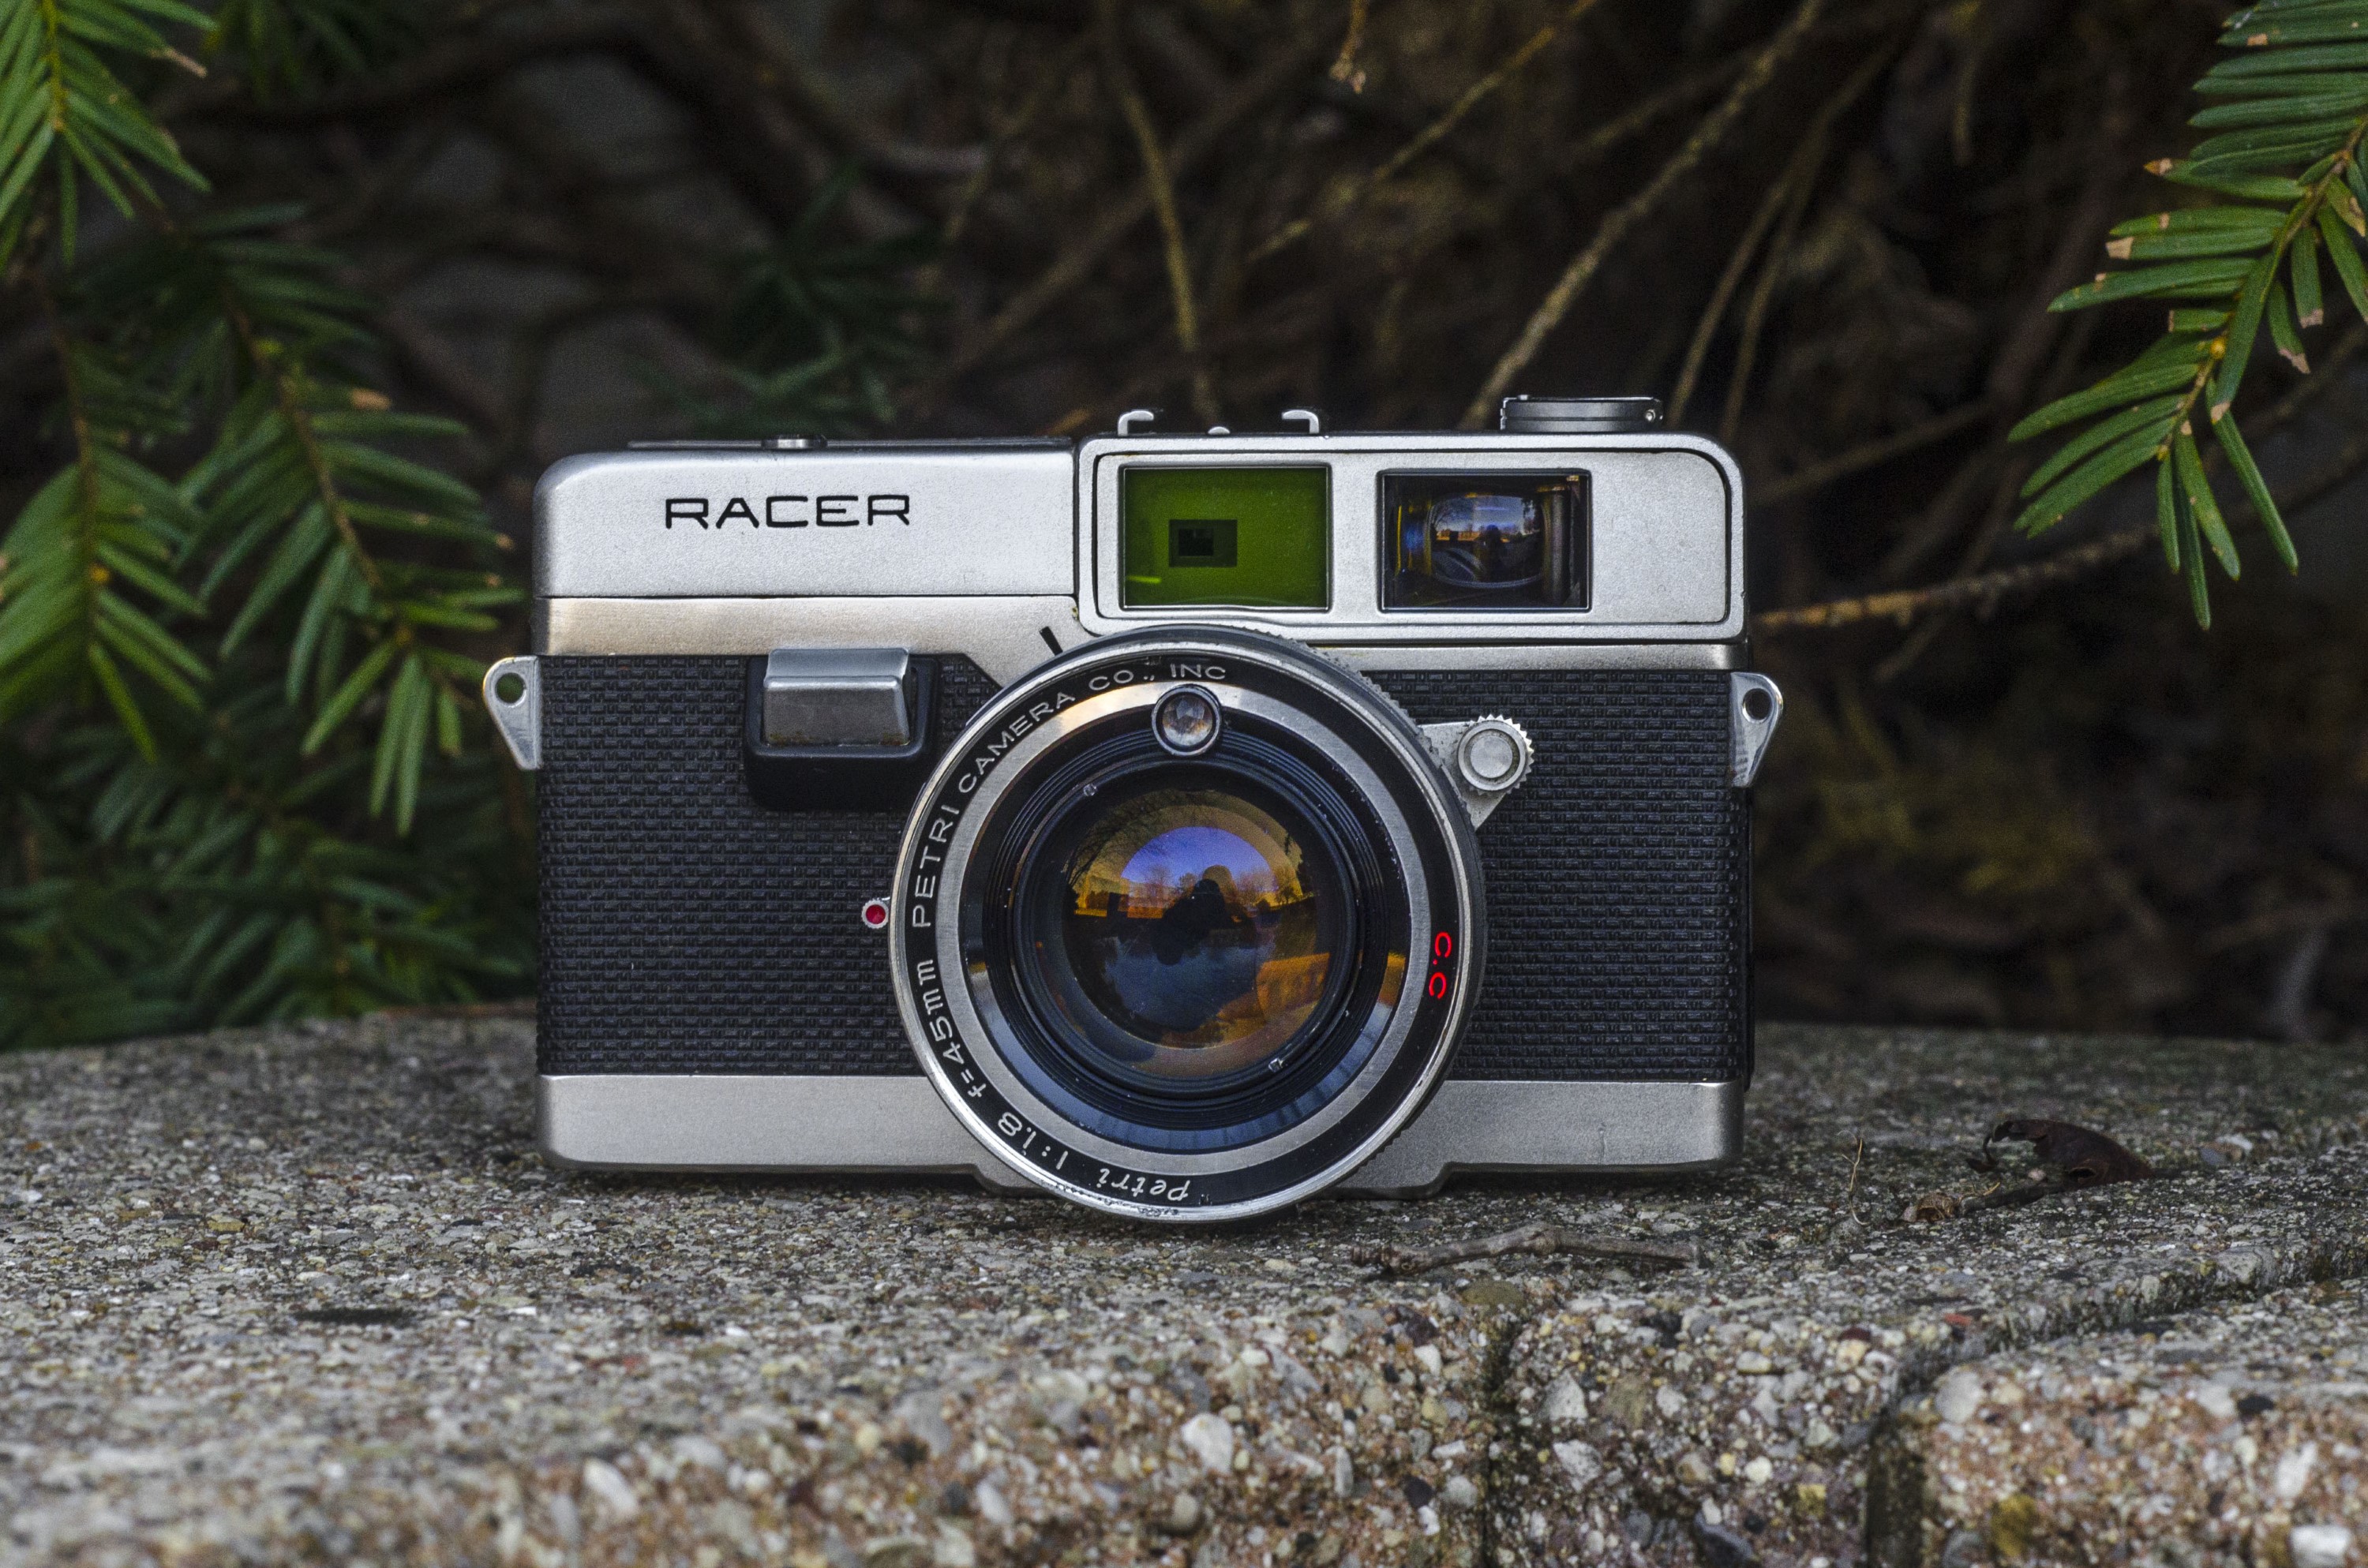
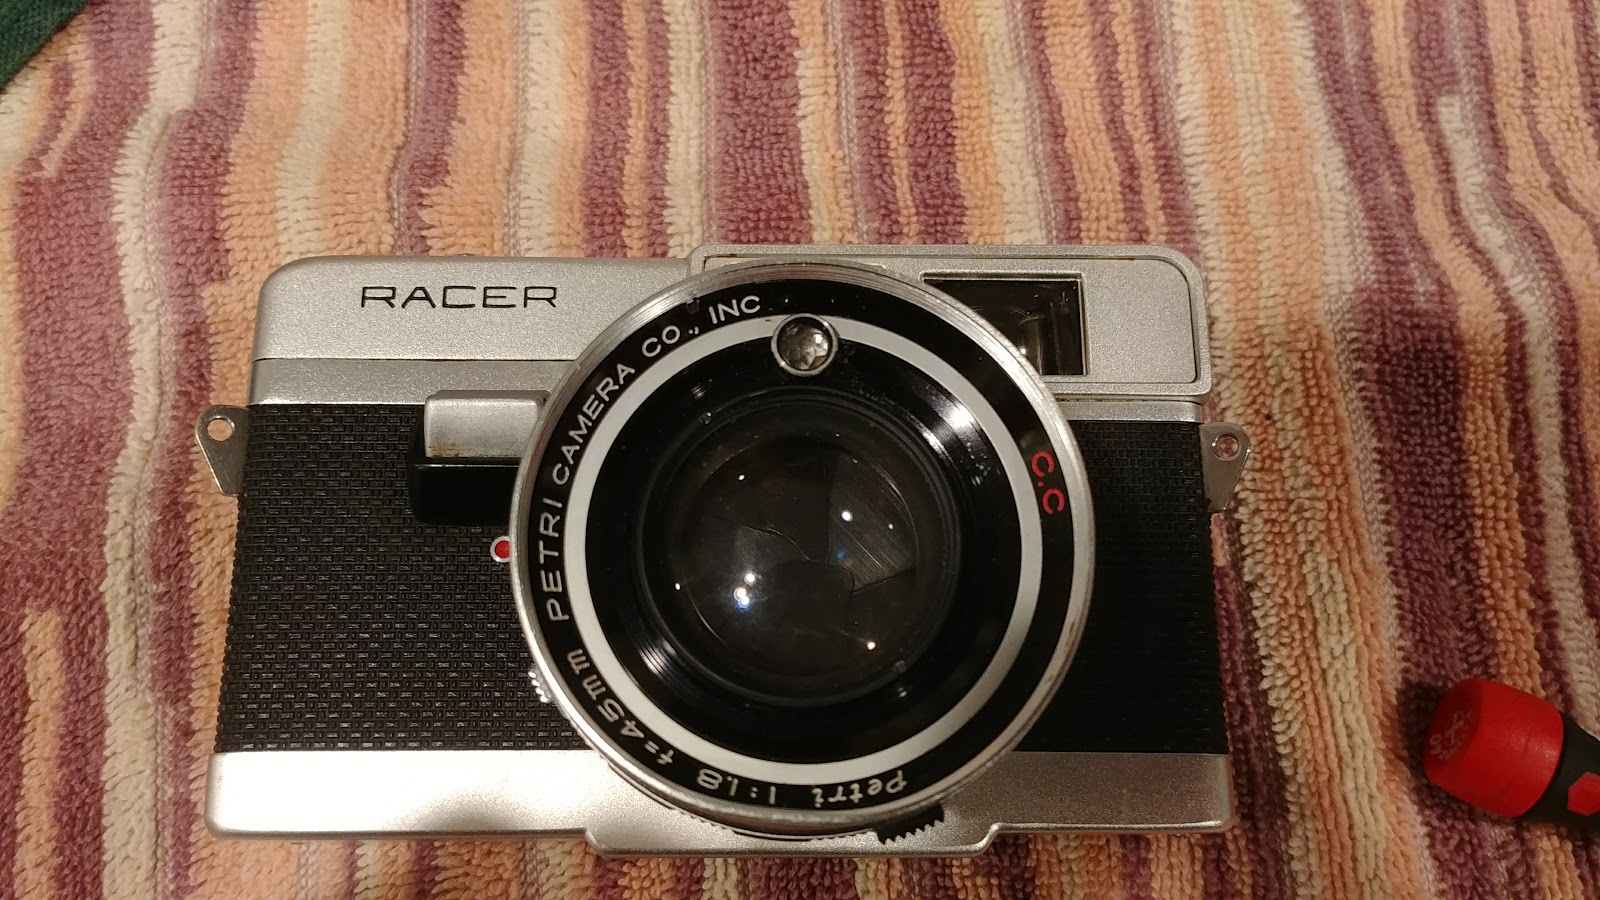
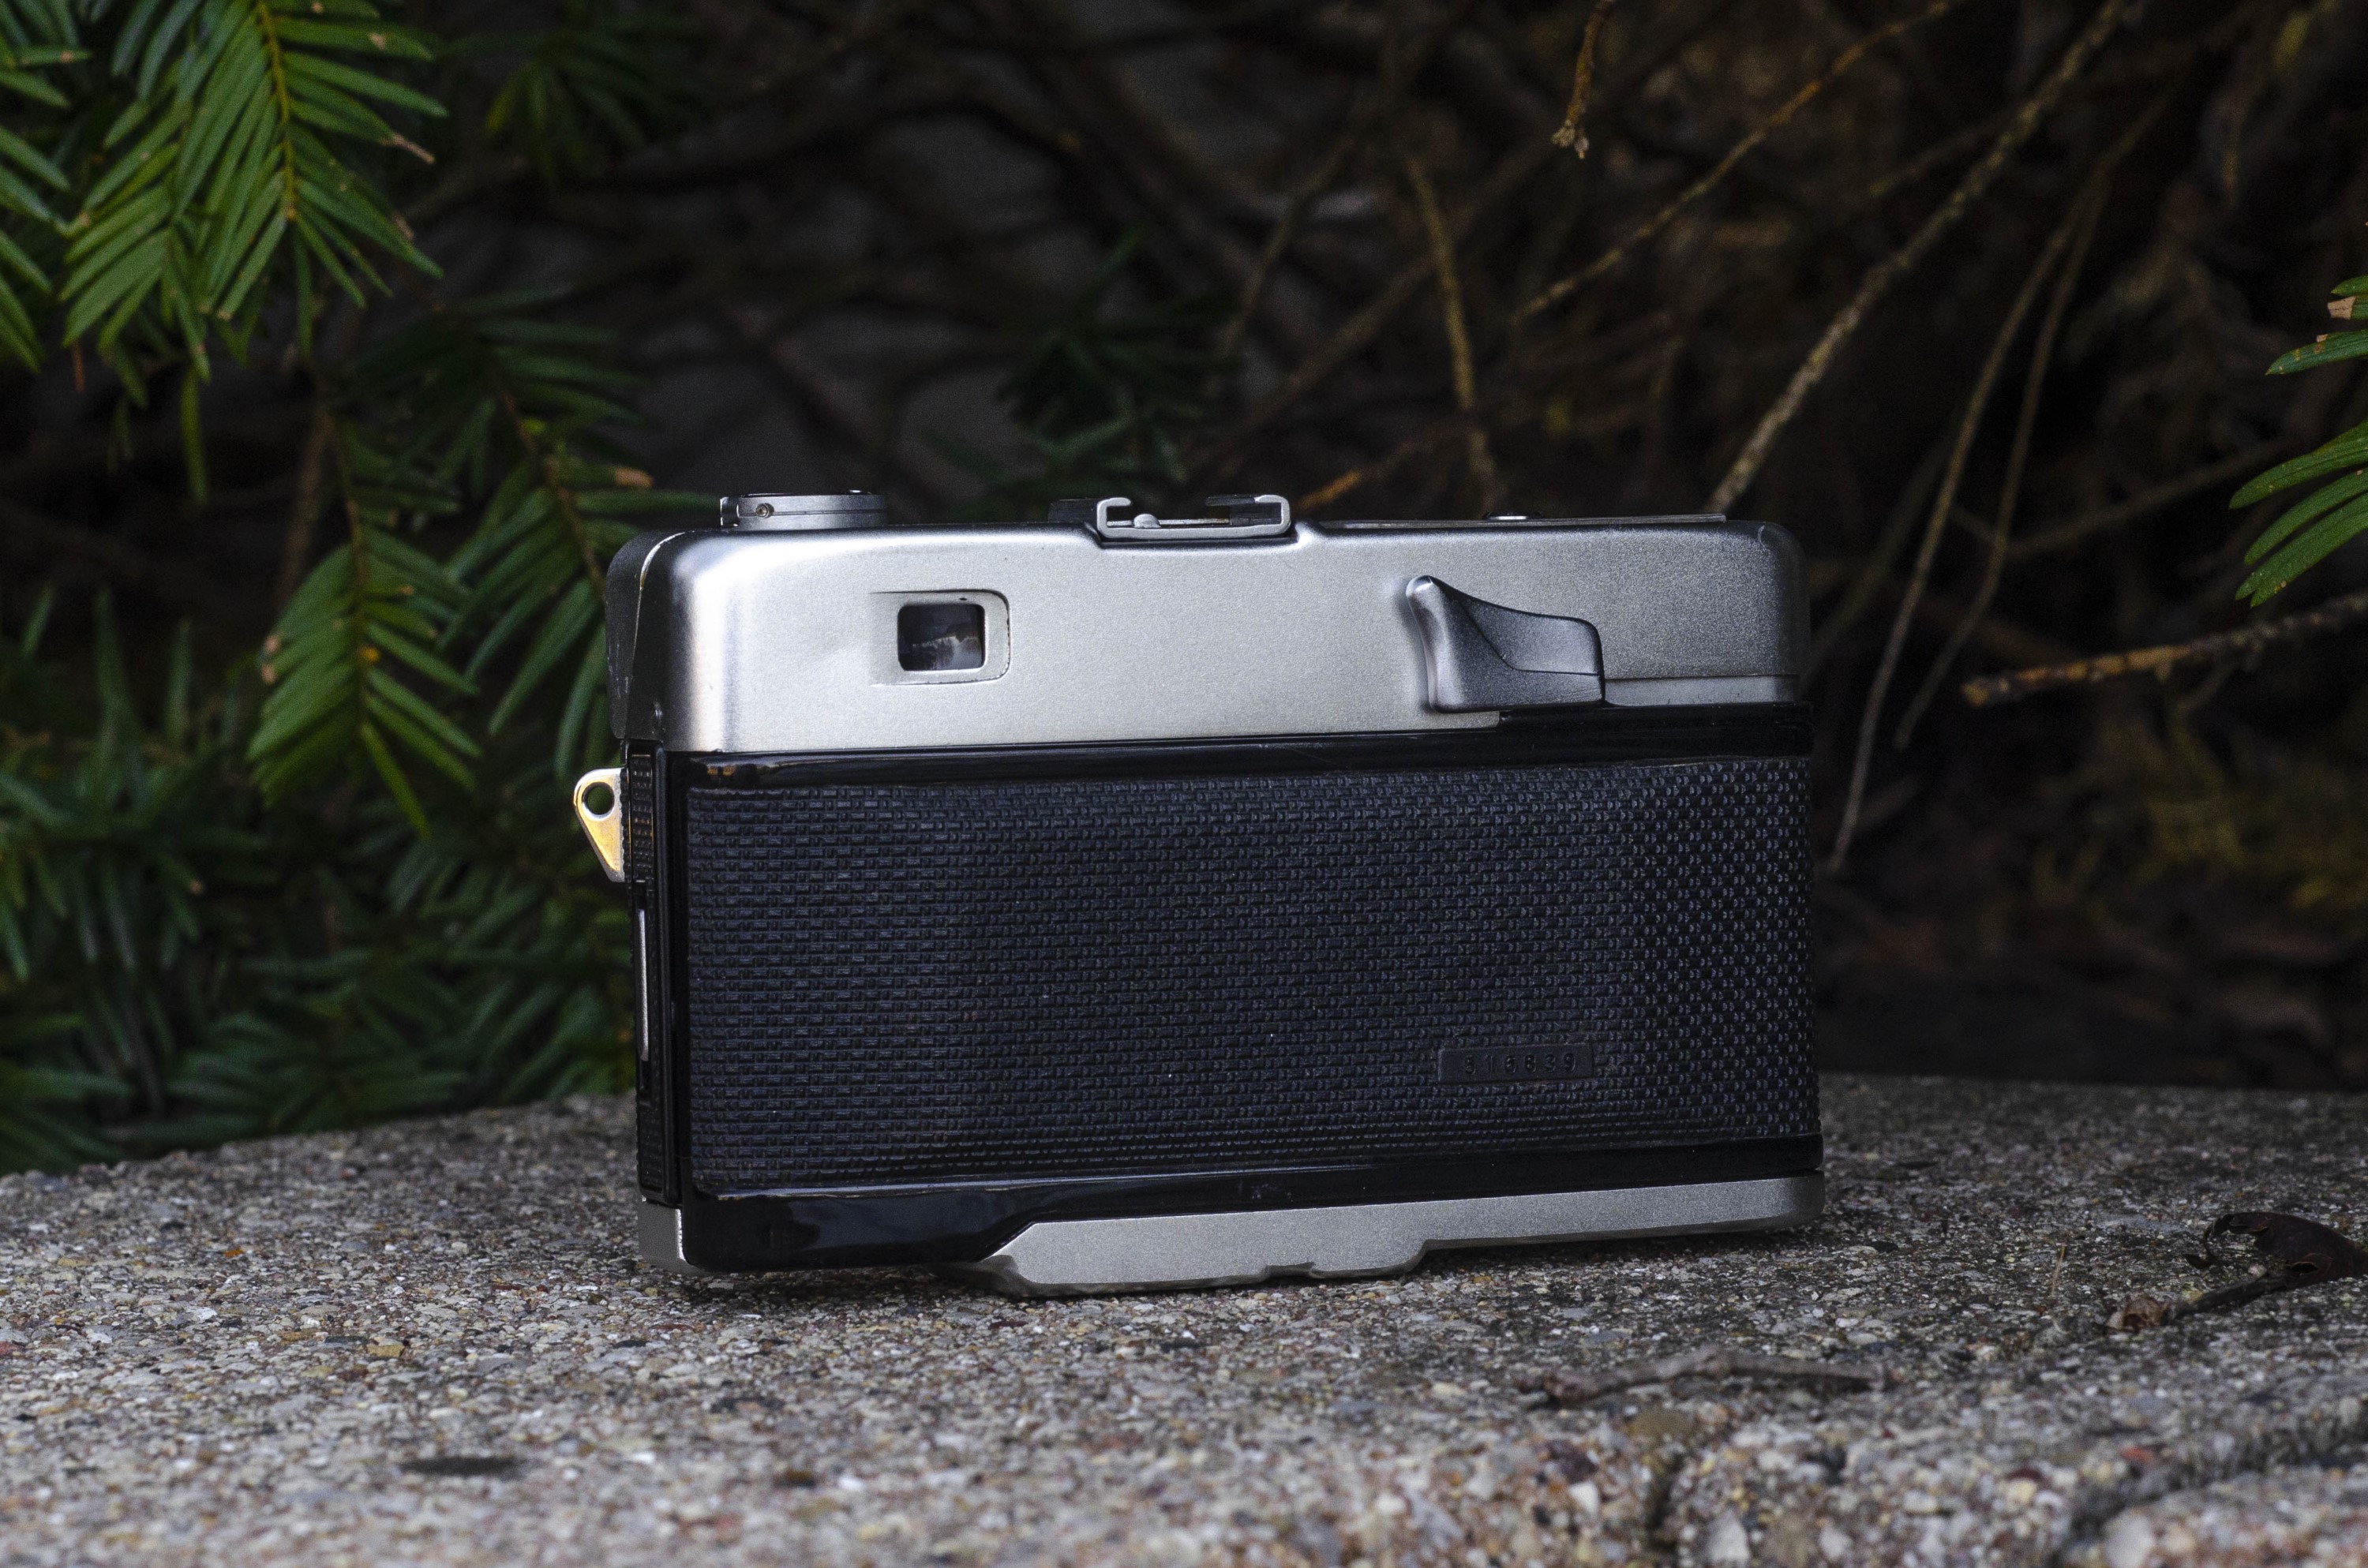
This is a Petri Racer 35mm rangefinder camera made by Petri Camera K.K. starting in 1966. The Racer was a compact version of the larger 7 series but came with similar 6-element f/1.9 and f/2.8 lenses, and featured the company’s trademark “Green-O-Matic” system which increased contrast in the coincident image rangefinder. The Racer was a short lived model, likely selling poorly due to growing preference to SLR cameras. Despite it’s relative obscurity, the Racer is handsome and compares favorably to other Japanese rangefinders of the era.
Film Type: 135 (35mm)
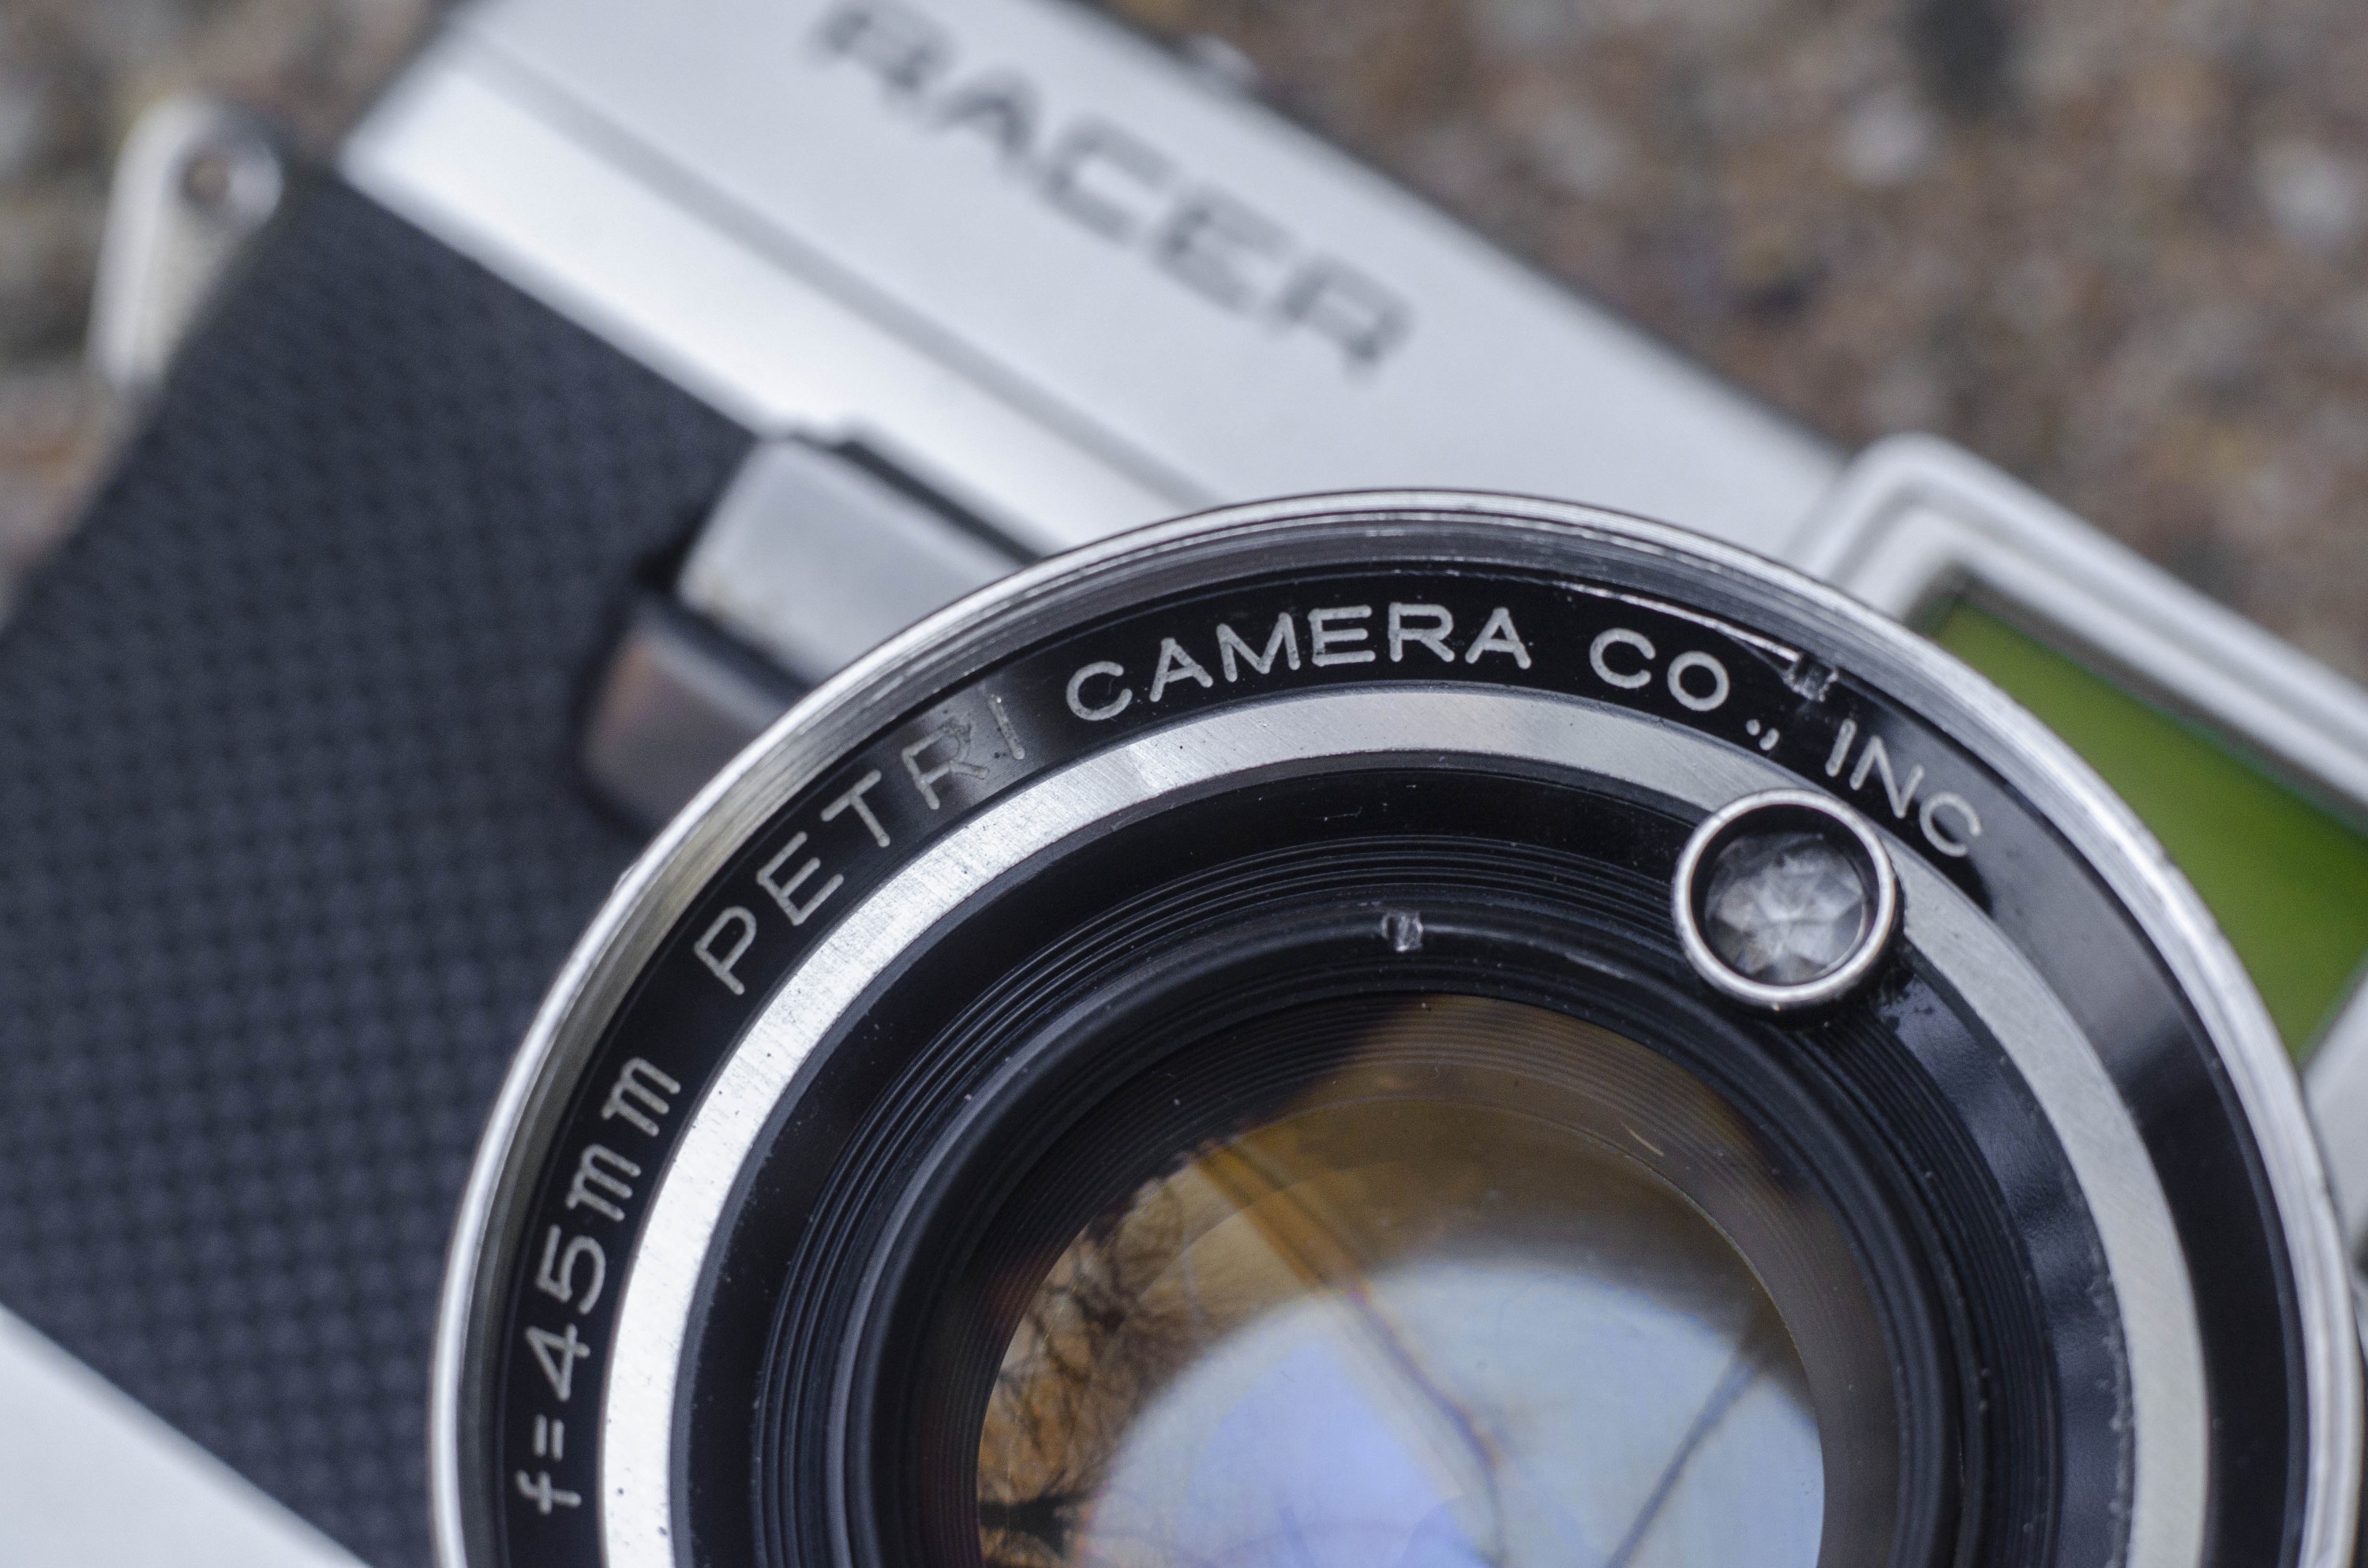
Lens: 45mm f/1.8 Petri coated 6-elements
Focus: 2.75 feet to Infinity
Viewfinder: Green-O-Matic Coincident Image Rangefinder with 45mm projected framelines and parallax hash marks
Shutter: Petri XV Leaf
Speeds: B, 1 – 1/500 seconds
Exposure Meter: Coupled CdS Cell w/ viewfinder match needle
Battery: PX625 1.35v Mercury Cell
Flash Mount: Coldshoe and M and X Flash Sync
Weight: 533 grams
Manual: http://www.cameramanuals.org/petri_pdf/petri_racer.pdf
How these ratings work |
The Racer was an attempt by Petri to release a 35mm rangefinder camera with a fast and sharp f/1.8 six-element lens and modern CdS exposure meter in a company and sporty body. Featuring many ergonomic choices like a large angled 30 degree front shutter release and beautifully sculpted wind lever, the Petri Racer is a joy to hold. The large and bright combined rangefinder/viewfinder features Petri’s “Green-O-Matic” system which increases contrast in the viewfinder making focusing a breeze. The camera is portable, light weight, easy to use, and most importantly, is capable of outstanding images worthy of a model that costs quite a bit more. | ||||||
| Images | Handling | Features | Viewfinder | Feel & Beauty | History | Age | |
| 2 | 2 | 1 | 2 | 2 | 0 | 20% | |
| Bonus | +1 for overall greatness, the complete package | ||||||
| Final Score | 11.8 | ||||||
History
Petri, previously known as Kuribayashi Seisakusho, was founded in Tokyo by Kuribayashi Yōji and made a variety of photographic equipment like tripods and dark boxes. The company would eventually make its own camera in the 1920s known as the Speed Graphic. It was a large format plate camera that could be custom ordered with a variety of lenses and shutters.
Many of Kuribayashi’s early products were sold by third parties under a variety of names. One of the more common names used was First Camera Works which was sold by a third party called Minagawa Shōten. For this reason, it can be incredibly difficult to identify a Kuribayashi made product.
In the 1930s, Kuribayashi made many folding roll film cameras such as the Semi First and First Six. These cameras were very similar to designs by German companies such as Balda and Welta.

During World War II, at least one of Kuribayashi’s offices in Tokyo was destroyed. There isn’t much information about what the company was doing around this time. It wouldn’t be until 1949 when Kuribayashi would regroup and change names to K.K. Kuribayashi Shashin Kikai Seisakusho and move to Chiyodo, Toyko. At this time, the company also ended it’s ties with Minagawa Shōten and would cease selling products under the First Camera Works name. Kuribayashi would release two new lines of cameras, one called the Kuribayashi Karoron which would be a lower end line of folding cameras, and a TLR called the Petriflex.
Like many other Japanese camera makers, Kuribayashi would see quite a bit of success in the 1950s. They would release their first 35mm rangefinder in 1954 and their first 35mm SLR in 1959. As was customary at this time, in 1962 Kuribayashi would change it’s name to that of its most successful camera and became known as Petri Camera K.K., or simply, Petri.
Although releasing SLR and rangefinder models at approximately the same rate, the company seemed to be more interested in innovating in the rangefinder market. Petri rangefinders were near the cutting edge with innovations like their “Green-O-Matic” focus system, their use of CdS exposure meters within the lens filter ring, and cameras with more attention to ergonomics than typical Japanese makers of the era.
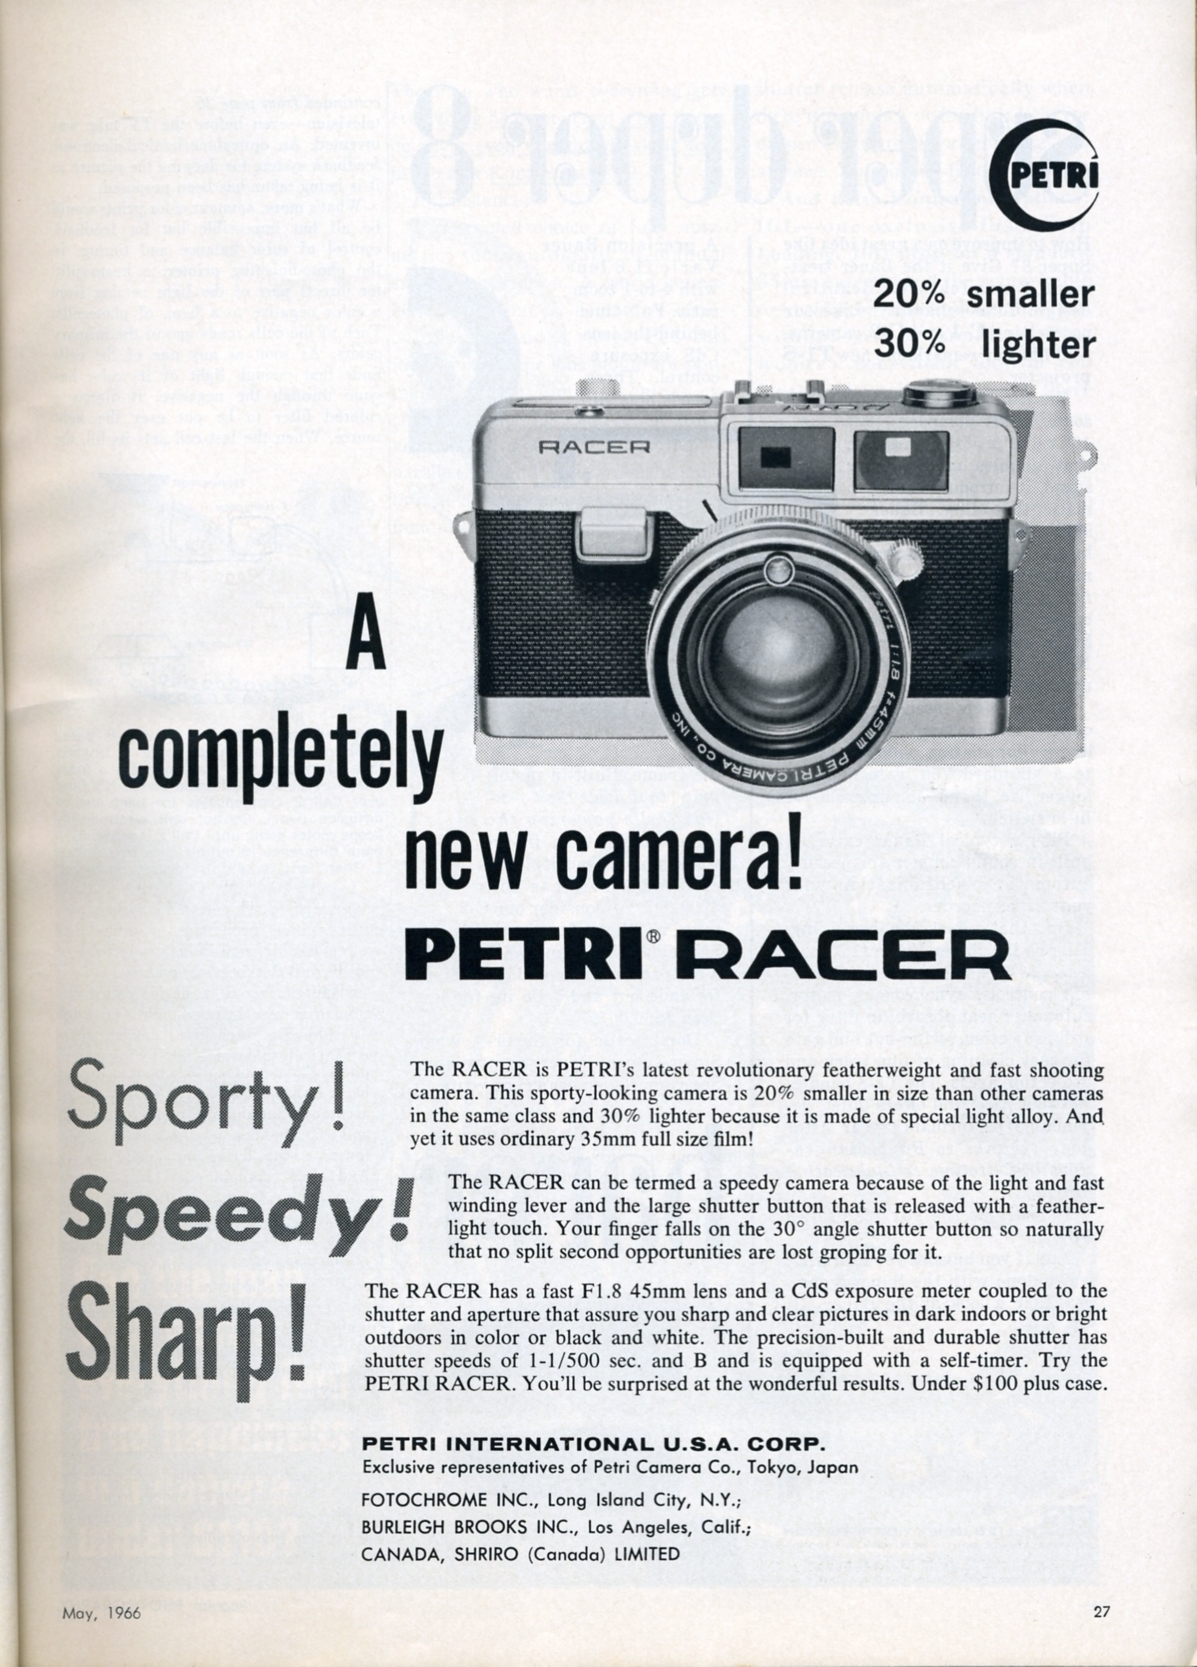
In 1966, Petri would release an all new model called the Racer, which they advertised as being 20% smaller and 30% lighter than competing models in the same class (although they don’t spell out which ones). The name “Racer” was used to evoke sportiness of the camera’s fast f/1.8 lens (an f/2.8 version was later available), and the lightweight design and controls of the camera. The price of the camera was advertised as simply “under $100” which probably means $99.50, which when adjusted for inflation is comparable to about $770 today.
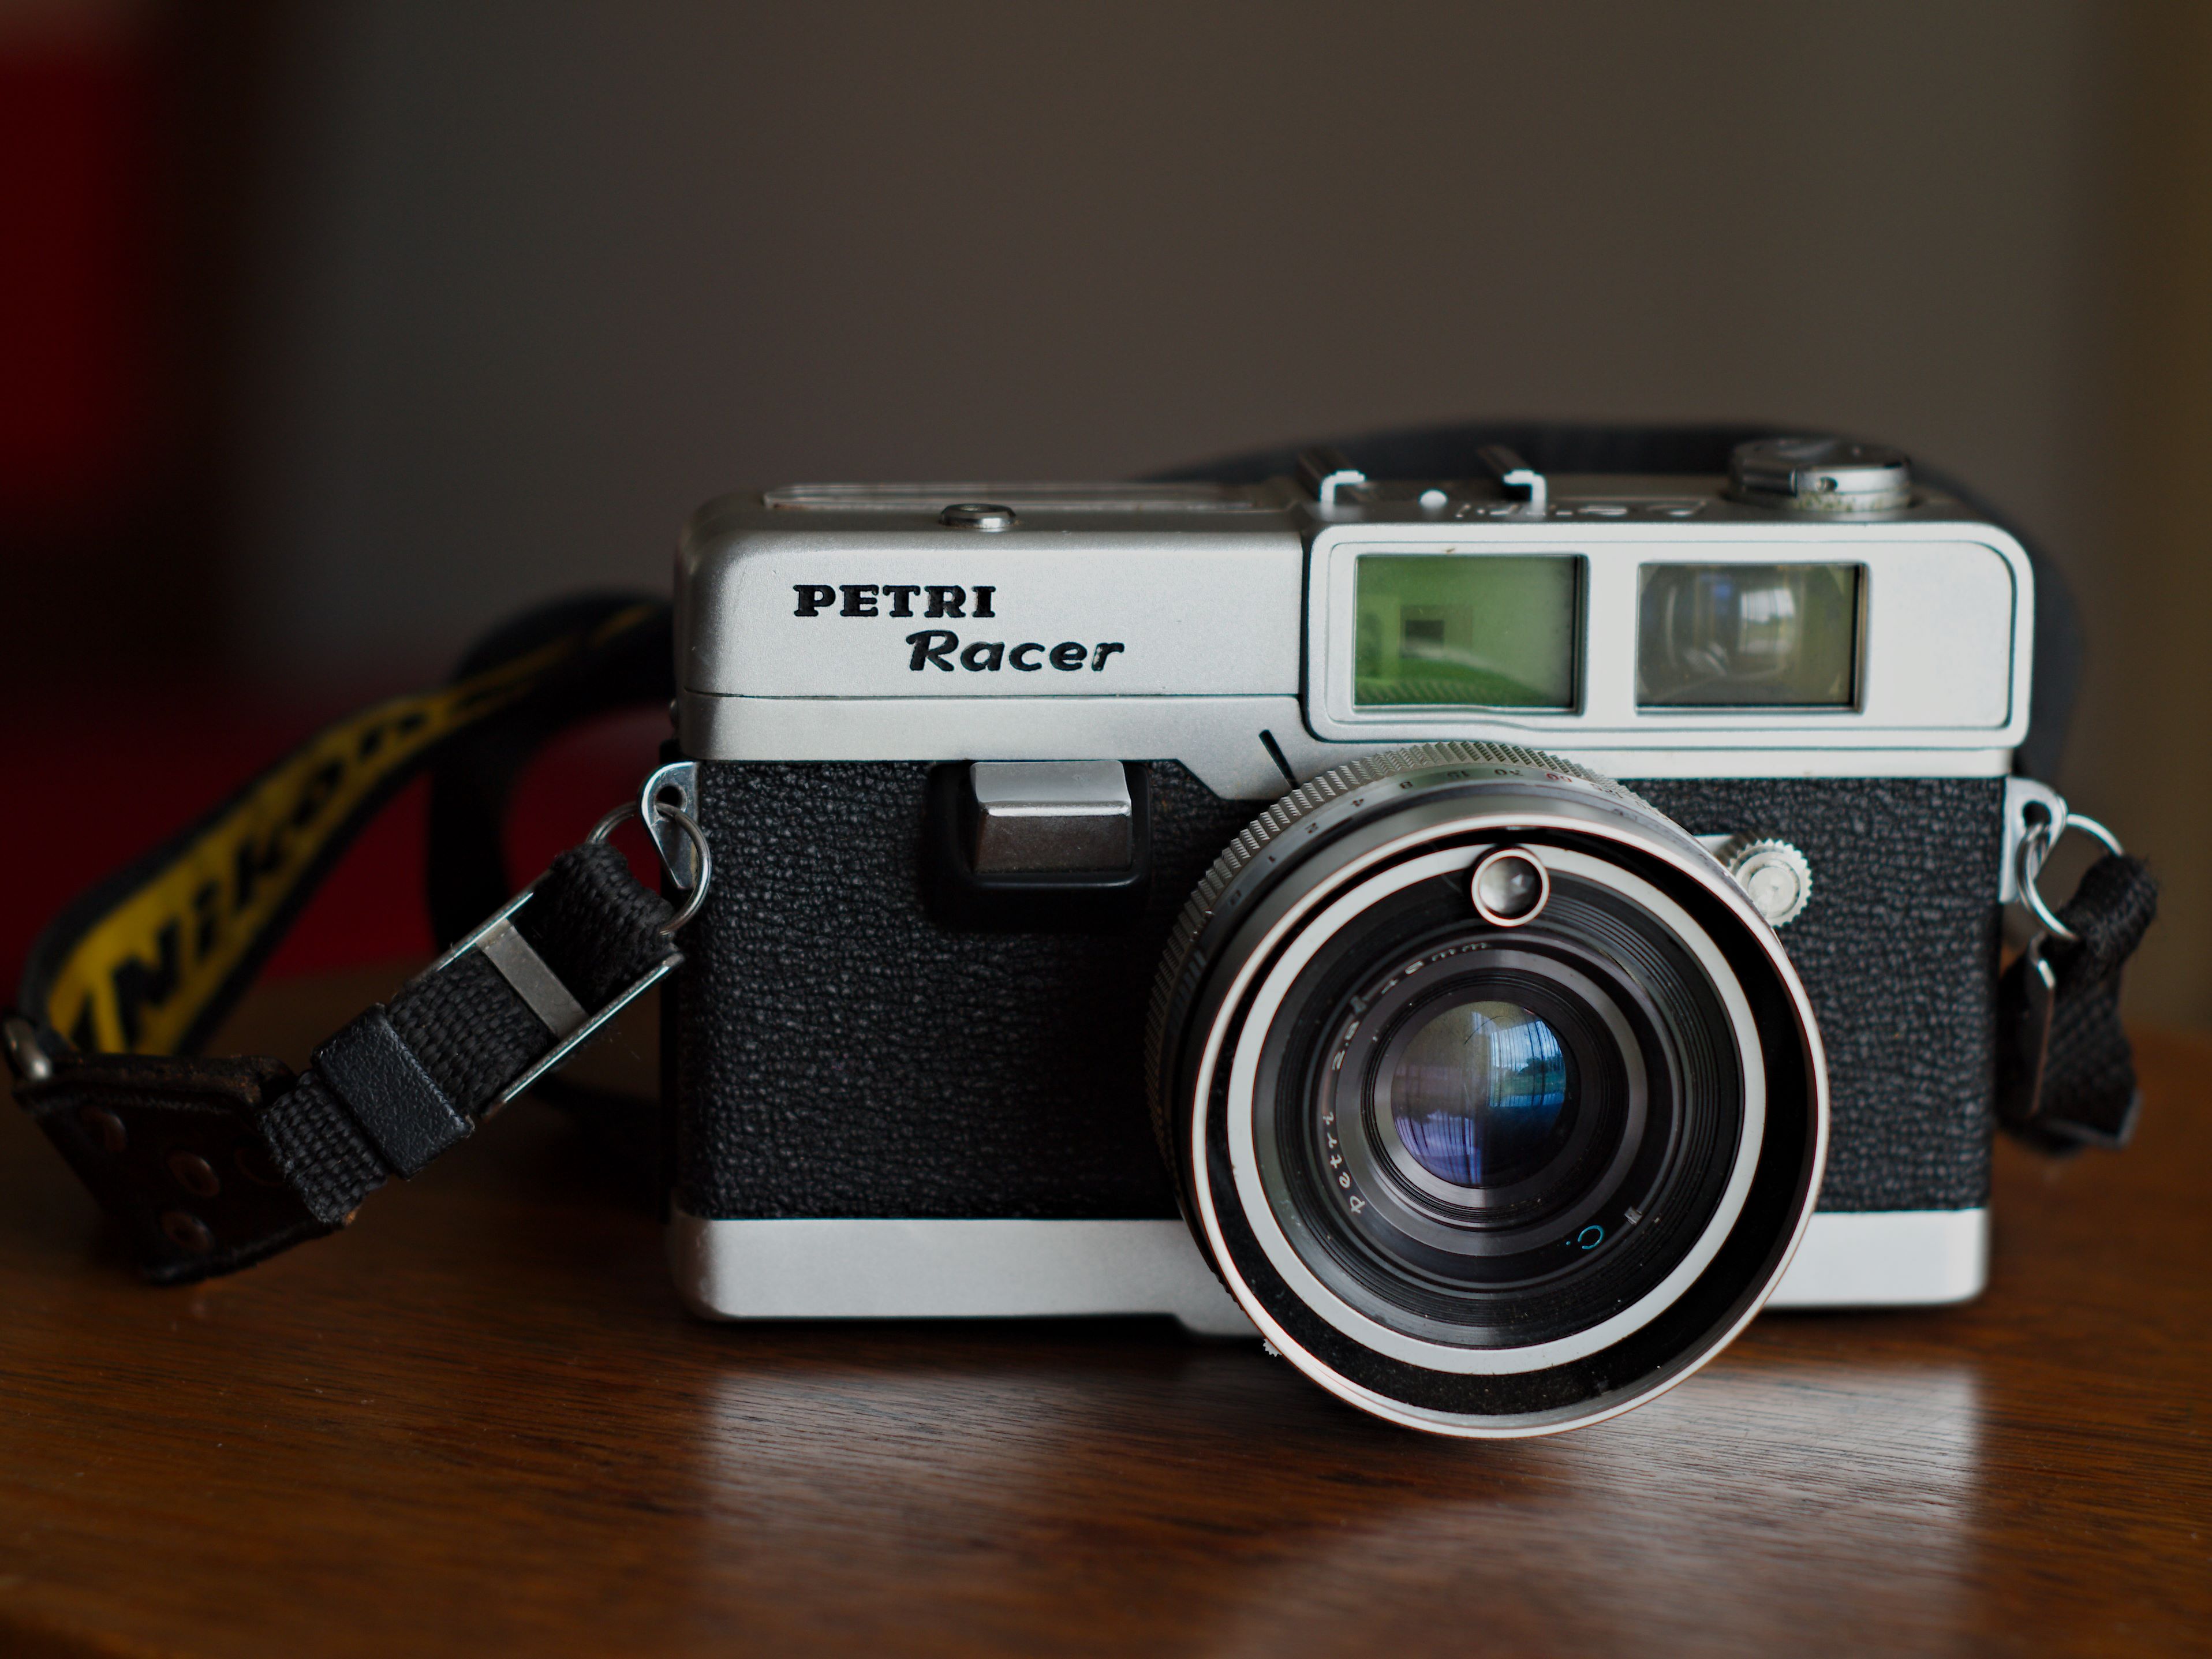
There was at least one cosmetic revision to the Racer changing the texture of the body covering to a more traditional black pebble and replacing the original “Racer” logo with a “Petri Racer” logo on the front plate. As best as I can tell, the rest of the camera was unchanged. The image to the right shows both the later design plus the lower end f/2.8 lens which was also available.
I could not find any sort of production numbers for the camera, but based on availability of other Petri models from the 1960s, it would appear it did not sell in large numbers. Perhaps the move towards automatic exposure was more attractive to the market of potential buyers who still had an interest in rangefinders.

Petri’s SLR and rangefinder cameras were generally highly regarded and well built designs back then. They saw moderate success in export sales throughout the 50s and into the 60s, but like Miranda, who was another Japanese camera maker, they had a difficult time transitioning into the electronic age and mass producing their products. As a result, Petri was heavily outsold by it’s competition from Nikon, Canon, Minolta, and Pentax in the 1970s. The company would limp through the decade, selling it’s products under a variety of other nameplates before finally going into bankruptcy in 1977. The Petri name would be revived a couple of times in the coming decades making a variety of products such as telescopes, but it would not be the same company.
Today, there is a small following of loyal Petri aficionados and certain models can be highly sought after, but for some reason, perhaps lack of knowledge, the Racer is not one of them. I regularly see these go unsold for bargain prices on eBay and the one being reviewed here was picked up for less than $20. Still, they are a very nice example of a late 1960s mechanical rangefinder with an excellent 6-element f/1.8 lens and an advanced CdS meter, in a compact and attractive body and are worth checking out if one ever comes your way.
Repairs
Petri rangefinders are commonly found with inoperable shutters and stiff focus. One side effect of a company like them that builds everything in house is that they sometimes try new things that don’t always work.
There wasn’t anything fundamentally wrong with Petri’s shutters, they were just different and repair guys hated working on them. The same cannot be said of whatever lubricant Petri used on their cameras. Whatever they used likely worked fine for the first decade or two of the camera’s life, but it almost always hardens into a cement-like crusty sludge rendering the camera inoperable. I spoke to a professional camera repair person who has worked on cameras for several decades and he said that when he first got started repairing cameras, whenever a Petri would come in, they always went to the new people because the older guys wouldn’t work on them. He remembers many times having to disassemble whole cameras and chisel and scrape dried chunks of old lube off lens helices and shutter parts in order to properly lubricate them. Making matters worse, is that sometimes with a stuck Petri, an unsuspecting user will pick one up and try to force something, which ends up bending or breaking some other part making repair nearly impossible.
If you ever come across a Petri rangefinder and expect it to work properly without any work, good luck! I won’t say they don’t exist, but based on my personal experience and that of many other collectors, Petri rangefinders have a higher than average rate of failure. The good news is that once you get them open and cleaned they’re wonderful cameras.
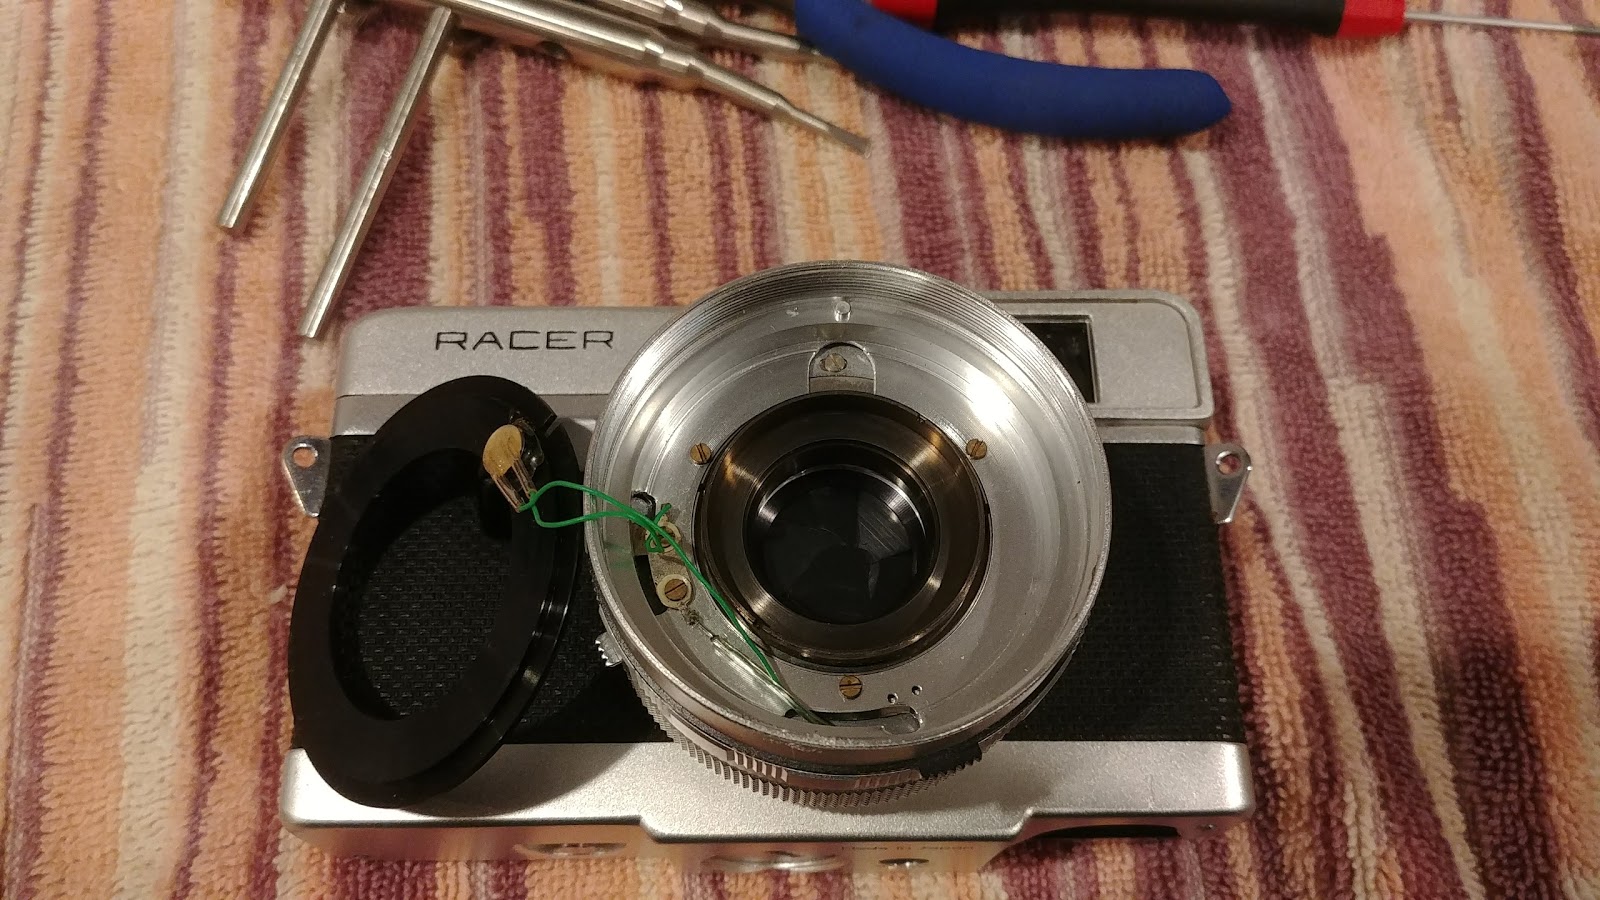
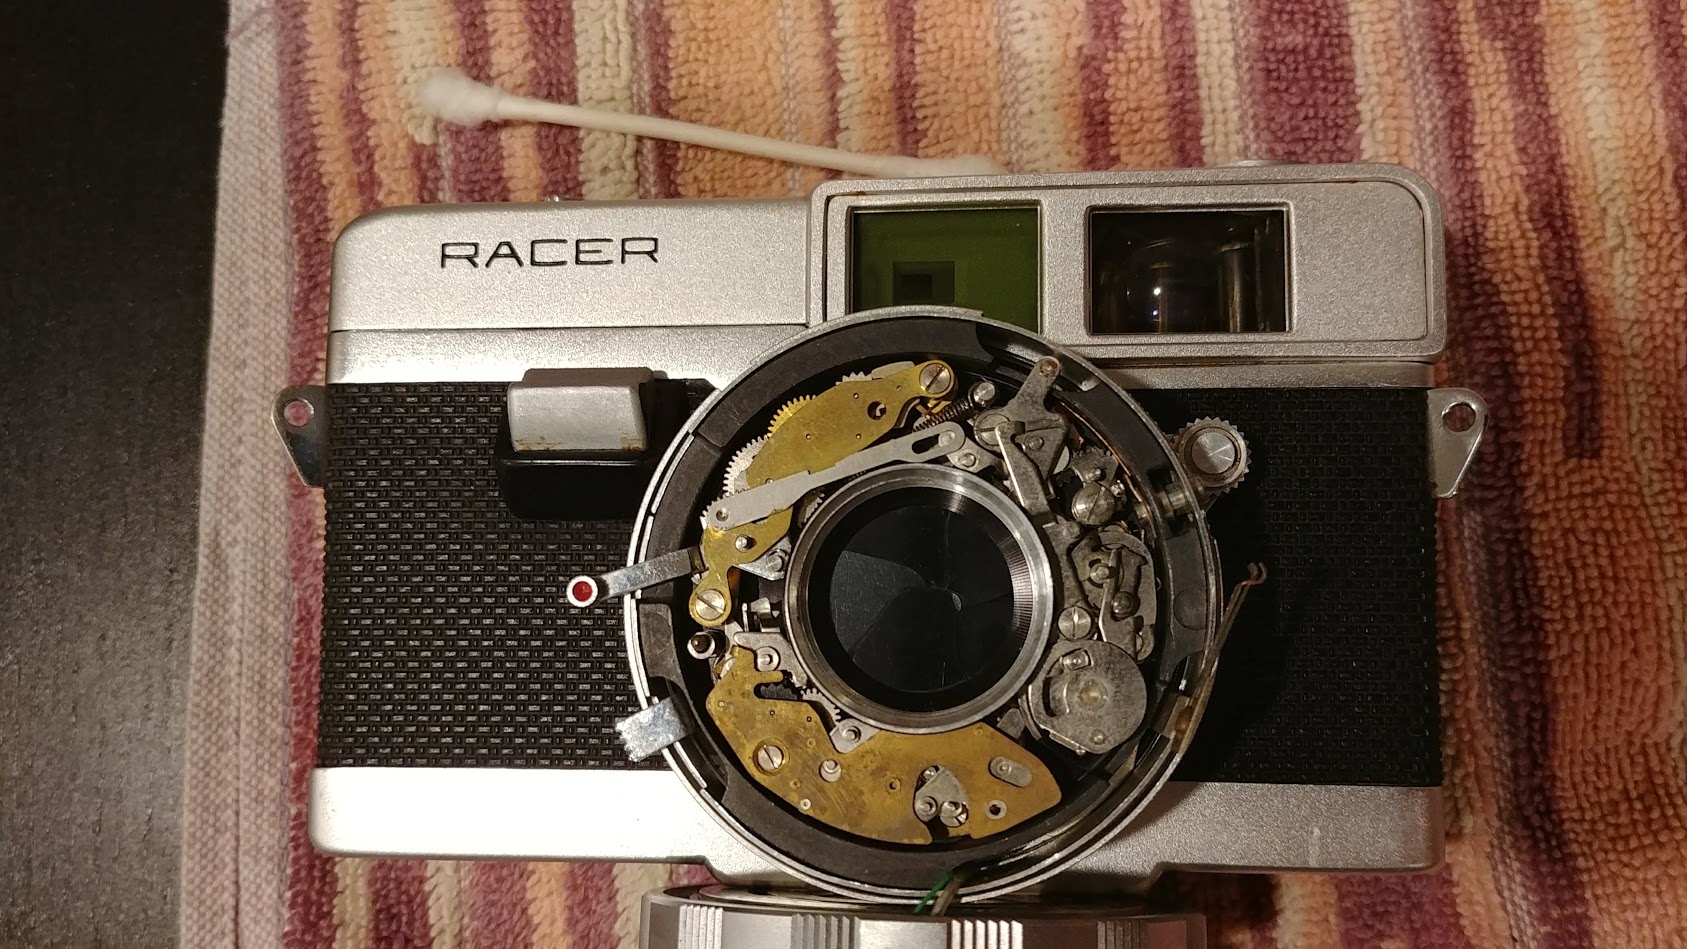
My example arrived, like many others, completely frozen. I couldn’t move the focus ring, and the shutter wouldn’t fire at any speed. I wanted to avoid completely removing the shutter from the camera, so my plan was to go through the front lens element and see if I could expose the shutter and helical in an attempt to give it a naphtha bath.
 Step 1:
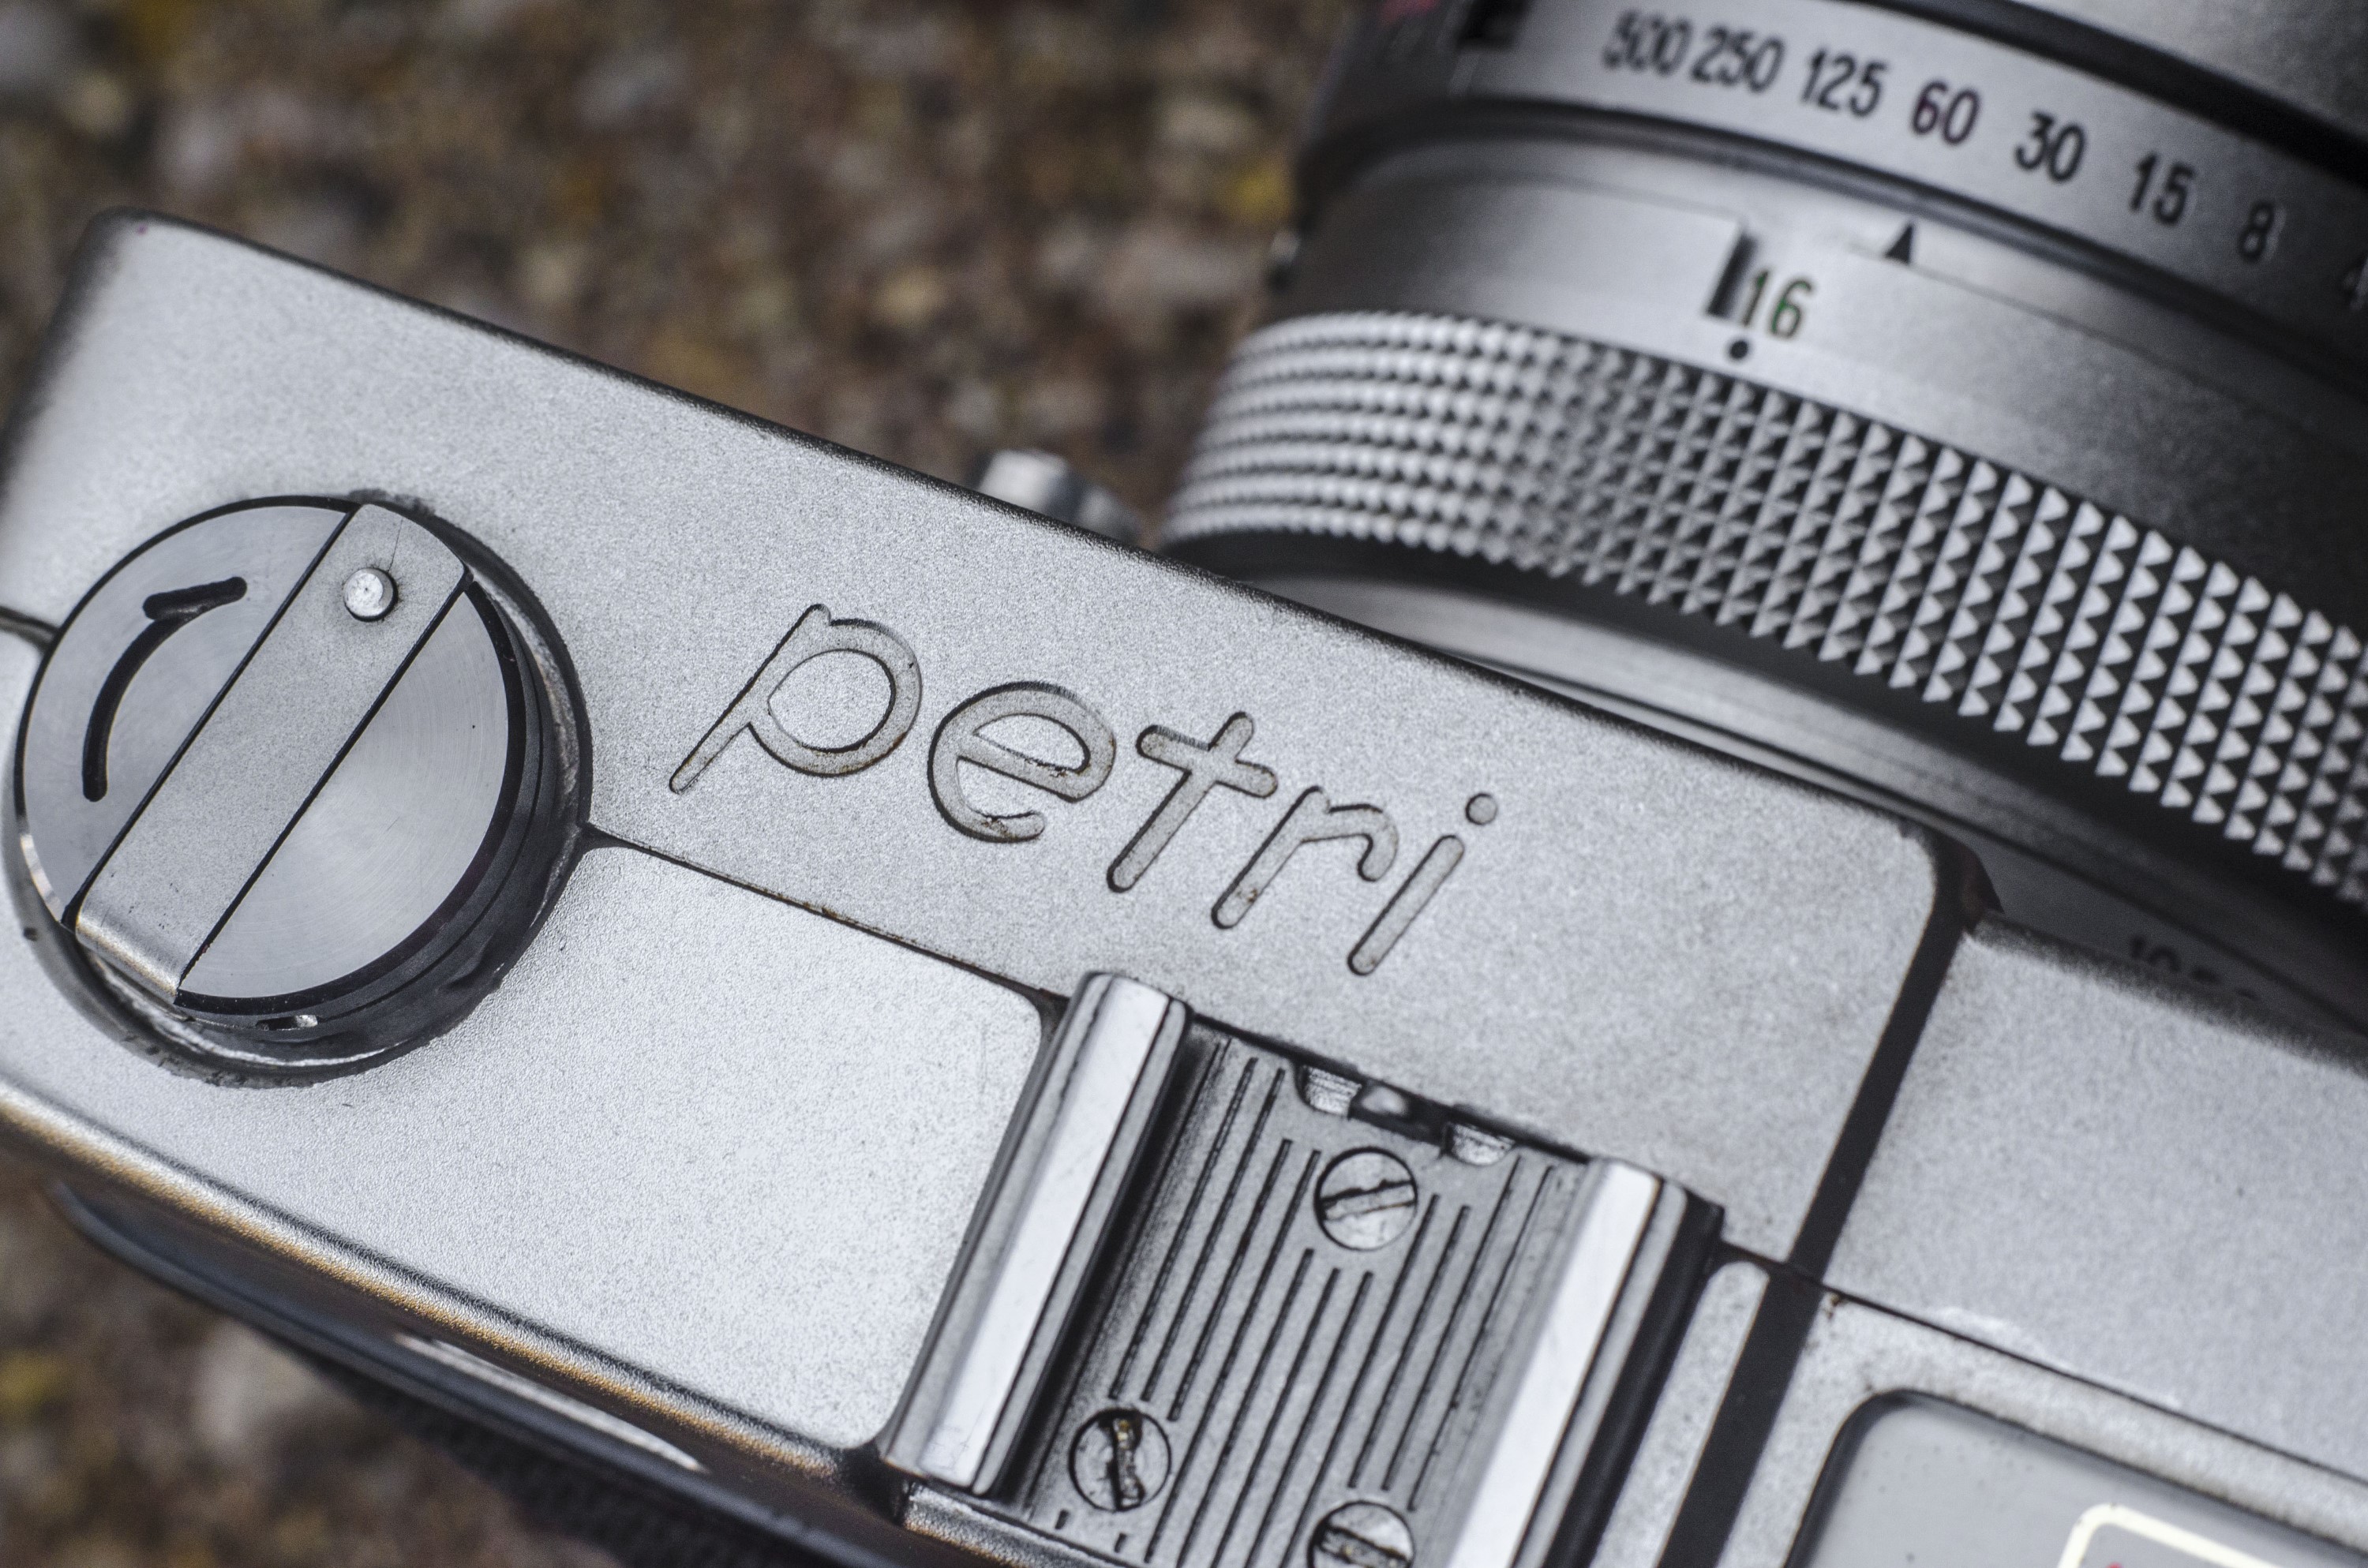
Getting to the shutter of the Petri Racer is pretty easy and only requires a lens spanner. The beauty ring (with the PETRI CAMERA CO text) is notched for a spanner. Just unscrew it. With this off, there is a flat chrome ring, a plastic disc with the meter attached, a second notched ring, and the outer element that can all come off too. Place these in a safe location.
Step 2: Optional, but Recommended
The exposure meter is soldered together with two green wires. You can optionally leave these attached throughout the entire repair, but they’ll often get in the way. In an effort to make your life easier, and prevent the wires from breaking in an inconvenient location, I recommend cutting the wires in the middle of the wire in a spot that will be easy to solder back together later. You’ll want to observe polarity, so I recommend making a black mark on one of the wires where you are going to cut, so you can connect the correct wires back together when you reassemble the camera.
 Step 3:
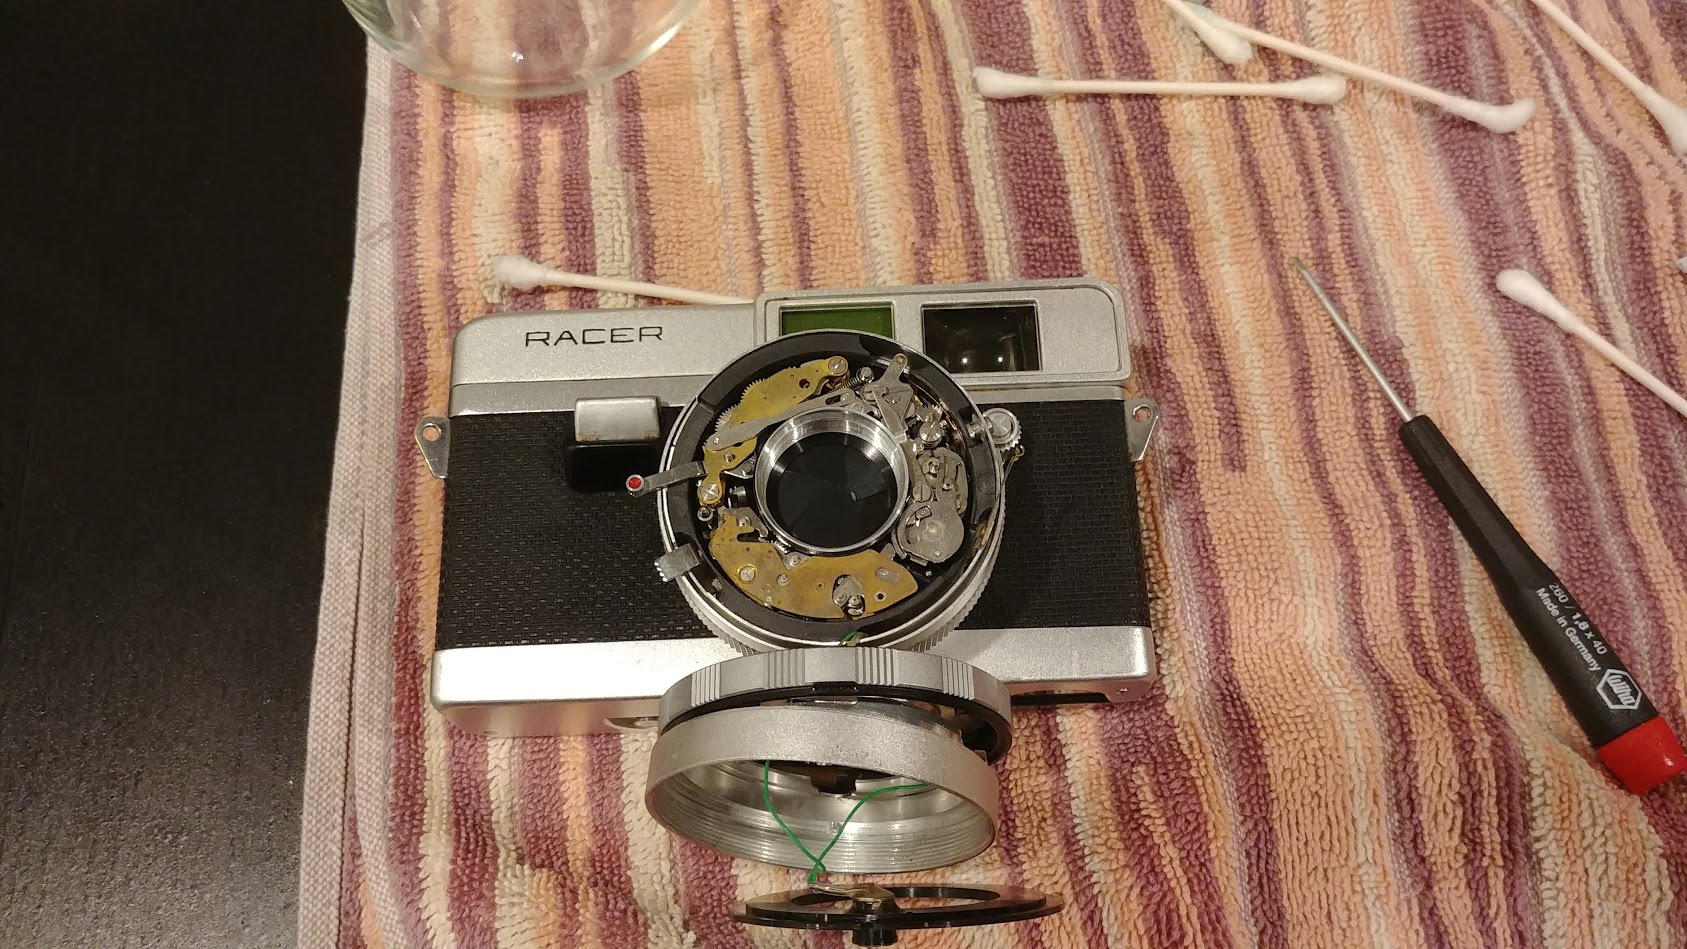
There is a middle lens element that is resting in a dark brass ring. There is nothing holding it in other than friction and it will fall out on it’s own when you turn the camera upside down and give a bump to the rear of the camera. Make sure you protect this lens element and don’t let it hit anything as it is fragile.
Step 4:
Remove the three brass screws around the perimeter of the brass ring (seen in the previous image) and lift off the ring. If you have not cut the green exposure wires, this ring will need to be moved to the side in a way that doesn’t disrupt the wires.
 Step 5:
Using your lens spanner, loosen and then remove the brass ring that was holding the middle lens element. You’ll only need to spanner to break it loose, and from there you should be able to unscrew it by hand.
 Step 6:
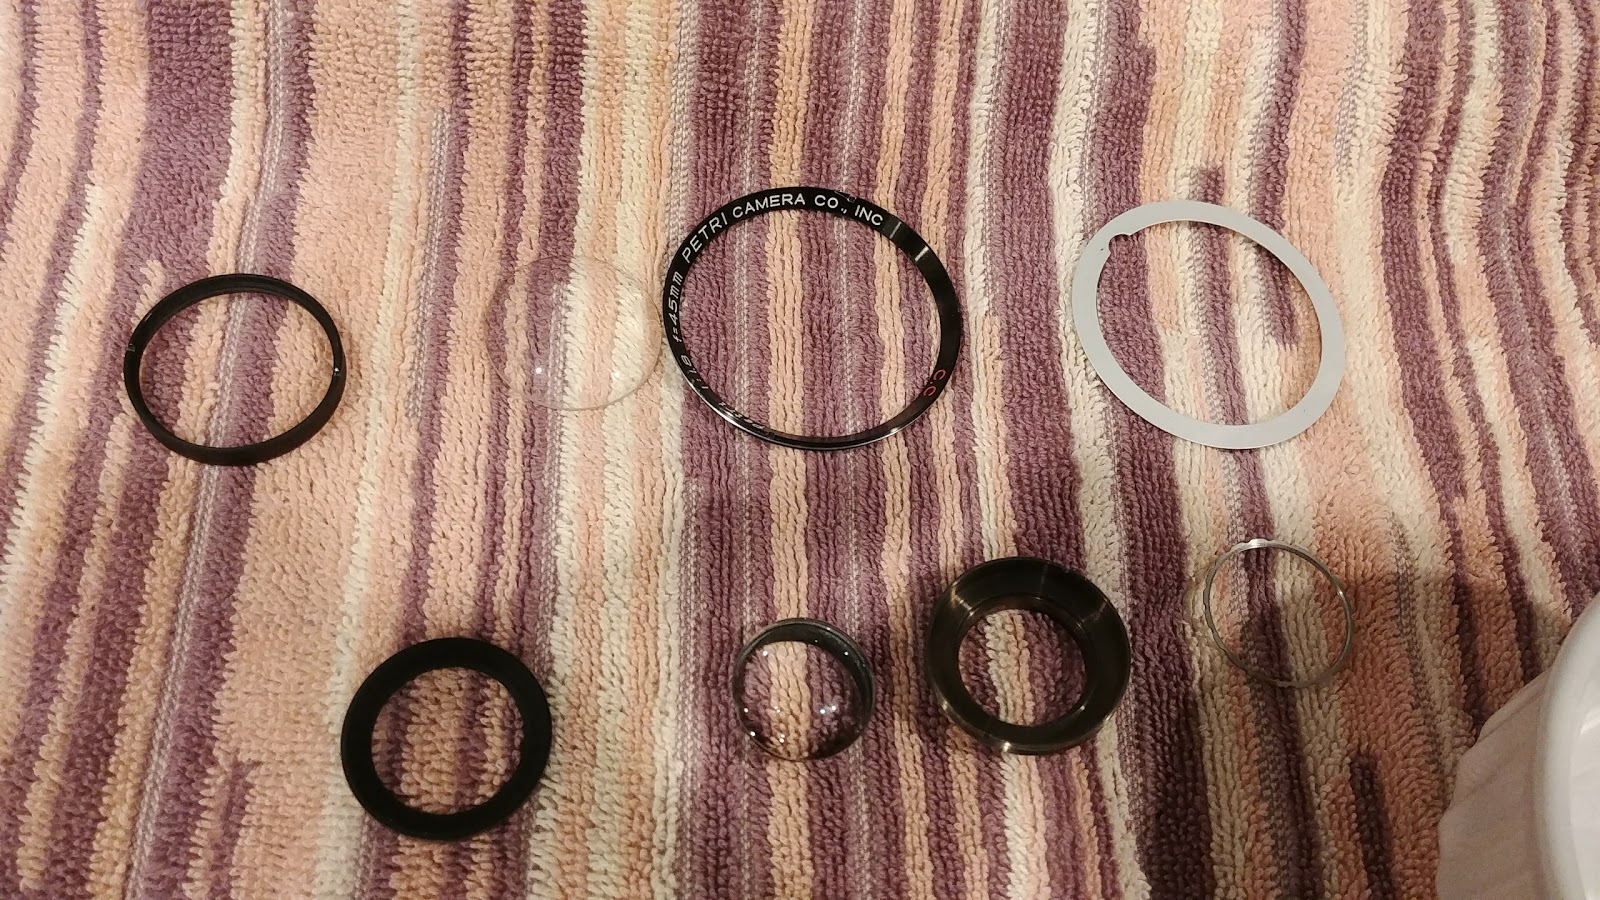
At this point, you should have all of the parts to the right removed from the camera. Although each of these parts can only go back into the camera in a specific order, you’ll save yourself a lot of time if you keep them in order for reassembly.
 Step 7:
At this point, you have enough of the shutter off to where you can see all of the inner workings of the shutter. A liberal douse of naphtha oil is required to loosen up the shutter. Although you cannot see the focus helix in this image, it is right behind the shutter, so flushing the shutter has a side effect of flushing the helix too.
This is the point where professional camera repair people smack their heads against the desk as what I’m doing here is essentially loosening up all of the years of dirt and grime, and the hardened lubricant and moving it around inside of the camera. They’re not wrong. This is not how a pro would do it, however it does work, at least temporarily.
Don’t be stingy when flushing the shutter. I generally buy large metal cans of naphtha oil at a hardware store usually for $7 – $8 a can. Do this over a utility sink or outside and let the excess drip out of the camera. Assuming your camera is just stuck, and doesn’t have any further physical damage, once it gets wet it should start working. You should still be able to cock the shutter and fire it in this partially disassembled state. I also like to gently drag Q-tips across the shutter blades to pick up any debris that lands on them.
Assuming the shutter has begun working, fire it 15-20 times. Move the focus lever several times to work in the naphtha into the helix threads. Once you’ve done it several times, put the camera face down on something to dry. A wire shelf works well so that air can ventilate and dry the oil. Leave it like that overnight. The next day, you’ll likely see that the camera has seized up again. Repeat the process of flushing, drying, and waiting again. You’re going to need to do this several times, but after a few cycles the shutter should remain working after drying over night.
Once you’ve flushed the shutter enough times that it works correctly dry, use your Q-tips to get any obvious debris out. Set the shutter to “Bulb” and fire it so the blades stay open, revealing the inside surface of the rear lens element, and use another Q-tip to gently clean the surface of the glass off. Get any dried naphtha or debris off the inside surface of the rear lens element.
At this point, you can put everything back together in the reverse of how you took it apart. Make sure you put the outer lens element in the correct way (curved surface faces outward). Since you did not take apart anything to do with the helix, you will not need to calibrate your focus, it should still be correct. As you install each part back into the camera, keep testing it to make sure it continues to work. Once you have it back together and can confirm the camera is still working, quickly load in some film and go out shooting!
My Thoughts
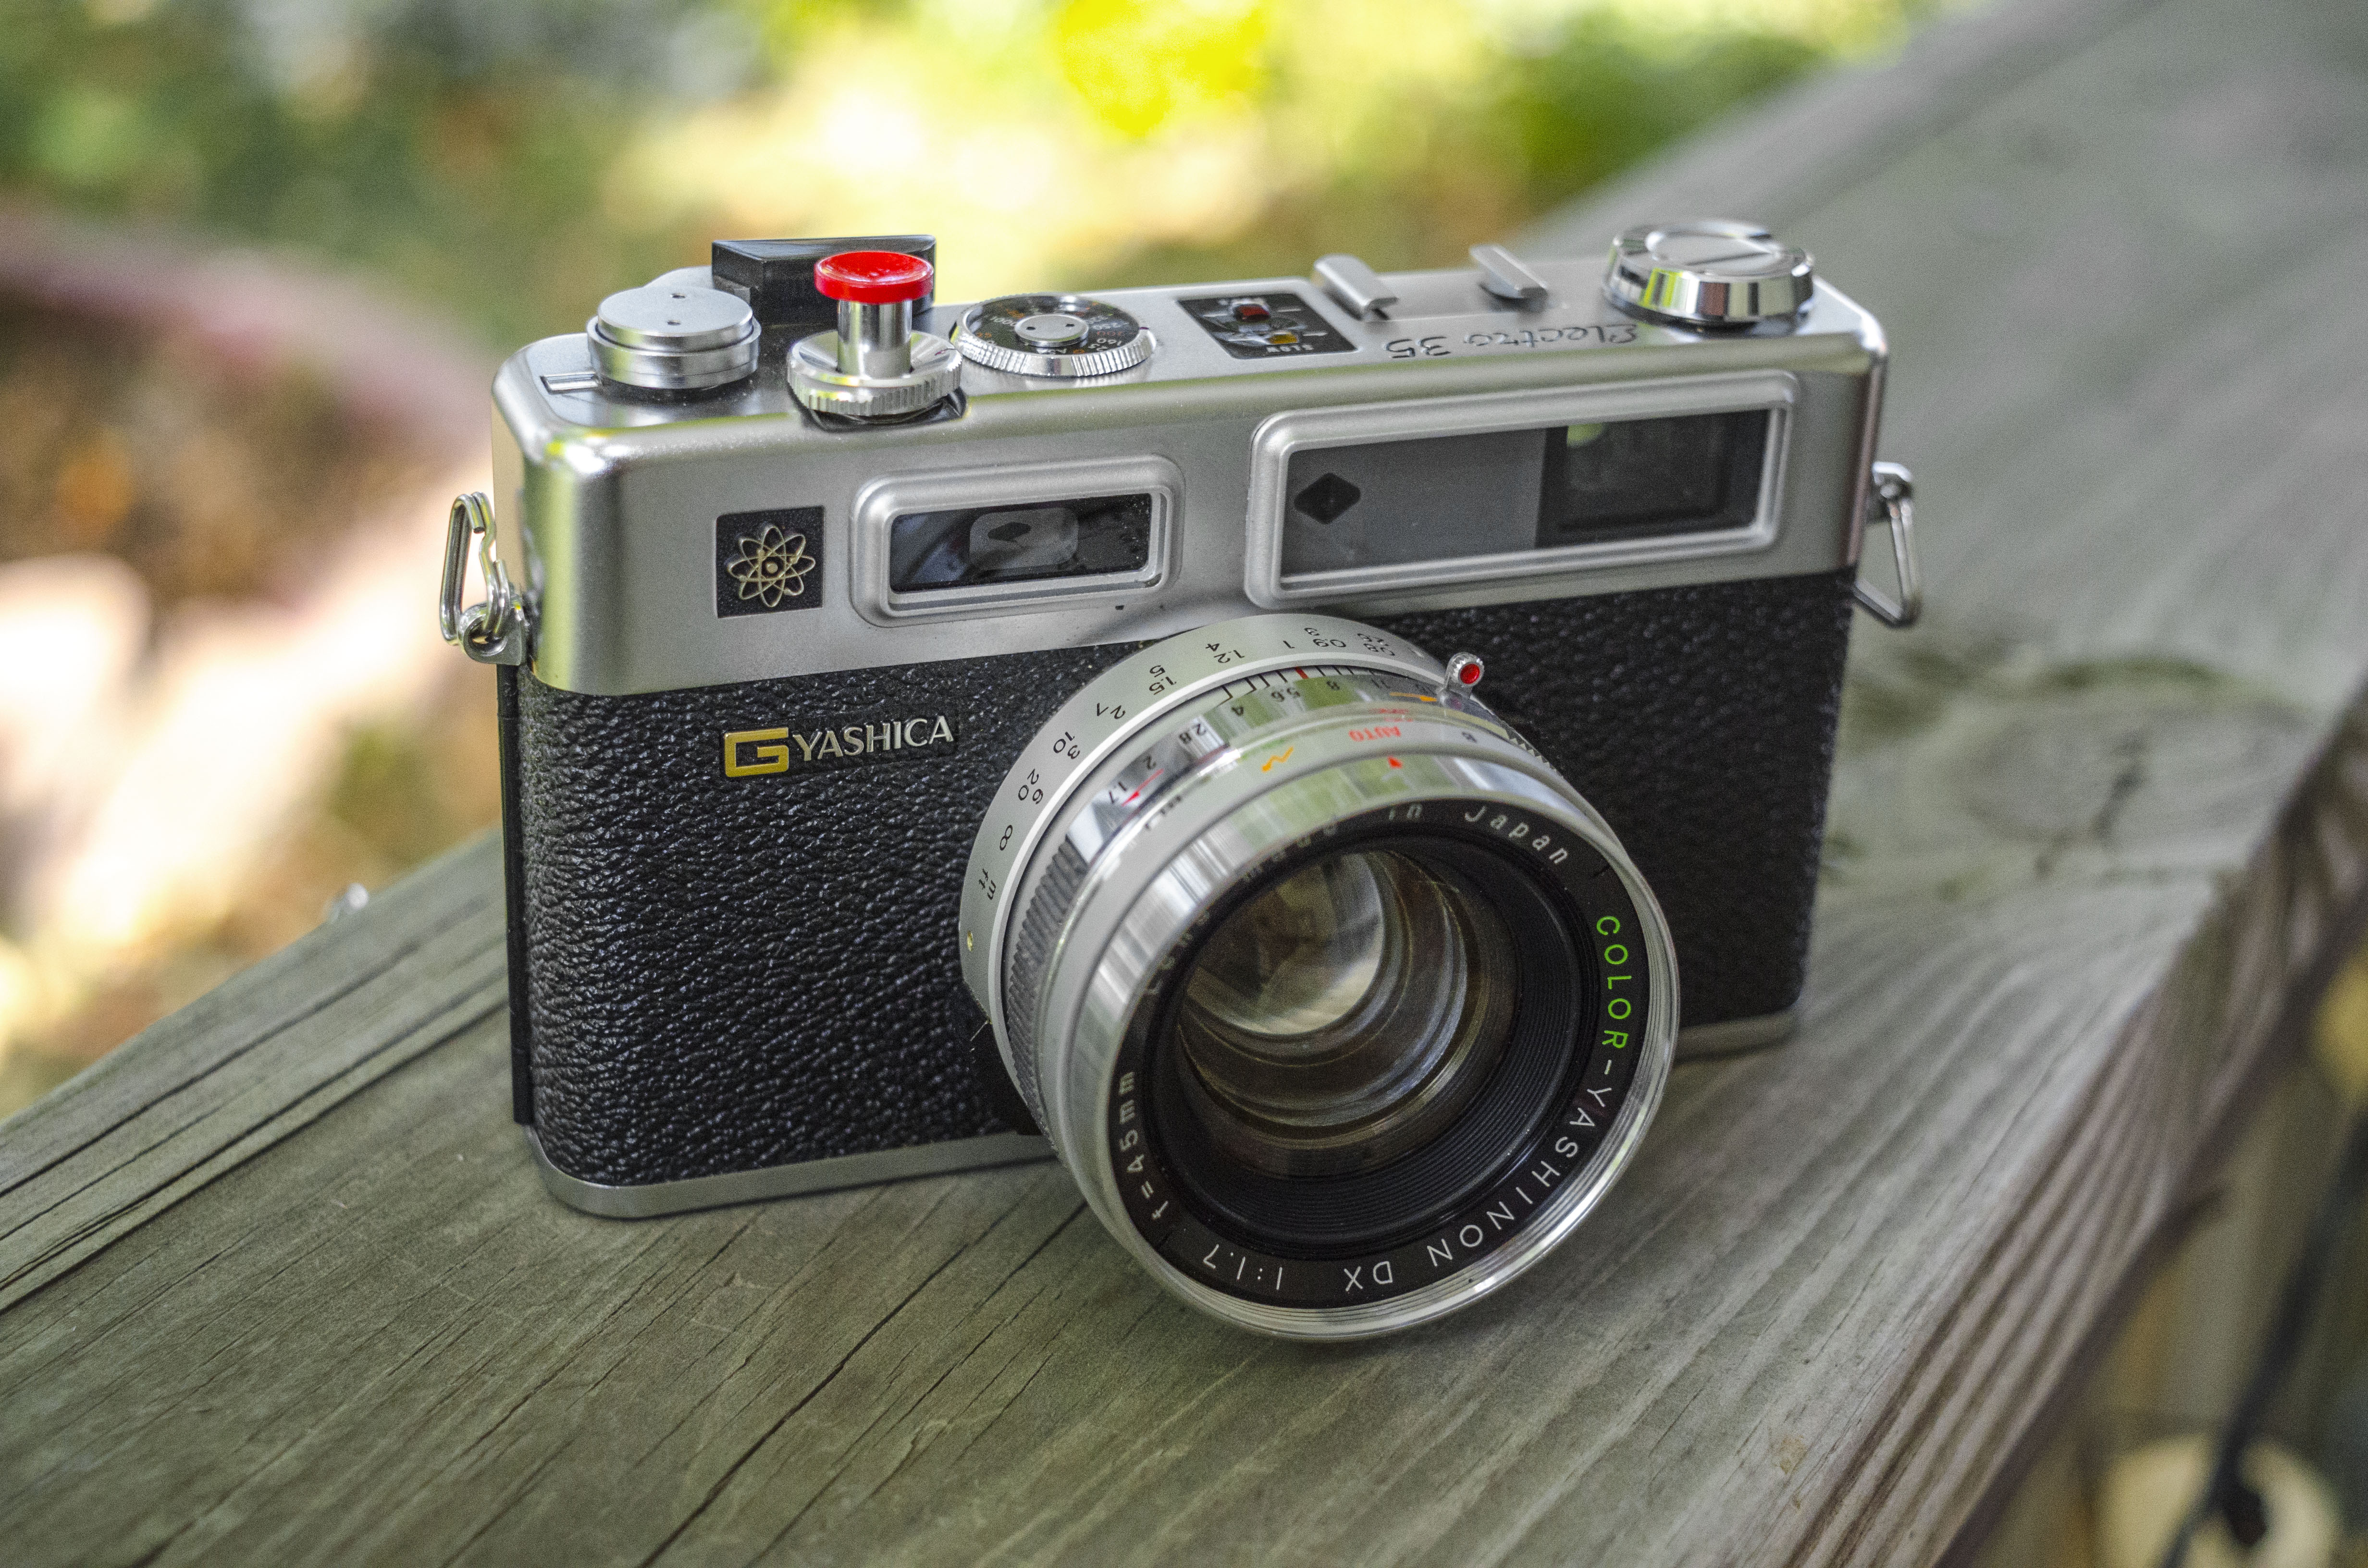
The Petri Racer made it’s debut in 1966, the exact same year as one of my all-time favorite 35mm rangefinders, the Yashica Electro. In some ways, both cameras compare favorably to each other, but in others they’re quite different.
Both the Racer and Electro had fast and extremely sharp 6-element sub f/2 lenses with a 45mm focal length to aide in focus estimation. Both had large and easy to use viewfinders with contrasty rangefinder patches, and both were made by Japanese companies that didn’t have an established SLR system of their own.
Where the Electro was an auto exposure camera that had a revolutionary (for the time) electronic shutter that could shoot step-less shutter speeds from 30 seconds all the way to 1/500, the Racer was a fully mechanical camera that used a less advanced match needle system and required you to manually choose the right aperture and shutter speed combinations. The Yashica Electro was still a large bodied rangefinder that resembled a 1960s SLR without a mirror box. The Racer was a compact and ergonomic wonder with soft curved edges that hinted at more compact rangefinders to come in the 1970s such as the Konica Auto S3 and Canonet QL17 GIII.
I don’t mean to put the Racer or the Electro in any sort of head to head comparison as they’re both different cameras, but one similarity I will say they have is the simplicity in which you can make quality images.
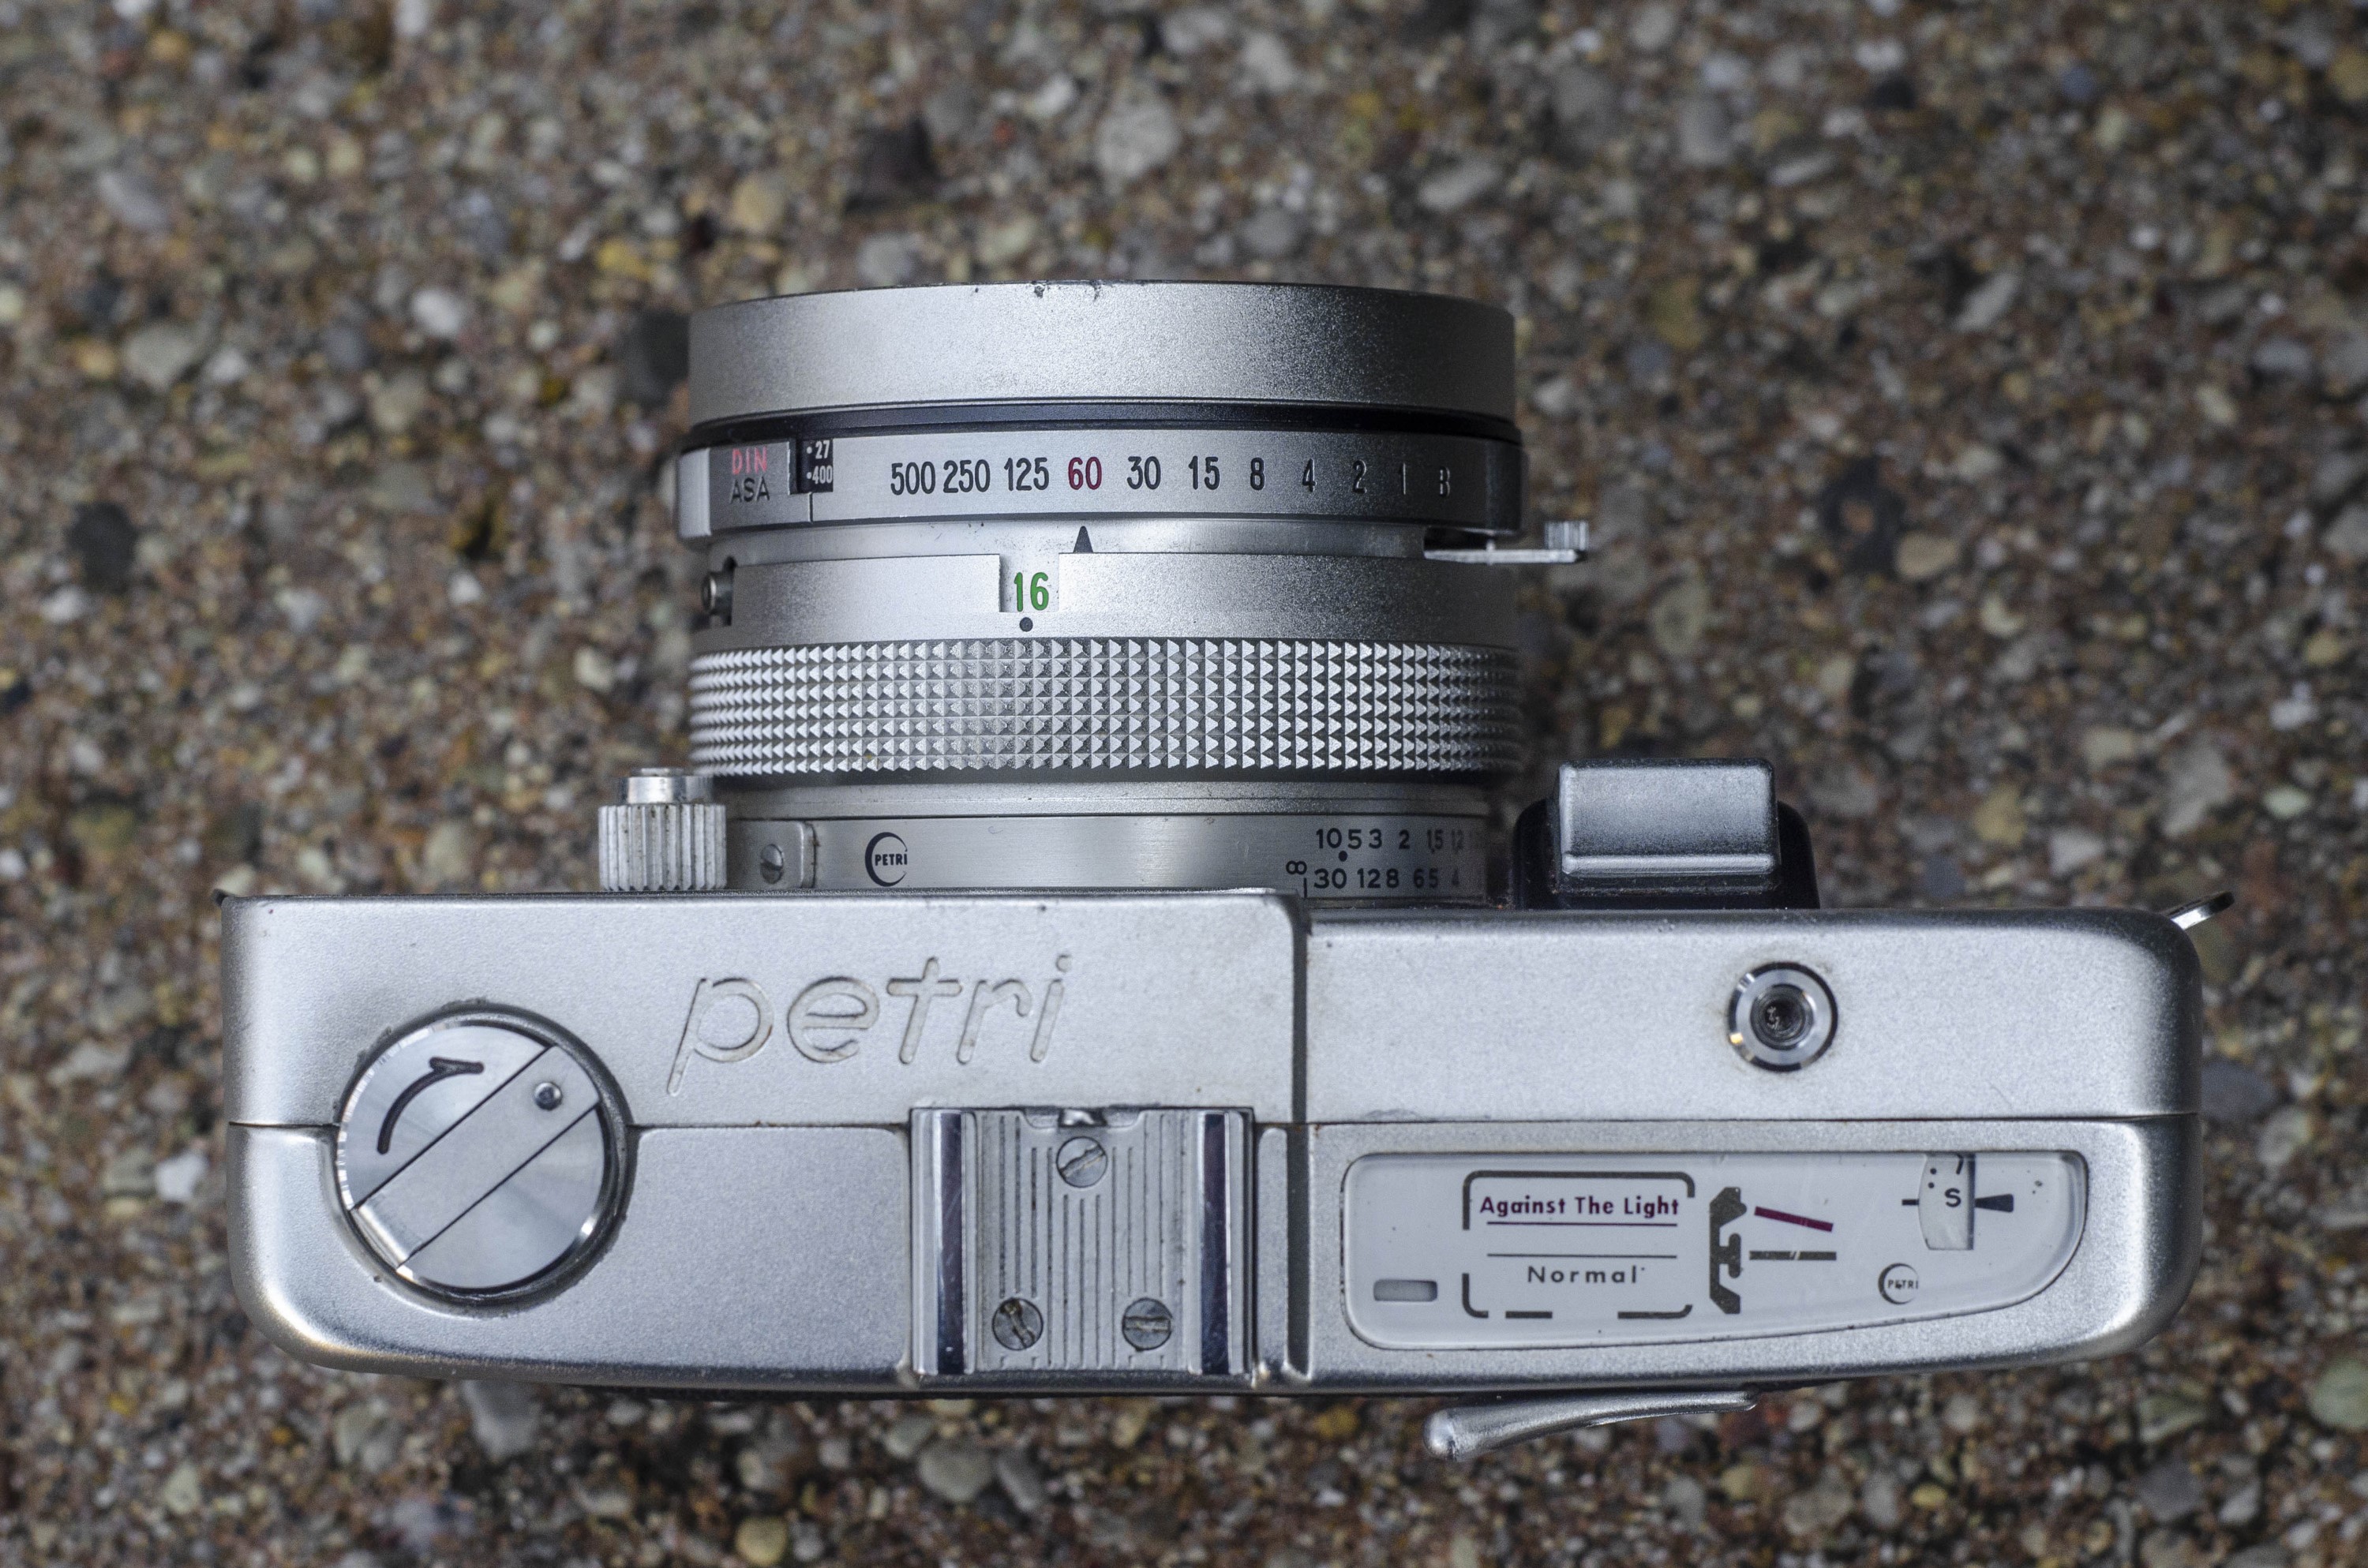
Despite not having automatic exposure, the Racer is quite simple to use. Starting with the top plate, you have a standard rewind crank, accessory shoe, and an exposure guide which I’ll get to later. Where the shutter release would normally be is a threaded socket for a shutter release cable. The normal shutter release is on the front of the camera in a nice large contoured button that is angled at 30 degrees and naturally finds your finger when holding the camera. Many cameras work fine with top plate shutter releases, but some work better with a front release and I feel as though the shutter placement on the Racer is one of the best I’ve ever used. This is without a doubt the best advantage of the Racer over a larger camera like the Electro with it’s larger angular body and top plate shutter release.
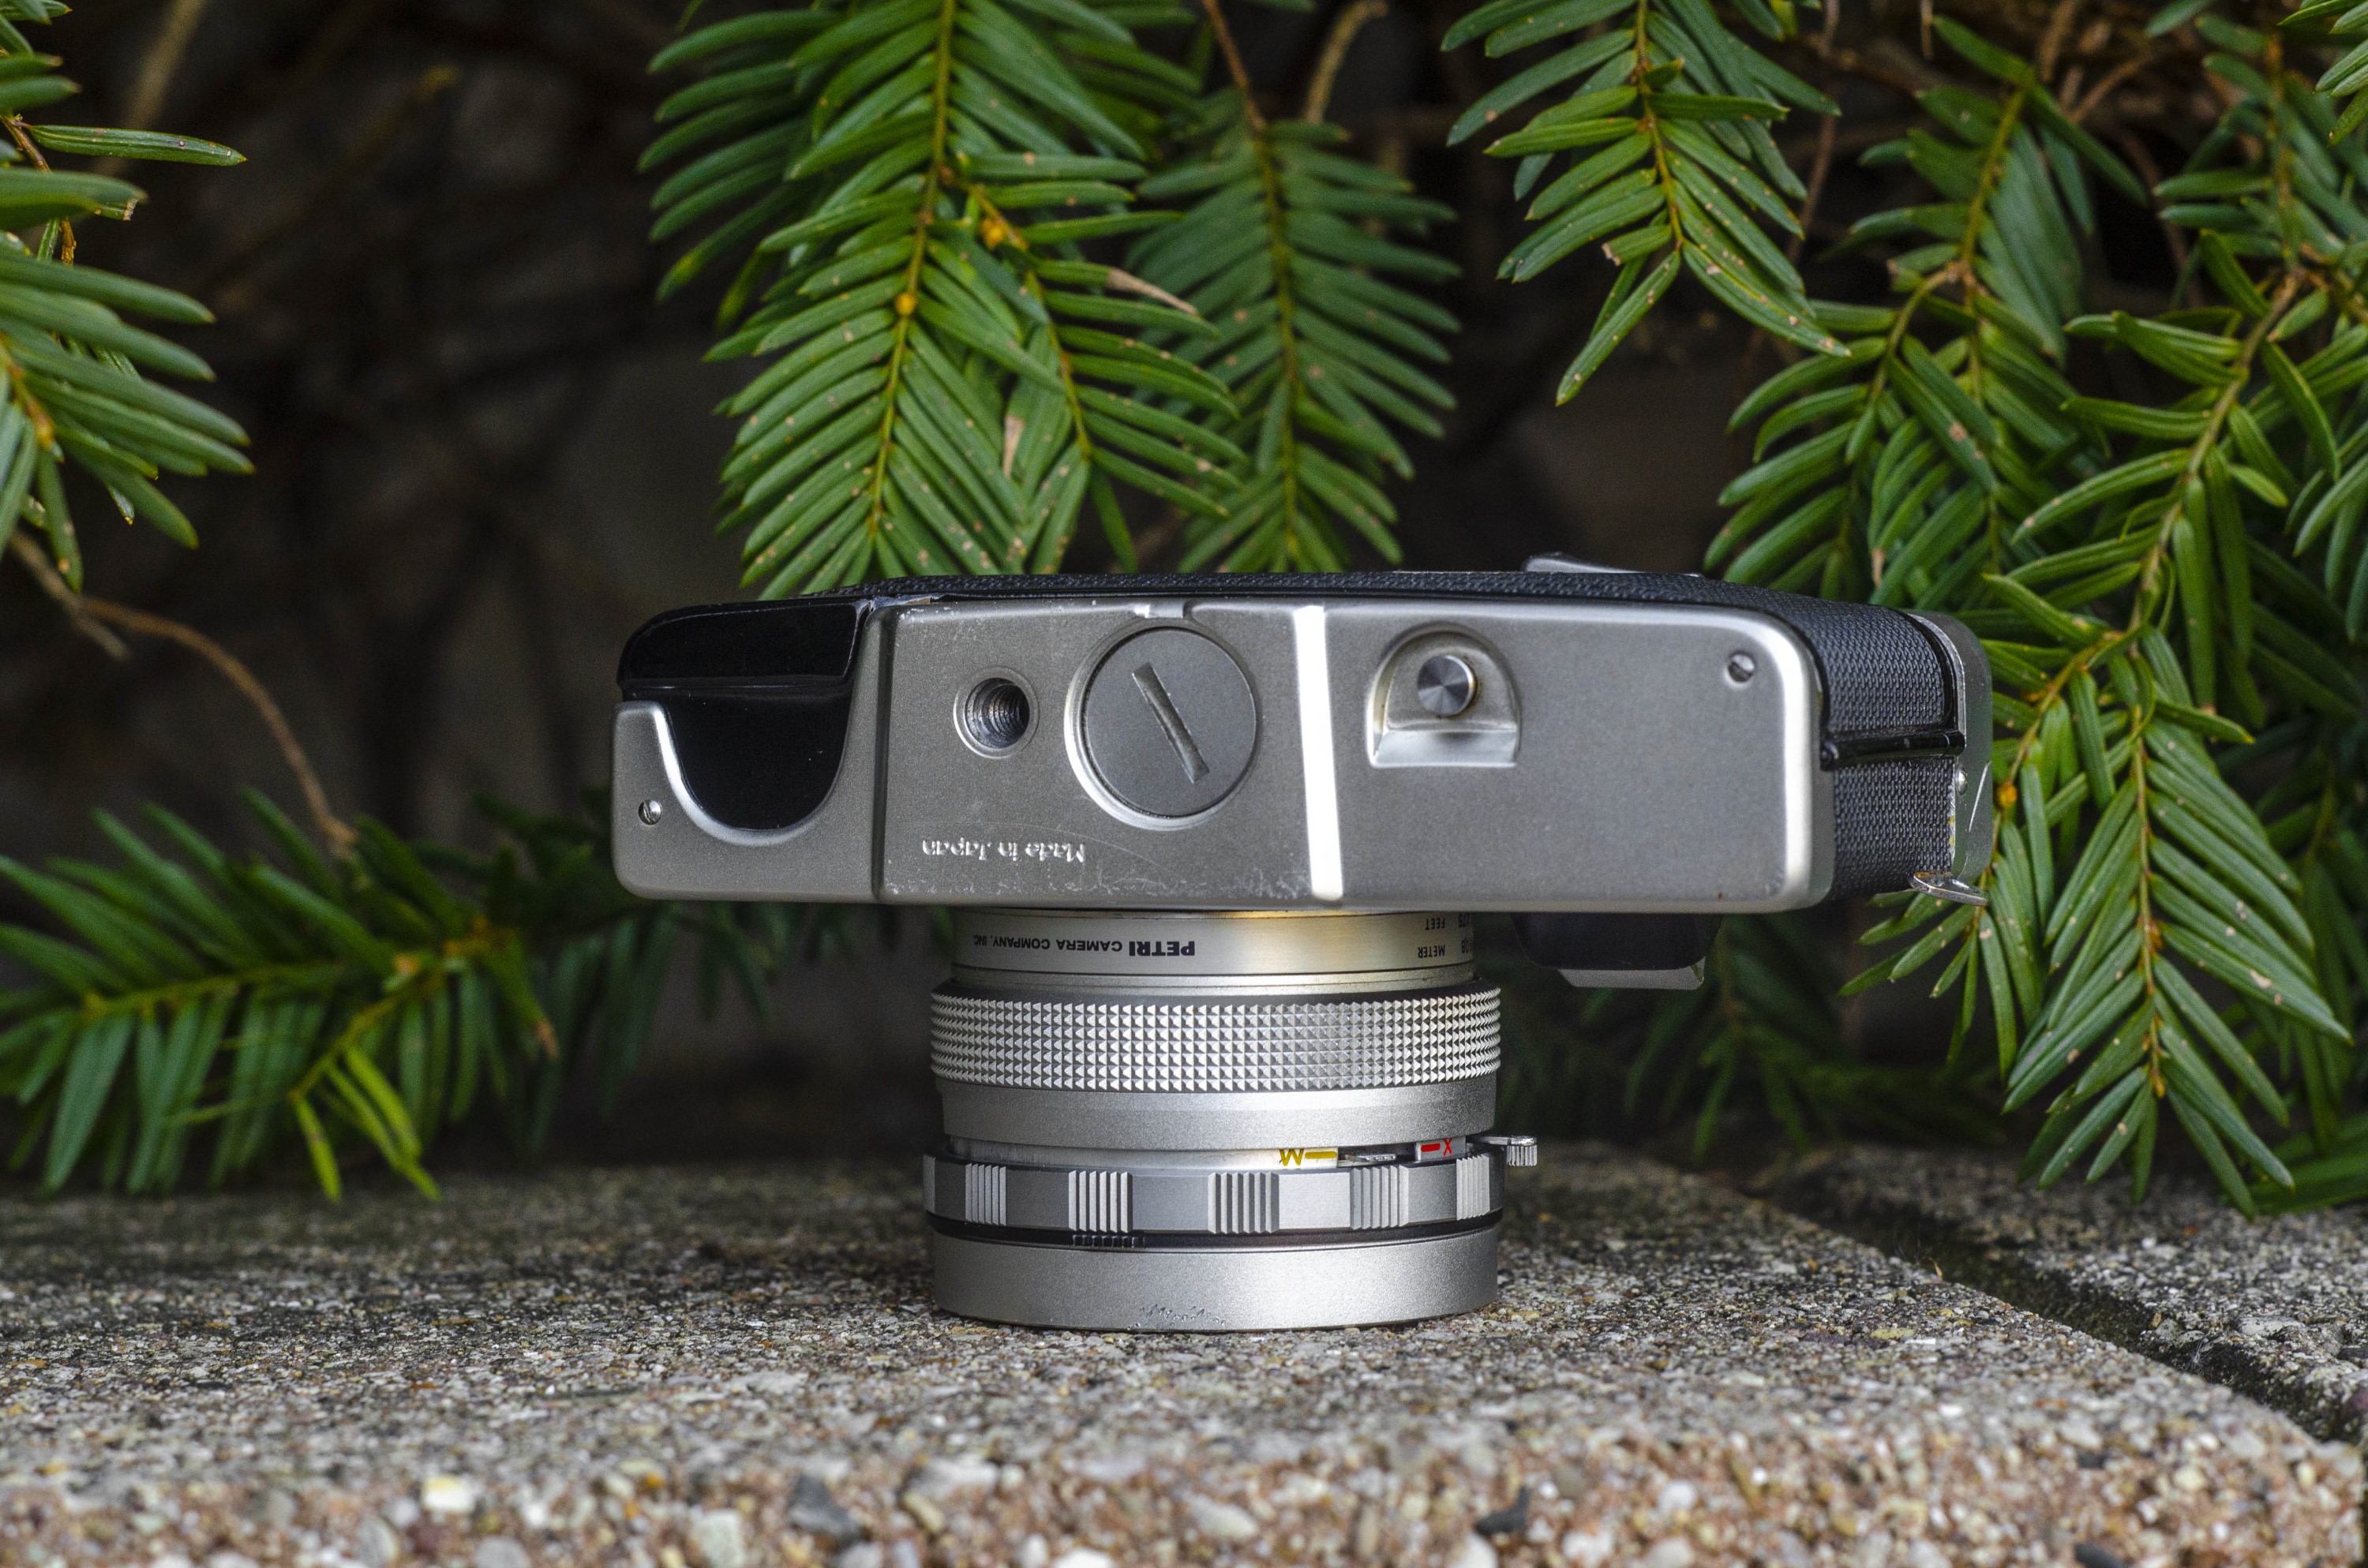
The bottom of the camera is pretty standard, featuring a standard tripod socket, battery compartment for the PX625 battery which is only needed for the meter, and the rewind release button. On the left side of the bottom of the camera is a notch that when the film compartment is opened, allows for easier film loading of a new 35mm cassette.
The back of the camera is pretty barren, featuring only the rear eyepiece and the nicely contoured film advance lever. It seems that whoever designed the Racer valued ergonomics well as the wind lever has a similarly nice feel to it as does the front shutter release.
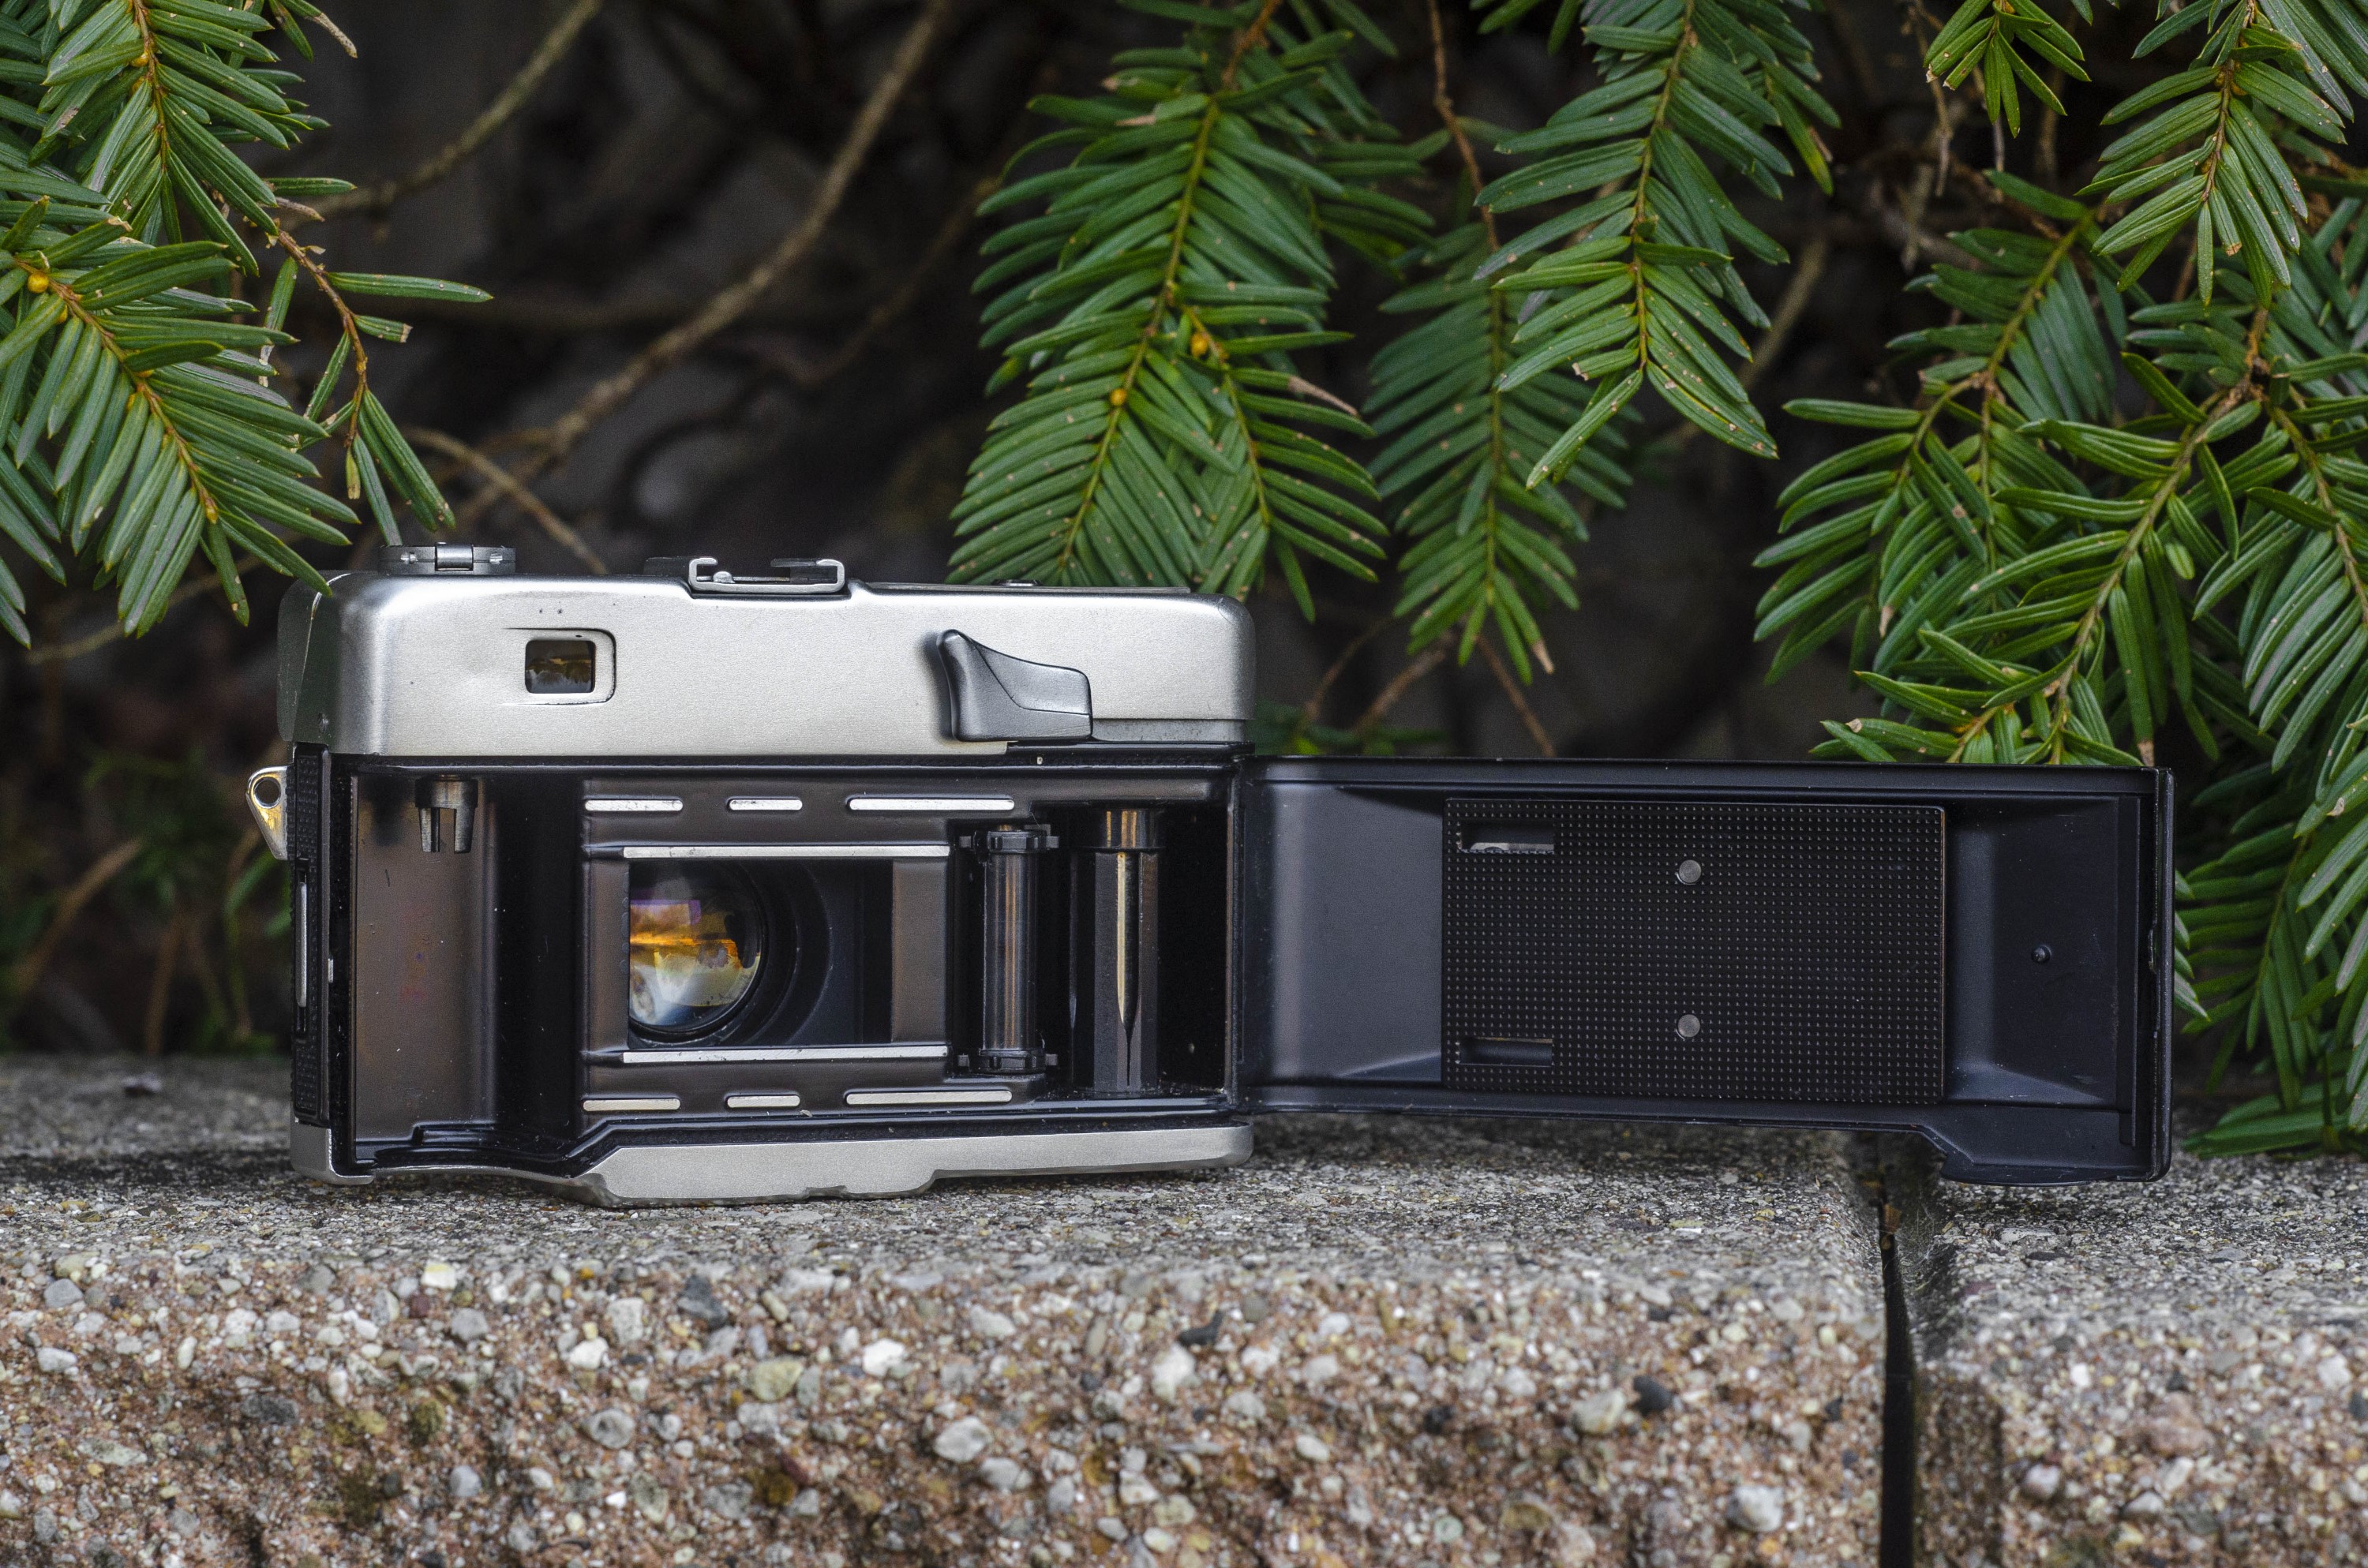
Loading film into the camera requires releasing a catch on the camera’s left side, which then reveals an ordinary looking film compartment. A new cassette loads on the left and the film leader attaches to a fixed spool on the right. The take up spool has four slits in it which allow the leader to attach in a couple of different orientations, simplifying loading.
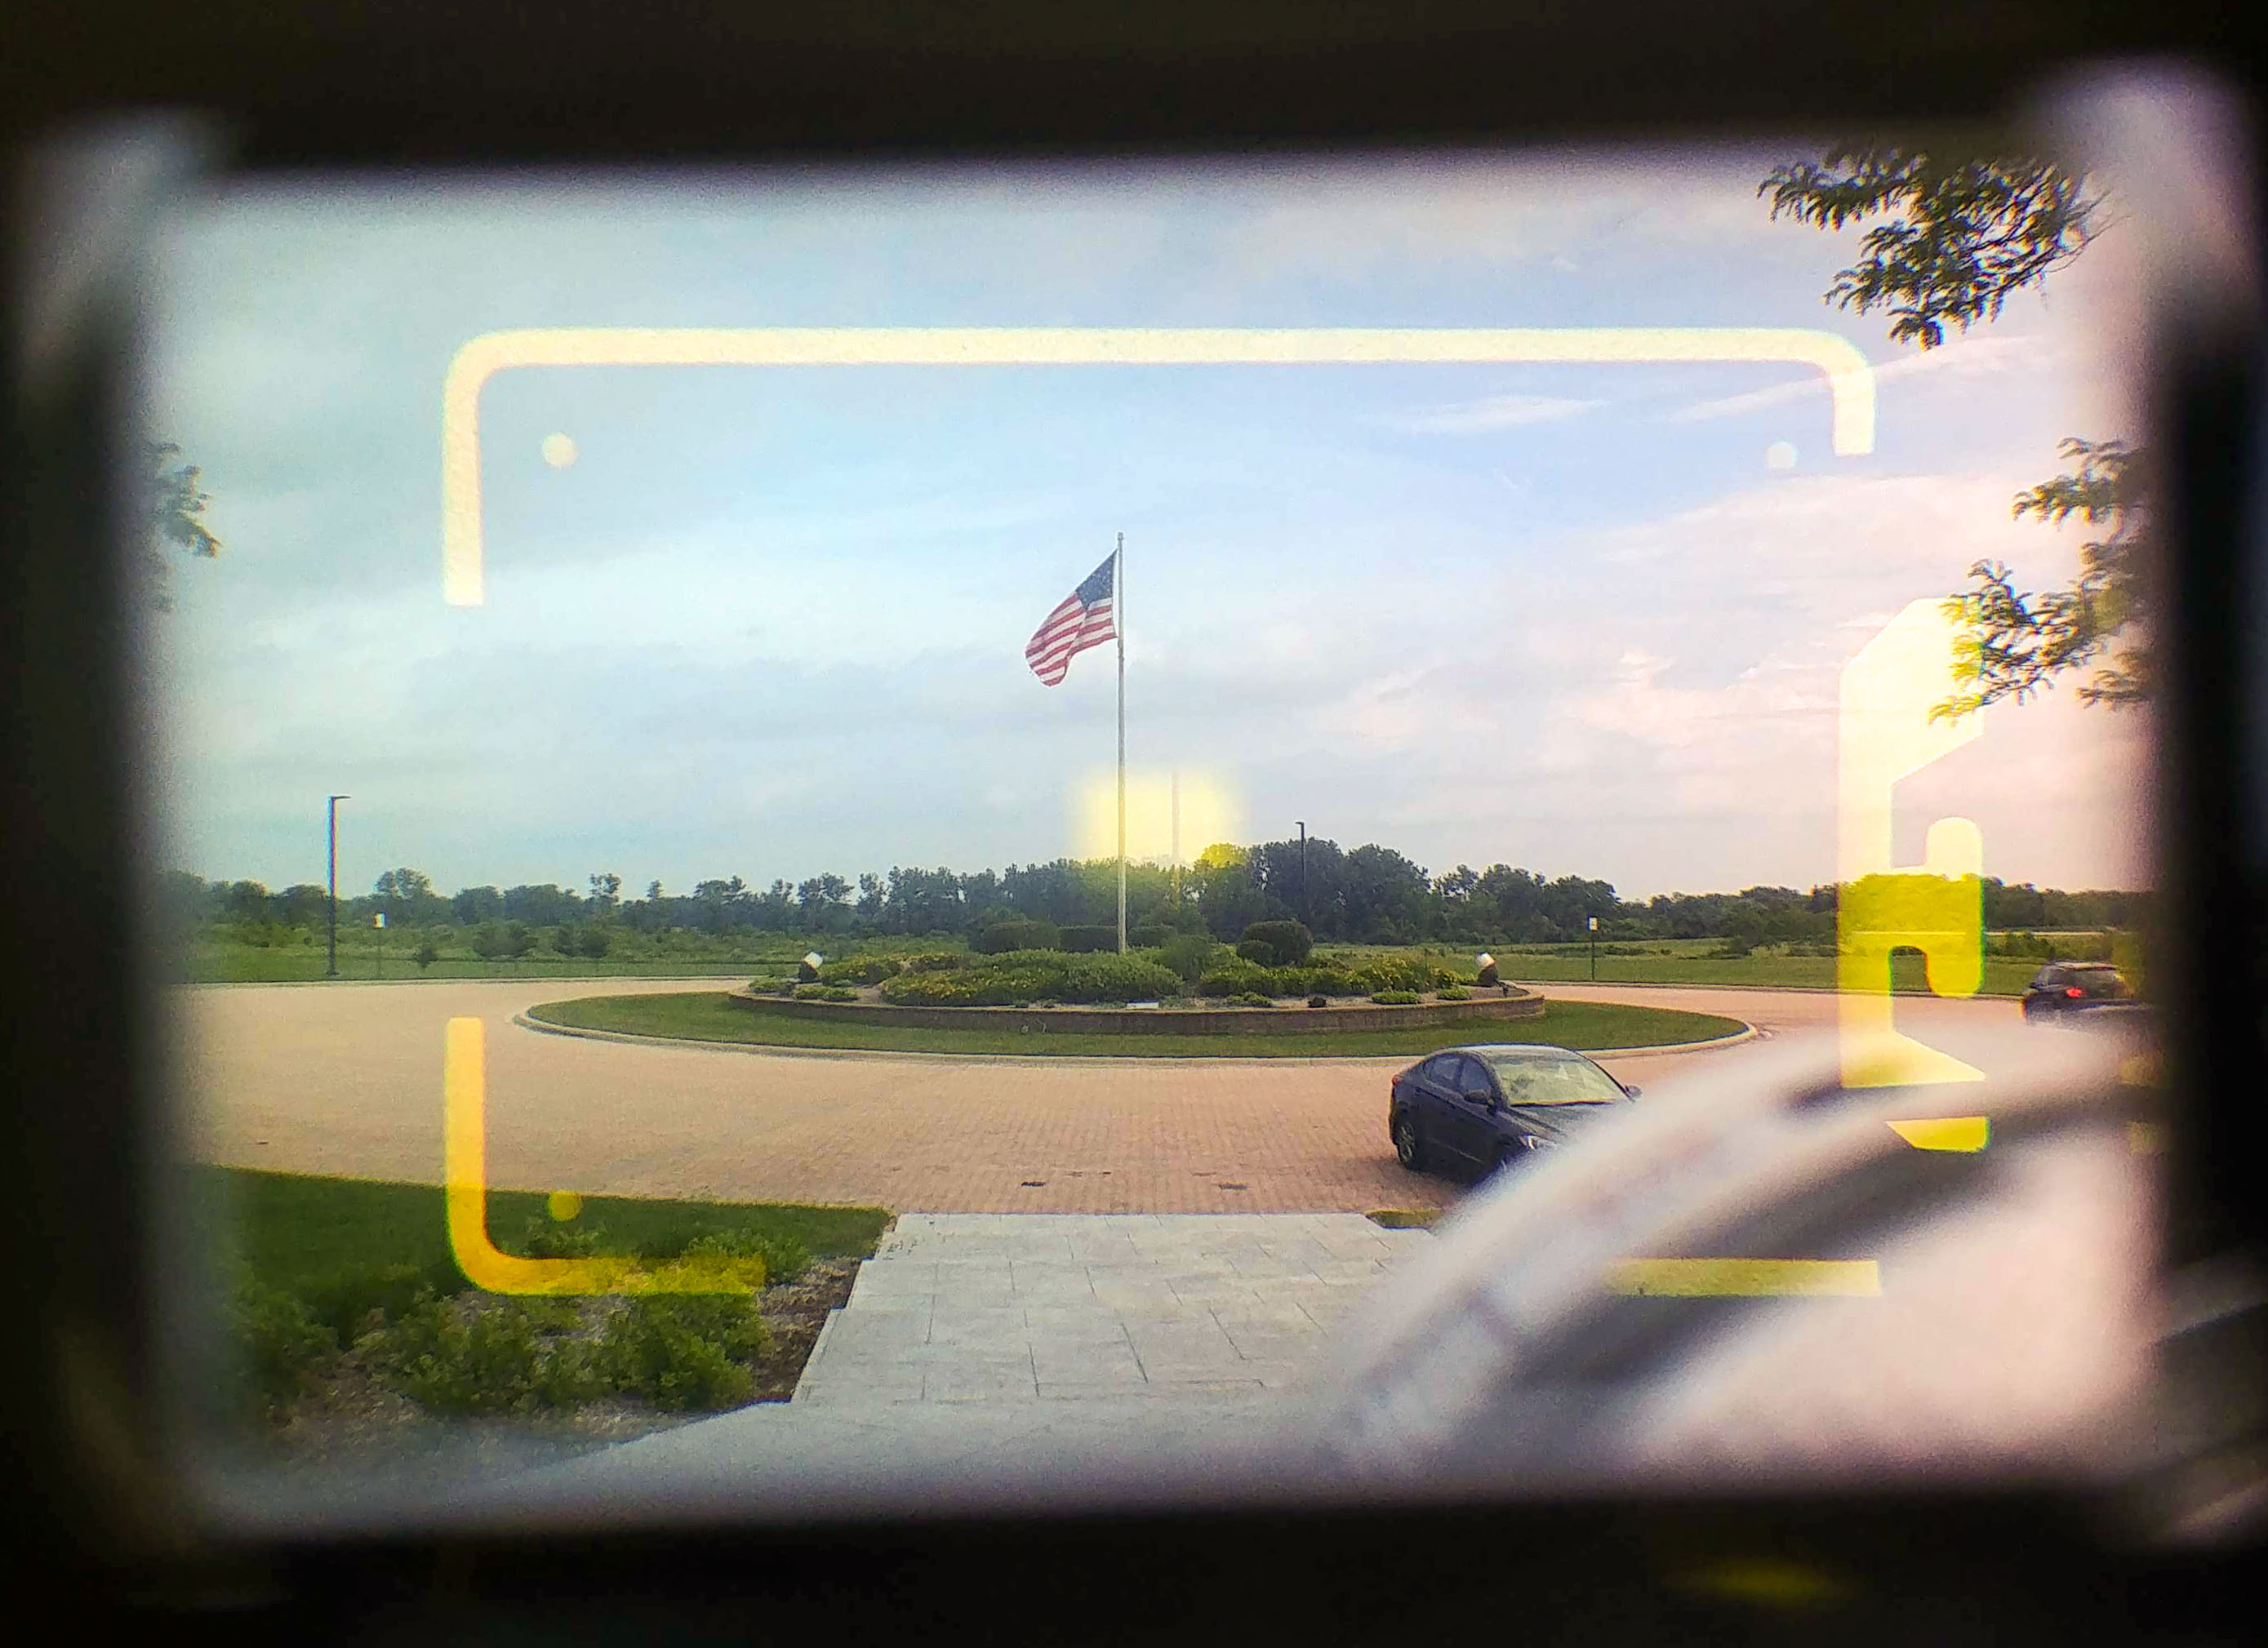
With the camera to your eye, the viewfinder is bright and features a very contrasty coincident image rangefinder patch. Using what Petri advertised as their “Green-O-Matic” system, the rangefinder light simply passes through a piece of green (actually more like an olive color) plastic that tints the rangefinder patch, projected frame lines and exposure meter giving them increased contrast. The idea of using green was unique to Petri as other companies experimented with blue and yellow filters to add contrast to their rangefinders. It’s not the biggest and brightest out there, but its certainly better than many other rangefinders of the era.
Using the Petri Racer is a joy. The size of the camera is much smaller than typical 1960s rangefinders, the tactile points such as the shutter release and wind lever are very nicely contoured, the viewfinder is large and easy to see through, and the match needle exposure system is quite nice.
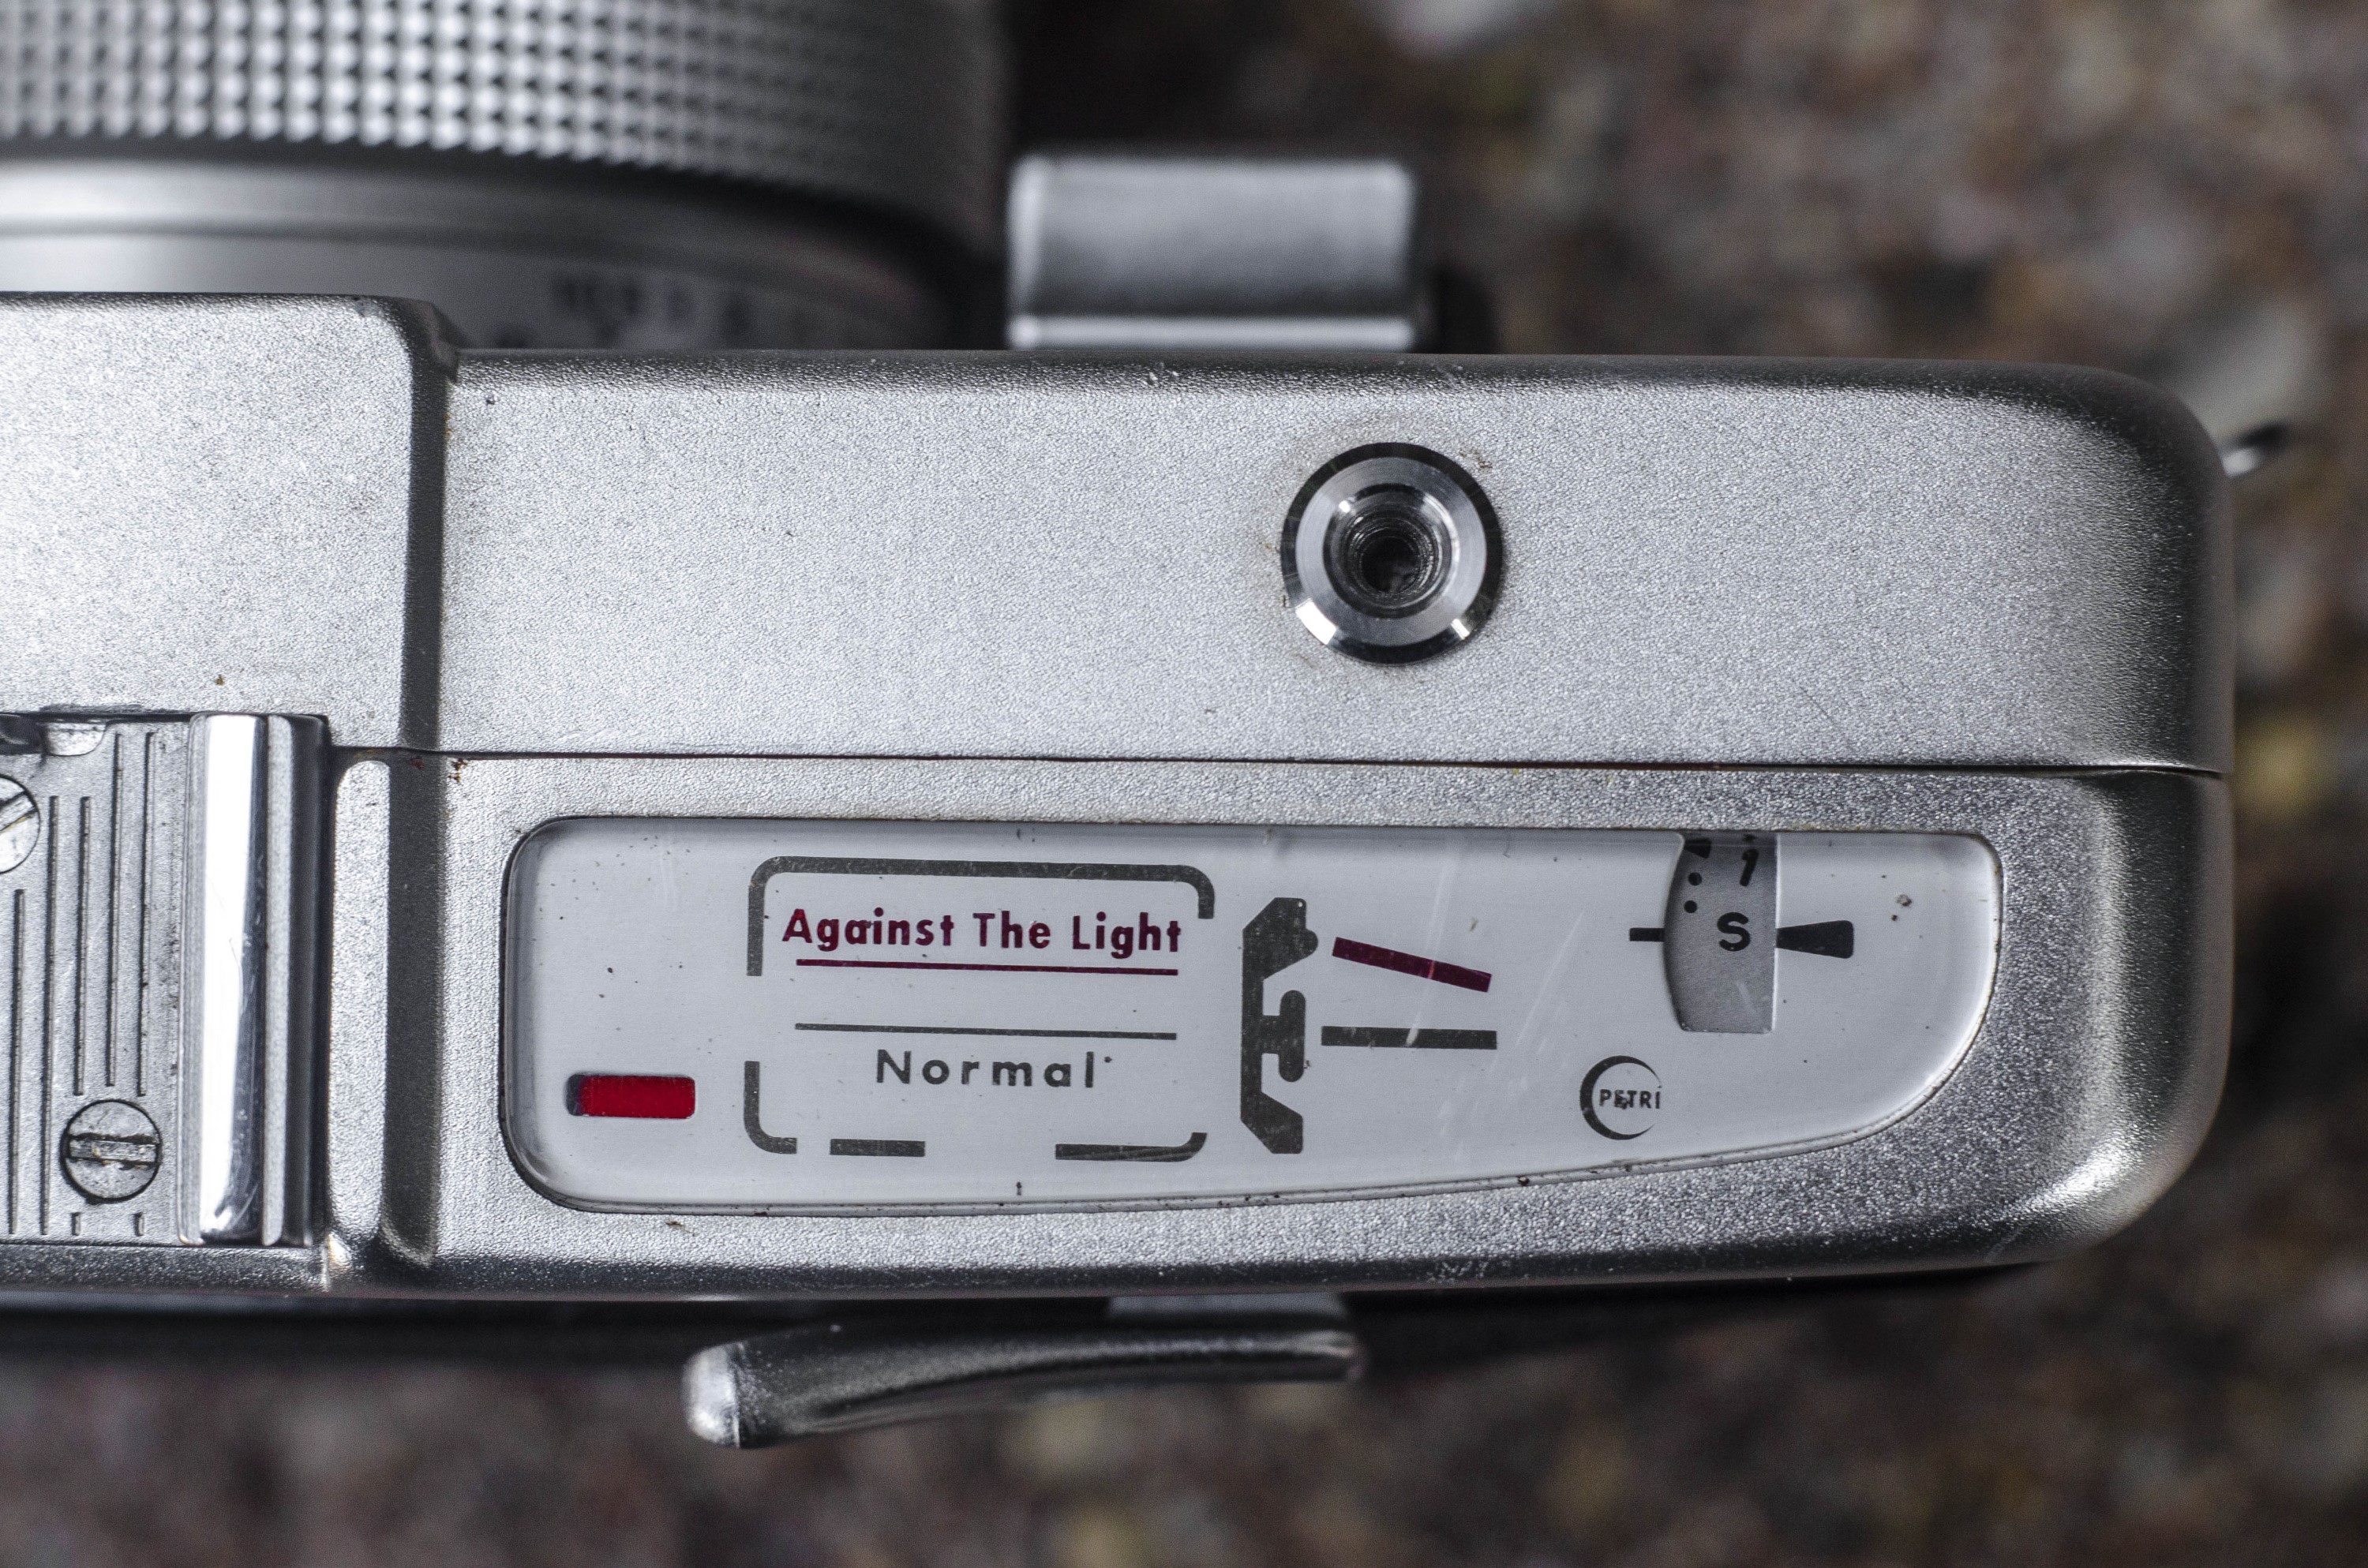
The top plate features an instructional plate that helps explain how to read the meter. Despite how this looks, this plate is informational only and does not actually show the readout of the meter. A subtle, but nice convenience on the top plate of the camera is a little red rectangle that is a “shutter readiness” indicator. When it is ready, the shutter is cocked and ready for the next exposure.
Unlike other compact rangefinders that would become increasingly popular in the 1970s that were fully automatic, the Petri Racer has a mechanical shutter, and allows for full control of shutter speeds and f/stops, even with a dead battery. You can choose to follow the recommendations of the meter, or pick whatever you choose.
My Results
With the Racer up and ready to go, I loaded in a roll of fresh Fuji 200 color film and took it with me on a family trip downtown Chicago in mid spring 2018. We walked around the Chicago Loop and visited Lincoln Park Zoo. The bright and sunny day, along with the fast f/1.8 lens meant that I felt pretty confident in my ability to capture fast moving children.


Upon developing the film from the Racer, I could see that my hopes for beautifully rendered and sharp images were validated. The work required to get this camera back into a working state was absolutely worth it as I was rewarded with a roll of mostly outstanding images.
I say “mostly” as I made some questionable composition choices with this roll, but I obviously cannot hold the camera responsible for that. Petri’s “Green-O-Matic” system worked well and I had no problem getting images sharply in focus, even indoors. The meter on my example was inoperable, so I shot these all using Sunny 16 and the exposures all seemed right on the mark, with maybe a nary of overexposure.
The star of the show is Petri’s six-element f/1.8 45mm lens which delivered shot after shot of sharp and beautifully rendered photographs without any hint of edge distortion, chromatic aberrations, vignetting, or any other lens anomaly typical of lesser lenses.
I thoroughly enjoyed shooting the camera, and found it’s usability, ergonomics, and looks to represent some of the best out there. When it comes time to choose a compact and capable rangefinder, I know the Petri Racer will be hard to resist. I am not typically fond of buying duplicate cameras, but I may seek out another to see if I can find one with a working meter. This is an outstanding camera and whether or not you are a fan of other Petri rangefinders, this camera absolutely deserves to be in your collection.
Additional Resources
http://camera-wiki.org/wiki/Petri_Racer
https://www.photo.net/discuss/threads/driving-the-petri-racer.437564/
https://thomaschamberlain.com/joy-riding-petri-racer/
http://vintagecameralab.com/petri-racer/
https://rangefinder-cameras.com/petri-racer-35mm-range-finder-film-camera-from-1966/
http://mailch.blogspot.com/2012/03/users-review-petri-racer-35mm.html
I’m sorry, Mike, but Agfa we’re doing the green RF patch and framelines way earlier on the Silette series from the ‘50s, and indeed, it works really well. They never gave it a silly marketing name like “Green-O-matic”, though
I had a Petri Racer which Ibougt at ~ May 1967 . This was my first camera , and I got nice shots , mainly B&W . I used the camera for about 7 years , added a yellow and UV filters . I think i’ll buy one if Ifnd a reasonable price . Just as remembrace of old days
The Racer is a fun cameras to use. A combination of a compact size, good ergonomics, and a great lens make them capable shooters, but in my experience, time has not been too kind to these models and I’ve found Racers to be less reliable than other cameras of the era. Sadly, it seems as though Petri’s quality control had started to suffer by the time these cameras were put into production.
I have it’s sibling The Petri Auto Rapid 2.8 which can Agfa Rapid and Karat/SL cassettes. It supports the ISO setting tabs of the Rapid but is also fully manual and can use the olderKarat and East German SL cartridges.
Thanks for a great review of this nice camera!