

 What is it?
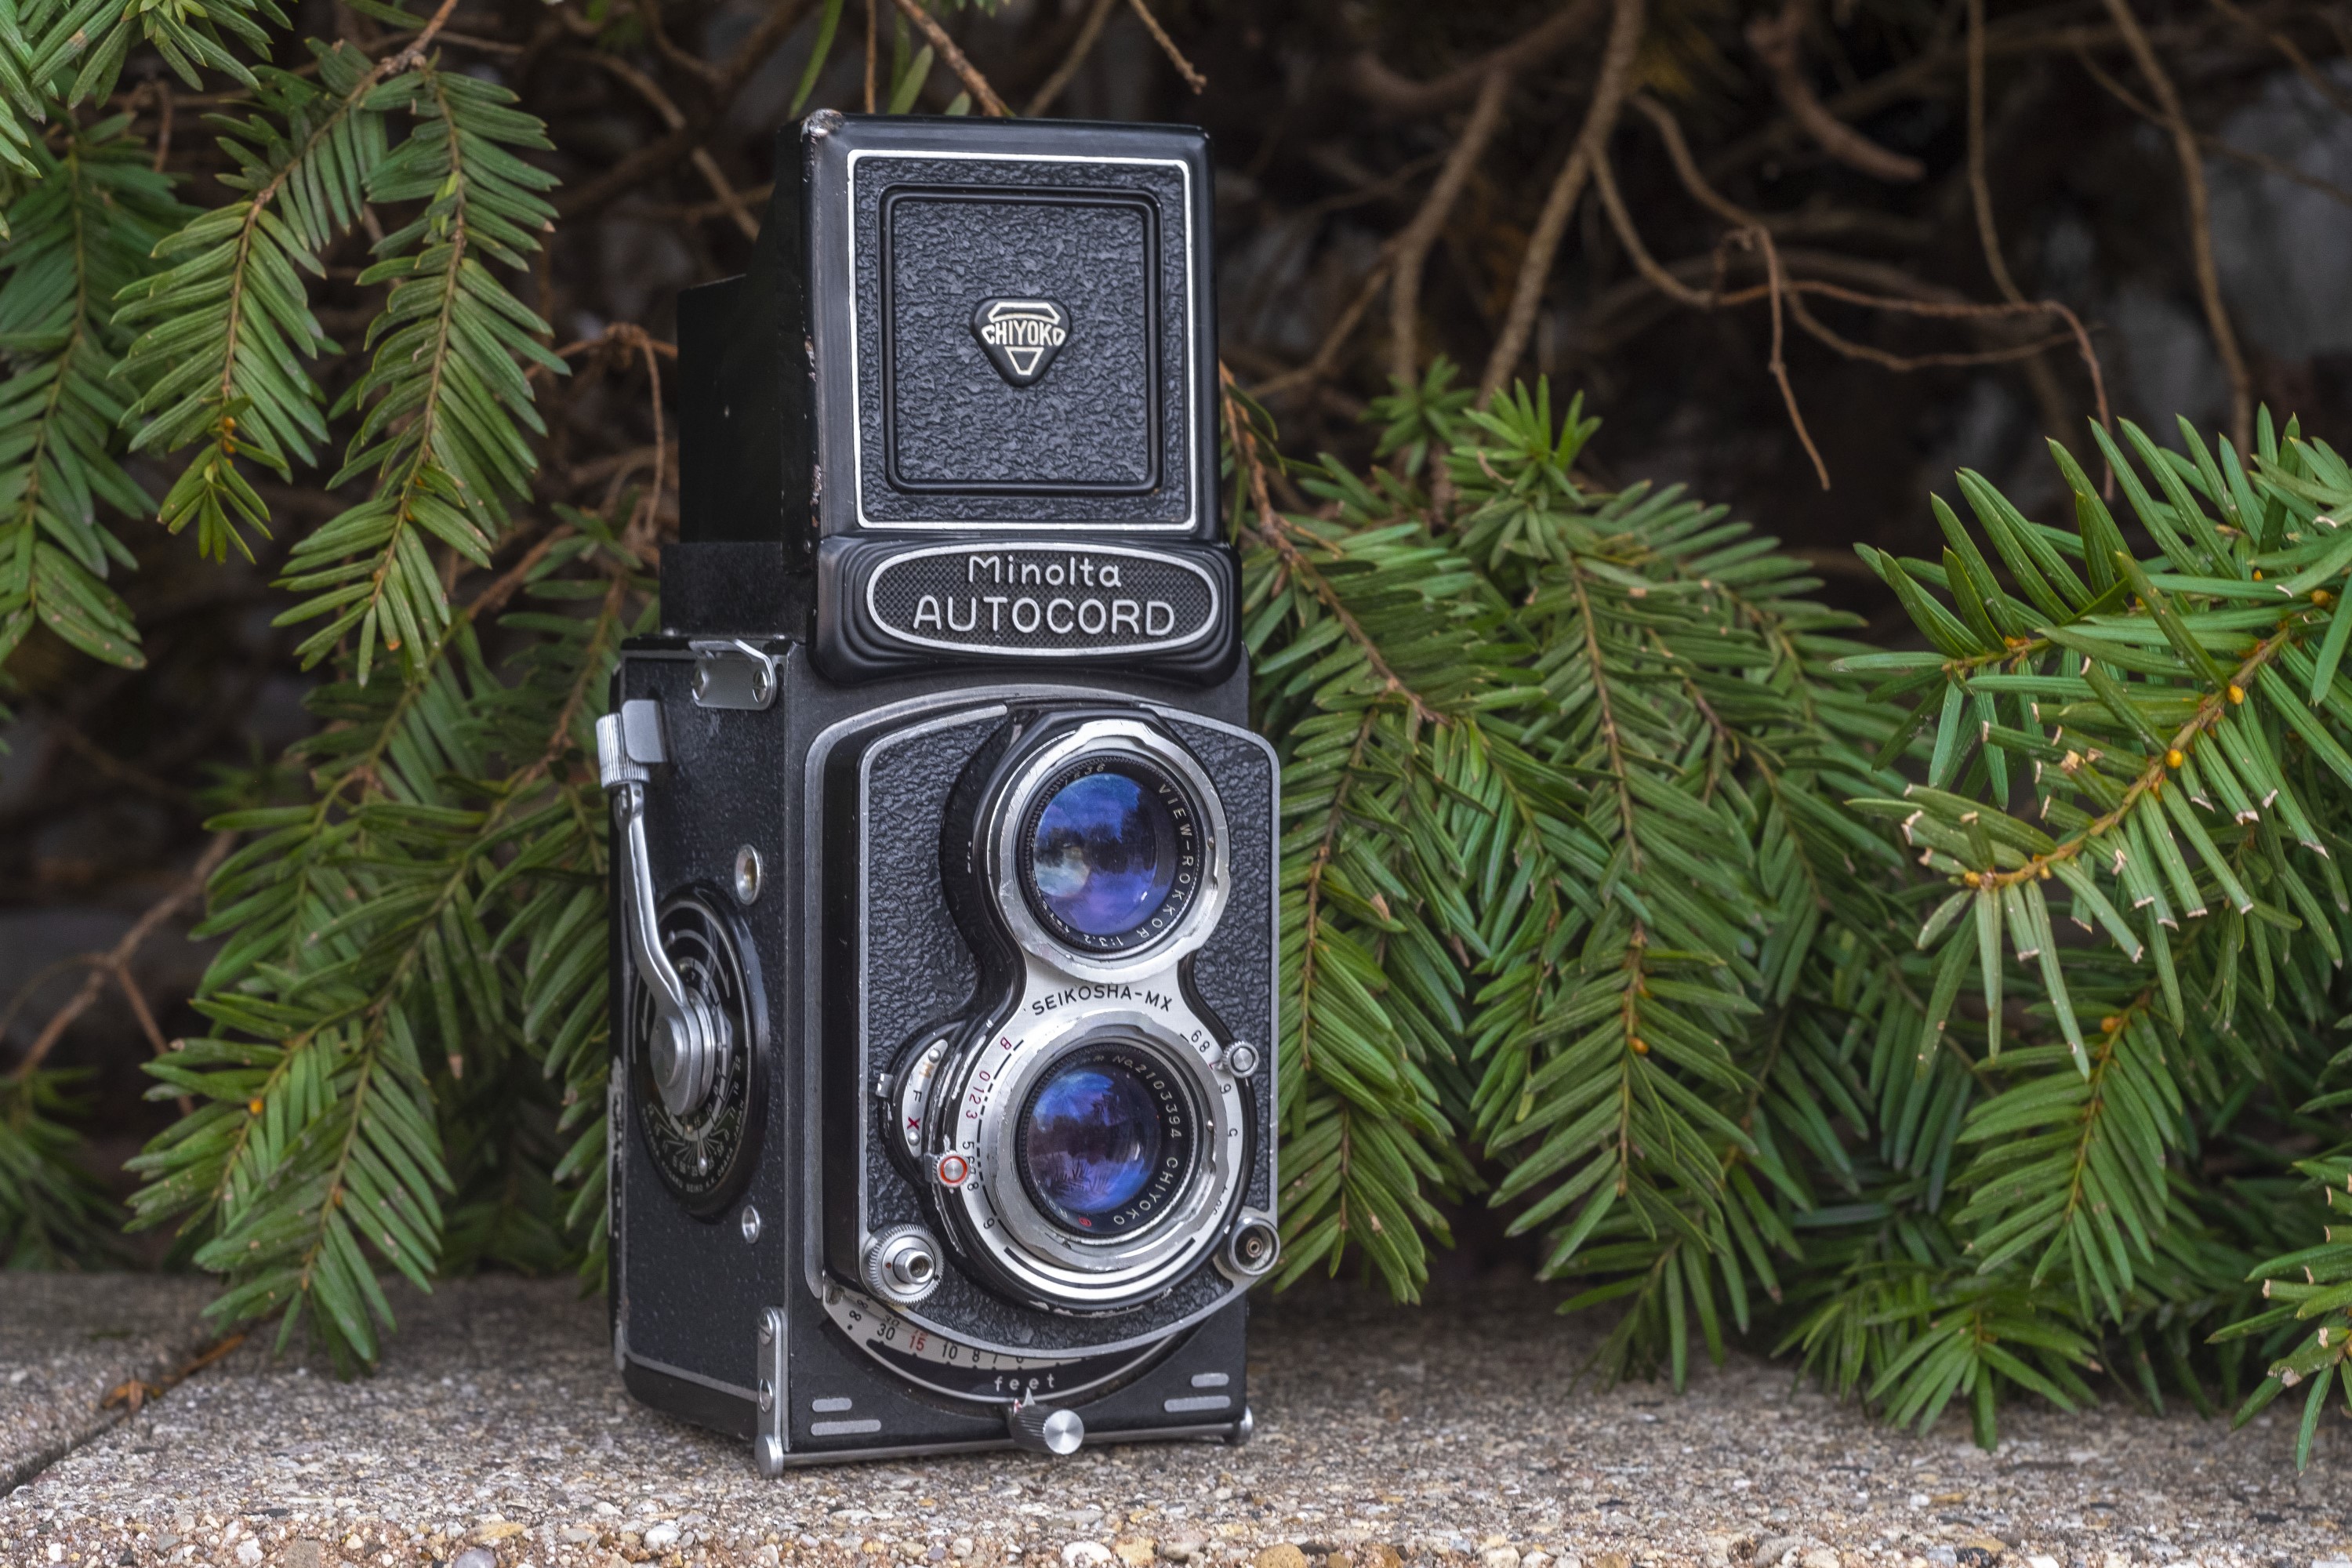
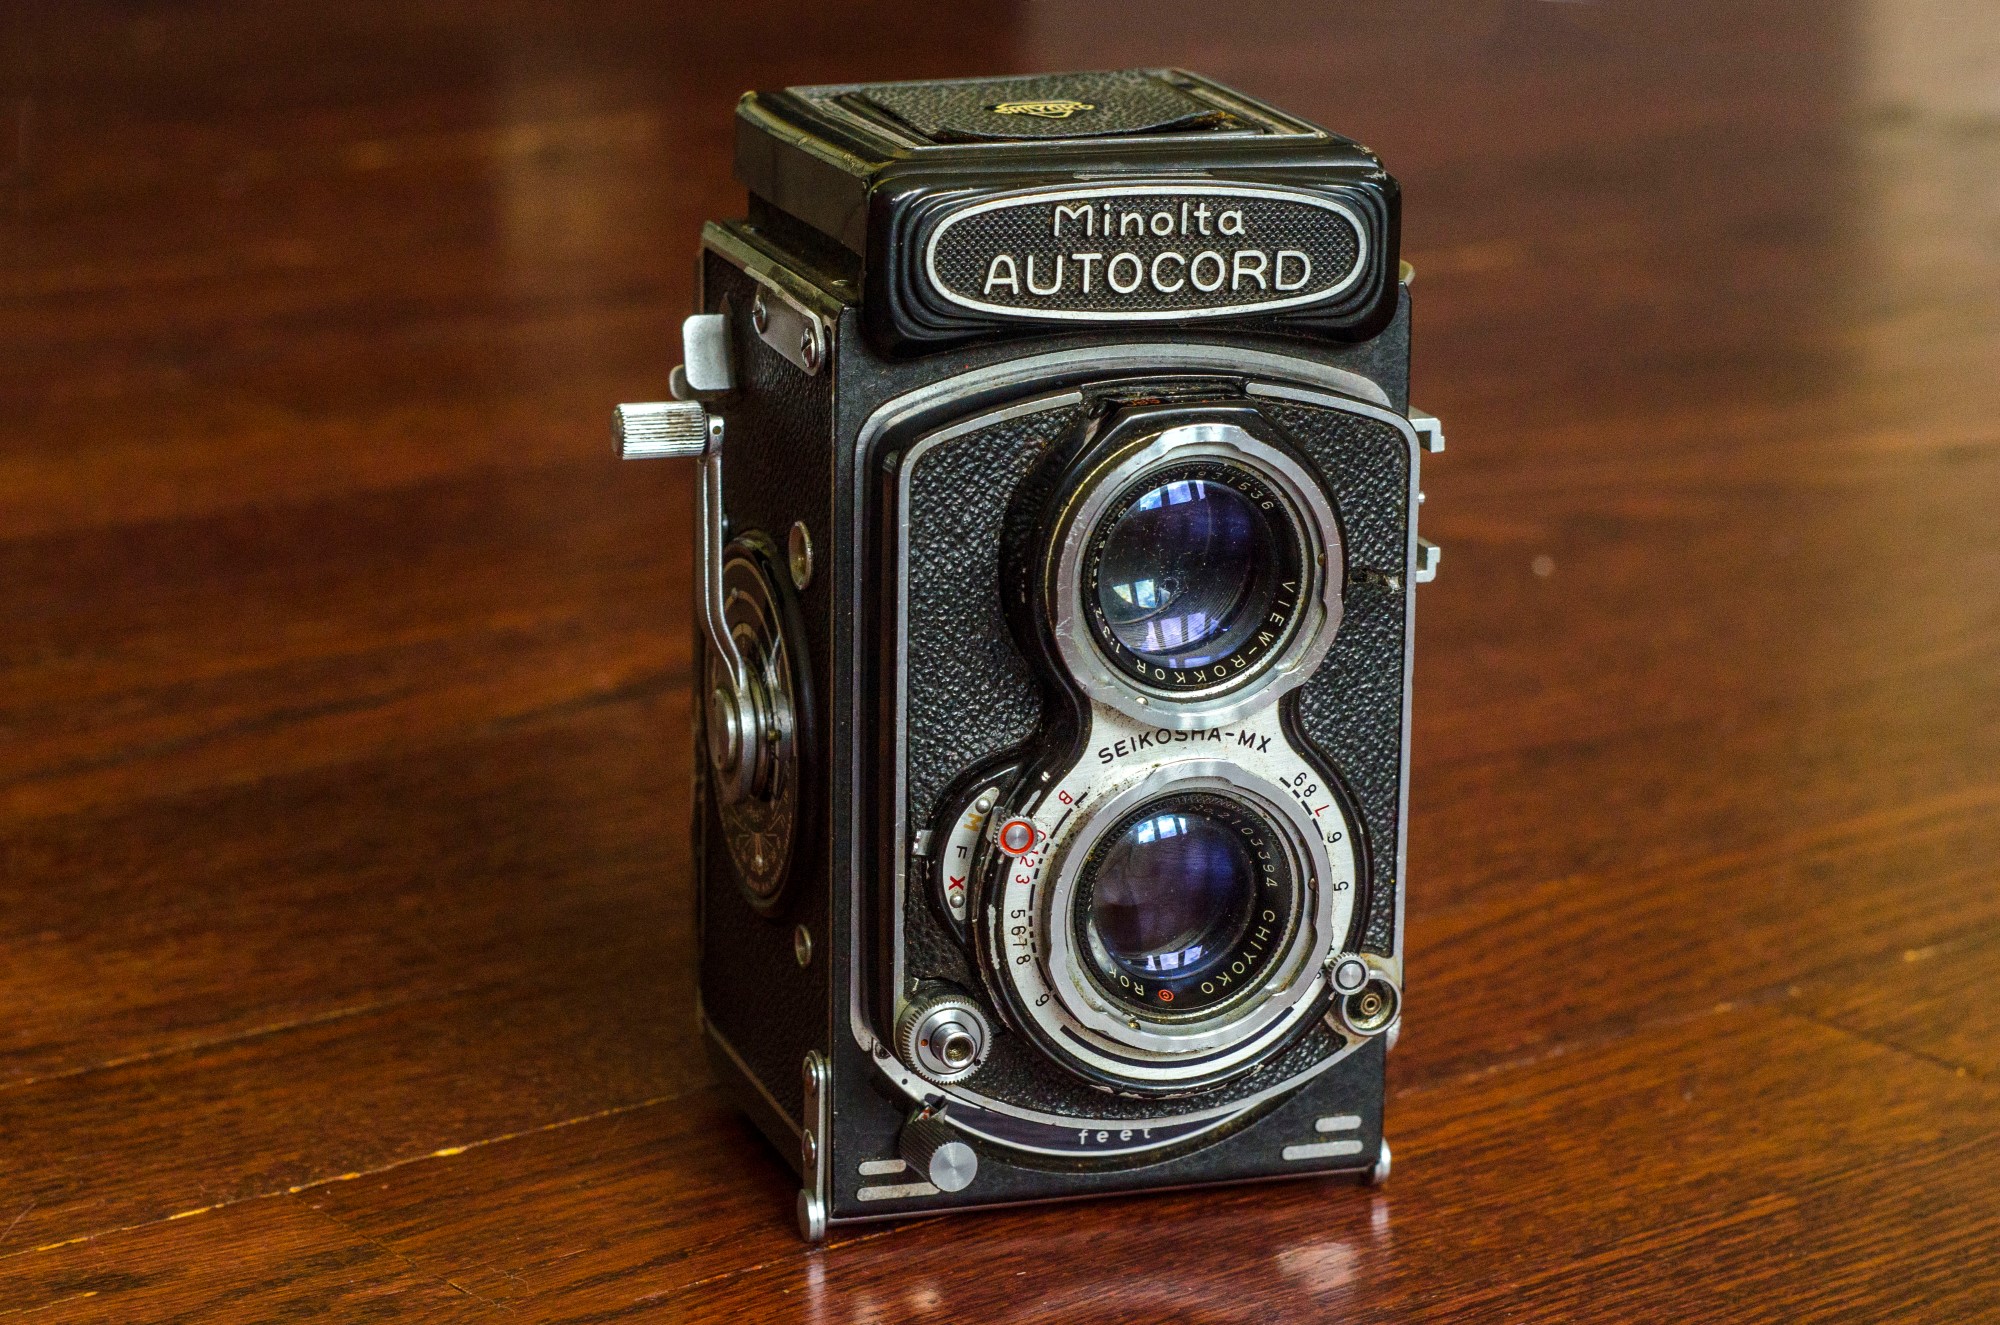
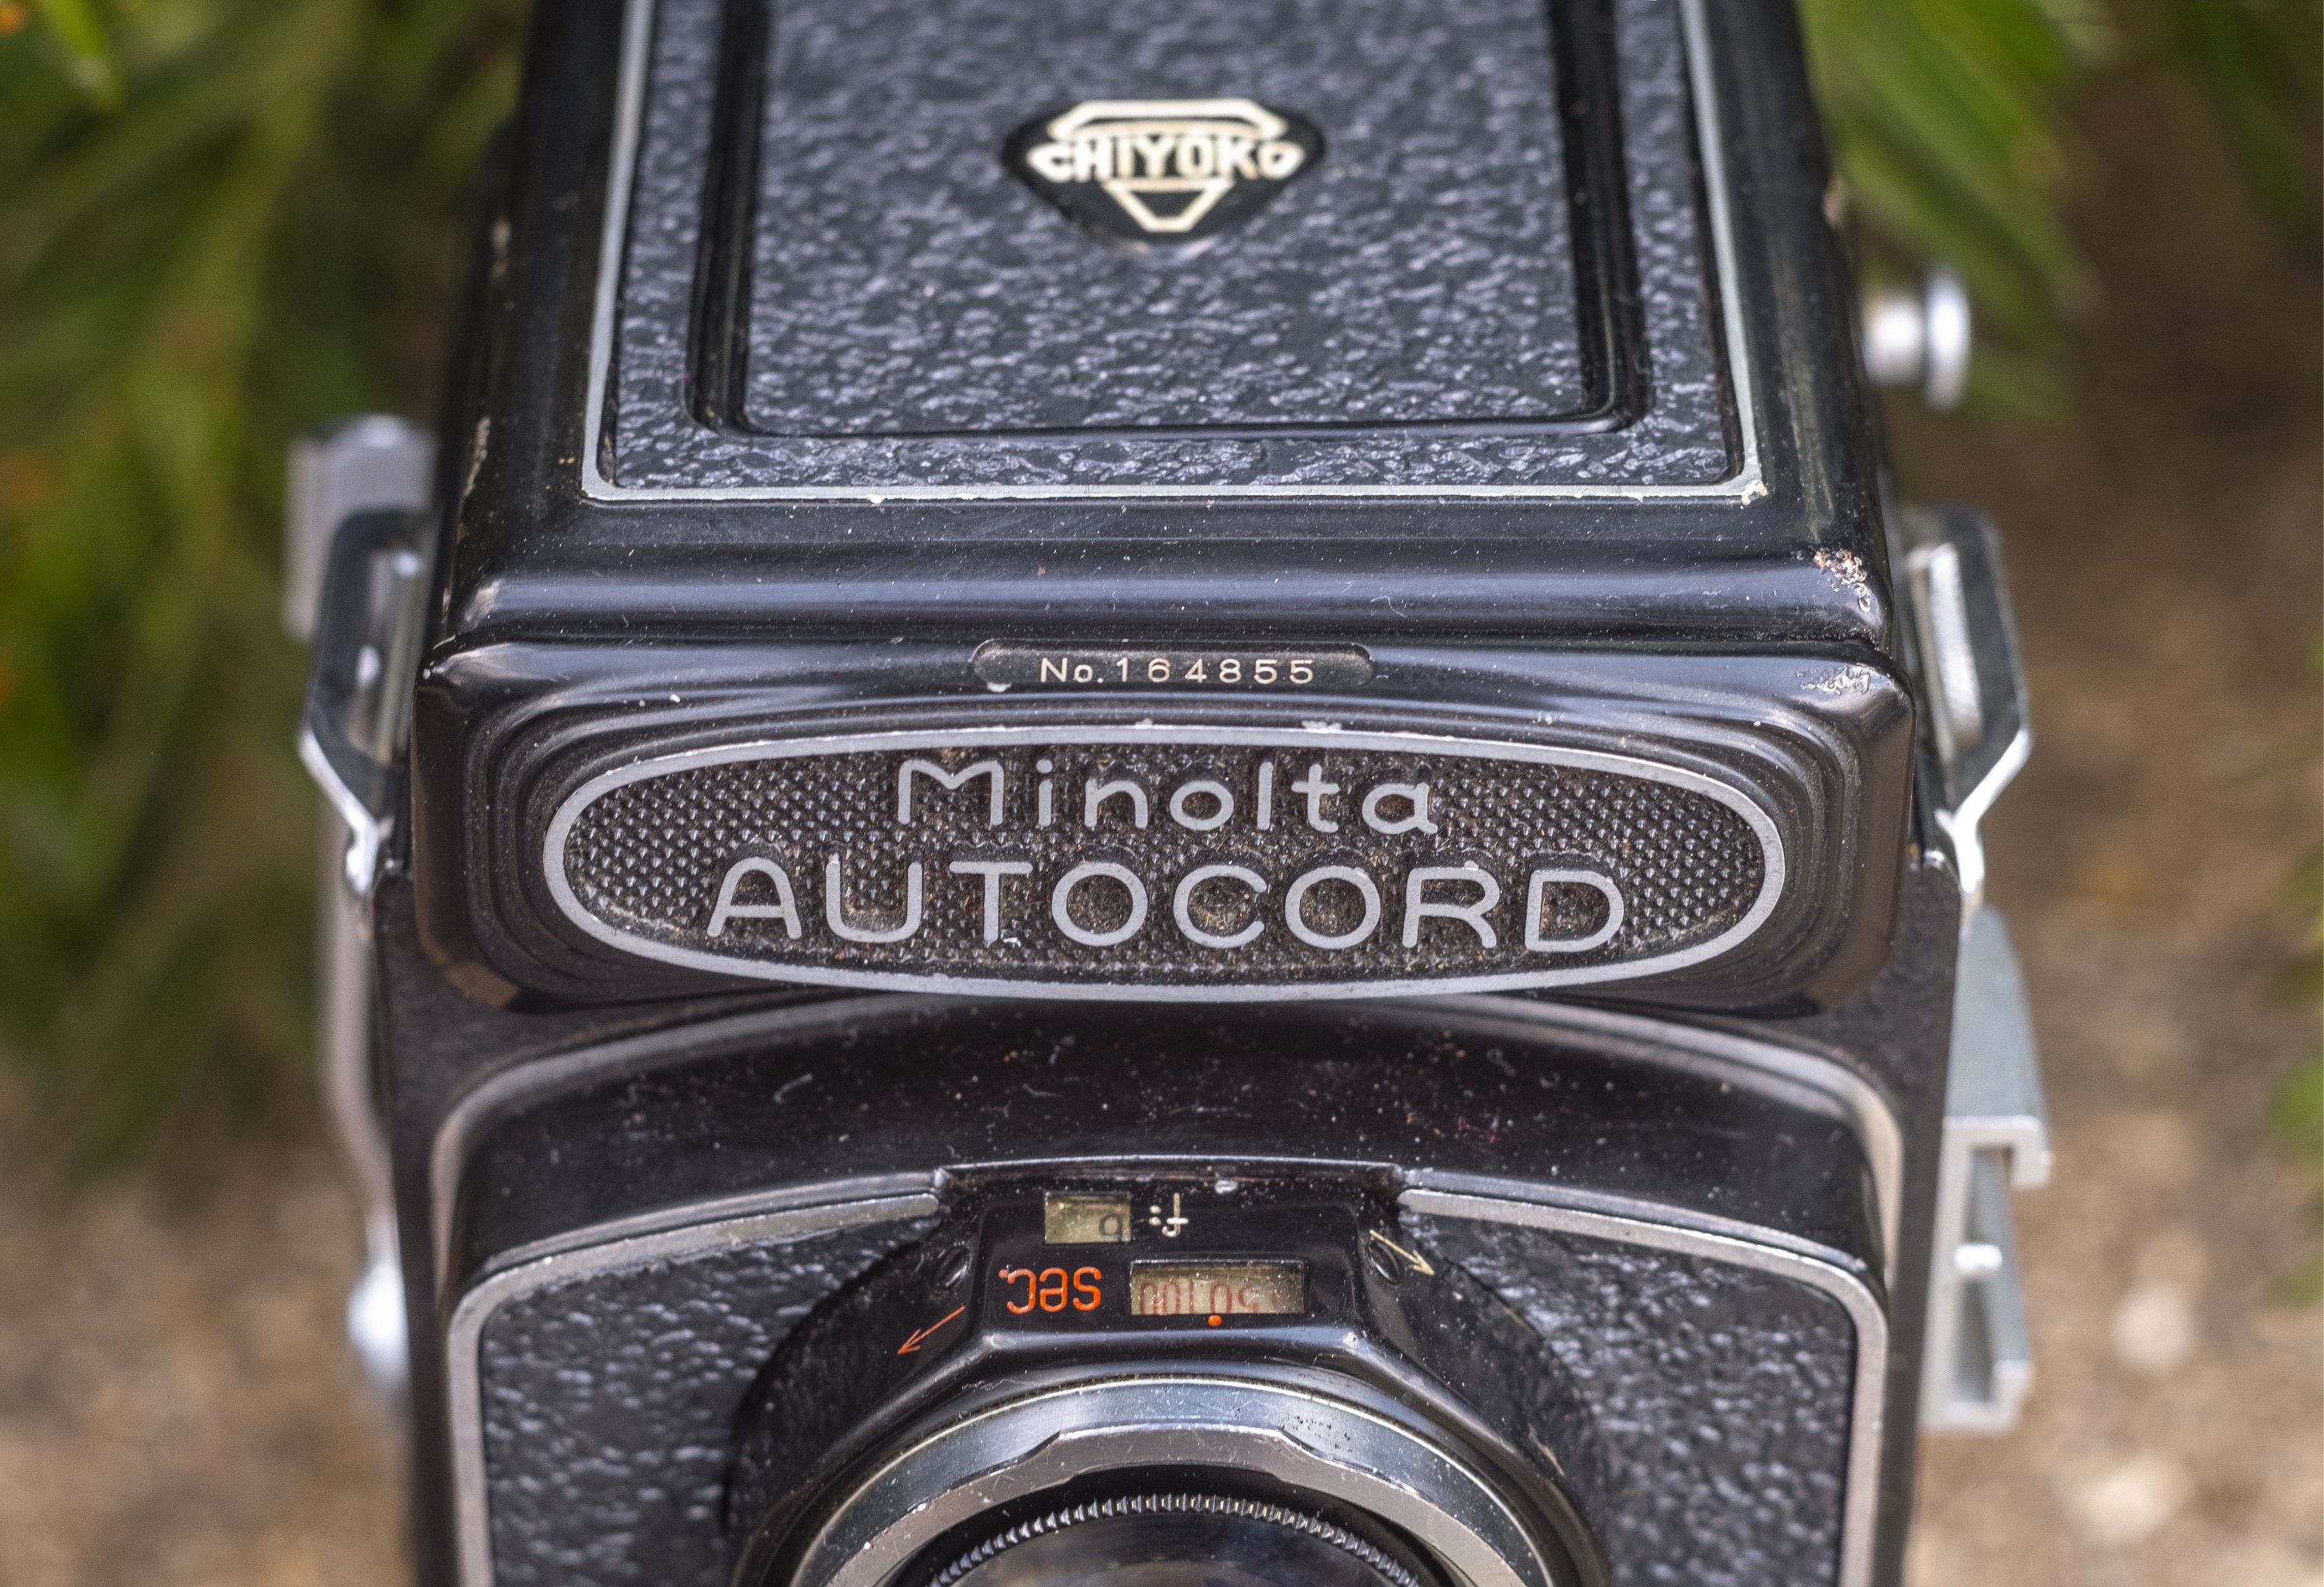
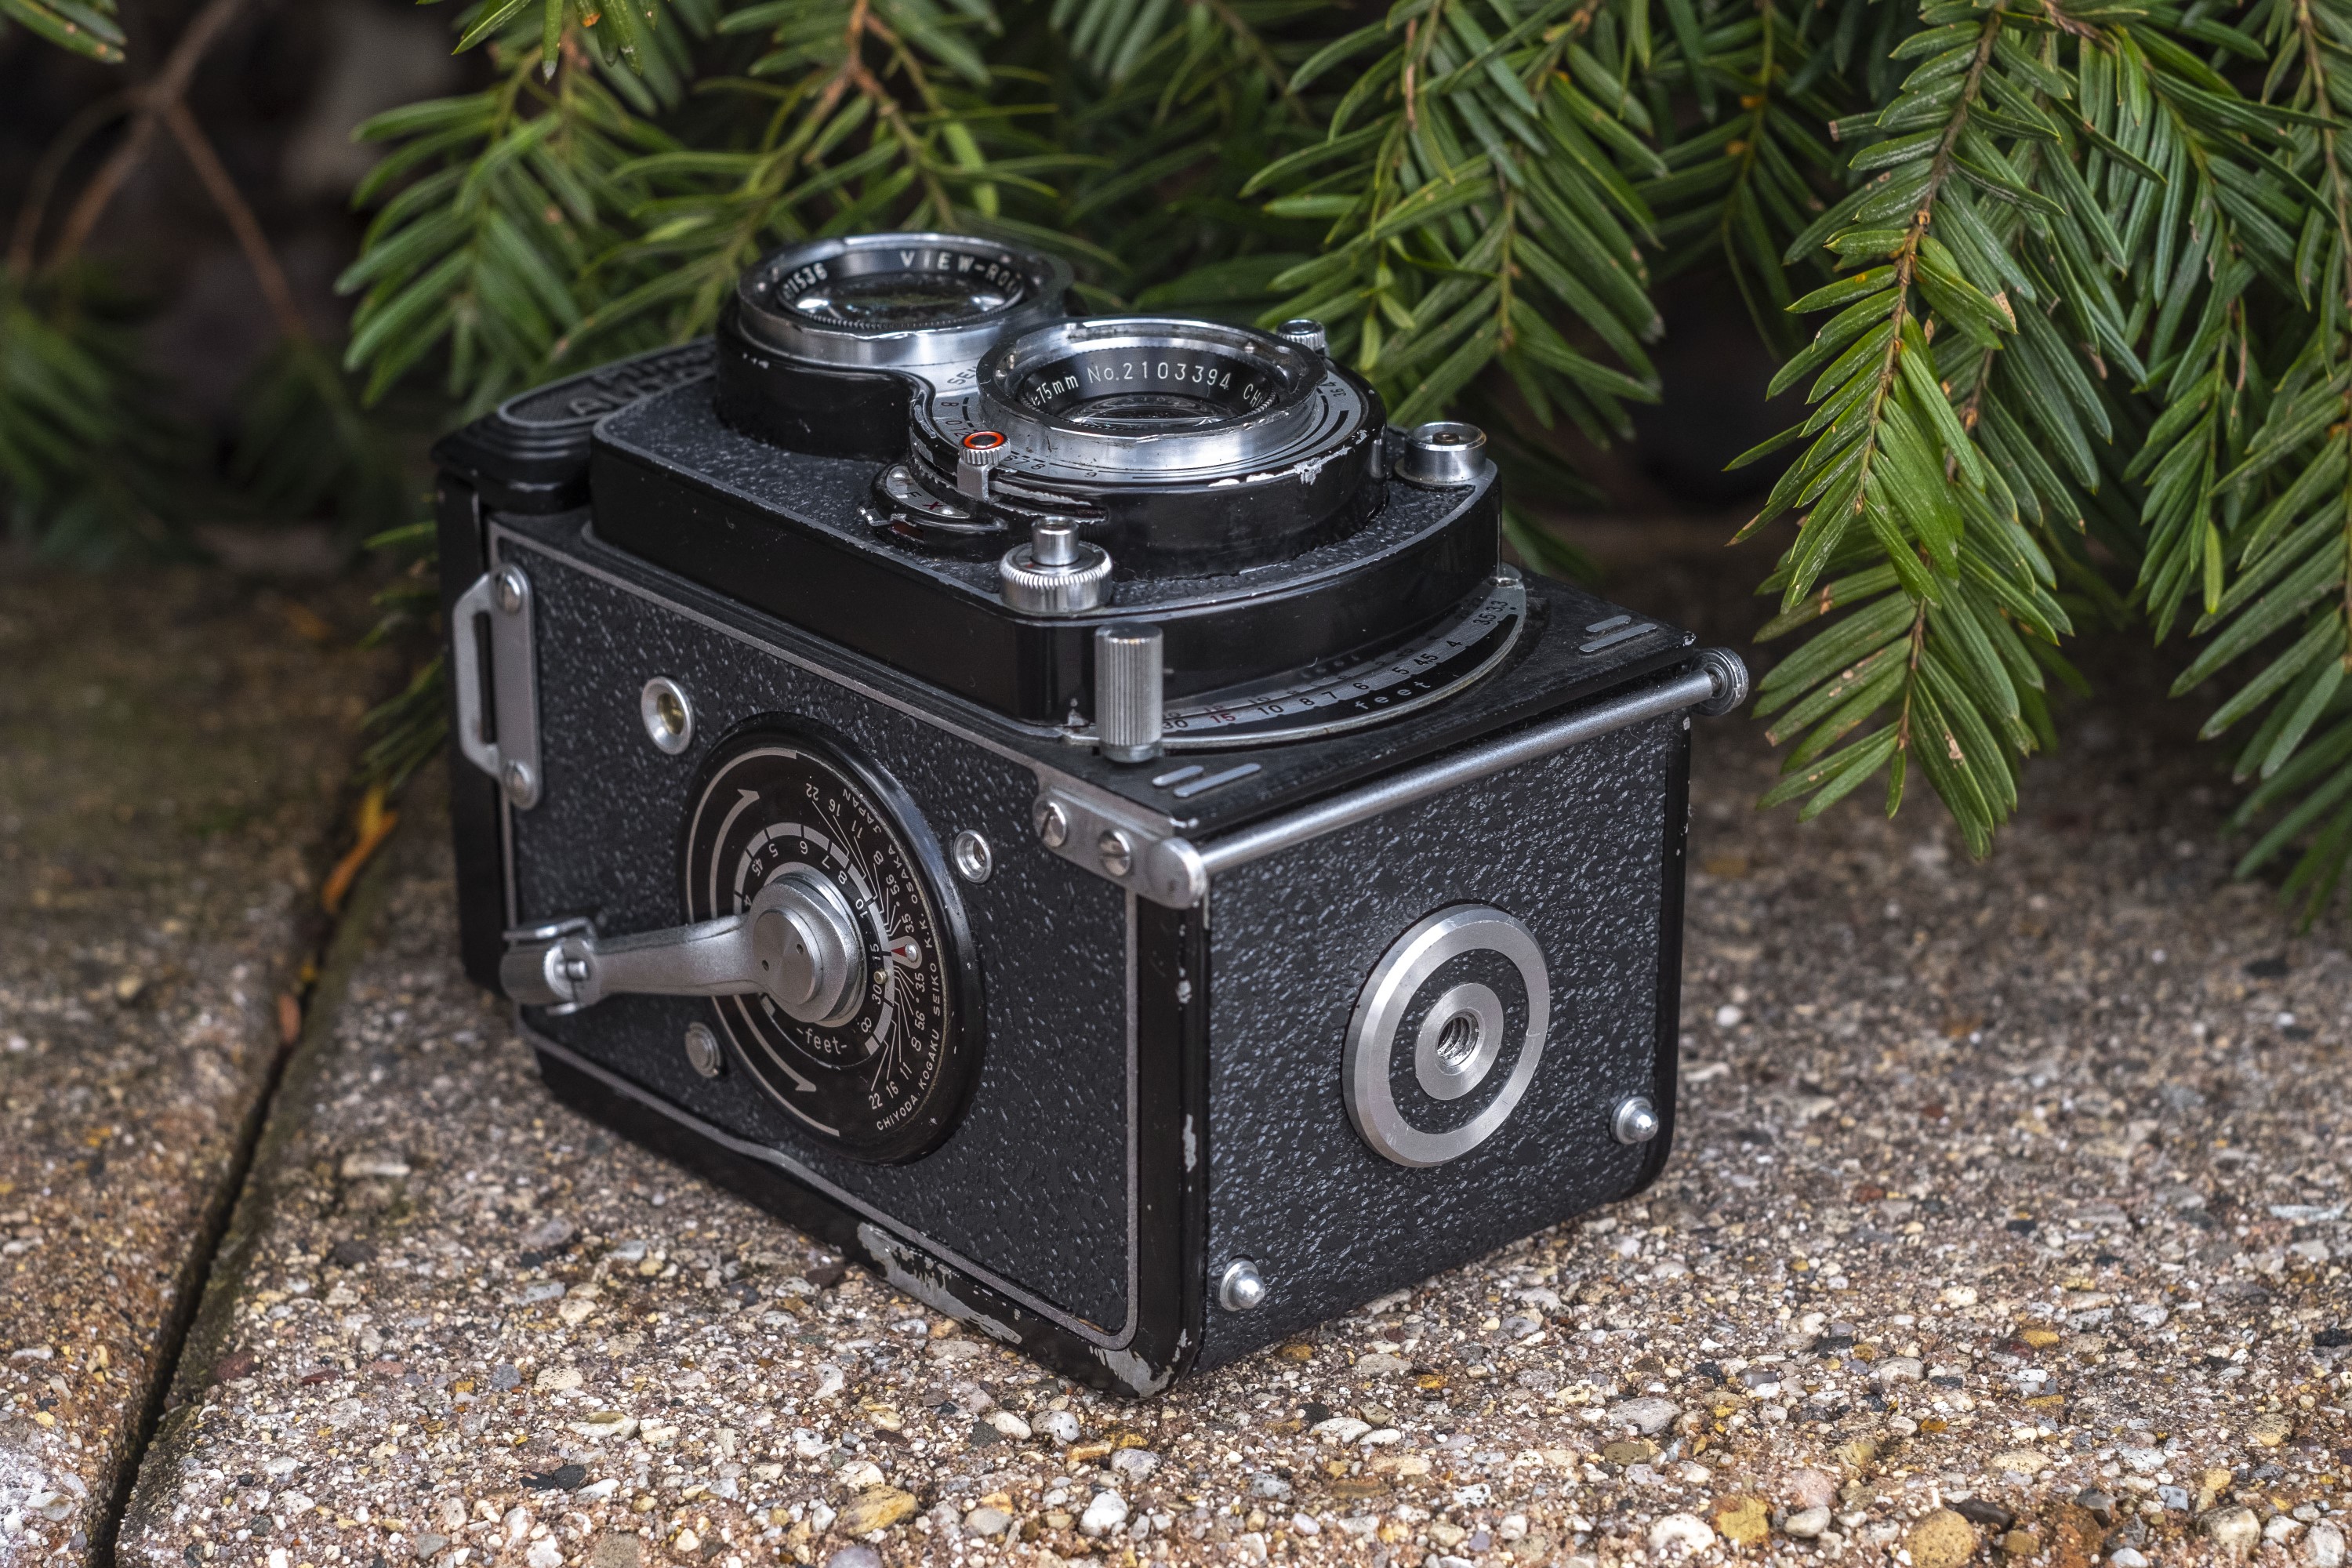
This is a Minolta Autocord Twin Lens Reflex camera made by Chiyoda Kogaku Seiko between the years of 1955 and 1966. The entire Autocord series was very popular and produced several variants. This particular model is an export model for North America, and was made in 1958. It is the only Autocord with a Seiko shutter, but without a light meter. The Autocord series had features that compared favorably to the Franke & Heidecke Rolleiflex of the same era, including an excellent 4-element f/3.5 Rokkor lens, lever wind with automatic frame advance, helical focus, self-timer, and double exposure override. Later Autocords could be equipped with a CdS light meter and support for 220 roll film.
Film Type: 120 Roll Film (twelve 6cm x 6cm exposures per roll)
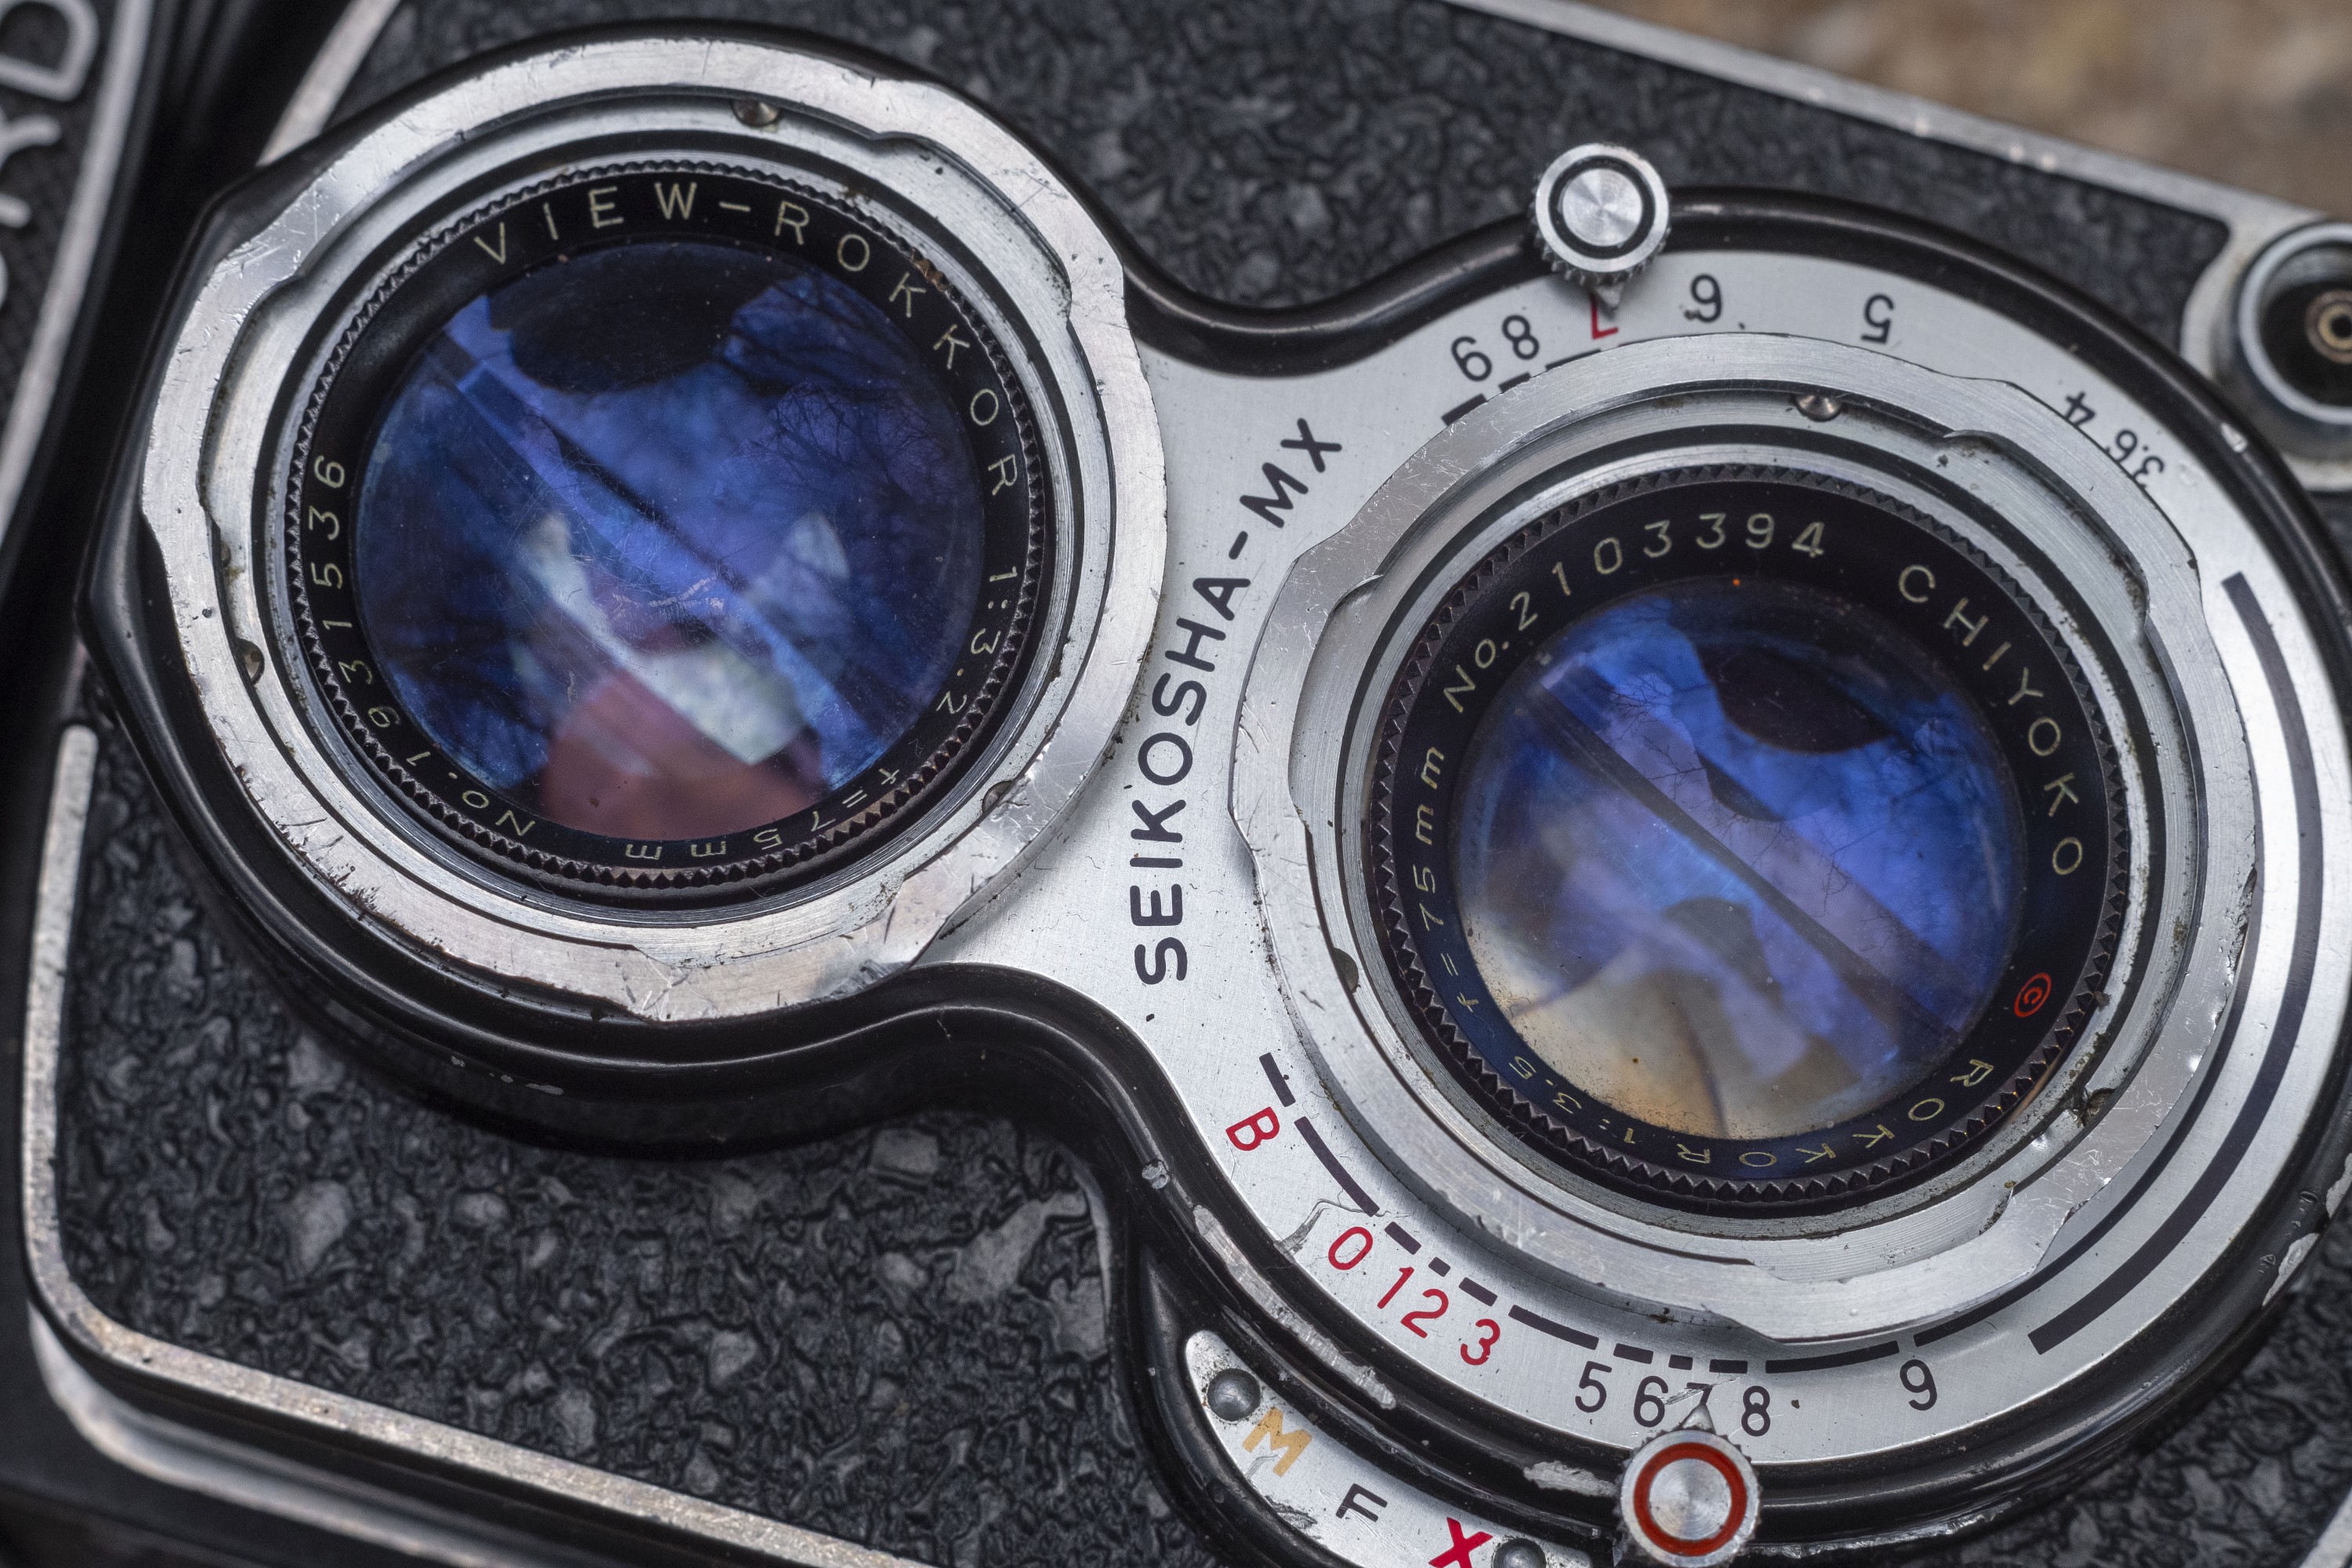
Lens: 75mm f/3.5 Chiyoko Rokkor coated 4-elements (taking), 75mm f/3.2 View-Rokkor coated 4-elements (viewing)
Focus: 3.3 feet to Infinity
Viewfinder: Coupled Reflex Waist Level Viewfinder
Shutter: Seikosha-MX Leaf
Speeds: B, 1 – 1/500 seconds
Exposure Meter: None
Battery: None
Flash Mount: Coldshoe and M and X Flash Sync
Weight: 973 grams
Manual: http://www.cameramanuals.org/minolta_pdf/minolta_autocord.pdf
History
The Japanese camera industry has a had a long history of mimicking and copying the German camera industry. Since the early 20th century, the bulk of Japanese optics were either imported or copied from German designs.
 This all changed when the first World War broke out in Europe. Japan was no longer able to get things from Europe and were forced to rely on their own ingenuity and optical knowledge. As a result, in 1917, the three most prominent Japanese companies, Iwaki Glass Seizo-sho, Tokyo Keiki Seisaku-sho, and Fuji Lens Seizo-sho all merged together to form a single national Japanese optics company, which would be called Nippon Kogaku Kogyo Kabushiki Kaisha, or Japan Optical Industries Co., Ltd. in English.
Nippon Kogaku’s primary goal was to produce optical equipment for the Japanese Imperial Navy such as submarine scopes, binoculars, and other equipment. Little, if any, of Nippon Kogaku’s early production ever made it into the hands on non-military personnel.
As a result, in the 1920s and 30s, a variety of smaller optics companies would be formed to produce cameras and other commercial goods. Like Nippon Kogaku, a lot of those early Japanese cameras were heavily based off existing German designs. Seiki Kogaku (later Canon) would create a copy of the Leica II rangefinder called the Hansa Kwannon which upon it’s release, would be known as the first Canon camera. Other companies like G.K. Konishiroku Honten (later Konica) would make the Pearlette in 1925 which was a near copy of the Contessa-Nettel Piccolette, and Okada Kōgaku Seiki (later Daiichi and Zenobia) made a 3×4 folding camera based loosely on the Foth Derby (the maker of this camera is actually disputed as there is no real evidence saying who made it).
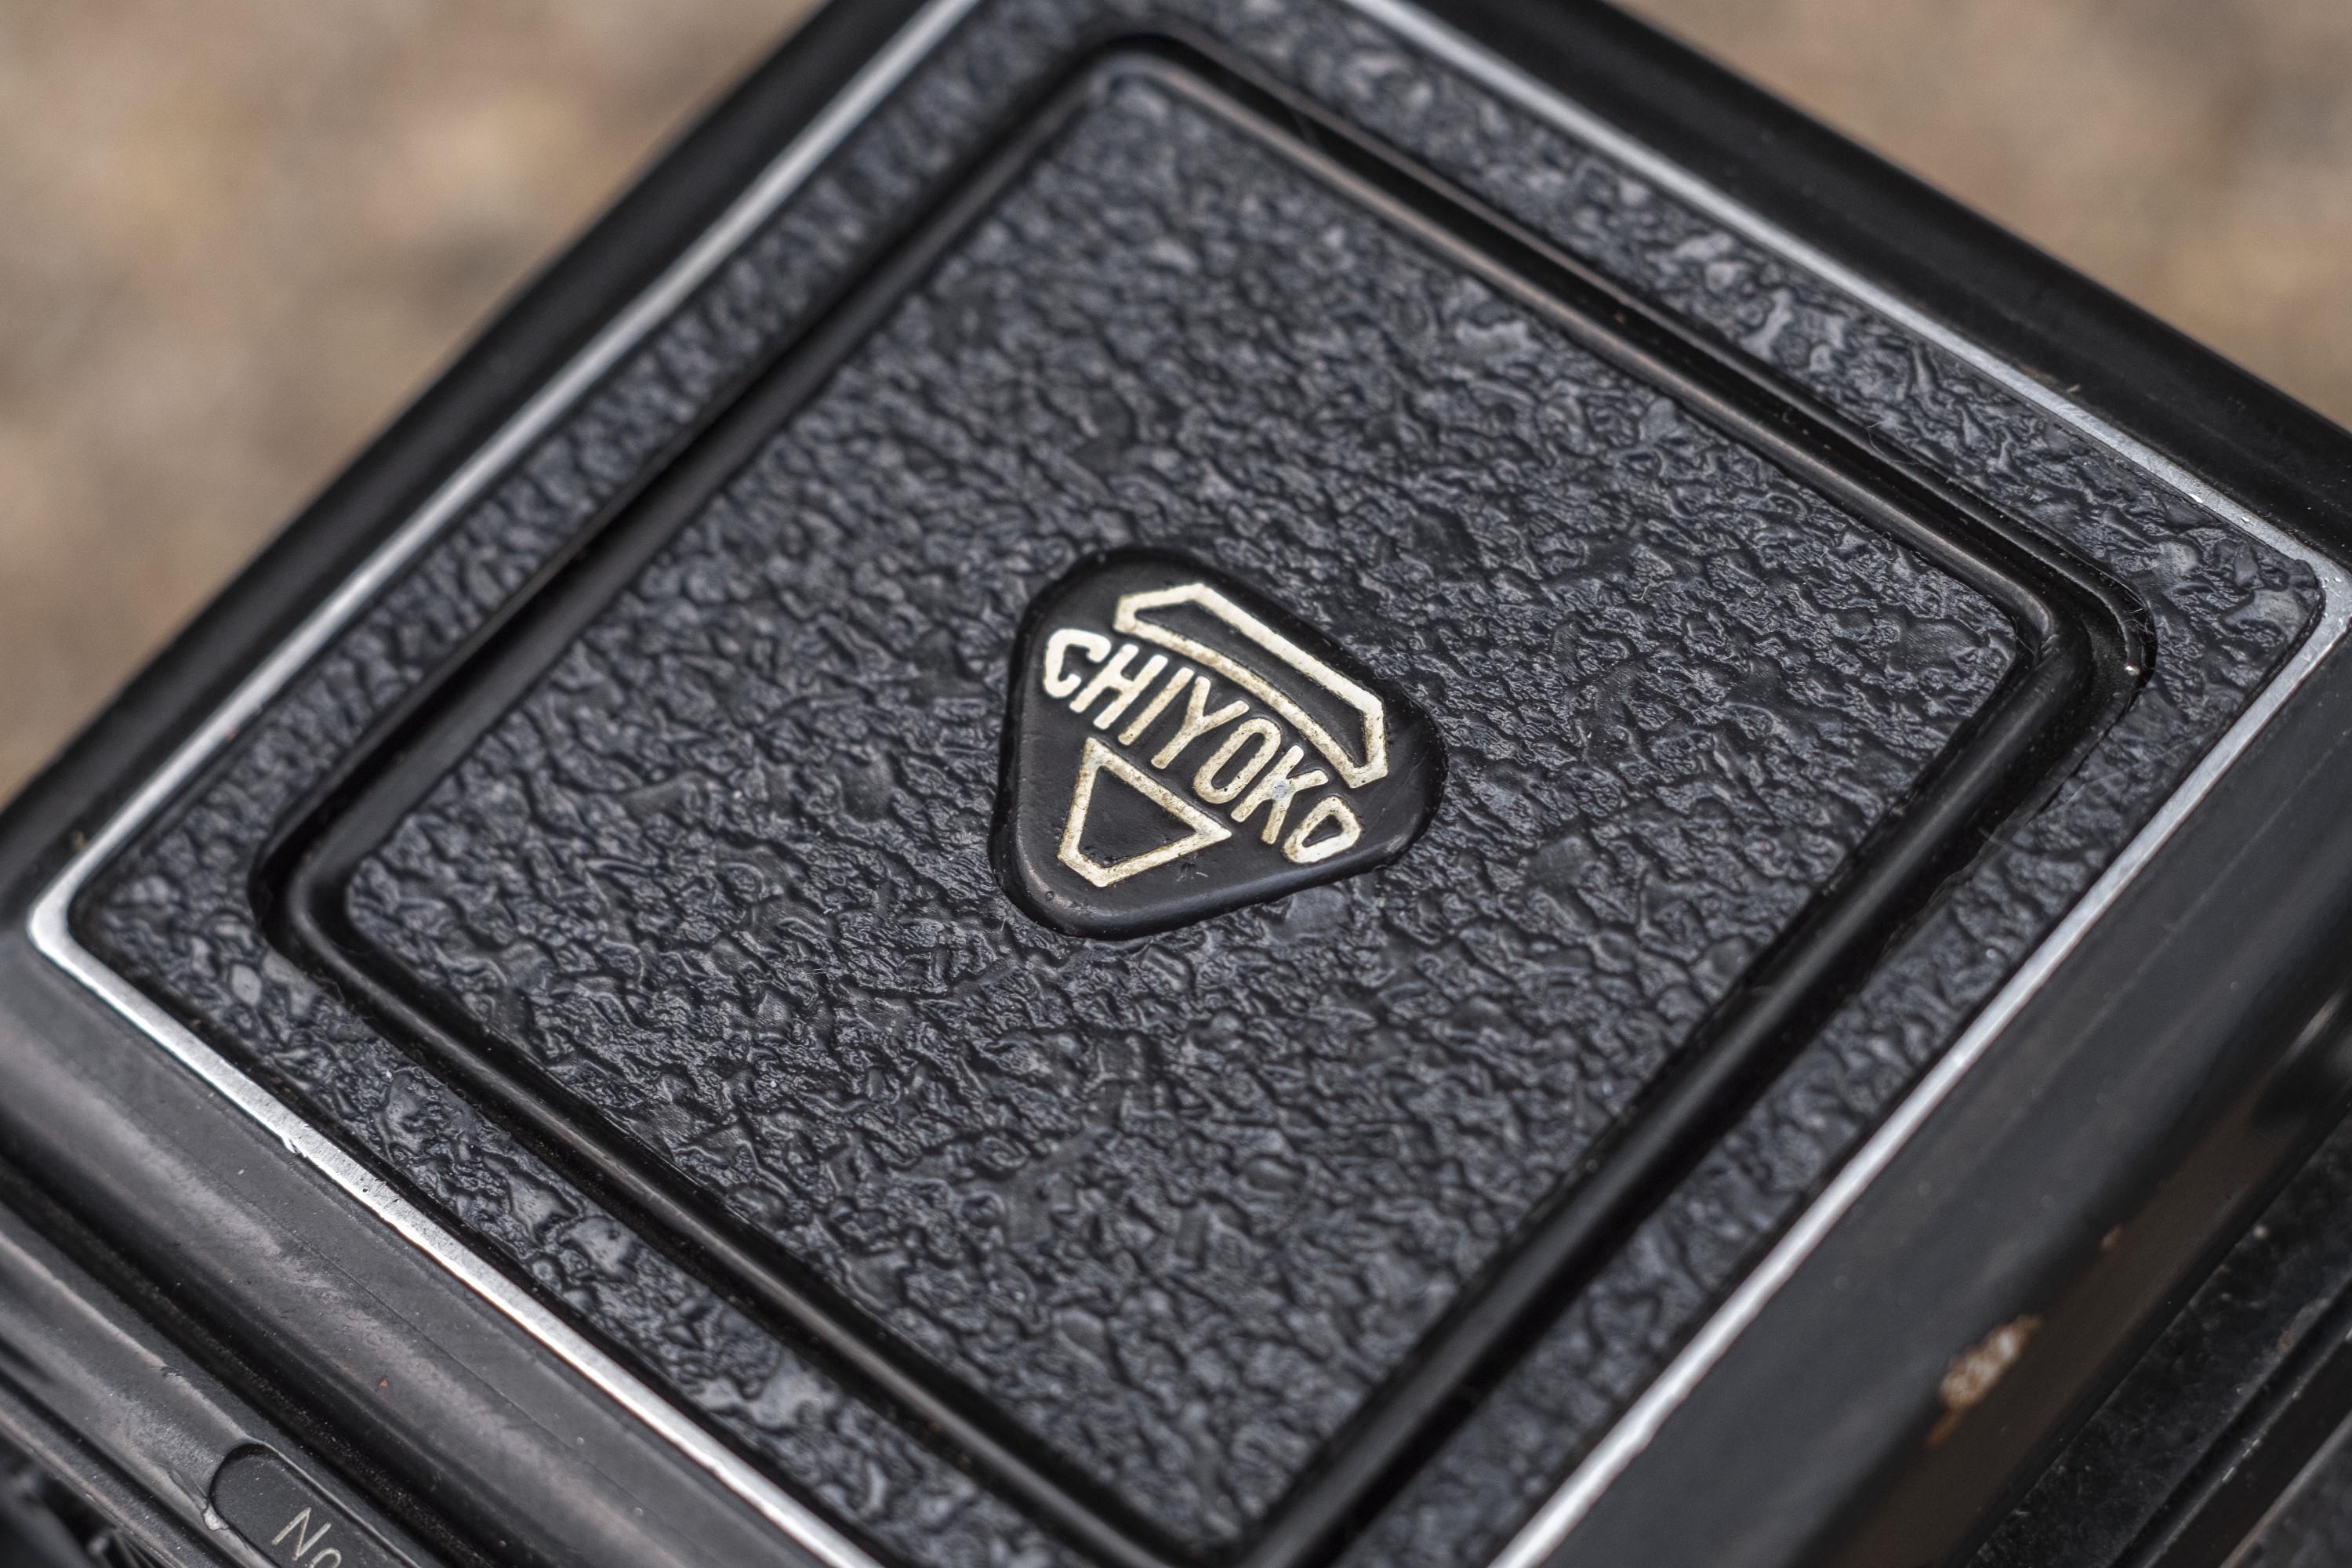
Another one of these companies, called Nichidoku Shashinki Shōten was formed in 1928 by a man named Kazuo Tashima who enlisted the help of two former German camera technicians to build German inspired Japanese cameras that had equal parts German DNA but with a unique Japanese design. Nichidoku didn’t want to simply copy German cameras, they wanted to make their own. Nichidoku would change it’s name in 1931 to Molta Gōshi-gaisha and the new company would build models inspired by other German cameras like the Plaubel Makina and the Zeiss-Ikon Ikonta and Icarette folding cameras. Several of Molta’s earlier models adopted the name “Minolta” which was believed to be an acronym for “Mechanismus, INstrumente, Optik und Linsen von TAshima”, or “Mechanism, INstruments, Optics and Lenses by TAshima” in English.
In 1936, Molta would announce a prototype for a new twin lens reflex camera that they were working on which was heavily inspired by the Rolleicord TLR made by Franke & Heidecke of Braunschweig, Germany. It featured a knob wind film advance, a German inspired shutter, and an f/3.5 lens. Before it’s release, Molta would reorganize once again and become Chiyoda Kōgaku Seikō K.K. which translates to Chiyoda Optics and Precision Industry Co., Ltd. In late 1937, advertisements in Japanese photo magazines started to appear showing Chiyoda’s new TLR, called the Minoltaflex. These early images show the camera with Compur shutters and a unique Minoltaflex logo that never appeared on production cameras.
The Minoltaflex likely went on sale in the summer of 1938 with a price of ¥245 and came with 4-element Rokkor lenses and Konan Rapid shutters which were clones of the German Compur shutter. It continued to appear in Japanese publications until September 1943, at which time it was believed that production was halted due to the war. In 1941, a second Minoltaflex called the Minolta Automat which shared the same body, front lens standard and viewfinder, but upgraded the original model with a lever wind film advance, and an automatic frame counter, bringing it’s specifications much closer to that of the German Rolleiflex Automat of the same era. Although both the Minoltaflex and Minolta Automat models were heavily inspired by their German counterparts, like most of Chiyoda’s products, they were not identical copies and had many different cosmetic and functional differences.
It is difficult to estimate production of these early TLRs as the serial numbers were shared between the two models, but according to Wikipedia, it is believed that less than 25,000 total units of the two models were made, making them rare collectors items today.
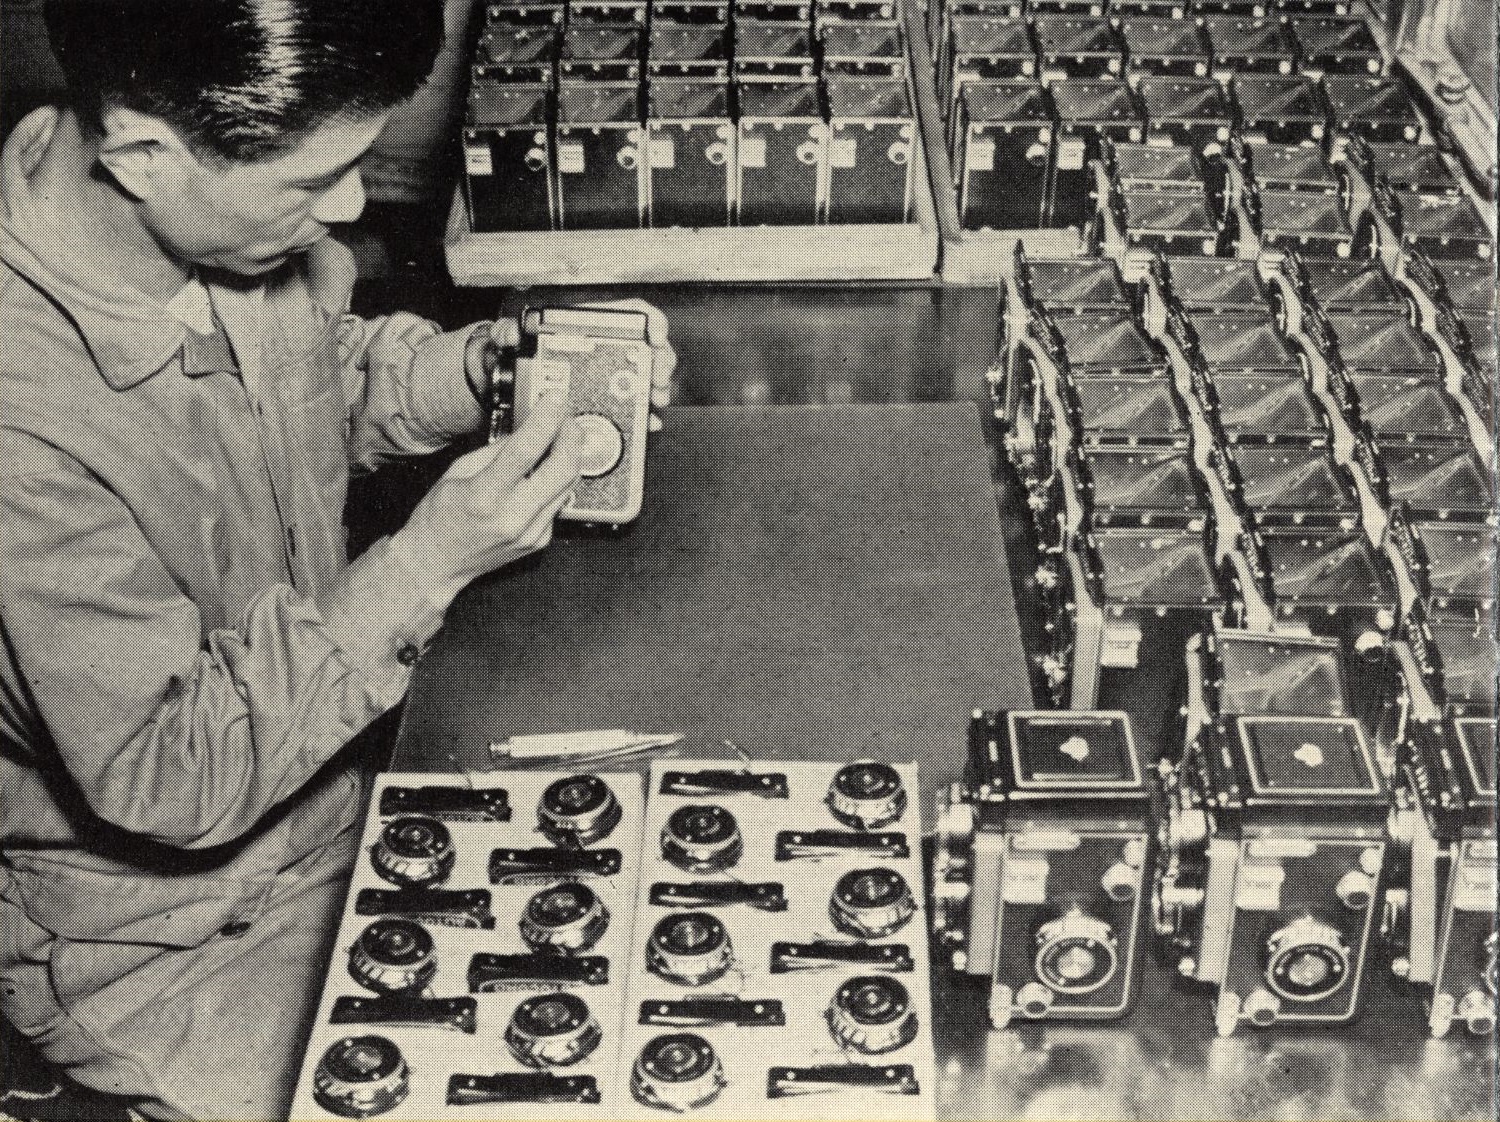
During the war, several of Chiyoda’s factories were destroyed by US bombers, so camera production took a while to start back up after the war had ended. Initially, TLRs were not included in the company’s first post-war production, instead focusing on the company’s simpler folding cameras.

In 1950, an all new Minoltaflex model was released with a new body and varying combinations of shutters and lenses. Although only ever advertised as a Minoltaflex, collectors today group these post-war TLRs into one of 3 types, the Minoltaflex II, IIB, and III. These TLRs were in production from July 1950 to November 1955.
By the early 1950s however, the Japanese camera industry had exploded. There were numerous new companies making a large number of cameras for every segment of the market. There were many low to medium priced models, but when it came to premium TLRs, Franke & Heidecke was still king with the Rolleiflex.
Chiyoda Kogaku was never one to shy away from a challenge and thought that they would do better competing at the top of the market and going head to head with the Rolleiflex. Starting in 1953, Chiyoda would release a new TLR called the Minoltacord which would build upon the original Minoltaflex but with more advanced features. Most notably was an all new quick focus helicoid which was controlled by a lever on the bottom of the camera instead of using a knob on the side like the Rolleiflex.

The perceived benefit of this method compared to Rollei’s knob, is that most photographers support a TLR using their left hand when holding the camera. When the focus knob is on the camera’s left side, the photographer must move his hand from supporting the camera to turning the knob and then back to the bottom to stabilize it. By keeping the focus control within easy reach of the hand that is already supporting the camera, focus can be changed without the photographer having to reposition their hand.
Another significant change was that the Autocord reversed the direction of the film transport compared to other TLRs. When loading film, a new roll is mounted in the chamber above the film gate, and the take up spool is mounted on the bottom of the camera. This method means the film has a straight path from the supply spool to the film gate without first having to go around a 90 degree corner on the bottom edge of the camera like in the Rolleiflex. The thought was that by eliminating this bend in the unexposed film, it would prevent film flatness issues across the film plane if the film sat in the camera too long. Many professional photographers who shot with Rolleiflexes would skip a frame of film to prevent this from happening if the camera sat for an extended period of time with film loaded.
The Minoltacord was also upgraded with a film advance crank and more advanced Seikosha and Optiper shutters. Lens selection was the base Chiyoko Promar sIII f/3.5 triplet taking lens and a View-Promar f/3.2 triplet viewing lens, but variants with a Chiyoko Rokkor f/3.5 4-element taking lens and Minolta-Anastigmat f/3.2 viewing lens were available as well.
Two years later, the Minoltacord received more upgrades and a name change, this time as the Autocord. Retaining the same basic body, viewfinder, reversed film transport, and quick helicoid focus system, the Autocord received a lens upgrade to the company’s top of the line 4-element Rokkor f/3.5 lens. In addition to the new 4-element lens formula, the Rokkor lenses differed from the original Promar lenses with a superior glass coating that was capable of vibrant and glare free color images.
Other changes to the Autocord was an “Automat” feature which simplified film loading by eliminating the red window for reading exposure numbers like on many other cameras, a new Rollei Bay I mount which allowed full use of a variety of filters, hoods, and other accessories designed for the Rolleiflex, and electronic X-sync flash synchronization. A separate model called the Autocord-L was available at the same time as the first Autocord with the only difference being it had a built in selenium cell coupled exposure meter.
The Autocord was considered to be the pinnacle of Japanese TLR design upon it’s release, and was received well by domestic Japanese and international press photographers. While many of the features of the Autocord compared favorably to the German competition, perhaps the best feature of the camera was it’s price. The non-metered model sold for $99.50 and the metered for $124.50. When adjusted for inflation, this compares to about $925 and $1150 today. While certainly not cheap, it was a far cry from the prices of the Rolleiflex which started north of $200 and went up from there.
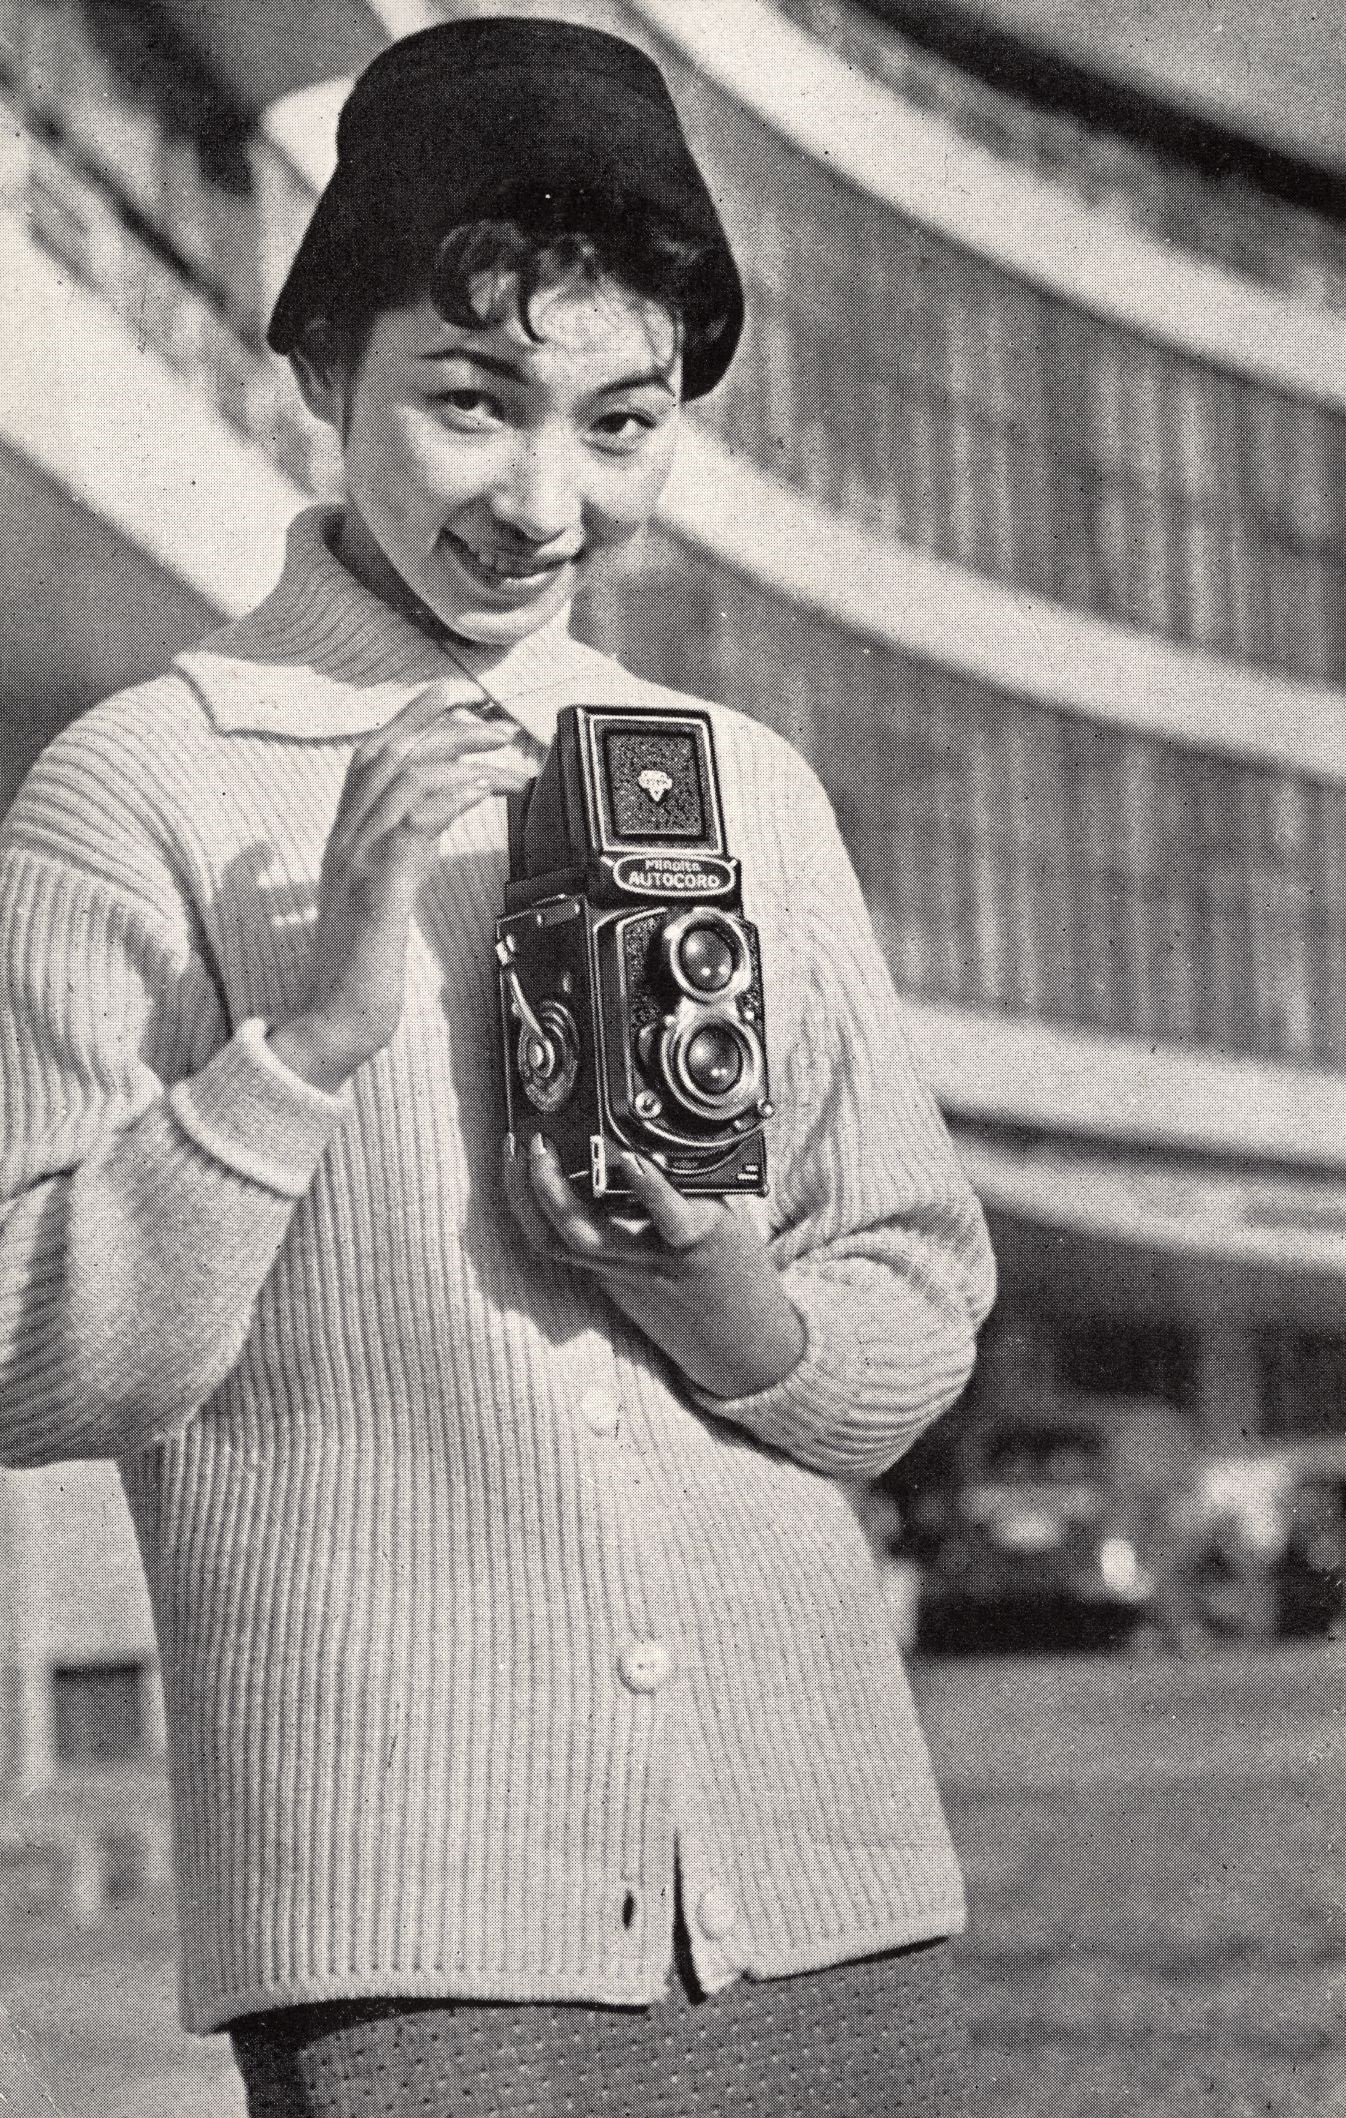
Here is a gallery of various advertisements of various Autocord models from the mid to late 1950s.


In a quick review in the August 1955 issue of Modern Photography, editor Herb Keppler says this about the Autocord:
What makes the Minolta Autocord different from other twin-lens reflexes? It isn’t the four-element, f/3.5 Rokkor taking lens, the automatic loading, or combined shutter cocking and film wind by crank lever? Other cameras have had similar features. Self-timers, MX synchronization, focusing with either hand, infrared footage markings, speeds from 1 sec. to 1/400 sec. aren’t novel either. But having all these features incorporated into a camera selling for $99.50 is novel…
Chiyoda aimed for the fences with their new camera while keeping the camera under the $100 price point and hit it out of the park. The above mentioned article goes on to praise the simple focus system, the bright viewfinders, and the excellent build quality. To have a camera this robust, with these features, all for under $100 was quite an achievement and earned (rightfully so) tremendous praise from magazines and photographers alike.
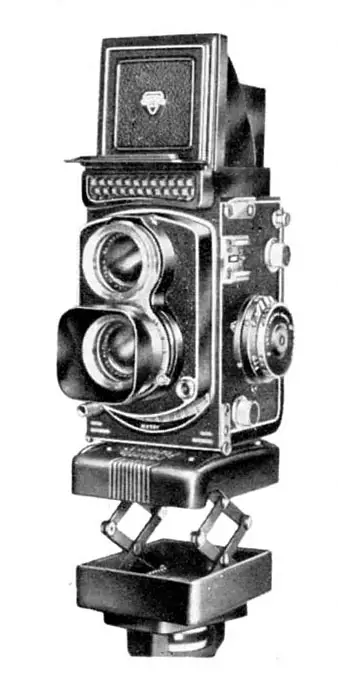
In addition to all of the Rollei Bay I accessories that were compatible, there were a huge number of accessories made specifically for the Autocord like the Minolta Autopole, a circular polarizer that covers both lenses and allows the photographer to see the polarization effects through the viewfinder, a Panorama head which uses the tripod socket and allows the camera to take a full 360 degree panoramic photograph using all 12 exposures on a roll of film, and the Parajuster, which is a collapsible mount which allows parallax correction when using close-up adapters for macro work.
The Minolta Autocord was a rousing success and would receive several updates and subtle revisions to it’s feature set over the next decade and a half. All models retained the f/3.5 Rokkor taking lens and were designed for 120 medium format film although there was one that could use 127 roll film with a mask and adapter, and some that could use 220 as well. The metered Autocords would eventually become available with CdS meters instead of the selenium cells of the early models.
The model being reviewed here was marketed simply as the “Minolta Autocord” but is classified by collectors as the export model. This model began production in 1958 and was sold exclusively in North America. For a comprehensive list of all Autocord models and the differences between them, check out Fred Math’s Autocord site.
The last new model was the Autocord CdS Model III from 1966 and it remained in production for a couple of more years before the entire Autocord line was discontinued due to failing sales. The rise of professional 35mm cameras and 6×6 SLR cameras like those made by Hasselblad and Mamiya rendered the TLR design obsolete.
Today. the Minolta Autocord series remains a popular camera with users and collectors. Many people have unfortunately called it the “Poor Man’s Rolleiflex” due to it being a bit more affordable, and while that’s technically true, many people consider it to be every bit as great of a camera as the Rolleiflex. You should be able to happily buy and shoot an Autocord without feeling like you bought a second tier camera because you couldn’t afford the real thing.
Repairs
On Father’s Day weekend of 2017, my wife said to me that I could have a day to myself to do whatever I wanted, and visions of running amok around the town danced in my head. Around the same time, my friend, and fellow collector Mark Faulkner from The Gas Haus had told me he would be visiting Chicago and wanted to know if I wanted to meet up. It just so happened that the weekend he would be there was Father’s Day weekend. So sensing an opportunity to have some “me time”, I told my wife, I’d like to spend it downtown Chicago with a stranger I never met!
Hmm, ok, let me start over.
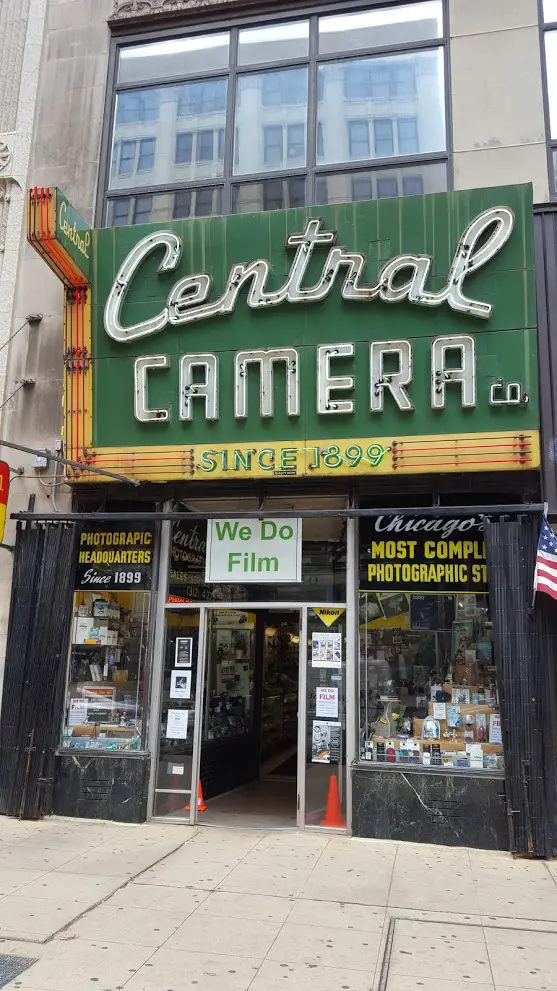
One day, in June 2017, fellow collector Mark Faulkner of The Gas Haus had told me he would be visiting Chicago and one of his stops would be the legendary camera shop, Central Camera, at 230 S. Wabash Ave in Chicago. Central Camera has been around since 1899, making it not only one of Chicago’s oldest businesses, but also one of the world’s oldest camera shops.
For anyone who has even a passing interest in photography of any kind, I strongly recommend checking the place out as it is chock full of photographic goodies. I’ll warn you though, hide your wallet or purse as it’s sure to take a beating!
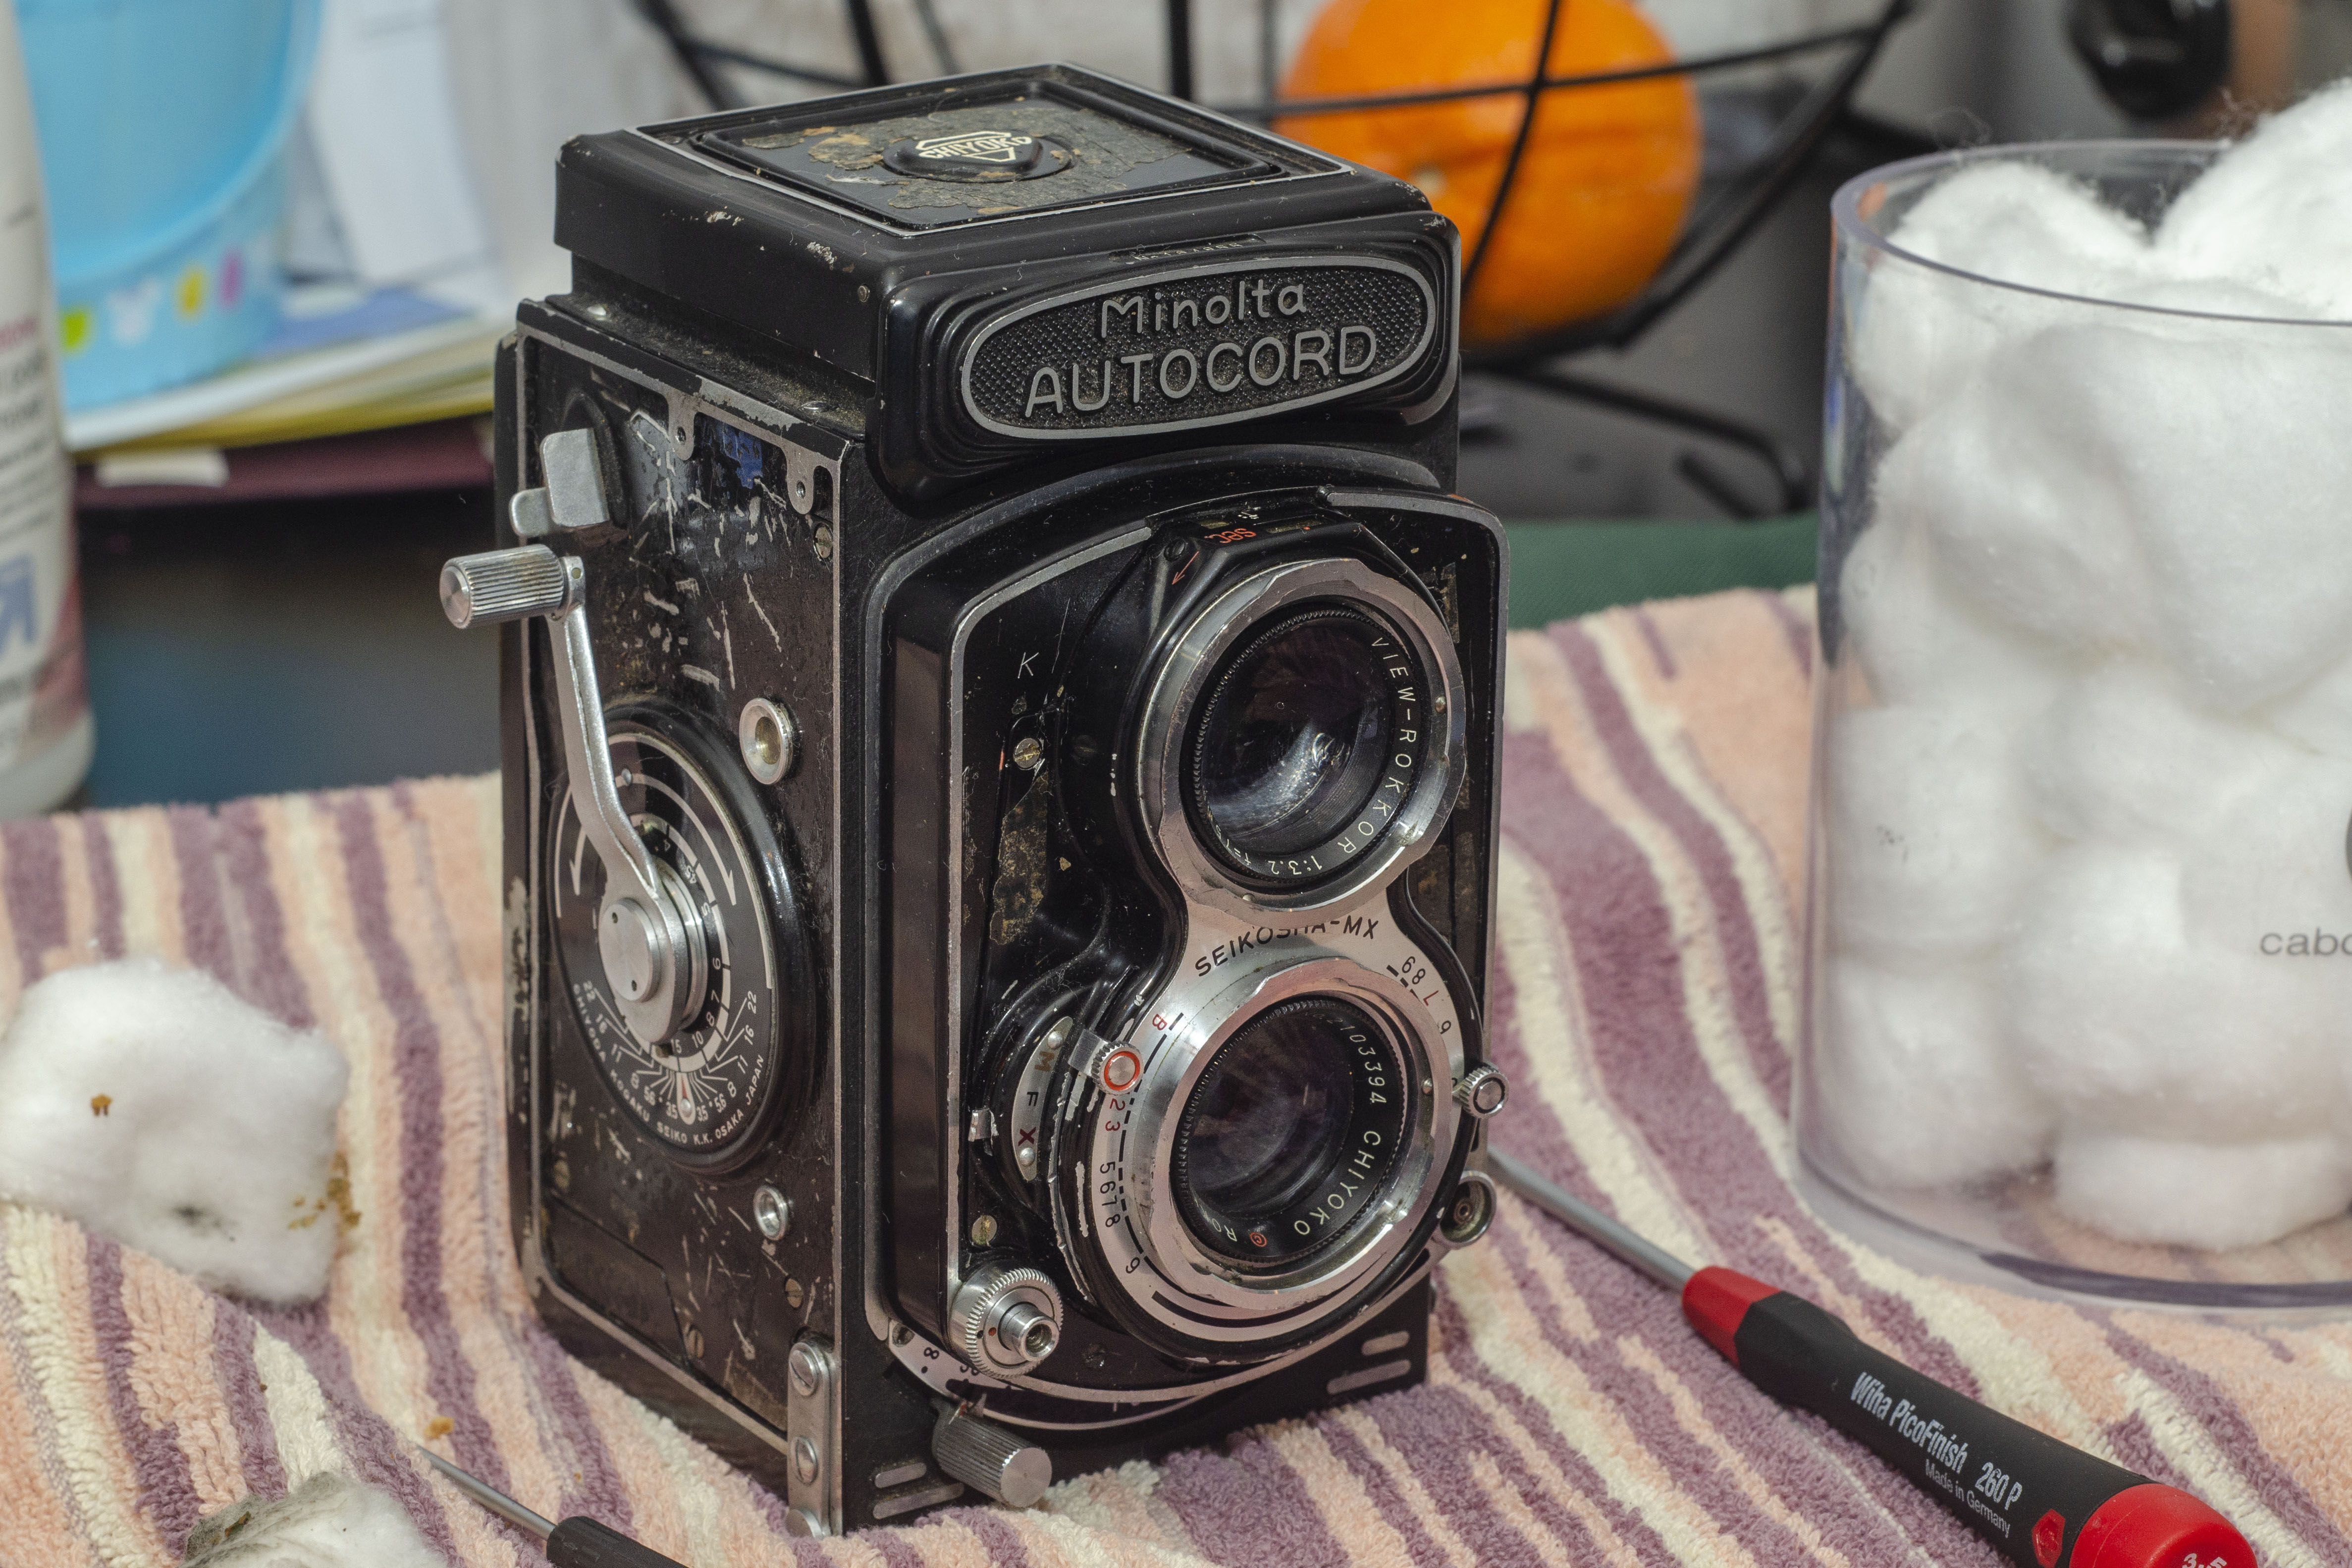
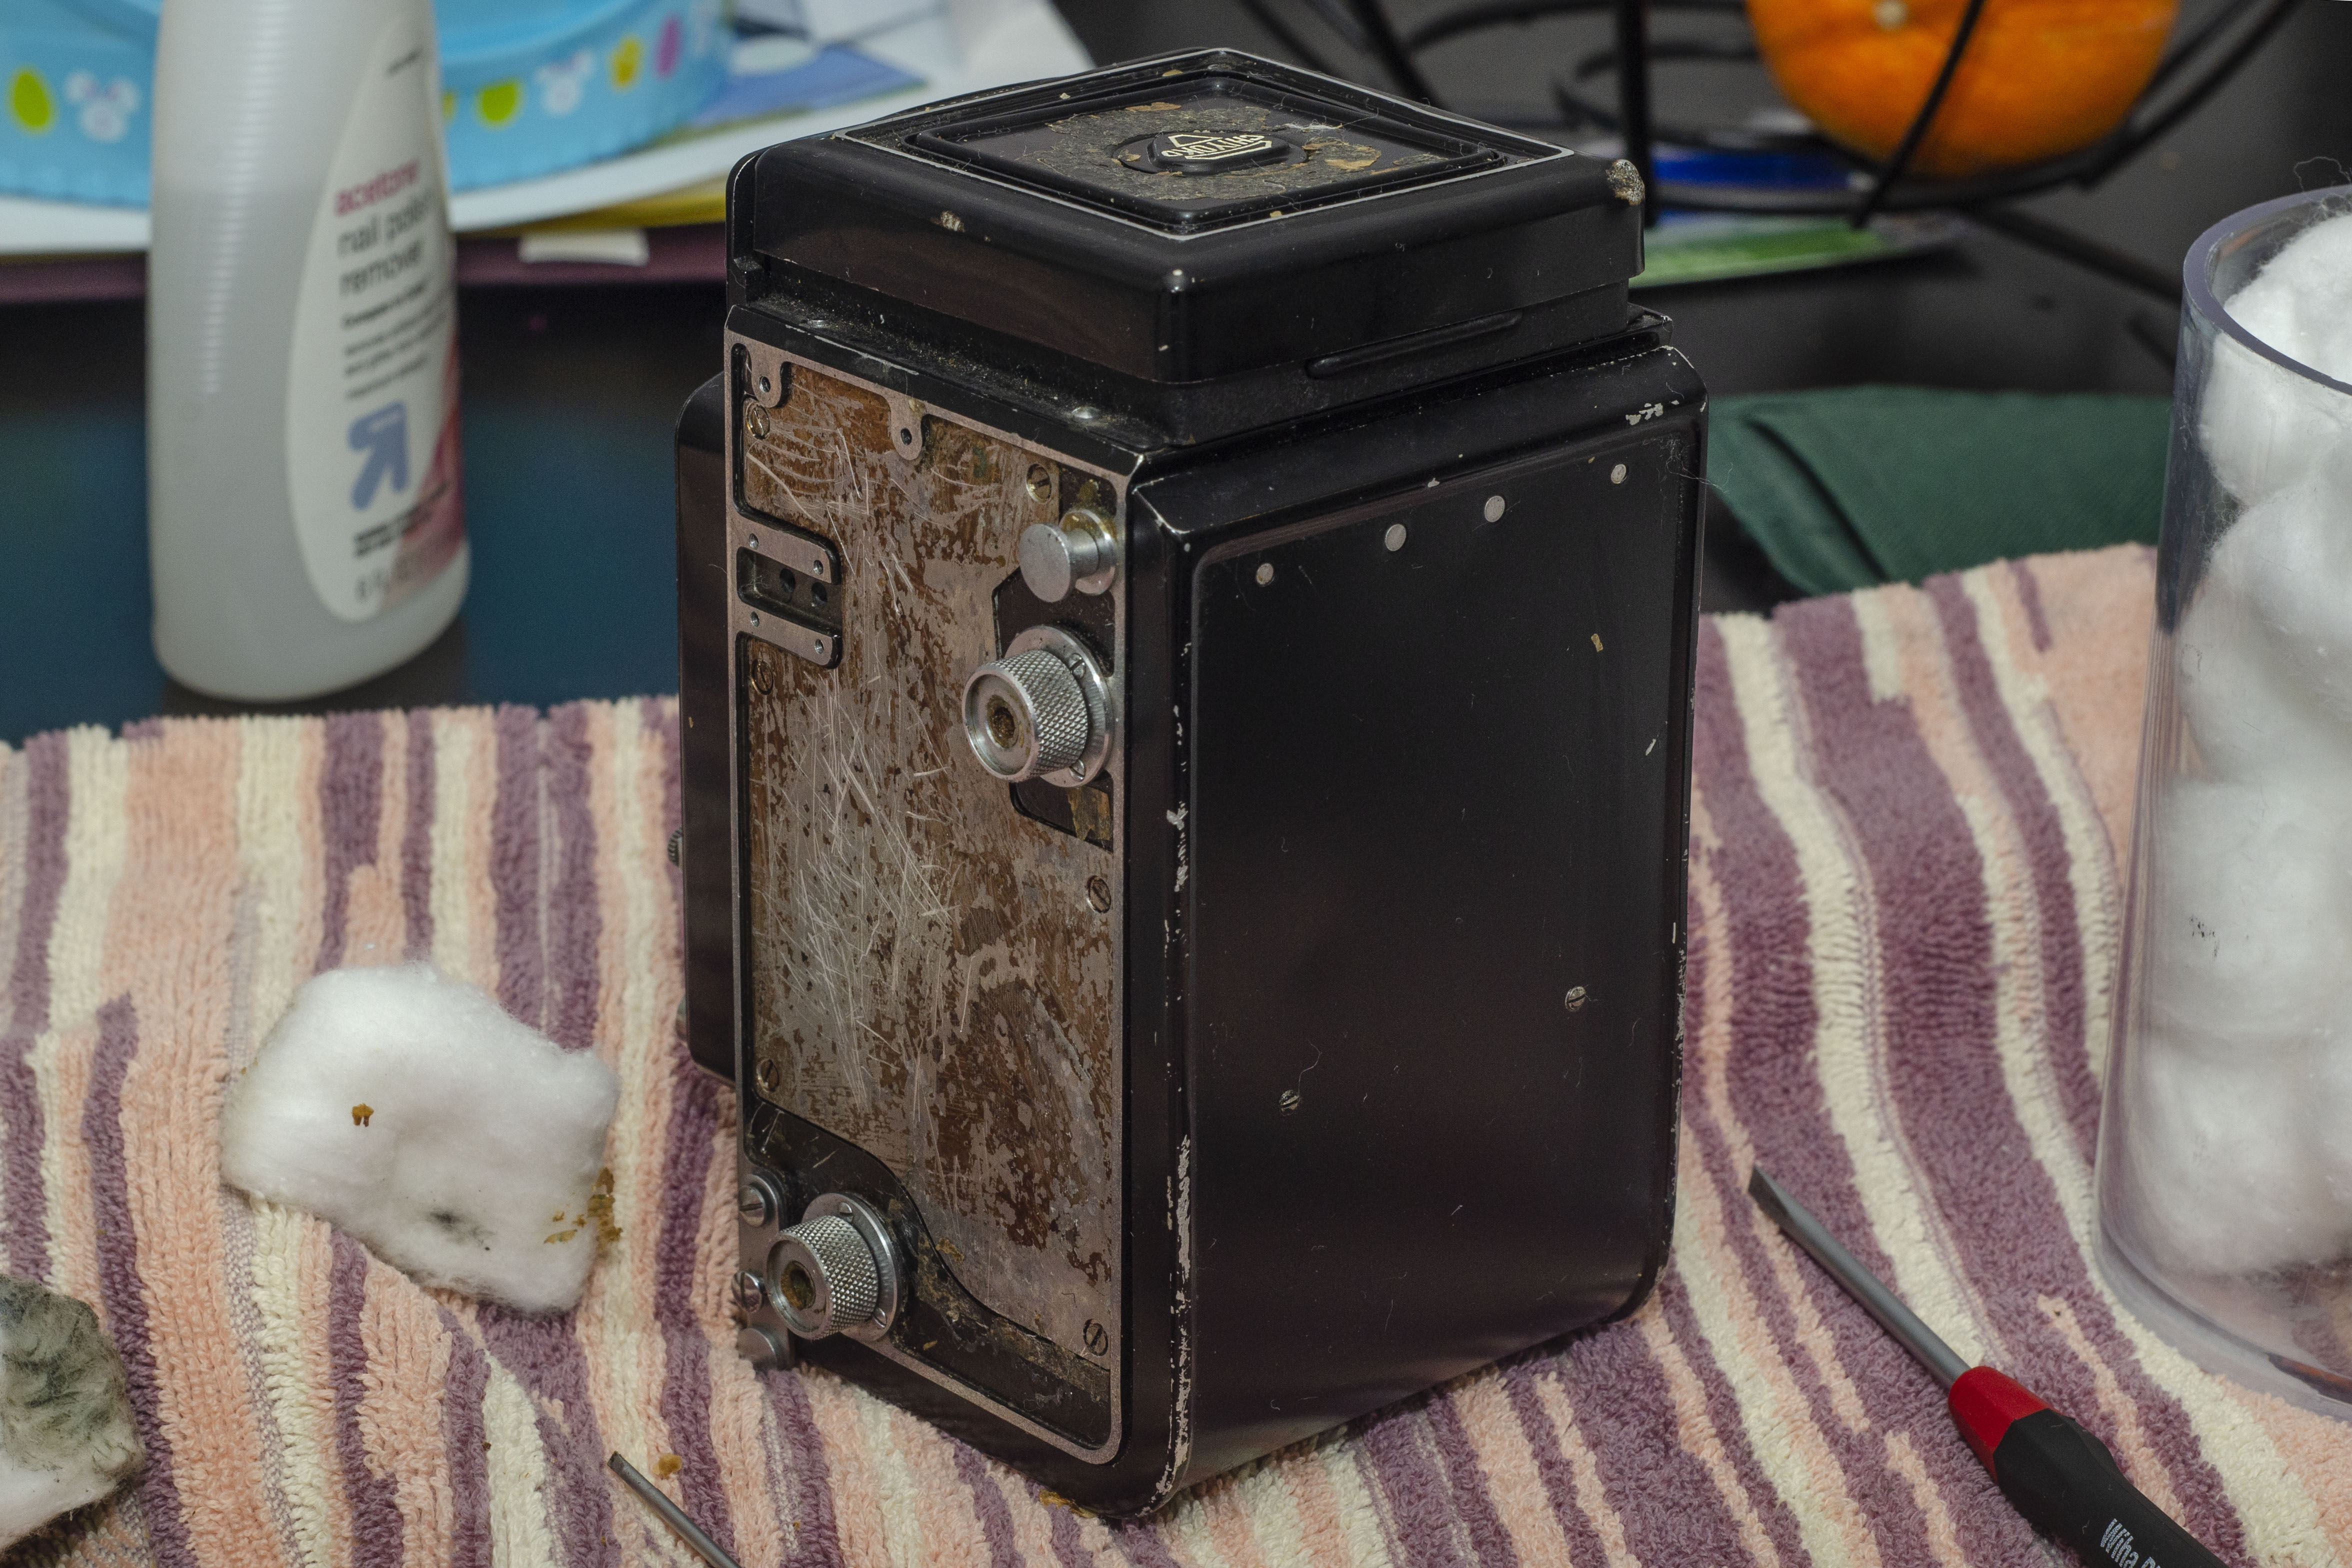
As I entered the store, I gazed upon case after case of cameras from large format view cameras, to the modern digital equipment, most of which is far beyond my budget. Shortly after entering the store, my eyes centered upon a display case on the right filled with various old cameras, and on the bottom shelf was a camera I had considered before, but never managed to find cheap enough, a Minolta Autocord. Noticing a price tag that was far lower than any I had seen before, I asked the clerk, (fellow VCC member Johnny Sisson) to take a look. He immediately warned me that the ‘cord was a disaster and had many issues.
He pulled the camera out of the case and gave it to me and I immediately noticed the camera’s many problems:
- The entire front standard, shutter, and lens assembly flopped around like it was about ready to fall off
- Very stiff focus
- Very oily shutter blades, they were some of the oiliest I’ve ever seen
- Inoperable shutter speed selector, the camera was stuck at 1 second, and couldn’t be changed to any other speed, it felt like the speed selector was disconnected internally somehow
- Cloudy, nearly opaque taking lens
- Various cosmetic issues including peeling leatherette, dirt, grime, and a dent on the rear film door
It was clear this Autocord had led a rough life and somehow wound up here at Central Camera in a very sorry state. Being the optimist that I sometimes am, I thought, hmm, maybe I could fix this. Even if I can’t if the price is cheap enough, it might make for a good “Camera of the Dead” article, since the Autocord is typically out of my price range.
On the plus side, the shutter did fire (even if it was stuck at 1 second), the inside of the camera was in nice shape, the ground glass was not cracked, the focus arm was not broken, the iris worked fine, and nothing was missing from the camera.
I put it aside and worked out a package deal with Johnny that his boss eventually agreed to. Cool! I own an Autocord!
Over the course of the next month or two, I tried to find as much as I could about Autocord repair and came up with two resources. The first was an excellent write-up by Ed Tse on his website showing how to disassemble an Autocord. He has good instructions with some excellent photos that really helped. I strongly recommend browsing his site if this is something you’d like to try yourself.
The second resource was Karl Bryan from Beaverton, Oregon who is highly respected in the vintage camera community for his work on the Autocord. Karl is a retired photographer who exclusively repairs Minolta Autocords. His love for this particular model has given him the reputation as one of the best repairmen for the Autocord in the whole world.
I sent Karl an email with images of my camera along with a description of it’s ailments. To my surprise, Karl replied to me the same day not only with information on how much he would charge to repair it, but also some step by step instructions on how I could do it myself. I had a similar experience with Chris Sherlock from Retina Rescue when I was trying to fix my Retina Reflex SLR. These guys could have been content to just say “send it to me” but they were gracious enough to take the time to give me some specific feedback for my camera’s problems.
Reading Karl’s instructions, and seeing the images on Ed Tse’s website, I thought that this was something I’d like to try myself. So one night, after the kids had gone to bed and my wife was reading in the bedroom, I got out my tools, cleared off a space on the kitchen table and got to work.
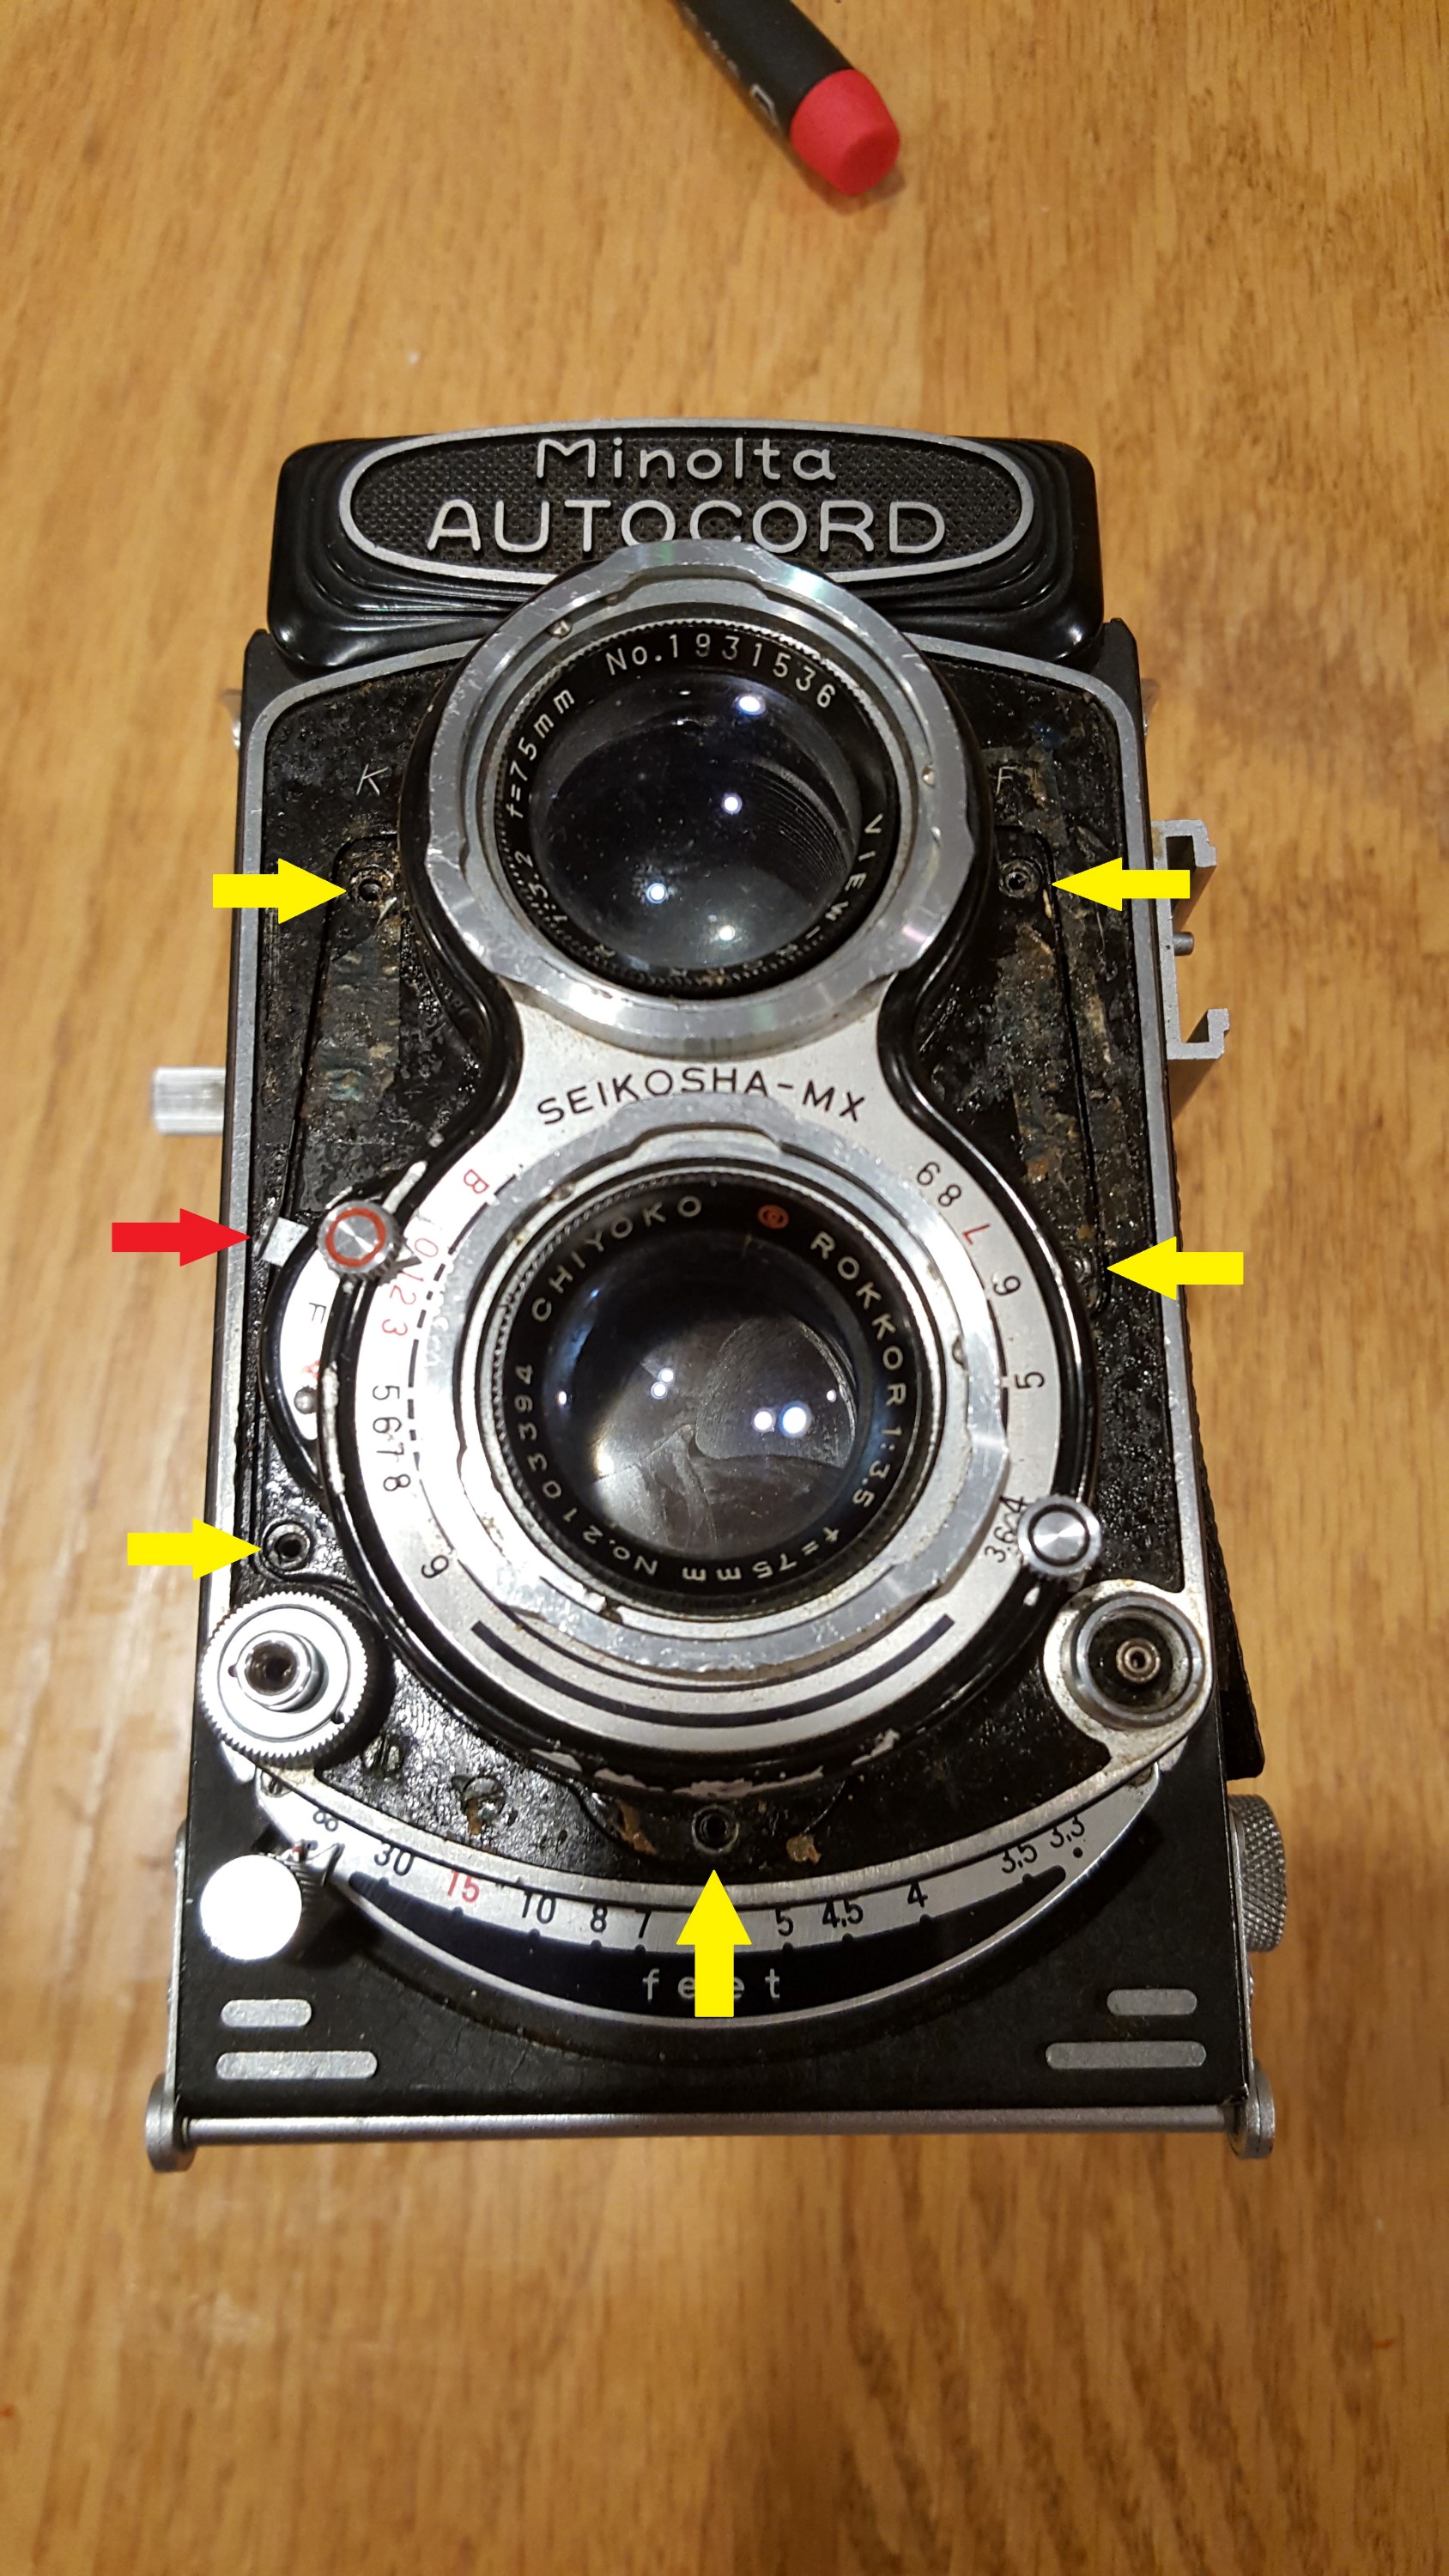 Step 1: The first step is to remove the front lens panel. There are 5 screws holding the panel in place, and to reach them, you need to peel off the front leatherette. Since mine was in very poor shape, I just took it off and threw it away. If you are planning on reusing your leatherette, you’ll want to go slow and take care to peel it off without ruining it. Remove all 5 screws indicated with yellow arrows in the image to the left. The red arrow points to the flash sync lever, which will most likely get caught up on the panel as you remove it, so be careful and slide it through the opening. A great tip from Karl Bryan is to set the flash sync lever to the “X” position to simplify removal of the plate.
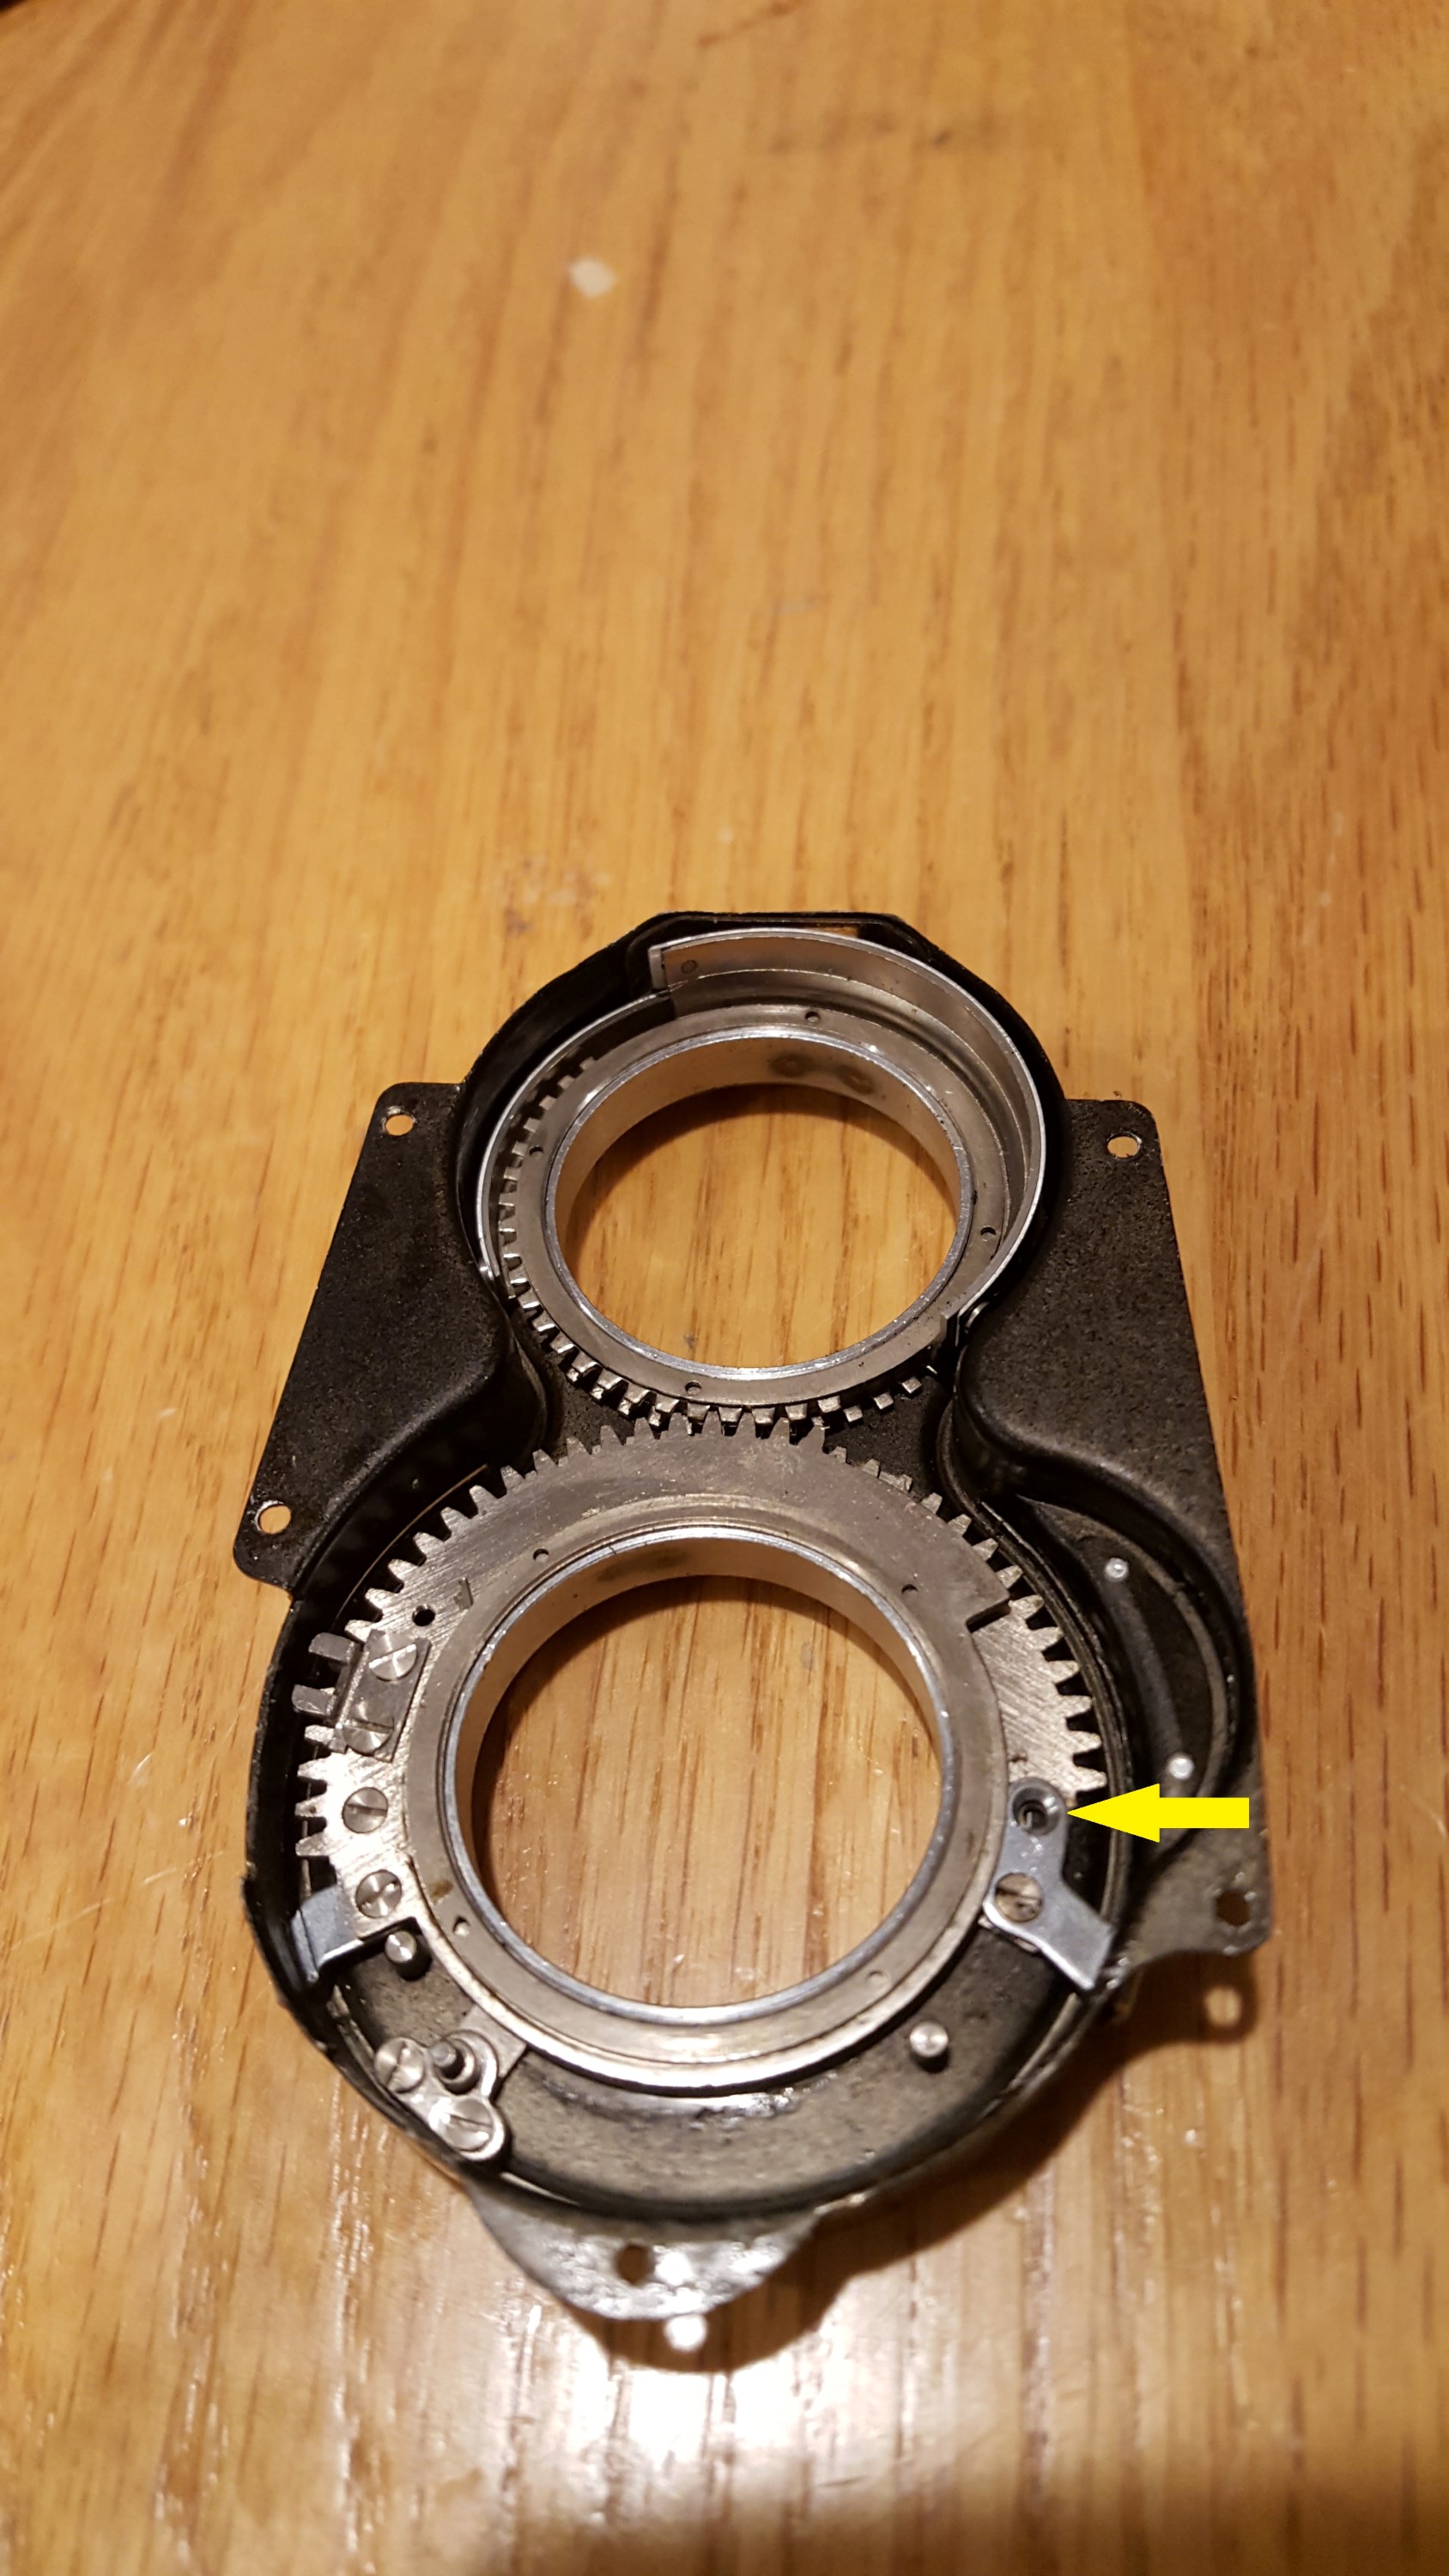 Step 2: Once the front panel is off, flip it around to see both the shutter speed and aperture selectors. In my camera, the reason for the inoperable shutter speed selector was because a screw had fallen out, causing the linkage to flop around. I indicated the missing screw hole with a yellow arrow in the image to the right. Unfortunately, the screw was nowhere to be found, so I had to locate a similar screw from one of my many parts cameras.
I could see while taking apart this Autocord that someone had clearly been inside of here before, so either they just forgot to put this screw back, or did such a poor job of repairing it, that things started falling out. In either case, it’s a good idea to check all of the screws in here to make sure they are tight. Also, a dab of Loc-Tite or nail polish on the head is a good idea to make sure they don’t back out again in the future.
Another good thing to do here is clean the shutter speed and aperture indicator that is underneath the top of this plate (not shown). When you change the shutter speed or aperture sizes, the display changes. On mine it was very dirty, so I cleaned this while it was off the camera.
 Step 3: One the front panel is off, you can see the shutter. The front lens element unscrews by hand and requires no special tools to get off. With the shutter exposed, you can attempt to change shutter speeds and test fire it with it still installed in the camera to check the rest of the speeds. If any of the speeds seem sluggish, you’ll need to clean the shutter.
 Step 4: To remove the shutter, you must first remove the lock ring from within the film compartment. Open the camera and turn it so the back is facing up and look in the film compartment and you’ll see a round metal shroud.
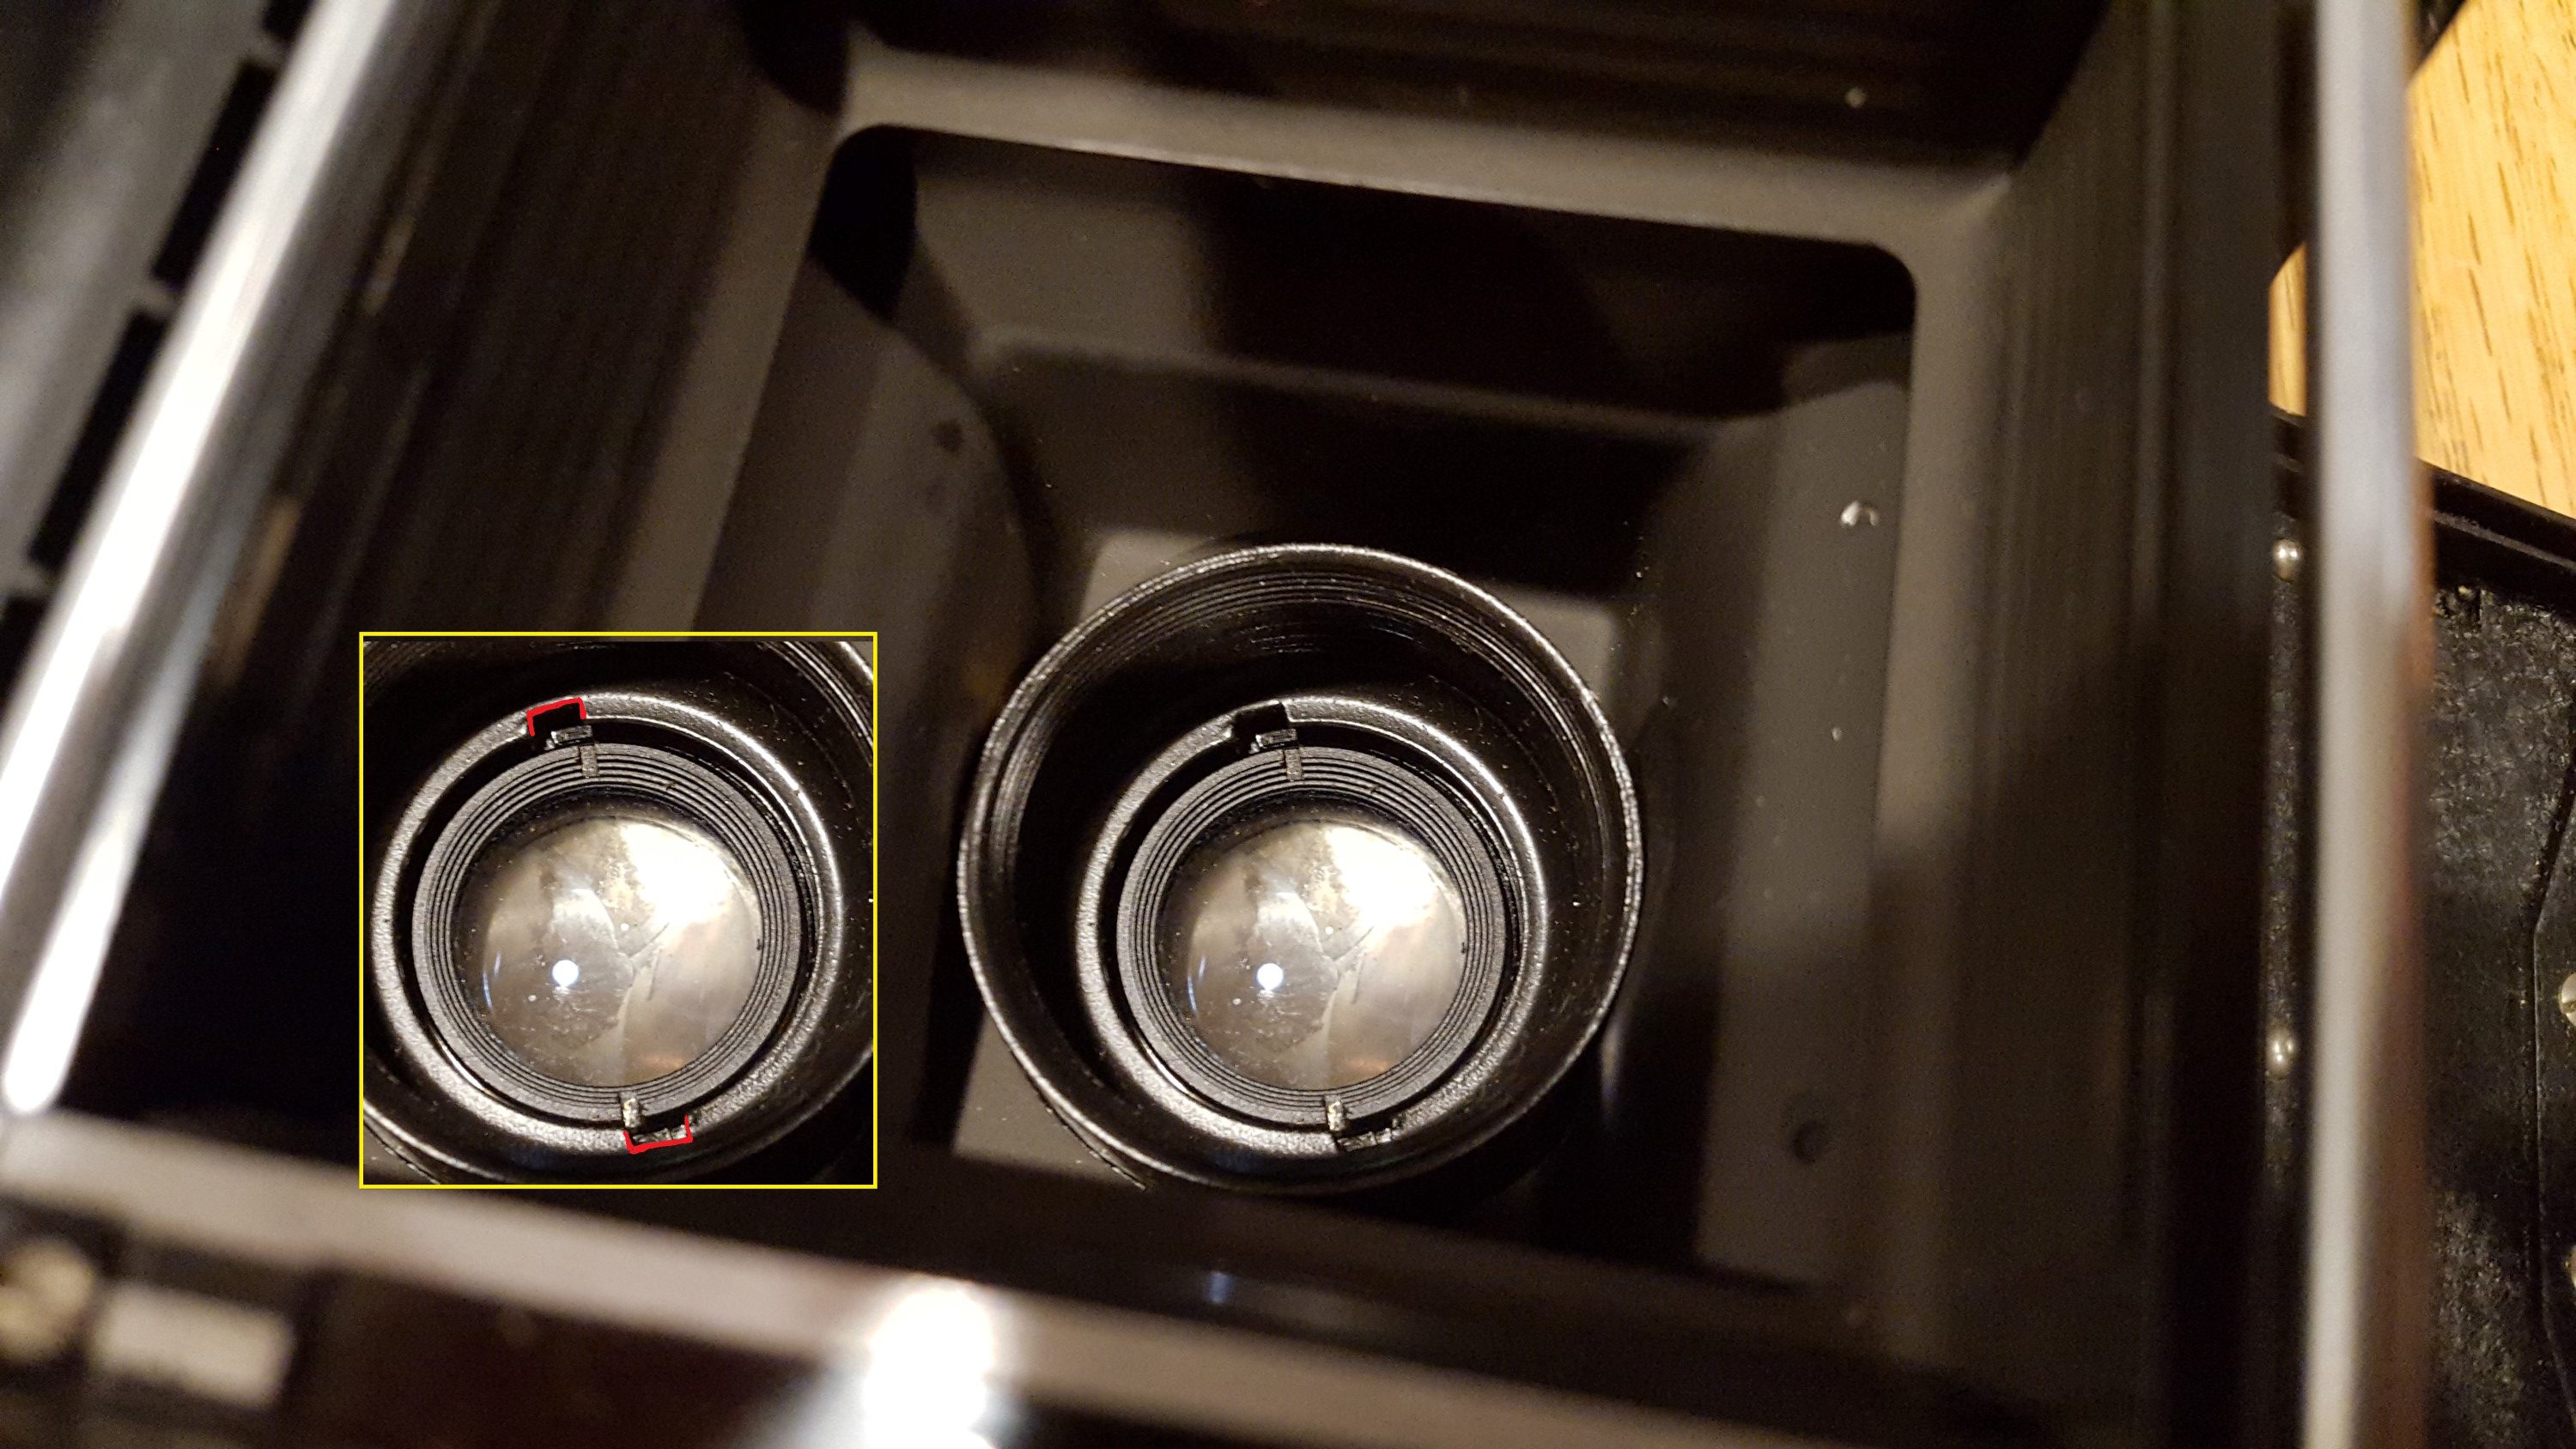
Ed Tse says he was able to unscrew this shroud by hand, but it is notched for a lens spanner, so that’s what I used. In the image to the right, I show an inset image with the notches for the shroud highlighted in red. Use any regular lens spanner to remove the shroud.
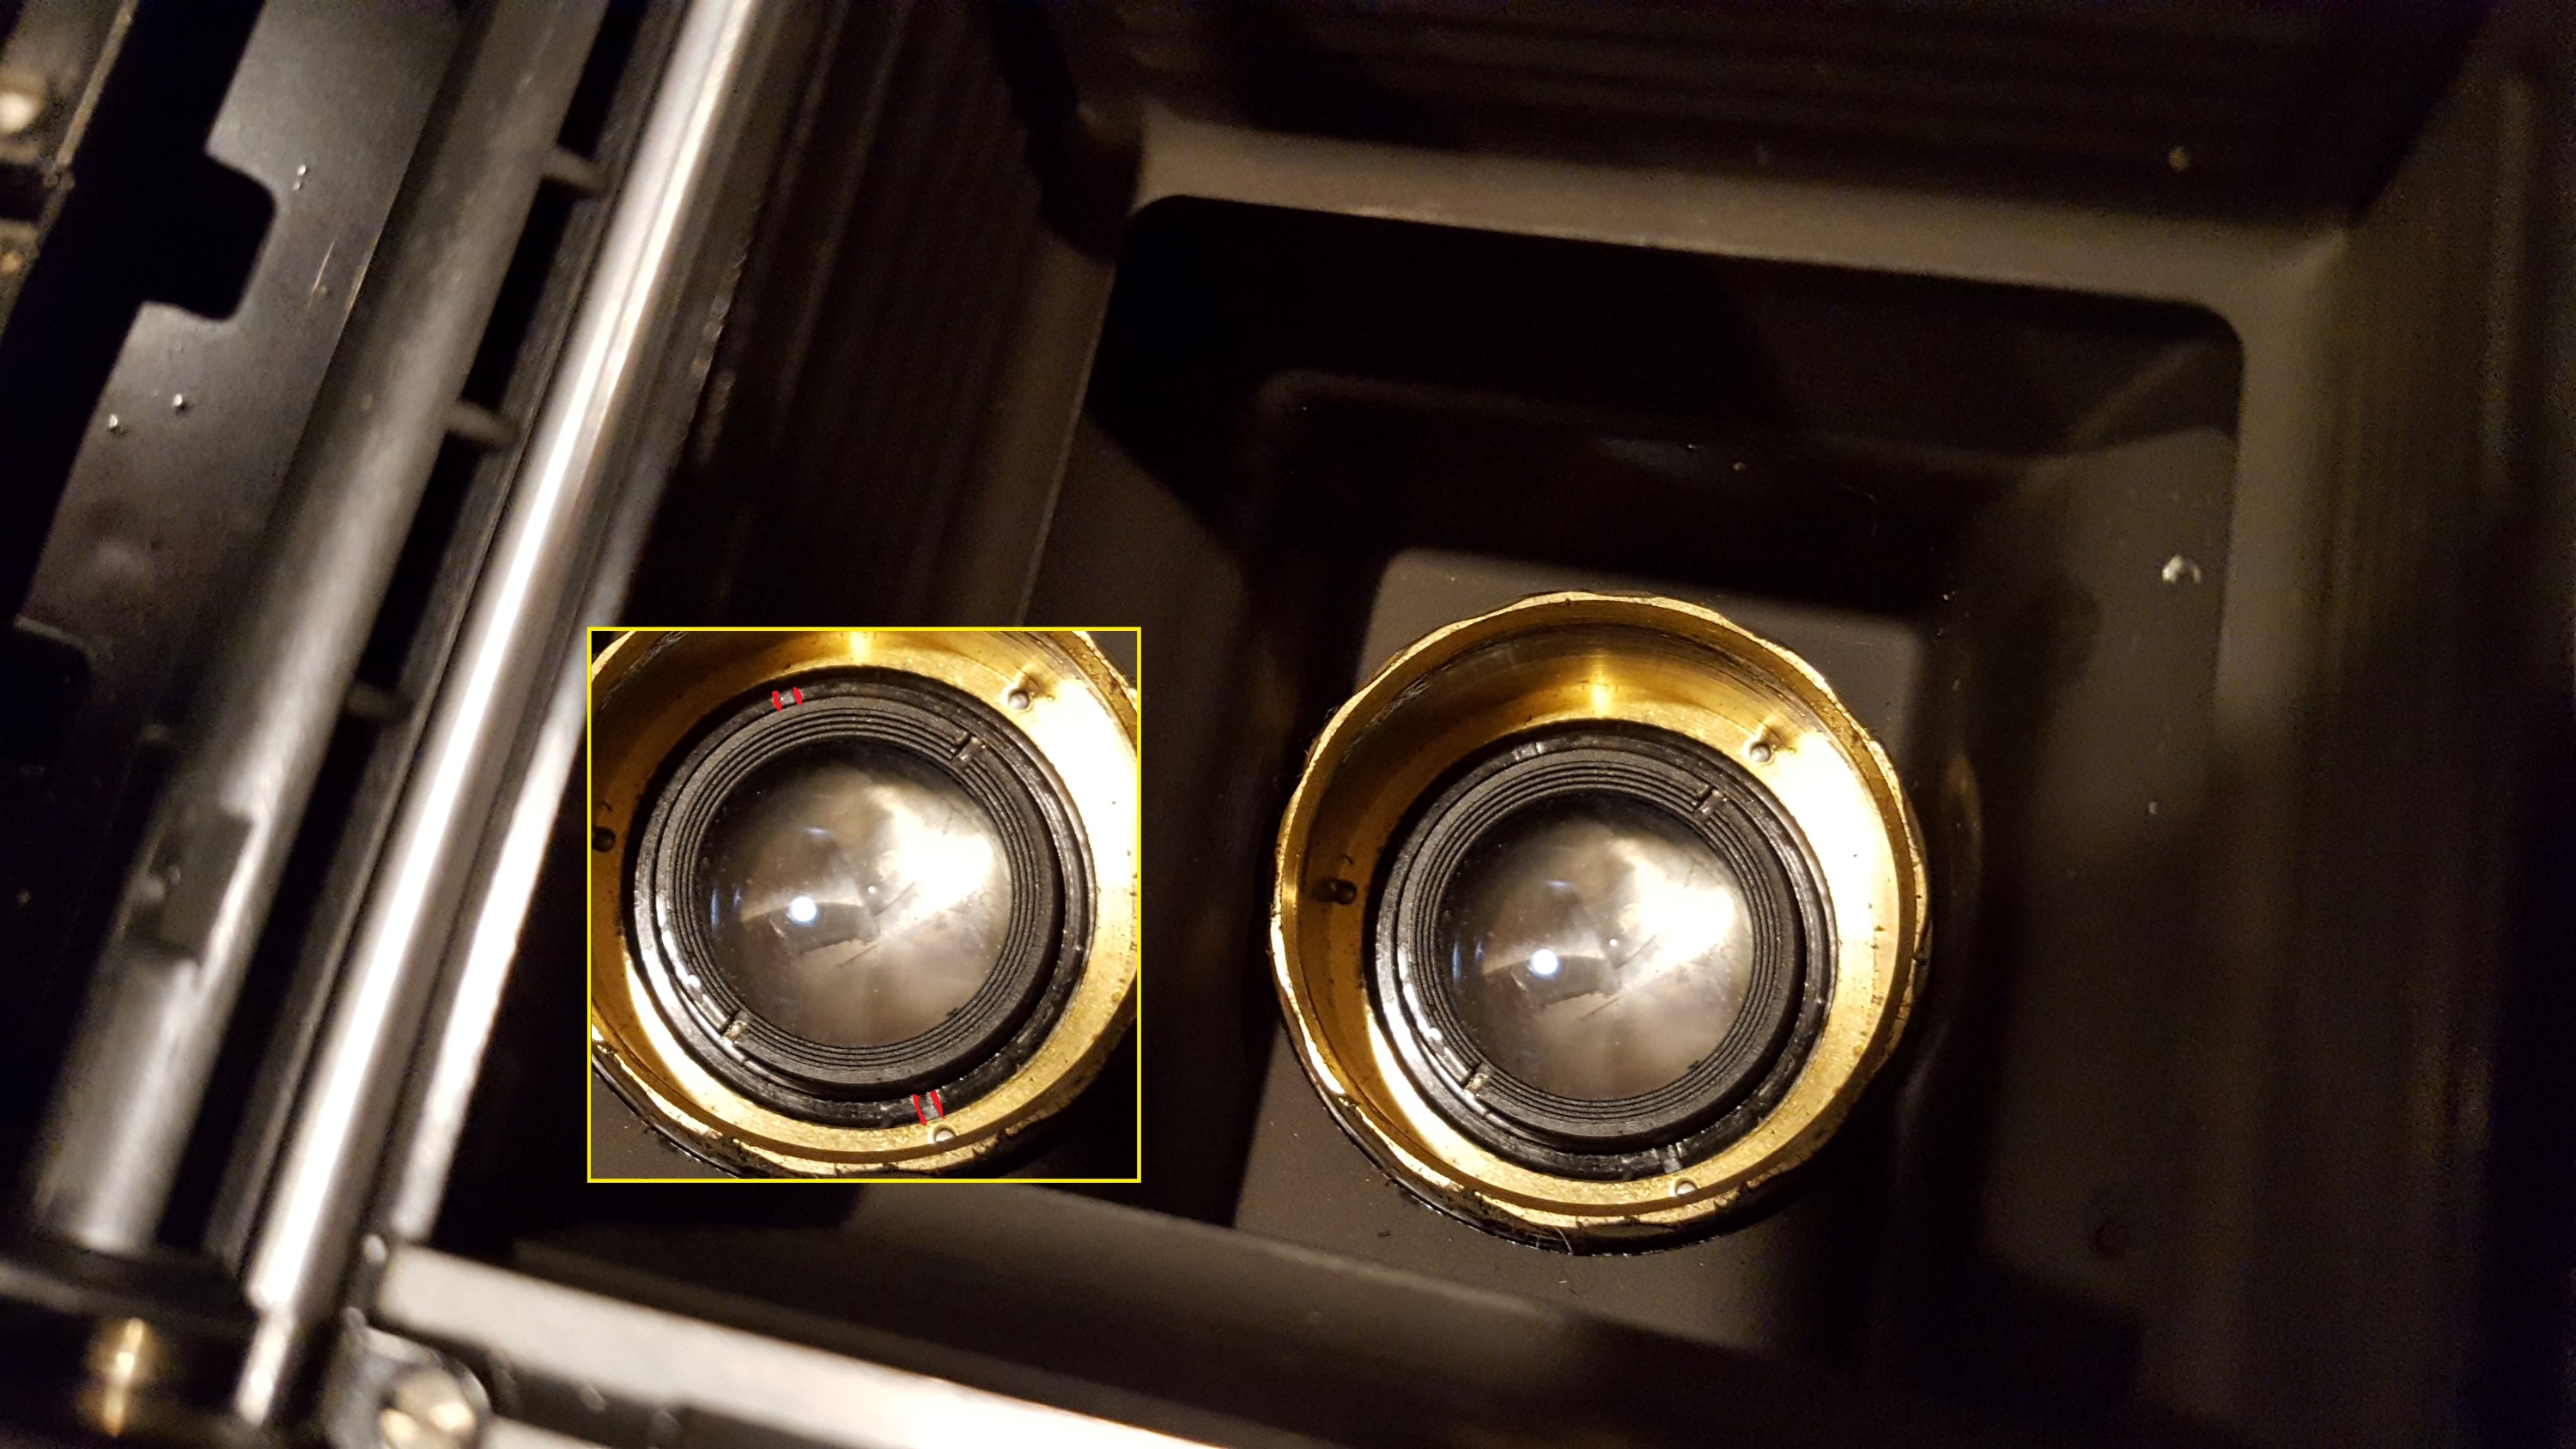
Step 5: With the shroud removed, you’ll need to remove the lock nut that is holding the shutter in place. In the image to the left, you’ll see both the rear lens element and an outer ring around it, which is the lock nut. Removing the rear lens element allows easier access to the lock nut, but has the side effect of exposing the leaf shutter to your tools. If you choose to do this, be very careful not to nick the shutter. If you can leave the rear element installed, try to get your lens spanner onto the notches for the lock ring. In the image to the left, the inset image has these notches highlighted in red. Always use a lens spanner when unscrewing any lens element on an Autocord. Never use a ring wrench which is commonly recommended for repairing cameras as it will damage the lens element and cause separation!
 Step 6: Go slow when removing the lock ring as it is the only thing holding the shutter in the camera. If you are not careful, the shutter can fall and become damaged, so use your hand to support the shutter from the front of the camera as you remove the lock ring.
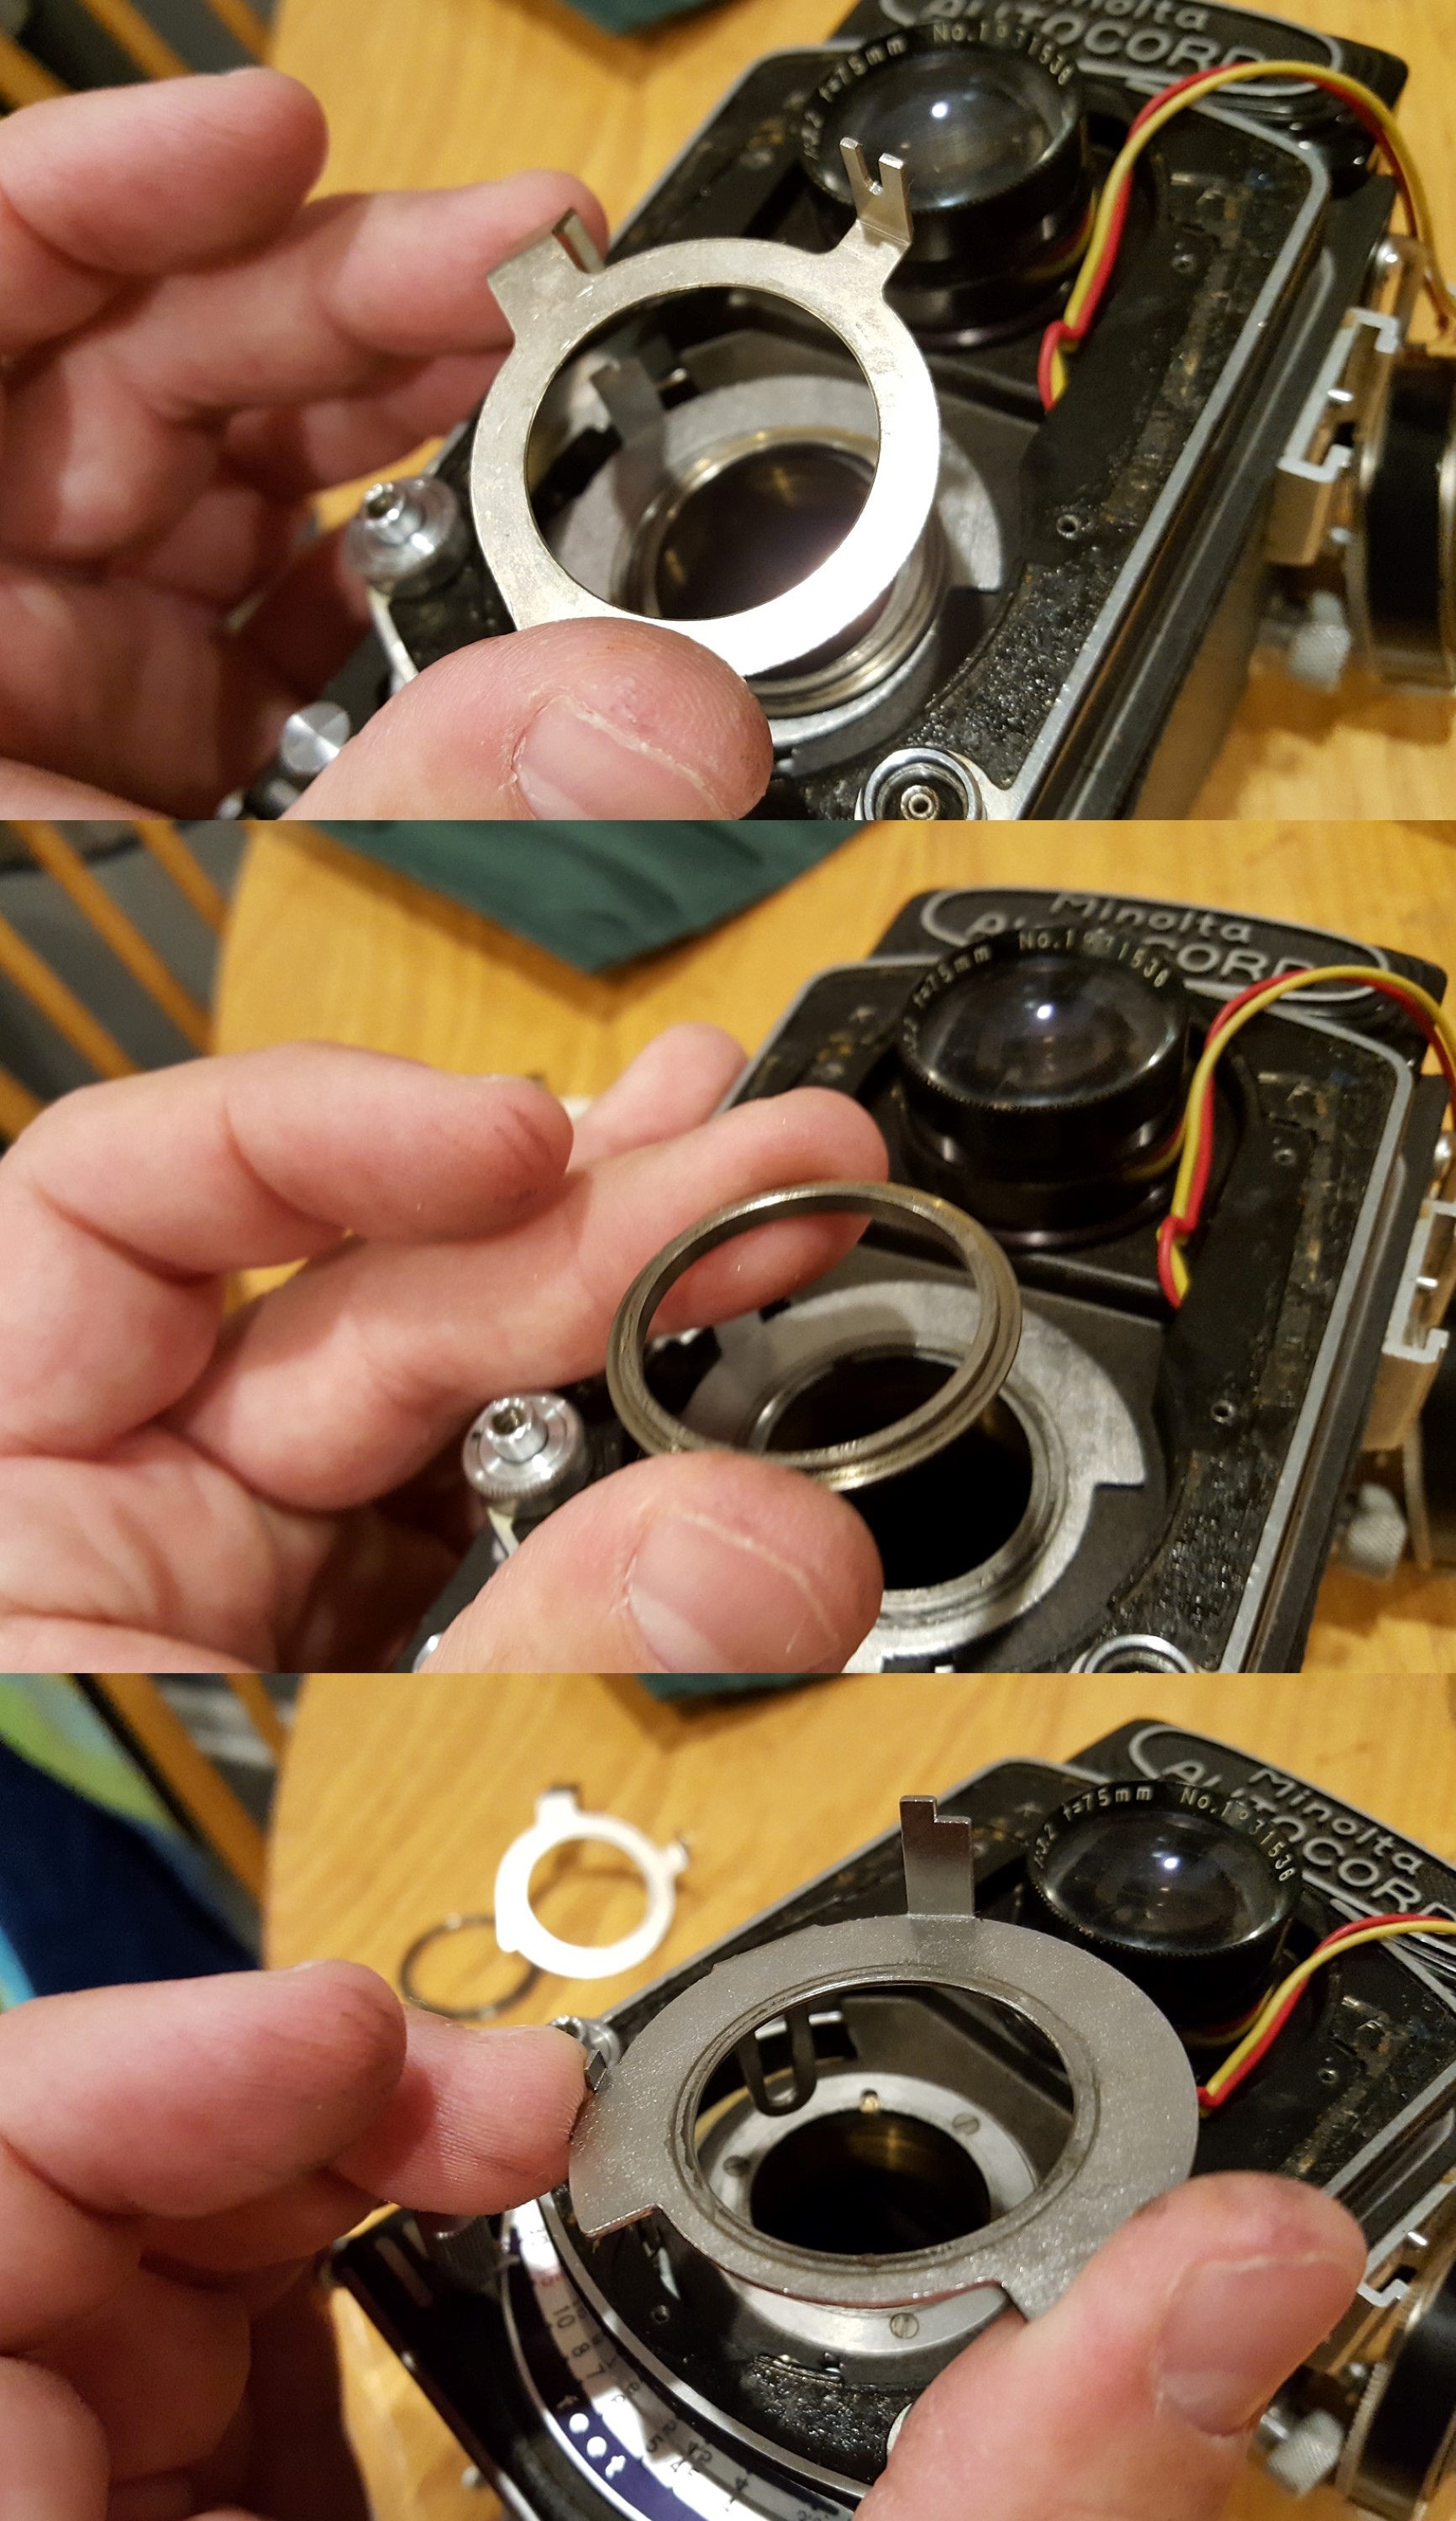
When the shutter is freed from the camera, there are 4 things behind it. The first is a very thin paper and metal spacer (not pictured) that is physically against the back of the shutter. The other three are all shown in the image to the right. Pay very close attention to the exact order and orientation of these three pieces as they all control various parts of the shutter and must be in the correct position when reinstalling the shutter into the camera.
There are also two wires connecting the shutter to the flash sync port. You do not need to disconnect these. They are long enough you can put the shutter off to the side while leaving them connected. If you do end up having to disconnect them, you’ll need to de-solder them and pay attention to the correct order of the wires as they cannot be reversed.
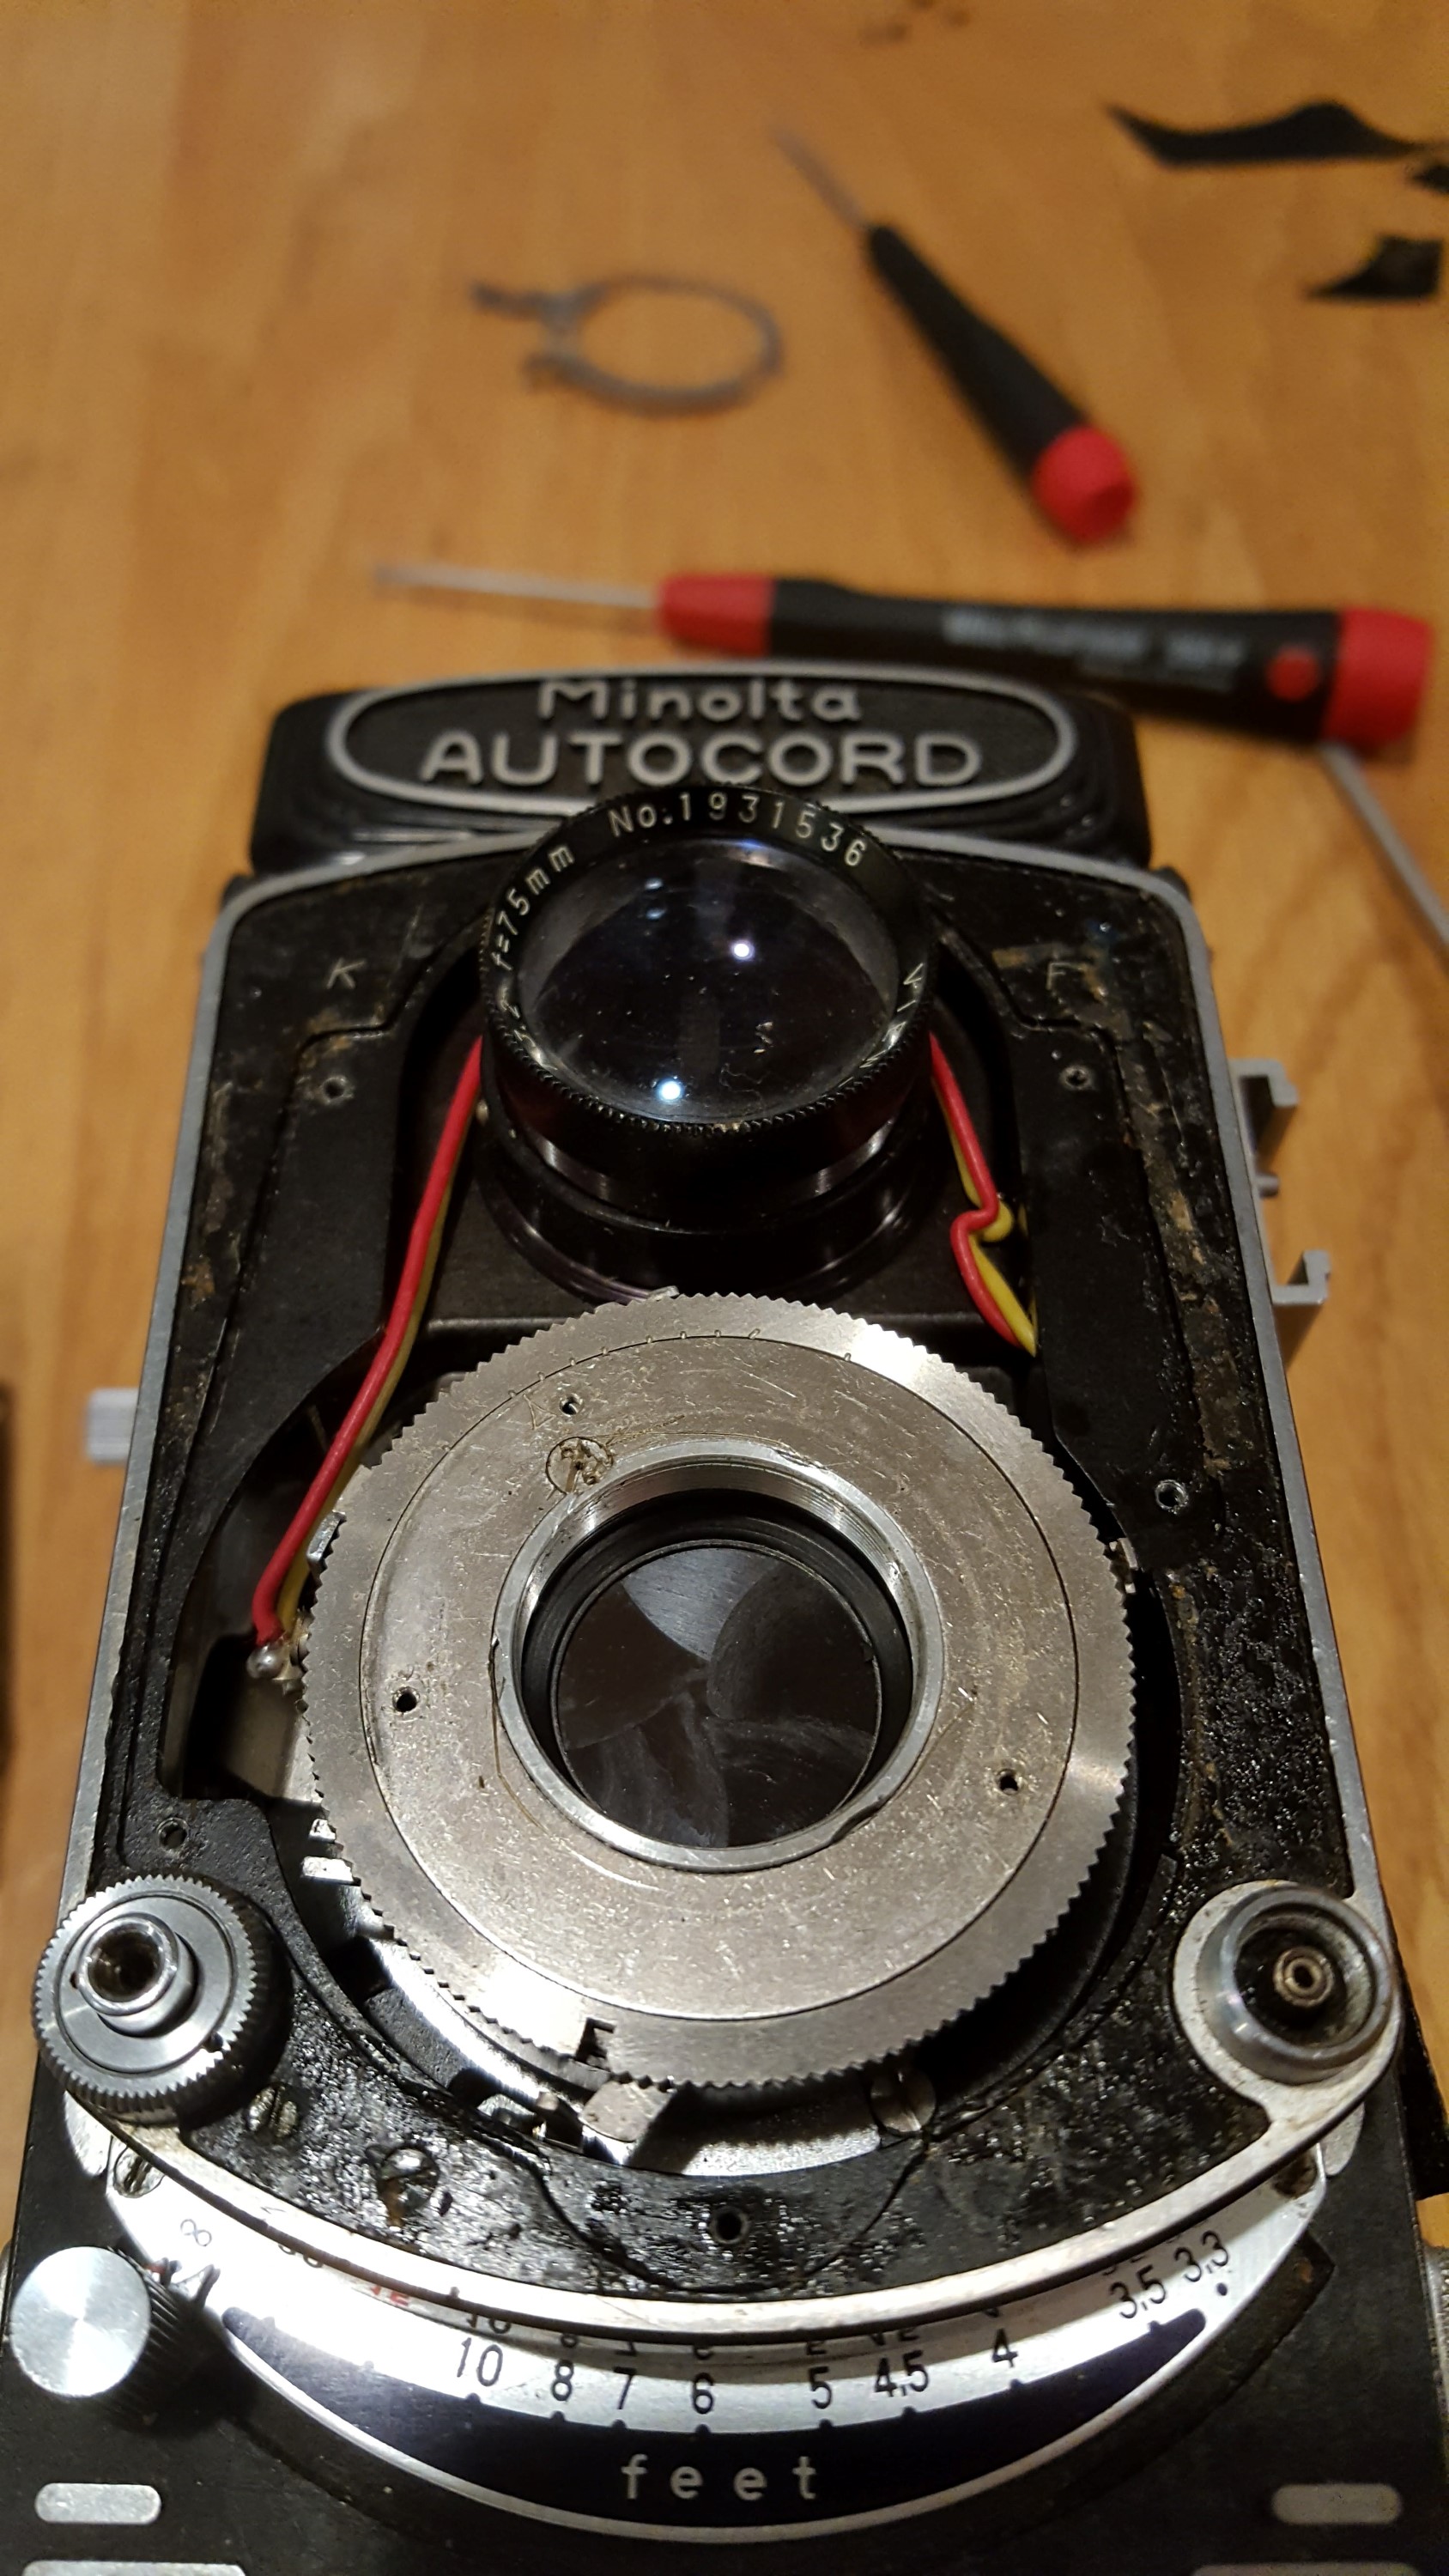
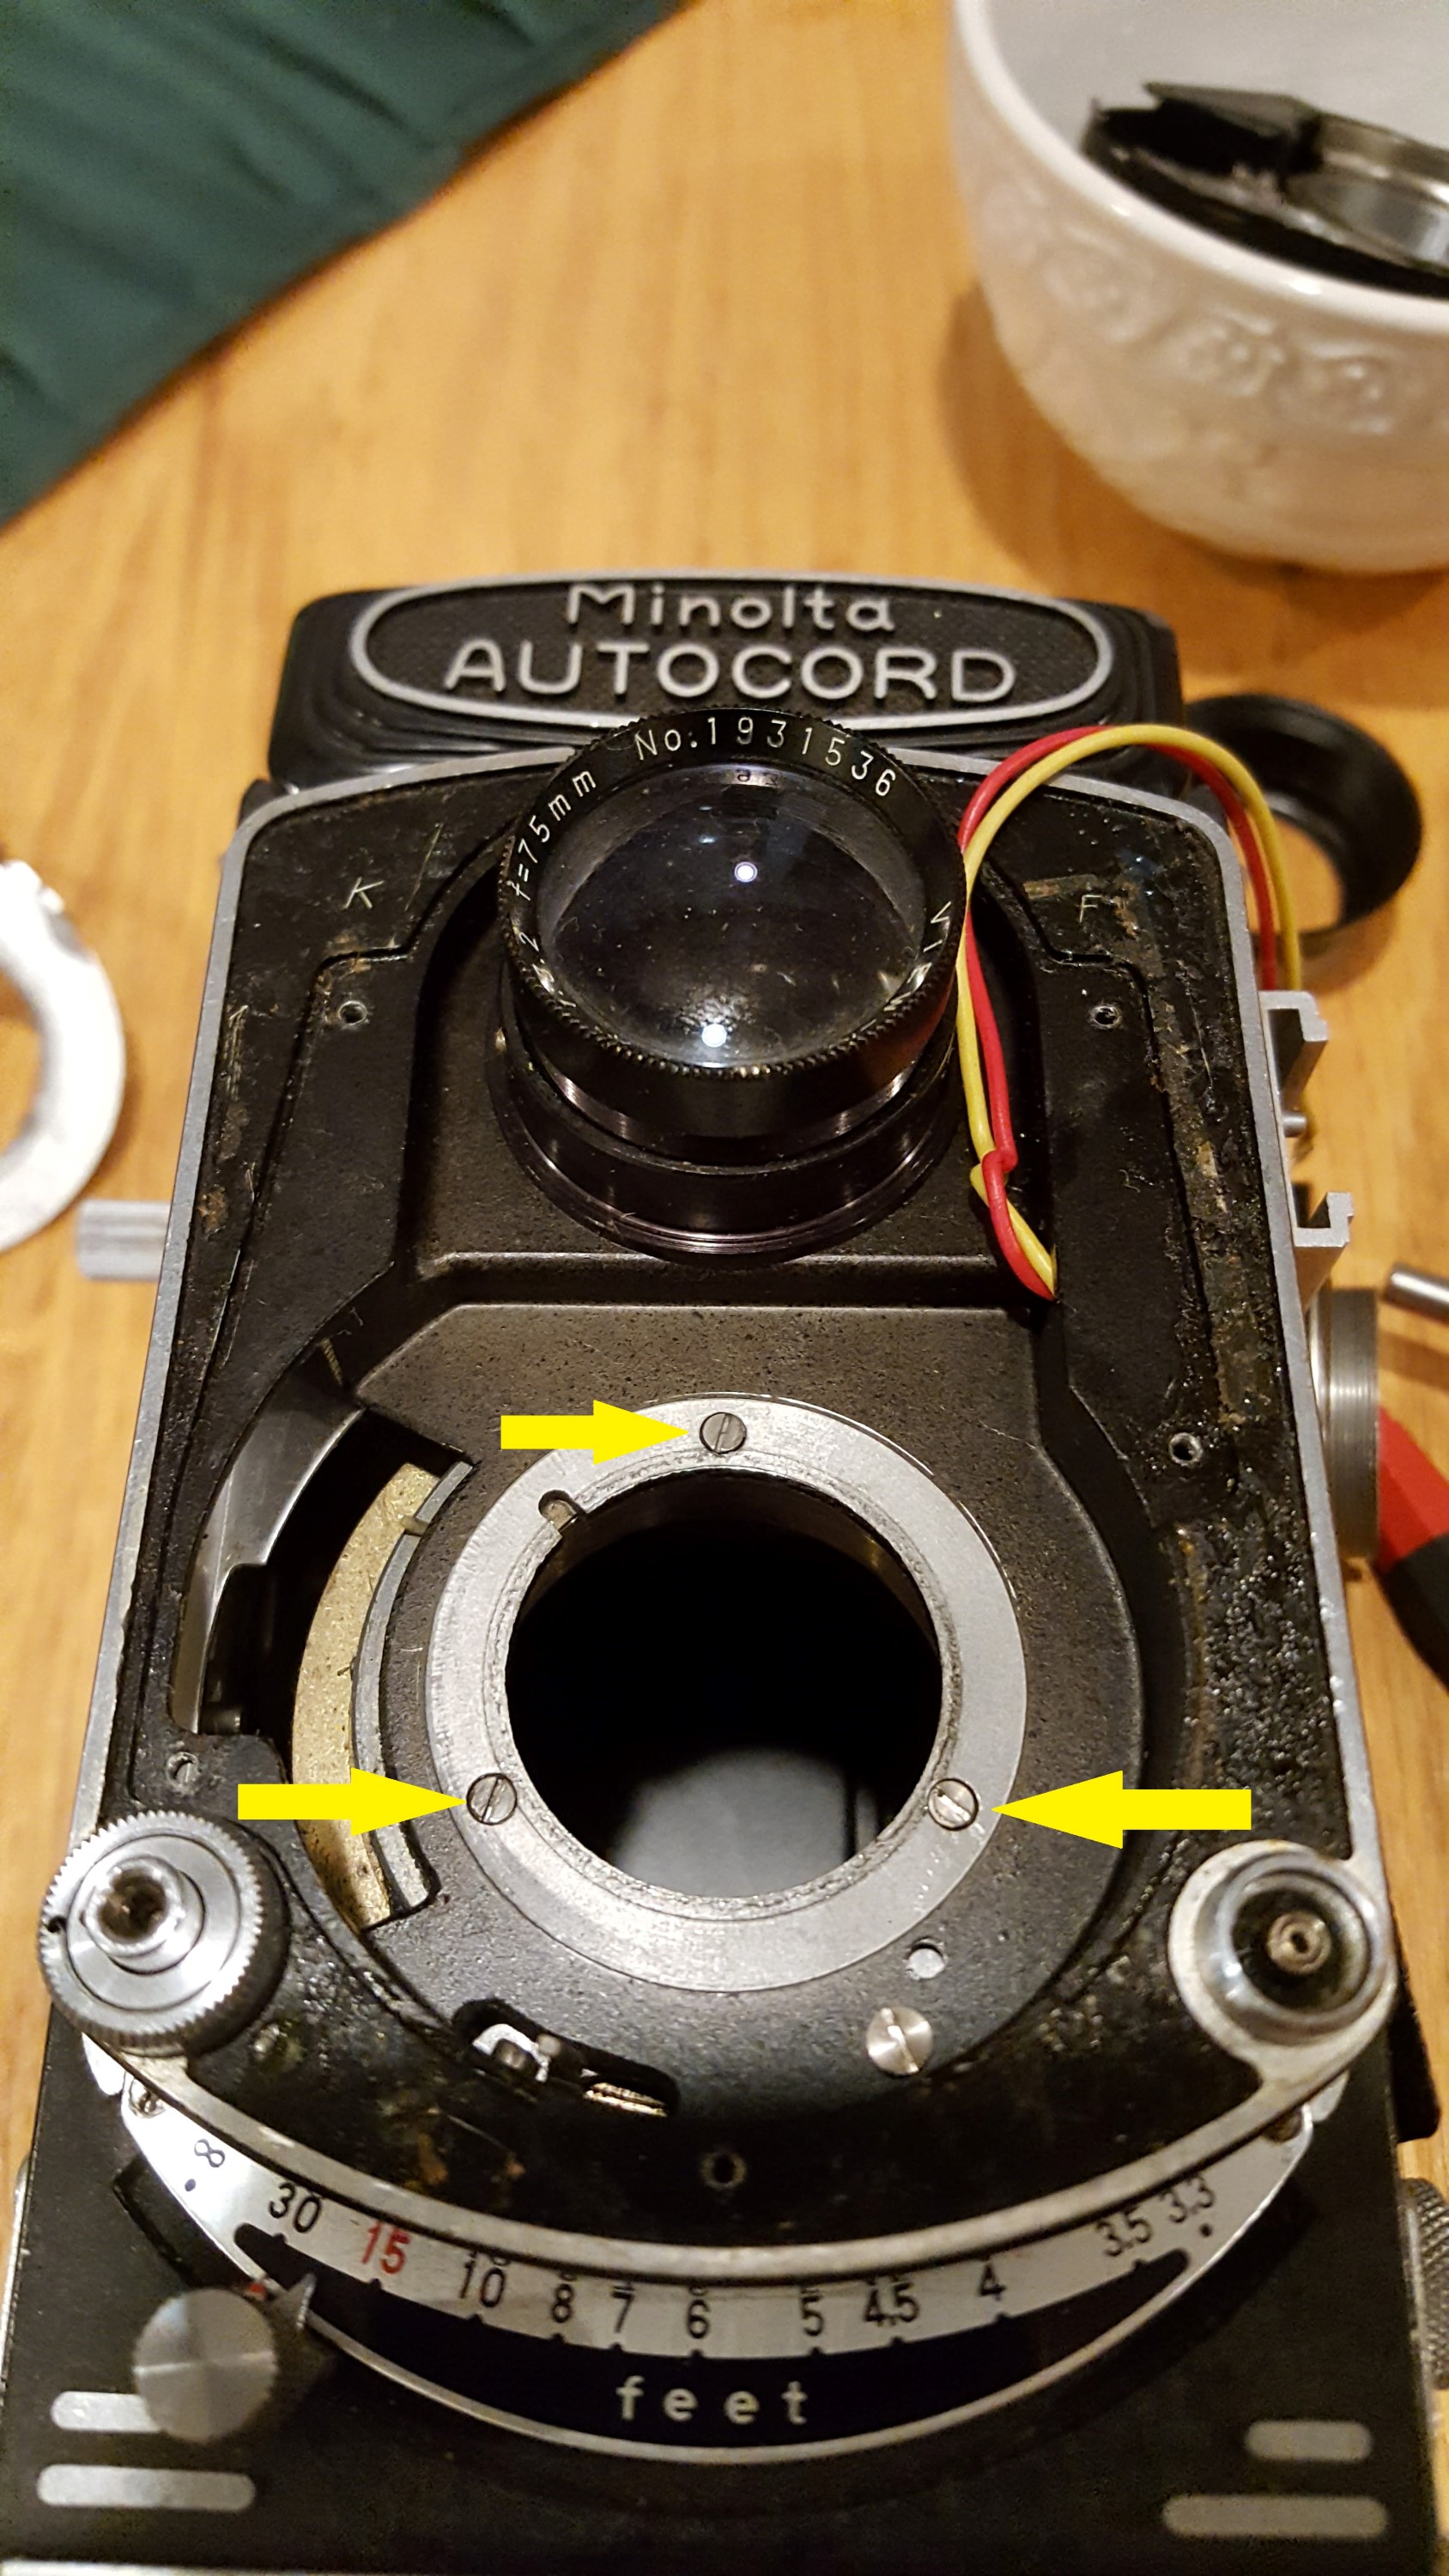 Step 7: With the shutter out of the camera, you will see three screws that were behind it. These three screws are what is holding the entire front of the camera to the helical.
On mine, these three screws were very loose which was causing the front of the camera to wobble around. If your camera has this same problem, you’ll need to tighten these to resolve your issue. You’ll also want to use some Loc-Tite or nail polish to prevent them from backing out again. If the focus on your camera is very difficult to move (highly likely), then you’ll need to clean and lube the helical, which requires you to remove these three screws.
WARNING: Before removing these three screws you MUST set the camera to infinity. Failing to do so could cause you to reassemble the camera incorrectly, throwing off the focus of your camera. Once the camera is at infinity, you can remove these three screws and set the entire front plate aside. The two flash sync wires will go with this panel, so you can put it and the shutter somewhere safe.
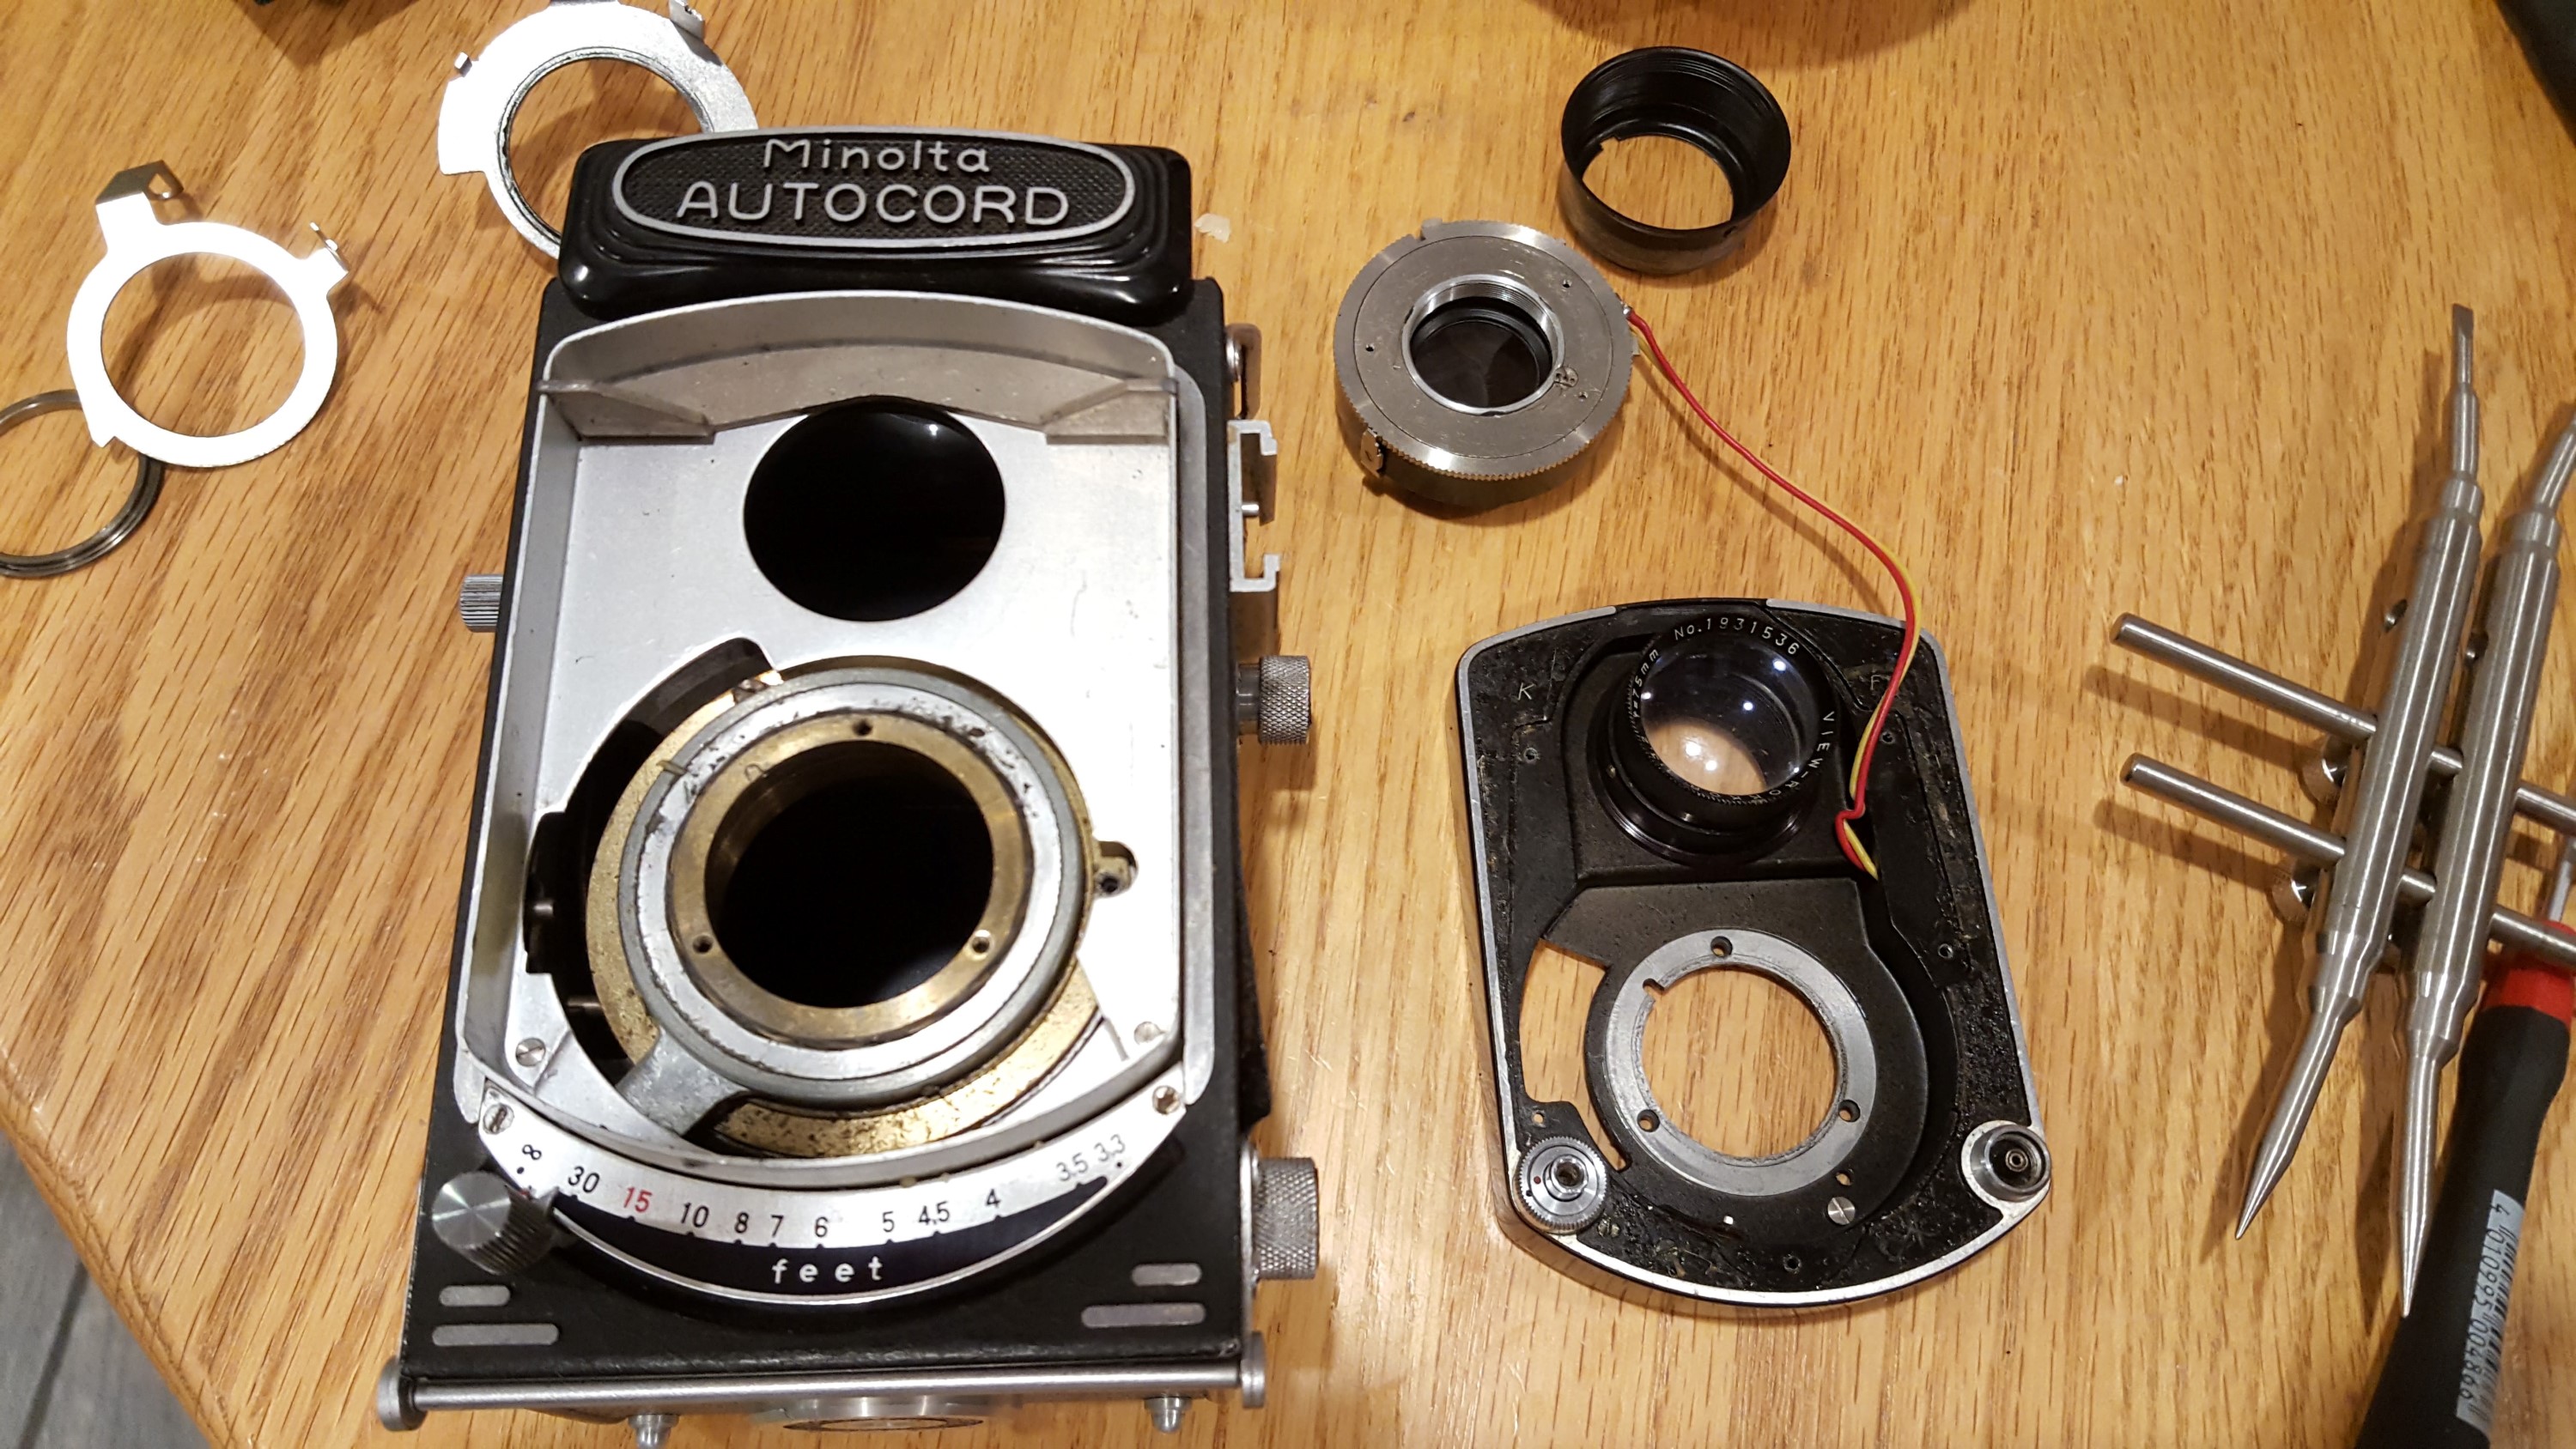
Step 8: Your camera should look like the image to the right. Notice the shutter is still connected to the front plate via the sync wire. Also, above the shutter is the shroud you removed earlier in step 4. You’ll probably find a lot of debris and gunk inside of the camera here, so this is a good time to clean it.
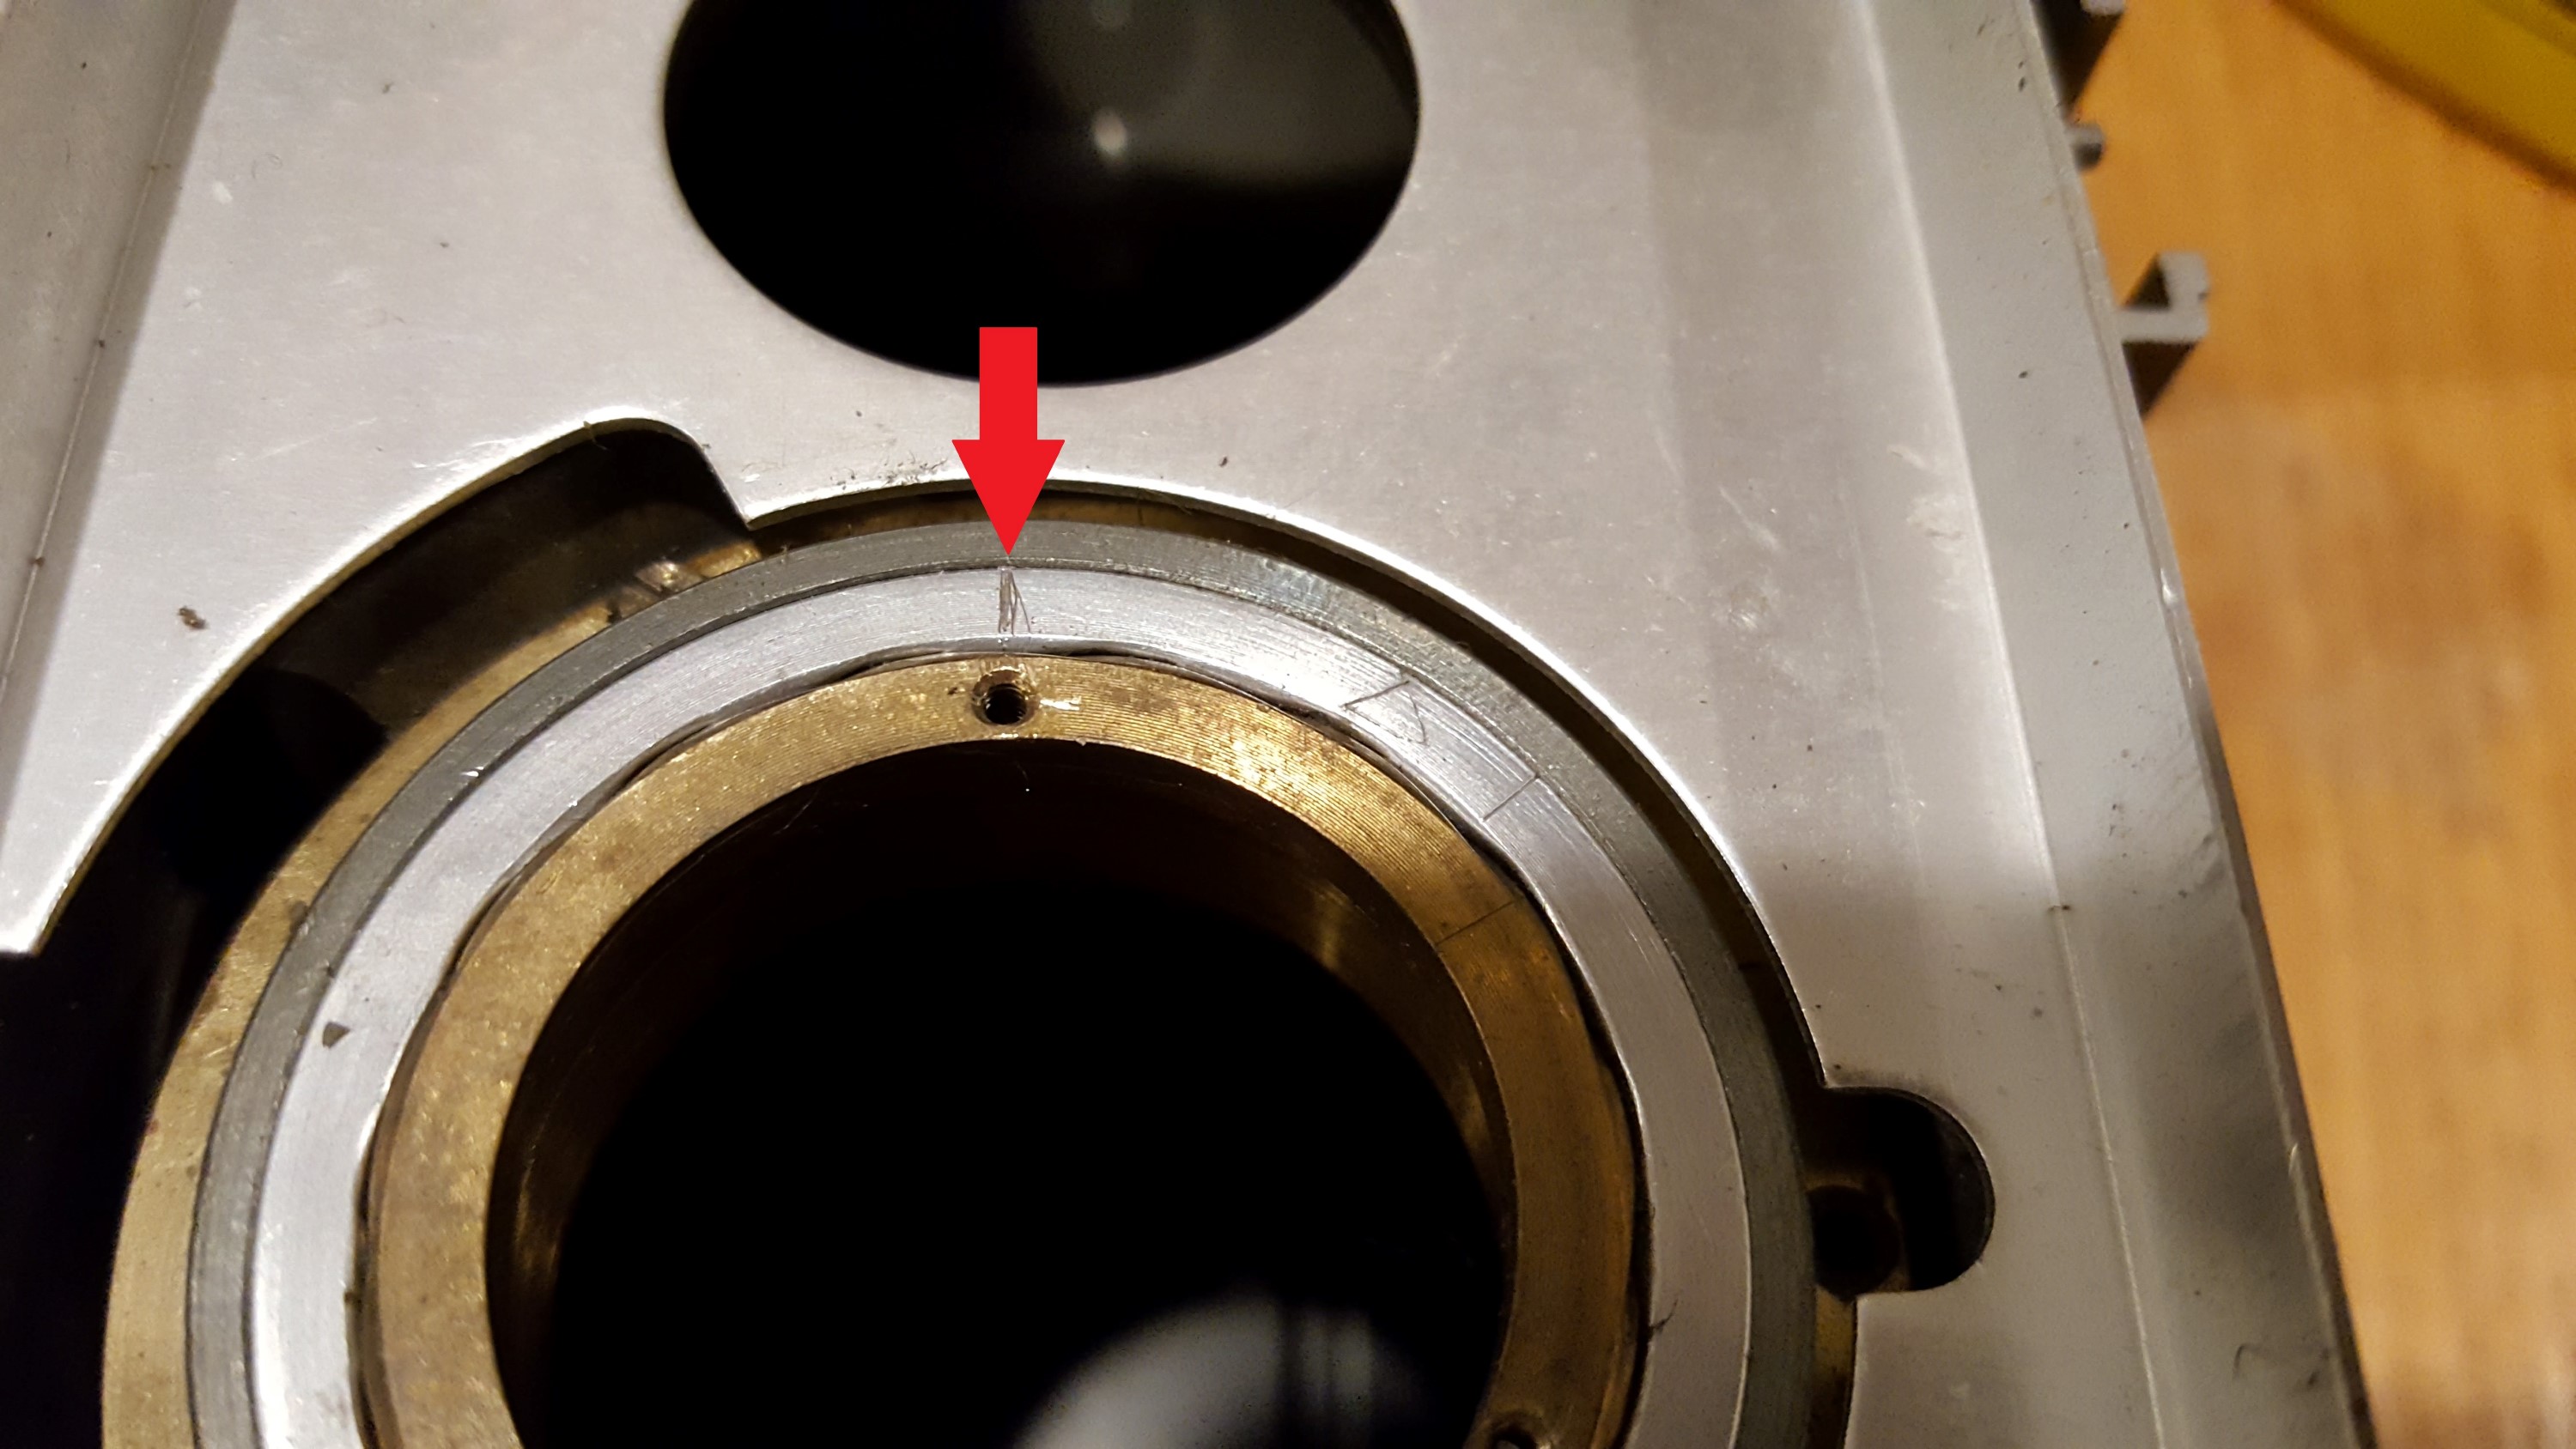 Step 9: The next step is to remove and clean the helical. The helical is a round piece of brass with what look like screw threads on both sides of it. The orientation of the helical is very important for accurate focus. Assuming you remembered to set the camera to infinity focus in Step 8, you’ll need to make a mark on the helical that you can use as a guide when you put it back into the camera. You can either use a black marker, or use your screwdriver to scratch a mark in it. I aligned my mark with the top screw hole for reference, but you can put the mark anywhere. You should also take note of the height of the helical compared to the metal around it. The helical should be slightly above the surface of the metal surrounding it. It will not be flush. If when reinstalling the helical the height changes when your marks are lined up, your camera will not focus correctly. See the image in Step 11 below for the correct height.
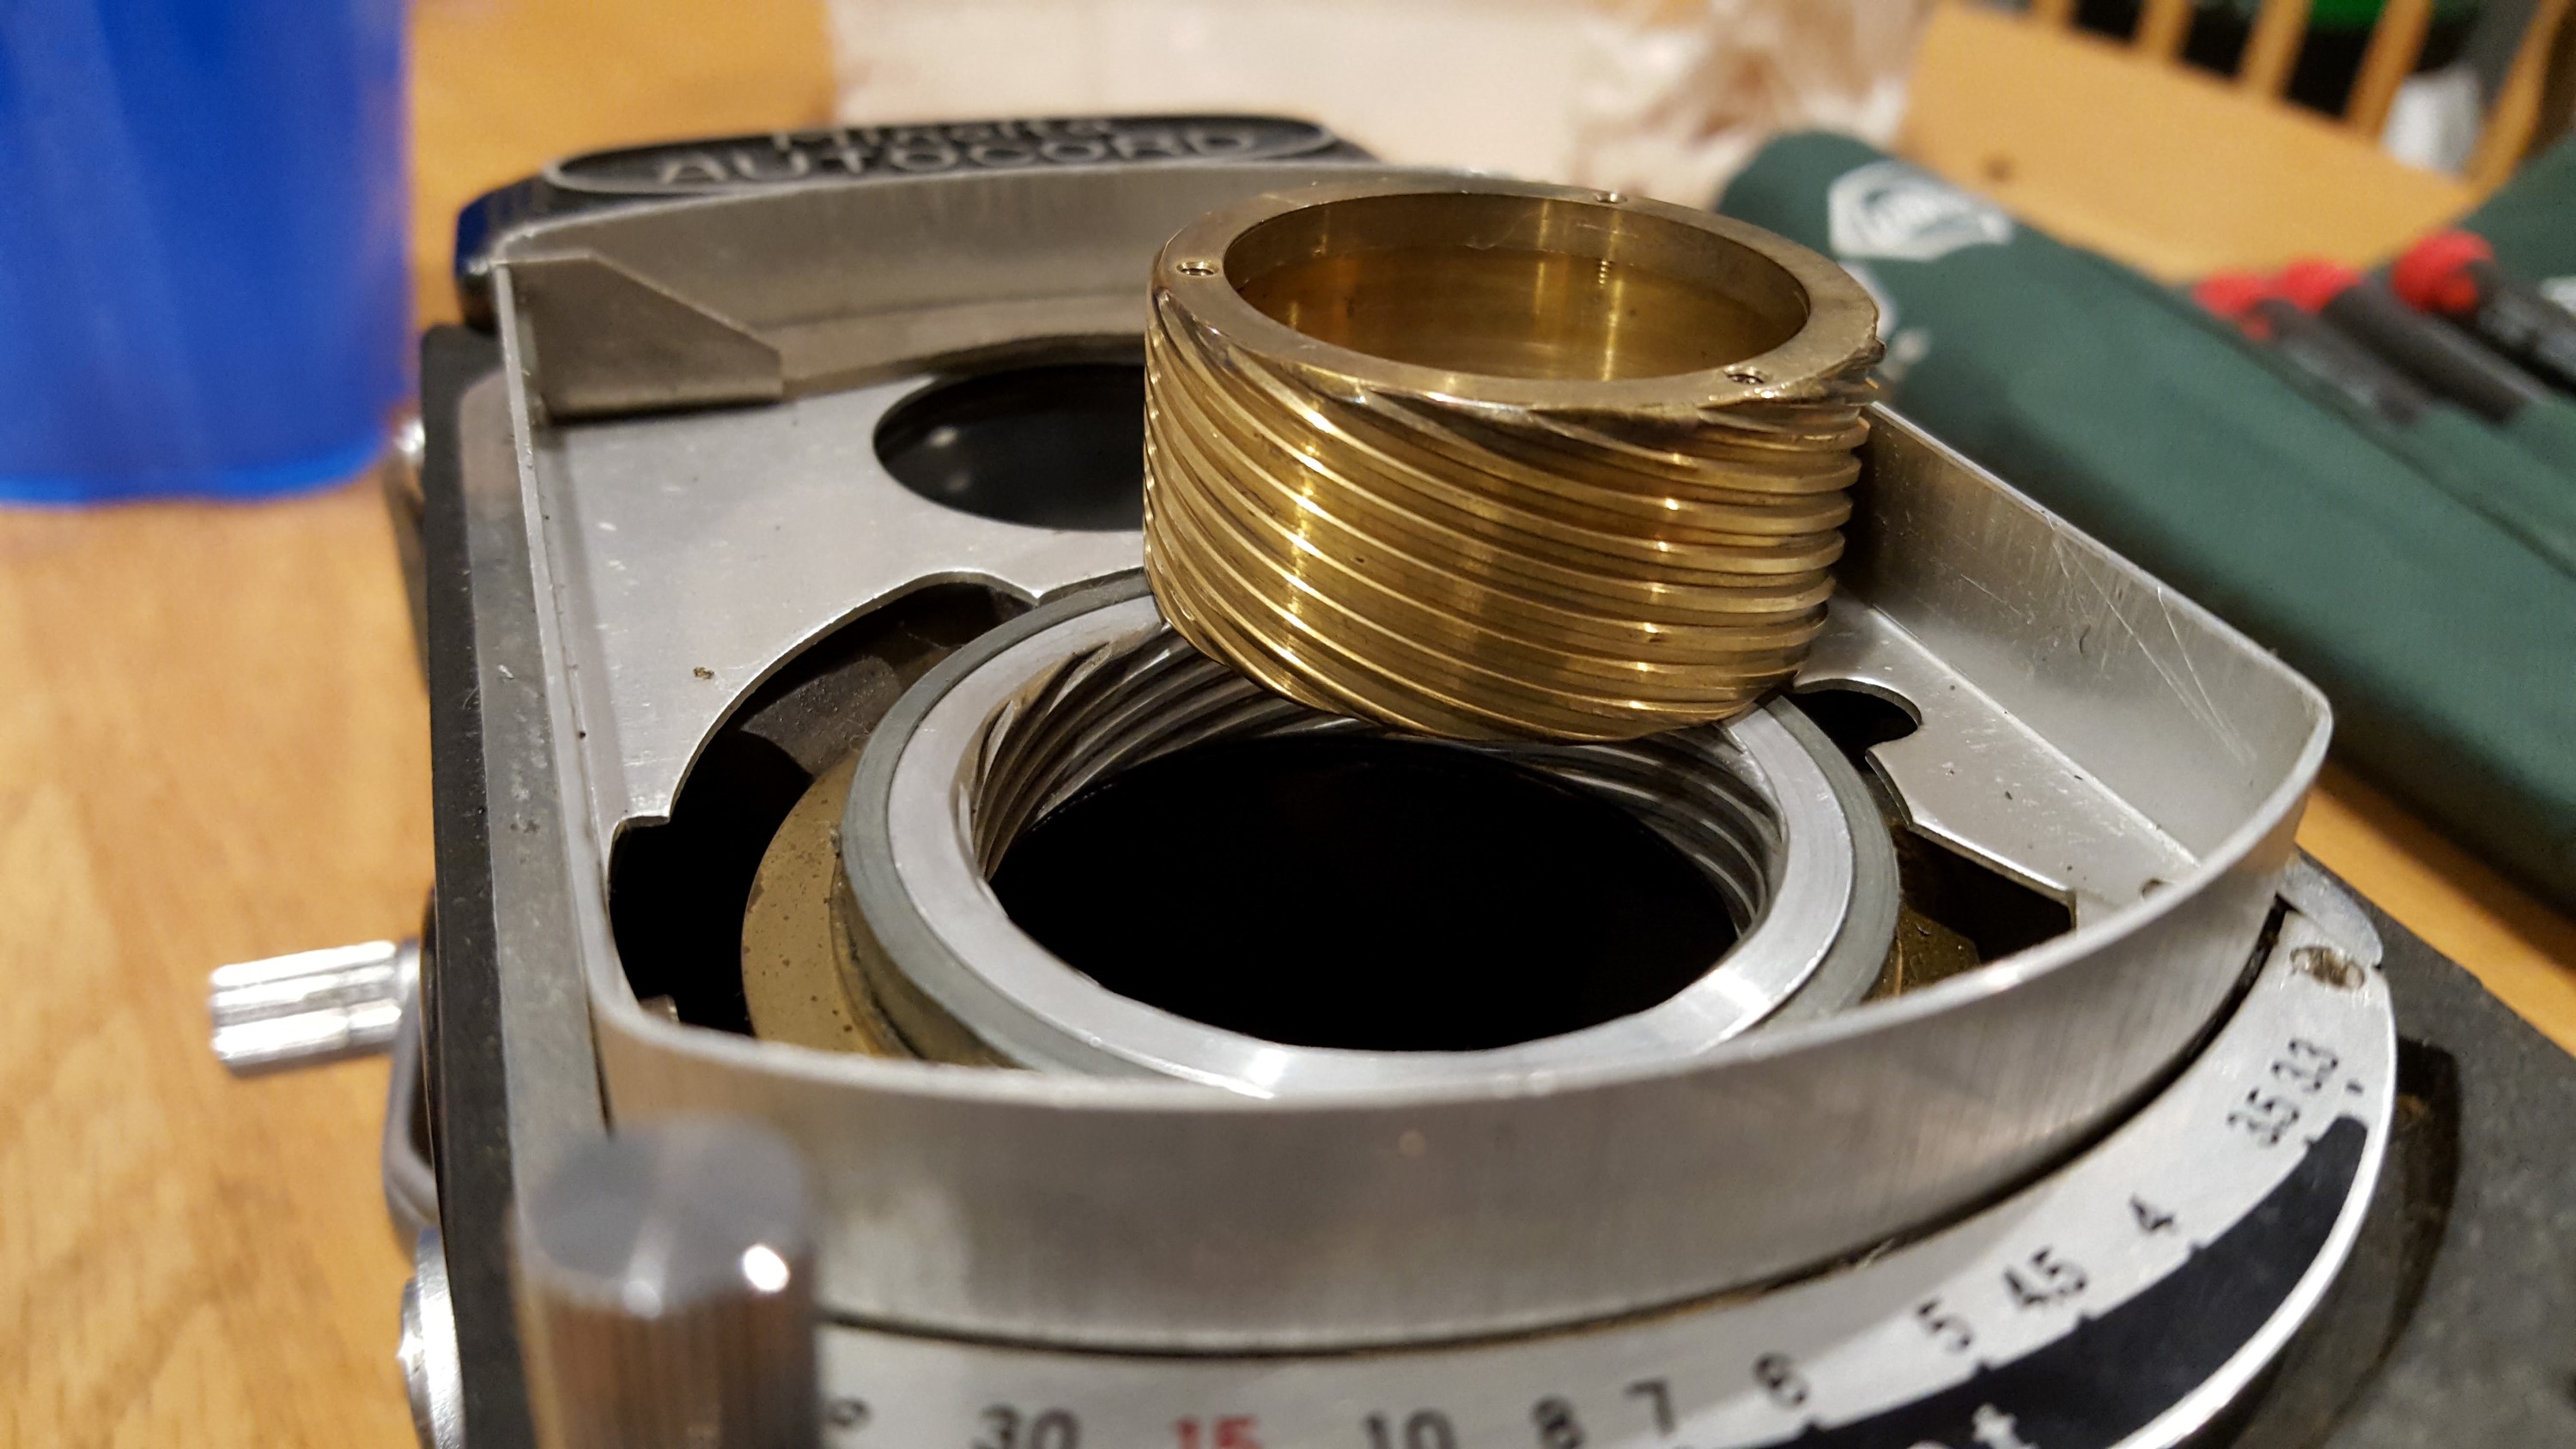 Step 10: The helical will unscrew out of the camera by hand. No special tools are required. You’ll probably notice a lot of black or green goo on the threads of the helical. Use some naphtha oil to completely wash away the old grease. I soaked the helical in a small Pyrex dish and used many Q-tips to clean out all of the threads. The image to the right shows the helical after I cleaned it.
You’ll want to put some type of lubricant on the threads before putting the helical back into the camera. I don’t show this, but a couple very small dabs of molybdenum based grease is what I used. Whatever you do, do not use any kind of silicon grease, machine oil, or WD-40 as it can spread into unintended areas of the camera.
I cannot stress how little you need to use. Once you have the helical back in the camera, move it in and out several times to work in the grease. If you see it oozing out anywhere, wipe the excess away with a paper towel. Once the helical is properly lubricated, make sure that it goes back into the camera exactly how it was before you removed it. Make sure your mark still lines up and the height of the helical is exactly how it was before.
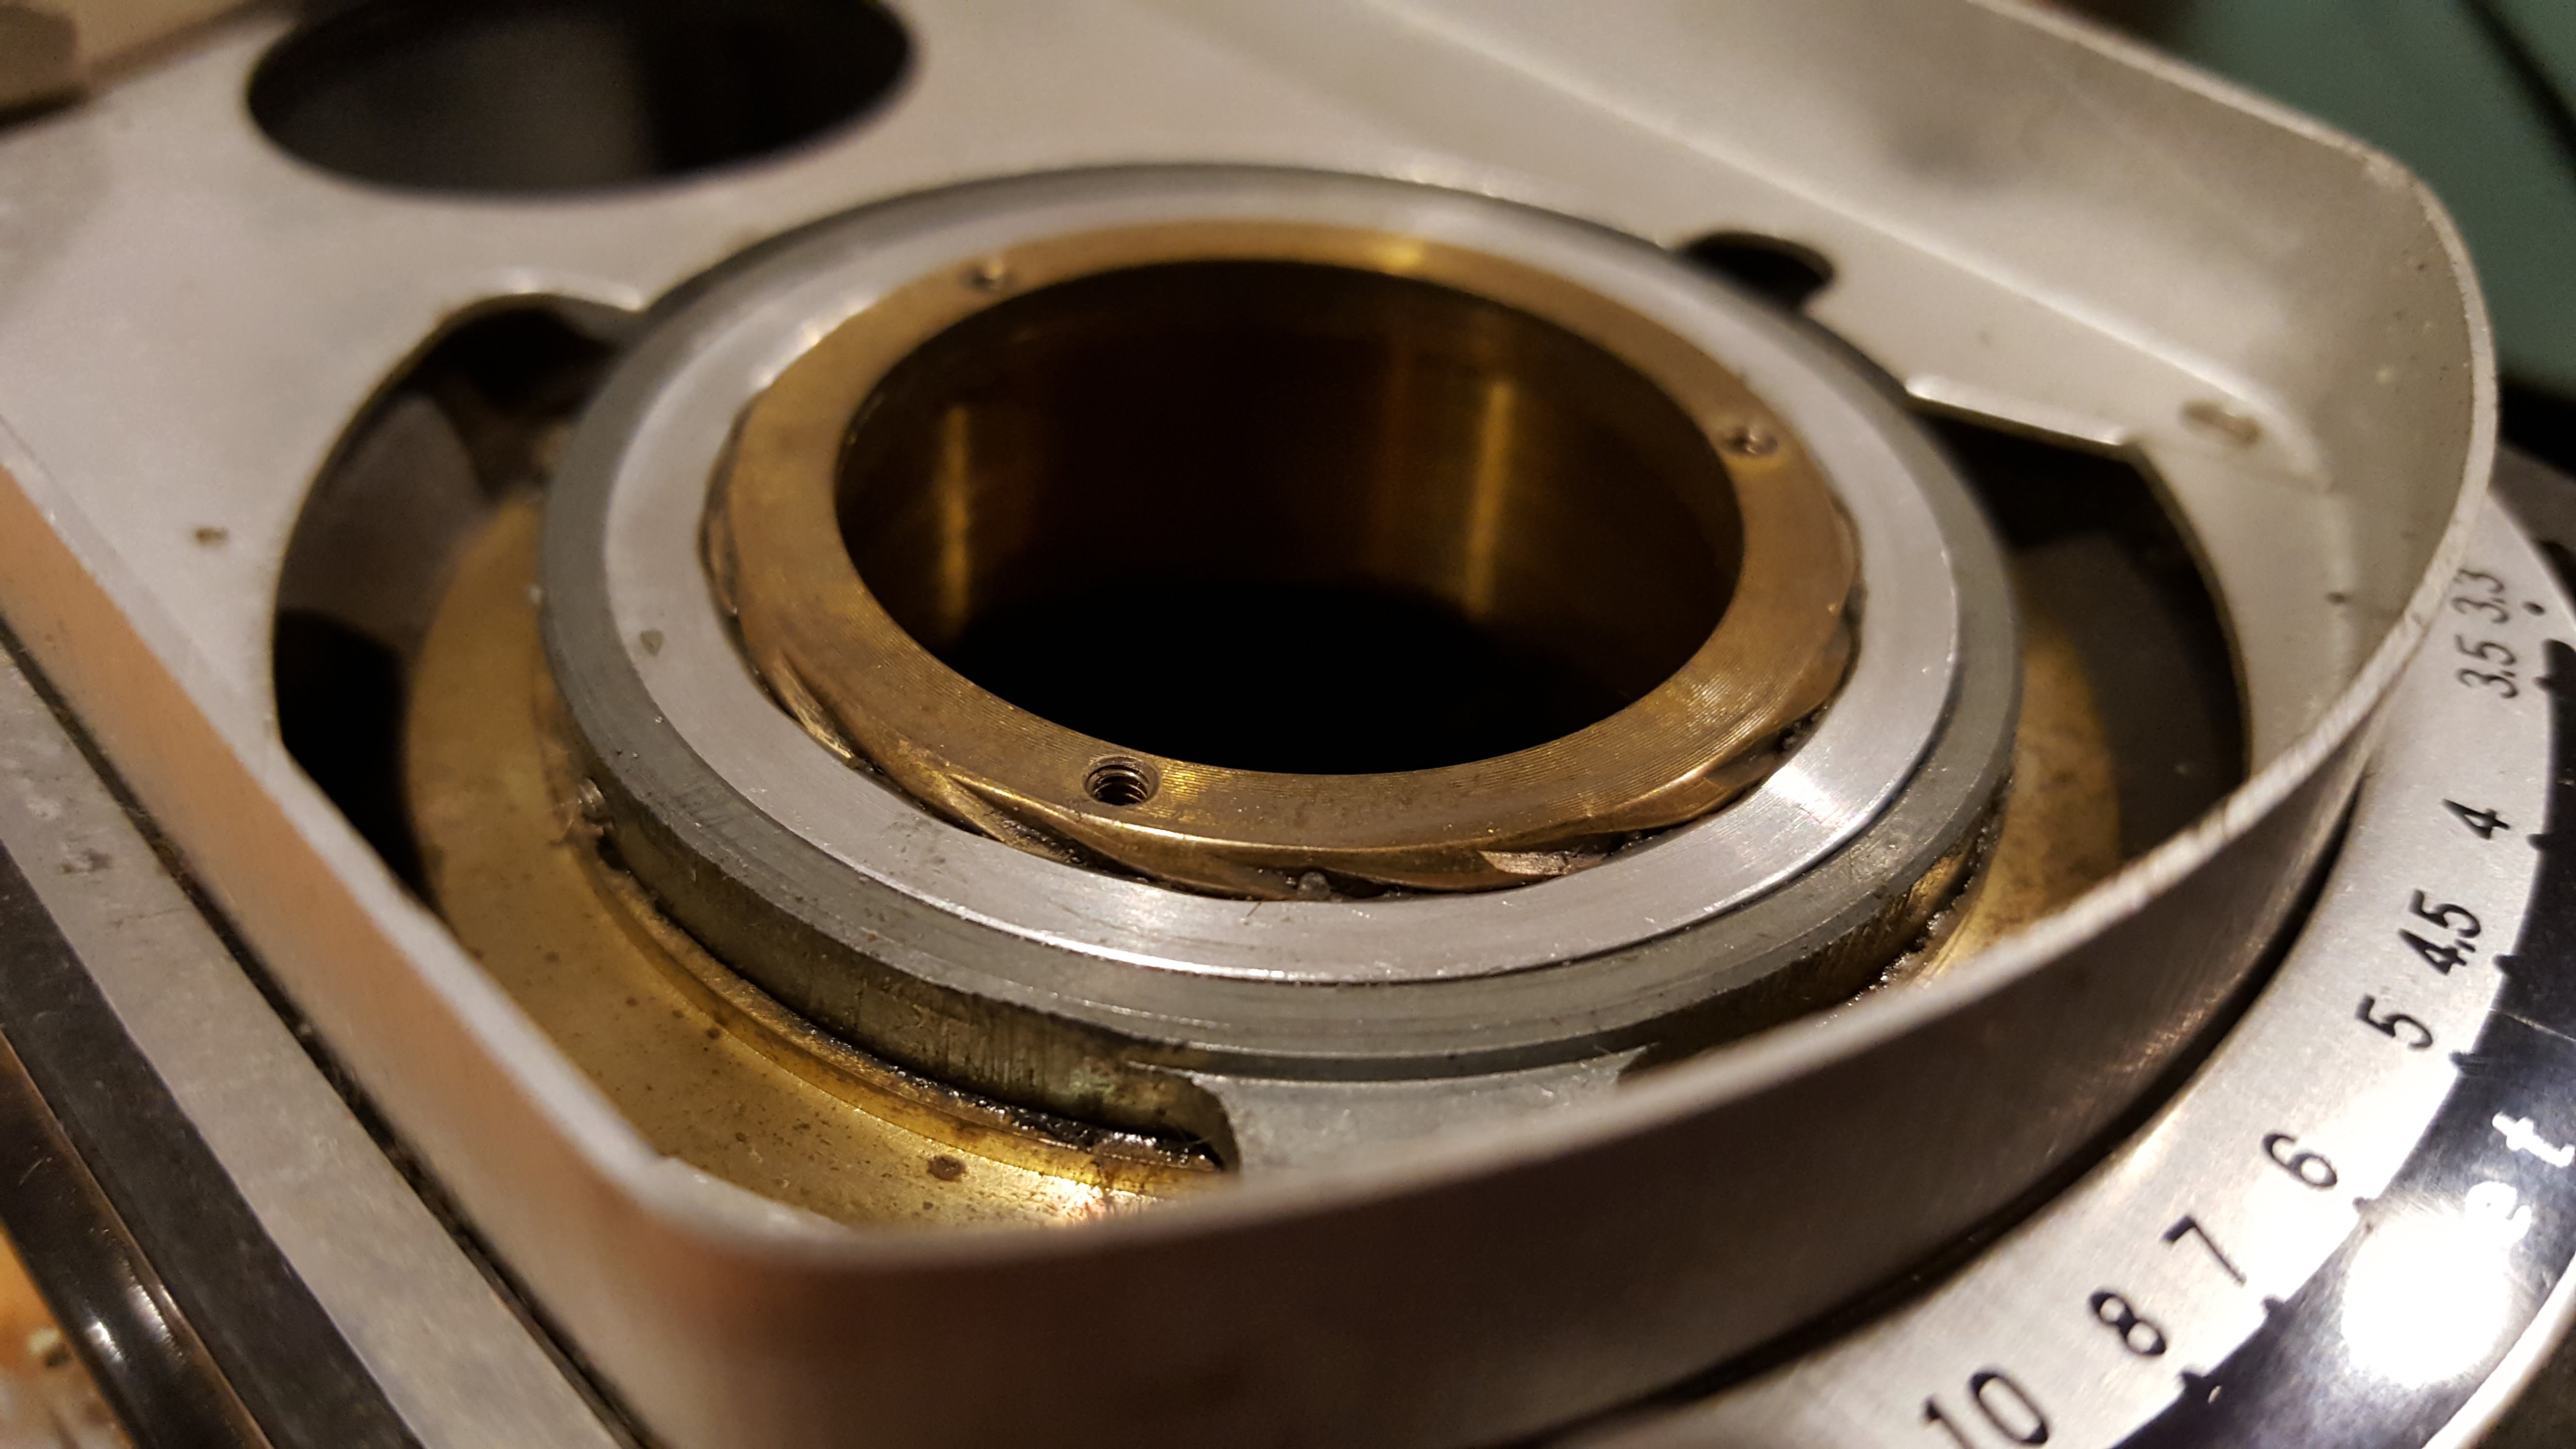 Step 11: This is about as far as you’ll want to go for most simple repairs. To put the camera back together, you pretty much reverse each of the previous 10 steps. Make sure you get the helical back in the camera so your marks line up and the height of the helical is how it was before you started. The image to the left shows the correct height of the helical when it is in the correct position. When attaching the shutter, make sure each of the rings from step 6 go back in the same order they came out. It is a good idea after each step to check for proper operation of the camera before going too far. Once the camera is back together, keep checking everything and if something seems off, undo and redo the previous step.
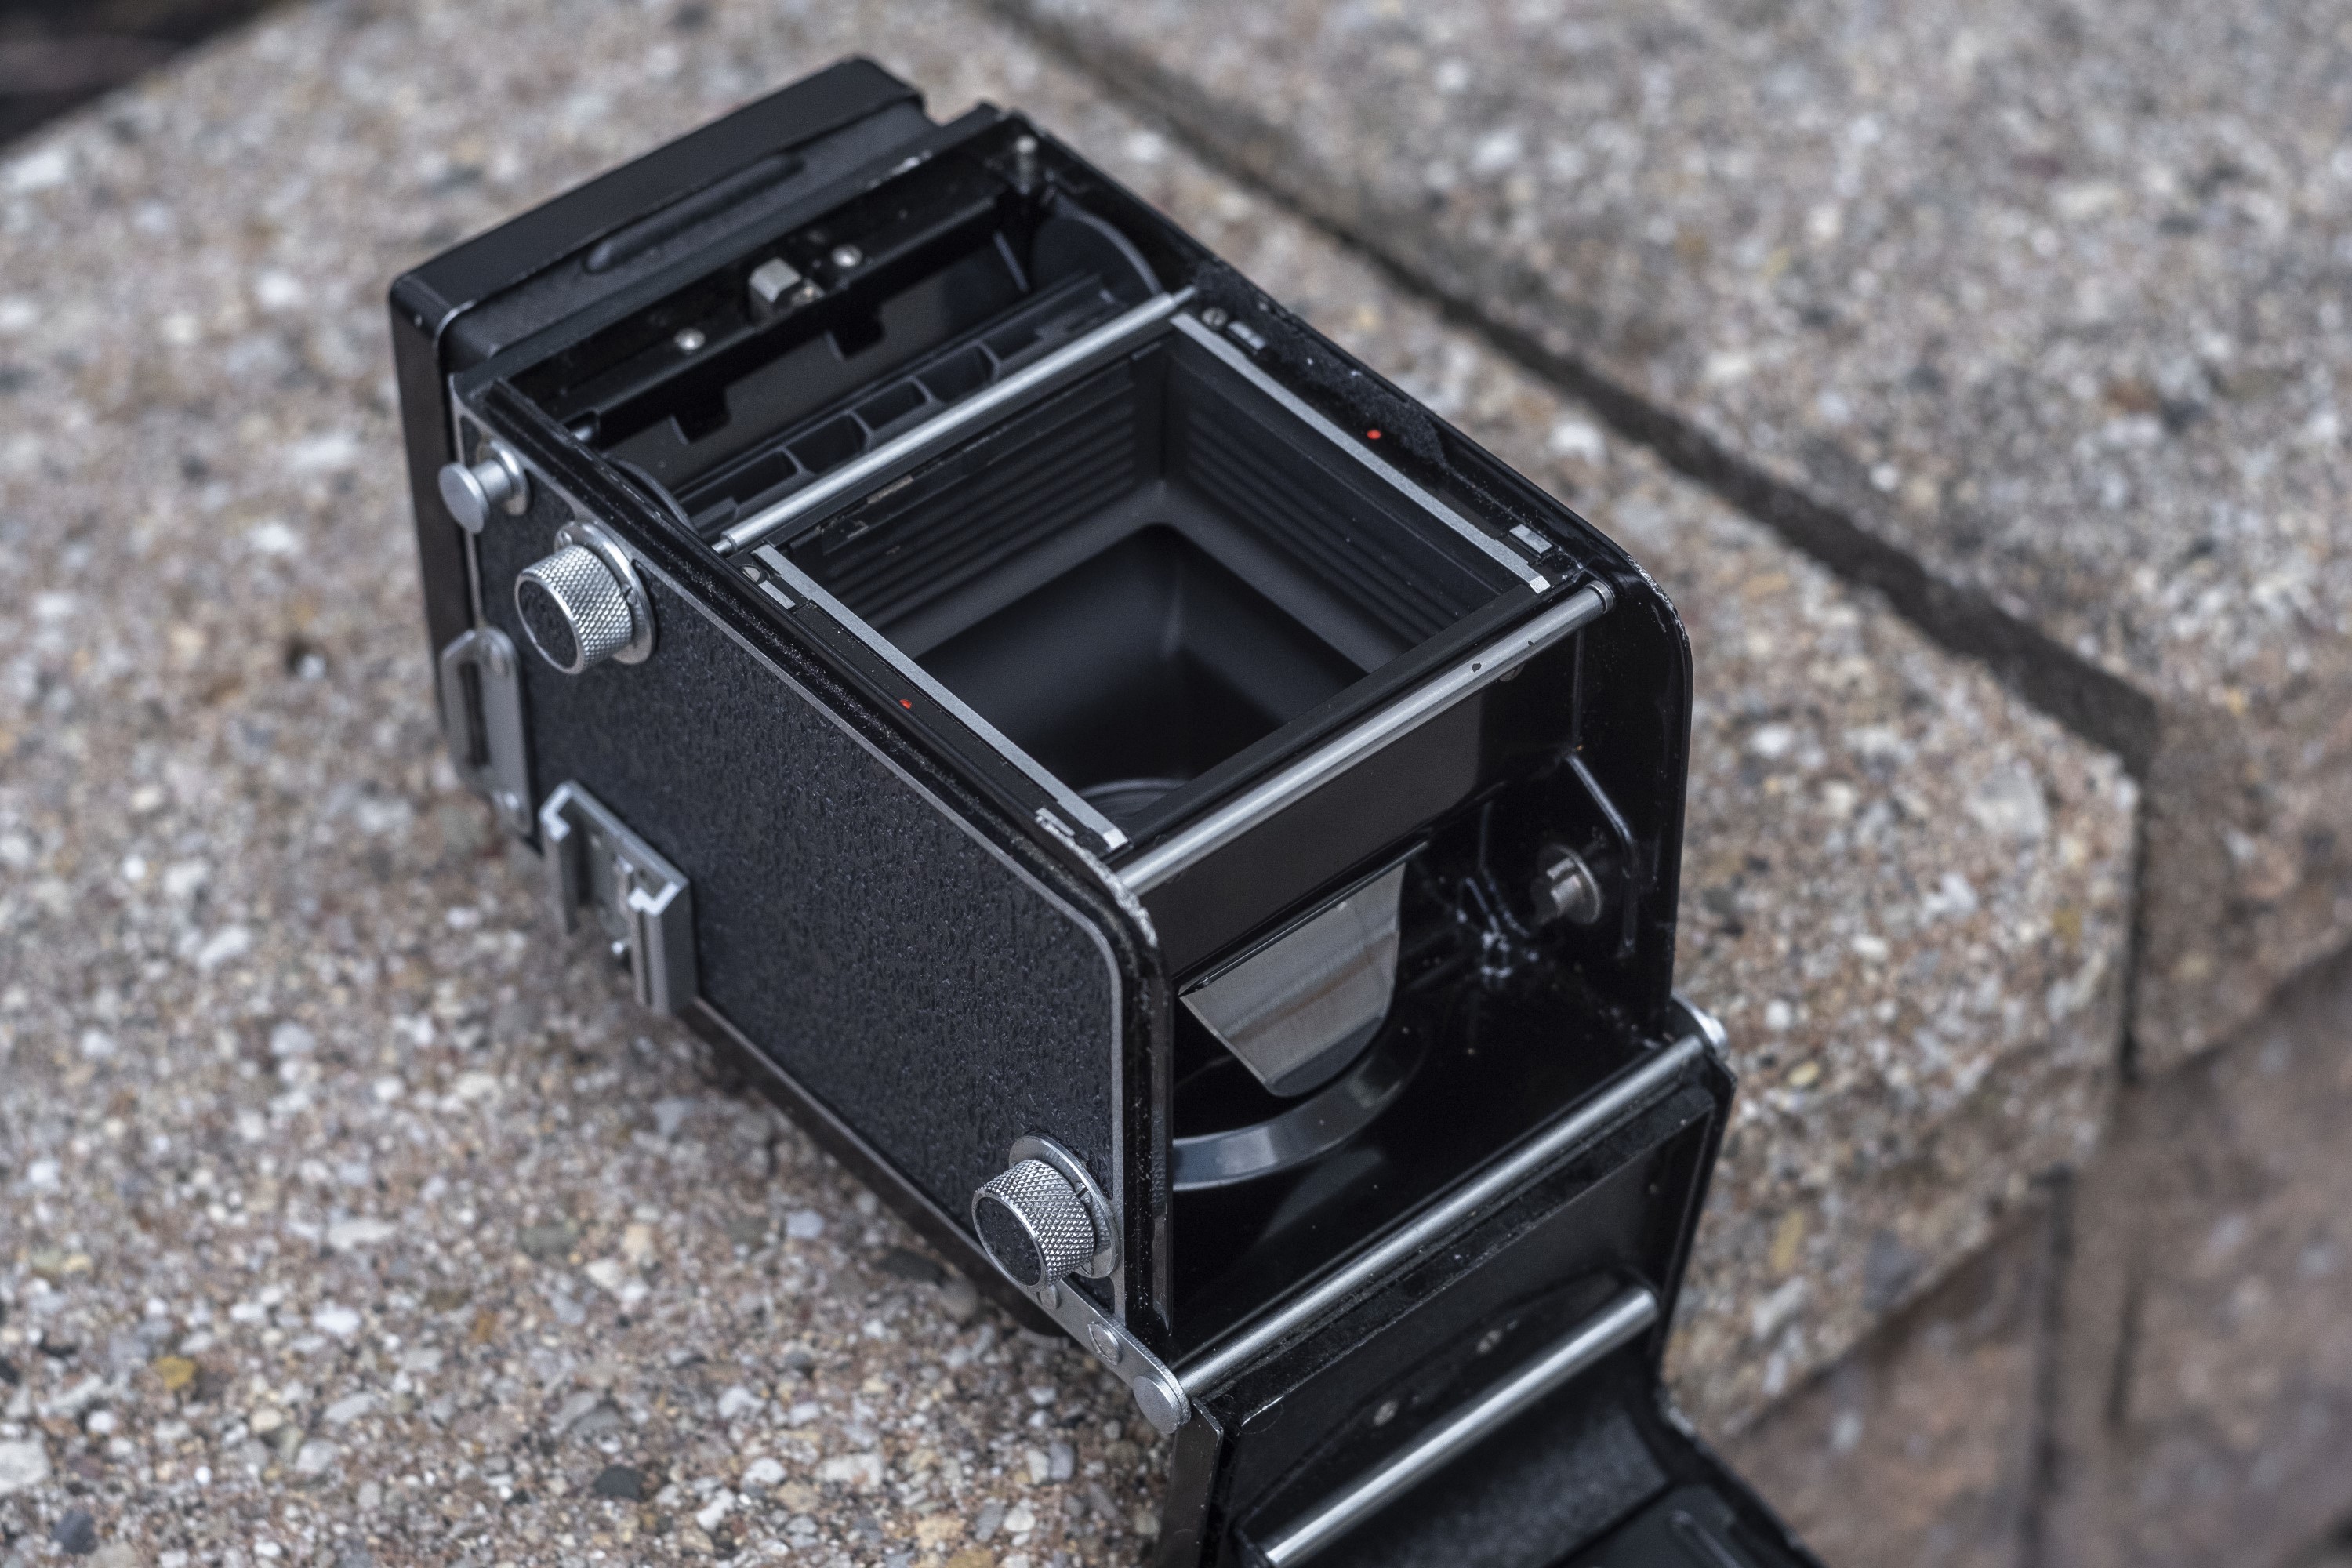
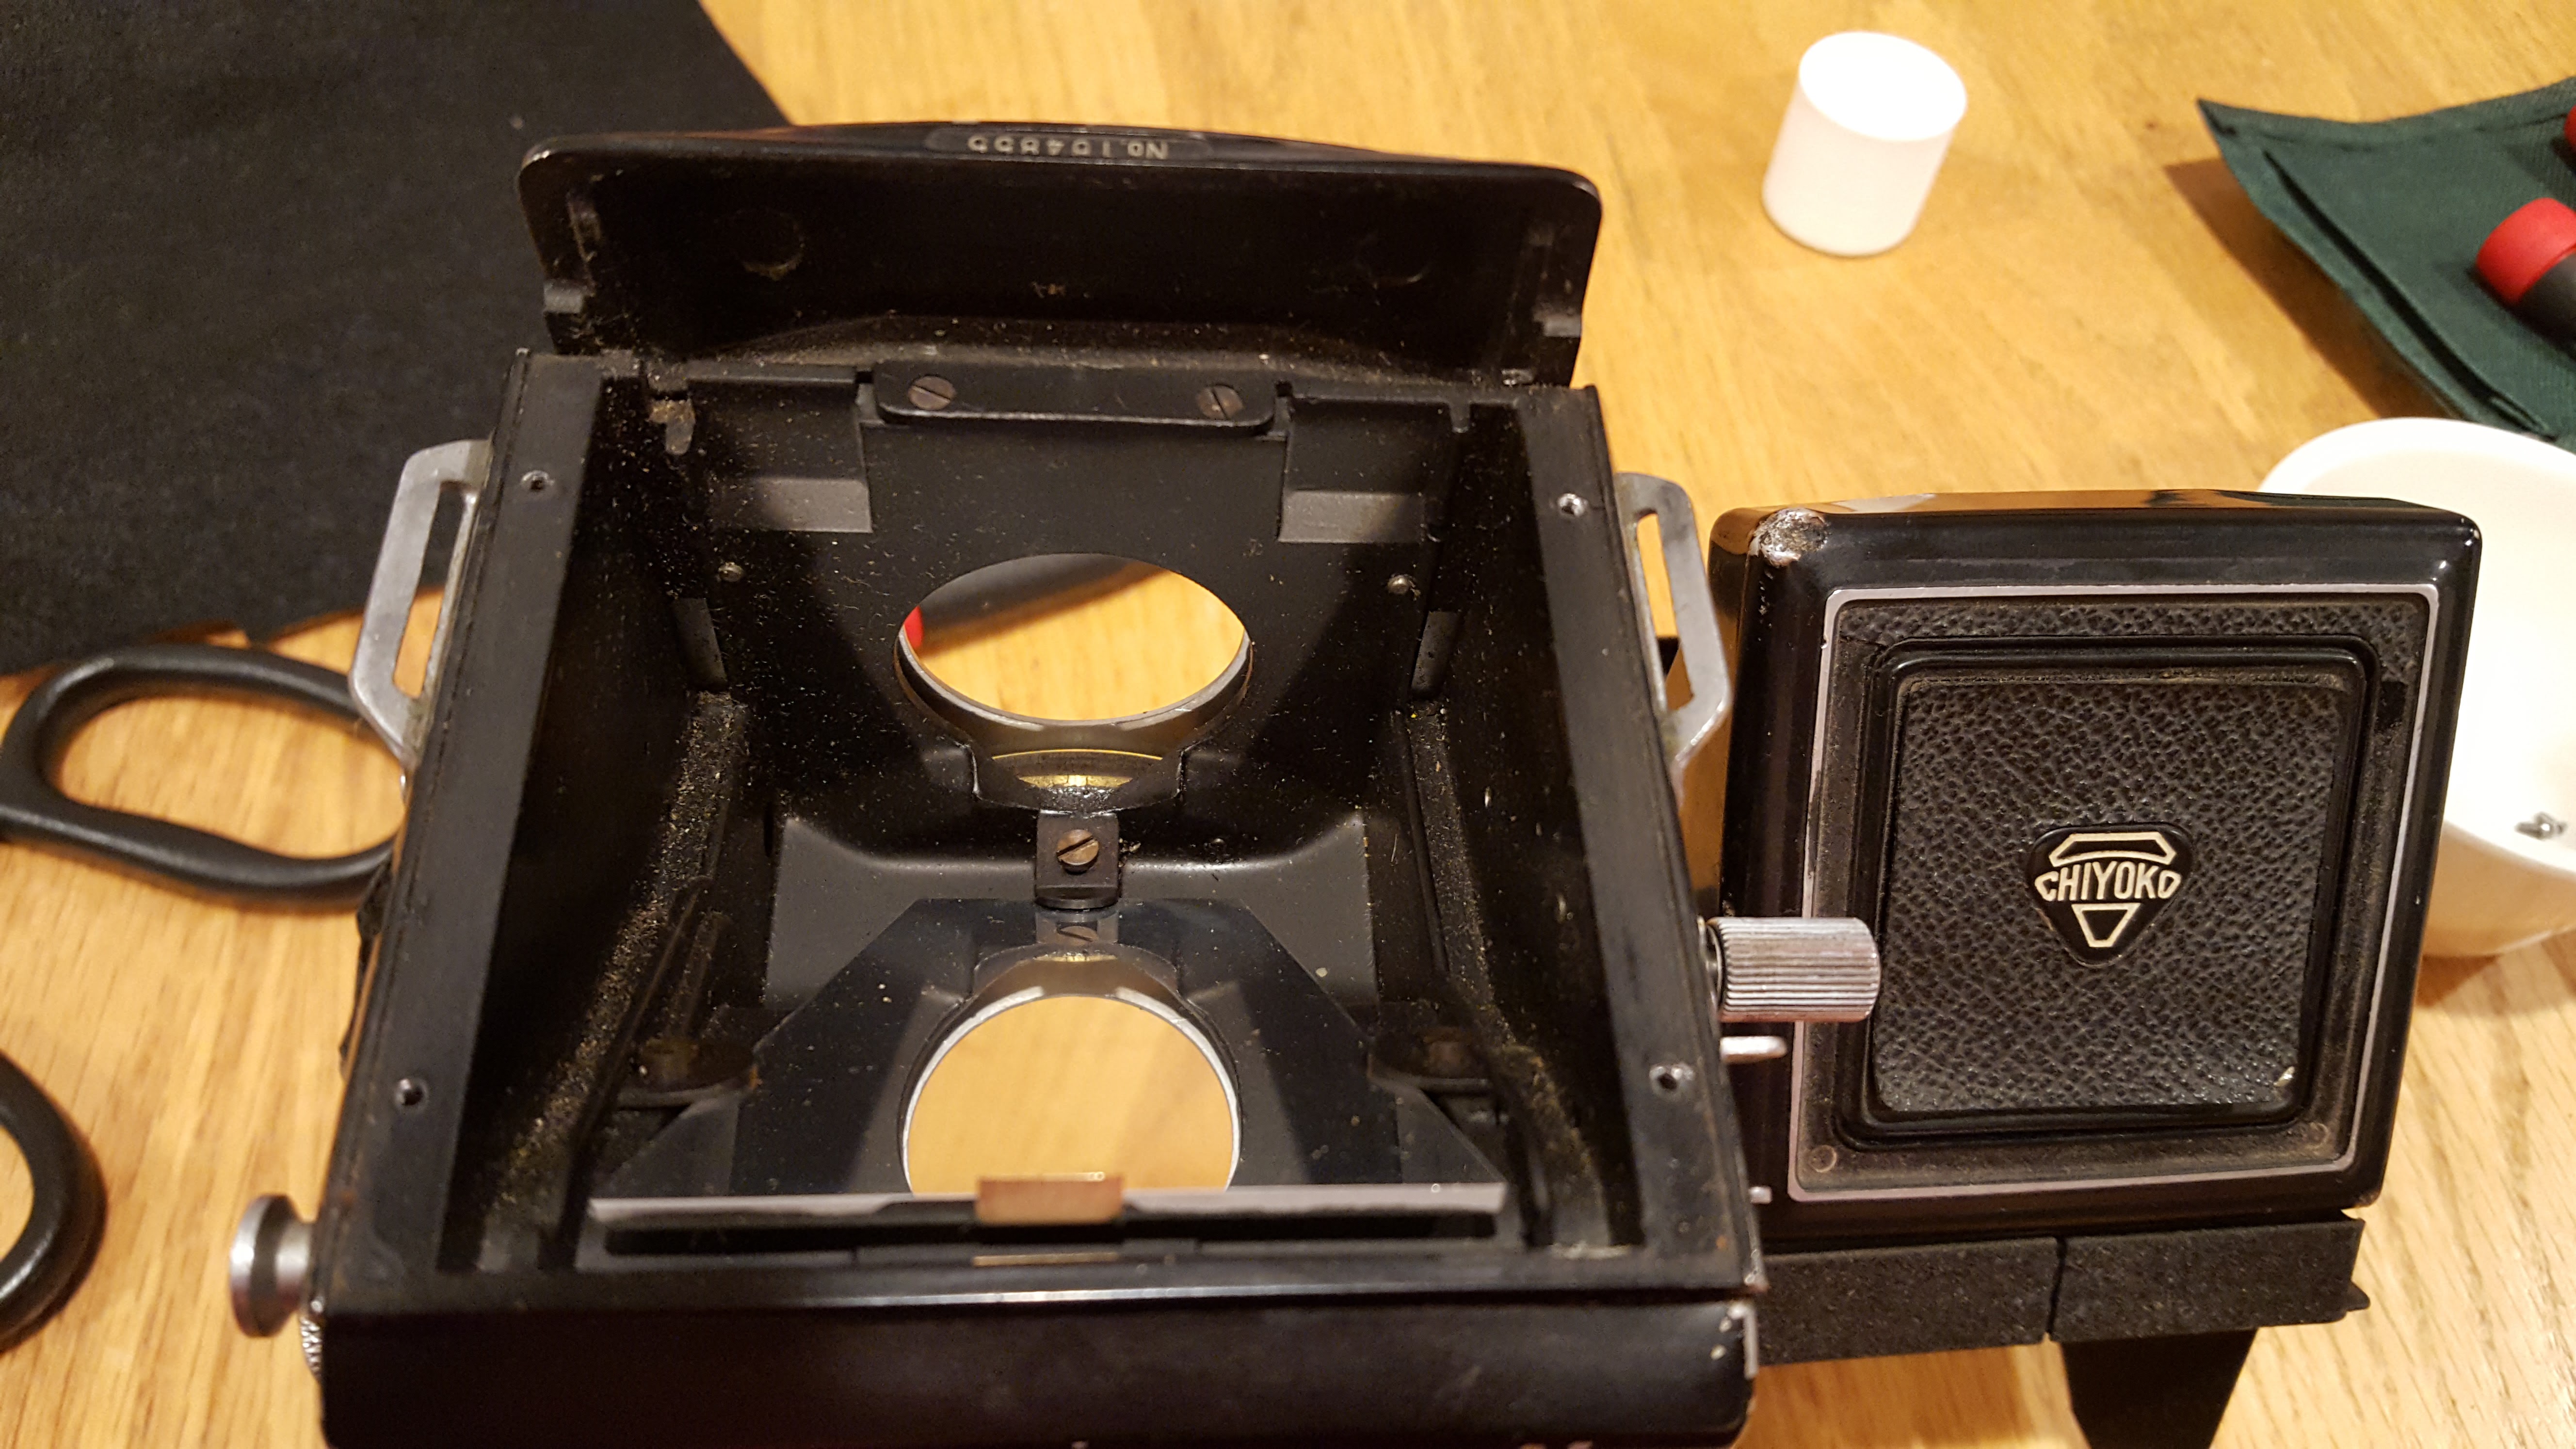 Step 12: If the viewfinder on your Autocord is dirty or darker than it should be, you’ll likely need to clean the ground glass and reflex mirror. To get to both, you’ll need to remove the viewfinder hood by unscrewing the 4 screws around the edge of the viewfinder (not shown). With these screws removed, the hood lifts up exposing the underside of the ground glass and the reflex mirror.
Thankfully, the mirror on this Autocord was still in decent shape and did not need to be replaced. If you notice black dots or splotches in the reflective surface of your mirror, this is contributing to a dark viewfinder and requires that the mirror be replaced. Martin Seelig (user marty1107 on eBay) makes a variety of reflex mirrors for nearly every TLR ever made, including the Autocord. Although I did not need one for this camera, I have purchased several from him before and have been very happy with the quality. If you need a new mirror on your Autocord, I highly recommend checking out his eBay store.
If you just need to clean your mirror, use plain glass cleaner and soft 100% cotton buds or a cloth. The reflective coating is on the top surface of the glass and can very easily be scratched or rubbed away. This is unlike regular bathroom mirrors where the reflective surface is behind the glass. If you notice that the reflective surface is coming off when cleaning it, you’re either using too much pressure, an incorrect cleaning solvent, or your mirror has deteriorated beyond repair and needs to be replaced.
Step 13: After putting the camera back together, I shot a couple of test rolls in it to get an idea that all of my repairs were successful. I’ll spoil the surprise and say that they were, but after seeing what this camera was capable of, I knew that I couldn’t just stop at the mechanics. I needed to address the cosmetics as well.
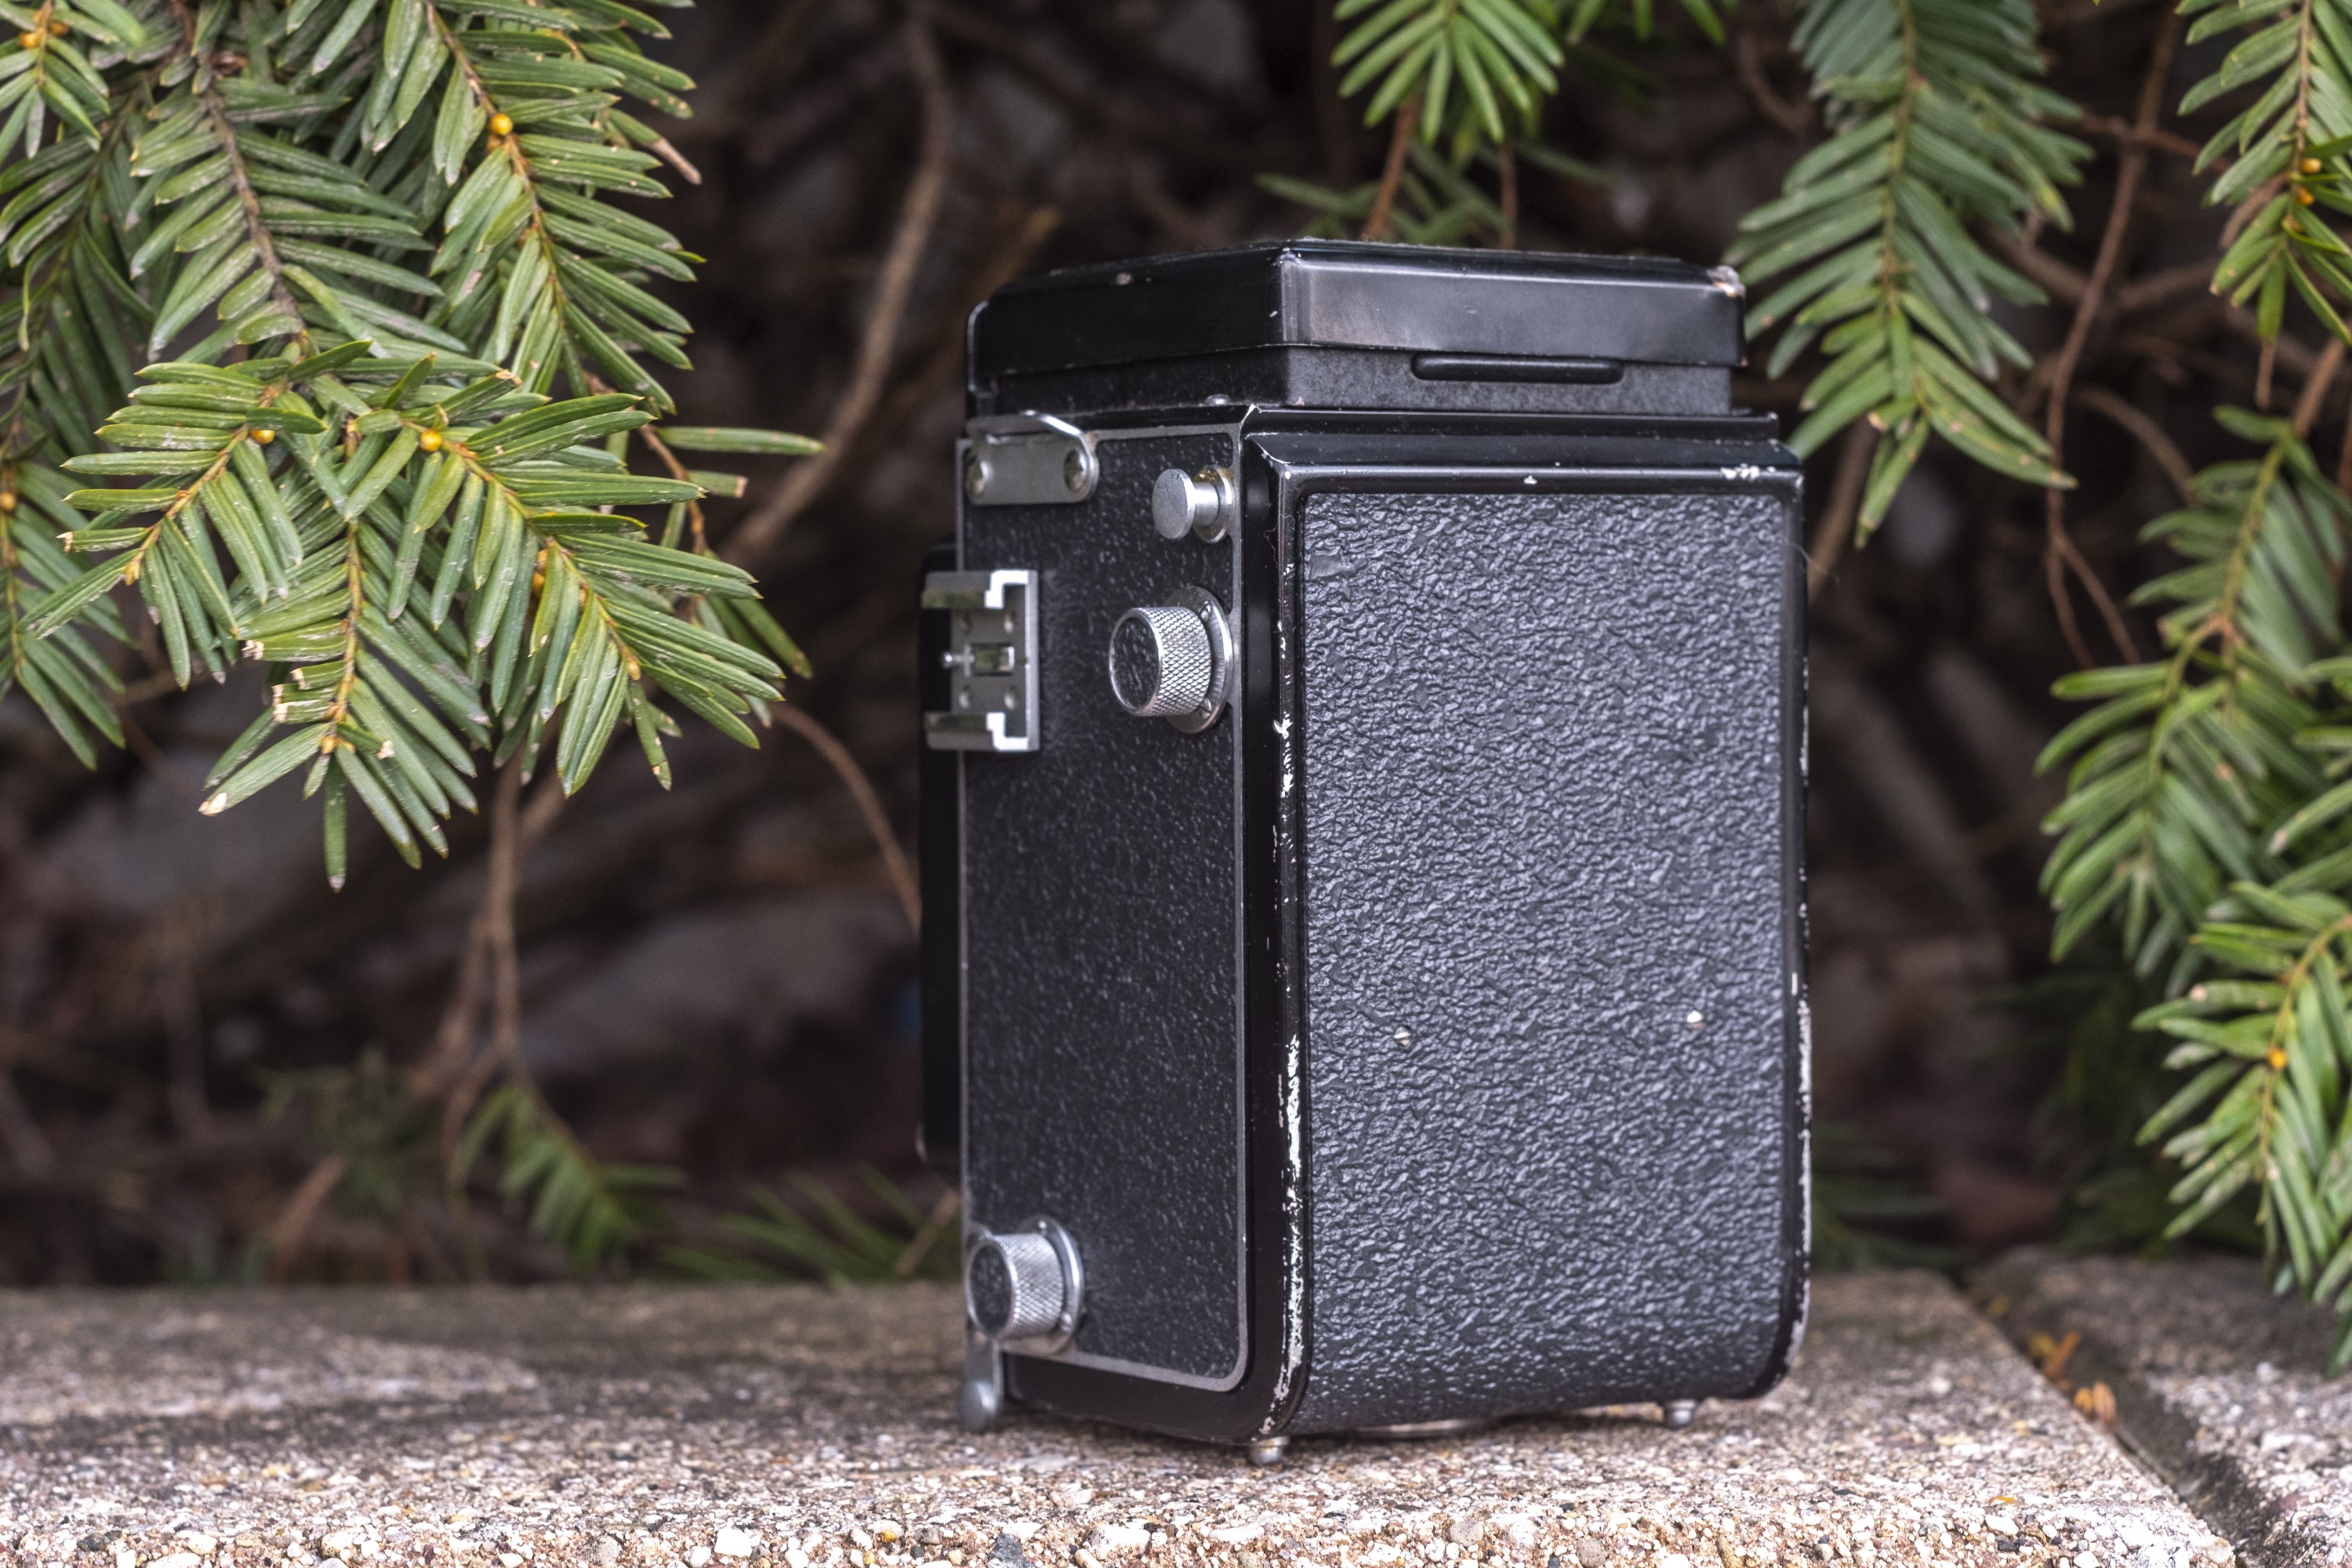
Most old cameras that have been used by their previous owners are going to show some degree of wear and tear. Scratches and scuffs to the paint, small dents in the metal, and a general patina can add to the character of an old camera and generally speaking are best left alone. I had no interest in repainting the body of this camera as I like the “battle scars” it has earned over the years, however the peeling and brittle leatherette needed to go.
There are many options today for people wanting to reskin their camera. I’ve used a number of sources such as aki-asaki.com, hugostudio.com, and cameraleather.com, but there’s also other sellers on eBay that sell pre-made skins for a variety of old cameras. Some people will even cut their own skins out of home made materials or those sourced from a crafts store.
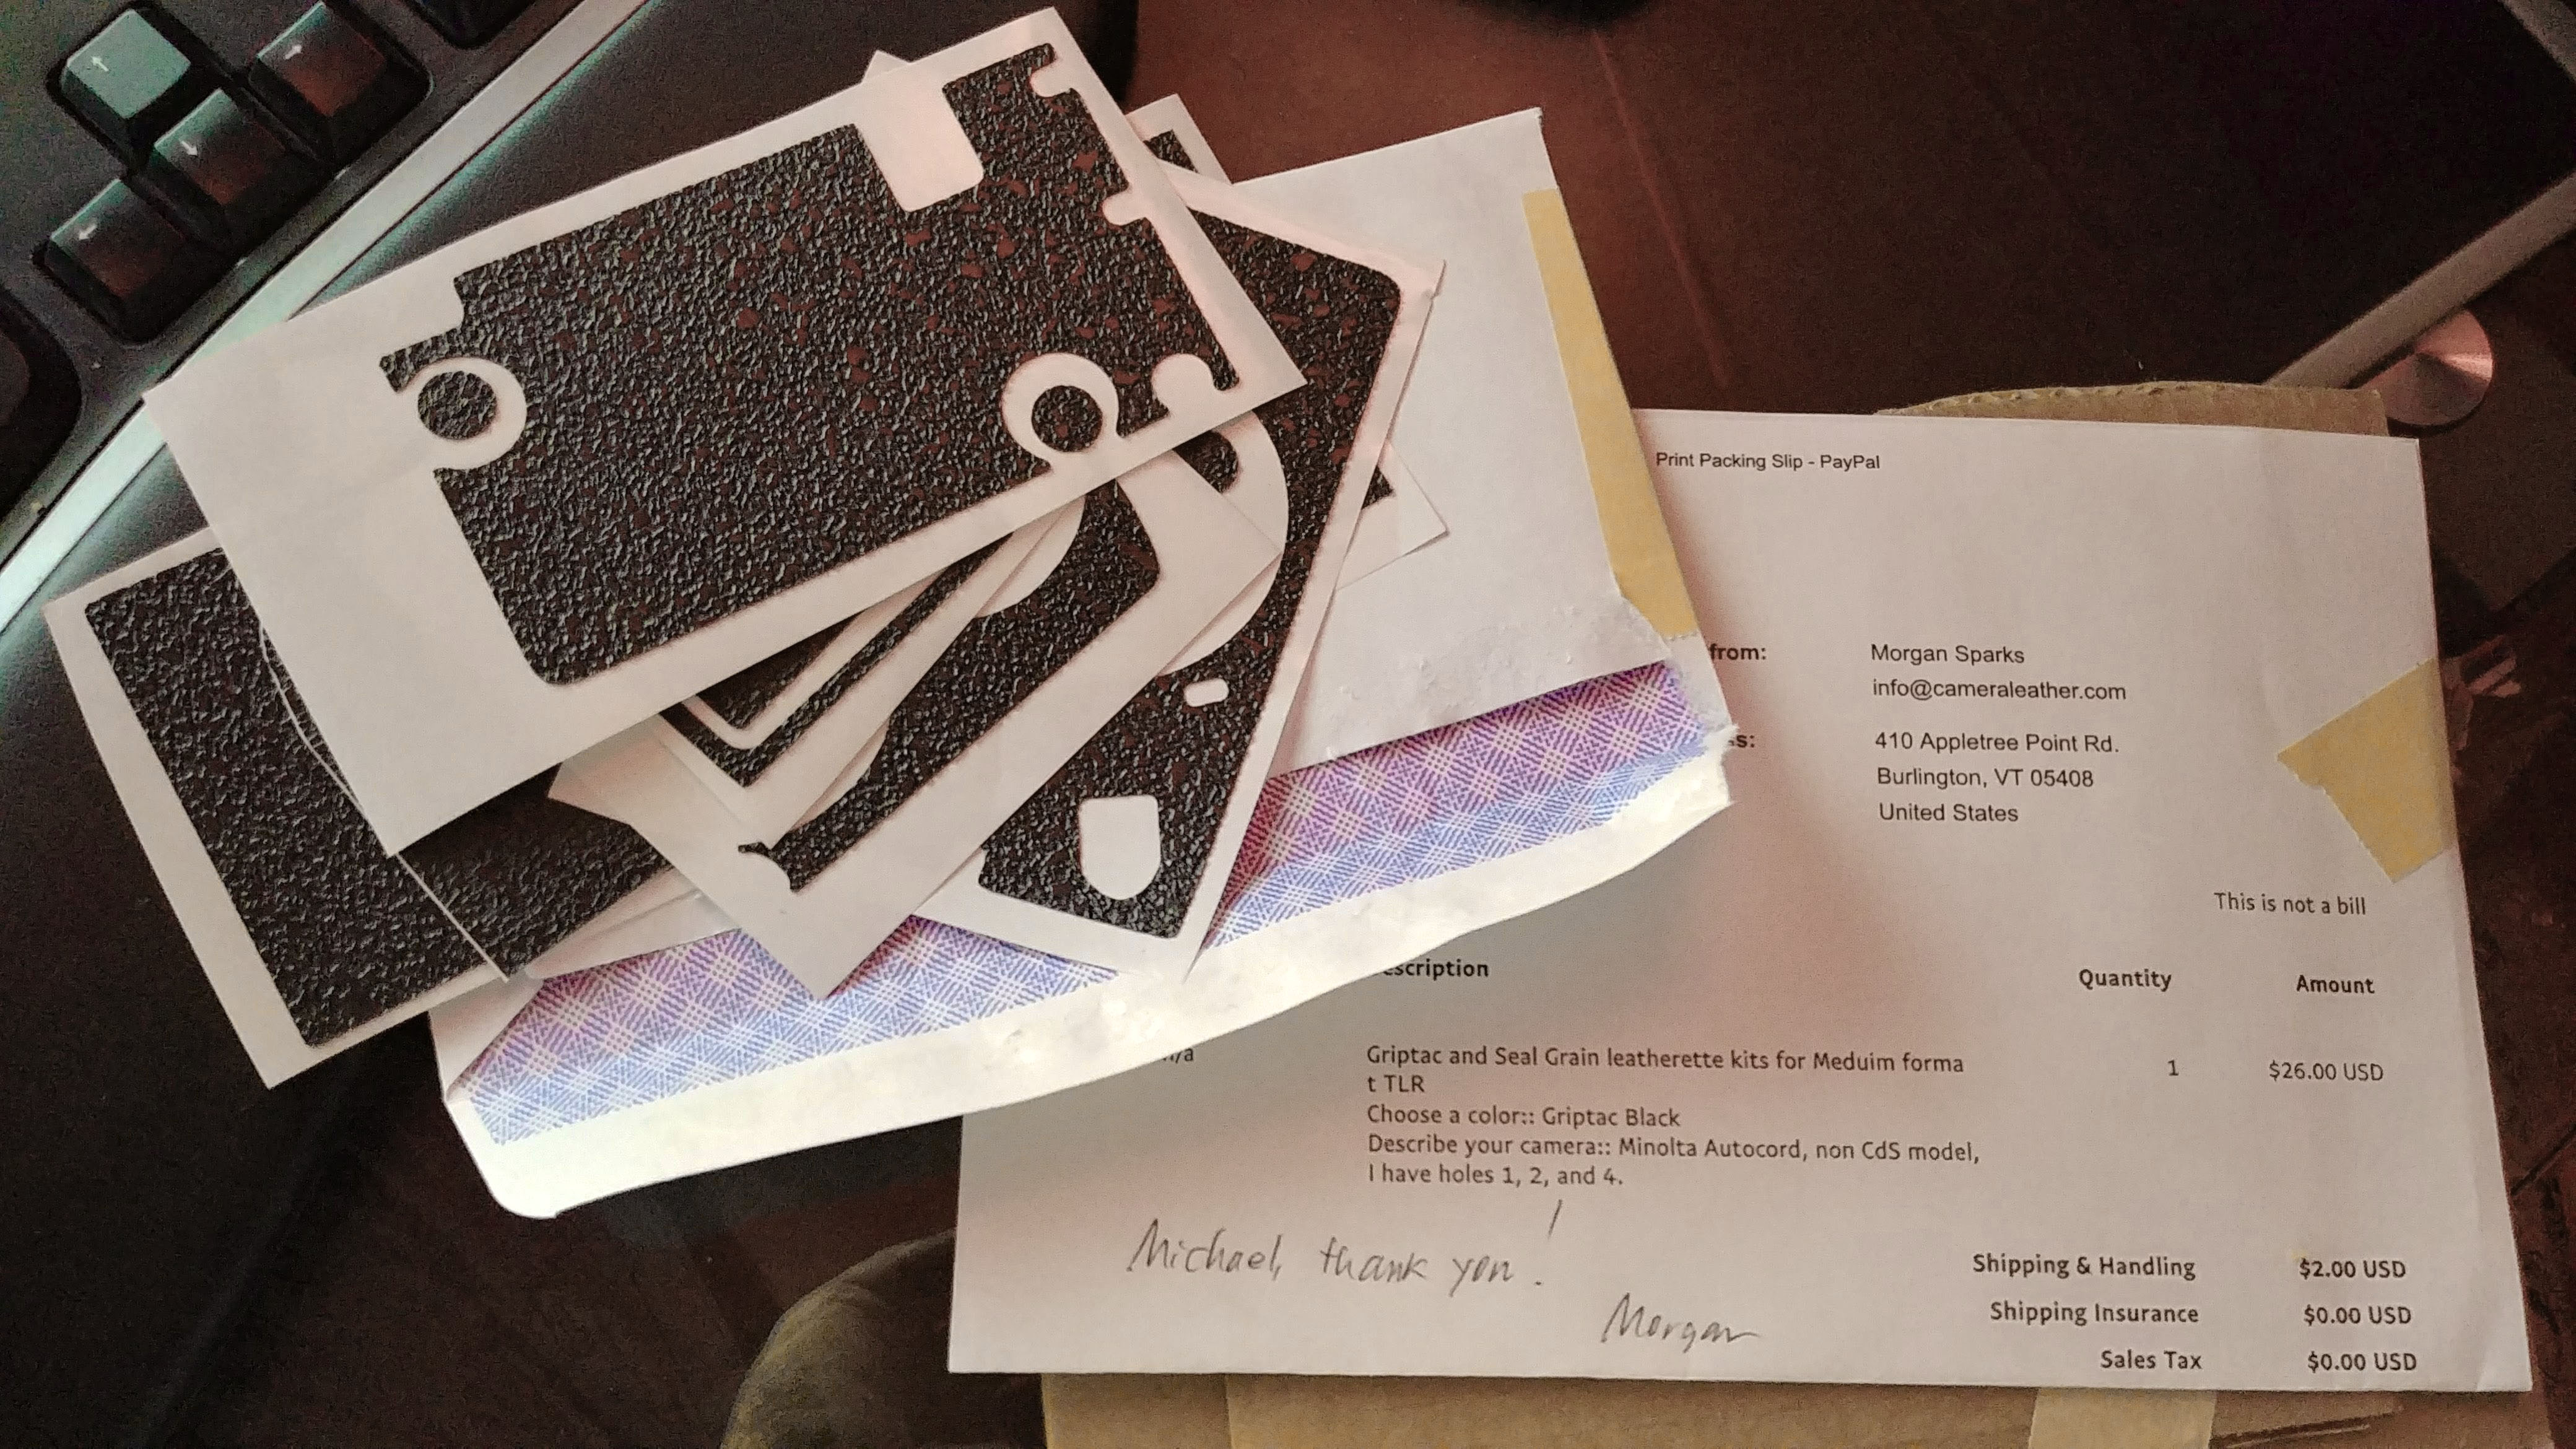
For the Autocord, I decided to go back to cameraleather.com. I’ve bought skins from them before and I’ve always been happy with the speed and service of Morgan Sparks, the man who creates these. I toyed with the idea of choosing a color like blue or red, but chickened out and stuck with black. Instead of a vinyl body covering that closely matched the Autocord’s original texture, I went with cameraleather’s Griptac covering as I had read positive reviews of it from other people online.
I placed my order on a Wednesday, got an email two days later that my order was already on it’s way back to me, and by Monday of the next week, had the order in my hands. I was very impressed with the speed and quality of the order. Morgan ships the skins still attached to the wax paper it was original cut from, and then he sandwiches it between two pieces of rigid cardboard to protect it during shipping.
Installation of a new skin is fundamentally easy. Remove the old stuff and stick the new stuff back on. If the skin is cut correctly, everything should match up, right?
In this case, the cameraleather skin was properly cut and fit perfectly, but I had to remove the old stuff first, which was a huge pain in the butt. Although some of the original leatherette was peeling away, some was cemented to the camera. Large chunks from the back door came off with ease, but then whole sections of the sides flaked into crumbled masses of projectile black dust as I scraped it away. I used a combination of metal scrapers for the large sections and then small flat head screwdrivers for the smaller bits.
To make things easier, I did have to remove a few pieces of the camera. The strap lugs on both sides needed to come off, as did the flash shoe, and a little switch near the film advance crank. I put these parts and screws in a small dish for installation later. In all, it took me a good half hour of scraping to get the camera to the point where all of the old material was gone. I went over the body of the camera with cotton swabs and rubbing alcohol to ensure the surfaces were clean.
With the camera completely stripped of the original covering and the surface as clean as you can get it, putting the new stuff on is pretty easy. The adhesive on this stuff is pretty sticky so once it sticks, it will be hard to move it, so you can use a variety of tricks like using hand sanitizer, or highly diluted soapy water to lubricate the adhesive side which will allow you to move it around before it makes a permanent bond. Once you have all of the pieces in place, I like to rub the new body covering with a soft cloth to work out any air bubbles that might be trapped. Assuming everything went smooth, you are done.
My Thoughts
When I acquired the Autocord, it was the most desirable of any TLR in my collection. Sure, Yashica made some great TLRs like the Yashica-mat and the Yashica D, but on the scale of desirability among collectors, they don’t compare to a good Autocord.
When Chiyoda Kogaku released this camera, they aimed for the top of the market, and wanted this camera to compete directly with the Rolleiflex of the same era. Top build quality was a priority for them, but so was innovation. Chiyoda had a history of releasing German “inspired” cameras without actually copying those original cameras, and the Autocord would be no different.
For anyone who has used a Rolleiflex, there are things that are similar, different, and somewhere in between. The viewfinder and magnifying glass work the same way. The selected shutter speeds and f/stops are visible in a little window above the viewing lens for easy reading while holding the camera at waist level. The film advance and the exposure counter work the same way, and finally the shutter release is in the same exact location.
There are a few changes to the Autocord which at first seem like a con, but turn out to be a blessing in disguise. The first is in a simplified film loading procedure. The Autocord lacks the Rollei’s removable back, but this is likely not something that many photographers would have ever used, and eliminates any possibility of additional light leaks due to the removable back. The supply side for a new roll of film is on top, immediately below the viewfinder. The take up spool is on the bottom. This is opposite of most other TLRs in which the take up spool is on top. The idea behind this system was that the film had a straight path from the supply spool across the film plane and wouldn’t have to make a 90 degree turn before being exposed. Some pro photographers believed that when a camera sat with film loaded, this bend could cause film flatness issues as the bent part of the film travels over the film gate. The Autocord’s solution prevents this from ever happening.
More significantly, the Autocord lacks the Rollei’s often problematic “feeler” roller that you thread the film through in order for the Automat feature to work. While the Rolleiflex was the first TLR to have a feature like this, the Autocord’s simpler method of lining up the backing paper with two arrows in the film compartment is both easier to do, and also less prone to failure. For as great as the Rolleiflex is, in the collectors market, one of the most common problems you’ll see is film transport problems which are often linked to this complex system which is prone to fail over the course of over half a century. The Autocord’s system is not only simpler, but does not have a reputation for failure.
Another potential con is the Autocord’s simpler lever controls around the perimeter of the taking lens for setting shutter speed and aperture. Most Rolleiflex Automats employ two round knobs to the left and right of the gap between the taking and viewing lens. While the Rollei’s method looks cool and feels much more elegant, it’s difficult to control one handed. With any Rolleiflex I’ve ever handled, I found it easiest to turn both knobs with separate hands. The Autocord’s method brings the two levers closer together and can more easily be operated single handed.
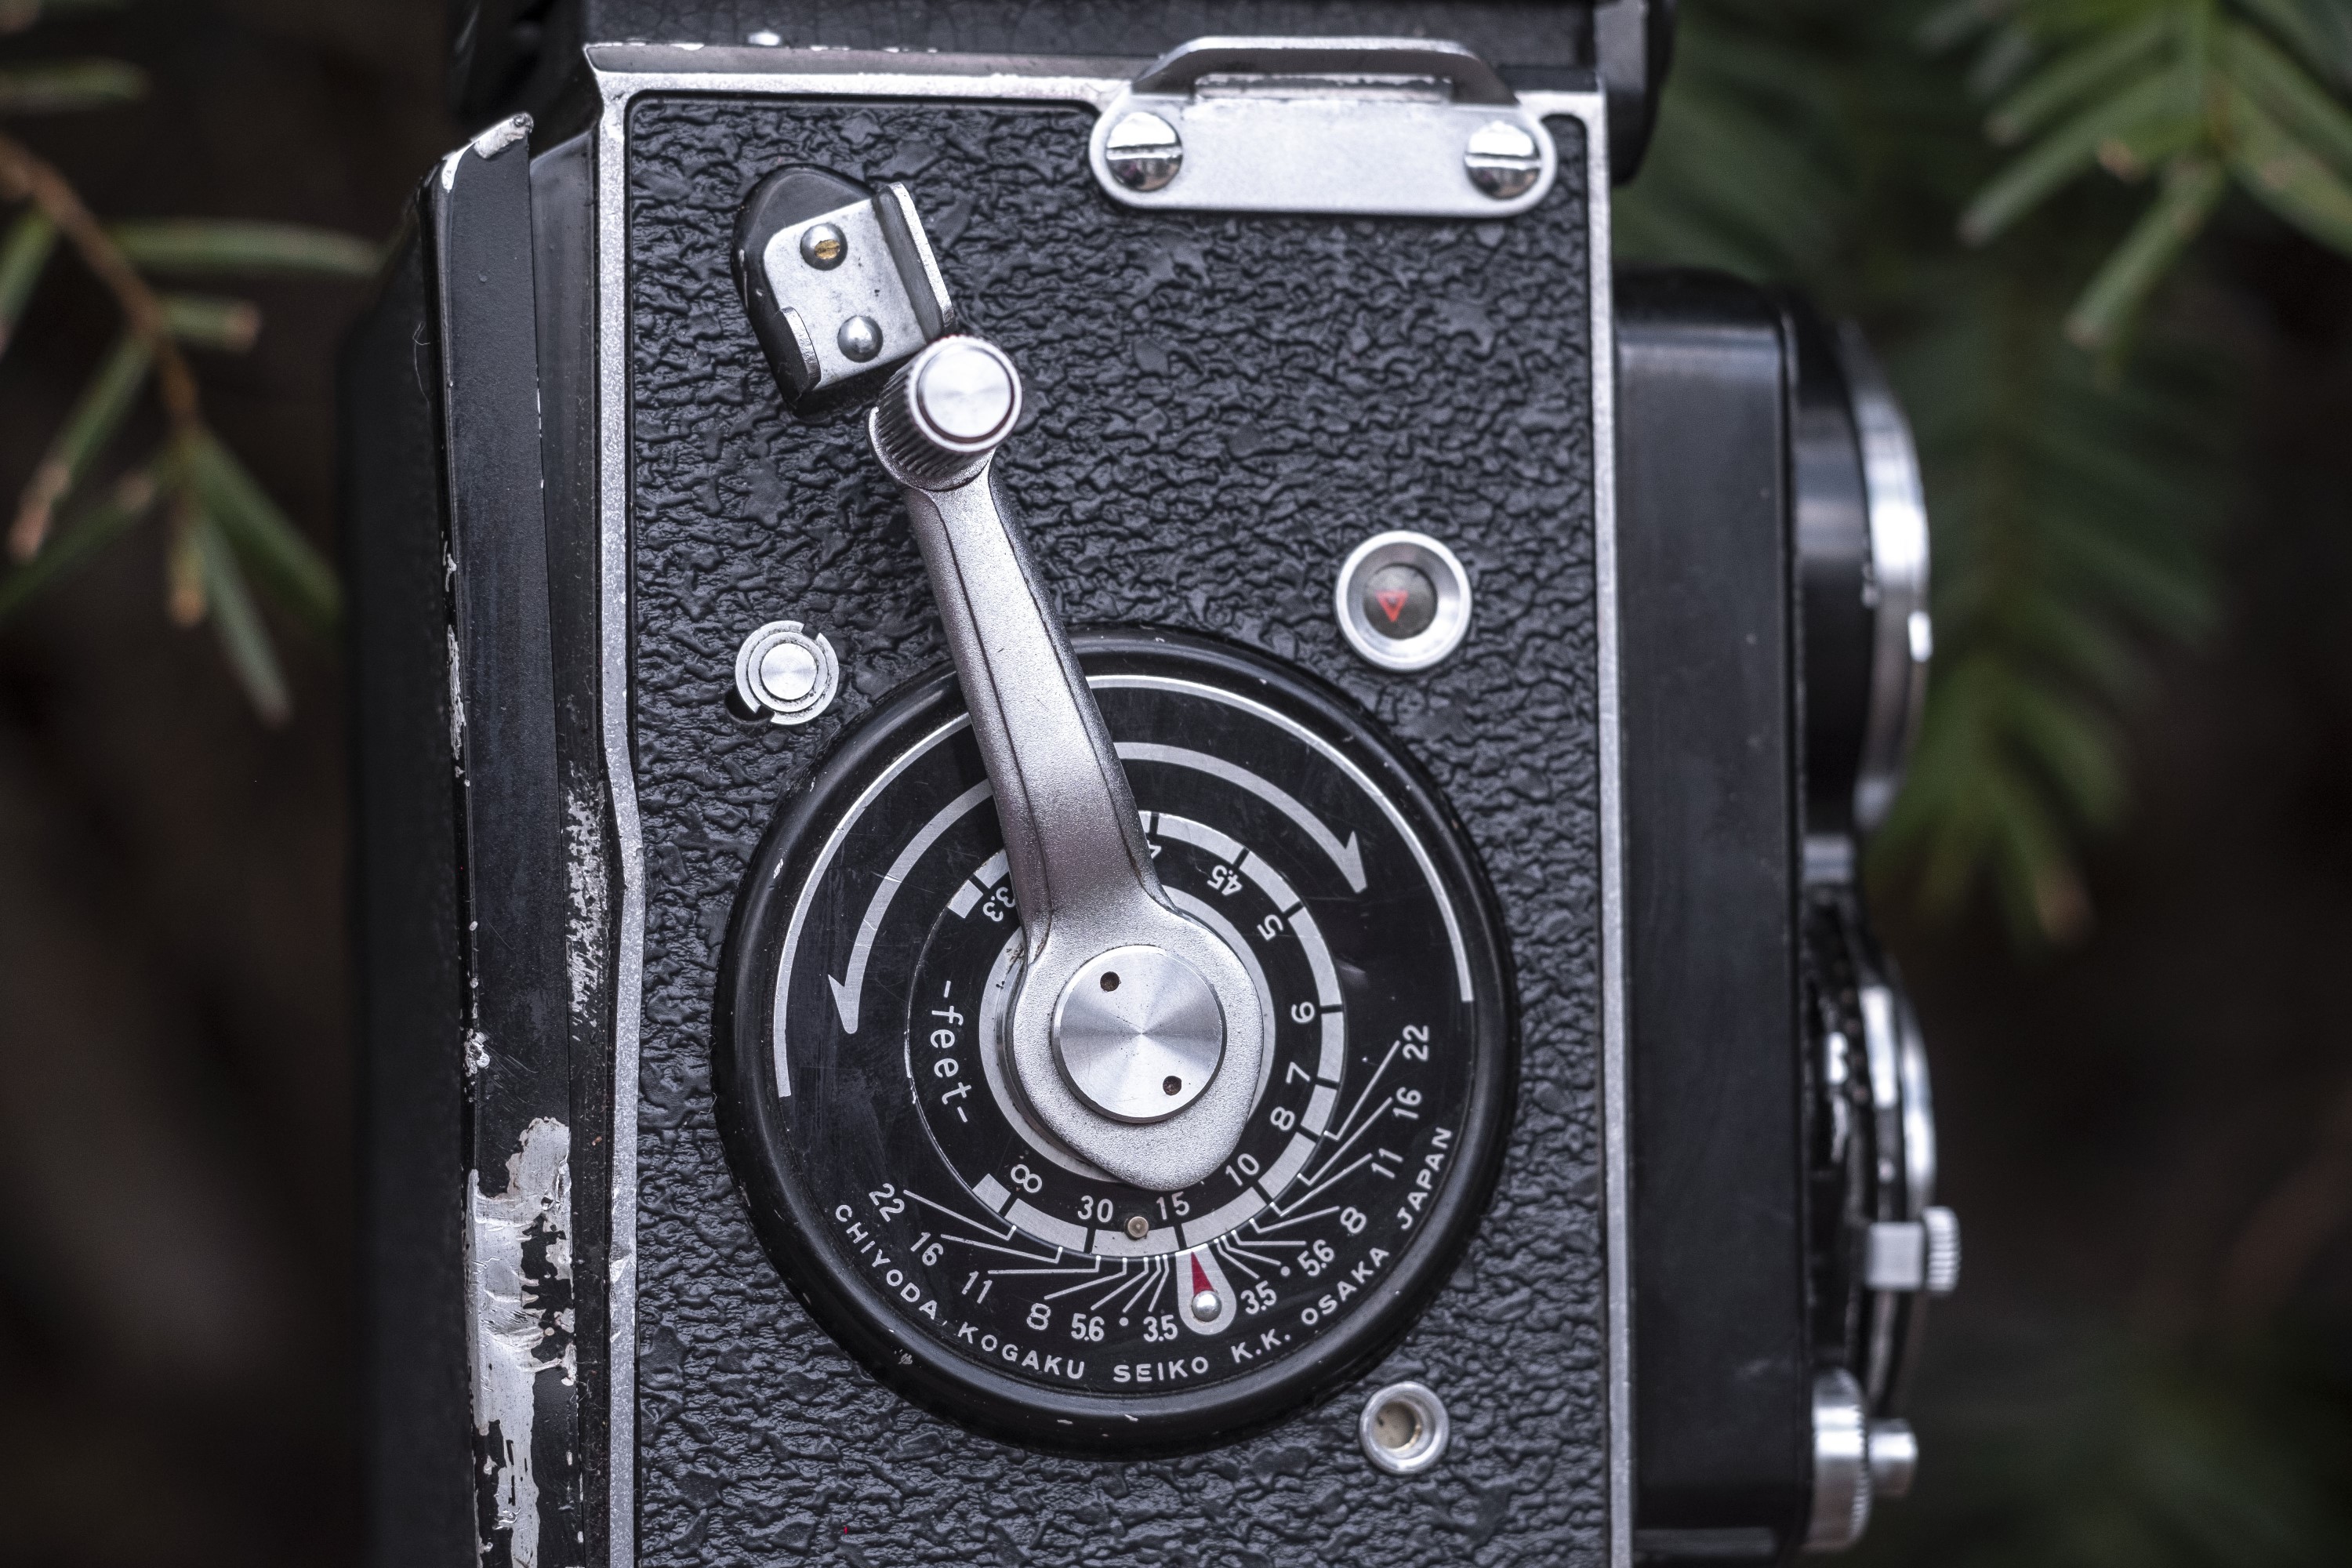
The Autocord had two other unique differences compared to other TLRs, the first of which was the quick focus helicoid. Instead of a knob on the camera’s left side that moves the lens standard in and out, the Minolta applies a curved lever below the taking lens that is used to control focus. A few other companies like Ricoh, Walz, and the Meopta Flexaret had similar focusing levers.
The perceived benefit of this method compared to Rollei’s knob, is that most photographers support a TLR using their left hand when holding the camera. When the focus knob is on the camera’s left side, the photographer must move his hand from supporting the camera to turning the knob and then back to the bottom to stabilize it. By keeping the focus control within easy reach of the hand that is already supporting the camera, focus can be changed without the photographer having to reposition their hand.
The first time I picked up the Autocord, this did take me a bit to get used to, but after a short while, I found the position to be very comfortable. While I would never say that the Rollei’s knob is hard to use, the Autocord improves upon something that likely no one ever thought needed to be improved. One potential con of the Autocord’s method however, is that if the camera is dropped or takes a large enough bump in this area, the focus lever can break. Some used Autocords have a broken focus lever, which is something that you rarely see on a Rollei. Thankfully, mine didn’t have this problem.
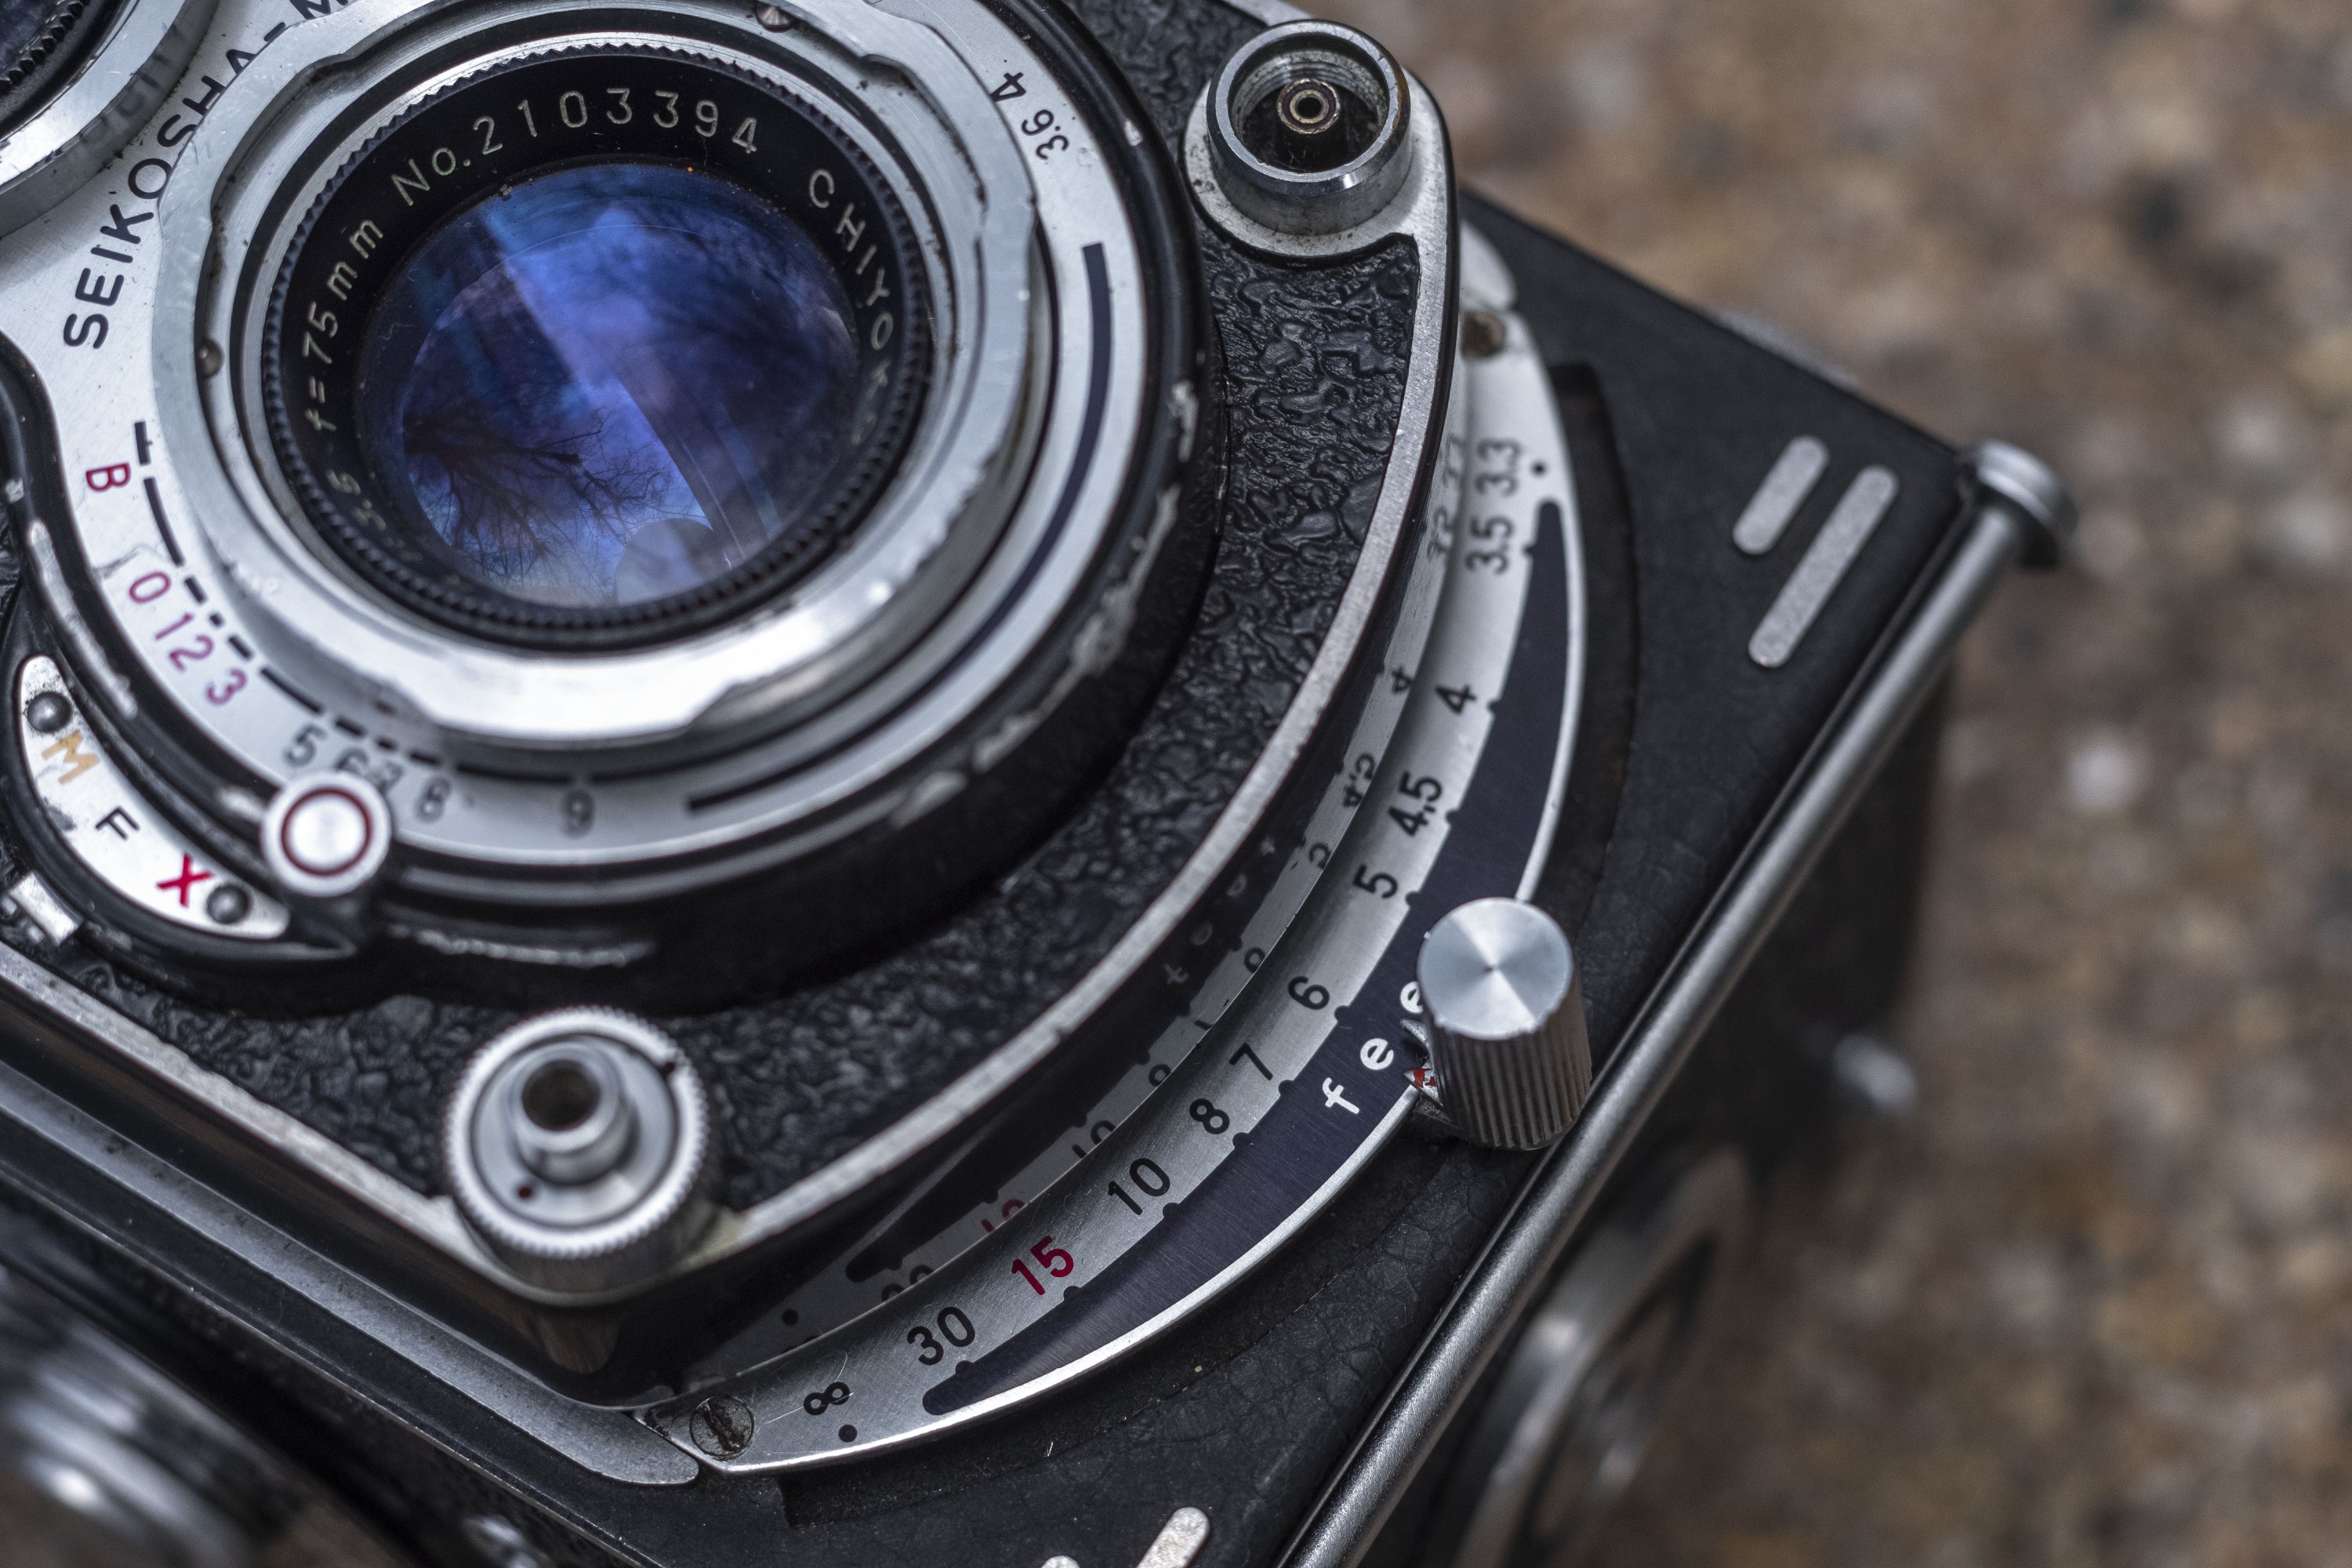
The second unique difference is the Autocord’s Light Value System, which is a bit less useful, but thankfully isn’t a deal breaker. All Autocords, starting with the original Autocord I from 1955 have a Light Value System with numbers 3 – 18 printed on the front plate of the shutter in lieu of shutter speeds and f/stops. The chosen values are shown in the window near the top of the camera, but on the front of the camera, you only get numbers. These numbers correspond to numbers that popular handheld exposure meters of the day would have had on them. A user would take a light reading on their meter, it would give them a number of 12 for example, and the user would set the camera to 12, and that would get them the correct exposure.
The problem with this system was that unlike other cameras of the day in which the LVS system was coupled between the aperture and shutter speed selectors, the Autocord’s was only linked to the aperture selector. This likely confused the people who the LVS was designed to simplify exposure settings for. In an attempt to find another way to calculate exposure values without making a mechanical connection between the two levers, starting with the Autocord-L, an additive system was designed.
On this camera, there are two sets of numbers, one next to the shutter speed lever, and a second set next to the aperture lever. The first scale had numbers from 0 to 9 (skipping 4), and the second had numbers from 4 to 9 (actually the lowest number was 3.6, but we’ll ignore that). The idea was that you would add to the two numbers together to get the actual light value number. Since there are multiple combinations of shutter speeds and f/stops that equal the same light value, this method meant that the photographer could select a variety of shutter speed and f/stop combinations and still have correct exposure. The chart below comes from the Autocord’s user manual and lists the exact shutter speeds and f/stops that each number corresponds to.
Lets say you are out shooting with an external light meter and the meter recommends a light value of 13. Using the chart above, any combination of shutter speed and aperture that adds up to 13 will correctly expose the image. f/16 @ 1/30, f/8 @ 1/125, and f/4 @ 1/500 would all work because they all add up to 13.
While this might sound neat on paper, it was a disaster in practice. Most anyone who already understood how to calculate correct exposure wouldn’t have needed a clunky LVS system like this, but for anyone who might have benefited from it, the need to add two numbers and make sure that you have a workable shutter speed and desired depth of field, meant that you had to look at the numbers on two different areas of the system. This likely confused people even worse than before, as Chiyoda would later return to the original single LVS scale on later models. As difficult as this sounds, the good thing is, you can just ignore it altogether and just look at the shutter speed and f/stops on the top of the camera and use Sunny 16, or a hand held meter that gives you correct shutter speeds and f/stops.
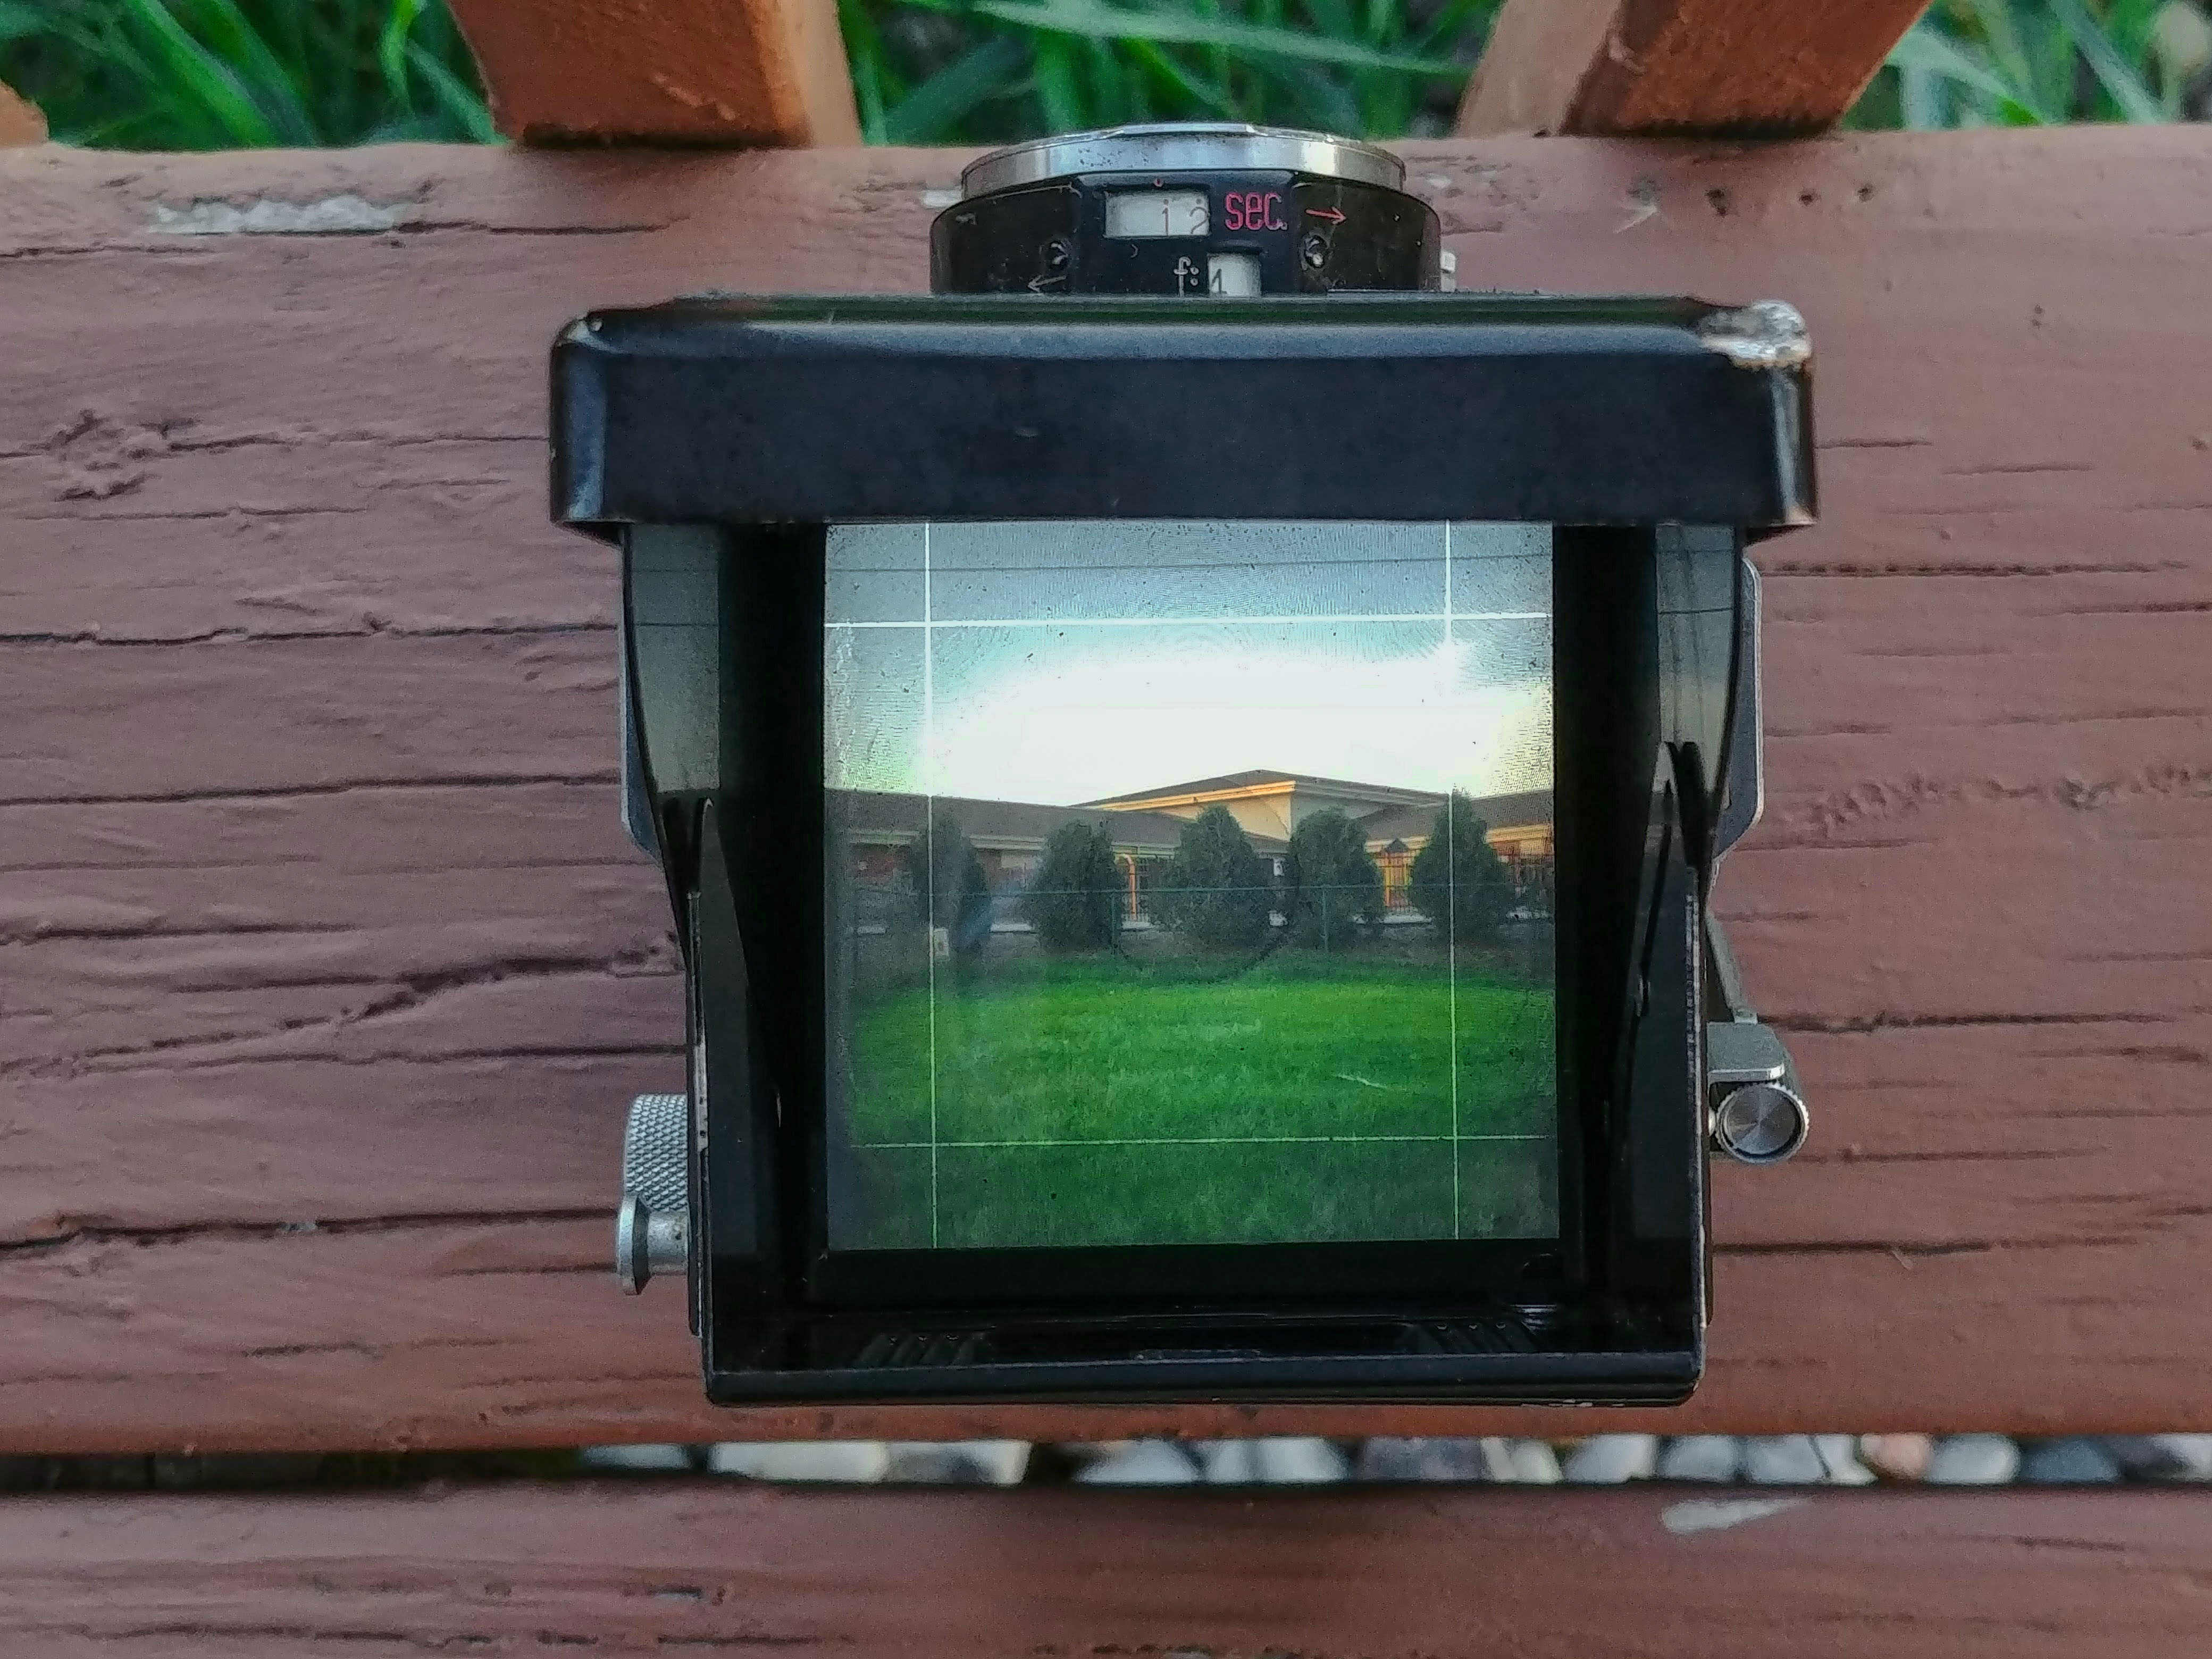
The rest of the camera is all good news. The build quality of the Autocord is excellent. It has a bright and easy to see through Fresnel screen with horizontal and vertical alignment marks in the viewfinder, and a magnifying glass for critical focus. The top lid of the viewfinder has a folding window which when open can be used as a sports finder for quick action shots.
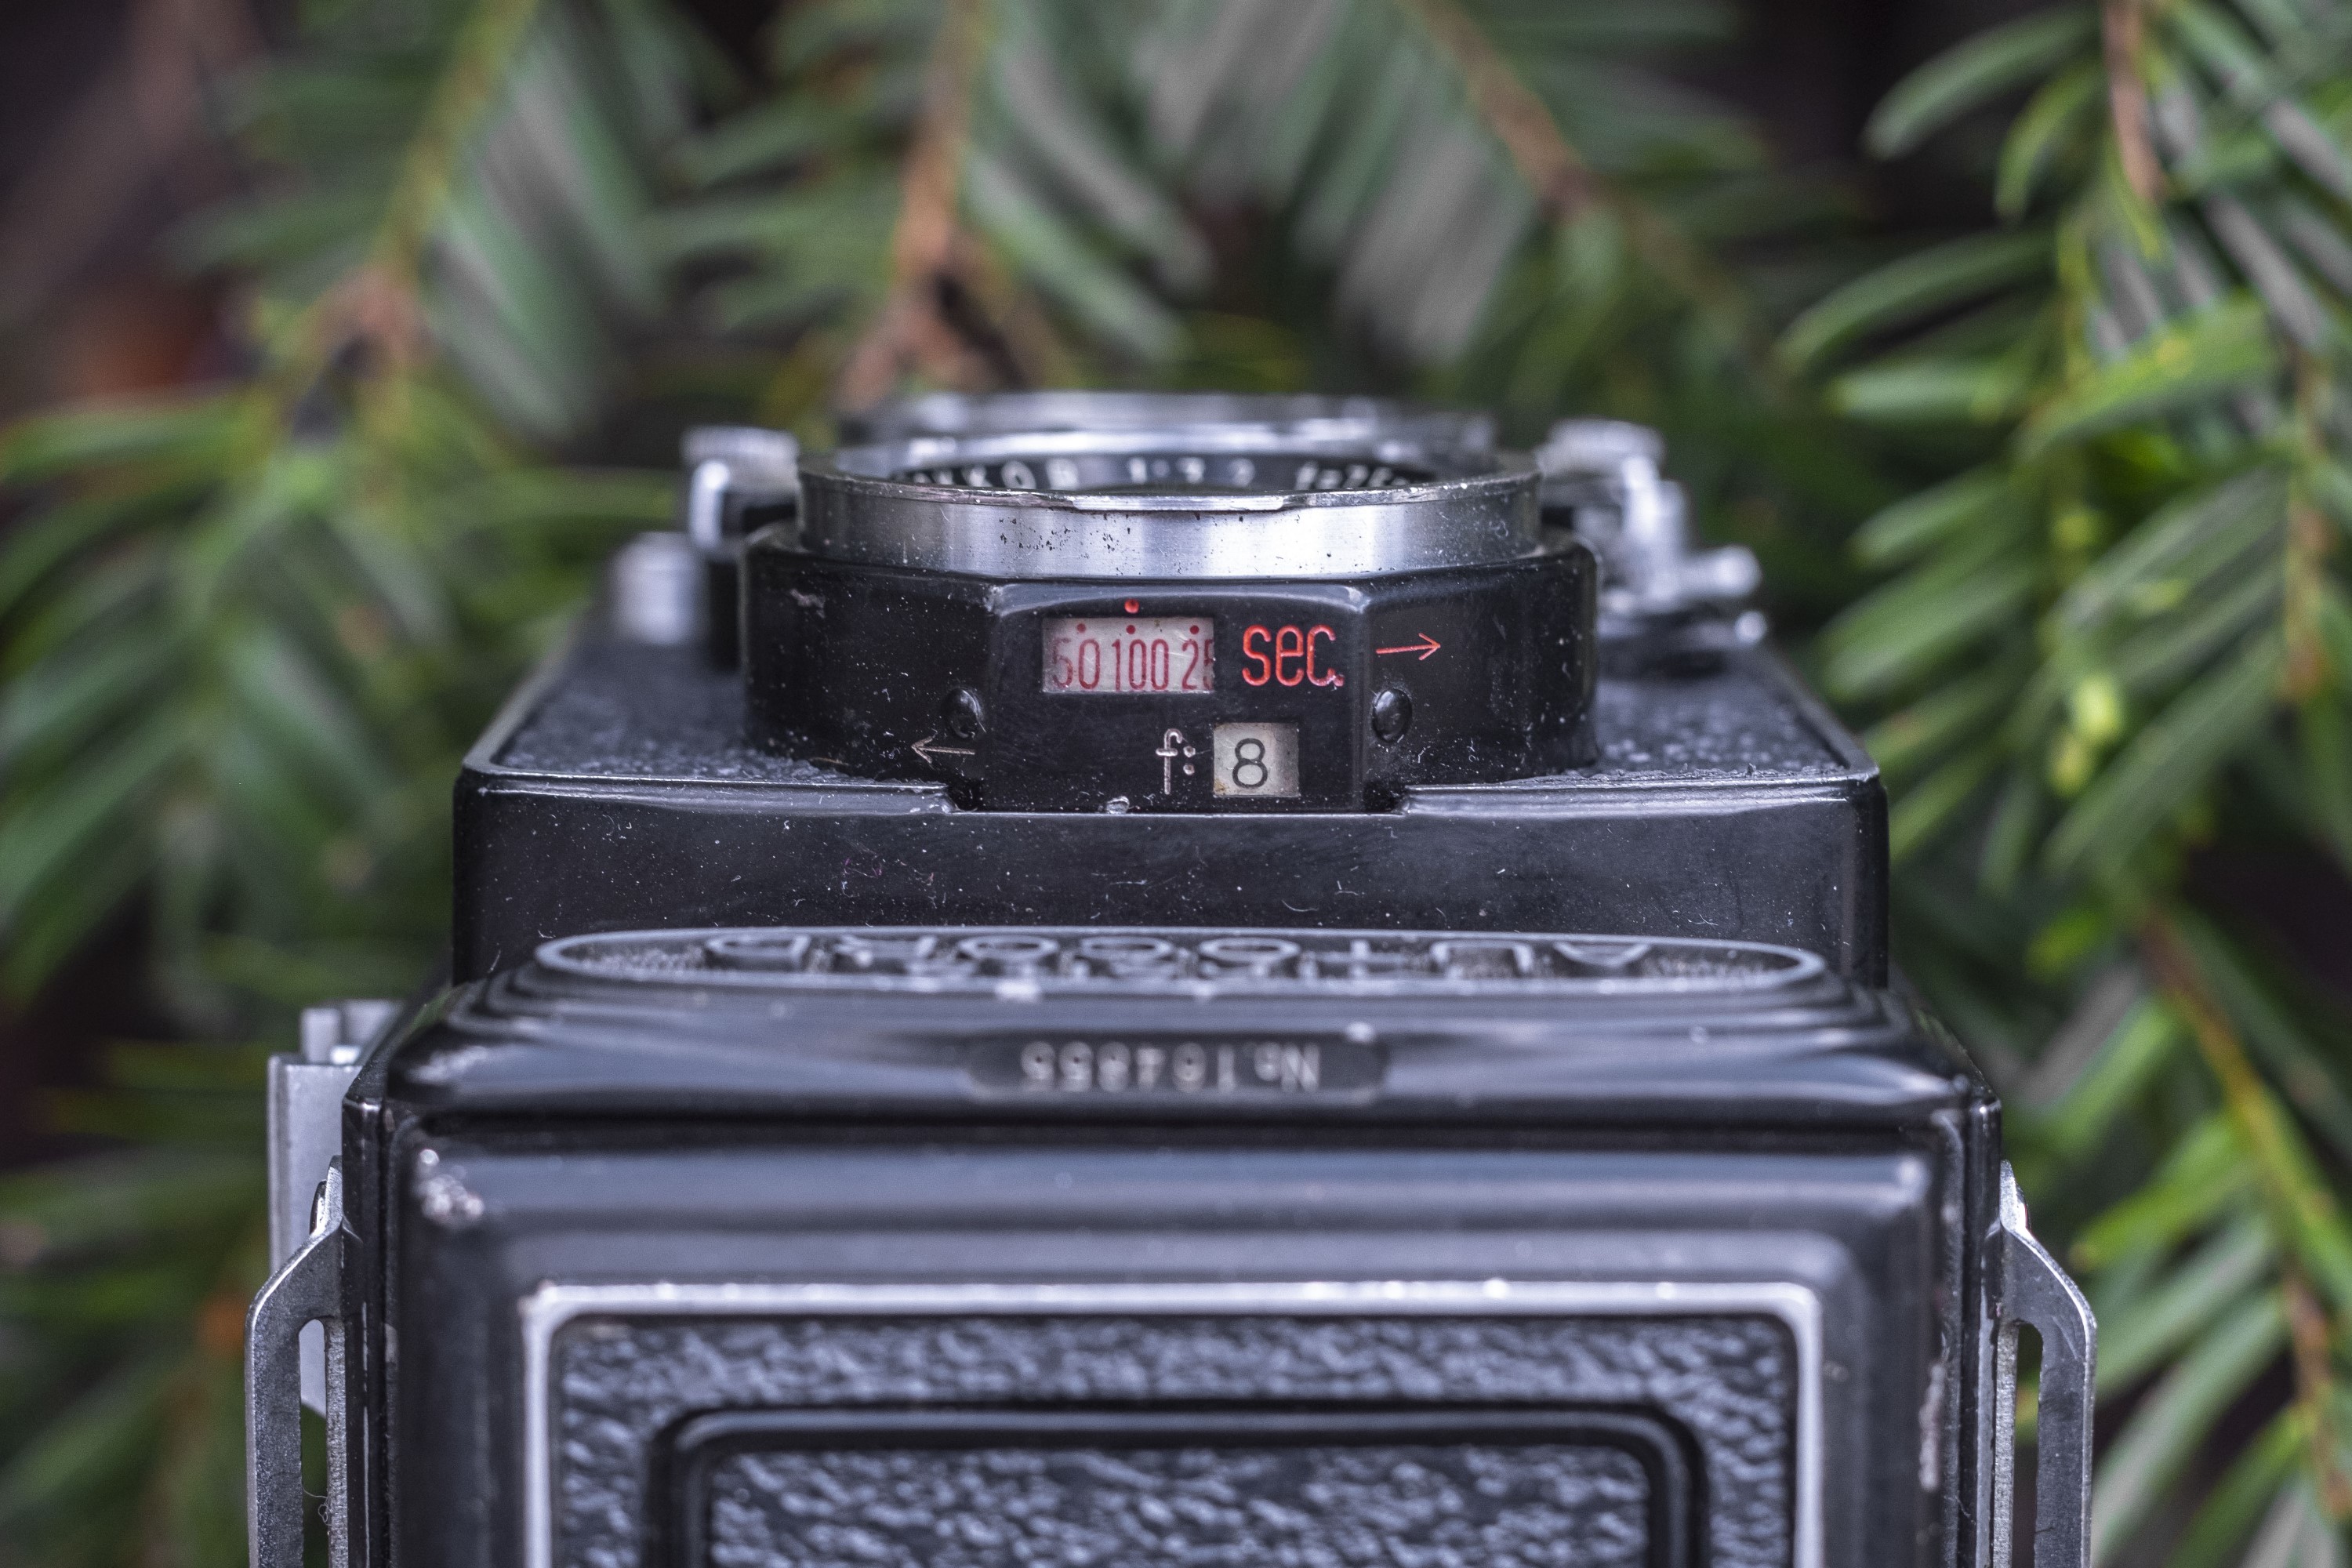
While holding the camera at waist level, the selected shutter speeds and f/stops are visible through a window just in front of the viewfinder, above the viewing lens. This helps negate the complexity of the Autocord’s clunky LVS system.
Advancing the film through the Autocord is a pleasure with the crank on the camera’s right side. A neat difference compared to other TLRs is that the tip of the handle folds out of the way and can be tucked into a bracket near the 11 o’clock position of the crank. This means the crank is a single piece of metal, unlike the folding ones on other TLRs like the Rolleis and Yashica TLRs.
Around the perimeter of the center of the crank is an uncoupled depth of field scale to help in estimating depth of field for quick action shots when looking through the reflex finder is not possible or practical.
At the 1 o’clock position around the crank is the exposure counter, which shows a red triangle when the camera is empty, or if a new roll of film hasn’t yet been started. On this model, the numbers count from 1-12, but on later Autocords which support 220 film, there was a provision to adjust this counter to show numbers 13-24.
At the 5 o’clock position is a small little hole that when film is loaded and the camera has been advanced and wound to the next frame, will turn red, warning you that the camera is ready to make an exposure.
Finally, at the 10 o’clock position is a double exposure override switch. Normally, the Autocord will lock the shutter and not allow you to double exposure the same frame of film. For creative effect, if a double (or multiple) exposure is desired, the user can override this lock by sliding it to the left and holding it, while turning the crank counter clockwise until it stops. This readies the shutter for another exposure without advancing the film.

The other side of the camera has less going on. An accessory shoe for a flash, two pull out knobs for loading and unloading supply and take up spools, and the rear door release are all that’s here. On Autocords with a meter, there is a large exposure calculator on this side of the camera.
The bottom of the camera only has the tripod socket, and feet to keep the camera off the surface of whatever you would set it down on. The back of the camera is completely bare, with no controls, windows, or anything.
The overall process of using the Autocord is very comfortable and intuitive. With the exception of the quick focus lever, you could mistake this camera from any other number of German inspired clones, but with the differences I mentioned above, the excellent build quality and outstanding results you’ll get from the 4-element Rokkor lens, it is clear that this isn’t just another Japanese clone of a German camera.
My Results
During the process of repairing this camera, I shot a couple of different rolls of film through it to confirm everything was working. My first was an expired roll of Ilford film that suffered from massive light leaks as I had not yet replaced the light seals in the film compartment. I am not showing any of those images as they’re not really indicative of what the camera can do.
The second and third rolls were a fresh roll of Ilford Delta 100 and a fresh roll of Kodak Portra 160. In addition to everything I had to do to get this camera working, I also replaced the entire taking lens with one from a donor camera because the original lenses had severe separation, so I wanted to shoot both a black and white and color roll through this camera to really get a feel for the images it made.


I’ll cut to the chase here and declare the Minolta Autocord is a fantastic camera that is absolutely deserving of it’s praise. For something that went head to head with the Rolleiflex and sold for less than half the price, I can’t imagine anyone buying one of these new and being disappointed. For every minor way the Autocord is less advanced than it’s German competitor (levers around lens, lack of fully automatic film loading), the camera excels in others (quick focus helicoid, more reliable film transport), and of course, there’s that lens.
I’ve read some claims that Minolta’s Rokkor lenses are inferior to the German Tessars and Planars that could be had, but frankly, I couldn’t see it. And for the premium you not only would pay for a German TLR, but one with the top-tier Planar, you could nearly buy 3 Autocords for the same amount of money.
When I first handled this camera, it was in miserable shape. The shutter didn’t fire, I couldn’t change shutter speeds, the lens standard was loose, the lenses were hopelessly clouded, and the body was damaged and peeling, yet I was still able to see that through all those defects, behind this sad and broken down camera, was something special.
I took a chance on it, repairing more things in a single camera than I’ve ever done before, and was rewarded with not only a diamond in the rough, but one of the best cameras in my collection. When I go out shooting, I don’t often reach for a TLR as they’re a little less portable and require special attention when shooting, but the Minolta Autocord will be the exception to the rule. I am already looking forward to shooting it again.
While I may one day add a high end Rolleiflex to my collection, and I’m sure it will produce excellent images, the Autocord does everything the Rollei does, and does it for a fraction of the price. The Autocord isn’t a “poor man’s anything”, it’s one hell of a great camera that stands on it’s own compared to any other TLR ever made. I loved this camera, and if anyone reading this article is somehow still on the fence about whether to pick one up, do it. You will not be disappointed!
My Final WordHow these ratings work |
The Minolta Autocord is an outstanding camera that needs no introduction. This was a camera created by one of the top Japanese camera makers at the peak of Japanese camera innovation. No expense was spared to make a well built, innovative, and easy to use camera that competed with German cameras costing more than twice as many. Although my example was found in very poor condition, everything was fixable, and once I did that, I was rewarded with one of my favorite cameras in my collection. Whether you find an Autocord in excellent or poor condition, if you can clean it up and run some film through it, this is a great camera and one that I hope to be using for many more years. | ||||||
| Images | Handling | Features | Viewfinder | Feel & Beauty | History | Age | |
| 2 | 2 | 2 | 2 | 2 | 1 | 30% | |
| Bonus | +1 for the complete package, this is one of the best cameras I have ever used | ||||||
| Final Score | 15.3 | ||||||
Additional Resources
http://camera-wiki.org/wiki/Minolta_Autocord
http://www.dantestella.com/technical/autocord.html (Archived)
https://www.casualphotophile.com/2014/11/08/minolta-autocord-medium-format-camera-review/
http://www.edtse.com/minolta-autocord-models/
http://www.drfrankenfilm.com/autocord-review/4575664837
http://www.wctatel.net/web/crye/a-cord.htm (Archived)
https://www.munkeatphotography.com/film-photography-tips/tlr-camera
One of my all-time favorite cameras. The design allowed you to hold the camera with one hand, and virtually work all the controls with the other; thereby avoiding the “Rollei Juggle” between hands. I found the lenses to be better than a lot of the stuff available with the Rolleicords, and better than most of the Yashica stuff. At one time in the early 90’s, I owned 5 of these, including some with complete boxes and instruction booklets. A lot of them were back-up cameras used by wedding professionals. I was getting them for about 90 bucks a pop. I tested them all and graded them by lens sharpness, but none of them were “dogs”. Alas, I moved to a different city miles away in the late 90’s, which facilitated a lot of winnowing out of vintage stuff, including 4 of these cameras, and some very sweet and perfect condition Canon FTb’s (which a Japanese camera repair tech in Chicago back then, told me was pretty much the best camera Canon ever made).
Sniff…
Great in depth article. I love repair info. Have always been partial to Minolta but that maybe because my first real camera was a 101 in 1970. To me cameras are works of art that are fun to use. Having funds to pursue all those works of art to my hearts content has been fun and space consuming. When I decided to take a look at a 2 1/4 TLR Minolta came to mind. I was lucky to acquire a standard Autocord and Autocord-L around 2002 in very nice condition.
Being a collector I couldn’t stop and ended up with a Rolliecord, Yashica A, D, and Mat, two Ricoh Diacords and some lesser brands for the fun of it. Still the Autocords are the easiest to use because of the focusing system and as you know yield great results. One day you will have to search out a Diacord to try. In the meantime, for the fun of it, do an article on how to remove some of these TLRs from their leather cases. I just tried a Diacord and what a pain!
Thanks for the kind words. I agree these are wonderful cameras, and you are definitely right, it can be hard to stop when you are a collector and theres so many other intriguing models out there to play with! 🙂
Mike, thanks for another great review. Being a die hard Minolta fan, you can’t find a lot of great reviews, and you did the Autocord justice. I have the LV model and the meter is still pretty accurate. I got mine back in the 80’s along with an XE-7 at of all places, a yard sale. Think my grandmother talked the lady down to $5.00 for both. Still have and use both today.
Thanks again for the great review!
Wow! $5! I’ve never had a score like that, and sadly, as more people realize there are collectors and users out there wanting these old cameras, the prices are going back up! I am still very happy with my Autocord after what I paid to buy it and get it back in working shape. I’d take this Autocord over most Rolleiflexes any day! 🙂
Excellent blog Mike! I also own a Minolta Autocord L and it was really superb! But I have this experience where the arm in my shutter speed is loosed an I don’t know how to fix it (I think the screws are also loosed or something). But again thanks for this blog since you also discussed how to disassemble an Autocord. 😀
Theres a very strong chance your loose shutter speed selector has a screw that backed out. Its a pretty simple fix. Just follow the instructions in my post to get the front lens element off and the shutter place and you should be able to tighten it. Assuming you are successful, take a drop of nail polish on the head of the screw before you put it back together. That will prevent it from backing off again in the future.
Dear Mike,
thanks for writing about my website as a resource of your long and mostly complete page. My mother was using a Roleiflex during the ’50, the 60′ and the ’70s. For a few years I wanted to come back to square mid size film cameras. When I saw the Roleiflex big prices I chose to buy an Autocord. Now I have over 30 of them – and also a Minoltaflex 1 from 1938 in full working condition after a self restoration (yes, I took pictures with it).
It’s good to know so many people like and use the Autocord.
Thanks for the comments Fred! As you can see from the review, I absolutely agree the Autocord is a fantastic camera and every bit as worthy of mention to the Rolleis. While there was likely a time a few years back where they slipped past modern collectors, I’ve seen prices rising in recent years to where some Autocords can actually fetch higher prices than their German competition. While mine was certainly a project and after it was complete, I probably could have saved money by just buying a good one from the get go, I’m still happy that I did my part to rescue one from the trash bin!
Great Post, you obviously love photography very much
Excellent article. Everything we should know about this camera is here. I’m glad I found you via Pinterest. I own 2 autocord and I absolutely love it. I did some repairs to one of mine (thanks to Fred’s website) and I am amazed by the build quality of this camera. The lens is fantastic with great details and sharp.
I have never used other TLRs but it’s pointless to try. I found my favorite square format camera.
Again great great article
One more thing : many thanks Mike
Hi Mike, donation made, this info is so appreciated. Sat here with my father’s Autocord slightly in bits. I need to check but I think he may have bought it new in the eraly 60s, so in very good condition. Currently doing a deep clean and looking forward to getting out with it again, I have taken some (not many) frames and always thought there was a ‘magic’ cloud of 1960’s ‘air’ between lens and film that made results unique. Thanks again, Dan
Dan, thank you for the kind donation and I am pleased to know that you found my article to be helpful! These old Autocords are “magic” as they not only are fun to use, but consistently deliver outstanding results! Glad to hear your father’s camera lives to shoot another day!
Hi Mike,
I just found your site and the Autocord write up is amazing. Was not aware what “Minolta” meant! I just received my Autocord, the same model you have, and just shot my first shot!!!! I use a Seconic L158 as the meter and set the camera according to the meter. I have copied your chart for f stops and shutter speeds. So much easier using your chart. I don’t use the “13” formula, as I have checked the light meter to my digital camera in manual mode and works perfect. Thank you so much!
I’m glad you enjoyed the review, and more importantly, are enjoying your Autocord! These are fantastic cameras and still worth shooting today!
I forgot to mention that It just had a full CLA by Karl Bryan, and came with the wide angle lens, gonna have some fun now!
Wonderful article! I inherited my father’s Autocord after he passed away. I brought it with me to help me docuent my time here in Japan. I really need to go out and put a few more rolls of film through it.
Also, I’m glad you like my article on the CONTAX N1. I got very lucky and picked up 8 of the 9 lenses made for the system through trades, bargaining and just plain luck here in Japan.
Glad you enjoyed it! It’s extra special to me that I was able to fully restore this particular Autocord, but that I rescued it from the shelves at Central Camera in Chicago before it burned down. Had I left it there, it likely would have been destroyed!
This is wonderfully detailed!
What kind of spanner did you use to get the lens locknut out?
I have a Japan Hobbies lens spanner, the compass type, but it doesn’t clear the opening. I’ve thought about an automotive type spanner wrench but the ends seem to large.
I own Rolleiflex, Yashica Mats and a couple days other TLRs. I must say that the Minolta Autocord performs slightly better than the others based upon a smarter design.
Morgan Sparks provides excellent cameraleather replacements that are high quality and reasonably priced.