

 What is it?
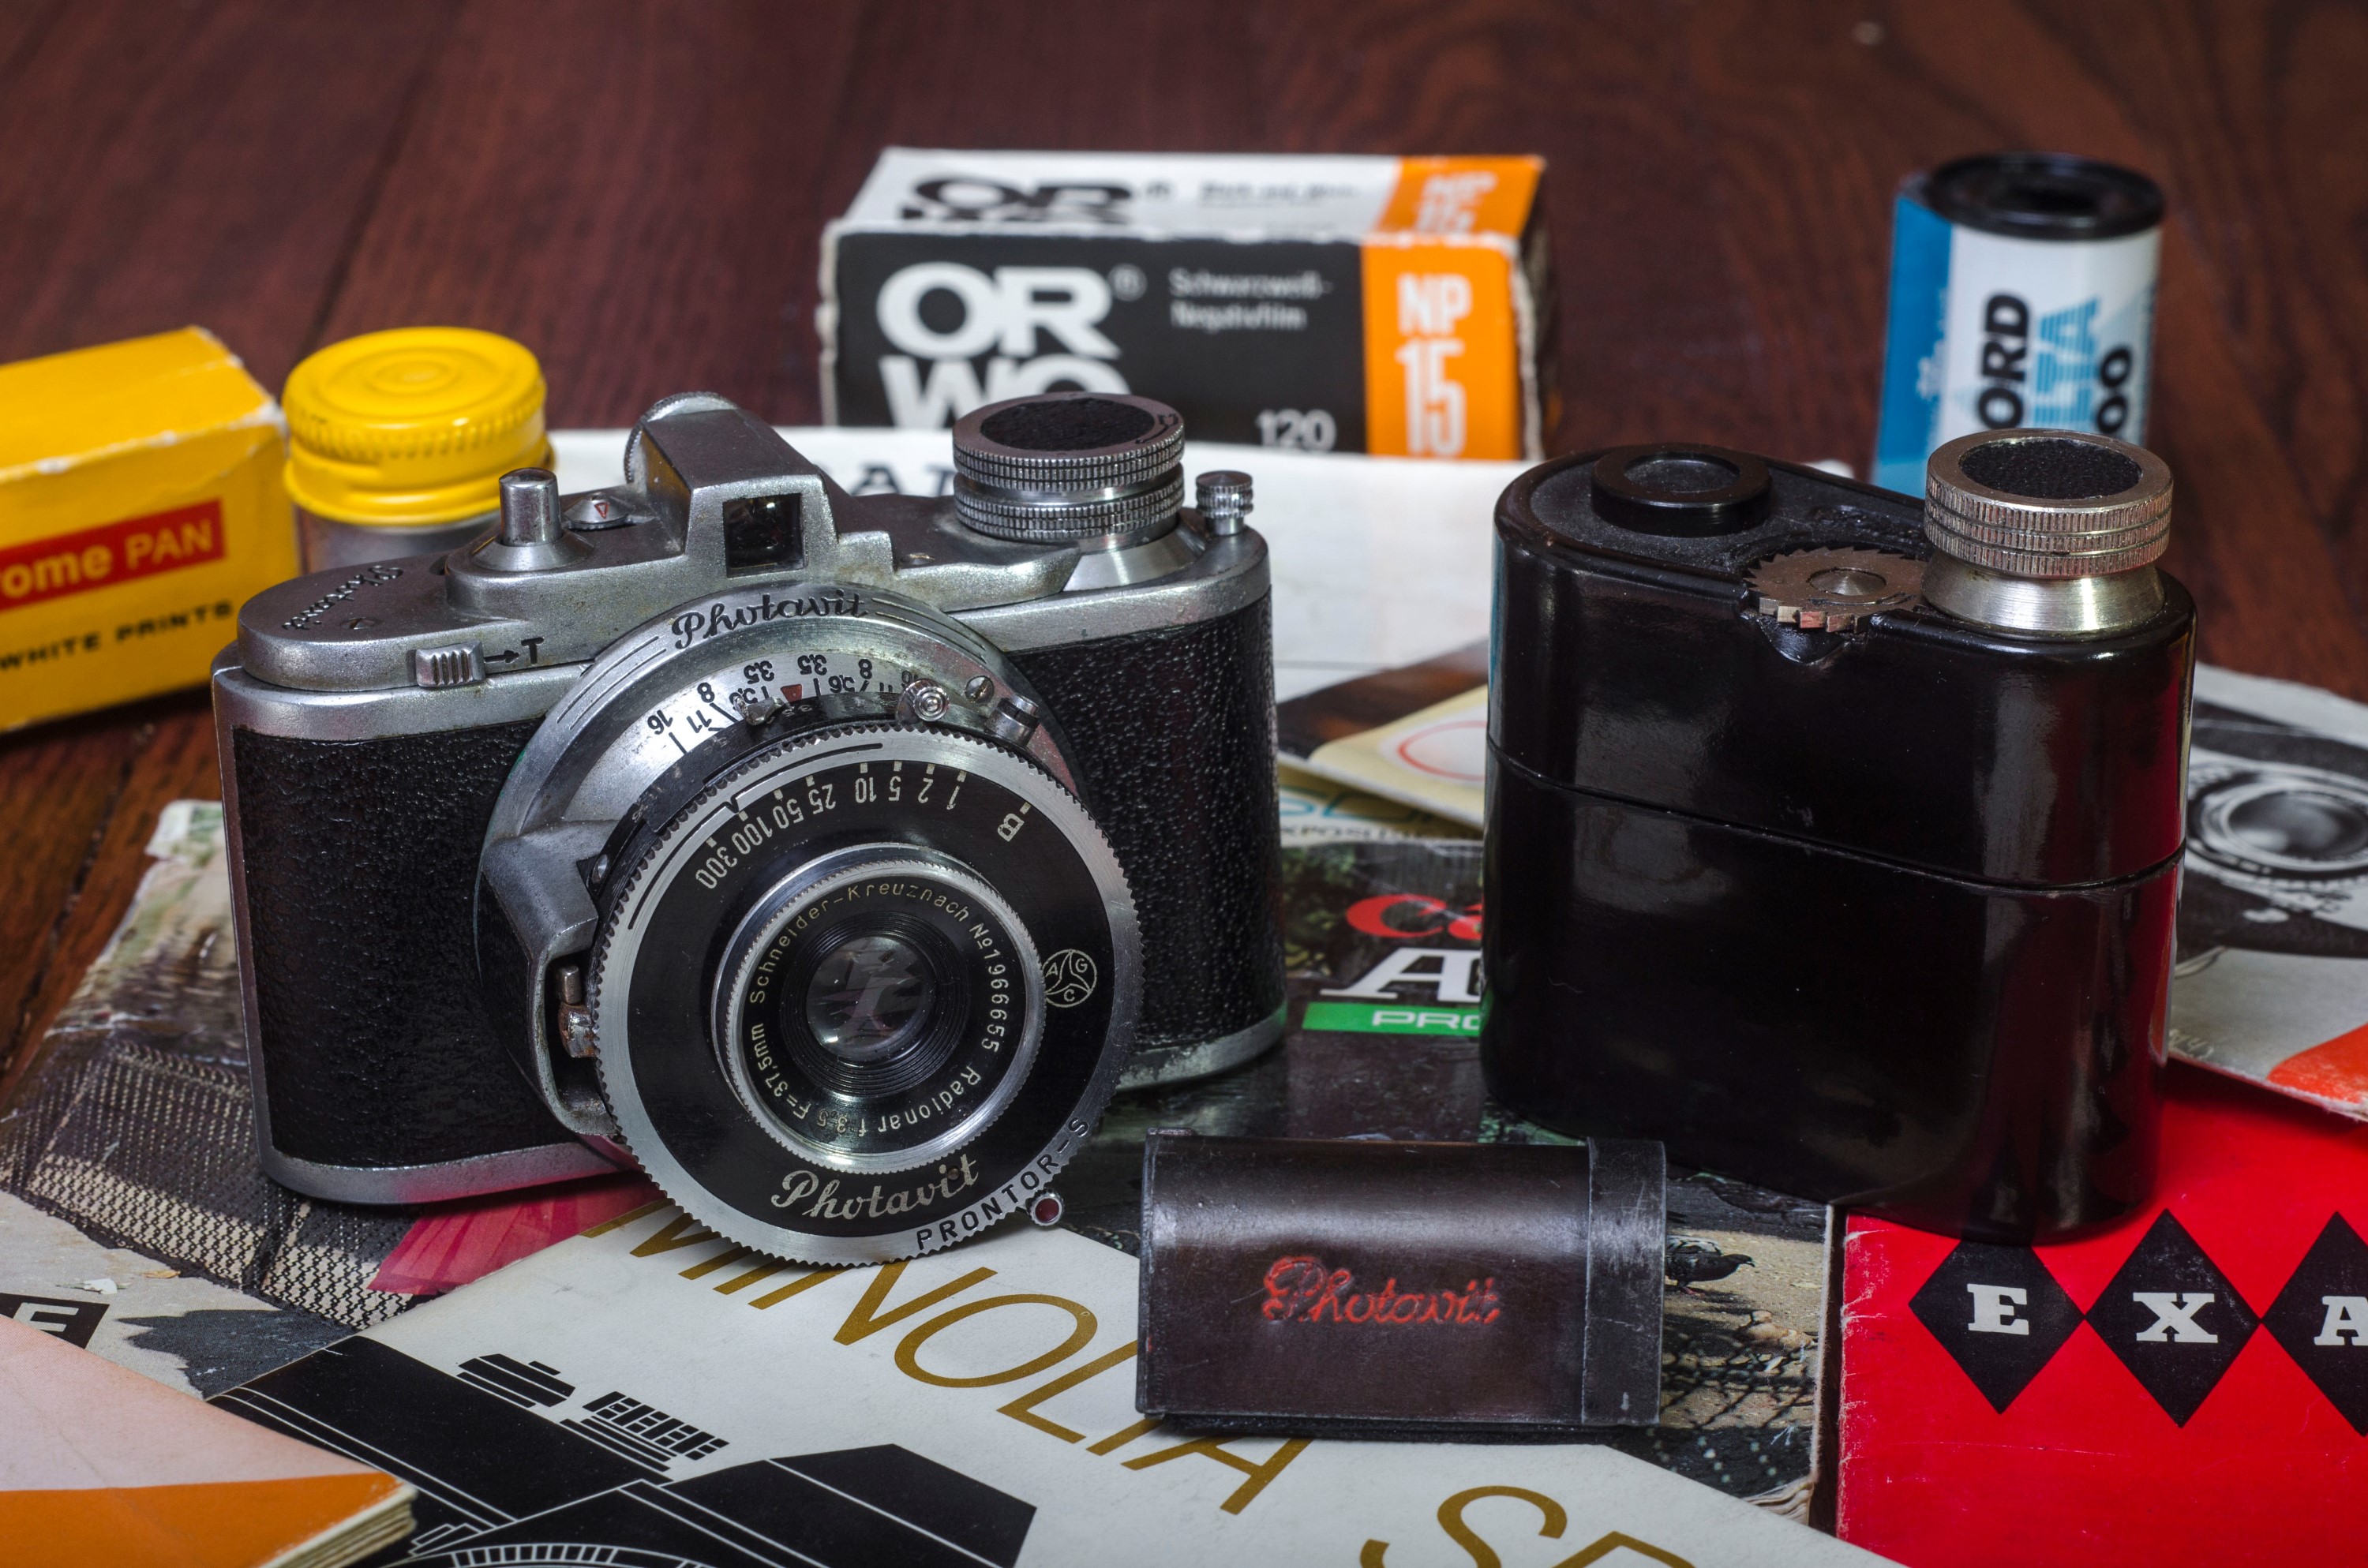
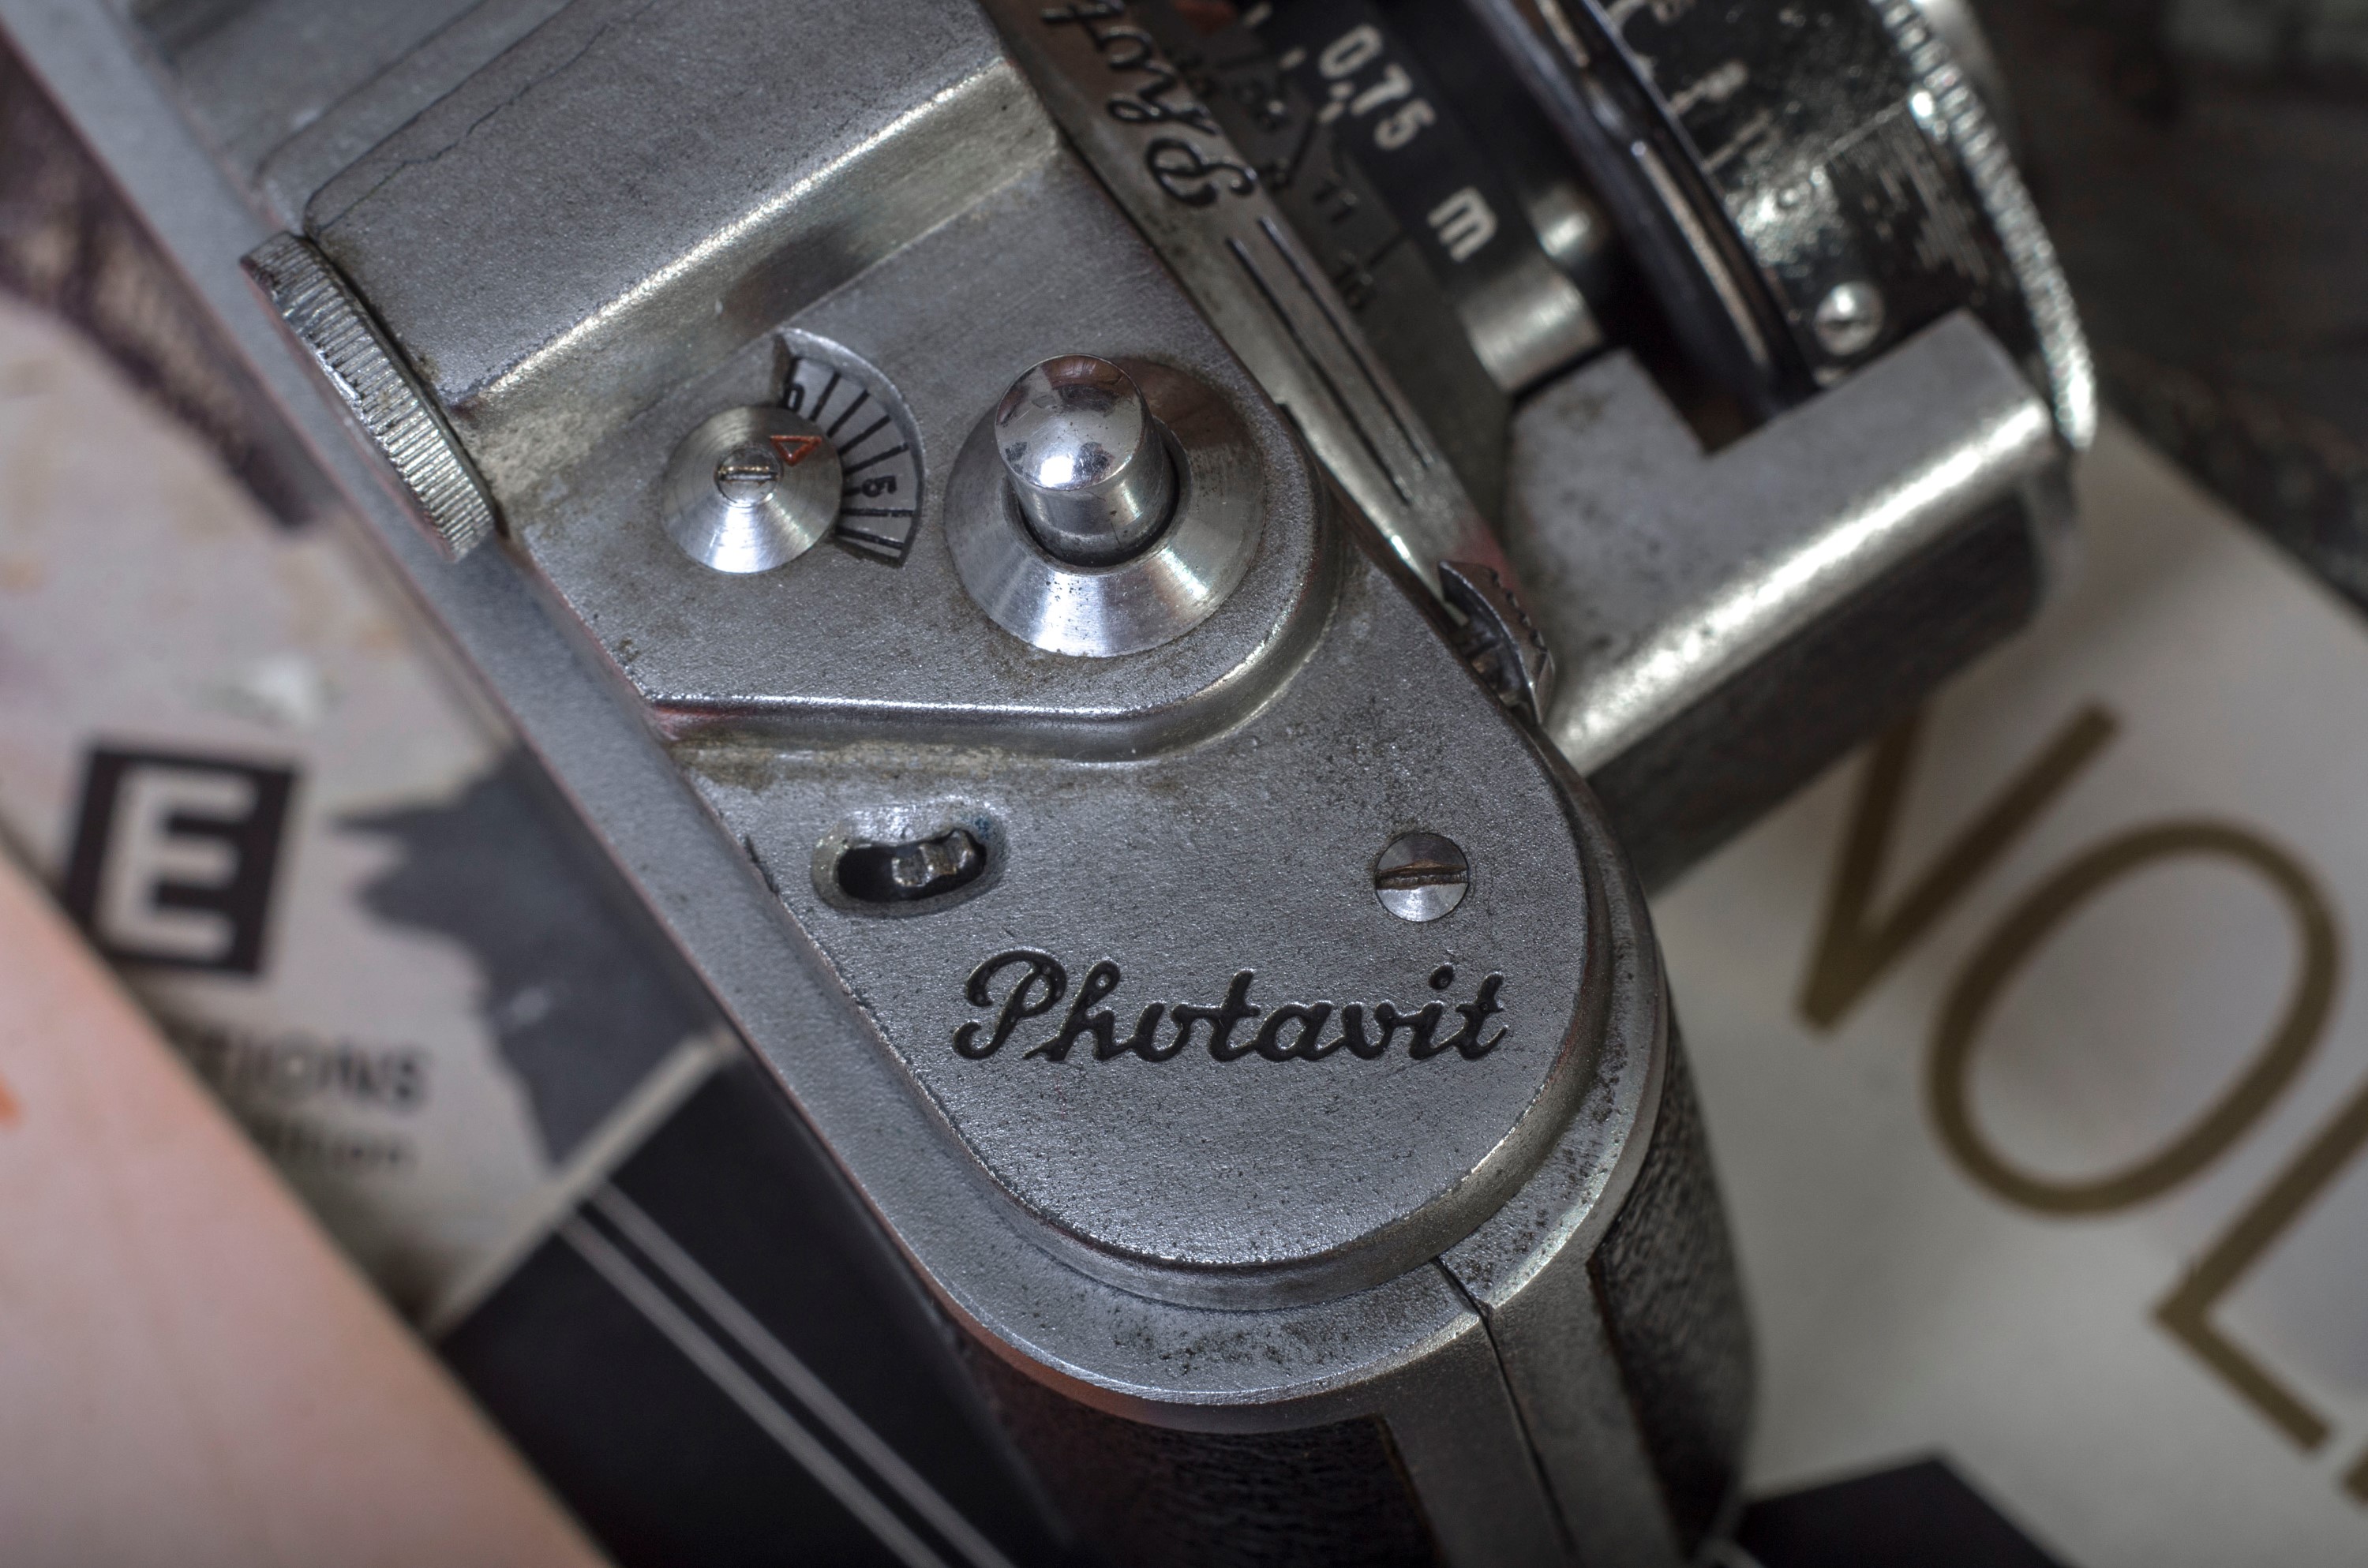
This is a Photavit IV 35mm camera made by Photavit-Werk GmbH in Nuremberg, Germany starting in 1947. The Photavit IV shoots 24mm x 24mm square images on regular 35mm film stock, but it requires the use of proprietary Photavit film cassettes to maintain it’s extremely small size. Before the camera could be used, film would have to be hand rolled into these cassettes and then loaded into the camera. Despite it’s small size, the Photavit series was generally well built and came with capable lens and shutter combinations.
Film Type: 135 (35mm) Loaded into Proprietary Photavit Cassettes
Lens: 37.5mm f/3.5 Schneider-Kreuznach Radionar uncoated 3-elements
Focus: 0.75 meters to Infinity
Viewfinder: Scale Focus
Shutter: Prontor-S Leaf
Speeds: B, 1 – 1/300 seconds
Exposure Meter: None
Battery: None
Flash Mount: PC socket
Manual (multiple languages): https://mikeeckman.com/media/PhotavitManuals.pdf
History
Bolta Werke GmbH is a multi-national German corporation that still exists today as a maker of high performance surface finished components, predominantly for the automobile industry. Bolta’s products can be found on vehicles made by exotic brands like Lamborghini, Mercedes, and Audi.
It was originally founded in Nuremberg, Germany by Johannes Bolten in 1921. The company originally started making a wide variety of products out of various types of metals and plastics. The company has dabbled in a variety of industries over the years, but seems to have stayed true to it’s original vision as a leader in the molded plastic and metals industry.
Bolta’s first products were combs and small toys made out of Bakelite, aluminum, and rubber. In my research for this article, I found little information about what else Bolta did during these early years, but in 1929 Johannes Bolten would emigrate to the United States at some point and launch an American branch of the company there. I can only assume the American Bolta produced many of the same products.
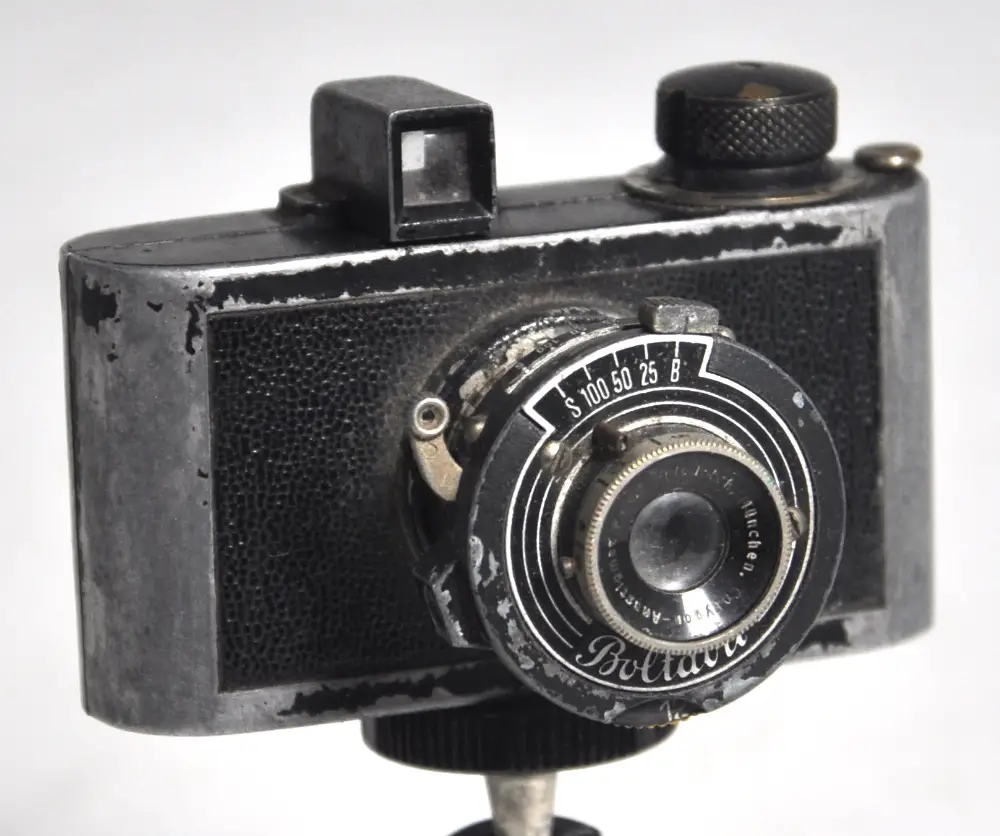
In 1935, the German Bolta would produce it’s first camera which they called the Boltavit. It was an extremely tiny camera, barely larger than a box of matches. It had a collapsible lens tube and was available with a variety of German shutter and lens combinations. Despite it’s small size, the Boltavit was a fully featured camera that made 24mm x 24mm exposures on paper backed 35mm roll film. The Boltavit would set the stage for an entire lineup of compact, but capable cameras that the company would make over the next several decades.
 Two years after the Boltavit’s release in 1937, Bolta would branch off it’s camera production into a separate company called Photavit-Werk GmbH and all subsequent cameras would be called Photavits. The Photavit I was simply a rebadged Boltavit II and is the only Photavit camera to share the original camera’s body design.
In 1938, the Photavit would be completely redesigned adding features like a top plate shutter release, double image prevention, and support for a new cassette to cassette film system that allowed for regular 135 format 35mm film to be used. This new camera was called the Photavit II and was the last new model developed before the war.
In 1941, after the outbreak of war, Bolten would lose control over his factory in Nuremberg as the factory transitioned to making products for the German war effort. Throughout the war, Nuremberg was the target of many Allied bombing raids and a large percentage of the city was destroyed. Somehow, the Photavit-Werk factory was spared total destruction, and Johannes Bolten was able to reclaim his factory after the war. Production of Photavit cameras resumed in early 1946, just in time for a revised model called the Photavit III to be released. The new model added further upgrades such as a helical focus with a non collapsible lens, a depth of field scale, and it was the first Photavit model to have the name “Photavit” appear on the camera.
The last “upgrade” to the Photavit line would happen in late 1947 and would be the first to be designed for two different film formats. The 35mm version would be called the Photavit IV, but another that used Kodak’s 828 film would also be released called the Photavit 828. The Photavit 828 was a logical option for Photavit as it was more consistent with the company’s earliest models that used a proprietary type of paper backed 35mm roll film.
Other than the film formats, the Photavit IV and 828 models would be nearly identical adding new features like an all new exposure counter with reset lever, a “T” mode which allowed for long exposures to be made with the lens open, and a larger lens base with the name “Photavit” engraved into it. Another major upgrade to the two models was an upgraded film transport system that allowed for even frame spacing. All earlier models would vary the frame spacing as the film was wound on. The first few images on the roll would be close together, but later exposures would waste more space between the rolls. This was no longer an issue on the Photavit IV and 828 models. Finally, later versions of the Photavit IV and 828 added a screw in cable release socket which simplified long exposures.
In 1951, a Photavit V was released that was a less featured model compared to the IV. This new camera was released likely as a way of cost-cutting to make the camera available at a cheaper price. The Photavit V lost the helical lens mount and returned to a simpler, front cell focus and also offered simpler lens and shutter combinations compared to earlier models.
After the original Photavit series, the company would experiment with two other models, both quite rare. The first was a Twin Lens Reflex model that used regular 120 roll film which they called the Photina. There were three variants of Photina cameras. The first two, simply called the Photina I and II were pseudo-TLRs like the Voigtlander Brilliant and Argus Seventy-Five which had a brilliant viewfinder that was not coupled to the taking lens. Focus could only be achieved by estimating, like in other pseudo-TLR designs. The third variant was a true-TLR with coupled viewing and taking lenses that was called the Photina Reflex. The entire Photina series was reasonably successful and all three variants were exported and rebadged in the United States as the Sears Tower Reflex II, III, and 30.
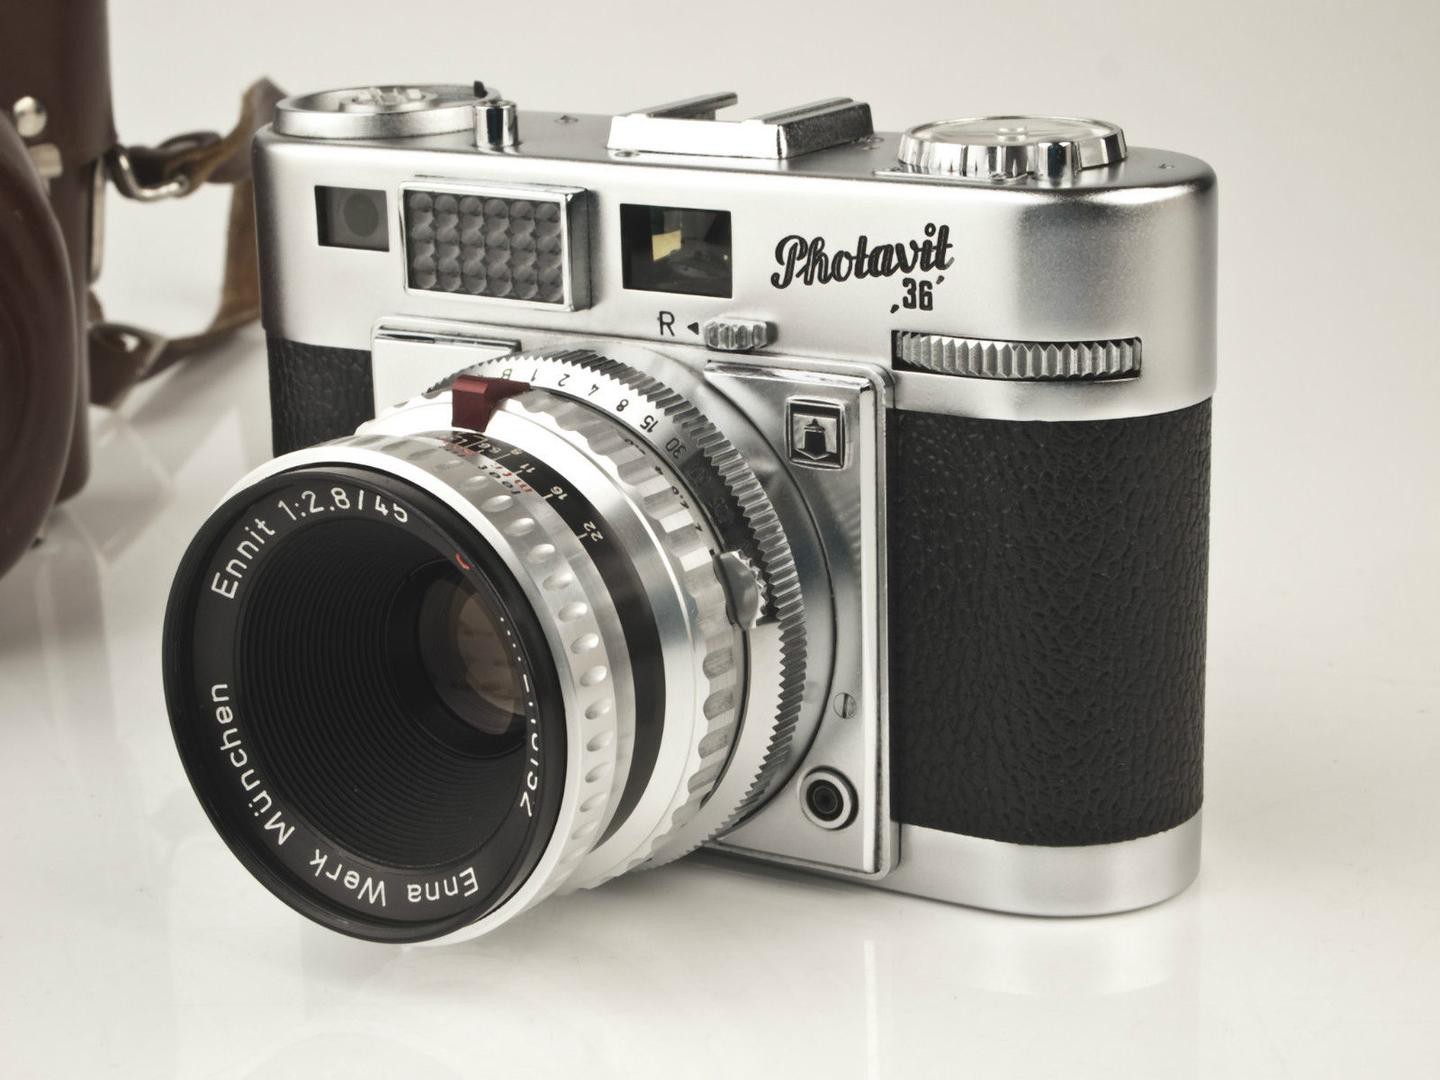
The last Photavit-Werke camera was the Photavit 36, a true 35mm camera that used regular Kodak type 135 cassettes, it was a completely new design that shared a very similar, but not identical, design to the Braun Super III. The Photavit 36 had both a rangefinder and an interchangeable lens mount that it shared with the previously mentioned Braun Super and King Regula. There were two variants of the Photavit 36, one with an uncoupled selenium cell light meter, and one without. The Photavit would be the last camera made by Johannes Bolten’s company, and is quite rare, with an estimated production of around 4000 cameras.
Throughout the production of Photavit cameras, the original Bolta company continued to make a variety of plastic and metal products for a the automobile and medical industries. In 1952, Bolta would innovate with new methods of plastic production, helping to develop early versions of PVC and Saran plastics. In 1958, Bolta would form Bolta Industries in Schönberg, Germany where the company would exclusively focus on the manufacturing of plastics and metals.

Bolta would be very successful, and in 1964, would relocate once more to an all new factory in Diepersdorf, where the company’s headquarters are still located today. At this time, Bolta was a world-leader in surface-finished injection molded components, an industry they still lead today. Over the decades since, Bolta made products have appeared in and on many products made by various companies. It is very possible that anyone reading this article has at one time in their life come across a product that had a Bolta designed or manufactured component in it, without even knowing about it.
Today, Photavit cameras are quite collectible for a variety of reasons. Their compact size and unique shape make them unlike most cameras out there. There were only ever a few cameras made that used 35mm film and took square images on them and they’re all desirable by collectors. I was fortunate enough to find this one for a price that was far below the average asking price. As I write this, a quick eBay search of sold auction prices range from $46, all the way to $250 so there is a wide range of prices one might expect to pay to add one to their collection.
Repairs
A common reason why I am able to acquire cameras for far below typical asking prices is that I am willing to take on risky models that are in an unknown operating condition, or in some cases, broken. This Photavit was sold by a seller who listed it as having an inoperable shutter. True to their description, when the camera arrived, the shutter wasn’t just stuck, the shutter release was too. Prontor shutters are like any other leaf shutter from the era in that they are prone to dried lubricant that can cause the shutter blades to move slowly, or not at all. But even the most sticky shutter should not jam a shutter release. I figured there had to be something wrong under the top plate of the camera.
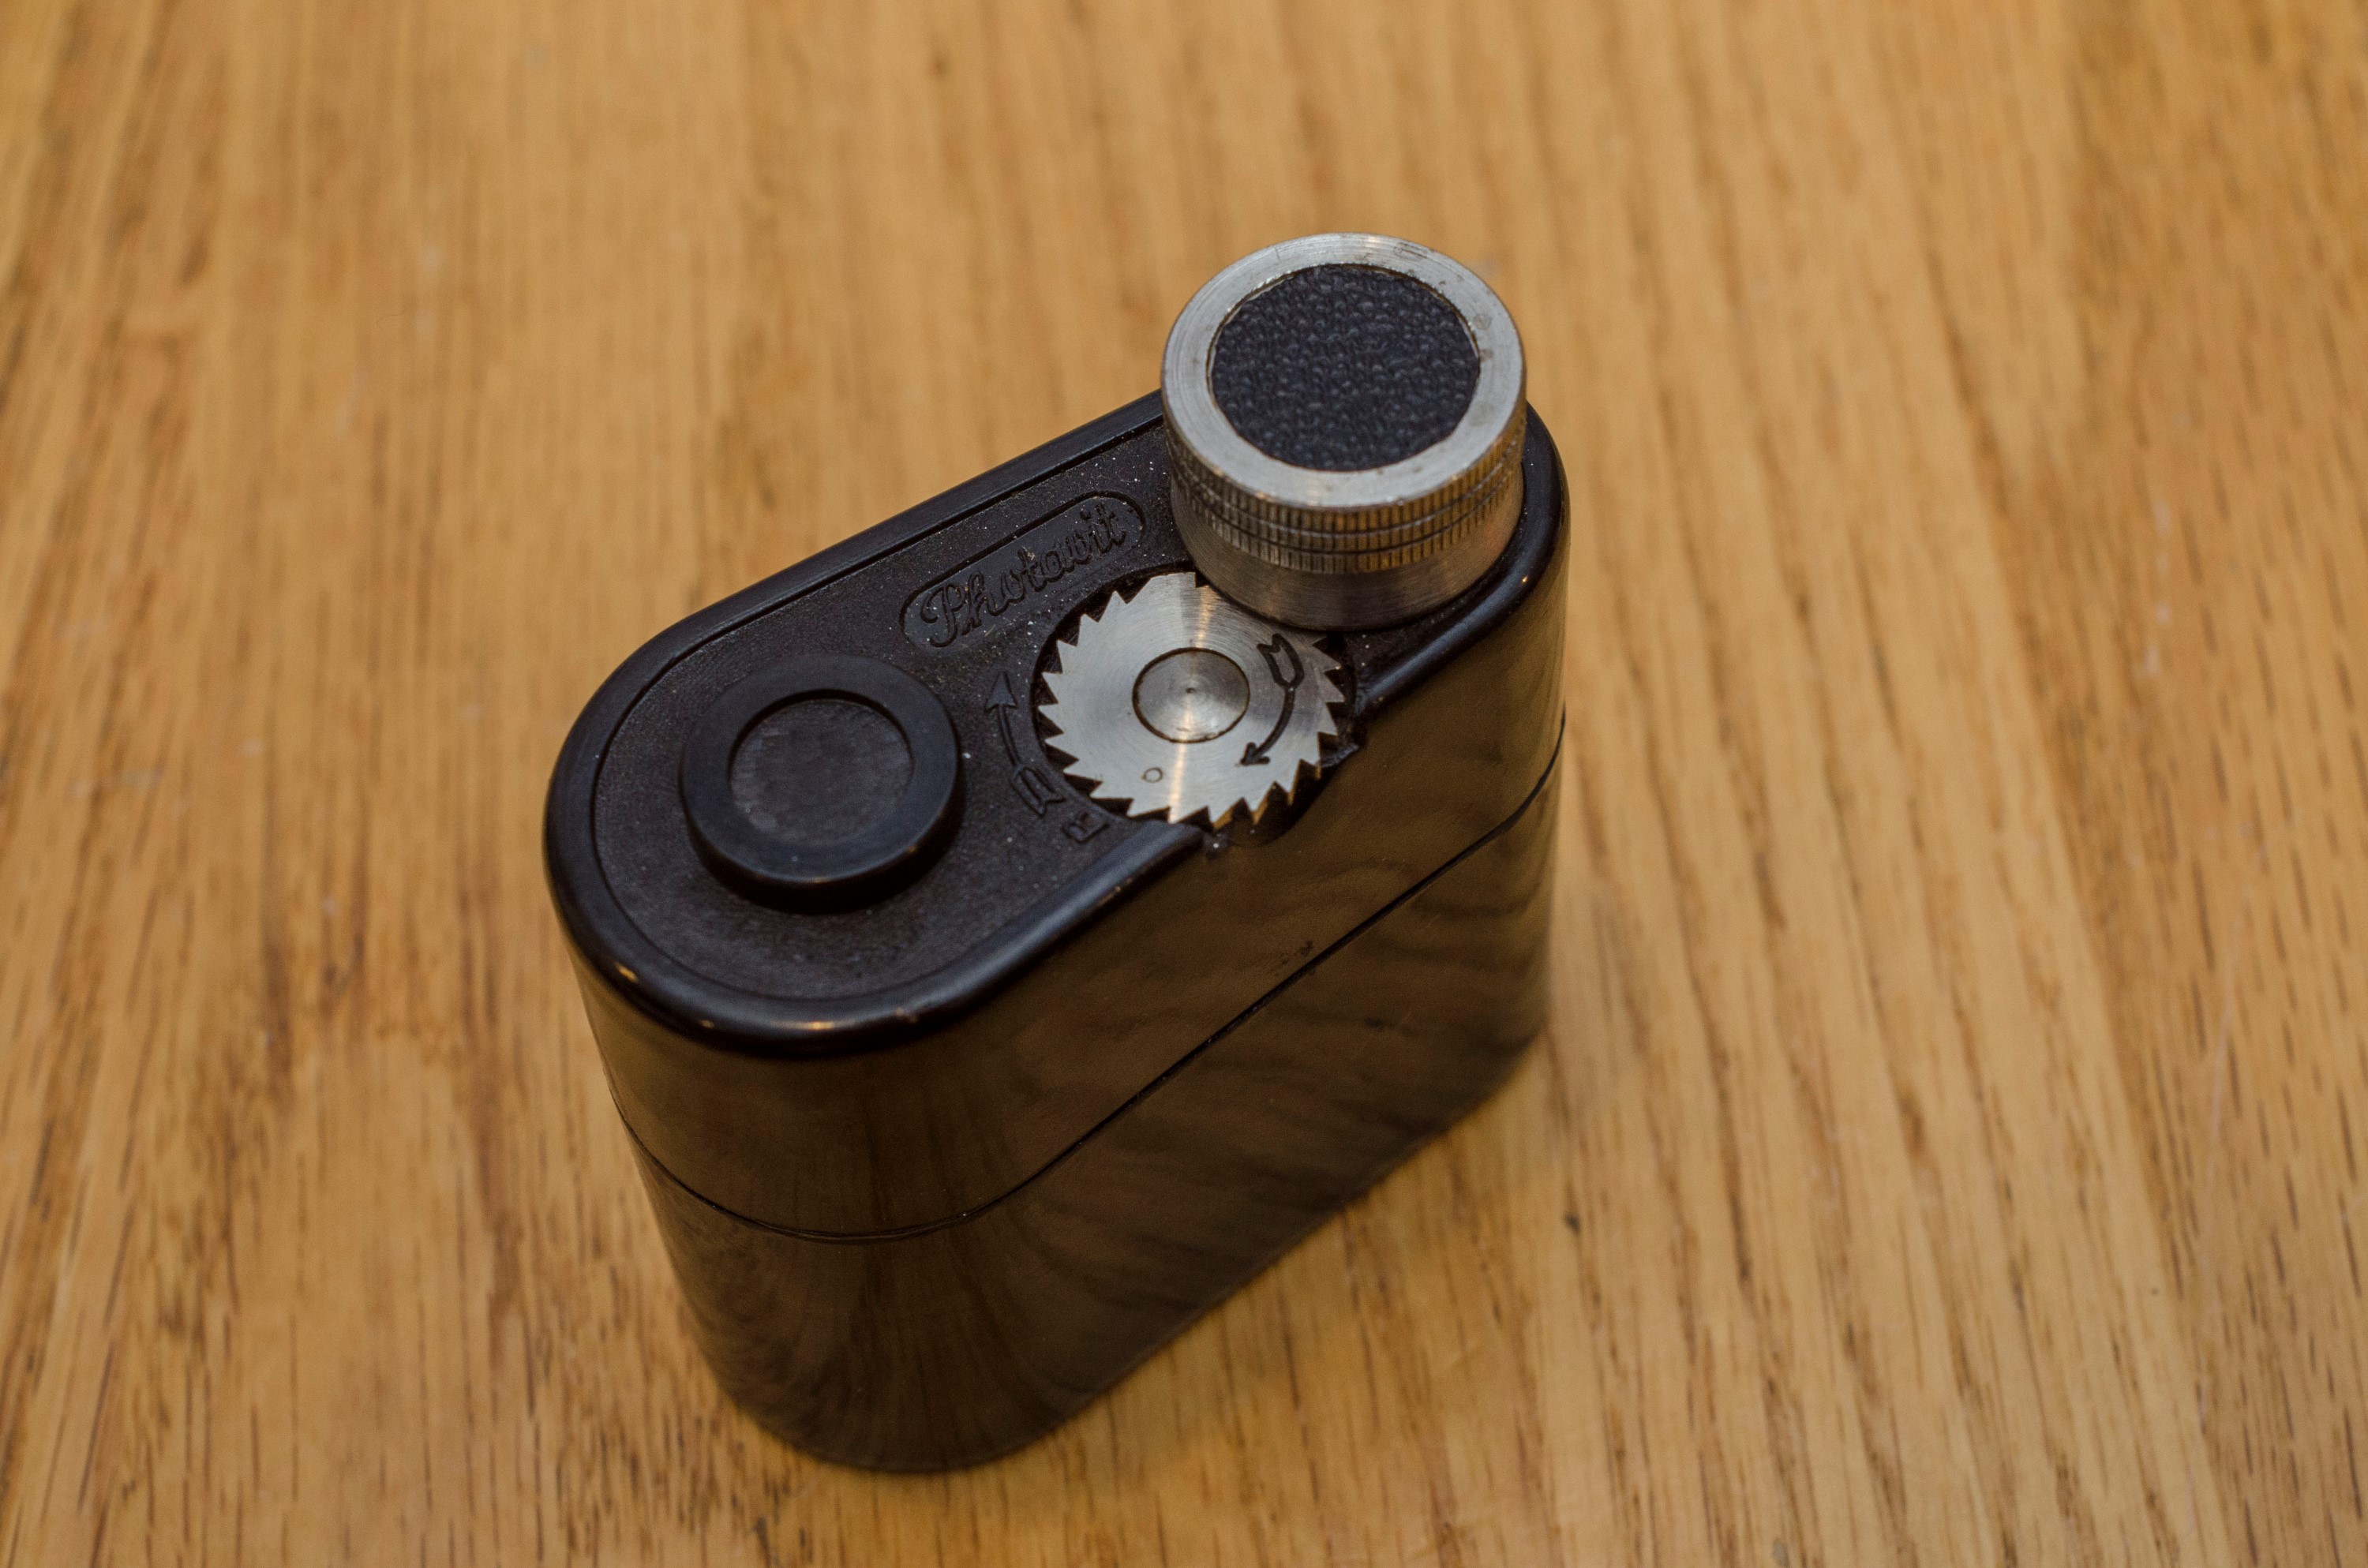
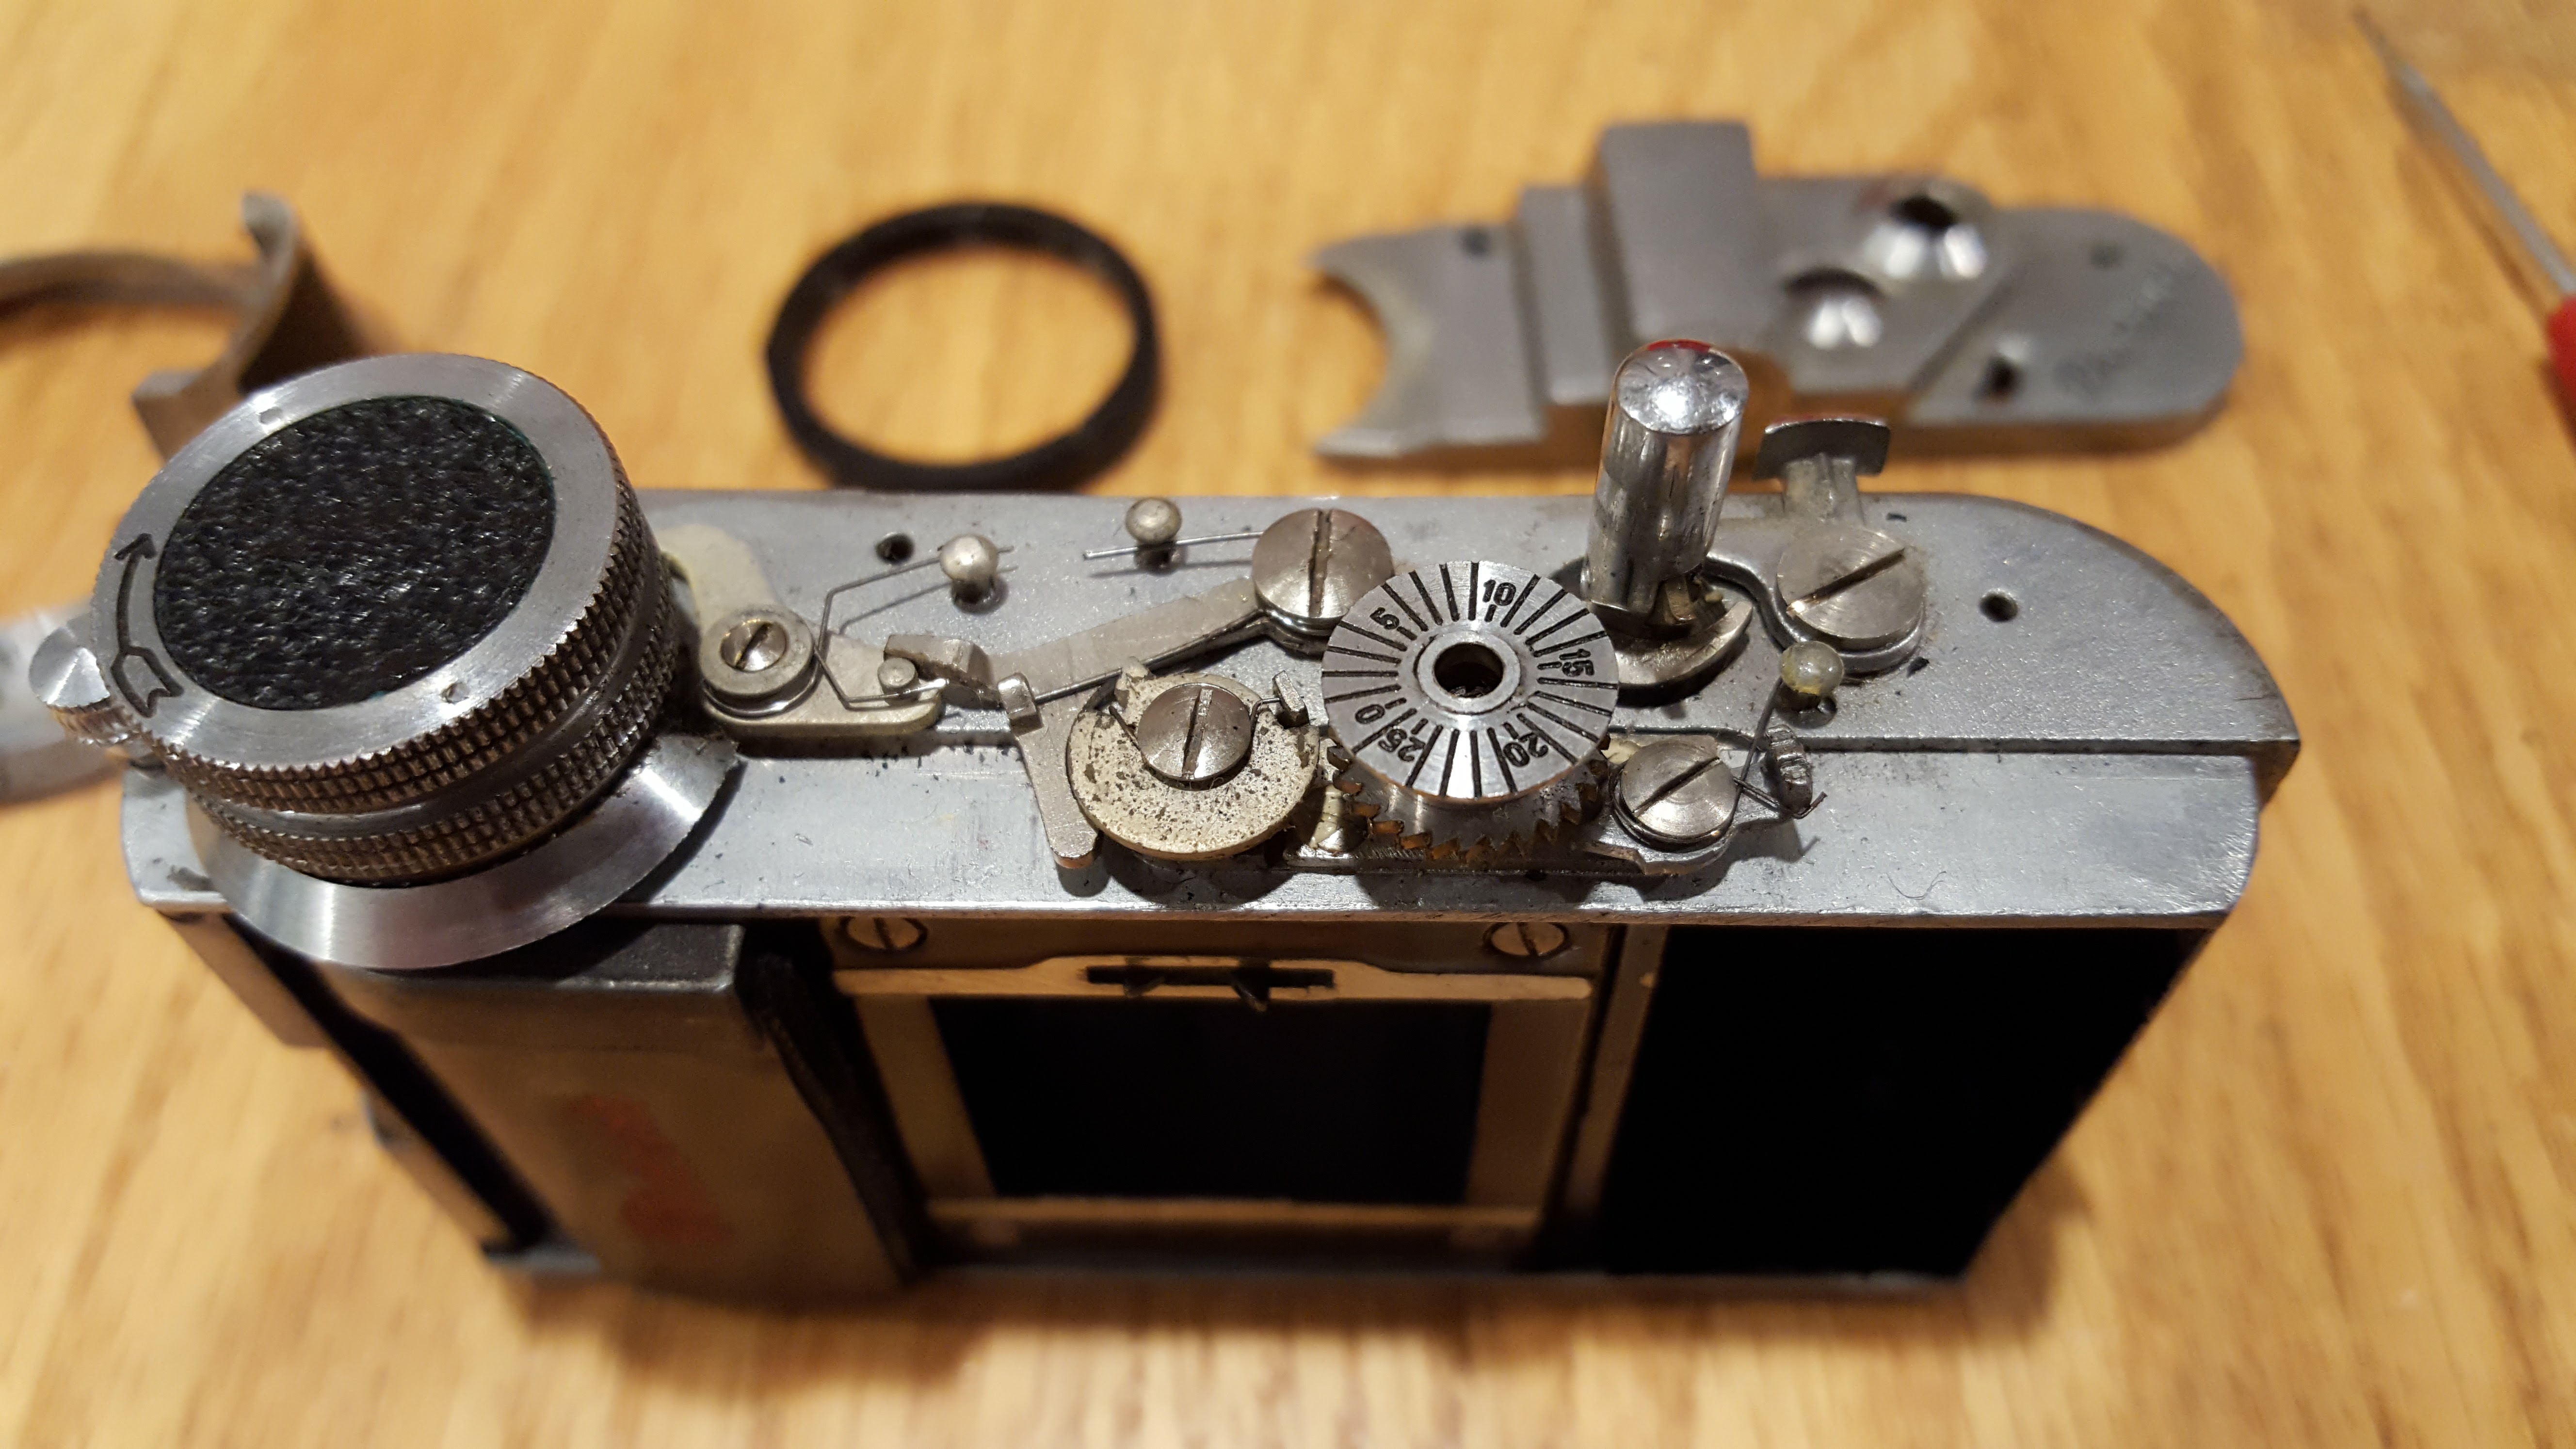 Lucky for me (and possibly you), the Photavit has one of the easiest top plates to remove. There are two screws on the top plate that when removed, reveal the insides. The image to the right shows the rudimentary shutter release system and frame counter. I found that a catch that exists under the shutter release to prevent double exposures had become bent and all it took was a bit of “persuasion” to get it lined up again so that it would operate as designed. Unfortunately, I did not document much of this process, so I don’t have a lot to show you, other than just to say, the fix was pretty straightforward. Satisfied with my repair, I put the top plate back on.
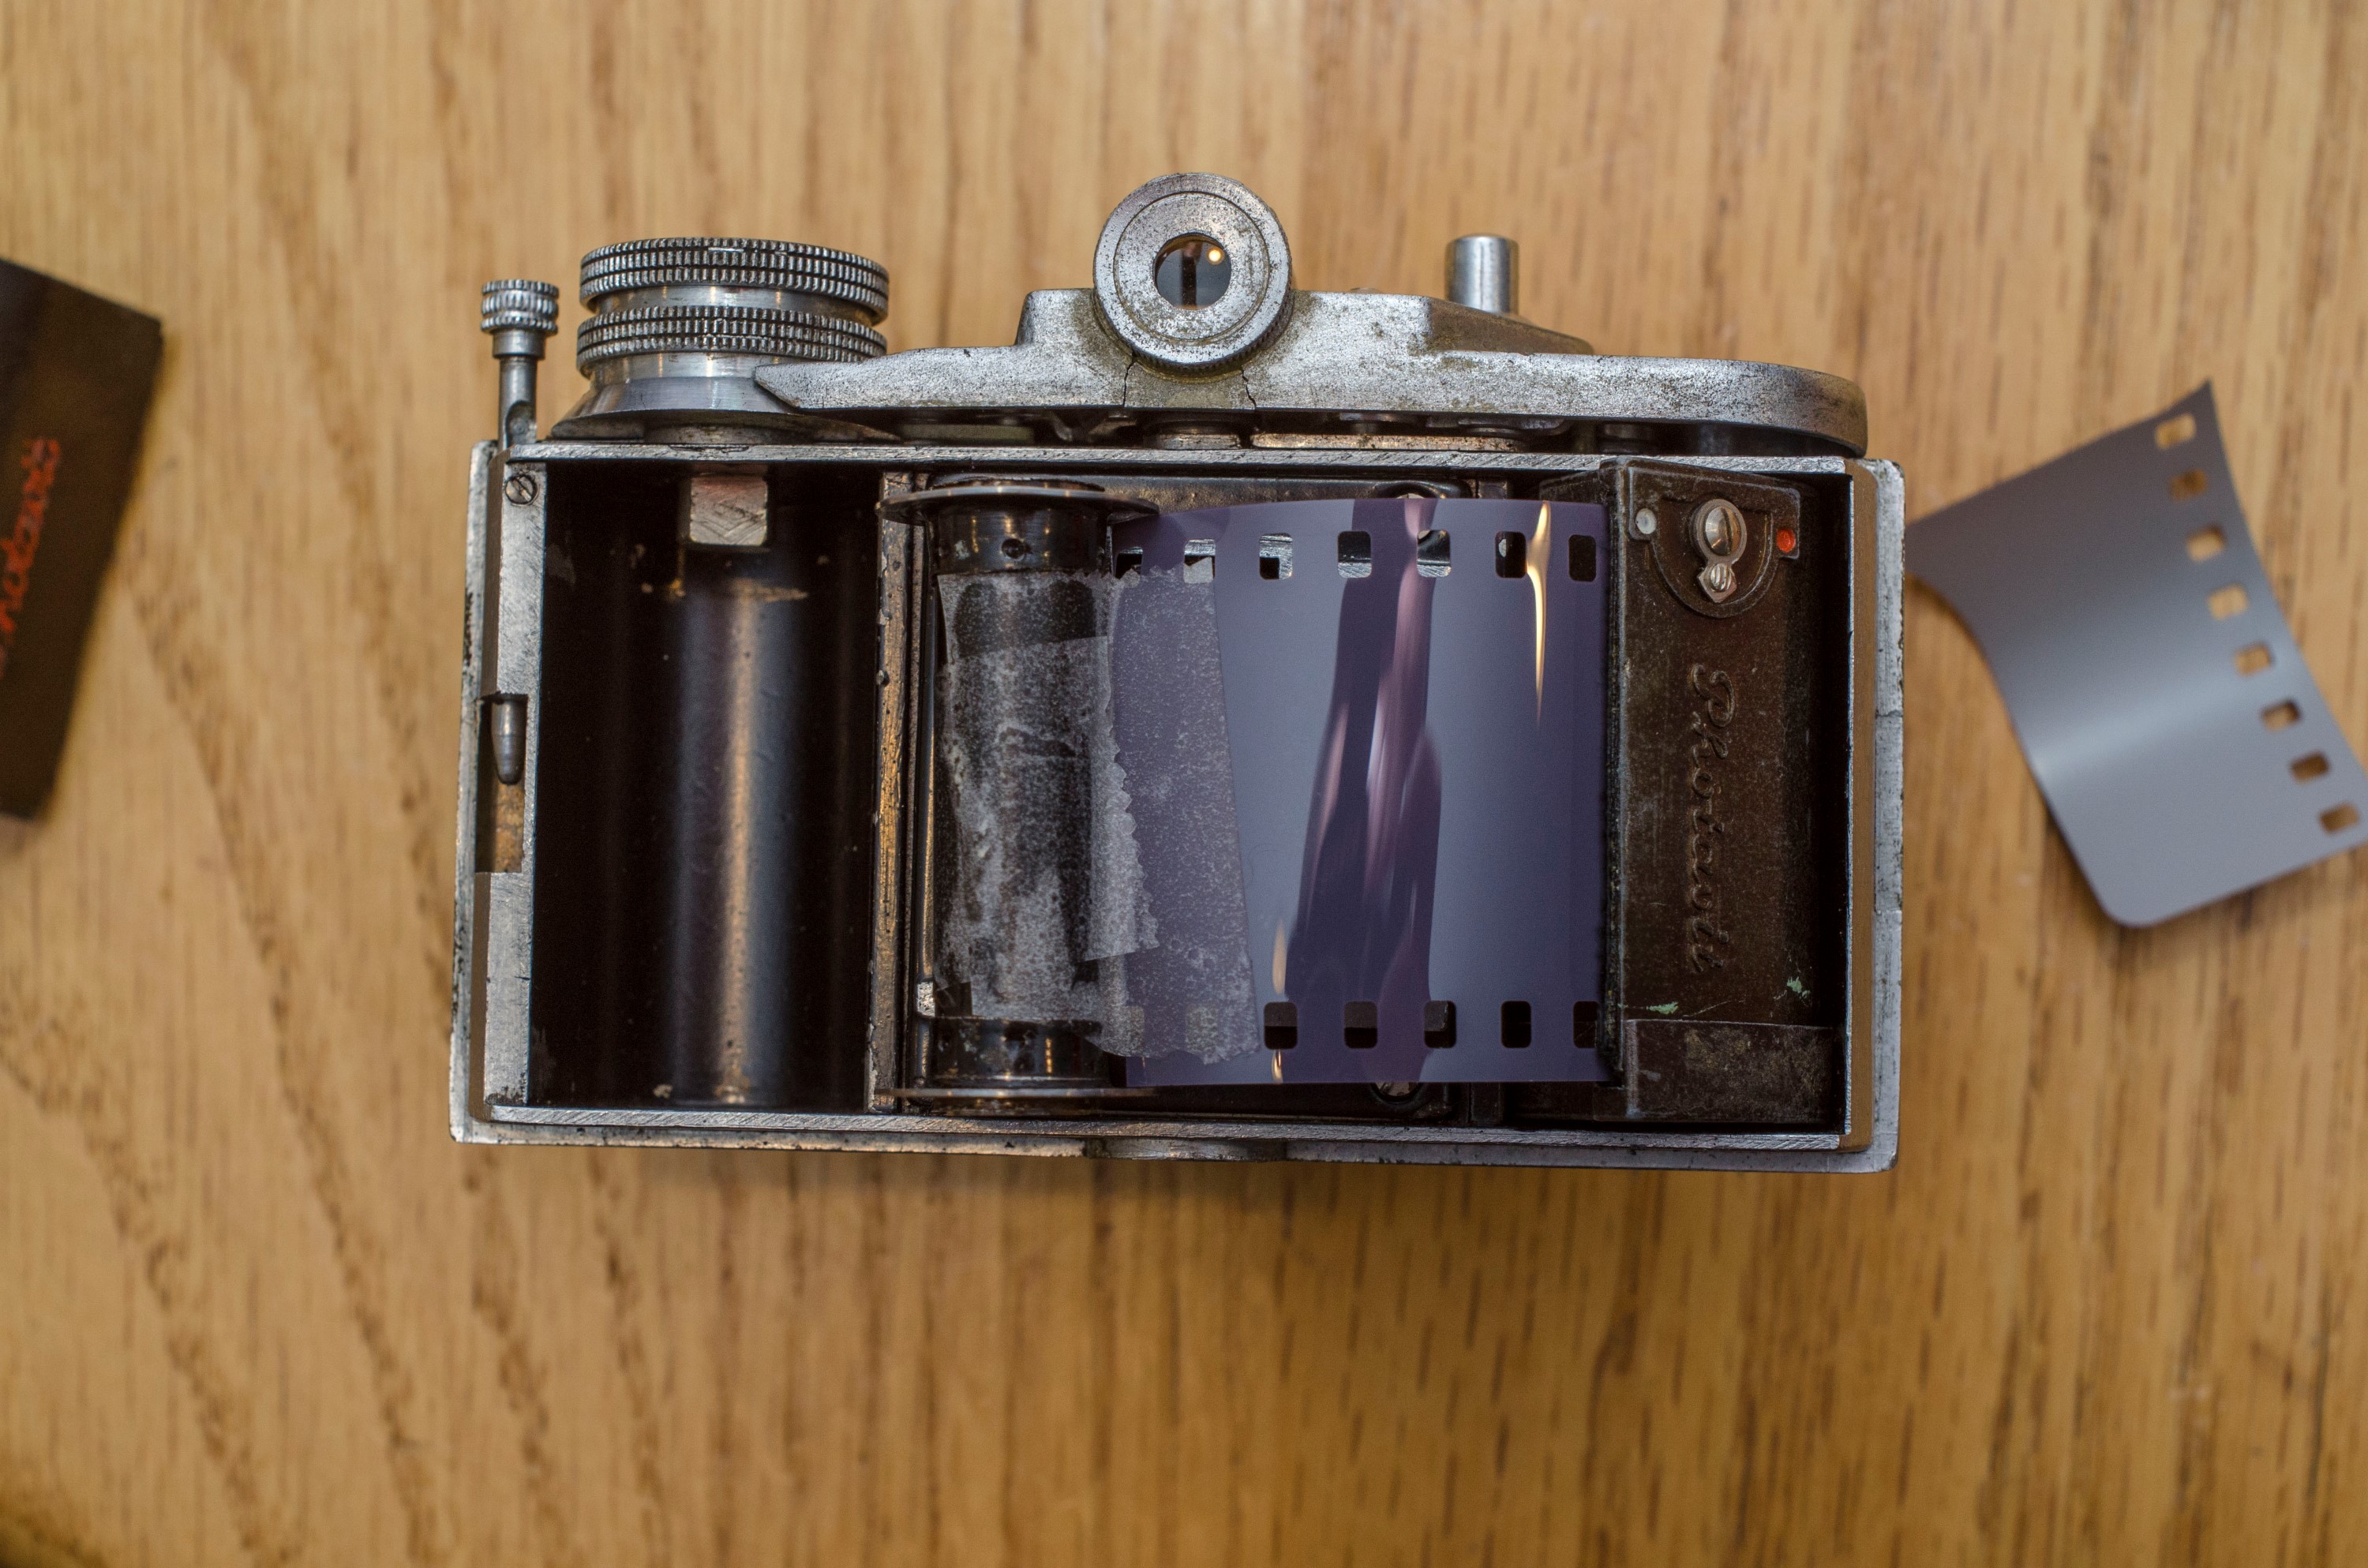
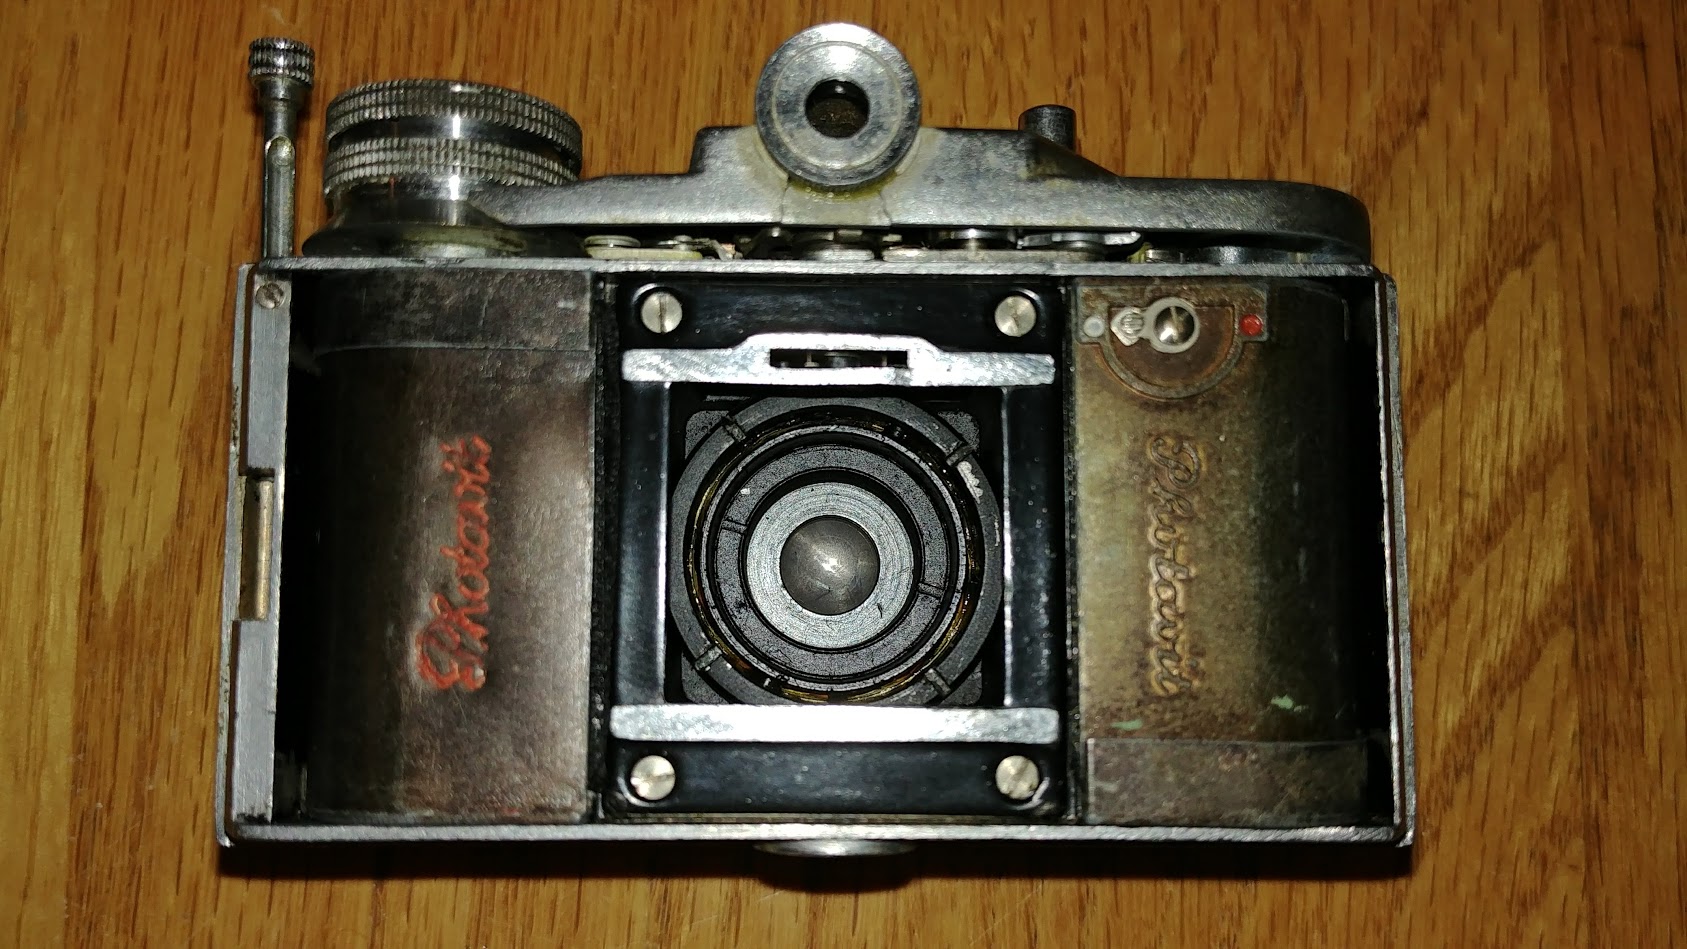 Next, I needed to clean the shutter. The Photavit is designed much like a pre-war German folding camera in that the Prontor shutter and lenses are connected to the camera body using a round lock ring around the back of the shutter visible in the film gate. In the image to the left, you can see two rings with notches in them. Using a spanner wrench, remove the outer ring and the entire shutter will come out of the camera.
 With the shutter out of the camera, you can unscrew the rear element, the front element, and flush the shutter. I did not take any pictures of the shutter flushing process as it was nearly identical to every other Prontor or Compur shutter flush I’ve ever done. I found that all it took was a single flush and the Prontor shutter was firing correctly at all speeds.
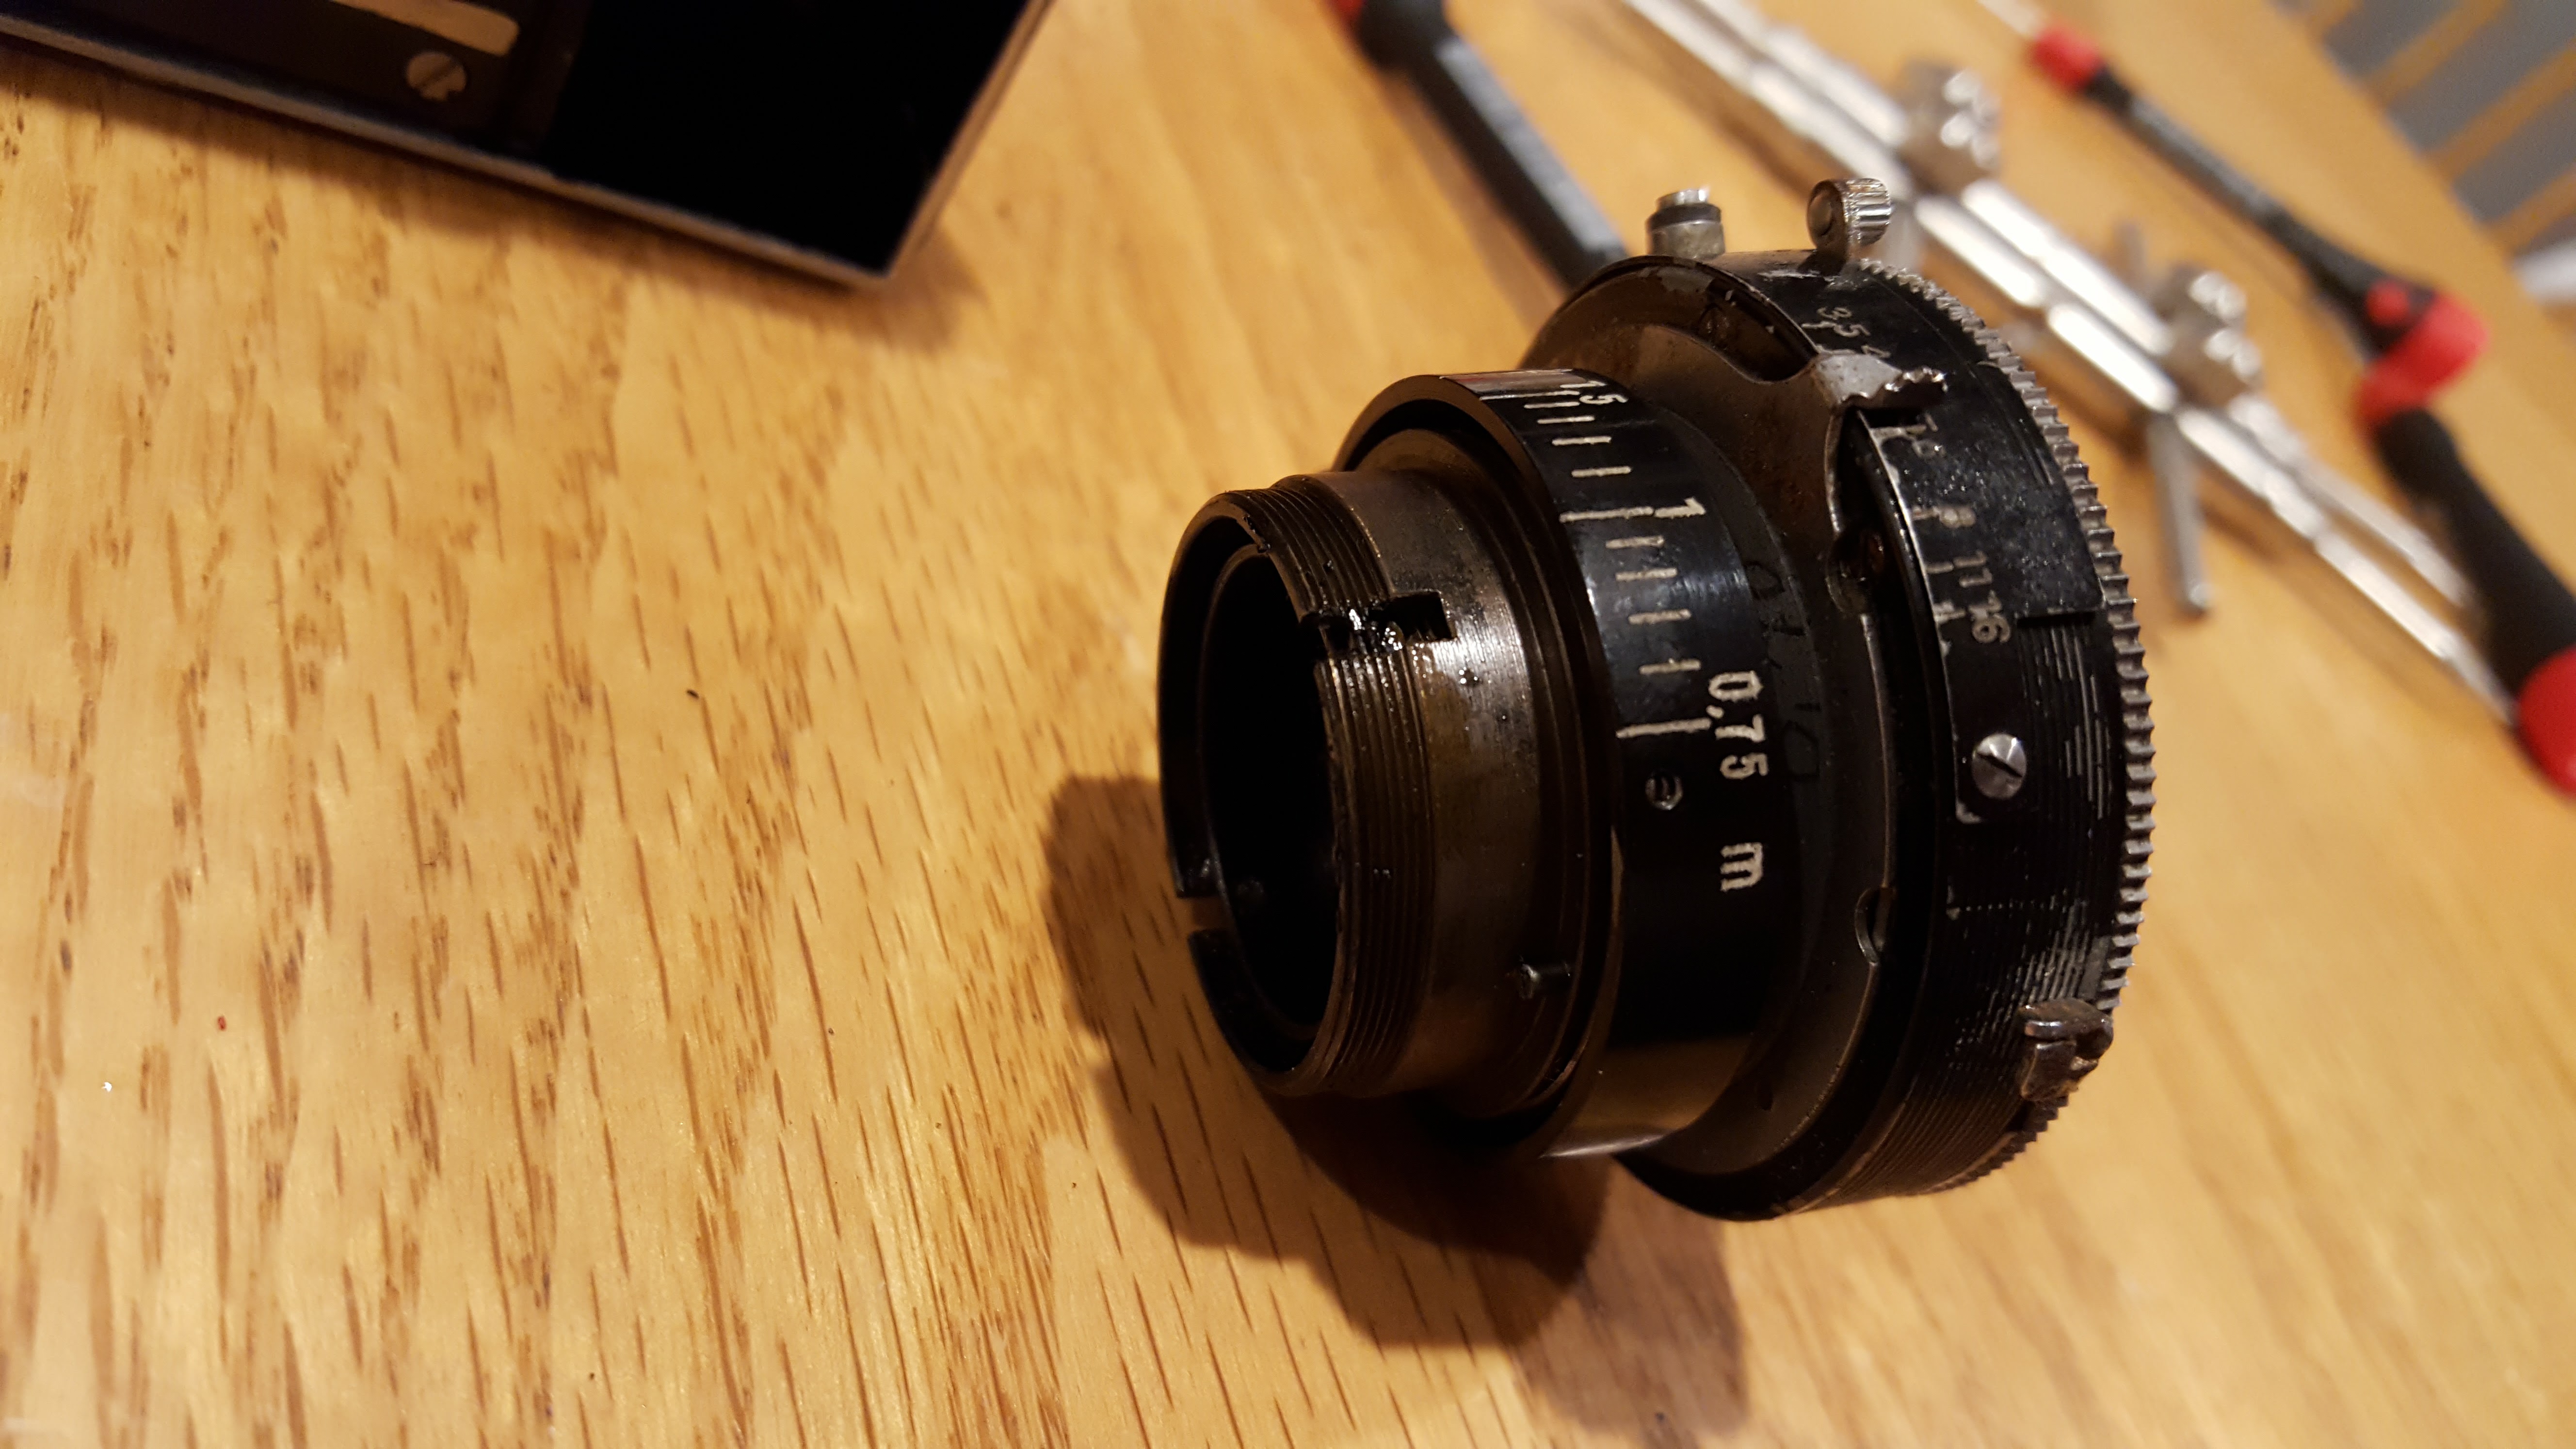
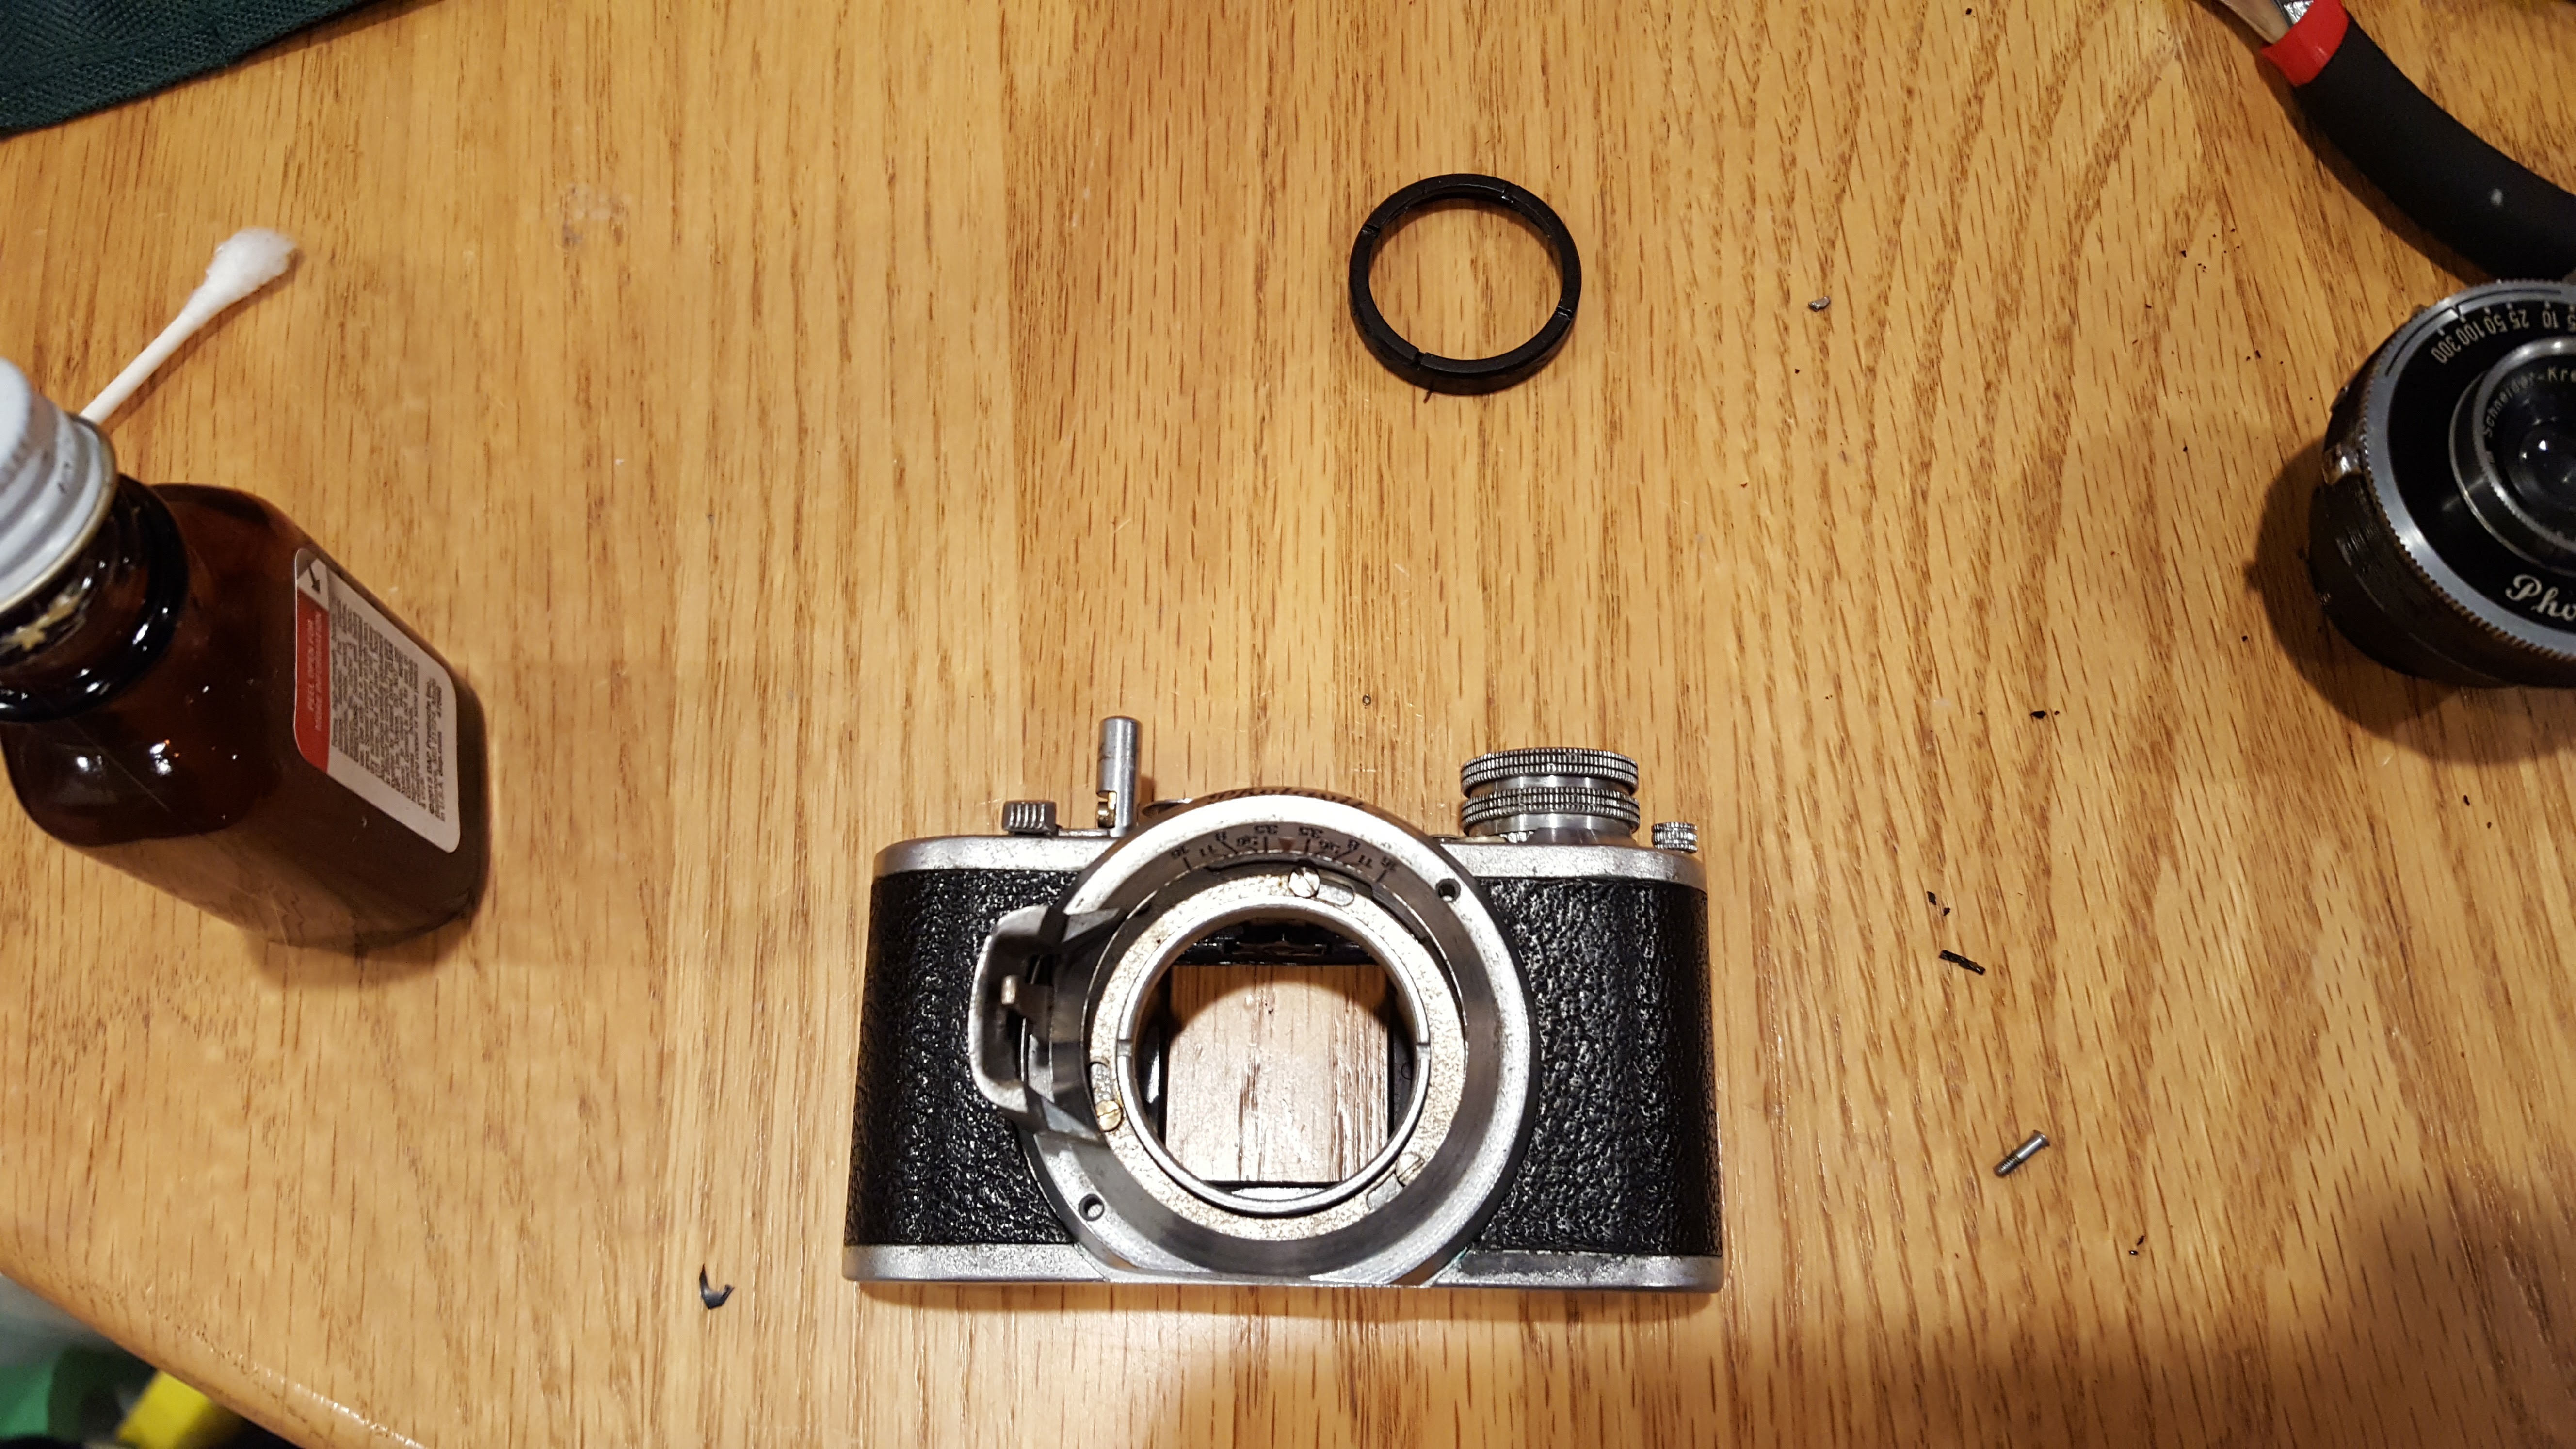 With the shutter out of the camera, I took the opportunity to give the body and lens mount area a good cleaning. In the image to the right, you can see the lock ring that had to be removed to take out the shutter. I also removed two screws from around the lens mount perimeter. These did not need to be removed.
With the camera cleaned up, the shutter lock situation corrected, and the shutter cleaned and firing at all speeds, I put the camera back together.
Loading 35mm Film…
Starting with the Photavit II in 1938, all future Photavits were designed for regular perforated 35mm film, but had to be loaded in special Photavit-cassettes. The cassettes were reusable and very similar to those used by AGFA with their AGFA-Rapid system. The special Photavit cassettes were smaller than the standard 135 format 35mm film, which was necessary to keep the camera as small as possible.
Back when these cameras were new, they were sold with a special film loading device which would allow you to load Kodak 135 format 35mm film into the special Photavit cassettes. I am not sure if Photavit cassettes were ever sold with film pre-loaded as that would probably have been unnecessarily expensive. In the 70+ years since these cameras were made, many of these film loaders have been lost, or are no longer included with the cameras.
The Photavit in my collection was one such camera that did not come with it’s film loader, but I was fortunate enough to have one loaned to me by fellow collector Rudi Berden who said I could use his film loader for this review. The good news is that you can still load film into a Photavit without this loader, although it must be done in the dark. I will type instructions for both methods.
…with the Photavit Film Loader
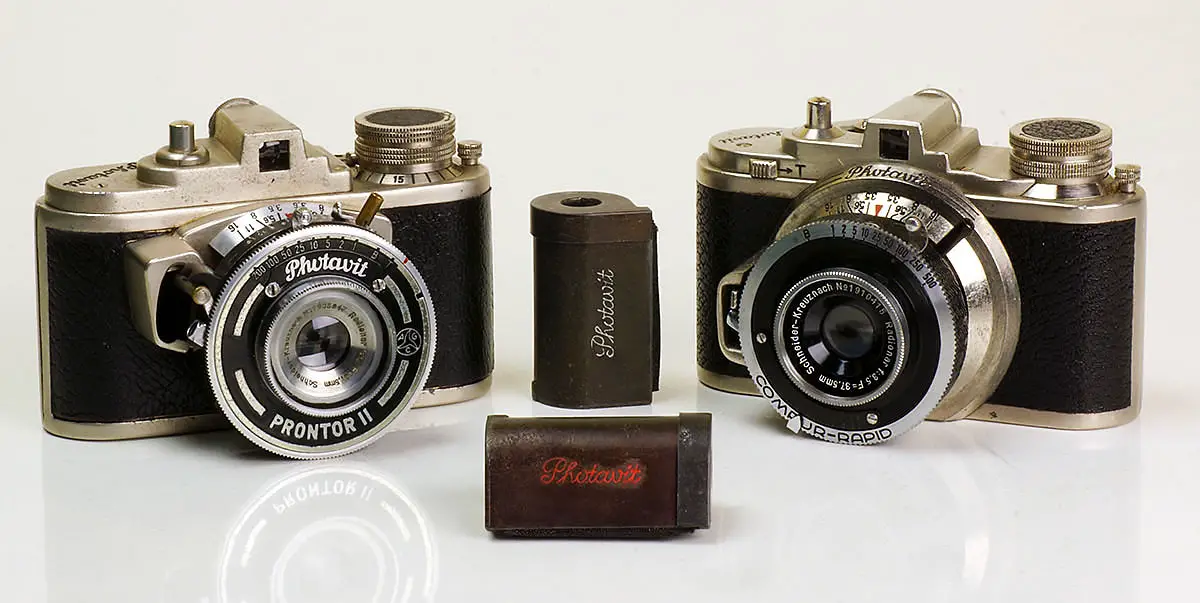
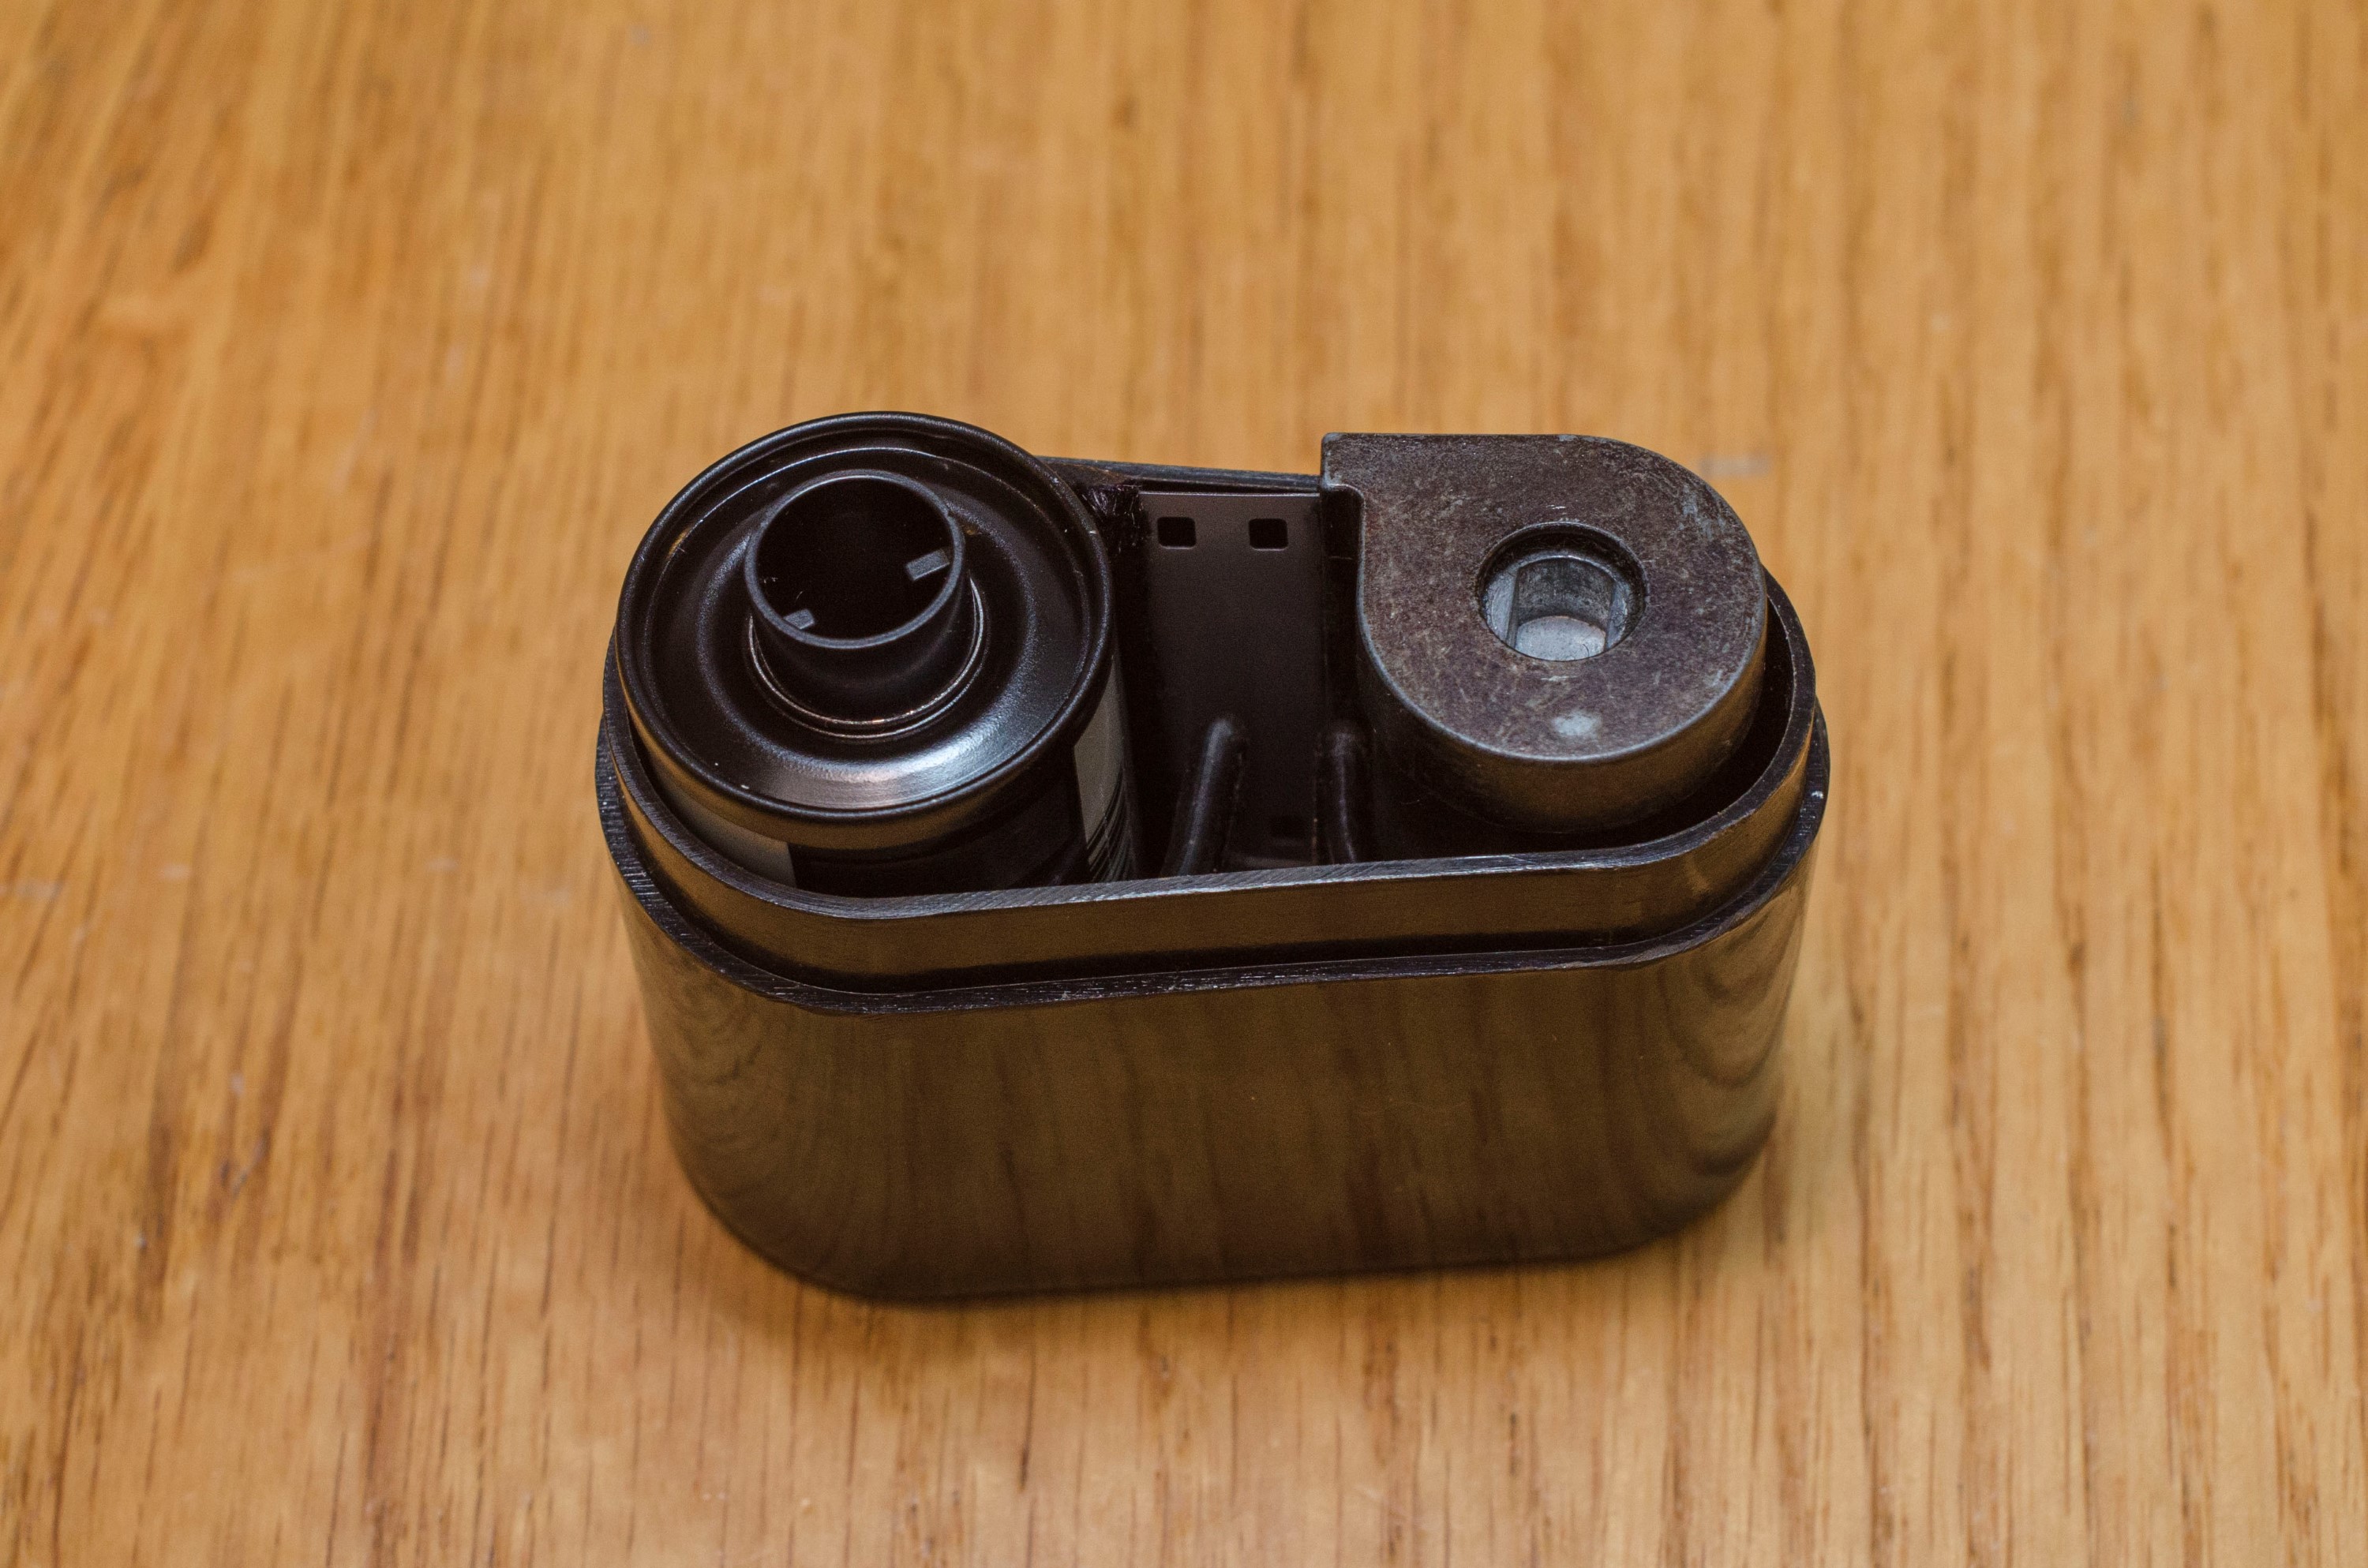
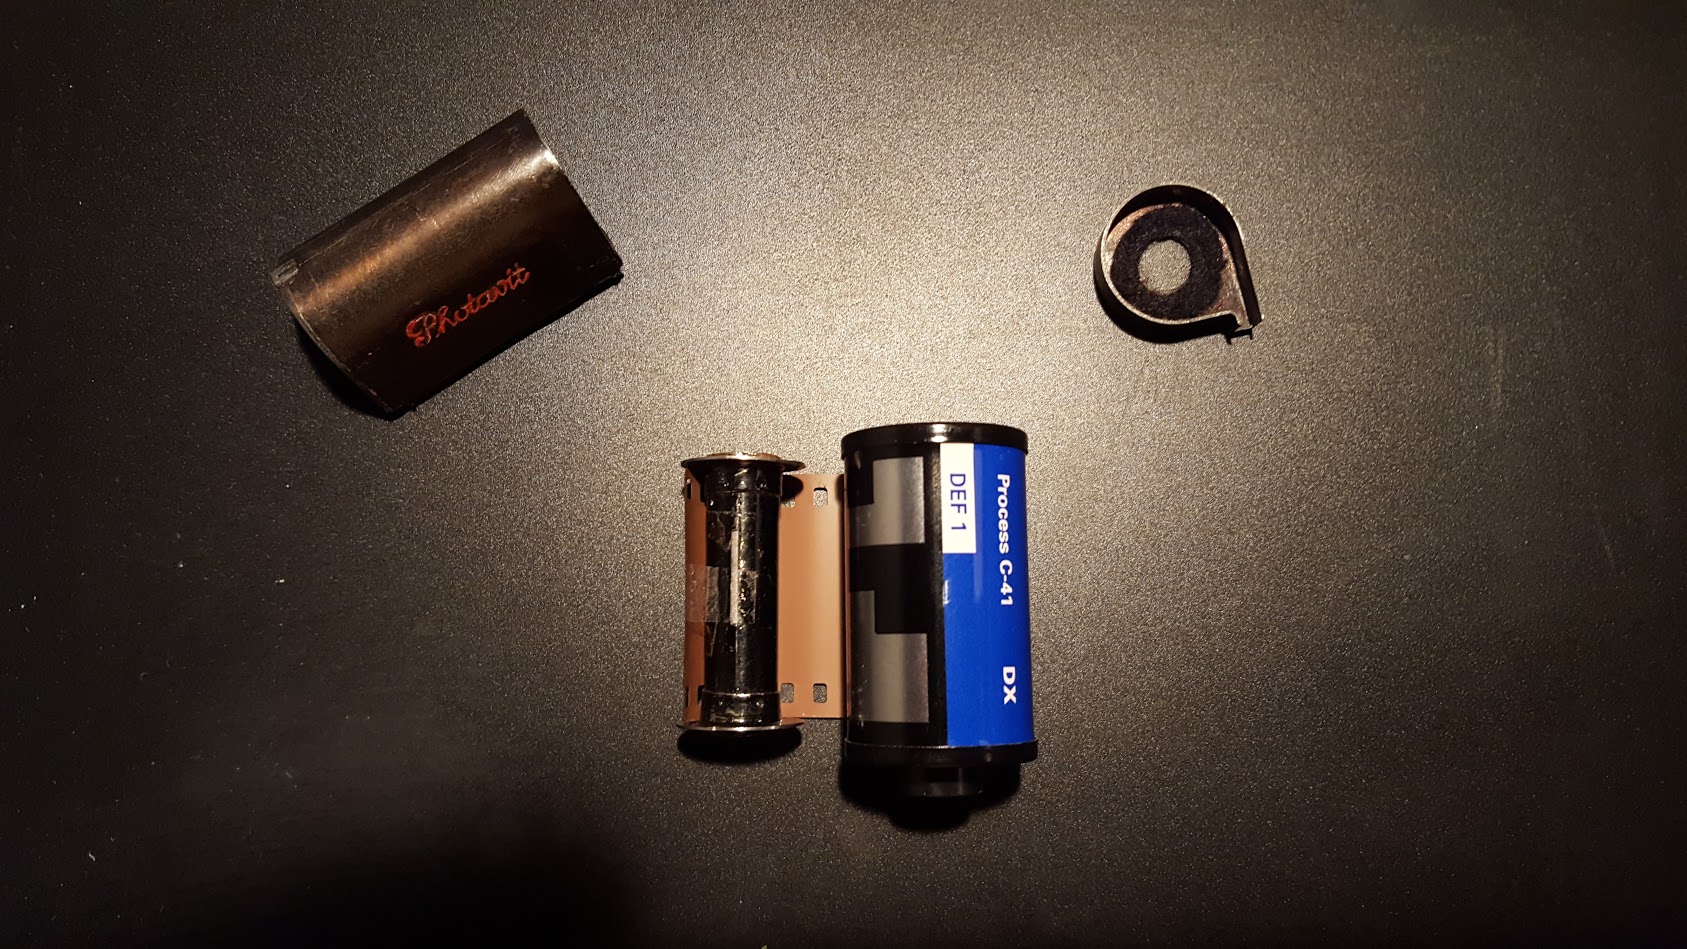
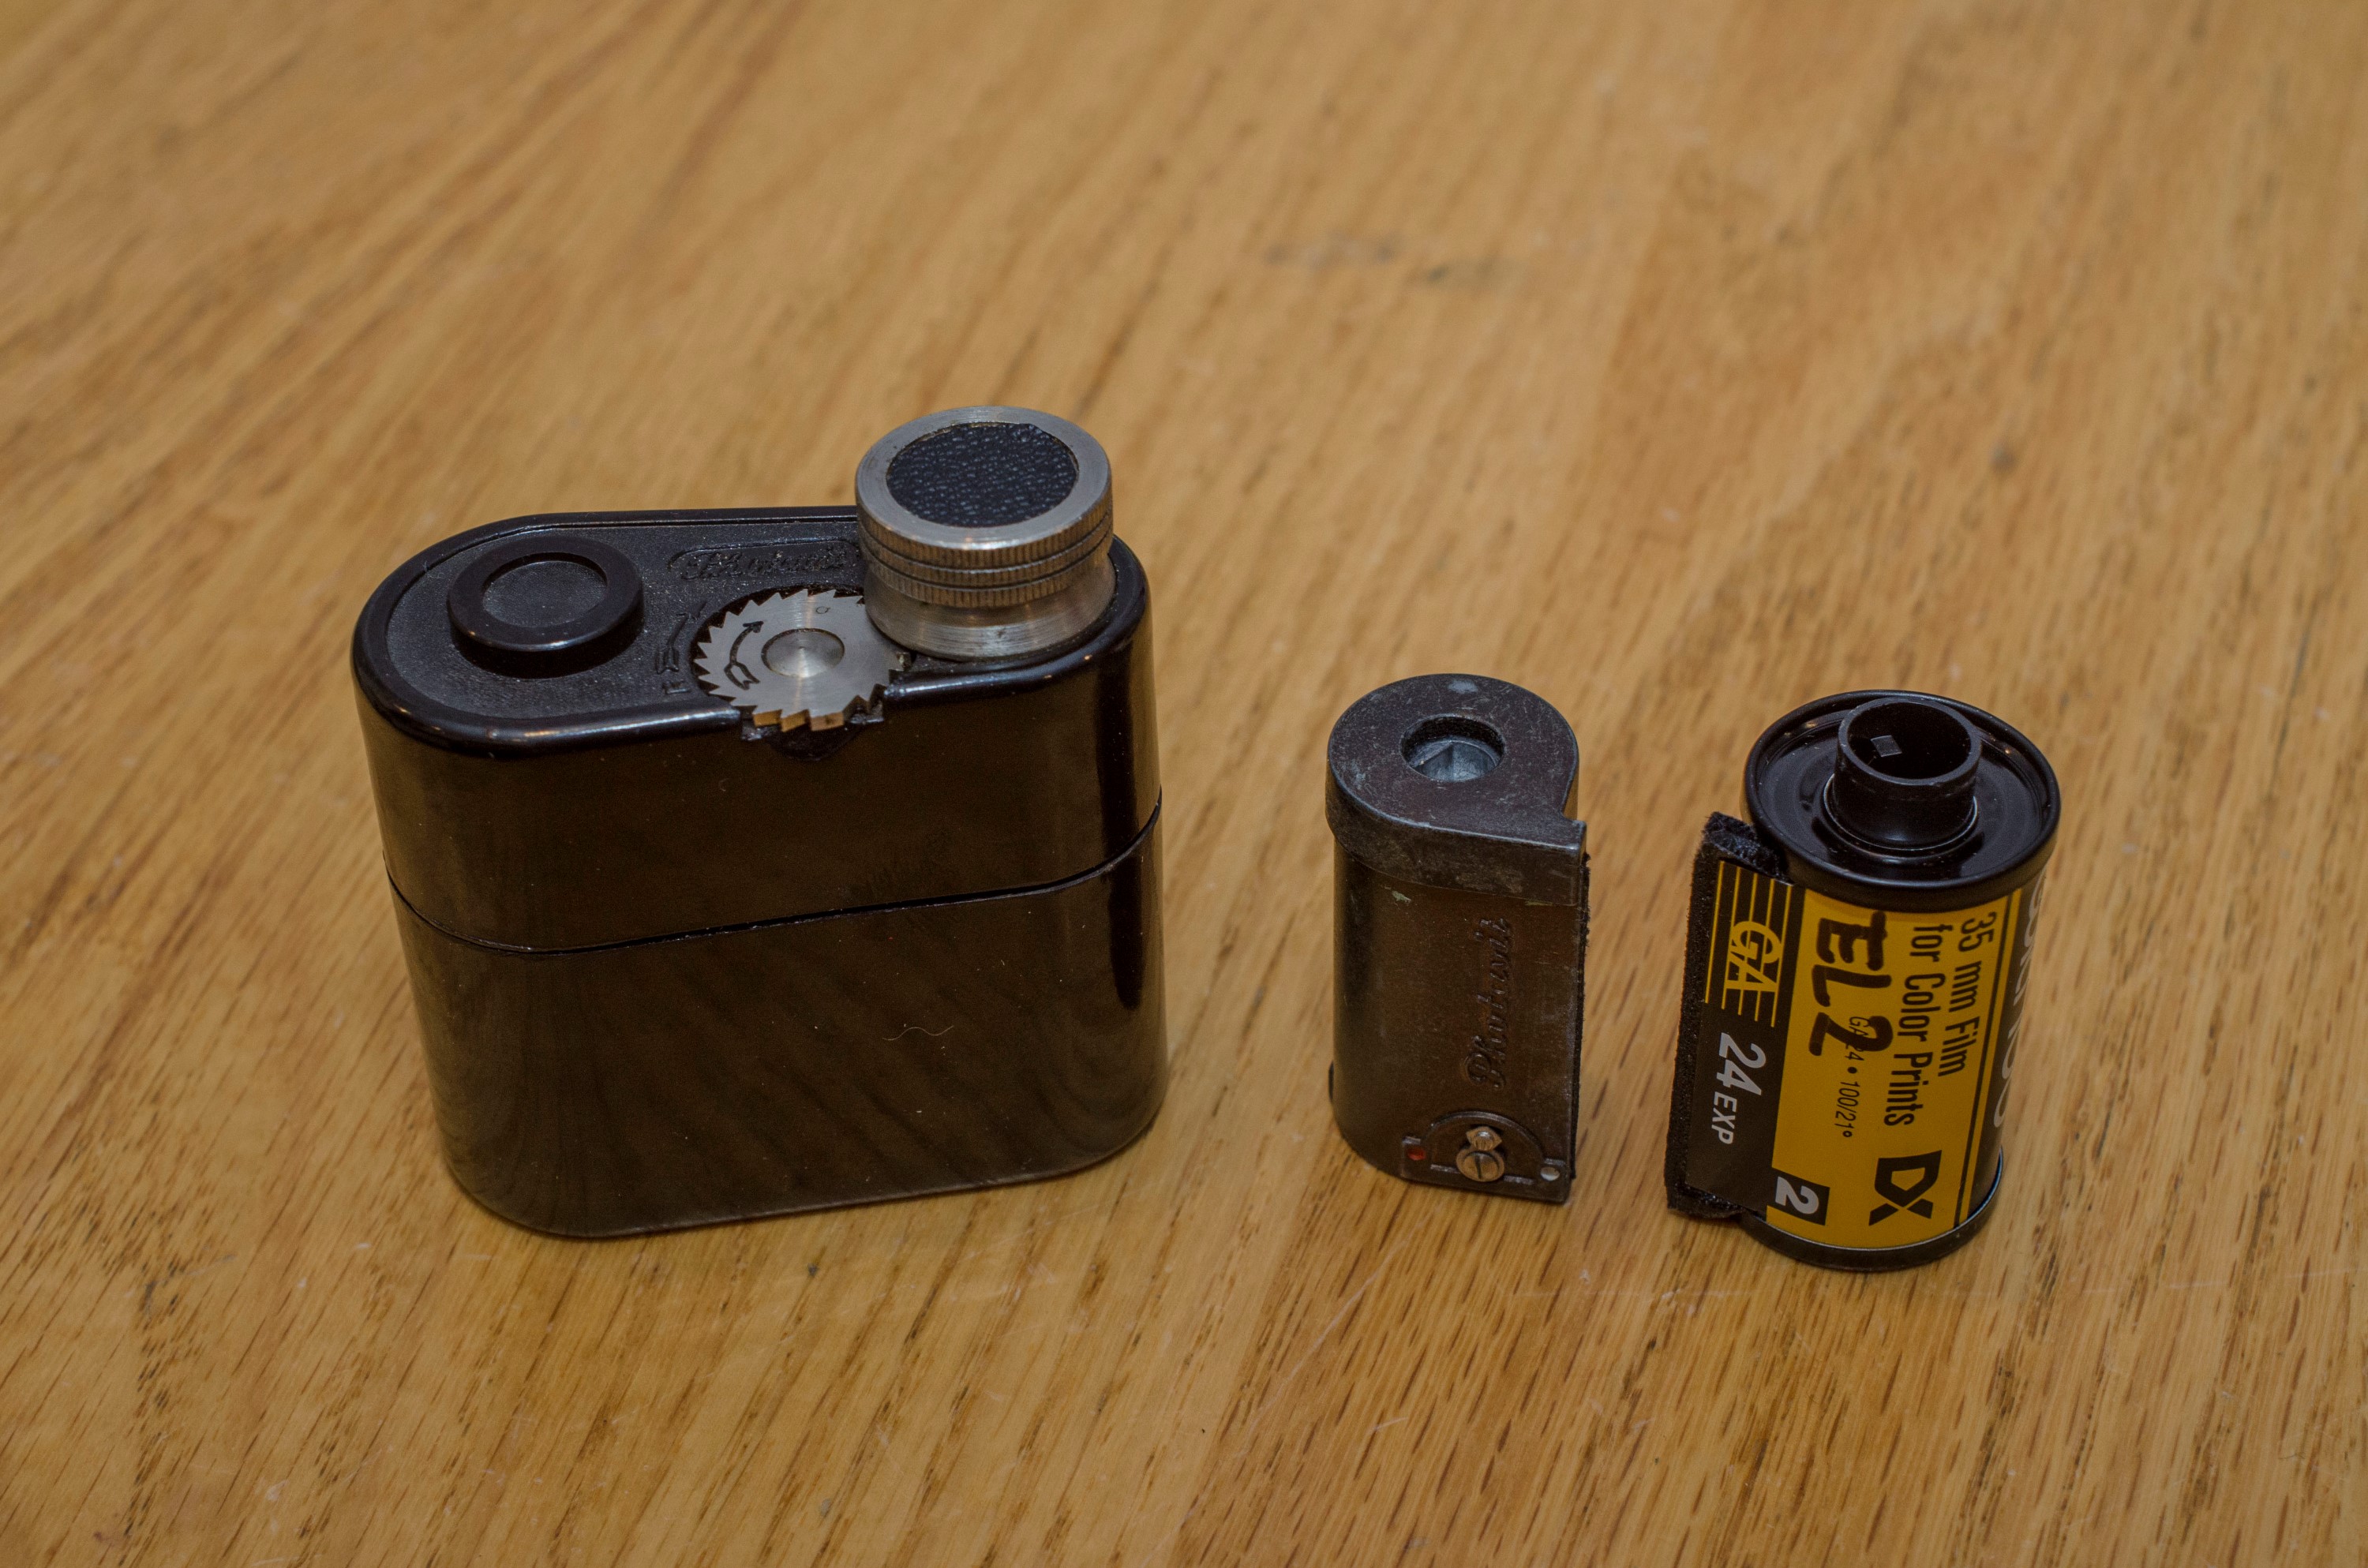 The Photavit Film Loader was an accessory that I believe was sold with every Photavit camera starting with the II and up. The camera used regular 135 format 35mm film, but only when loaded in the proprietary Photavit film cassettes as the standard Kodak cassettes were too large. The camera would house two cassettes, and the film would transfer from one cassette into another, very similar to AGFA’s Rapid style film.
In the image to the left, you can see the film loader, along with a Photavit and standard 135 format cassette. Although both cassettes accept the same film, the Photavit cassette is noticeably smaller.
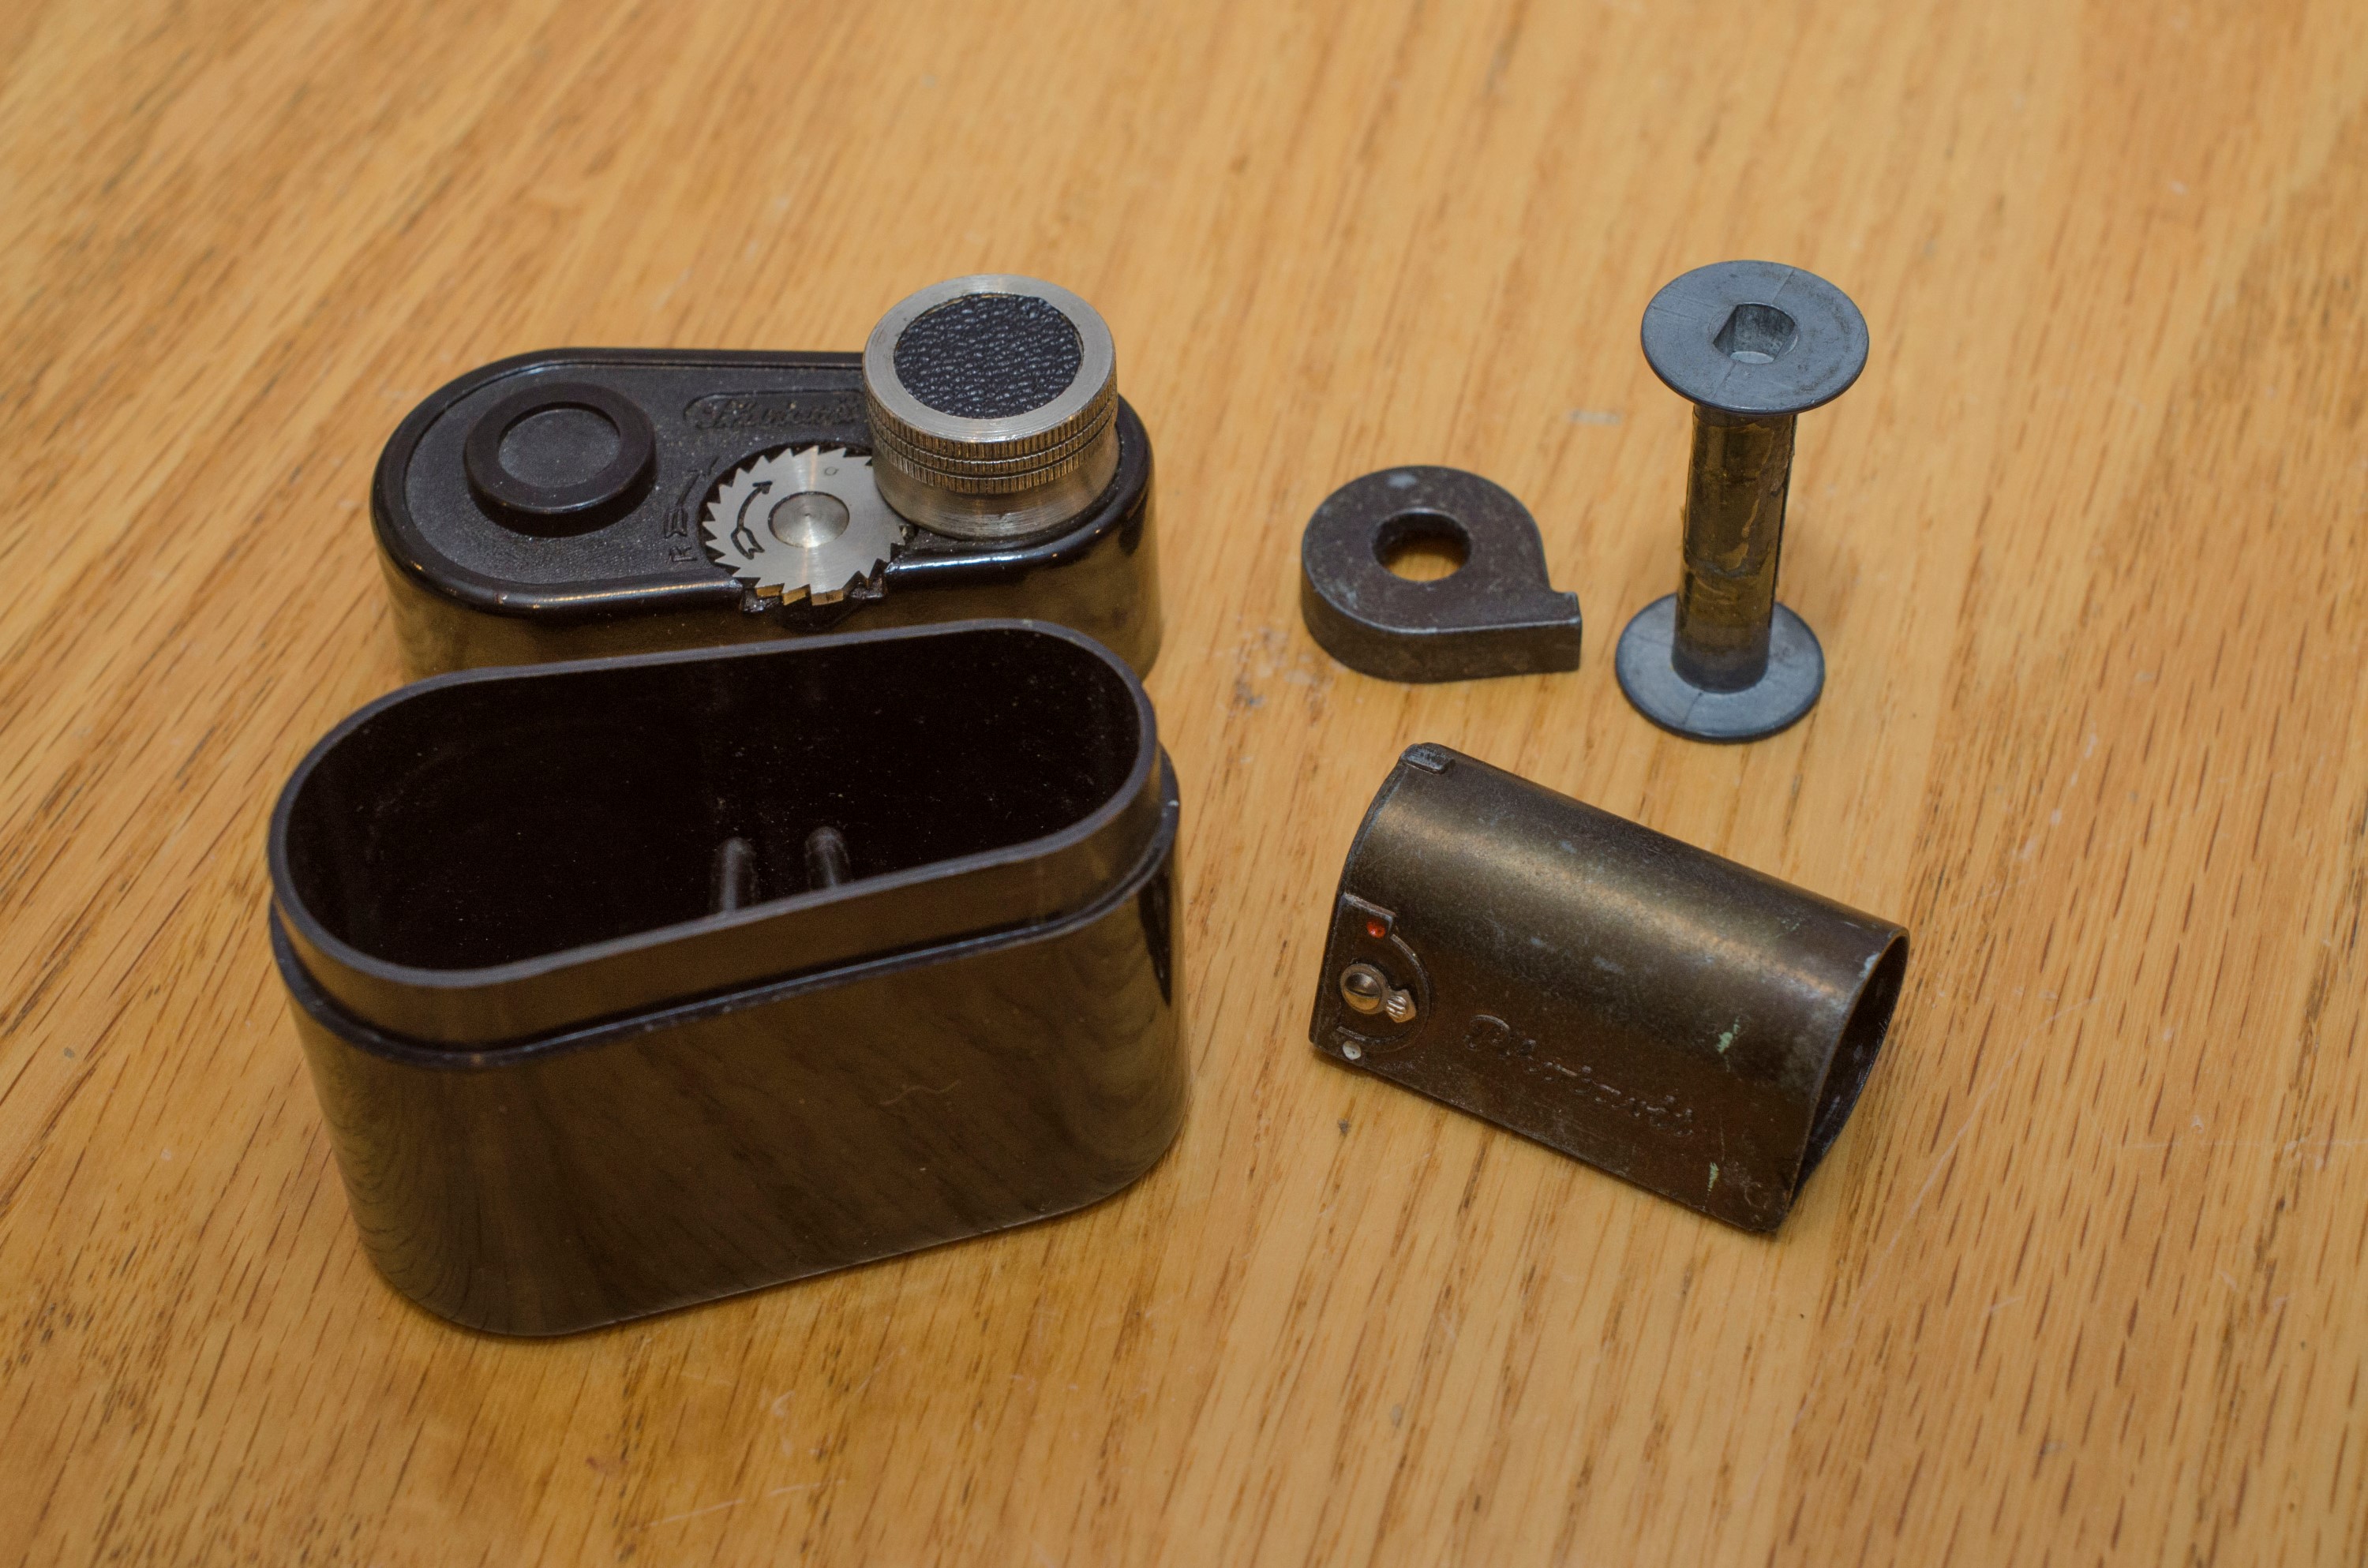
The Photavit film loader is made almost entirely out of Bakelite plastic with only a metal knob, and a toothed wheel which acts as a film length limiter. The film loader has two primary benefits. First, it allows someone to transfer film out of a stock 135 cassette into the Photavit cassette without the use of a darkroom, but it also ensures that the correct length of film is installed into the cassette without overloading it. If you had a darkroom, you could do it without the film loader, but it is a little trickier. I will go over instructions on how this is done for those of you who might not have the original film loader.
Before loading film, you should be aware that the proper length of film that the film loader will allow you to load into a Photavit cassette is about the same length as a 12 exposure roll of regular 35mm film. You can use a 24 or 36 exposure roll of film, but you’ll have to stop before reaching the end of the roll.
 Step 1:
The first step is to open both the Photavit film loader by pulling up on the lid and also opening one of your Photavit cassettes. The top of the cassette should just pull off, and within it is a spool that you must pull out.
I have encountered at least two variants of Photavit cassettes. One with a film type indicator on it as seen in the image to the right, and one without. The steps to load each are identical.
 Step 2:
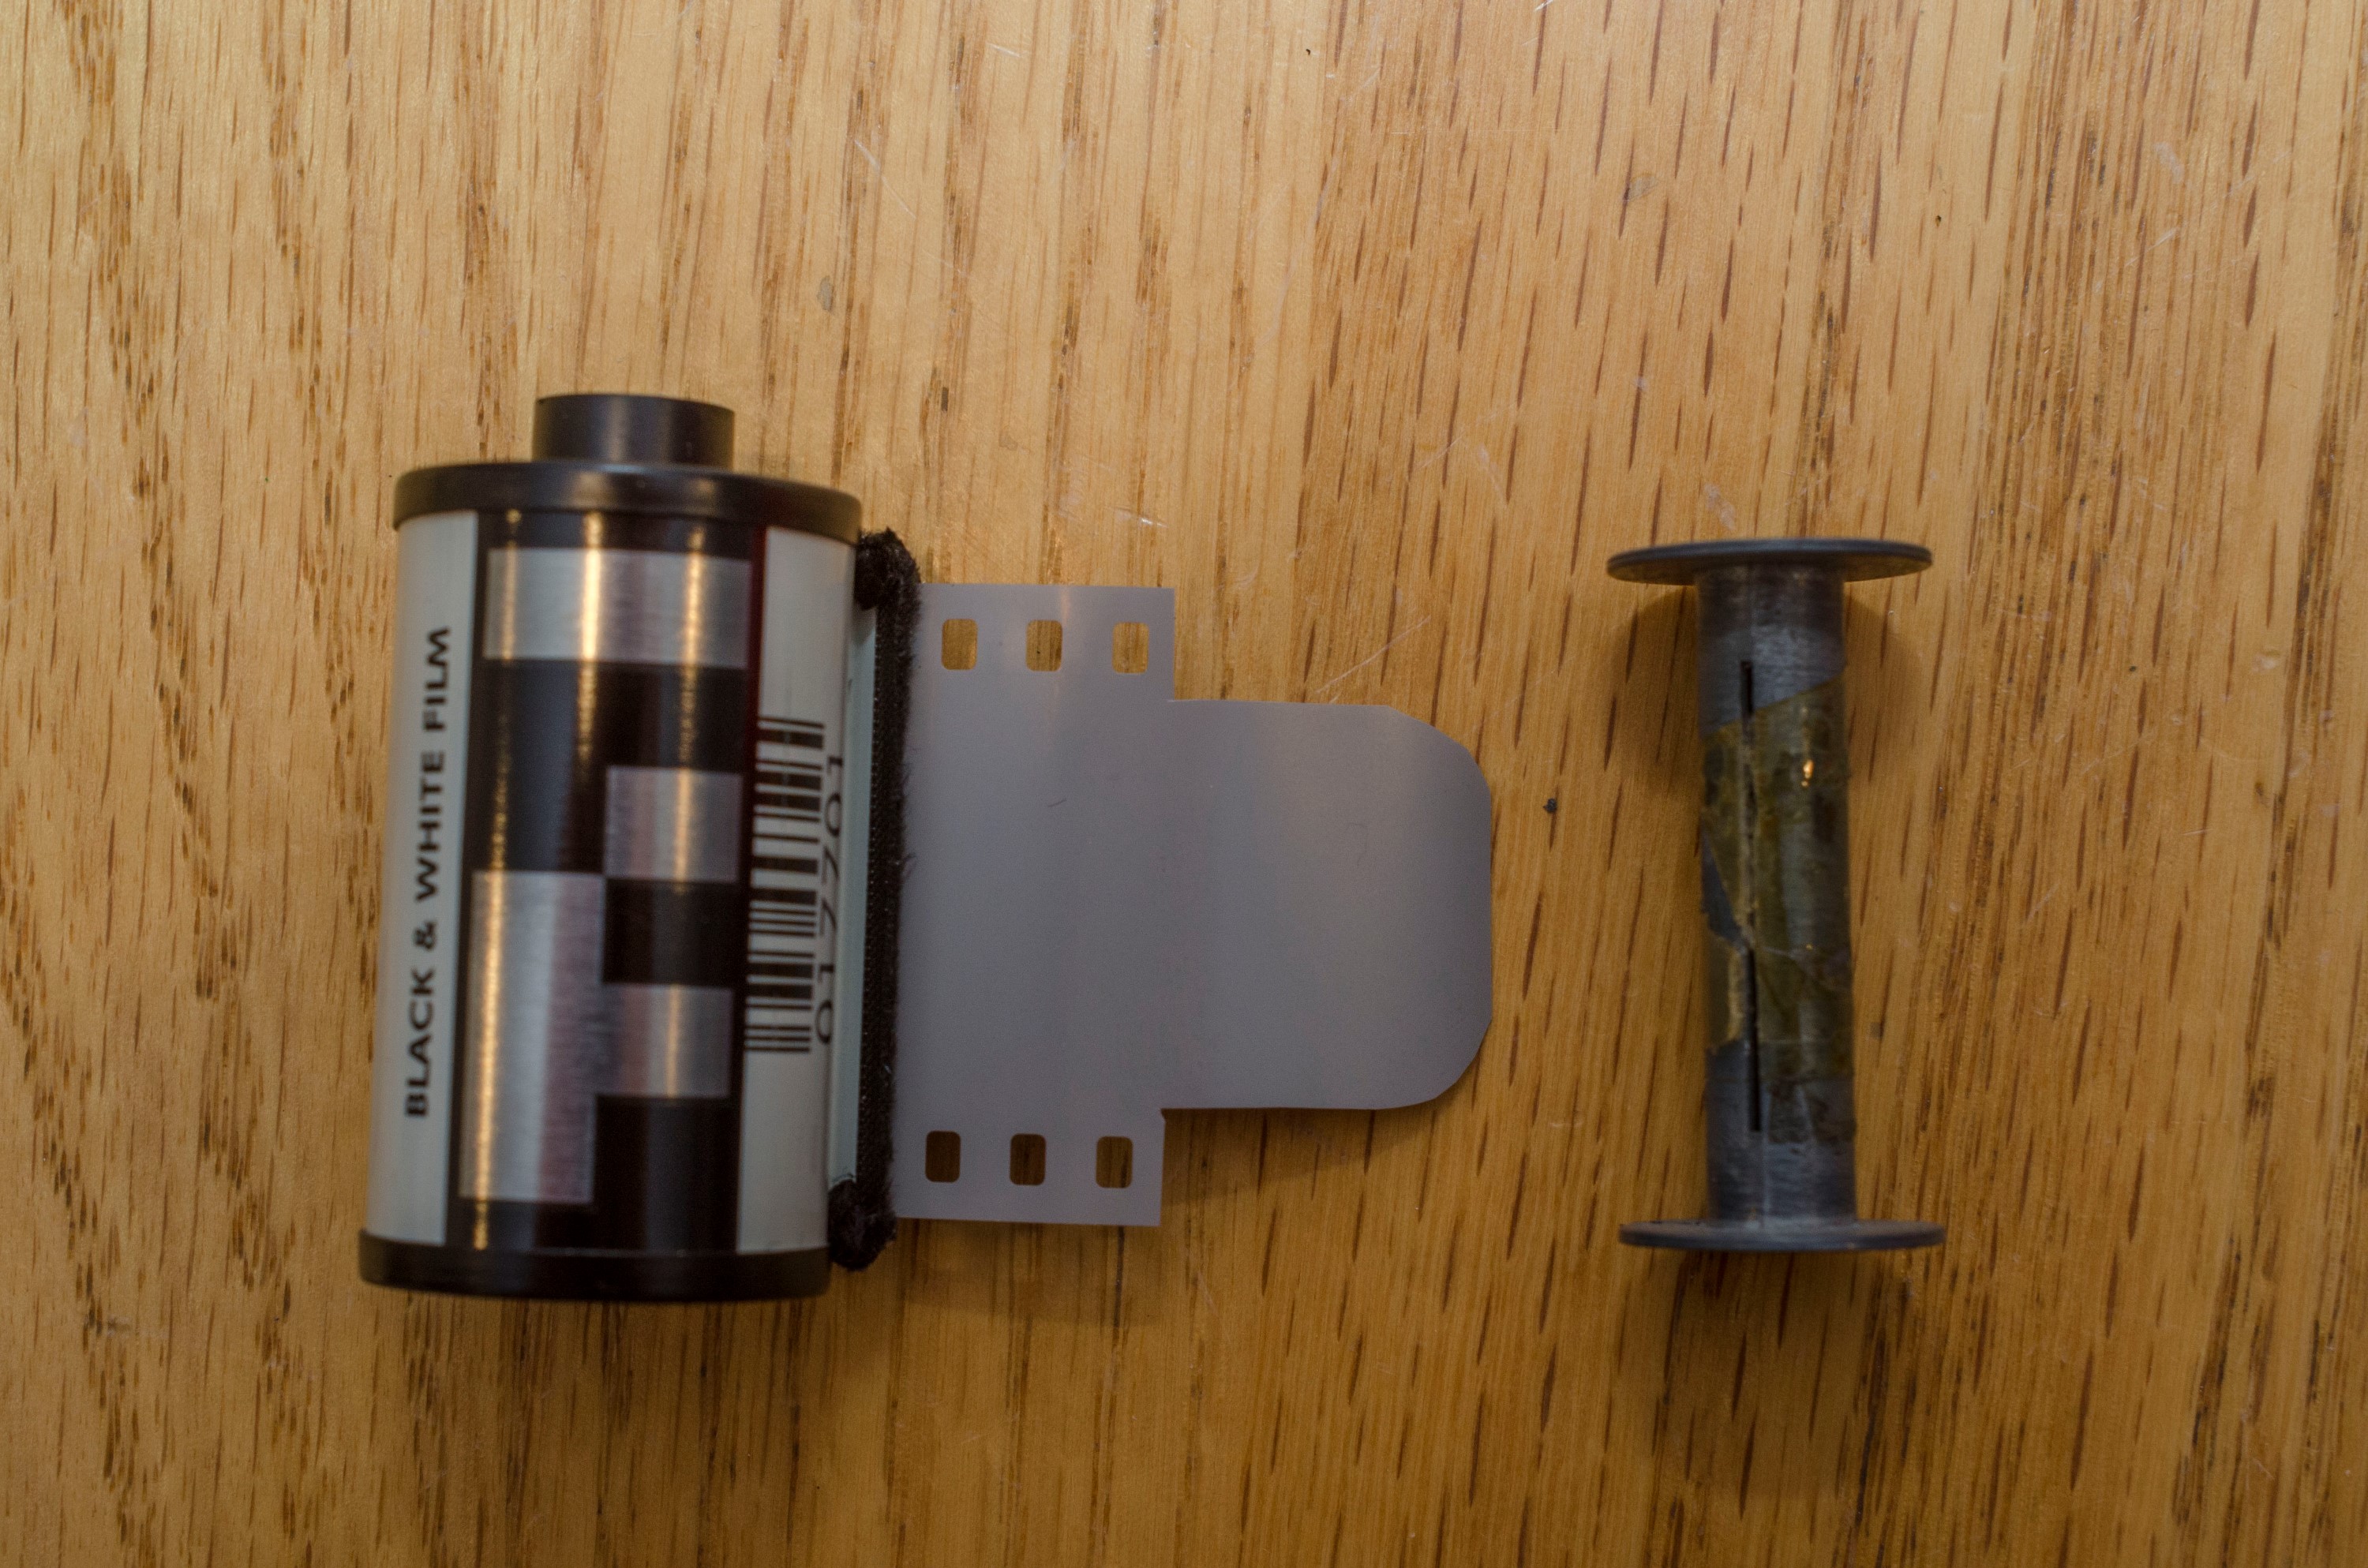
With the spool out of your cassette, the next step is to attach the leader of your 135 format 35mm film to the spool. In the image to the left, you can see I modified the leader of the 35mm film so it can be fed through a slit in the spool. Not every Photavit spool has this slit however, so in those cases, you can just use a piece of tape to secure the end of the film to the spool.
How you attach the leader to the spool isn’t as important as making sure the spool has the correct end facing up. Only one side of the spool will have a round opening with two flat sides which couple to the advance knob in the loader. In the images in Steps 1 and 3, the spool on the table shows this opening facing up. The side facing the table is the wrong side.
 Step 3:
With the leader of your film securely attached to the Photavit spool, gently slide the spool with film attached back into the cassette and put the lid on. Be careful not to pull any more film out of the 135 cassette than necessary. You may need to adjust the length of film coming out of the 135 cassette so that it sits correctly in the film loader.
 Step 4:
Put the lid of the film loader back on and make sure it is properly seated. Look at the toothed wheel on top of the loader. You’ll notice that each tooth is evenly spaced, with one flat edge. This edge acts as the “stop” for the end of the roll. With your thumb, rotate the toothed wheel in the direction of the arrow until the flat edge wont turn any more. It should look like the image to the left.
Step 5:
With everything loaded and ready to go, the next step is to turn the knob all the way until you can’t turn it any farther. I found through trial and error that the film loader will stop you slightly before the end of a 12 exposure roll of film. There will be just enough room to put the whole roll in there, so you can optionally use your thumb to back off the flat edge of the toothed wheel so you can rotate the knob some more. I just turned it until I felt the end of the 12 exposure roll. If you are using a 24 or 36 exposure roll, I would just stop when the loader reaches the stop. Don’t try to jam a whole 24 roll of film in there as it won’t fit and you could risk damaging the film.
Step 6:
Now that you’ve completely filled the Photavit holder with film, the next step is to lift the lid off the film loader and take the two spools out. Be careful not to accidentally open the Photavit cassette exposing the film. You will need to take a pair of scissors and cut the film so you can separate the two spools. Before doing this, pull about 2 inches of film back out of the Photavit cassette to make a new leader and then make your cut as close to the 135 cassette as possible. Assuming you used a 12 exposure roll of film, you can throw away the 135 cassette or if you used a 24 or 36 exposure roll, pull a little more out to make a new leader so you can load more into something else.
 Step 7:
Take your freshly loaded Photavit cassette and insert it into the supply (right) side of the camera. On the supply side, the removable lid will be facing down. Use the leader you pulled out of the Photavit cassette and attach it to the spool of your other cassette in the same way you attached it in Step 2 above. This second cassette will be the takeup cassette.
 Step 8:
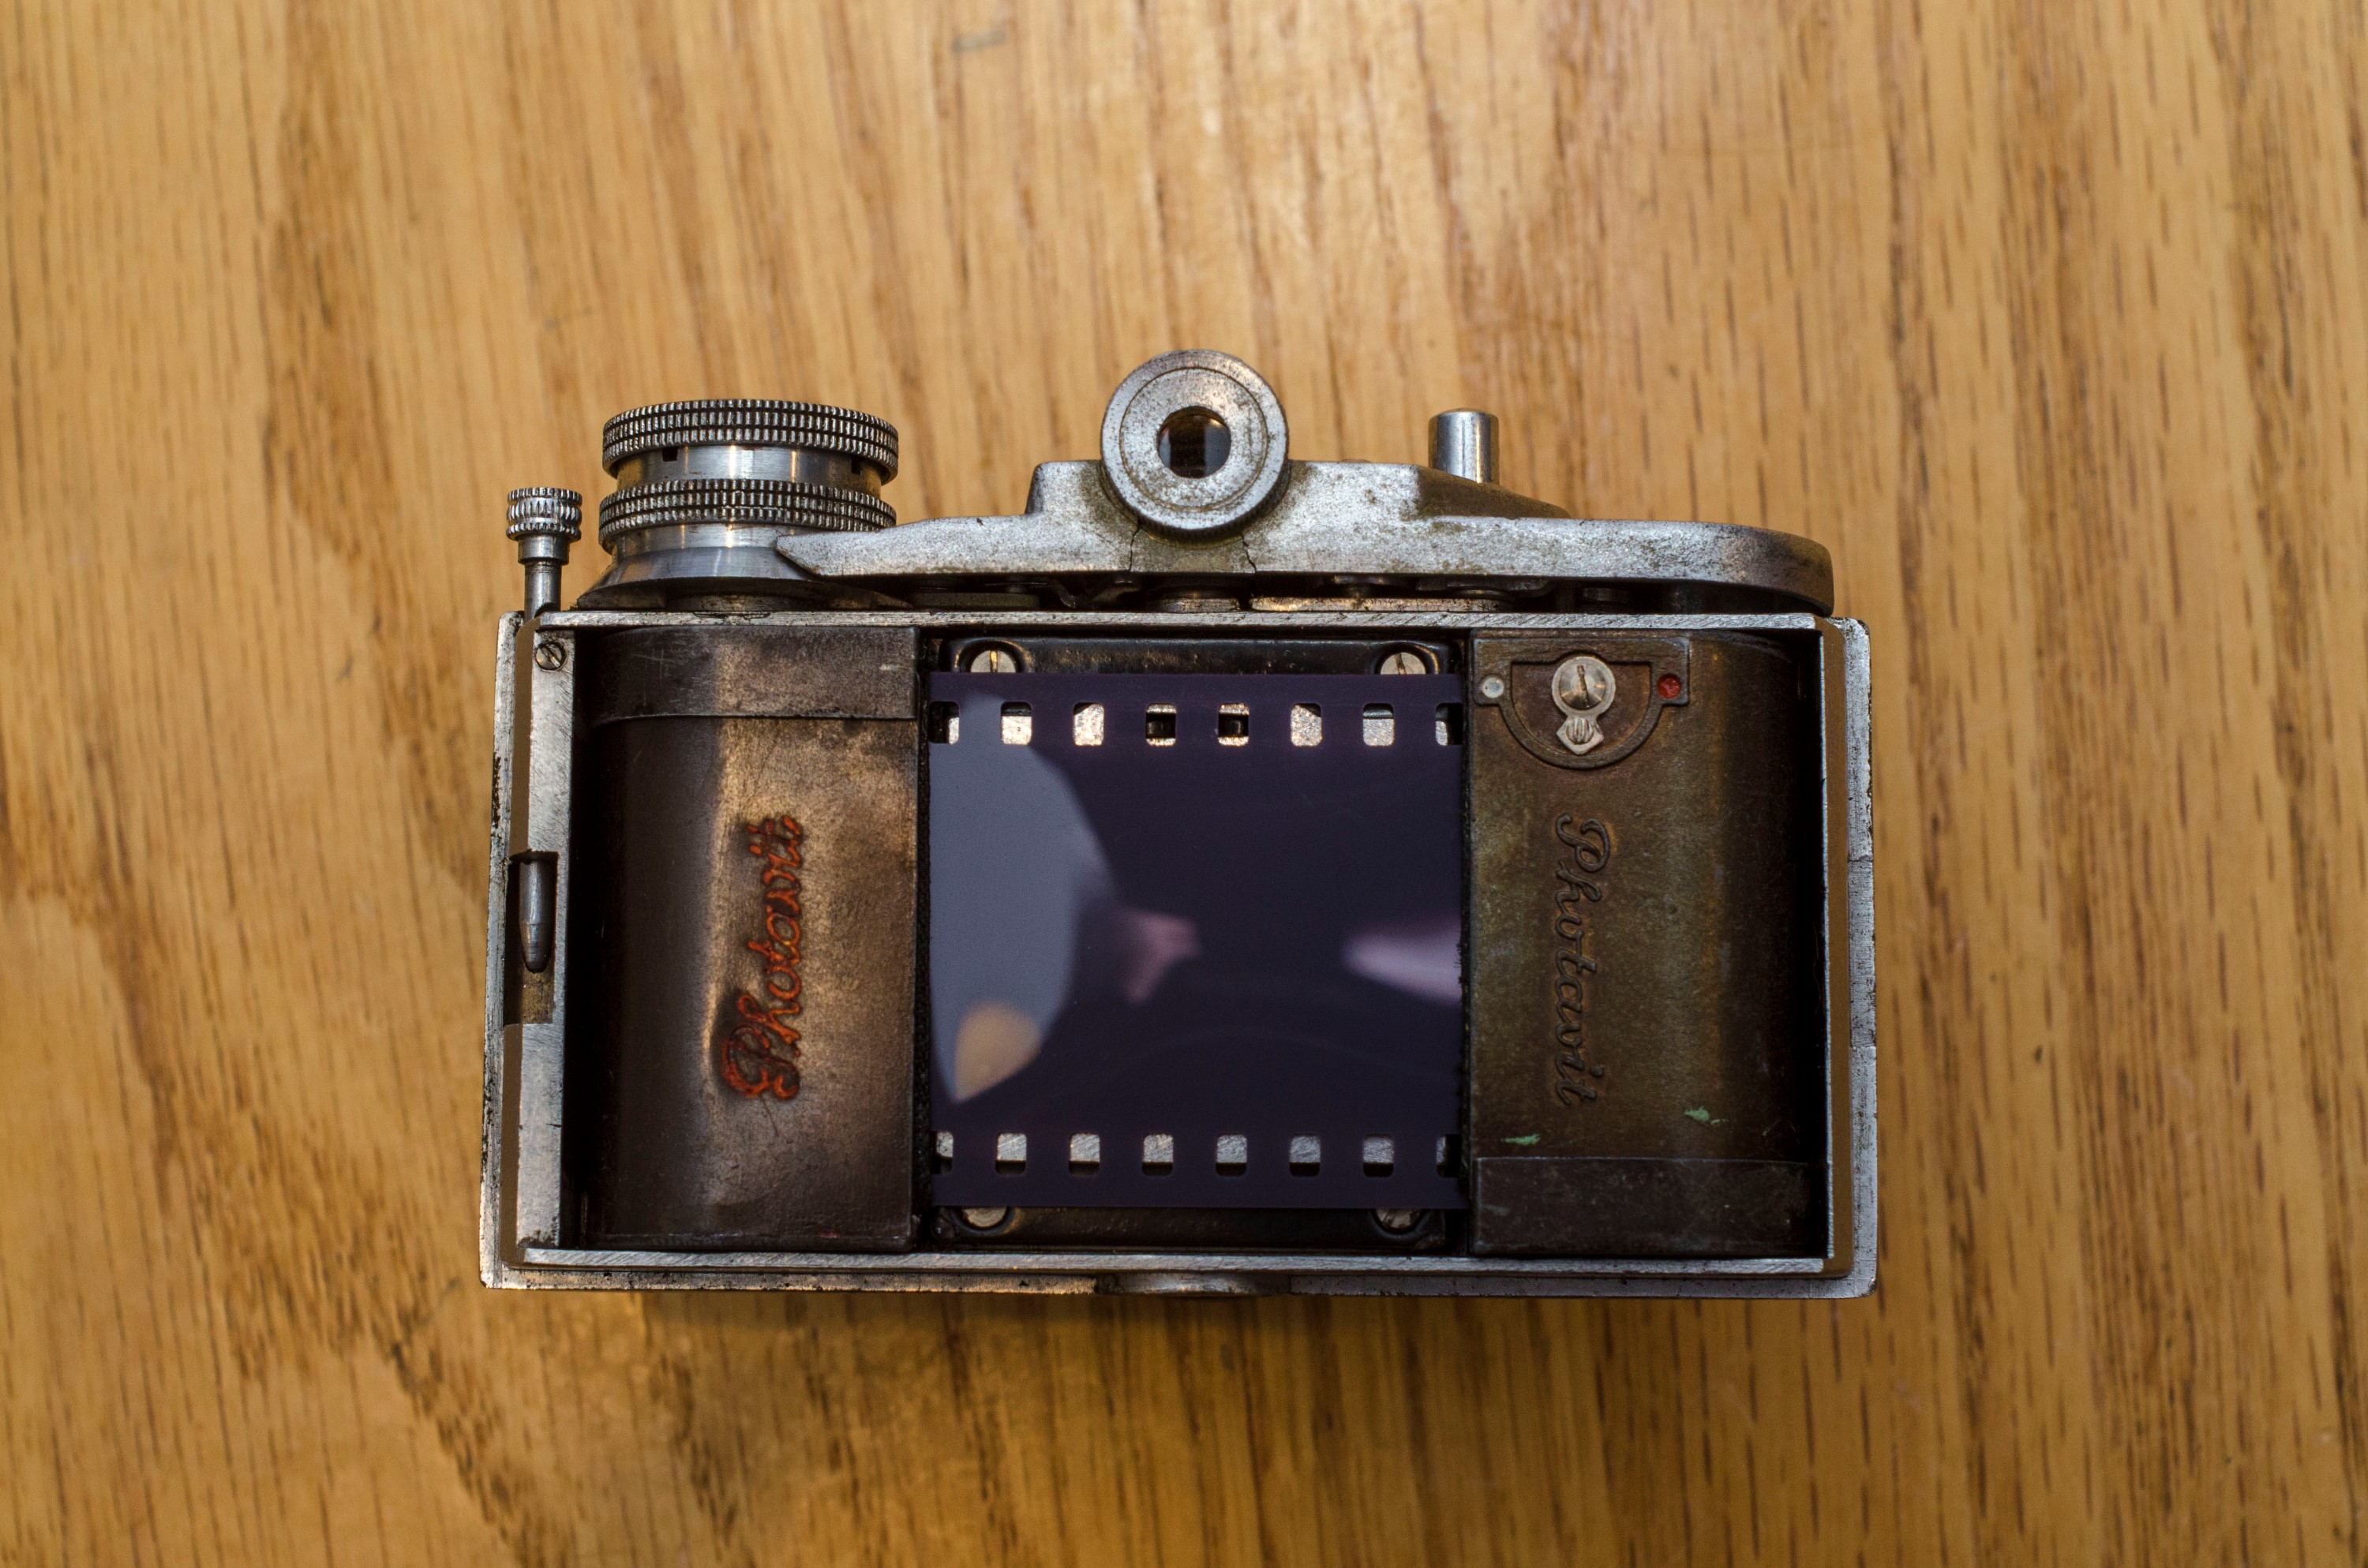
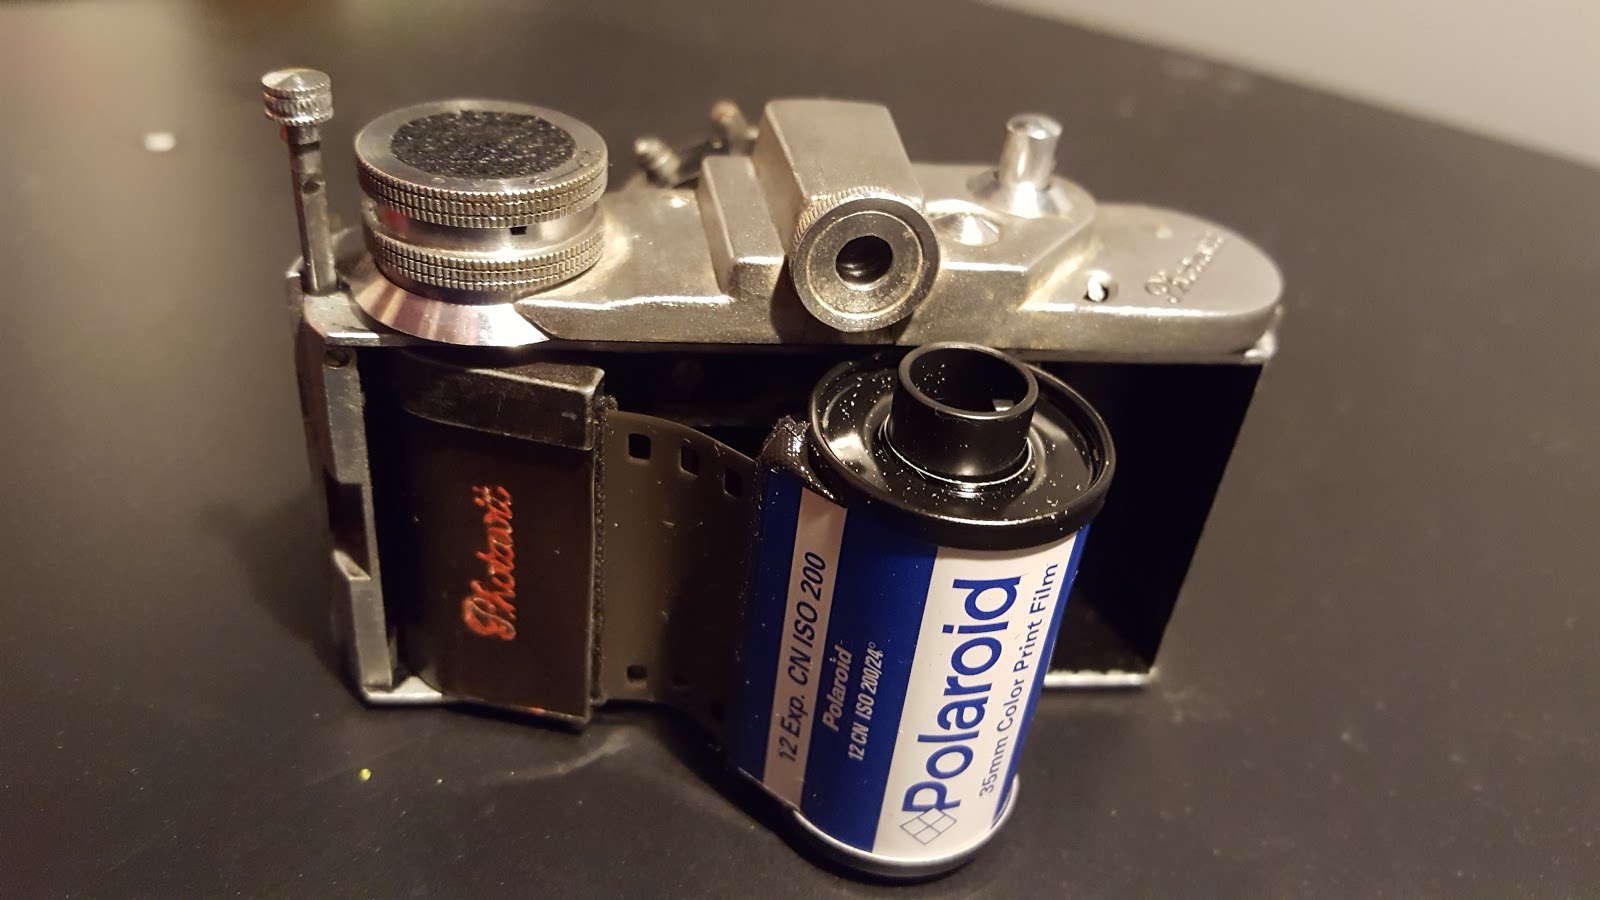
With the film attached to the second spool, reassemble the takeup cassette and insert it into the takeup (left) side of the camera and make sure both cassettes are properly seated in their respective sides of the camera.
If your camera looks like the image to the left, you are ready to go. Reattach the back of the camera, and advance the film twice and you’re ready to make some 24mm x 24mm photographs!
…without the Photavit Film Loader
Although the Photavit film loader is a very neat accessory that conveniently lets you load film in daylight, its not mandatory. The process for loading film in the dark is almost the same, you just need to do it by feel and you don’t have a measurable way of loading the correct length of film into the cassette. The process is largely the same as above as you can use the film advance knob of the camera as your loading knob.
In terms of length, we know that a 12 exposure roll of film will fit, so you don’t need to worry about the length, but if you don’t have access to any 12-exposure rolls, you could use a 24 roll of film and just stop when you start to feel resistance.
 Step 1:
Attach the leader of your 135 film to the spool inside an empty Photavit spool. This step can be done with the light on. See the instructions in Step 2 in the instructions above.
 Step 2:
Insert the Photavit spool with the leader attached into the takeup (left) side of the camera. This spool will end up being the supply spool, but you are temporarily going to use the wind knob on the takeup side to pull the film into the empty Photavit cassette in the same way the Photavit film loader does. Once you have your camera like in the image to the left, turn out the lights.
Step 3:
In total darkness (or a dark room), rotate the wind knob on the camera until you have reached the end of the 12 exposure roll of film, or if using a 24 or 36 exposure roll of film, when you feel resistance. Do not overload the Photavit cassette with too much film as this will damage the film.
Step 4:
Turn the lights back on, and pull out about 2 inches of film from the Photavit holder and use a pair of scissors to cut the film just as you did in Step 6 in the instructions above.
Step 5:
Remove the freshly loaded Photavit cassette and move it to the supply (right) side of the camera. At this point, perform the instructions in Steps 7 and 8 above, and you’re done. The camera should look like the image to the right.
These instructions assume you have two good Photavit cassettes, but it can even be done if you only have one. I won’t type up those instructions as they basically require you to attach the film leader from the 135 cassette to an empty Photavit spool and then completely pull out the entire length of film out of the 135 cassette in total darkness, and then wind it up into a tight roll and shove it into the supply side of the camera without any cassette.
This is a very risky method as there is a very high chance you’ll scratch or in some other way damage the film while it is in the camera unprotected. There is also an increased risk of light leaks, so you might want to use some black electric tape to seal up the door seams to ensure no light gets in.
My Thoughts
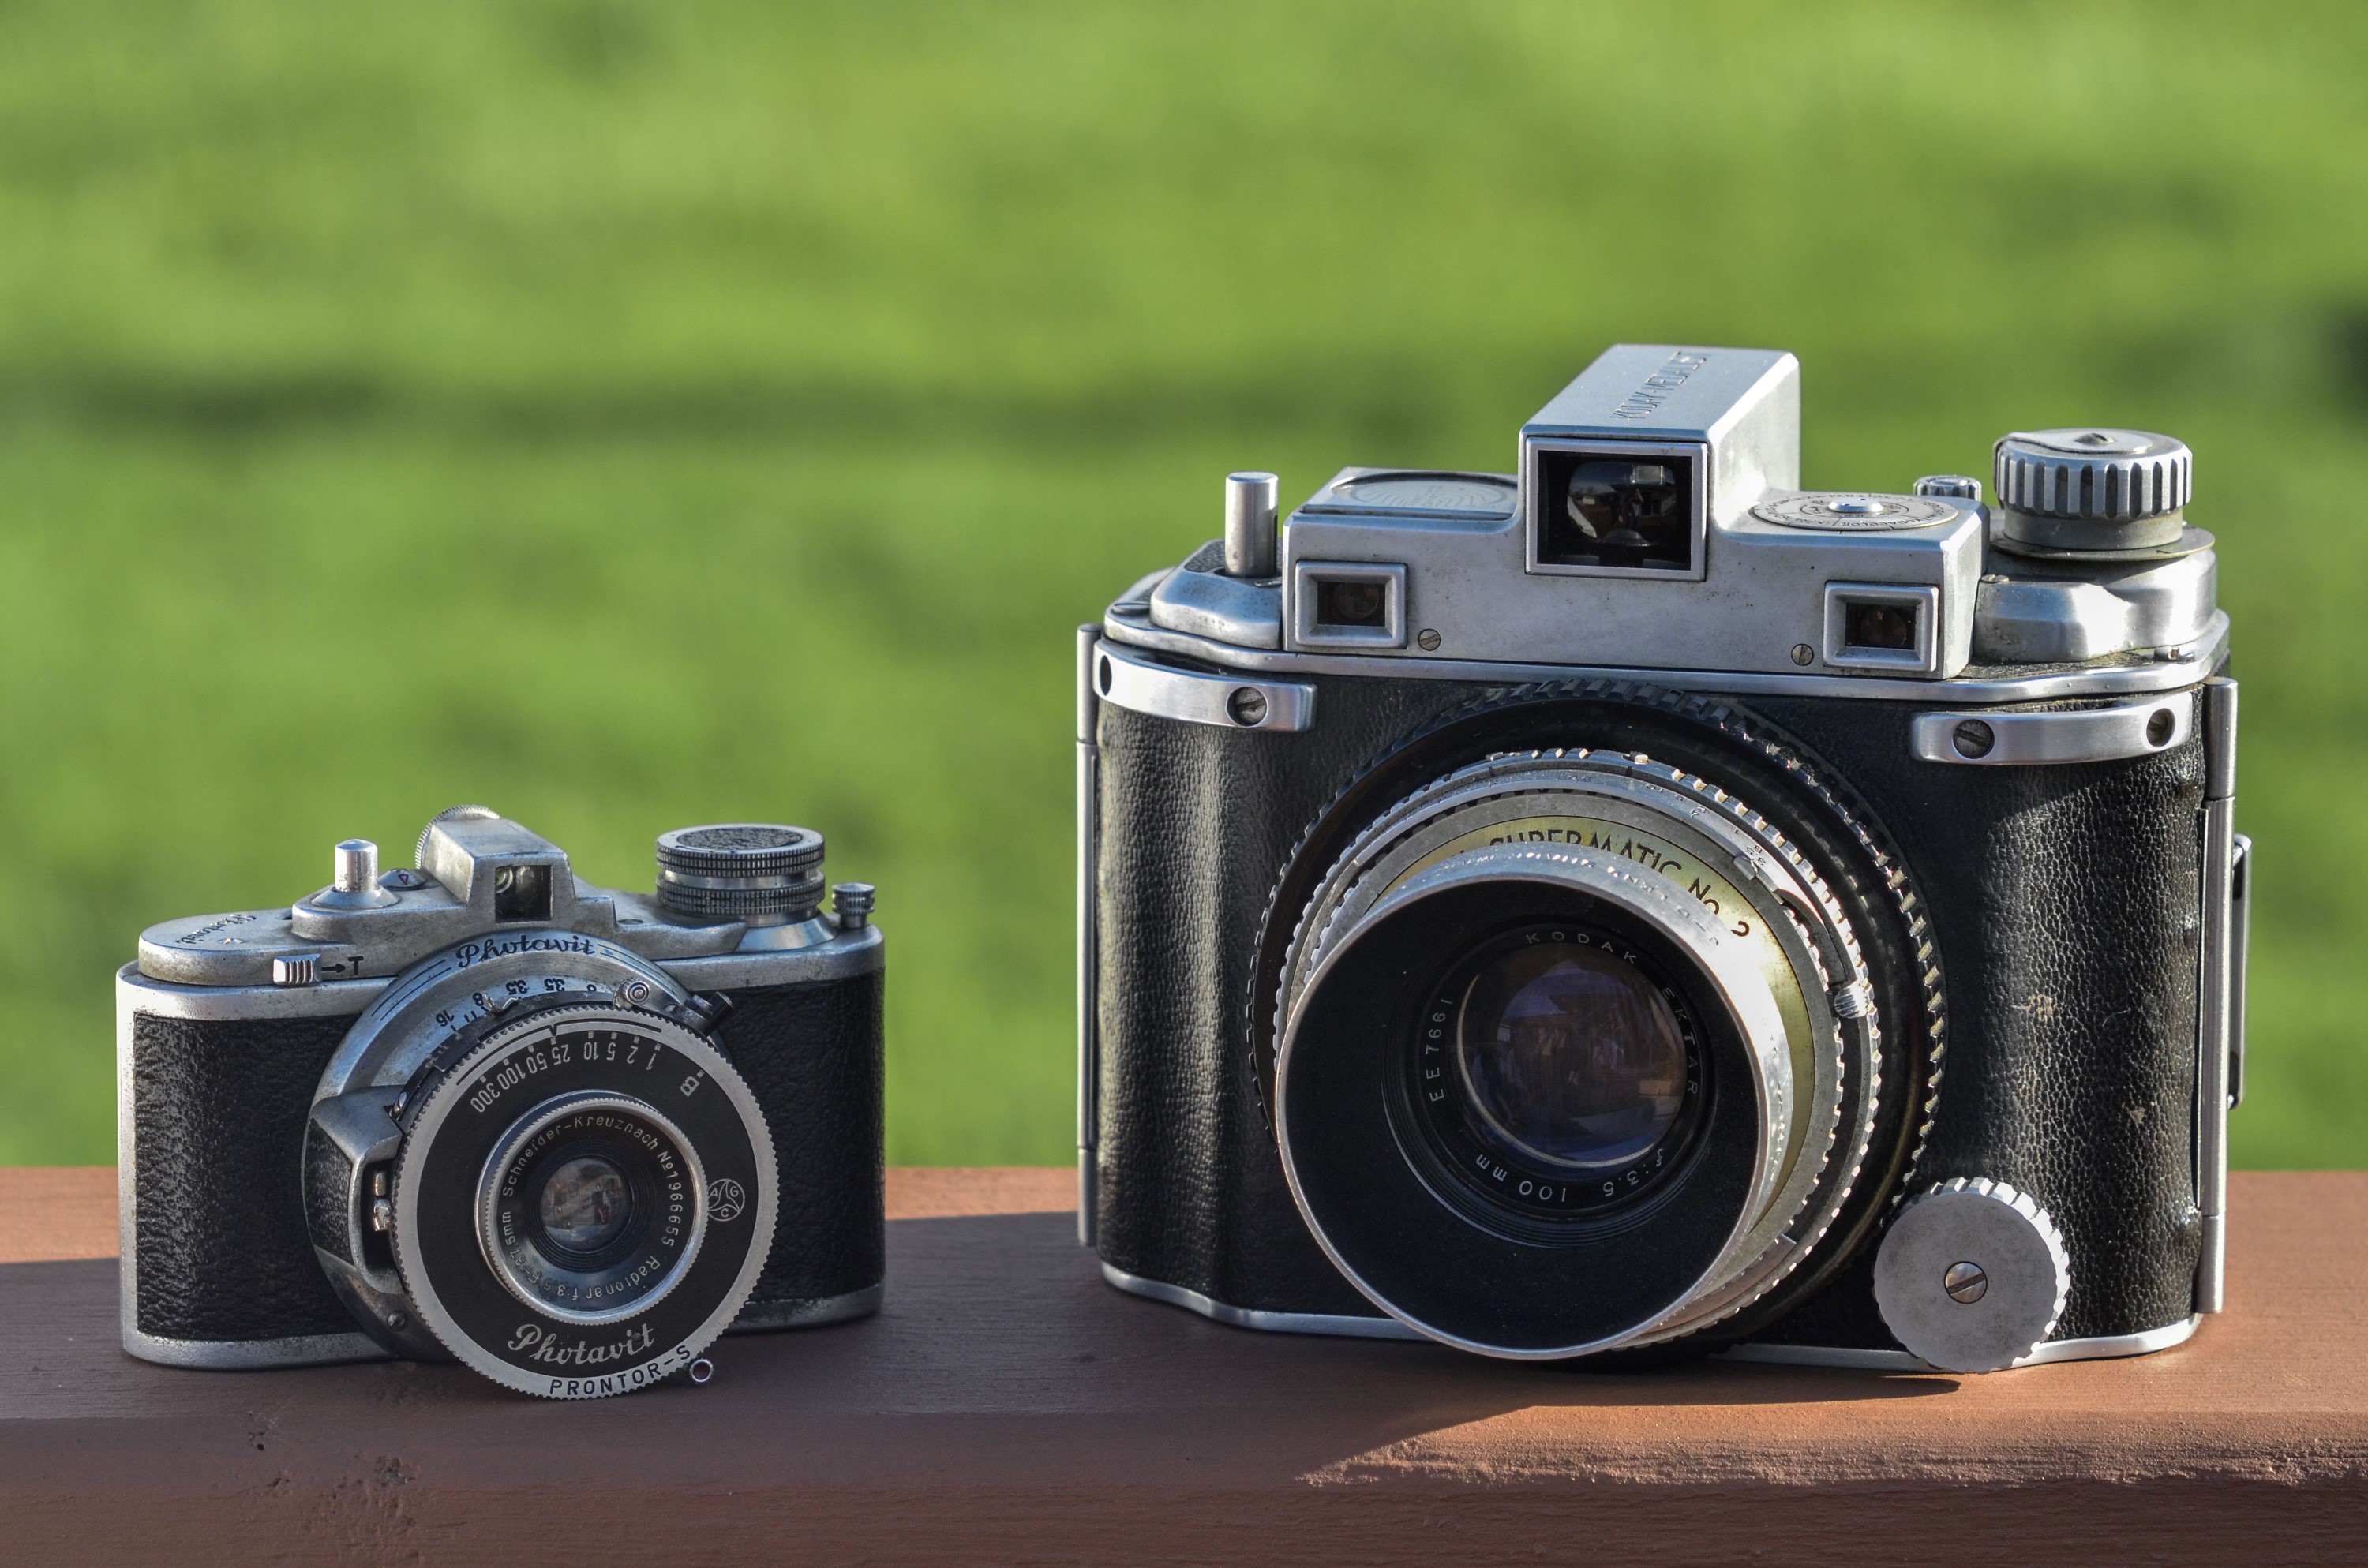
The Photavit IV is small. It easily fits into the palm of your hand and when placed next to a “normal” sized camera, looks like a toy in comparison. Okay, maybe the image to the right of it next to a Medalist is a bit unfair as the Medalist is a big honking beast of a camera, but the effect would still be the same next to a Yashica Electro or a Nikon SLR.
Despite it’s small size, the Photavit is made entirely of metal, and has a solid heft to it. Weighing in at 368 grams with both spools installed, the camera has enough weight to inspire confidence when shooting.
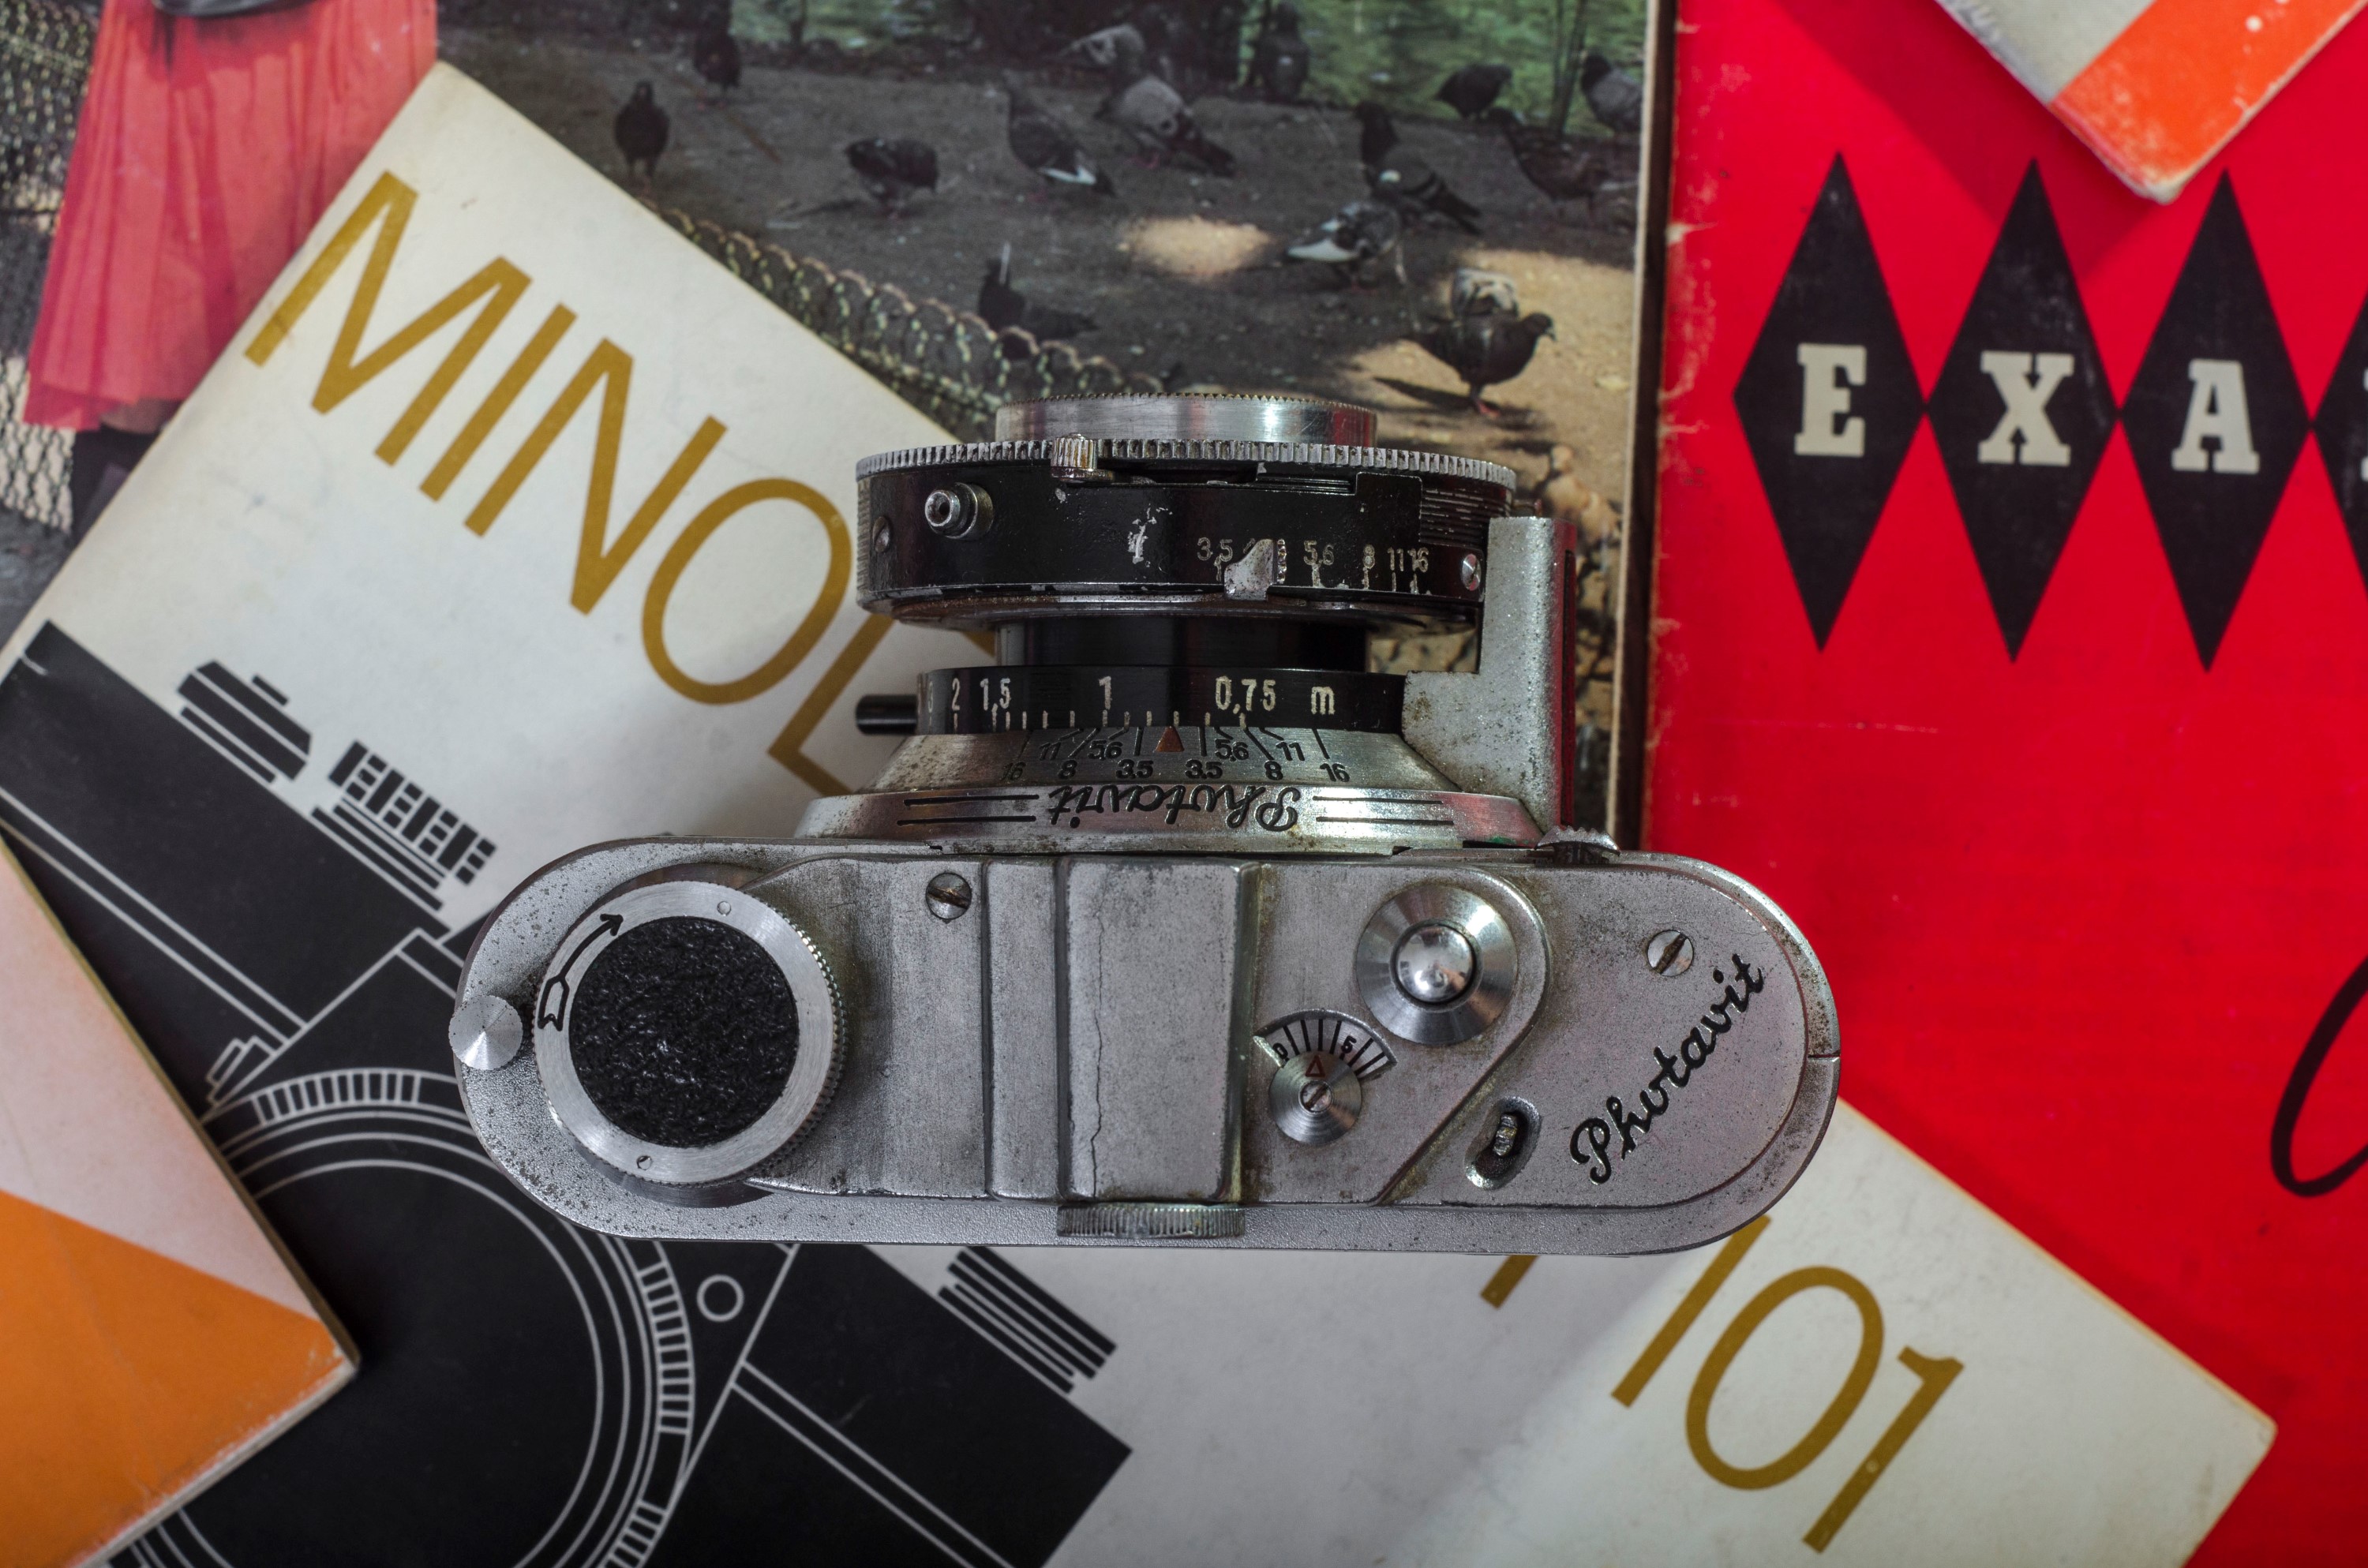
The control layout is quite pleasant, with the shutter release comfortably located on the top plate, where you’d expect to find it on a much larger camera. Focus is controlled by the black lever located behind the shutter. Movement is very smooth from the camera’s minimum focus distance of 0.75 meters all the way to infinity.
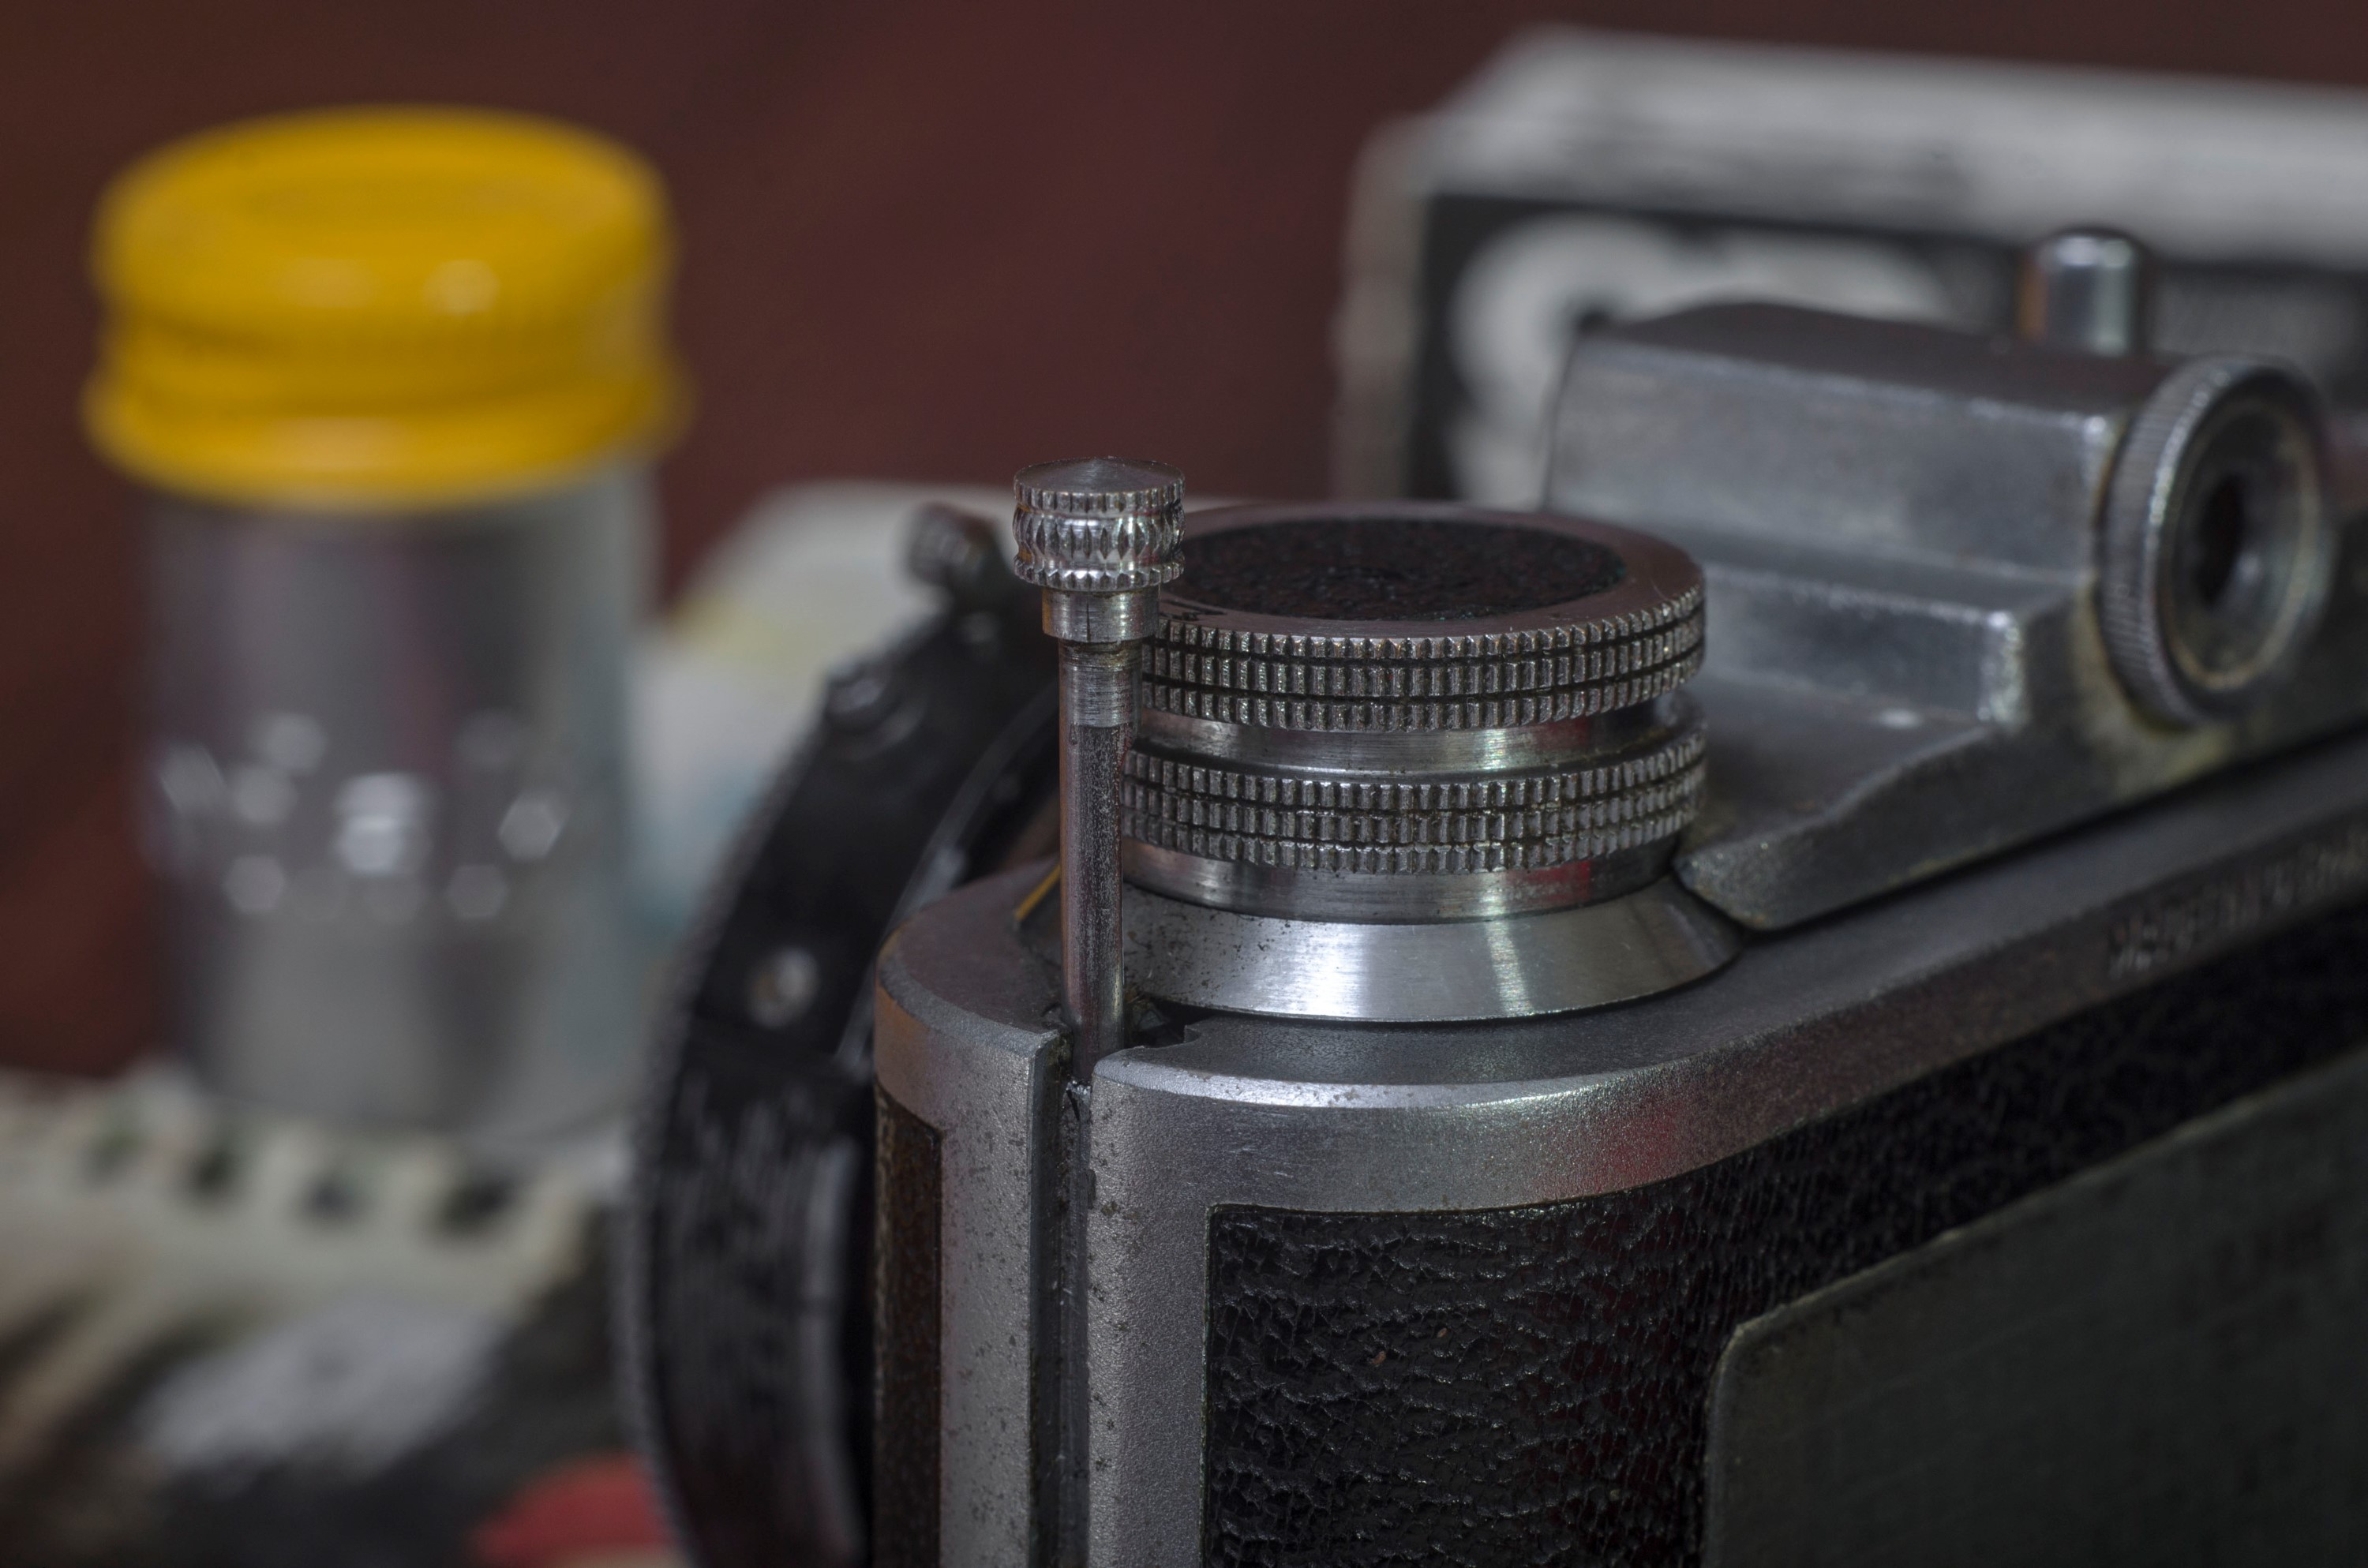
The knob on the top left side of the camera is the wind knob, and unlike regular 35mm cameras that must be rewound, the Photavit is designed for spool to spool film transfer, so no rewind is necessary. When you’ve reached the end of your film, you simply remove the spool and get your film developed.
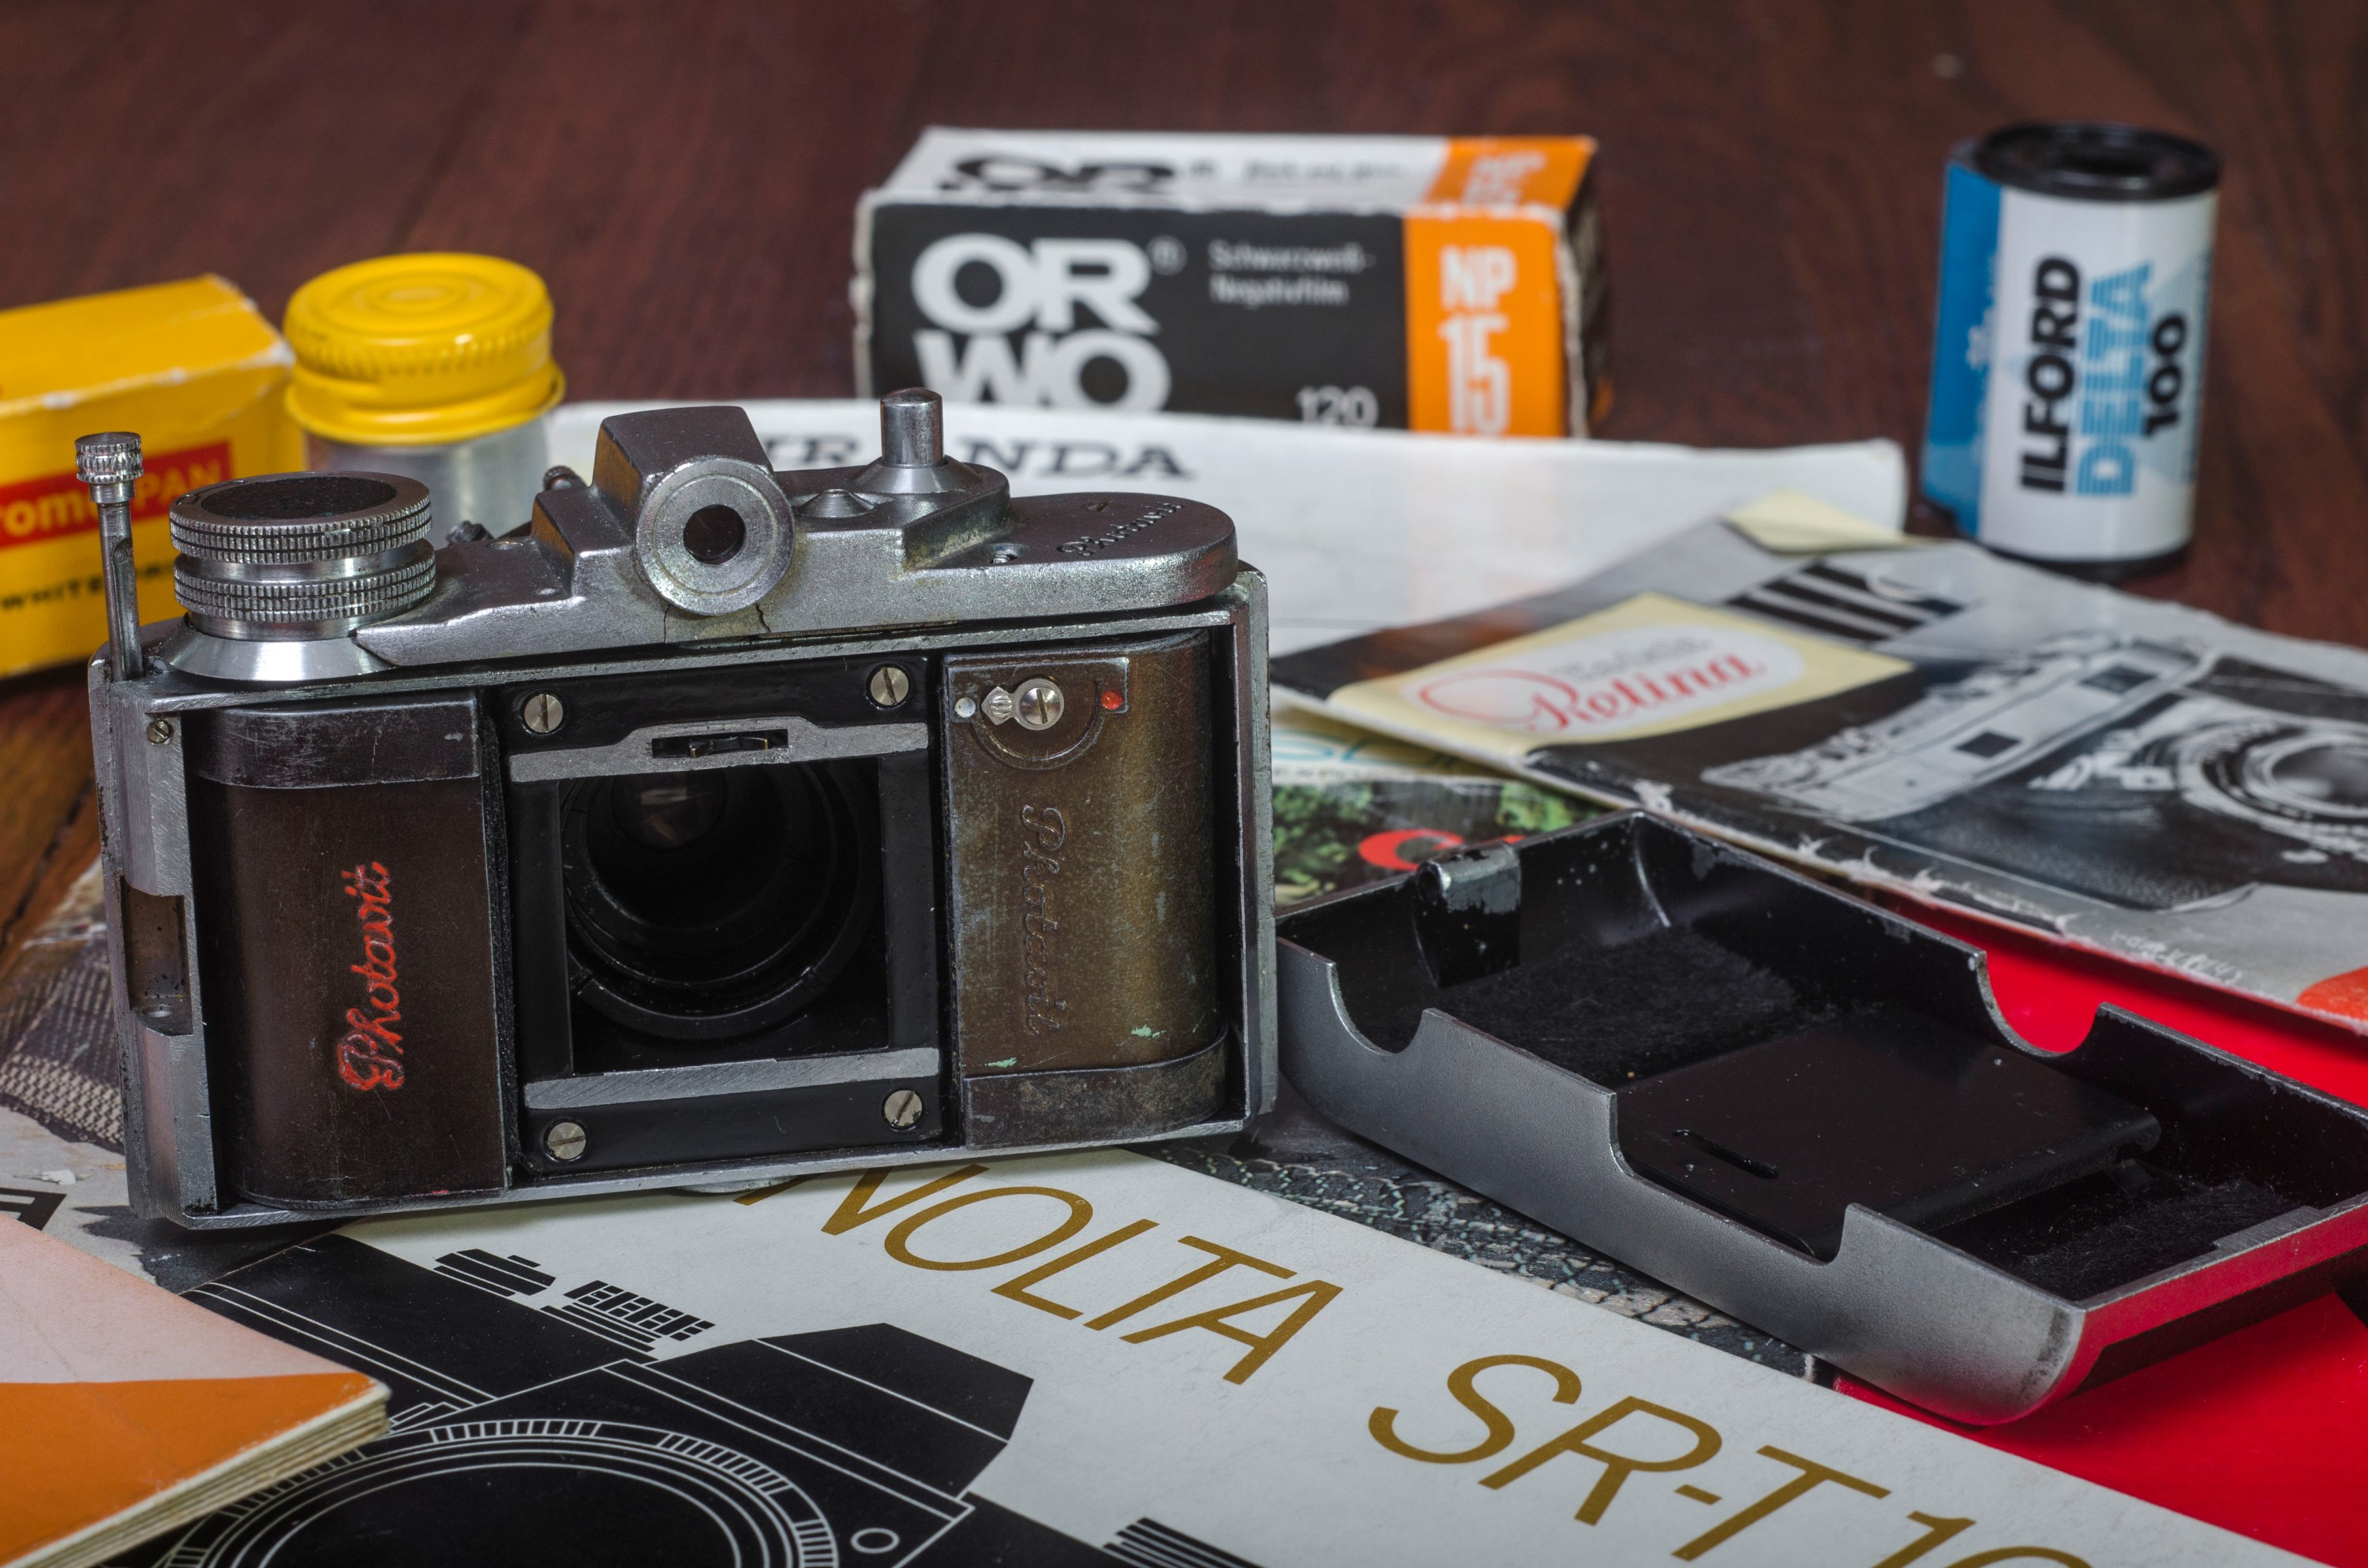
I’ve covered film loading in the above two sections, but in order to open the camera, you pull up on a shaft located next to the wind lever, which acts like a hinge-pin allowing you to completely detach the back of the camera. Without spools installed, an uninformed person might think this camera was designed for some type of roll film.
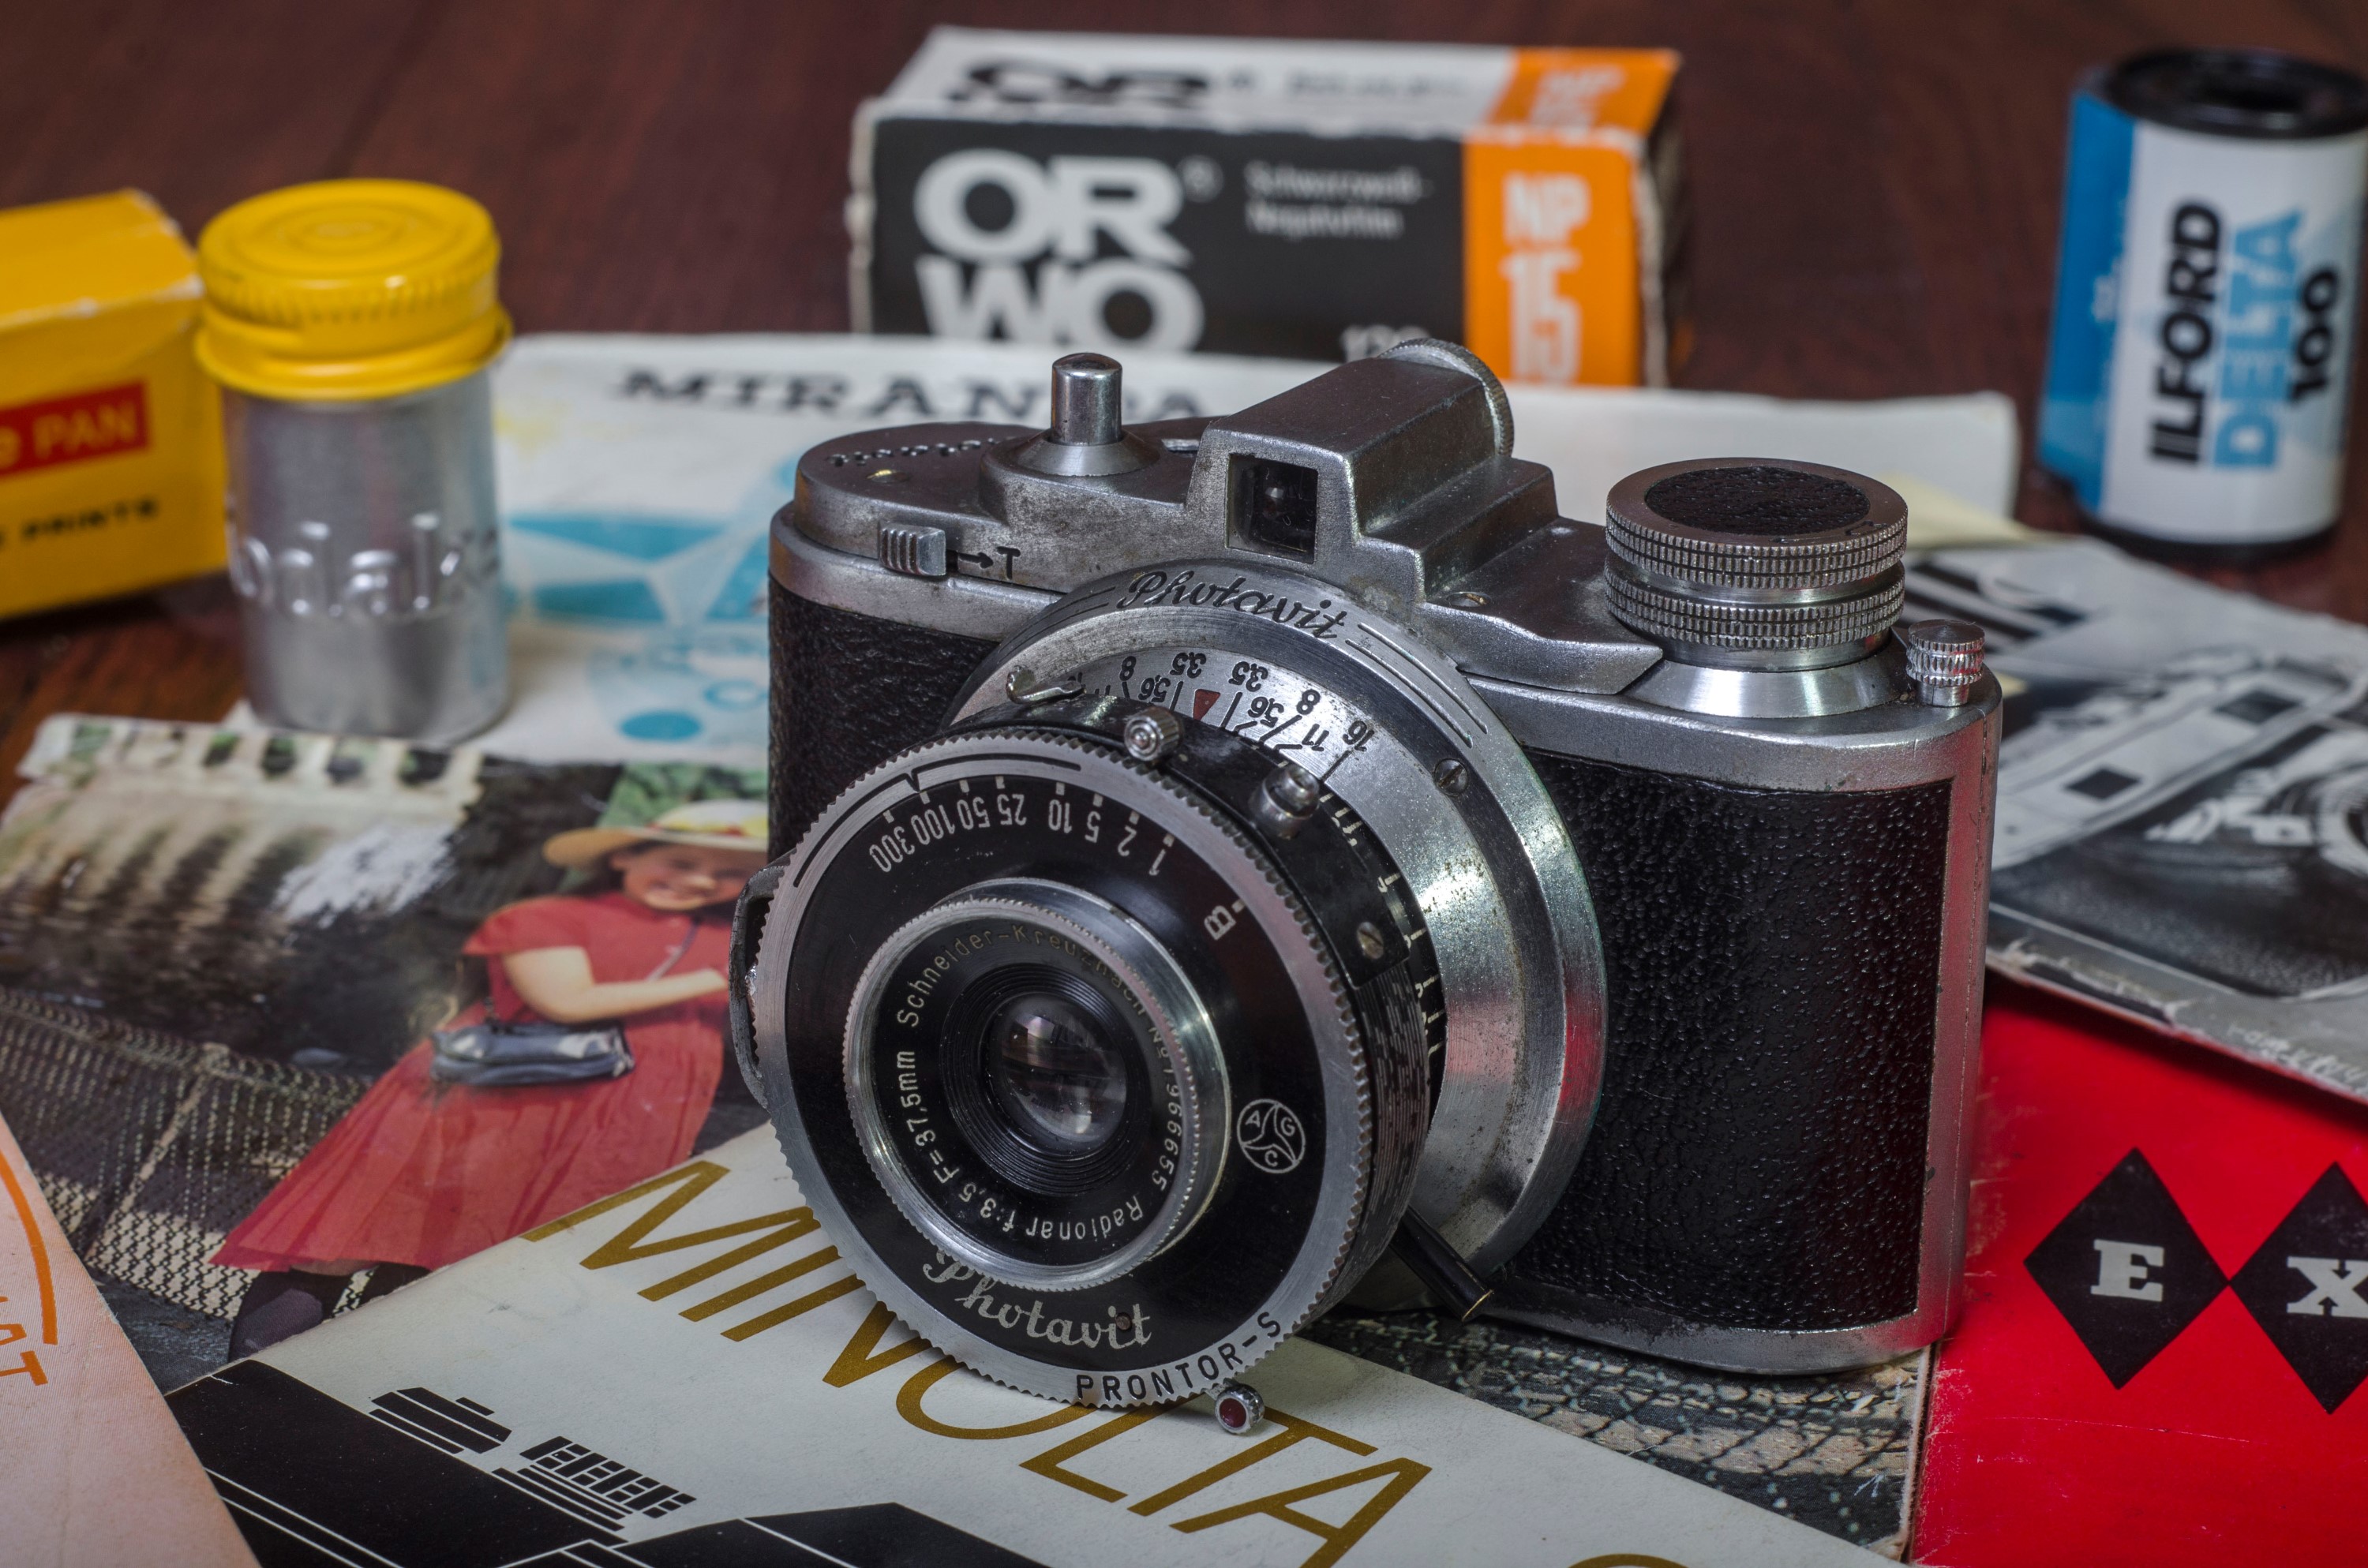
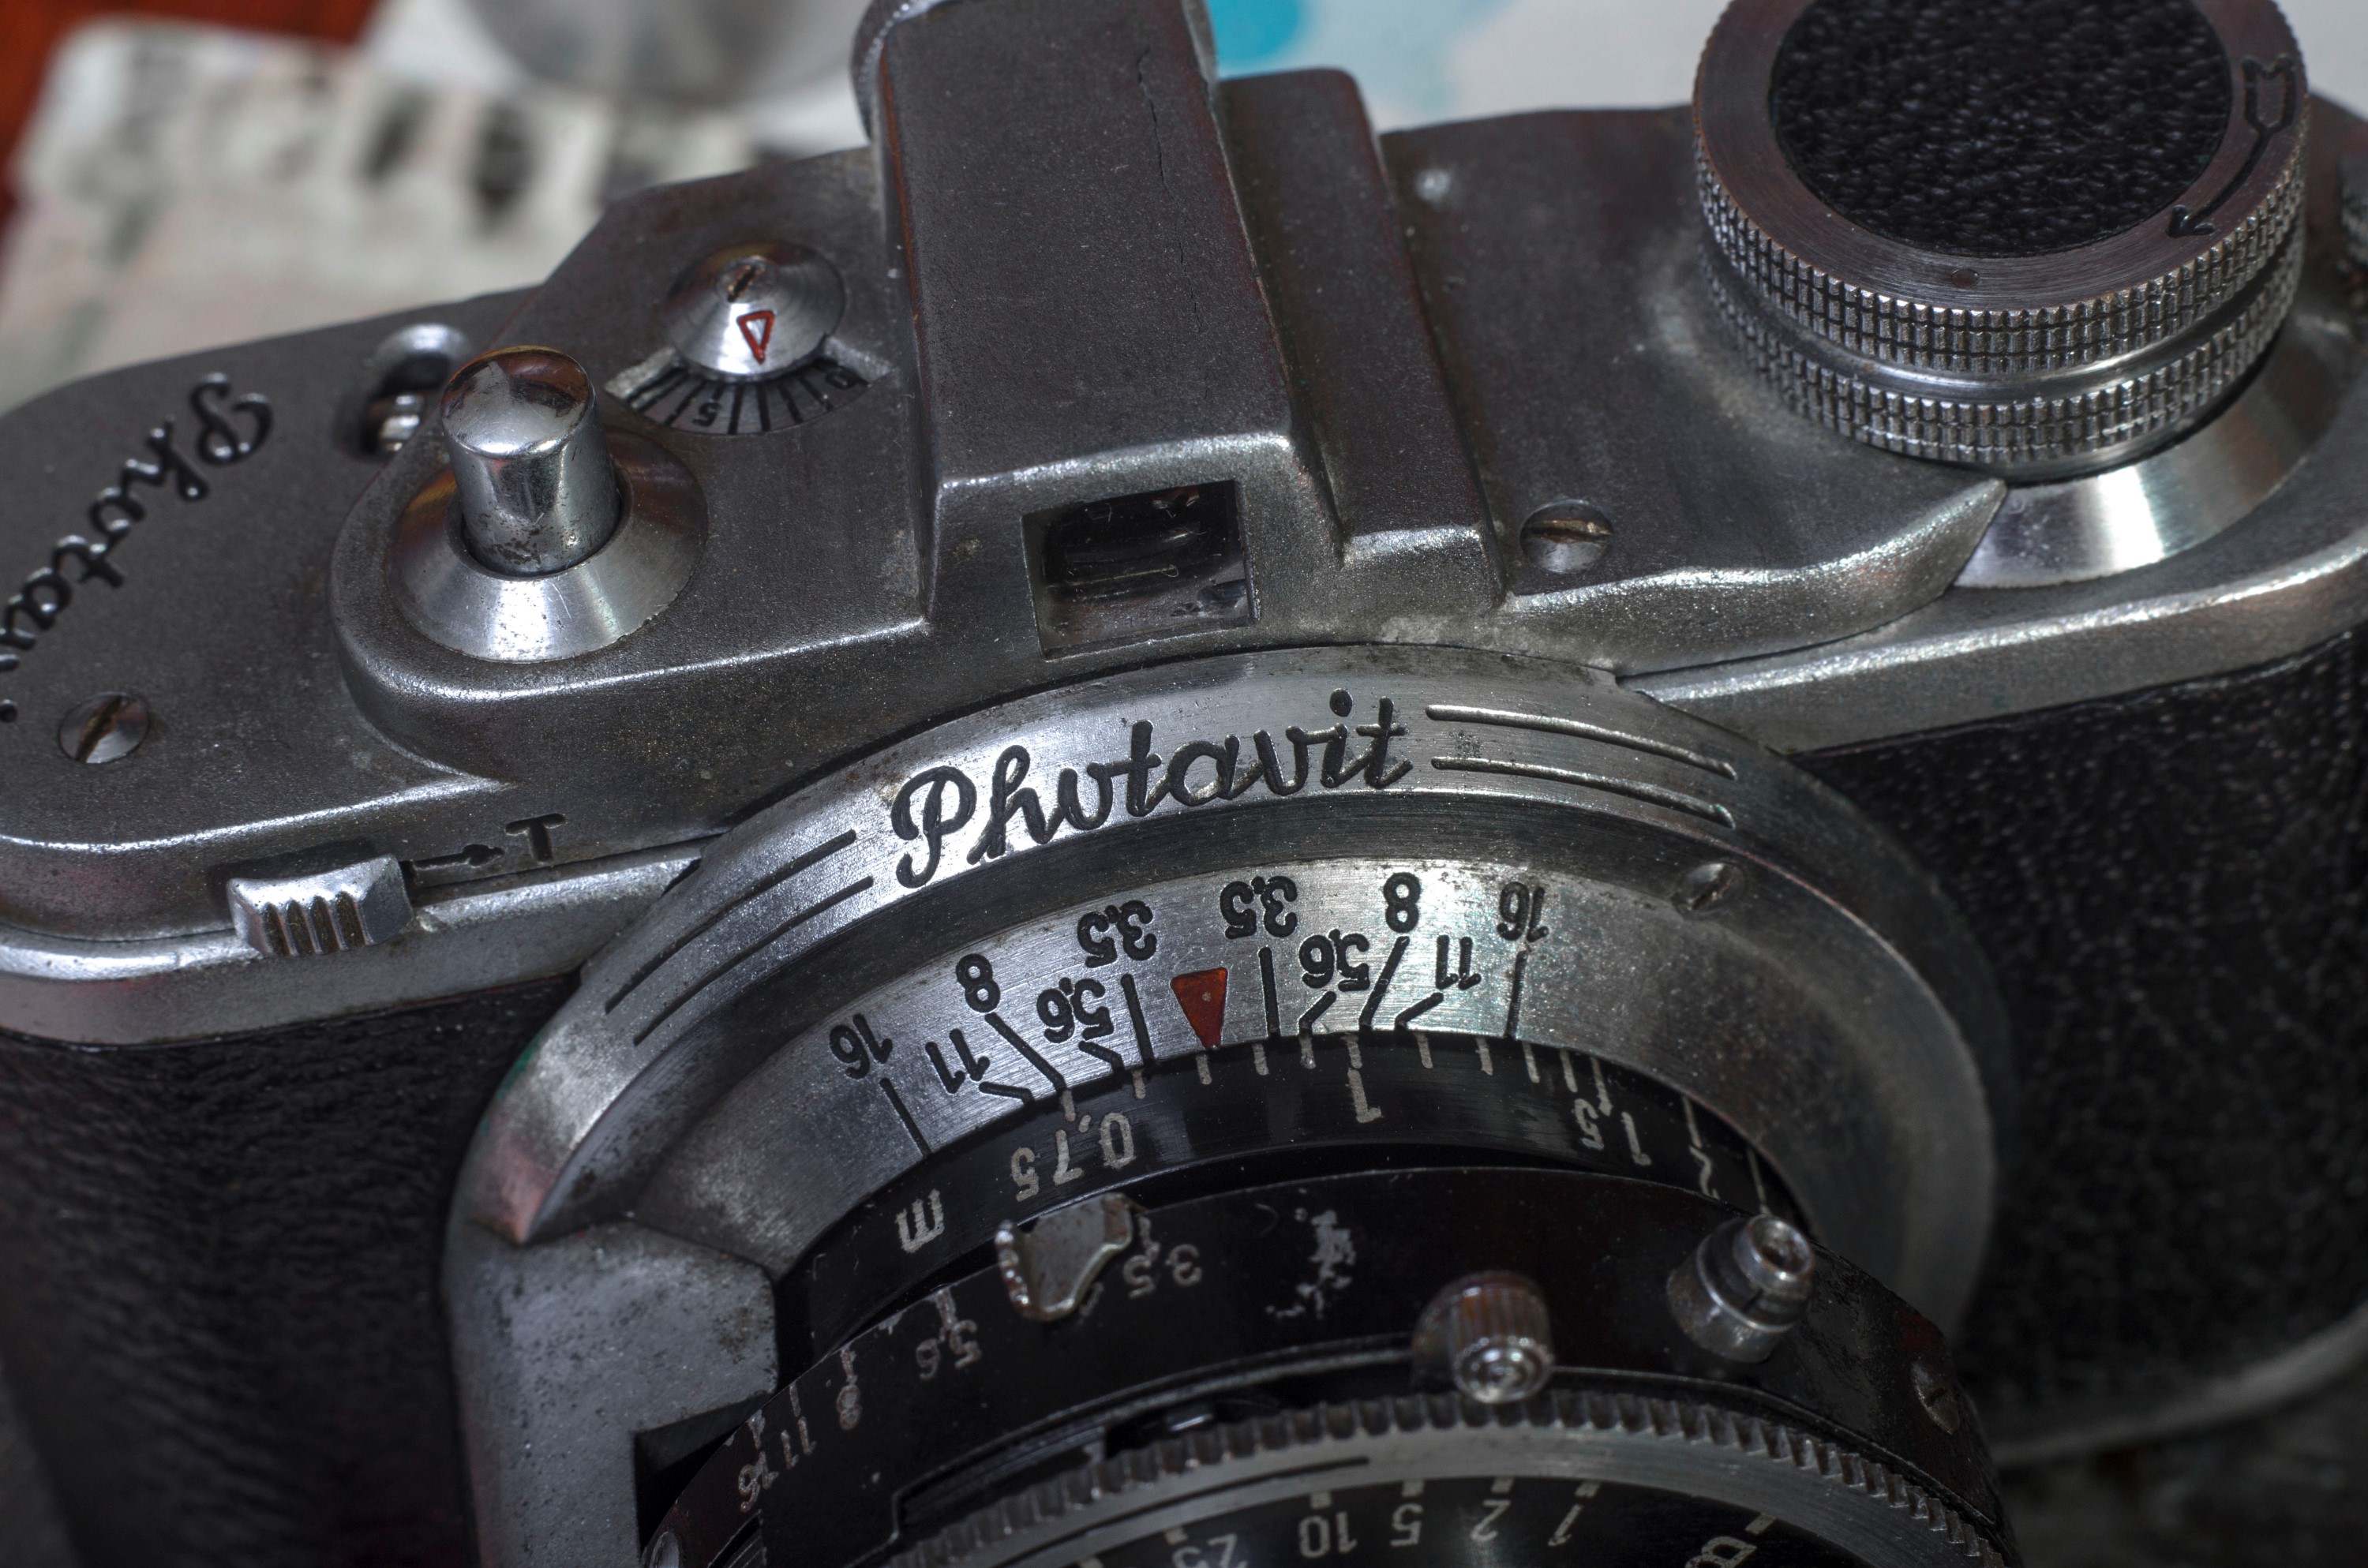
The rest of the controls, like the shutter speed, aperture selector, and cocking lever are all located around the perimeter of the Prontor shutter. Some Photavits came with Compur shutters which look a little different, but otherwise the control layout is largely the same. There is even a self timer in the bottom right corner, indicated with a red dot.
The viewfinder is small and square, but usable. Peering through it you get a simple square image that estimates what should be captured of film. Although there is no parallax correction, the camera is so small, it probably doesn’t need it anyway. The cocking lever on the shutter is located in a position to where you can see the lever in front of the viewfinder when it is cocked. I do not know if this was by design or by accident, but it has the benefit of reminding you if the shutter is cocked or not.
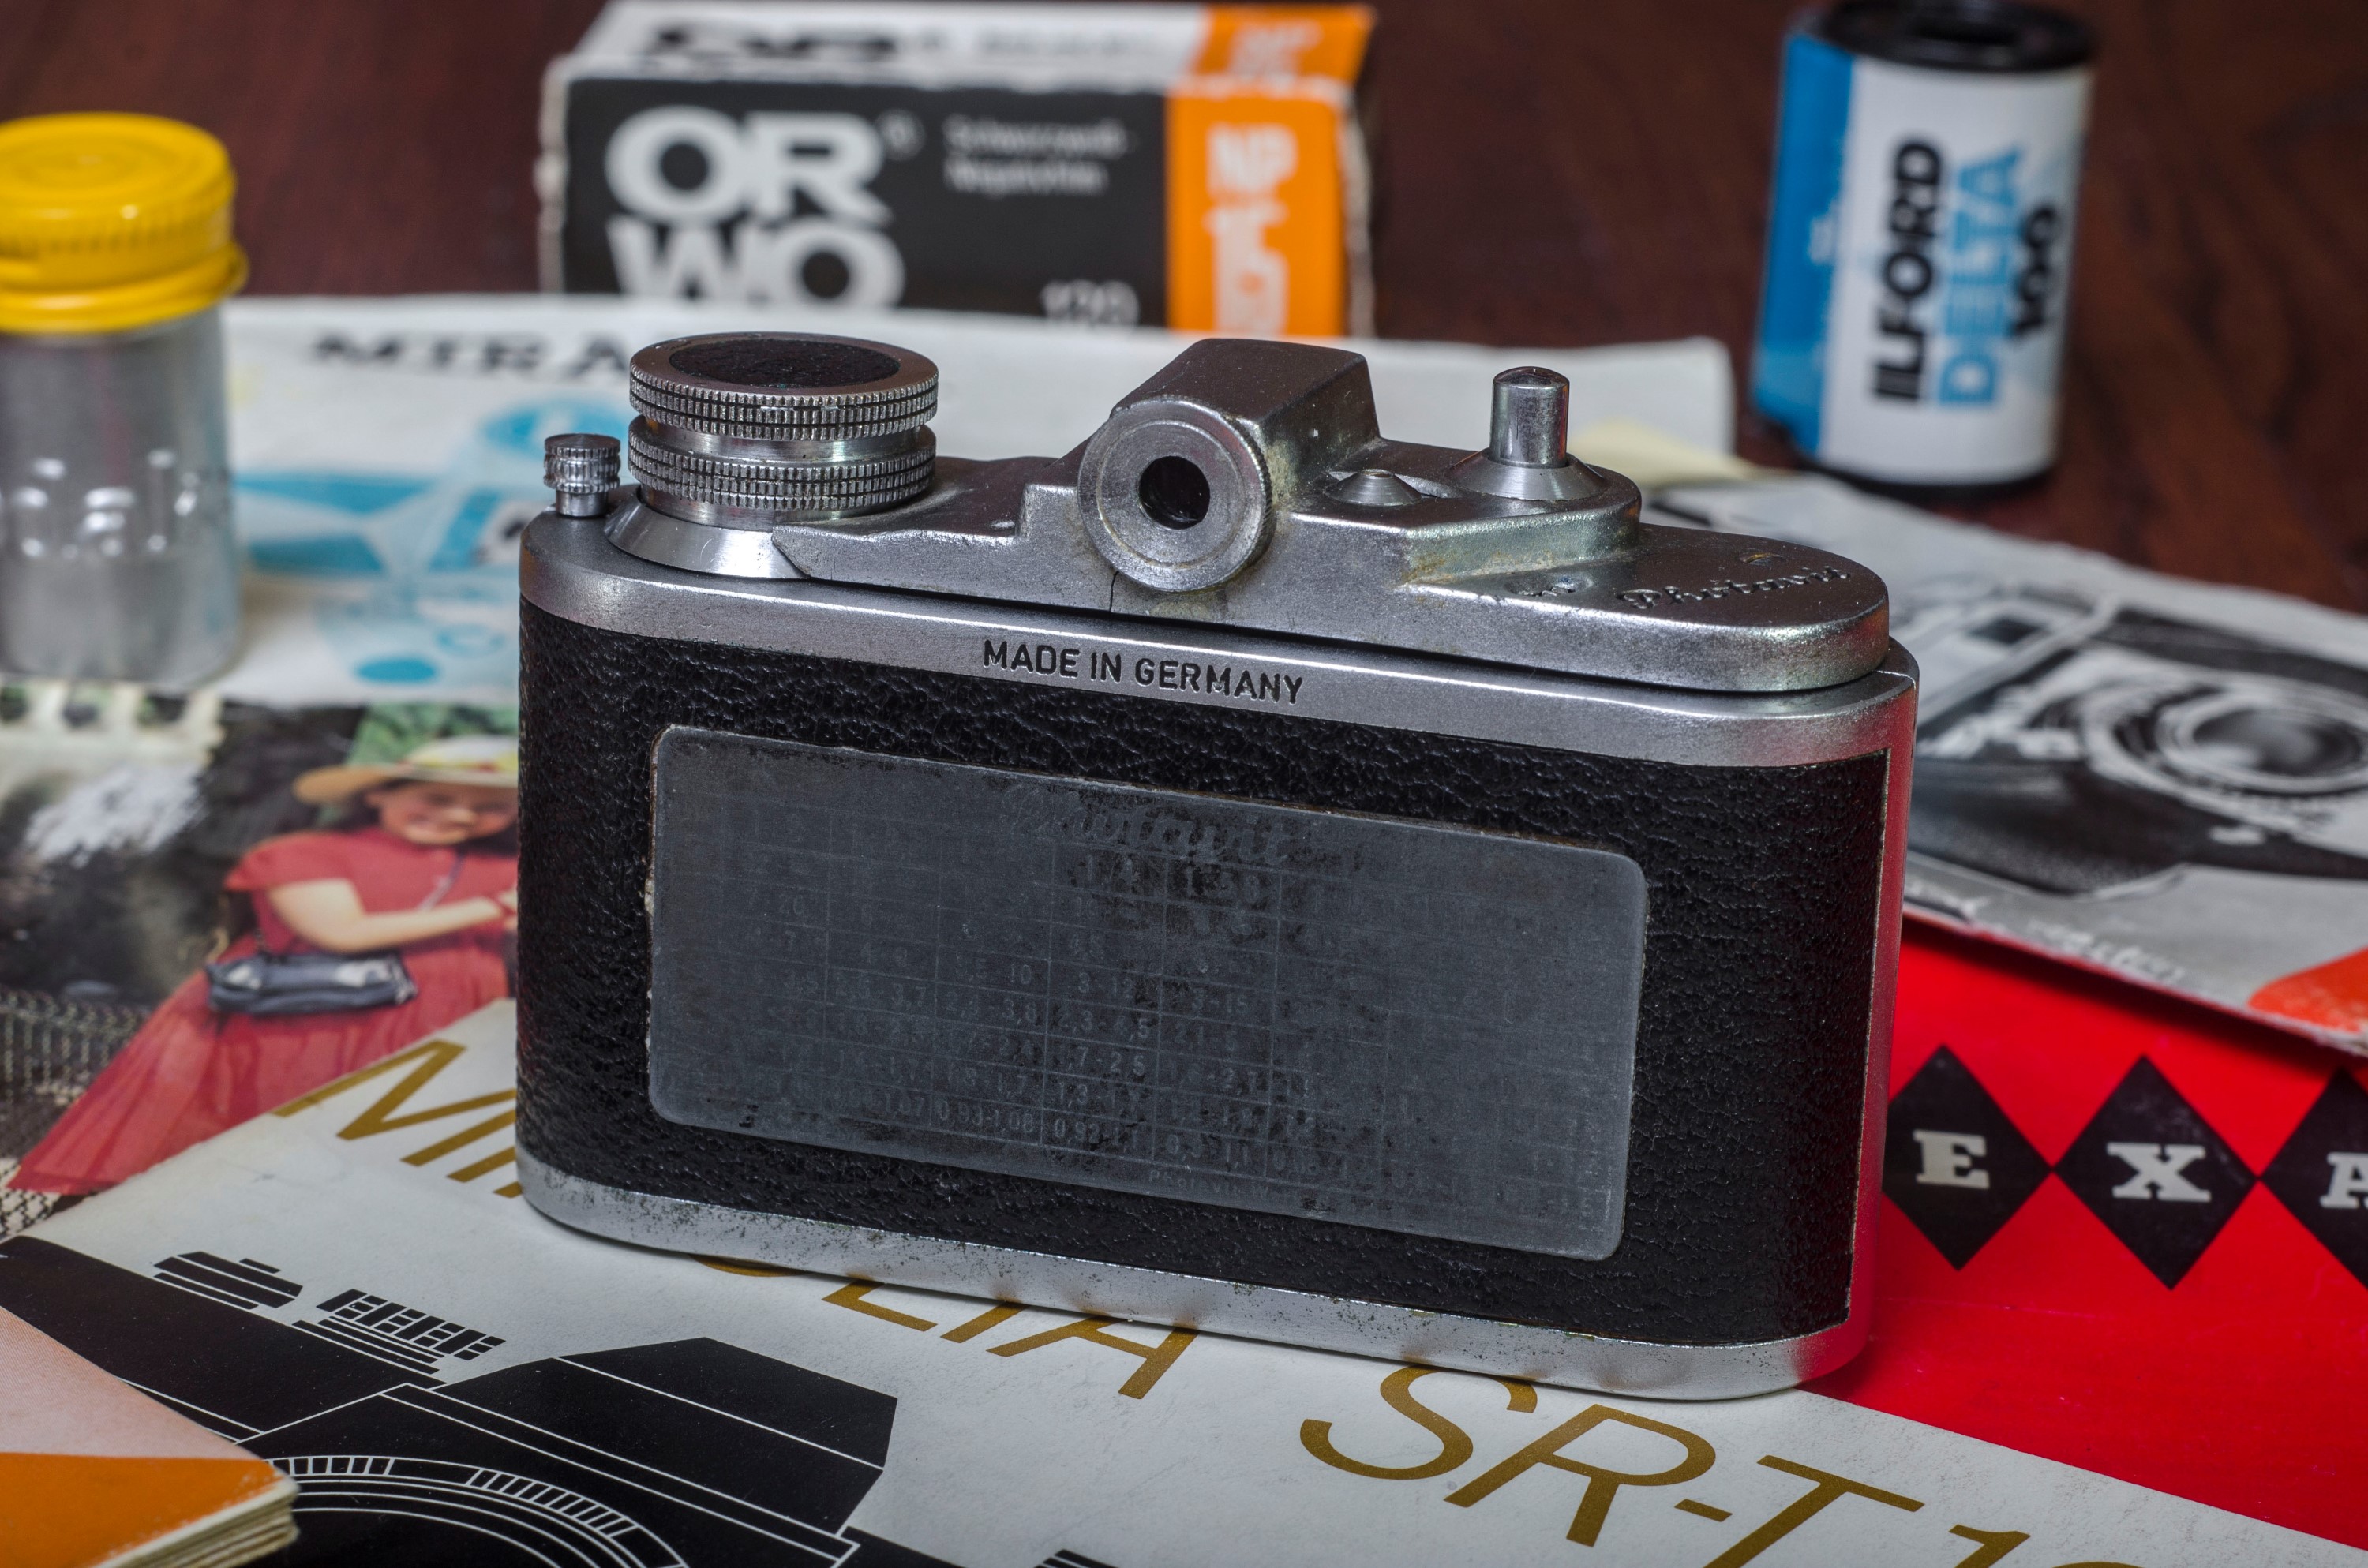
The back of the camera came with a built in depth of field calculator, but the print on mine had completely faded away, making it very hard to read. As best as I can tell, the chart was indicated in meters, just like the focus scale on the helicoid. I am not sure if Photavits exist with measurements in feet, or if they were all meters.
I quite liked shooting with the Photavit. There was something about the incredibly small size, yet fully capable camera that I enjoyed. I often struggle with square format TLRs and folding cameras, but the 1 by 1 composition on this model didn’t seem to bother me. Perhaps it was the familiar ergonomics that allowed me to burn through my film faster than with other square format cameras.
If I had one nitpick about the camera is that at times, the Radionar’s 37.5mm focal length seemed just a tad bit cramped. I found that with a few compositions, I had to back up a little more than I had wanted to get everything in frame. I really think that the compact size of this camera would have paired a little better with a slightly more wide angle lens. Perhaps a 30mm lens would have been perfect. This was a minor complaint though as looking through the results in hind sight, composition wasn’t my weakness.
My Results
I shot the first roll of film through the Photavit in early summer 2017 using an expired roll of Polaroid brand 200 speed 35mm film. This film was gifted to me by my friend Adam and was ideal for the Photavit as it was a 12-exposure roll. This allowed me about 18 exposures through the camera. Neither Adam or I knew if Polaroid really made this film themselves or if it was rebadged from someone else’s emulsion. We also had no idea of how old it was, or how it was stored, but based on the artwork on the cassette, I guessed that it was probably from the 1990s. Assuming a two decades old film, I applied a +2EV overexposure to my images.


The results from the Polaroid 200 film were less than impressive. The color images above have had heavy post processing in Photoshop to get them as good as they look here. Straight out of the camera, all of the images were washed out with blown out highlights. It’s possible that the +2EV was unnecessary, but I’ve seen what overexposed color film looks like and this was worse. I had this film developed by a very small lab and when I sent it in, I left it in the metal Photavit cassette and wrapped it in foil with explicit instructions to return my spool, which they did, but since they had to remove loose film from a 60 year old metal cassette, its possible that the film got fogged along the way. Making matters worse, upon closer examination of the glass element of the Schneider lens, there was a bit of internal haze that I missed the first time.
Although disappointed with my initial results, I could at least see that the Schneider triplet gave decent sharpness with subtle vignetting at the corners. I knew I had to give this camera a second chance.
That second chance came after the generosity of fellow Vintage Camera Collector Rudi Berden loaned me his Photavit film loader and I decided to take a second shot at shooting the camera using some black and white film I could develop myself. Using Rudi’s film loader, I documented the film loading process, loaded in a 12 exposure roll of fresh Ultrafine 400 film and fired off the roll.
My results from the second roll were much better. I had a much better grasp of exposure, although the internal haze from the lens still shows up in all the images as reduced contrast. Ultrafine 400 is a grainy film that I don’t find particularly pleasing, but I certainly can’t fault the camera for that.
After seeing the results from the second roll, I saw everything I needed. Unless I was able to get into the lens and completely remove the haze, my images weren’t going to look much better than what I had here, but I can safely say that the Photavit is a really cool little camera that was fun to use and although I am sure there are those who might be turned off with the additional complexity of having to manually spool 35mm film into a proprietary cassette before each and every roll, I quite liked the experience.
You don’t collect and shoot old film cameras for their convenience. Quirks and additional steps are part of the program, and if you like oddball cameras, you should love the Photavit. Mine wasn’t in the best condition. I had to do some repairs when it came to me. The lens is hazy, and the top plate is cracked. Still, I got some pretty cool images from a unique camera that is unlike anything else in my collection. If you have an opportunity to pick one of these up for a fair price, I highly recommend it!
My Final WordHow these ratings work |
The Photavit IV was the best equipped of the original Photavit line made by Photavit-Werke GmbH in the late 40s. It is an extremely compact camera that shoots square 24mm x 24mm images on regular 35mm film loaded into special Photavit cassettes. Normally sold with a special Photavit film loader which allows film to be loaded in daylight, it can be done without one. The camera is pretty basic, but all Photavits came with quality German lenses and shutters which allowed them to be pretty capable little devices. These cameras don’t show up for sale often, but when they do, are worth considering. If you plan on shooting one, look for one that includes the film loader to get the full experience, or be prepared for some additional steps. | ||||||
| Images | Handling | Features | Viewfinder | Feel & Beauty | History | Age | |
| 1 | 1 | 1 | 1 | 2 | 0 | 40% | |
| Bonus | +1 for indescribable cool factor, this thing is small! | ||||||
| Final Score | 9.4 | ||||||
Additional Resources
http://camera-wiki.org/wiki/Bolta
http://www.cjs-classic-cameras.co.uk/photavit/photavit.html
http://www.submin.com/35mm/collection/photavit/index.htm
Nice Square Shooter! Though I know you’re not a huge fan of square formats, some of your photos are quite nice in making the most of it, and in making good use of the camera to give a true review of its shots rather than treat it only as a curious keepsake.
One curious thing I could never quite figure out was why it seems no one made a general use, general cost 35mm square format camera that did not require special cartridges and loading practices to get film into their chambers. Given the number of normal loading half frame (or even 3D) cameras out there, it just seems odd that no one thought to do much in square aspect from such a widely used format.
Hallo Mike.
Since a few days I have the Boltavit and Photavit Virus inside! I am deeply impressed about them.
Never heard before of them. The Quality is amazing.
Thank you for your blog and exzellent Description.
Especially how to load them.
Regards
Fabian
Thanks for the feedback! I am glad the article was helpful for you!