

 What is it?
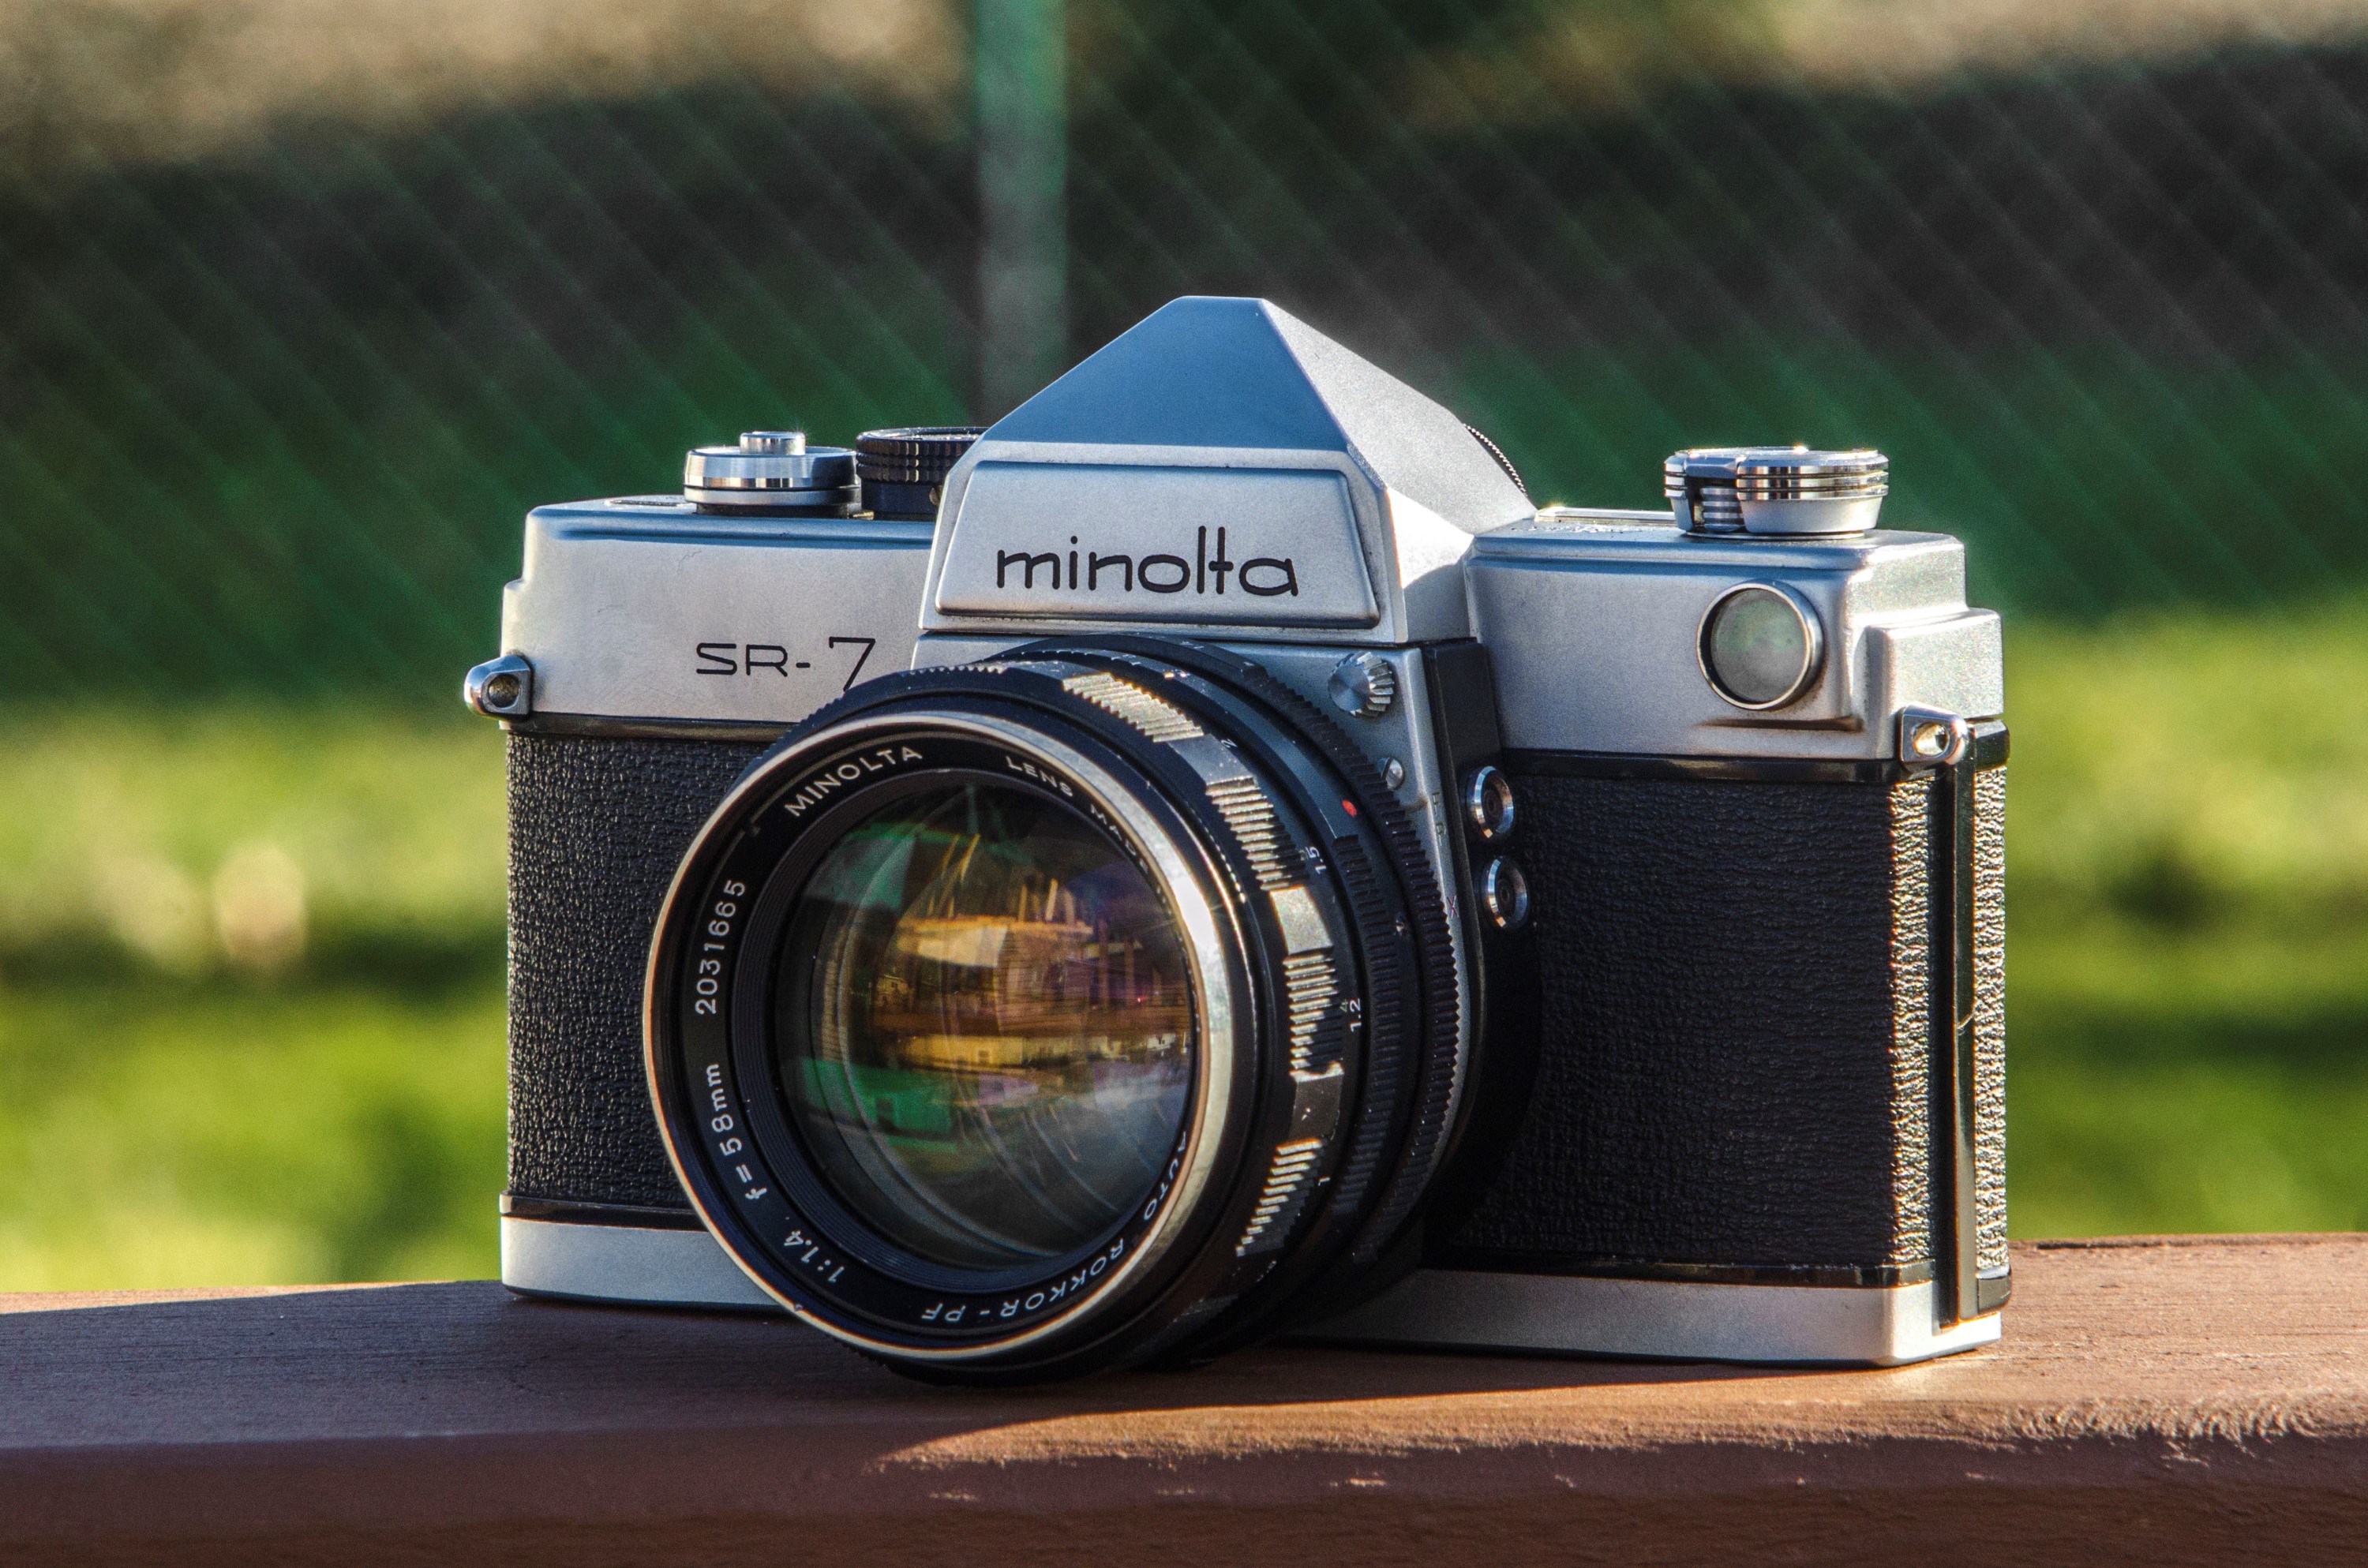
This is a Minolta SR-7 Single Lens Reflex camera made by Minolta Co., Ltd. between the years 1962 and 1966. It was the last in Minolta’s original SR-series of SLR cameras which started with the SR-2 in 1958. The SR-7 is a historically significant camera as it was the first SLR camera with a coupled Cadmium Sulfide (CdS) light meter. The CdS meter relied on a single PX625 and was body mounted. The SR-7 was a large and heavy solid metal camera that was built to very high standards. The entire Minolta SR-series was generally well regarded and earned a reputation as being extremely well built and reliable.
Film Type: 135 (35mm)
Lenses: 58mm f/1.4 Auto Rokkor-PF + others
Lens Mount: Minolta Bayonet SR Mount
Viewfinder: Fixed SLR Prism
Shutter: Focal Plane Cloth
Speeds: B, 1 – 1/1000 seconds
Exposure Meter: Coupled Dual Range CdS Meter
Battery: 1.35v PX625 Mercury
Flash Mount: PC Port M/FP Sync
Manual: http://www.cameramanuals.org/minolta_pdf/minolta_sr-7.pdf
History
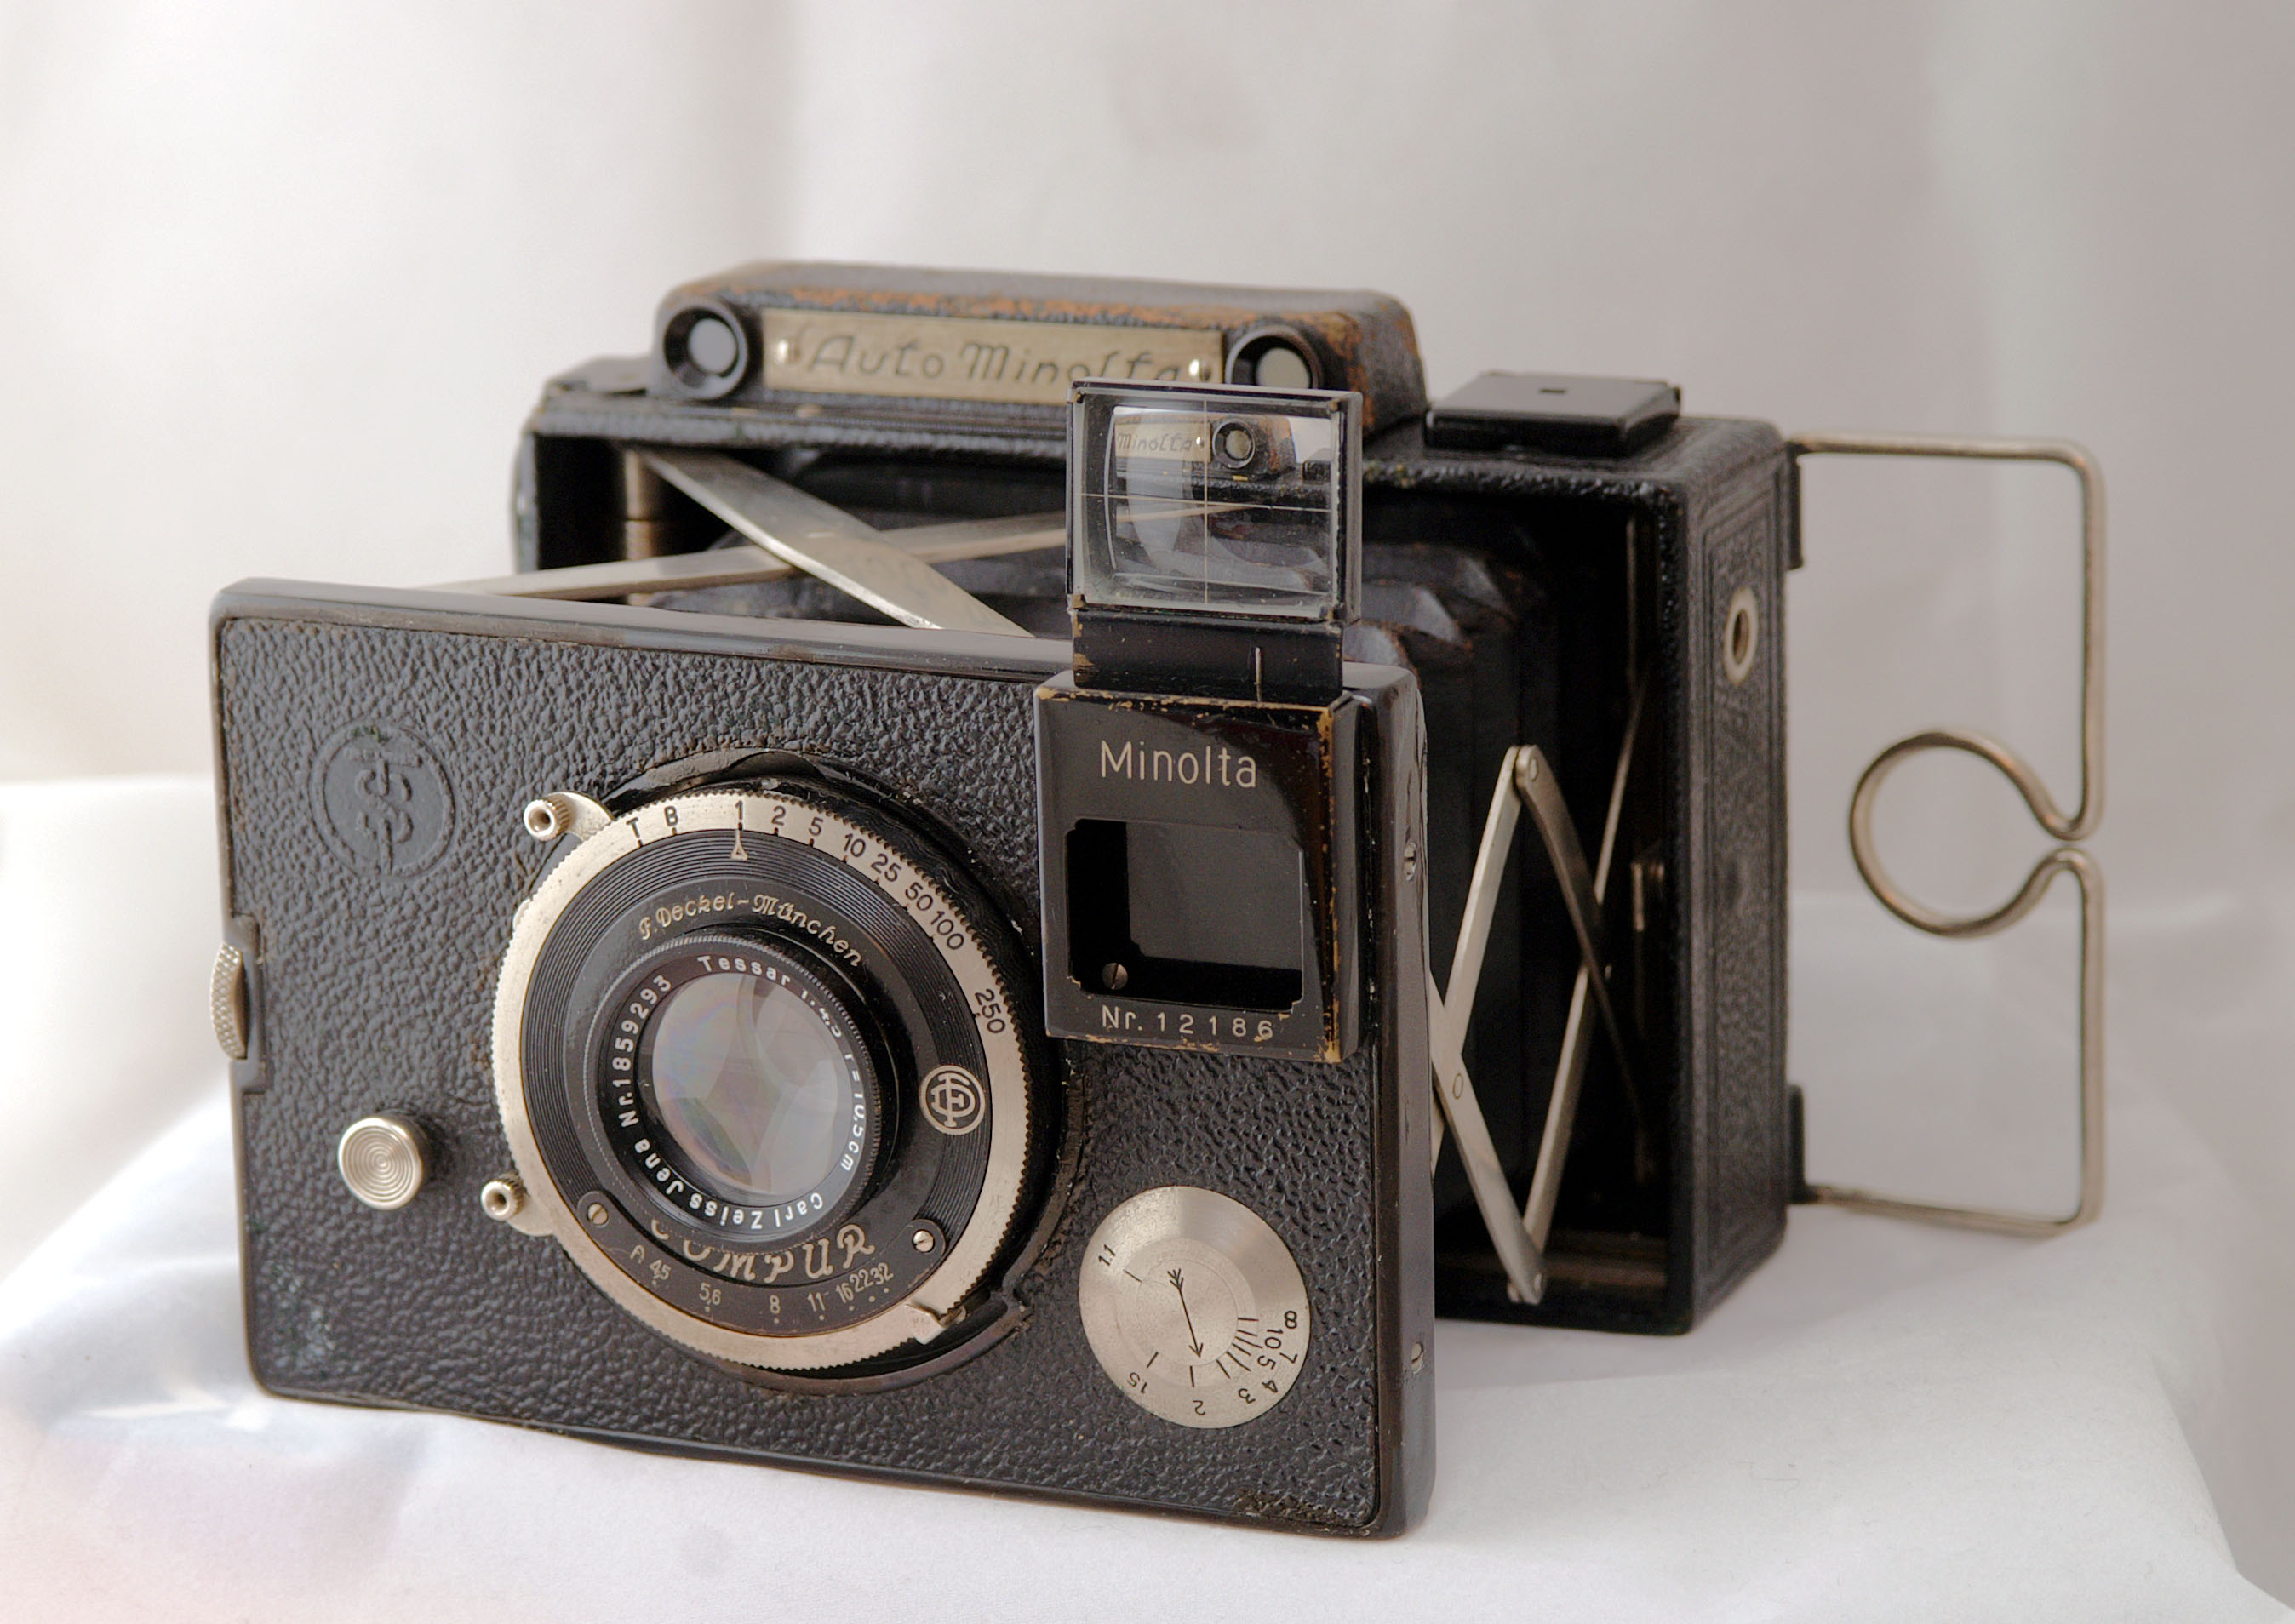
Minolta was a Japanese company founded in 1928 by Kazuo Tashima in Osaka, Japan. Tashima enlisted the help of German camera technicians Billy Neumann and Willy Heilemann to help him design Japanese made cameras, but utilizing German expertise. The company was originally known as Nichi-Doku Shashinki Shōten which translates to “Japanese-German Camera Shop”. In 1929, Nichi-Doku released its first camera, a folding 6 x 4.5 cm camera known as the Nifcarette which was inspired by similar German folding cameras of the time.
In 1931, the company changed its name to Molta Gōshi-Gaisha. The word “Molta” is an acronym of a German translation meaning “Mechanism, Optics and Lenses by TAshima”. Shortly after this time, both Billy Neumann and Willy Heilemann left the company to form their own company simply called Neumann & Heilemann.
In 1933, Molta Gōshi-Gaisha applied for a trademark for the name Minolta which would be used as a brand name for their forthcoming cameras. After World War II, much of the information regarding the history of the company was lost or destroyed, so it’s hard to know for certain if Minolta was also an acronym like Molta. Some sources say that Minolta stood for “Mechanism, INstruments, Optics and Lenses by TAshima”, but others state that Minolta is taken from the Japanese term “Minoru ta” (稔る田) which means “ripening rice fields”. Ripening rice fields are commonly used as symbolism in Japanese culture for signs of health and prosperity. In addition “Minoru ta” is pronounced exactly the same as the name “Minolta”.
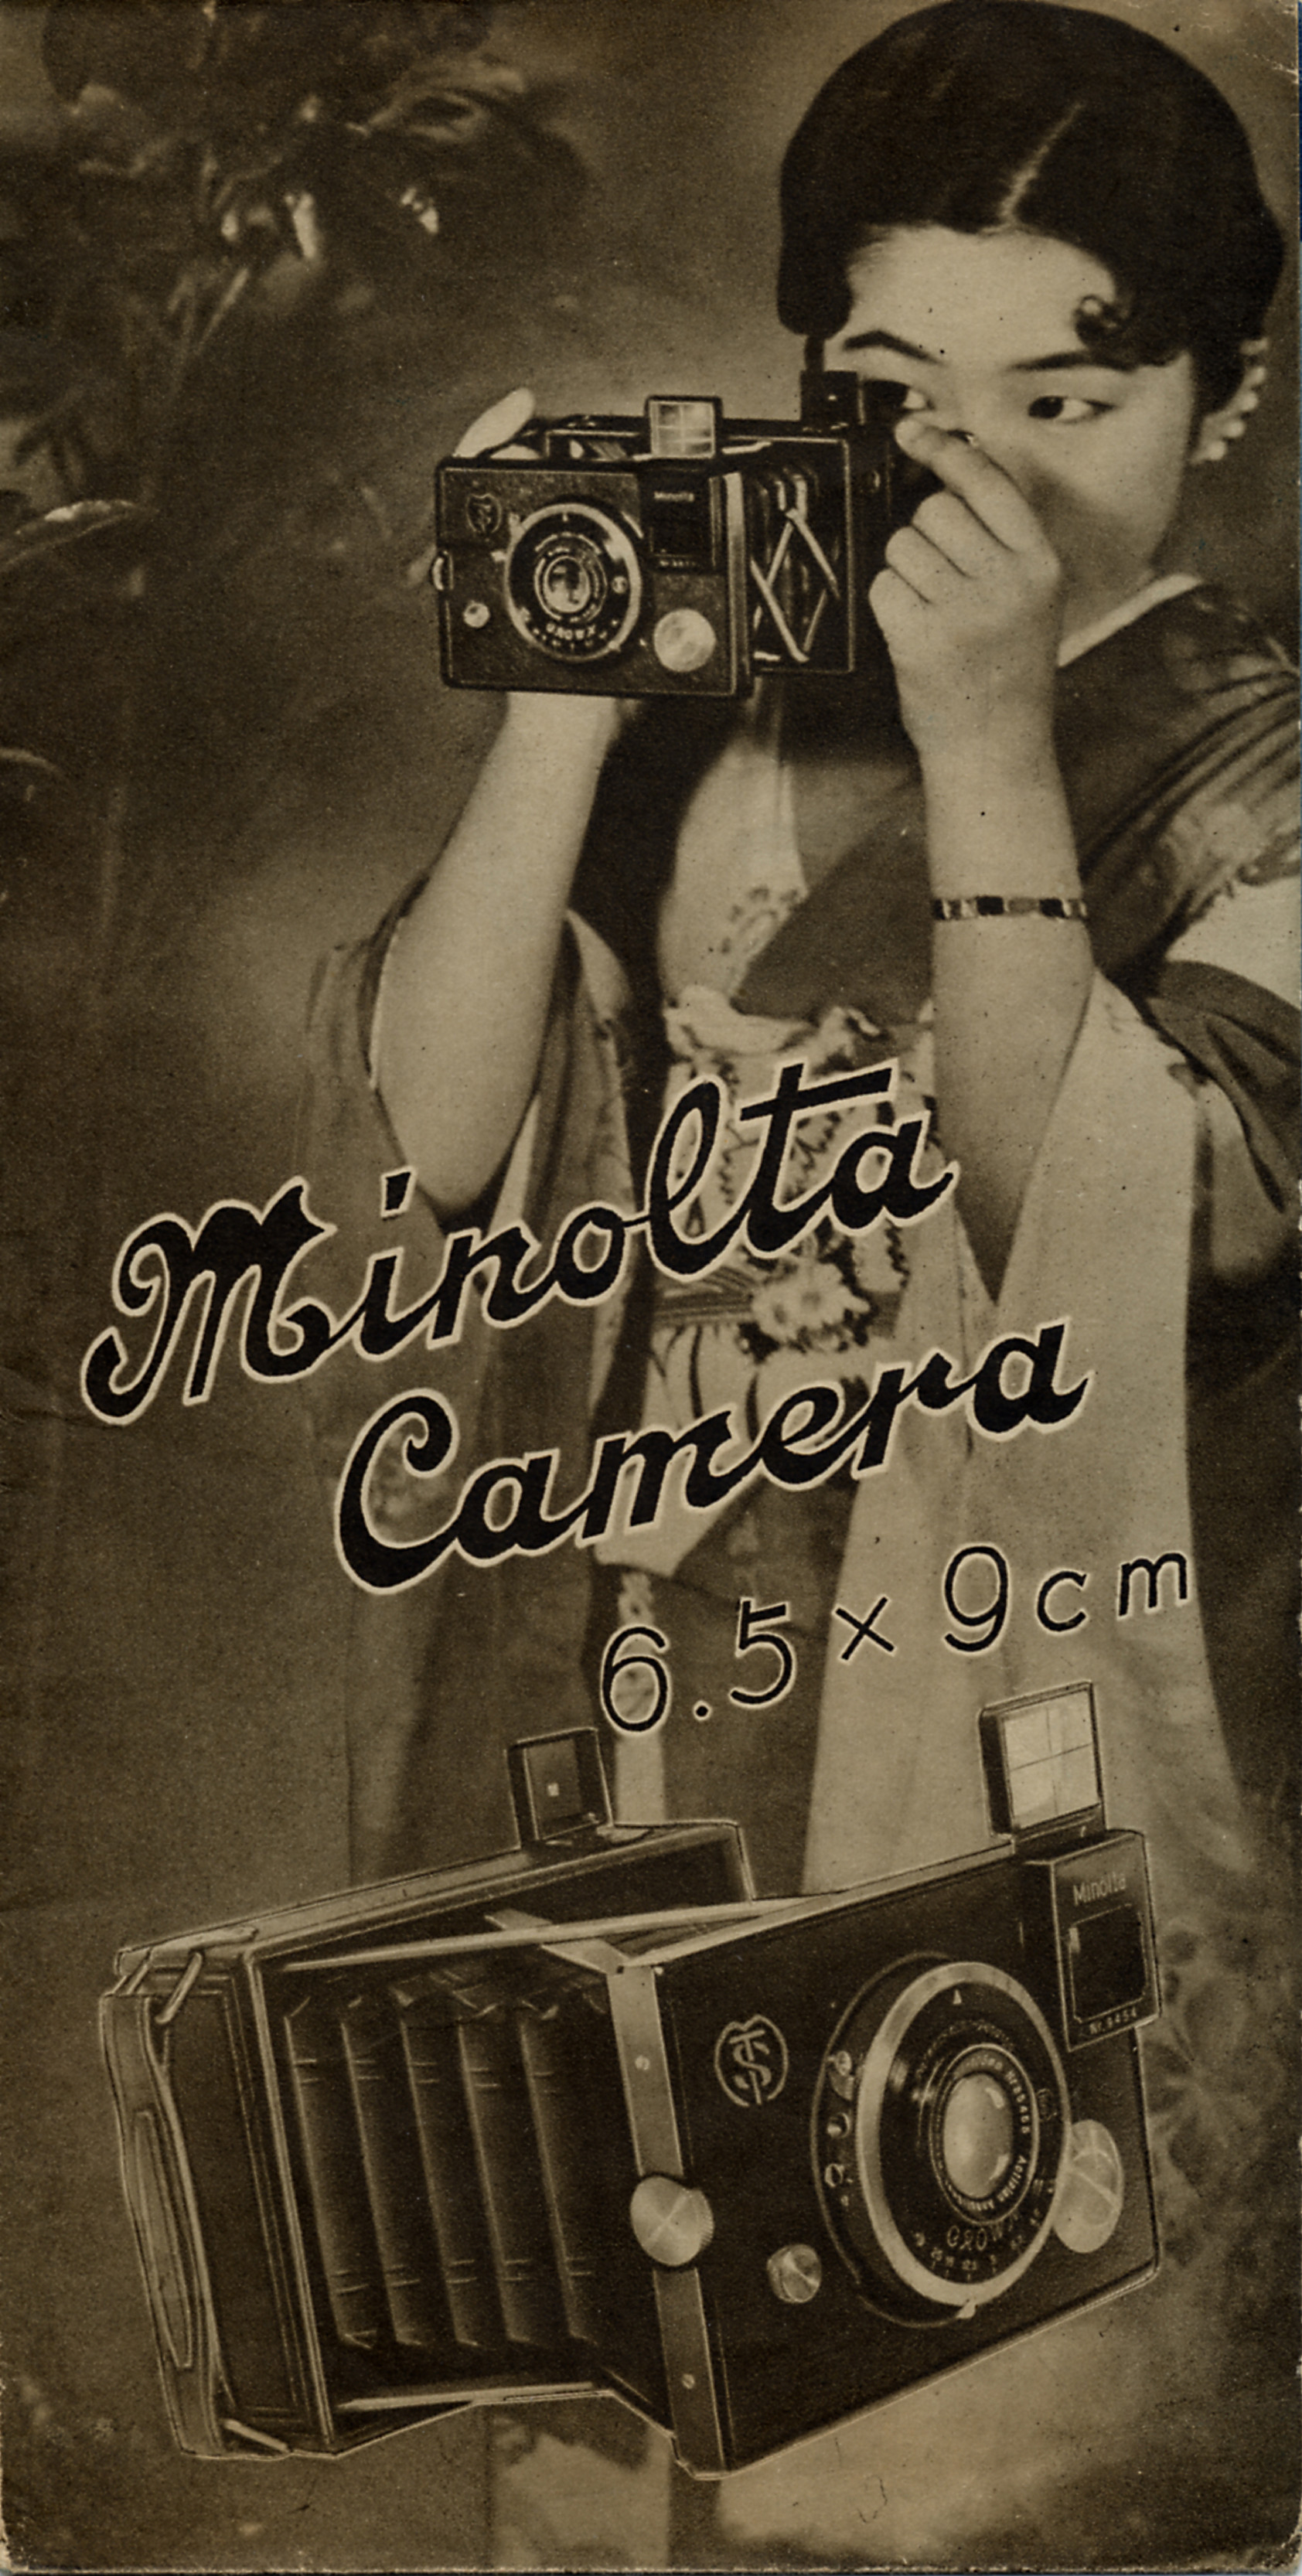
Throughout the 1930s, the company saw great success in Japan and started releasing other lines of cameras and photographic equipment. In 1937, the company changed its name once again to Chiyoda Kōgaku Seikō K.K. which is often abbreviated as “Chiyoko” and released its first Twin Lens Reflex known as the Minolta-Flex.
In 1940, Chiyoko introduced the Rokkor line of optical lenses for military use only. During the early part of World War II, Chiyoko produced cameras both for military and civilian use, but in 1943 stopped all civilian production. Chiyoko was heavily involved in the Japanese war effort, but by the end of the war, 3 out of the company’s 6 factories were destroyed by US bombings.
In 1946, Chiyoko resumed manufacturing of consumer cameras and optical equipment and continued to expand its line of cameras. In 1947, a highly successful line of “Leica-inspired” 35mm rangefinder cameras known as the Minolta 35 was released. The Minolta 35 was the first mass produced 35mm rangefinder made in Japan built with Leica specifications. It sold very well and was in regular production until the early 1960s. One unique aspect of most Minolta 35s is that although they used standard 35mm film, it produced negatives that were 24mm x 32mm, compared to the international standard of 24mm x 36mm. This gave exposed images from the Minolta a more square look, and because the negatives used less space on the roll of film, you would get a few extra exposures per roll. A standard 36 exposure roll of film would yield 40 exposures. This exact same size was also used by Nippon Kogaku with their Nikon rangefinder which was sold at the same time as the Minolta 35. The Minolta 35 would receive 8 revisions throughout it’s 12 year production run, and only the very last revision, the Minolta-35 Model IIB would shoot normal 24mm x 36mm exposures.
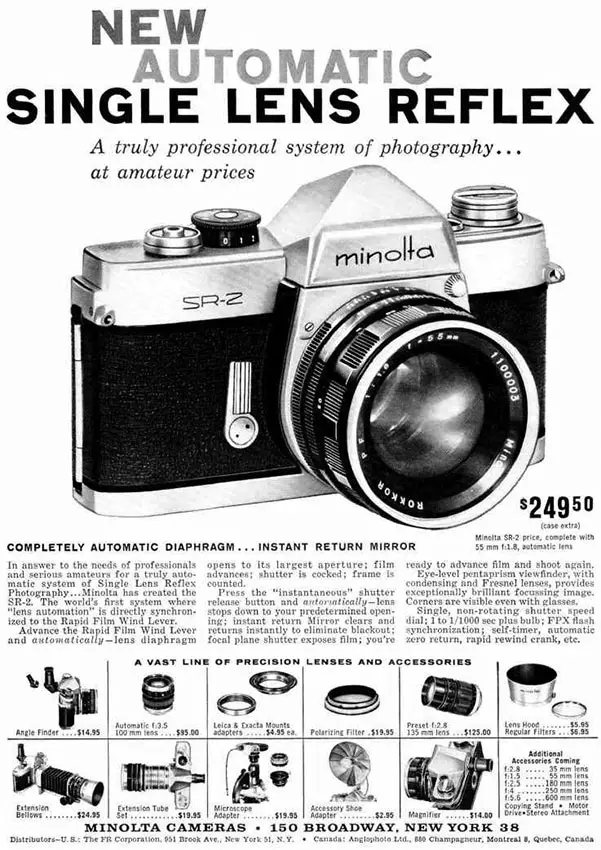
By the mid 1950s, Single Lens Reflex cameras were gaining popularity with manufacturers both in Japan and Germany, and many Japanese companies started working on their own line of cameras to meet this new demand. Minolta would release it’s first SLR, the SR-2 in 1958 (why wasn’t it called the SR-1, or simply the SR…I have no idea). Although behind several other Japanese camera makers like Asahi, Miranda, and Topcon to the SLR party, Minolta did beat both Canon and Nippon Kogaku (Nikon) by one year. Unlike Canon and Nikon however, the SR-2 was not a high end camera aimed at the professional market. The SR-2 was a rather rudimentary SLR which lacked interchangeable viewfinders, the ability to re-open the lens aperture after each shot, any sort of depth of field preview, or any type of exposure metering system. It did however have a self timer, a rapid return mirror, and introduced the world to the SR lens mount, which would be the basis for the company’s later MC and MD mount lenses.
Minolta would quickly release the SR-1 and SR-3 in 1960 which improved upon many of the SR-2s shortcomings. Then in 1962 came the SR-7, which has the distinction of being the worlds first SLR with a built in CdS exposure meter. Although the meter on the CdS was not through the lens, this was still a pretty big achievement considering most light meters of the day were still selenium cell based.
The SR-7 was pretty advanced for it’s time and had many small details that made it worthy of it’s $270 price tag. It was in production until 1966, outselling many other Japanese SLRs along the way.
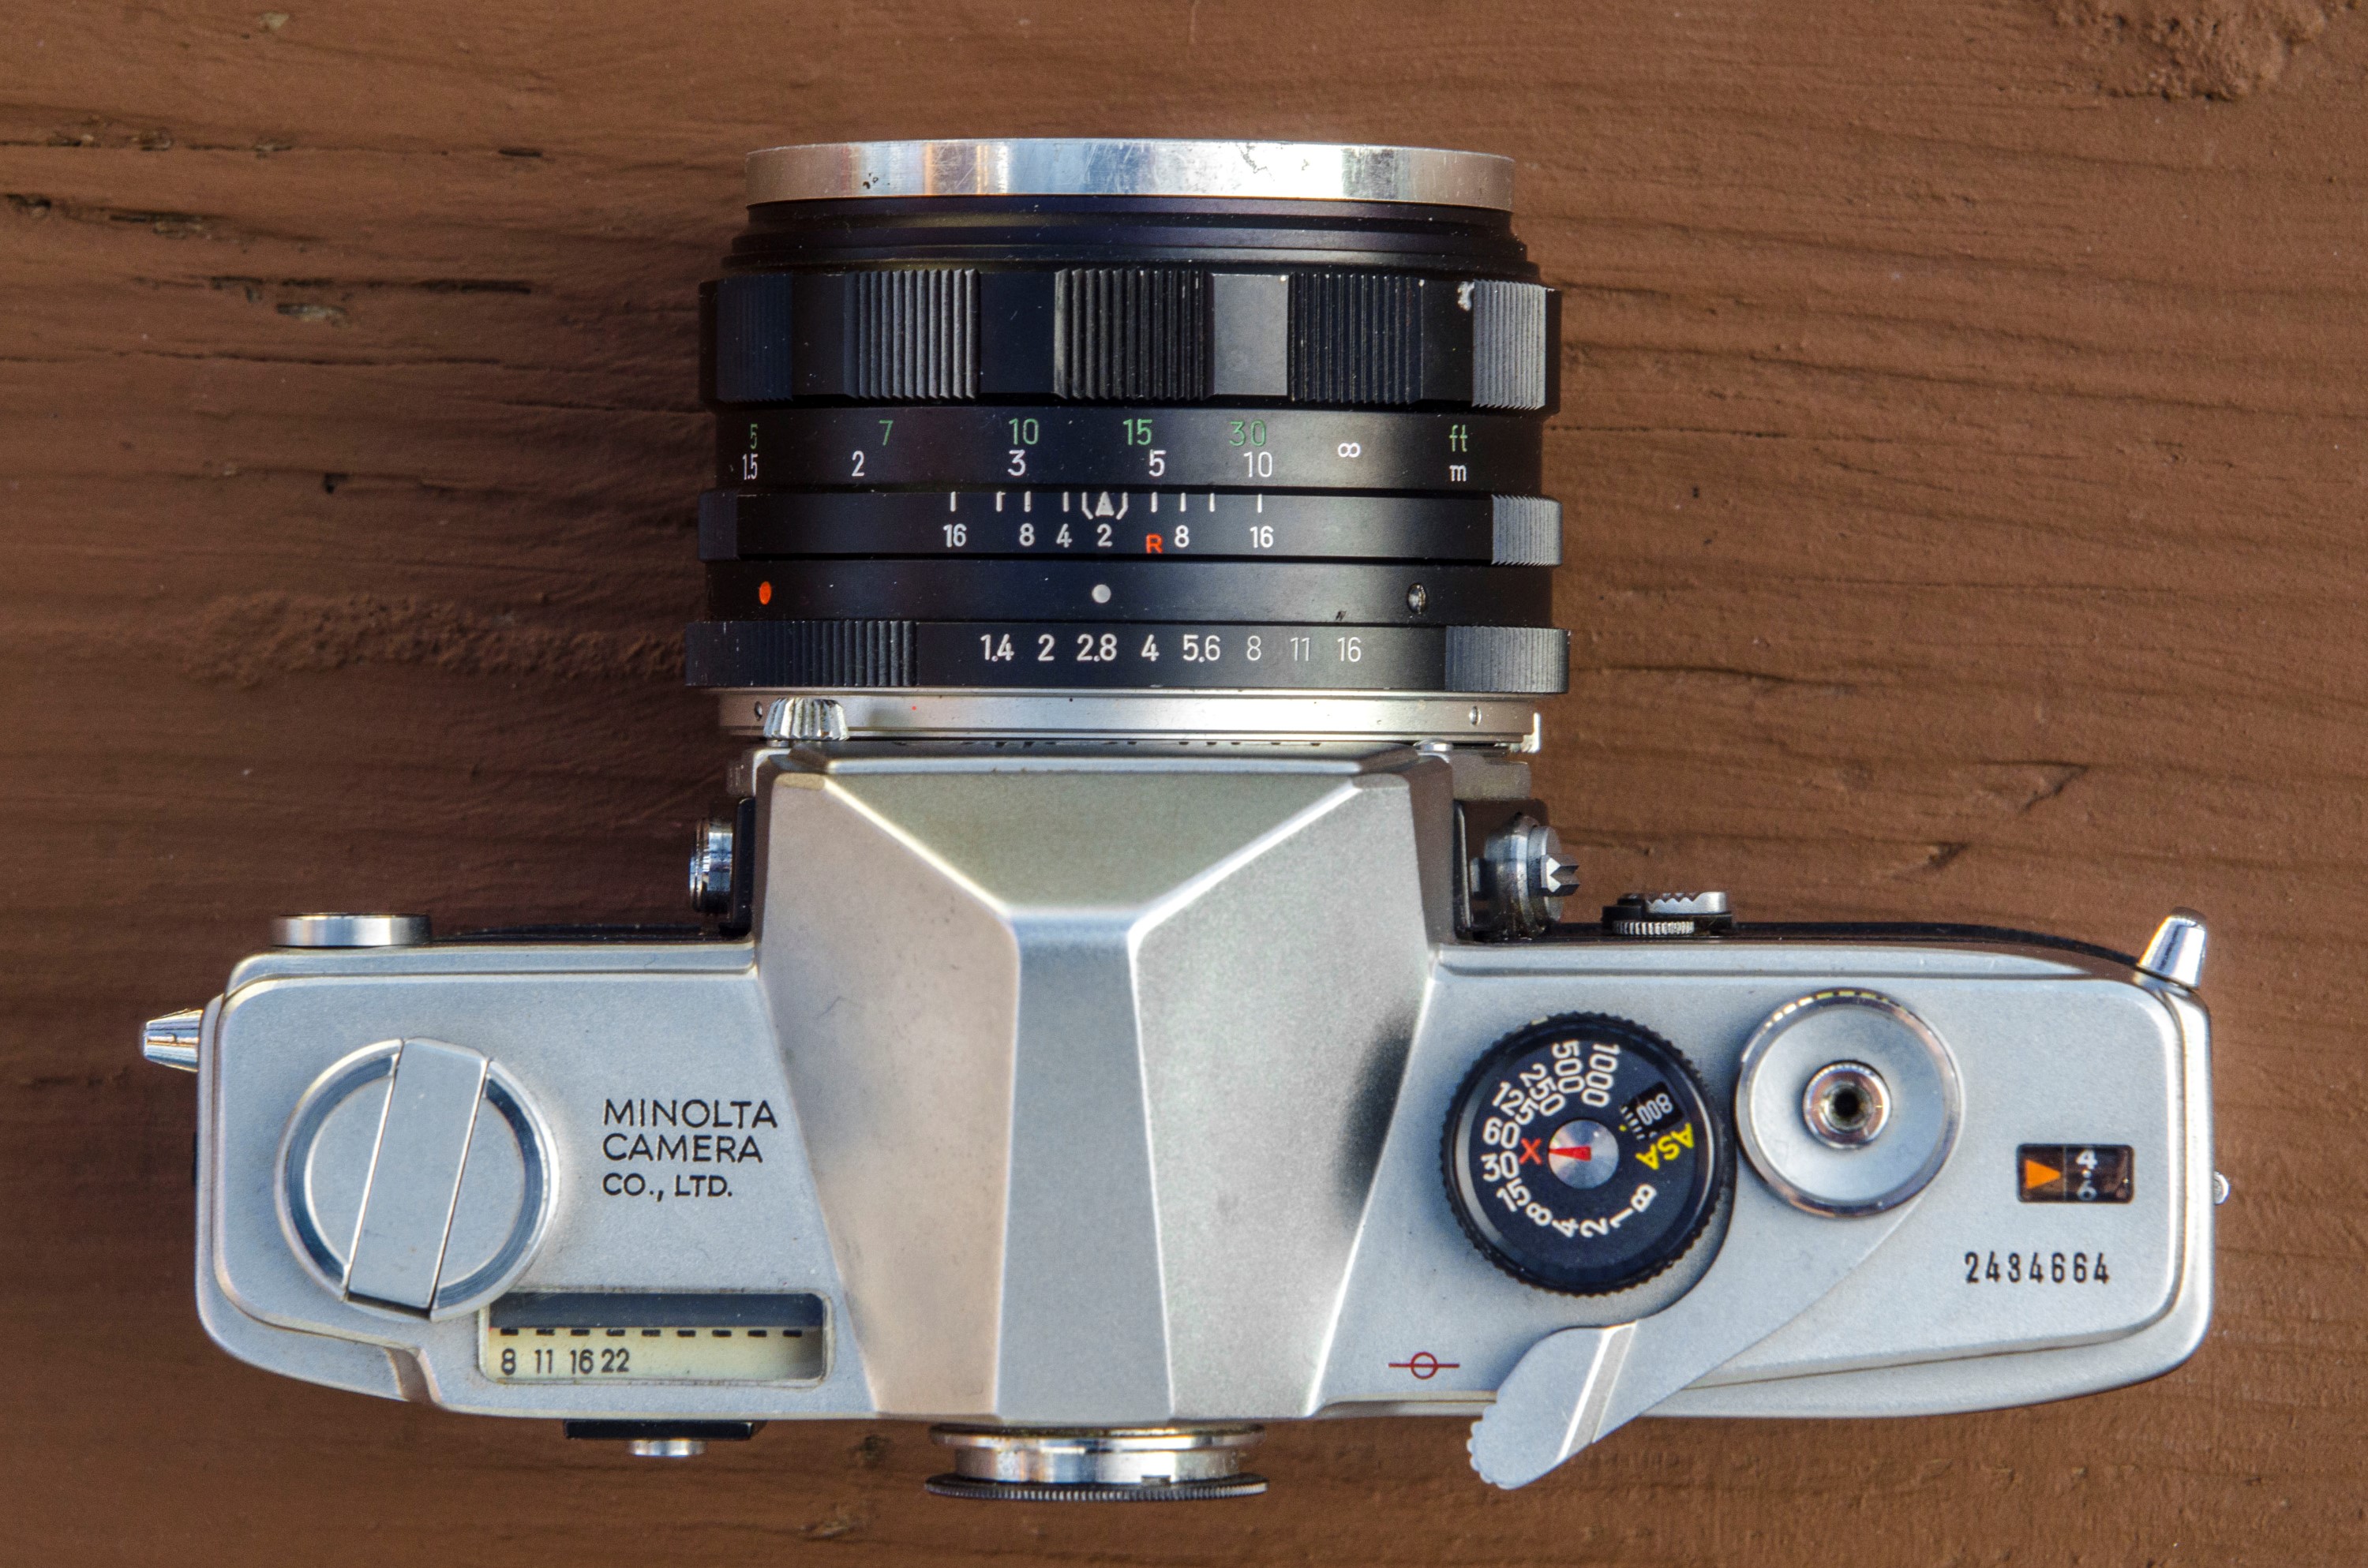
Unlike other metered cameras from the early 1960s, which relied on a light value scale which required the photographer to get a measurement from the meter and then translate that into both shutter speed or aperture readings to get proper exposure, the meter on the SR-7 was coupled to the shutter speed dial. The meter would correspond properly to whatever shutter speed the camera was set to, and the photographer would simply have to select whatever aperture the meter was pointing to. It’s worth mentioning that this system predated the “match needle” system that’s visible inside of the viewfinder. The only meter readout was a display on the top plate of the camera.
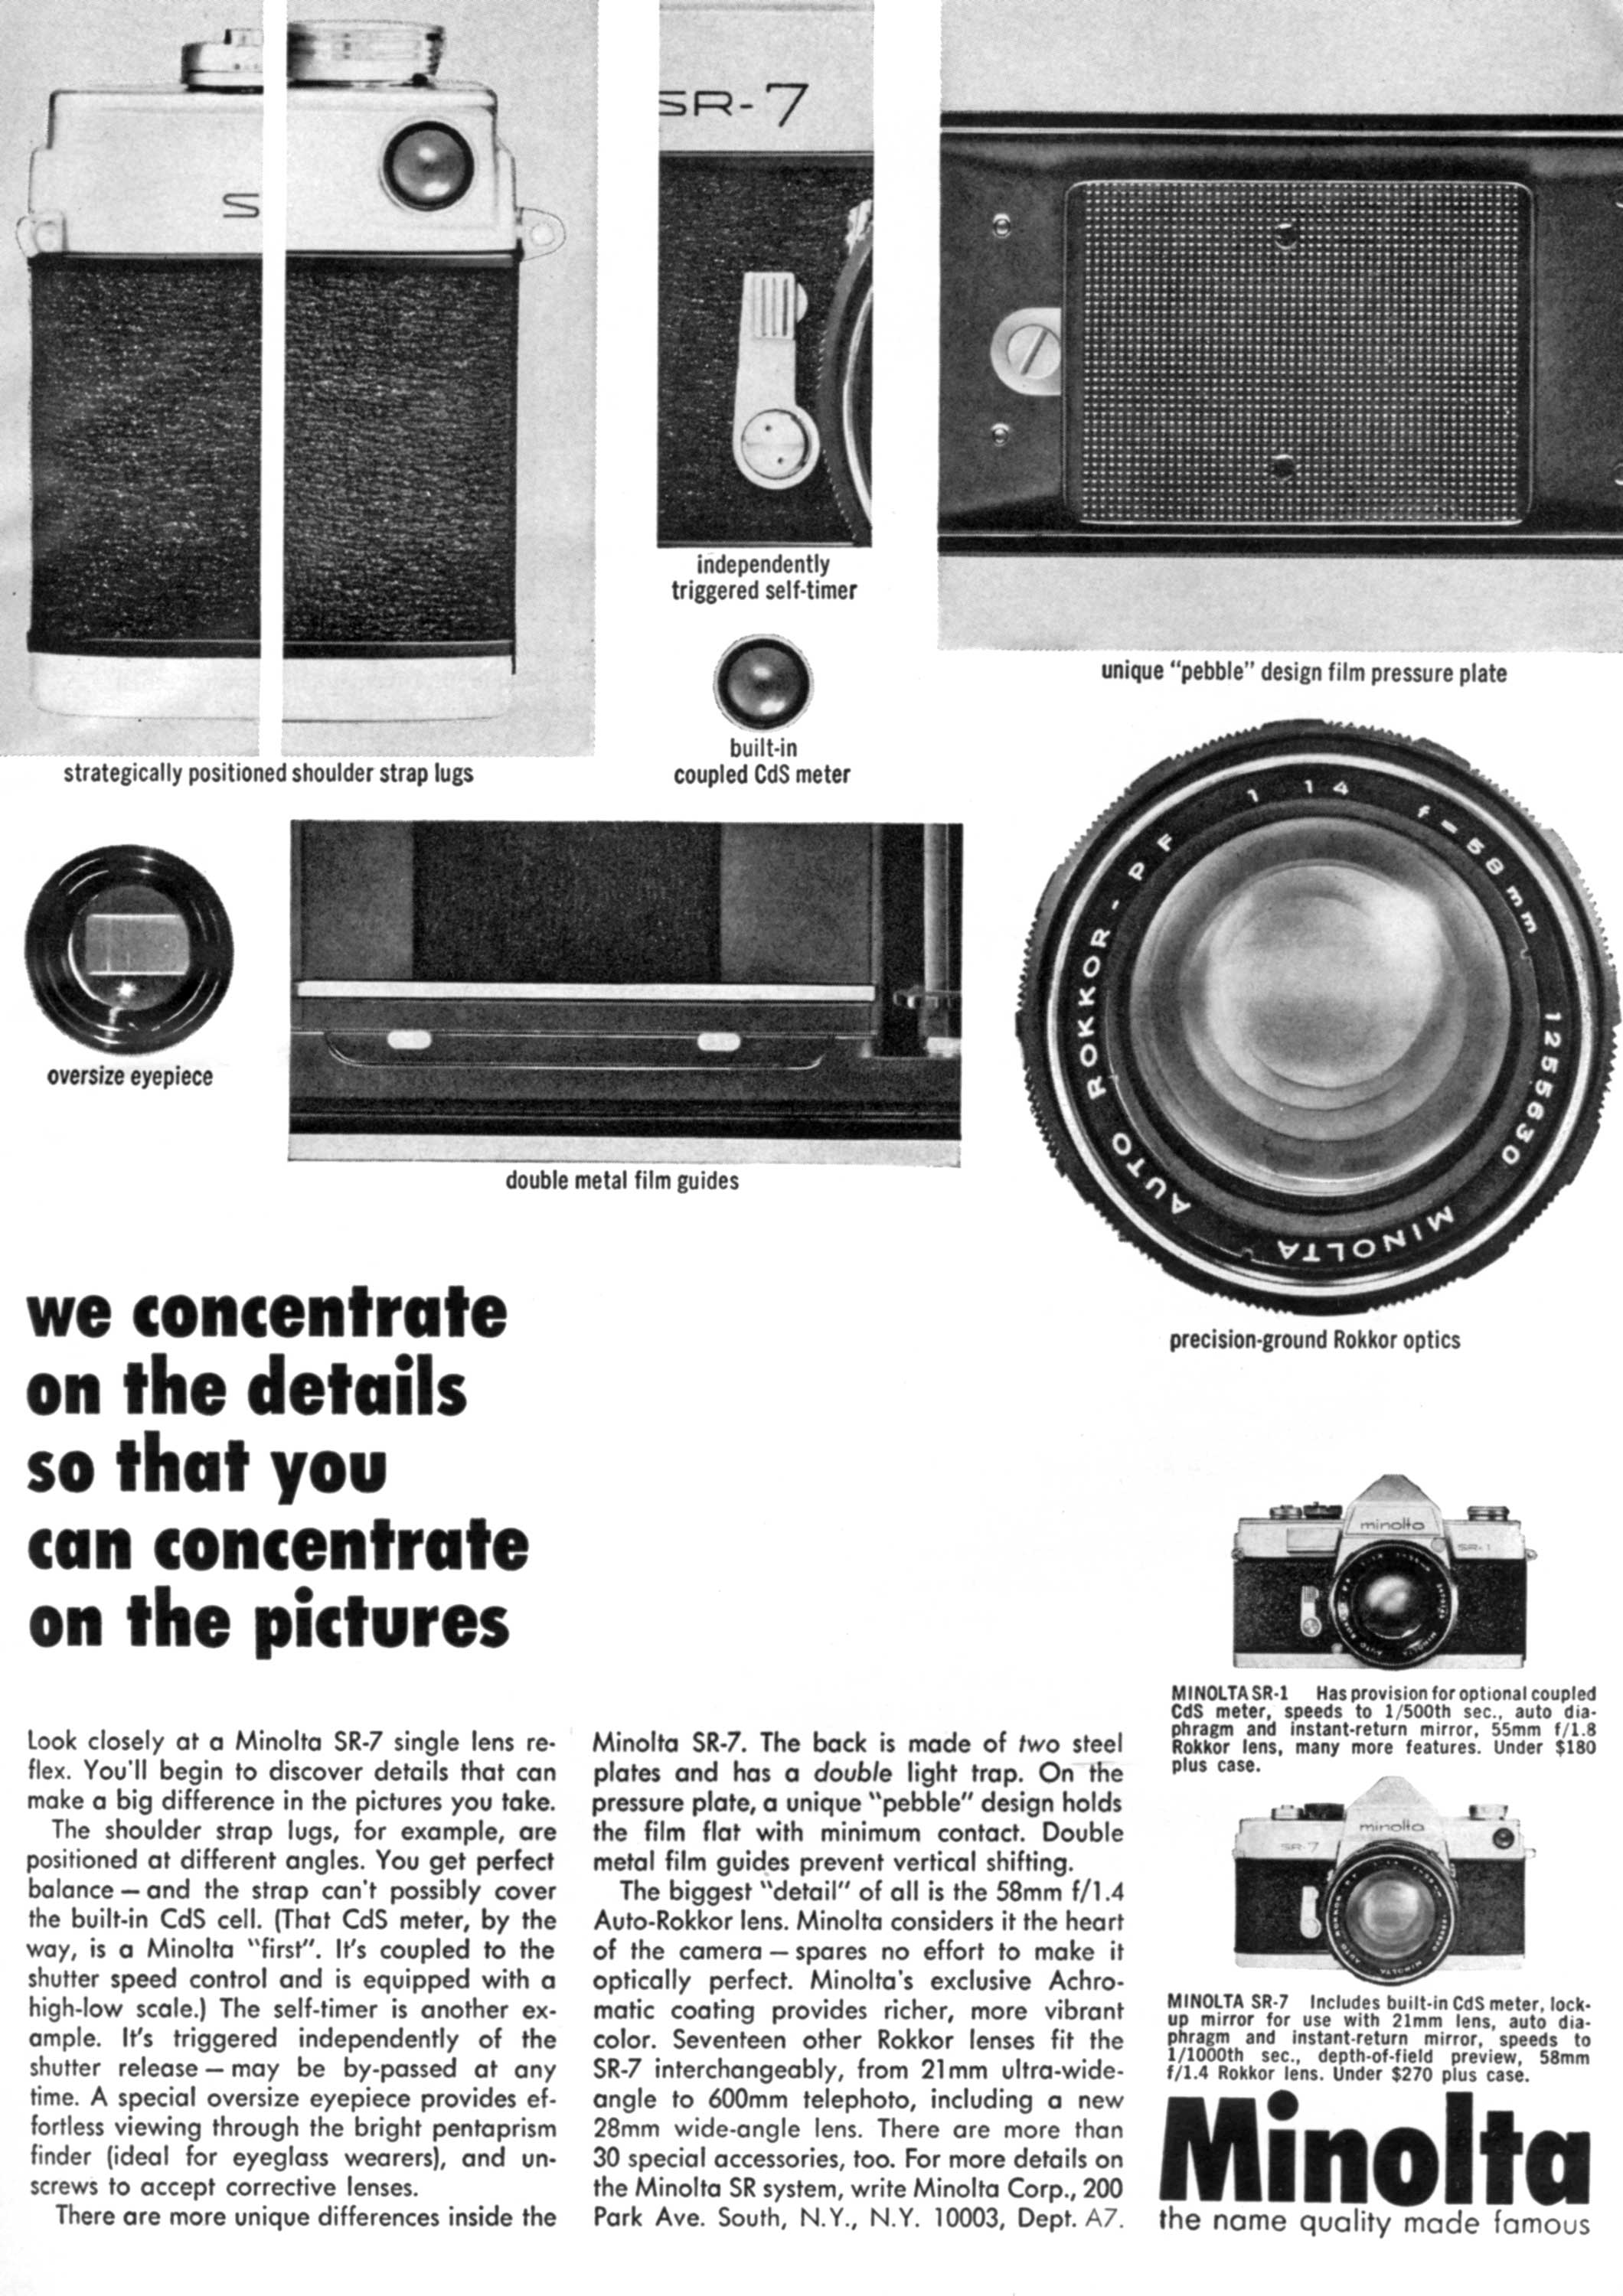
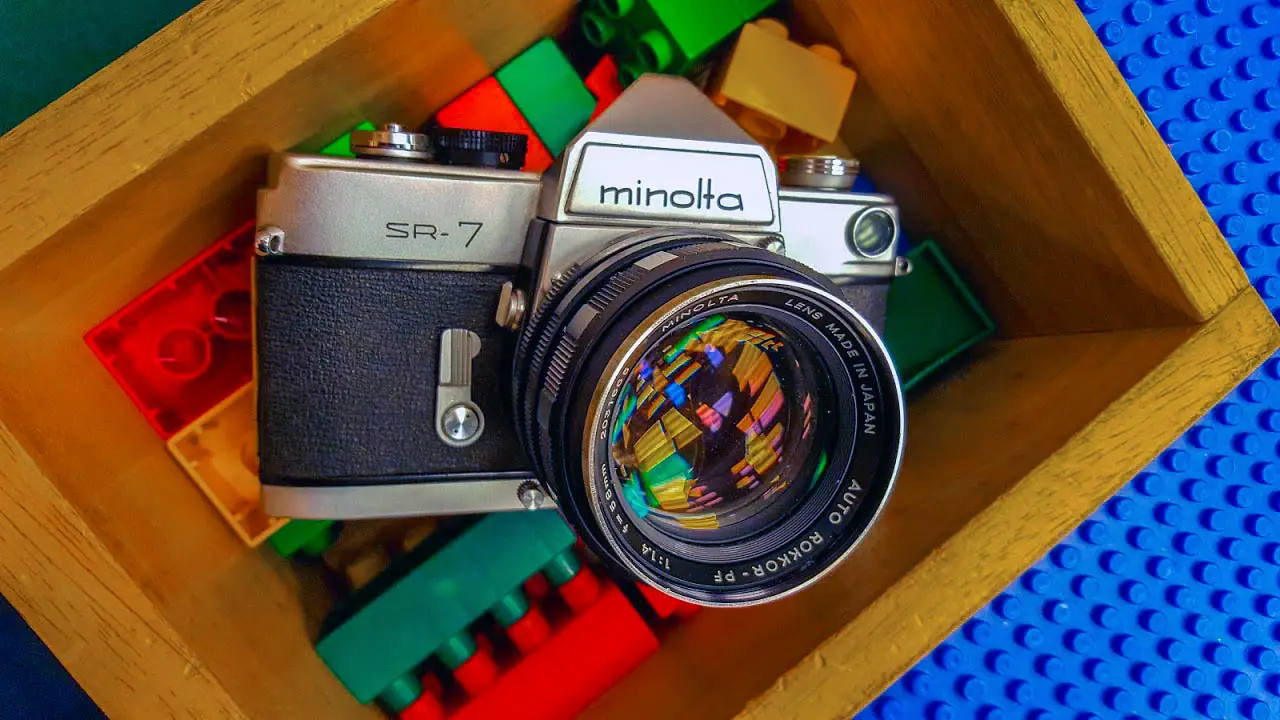
Compared to later SLRs that would become available a few years after the SR-7s release, this model was positioned as a very well built and feature rich camera aimed at the middle to high end of the market. The kit lens typically sold with the SR-7 was the 58mm f/1.4 Auto Rokkor-PF pictured here.
The SR-7 had several small, but significant features that added up to a very well built camera. The mirror box had dual baffles to block out extra light, the film pressure plate was pebbled which would minimize the area in which the film physically touches the film to reduce scratches, the eyepiece was oversized offering a brighter viewfinder than was available on lesser models, and there were two sets of film guides to guarantee the film would not wiggle while traveling across the film plane. While the above mentioned features were certainly nice, the biggest and most appealing feature of the SR-7 was it’s CdS light meter and coupled shutter speed selector.
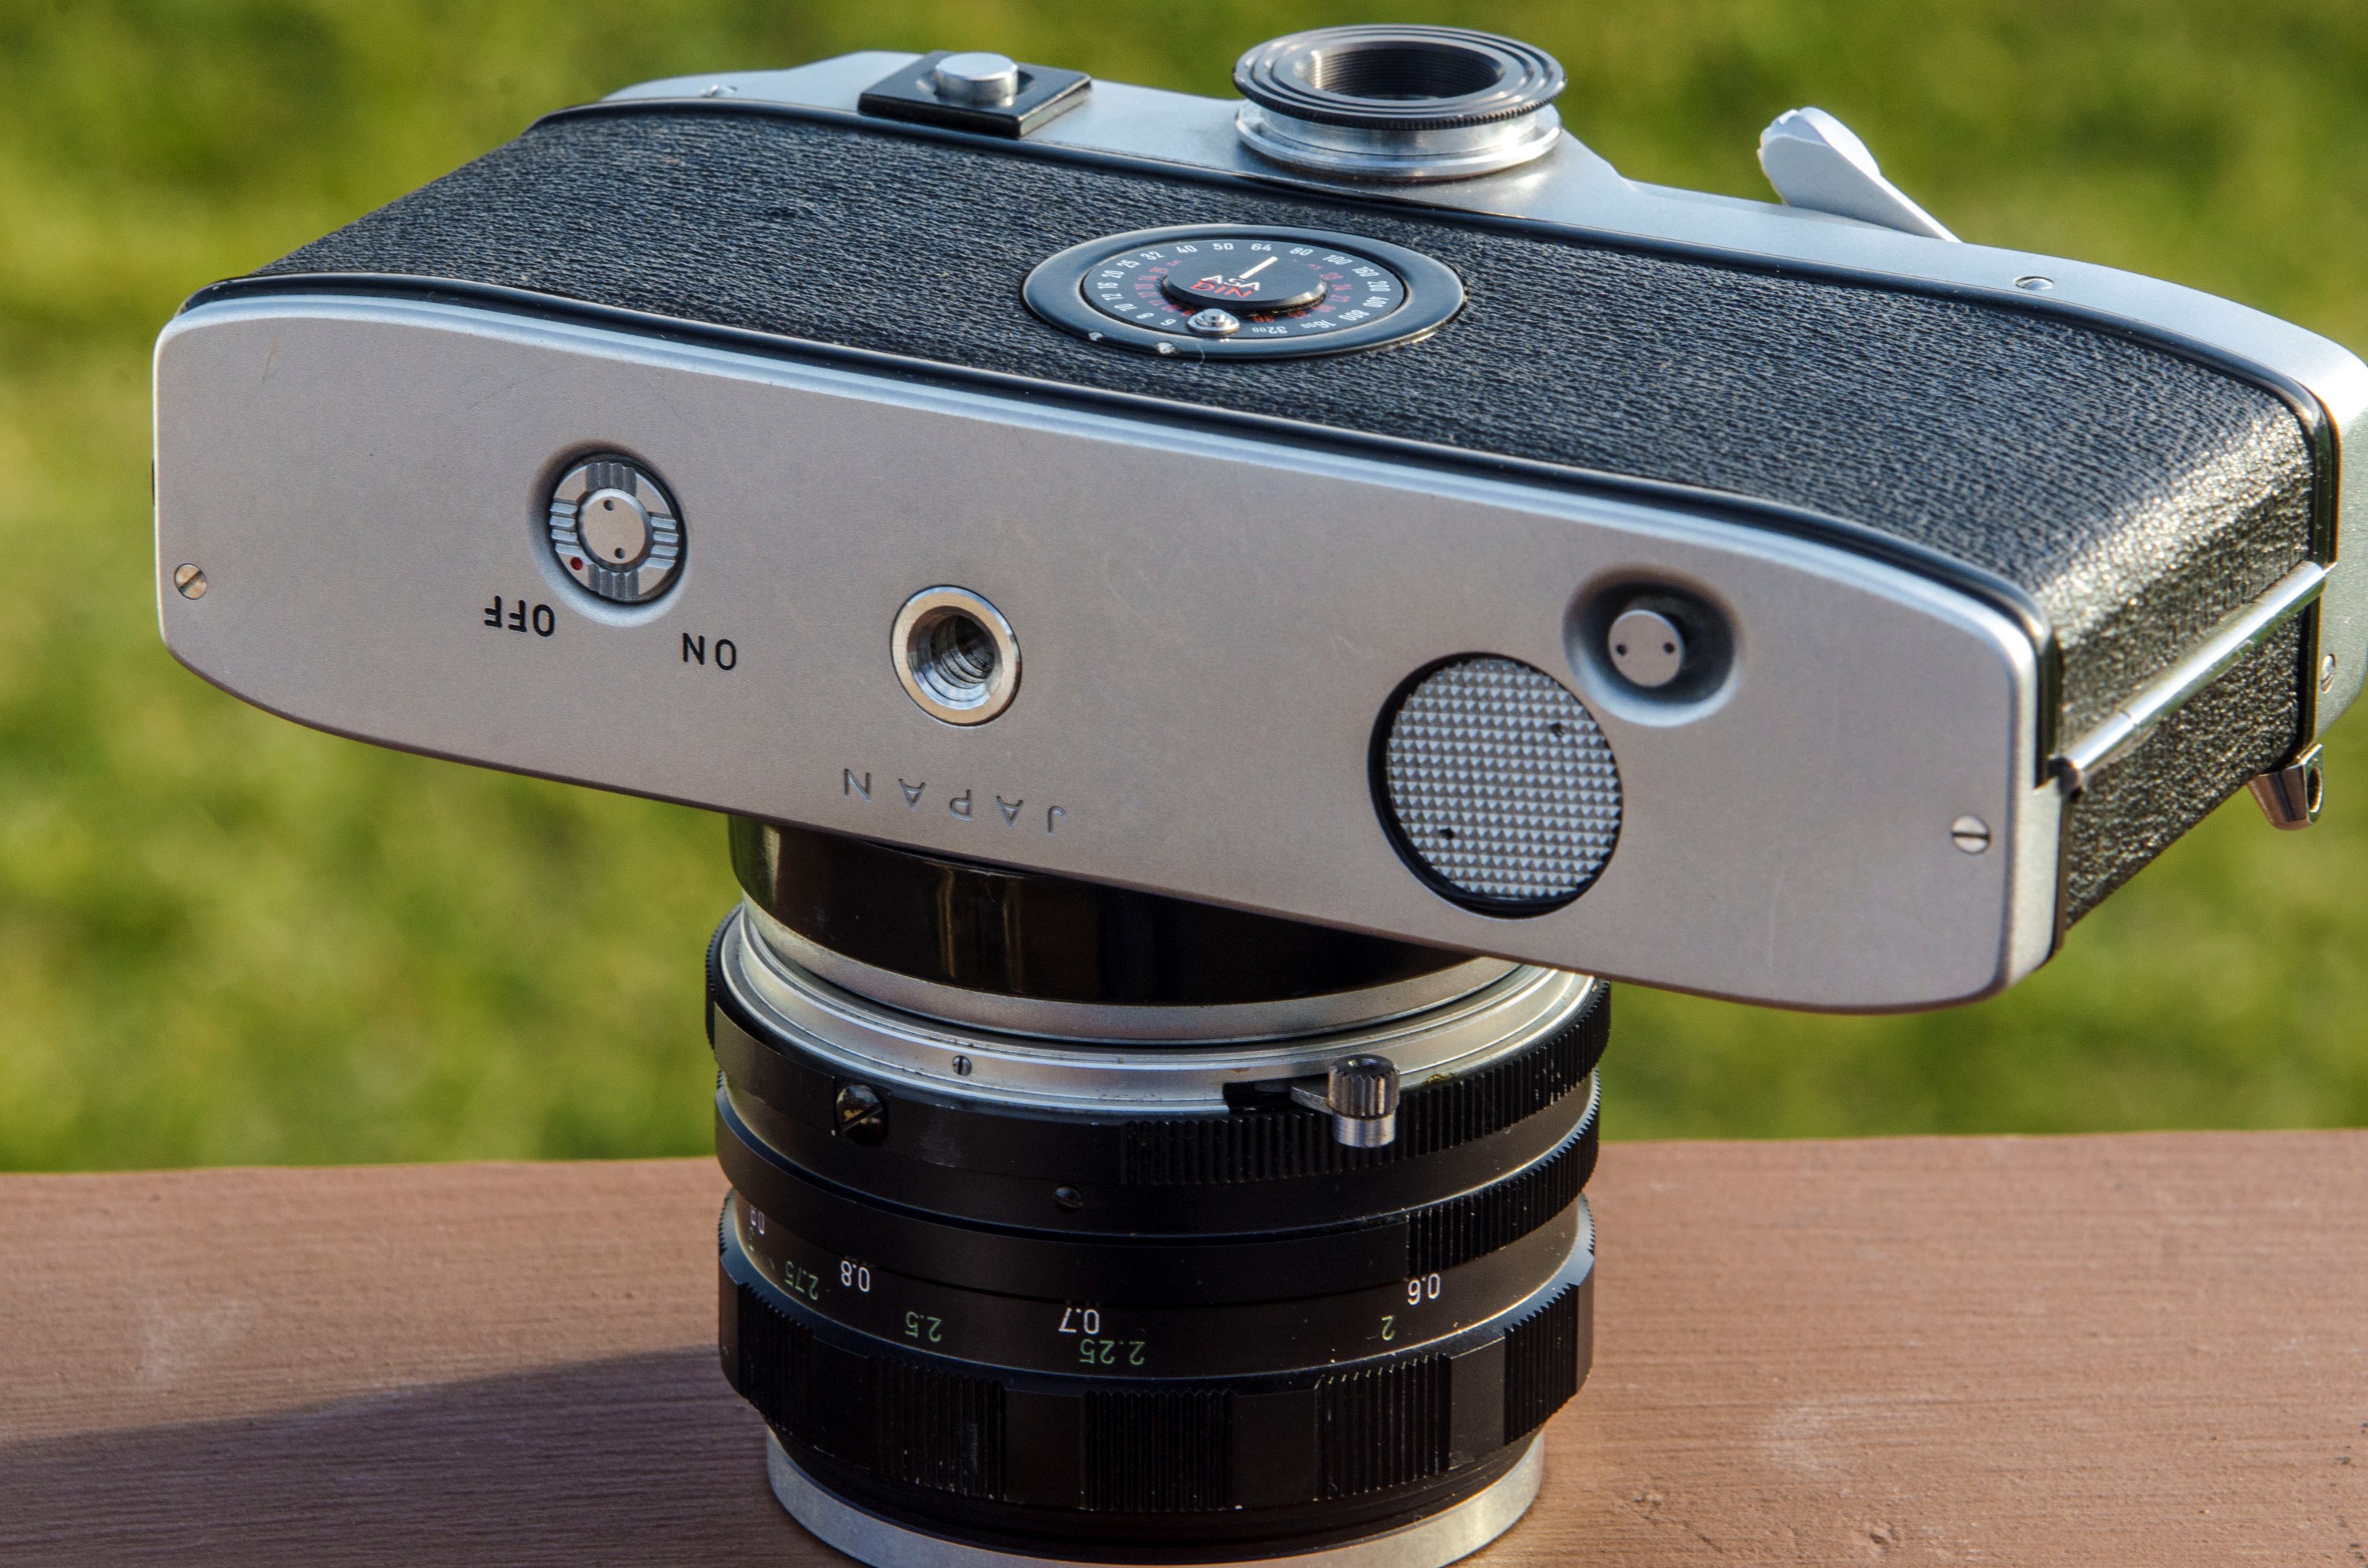
The SR-7 went through a couple of revisions throughout it’s run. The earliest models lacked an on/off switch for the meter, which meant it was always on causing the batteries to drain quickly. You could prolong the life of the batteries by keeping the camera in it’s case when not in use, but this likely still caused many frustrated users who would pick up the camera only to find that they needed to replace the batteries again. In 1963, Minolta added an on/off switch for the meter on the bottom of the camera.
Another minor change was an improvement to the mirror lock up feature. The earliest models could only lock up the mirror after taking an exposure. With the addition of the on/off switch for the meter, the mirror lock up changed to allow for the mirror to be locked without having to fire the shutter first.

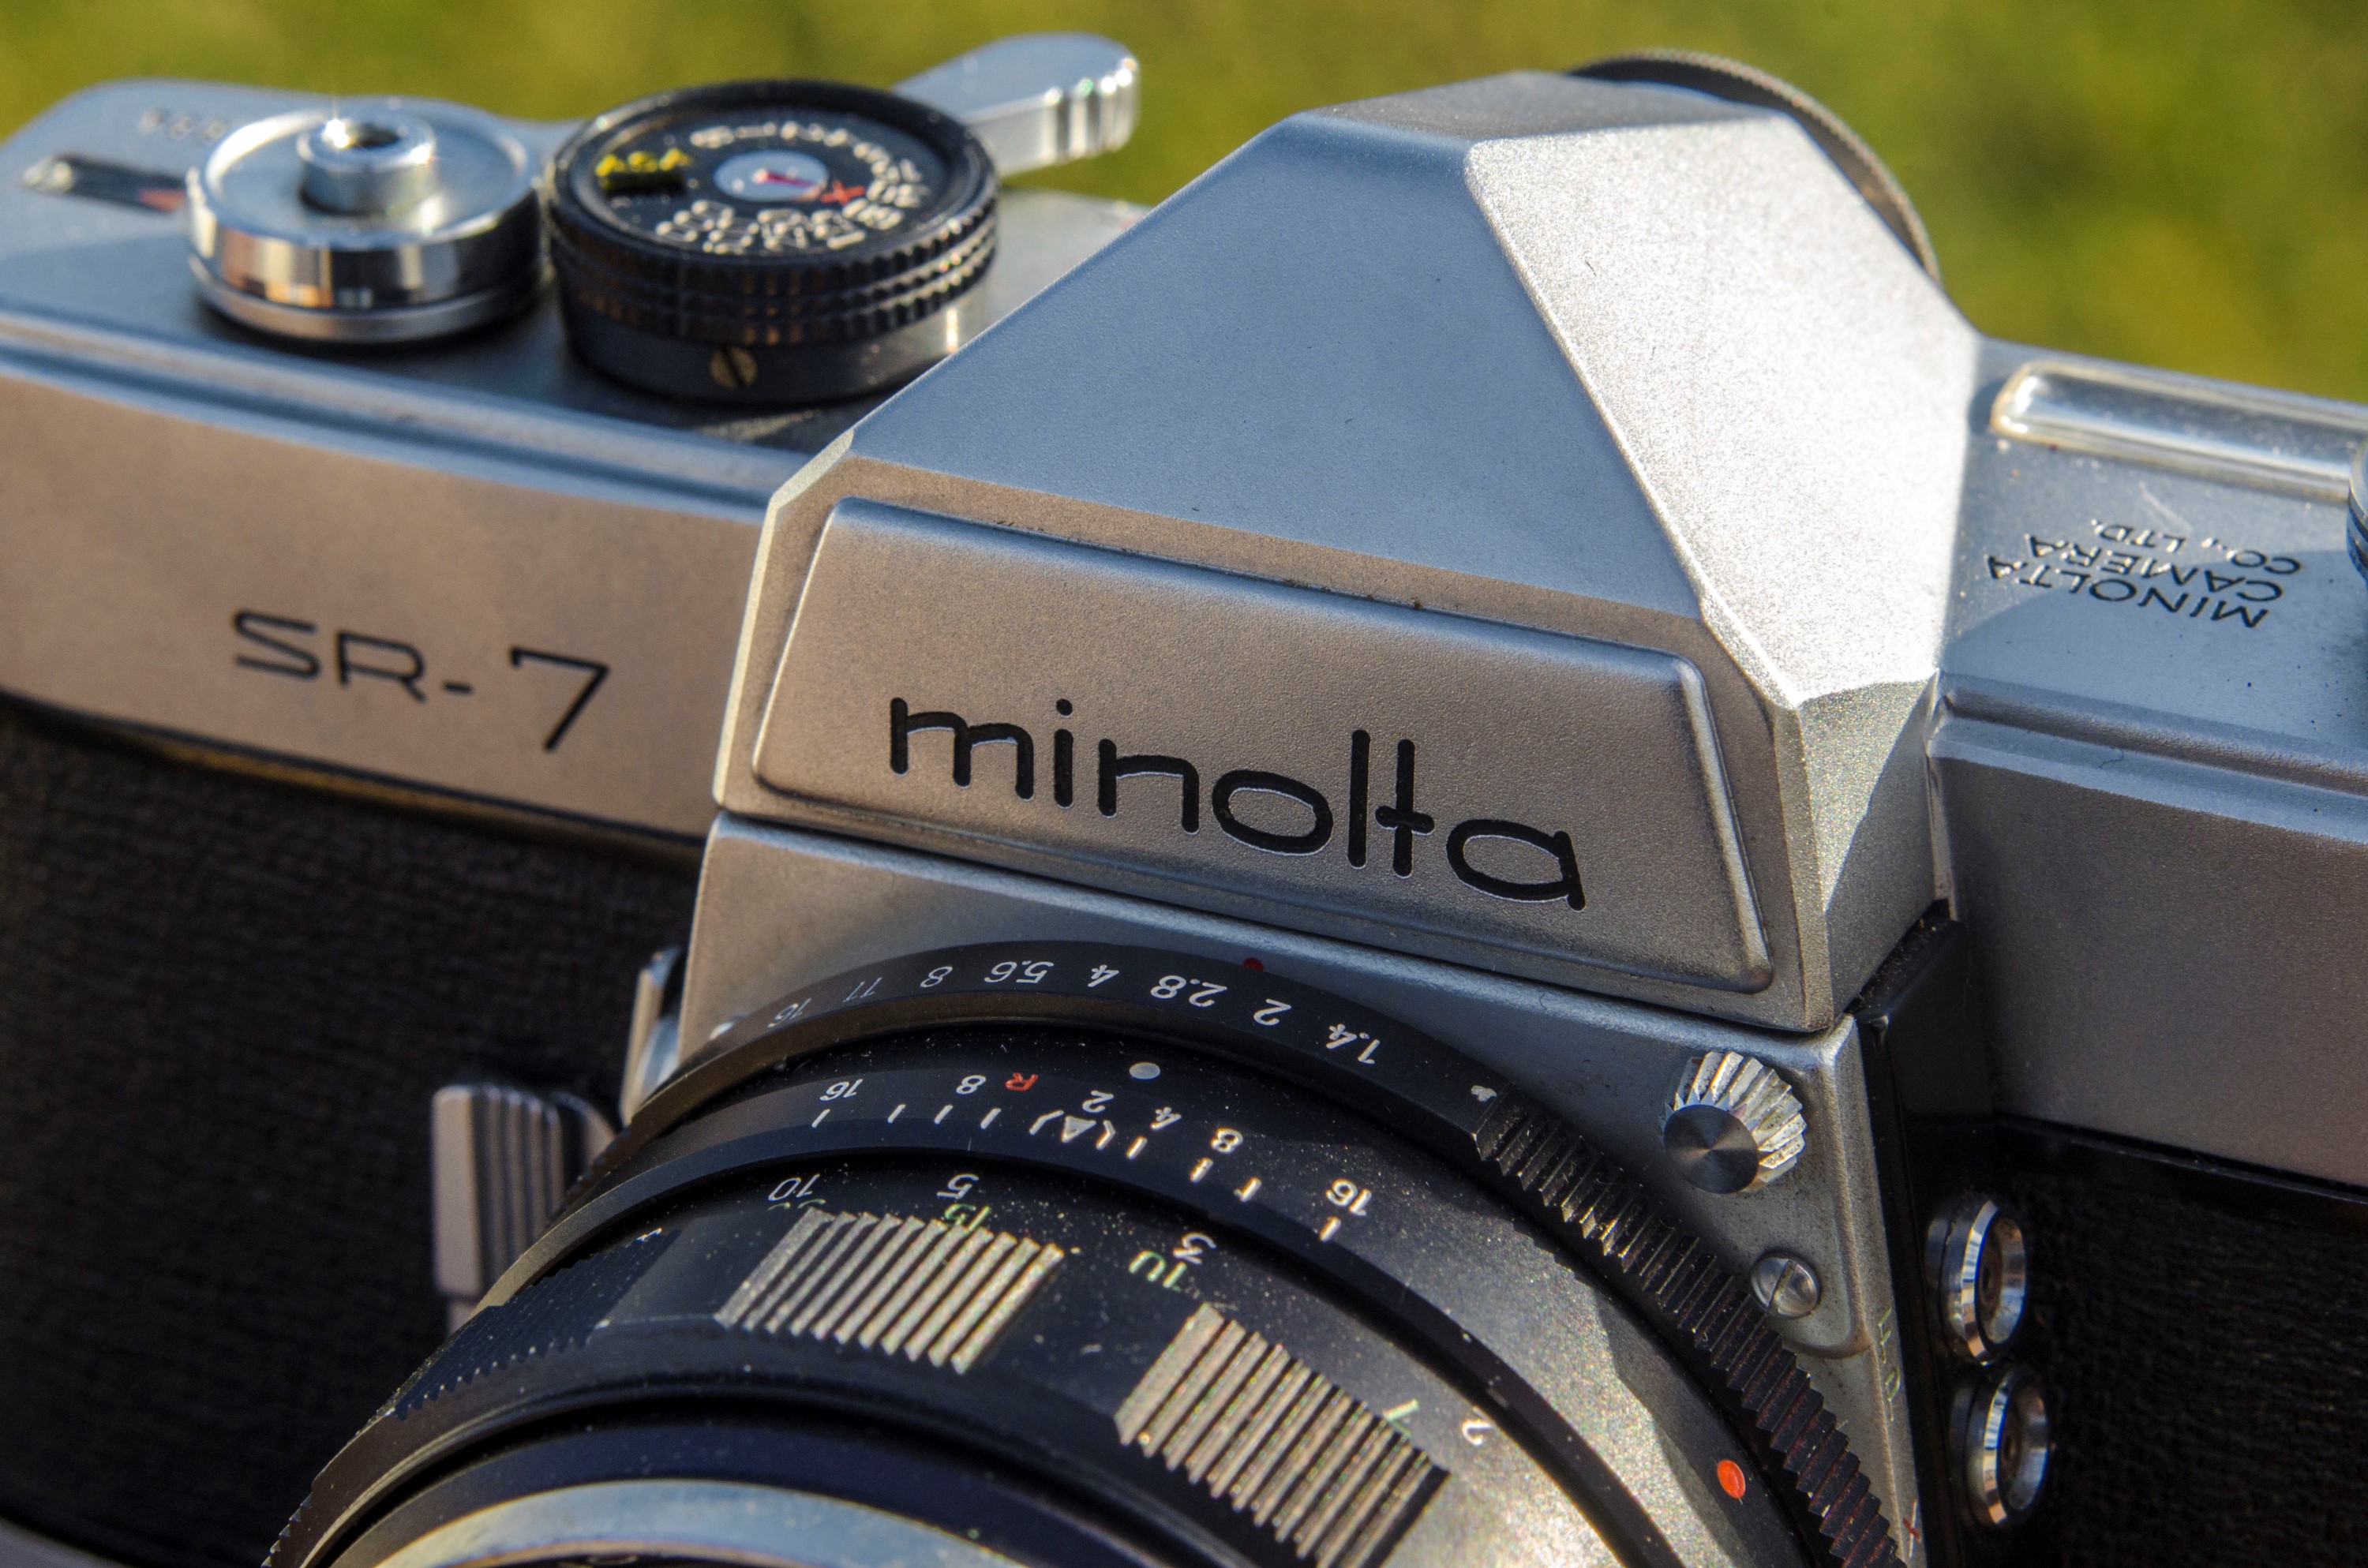
A more significant change to the SR-7 came in 1965 which they called the SR-7 Model V. The name “Model V” never appeared anywhere on the camera, but was present in company literature. Most of the changes were cosmetic. The most noticeable change was the placement of the “Minolta” logo which moved from the vertical part of the front of the prism, to the diagonal top of the prism. The round viewfinder was replaced with a rectangle one that offered a few angled viewfinder accessories. The placement of the lo/hi switch for the meter moved from the back to the side of the mirror box, and the stepped shoulders of the top plate were removed. The design of the SR-7 Model V closely mimics the SR-T 101 which would debut a year later.
The SR-7 would be the last model released from the original SR-series, superseded by the SR-T series which started with the SR-T 101 in 1966. The major feature of the SR-T series was Through the Lens (TTL) metering which would use a modified form of the SR lens mount adding a meter coupling pin. This new mount would be called the MC mount and would be fully backward compatible with older SR mount lenses.
The SR-T series would be enormously successful for Minolta, spawning at least a dozen variants and would remain in production until 1981. A feat even more impressive considering the availability of much more advanced, smaller, and inexpensive SLRs available at the time.
Today, both the SR and SR-T models are quite popular. SR-T models are more common in the used market, likely because of the massive numbers of them that were made. SR-2s and 7s regularly show up often, and are quite collectible as they are very well built and capable cameras. Despite their lack of TTL metering, they are excellent fully manual cameras and are compatible with all Minolta lenses made up until the mid 1980s.
My Thoughts
This is the second SR-7 I’ve owned. The first was in far worse condition, and I ended up selling it in a lot of Minolta lenses and bodies in mid 2015. After getting rid of that camera, I kept seeing SR-2s and SR-7s for sale and remembered how nice of a camera it was, and thought if I ever saw one for a price I couldn’t resist, I would take a stab at another. Eventually, this SR–7 came to me for next to nothing. I already had the Rokkor 50/1.4 lens from a previous lot and thought it would make for a great pairing.
Even though the signature feature of the SR-7 is it’s body mounted CdS meter, it is still a purely mechanical camera. With a dead battery, the camera is still usable at all speeds.
Using the camera with the meter does require a small bit of extra effort as it doesn’t quite work like most other metered SLRs that came after it. The first thing you’ll notice is that nothing is visible inside of the viewfinder. The only readout is on the top plate to the left of the viewfinder.
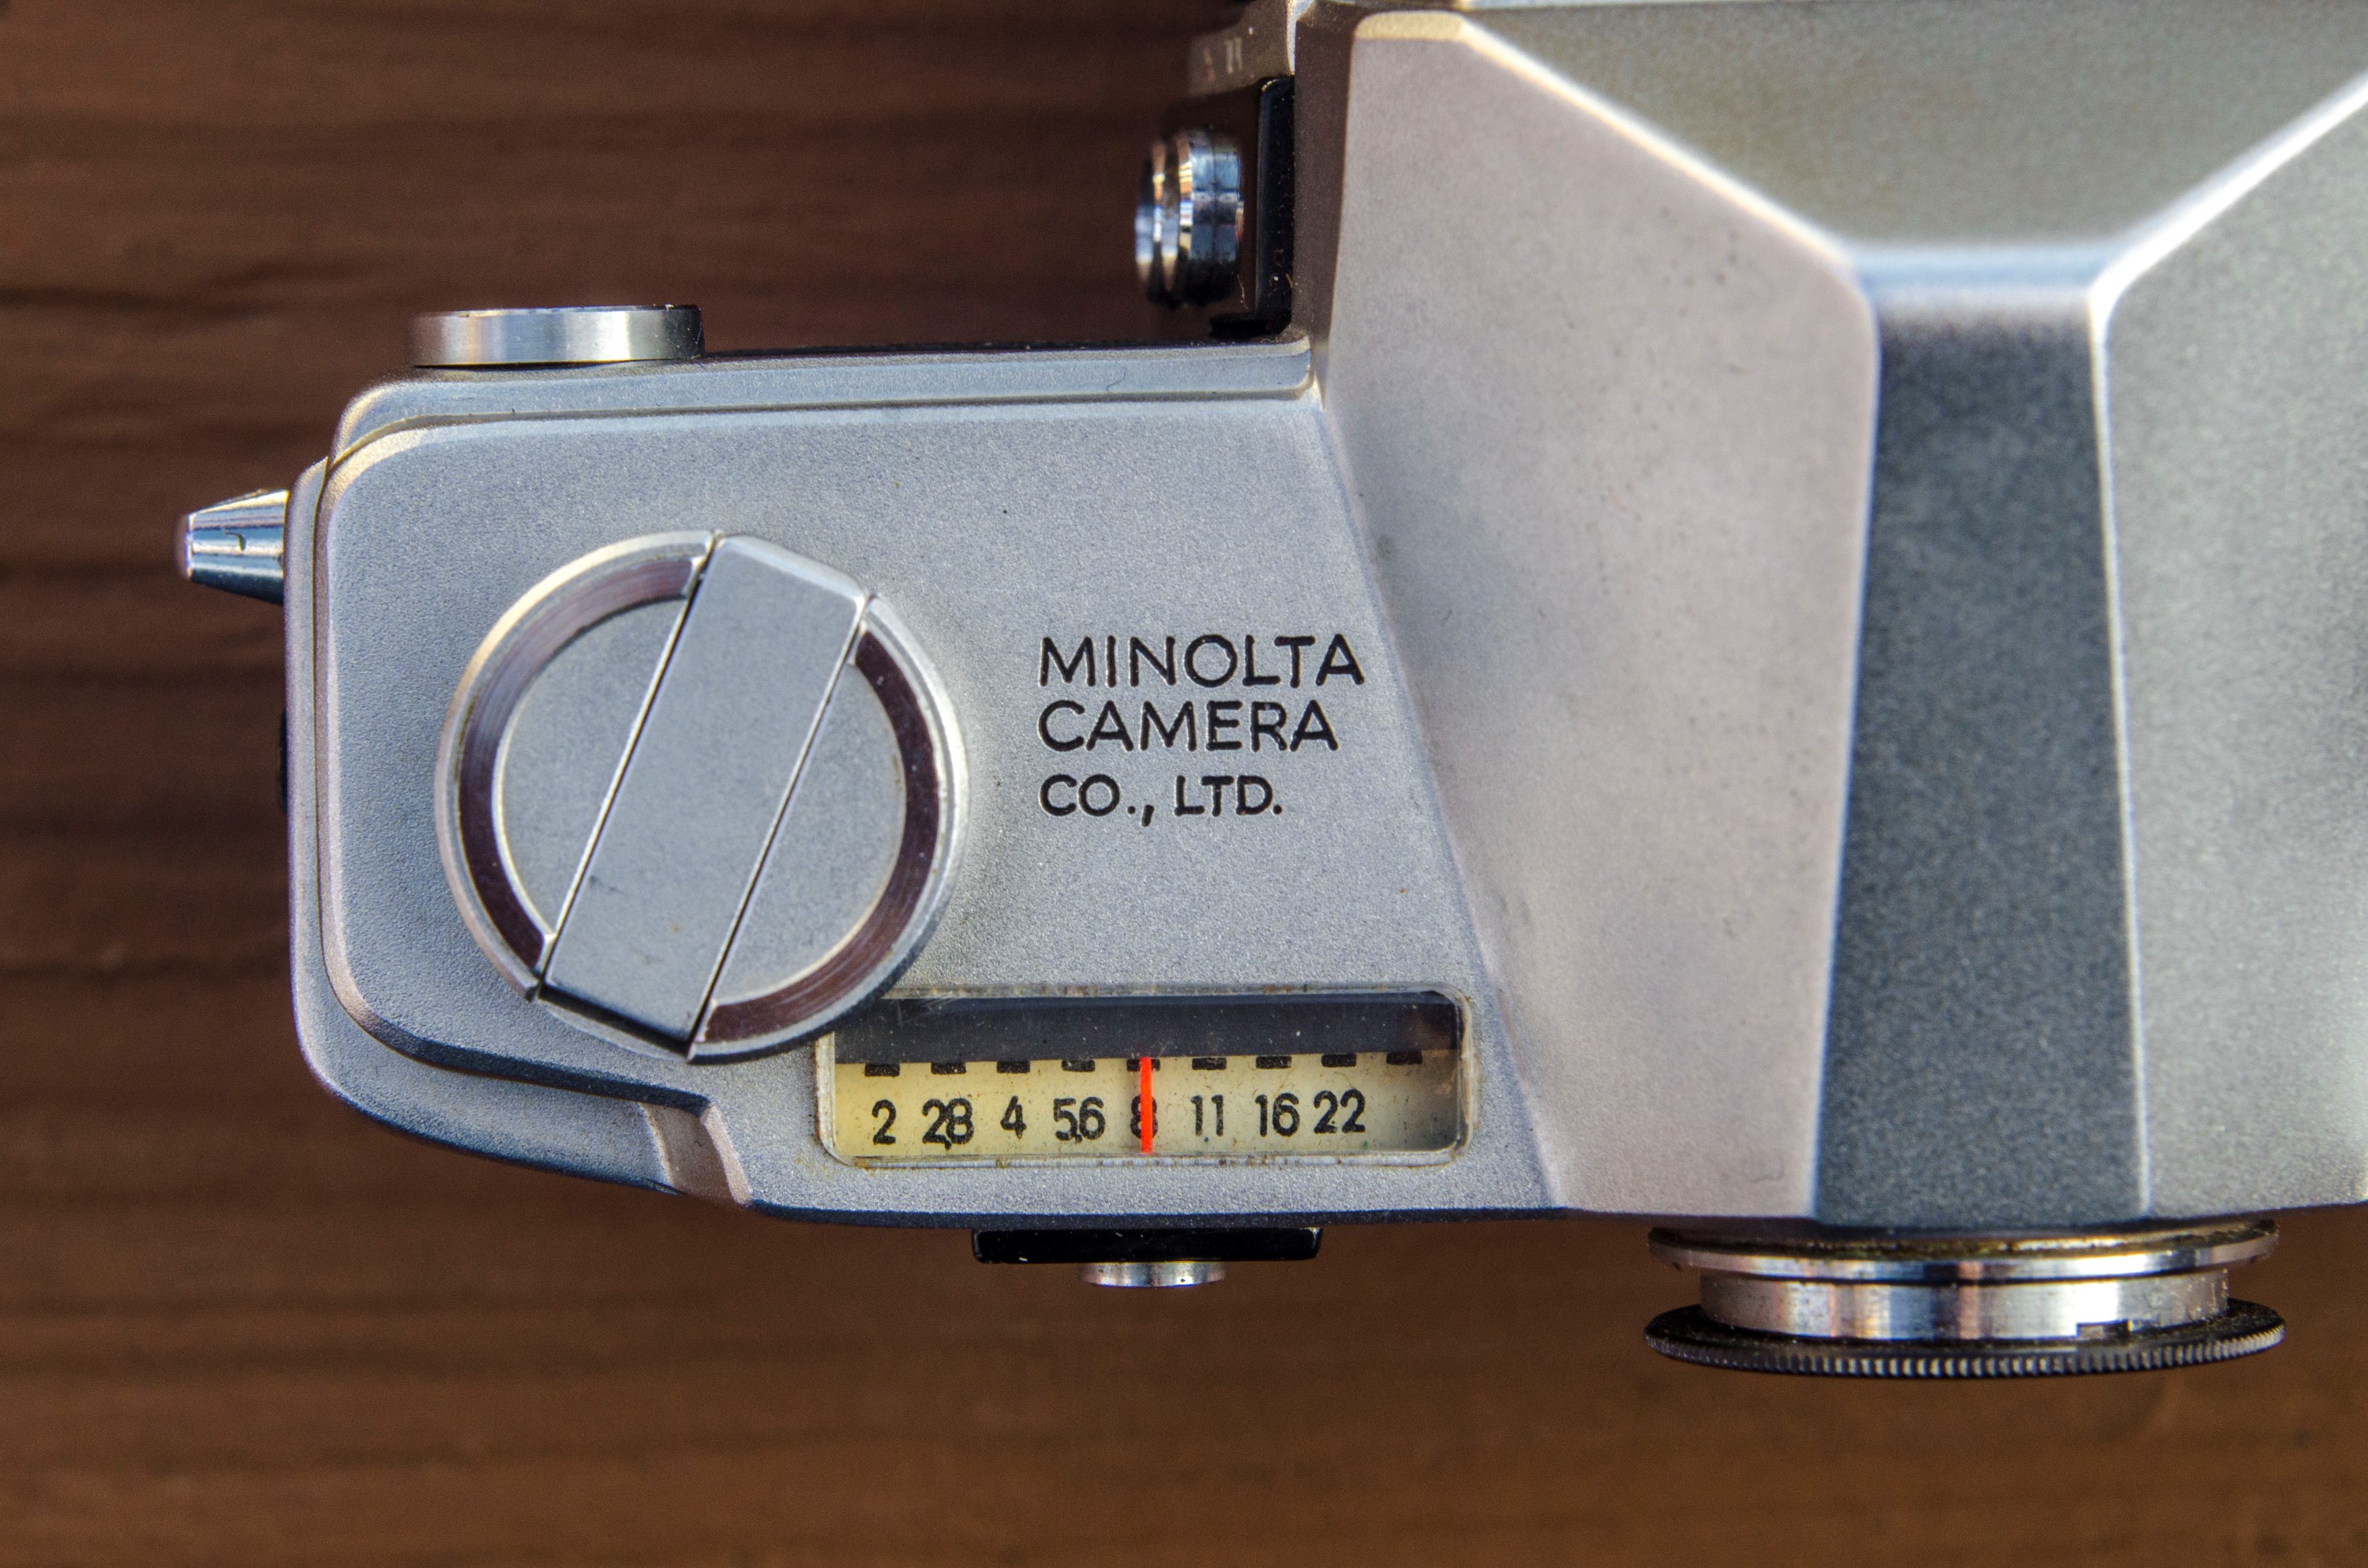
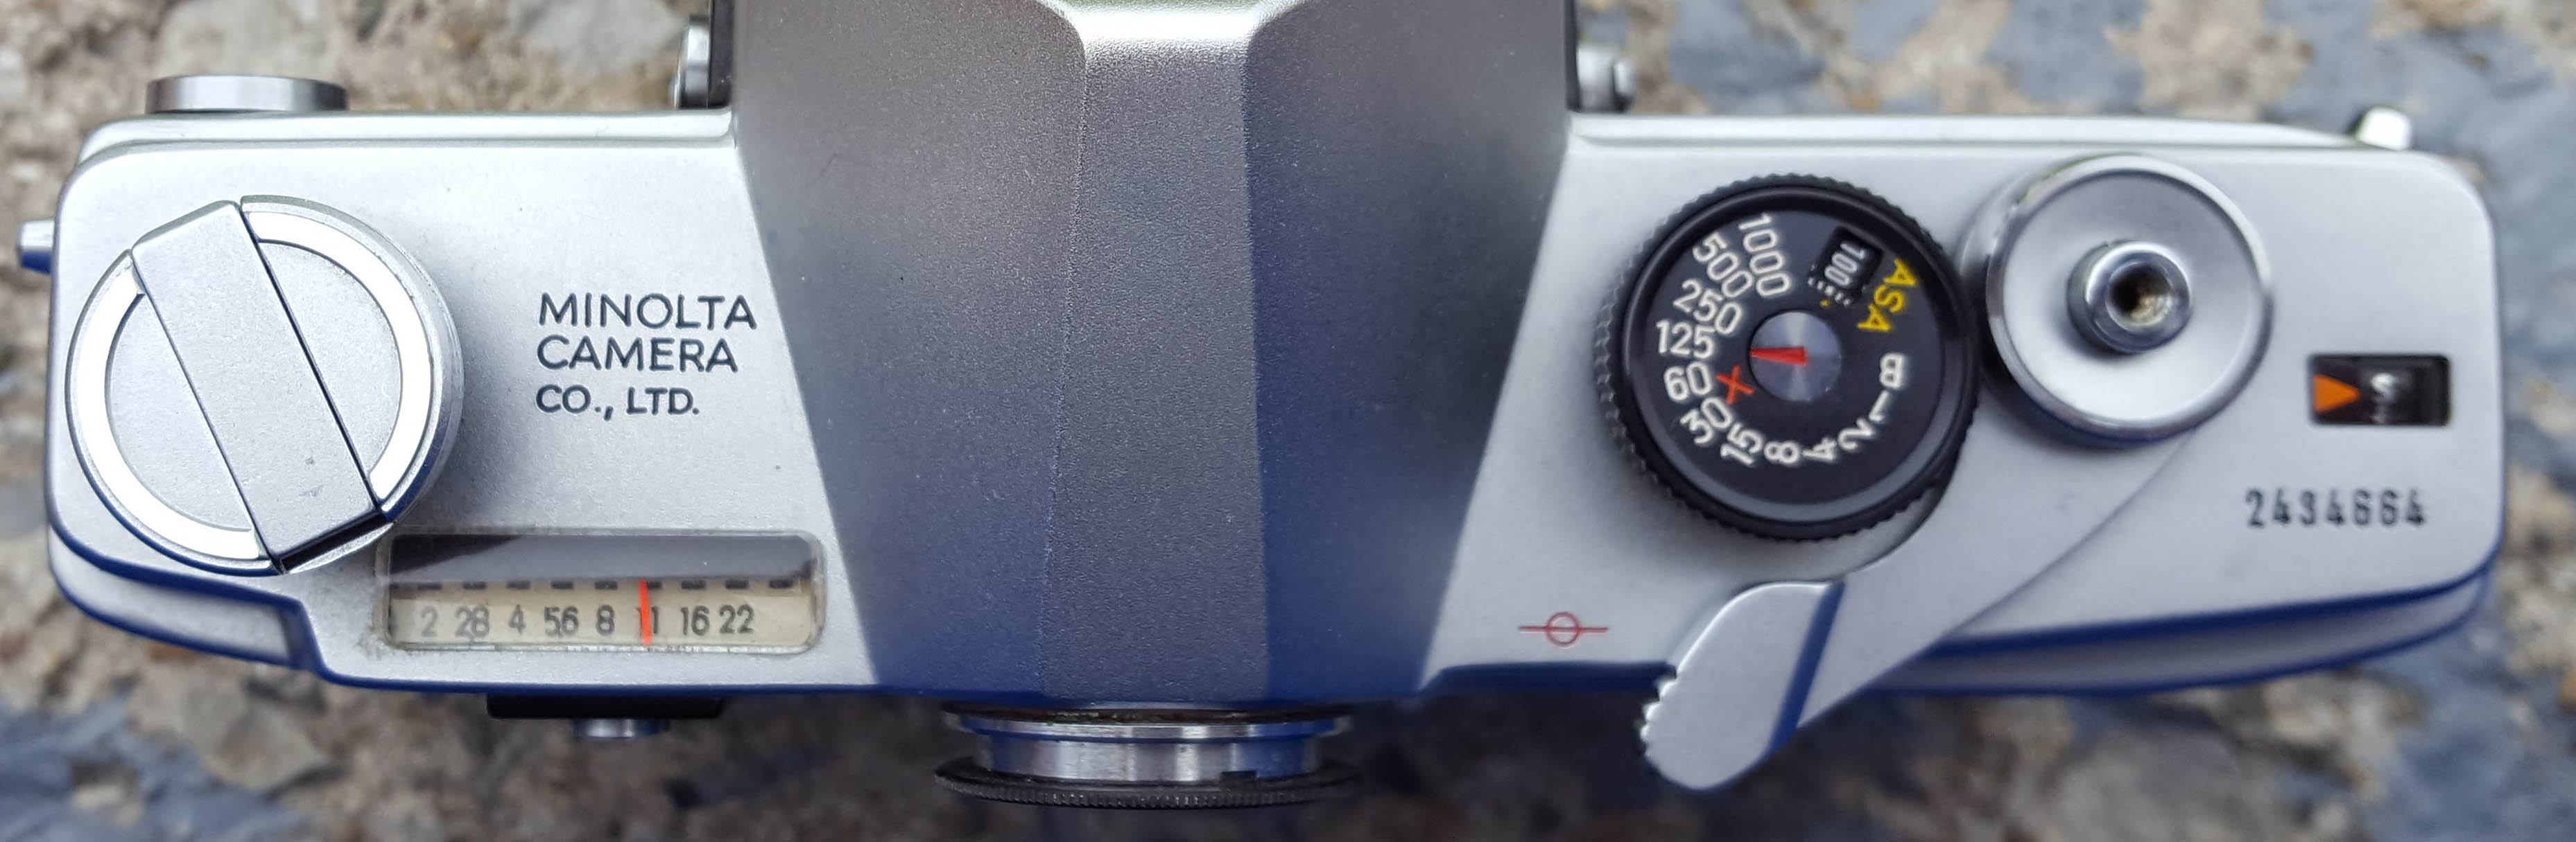
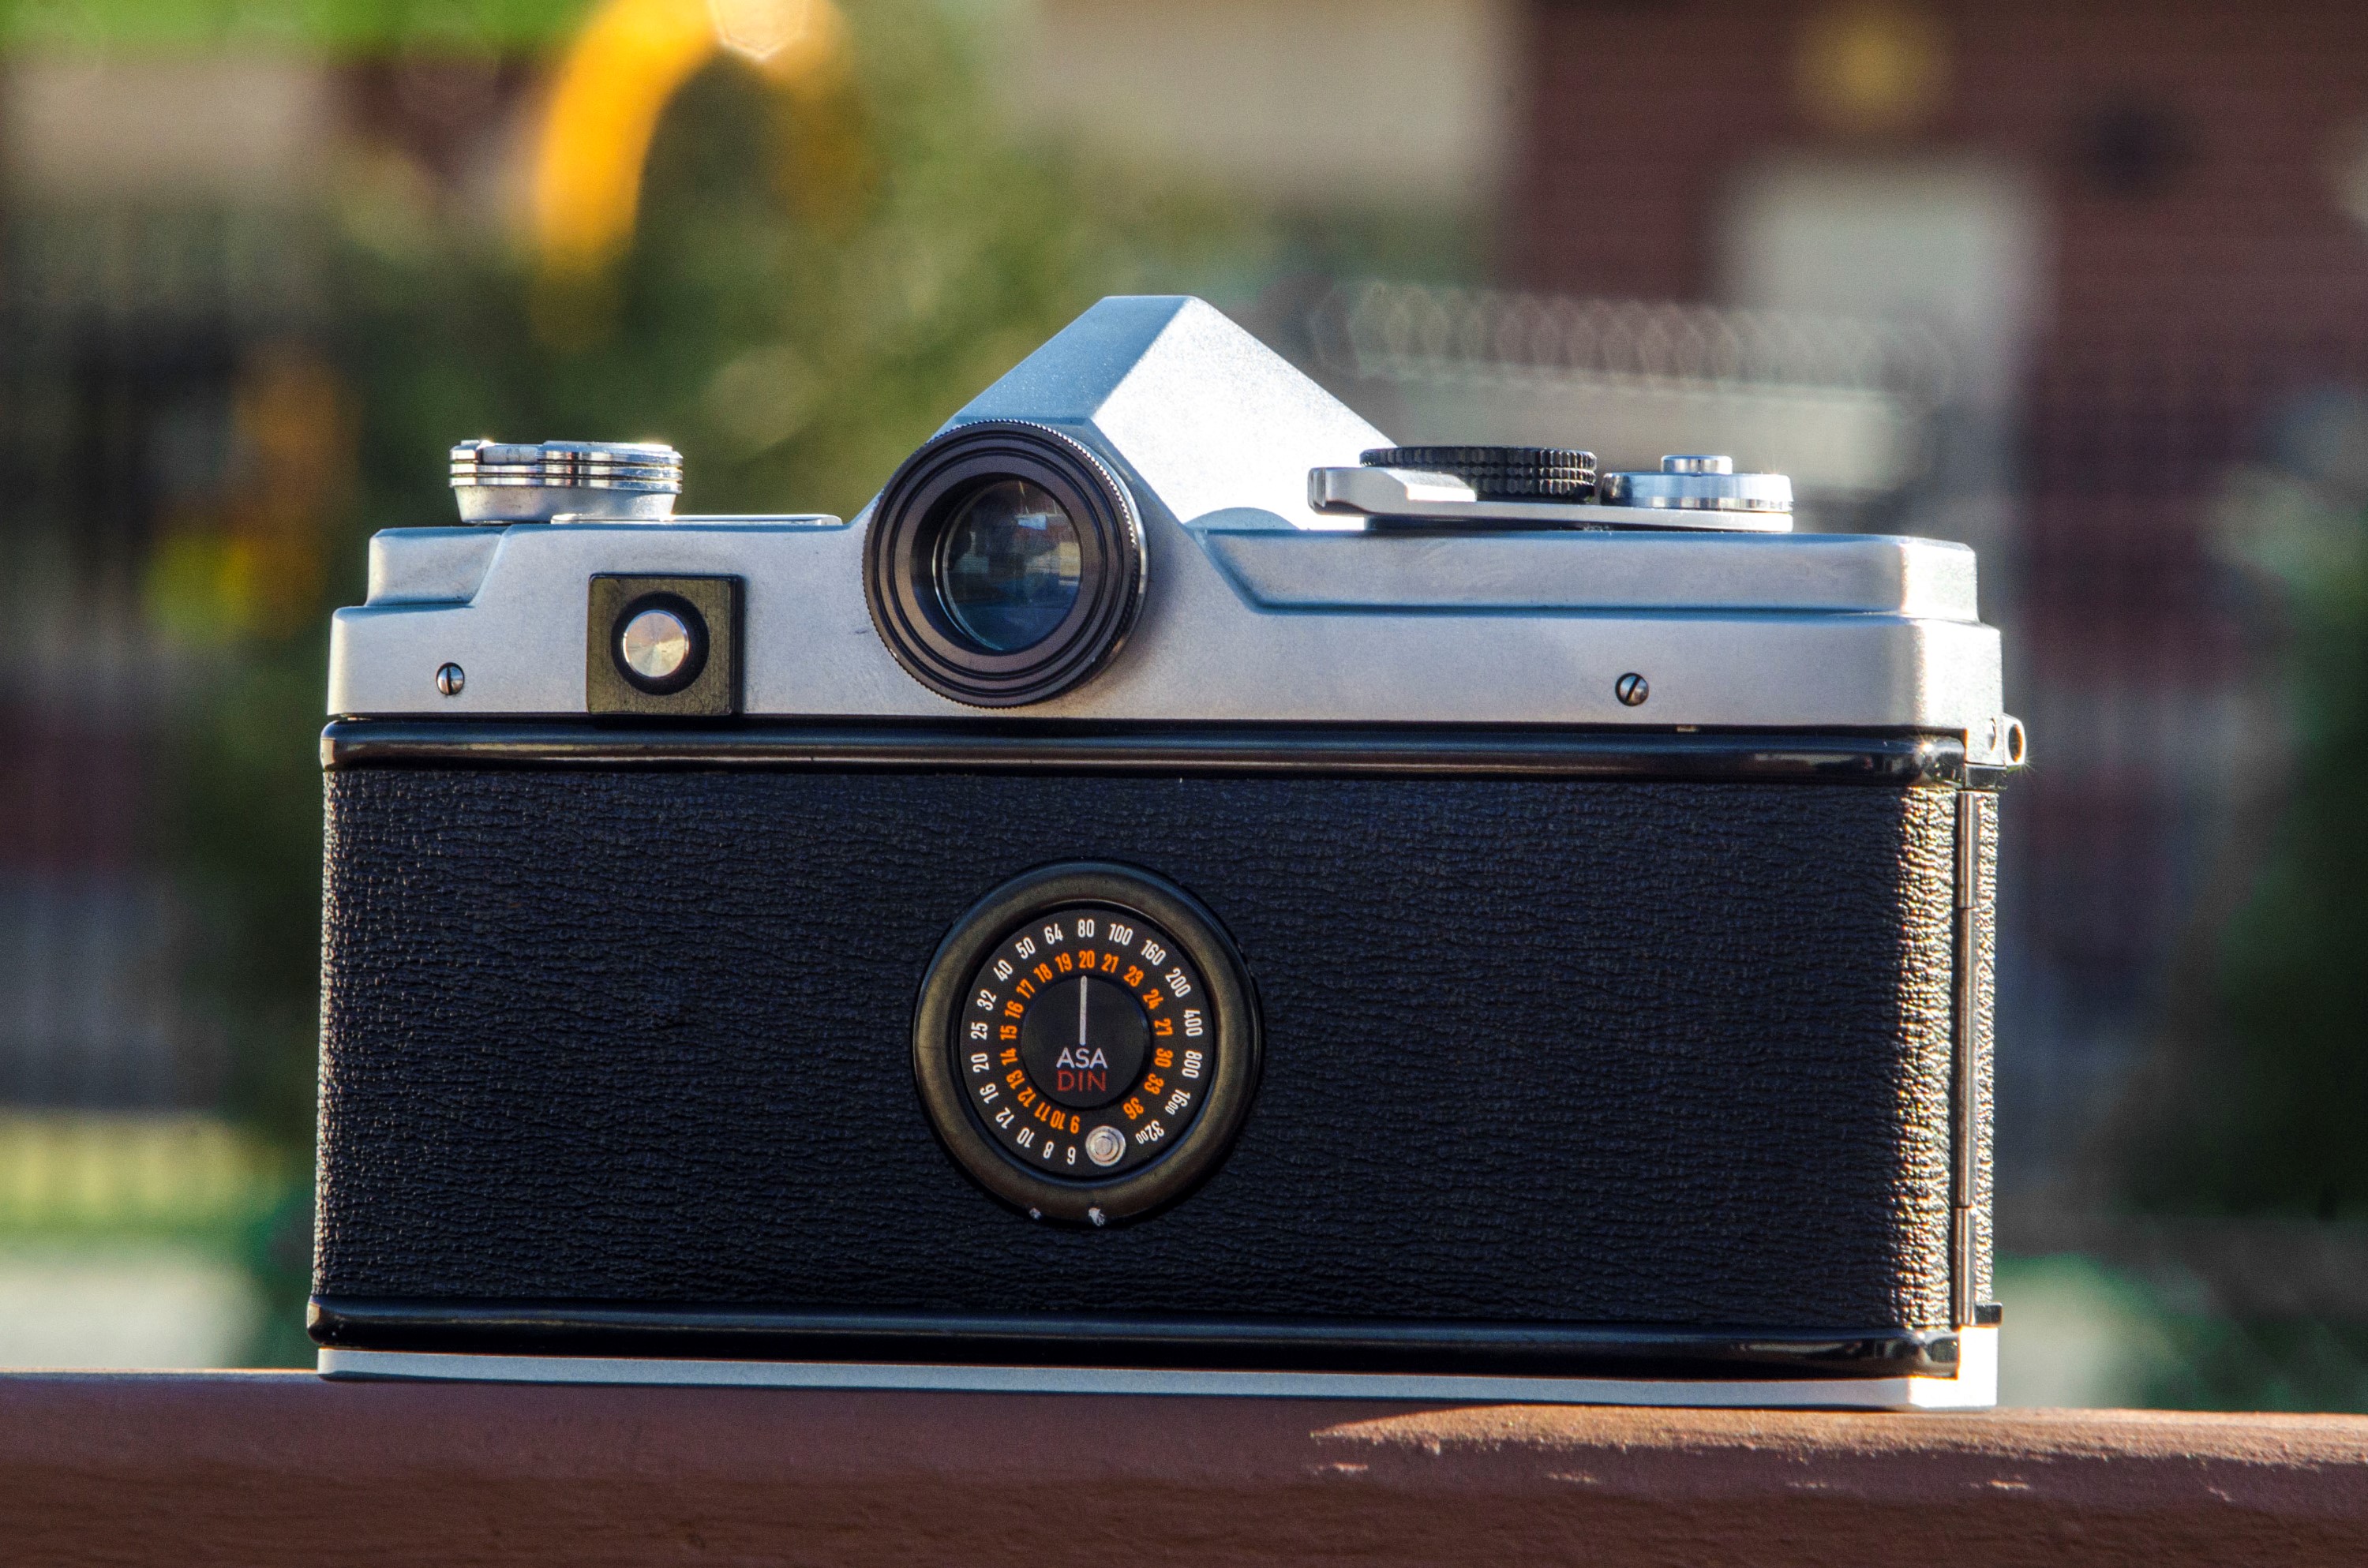
There is a rectangular exposure window that shows a white ribbon with two rows of aperture numbers. Immediately below this window on the back plate of the camera is a “meter lo/hi” switch. Under normal use the meter is in “lo sensitivity” mode which is what you would use outdoors and in well lit indoor scenes. In “lo” mode, the bottom row of aperture numbers are visible in the exposure window. When using the camera in lower light, you must press and hold the button to put the meter in “hi sensitivity” mode which also moves a black plate in the exposure window allowing you to see the top row of aperture numbers.
Regardless of whether you are in “lo” or “hi” mode, with the meter on, there is always a red needle that moves depending on the amount of light detected by the CdS meter. The ribbon itself is connected to the shutter speed selector on the top plate of the camera. As you rotate the shutter speed selector, the white ribbon in the exposure window will move, changing the position of the two rows of aperture numbers. The shutter speed selector also doubles as the film speed selector. By lifting on the shutter speed selector and rotating it, you can change the film speed from ASA 6 – 3200, quite a range of film speeds!
This probably sounds more complicated than it is, so lets go over a few examples of how it works. Lets say you are using 100 speed film and you have the ASA selector set to 100 and you have the shutter speed set to 1/125. With the meter in “lo” mode, the exposure window shows aperture numbers from f/2 to f/22. To get an accurate f-stop number, look at the red needle and see what aperture number it is pointing to. In the image below, the needle is pointing to f/11, so you need to set the lens to f/11 and take your picture. If it was pointing at f/5.6, you’d set it to that and take your picture.
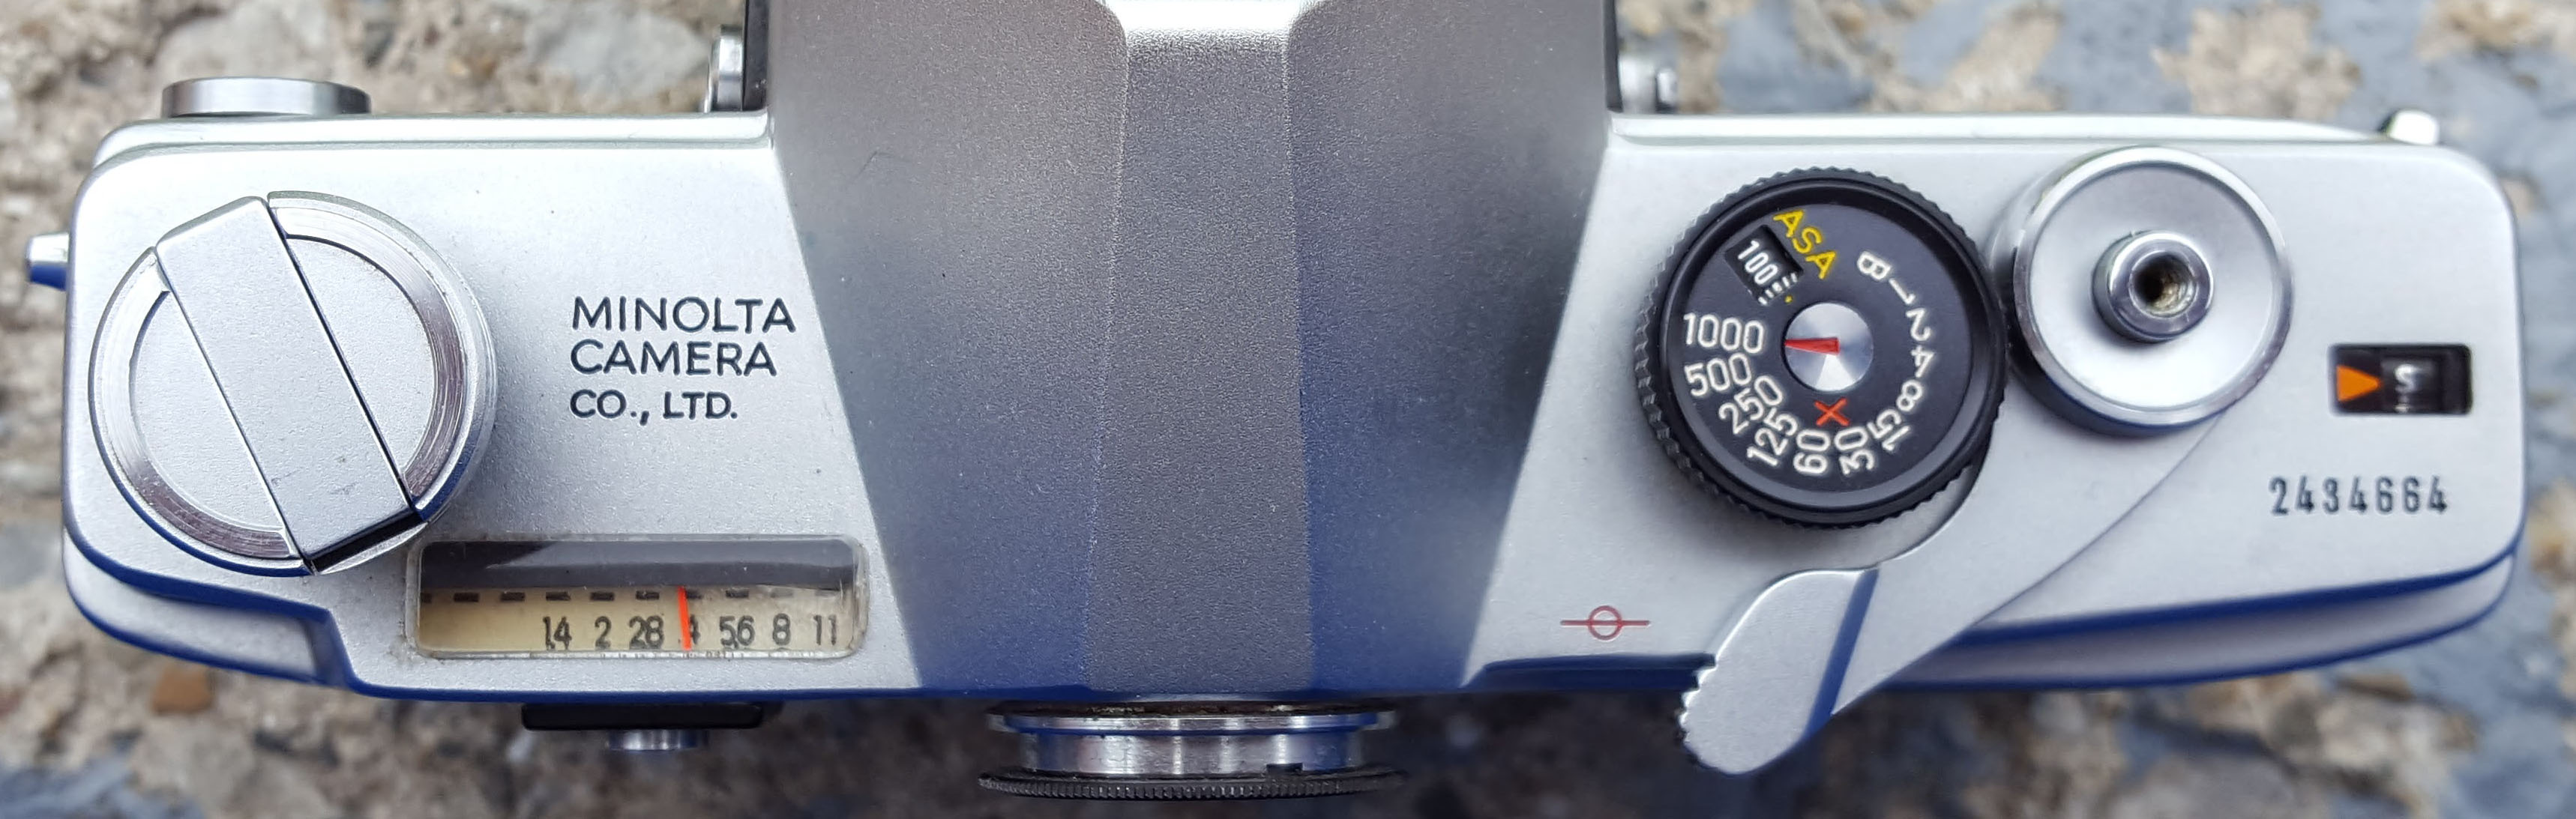
Using the same circumstances from the example above, lets say you want to shoot a fast moving object and you want to use as fast of a shutter speed as possible. With the needle still pointing to f/11, change the shutter speed to 1/1000. By doing so, the needle will remain in the same position it was, but the ribbon in the exposure window will move 3 stops to the right, and will now indicate f/4 instead of f/11.
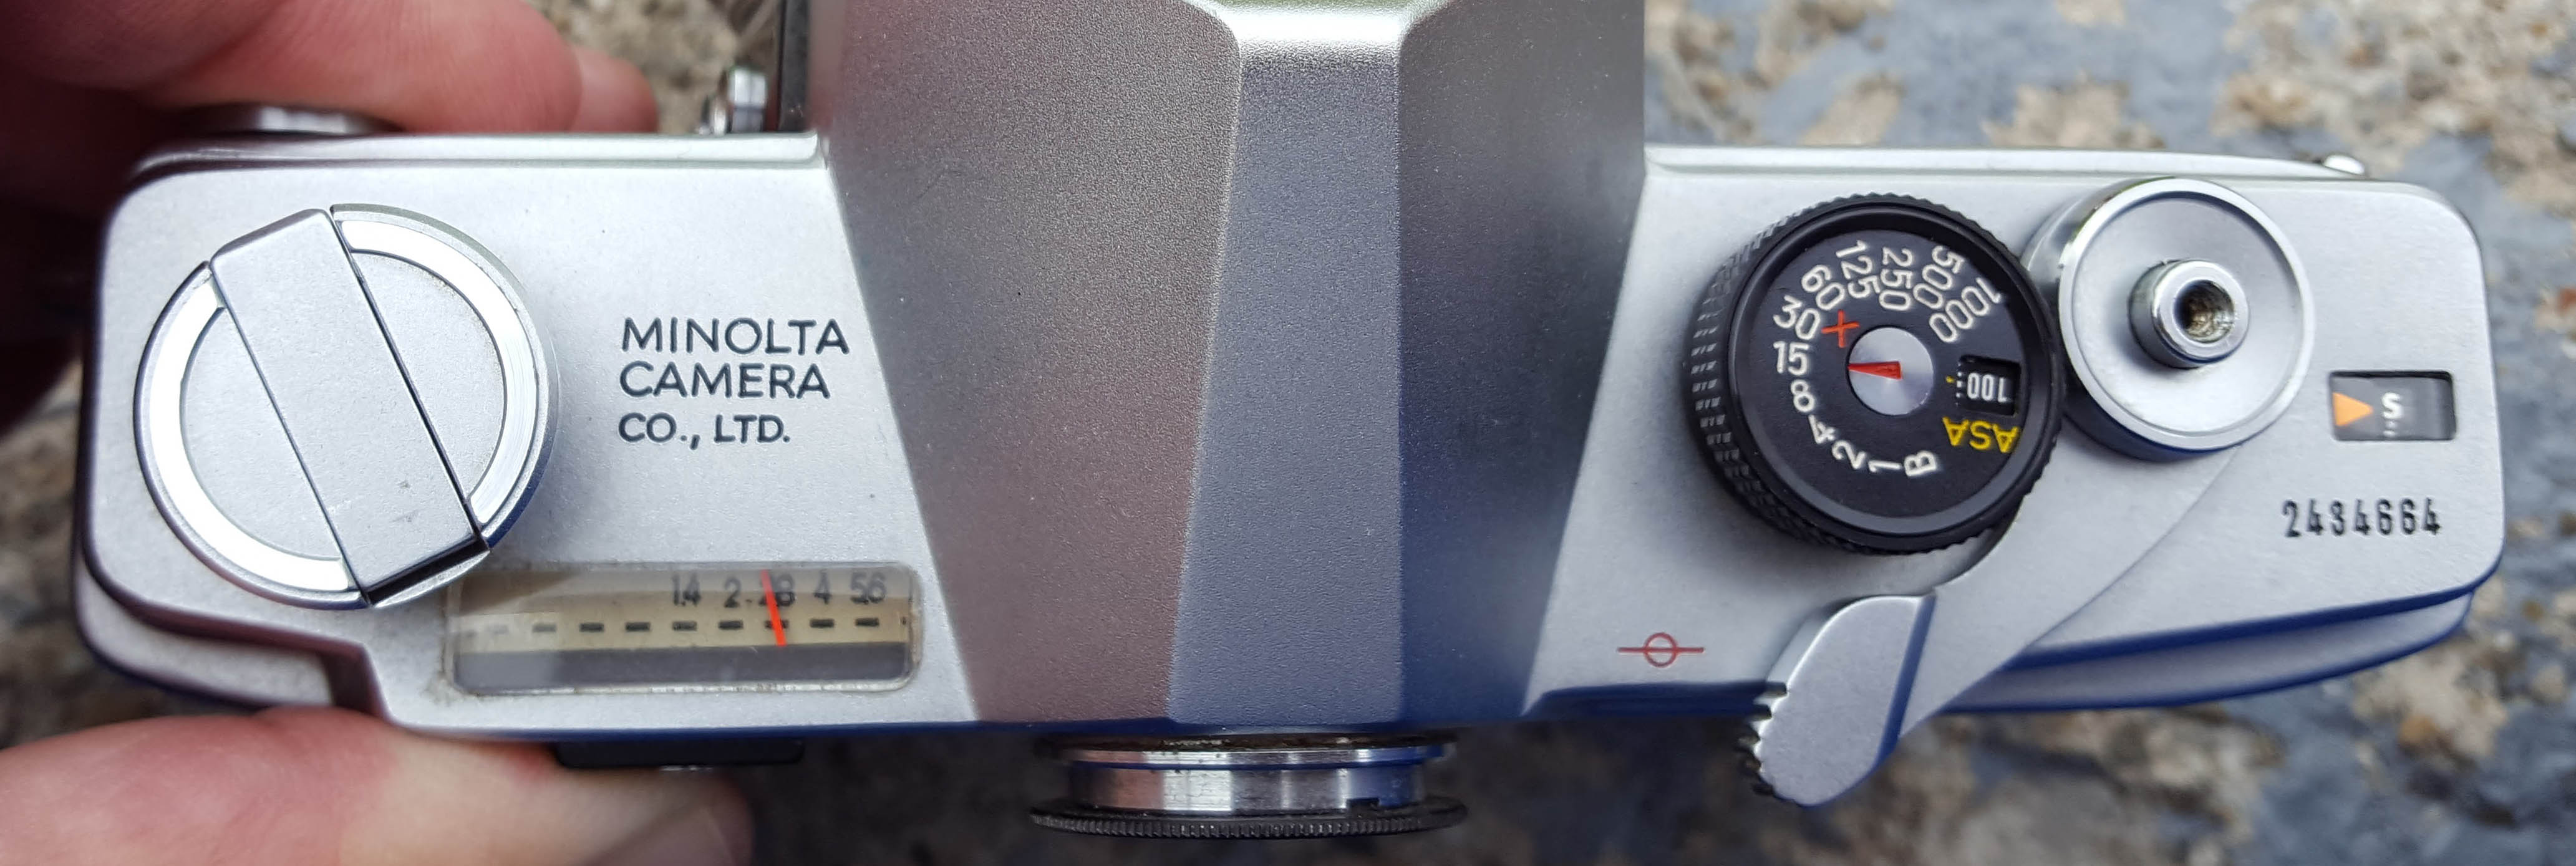
Let’s say you are shooting indoors and want to use the meter in “hi” mode. With 100 speed film and the shutter still set to 1/125, you likely won’t get a reading in “lo” mode, so you must press and hold the meter hi/lo switch. This will show the top row of numbers. In “hi” mode, you may get a reading that is off the chart which means that even with an f/1.4 lens wide open, the camera will not be able to properly expose the scene at 1/125, so you must select a slower shutter speed.
As you change the shutter speed selector to a slower speed, the white ribbon moves to the left, moving the numbers closer and closer to the needle. Lets say that once you get to 1/30, the needle is now pointing to f/1.4. But you are currently using an f/2.8 lens. You’ll need to go to 1/15 to get a reading at f/2.8. Of course 1/15 is very hard to shoot hand held, so you might want to use a tripod. Notice that in the image below, my hand is blocking the CdS meter to mimic a low light situation.
This all probably sounds confusing, but it’s really not that hard once you play with it. The system is actually quite intuitive to use. The only complaint I have, which is shared with other cameras like the Yashica Minister-D that have top plate meter readouts, is that you must hold the camera down by your chest to read it. You must take special care to point the camera in the same direction of the image you wish to expose, or else you might get a different reading down by the chest, than when the camera is up to your eye.
The rest of the camera is pretty standard fare. All of the rest of the essential controls are exactly where you’d expect them to be. The wind lever is solid metal and swings to roughly 180 degrees to fully advance the film and cock the shutter. This is longer than most SLRs of the 70s and 80s, but not as far as cameras like the Minolta Hi-Matic 7s that swing out an absurdly far 230 degrees. You can choose to move the lever in a single 180 degree motion, or several smaller motions.
Opening the film back is surprisingly modern as the SR-7 uses the rewind knob as the lock for the film door. Simply pull up on the rewind knob to unlock the rear door. This is a nice change from other 60s cameras that often still have some type of sliding tab on the side or bottom of the camera.
The viewfinder is very basic. The non-removable focusing screen has a Fresnel pattern to increase brightness. In the center is a ground glass circle around a microprism focus aide. I have never found microprism aides to be very useful, and much prefer the split image type, but I can’t fault the SR-7 here because this type of view screen was very common for the time. Beyond that, there is absolutely nothing else to see in the viewfinder, no match needle and no indicators of shutter speed or selected aperture.
With the Rokkor-PF f/1.4 lens attached, the camera is quite heavy, coming in at 1018 grams with battery installed, but no film. The lens itself makes up 320 grams of that weight, so if I swap out the f/1.4 lens for a lighter Rokkor-X f/1.7, the weight drops to a somewhat more reasonable 930 grams. It’s definitely a camera you wouldn’t want hanging around your neck on a long family trip to the zoo, but despite it’s weight, the camera is nicely balanced. The f/1.4 lens balances out the heavy body and it’s diameter perfectly matches the height of the body, so you can sit it flat on a table without the camera falling forward.
In terms of other features, you have the 10 second self timer, mirror lockup, the shutter release is threaded for a cable release, there is a film speed reminder dial on the back of the film door, and two PC flash sync ports for flashbulbs and electronic flashes. The camera itself lacks a depth of field preview, however most early SR-mount lenses like the Rokkor-PF f/1.4 have a DOF preview lever on the lens itself.
While shooting my inaugural roll of film in the SR-7, I really enjoyed everything about it. This is a solid tank of a camera that echoes a solid thunk each time the shutter is released. I actually shot the camera inside of a library during my first roll and anyone within 50 feet of me easily heard the camera each time I snapped a photo!
Although I do like the implementation of the CdS meter, and found it to be surprisingly accurate on mine, I found that I didn’t use it quite so much while shooting. I completely understand that CdS meters were cutting edge stuff back when this camera was released, but having to keeping lowering the camera from my eye to look down at the meter to take a reading slowed me down more than I wanted to. Instead, I relied on my own Sunny 16 estimations, which I suspect most photographers of the era did too.
So it would seem the SR-7 is a nicely featured (for it’s time), heavy, and well built camera with a surprising number of modern features, but what kind of images does it make? Well, it does have a Rokkor, so you can probably guess where this is going…
My Results
I did something I don’t normally do with a new camera and shot two different rolls through the SR-7. I was reasonably sure the camera was working, so I didn’t have to worry about ruining two different rolls, but my main motivation is that one of the rolls was Konica SR-V 3200 color film that had expired in 1989. I had never shot a 3200 speed film before and being nearly 30 years expired, I had serious concerns I would get anything at all from it. I am no stranger to shooting expired films, but I’ve learned that the higher the ISO/ASA of a film, the worse it ages. A 50 or 100 speed film will typically show only small amounts of degradation, a 200 or 400 speed film will show a little, but not enough that it couldn’t be corrected in post, but anything 800 and above is a crap shoot if you’ll get anything.
I took to the Internet and asked a bunch of collectors if they had any experience with this Konica 3200 film and one guy said that he remembered when this film was new and that it was garbage back then. So his opinion of shooting 30 year old garbage film was that I shouldn’t waste my time.
Still, I thought it might be fun to try so I shot a roll of it in the SR-7 and overexposed at least 3 stops in the hope I got something. For the second roll, I shot fresh Fuji 200. I shot these images at the end of winter, so my color palettes weren’t the best, but nevertheless, here are the results. The first gallery is the Fuji 200.


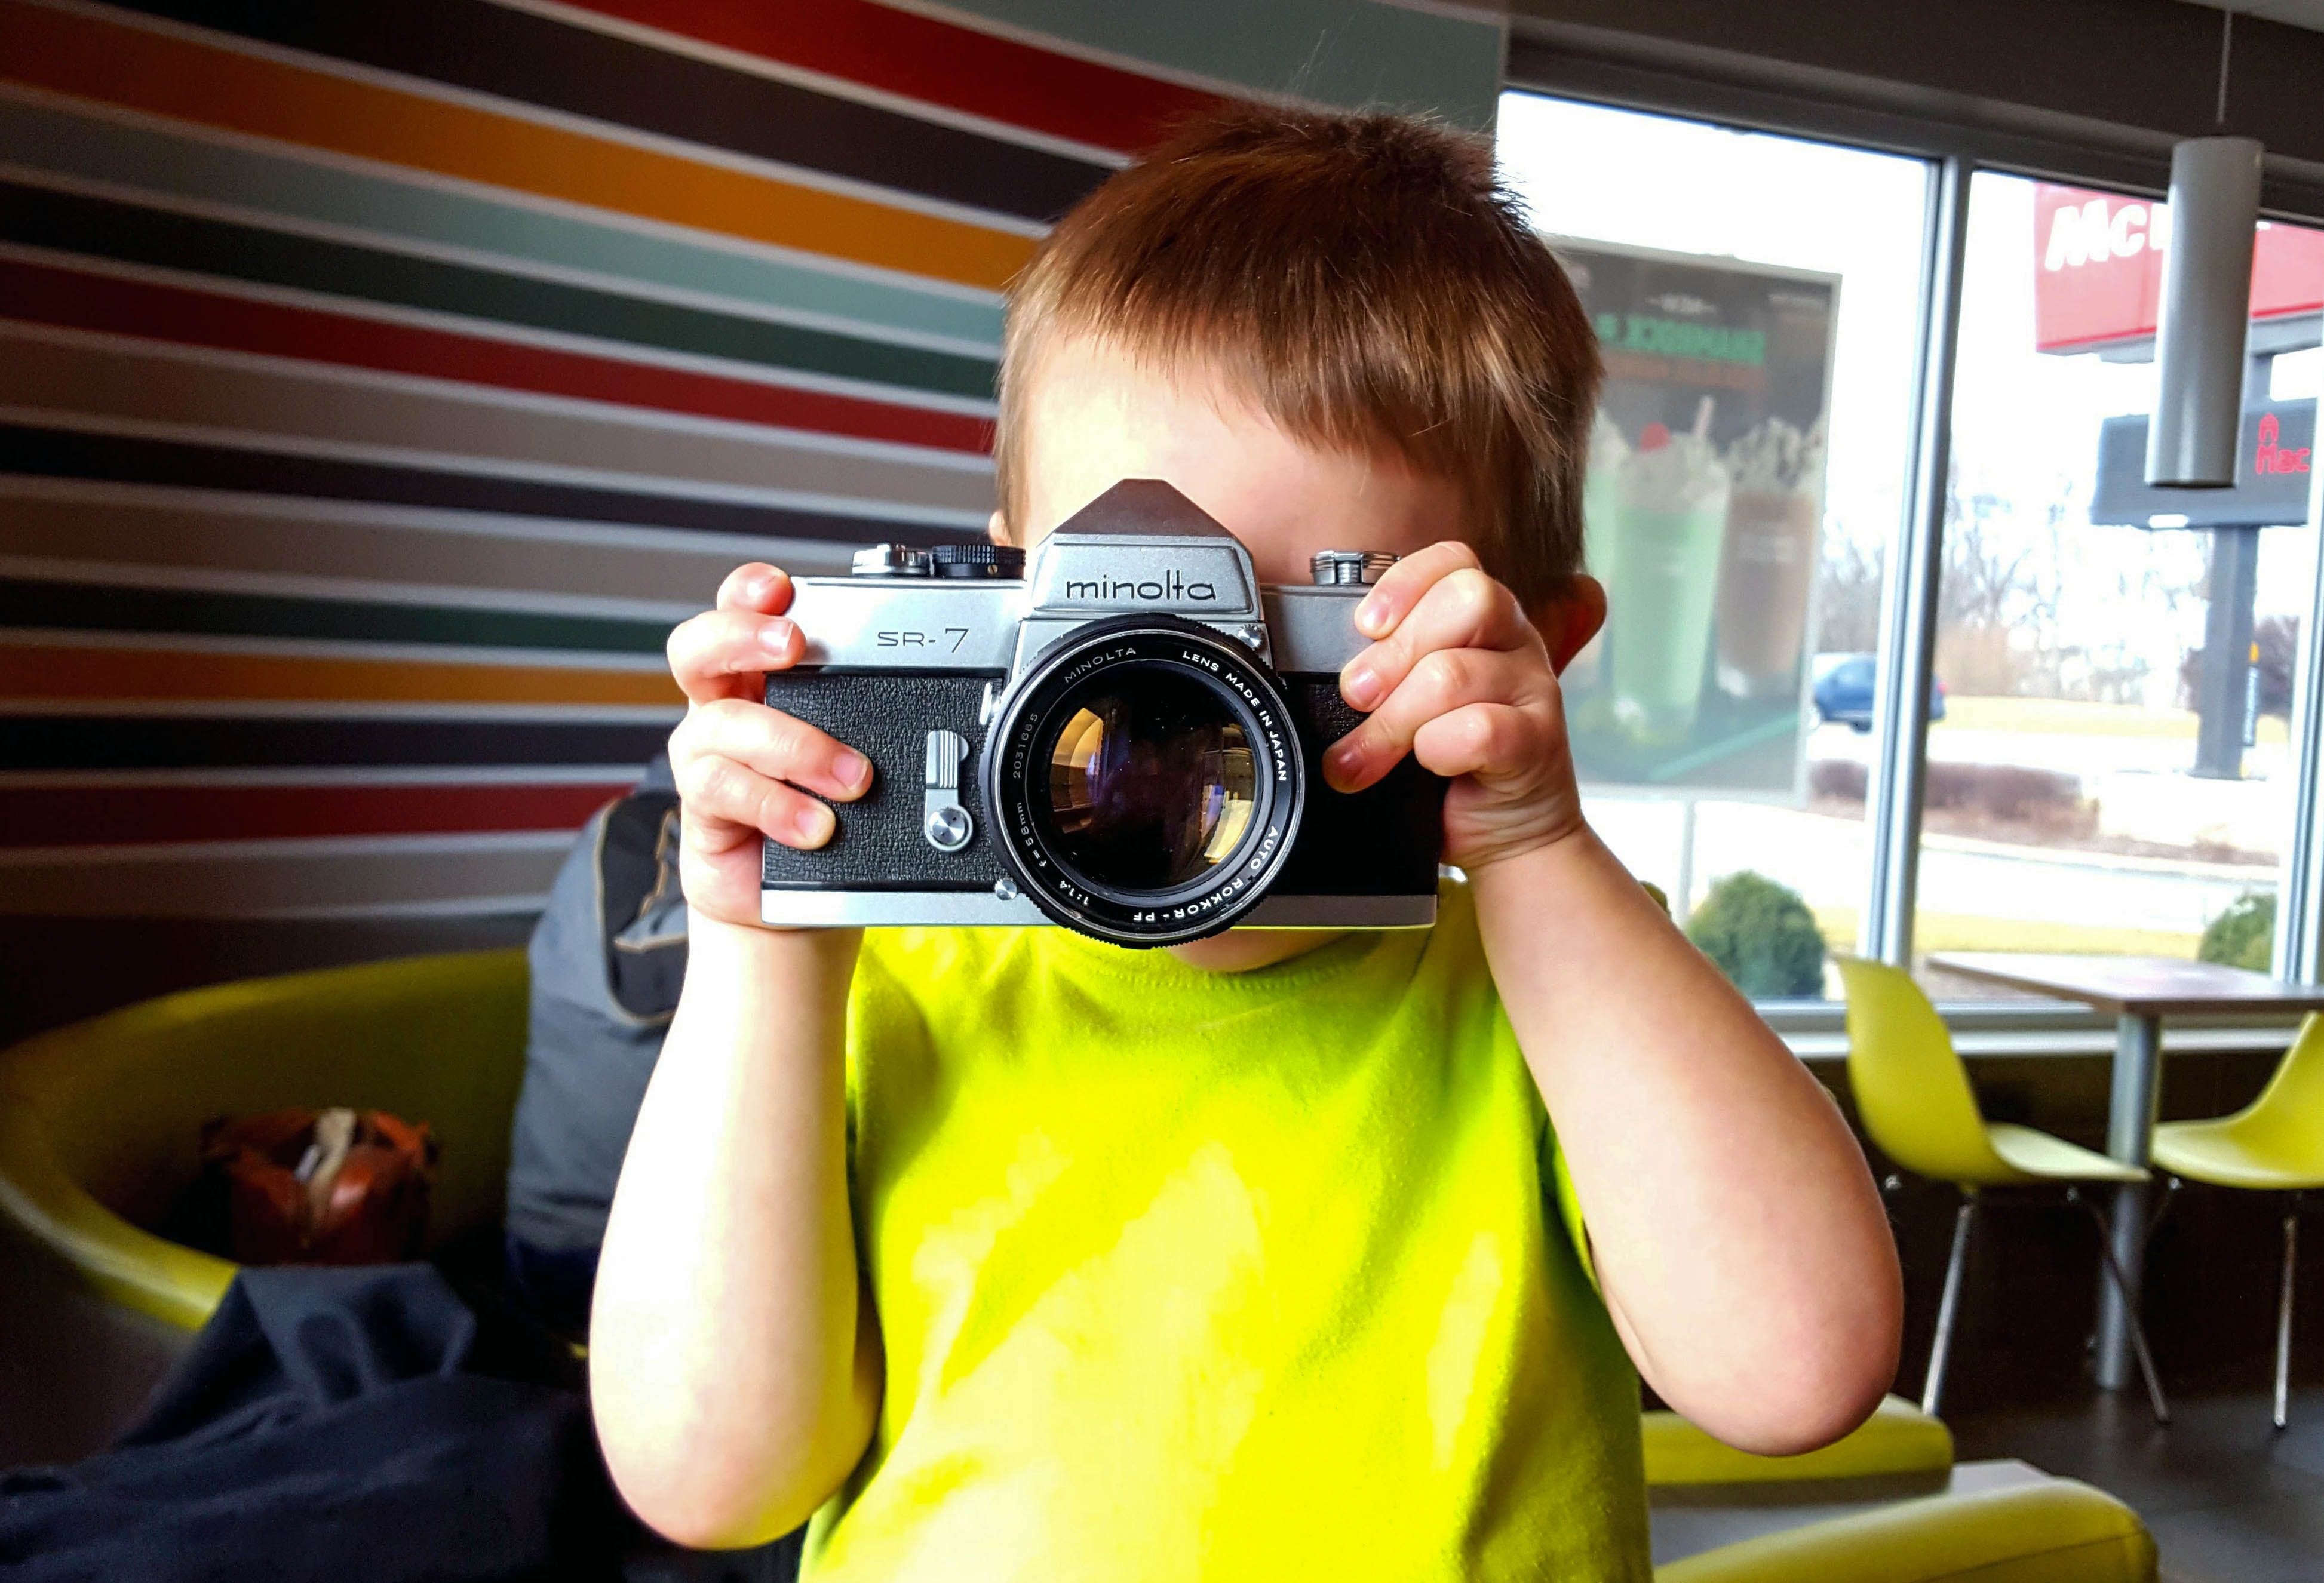
Looking at these images, I am a bit underwhelmed at my choices for these images, but I cannot fault the camera for this. The trouble of trying out a new camera in late winter when there aren’t many good options for pretty scenery, means that your chances of “grab shots” like these is high. I’d say the camera is not at fault of course. I’d say that while the SR-7 had a brighter than usual viewfinder for the era, it is still darker than SLRs from the 70s and 80s that would follow it. As a result, I found that getting accurate focus indoors was a bit more difficult than I had hoped. The image of the boy eating above is out of focus as I shot it wide open and getting perfect focus with a narrow depth of field indoors on a camera with a slightly dim viewfinder was a challenge.
I was impressed that the meter seems to have survived the 45+ years since it was made. I trusted the meter for a couple of these shots and I cannot tell a difference between the ones where I used Sunny 16 and the ones where I used the meter.


As expected, the Konica 3200 speed film did not hold up well. The images straight off the scanner were barely visible. Each of the above shots had to be significantly boosted in Photoshop to get them as good as they are. Oddly, the interior shots seemed to hold up the best, producing colors that are at least close to correct. The few I shot outside showed a dramatic purple shift. The only example I’m sharing is the McDonalds photo which was done in bright sunlight.
Since these images were more of a “film experiment” and not a fair representation of what the SR-7 was capable of, I won’t spend too much more time critiquing them. I doubt these would have looked any better using any other camera in my collection.
With that in mind though, I actually do like some of the shots. The excessive grain and boosted levels and dirt in the film add up to a pretty cool looking distressed look. Some people intentionally look for ways to distress their photos, and for those people, they may be interested in this film. I have 3 more rolls of the stuff, so perhaps I will use what I learned from this roll and try some more indoor shots and see what I can get.
Coming back to the SR-7, I was pleasantly happy with the camera. Its a large hulking beast of a camera. These early Minoltas were built with a very high quality standard, which likely is why it works so well today. The Rokkor-PF 58/1.4 lens is physically gorgeous and like all Rokkor lenses is capable of wonderful images. It is unlikely you would be able to differentiate images shot on the SR-7 with this Rokkor lens as opposed to a much later Minolta SLR like the XG7 or the X-570.
If there’s one bit of criticism of the SR-7 is that for as good as it is, it doesn’t do anything better, or more interestingly than any of the many Minolta SLRs that would follow it. Minolta, like most Japanese camera makers, has many excellent models, and the SR-7 is easily overshadowed by the many great SLRs that would follow it. Comparing the SR-7 to these later models, they only got better, so its hard to recommend this over other Minolta SLRs. Still, its a historically significant camera, with a unique exposure system, and it really does look nice, so if you have a chance to add one to your collection, go for it!
My Final WordHow these ratings work |
The Minolta SR-7 was the predecessor to the excellent SRT series and was at one time Minolta’s most advanced SLR. It is historically significant as being the first SLR with a coupled CdS light meter. It accepts all Minolta SR/MC/MD mount lenses and is built with a very high quality. The camera has excellent balance, good ergonomics, and for it’s day, a bright viewfinder. Despite these accolades, there isn’t anything that the later SRTs can’t do better. It is a very capable fully mechanical camera and there’s really nothing negative to say about it, other than it doesn’t do anything that later models can’t also do. For this reason, I would hesitate to recommend this camera over the later SRT series. | ||||||
| Images | Handling | Features | Viewfinder | Feel & Beauty | History | Age | |
| 1 | 1 | 1 | 1 | 1 | 2 | 20% | |
| Bonus | None | ||||||
| Final Score | 8.4 | ||||||
Additional Resources
http://camerapedia.wikia.com/wiki/Minolta_SR-7
http://www.rokkorfiles.com/SR%20Series.htm
http://www.collection-appareils.fr/x/html/page_standard.php?id_appareil=11512
http://retinarescue.com/minoltasr7.html
http://www.subclub.org/minman/sr7.htm
https://www.flickr.com/photos/ellenjo/sets/72157617435287243/
What I like about the SR7 compared to the SRT is actually the top mounted viewfinder – I like that I can preset everything in advance and raise the camera to my eye only to do the final framing and focusing – its great for candids 🙂
Greats article and matches my experience to a “T”. I have one in excellent condition that hasn’t been used for a few years. Any idea where I could/should go to find a buyer? Thanks, Ron
Ron, the absolute best place to sell an old camera is eBay. You’re guaranteed to get the highest anyone in the world is willing to pay for it at that time. Make sure you take multiple, good photos of the camera, showing it from many angles, and in good lighting. Spend a few minutes typing up a good description of the camera’s condition and whether it works or has any issues. Auctions where the seller puts some effort into the photos and the description always go for higher than ones that have 1 or 2 blurry pictures, and a description that says “as is”.
Hi there.. I have an SR7 m V, I am using now and then. In your artical it seems like there is an illumination in the light meter scale window. On my camera there is no light, but I have some vague memory of illuminated scale window when the camera was new. Can You please tell me how it is with that – should there be light or not? Nenne Karlsson, Sweden