
 What is it?
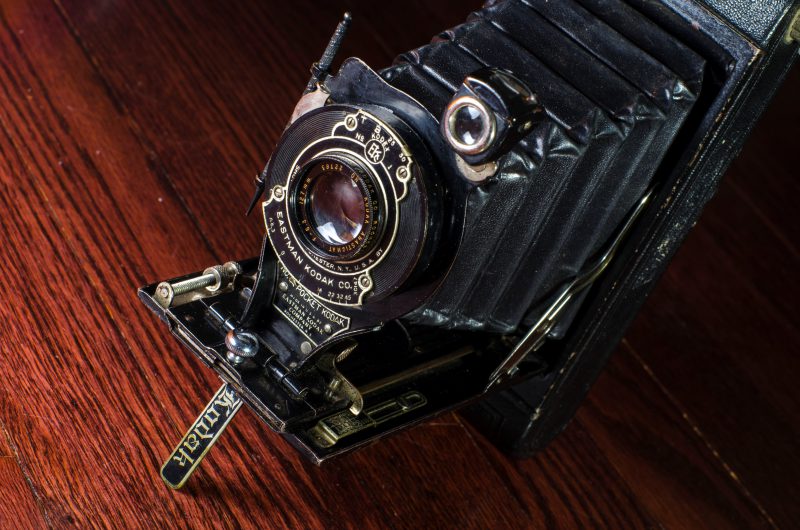
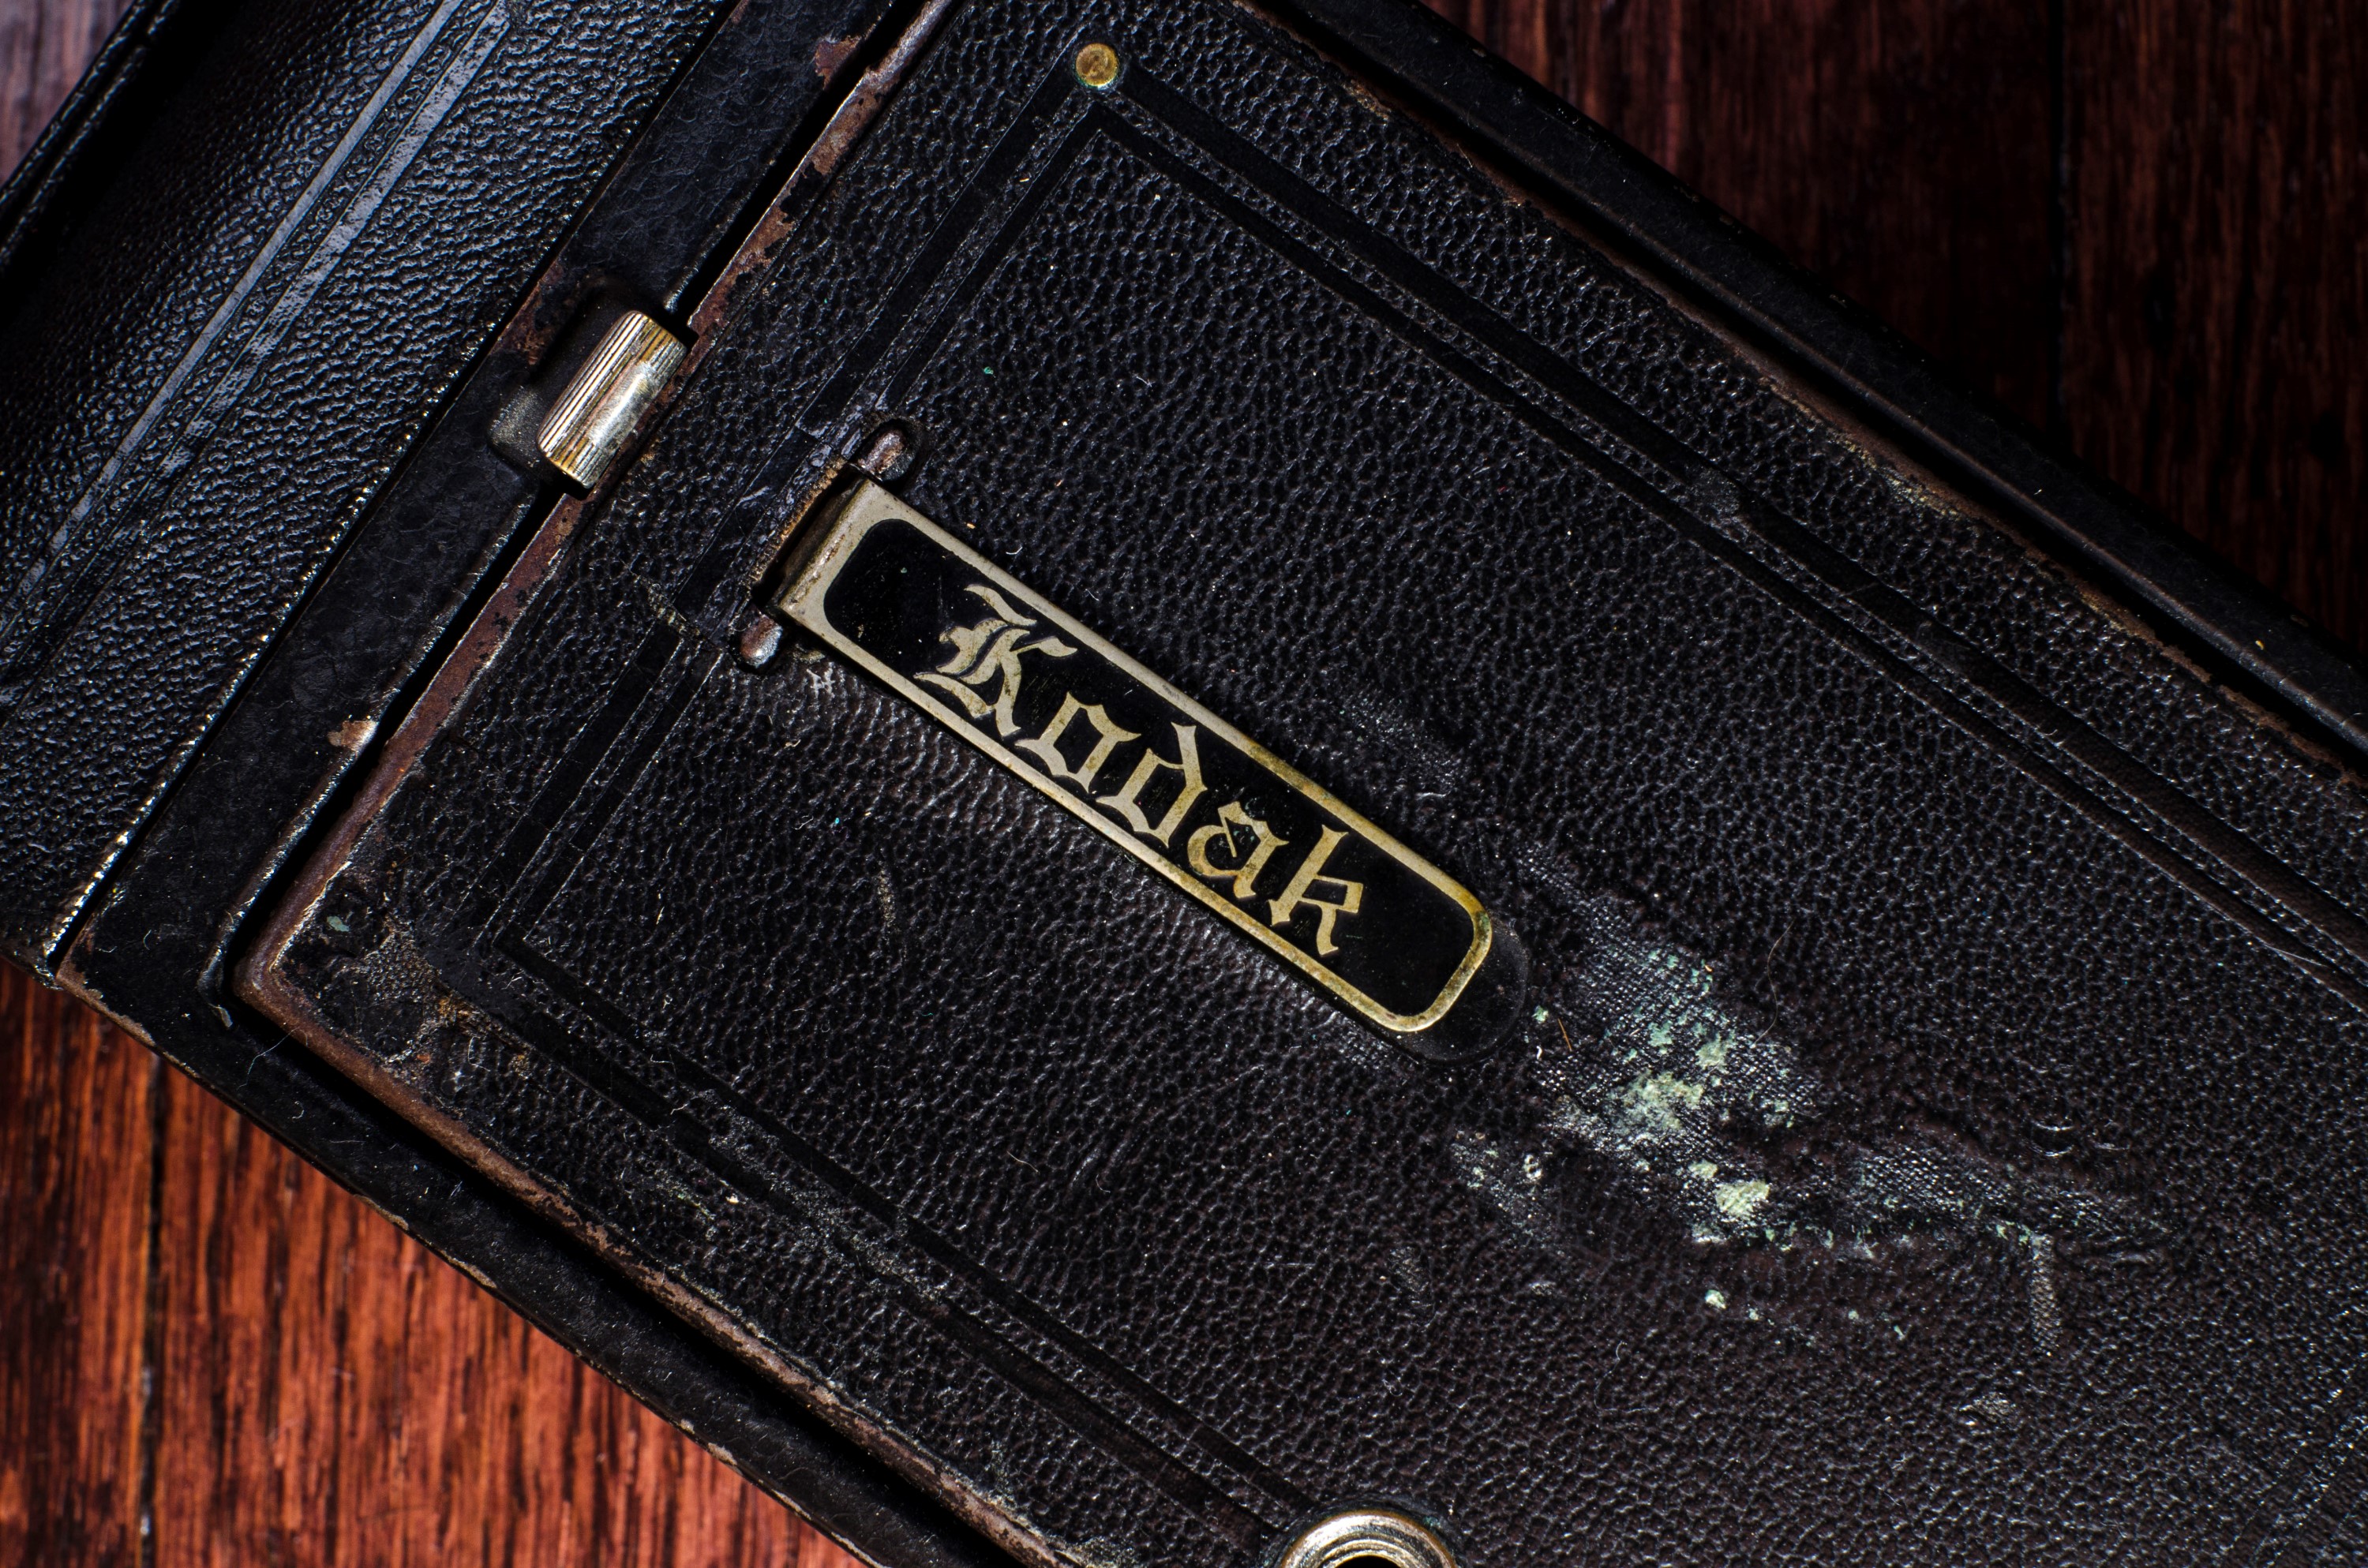
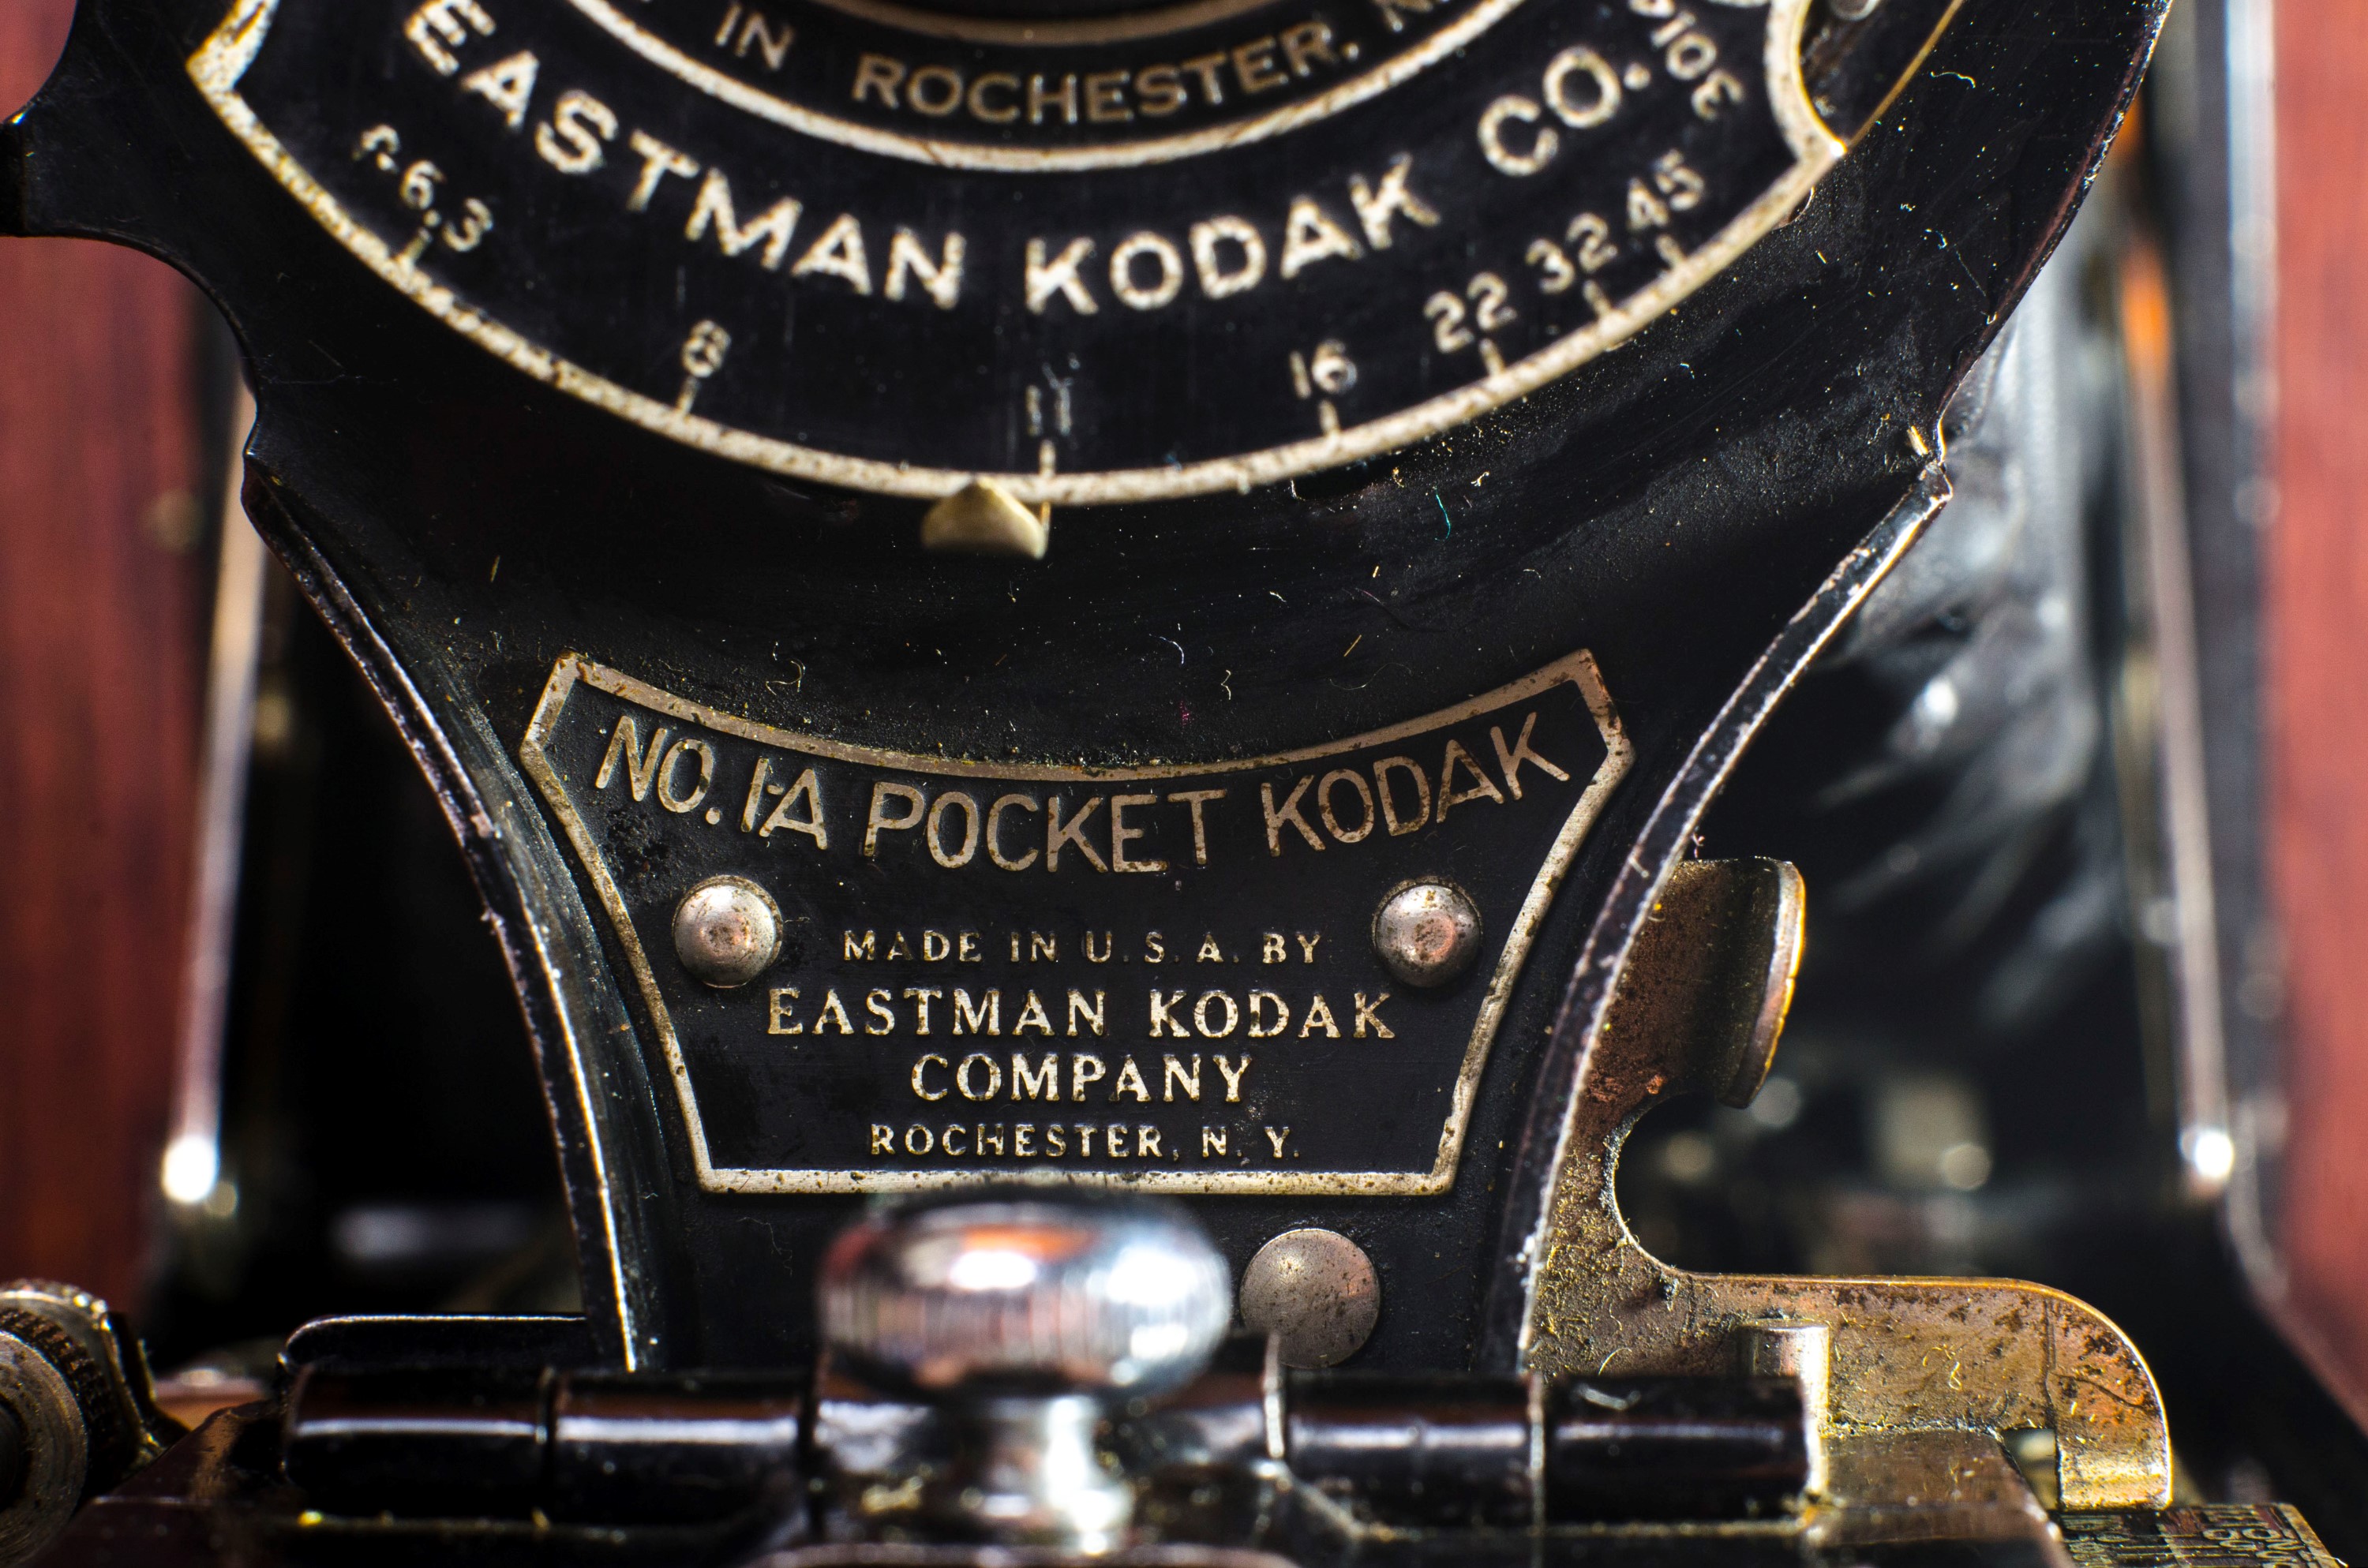
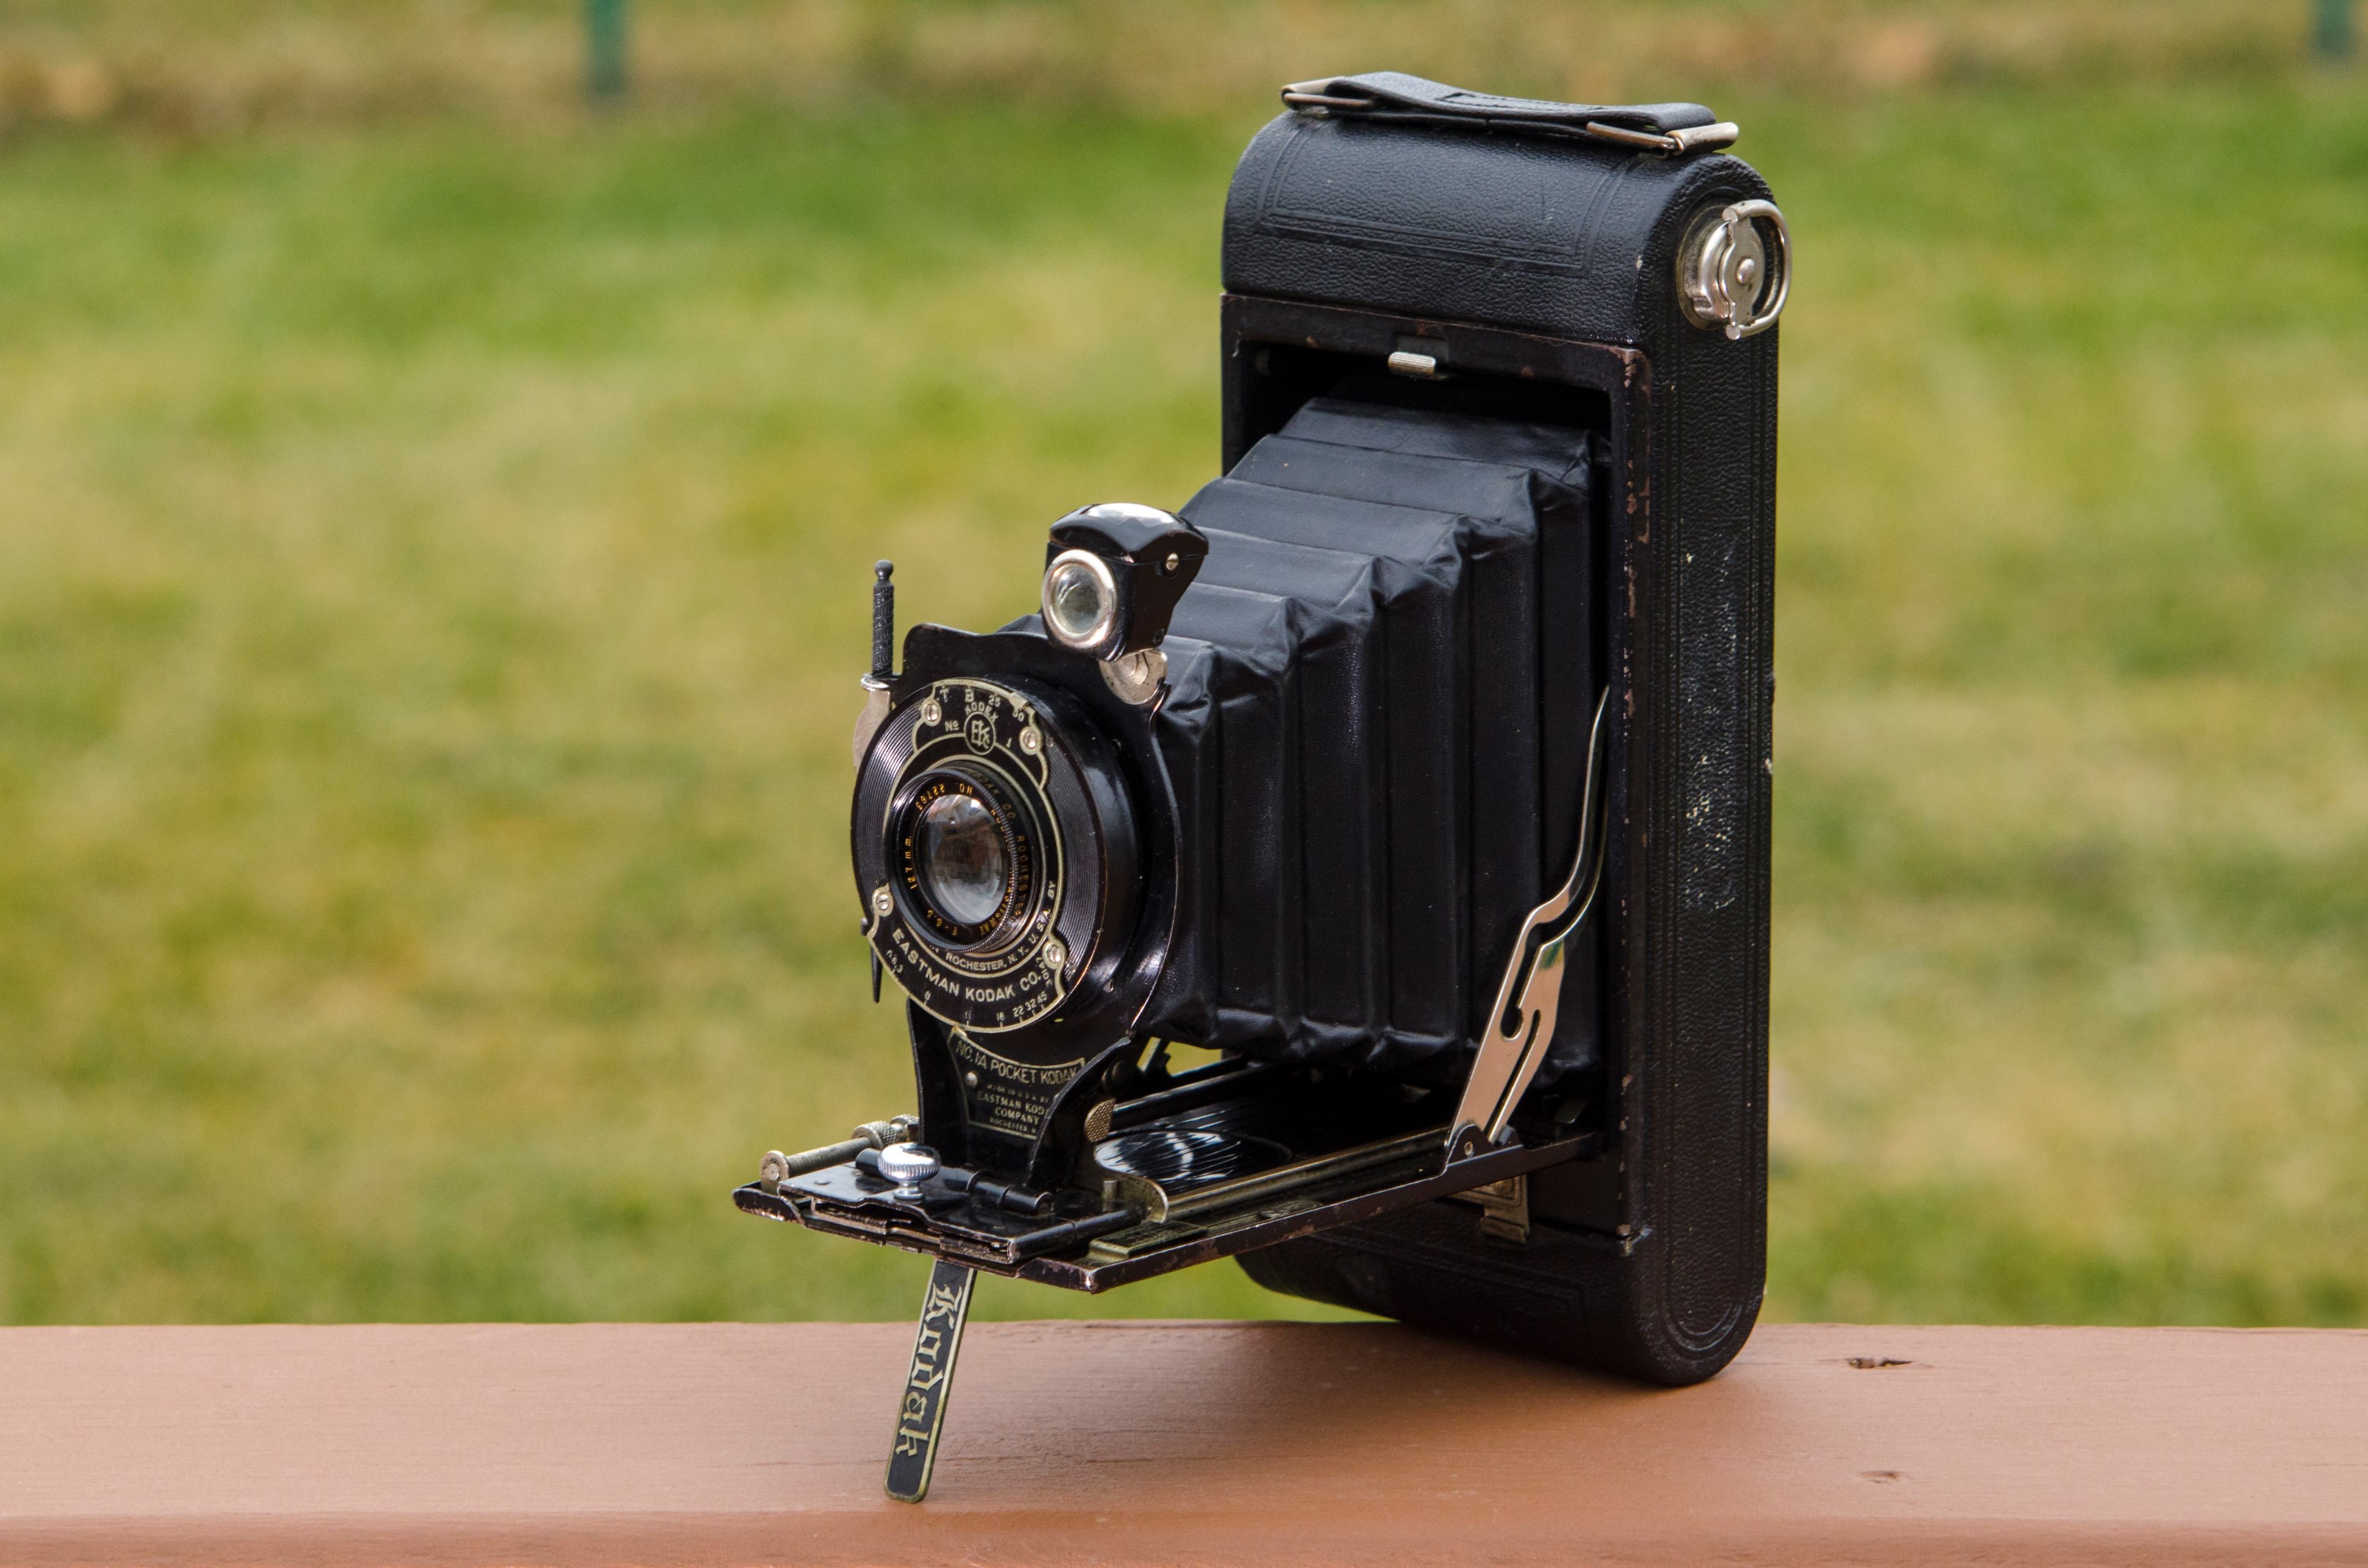
This is a No.1A Pocket Kodak folding camera made by the Eastman Kodak Company between the years of 1926 and 1932. It used Autographic 116 film which allowed photographers to open a tiny door on the back of the camera and write notes about the exposure which would show up on the border of the image upon developing. Selling for around $20, this model would have been above Kodak’s Brownie and Junior lines of folding cameras, but beneath their line of Special cameras. These cameras were very popular for amateur photographers who wanted a camera with a capable lens and shutter, but at a price that was still affordable. These cameras would be some of the last models made by Kodak before their switch to their unique 616 and 620 film formats.
Film Type: A-116 roll film (twelve 2½” x 4¼″ exposures)
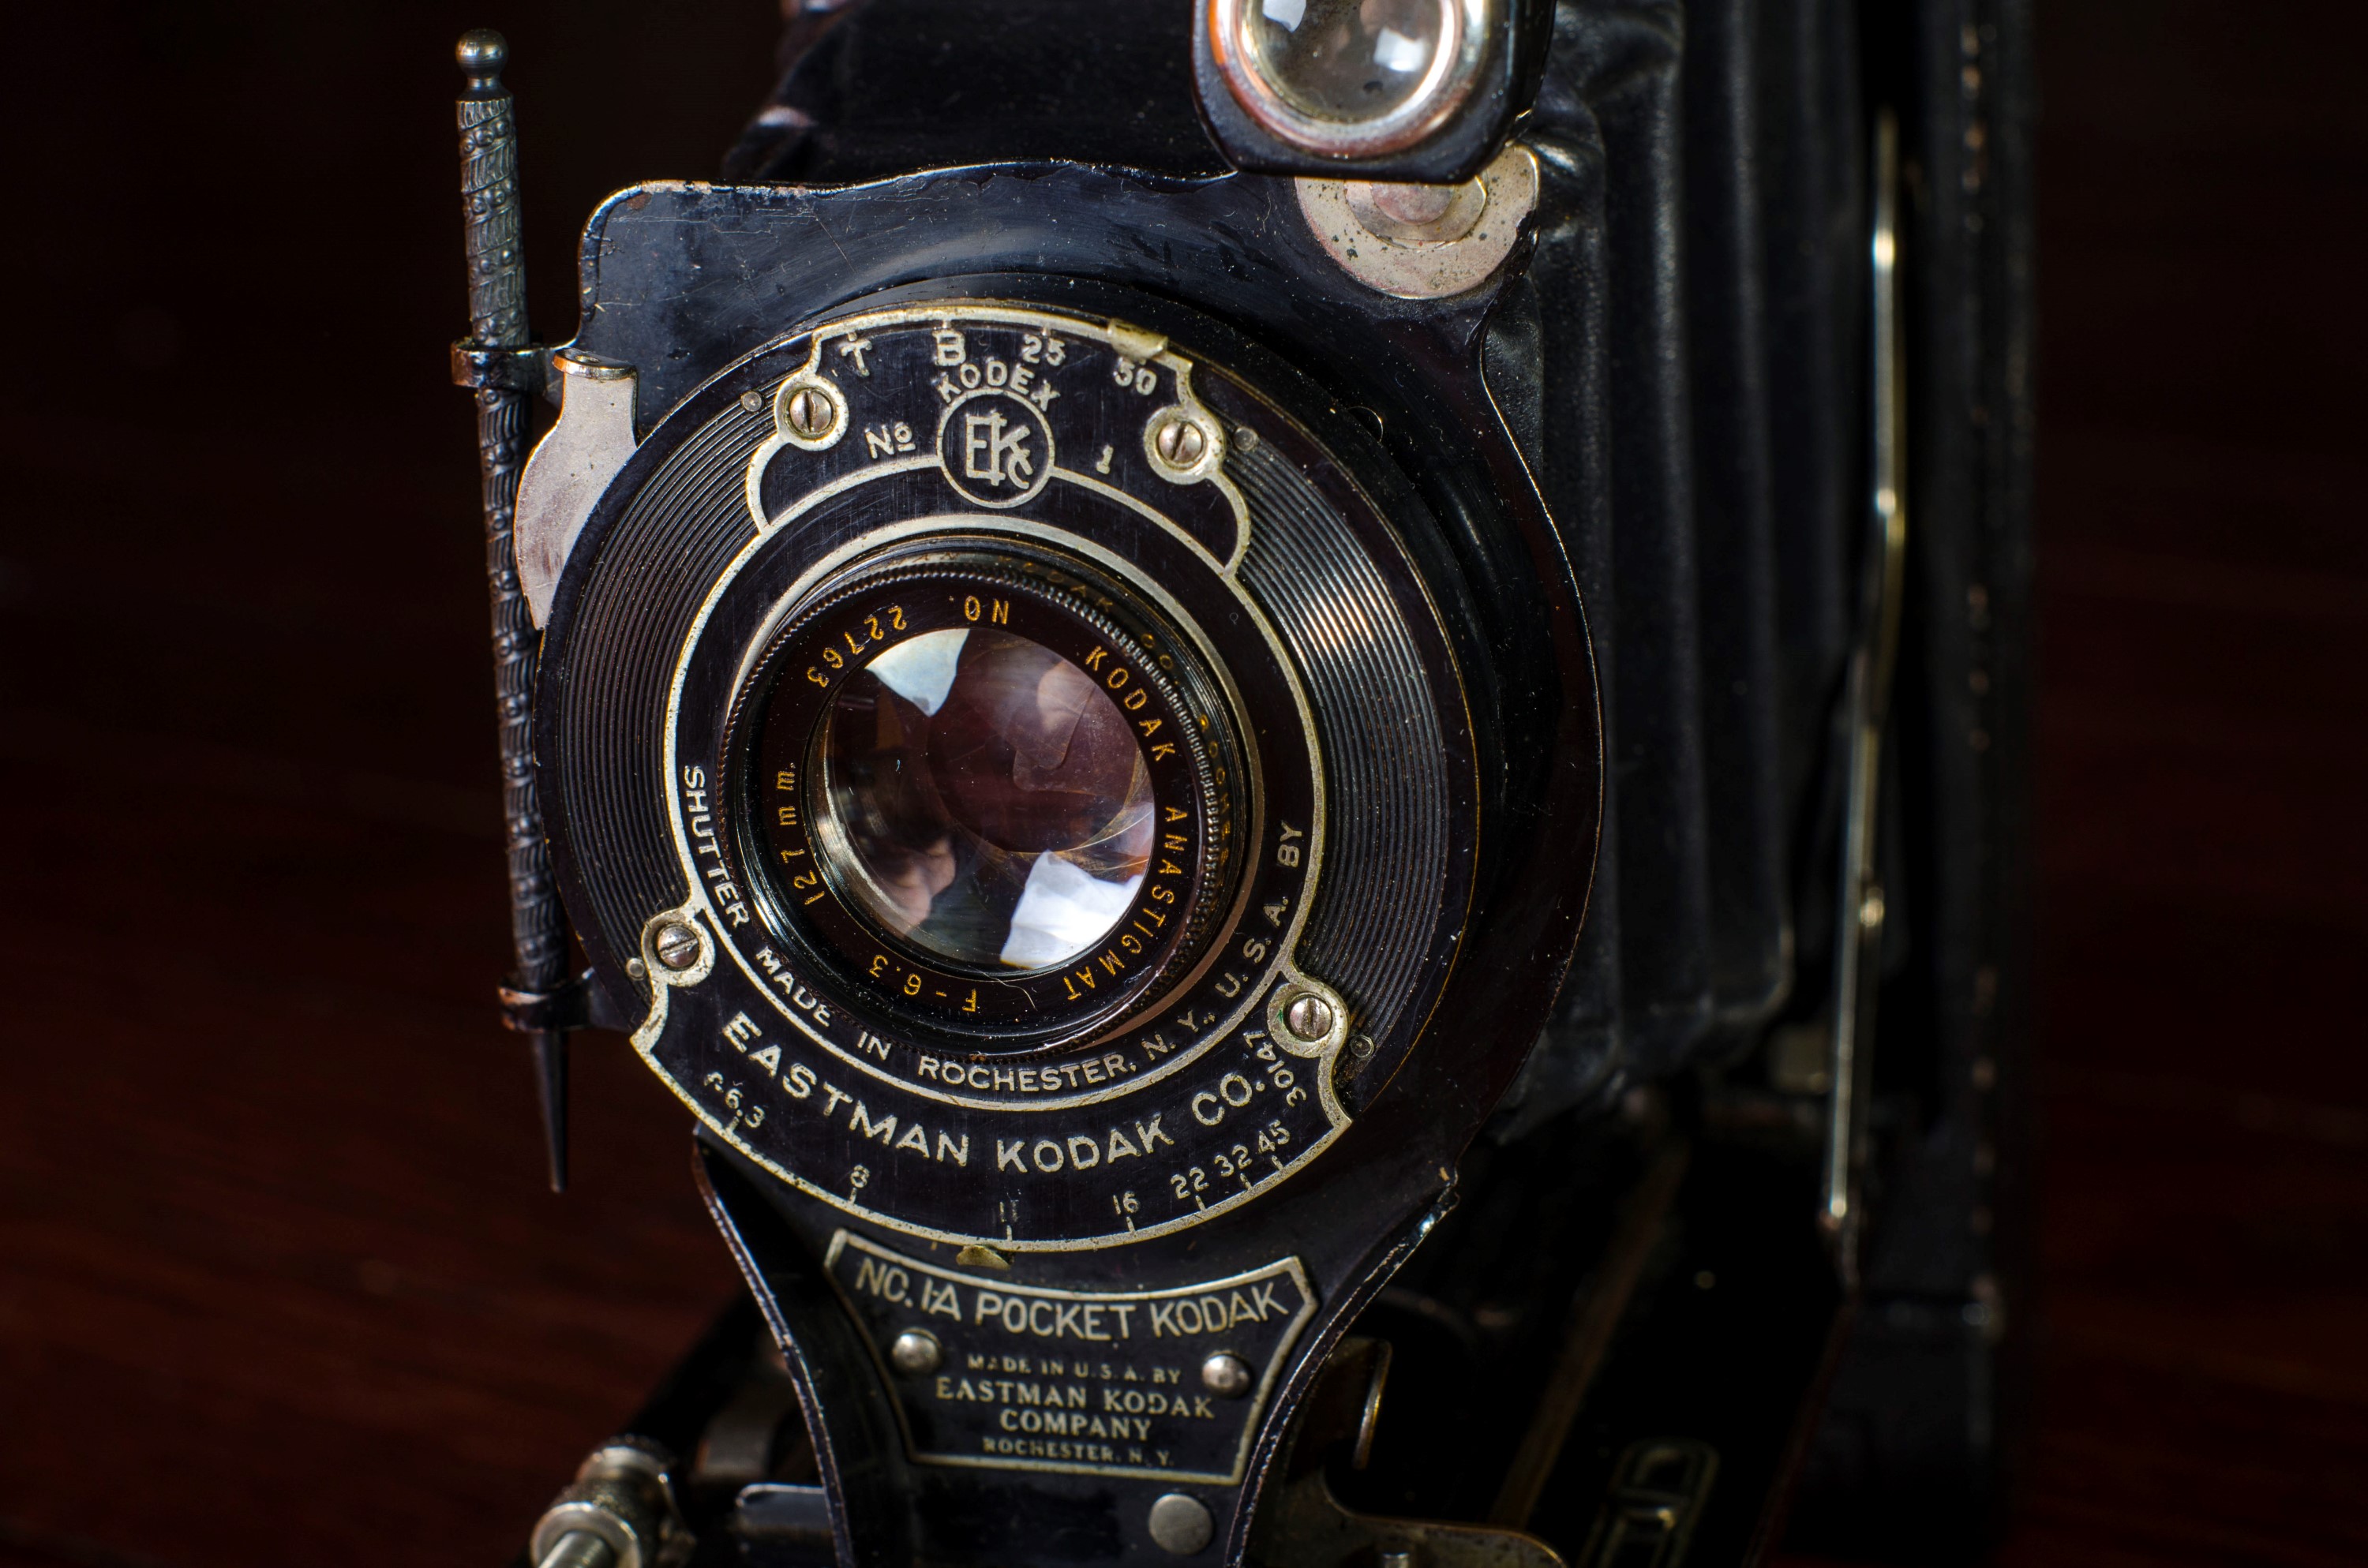
Lens: 127mm f/6.3 Kodak Anastigmat uncoated 3 or 4-elements
Focus: Worm Gear adjustable 6 feet to Infinity
Shutter: Kodex Leaf
Speeds: T, B, 1/25, and 1/50
Exposure Meter: None
Battery: None
Manual: http://www.cameramanuals.org/kodak_pdf/kodak_pocket_no_1_1a.pdf
Prologue
What were you doing on August 19, 2014? I know what I was. I was sitting in front of my computer, on eBay ordering this camera. I paid exactly $30 including shipping for it. I even took the time to write my very first post on this website announcing that I had just bought an 85 year old camera.
What was running through my head that day that prompted me to order such an old camera? Of all the old cameras I could have bought, why the hell did I start with a folding camera from the 1920s? If someone were to ask me today to recommend a good first vintage camera to try, I would certainly not recommend a No.1A Pocket Kodak. It’s not that it’s a bad camera, but these old Kodaks are notorious for having leaky bellows which will ruin film the moment it is put into the camera, plus Kodak’s No.1A cameras use a format of film which hasn’t been made in over 30 years.
Sure, they look cool sitting on a shelf, but I remembered buying this with the intent of using it. Boy, did I have the odds stacked against me.
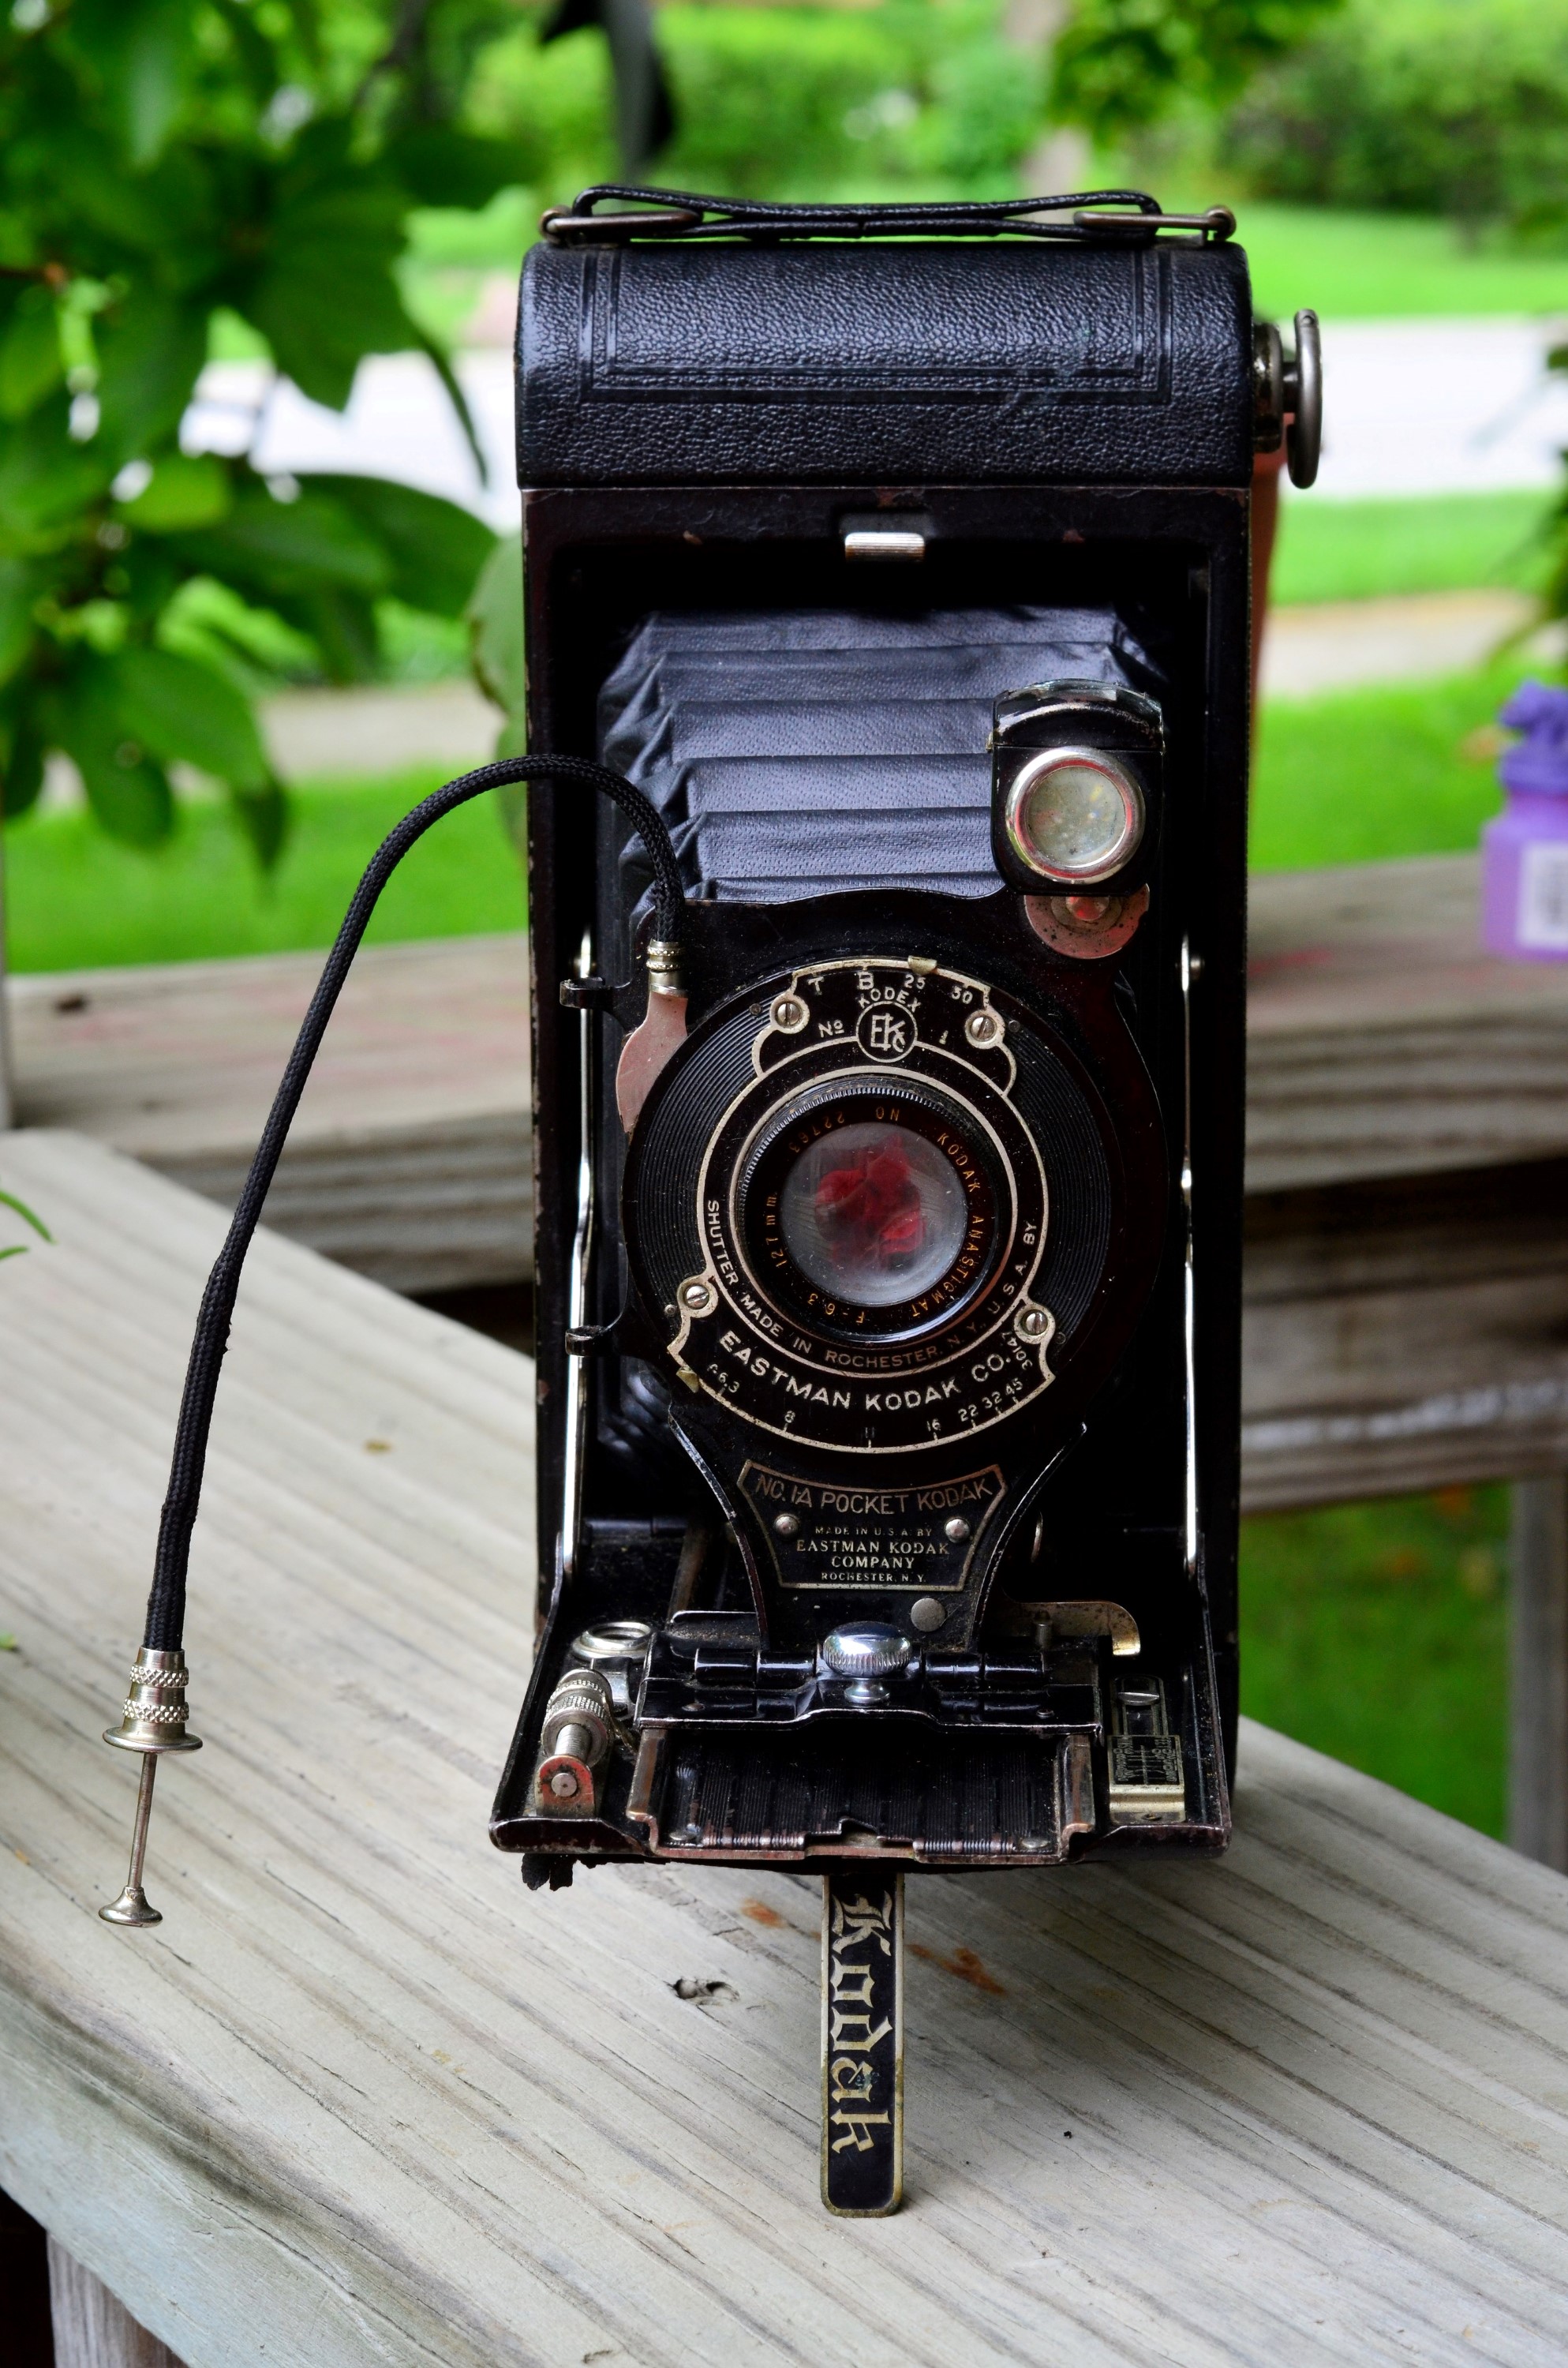
As fate would have it, the camera showed up in unusually good condition, especially for a 1920s Kodak, and although I wouldn’t know it at the time, the camera was in perfect working order. It even came with a remote shutter release cable which I thought was very cool.
As I began to learn about the camera and how it would work, I realized that the film it needed was no longer made. I searched the Internet and found a post by a guy named Mike Connealy who had reviewed the same exact model I had. Mike’s website has since gone offline, but before it went down, I archived his entire site and hosted it on my domain. Here is a link to Mike’s original review for the No.1A Pocket Kodak. In Mike’s review, he lists that it is possible to use 120 film in the camera by making spacers.
Curious to learn more, I emailed Mike and he explained in greater detail how to secure a 120 spool in a camera designed for 116 and how to get the frame spacing right so that I don’t overlap images. I’ll get more into how this is done later in this review, but armed with Mike’s tips and the knowledge that I could make this camera work, I went off to the hardware store to buy the necessary parts to make my own adapter.
As it would turn out, the camera worked wonderfully, and although the images weren’t perfect, I was ecstatic. My wife thought I was crazy, and little did either of us know that this would be the launching point into a wonderful hobby. I have learned so much about the history of photography and how photographs used to be made. The lessons I would learn through experience and talking to other collectors has made me a better photographer, even when I use my digital cameras. I won’t ever suggest that film is better or worse than digital, it’s just different. I enjoy collecting cameras, tinkering with them, repairing them, shooting them, and reviewing them. It also doesn’t hurt that cameras make excellent display pieces.
Had things gone differently with this Kodak and it ended up not working, or couldn’t make anything resembling a good image, who knows how that might have impacted me. Would I have tried again or would I have just given up and never pursued any other models? I guess the film gods were with me on August 19, 2014, and guided me through those early days, which set me on a path to where I am today, and for that, I am eternally grateful!
History
You don’t have to be a camera collector or even a photographer to know who Kodak is. The Eastman Kodak Company has been one of the most influential companies in the photography industry from the moment the company was founded in 1888, all the way through today. They dominated the film and photographic paper market for over 100 years. As recently as 1976, the Kodak company accounted for over 90% of the film sold in the United States.
In addition to film and photographic supplies, Kodak had several successful lines of cameras, starting with the Brownie box camera in 1901, a long line of folding cameras, and then several inexpensive casual cameras in the mid 20th century. Chances are very good that every person reading this article has, or knows someone that at one time has owned a Kodak camera.
One of George Eastman’s principles in founding the company was to sell cameras cheaply to people in an effort to get them to be repeat customers by buying film and other supplies from him. This type of sales model is still used today with smartphones and video game consoles where the product is sold to the consumer at a loss to the company, with the understanding that customers will be locked in with continuing purchases.
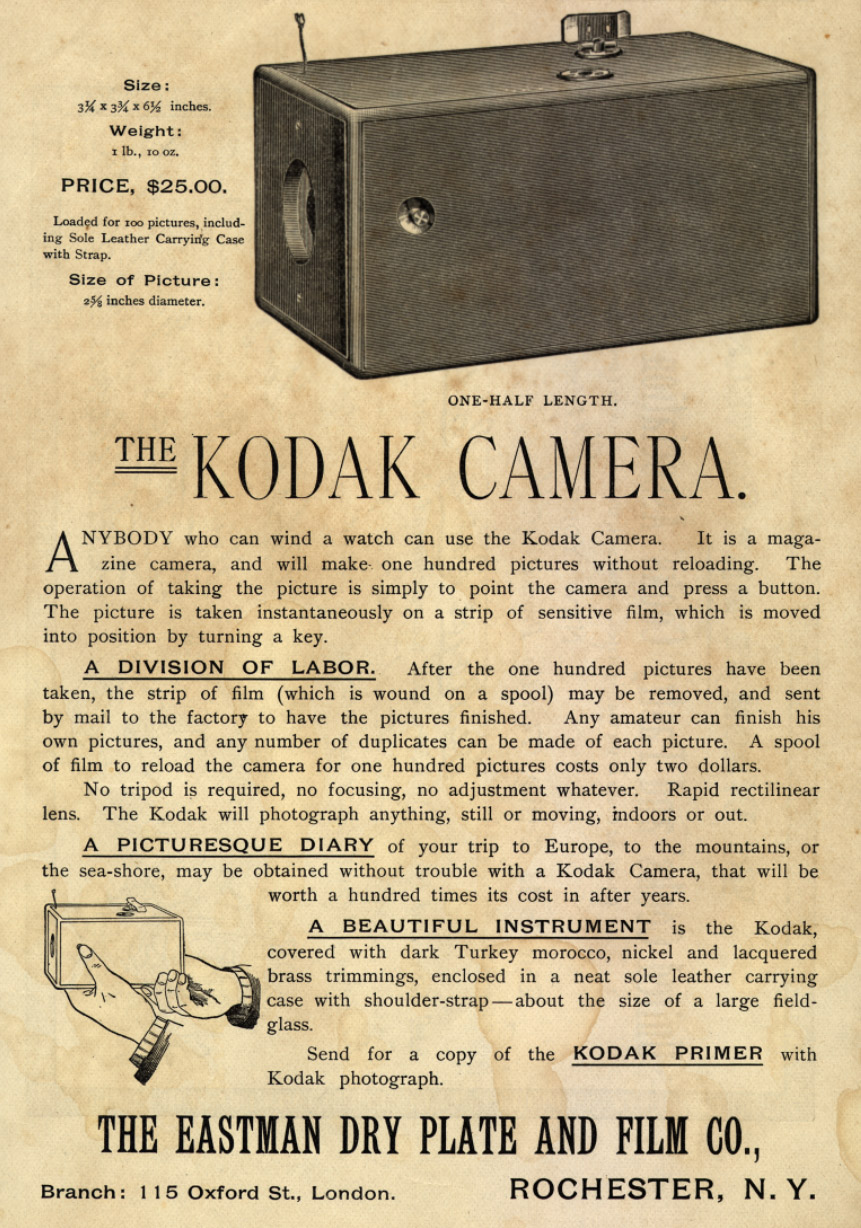
The earliest Kodak cameras were box cameras made out of cardboard and wood. The original Kodak camera from 1888 used a type of film that wasn’t changeable by the user. When the camera was purchased, it came preloaded with enough film to shoot up to 100 exposures. Once the film was used up, the user would return the entire camera to Kodak to have the film developed and the camera reloaded.
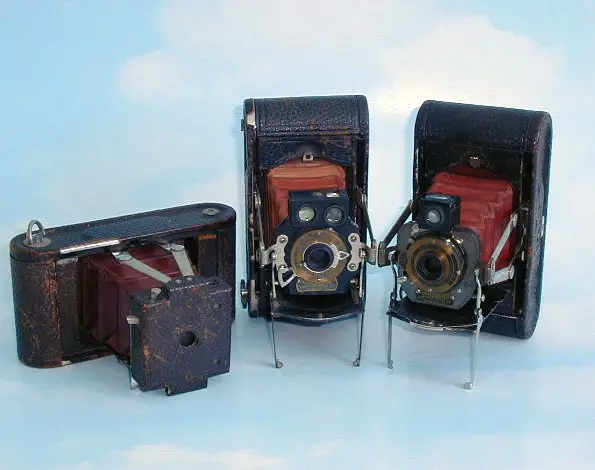
In 1895, the first roll film camera was released that used a primitive type of film that could only be loaded in a darkroom. It wasn’t until 1898 that Kodak released the first folding camera to use roll film. The 1898 Pocket Kodak was released and used type 105 roll film which took 2¼” x 3¼” frames on a roll that looked very similar to 120 format roll film, but with different flanges.
These early folding Kodaks resembled “Vest” cameras where the front lens element was always visible from the front of the camera. The camera had to be opened via a scissor mechanism which would move the front lens and shutter away from the body of the camera connected by a leather bellows. It was not until around 1905 when the first folding bed cameras were released which had a door that covered up the entire lens and shutter assembly when folded.
Photography was still pretty expensive in the late 19th century and although Kodak made a lot of effort to reduce costs, one way in which people kept costs low was through the use of contact prints. A contact print is when you make a photographic print of an exposed negative that is same exact size as the negative itself. You do this by taking an exposed negative and putting it in direct contact with light sensitive photographic paper in a dark room and then momentarily shining light through the negative to expose the photo paper. This method greatly simplifies the film development process as bulky equipment like an enlarger was not needed.
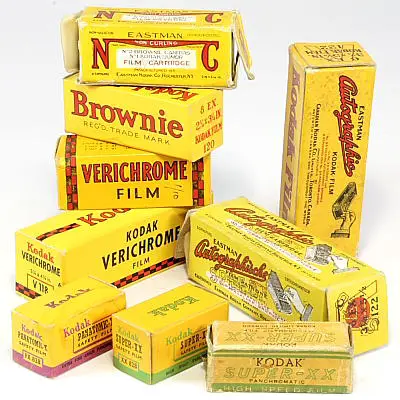
The down side to a contact print is that your printed photograph will never be any larger than the negative that made it. When using small formats of film, you end up with small photographs. In order to make a larger contact print, you’d need film that was physically larger, and because of that, larger film stocks were needed. In 1899 Kodak would release a No.1A variant of its popular No.1 Pocket Kodak that used a larger type of film that made 2½” x 4¼″ exposures instead of the traditional 2¼” x 3¼” that was common. This new format of film would eventually be given the classification of 116 format, but would more commonly be grouped in with other large roll film formats and given the nick name “post card film” due to it’s size being roughly similar to a post card. Although other large formats of film like 122 and 130 were known as post card formats, 116 was the most common.
The post card size became very popular in the early 20th century in mid to lower priced folding and box cameras due to the larger sized photographs that could be made from the larger film. It is this reason that if you search eBay or other antique shops for early 20th century cameras, you’ll likely encounter 116 format cameras more often than the smaller 120 sizes.
This first camera that used 116 film was the No.1A Pocket Kodak from 1899, and it was in production until 1915. There were 4 major redesigns of this model during it’s 16 year run, which are known by collectors as Models A, B, C, and D. Each looked pretty different from the previous model, but were still sold using the same Pocket Kodak branding.
Before I go on, I should attempt to explain Kodak’s completely illogical and inconsistent numbering system that they used on most of their roll film cameras from the late 1890s to the early 1930s.
For reasons that I’ve never discovered, and likely no one alive could answer, in the 1890s Kodak started identifying each model of camera with a number that would identify what size film was needed in that particular model. While this probably started out as a great idea, it was never applied consistently over Kodak’s entire line of cameras. What would be called a No.1 Brownie did not use the same type of film as a No.1 Panoram, or a No.1 Pocket Kodak. You simply had to just know which size film was needed for each model.
As more and more cameras and film sizes were made by Kodak and it’s competition, the need to come up with a standardized numbering system for roll film was required. By 1908, there had already been 26 different sizes of film, so a new system of roll film numbers was created that would start with Kodak’s first roll film type from 1895, which would be called 101 film, and it would go up to 126 film. Then, whenever a new type of film would be released, the numbers would continue to increment from 127 and up. At least, that was the plan. By the 30s, Kodak’s film numbering system started to jump all over the place.
The problem remained that Kodak’s earlier No.1, No.2, No.3 system was not consistently applied to every series of camera. There were patterns for sure, but for a beginning collector, this can be difficult to understand.
Below is a table I’ve made that attempts to simplify the most common models. It’s worth noting that this table does not cover every single Kodak made during this time period. There were many variants of Kodak box cameras from the late 1800s that used type 101 film that isn’t accounted for here.
There were a few exceptions to this table which I tried to annotate at the bottom. There exist No.5 and No.6 cameras, but they used plate film. Some cameras like the Premo series were designed for both plate film and roll film, and would use a number inconsistent with the chart below. This table probably covers 95% of all Kodak roll film cameras from the mid 1890s, until the early 30s and is a good starting point for the beginning collector.
| Kodak Film Formats / Camera Nos |
Standard Folding Kodaks |
Brownie / Folding Premo ¹ |
Panoram | Bulls-Eye / Bullet |
| No.0 | 121 | 127 | – | – |
| No.1 | 105 / 120 ² | 117 | 105 | – |
| No.1A | 116 | – | – | – |
| No.2 | 101 | 120 | – | 101 |
| No.2A | – | 116 | – | – |
| No.2C | 130 | 130 | – | – |
| No.3 | 118 | 124 | – | 124 |
| No.3A | 122 | 122 | 122 | – |
| No.4 | 123 | – | 103 | 103 |
| No.4A | 126 ³ | – | – | – |
¹ – I combined the Brownie and Folding Premo series of cameras as they consistently used the same film formats, but there was never a No.0 or No.1 Folding Premo.
² – No.1 Folding Pocket Kodaks used 105 format film until 1914, and which point they changed to 120 which was the same size film, with just a smaller spool.
³ – There was a later form of 126 format film invented in 1963 known as Instamatic film. This type of film is not related to the original 126 roll film that was made between 1906 – 1949.
In 1915, Kodak had already been in the midst of changing all of it’s folding cameras to support a new type of Autographic Film which would allow a photographer to inscribe notes onto the film through a special door on the back of the camera.
Autographic film was invented in 1914 by a man named Henry Jacques Gaisman. Mr. Gaisman had previously invented the safety razor while working for a competitor to the Gillette razor company. His company would later be acquired by Gillette and he would later run the company. His invention for autographic film was bought by Eastman Kodak in 1914 for the price of $300,000 which was an incredible amount of money for the time.
One of the first autographic Kodak cameras was the No.1A Autographic Kodak Junior which was released in 1914. Kodak would differentiate autographic from non-autographic film by placing the letter “A” in front of the format number. So 116 autographic film was called type A-116 film. You could interchange autographic and non-autographic film between cameras that supported it without any issue other than having to remember not to open that door if the film didn’t support it. Kodak would expand the selection of autographic film to other sizes including 118, 120, 122, and 127. I reviewed the Kodak No.1 Autographic Special from 1916 on this site which was designed for type A-120 film.
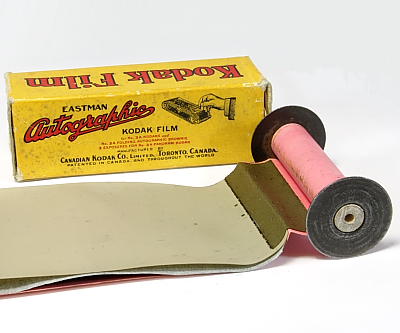
Autographic film had two layers of paper backing instead of the conventional single layer. The outer paper backing was ever so slightly translucent so that direct light could penetrate it. The inner paper backing was a carbon impregnated material that was opaque, but would be rendered translucent whenever a sharp instrument pressed against it and compacted the carbon compound. The film came on a spool like any other standard roll film. It was loaded into the camera and the outer paper backing had exposure counting numbers on it that could be seen through the little red window on the back of cameras like typical roll film.
Whenever the photographer wanted to make a note about a particular picture he was taking, the little door was opened and a metal stylus was used to write a message on the little portion of paper backing exposed in that space. The pressure of the stylus caused the inner carbon layer to compact and become translucent under the tip of the stylus, allowing light to imprint a message on the film. When the film was developed, you would see the message along the margin of the photograph. Think of this like a very early example of EXIF data!
Over the course of the next 15 or so years, the autographic feature would be included on almost every folding Kodak made. Kodak did not charge extra for autographic film as opposed to non-autographic film, but nevertheless, it didn’t seem to be very successful.
Perhaps the biggest downfall of autographic film is that in order for it to work, one of the layers had to be semi-transparent to allow light to expose the film. Autographic film was pretty slow, probably around ASA 12, and required quite a bit of light to imprint an image. As more and more sensitive film was being released, it became harder to retain the autographic feature on faster films because the more sensitive film could more easily be accidentally exposed. By the early 1930s, autographic film was discontinued by Kodak. It was never offered by any other film maker.
The No.1A Autographic Kodak Junior represented a mid-priced option for photographers who wanted to shoot post card sized film. It sold in 1915 for $18 with the top of the line Kodak Anastigmat f/7.7 lens. The Kodak Junior must have been a pretty popular model as it stayed in production for almost 13 years, ending production in 1927.
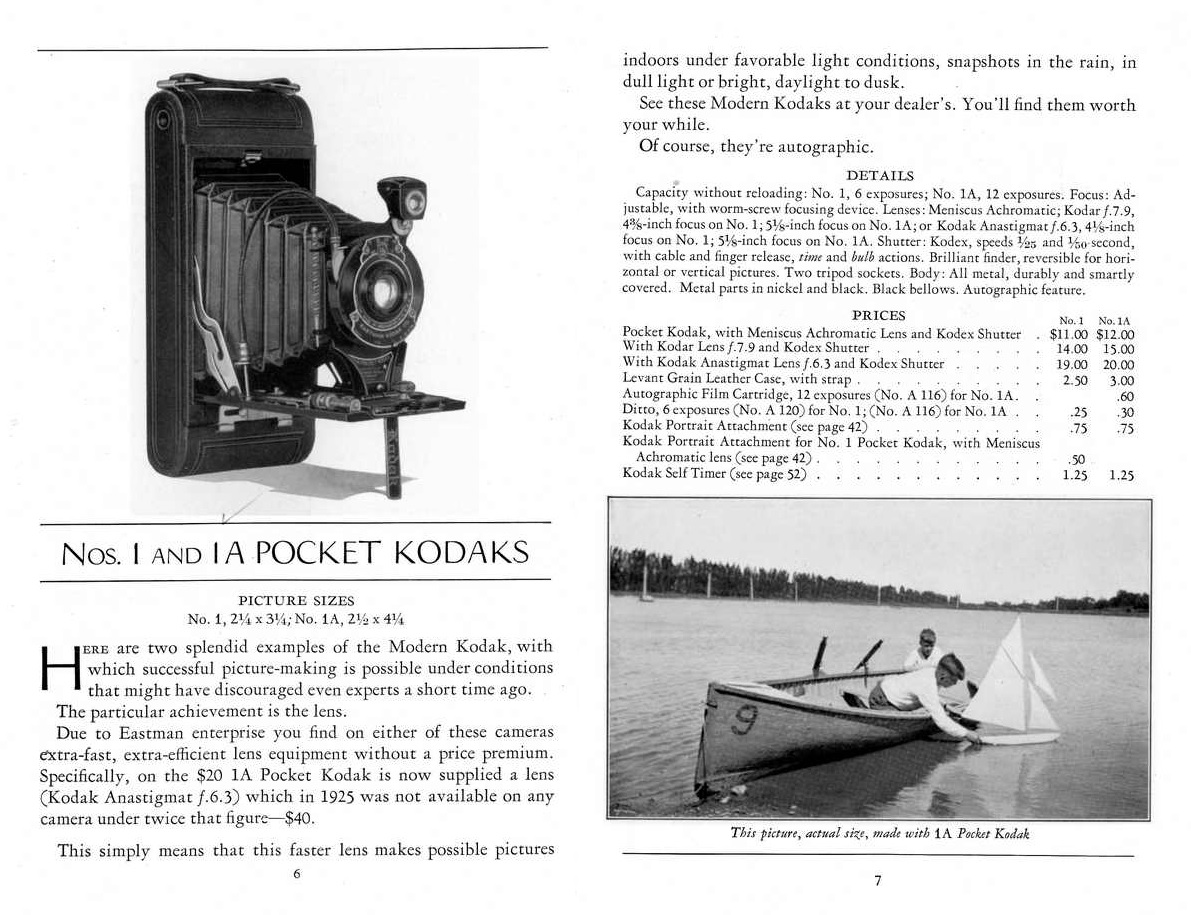
The model that would replace the No.1A Autographic Kodak Junior would be the No.1A Pocket Kodak being reviewed here. Many sites online list the introduction of this model as 1926, however, I found no mention of this model in Kodak’s 1926 catalog. It would not be until the 1927 catalog that the camera would show up. Perhaps it was introduced in the middle of 1926 as a midyear model or perhaps the 1926 catalogs were printed in advance of the camera’s release. In any case, the No.1A Pocket Kodak was definitely released in either 1926 or 27. The 1928 Kodak Catalog lists the No.1A Pocket Kodak as having a list price of $20 when equipped with the Kodak Anastigmat f/6.3 lens and Kodex shutter. When adjusted for inflation, this compares to $280 today, a price that was certainly within the grasp of most people.
The No.1A Pocket Kodak was available in black or four different colors, green, brown, blue, and gray. It would be in production for a relatively short time, being discontinued in 1932. It’s discontinuation in 1932 wasn’t reflective on it’s popularity, but more due to Kodak’s decision to end support for 116 and 120 format films. Instead, all future Kodak cameras would use Kodak’s new 616 and 620 formats.
Both 616 and 620 films were nearly identical to the original 116 and 120 formats, with the only exception being that the spool was smaller. Although Kodak marketed this as a feature to allow them to design smaller cameras, it was more likely to increase market share by offering a new film format that was proprietary to Kodak cameras. If you bought a Kodak camera that used 616 or 620 film, you couldn’t use 116 or 120 film made by anyone else, you’d have to buy it from Kodak. With the release of 616 and 620 film came new models, called the Kodak Six-16 and Six-20 respectively. They were billed as the world’s smallest folding cameras that made big pictures.
Today, the No.1A Pocket Kodak isn’t any more or less collectible than any other folding Kodak of the era. Certainly the higher spec “Special” Kodaks and the more historically significant cameras like the earlier models are more desirable, but there are a large number of collectors who like these old folding Kodaks for their good looks and history.
Sadly, Kodak would use a paper based synthetic material in most of their bellows during this time which has not held up to nearly a century of time. Kodak was always concerned with value in their products and did not use animal leather in their bellows like many European models do, so it is very difficult to find these old cameras with in tact bellows. Knowing what I know now, I realize I was incredibly lucky to have gotten one with good bellows on my very first try.
Using 120 Film in a 116 Film Camera
When I first attempted to load 120 film into a camera designed for 116 film, it seemed like a huge undertaking. I imagine this proposition might seem the same way for others as well, and now that I’ve done it, I can tell you its really quite simple. There’s no rocket science here. You’re trying to fit a film that’s one size too small into a camera designed for larger film.
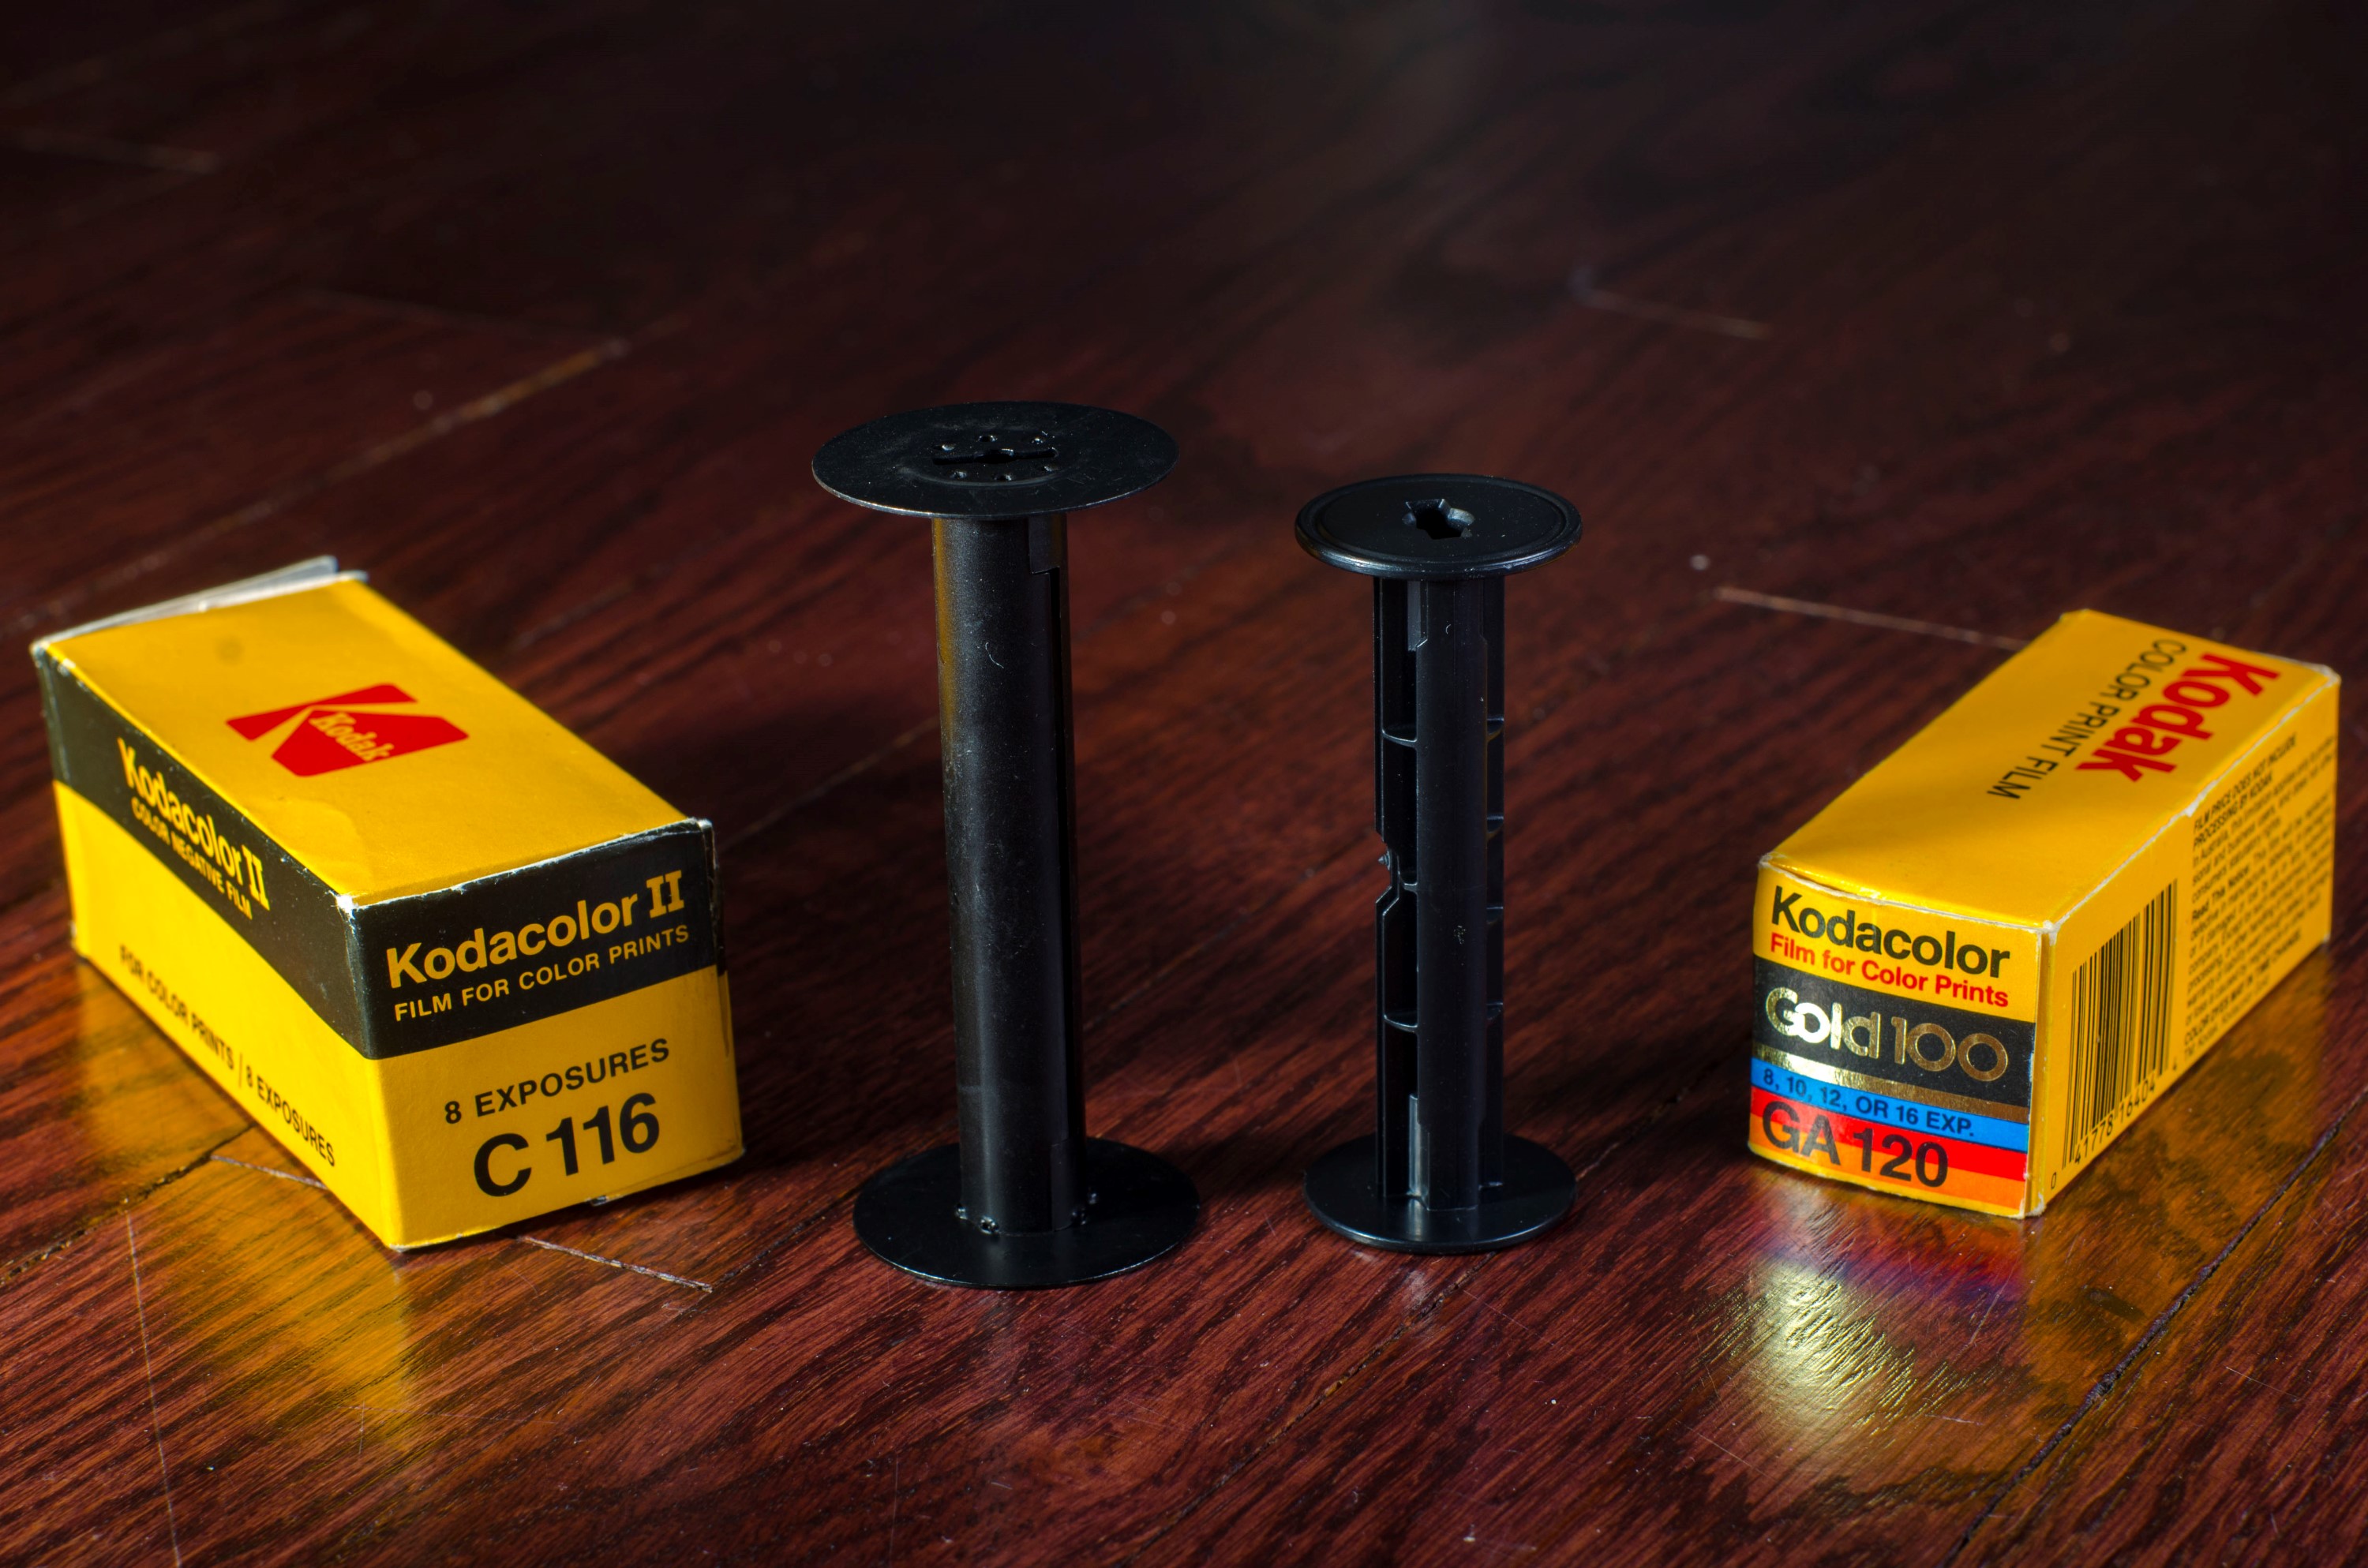
The good news is that you don’t need to do anything special to the film and no modifications to the camera are required. In fact, theres really only two steps, but there’s a bunch of different ways to accomplish those steps. There are many people who have adapted cameras to use film that it wasn’t original designed for, and my method certainly has it’s drawbacks, but it did make the images below.
The instructions that follow are not unique to the No.1A Pocket Kodak. What I show you below should work on any 116 camera.
The first step is finding a way to securely hold both 120 spools in the camera while still allowing the film advance key to work. You could simply put in a bunch of washers to fill the space between a 120 spool and a 116 spool, but you’d have no way of turning the film to advance each frame.
I’ve read that some people suggest using a 116 film spool on the takeup side. In doing this, you’d be spooling 120 film loosely onto a 116 spool and while this would technically work, it would cause you two problems. The first is that there is no guarantee the film would roll on the 116 spool straight, since it wouldn’t have the ends of the spool as guides to guide it. If the film started to roll up crooked, it would get progressively worse towards the end of the roll and could even damage the film. The other problem with doing this is you would have to remove the film from the camera in a dark room, since light could leak onto the edges of your exposed film when you opened it up, since the film is rolling loosely onto the 116 spool.
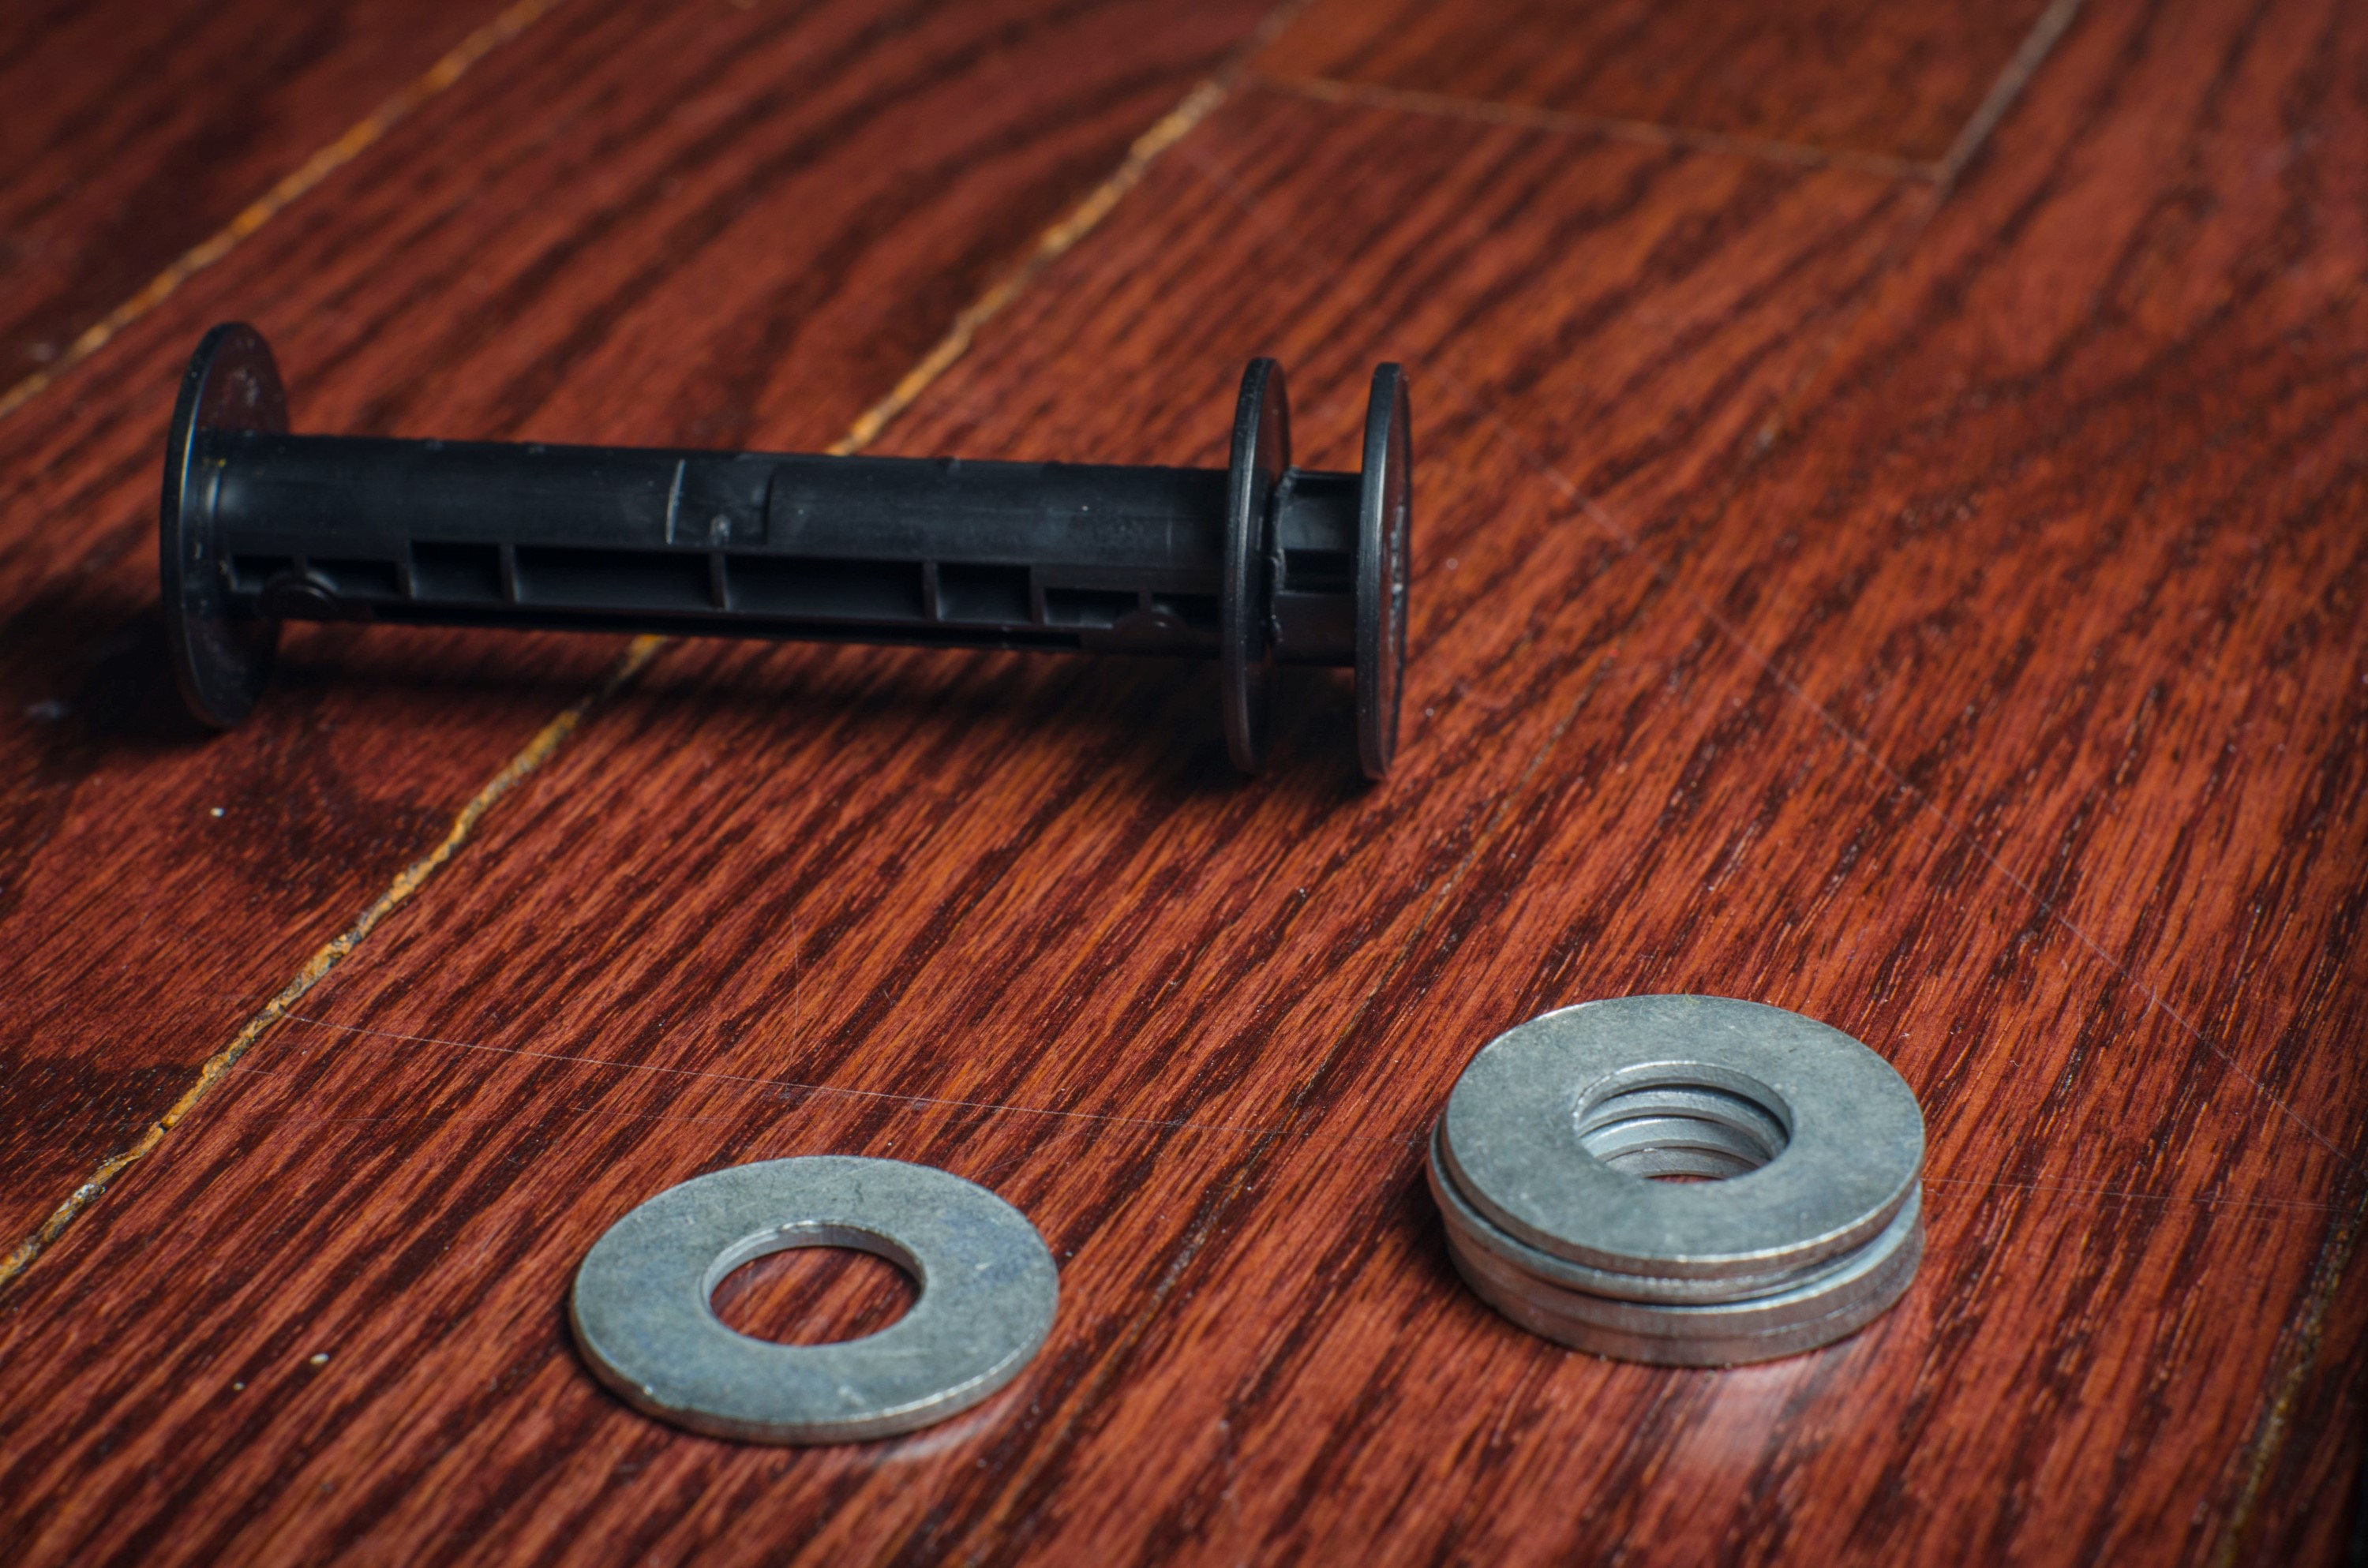
I didn’t like that idea and wanted to roll my 120 film onto a 120 spool. I decided that I needed to devise a way to “extend” a 120 spool to the length of a 116 spool so I could still use the notches on the ends of the spool. I thought the easiest way to do this was to simply take another 120 spool and cut enough of it off and piece it together with a full spool which would make the combined spool be exactly the right length.

This was a great idea, except, how would I attach my cut up spool to my good spool? I could glue it together and that would work, but the problem is when I was done with a roll, I’d have my glued adapter on the end of the spool I’d send in for developing. For someone who develops their own film, this wouldn’t be a problem, but I send in my film to a lab. Most labs are good and will return your spools to you, so you would just need to make sure you asked them to return your homemade spool.
Or you could get creative and do what I did, which was to grind away at the shaft of the piece of spool to form a “plus” shape that would fit into the key of the good spool. This would serve like an extender to a 120 spool that was detachable. I wouldn’t have to glue anything to a good takeup spool. I would just push my extender into the end of a good 120 spool, load it into the camera, and when I was done with the roll, just pull it off and send in my normal 120 spool.
Now before I go on, there is one side effect of this method, which is that since the 120 film is not as wide as 116 film, it will not be centered across the film plane in the camera. It would be ideal to center the film, but that would complicate things as you’d need to create extenders for both sides of the takeup spool which I just didn’t want to do. As it would turn out, the film off to the side ever so slightly did not complicate my framing. In the instance where you might want to make a closeup, you’d just need to frame your image off to the side ever so slightly.
Extending the takeup spool is the most difficult part and you only need to do it on the takeup side. You can keep your film on it’s original 120 spool on the supply side without any modifications. All you need is something to fill the space between the edges of the supply spool so that it sits snug, but not too tight. For that, I used fender washers from the hardware store, but in hindsight, pennies would have worked just as well. They don’t actually need to do anything other than take up space.

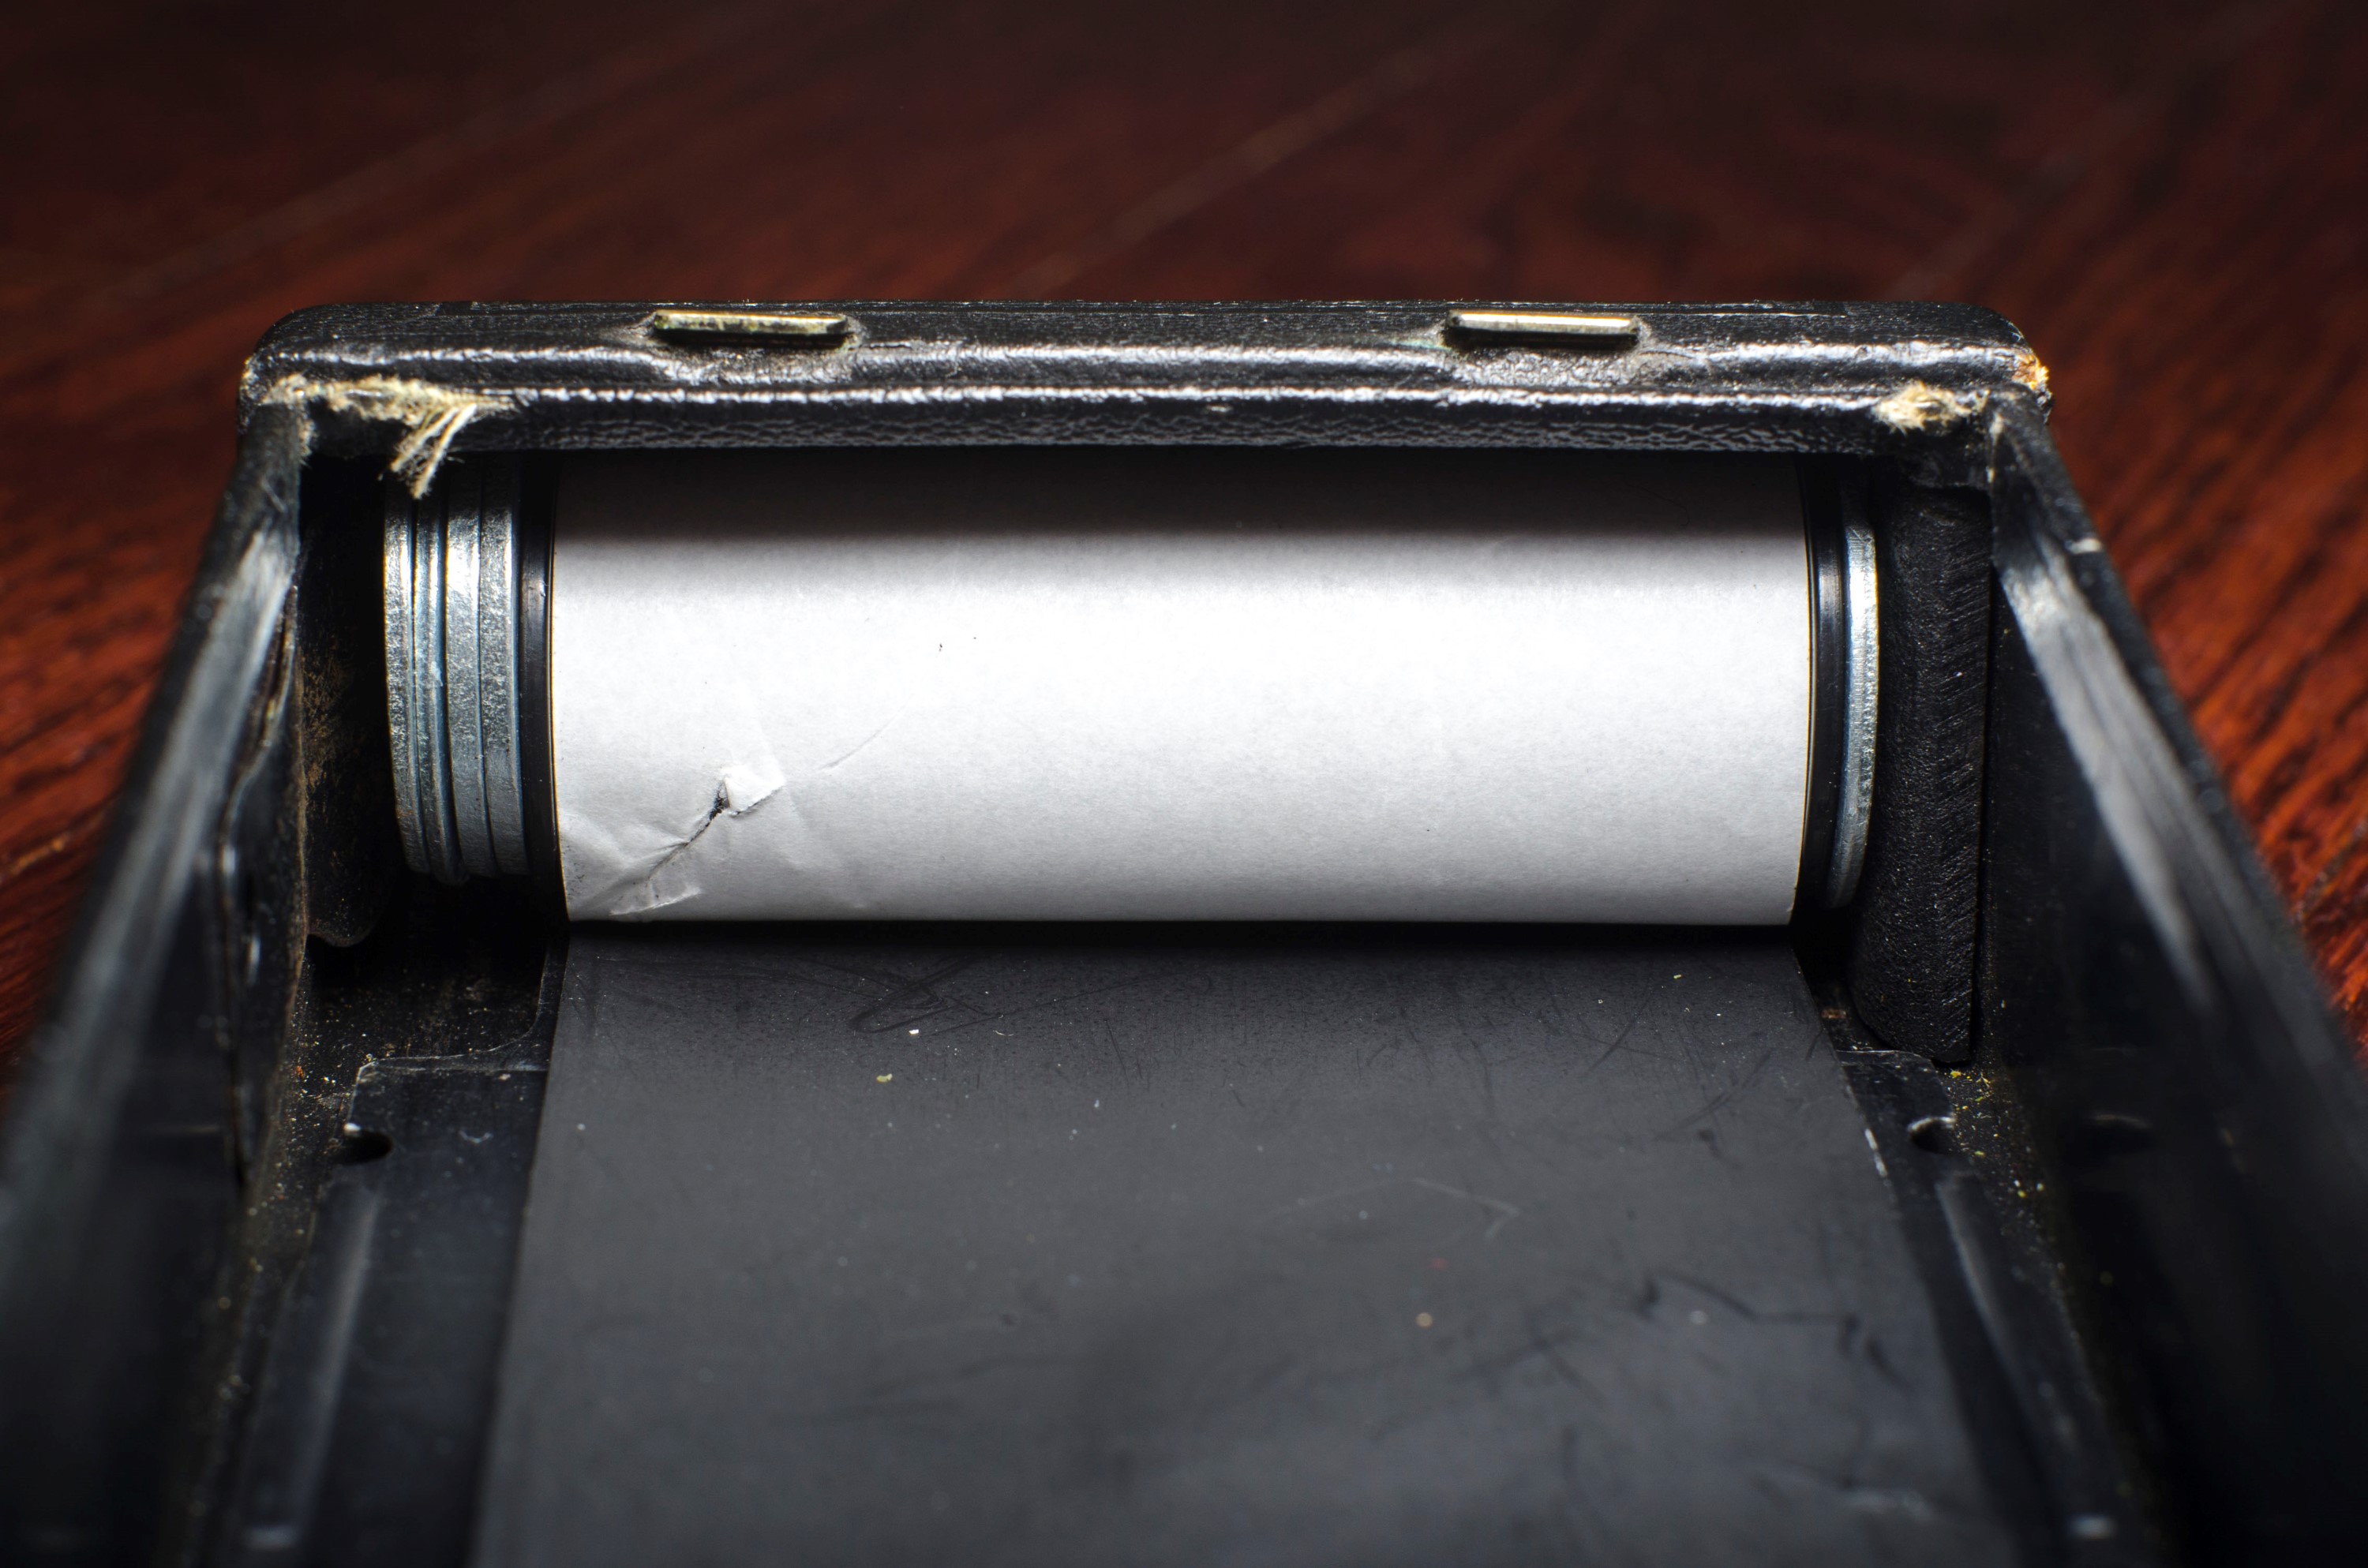
In the images above, you can see the fender washers. I stacked 4 of them together and glued them to approximate the same gap that would be on the takeup side with my extender. The single washer is just there to put extra tension on the other side of the spool. If this is difficult to visualize, just look at the pictures to the left of the takeup spool, and the right of the supply spool. You can clearly see in these images how the film is offset to one side of the focal plane.
Now that you’ve loaded your 120 roll into your 116 camera, the next step is figuring how to space your frames so that you can safely shoot what will be 6cm by 11cm panoramic images. The backing paper for 120 film only has frame numbers for 6×4.5, 6×6, and 6×9, so you’ll need to get creative to space 6×11 images without overlapping each other.
I have found that you can successfully fit 6 images on a single roll but it requires some careful attention when advancing the film. Before I ever shot a single image on this No.1A Pocket Kodak, I took a roll of Ilford HP5 and used it as a test roll so that I could practice loading and advancing the film in a way that would not ruin any images I tried to take. I thought it was worth it to sacrifice one roll of film for practice, rather than practice in the field and potentially lose some shots.
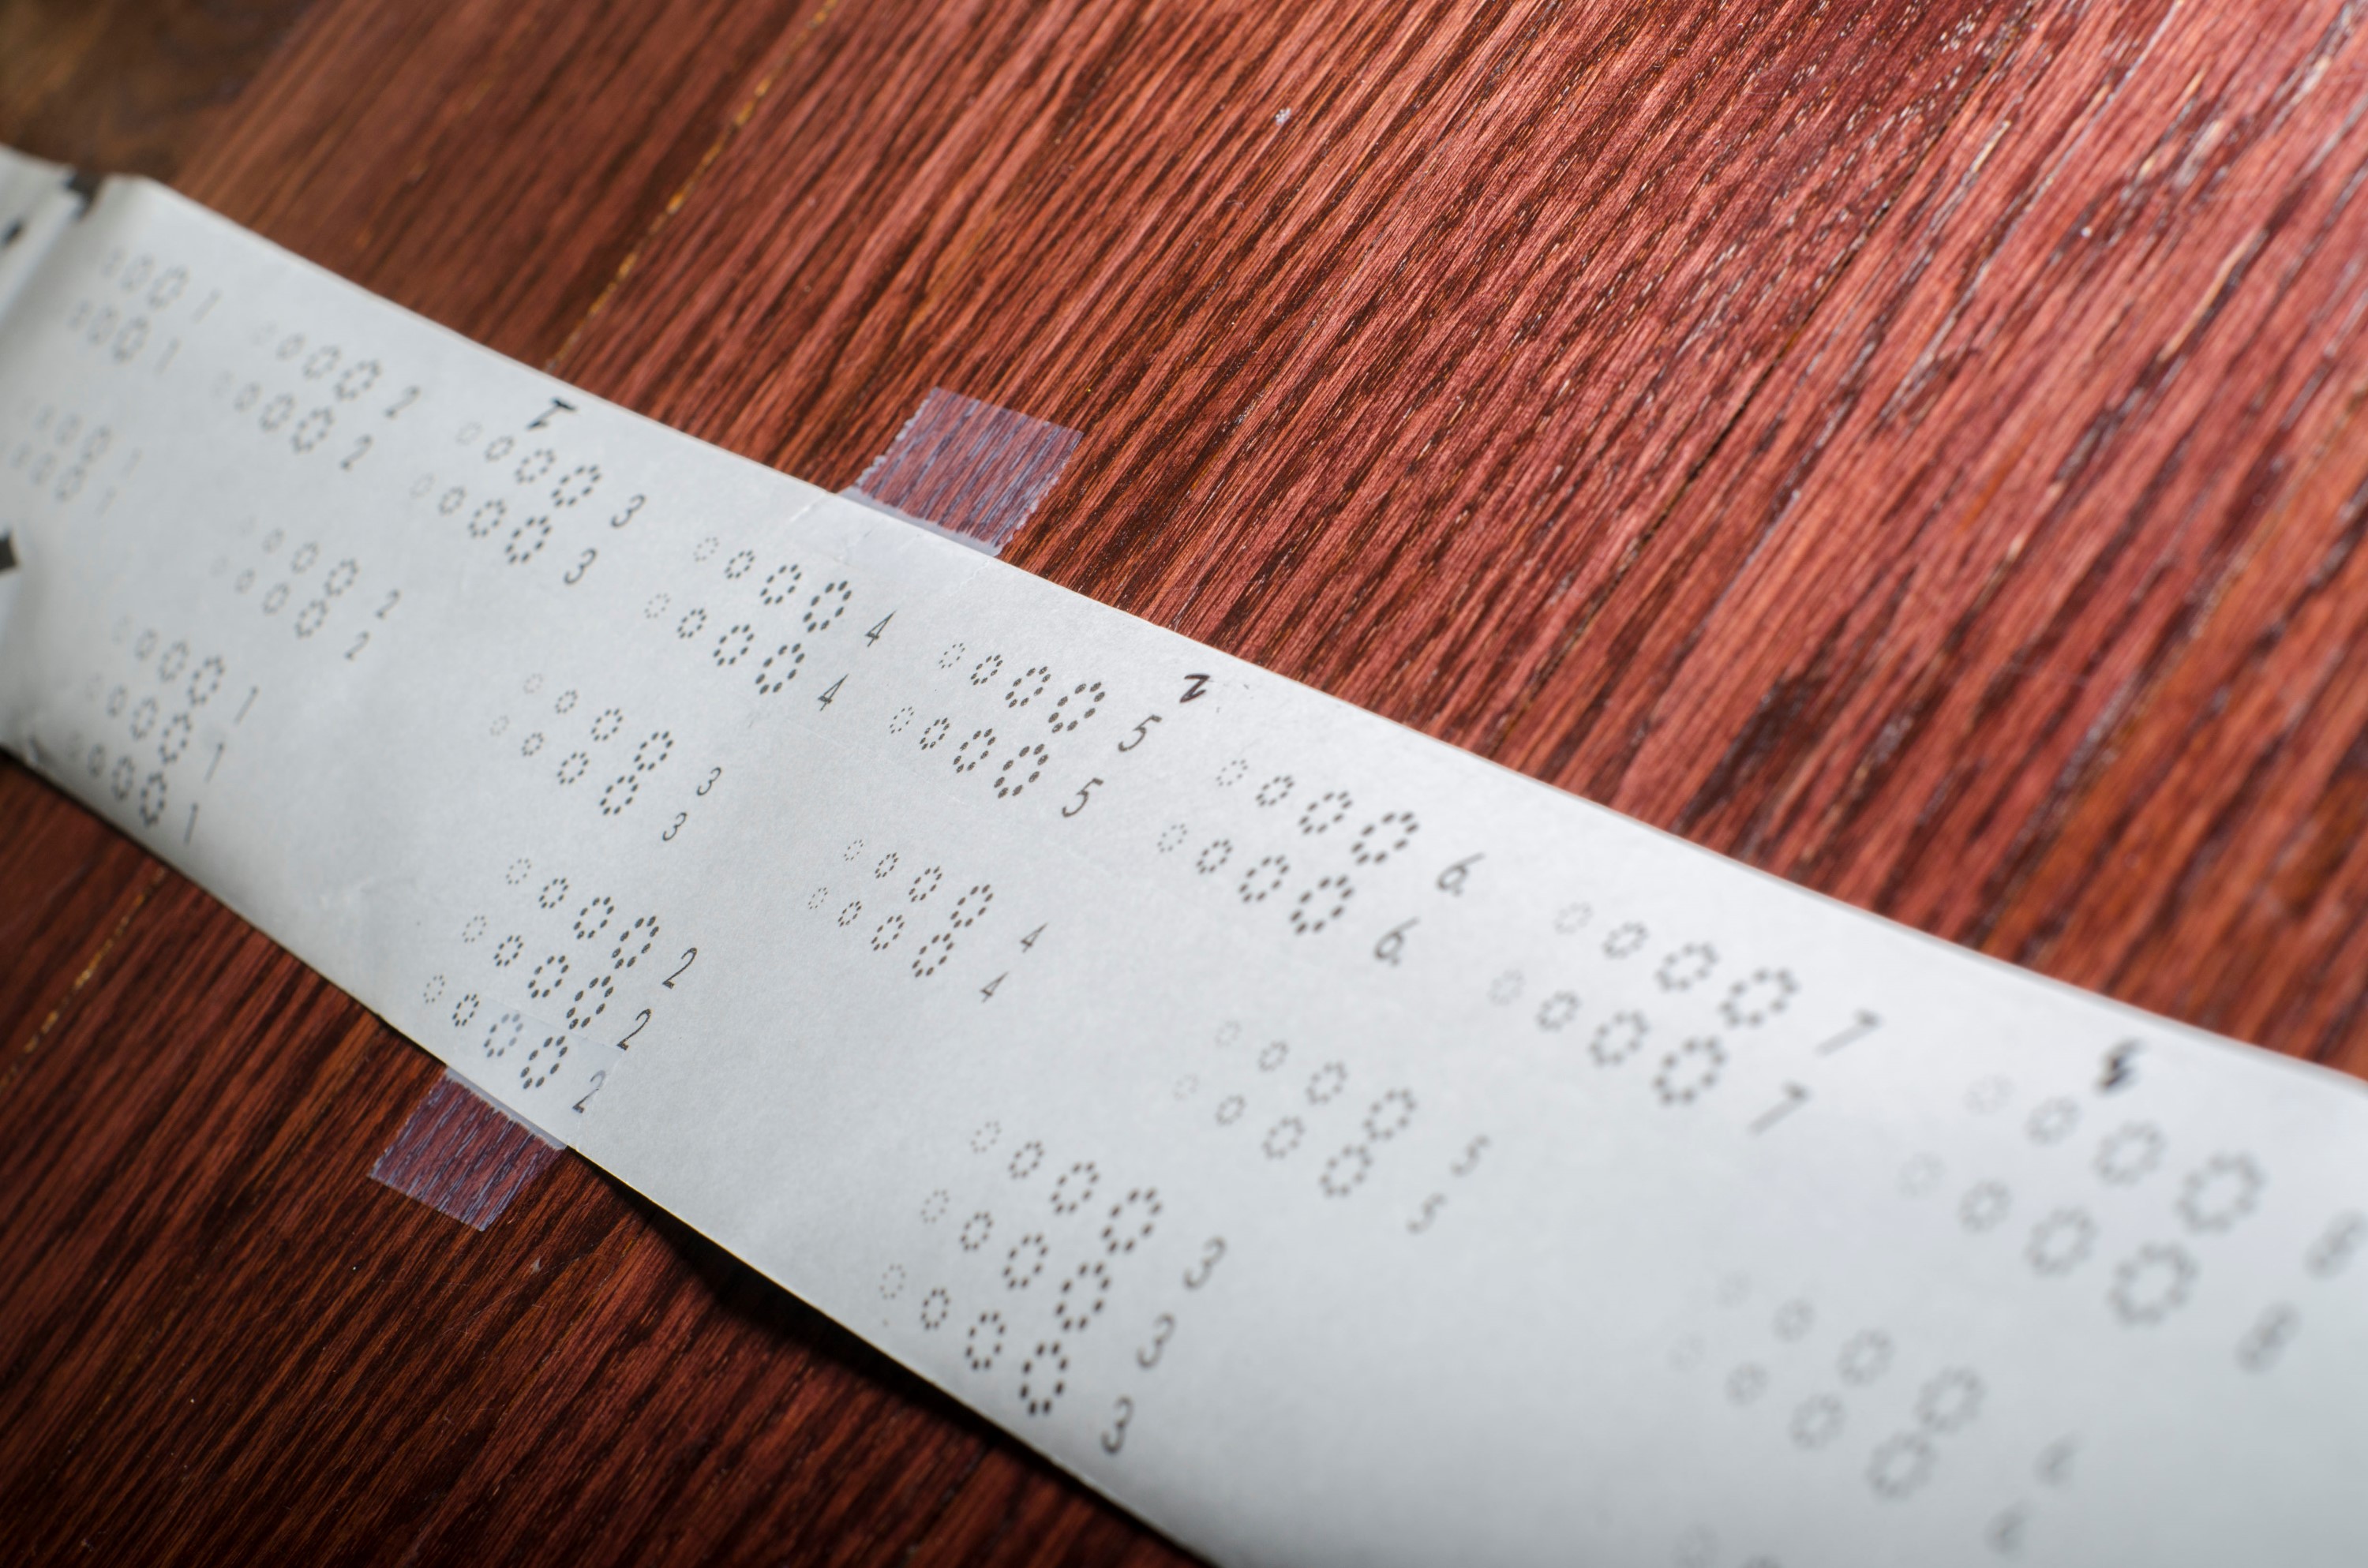
I learned that you can get 6 perfectly spaced frames on a roll of 120 by using the numbers for 6×4.5 images, and advancing your film to 2.5, 5, 7.5, 10, 12.5, and 15. Look at the image to the left where I wrote the numbers 1, 2, and 3 at the 2.5, 5, and 7.5 spots on the backing paper. If you had access to a dark room, you could unroll a fresh roll of film and make your own markings to simplify shooting, but it’s really not necessary.
Ilford backing paper has the same frame spacings as any other 120 film, but it is unique in that it has these little circles in between each frame that get larger and larger to let you know how close you are to the next frame number. This is very useful because it is obvious when you are exactly halfway between numbers. Since you need to stop your film at half frame points, you need to look for the second circle when you are in between frames 2 and 3. You’ll need to do it again between 7 and 8, and again when you are between 12 and 13. If this seems difficult, or you are using a film that does not have an easy way to know when you are halfway between frames, you can just use frames 3, 6, 9, 12, and 15, but you’ll only get 5 images per roll, instead of 6.
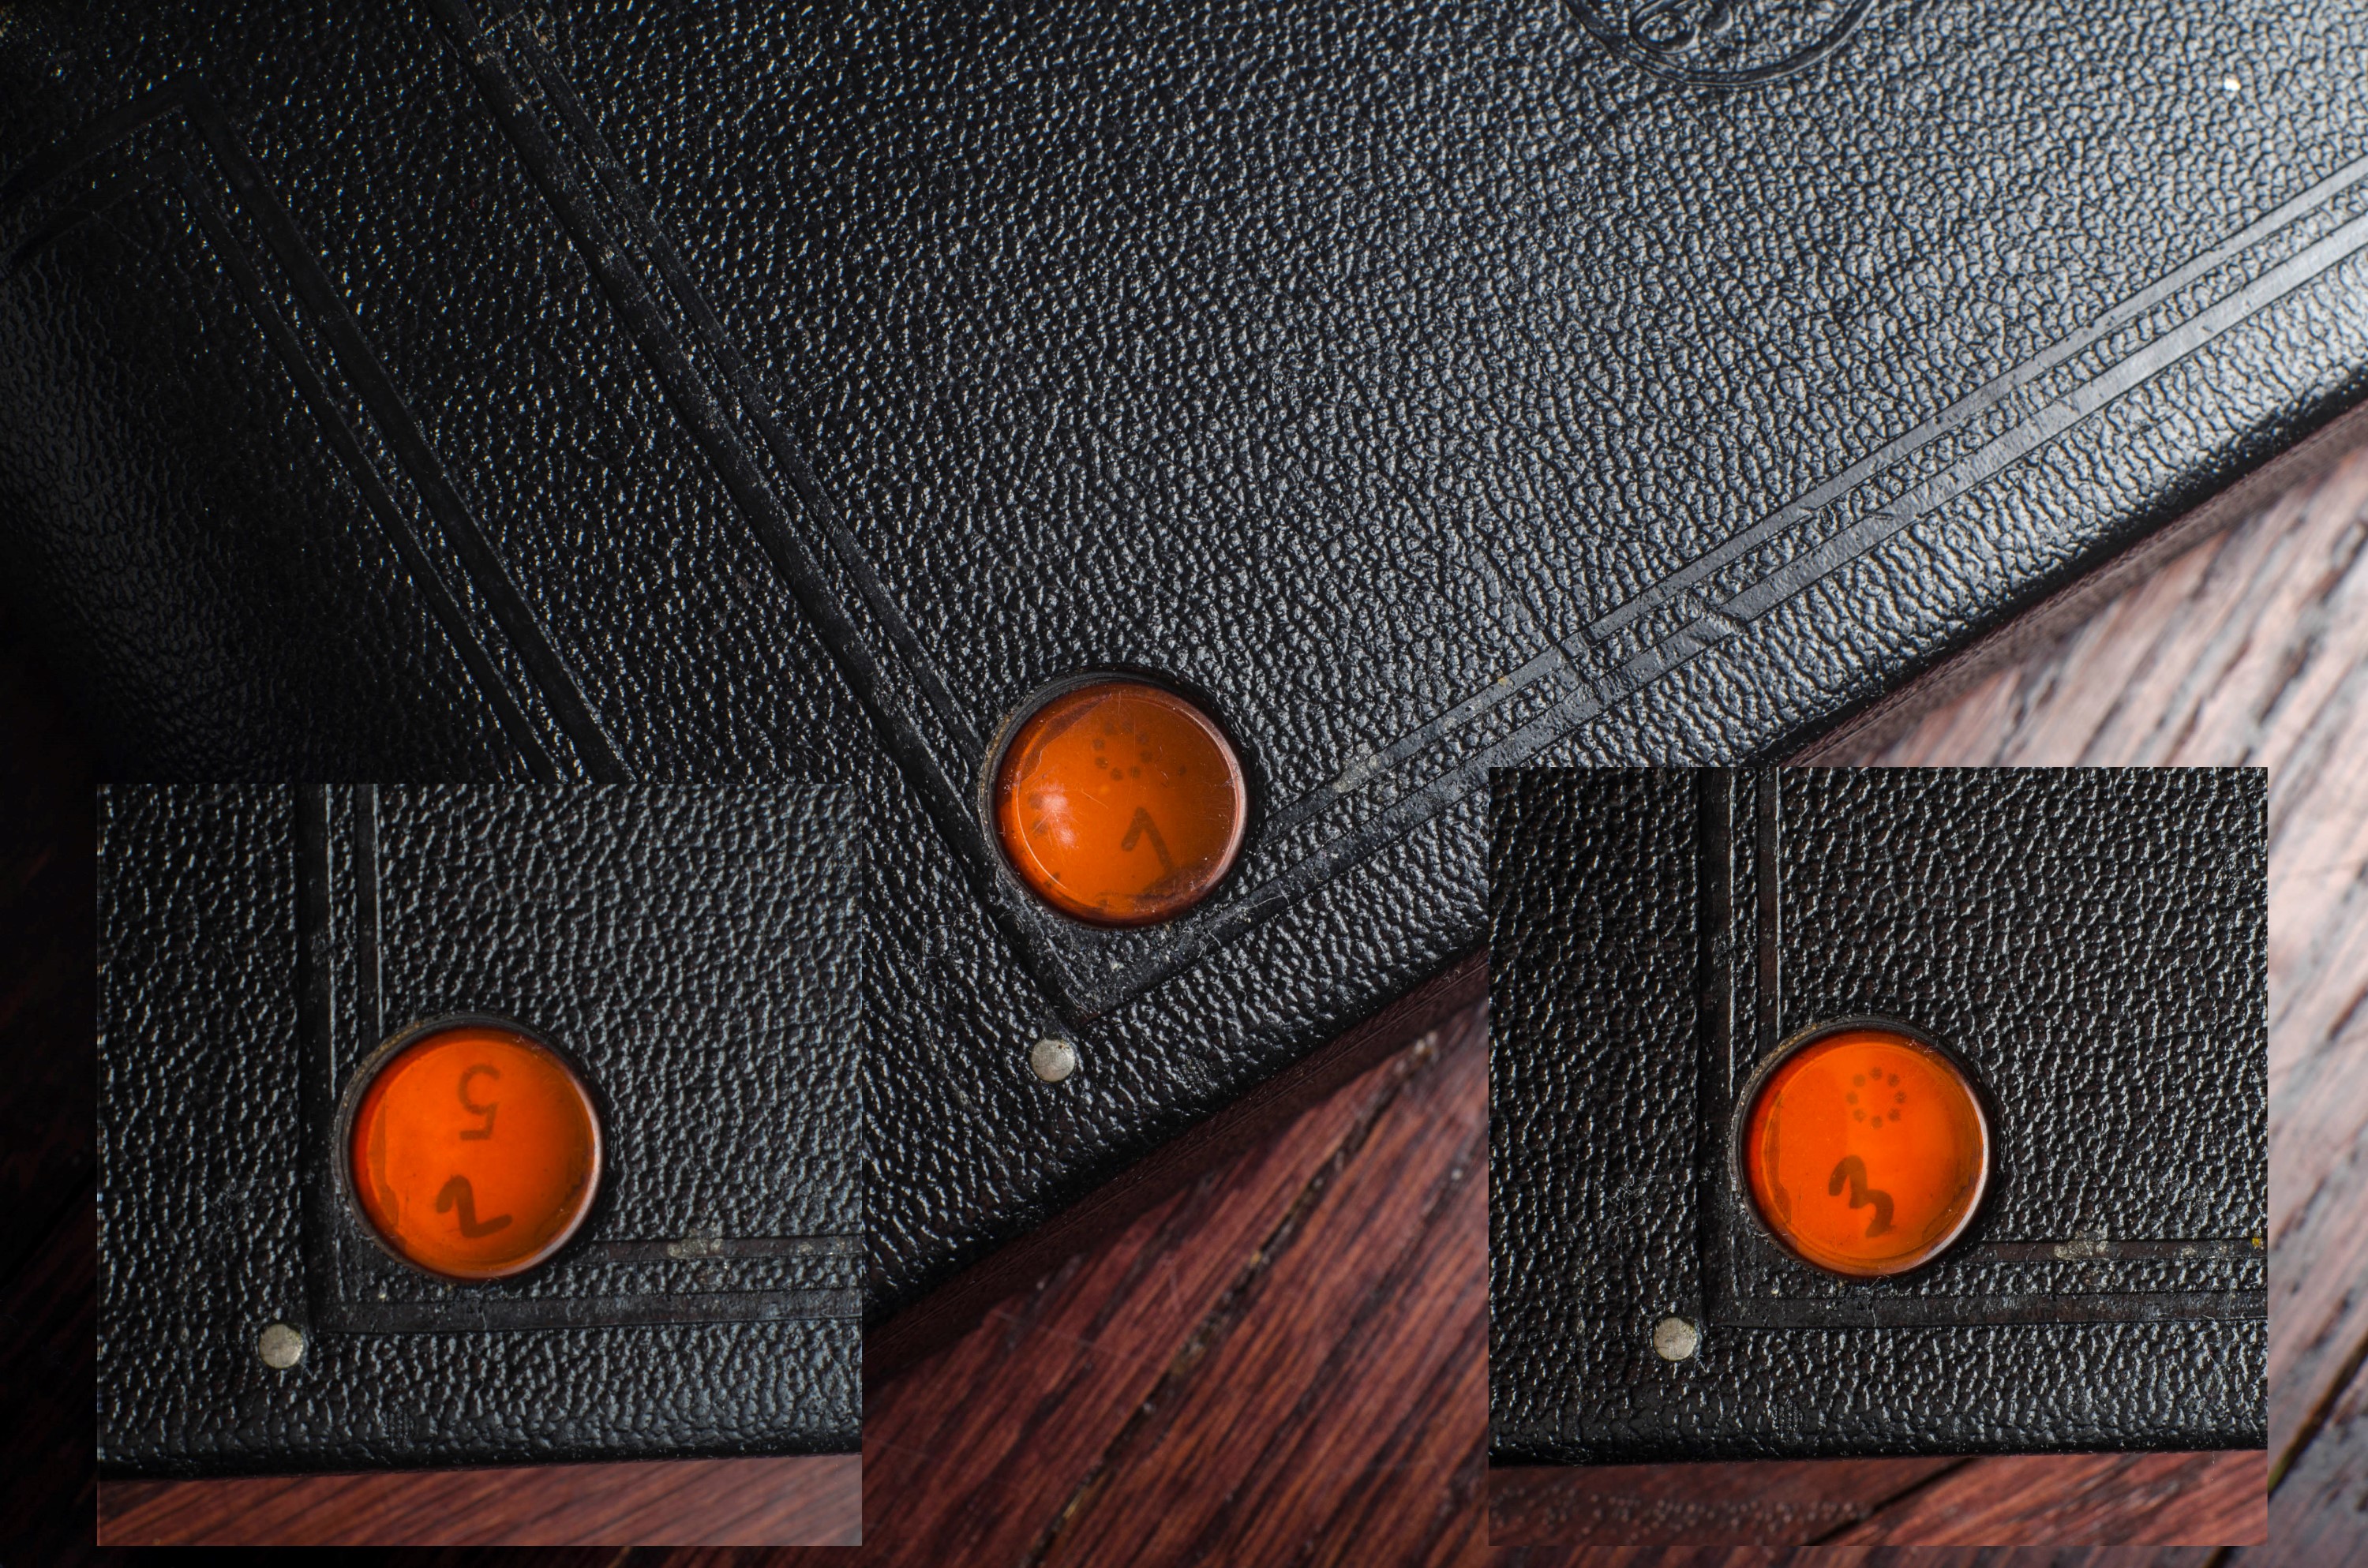
Once you know the correct frame spacings for 6×11 images on 120 film, you can go out and shoot your 116 film camera with 120 film in it and just pay close attention to the numbers in the red window. The image to the right shows what you might see for the first three frames.
It’s also worth noting that many old folders like this No.1A Pocket Kodak have degraded red windows that aren’t as light tight as they once were. So when shooting with film in the camera, you should take extra caution to protect this window to make sure light does not leak in, ruining your film.
My Thoughts
I am writing this review in January 2017, even though I last used this camera in September of 2014. Why has it taken me so long to review this camera? I honestly don’t know. I can tell you for sure that it has nothing to do with the merits of it. I guess I got sidetracked by so many other quality cameras along the way that it never occurred me to revisit this camera. In fact, I now have quite a large supply of 116 film that I could load into this camera without having to mess with my home made adapter, yet it still sits. Such is the life of a camera collector. I pride myself on using my cameras and not just hoarding them on a shelf, but then I look at models like this No.1A that have sat untouched for over 2 years.
Something I want to make clear to anyone reading this is that I am not some professional photographer who has been shooting film cameras my whole life. You might even be surprised to learn that I first started collecting cameras as recently as 2014. I’ve amassed quite a bit of knowledge and experience in a relatively short time, but I am still a novice compared to much more qualified photographers out there.
Whether you are a regular reader of my site, or if this is the first review you’ve seen, it might seem intimidating to start out with a nearly century-old folder. I’ll repeat what I said earlier in this article, which is there are better ‘first’ vintage cameras than the No.1A Pocket Kodak, but it’s what I started with, and it’s one you could start with too if you wanted.
What follows is what I remember thinking the first time I used this camera in 2014. Prior to shooting the images below, I had never shot with a folding camera before. I had never shot medium format film before. I had never used a scale focus camera before. I was completely out of my element! If you are a beginner, I was just like you, and you can do it too!
I remember feeling intimidated by the prospect of using such an old camera, but once I started to learn more about how the camera worked, I realized that the principles of photography were the same now as they were in the 1920s when this camera was made. The physics of how a lens focuses light, how a shutter works, and how aperture and shutter speeds control exposure are exactly the same on this camera as a modern DSLR. I realized that as I learned how to apply the basics of photography, my shots should all come out great.
Of course how you apply the basics of photography takes practice. One of the best tips I can give when it comes to using an old camera is one you’ve likely heard before, which is “read the manual”! I make an effort with every review on this site to link to an original user’s manual for each camera. Most of those links go to the same website, which is Mike Butkus’s excellent resource of camera manuals. Mike has an amazing collection of camera manuals spanning well over a hundred years. I do not know where he gets them all from, but I never cease to be amazed at how many manuals he has for rare and obscure models.
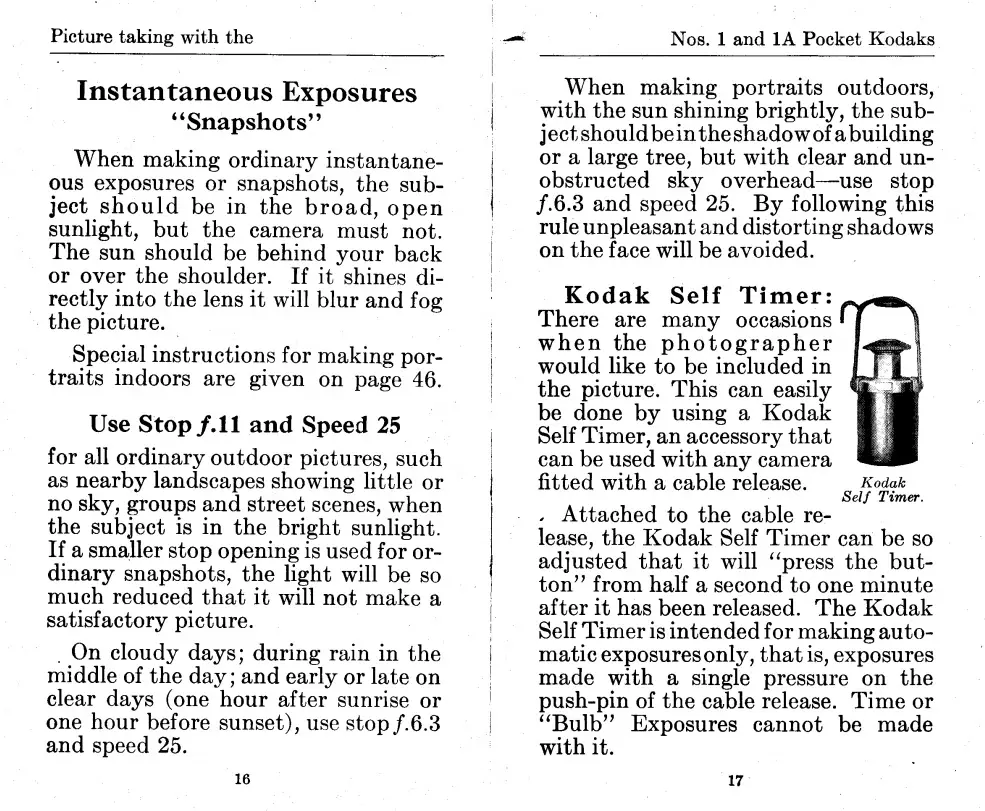
I have found that reading old camera manuals is one of the many things I enjoy about this hobby. In the early days of photography, these manuals doubled both as instruction manuals, but also educational guides on how to make photographs. There is a lot of background information about photography and tips for making good photographs in them. The image to the left is a scan of pages 16 and 17 or this camera’s manual which have tips for using the No.1A Pocket Kodak as a snapshot camera. The tips on this page are essentially what we today call “Sunny 16”.
This kind of information made me feel more confident using the No.1A Pocket Kodak as I tried to remember that when this camera was first made in the 1920s, many people were just as much of a novice as I was. The manual that came with this camera gave you all of the information you needed to use it, and that’s just as valuable today as it was then.
One thing that is missing in the manual for the No.1A Pocket Kodak is any reference to film speed. There didn’t need to be much thought put into selecting the right film because back then, most film was around what we would call ASA 12 today. Finding film today that is comparable to the speeds of those early types of film can be difficult, so you’ll need to compromise when selecting a roll of film. I used Ilford HP5 Plus which is a 400 speed film. In hindsight, Ilford Delta 100 would have likely have been a better option, but looking at the results below, it clearly made no difference. Black and White film has incredible latitude, which means you don’t have to get exposure perfect for the images to still look good. Color film is far less forgiving, so if you wanted to shoot color in a camera like this, I would recommend something like Kodak Ektar. A 400 speed color film would likely have been extremely over exposed.
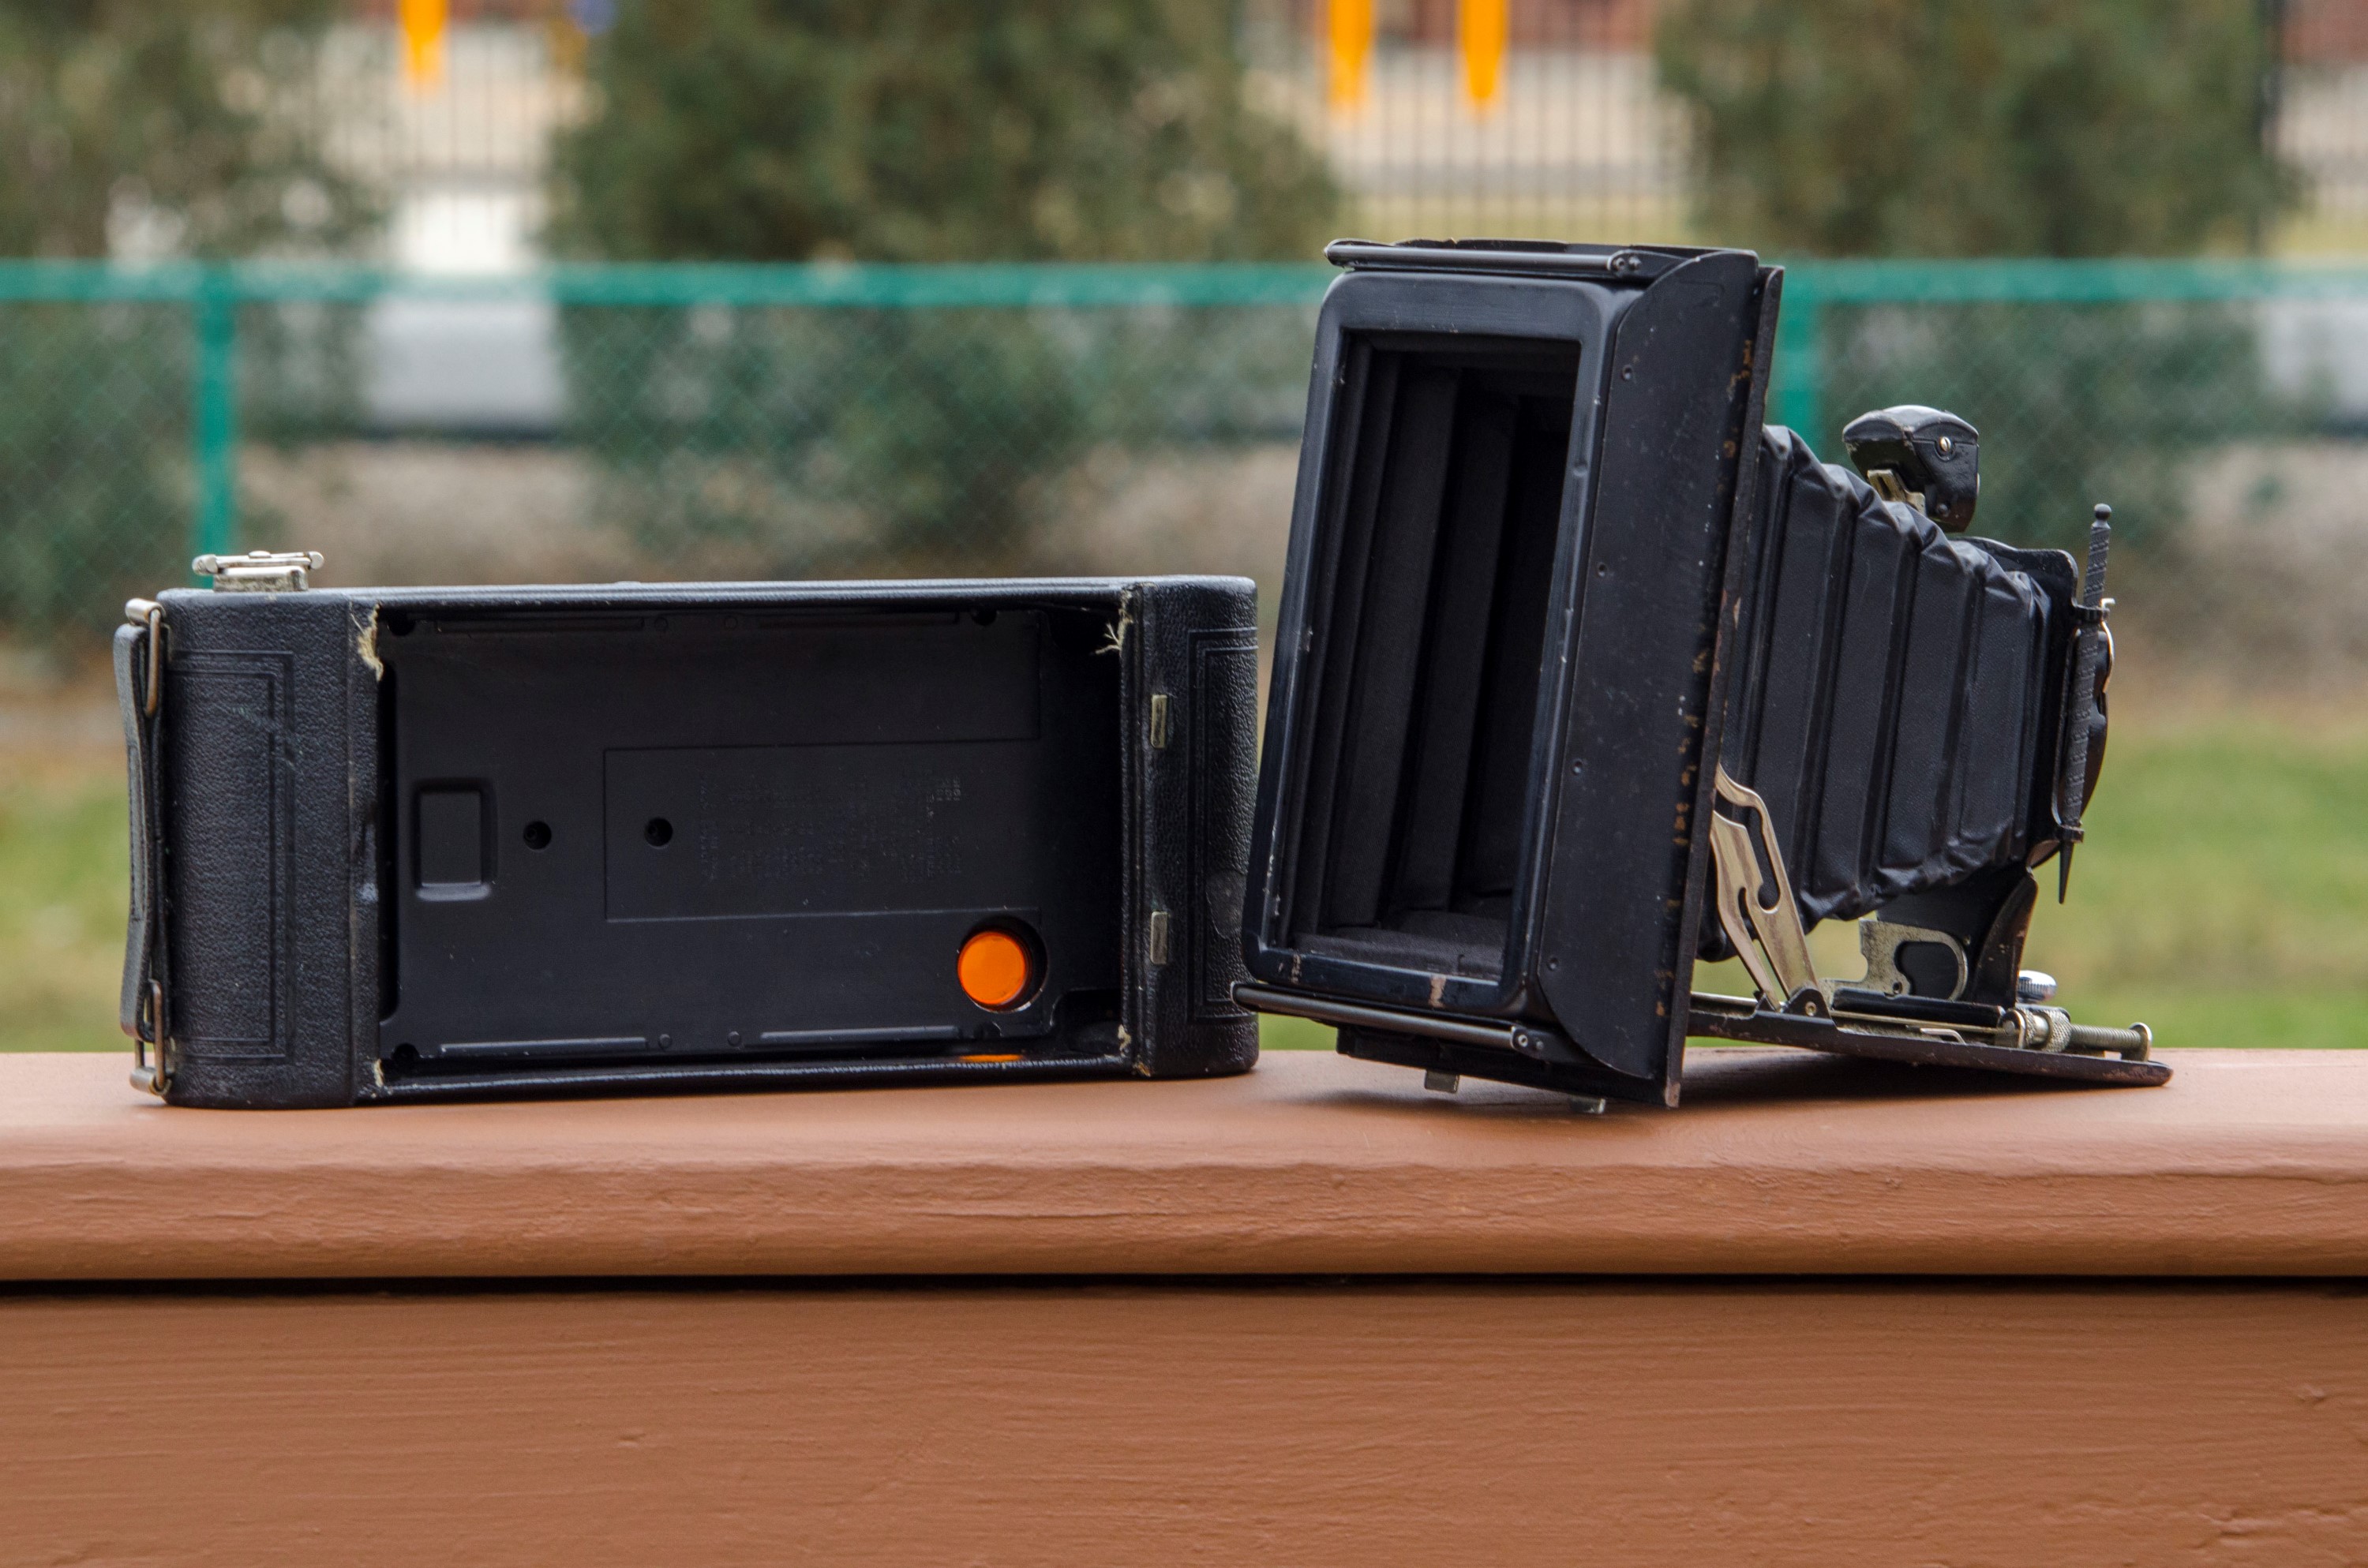
Loading film into the No.1A Pocket Kodak is not as easy as it is on other folding cameras of the era. On this camera, the film compartment and pressure plate are all part of the “back” of the camera. The folding part of the camera that contains the bellows and the entire lens standard assembly are all one piece and must be separated from the camera before loading film. Separating these two parts is just a matter of sliding a lock to one side and pulling them apart, but once you have them apart, you have to tuck both the supply and takeup spools into these tight compartments in the film back. You can see this in the section above where I talk about using 120 film. It’s not the hardest thing in the world to do, but it seems unnecessarily difficult, especially considering there were many other folding cameras when this model was made that had a much better design. If I were to make a wild guess of why Kodak might have done it this way, it could possibly be that since this camera was targeted at an amateur, you cannot physically put the camera back together until the film is properly loaded. Maybe they thought that by using this design, it would prevent film loading mistakes, even if it made it harder to do.
The No.1A Pocket Kodak only has 2 shutter speeds, 1/25 and 1/50, and I have no way of knowing how accurate they were. Assuming they were slow, you should make every effort to stabilize the camera when shooting it. Use a tripod whenever possible, and if you are in situation where that is not possible, lean up against a post or something to help stabilize yourself or else you risk motion blur in your images.
The viewfinder on this camera is a simple device called a brilliant finder. It is simply a piece of mirror and 2 pieces of glass angled in a way that it approximates what will be captured by the lens when you take a photo. Composing your images in the viewfinder can be a bit tricky as many of these brilliant viewfinders have become cloudy or in some cases, unusable over time as the reflective layer of the mirror peels away. Even if your viewfinder is cloudy, you should still be able to get a general idea of the generation direction your camera is pointed by aligning the surface of the side of the camera towards what you are pointing the camera at. If this is your first time using your camera, I strongly recommend sticking to landscapes or at the very least, objects no closer than 25 feet away. Once you get a better feel for how your camera works, and how to compose an image, you can try shooting things closer.
Despite the age of the No.1A Pocket Kodak, I found it to be pretty easy to use. There is a threaded socket for a shutter release cable which can help when stabilizing the camera. If you are brave and wanted to take Bulb or Timed exposures, a shutter release is a requirement as the camera has no slow speeds.
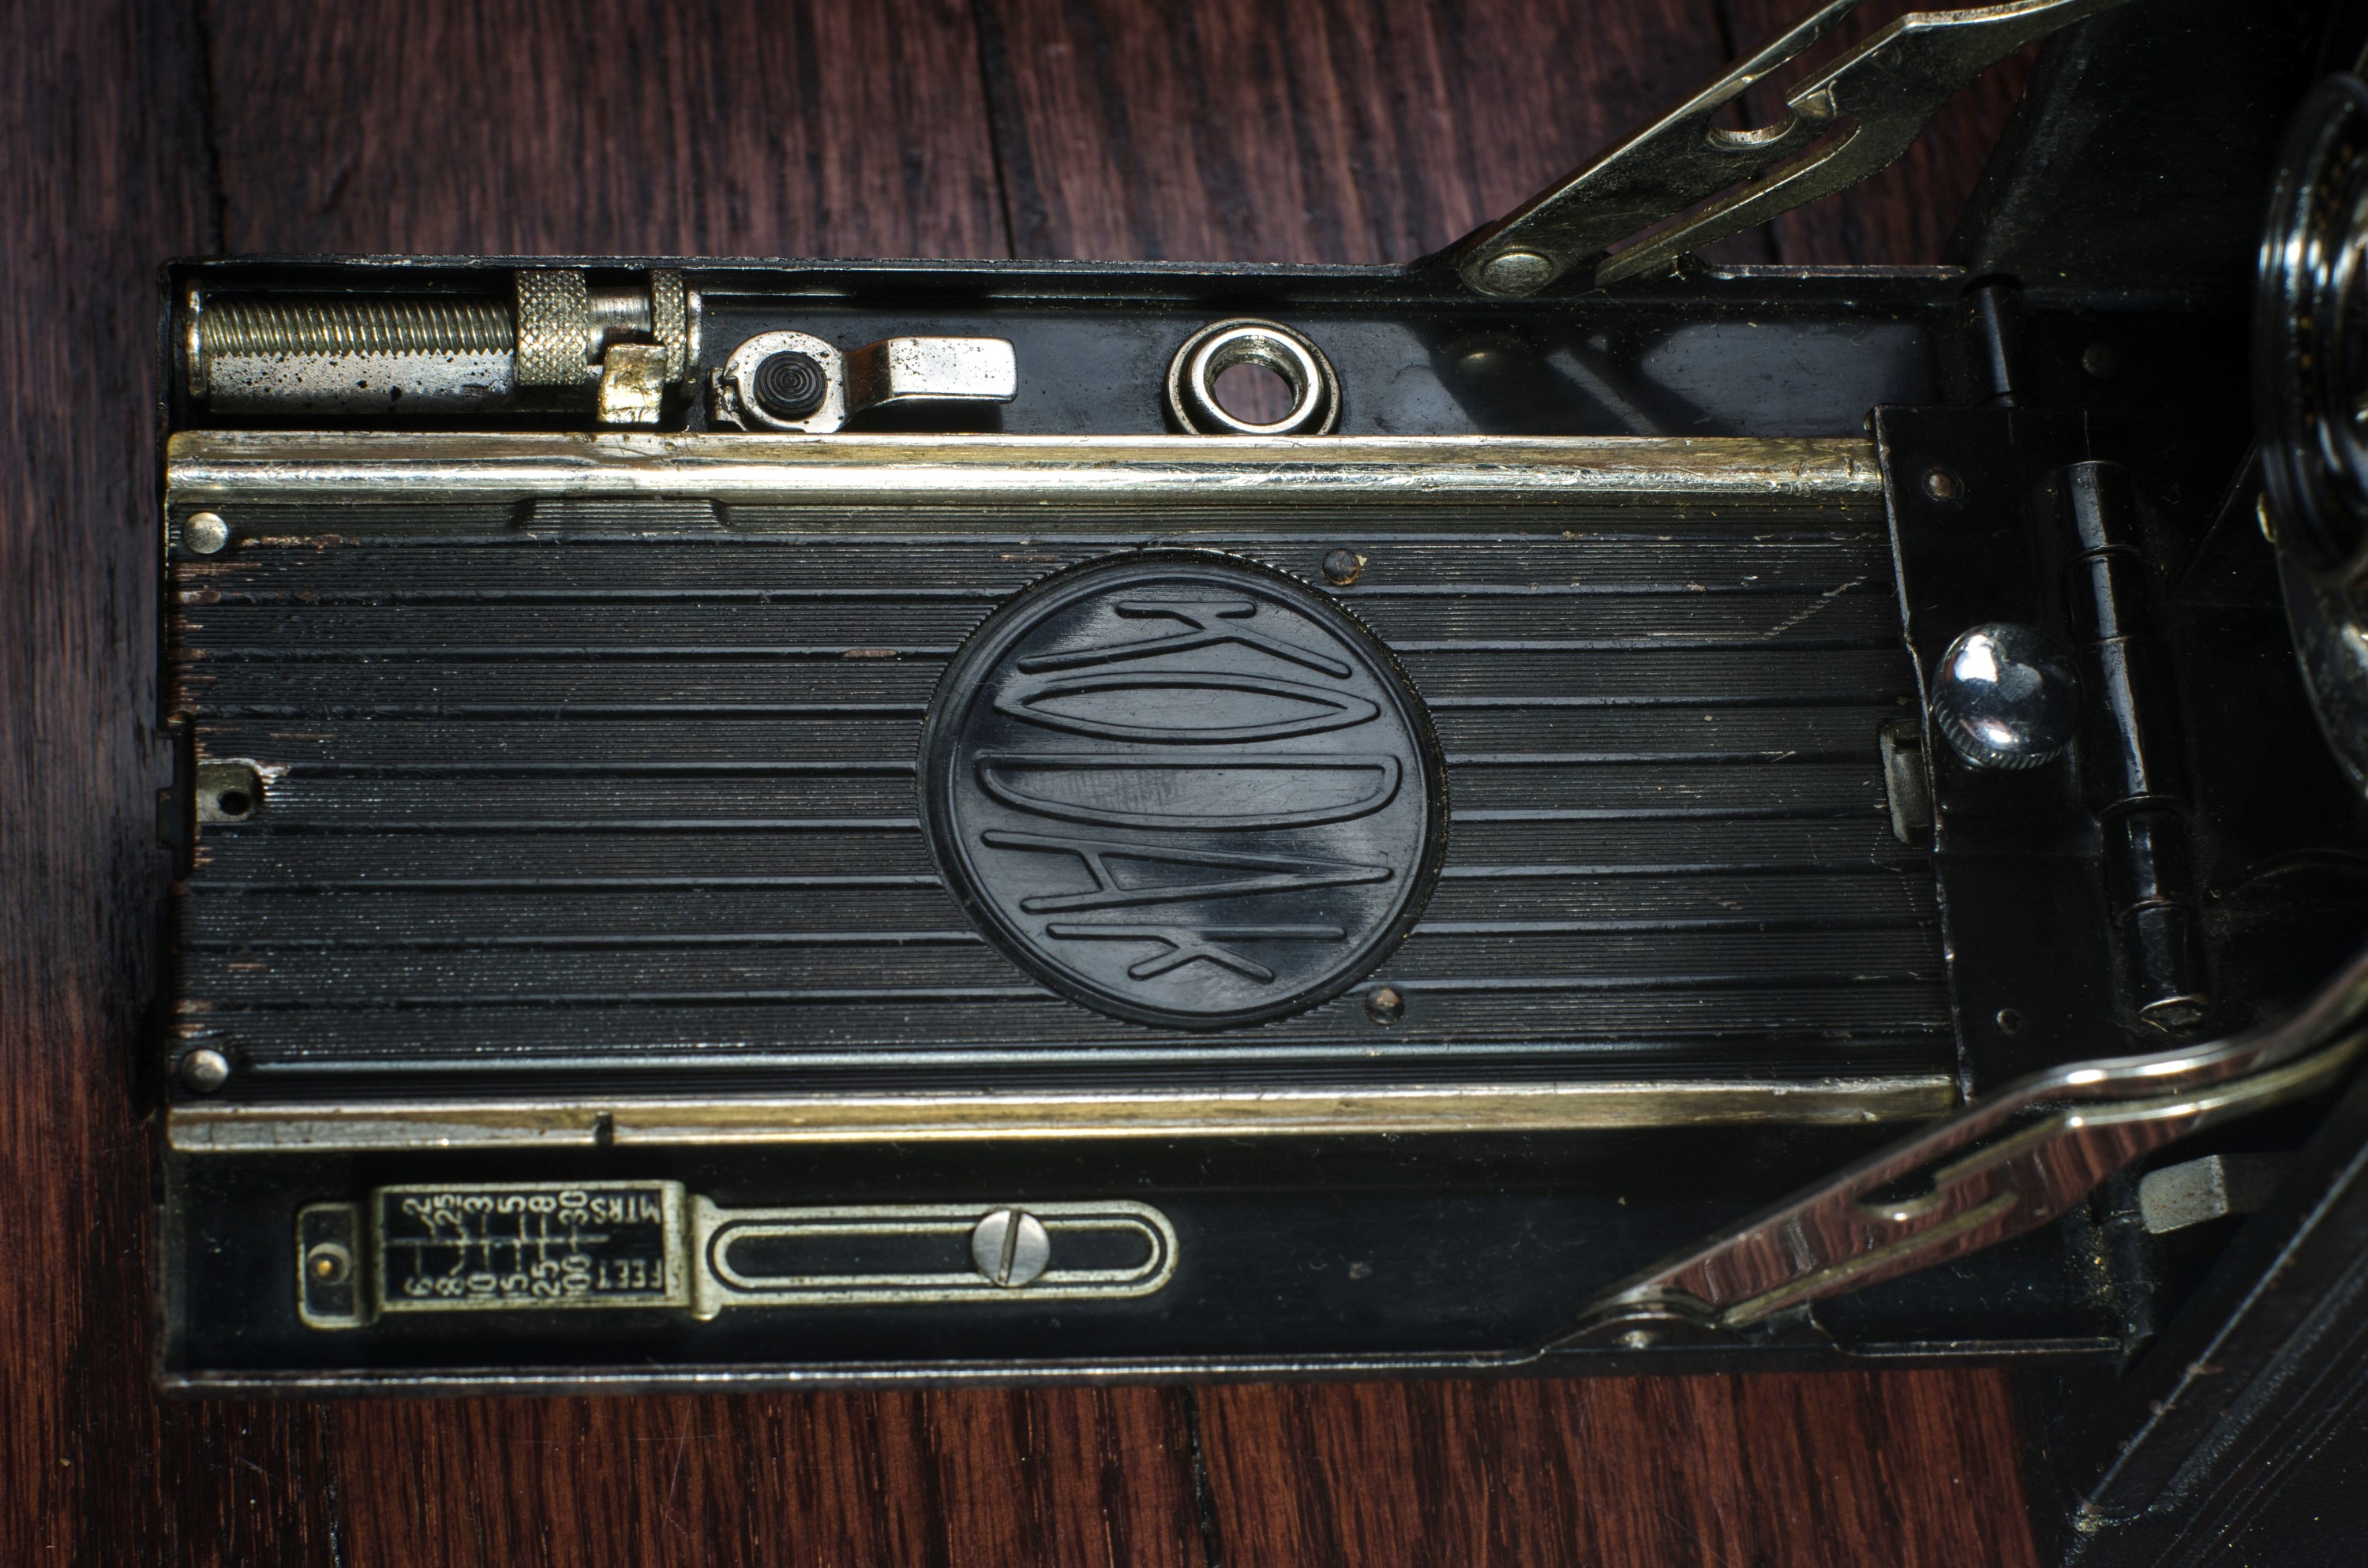
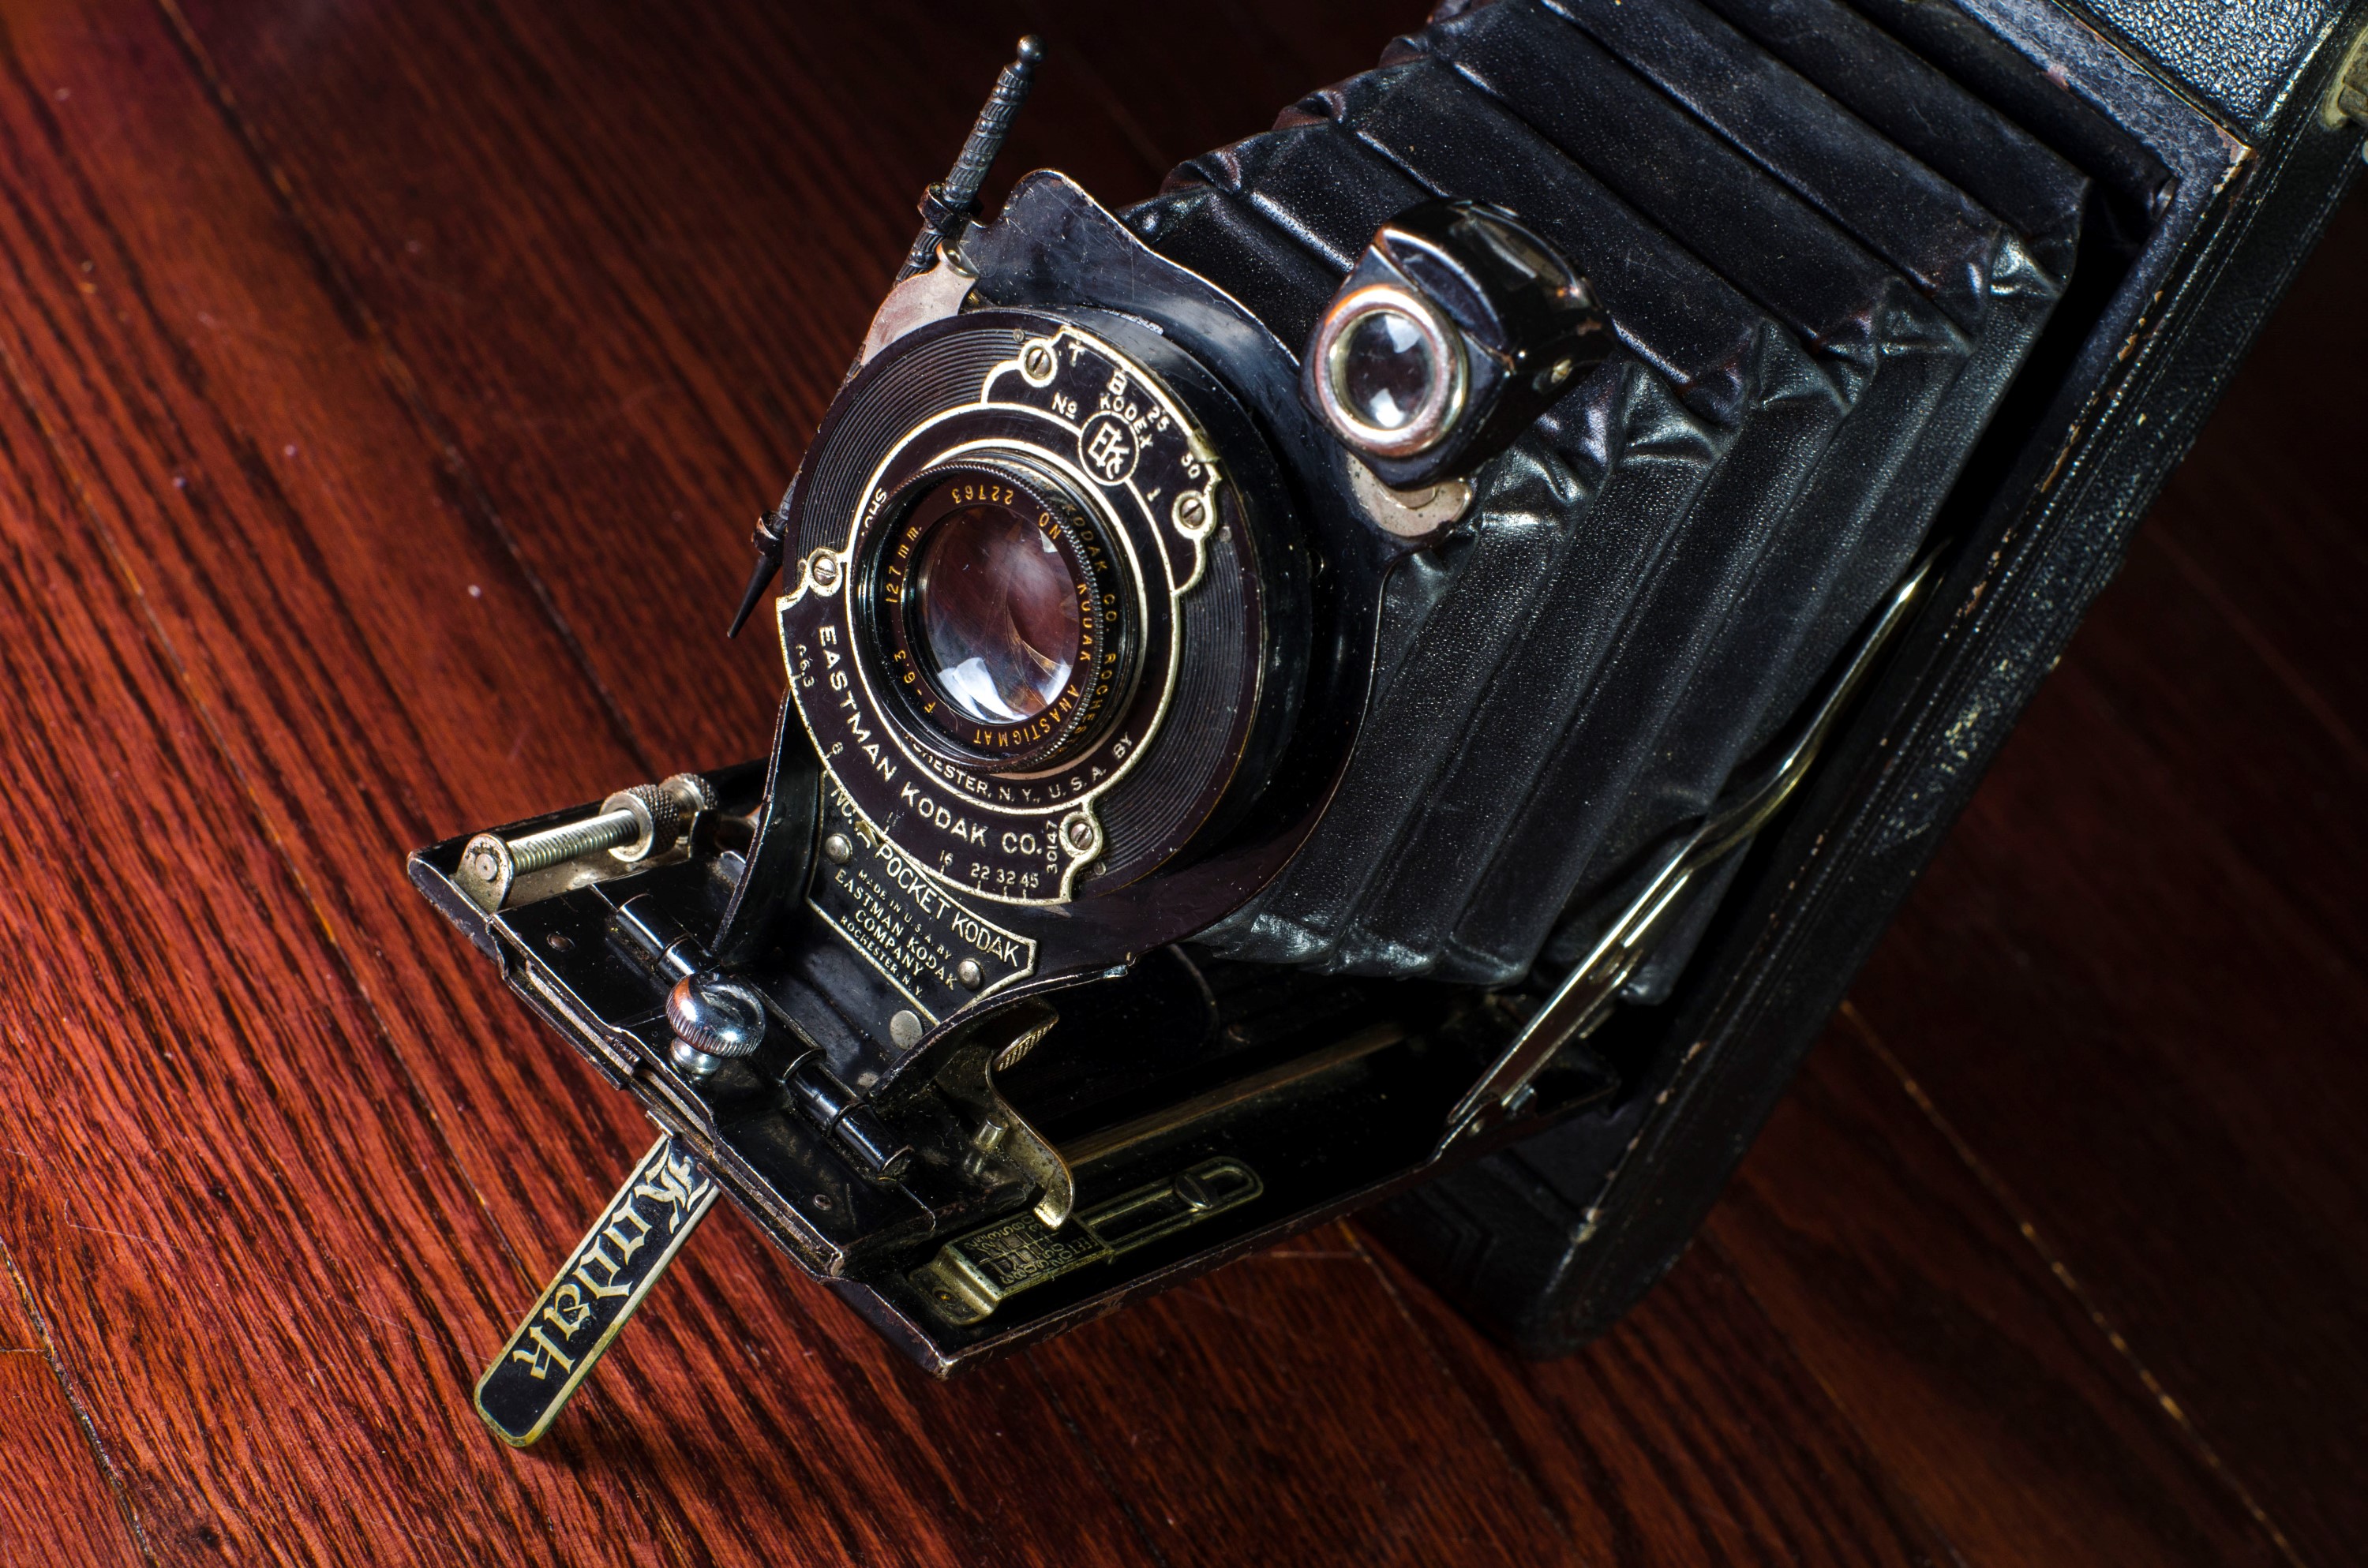
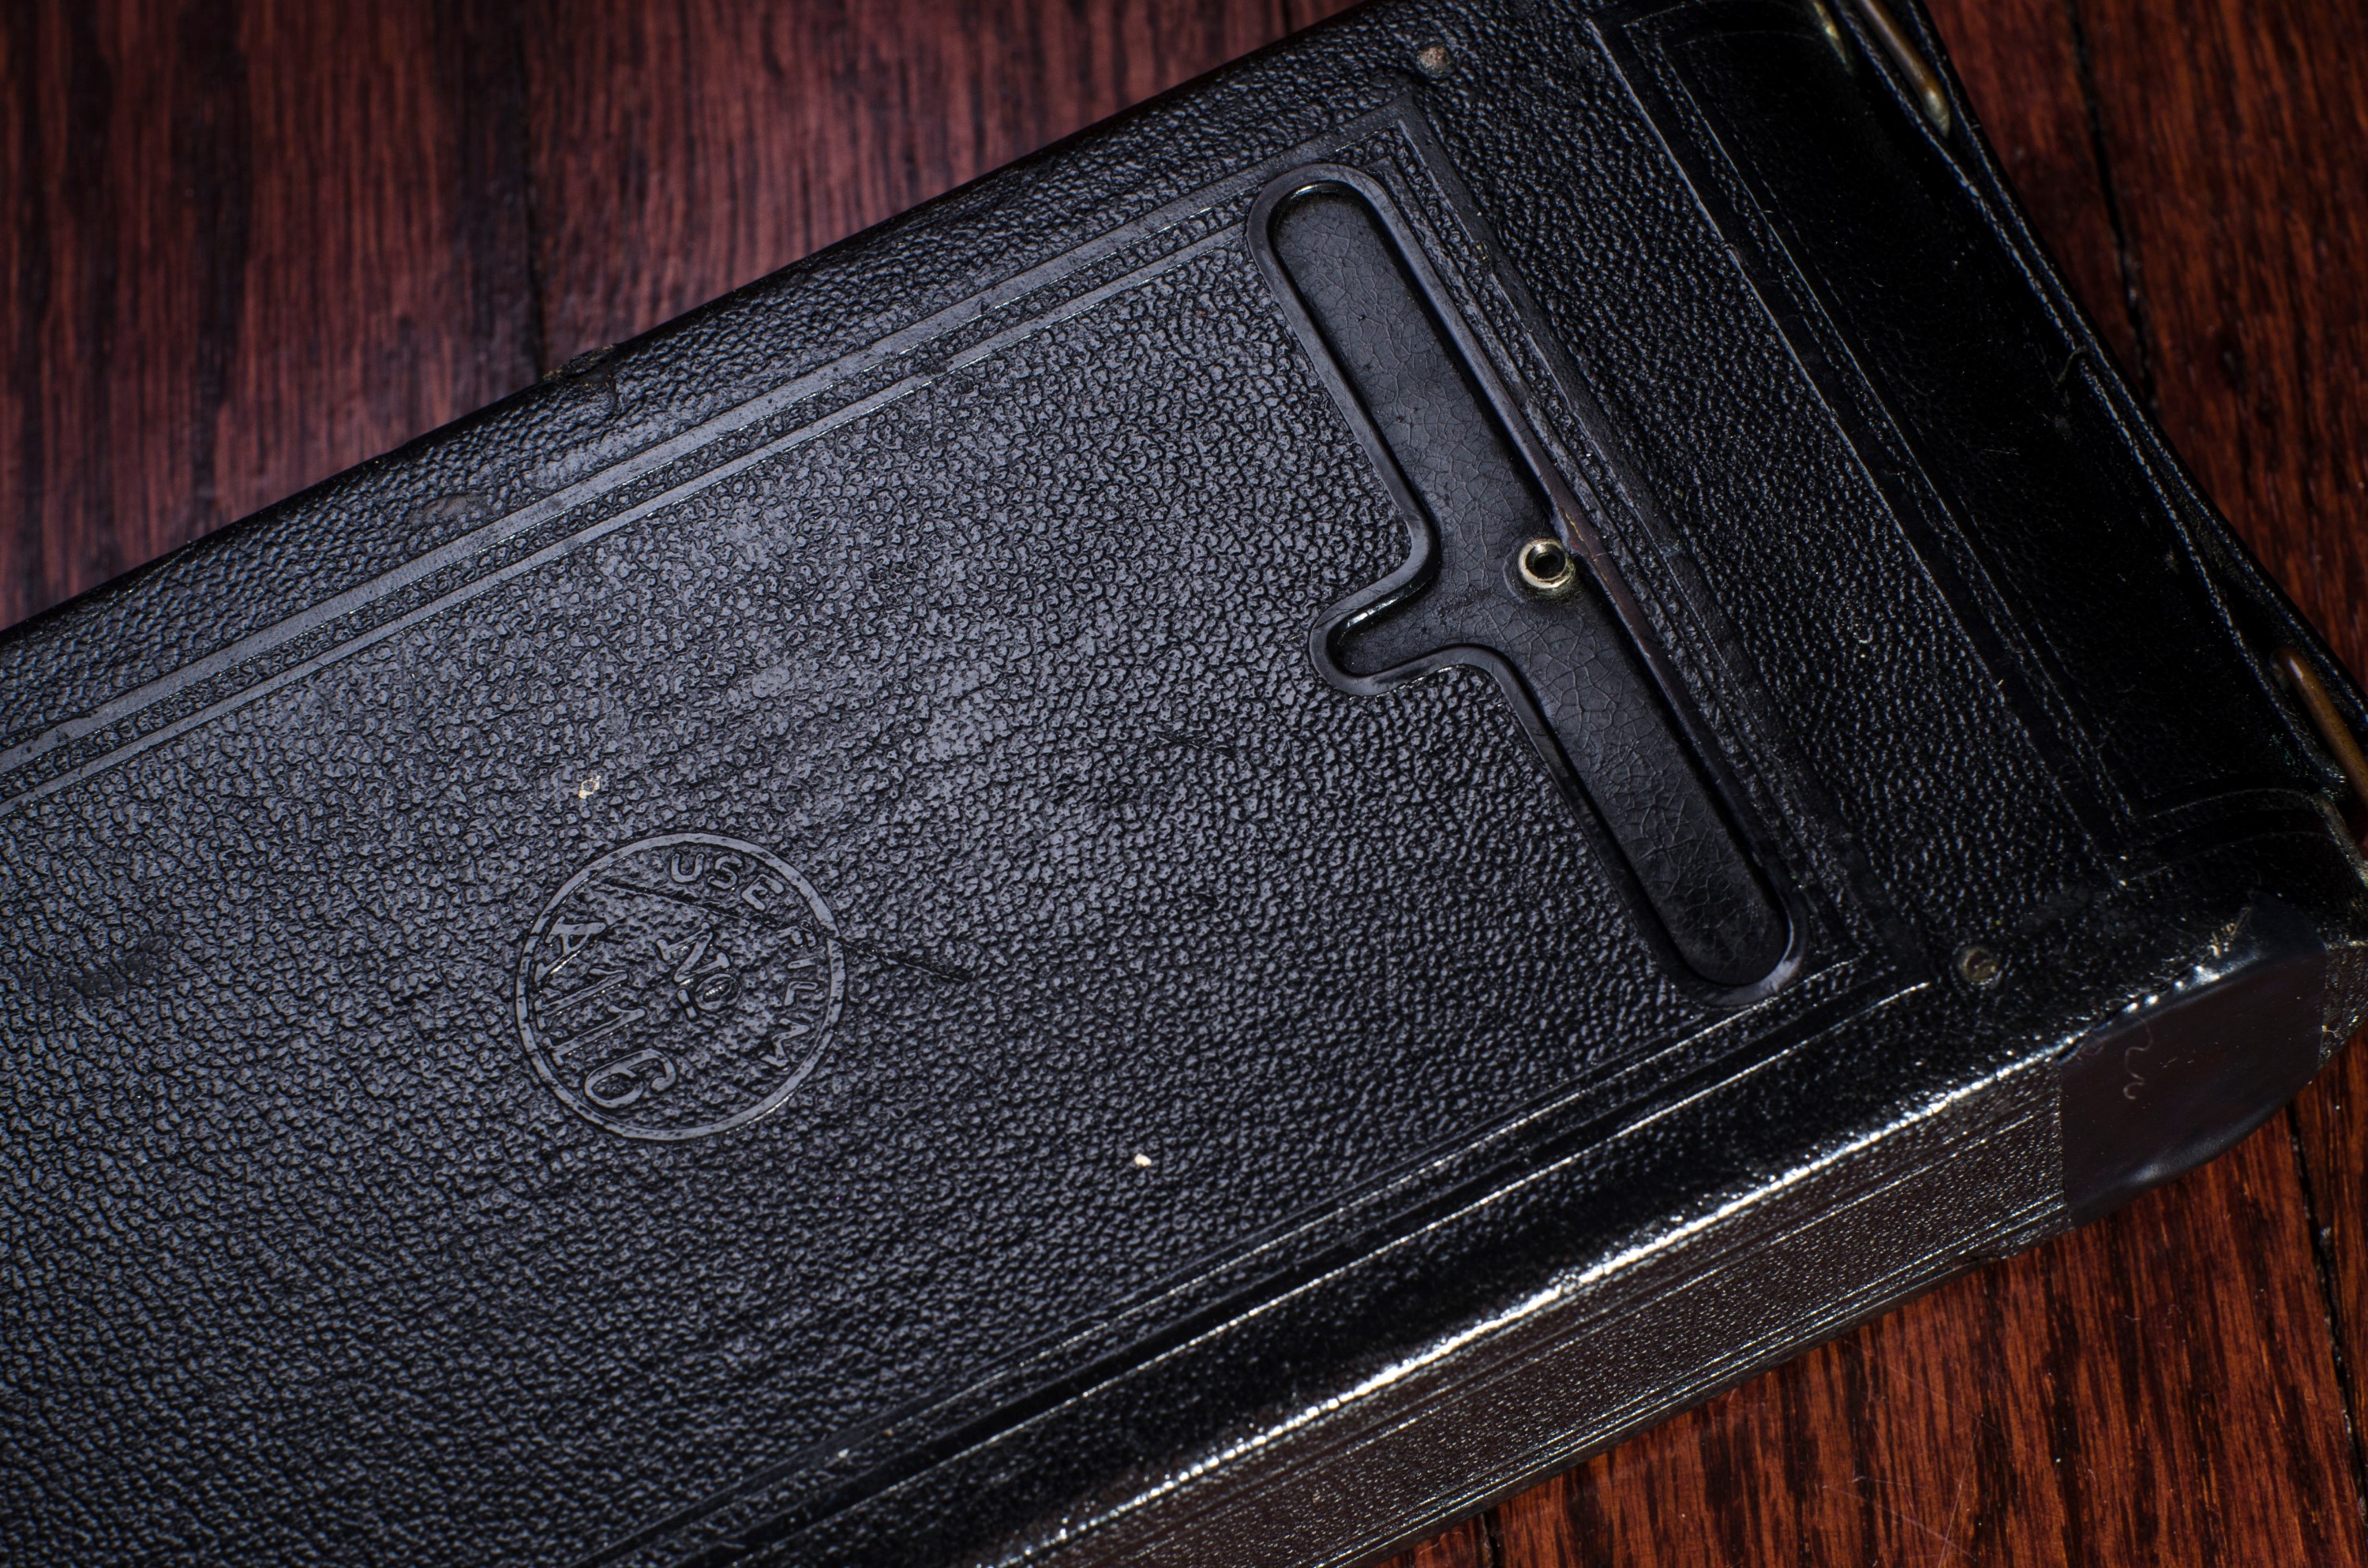
Focusing the camera was probably my least favorite part of using the No.1A Pocket Kodak. Some higher end folding cameras like the Kodak No.1 Autographic Special or Zeiss-Ikon Icarette 500/15 have a focusing rack that precisely controls the movement of the lens standard via a sliding lever. This type of focus rack would have been considered a premium feature available on the most expensive cameras of the day. Models like the No.1A Pocket Kodak were lower end models that had more rudimentary focus systems. On this camera, there is a worm gear that rotates, pushing and pulling a pin which is connected to the lens standard. On the image to the right, the worm gear is in the upper left corner of the image. This pin can easily fall out of position, jamming the focus of the camera. It’s likely that mine jams more often due to it’s age, so it’s something you should pay special attention to.
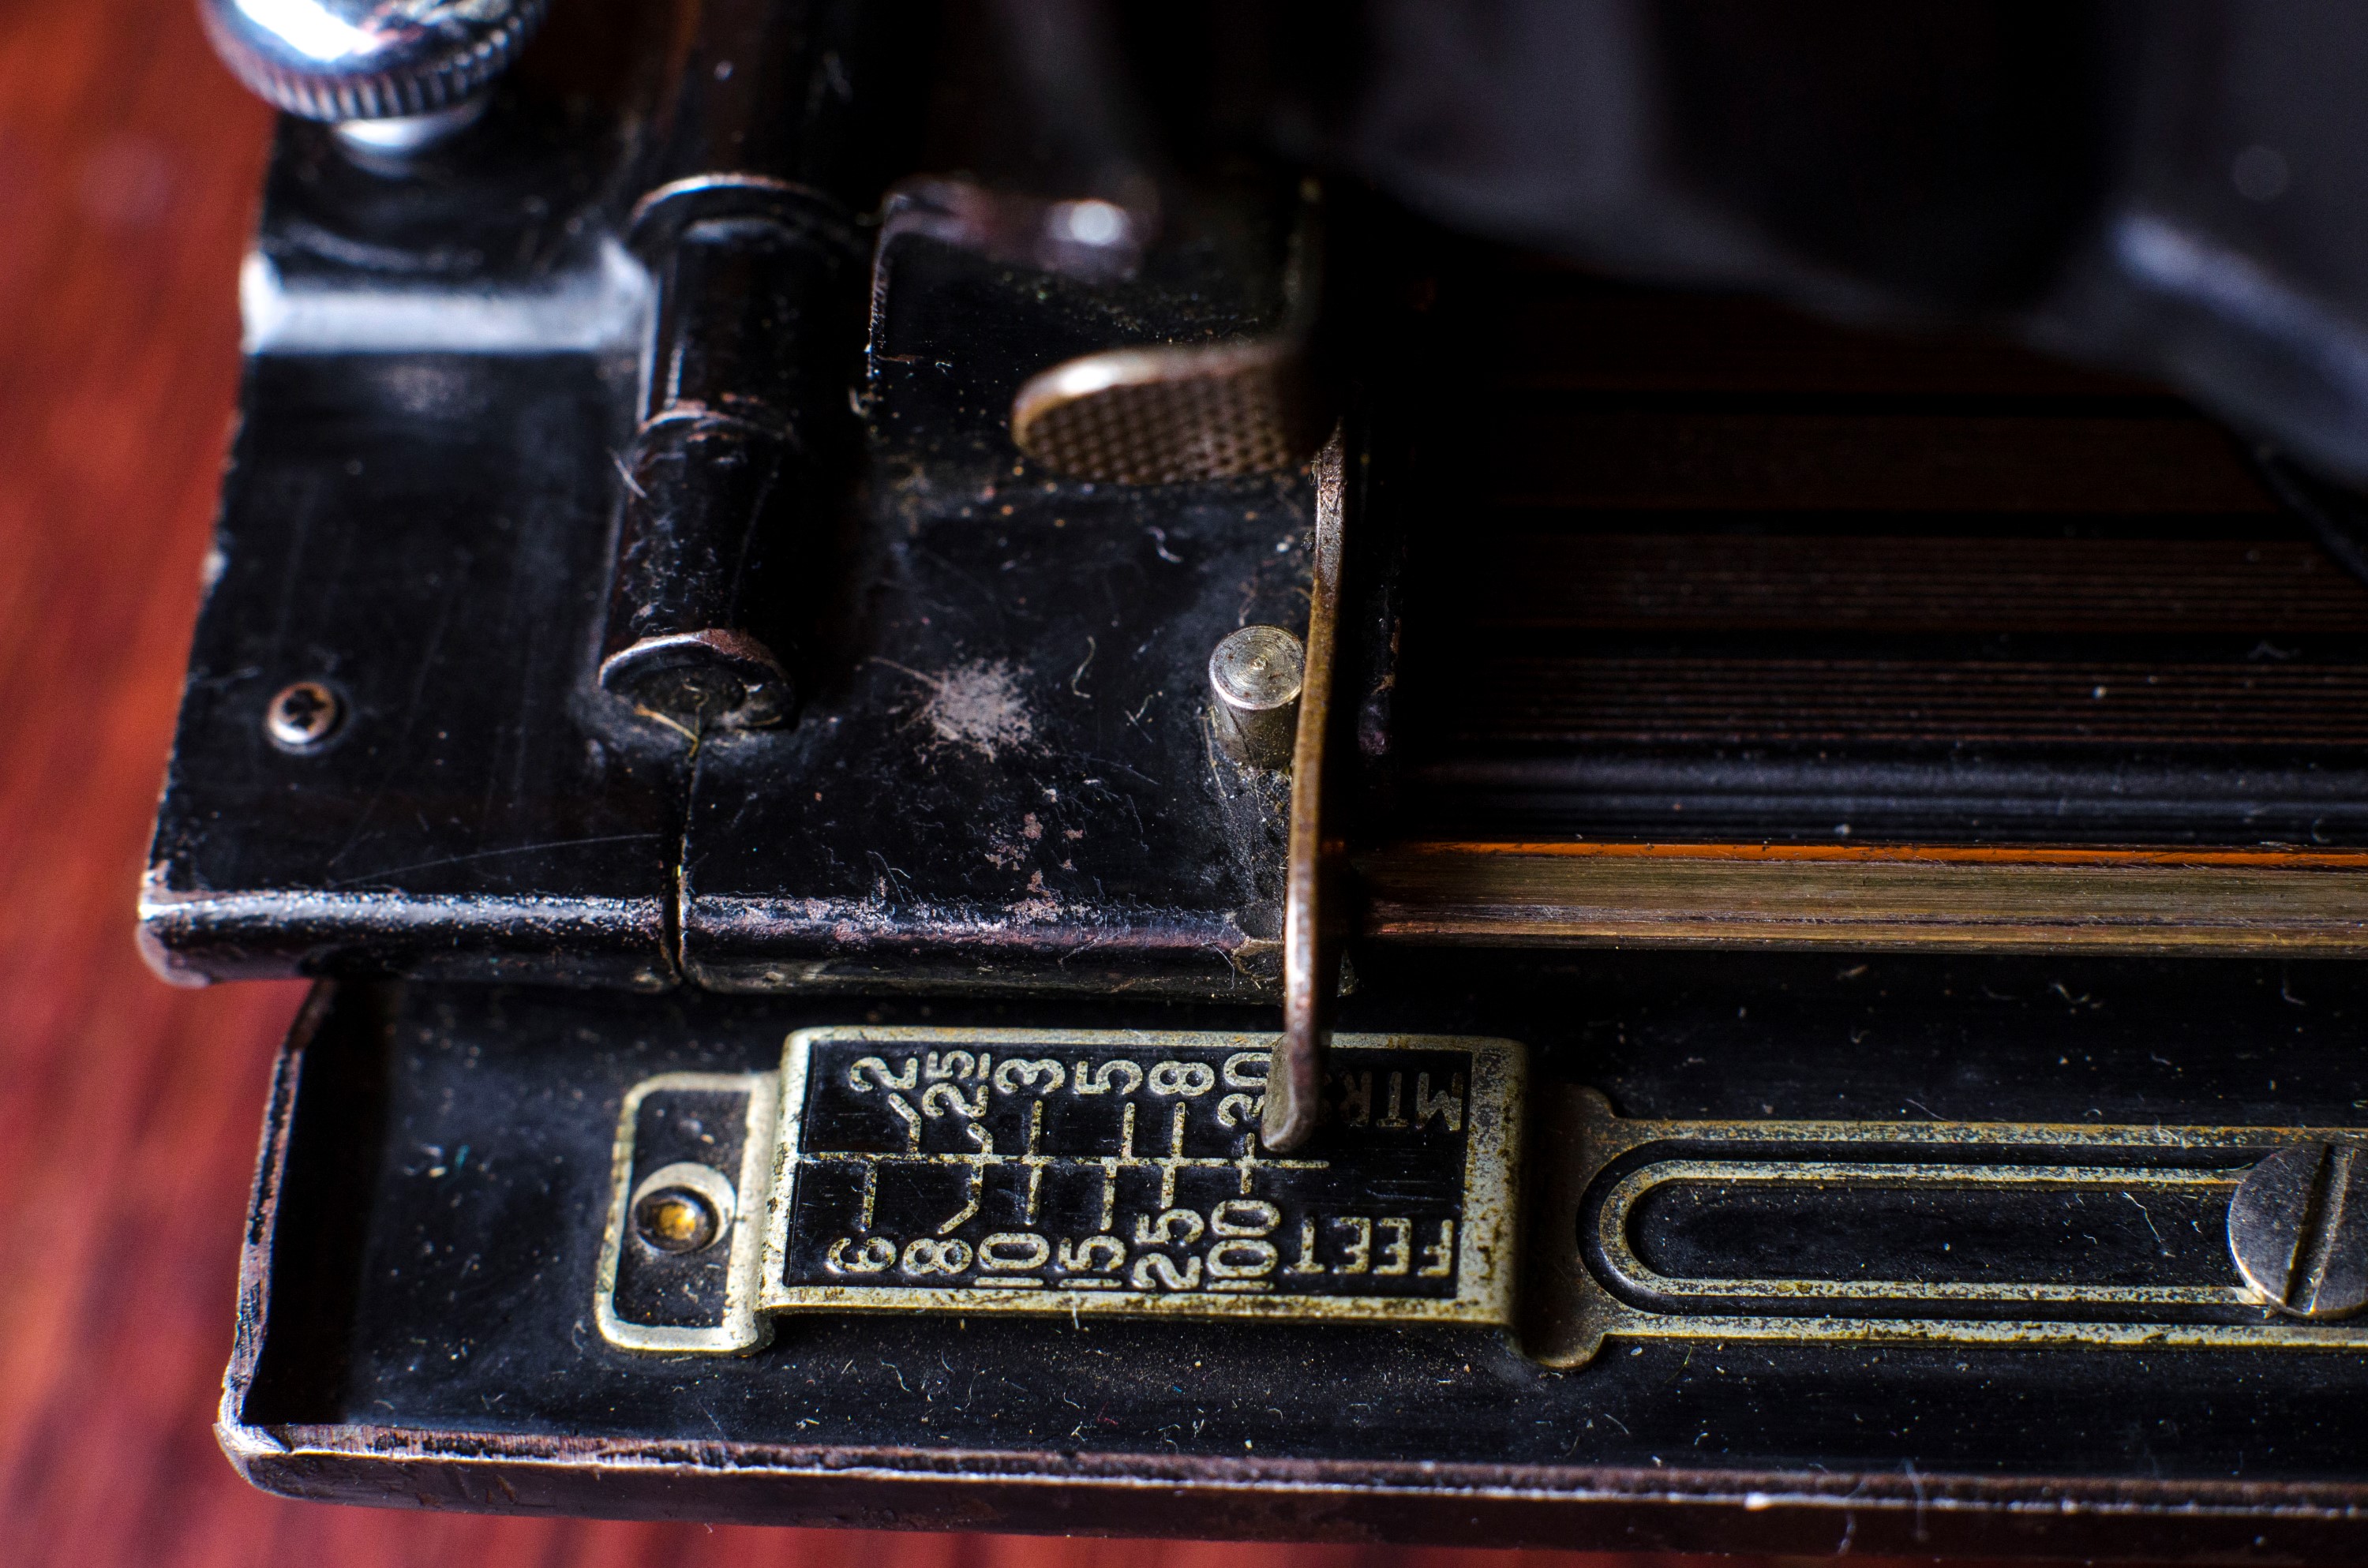
When extending the bellows, the camera will “lock” into position at the 100 foot mark, and you use that worm gear to change the focus to any position on the focus scale. I find it interesting that the focus scale goes to 100 feet instead of infinity. Also, the scale is in both meters and feet. Either this model was also sold in Europe, or Kodak was being optimistic about the adoption of the metric system in the United States.
Patience is a virtue when shooting these old cameras. Take your time when selecting a shutter speed, aperture size, focusing, and composing your image. Remember that part of the appeal of using these old cameras is in the process. If you are in a rush and don’t have the time to think about each image and plan everything out ahead of time, you really should consider using a different camera. If however, you are willing to put in the necessary time and thought into using this camera properly, I think you’ll be extremely pleased with the outcome.
My Results
I sent my first rolls of film from the No.1A Pocket Kodak to The Darkroom in California. They had come highly recommended on a couple of sites and I figured I would use them. I hadn’t yet discovered Dwayne’s Photo yet, and even though the prices for The Darkroom were a bit high, I knew they had a positive reputation. The cool thing about The Darkroom is that once they scan your images, they put them on their website for you to view before the film is sent back to you.


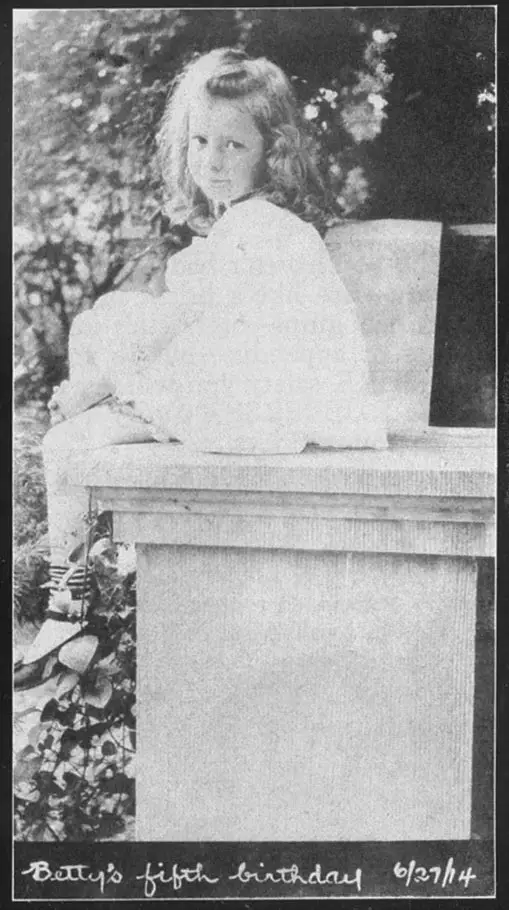
Unlike most reviews where I critique my results shortly after receiving them back from the lab, I’ve had these for over 2 years now. When I first got them, I was amazed at how good they looked from such an old and primitive camera. I was proud of myself for taking on such a challenge and getting some really nice shots. Now, with over 2 years of experience shooting antique and vintage film cameras, I think I am even more amazed at the results I got as I am more aware of the challenges I unknowingly was facing.
For one, I did little to protect the film from light leaks. Not only did I not mess up loading the film, but there were absolutely no light leaks anywhere on these images. I’ve had cameras from all decades not seal light out as well as this No.1A Pocket Kodak did. Considering Kodak’s less than stellar reputation at having light tight bellows, I got really lucky with this first camera.
Also, I used 400 speed film on a camera that was firing at best, at 1/50th of a second. It is common for shutters to slow down over time, so it’s likely that the 1/50th speed was slower than that. Knowing what I know now, I was using film that was likely 3 to 4 stops too fast for this camera. This is where the extreme latitude of black and white film really benefited me. I think that had I tried these first rolls using color or slide film, my results would not have looked quite so nice.
There is some motion blur in the shot of the car as I remember hand holding that one. The ones of me standing in front of the house and sitting in the chair weren’t focused correctly, but they’re still pretty good, and are likely as good as shots that people back in the 20s likely would have gotten. When you consider that 116 film cameras like this often made contact prints that were no larger than the exposed negative, you would not have had the benefit of 4800 dpi scanners to see every minute detail of the film emulsion.
Despite my unfamiliarity of using such an old camera, looking back at these shots, I am still amazed as how nice everything turned out. The No.1A is quite a capable camera and I think that the fact that I did get such good shots was consistent with it’s design as an easy to use camera. While there certainly were cheaper cameras back then, Kodak clearly had the novice in mind, and it shows.
My only regret is letting this camera sit on the shelf as long as I have. Now that I have some real 116 film, and I have more experience using these old cameras, I definitely see another roll going through it soon. Once I have those results, I will be sure to update this review.
My Final WordHow these ratings work |
The No.1A Pocket Kodak was a mid range Kodak folder aimed at the novice photographer who wanted a step up from the low-end single element cameras of the day. The Kodak Anastigmat f/6.3 lens offered a great compromise between value and quality. The sharpness and contrast of the images that the lens produces is quite good. While you could have spent quite a bit more money for a Kodak Special with Zeiss Tessar based lenses, I don’t really believe that the target customer that would have bought this camera would have benefited from such an upgrade. The 2 speed shutter is good enough for most exterior shots, and when using a modern black and white film with a large exposure latitude, it is capable of really great shots. It might be difficult to find one of these in usable condition, but if you do, don’t let it’s low-spec reputation fool you. This is a nicely designed camera that is fun to use, and very forgiving. | ||||||
| Images | Handling | Features | Viewfinder | Feel & Beauty | History | Age | |
| 1 | 0 | 1 | 0 | 2 | 1 | 40% | |
| Bonus | none | ||||||
| Final Score | 7.0 | ||||||
Additional Resources
https://mikeeckman.com/photovintage/vintagecameras/1apocket/index.html
https://www.flickr.com/photos/39076108@N00/sets/72157622476076706/
http://www.historiccamera.com/cgi-bin/librarium2/pm.cgi?action=app_display&app=datasheet&app_id=560
http://kodak.3106.net/index.php?p=213&cam=1463
https://www.flickr.com/groups/55624923@N00/discuss/72157609729624241/
Good Morning,
I have recently been given my Grandfathers No. 1A Autographic Kodak JR.
I am not to familiar with this camera. I was wondering if you could help me. Under the kickstand it has a number beautifully engraved. I was wondering if this had any meaning or if it was simply a personal number engraved after the purchase of the camera.
Trish, how fortunate to be given such a wonderful camera that belonged to your grandfather. While this camera doesn’t have a lot of value in the collector’s market, knowing the camera’s history is invaluable!
As for that number, mine has it too. I have always assumed this was a serial number, but I have never found any sort of chart confirming this, or if this can help date the camera. Mine is 265820, so if yours is close, then perhaps our two were made around the same time!
Good luck with the camera. Hopefully my article has given you more information about it, and possibly even encouraged you to give it a try!
Hello!
As a graphic designer I was initially trying to find the old patents for a couple of cameras I was given recently and came upon this site.
I just finished perusing this review and was thrilled to have come upon it! Kudos to you for actually using film and taking shots with this old relic! I was given this similar model camera, the NO.1A POCKET KODAK, although it must be slightly different. The aperature settings are 1, 2, 3, and 4. The shutter settings are T, B, 25, and 50. It used A116 film, although the stylus is now missing. The cable release is still with the camera, and the ‘red’ window is no longer in place. The bellows are in good shape, although when the body of the camera is removed, a look down the expanded bellows through to the lens reveals a dozen or so tiny pinholes where the bellows has failed.
The NO.1A POCKET KODAK was used by my great grandfather in the late 1920’s early 1930’s. I also have a JIFFY KODAK SIX-20 with the TWINDAR LENS, that also belonged to either my great grandad or my grandmother. The photographs taken of my father as an infant in the 1930’s are still in beautiful shape. I wish there was a way to tell which camera took which photographs. I guess it doesn’t matter, but I picture either relative taking photographs with either camera and get absolutely giddy about it! The value of the cameras monetarily means nothing to me, but the people that held them in their hands mean the world!
I doubt I will ever actually use either camera for shooting, but was thrilled to come upon this site with such informative dialogue. I have since taken a look at the manuals on the site you suggested, and also have taken a peek at “How to make Good Pictures — A Book for the Amateur Photographer” which was published by Eastman Kodak Company in the early 1900’s. What a trip to read the basics and see the mechanics of photography ring roughly true today. Such fun!
I just wanted to thank you for sharing your hobby with the rest of the Interweb. I am eternally grateful for the information available for all. So thank you, thank you and may you be blessed with many years exploring old cameras!
Pamela
Pamela, did you ever find the patent numbers that you were looking for? If yes, would you be willing to point me in the right direction?
I have a 1a with a little plack on the top edge from what I can tell the company that originally purchased the camera much have put it there. Company name and everything. Any thoughts?
We have a No. 1A Pocket Kodak. The original box says “M.A. Lens” on it. On the back it says “use Film No. A116. Instead of being calibrated in f-stop values, that adjuster is labeled “1”, “2”, “3”, and “4”. To the extreme left of the “1” is the number 27440. Not sure if this is a part number, or serial number, or what. Camera has threaded screw for adjustment of the travel limit for the bellows expansion, and on the other side of the guide track for the bellows is a scale of the focus distance, labeled in parallel with values in feet (markings from 6 to 100) and meters (2 to 30). There is a metal object that looks like a stylus in a clip on the frame holding the front lens. There is an apparent serial number on the kickstand: 448817.
The camera belonged to my wife’s grandmother, who was born in Sweden. On the camera box, “1931 trip to Sweden”. Presumably the camera was made in 1931 or earlier.
Anyway, the camera appears to be in pristing condition. The exterior looks like new – no rub marks or dings. So far as I can see the bellows is intact, though I probably couldn’t see any pinholes if they are present. The camera has been stored for decades in the original two-box packaging. The iner box looks very well preserved, but the outer box is more worn.
We are getting old and need to make decisions of what stuff to still keep and what to pass along to strangers. I see no interest in the next generation of our family. It seems to me that there should be some continuing value in such a nice unit, but I have no sense of what to ask. I haven’t yet come across an exact match to this particular embodiment of the No 1A Pocket Kodak camera, so I don’t know if it makes this more interesting/attractive or not.
Any additional guidance would be appreciated.
I have a roll of 1A autographic roll of film.Its not in origonal box but it still has the patented seal on the film. It is labled 1A FPK-6. AND HAS A METAL SPOOL LABLED. E.K. CO. Does this hold any value.
Not really. If it had the original box, a collector might like it to display, but to just have the roll of film, someone might be willing to give you a couple of bucks for it, but there’s no significant value.
Hi Mike. I’ve found your article while searching for information about my own N°1A Pocket Kodak. It’s in perfect condition but is missing the stylus. It seems that Kodak made various stylus sizes, the smallest being the one shipped with Vest Pocket cameras. Would you be able to tell the length of your own stylus coming with your camera? I’d really love to reunite mine with one. 🙂
Hello Mike. I’m a camera collector focusing on made-in-italy camera. Years ago, a british ebayer sold me an italian folding camera kept into a pocket kodak 1a series II leather case. I decided to wait for a cheap auction on ebay and last week, after 5 years waiting, I finally found it for $16! It’s a very nice focusing model with a ball bearing shutter and a f/7.7 lens. Do you have more info about the year it was produced? I’ll try shooting pictures with a 120 roll as you learned us with you tricks! Thank you for your nice article!
Roberto-Italy
Roberto, congratulations on the pickup! Unfortunately, Kodak was never one to keep good records of production numbers for their models. You can generally find a range of dates when a particular model was made, but narrowing it down to a specific year is often impossible. As a general rule, if its a Kodak camera that uses 120 or 116, but not 620 or 616, then you know it was made prior to 1933. If it uses autographic film (has the little door on the back) then it was made after 1914. Red bellows Kodaks usually were made prior to 1915. Sadly, unless there’s a resource online that I have yet to find, that’s about as good as you can get!
Well my journey was similar in many ways. This model was not the jump-off point point but it was close. I had started in with a already 8 year old SLR in around 1984 but I was developing my own film and frankly the camera bug ..more so interest in old cameras had bitten. My father who had been a photo hobbyist until too many children and career took overs was winding down and my interest and his help coalesced. He gave me an Argus 40 /620 which he saw at a Flea market andso I was experimenting and learning and now I wanted MF so I bought a Yashica D TLR . The neighbor boys in the early teens mentioned their parents had an old camera and they frought it to me. Well maybe not intentionally, but I never gave it back. I’m sure their parents were unhappy. It was this very model featured here. I played with it without film and saw no reason to doubt…but no film. I wrote a letter to Kodak to complain. And they sent back a very bad mimieographed list of discontinued films. I got the idea so many had written that this now SOP in a pre-internet world. The mimeographed page showed how long some of their films were in production. I guess the point was we kept it up for 50+ years ..quit your whining. Not long after that I attended an antique camera “swap” show and now I was in deep waters. I found some out of date 116 Kodacolor? CN film. I still have the prints. A little shabby but demonstrated it worked. LAter on still I tried to adapt some 120 film. My Idea was to use some wooden golf tees at both ends. They only had to spin right…well I don’T remember what if any result I got I think the advance didnT’ work the film jammed etc and that was that for the next 20 years. I did aquire more old cameras. I got a Baby Speed Graphic, a 2nd Yashica TLR and a Super Ikonta 532/16 (we are just talking MF) . In htose years I married had children and moved overseas. I now live Germany and have way tooooo many cameras. With all the new info the Internet opened up for us I came back to this a few years ago. The wooden golf tees were still inside haha. I had debated some of the different ways to adapt the 116 spools over the years and like another poster one of my brothers gave me a Jiffy Kodak 616 so I saw some §d printer adapters that were cheap, so I bought a set for each. These were cheap beacuse they were not “finished” The spacing was right. The “interface” for where the film advance engages was non-existent. So I had to bastardize this.. took me two tries to get it right on both cameras. Luckily the screwed up ones just do the spacer duty. I ended up shooting four rolls between the two cameras. The 1A was leaking mostly from the ruby window and while the bellows looked very good, somewhere light was getting in. The Jiffy was a disaster to say the least the bellows qwere more like a sieve. After playing with the liquid electrical tape..which I was warned, a bad solution, I took strips of black fibre tape that did the job. The B&W film I shot with the 1A I was very pleased with the lens performance, how sharp it is. Though I just read these models were geared to the ambitious amateur I would like to know more about the lens construction. Needless to say, as you waxed on about your beginning.. the Road Goes on Forever. I never have the lost the fascination of using these old cameras and the magic of the silver process. Good Light
Chuck, thanks for sharing your story. As you can probably see from reading my site, I haven’t lost the fascination with old cameras either! There’s so many different types and formats, you can never get bored. I will admit, I do miss the smell of those purple mimeographs that predated toner based copiers.
From one Mike to another–I inherited my grandfather’s 1926 Kodak 1A Pocket (it looks almost identical to the one in your picture) way back in 1976 and just stored it away over the years. I recently came across it again and wanted to take a look to learn more about it–I was really grateful to you for all the great info on it. Unfortunately, when I opened the camera, the bellows just disintegrated. I’ve been trying to find a replacement bellows online, but am having some difficulty matching up the replacement bellows on, for example, EBay, with the camera. Do you know how to find the correct bellows? As a Plan B, I also watched some videos on how to make my own replacement bellows, but, since the old one disintegrated, I don’t have anything to make a template with. Any thoughts on where I might find a diagram? Thanks for any help you might be able to offer.
Mike, thanks for the compliments, I am happy you found my article useful. Sadly, I will not be of any help in your journey of replacing bellows. I have tried in the past to locate original part numbers to other Kodak cameras and apart from a few for the Vest Pocket Kodak, I’ve never been successful. I’ve also never made an attempt to make my own bellows.
As a shot in the dark, perhaps you could reach out to Jurgen Kreckel from certo6.com as I know he makes bellows for other cameras. I do not know if he can do them for Kodak, but it’s worth a shot. Good luck and if you ever find out more information, please pass it along, in case someone else asks!
I have this camera— No. 1A pocket Kodak. I had no idea people could still use it! It opens but the lens won’t slide forward on the track when I pull the silver knob. I don’t think the bellows is to blame— something feels jammed on the track. Any advice on this issue? Is there a release button or something I’m missing? TY! Great job on your site.
There is no release for extending the bellows. Just be sure the door is completely open as if it’s even a tiny bit closed, it won’t come out. If you still struggle, it’s likely that some rust or other gunk has gotten into the tracks preventing it from sliding smoothly. Just keep working at it and see if you can clean anything out using toothpicks and it should work.
Hello sir, I really appreciate the information about this camera. I have recently purchased a Kodak 1A folding camera myself. MY first exposure to old cameras, (no pun intended) was when I was about 12 yrs old. I was always interested in anything old. the older it was the more I was interested. So old cameras naturally were right up my alley. Along with lots of other stuff including old typewriters. I am very happy to hear you can still get film for these cameras. I’m 52 now, and every time I come across these cameras I’m 12 yrs old all over again. When I first started collecting cameras most people didn’t want them. I bought most of them for 2 or 3 dollars. A song by today’s standards. These cameras are beautiful pieces of design and art. As well as creating art themselves. I intend to buy some film and let you know how it turns out. Again I appreciate the info. Your fellow collector, Greg B.
Thanks for the kind words, Greg. What a great camera to have in your collection. As you read in the review, this was one of the first I ever got and I blame it for planting the seed to what grew into my camera collecting obsession (not to mention this site)! Please let me know when you shoot some images so I can see your results!