

 What is it?
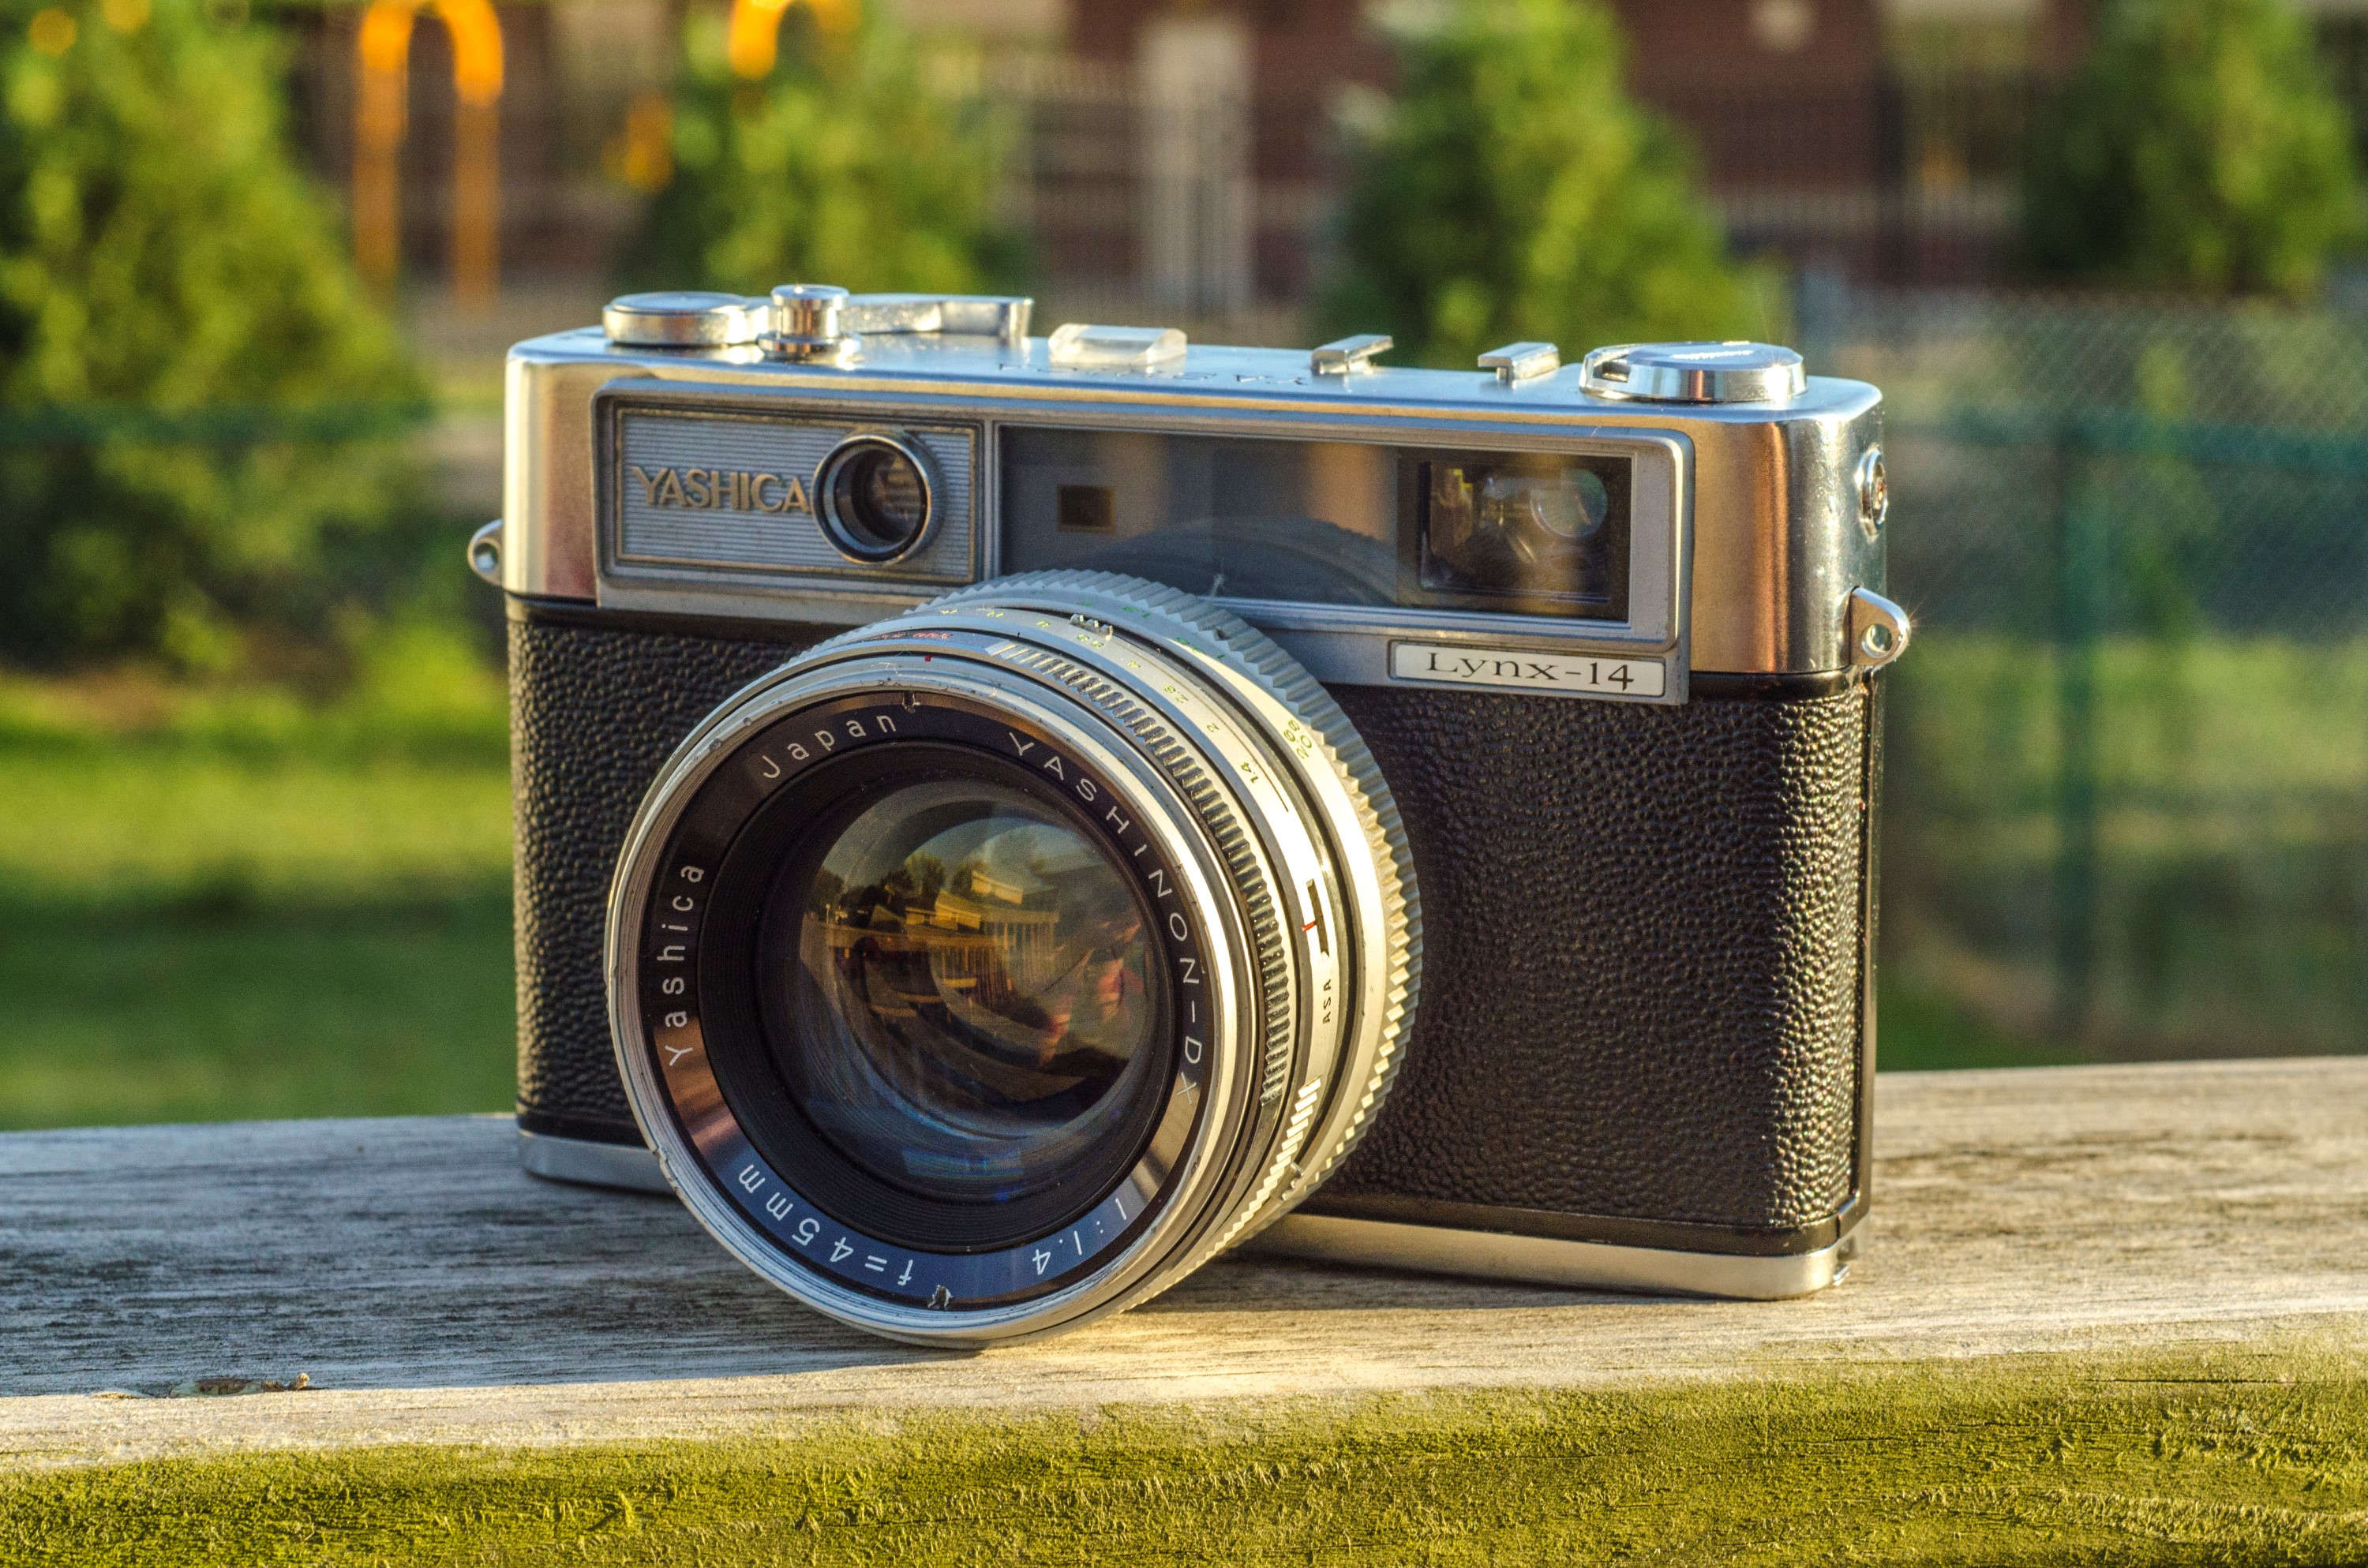
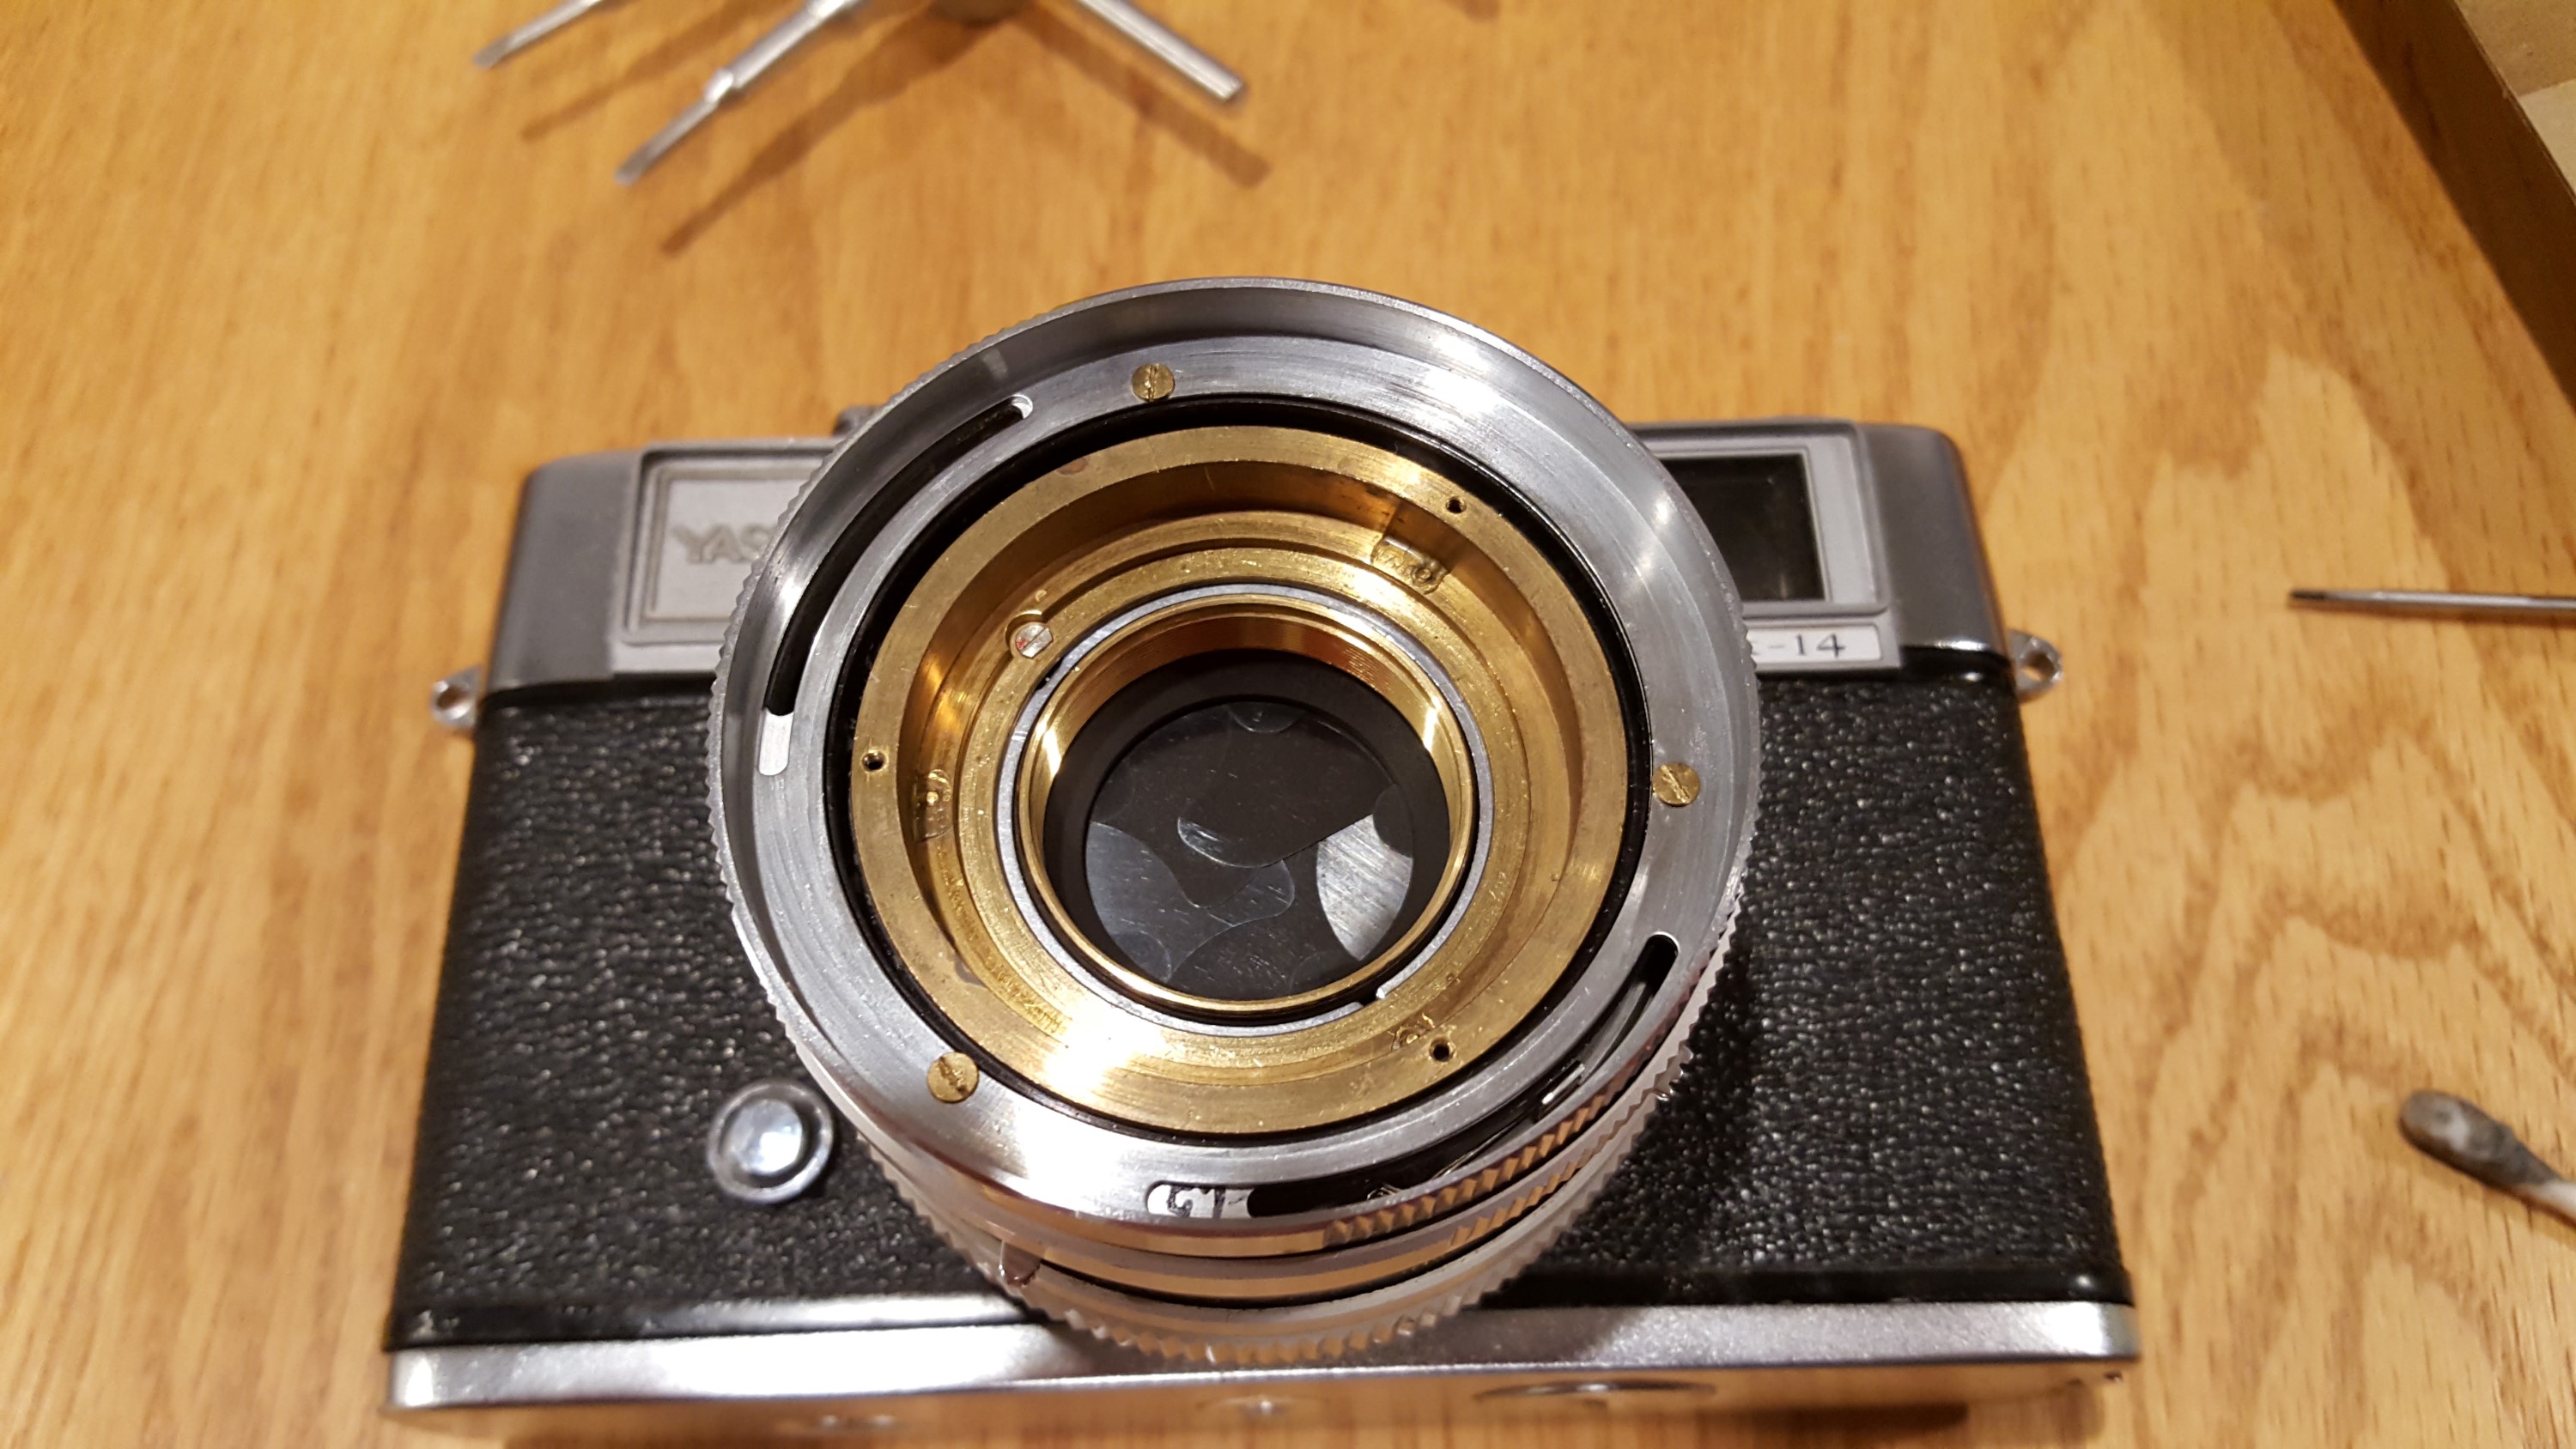
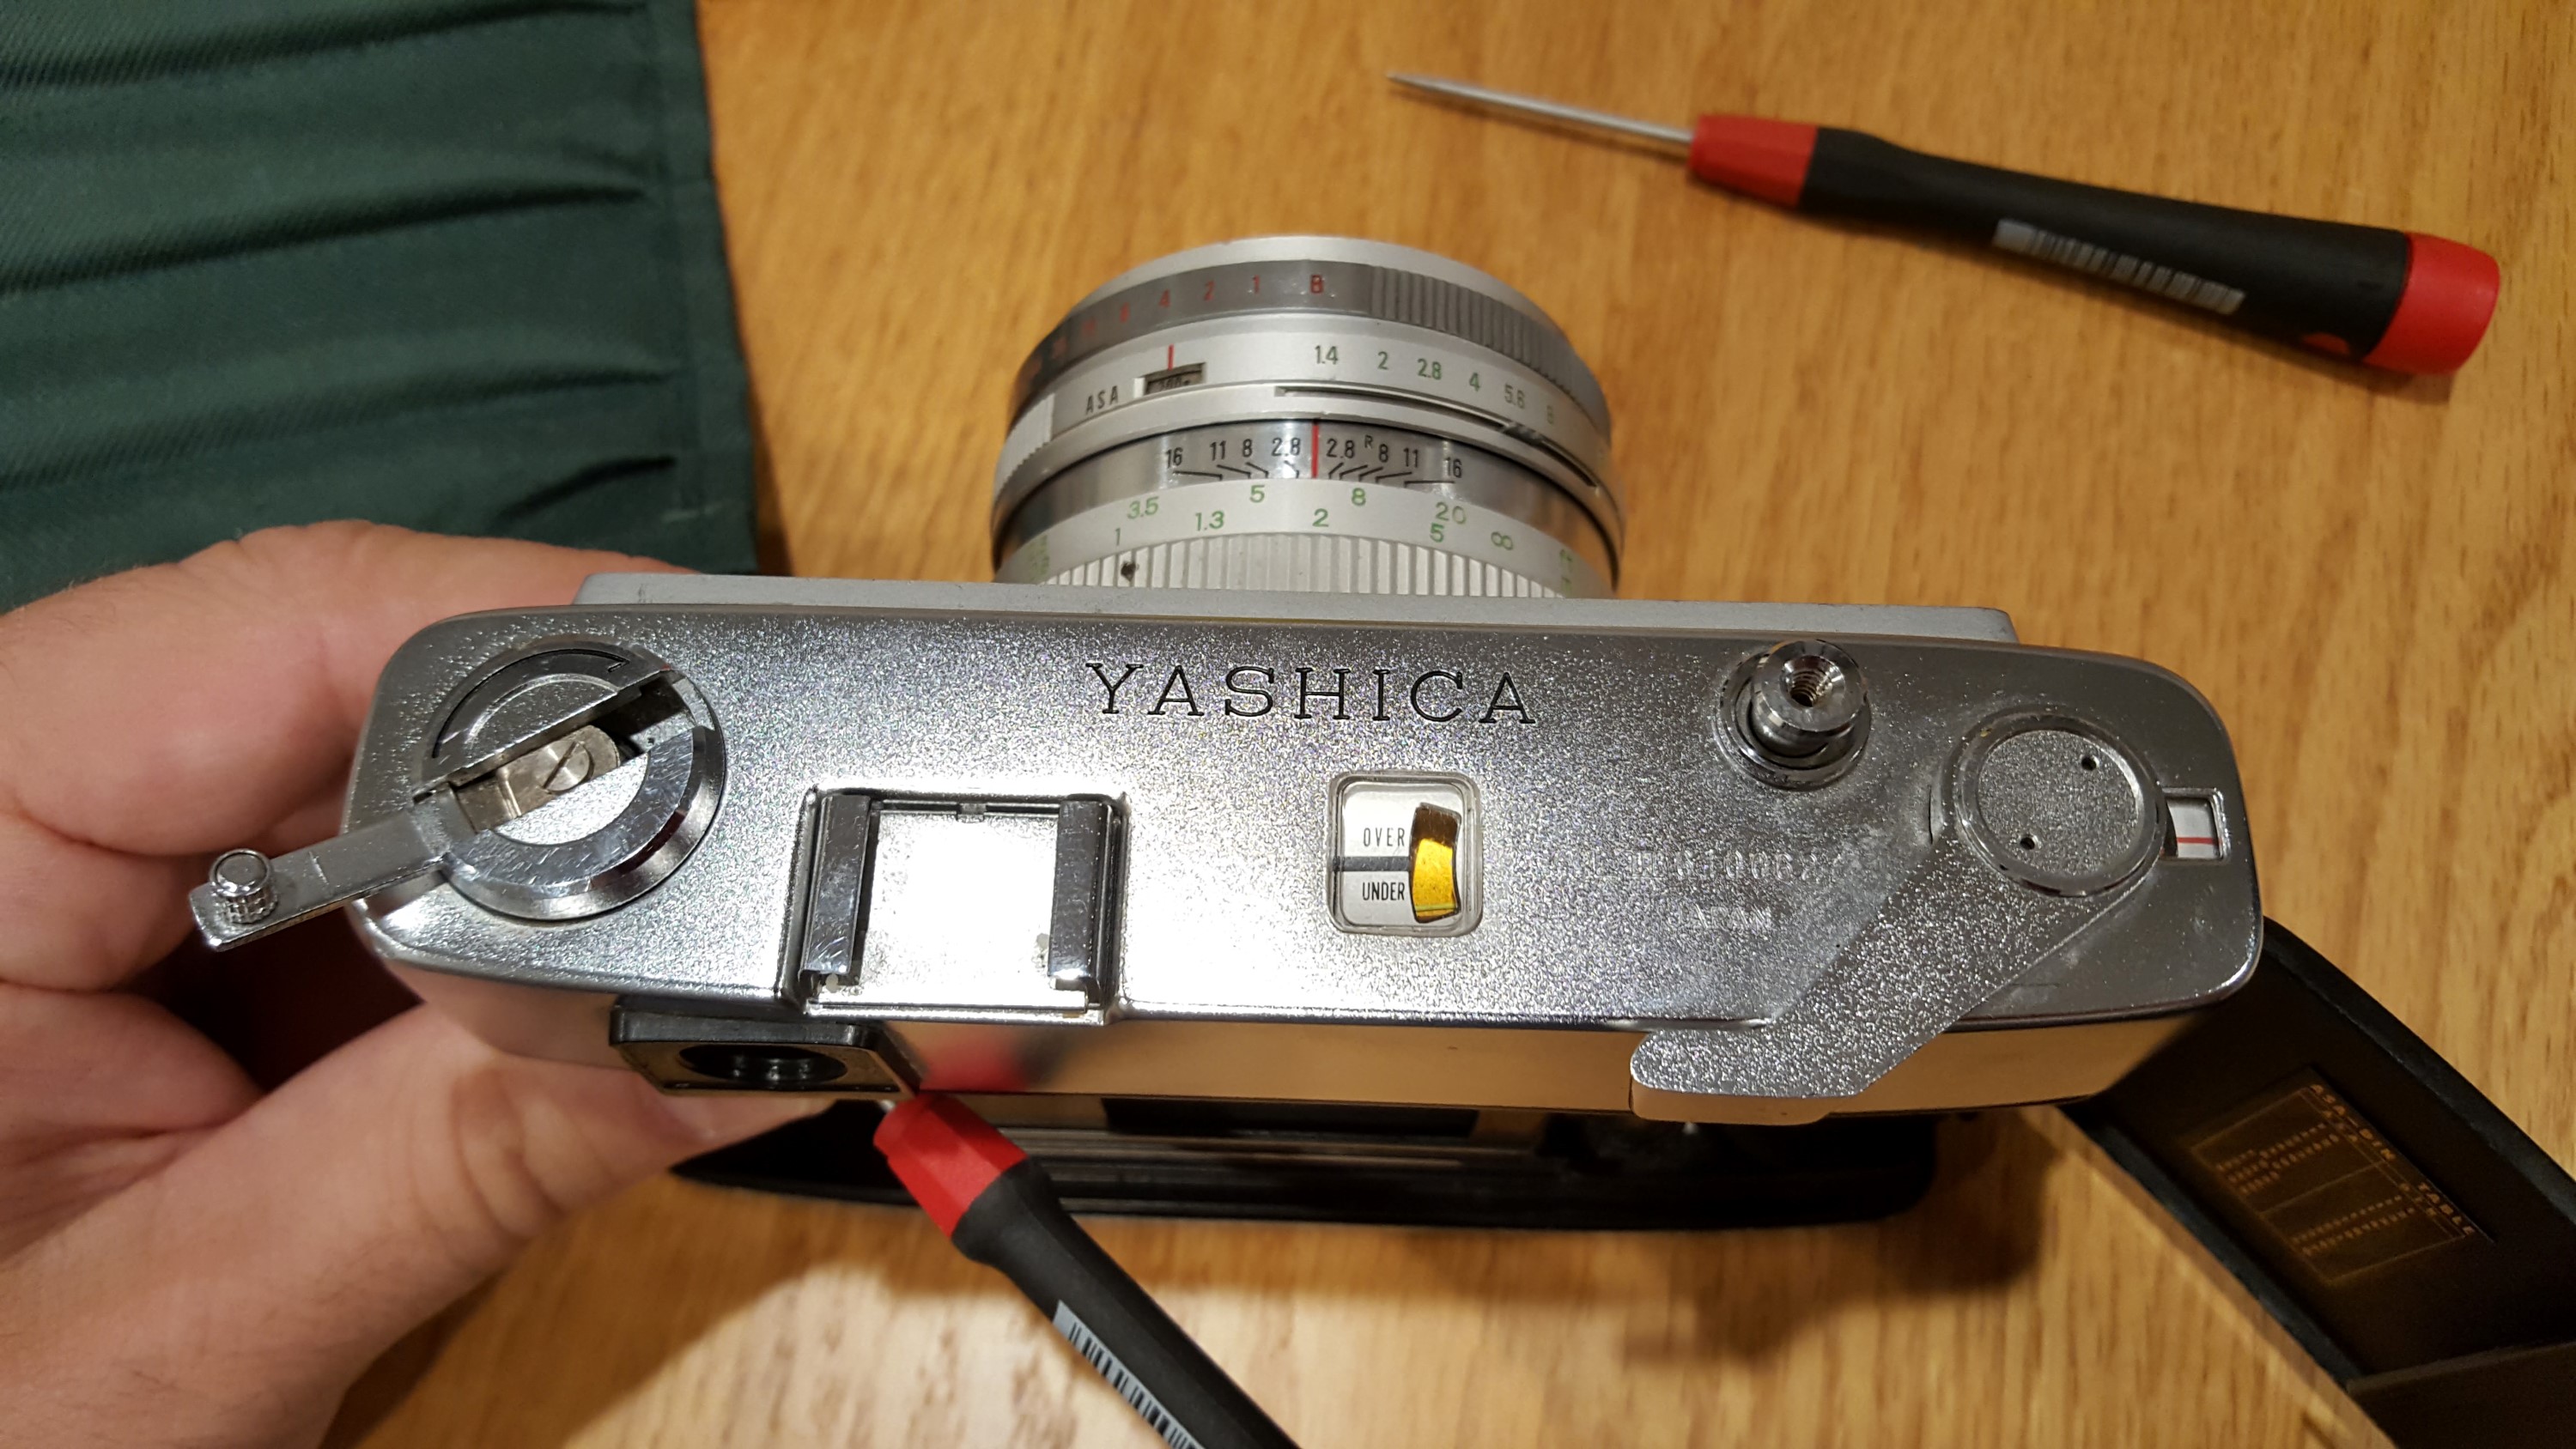
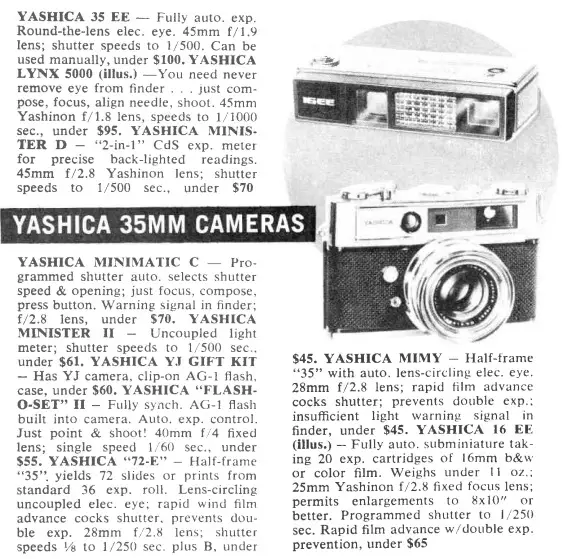
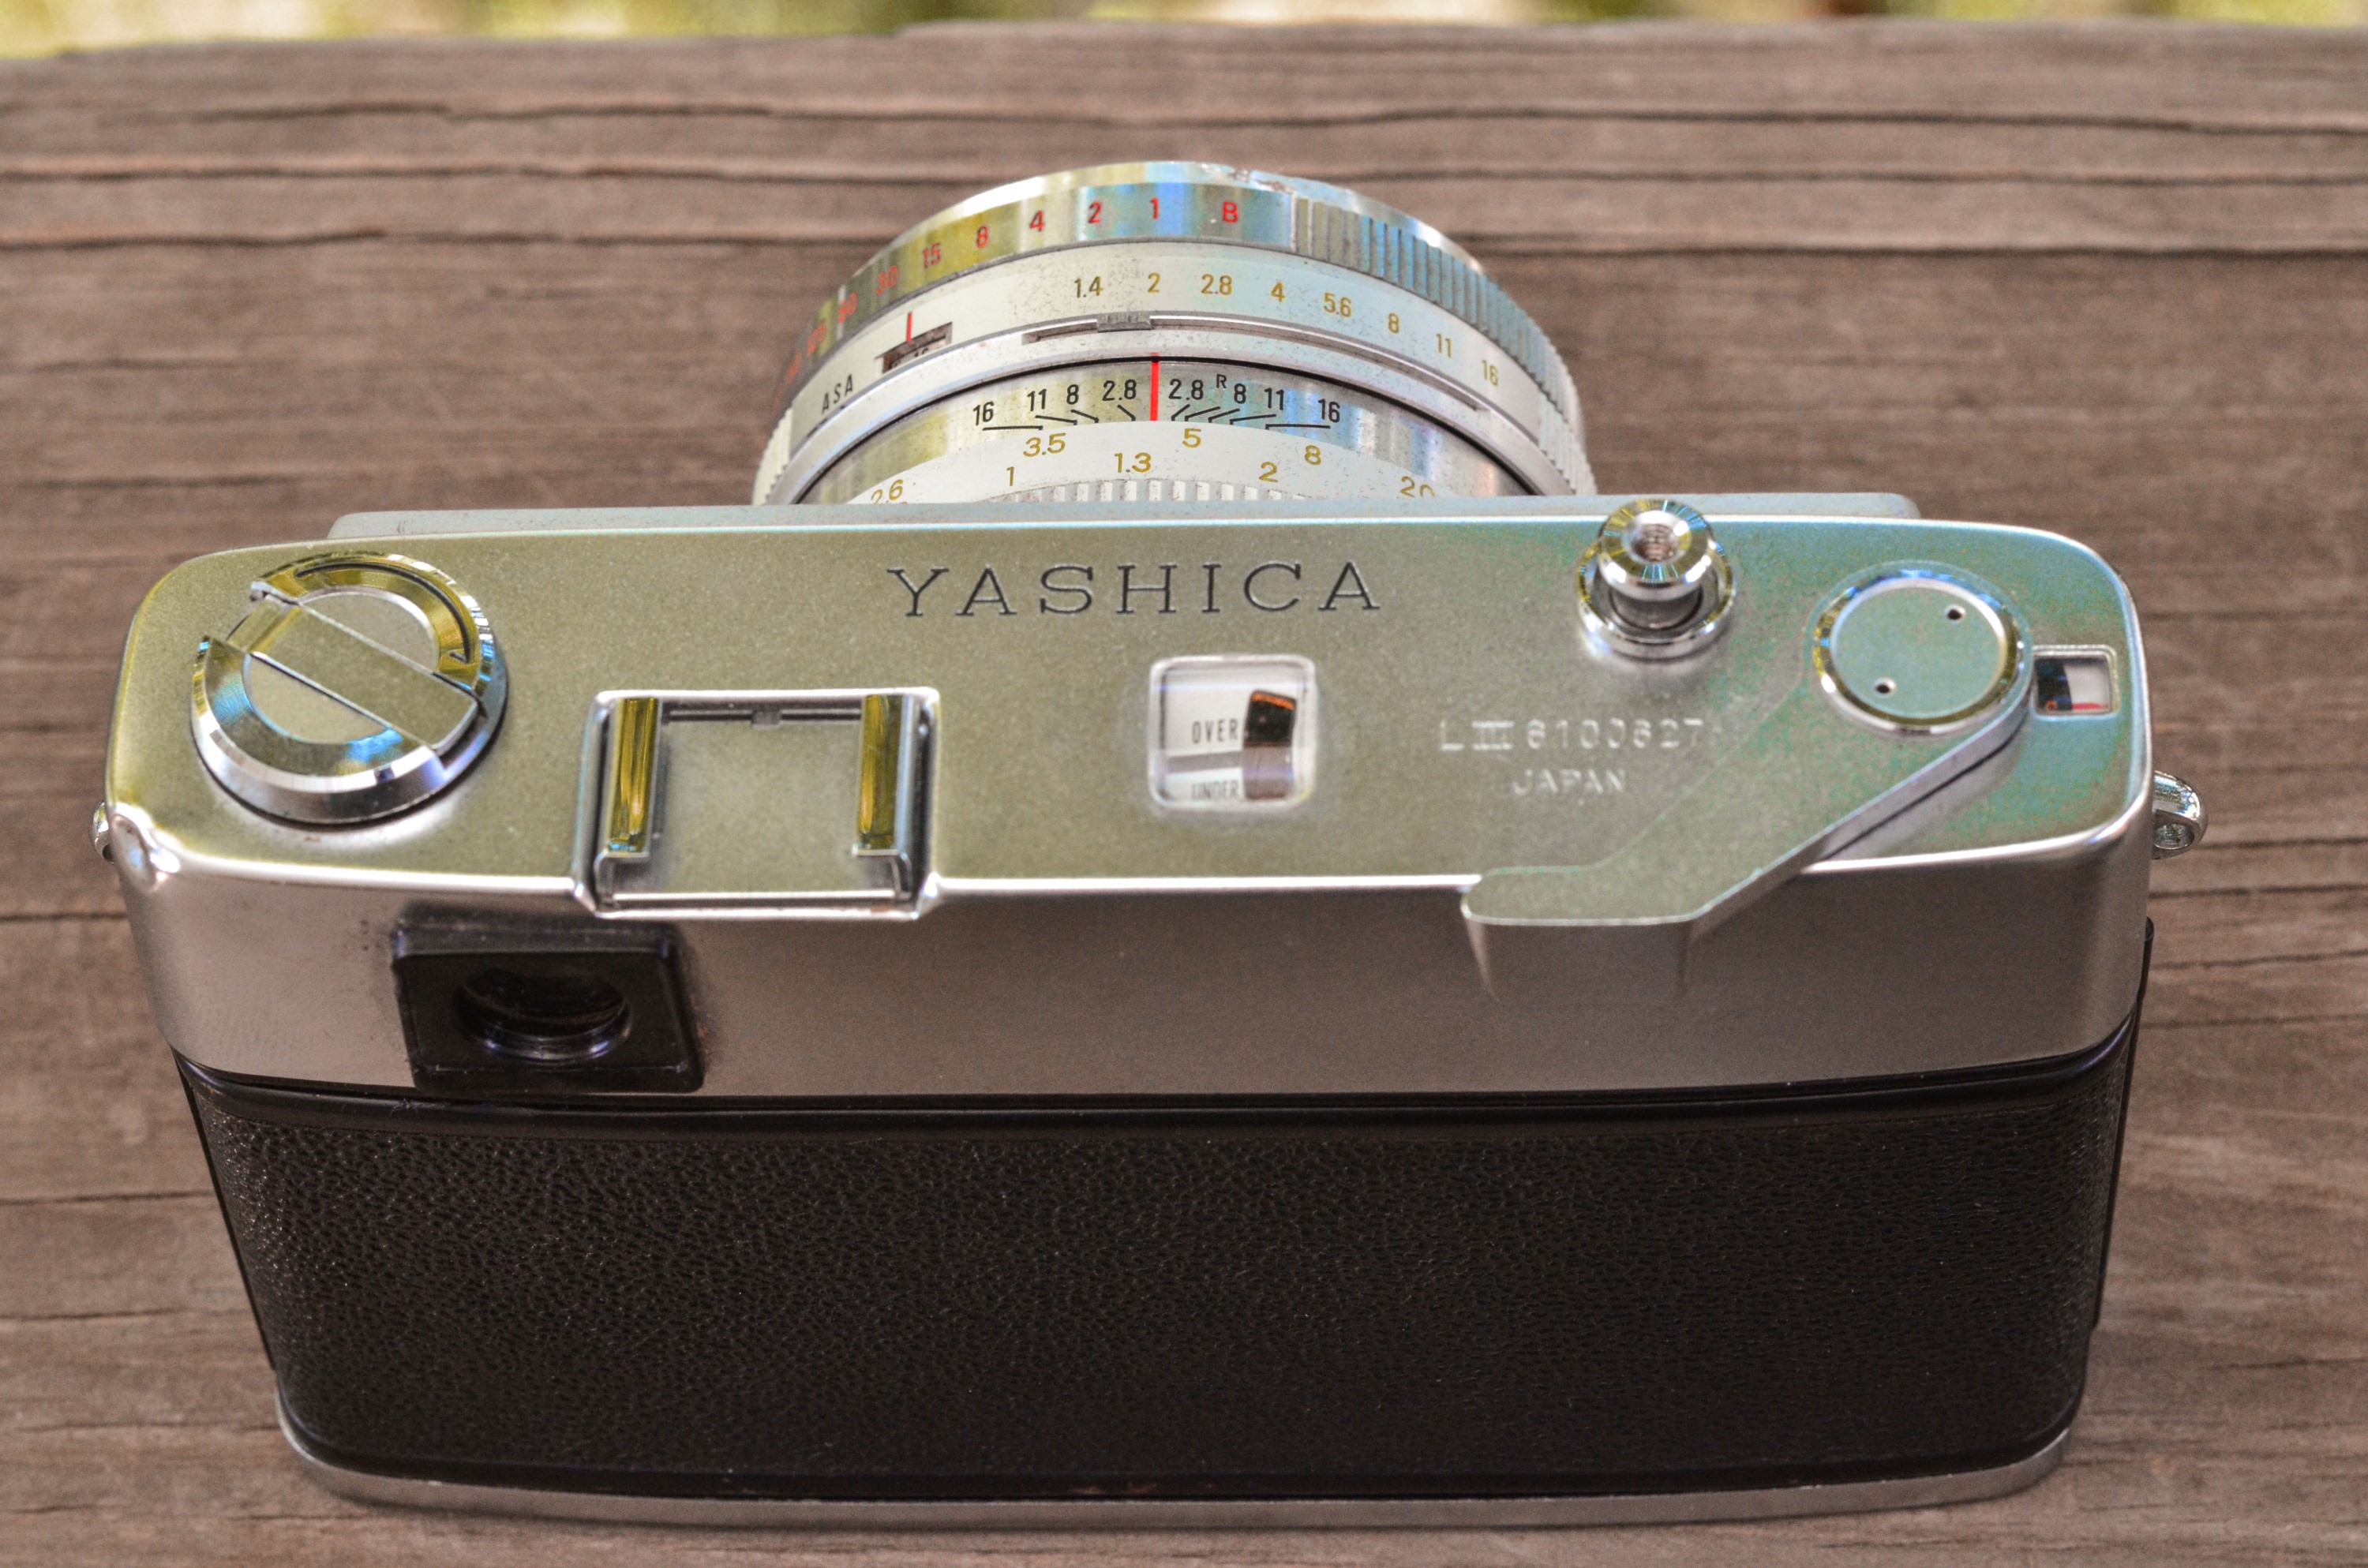
This is a Yashica Lynx-14 35mm rangefinder camera made in Japan starting in 1965. The Lynx was Yashica’s top of the line 35mm rangefinder series in the 1960s. The first two models, the Lynx 1000 and 5000 both had fast f/1.8 lenses with modern light meters. Then in 1965, Yashica upped the ante and replaced both models with this Lynx-14 and gave it a huge 7-element f/1.4 lens. The Lynx-14 was one of the only fixed lens rangefinders ever made with an f/1.4 lens making it ideal for low-light photography. The large and bright lens was extremely well built, as was the rest of the camera making it extremely heavy and expensive. The Lynx 14 and it’s replacement, the 14E, were in production for a little over 5 years, eventually being discontinued in the early 1970s in favor of the Yashica Electro.
Film Type: 135 (35mm)
Lens: Yashinon 45 mm f/1.4 coated 7 elements
Focus: 2.6 feet to Infinity
Type: Coupled Rangefinder
Shutter: Copal SVE Leaf
Speeds: B, 1 – 1/500 seconds
Exposure Meter: CdS body mounted meter
Battery: PX625 1.35v Mercury (for meter only)
Flash Mount: Coldshoe and M and X Flash PC Sync
Manual (similar model): http://www.cameramanuals.org/yashica_pdf/yashica_lynx-14e.pdf
History
The Yashica Camera Company originally started as two separate Japanese companies both who made cameras along with other products.
In 1940, several ex employees of Canon branched off to form the Kōgaku Seiki Company. In 1942, they released their first model called the Nippon, which was a Japanese clone of the popular German Leica III.
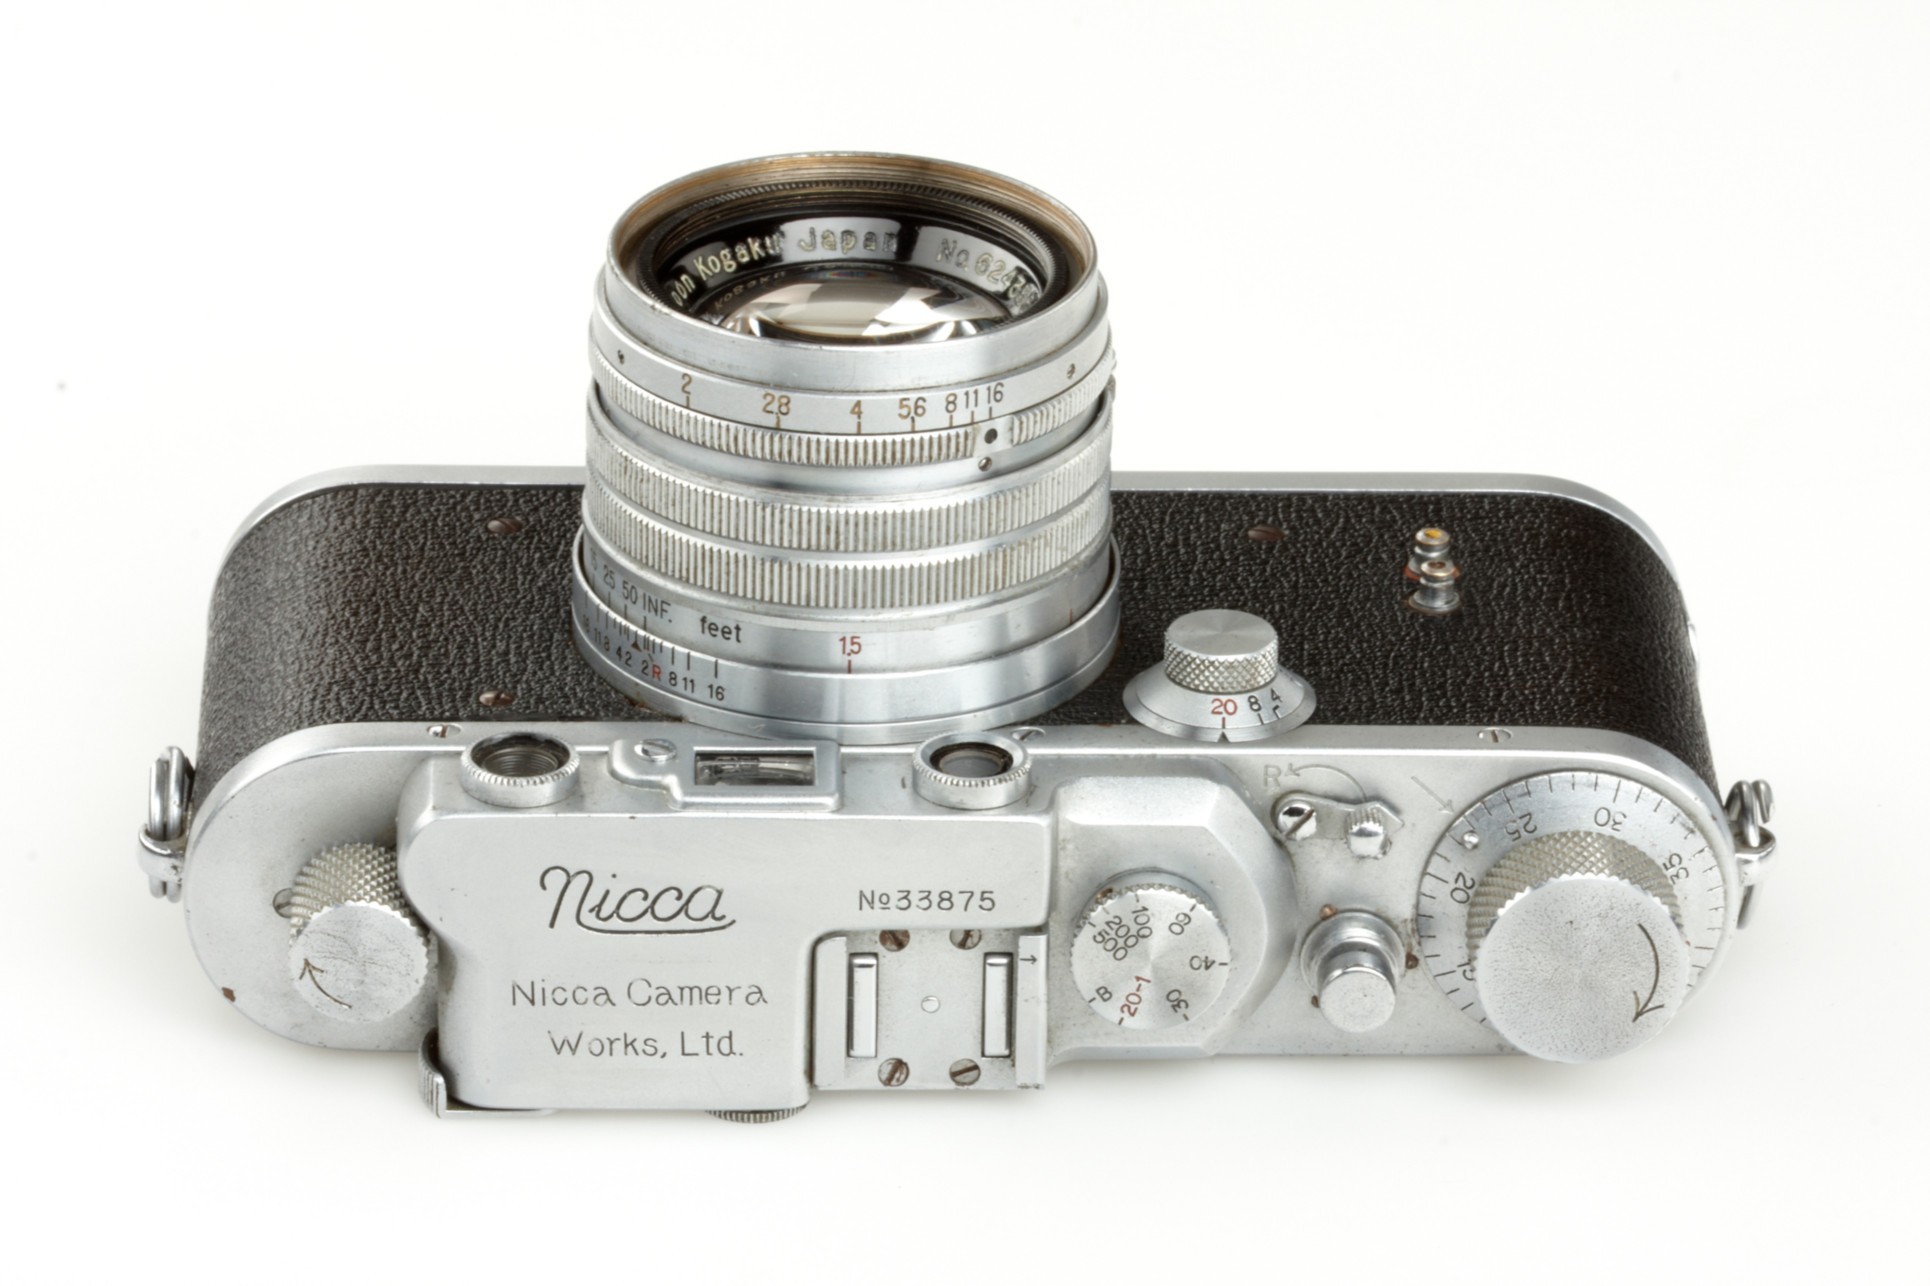
Meanwhile in 1949, another Japanese company called Yashima Seiki was founded who primarily made electronic parts for clocks. They eventually moved onto camera parts and released their first camera, the Pigeonflex in 1953 which was based off another German camera, the Rolleicord. In 1948, Kōgaku Seiki Company changed its name to Nippon Camera Works, and a year later changed it again to Nicca Camera Works. The company continued to build clones of Leica cameras. Although these early Nicca cameras were did not sell in large numbers, they were well respected and remain valuable collector’s items today.
During this time, both the Yashima and Nicca companies made good cameras, but after Japan’s defeat in World War II, not many people outside of Japan were interested in a Japanese copy of a German camera. Despite their success at making good cameras, both companies struggled to sell their models in large volumes.
In 1958, Yashima would acquire Nicca Camera Works and form a single company. They combined the resources of both companies and changed their name to Yashica Co., Ltd. which itself was a combination of both company’s names. Yashica would continue to release new TLR models, but would release two previous Nicca models under the Yashica nameplate, called the Yashica YE and YF which used LTM screw mount lenses. Both of these models strongly resembled the Leica IIIf and would be the last Yashica models with an interchangeable lens mount.
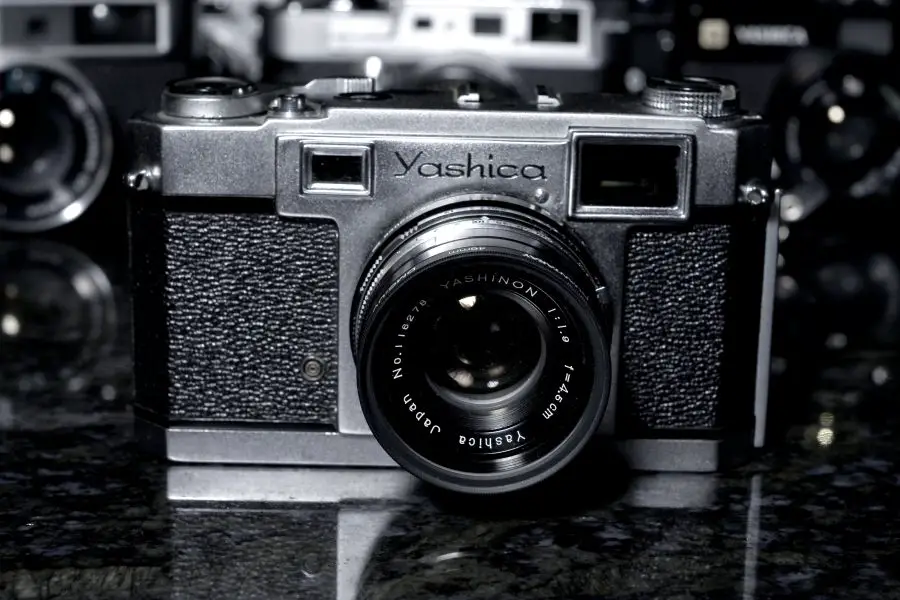
Later that year, Yashica would release it’s first fixed lens rangefinder, the Yashica 35. Although an all new design, this camera had design elements that loosely resembled Nikon’s S-series rangefinder of the same era. With the release of the Yashica 35, the company would begin a decade long blitzkrieg of new TLR, SLR, and rangefinder models. Yashica would release several lines of cameras with nearly constant revisions and improvements.
I won’t cover all of the rangefinders here, but starting in 1960, most Yashica rangefinders were split between the Minister and the Lynx lines. The Lynx cameras represented the company’s top of the line range with higher spec lenses, larger bodies and more innovative features. Each year a handful of new models from both lines would be released.
The fist in the Lynx series was the 1000. It’s name signified it’s Copal SVL shutter which had a top speed of 1/1000th of a second. Although this was a common speed on SLR and rangefinder cameras with focal plane shutters, it was far less common on leaf shutters like that of the Lynx.
The Lynx 1000 had a very good Yashinon 6 element 45mm f/1.8 lens. It featured a selenium cell meter with a match needle “over/under” display on both the top plate of the camera and visible in the viewfinder. It was a robust camera that was very well built and combined with the excellent lens and battery-less meter, was a very reliable camera.

The Lynx 1000 was in production for a couple of years before two models replaced it, the Lynx 5000 in 1962, which still had the same 6 element Yashinon 45mm f/1.8 lens but came with it a bevy of new features, including a CdS meter powered by a PX625 battery, and the Lynx-14 in 1965, which had an all new 7 element f/1.4 lens. The new f/1.4 lens was the fastest lens available in any fixed lens rangefinder in the world, and to this day remains the only one I know of.
The Lynx-14 had all of the upgrades of the Lynx 5000, but due to the larger surface area of the larger lens, the top shutter speed was limited to 1/500 second. Both the Lynx 5000 and 14 used the same CdS meter powered by a single PX625 battery.
Finally, in 1968, Yashica would upgrade the 5000 and 14 models one last time, adding the letter ‘E’ to the end of the name. The big change with the ‘E’ models was a more advanced electronic meter that featured “Over” and “Under” arrows visible in the viewfinder instead of the match needle system. The new metering system was said to be more reliable, but also required more power, so a switch to the larger PX640 battery was necessary. This can be seen as a ‘con’ to modern collectors as PX640 equivalent batteries are much more difficult to come by these days, whereas the smaller PX625 is still pretty common.
The following chart shows the notable differences between the 5 Lynx models. It’s worth noting that every Lynx model had features like parallax correction for closeups and fully mechanical shutters that would work with a dead battery.
| Year Released | Lens | Top Speed | Filter Size | Battery | Meter | |
| Lynx 1000 | 1960 | 45mm f/1.8 | 1/1000 | 46mm | none | Selennium |
| Lynx 5000 | 1962 | 45mm f/1.8 | 1/1000 | 46mm | PX625 | CdS |
| Lynx 5000e | 1968 | 45mm f/1.8 | 1/1000 | 46mm | PX640 | CdS |
| Lynx-14 | 1965 | 45mm f/1.4 | 1/500 | 58mm | PX625 | CdS |
| Lynx-14e | 1968 | 45mm f/1.4 | 1/500 | 58mm | PX640 | CdS |
Although these 5 were the only ‘official’ Lynx models, Yashica had two other rangefinders, called the Yashica J and Yashica Campus, which were built upon the same body as the Lynx, but without any type of meter, a lower spec Yashinon f/2.8 lens, and in the case of the Yashica J, a top shutter speed of 1/300th of a second.
Repairs
I found myself the proud owner of not one, but two Yashica Lynx-14s, both of which did not work when I received them. The first one was in nice cosmetic shape and at first glance, the shutter seemed to be working properly. Sadly, upon further examination, I noticed that one of the shutter blades was stuck or missing. As significant as a missing or stuck blade might seem, the rest of the camera worked properly. I picked up a PX625 battery and confirmed that the meter was working. I was pretty happy with the camera, and felt that as long as I could resolve the shutter issue, I’d have a fine camera.
Then, without warning, the shutter stopped working at all. I couldn’t get a single speed to fire. I had worried that whatever happened to the ‘missing’ shutter blade had possibly broken off and gotten stuck somewhere else. Hoping that this was merely a case of a jammed blade somewhere in the shutter, I still thought that perhaps a generous application of naphtha oil would resolve the issue. While I don’t have a ton of experience with Copal shutters, I felt as though I should be able to get deep enough into the camera to see what was wrong.
I was wrong.
Sadly, that attempt at fixing the camera came to a screeching halt as it became very clear that the Lynx was more complicated of a camera than I had experience with. After getting into the lens, pieces just started falling out and I knew that I would never get this thing back together.
Then, as fate would have it, I had a second opportunity to pick up another broken Lynx. I can’t remember what I paid for it, but it was cheap and I felt that perhaps with the lessons I learned with the first Lynx, I might have a better chance to get this one going, or at the very least, somehow combine the two cameras to make one good one.
Upon receiving the camera, it wasn’t in as nice of physical condition as the first one. The top plate and front filter ring were dented and the shutter didn’t fire at all. Armed with my Wiha precision screwdrivers and a lens spanner, I slowly, and carefully began disassembling the camera.
As is my typical disclaimer, the instructions that follow should not be seen as an authoritative guide for repairing a Yashica Lynx. I am not a camera repair technician. I am just a guy who likes to tinker, and accepts the very real possibility that anything I take apart may never go back together again. If you want to try this yourself, go for it, but realize that you could do everything exactly as I did, and still have different results.
 Step 1:
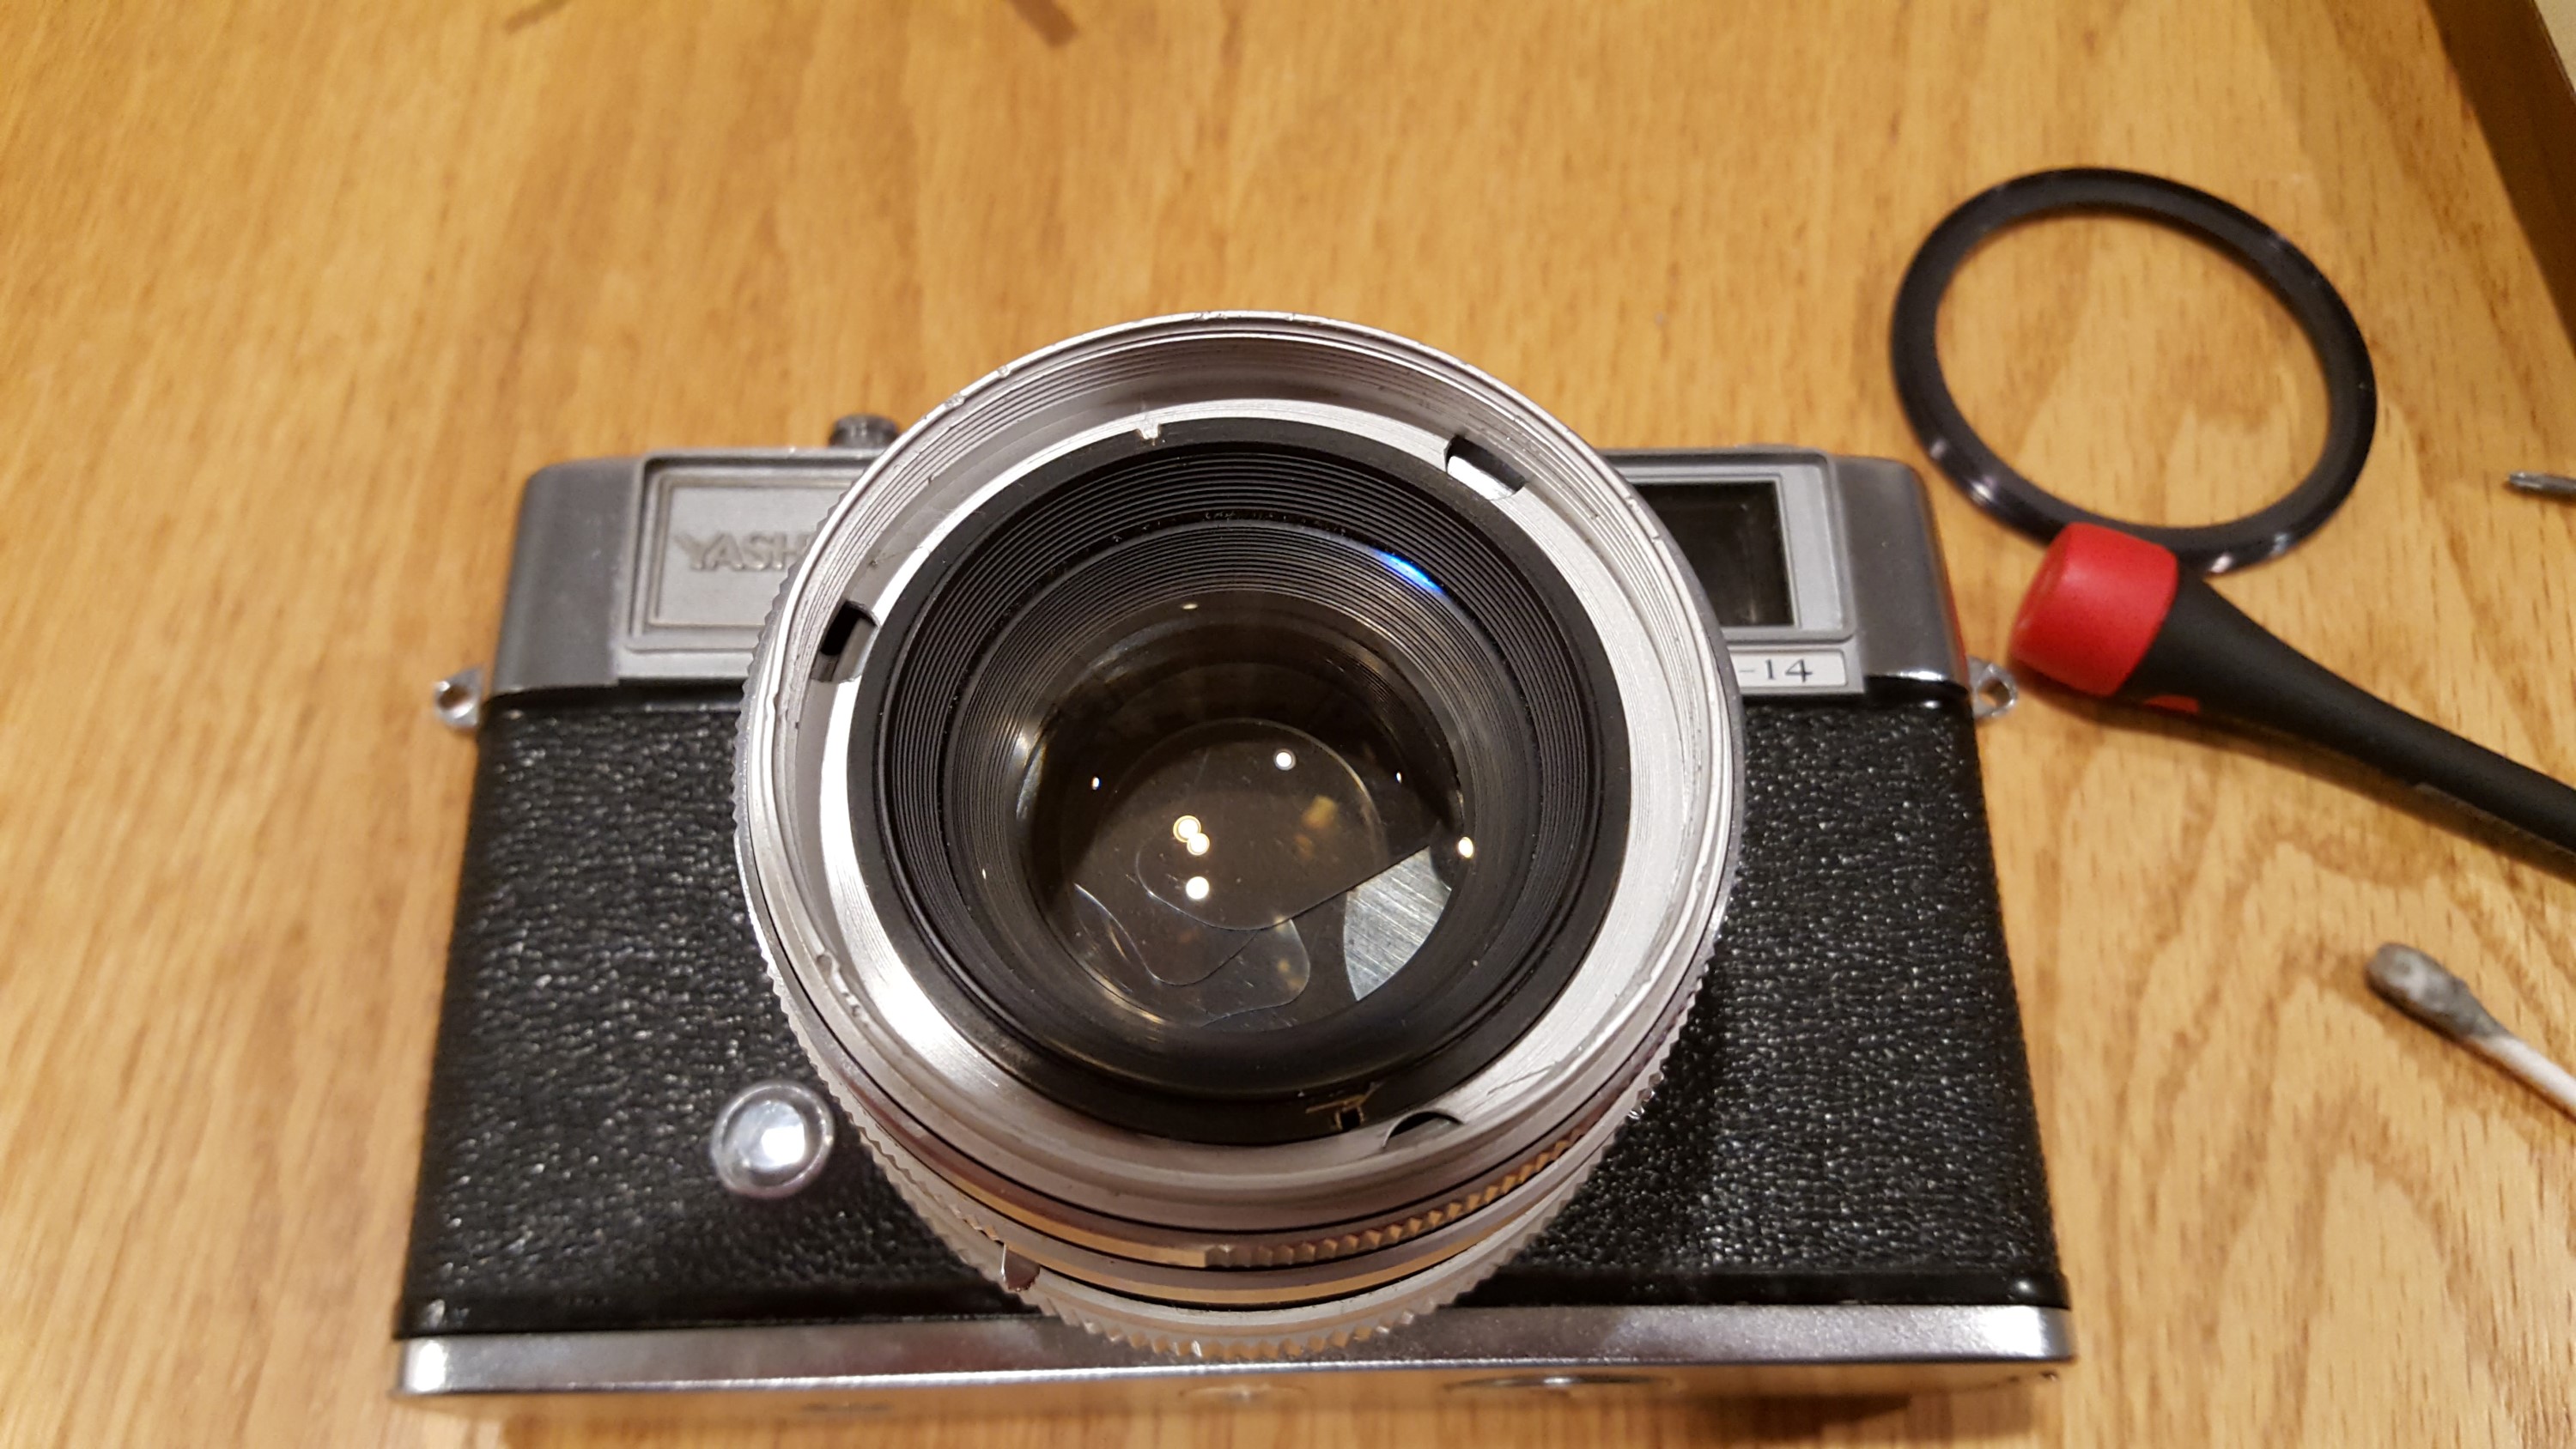
Using a lens spanner, unscrew the black plate with the ‘YASHINON 1:1.4 f=45mm’ lettering on it. If your filter ring is dented or damaged, this may be difficult to unscrew. You may need to massage the filter ring to get it moving. After removing the black plate, unscrew the outer lens element and put in a safe location. I didn’t need any special tools to unscrew the lens element, it came out by hand.
 Step 2:
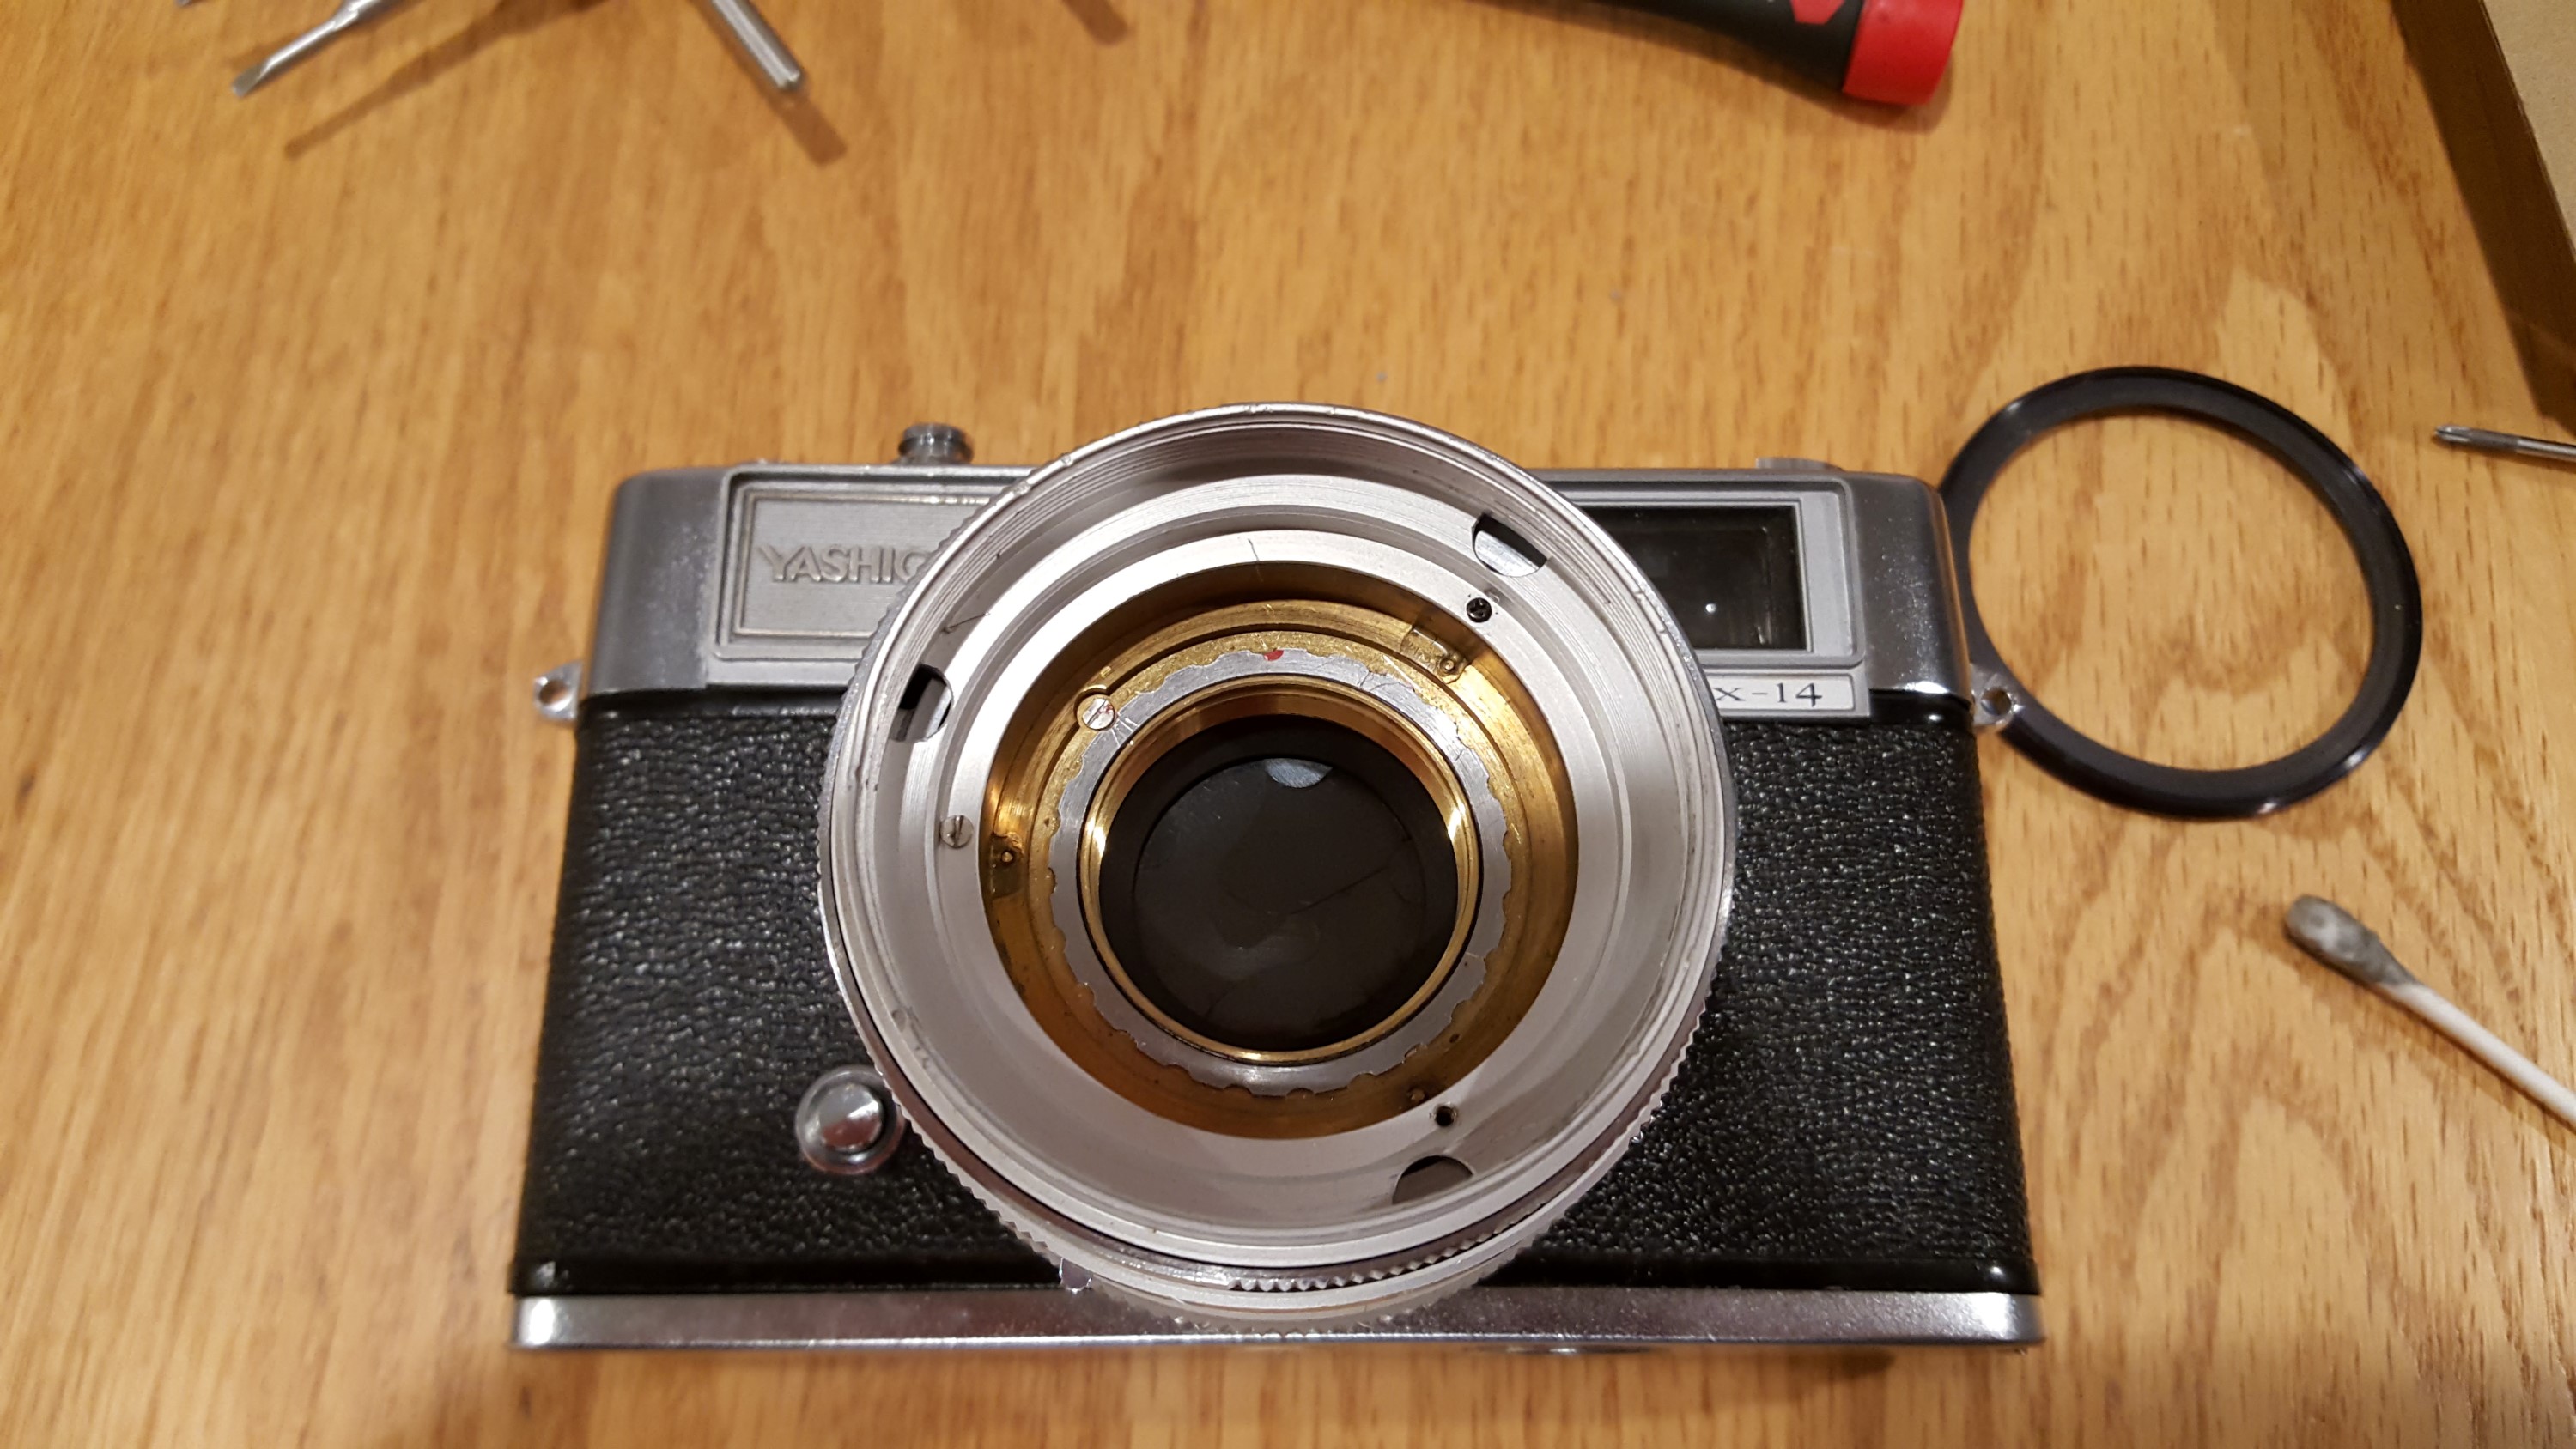
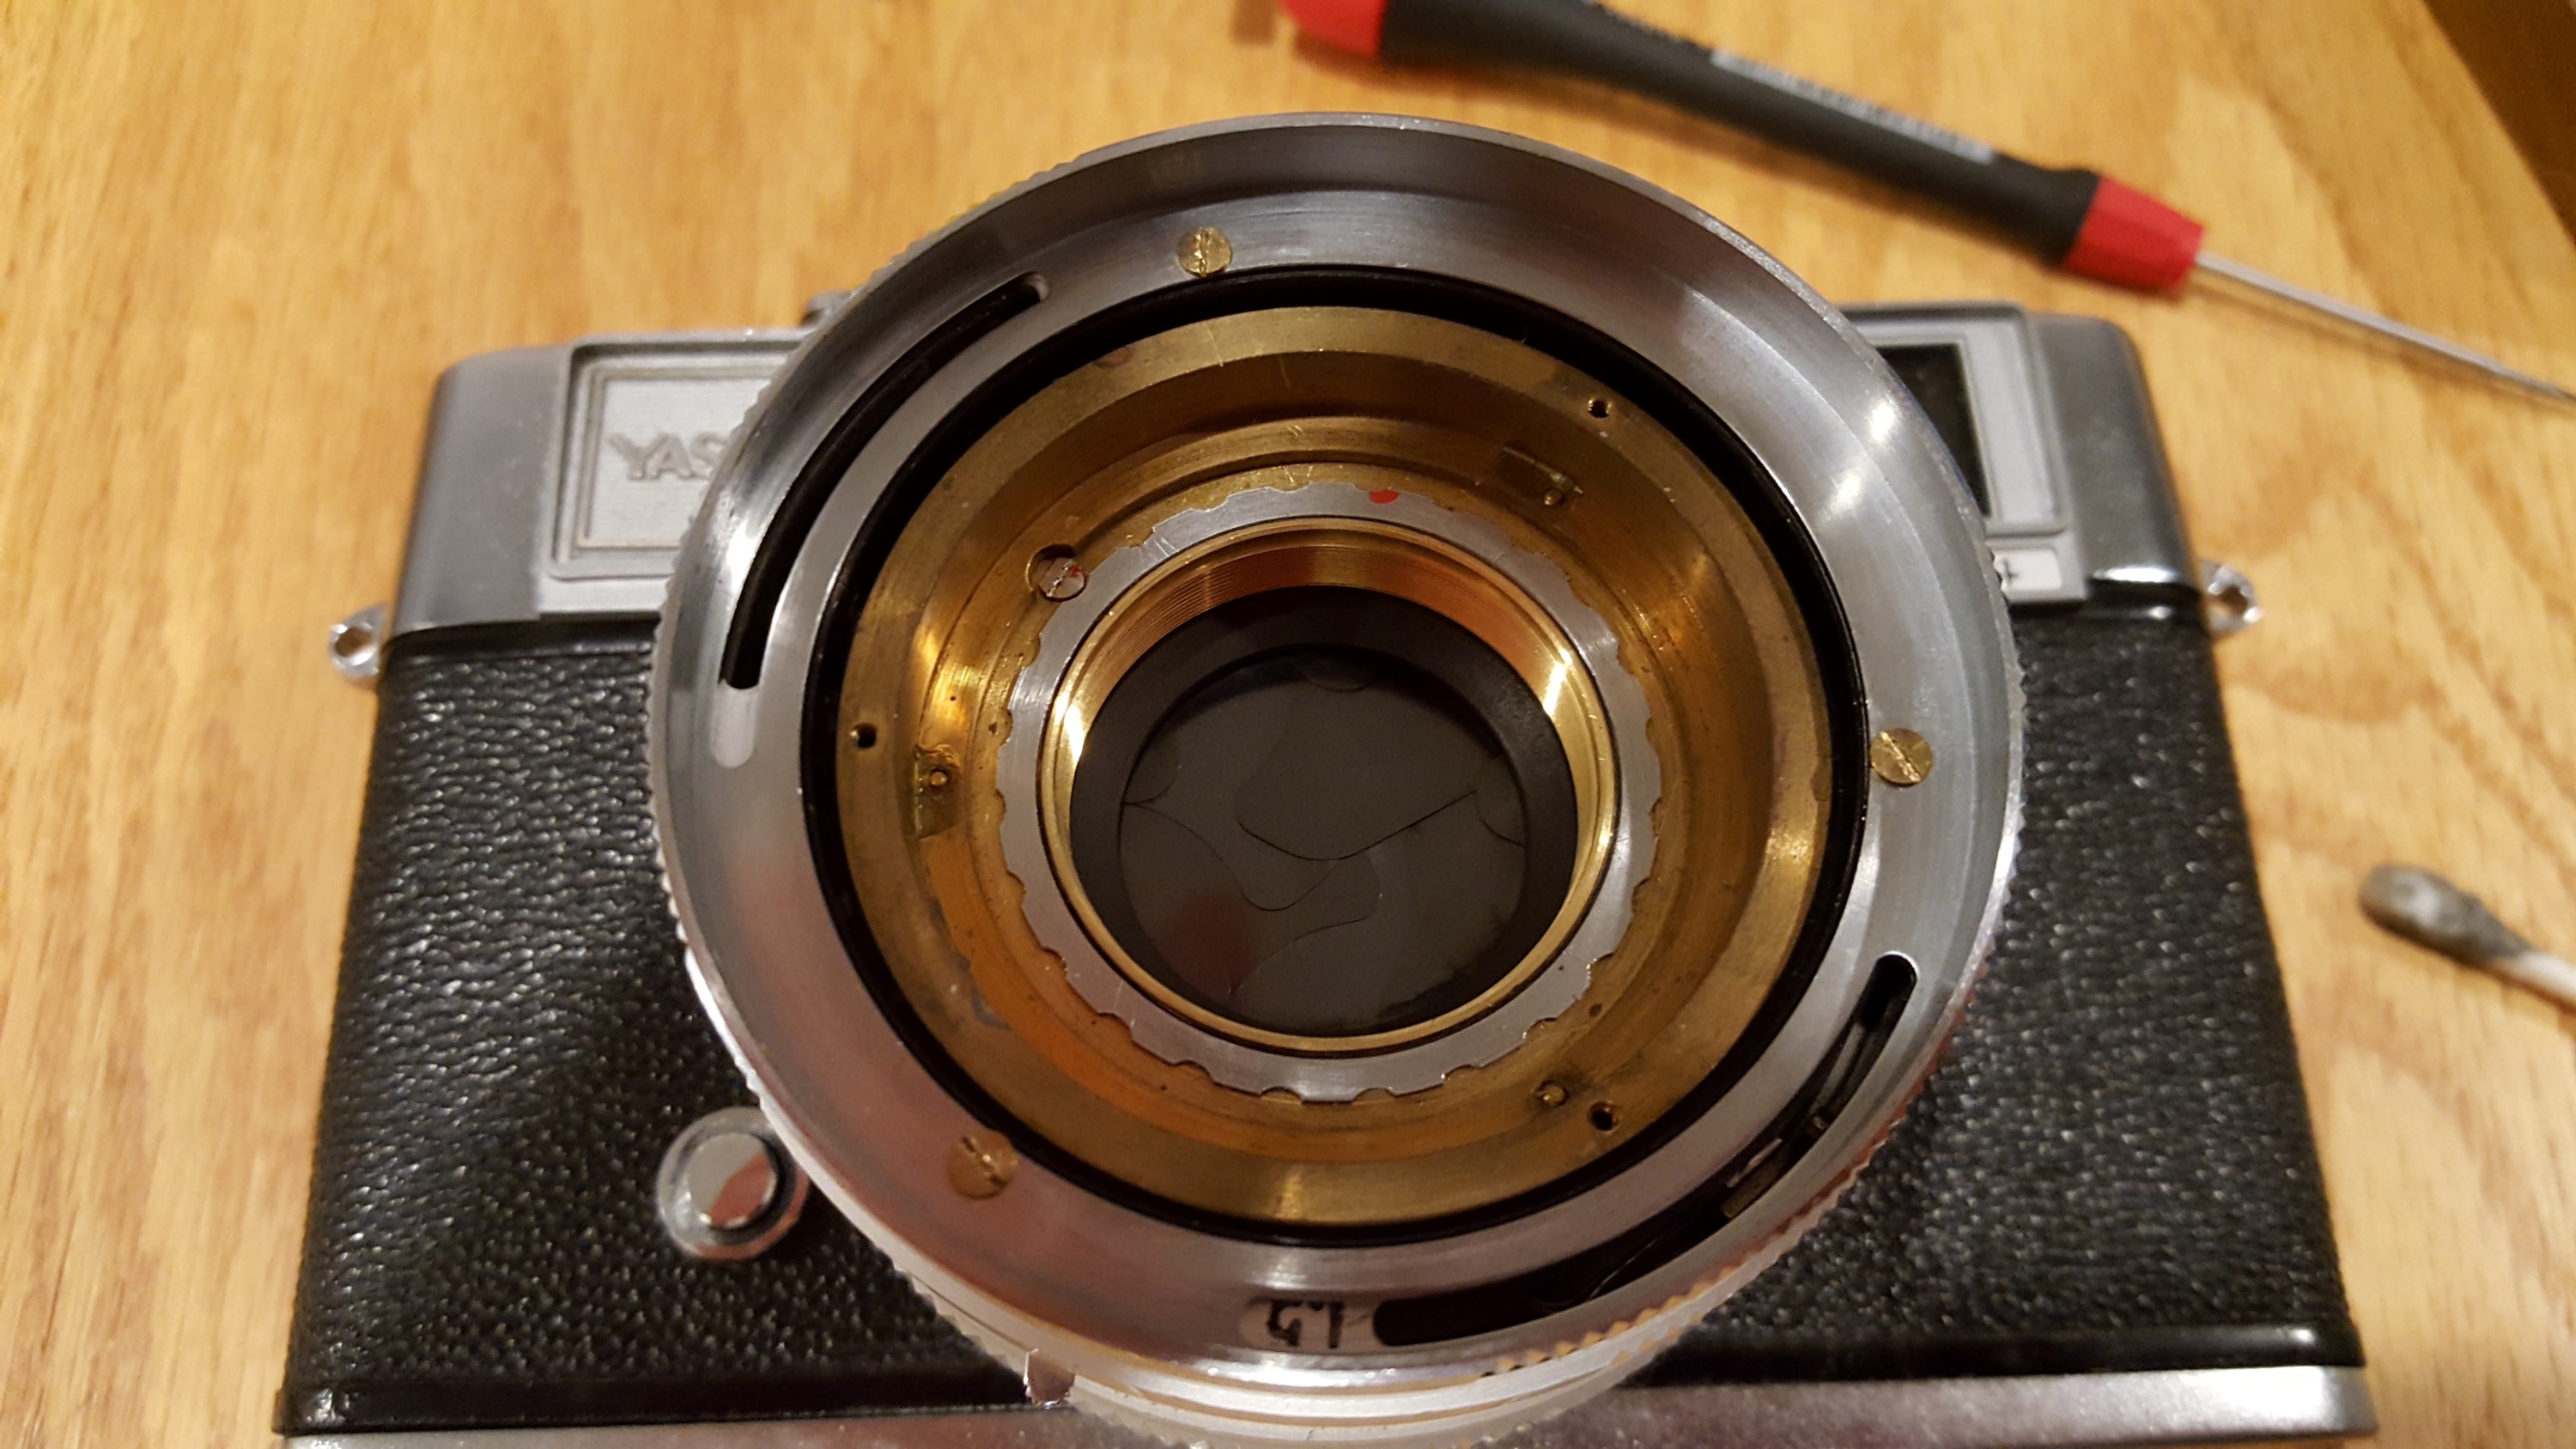
Remove the 3 screws holding the silver ring that is below the outer lens element. Save these screws as they are very small and easily lost.
 Step 3:
First, using a flat head screw driver, rotate the small screw near the 10 o’clock position, half a turn so that the flat side of the screw is facing the lock nut around the shutter opening. You will not be able to unscrew the lock nut if this screw is in it’s original orientation. You do not need to actually remove this screw.
Using your lens spanner, loosen the lock nut and unscrew it by hand. Be careful not to touch the shutter leaf blades.
 Step 4:
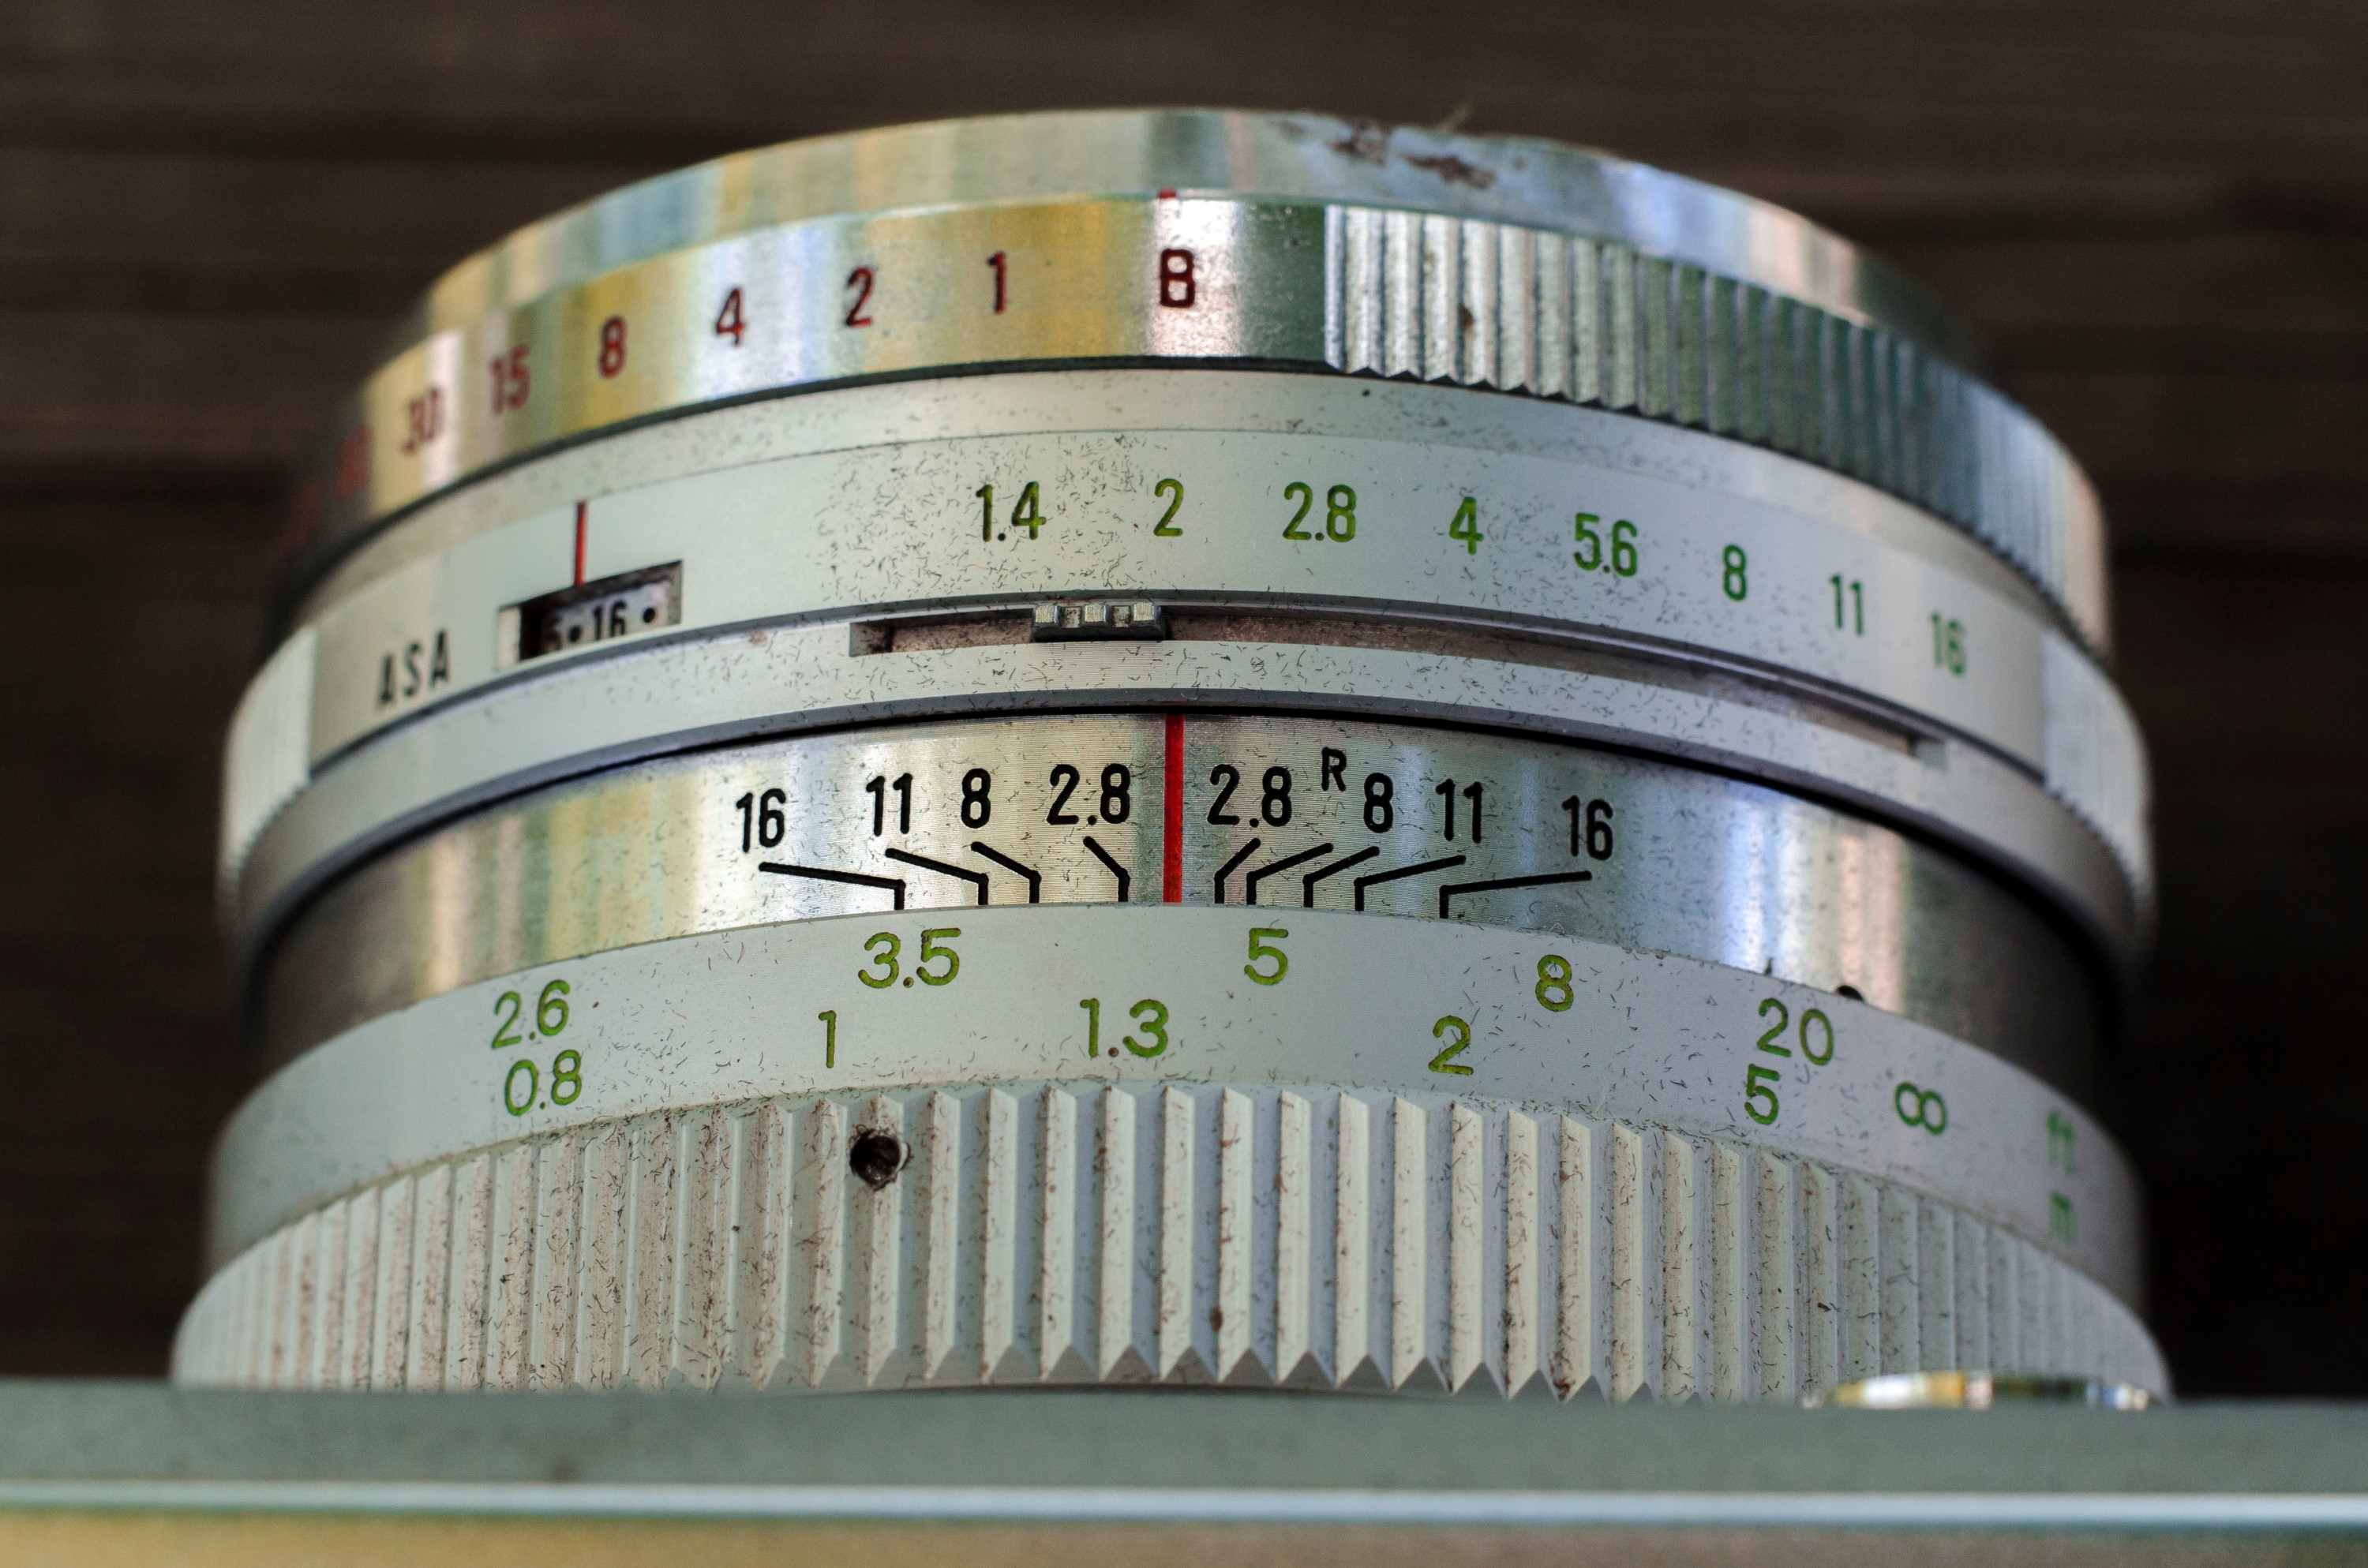
Lift up on the entire speed selector / ASA film speed ring. The brass inner ring will come up with it. This piece you just took apart can be further disassembled if you wish to clean inside of the ASA film speed opening. If you choose to do this, be very careful as there is a very tiny ball bearing that acts as a “click stop” for each film speed setting. I didn’t need to do this, but if you choose to do it, just be careful that you don’t lose that ball bearing. If you are not going to clean this piece, just set it aside.
 Step 5:
Next, lift straight up on the aperture selector ring. This ring has a metal linkage that goes behind the shutter to control the opening of the aperture iris. It may snag while lifting up on this ring, so be careful. Also, be careful of the two metal tabs on the left side of the lens which also stick out.
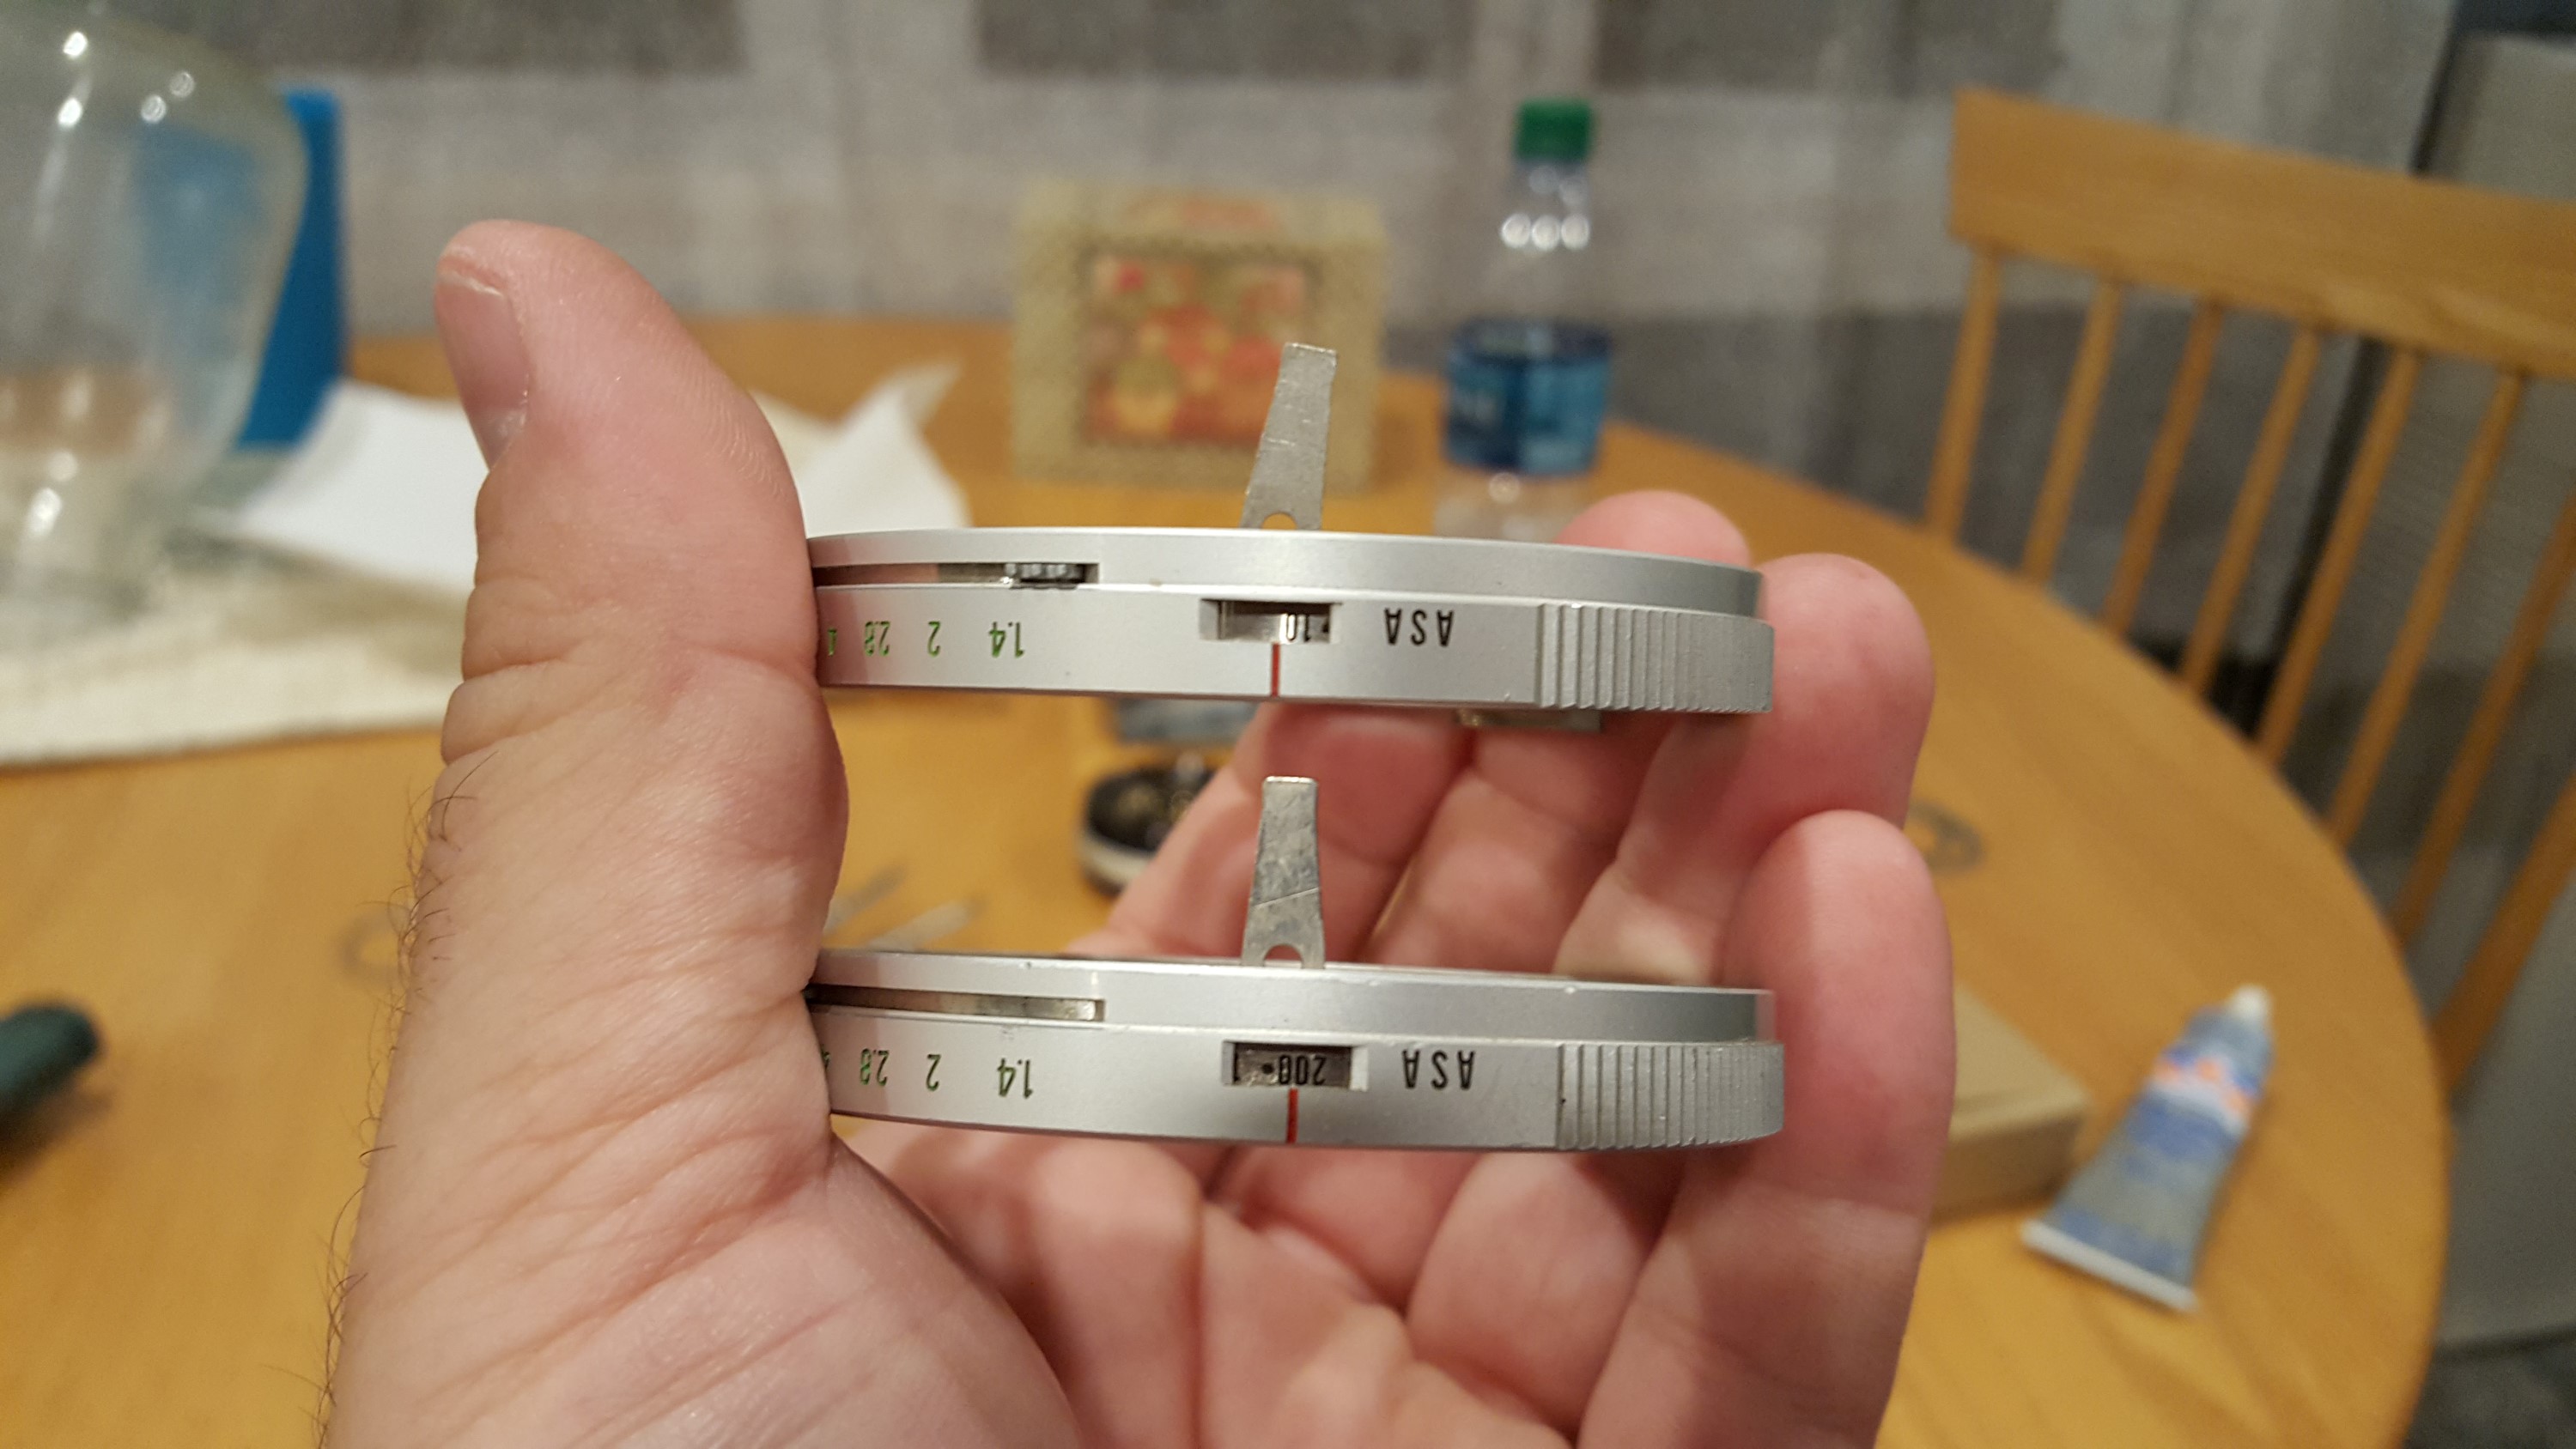
Once you have this ring out, look at the metal tab that is attached to the ring and compare it to the image to the right. This tab should look like the one on the bottom in the image. It should stick straight up at a 90 degree angle. If it is bent, like in the top image, your camera may have trouble selecting the correct aperture iris size. In my case, I had the luxury of two Lynxes, so I swapped out the bent one for the good one. If you do not have a parts Lynx, you should attempt to bend this metal tab as close as you can to make it look like the one on the bottom in the image to the right. Be extremely careful not to break this tab though, because if you do, you will never be able to change aperture sizes.
 Step 6:
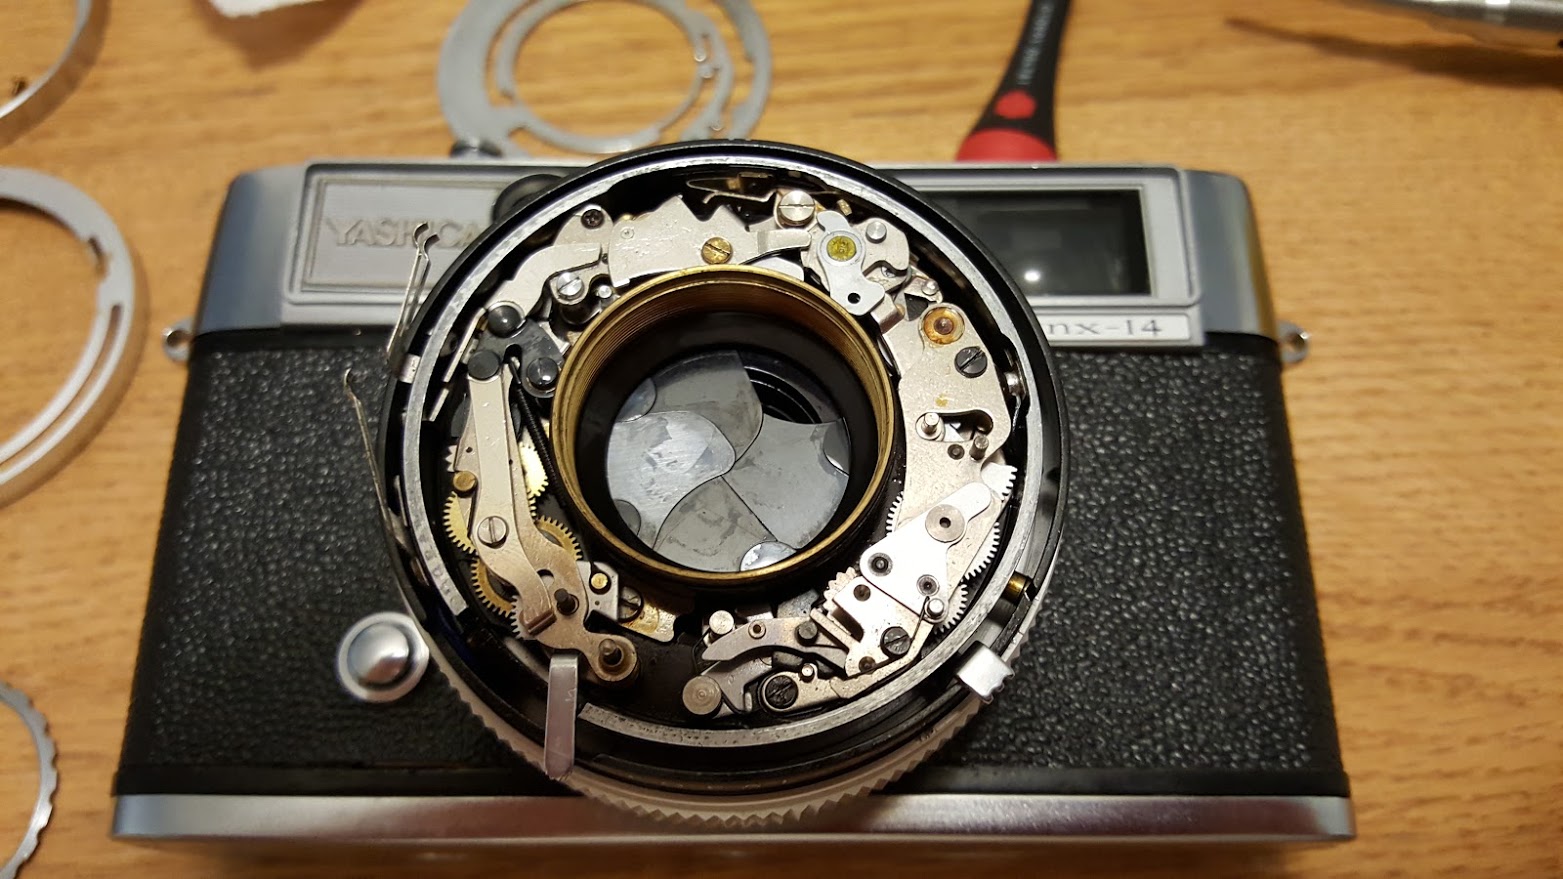
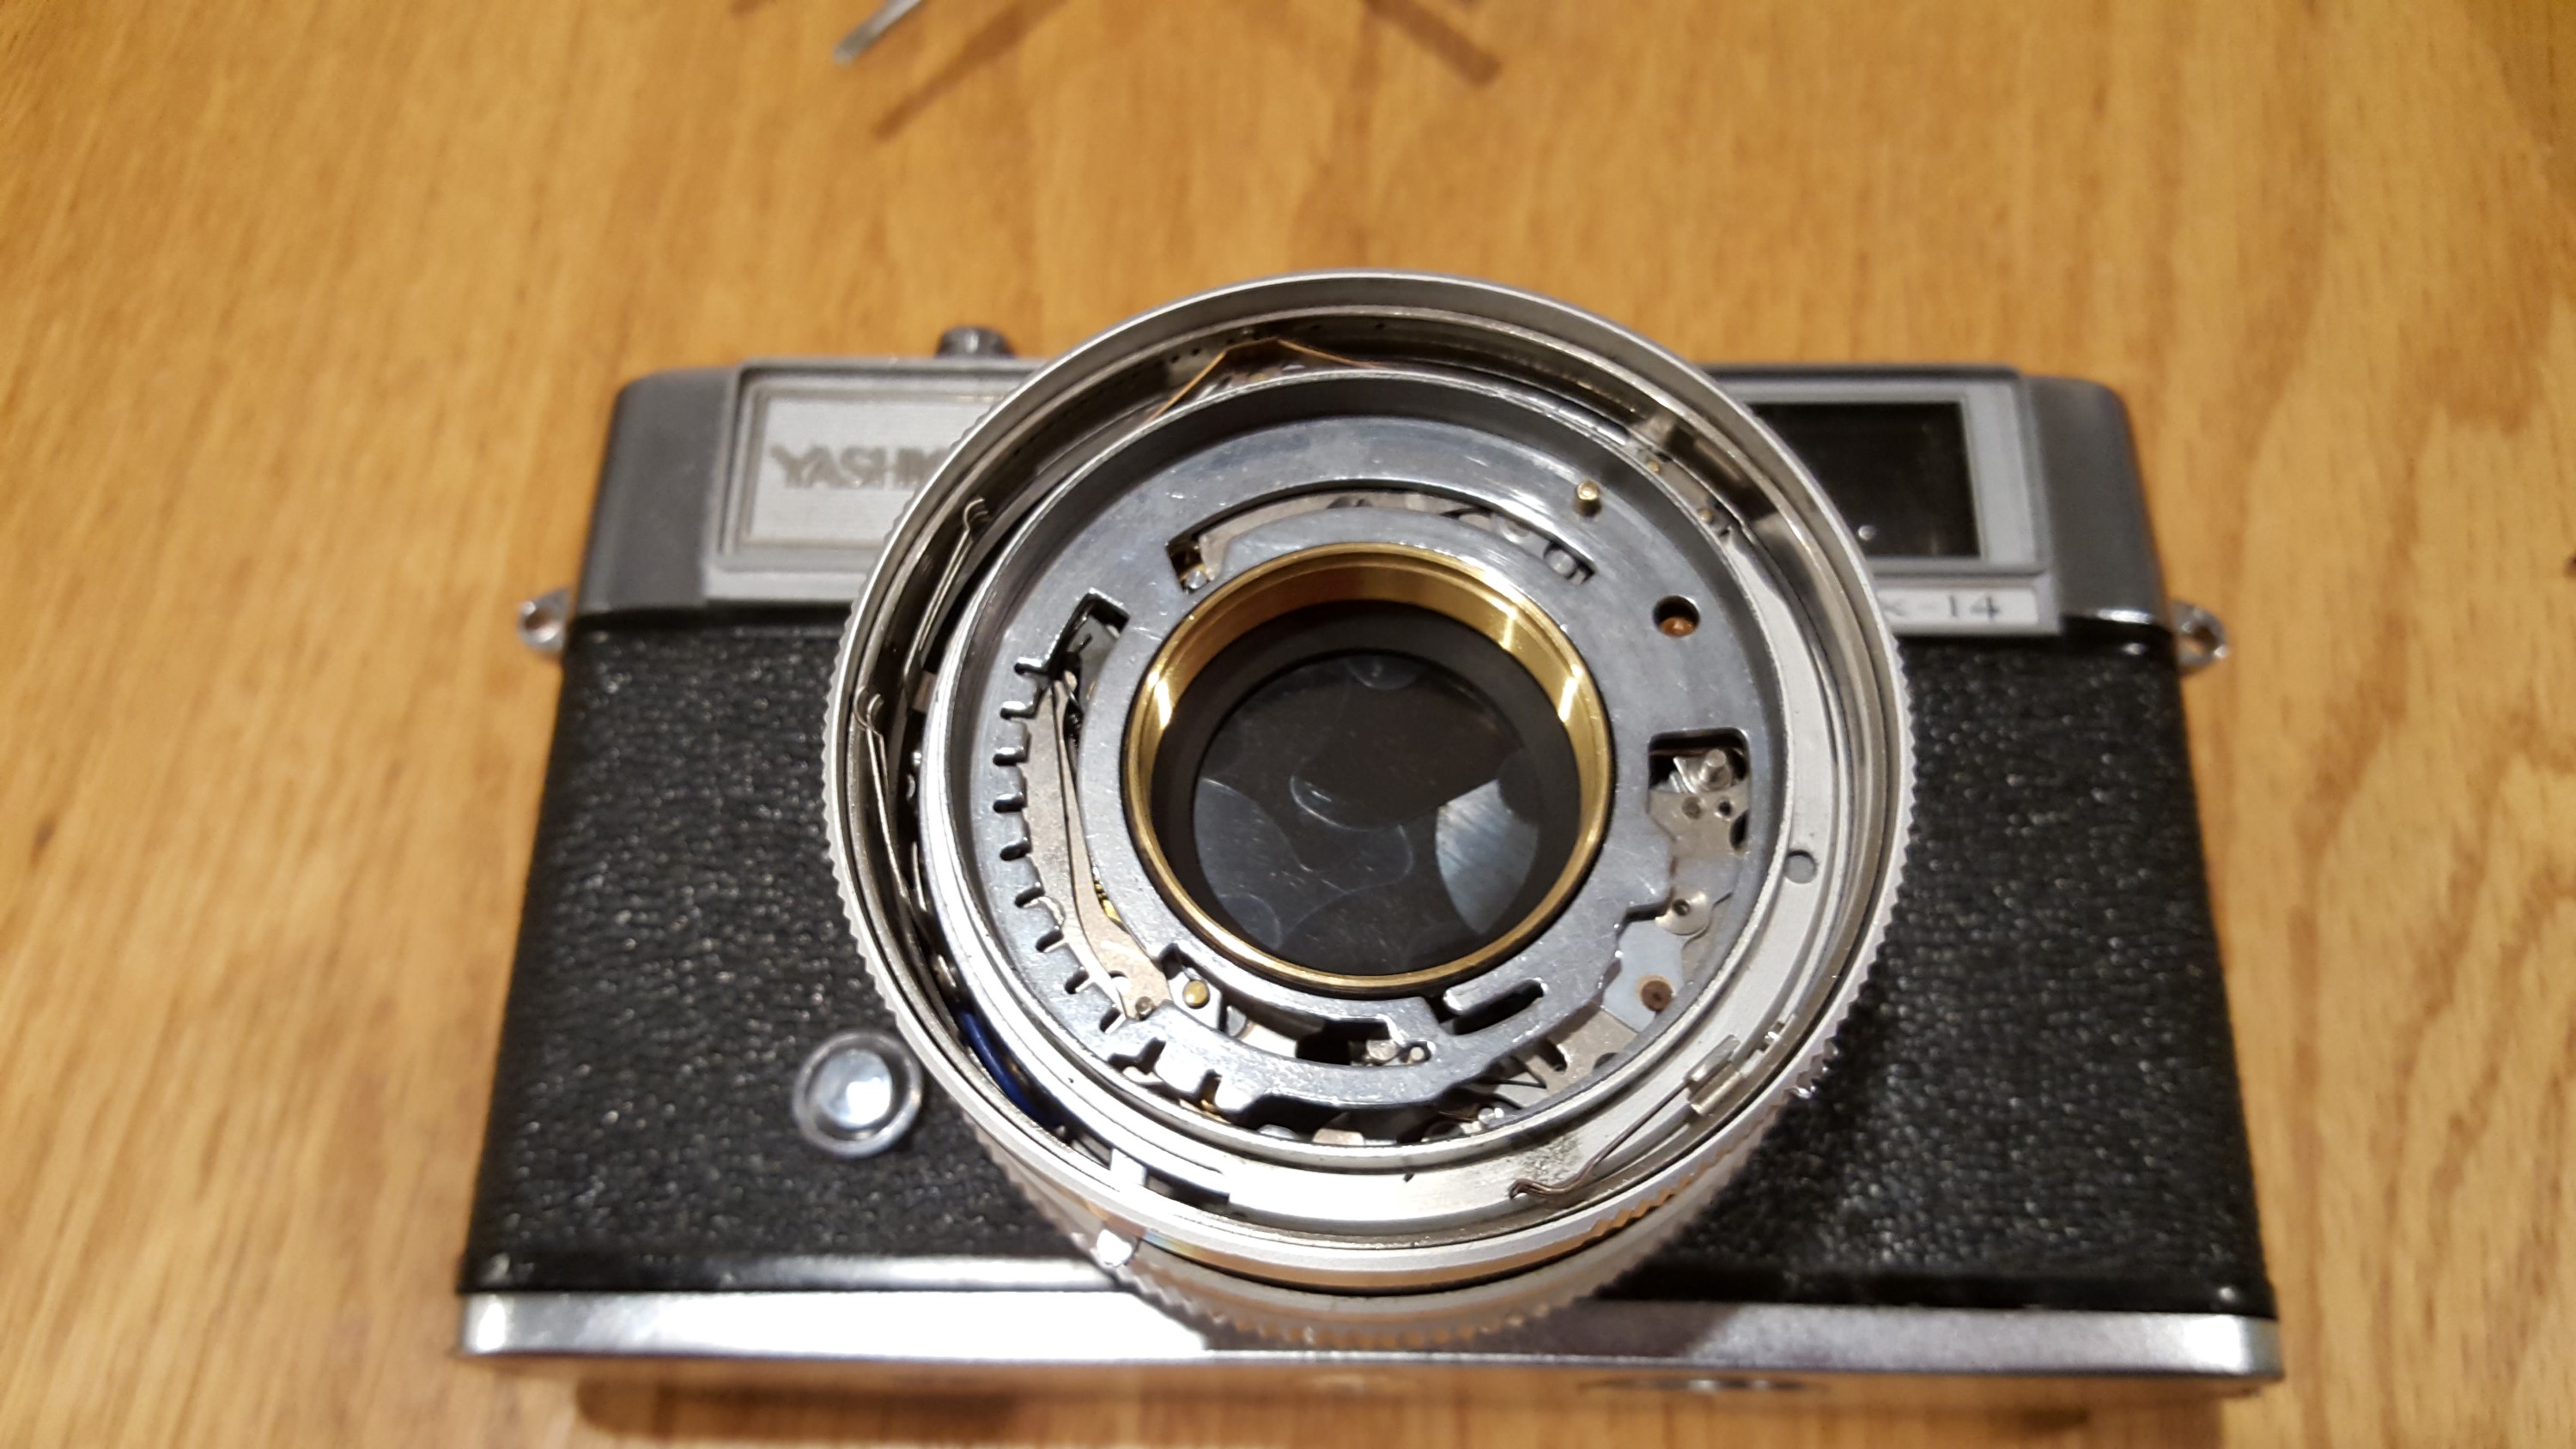
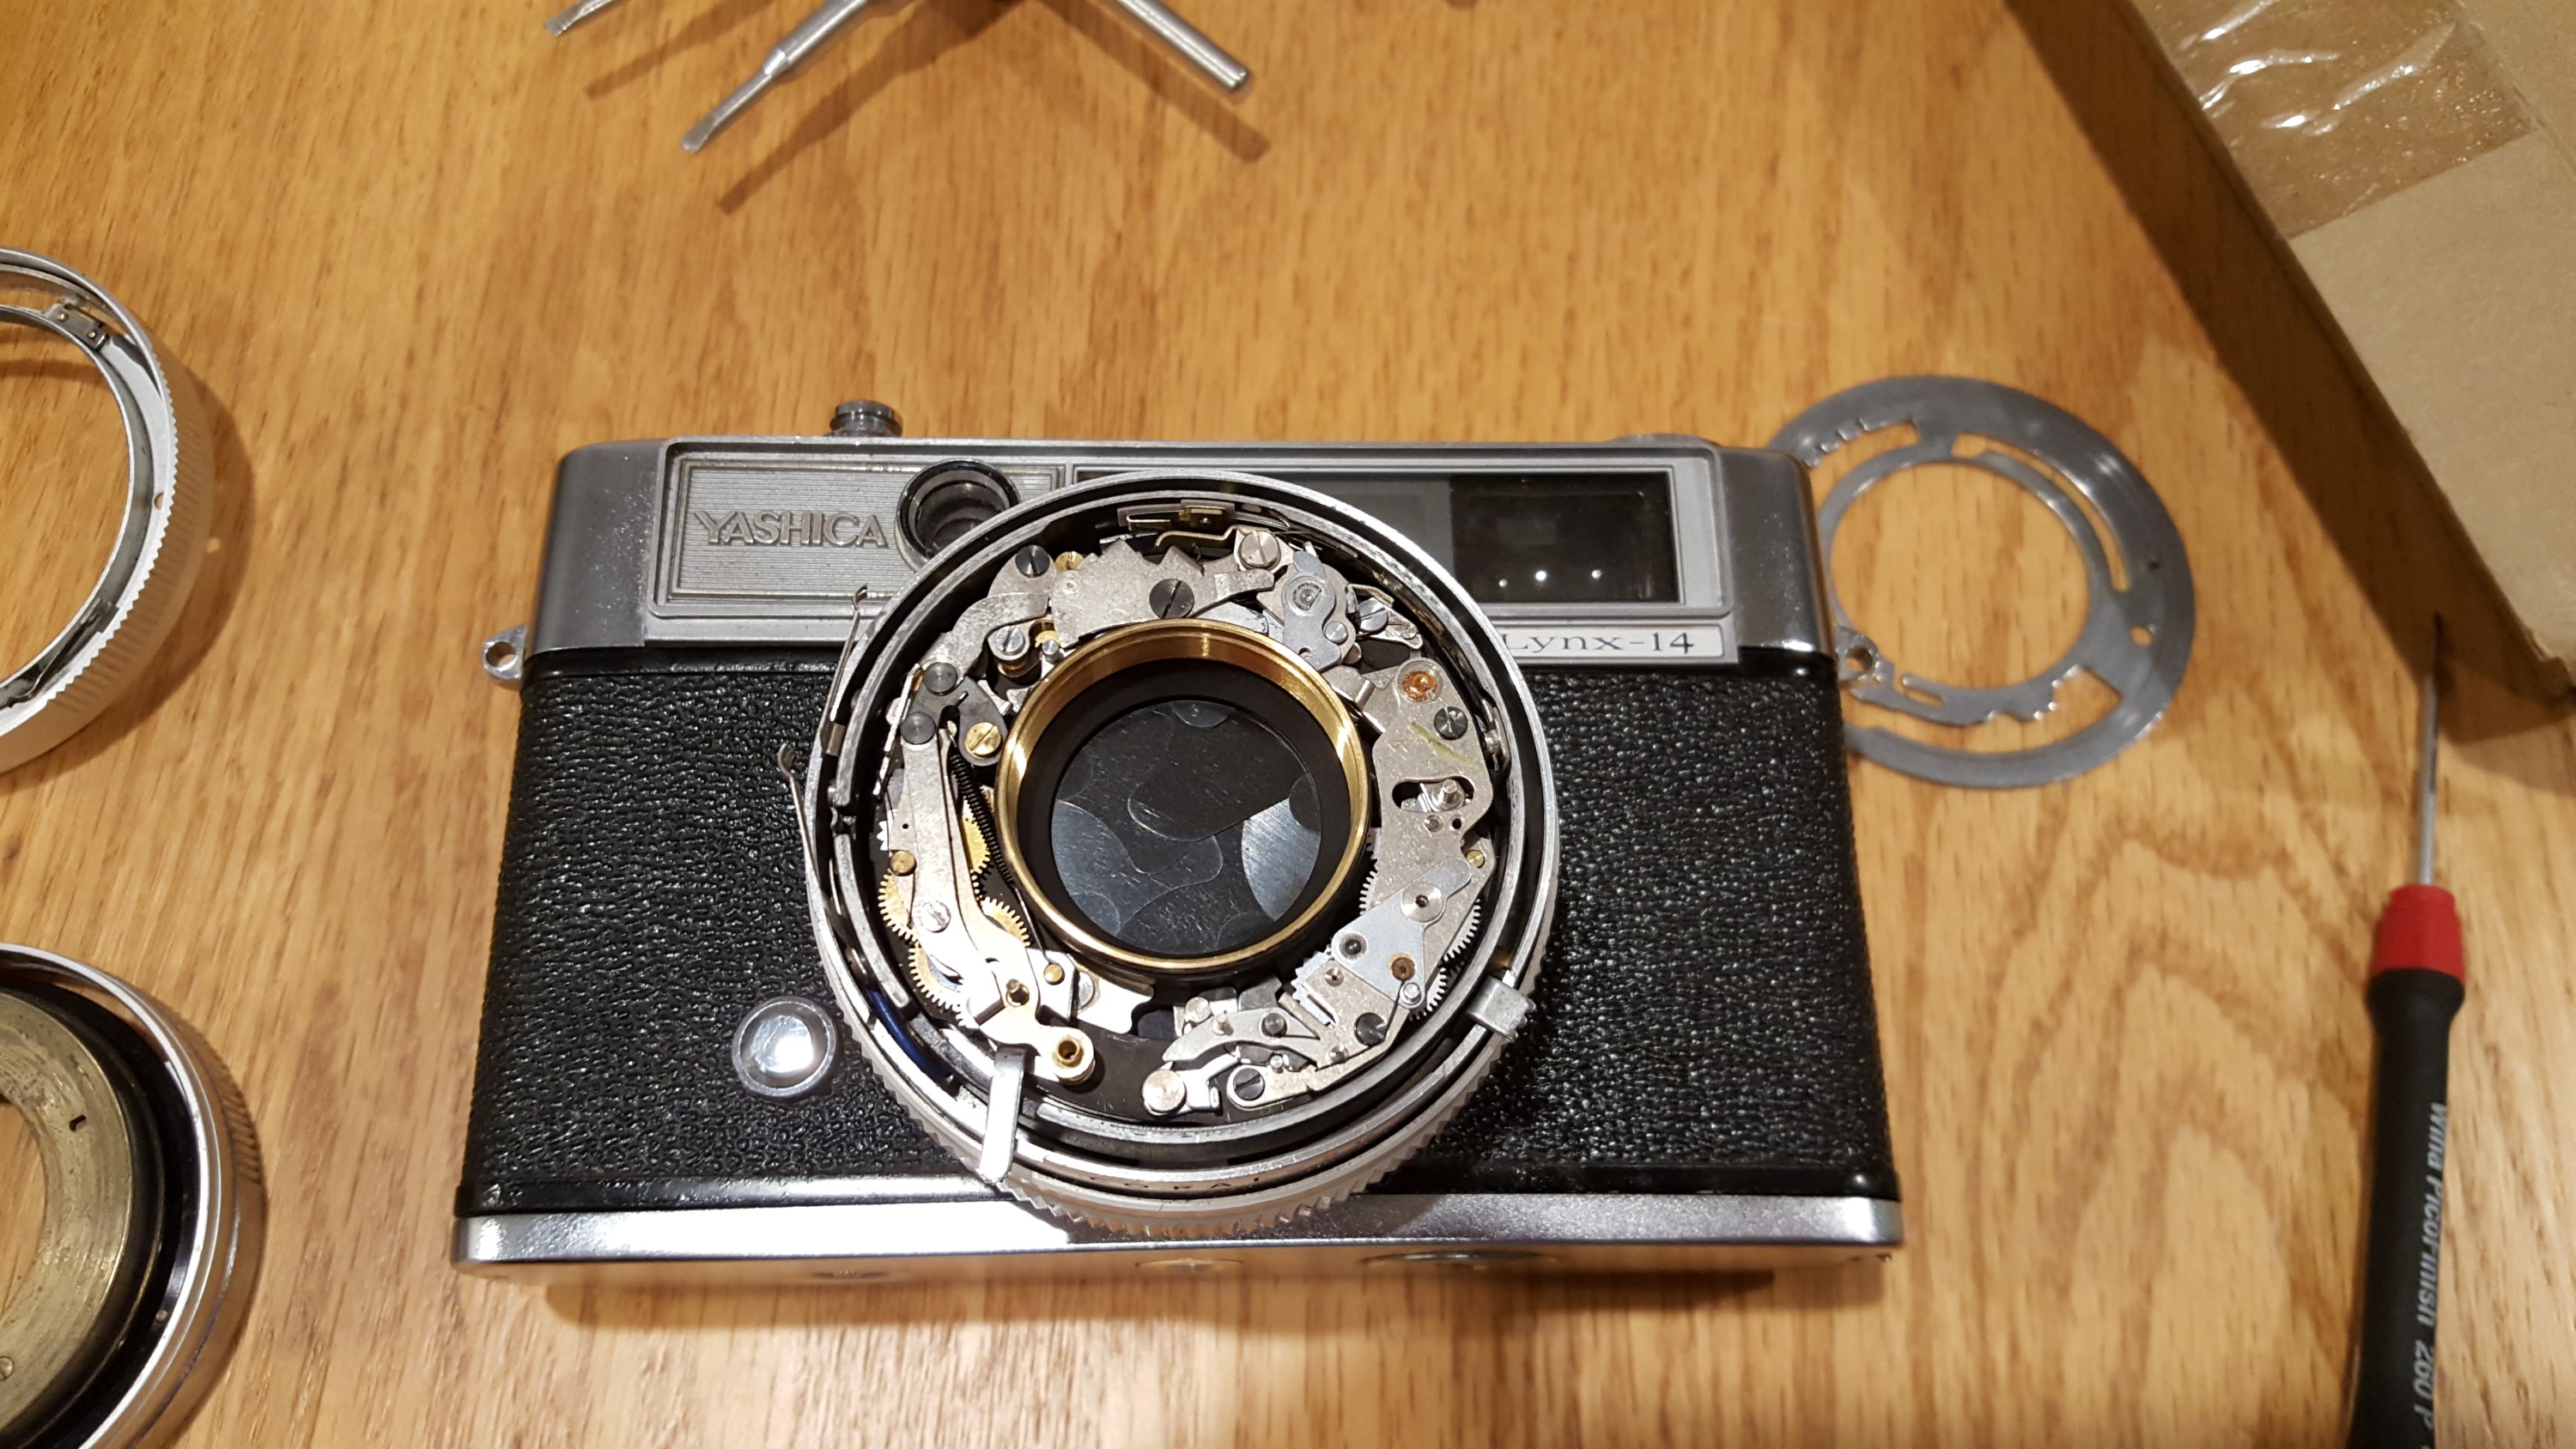
After taking the aperture ring off, the last thing you will need to do is remove what I call the “speed plate” which is that round metal plate with all the notches and strange shaped holes in it. This plate lifts straight off too, and exposes the inner workings of the shutter. This should be as far as you need to do for a simple cleaning of the shutter. If you have issues with the blades themselves, or the aperture iris, you’ll need to go further into the lens, which is beyond the scope of what I will explain. In the image to the left, the speed plate is already off and is sitting to the right of the camera.
At this point, the shutter can still be cocked and fired to test whether your cleaning is working correctly, however, it will only fire at one speed. You cannot change the speeds of the shutter or activate the slow speed governor without the speed plate.
Commence cleaning of the shutter with Ronsonol / lighter fluid / naphtha oil. Don’t be stingy here. You’ll need a lot. My philosophy is to just soak it. Don’t worry about getting the lighter fluid elsewhere in the camera, it will dry without hurting anything. The whole process of cleaning a shutter is to soak it, wipe it, and then let it dry overnight. Depending on the degree to how sticky your shutter is, you may have to repeat these steps multiple times. I’ve cleaned enough shutters to where I just automatically repeat the process 3 times over the course of 3 days. I soak the shutter, fire it a couple of dozen times while continuously squirting lighter fluid to really work it in there. Then VERY GENTLY, I drag a Q-tip over the surface of the shutter blades to soak up any dissolved goo that the lighter fluid has dislocated.
When I do this, I almost always see a yellowish substance on my Q-tip which tells me it’s working. I cannot say enough how careful you have to be dragging the Q-tip over the shutter blades as they are very fragile. Do not put any pressure on them and also pay attention to how each blade overlaps the one next to it. Always go in the same direction as the overlap and not against it. There is no science here, just common sense. Your objective is to get old gunk out of the shutter. The lighter fluid will dissolve it, and your Q-tips remove it.
When the shutter is sticky, you’ll notice that it almost always immediately springs back to life when it’s wet. The wet lighter fluid is acting like a lubricant allowing it to move. Once it dries, it will most likely stick again. Just keep repeating your cycle of cleaning it until you can pick up the camera after it has fully dried, and it continues to work properly. Once the shutter is clean, you can put it back together.
 Step 7:
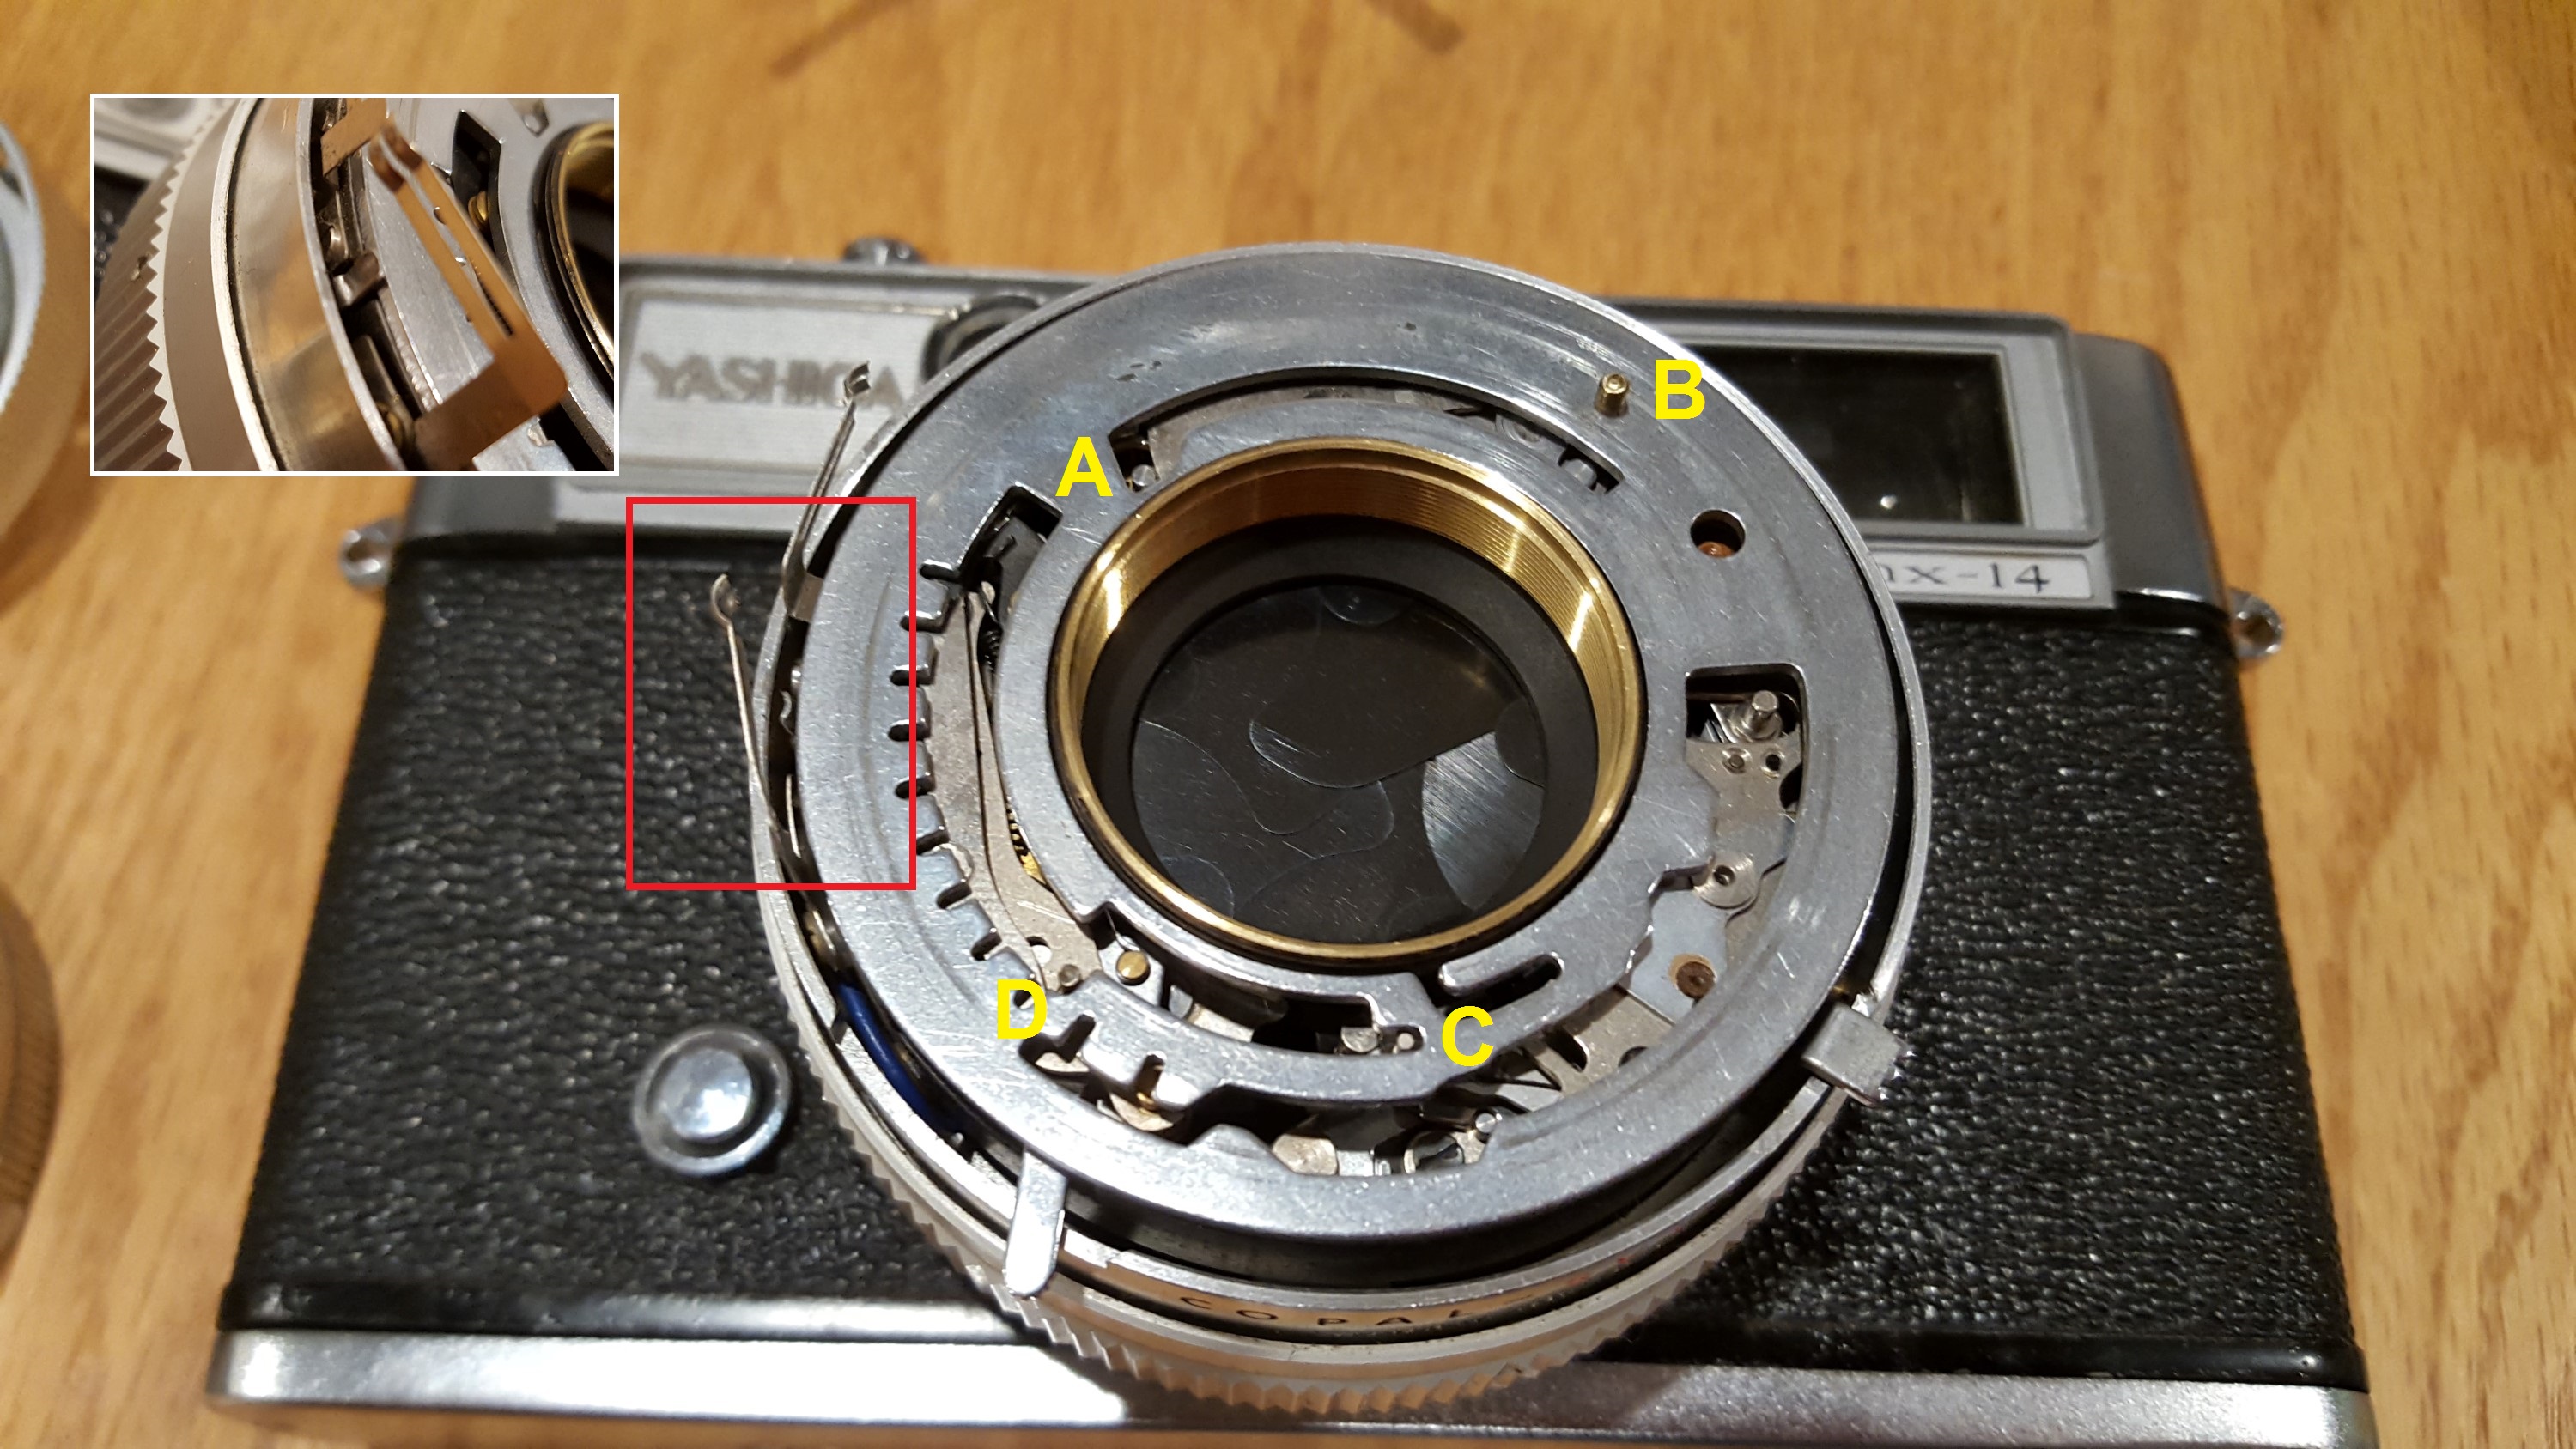
Put the speed plate back on. This plate only goes on in one orientation. Normally, I will tell you to refer to your own pictures which you should have been taking while disassembling the camera, but I did that for you.
Look very carefully at the image to the right. You need to orient the speed plate exactly how I have it in the image. This orientation puts the shutter in “B” mode. Pay attention to the A, C, and D pins. They must line up and go in those exact same spots. Also, pay attention to the little tab at the 9 o’clock position of the shutter. I added a second image in the corner showing this same tab from the side. This tab must make contact with the edge of the speed plate.
Curiously, between my two Lynxes, one had smooth edges like the one in the image, and the other one had little indentations on the edge of the speed plate which act as ‘click-stops’ as you change shutter speeds. Apparently, this was a mid-model change for the Lynx. Some have click stops, some don’t. Regardless if your camera has click stops or not, this speed plate will still go on the same way.
Pin B is on the speed plate itself and does not stick through the speed plate. If this pin is loose or missing, you may have trouble changing speeds on the camera.
Once you are sure that the speed plate is properly seated, and all 3 pins are visible like in the image, and that little tab on the side is correctly up against the side of the speed plate, you can continue.
 Step 8:
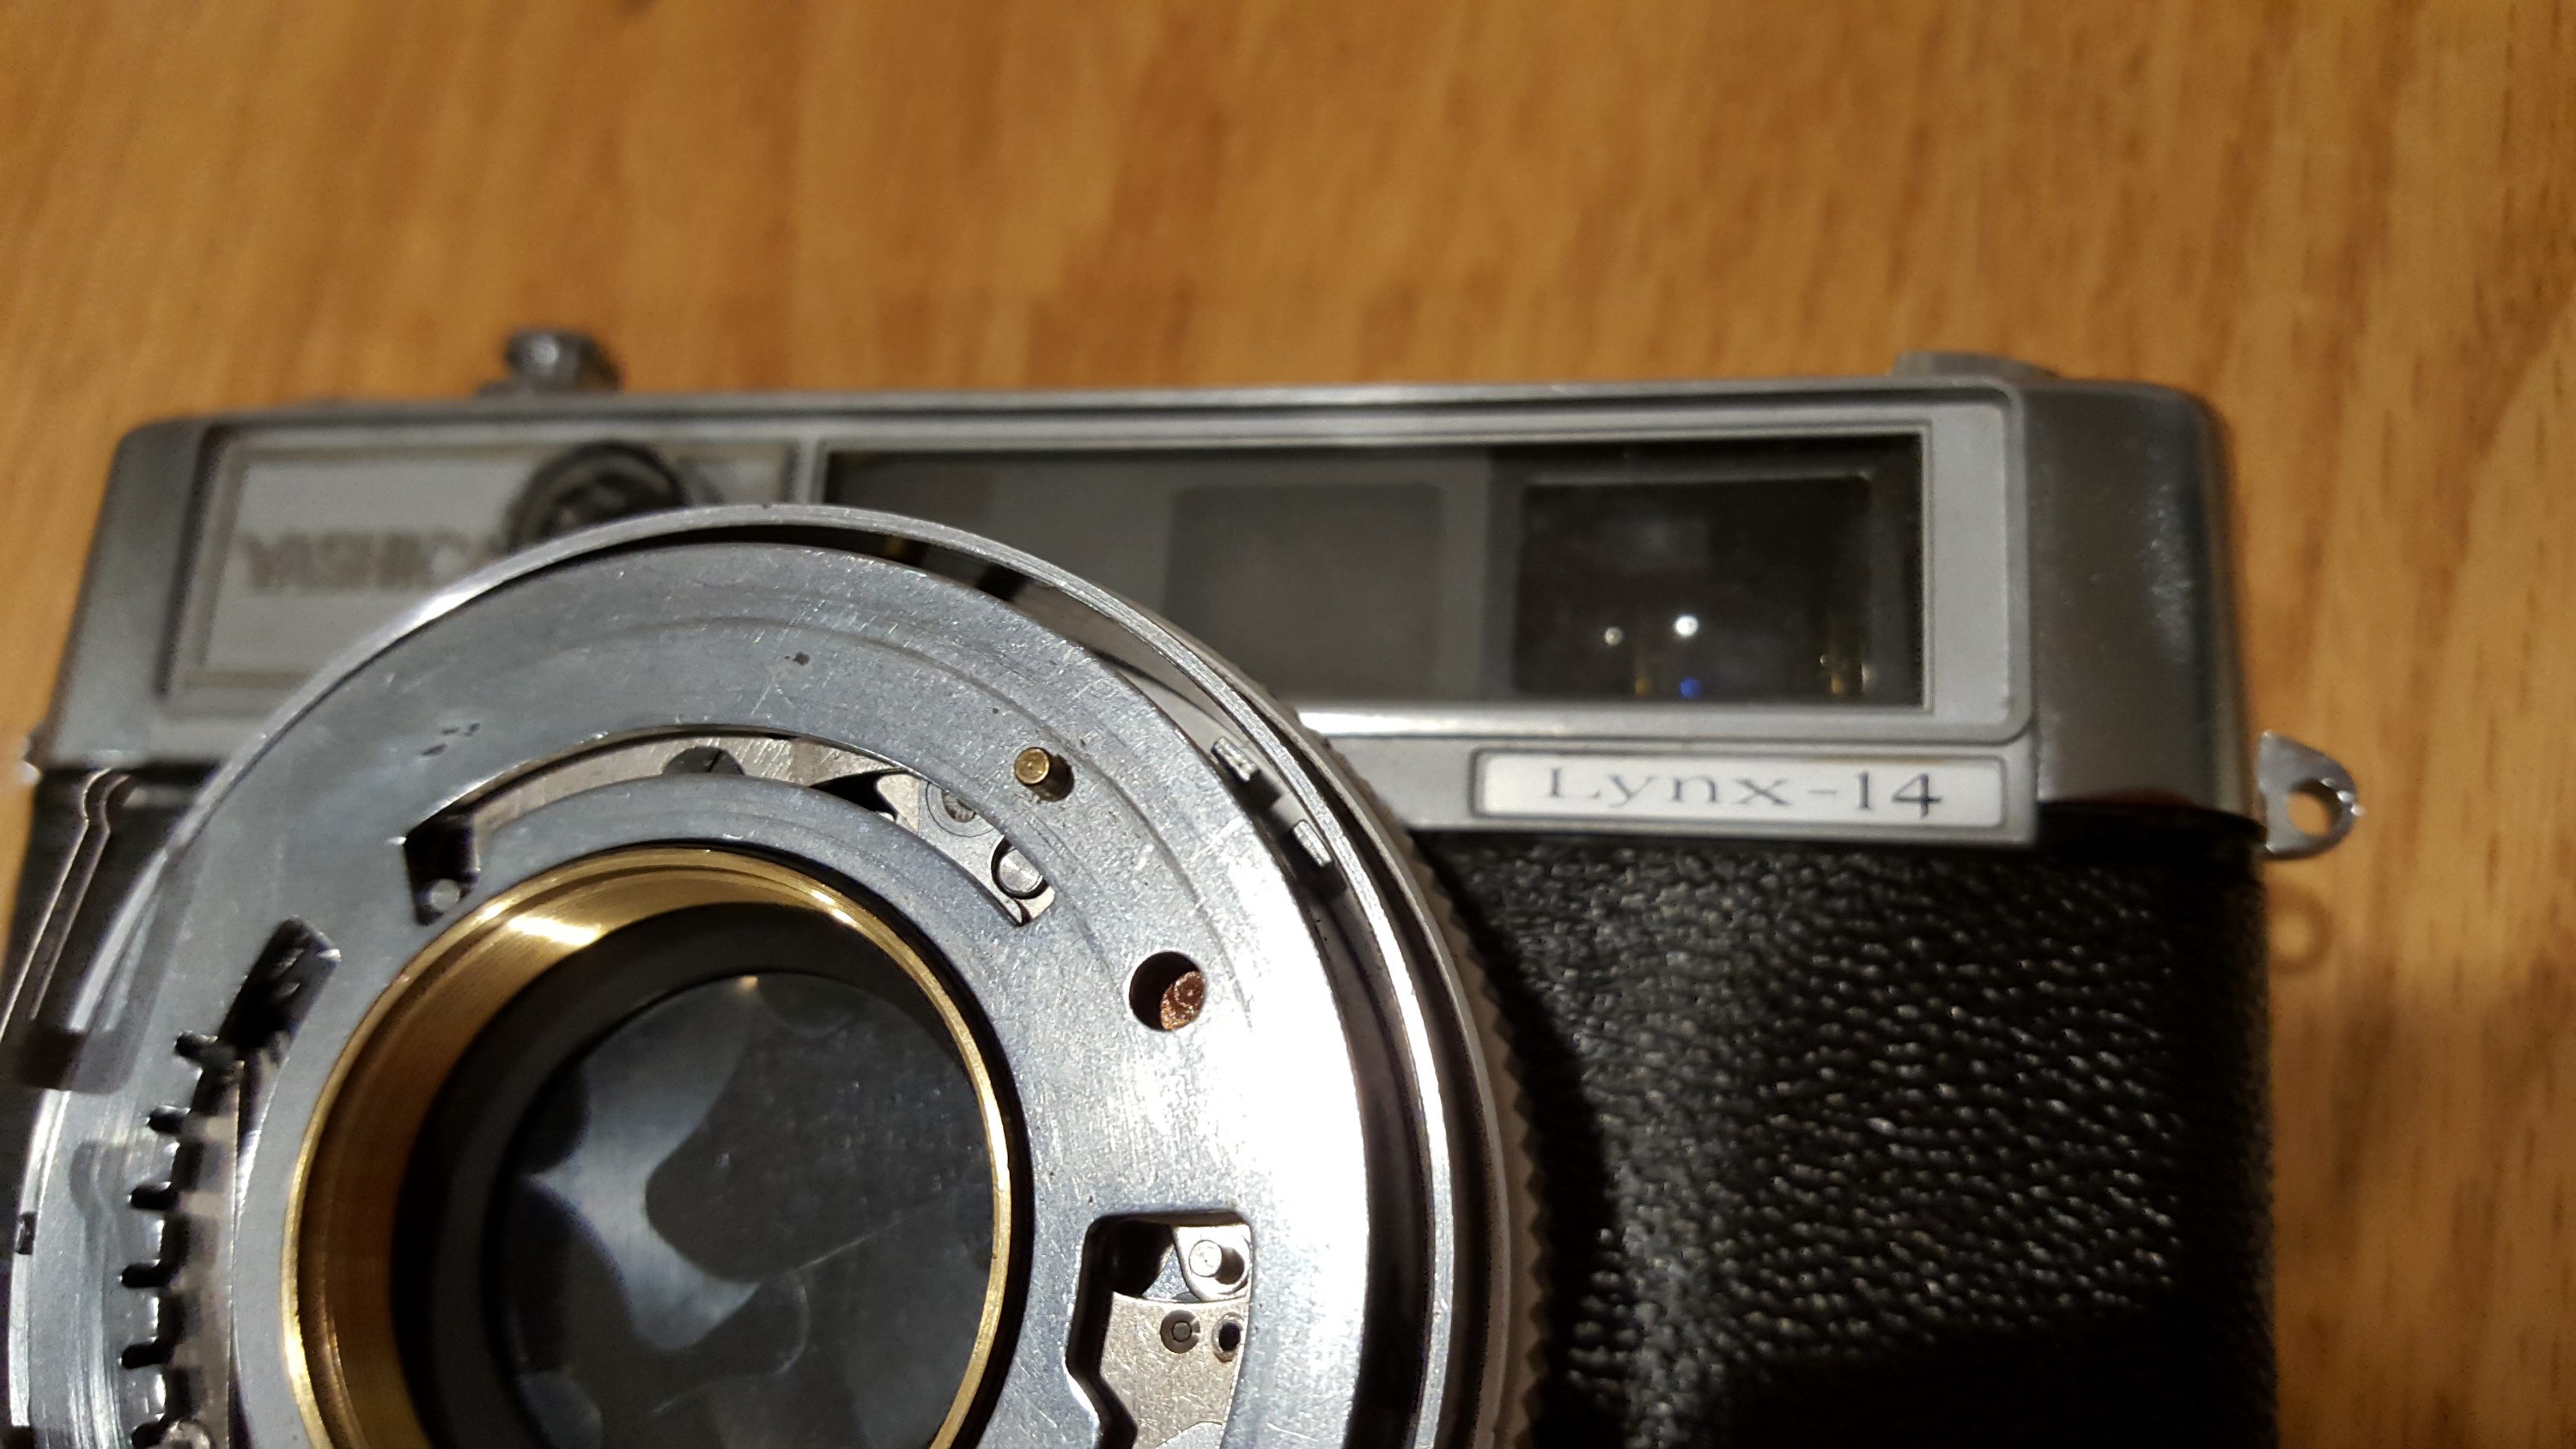
Next, you need to put the aperture ring back on. This is the piece that has that 90 degree metal tab sticking out of it. That tab must engage the iris which is behind the shutter. Look at the image to the right, and you can see two tabs in the gap between the shutter and the outer camera barrel. The metal tab on the aperture ring must go in between the two tabs behind the shutter. If that 90 degree tab is not correctly oriented, you will not be able to change the aperture on the lens.
Carefully push the aperture ring back into position, getting it oriented correctly, and also pay attention to the two other metal tabs at the 9 o’clock position of the shutter. If you’ve followed the instructions above correctly, your camera should be in “B” mode meaning you can fire the shutter and keep it open as long as you keep your finger on the shutter release button. You can confirm that the aperture is working correctly by firing the shutter and leaving it open so you can see the iris. Rotate the aperture ring a little to see if it opens and closes properly. If it doesn’t go back and repeat the previous steps until it does.
 Step 9:
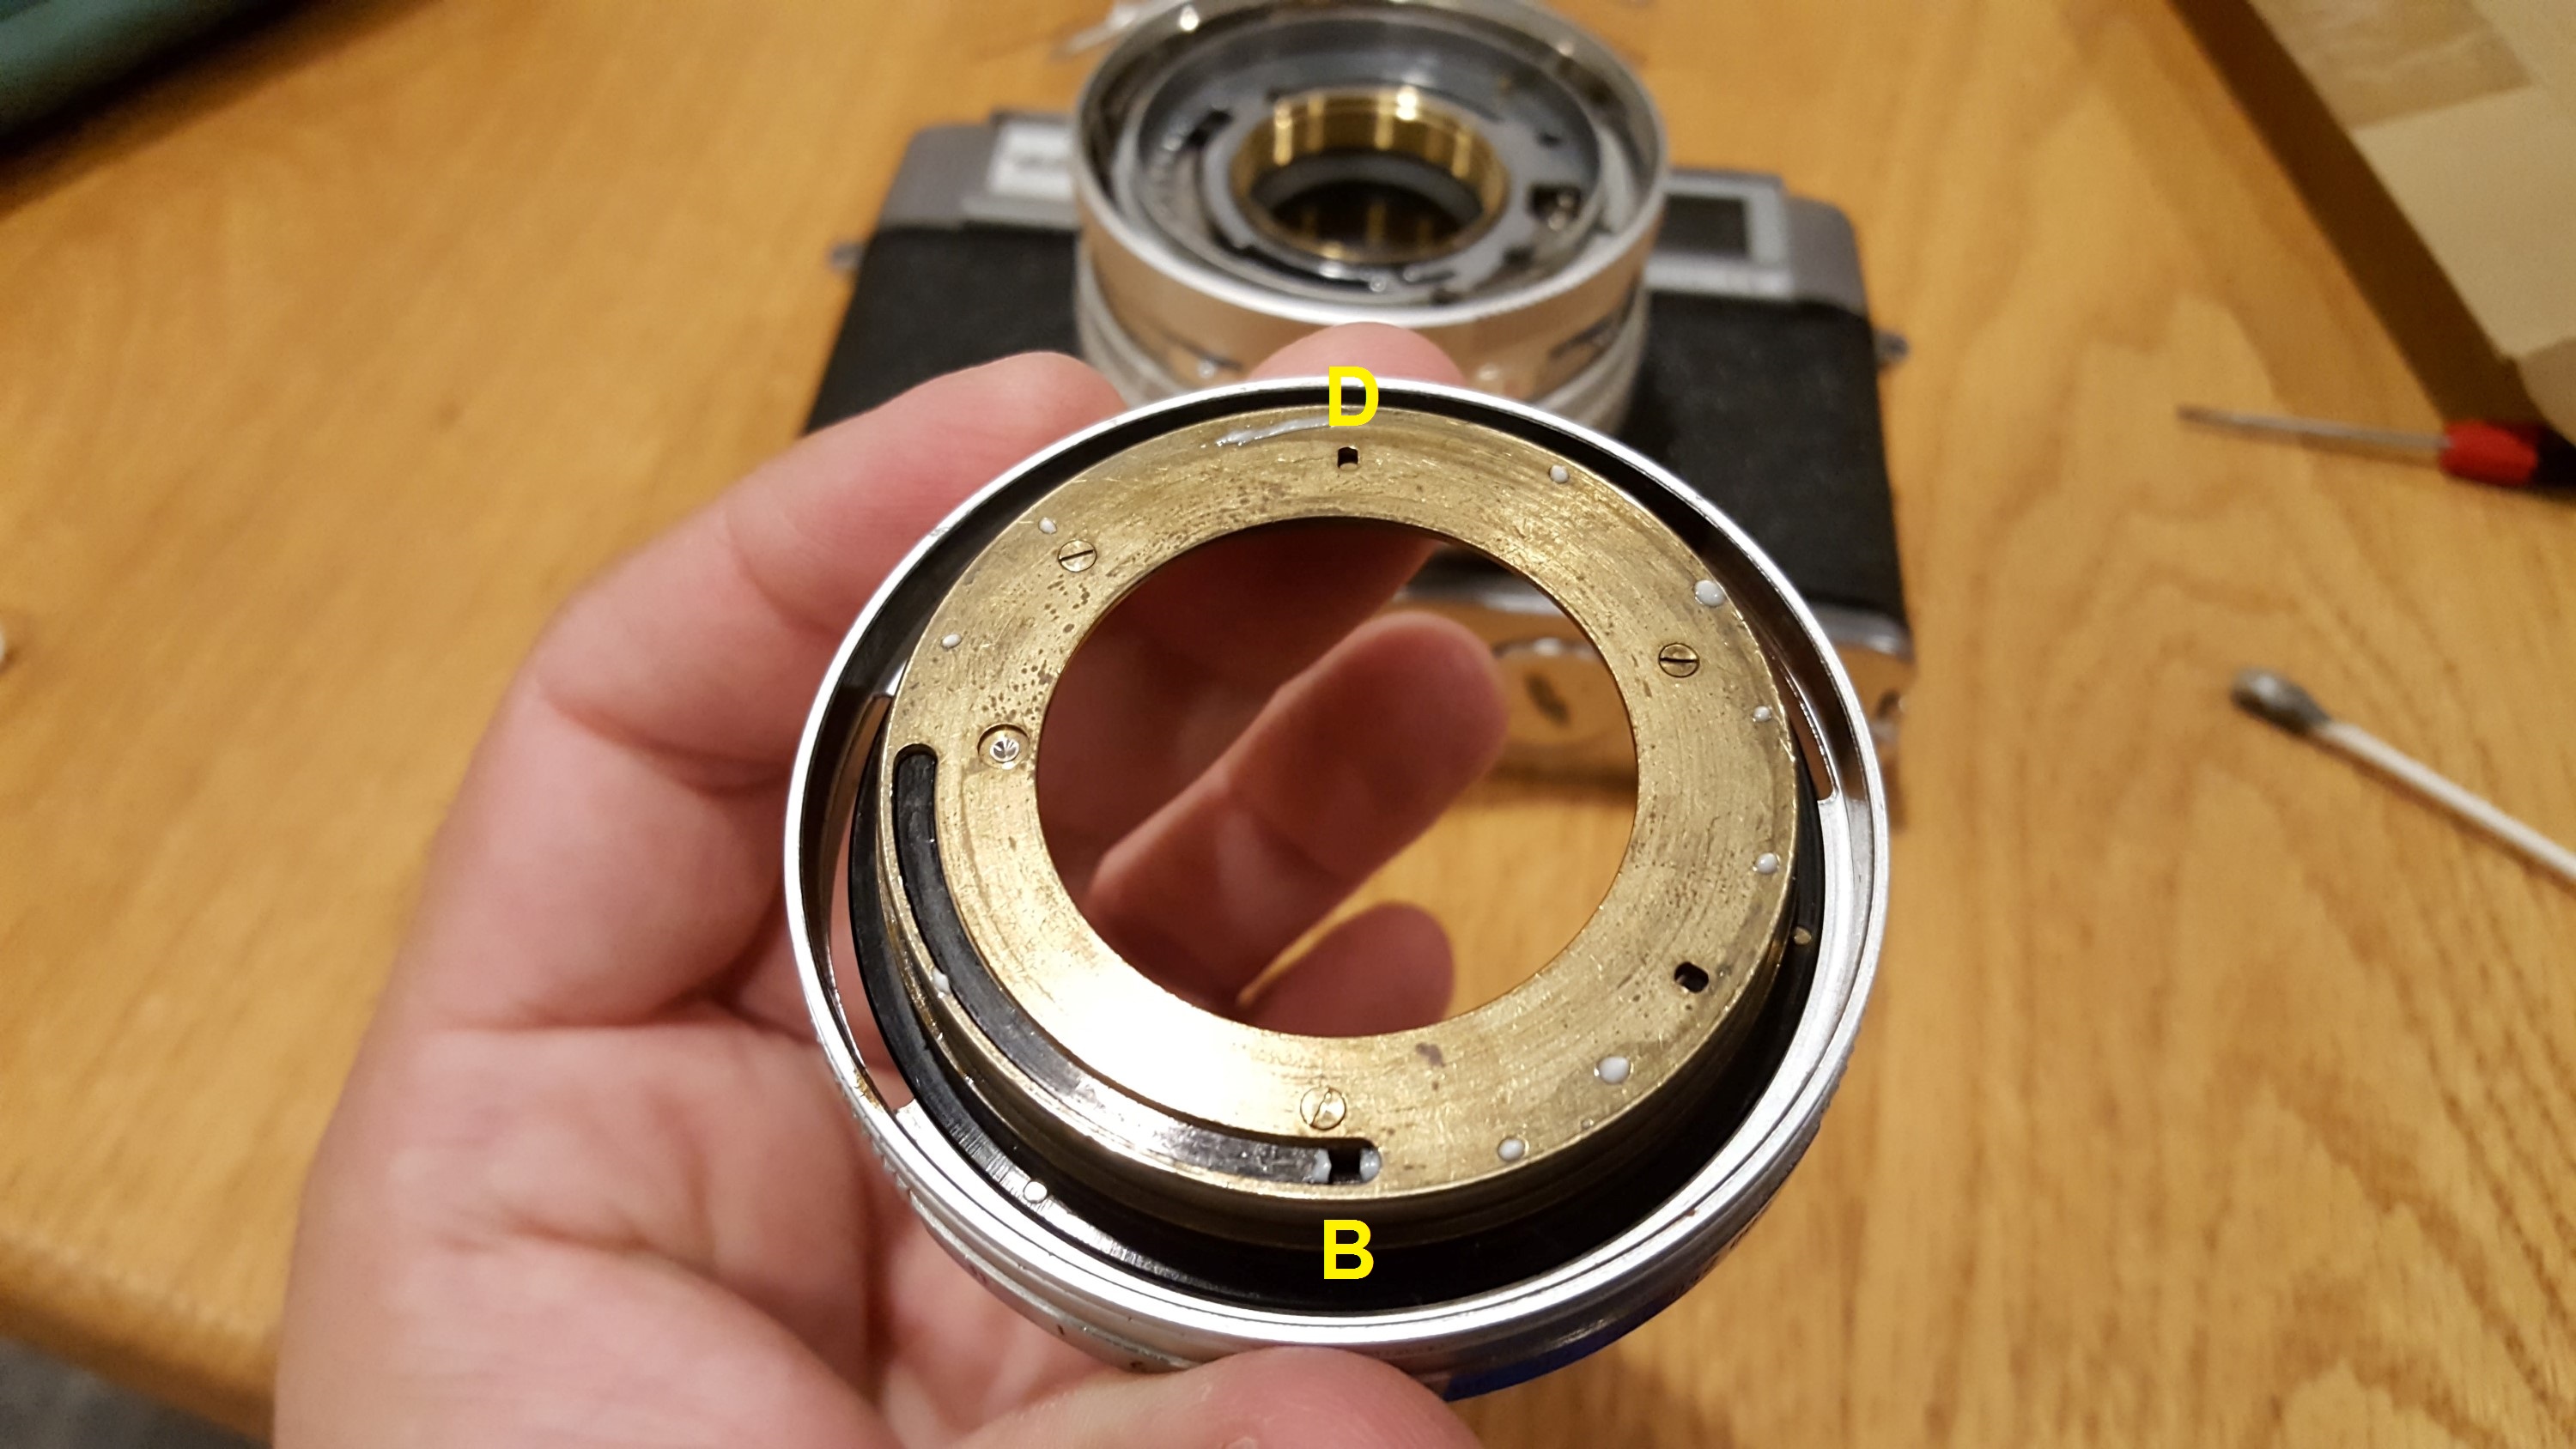
Next, you will put the speed / ASA film selector back onto the camera. The orientation of this ring is important as well. Take a look at the image to the left and also look at the image above in Step 7. You must get this speed selector to where the notch for pin B and the notch for pin D are 180 degrees opposite of each other. There is a third notch approximately in the 4 o’clock position of the image to the left, but this does not do anything.
You’ll also notice that I applied a couple of very small drops of white lithium grease on the underside of the brass ring. I found that on my Lynx, the speed selector was extremely tight, so I thought a tiny amount of grease might help. Normally, I do not advise using lithium grease inside of a shutter, but as long as you use a very small amount, I feel like this is OK here. If this proves to be a bad idea and the grease gets to where it doesn’t belong, I can always take things apart and clean it later. I will update this review if I ever have to do that.
With this ring in the orientation of the previous image, gently put it back into the camera, making sure that the notch for B lines up with the B pin in image 7, and the notch for D lines up with the D pin in image 7. You may have to gently wiggle this ring to get it to seat properly, but once it seats, you should feel it firmly fall into place. Everything should look like the image to the right.
Step 10:
Next, you’ll replace the locking nut in the center of the shutter. It is important to get this moderately tight, but not as tight as possible. If you tighten this nut too much, it will make changing shutter speeds very difficult. You’ll notice in the image to the left, there was red paint on the screw and nut in it’s original position. When I put it back together, the red paint no longer lines up. This is OK as long as the nut isn’t on too tight.
Once this nut is tightened down, you can rotate the speed selector ring. If it feels too tight, back off the nut every so slightly. Once you are happy with everything, rotate the locking screw 180 degrees to prevent the locking nut from backing off.
At this point, the camera is almost back together. You should confirm that the shutter still works and that all speeds sound correct and the aperture still works. If anything fell into the shutter, you still have access to clean it out. This would be a good time to fire the shutter in “B” mode and hold the shutter open with the aperture all the way open at f/1.4 so you can see the inner surface of the rear lens element. While cleaning the shutter, some debris may have settled on the glass. Using your Q-tips and some high content rubbing alcohol (do not use lighter fluid for this), you can gently clean the inner surface of the rear lens element while still holding the shutter open.
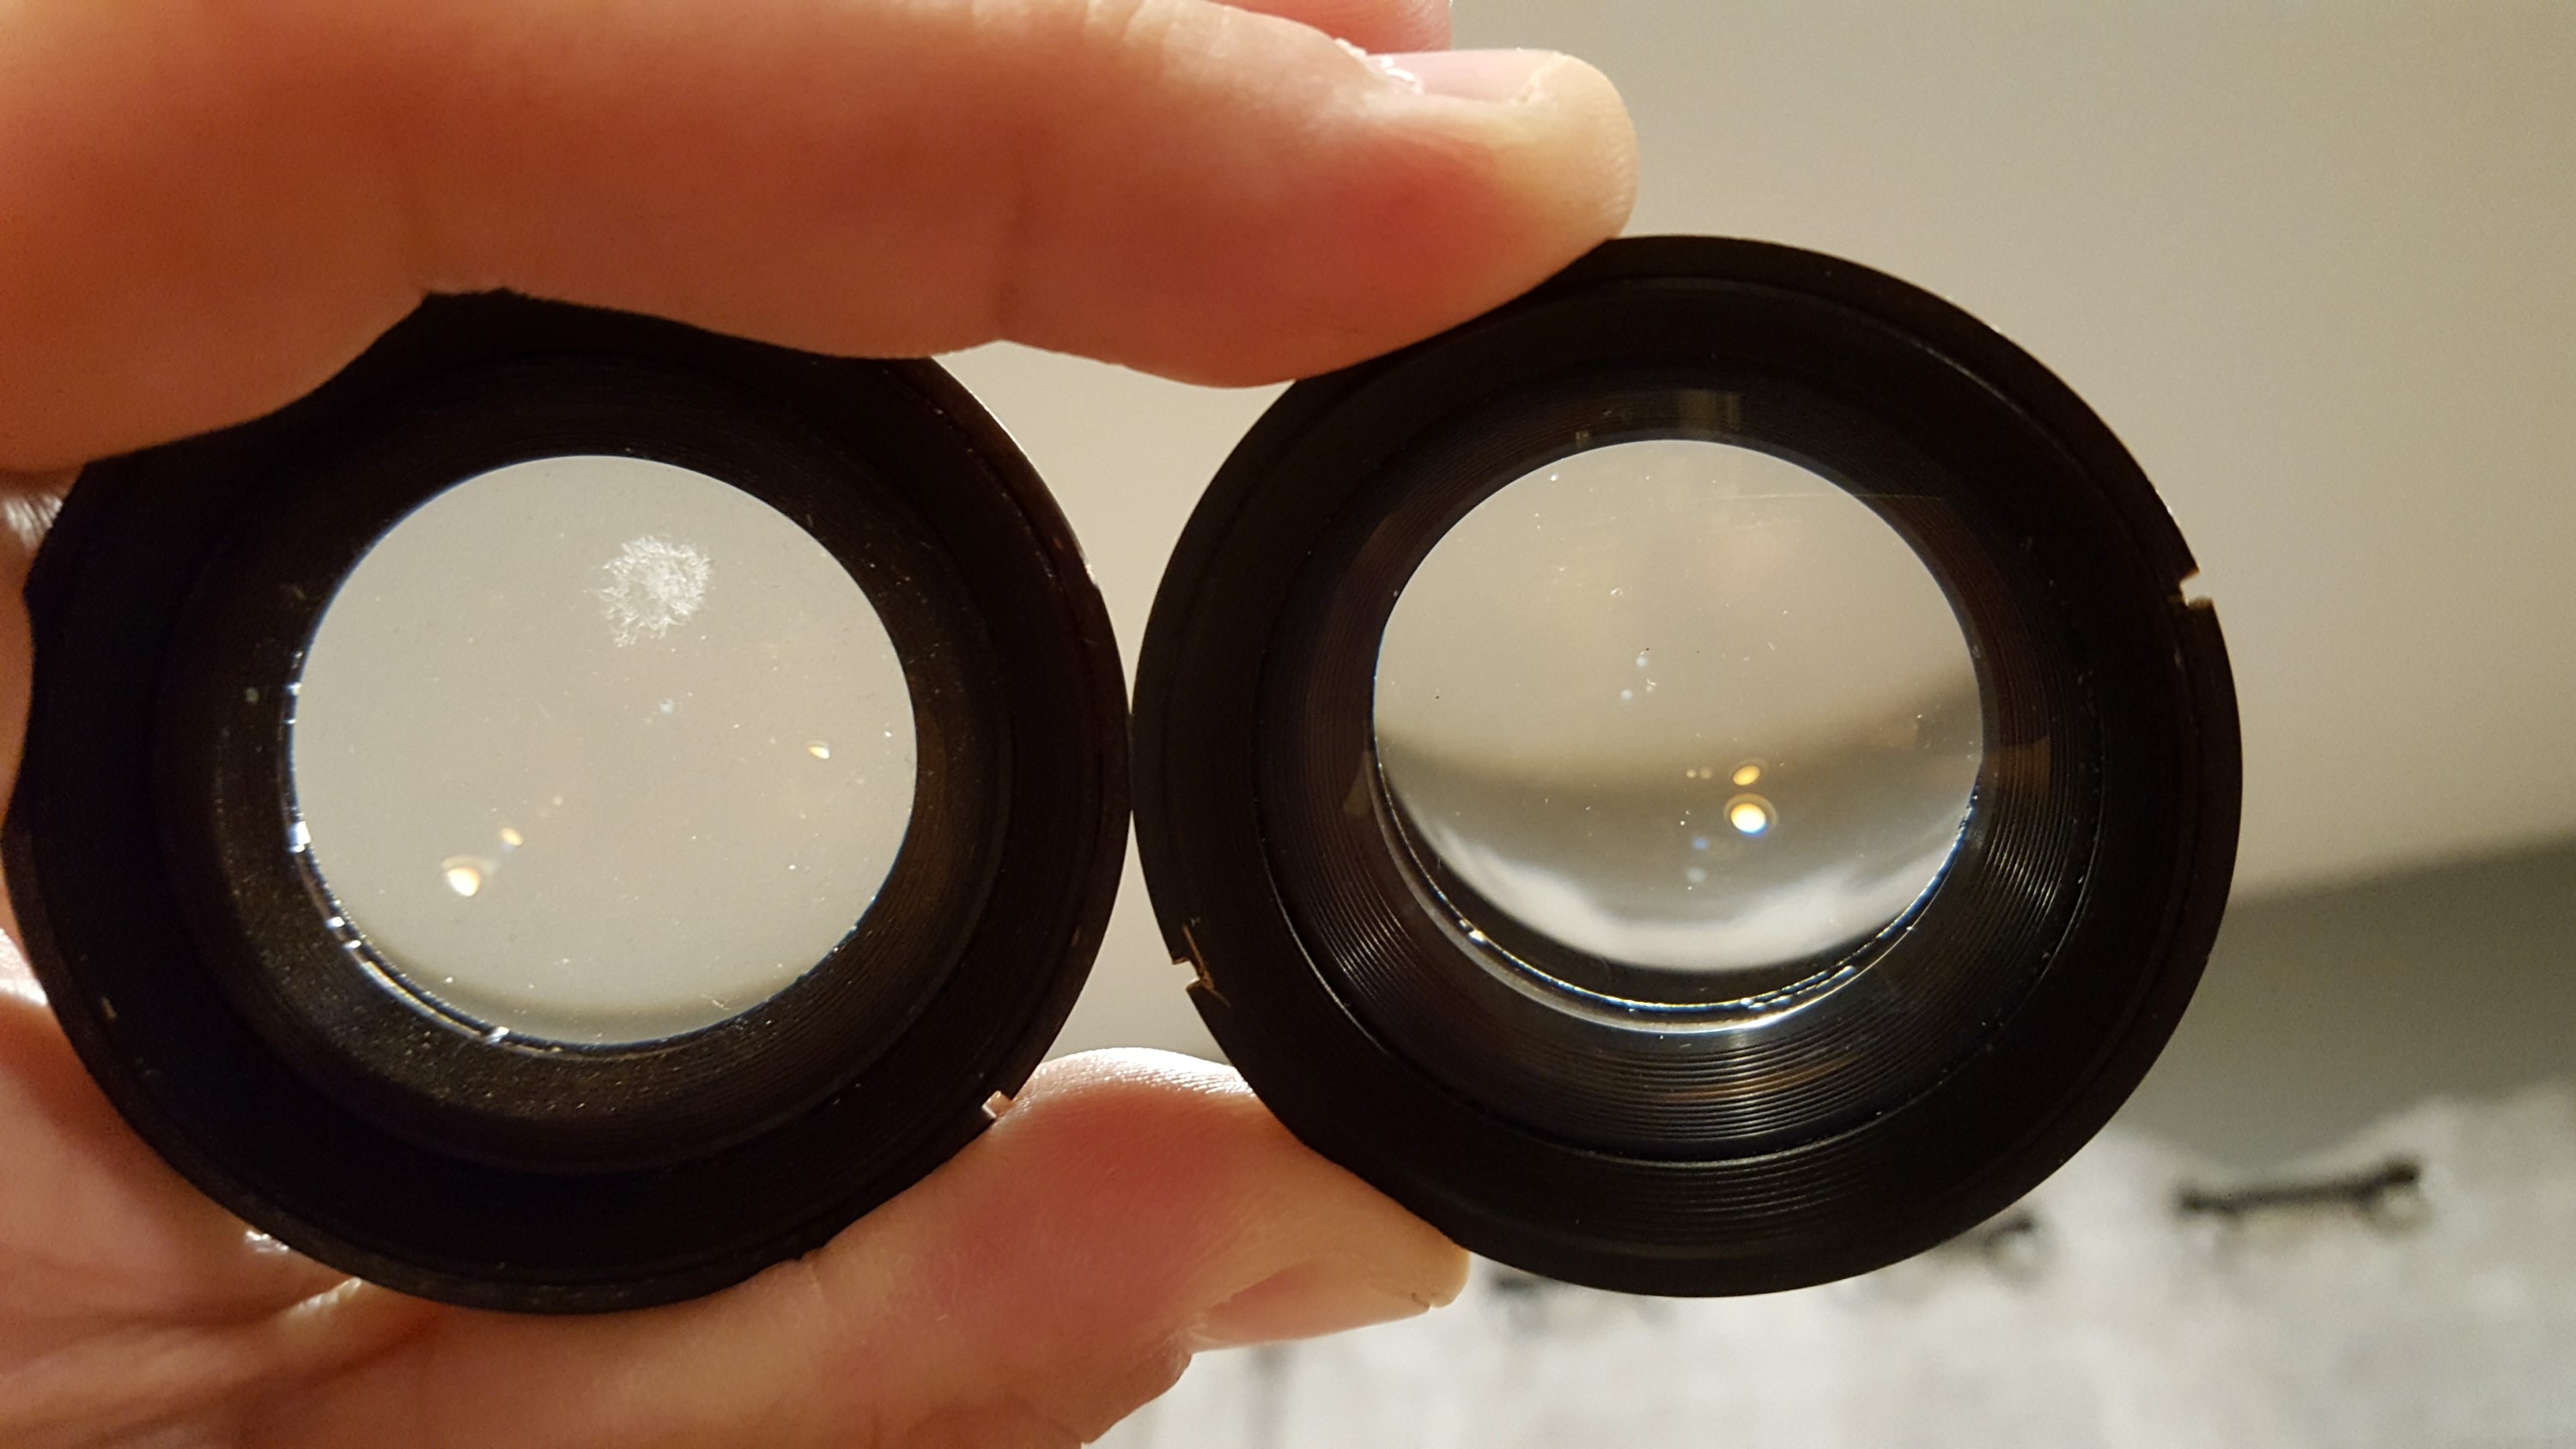 You might as well clean the outer lens element group too. Since it is out of the camera, you have access to the back of the front element. Between my two Lynxes, one of them had a huge splotch of fungus inside of one of the elements. Take a look at the image to the right. The lens element on the left has a large “cotton ball” of fungus. Needless to say, I chose the one of the right.
If this is the first time you’ve ever cleaned a glass element in an old camera lens, you will notice that every lens has small specks of dirt or debris and the glass will most likely have some (or many) very fine scratches in the lens. Do not obsess over getting the glass perfect. Minor specks and scratches will have no impact on your photographs. As long as you get the big stuff off, you should be fine.
Step 11:
Assuming you are happy that everything is working correctly, no debris has fallen back into the shutter, and all glass lens surfaces are clean, you can finish putting the outside of the lens back together. First, put that chrome ring that had the 3 screws in it first. Then screw the outer lens element back into position. Use your lens spanner to get it tight, but don’t over tighten it. Then finally replace the black YASHINON plate in the filter threads.
Congratulations, you have successfully cleaned a sticky shutter on a Yashica Lynx. You may also need to clean or adjust the viewfinder or rangefinder as many of these cameras will have dirty viewfinders. The next few steps cover how to do that.
 Step 12:
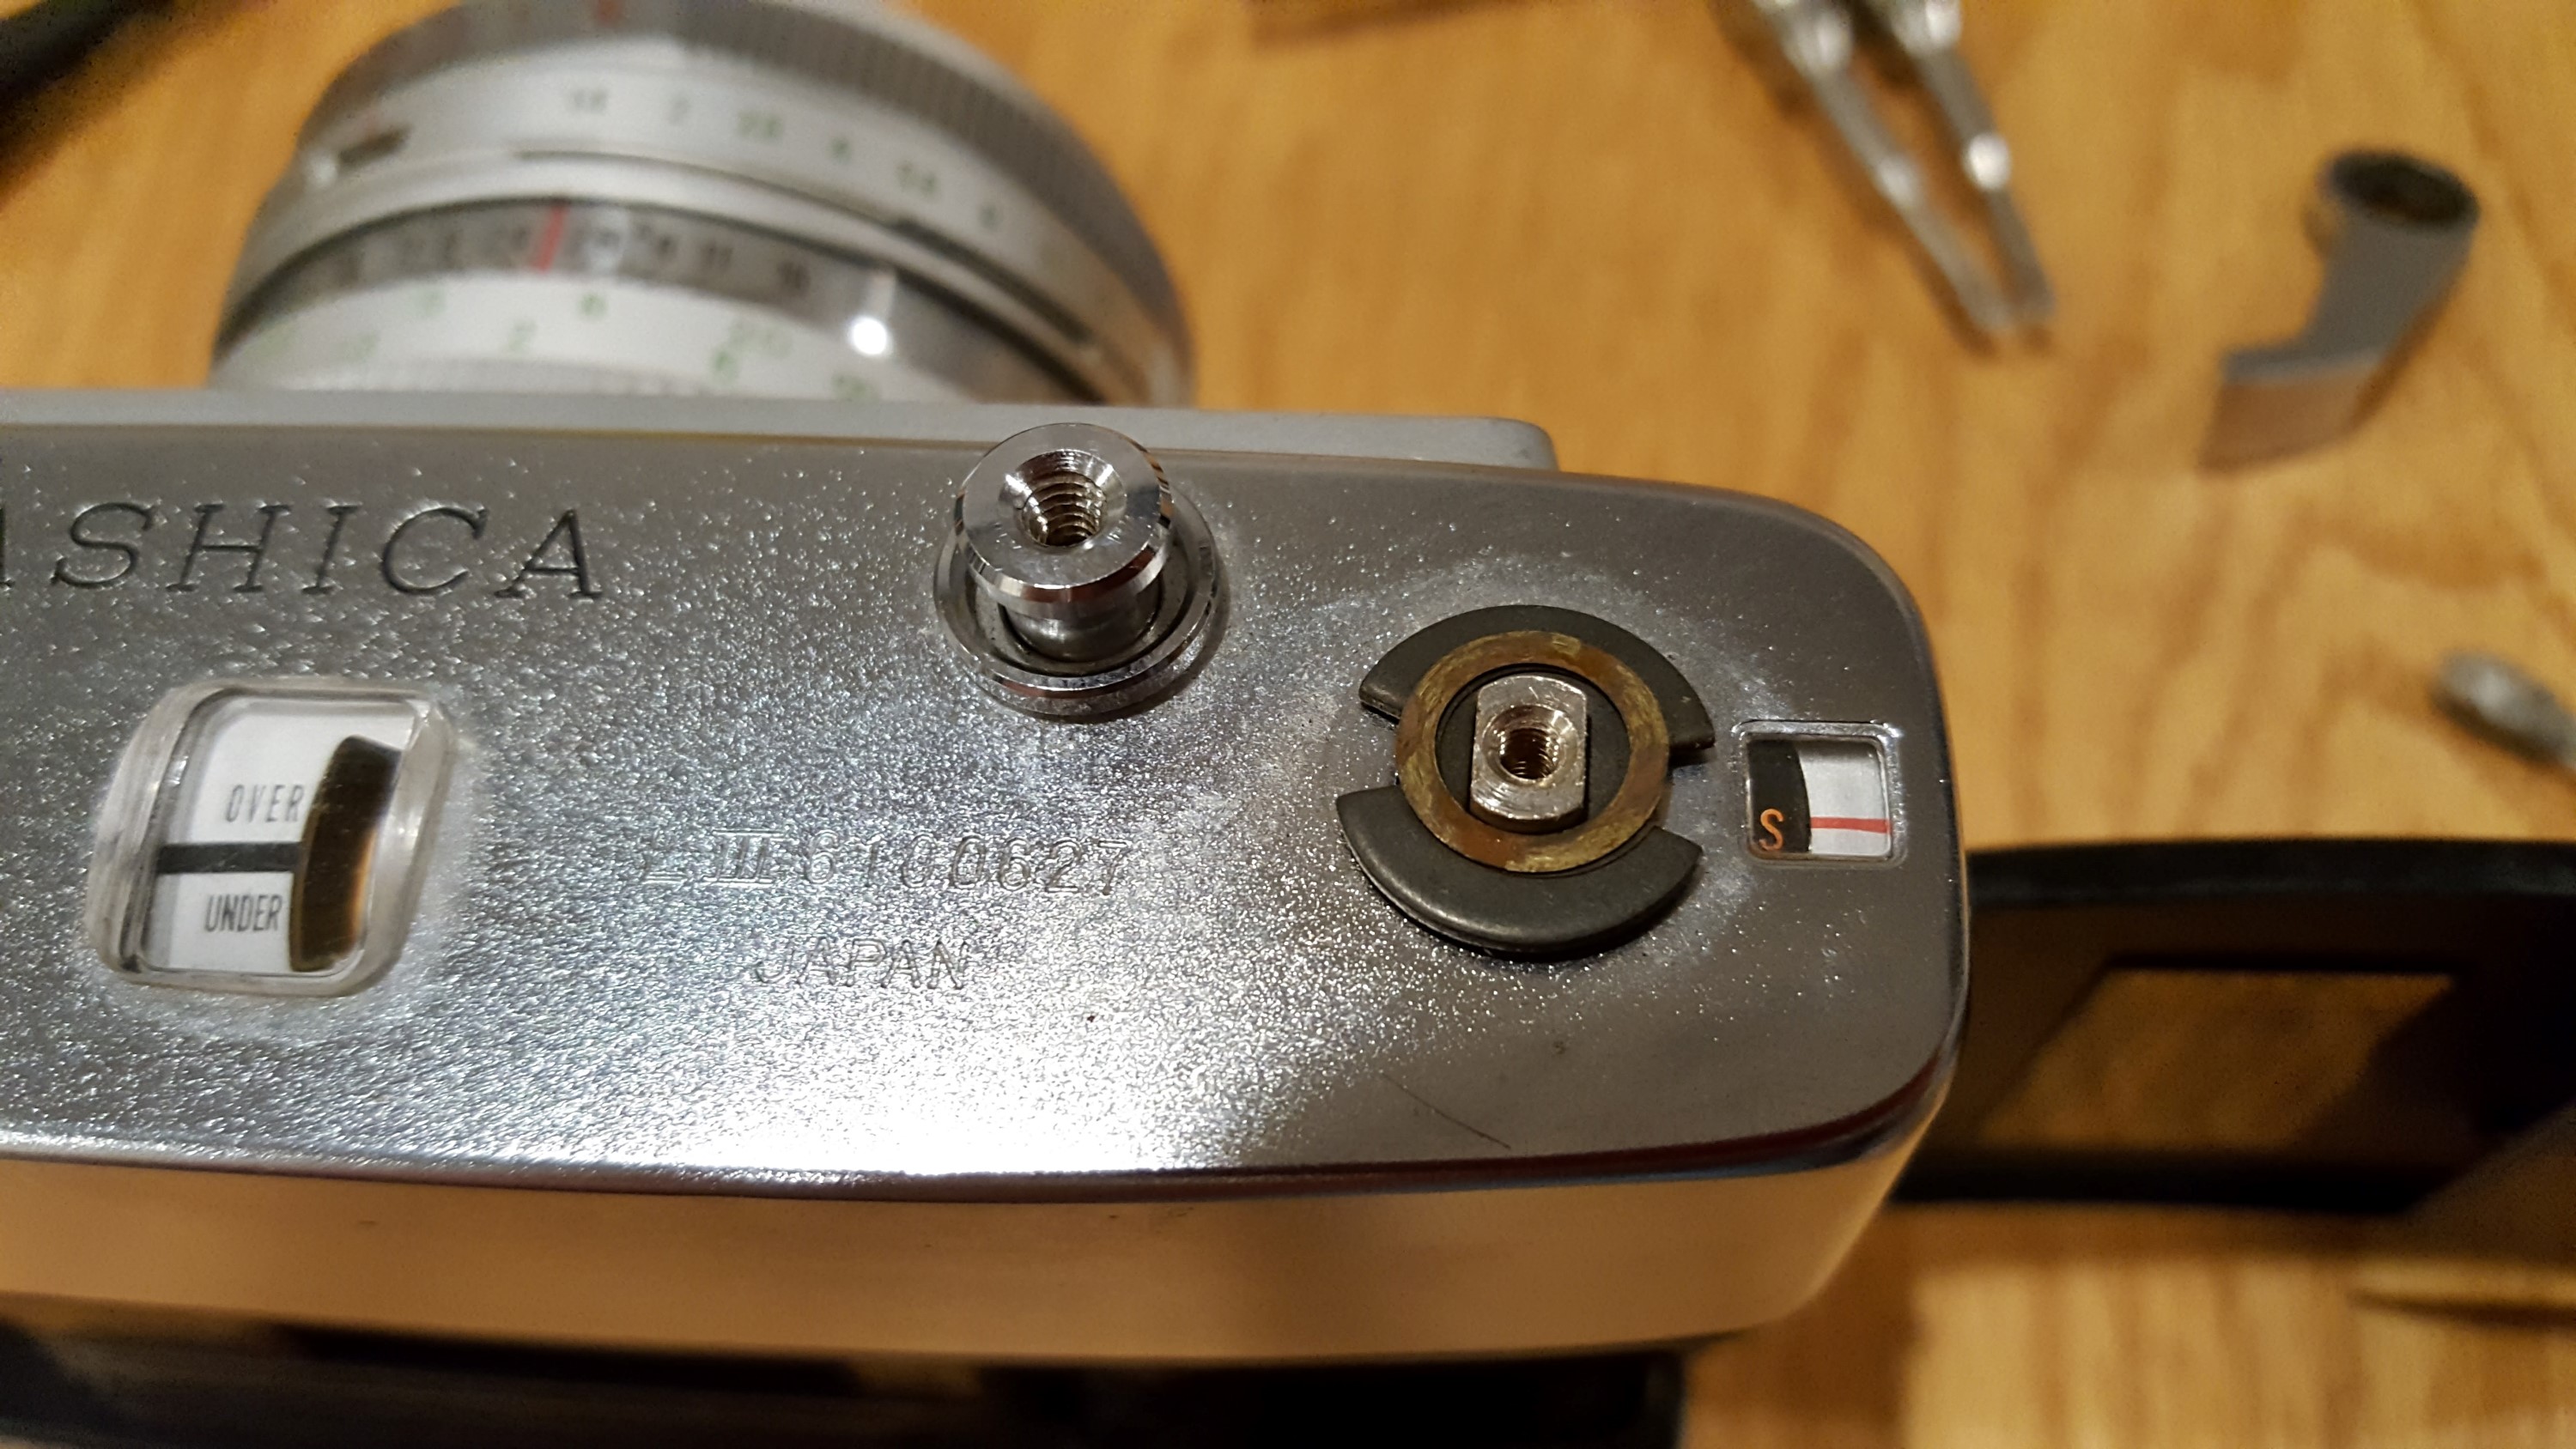
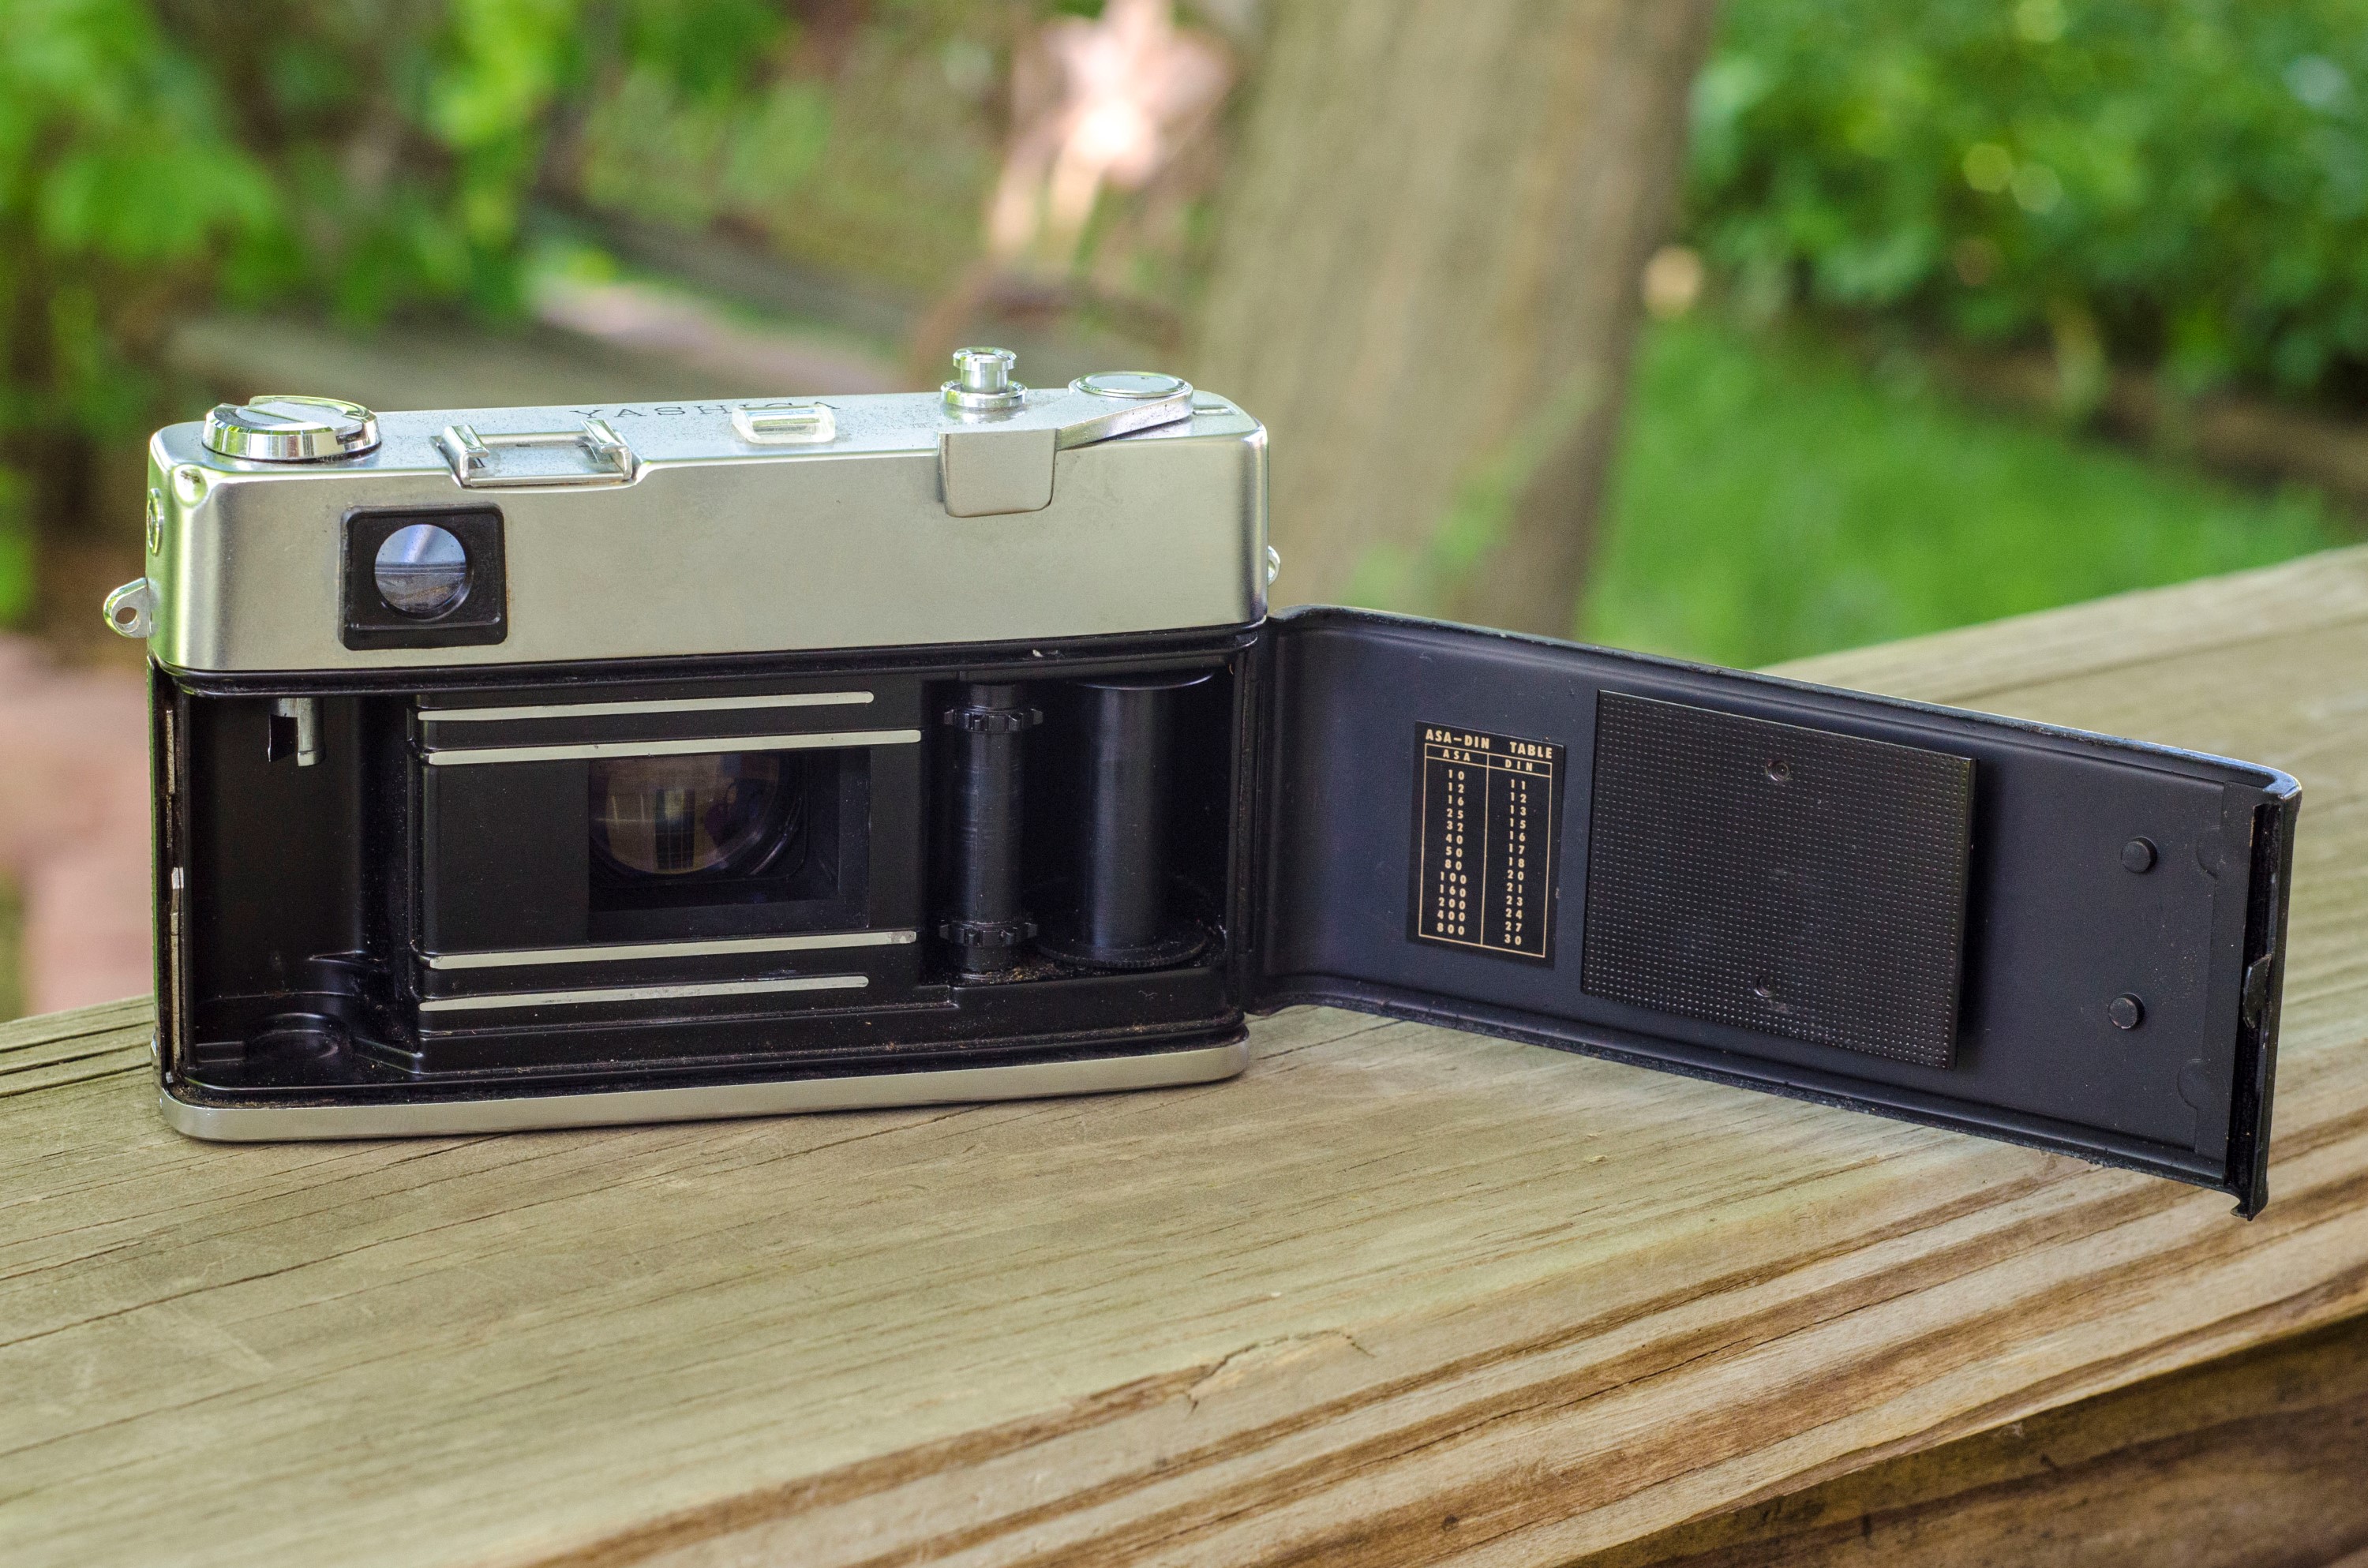
First, open the film door and using a screwdriver or some other flat piece of metal, stick something through the fork of the shaft that is beneath the rewind knob to prevent it from turning. Fold out the crank for the rewind knob and turn it counterclockwise. You do not need to remove the screw in the center of the rewind knob. You should just be able to unscrew it by hand.
 Step 13:
Using your lens spanner, unscrew the metal circle on top of the advance lever. There are two small divots that you can insert the spanner prongs into to get a grip. It unscrews counterclockwise.
Once that metal circle is off, you can lift up on the advance lever. There should be a total of 3 different washers in here, pay attention to their orientation when taking them out as you’ll need to put them back in the same way upon reassembly.
I don’t have a picture of this, but there should be 1 screw each on the side of the top plate right next to the strap lug. Remove these two screws, and your top plate is ready to lift off
Step 14:
When lifting the top plate off the Lynx, pay attention to the front beauty plate with the YASHICA and LYNX-14 logos on it as it is not actually attached to the top plate. It is just resting in there and can fall off when lifting off the top plate. This front plate has glass on it so you want to make sure it doesn’t break.
Set aside both the top plate and this front plate with the glass. There will be a single black wire attached to the flash sync port on the side of the top plate. If you are not planning on replacing the top plate, you can just leave this connected. On mine, this wire was long enough that I could just rest the top plate upside down next to the camera with this wire still connected. If you need to replace the top plate because it is damaged, like mine was, you’ll need to cut this black wire and solder it back to the replacement plate.
Step 15:
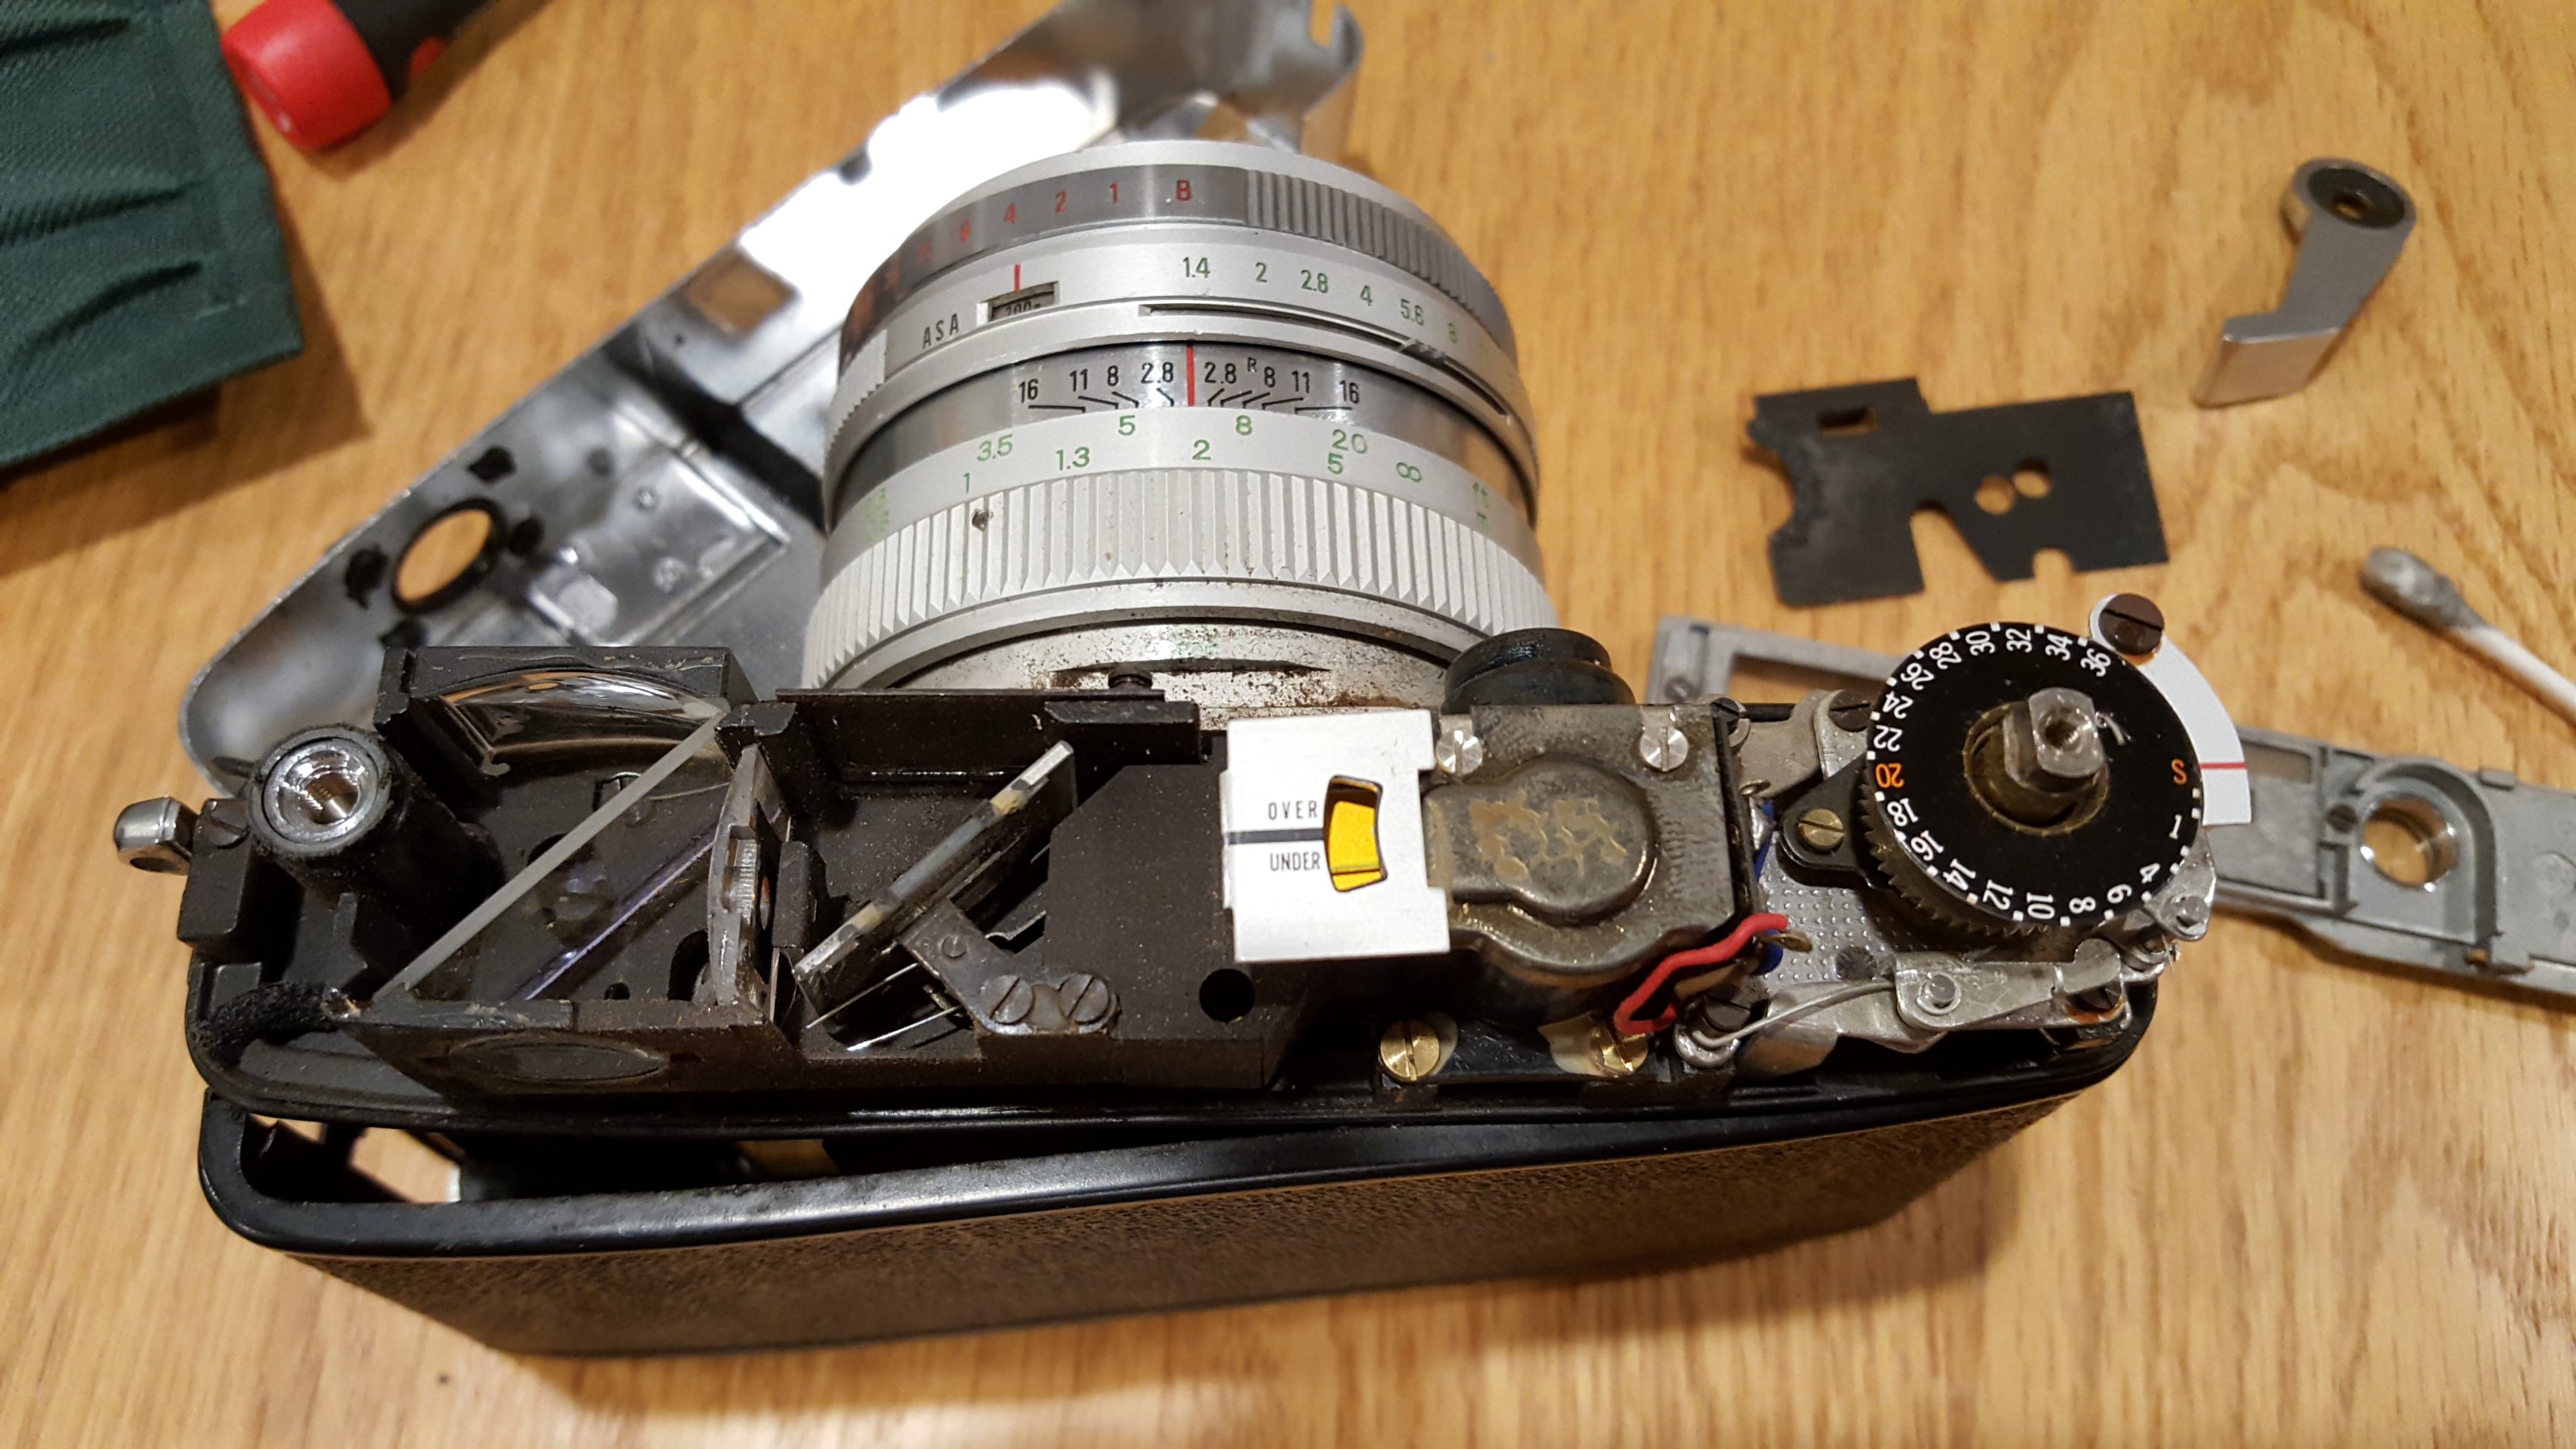
The image to the left shows the top plate completely removed from the camera. At this point, you have access to the entire viewfinder and rangefinder assembly. You can clean all glass surfaces with Q-tips and glass cleaner or rubbing alcohol EXCEPT for the large diagonal piece of glass near the left side of the camera.
This diagonal piece of glass is called the beamsplitter. On the Lynx, the beamsplitter has a yellowish coating on it which gives the rangefinder patch a yellow color. The coating that allows this to work is extremely fragile and will come off if you try to clean it. While it’s ok to clean all of the clear glasses surfaces in here with a Q-tip, you should do everything possible to not touch the beamsplitter. Once you start to wash off that yellow coating, it is permanently damaged and your rangefinder patch will completely disappear. If there is some debris on the beamsplitter, you can try blowing on it with a bulb or gentle air sprayer. It is better to just leave any minor dust specks on the beamsplitter rather than risk damaging it by trying to clean it.
In terms of cleaning everything, just use common sense. Other than the beamsplitter, everything in here should be able to tolerate a light application of glass cleaner on a Q-tip. Get it as good as you can without being too obsessive. Do not apply too much pressure to any of the glass surfaces or any of the moving mirrors. If you need to adjust the rangefinder, you can use the adjustment screws in here. I didn’t need to adjust mine, so I can’t actually tell you which screws are the adjustment ones, but I am sure with a bit of poking around, you should be able to figure it out.
My Thoughts
I am man, so therefore I am flawed…or something like that. Envy is one of the seven deadly sins, and in most sects of Christianity, “Thou shalt not covet thy neighbor’s goods” is one of the holy 10 Commandments. Knowing this myself, I guess in this case, “thy neighbor’s goods” translates to “thy neighbor’s f/1.4 lens”, to which I am guilty of.
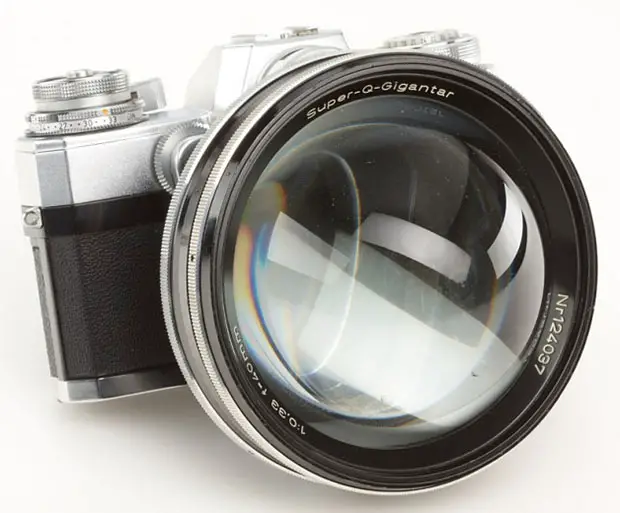
Since the beginning of photography, I am sure that every photographer has at one time turned green with envy at the thought of coveting large and fast prime lenses. The Canon f/0.95 50mm lens for the Canon 7s has earned a nickname as the “dream lens” and regularly sells for well over a thousand dollars on the used market. Stanley Kubrick famously shot many scenes using candlelight for his 1975 film, “Barry Lyndon” using a Zeiss f/0.7 lens originally designed for NASA. Finally, on the extreme end of sanity, there’s the Carl Zeiss Super-Q-Gigantar 40mm f/0.33 lens which caused quite the uproar when one went on sale in 2011 at an auction for the absurd price of 60,000 Euro. Perhaps even more absurd than the price of the Super-Q-Gigantar is that the lens isn’t even a real lens. Sure, it exists, and it looks like a real lens, but it was just a mock-up created as a practical joke.
So although the Yashica Lynx-14’s f/1.4 lens is nowhere near as bright or large as those previously mentioned, it still amazed people and for the first time, a uniquely large and bright lens was within reach of people who otherwise could never afford such a fast lens.
I had difficulty finding any information about the Lynx-14’s original selling price, but a scan of page 10 from a catalog for Webbs Camera in San Jose, CA from the 1960s suggests that the retail price of the original Lynx 5000 was around $95. Then an article on yashica-guy.com says that the Lynx 14 was only $15 more than the Lynx 5000, so if we put the two numbers together, a good estimate of the original price for the Lynx 14 would be around $110.
Assuming that the Yashica Lynx-14 sold for around $110 in 1965, using an inflation calculator, that comes out to $840 in today’s money which is certainly consistent with a mid to upper range camera today.
Whether the Lynx-14 was the equivalent to $800 or $900 today, it wasn’t something that one would purchase without needing (or thinking they needed) such a fast lens. The fast lens allows the camera to be used indoors without the bother of flash photography in all but the darkest light. By the 1960s, faster films like Kodak Tri-X allowed for handheld shots in less than ideal light while still maintaining proper exposure. The Yashica Lynx-14 allowed for increased flexibility with films other than Tri-X and allowed photographers more options when shooting.
In addition to all of what the 7-element Yashinon lens was capable of, it also looked darned impressive. I think that this latter fact helps maintain this model’s desirability to collectors. When searching the used market for Yashica rangefinders, this model consistently fetches prices higher than other Yashica rangefinders. Sometimes I see the f/1.4 version selling for double or even triple that of “lesser” Yashicas. But is the additional cost worth the effort?
Coming back to my earlier admission of sin, I wanted a Yashica Lynx-14, and I wanted one bad. It took me two tries to get one in good working condition, but once I had the second one pieced back together with the good parts of both cameras, I loaded in some film and went shooting.
The first thing (ok, the second thing) you’ll notice when picking up the Lynx-14 is it’s weight. It takes quite a bit of glass to make an f/1.4 lens. Keep in mind that there’s 7 elements in there as well. The filter ring is 58mm which not as big as some modern telephoto lenses, that was quite big for the 1960s. This is definitely not a camera that would fit in any type of pant or coat pocket, and its certainly not one you’d want hanging from your neck for a long period of time. Are there heavier cameras? Sure. This thing is a feather compared to the Mamiya M645 and other medium format SLRs, but still, when compared to other Japanese rangefinders of the 1960s, the Lynx-14 is quite large.
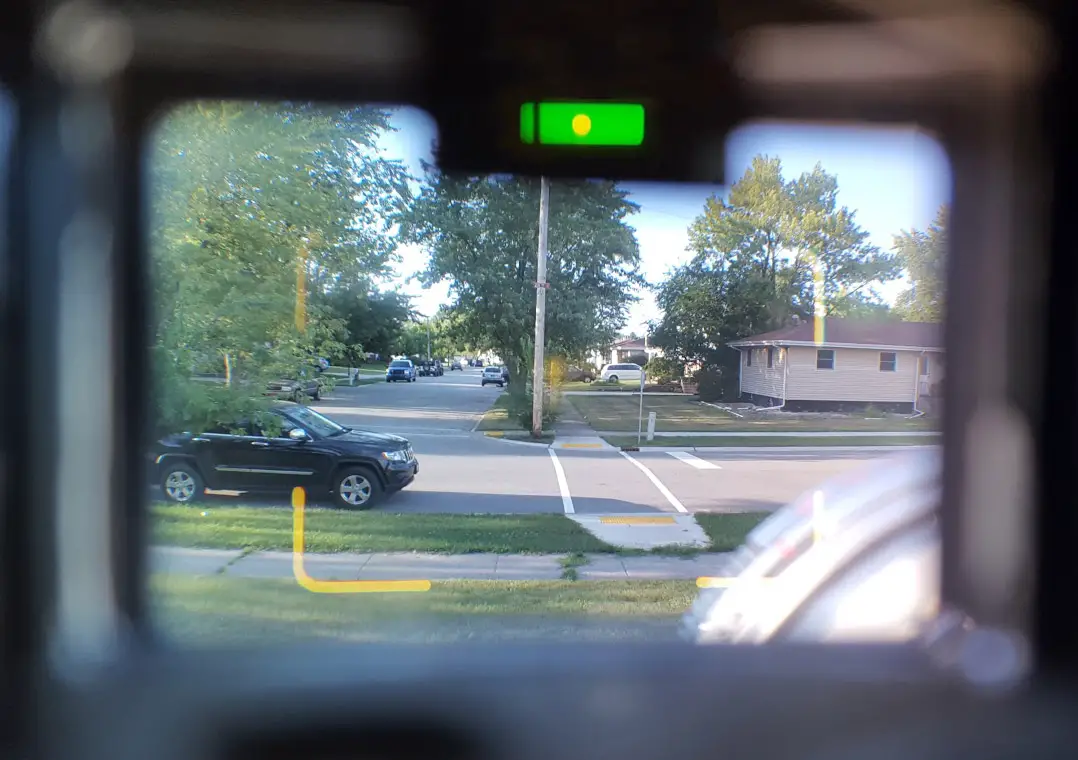
The large diameter lens barrel blocks a significant amount of the lower right corner of the viewfinder. It shouldn’t affect the composition of most shots, but the viewfinder is parallax corrected, so as you get closer to minimum focus, the frame lines will occupy more of the same space as the lens. The next picture shows a view through the viewfinder and you can see how much of the lens barrel is visible through the viewfinder.
While the visibility of the lens in the viewfinder doesn’t degrade the shooting experience too much, something that does is the design of the match needle exposure system. Rather than take a cue from SLRs of the time which had a needle that was visible in the main part of the viewfinder, Yashica added a blacked out section of the top part of the viewfinder frame to which you could see the match needle through a prism.
It’s rather hard to explain, but even harder to see in most light. This match needle is not backlit by anything other than ambient light and can be very difficult to see indoors. In addition to it’s dimness, the match needle is only visible when your eye is perfectly centered in the viewfinder. At even the slightest angle, it becomes impossible to see. The image to the right is a composite of two different images that I had to edit together to give you an idea of what you see when looking through the viewfinder. Despite my best efforts, I could not get my smartphone camera to be able to see the match needle, frame lines, and composed image frame all at once, so what you see is an edit of two different pictures. Although it looks like the match needle (in green) looks bright, keep in mind that in order to capture this on my phone, I had to point the Lynx directly into the sun. Anything less than direct sunlight and that green section of the viewfinder is much dimmer.
In addition to the dim match needle in the viewfinder, I found the rangefinder patch to be dim as well. Like other Yashica cameras of the era, Yashica went with a yellow tinted beamsplitter. This is nearly the same system they used in other rangefinders, including the Electro, yet I found it harder to see in this camera than any of my Electros or even the Yashica Minster D which I have also reviewed. I’ll at least consider that this particular Lynx-14 has lost some of it’s reflectivity and that fresh examples back in the 1960s weren’t as dim, but I found the RF patch to be more difficult to use in this camera than any other Japanese rangefinder in my collection.
If however, the dim match needle and rangefinder patch are indicative of mint condition Lynxes, I feel as though part of the appeal of a fast f/1.4 lens for low light indoor photography is partially lost due to this inability to easily use them in low light. Sure, its fine in well lit outdoor scenes, but that’s not where you usually are going to benefit from such a fast lens.
After shooting the first few frames of my inaugural roll of film in the Lynx-14, I started to realize that I’ll likely never use this camera to it’s strength. I found myself falling back on Sunny 16 and shooting many of my images using apertures of f/5.6 – f/11 which is something I could have done on a “lesser” rangefinder. Still, shooting with the Lynx was far from a miserable experience. The large diameter lens barrel is easy to maneuver with the camera to your eye. Each of the focus, aperture, and shutter speed rings were easy to change without having to lower the camera. The meter is powered by a button conveniently located on the front of the camera where your right hand naturally rests.
The shutter fires with a faint “snick” which like most leaf shutter cameras, means that it could be used as an effective “discreet” candid camera. All of the movements of the camera were smooth and purposeful. The top plate is cleanly designed and all of the controls are exactly where you expect them to be. Although the meter within the viewfinder is difficult to see, there is a second one on the top plate which is very clear and easy to read. Yashica enjoyed a great reputation for well built cameras in the 1960s, and the Lynx-14 is no exception. Although I struggled with some aspects while shooting this camera, it was nice to know that if someone ever threatened me, the Lynx could double as an effective self defense weapon!
Loading film into the camera is uneventful. Although it pre-dates the quick load systems that became popular in the 1970s, I had no issue getting film loaded into the camera. If you’ve made it this far into the review, you are likely chomping at the bit to see it’s results. Read on.
My Results

I shot my inaugural roll of film with this camera at the end of the summer, but that roll sat on a shelf waiting for me to get enough other rolls to send in to be developed all at once. The anticipation of seeing the results of this camera was eating away at me, so I ended up loaning it to my friend Adam from A Quirky Guy with a Camera to see what he thought of it. Adam and I both have a fond appreciation for Yashica rangefinders, and we both rank the Minister-D as one of our all time favorite rangefinders, so I wanted to hear his thoughts on the use of the Lynx. I didn’t give him any clue to my thoughts, so as not to taint his opinion. I also knew that Adam develops his own film, so he’d likely see results from this camera before I saw mine.
When he got the package with the Lynx in it, he was thrilled to have a chance to shoot a camera that had been on his want list for quite some time. He loaded it up and shot with it within a day or two of receiving it, and I eagerly awaited his thoughts.
Essentially, his thoughts mirrored mine. The rangefinder patch was frustratingly dark, especially when compared to other Yashica rangefinders of the era, and the choice for a non-backlit exposure meter at the top of the viewfinder was a curious design choice. More troubling however, upon reviewing his first test roll, not a single image was correctly in focus. He showed me a contact sheet of 24 exposures he shot and they were all out of focus to varying degrees.
Adam is an experienced user of classic rangefinders, so I knew it couldn’t be a usability issue, and while we all can make mistakes on the occasional frame or two, theres no way that he misjudged the whole roll. So, with this information, I feared my results would look the same.


Upon receiving my roll back, I saw that I too, had the same issue with out of focus shots. Oddly, the shot of me shooting the mirror is the one thats closest in focus, but that likely is that I was actually off in my judgement of distance, but in a way that partially cancelled out the problem with this camera. Of the other three shots, you’ll notice that I tried to use the f/1.4 lens to it’s strengths and shoot indoor pictures with low light.
There is something clearly wrong with this camera. It’s possible the rangefinder is out of adjustment since I could have bumped something out of alignment when I was cleaning it, but the likely culprit is one or more of the glass elements. If you recall, I swapped the original front group from this camera with one from another Lynx because the one that came on this body had a huge splotch of fungus on it. In hindsight, I should have checked focus accuracy by collimating it, but I was so sure that this was a direct swap, it never crossed my mind to do so. While it would make sense that Yashica used identical lens elements between all Lynxes, it’s plausible that there were some subtle changes throughout the lifespan of this model.
In either case, I can’t fault the camera for it’s out of focus shots. Yashica’s Yashinon lenses are well renowned to be extremely sharp and accurate. The f/1.4 monster in this Lynx is a 7-element design that has repeatedly been called one of Yashica’s sharpest lenses ever. So, even with these terrible images, I still feel like I can draw some conclusions to this camera.
For one, I hated the viewfinder. Even if there’s a chance that the beamsplitter in my example isn’t transmitting as much light as it would have when it was new, I can still say it’s a very small patch that is difficult to see, especially in low light. Considering this camera’s biggest selling point is it’s fast f/1.4 lens, and the whole point of using an f/1.4 lens is for these low light situations, I can confidently declare that even a mint condition Lynx-14 would be a struggle to use wide open in low light.
While I generally enjoy Yashica rangefinders, and find their designs to be well thought out, the blacked out top portion of the viewfinder with the dim match needle meter was a very poor choice. Yashica must have agreed as the later Lynx-14E had illuminated arrows instead of a match needle. For that reason, the 14E might be a better user camera than the 14, even though it uses a more difficult to source battery.

I started off this review stating that the Lynx 14 was one of the only fixed lens rangefinders with an f/1.4 lens, and there’s probably a good reason for that. f/1.4 is only half a stop faster than f/1.7 and most film has enough latitude to absorb a half stop of exposure difference. If you were really looking for a rangefinder with good low light performance and a sharp lens, I really feel that there are better options than the Lynx-14 or 14E. The image to the right was taken with a Yashica Electro GS with it’s f/1.7 lens in a dark restaurant with no supplemental lighting. I had no problem acheiving focus and although it was shot wide open, the Yashinon lens still rendered a clearly defined and sharp image. I doubt this image could have looked any better with a mint condition Lynx in optimal conditions.
So, putting aside the focus problems as it’s clearly an issue with my specific Lynx, I feel as though even if I had a properly working Lynx, my overall opinion would be the same. This camera’s appeal is because of the f/1.4 lens. It’s big, it’s pretty, but in practice, it offers little to no benefit compared to other rangefinders of the era with sub f/2 lenses. Sure, this camera’s shortcomings would be largely negated in brightly lit sunny scenes, but at that point, you could be shooting with a Yashica Minister-D or a Yashica Electro at f/11 and you’d never notice a difference.
The appeal of the Lynx-14 is lens envy, and nothing more. It looks great on paper, and it looks great on shelf. Even if I manage to correct the focus issues with this camera, I doubt it’s one I could come back to again, and if anyone reading this is considering buying one, I’d tell you that unless you just really want to look at that lens on your shelf, there are much better (and cheaper) options if you plan on shooting with it.
My Final WordHow these ratings work |
The Yashica Lynx-14 is a popular collectors camera that has a magnificent 7-element f/1.4 Yashinon lens. The camera is large and heavy, and although it uses a battery for the CdS meter, everything is completely mechanical and works without a battery. While I struggled with some focus issues that are specific to my example, I did not find the rangefinder to be especially easy to use, and I also hated Yashica’s implementation of a blacked out section inside of the viewfinder for the meter. While an f/1.4 lens seems like a good selling point, in reality, it only offers you half a stop more exposure than a Yashica Electro, and unless you consistently shoot wide open in dark locations, you could duplicate identical results from many other, less expensive, and less heavy rangefinders. I did not enjoy my time with this camera and don’t feel it’s use is deserving of it desirability on the used market. Quite simply, if you are looking for a classic rangefinder experience that is easy to use and produces razor sharp images, there are far better options. | ||||||
| Images | Handling | Features | Viewfinder | Feel & Beauty | History | Age | |
| 1 | 0 | 1 | 0 | 1 | 1 | 20% | |
| Bonus | none | ||||||
| Final Score | 4.8 | ||||||
Additional Resources
http://camerapedia.wikia.com/wiki/Yashica_Lynx_14
http://photoethnography.com/ClassicCameras/YashicaLynx14.html
https://www.cameraquest.com/yaslyn14.htm
http://www.yashica-guy.com/document/chrono2.html
https://blog.jimgrey.net/2014/10/10/yashica-lynx-14e/
http://camera-wiki.org/wiki/Yashica_Lynx_14E
http://feuerbacher.net/photo/frame.html?Cameras/Lynx14E/YashicaLynx14E.html
Thank you for quality reviews, it’s a pleasure to read. I’m no longer accumulating the gear and shelving just one leica for sentiment, but your articles bring much good memories, and insights provided sure will be precious to many.
I wish there were a page like that those 10+ years ago.
Thanks for the compliments! I, too wish there was a page like mine before I bought many of my cameras!
As you point out; the Achilles heel for this camera was its small, dim focus patch that compromised the camera’s promise as a low-light shooter. It’s important to note that the E640 Mercury-oxide batteries used in the 14E were notoriously leaky and acid fumes stripped the coating on the beamsplitter. In my view; a bright focus patch should be the primary purchase criteria for this 50 year old camera, but in my experience that’s a big challenge Enthusiasts have reported that the beamsplitter from a Yashica GS/GSN fits perfectly in the Lynx 14E and features the “key” cut in the glass for easy alignment. I’m currently looking for an organ donor GS/GSN to harvest the beamsplitter to find out if this is a workable solution.
Frank, thank you for the excellent information. Although the original Lynx-14 in my collection didnt use the E640 batteries, its still possible that something similar to what you described has happened to mine.
I actually do have a parts Electro that I might be able to salvage the mirror from. I will add this to my “queue” of repairs and if I ever get around to doing it, I will update this thread with my findings! Thanks for the tip!
Hi Mike, I almost finished my repair work of my lynx-14 then started to read your article then I read again. I did the rangefinder adjustment. its very easy by adjust the two screws at the view finder window area. If you look down from top you will easily pick them up. The big screw close to the viewing eyepiece is the infinity adjustment, the small one close to the 1/2 transparence glass is the closest adjustment. Once you did the infinity, then do the closet adjustment. A little turn affect lots of image shipment so do it carefully. Thanks for your document! John
John, thank you for the additional information. Since posting this Lynx-14 review, I took mine apart again and fixed the lens, and resolved the focus issue. I am pretty confident mine should shoot correctly now, but I haven’t had the time to put a second roll of film in it yet. I really hope to get to it soon, so I can update this review with images of a quality this camera deserves.
Thanks for the detailed review Mike.
The image of the lady and baby shot in the restaurant is delightful.
I agree with the lens envy and stop at anything need to have a rangefinder with a 1.4 lens.
I myself have many rangefinder’s including an electro & a minster. Both give me beautiful results and render images I there own style.
I may go for a lynx 14 if one becomes available. But with the reduced shutter speed, I can’t open the camera up fully outdoors.
I enjoy your writing and luck forward to many more reviews.
Best regards,
Andy.
Thanks for your opinion and well articulated user experience. Without touching the camera, I learned enough to know it probably wouldn’t suit me. You’ve written the body-cavity search of camera reviews (and I mean that in the best possible way :-). Nicely done!
The Lynx-14 isn’t for everybody. It sounds like a great idea, put a fixed f/1.4 lens on a rangefinder and see what happens. The problem was that the Lynx was already a large camera to begin with, and adding that monster 7-element piece of glass makes it ungainly. Plus, I really did not like how Yashica implemented the meter readout in the viewfinder. It just doesn’t work well for me. I doubt I’ll ever use mine again.
Thanks for the nice article,Mike.I really enjoy all the neat and qwerky aspects of the 14 and 14E’s.I have about 4 of these cameras that I have picked up along the way and its hard for me to part with any of them (although my wife
has another opinion about my cameras-LOL)
They are easy to work on and clean up and the glass takes great images.Fully manual with a 1.4 and there relatively inexpensive-I like that.
They are rather big but for someone who shot with a Pentax 6×7 for many years its ok.:)
Thanks,
Wayne
Thanks for the great article! I bought a $15 Lynx 14A in a flea market, knowing that there was something wrong with the aperture (the iris did not change in size as I rotated the aperture ring). Looked into various posts on disassembling the Lynx lens and yours was the most detailed and descriptive. I followed your instructions and checked the metal tab (not bent) that fits between the 2 tabs deeper in the lens that changes the aperture size. Unfortunately the 2 deeper tabs seemed to have displaced lower into the barrel such that the larger metal tab does not engage in between anymore. Not wanting to disassemble the shutter mechanism to get to the 2 deeper tabs, I set the aperture with a screw driver to its largest size and reassembled the components back again. While not ideal, I have the Lynx at least operational at its largest aperture.
Thanks again for your post!
HH Teh
I (impulsively, and for far too much) won an auction on eBay for a Lynx 14E, but unfortunately it was from a seller who didn’t know much about cameras and the camera ended up being a dud. The shutter speed ring doesn’t step into the speed settings and rotates 360°, and the red stripe indicating shutter speed is on bottom of the camera lens instead of the top, indicating someone has disassembled the camera previously.
Hopefully with this guide I can figure out how to get it working again.
James
Me again.
I disassembled the camera and encountered the following:
– sticky shutter (cleaned using lighter fluid over three-four days, works nicely now)
– bent aperture selector pin (bent it back to 90° using pliers)
– ISO selector was slightly misaligned so there were no clicks between speed selection – the spring holding in the ball bearing just needed to b e realigned
– missing shutter speed pin (pin B in the image on step 7)
– circlip fallen off of one of the pins (near region D in the image on step 7, luckily was inside and didn’t fall into or jam the mechanisms)
– fungus on the inner surface of the front lens
The mechanism for pin D doesn’t appear on my Lynx 14E as it does on Mike’s Lynx 14. Instead, there’s a a different pin below pin C that needs to be pushed out of the way before the speed plate can be mounted.
For fixing the shutter speed pin (pin B), I epoxied (two-part JB weld) on a 1.27 mm diameter x 4.00 mm pin (from an SMA edge connector) and it held for about ten uses. I’m going back in eventually and fixing it with a more permanent solution.
Thank you Mike for the great guide. The camera seems to be in working order now — at least when the pin worked. I haven’t cleaned the viewfinder yet but I don’t think that will be as much as a challenge.
Thanks again,
James
Great post Mike. I now have a 5000 and hope to shoot a roll of film this week. I am writing a book on Yashica 35 cameras and I will be including the Electro range e.g. GSN which I enjoyed using – great exposure results but I was a little off on focus on some shots. My first Yashica in this range was the 35W – no meter. I found it to be great. – hence the interest in looking at other models. I will add a link back to you pots page from my dedicated resource page for my book.
Dude, maybe you should learn how to use the graduated focus ring distance scale. My yashica Lykx 14 is beautiful.
Hi Mike – Can you confirm if the rear lens element group for the Lynx 45mm f1.8 is the same as the 45mm f1.4? Something tells me that this could be the case for ease and economy in manufacturing the elements. I have a damaged 45mm f1.4 that I am trying to revive as one rear group element is bad.
I am sorry but I cannot comment on that as I do not know, but I would be shocked if they were the same. It would be very unusual for two lenses of different formulas to share the same elements.
Many Thanks for responding. 🙂
Is there a way to separate the front lens group in a 45mm f1.4? Anyone successful with that?
There are multiple front elements in the front group for a 45mm f1.4 I believe – separated with air gaps, brass spacers and screw threads. If there is fungus inside, then one needs to get in. The trick is – trying to find where the sealing joint is and separating the screw thread joint by using either acetone or lighter fluid to soften the sealing. A lens diagram would help immensely, if that is available.