

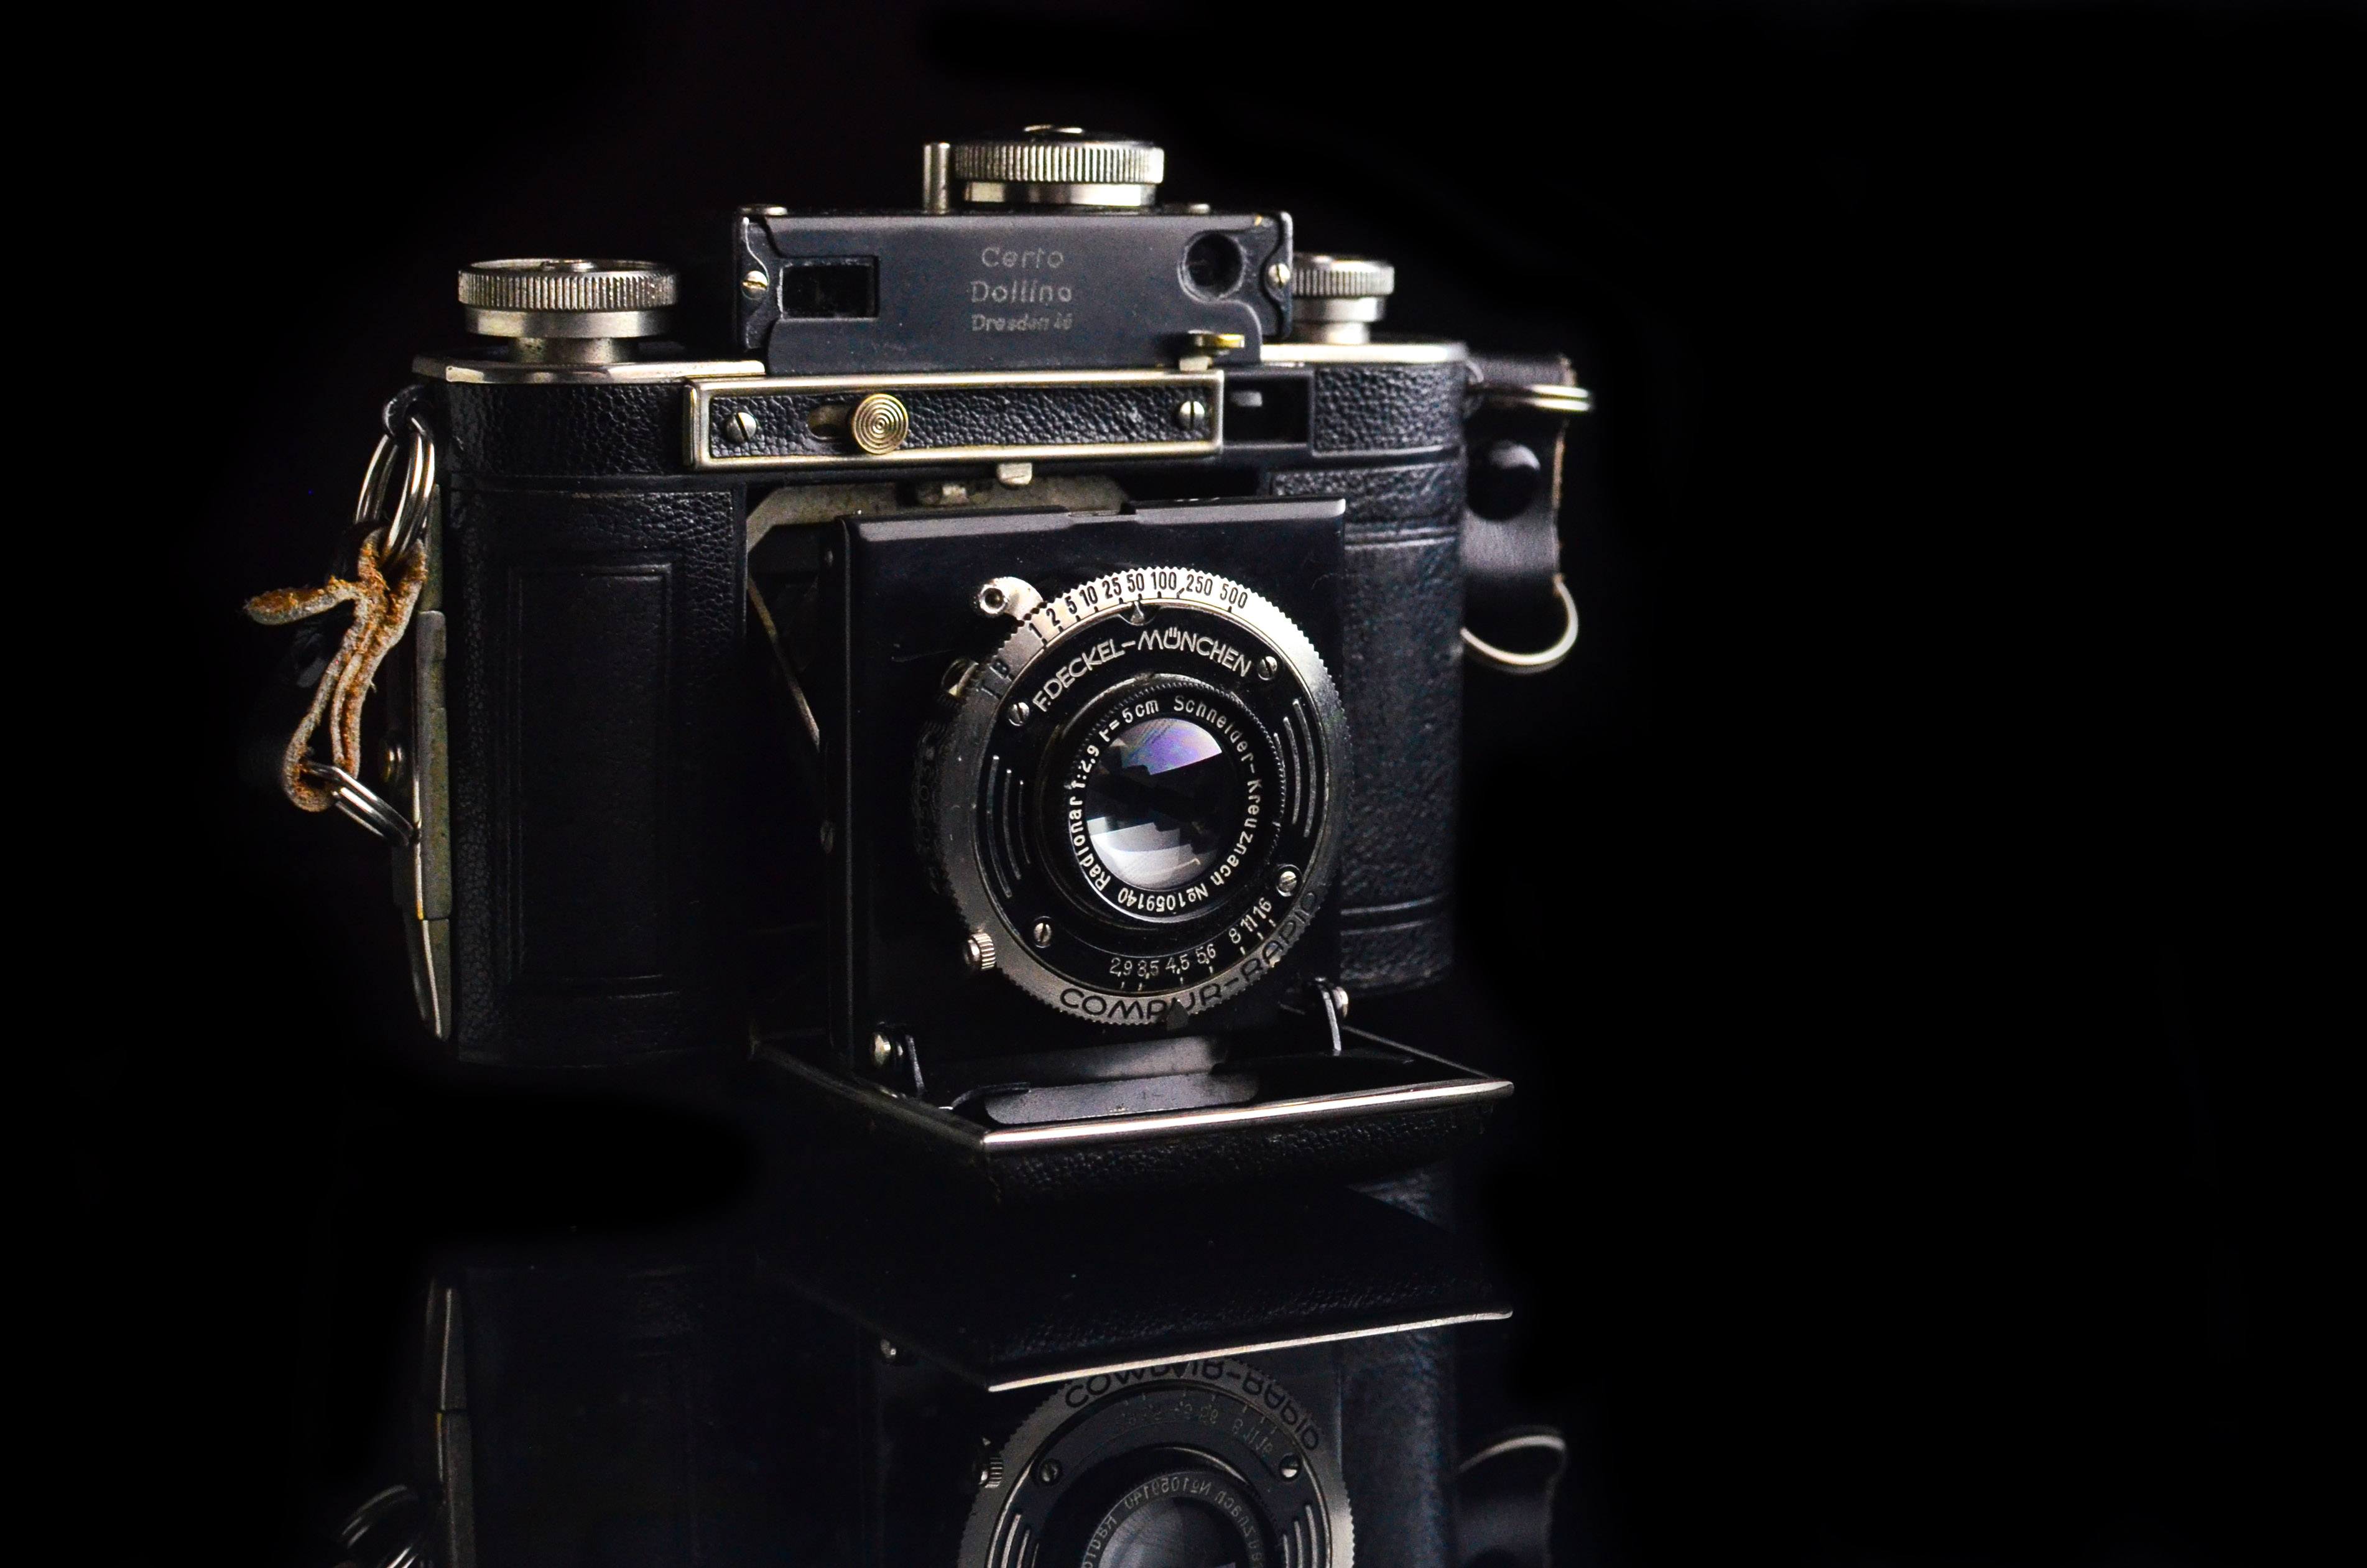
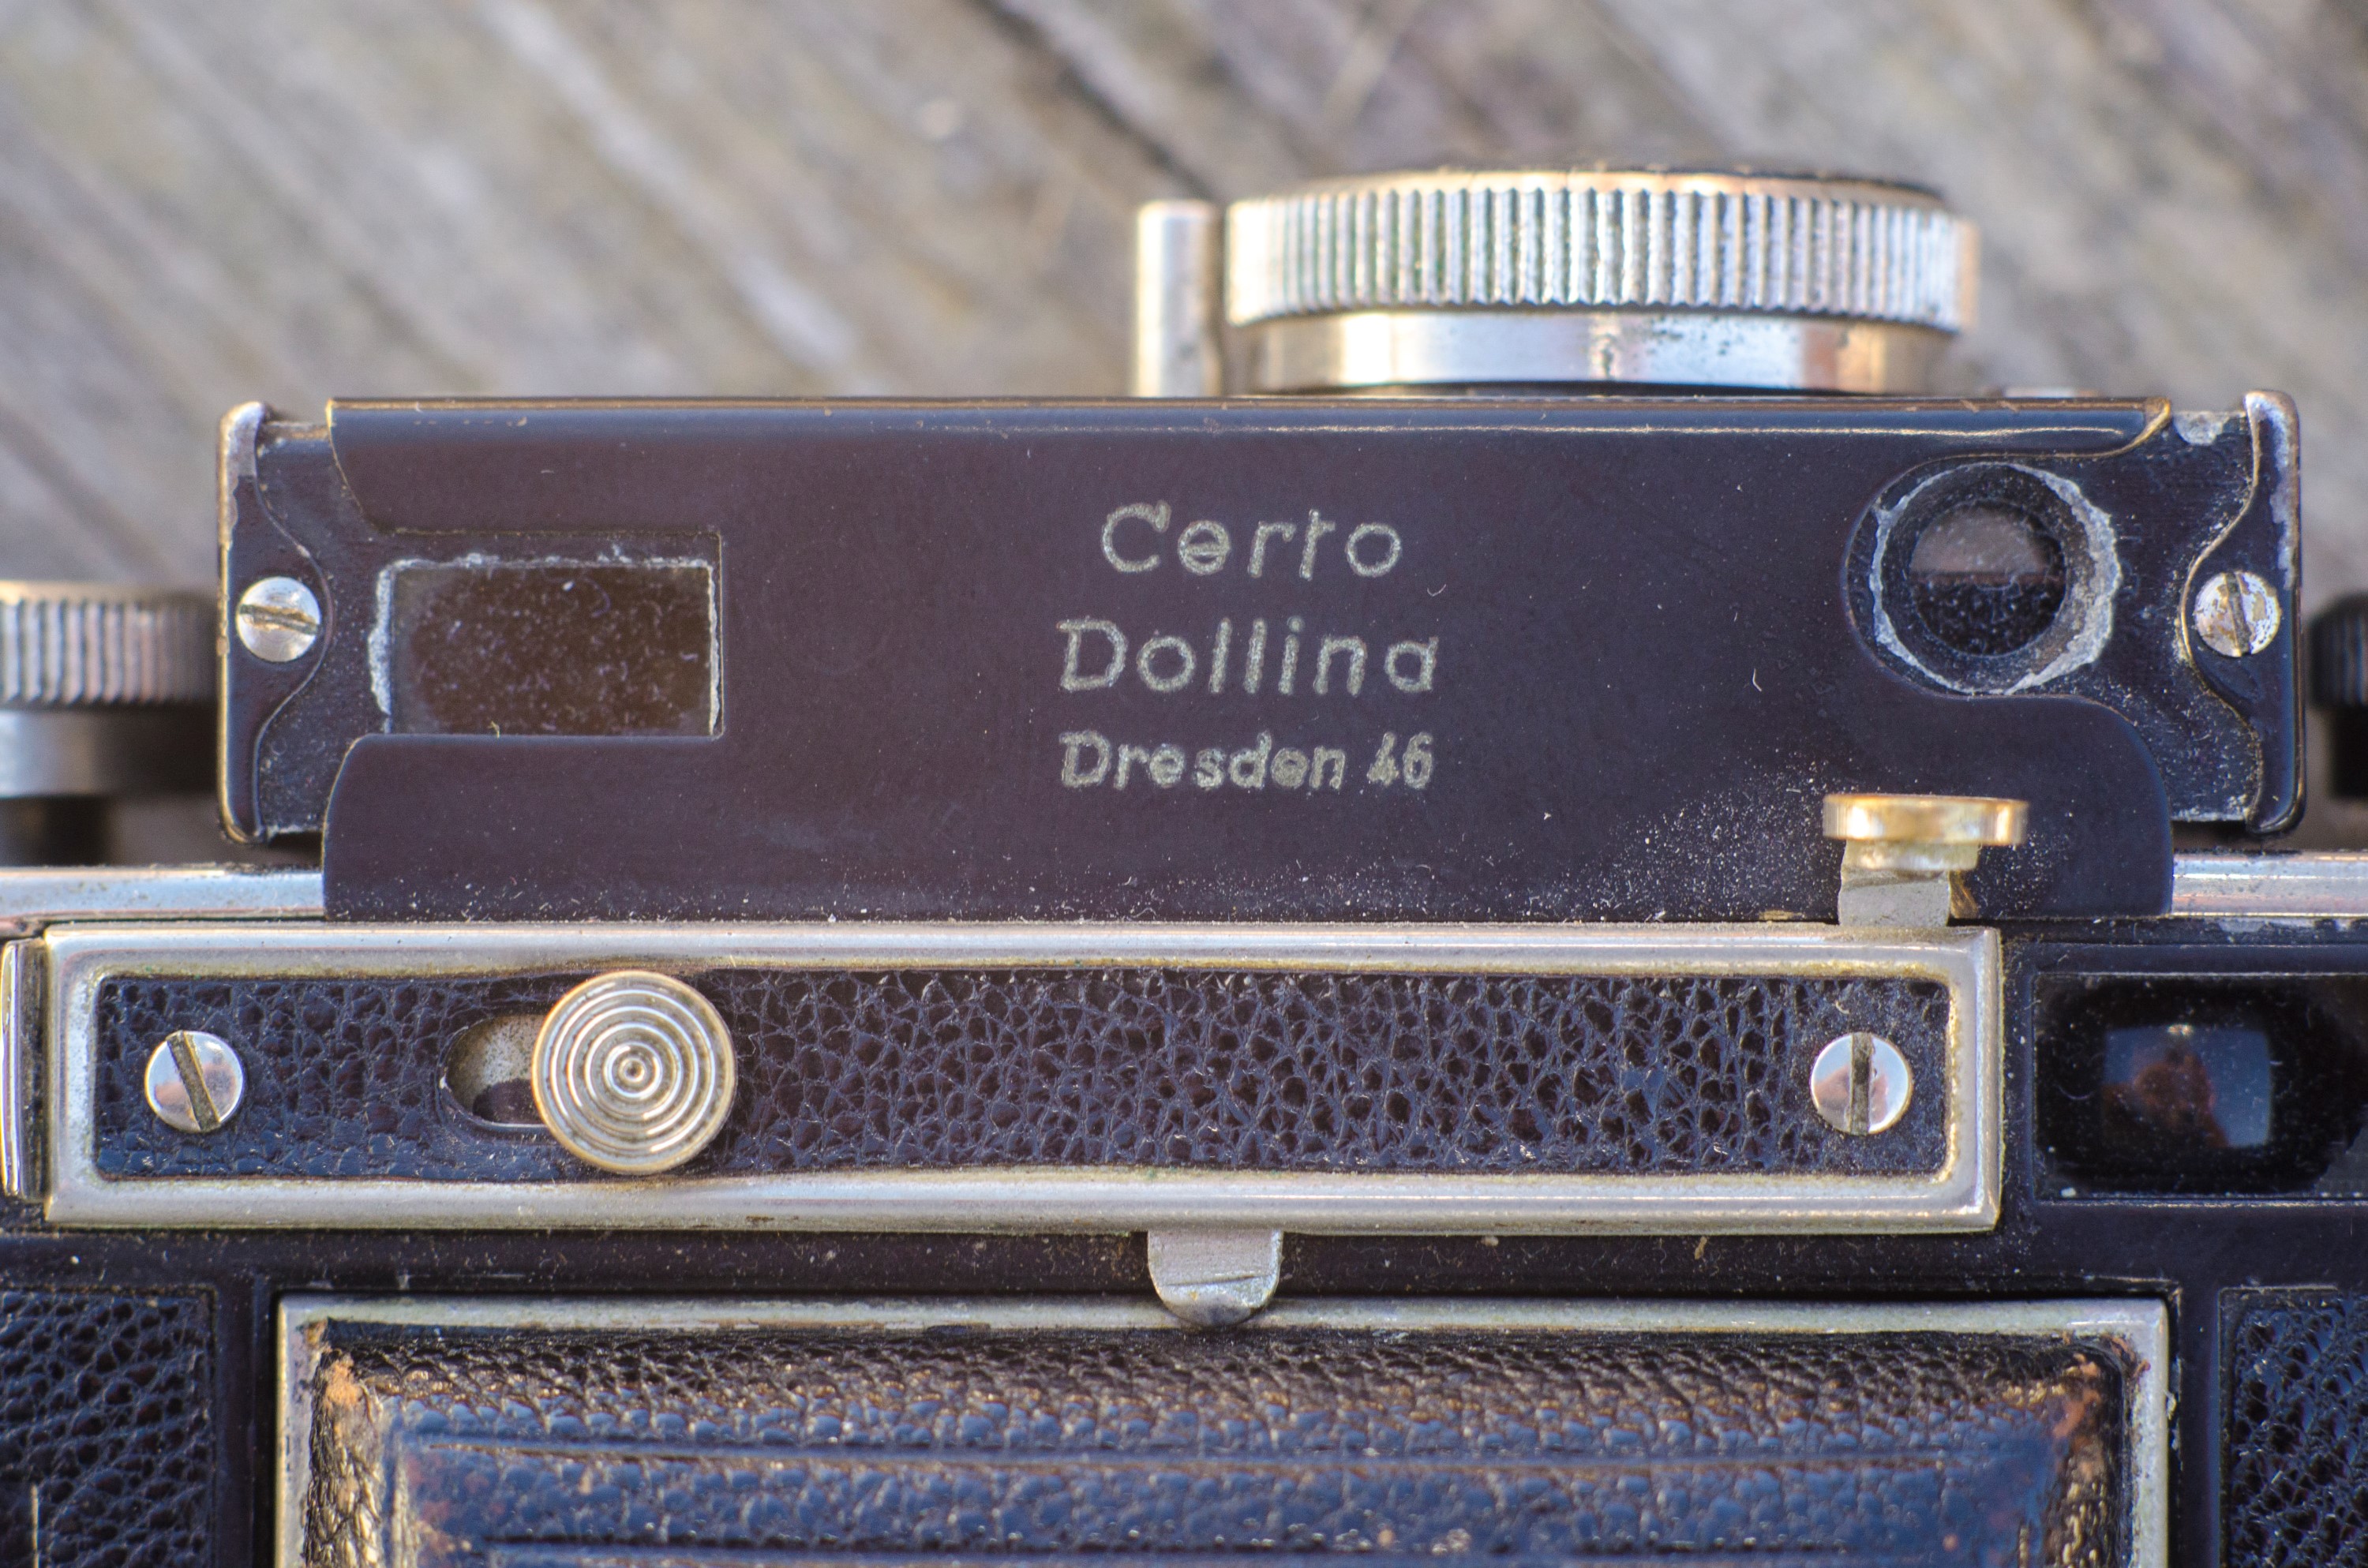
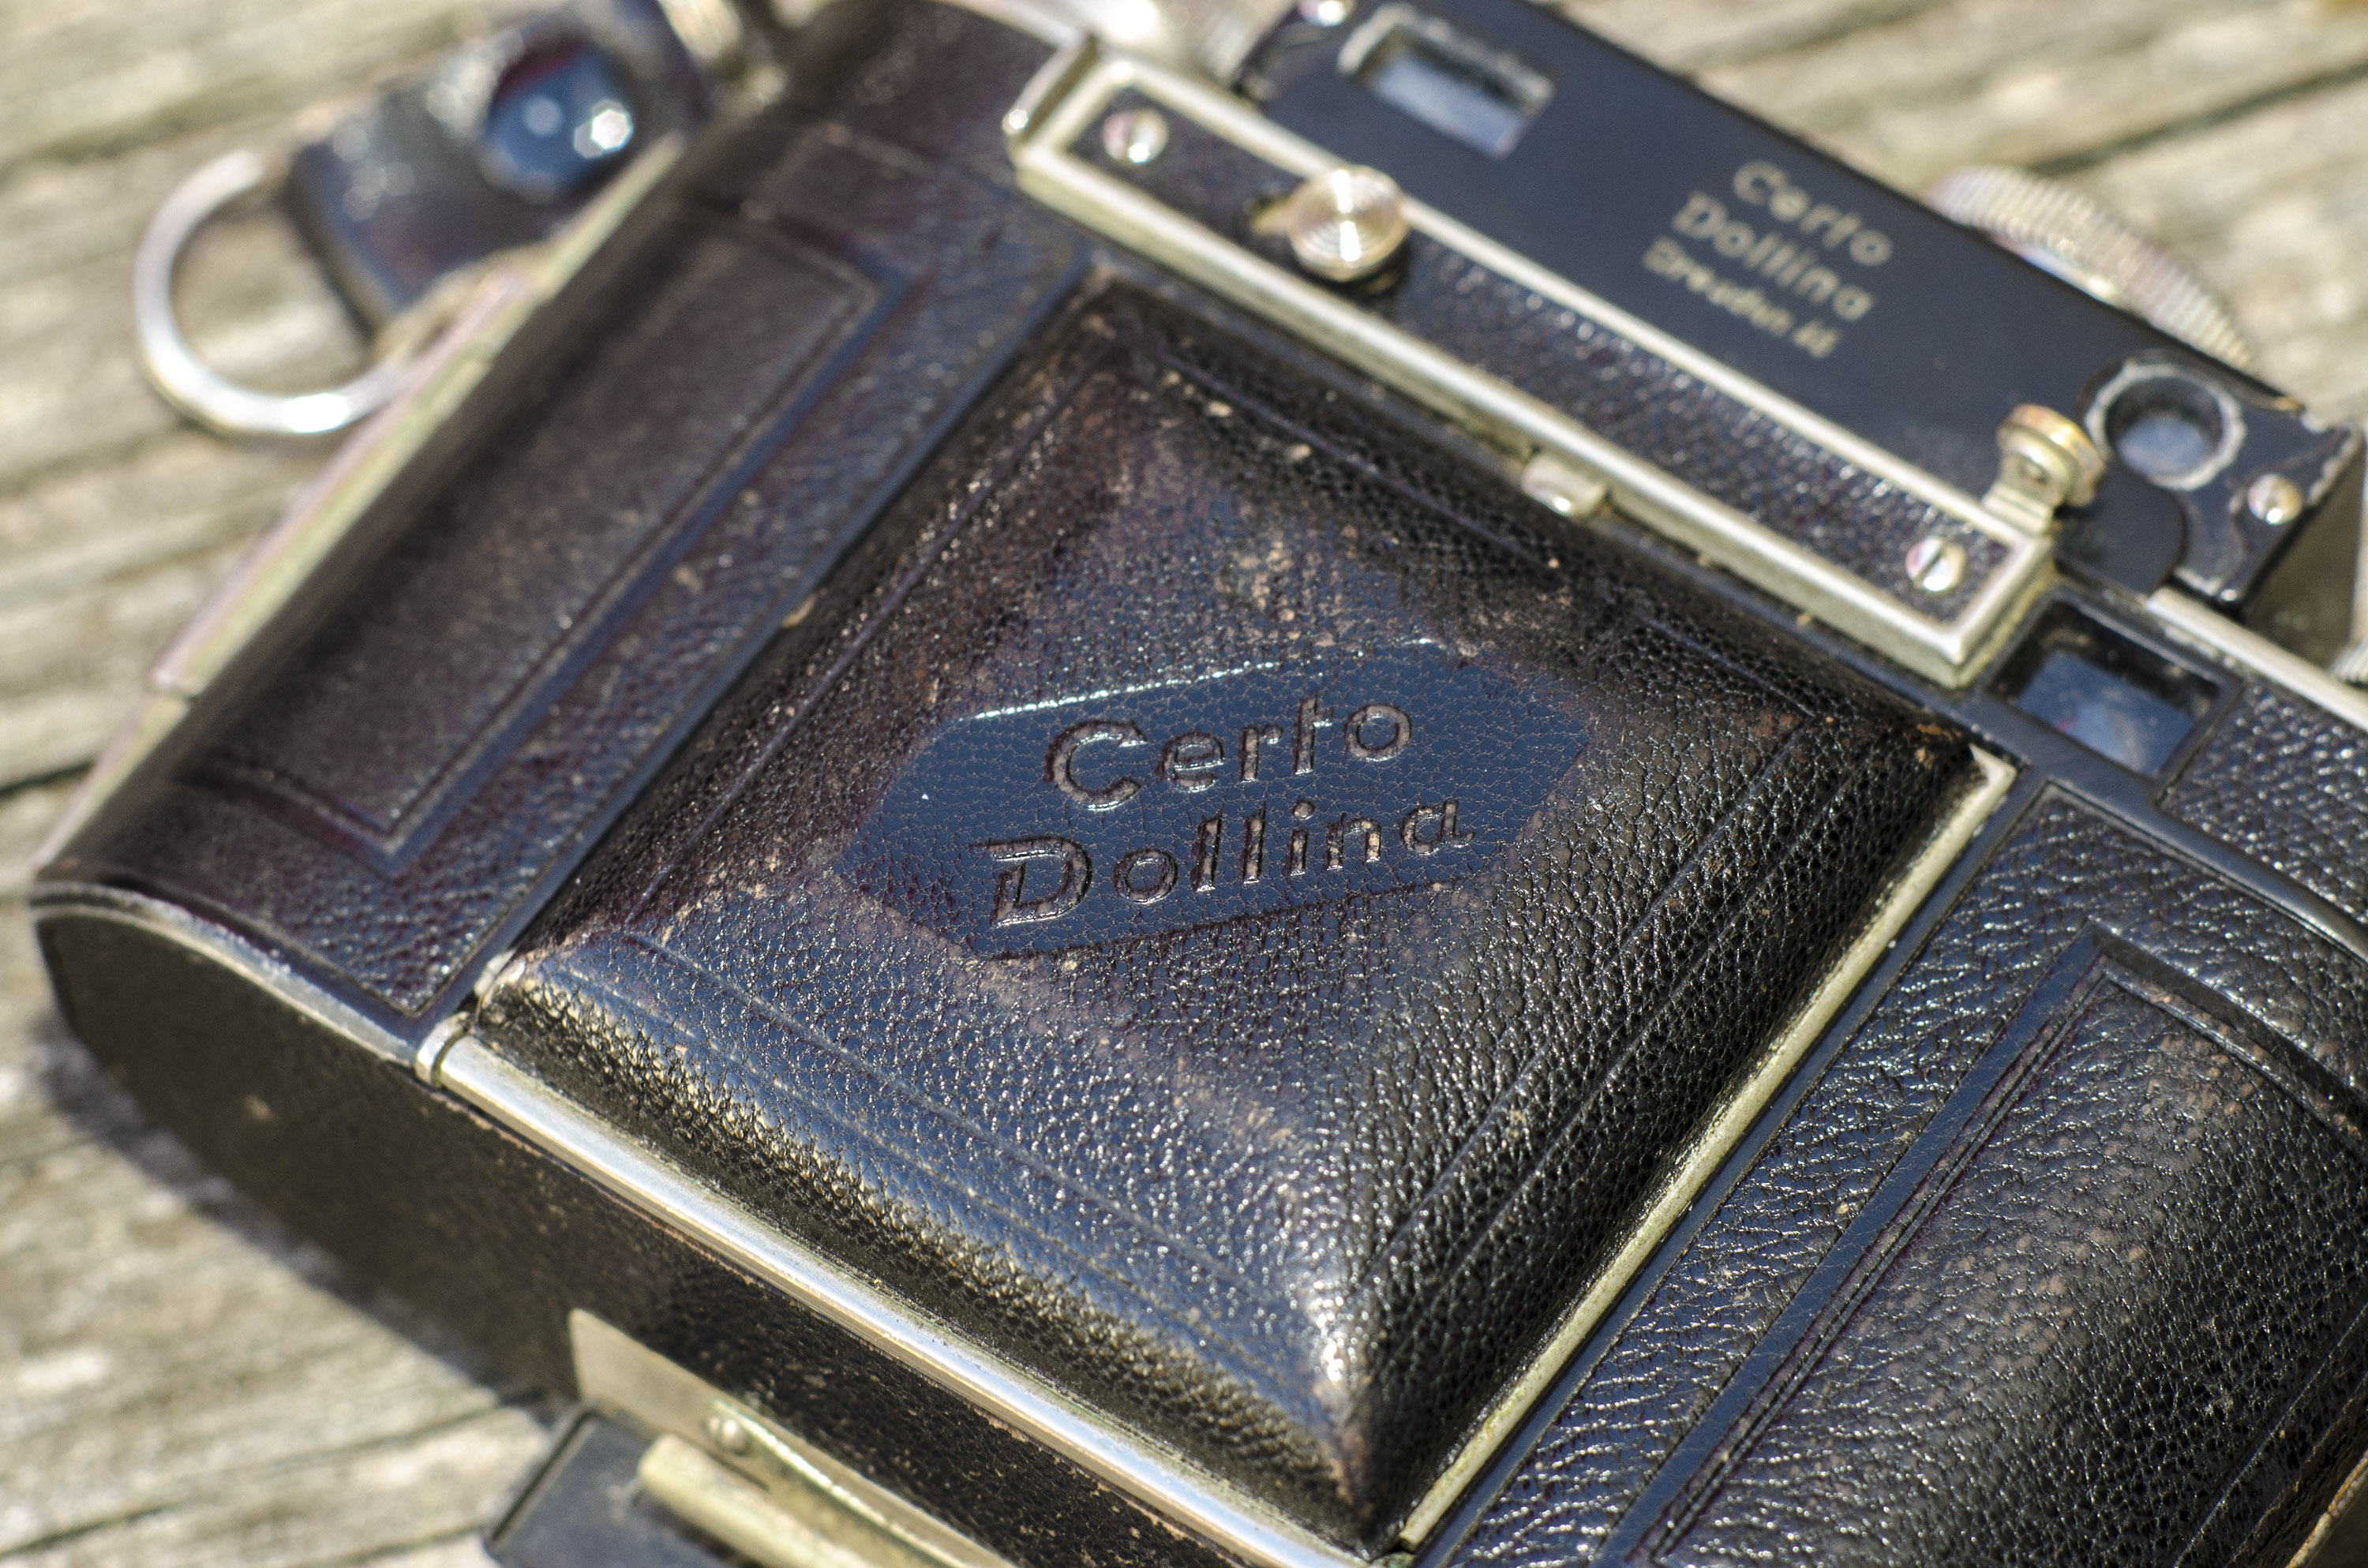
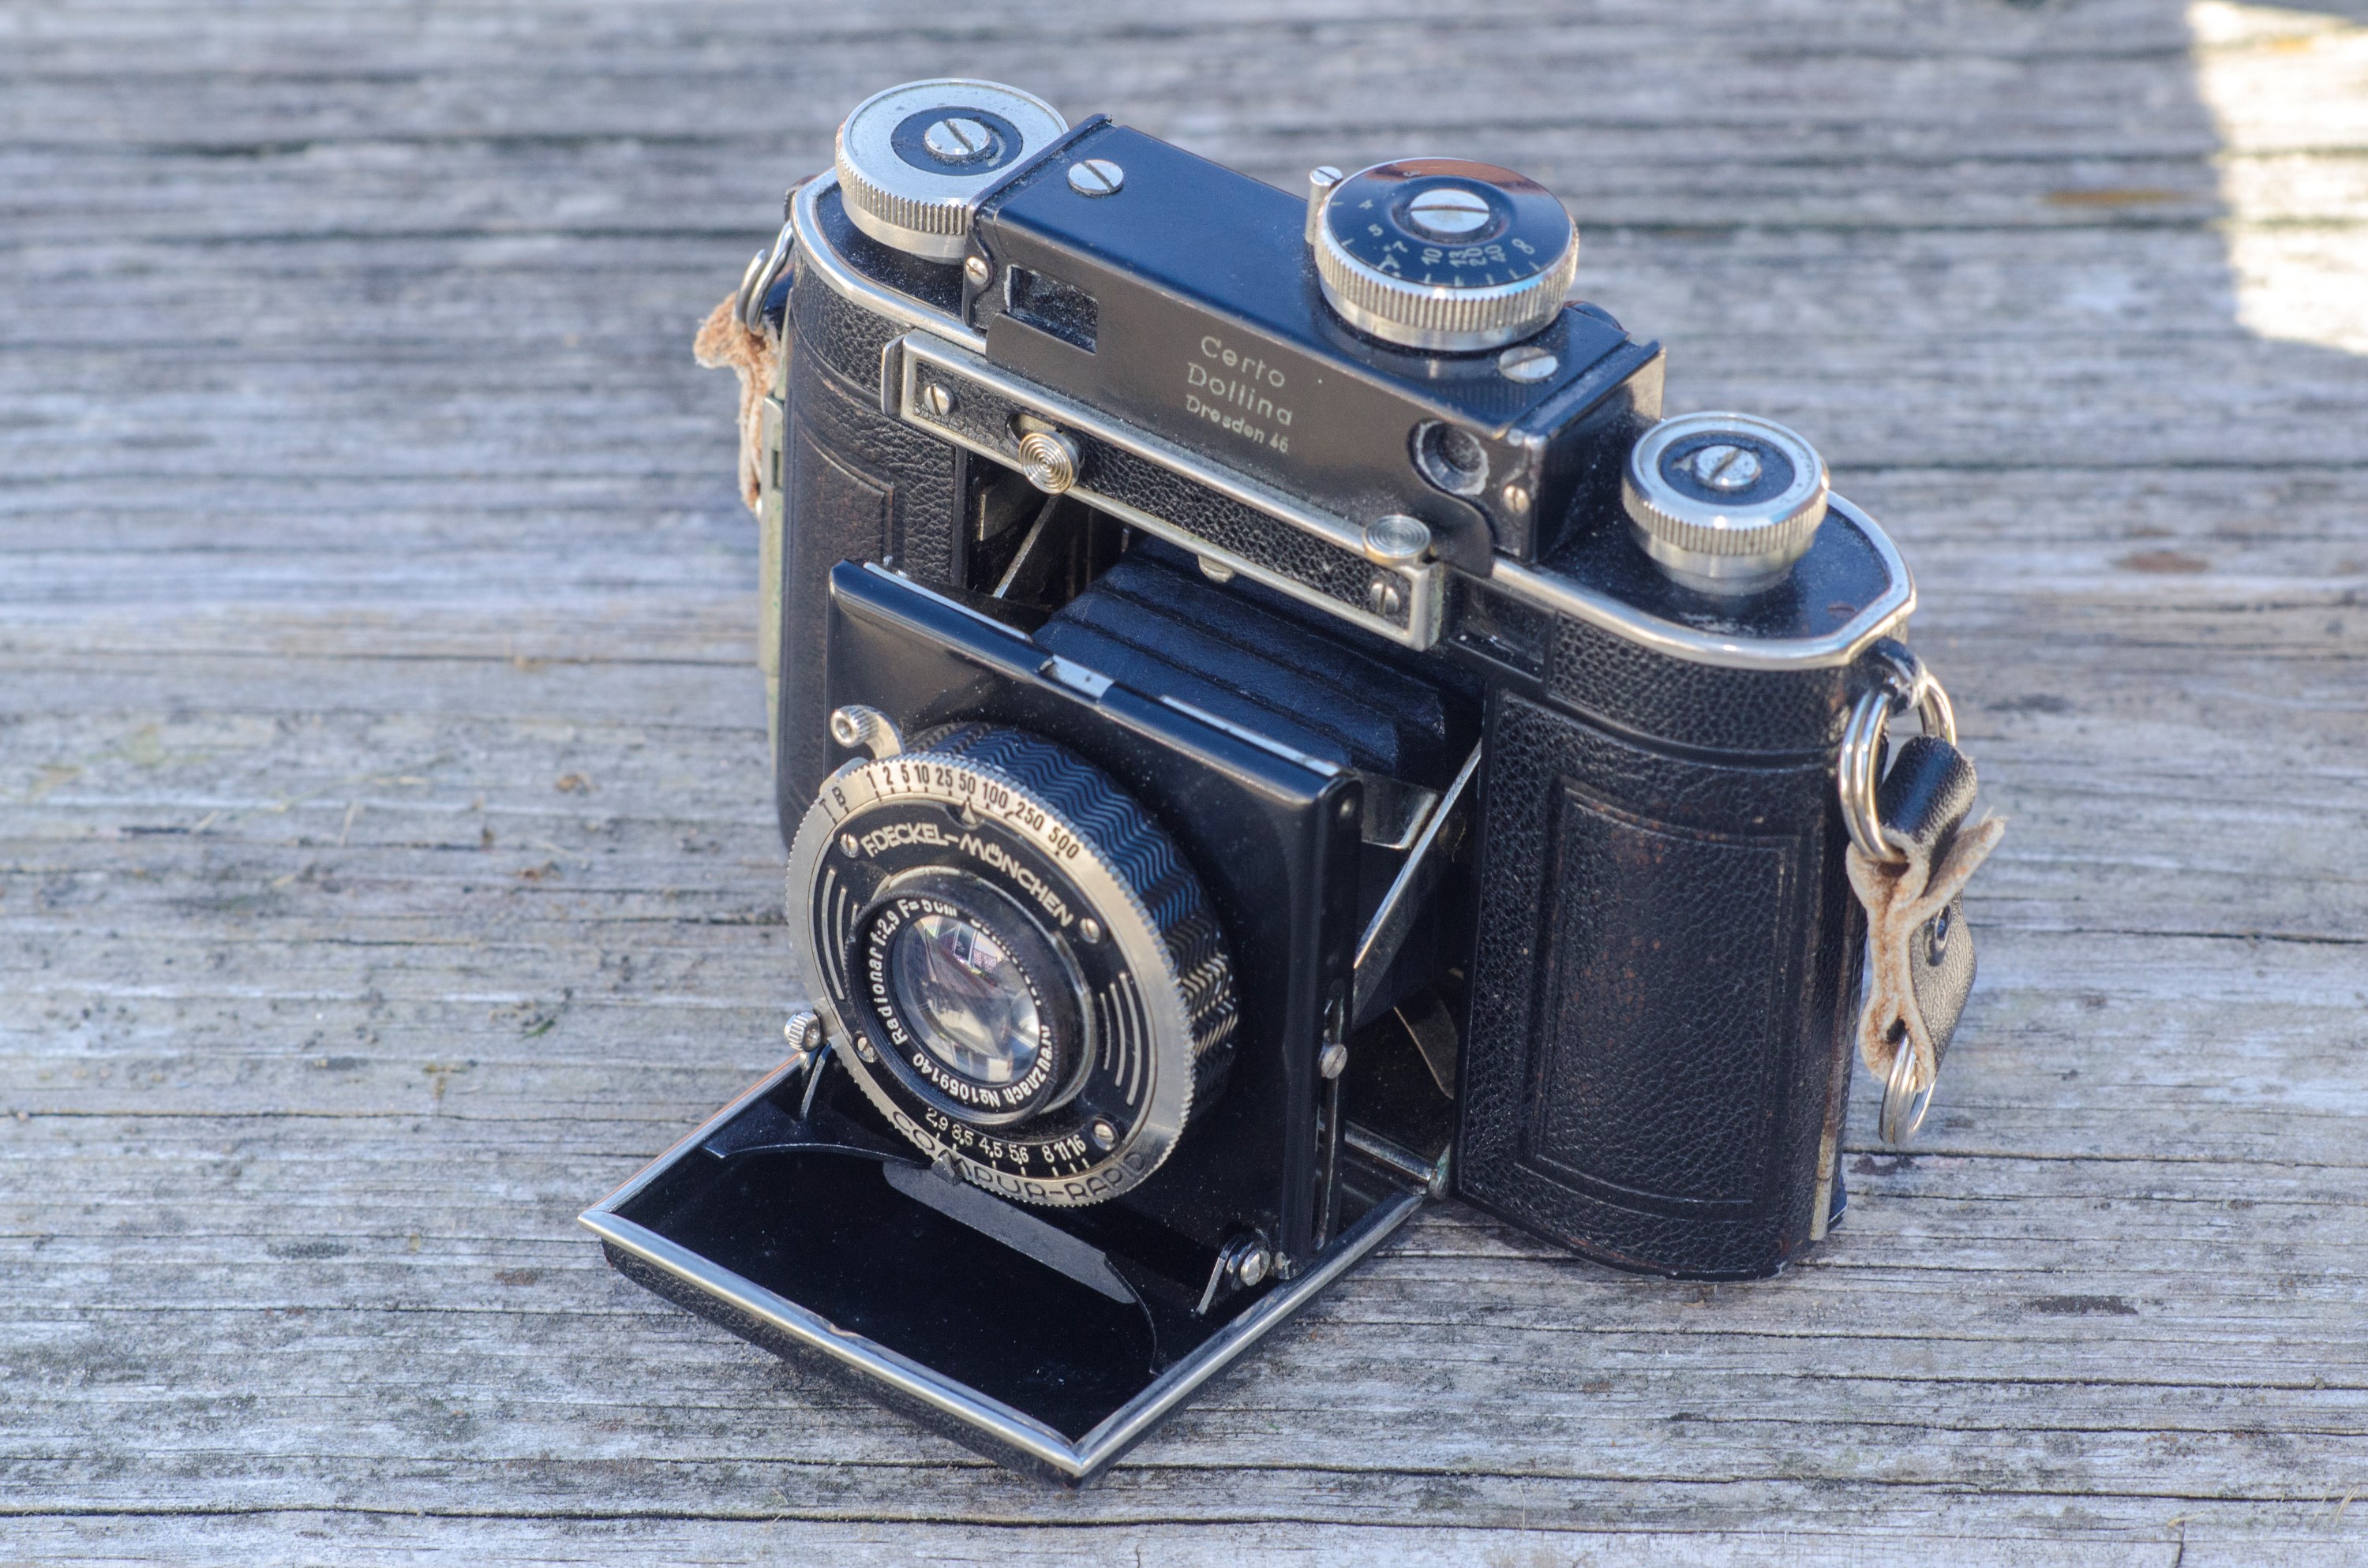
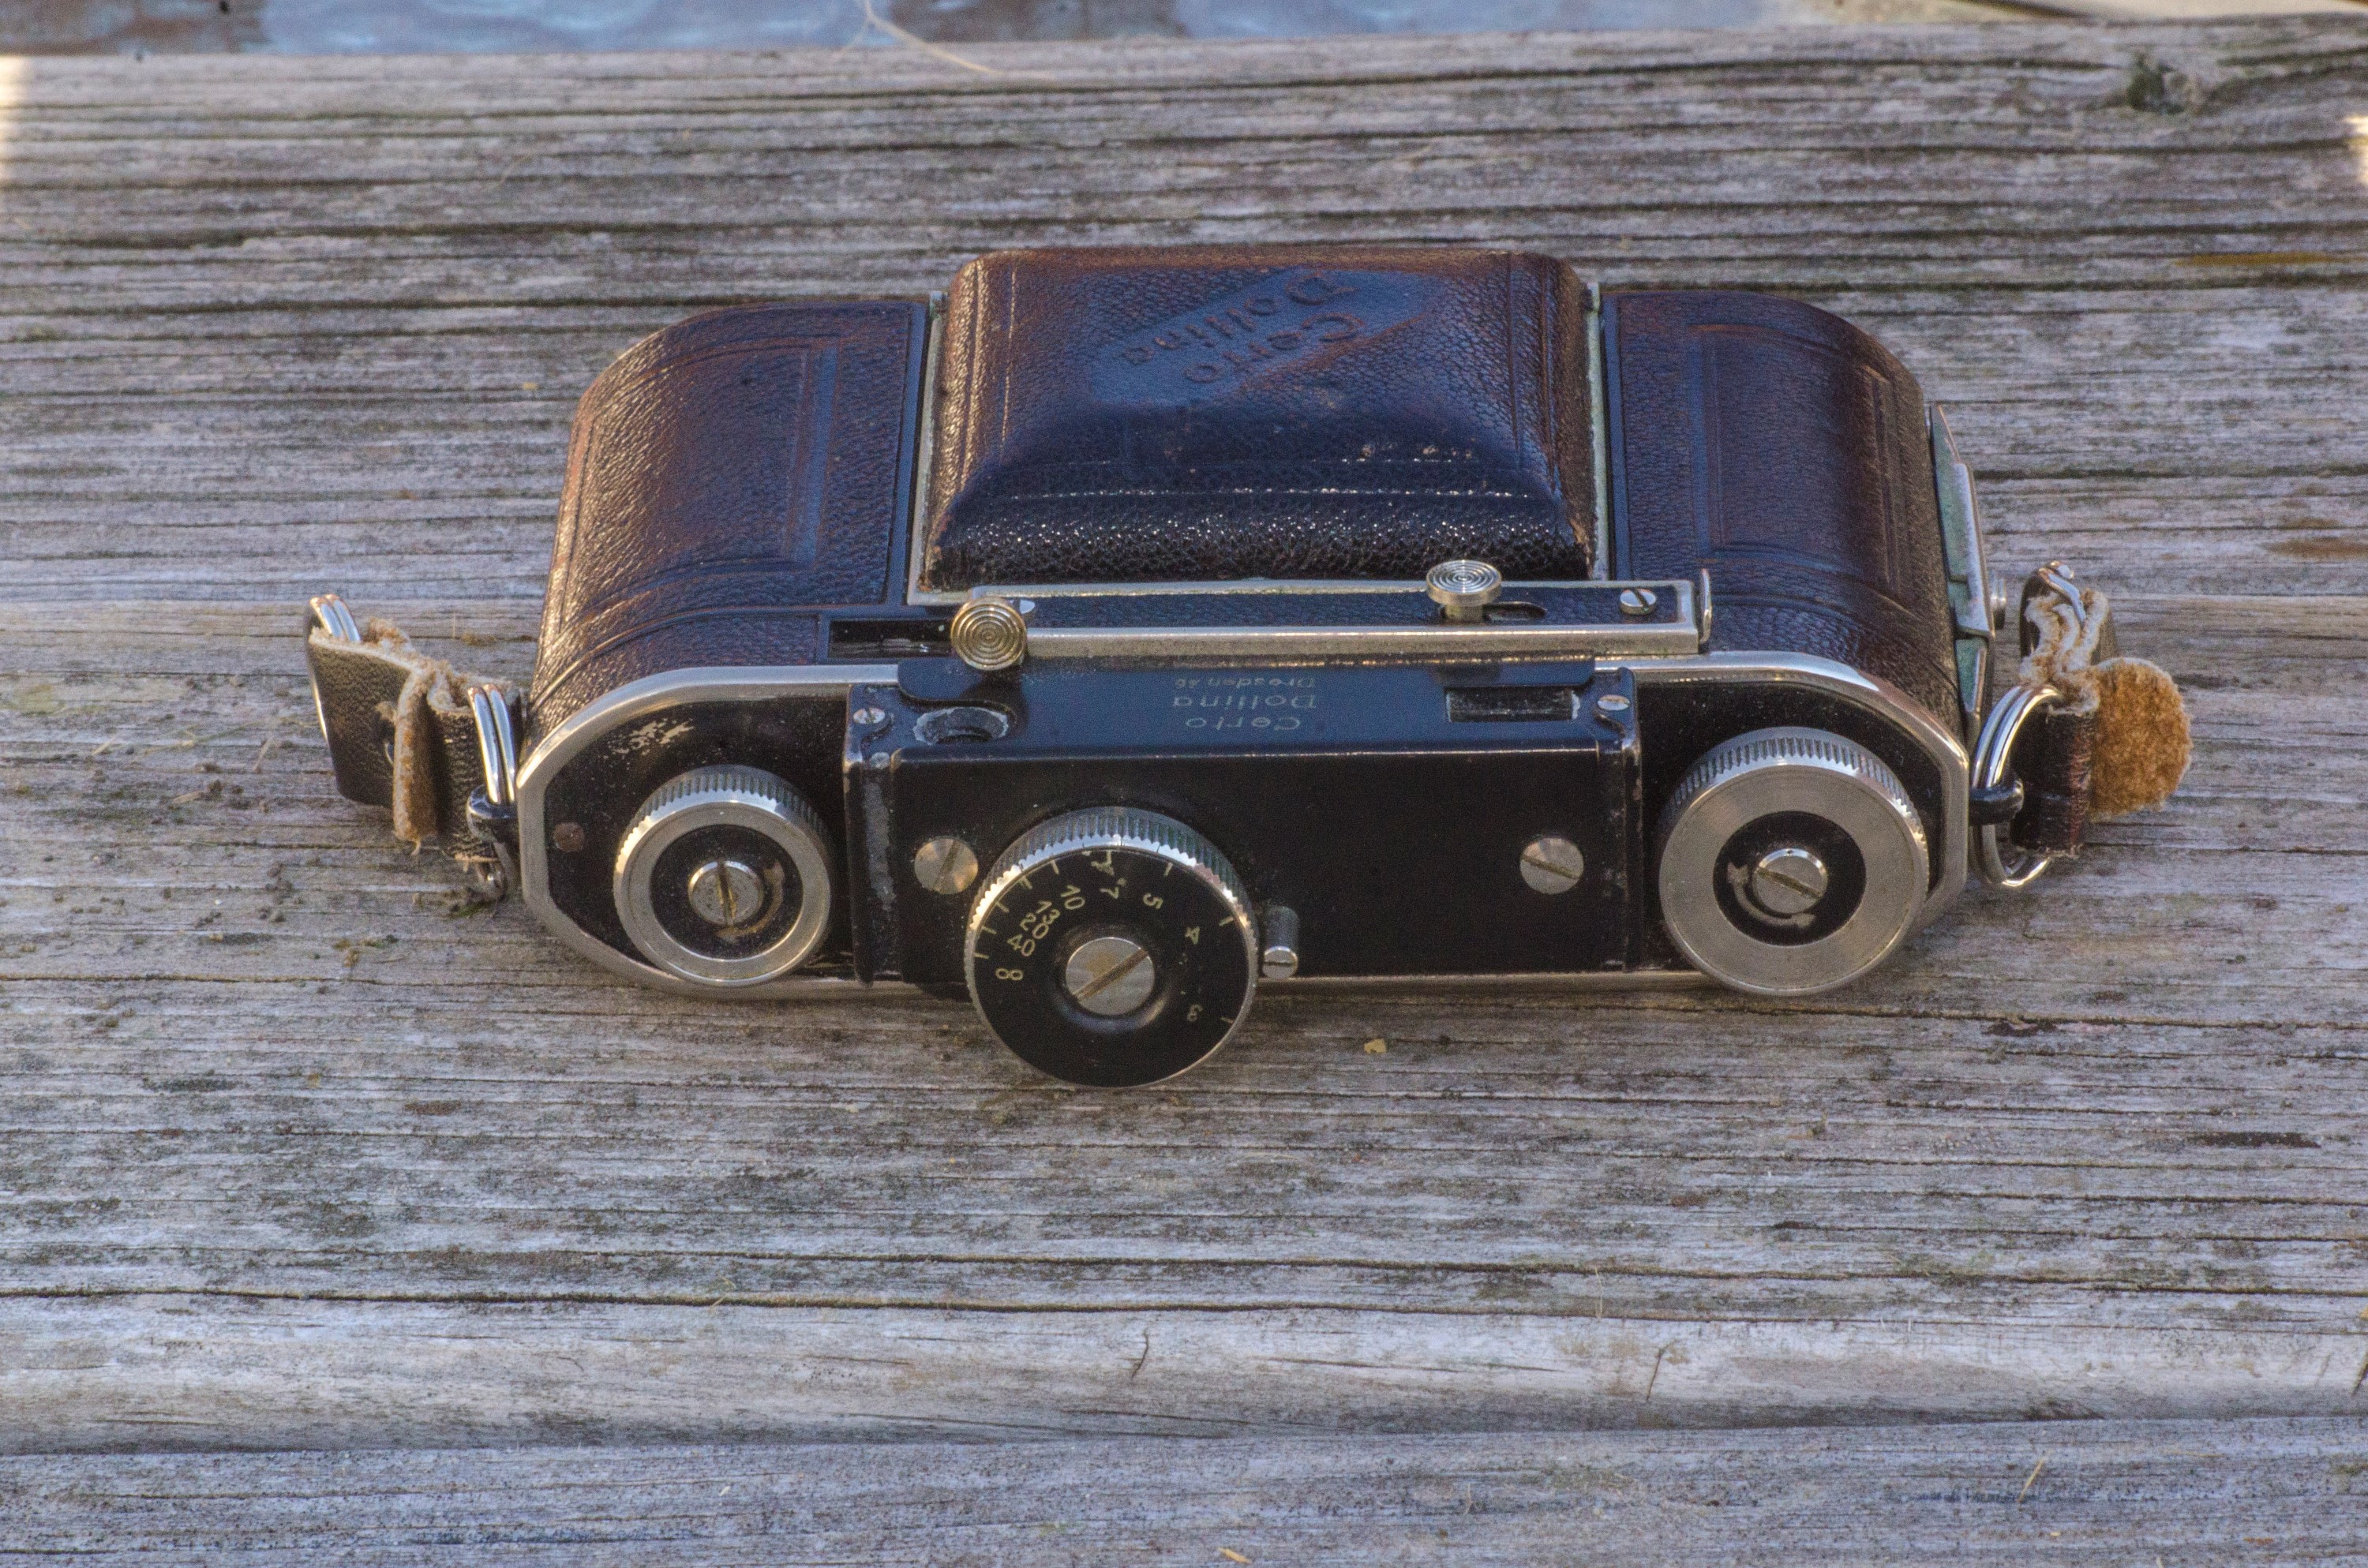
This is a Certo Dollina II rangefinder camera made in Dresden, Germany by Certo Camera Werk. The Dollina II was first introduced in 1936, only a year after the Dollina I which did not have a rangefinder, making the Dollina series the second cameras ever made designed to use Kodak’s new 135 35mm film format. When it was released, it was a state of the art camera with a variety of excellent lenses and a shutter which was capable of 1/500 second shutter speeds.
Film Type: 135 (35mm)
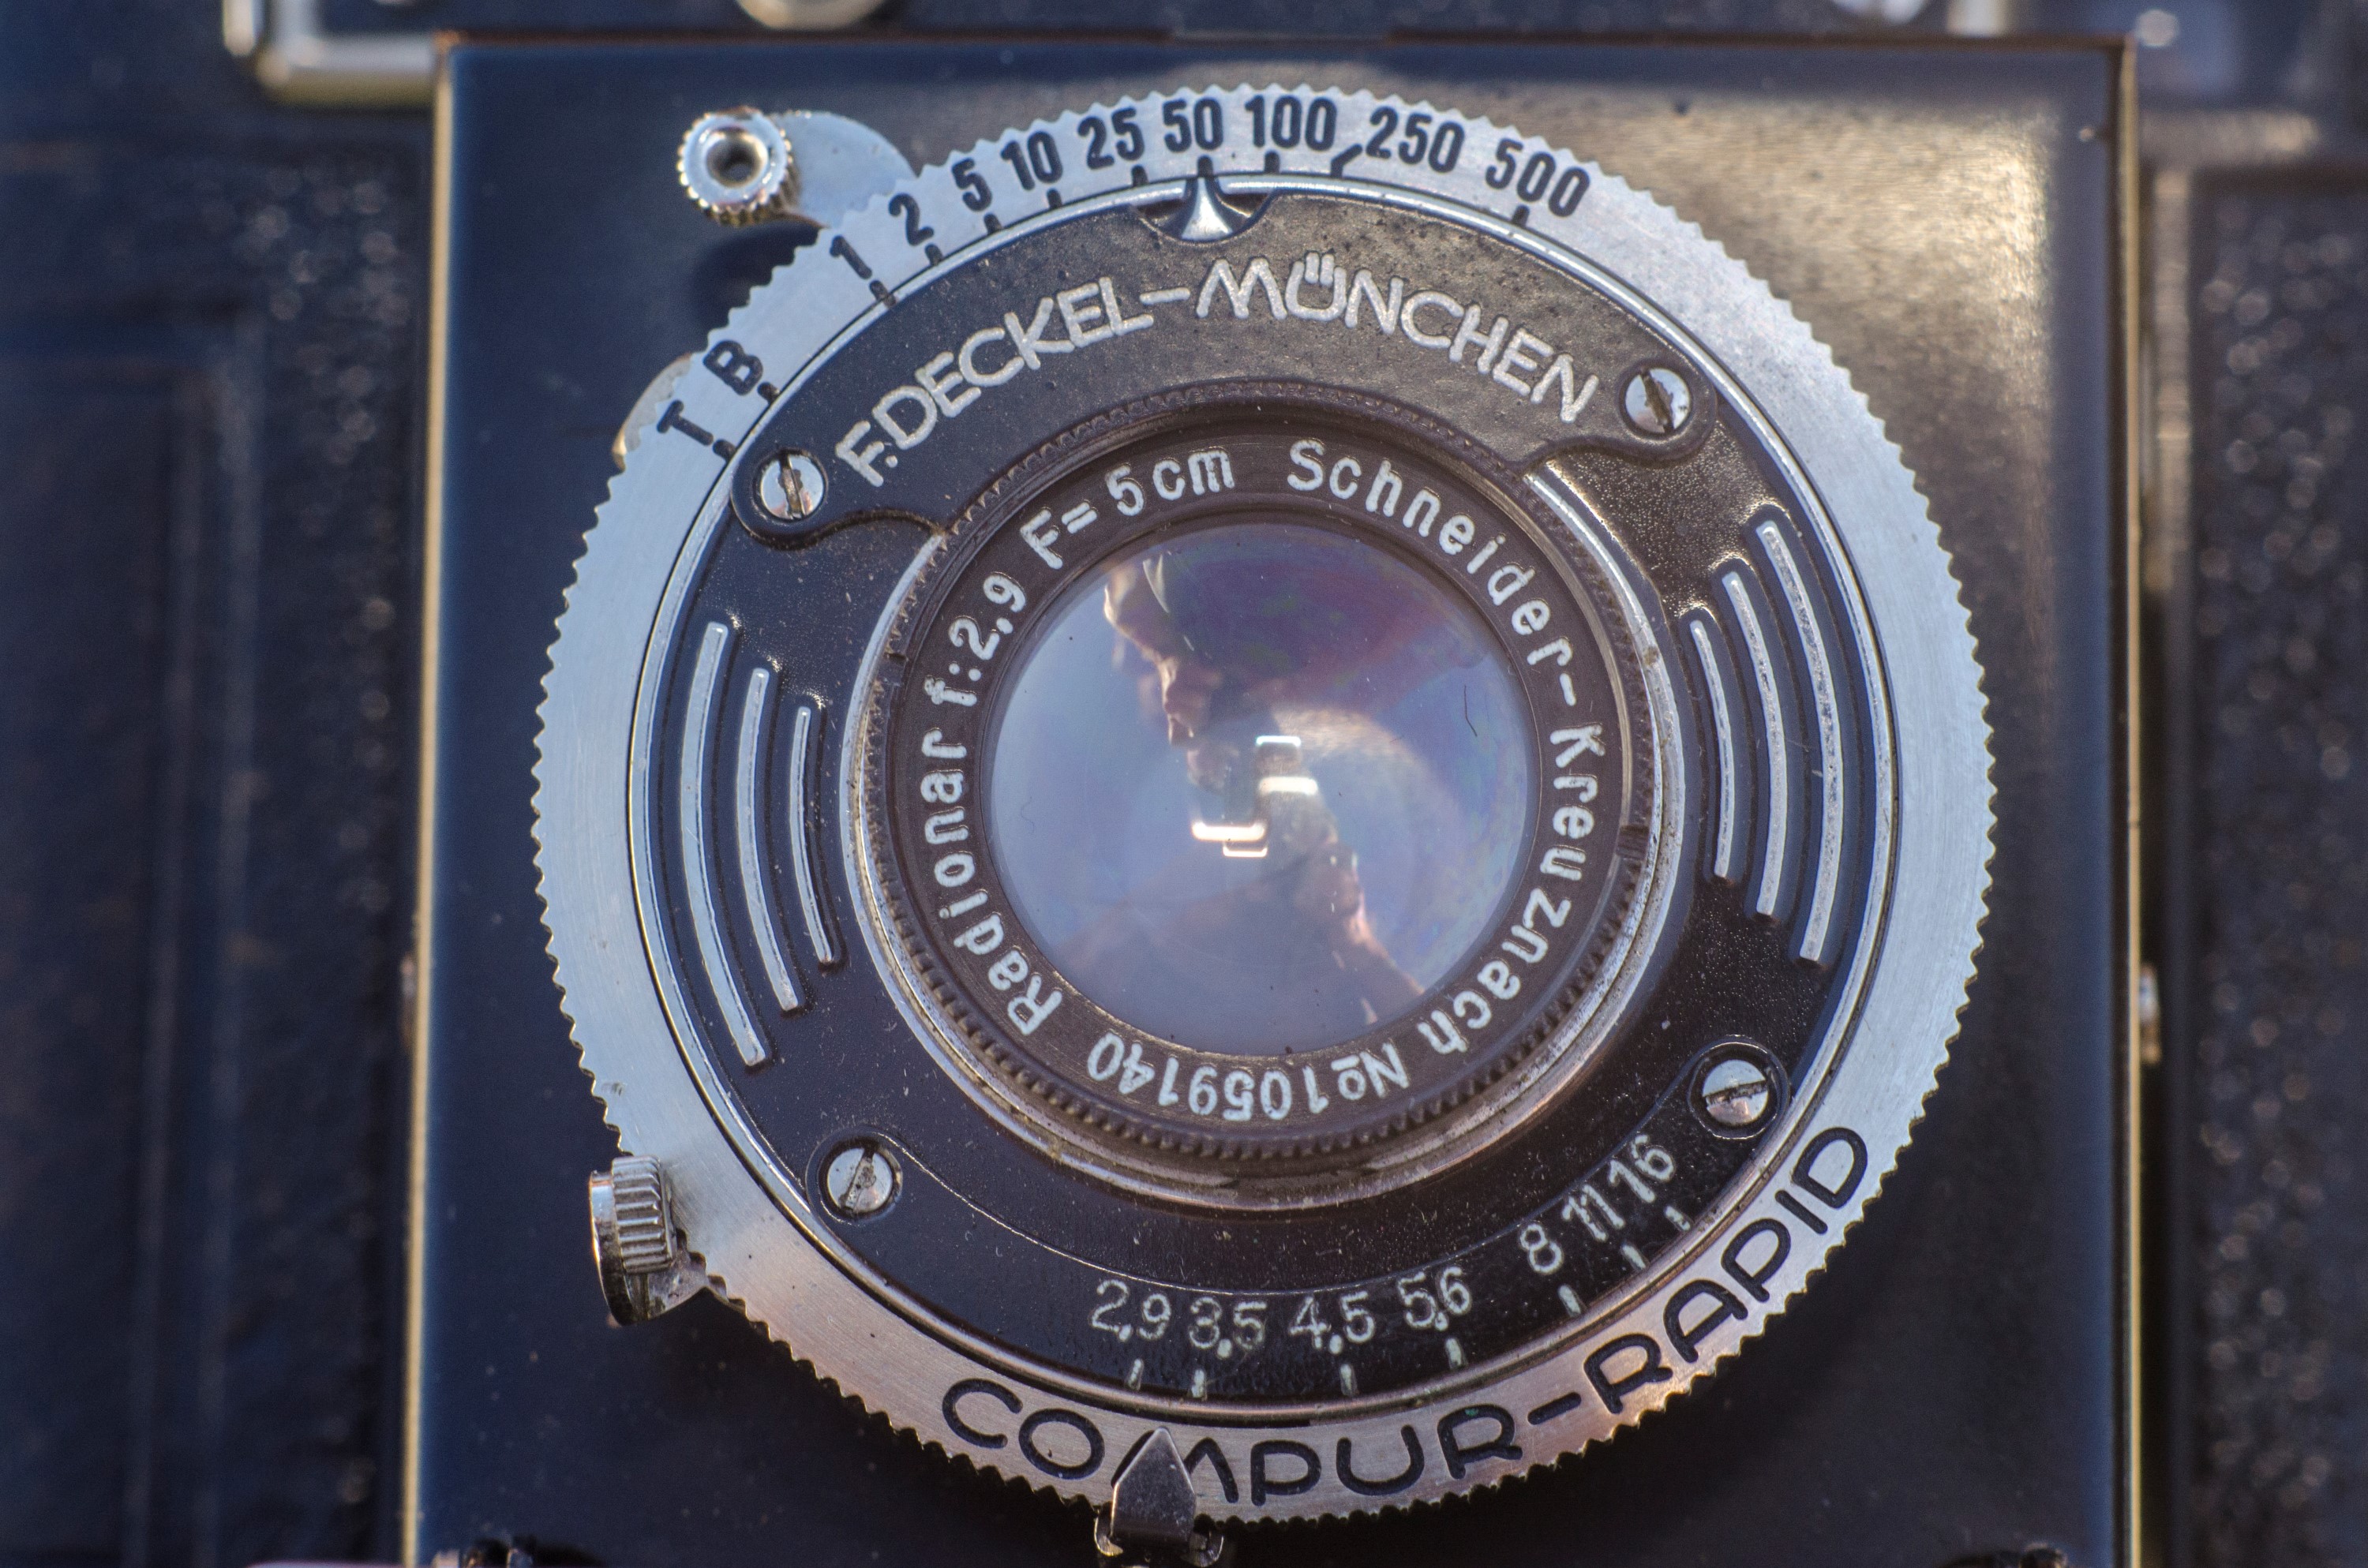
Lens: 5cm f/2.9 uncoated Schneider-Kreuznach Radionar 3 elements
Focus: 3′ to Infinity
Type: Coupled Split Window Rangefinder
Shutter: Compur-Rapid Leaf
Speeds: T, B, 1 – 1/500 seconds
Exposure Meter: None
Battery: None
Flash Mount: None
Weight: 546 grams
Manual: http://www.cameramanuals.org/pdf_files/dollian.pdf
How these ratings work |
The Certo Dollina II is a well built and compact pre-war German made 35mm camera. This particular model’s grafted on rangefinder makes it look a little strange, but in use, it works quite well, at least compared to any other late 1930s rangefinder. I also appreciate the top plate focus control. The results of the Radionar lens and Compur shutter are as good as anything the Retinas could do. This is a handsome camera that is well built and fun to shoot. I honestly would have preferred the rangefinder-less model as it would have looked better, but the character of that added on rangefinder makes the Dollina II worthy of being added to anyone’s collection. | ||||||
| Images | Handling | Features | Viewfinder | Feel & Beauty | History | Age | |
| 1 | 1 | 1 | 0 | 2 | 1 | 40% | |
| Bonus | none | ||||||
| Final Score | 8.4 | ||||||
Edit 11/14/2016: This review for the Certo Dollina II was originally written in December 2014 and was one of my earlier reviews. I have updated the review with some additional pictures of the camera, more notes on it’s use, and I formatted the review to be consistent with how I currently write reviews.
History
There probably aren’t many people that have heard of Certo Camera Werk. Unlike other German camera makers of the time such as Leitz or Franke Heidecke who continued to have success well after World War II, Certo barely survived, releasing a small number of models before being acquired by Pentacon in 1968, and completely dissolved by the early 80s.
 The company was founded in 1902 by Alfred Lippert and Karl Peppel who were both German engineers. They adopted the name Certo which is Latin for “safe and reliable”, and released their first camera in 1905.
Throughout the early part of the 20th century, Certo released a variety of mid-priced folding cameras. Certo cameras were neither cheap nor top of the line, but they were respected in their day. Their products were comparable to Welta and Balda who were two other German camera manufacturers of the time. The company experienced it’s best success in the late 1920s and 30s before World War II. The Super Dolly folding camera is sought after by collectors as it was an excellent example of a folding rollfilm camera from the 1930s.
In 1934 when the Eastman Kodak company released 135 format 35mm film, the first camera made for this new type of film was the German built Model 117 Kodak Retina. Although Kodak was an American company, in 1931 they had purchased Nagel Kamerawerk based out of Stuttgart, Germany who built the Retina camera for Kodak. The Retina name continued to be used all the way through the late 60s on a variety of different Retina models, all of which were made in Germany.
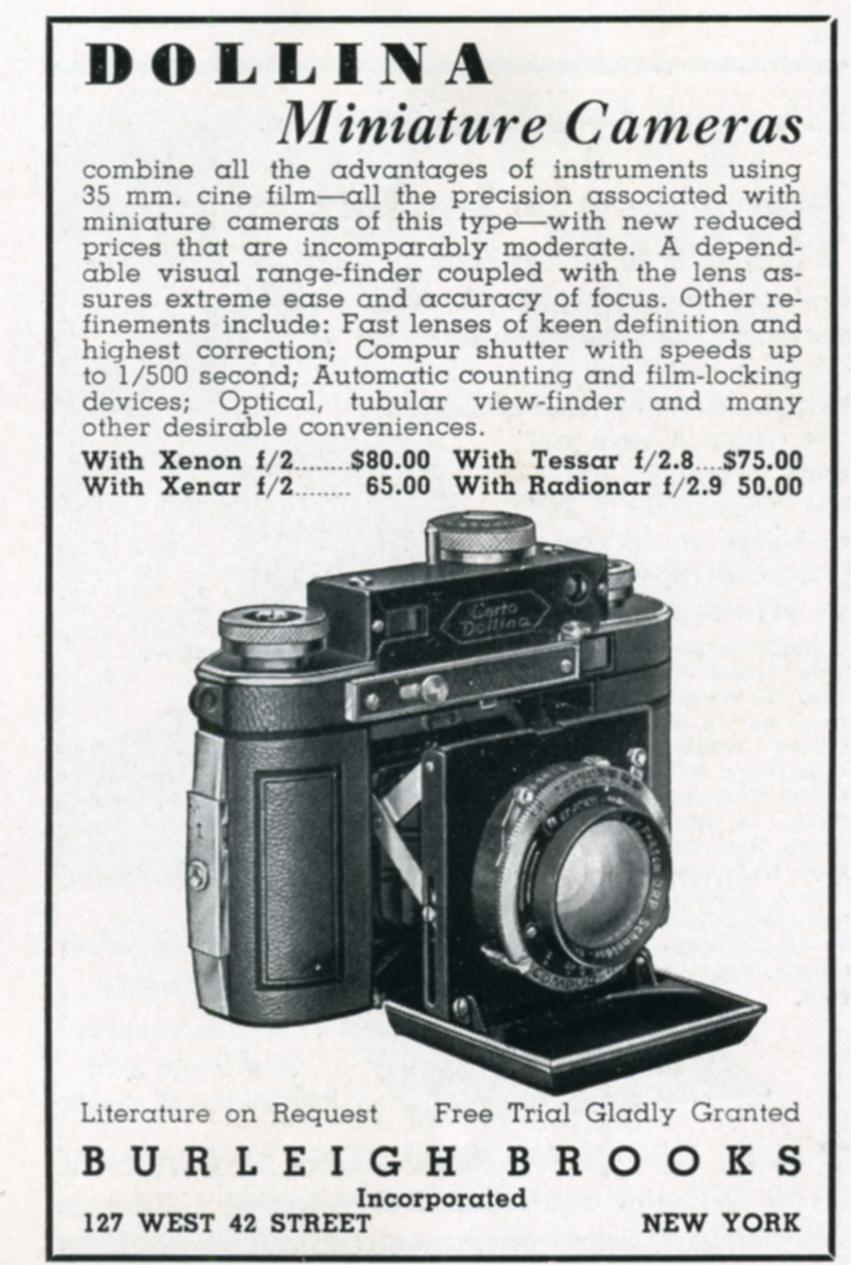
Within a year of the first Retina’s introduction, Certo released the Dollina camera which also used 135 format 35mm film. Although the Dollina did not have interchangeable lenses, it was available with a variety of lenses at the time of purchase. The price of a Dollina II in 1936 was somewhere around $50 USD which translates to $862 in 2014 money. Although this was quite a bit of money for the time, the price was half of a comparable Kodak Retina, and considerably cheaper than top of the line Leica and Contax cameras which sold for over $250.
There were a lot of similarities between the original Retina and the original Dollina. Both were compact sized German built folding cameras. Both had lenses with excellent optics and Compur shutters capable of 1/300 and eventually 1/500 seconds. Also, both cameras originally were scale focus, with a rangefinder model released a short time later.
Only one year after it’s debut, the Dollina II was released which featured a coupled split-window rangefinder. The rangefinder on the Dollina II was added to the top of the original Dollina (now called the Dollina I). Because a Dollina II is essentially a modified Dollina I, the scale focus viewfinder from the original camera remains on the Dollina II. To focus and compose a shot, you have to look through two different windows. The rangefinder window is on the rangefinder itself, above the top plate of the camera. Once the image is in focus, you’d move your eye to the other window which was on the main body of the camera, for composing your shot.
In 1938, both the Dollina I and II were replaced by the Dollina 0 and III. The Dollina 0 was a lower cost model with entry level lenses and no rangefinder. The Dollina 0 physically differs from the Dollina I in that it omits the focusing knob on top of the camera. Focusing the Dollina 0 was done on the lens itself. The Dollina III had a completely redesigned body which was much larger than the previous models, and it incorporated the rangefinder inside of the camera. The Dollina III was only available for one year, and is the rarest of the pre-war Dollinas, and as such are very hard to find. When one does show up, they fetch significantly higher prices, especially if they are in good working condition.
In 1939, another model called the Super Dollina was released, which like the Dollina III had an integrated rangefinder in the main body of the camera, but was much more compact. I can’t find any information about this, but I would guess that the Dollina III was not popular because of it’s bulbous shape and size. The Super Dollina was only available in a silver/chrome finish, unlike all previous models which had bodies which were mostly black.
The Super Dollina was made for a short period of time as production stopped around the start of the war. At this point, Certo’s history becomes pretty vague. While it is very common for companies to focus their production making things for the war, I can’t find much evidence that Certo continued making war related products. At least one article says that the machines and equipment used to make the Dollinas were disassembled and hidden in the homes of loyal employees.
There had to be a reason that someone at Certo thought it would be wise to hide their equipment. Dresden is located in what would become Soviet controlled East Germany, but that didn’t happen until after the war. Why would a German company be so worried about their machinery, that they went through the efforts to hide everything? What were they doing in the first half and middle of the war when Germany looked like they had a chance at being victorious? Whatever the reason, their paranoia ended up being valid because after the war, the USSR would commandeer East German technology and industry as war reparations. A notable example of this was the Zeiss-Ikon factory in Dresden where the Contax camera was made. The Soviets would not only take control of the factory, but they disassembled and shipped the entire assembly lines to Ukraine, where they would build a copy called the Kiev 3 and 4.
After the war, the Certo factory began making cigarette wrapping machines. One site says that Certo continued making Super Dollinas in secret, but then it also says that they made them for the Soviet Union as reparations. I can’t conclusively say whether or not the cameras were made alongside of the cigarette wrappers, or after. In either 1950 or in 1953, Certo became a privately owned company and released the Super Dollina II which was very closely related to the pre-war Super Dollina. This new model featured thinner film advance and rewind knobs, and was available with a wider range of shutters and lenses. Since the Super Dollina II was the only post-war Dollina camera in production, it appears that this wider range of shutters and lenses allowed it to fit the niche of both an entry level and high end camera.

The Super Dollina II sold well throughout the 1950s and into the early 60s. Copies regularly show up for sale on eBay and other sites and usually are still in good working condition. By the mid 60s, Certo’s popularity seemed to fade as they only had lower end cameras available.
In the 1950s and 60s, there were several different camera makers based in Dresden. It seems likely that this over saturation of camera manufacturers in one area caused a decline in quality and sales. East Germany had a socialist government which had great influence on all of these companies. In 1959, several companies including Zeiss-Ikon, Altissa, and Welta were combined to form an organization called VEB Kinowerke Dresden.
VEB Kinowerke Dresden continued to expand, and by 1968 changed it’s name to VEB Pentacon Dresden (Pentacon for short) and they merged with several other East German companies including Certo, Ihagee, and Mentor. Pentacon would continue to use the Certo name in a line of very cheap plastic cameras throughout the 1970s, but would discontinue use of the name in 1982. Pentacon would continue to lose money throughout the 80s and would be completely dissolved in 1991 after the fall of the Soviet Union.
Today, Dollina cameras have a small but very loyal fan base among collectors. Although they sold in moderate quantities, they are often hard to find as the pre-war models were made for such a short period of time, and the post war models were not as popular as other 35mm rangefinder cameras like the Kodak Retina or Argus C3. Plus, after 70+ years there simply aren’t that many left for sale. When one does become available, they are often in varying states of disrepair and condition. It is difficult to find one that looks nice and is in good working order.
When they are working, the Dollinas are very capable shooters on par with other German cameras of the era. While the American made Argus C3 was extremely popular and in production for nearly 30 years, it was a lower end camera with very poor ergonomics. The Dollina is a handsome camera that is comfortable to hold and fits neatly into a pocket, plus the shutter and lenses make them capable of excellent results.
My Thoughts
If you compare the Dollina II to the Kodak Retina and Argus C3 which are two other popular 35mm rangefinders designed in the 1930s, this camera has several distinct advantages. It has considerably better lenses and shutters than the Argus C3 making it a higher end camera. It is also smaller and much easier to handle, and in my opinion, better looking. Quality wise, it does compare more with the Retina, but the Retinas are significantly more expensive. You can expect to pay well over $100 for a working pre-war Kodak Retina 117 or 118. The biggest knock to the Dollina is that they aren’t very common and many people have never heard of them.
I’ve often been unimpressed with many folding cameras, but the German designed ones have a certain elegance to them and when folded in their closed position, they are extremely portable. When I first saw a picture of a Dollina, I didn’t even know what it was. I immediately fell in love with the look, but became discouraged at how uncommon they were. When I found the one I ended up with, the seller knew nothing about it. He said it looked to be in good condition, but confessed he didn’t know how to use it. Plus, one of the rangefinder windows was missing. I still took a chance on it as it was the only one available for cheap.
When it arrived, I was pleased that the body and leather were in good shape, the lens was clear and free of scratches, haze, or fungus, and the shutter worked. Amazingly, the shutter was accurate at all speeds, even at 1 second and 1/2 second. I have many leaf shutter cameras, some from as recently as the 1960s where the slow shutter speeds are off, so to have a camera from the 1930s where all of the shutter speeds are still accurate was pretty amazing.
The Dollina II was in production from 1936 until the early part of 1938. Pre-war Dollinas have 3 serial numbers, one each on the body, lens, and shutter. The body serial number on mine is 8817 which means I have a somewhat early example. I have not found any information about how to date a Dollina II by this body serial number, but there is a site that has production numbers for the lens. According to this site, you can date a Schneider Kreuznach lens by it’s serial number. Mine is number 1,069,140 which means it was made sometime between November 1936 and December 1937. Based on this information, I concluded that my Dollina was most likely made sometime in early 1937.
The sad thing was that my camera had a problem which jammed the film advance mechanism which meant that the takeup spool could not be rotated. This obviously rendered the camera inoperable. I still liked it and thought that maybe I would keep it as a display piece since I don’t own any other cameras from the 1930s.
I did some research on what might be wrong with my camera, and although at first there wasn’t a lot of info about Dollinas, I eventually encountered several other people with the same problem as me. I talked to two different guys who said that their winding mechanism was jammed like mine and that they had to pay several hundred dollars for a vintage camera specialist to repair it. I even encountered another guy in England who owned “a box full” of Dollinas and none of them worked. While the Dollina is generally considered to be a well built camera, there is only so much you can expect from a camera that’s approaching 80 years old. I became discouraged and put my camera on a shelf for a while.
It wasn’t until recently that I encountered a guy named Michael Jackson (seriously) whose father used to shoot with a Dollina back in the 1940s. He said that the camera was lost sometime around his fathers death, but recently he found some of those negatives and had them scanned in. He shared with me some of the scans he made, and I was very impressed. As I talked to more people who owned one of these cameras, they all had a fondness for them which I haven’t seen as consistently with other vintage cameras. It was then that I knew I wanted to try to revive mine.
Repairs
The Argus C3 has a reputation as the “Ford Model T” of cameras due to it’s simplicity and ease of repair. While the Dollina is clearly a better built camera, I had the theory that it couldn’t be that complicated. Adding to my curiosity was the fact that every visible screw on the camera is a standard flat head screw. I went with the assumption that if the Argus is very simple to disassemble, maybe this one would be as well. Considering the camera was already broke and I didn’t invest much money in it, I pulled out my Wiha screwdrivers and one by one started removing screws.
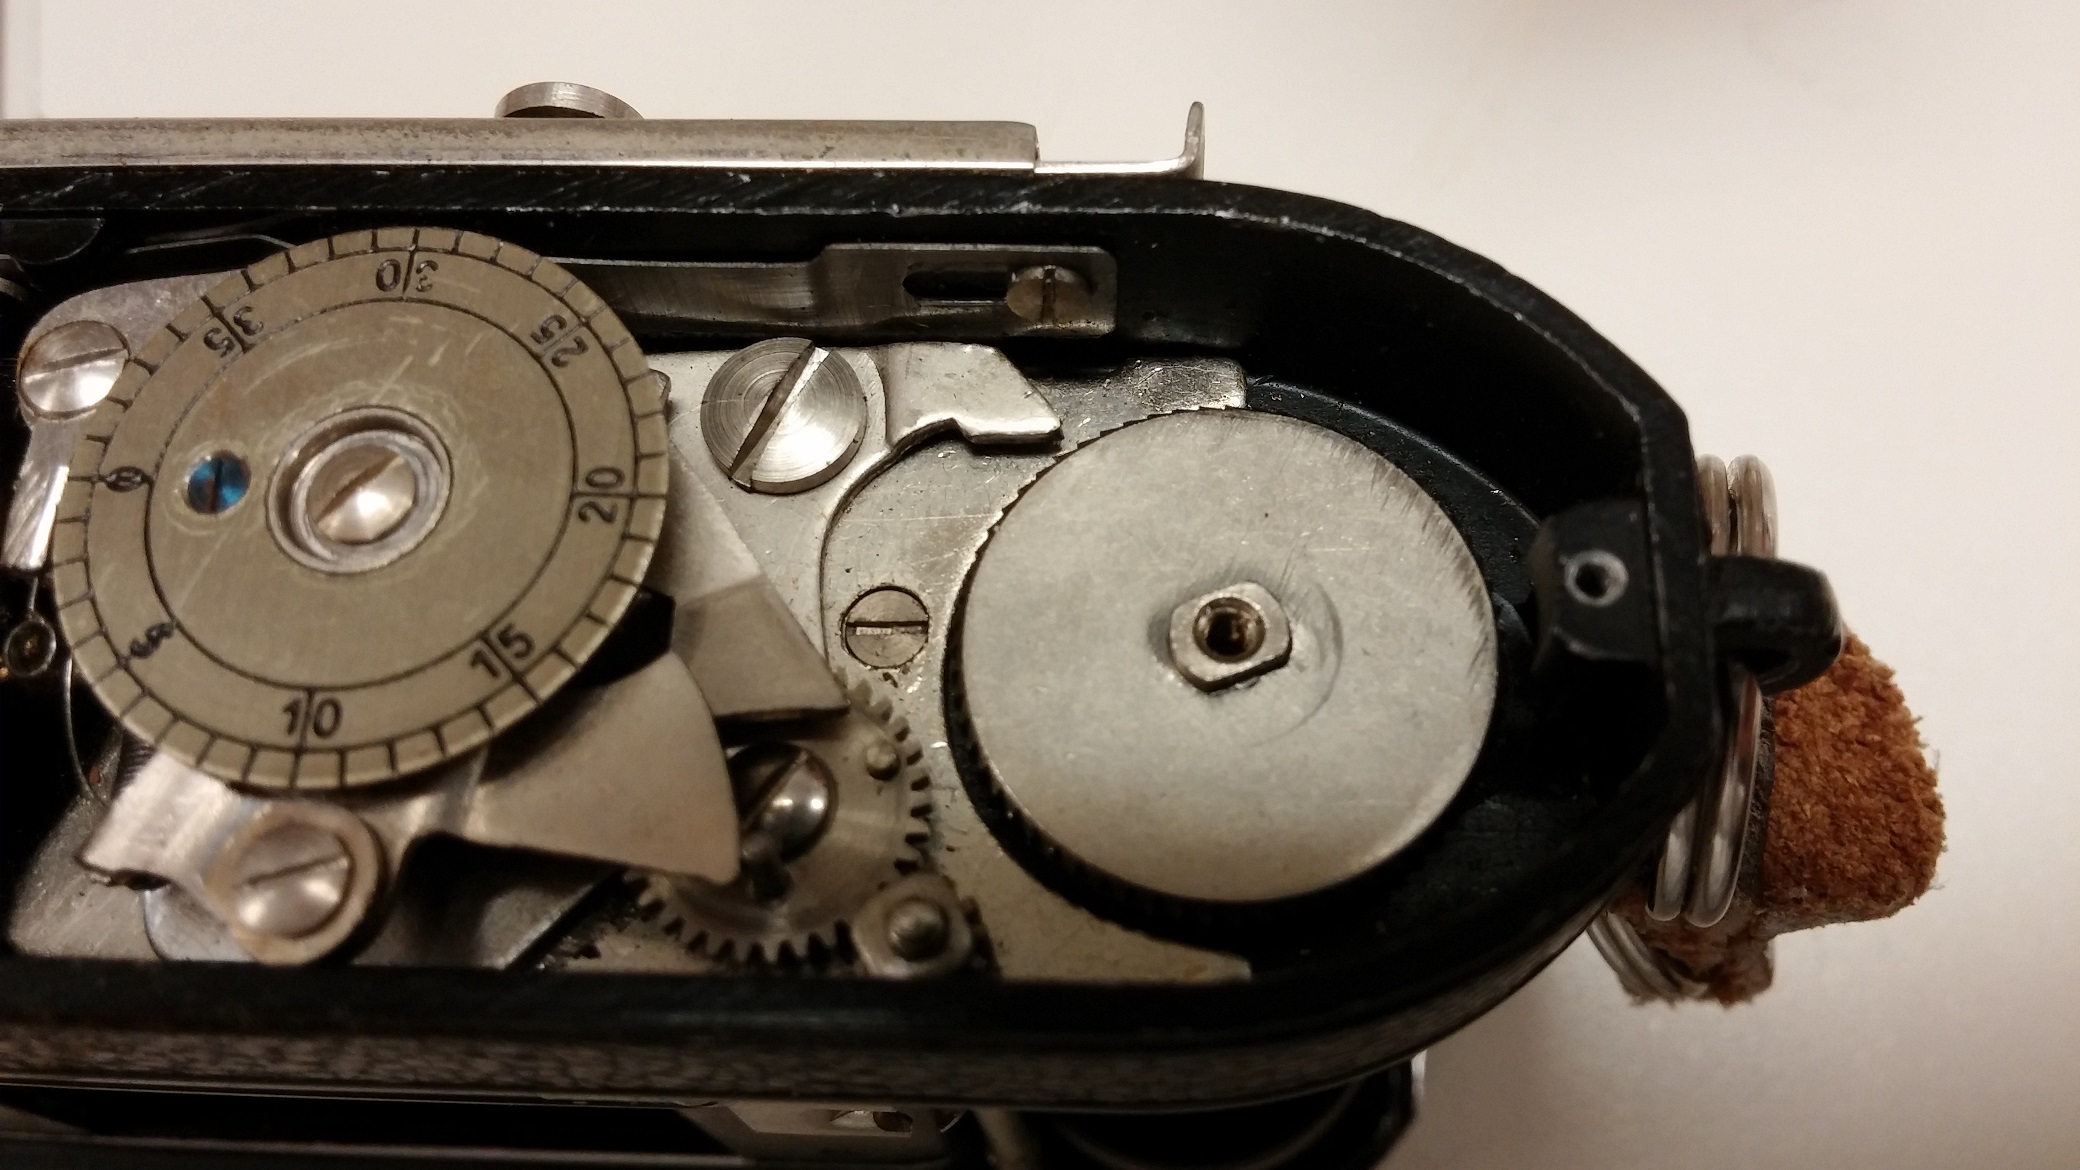
It only took me about an hour to get to the take up spool and I was able to see what was causing it to not move. I feared that there would be piles of corroded metal, bent levers, and stripped gears, but all it ended up being was some sticky goo on a metal finger that locks the take up spool assembly from moving. I was able to easily clean off this old goo and restore the camera to a working condition. You can see the finger in the picture to the left. It is the metal arm that is near the front of the camera in between the film counter dial, and that geared round metal disc on right. Here is a video I made showing the operation of the gears in both a locked and unlocked position.
I was even able to repair the missing glass in the rangefinder. It turns out, the glass wasn’t missing at all, it had just slid out of position and was hiding behind a panel inside of the rangefinder. I used my screwdriver to slide it back into position, and that was that! I chronicled my entire repair in this thread that you can read if you’re interested in repairing yours.
After repairing the film winding mechanism and the rangefinder, I cleaned up the rest of the camera and collimated it using my Nikon D7000. I was able to get focus at infinity almost perfect. Certainly close enough considering the age of the camera. I loaded in a roll of Fuji 200 and started shooting.
Using the Camera
There are many reasons why I like this camera. It’s age, history, looks, etc, but another thing to add to that list is how easy it is to use. Considering this camera is nearly 75 years old, you would think that shooting it would be a lot different than more modern cameras, but in reality it is not. Of all the cameras I own, the one that it most closely resembles is the Argus C3. This makes perfect sense considering they are both early examples of 35mm rangefinders that were designed in the late 1930s.
Both the Argus C3 and the Dollina each have separate viewfinder and rangefinder windows. The rangefinders are of the split-image design which means there is a top image and a bottom image that you must line up, and both require a manual release of a film catch before advancing the film.
When loading film in this camera, there is a little metal tab in front of the sprocket for the film holes, and you have to make sure to feed the film under this tab, otherwise it won’t feed correctly. Aside from that, loading film in this camera is like any other. Once you have the film tab fed into the takeup spool and you can get it to advance properly, fold the door shut and lock it by sliding down the door latch. You need to advance the film 2 full rotations to get to the start of your film.
Unlike most cameras (even the Argus C3), the shutter release is not coupled to the film advance knob. This means you do not have to fire the shutter to get the film to advance. Simply rotate the film advance knob until it stops, then gently press in the film release button in front of the camera, and continue advancing the film until it stops again. Do this twice to get to the start of your unexposed film.
You’ll also need to manually reset the film counter to ‘0’ at this point. It is a bit difficult to explain in writing, but if you have a Dollina, try playing with it and the following instructions should make more sense. The film release button on the front of the camera also functions as a reset for the film counter. There is a sliding tab to the side of the film release button that unlocks the film counter. Slide this tab into it’s outer position, and then using a side to side movement, slide the film release button back and forth until you see the film counter hit ‘0’. Keep in mind that a full movement of the film release button moves the film counter 2 positions. So if you are getting close to ‘0’, make smaller movements to move it 1 at a time. Once the film counter is at ‘0’, slide the tab back into the locked position and you are ready to go.
Once you have your film loaded, advanced, and your film counter is at ‘0’, you are ready to shoot. Fold out the lens by pressing down on the unlock button on the front of the camera. This camera was designed to have the lens fold itself out when this button is pressed, but mine sometimes needs a little help to fold out. Once the lens it out, you’ll notice that there are 2 levers on the outer perimeter of the lens. The one on top of the lens is the lens cocking lever. The shutter release is a small lever in the lower left corner (looking at the camera) of the lens.
To change the shutter speed, the chrome outer dial of the lens rotates to whichever position you would like. On mine, the amount of force to go between 1/250 and 1/500 is very high. I am not sure if this is due to extra tension to get the 1/500 speed, or if mine is just sticky. I also noticed that when set to “T” mode, the shutter works without having to cock the shutter.
Changing the aperture requires movement of a small indicator on the bottom of the lens. Its a little awkward to reach since the film door is kind of in the way, so this is something you’d probably have to do without the camera at eye level. The shutter on this camera is a Compur-Rapid which was a very common shutter in this era and was used on a variety of different cameras, so it was not designed specifically for this camera.
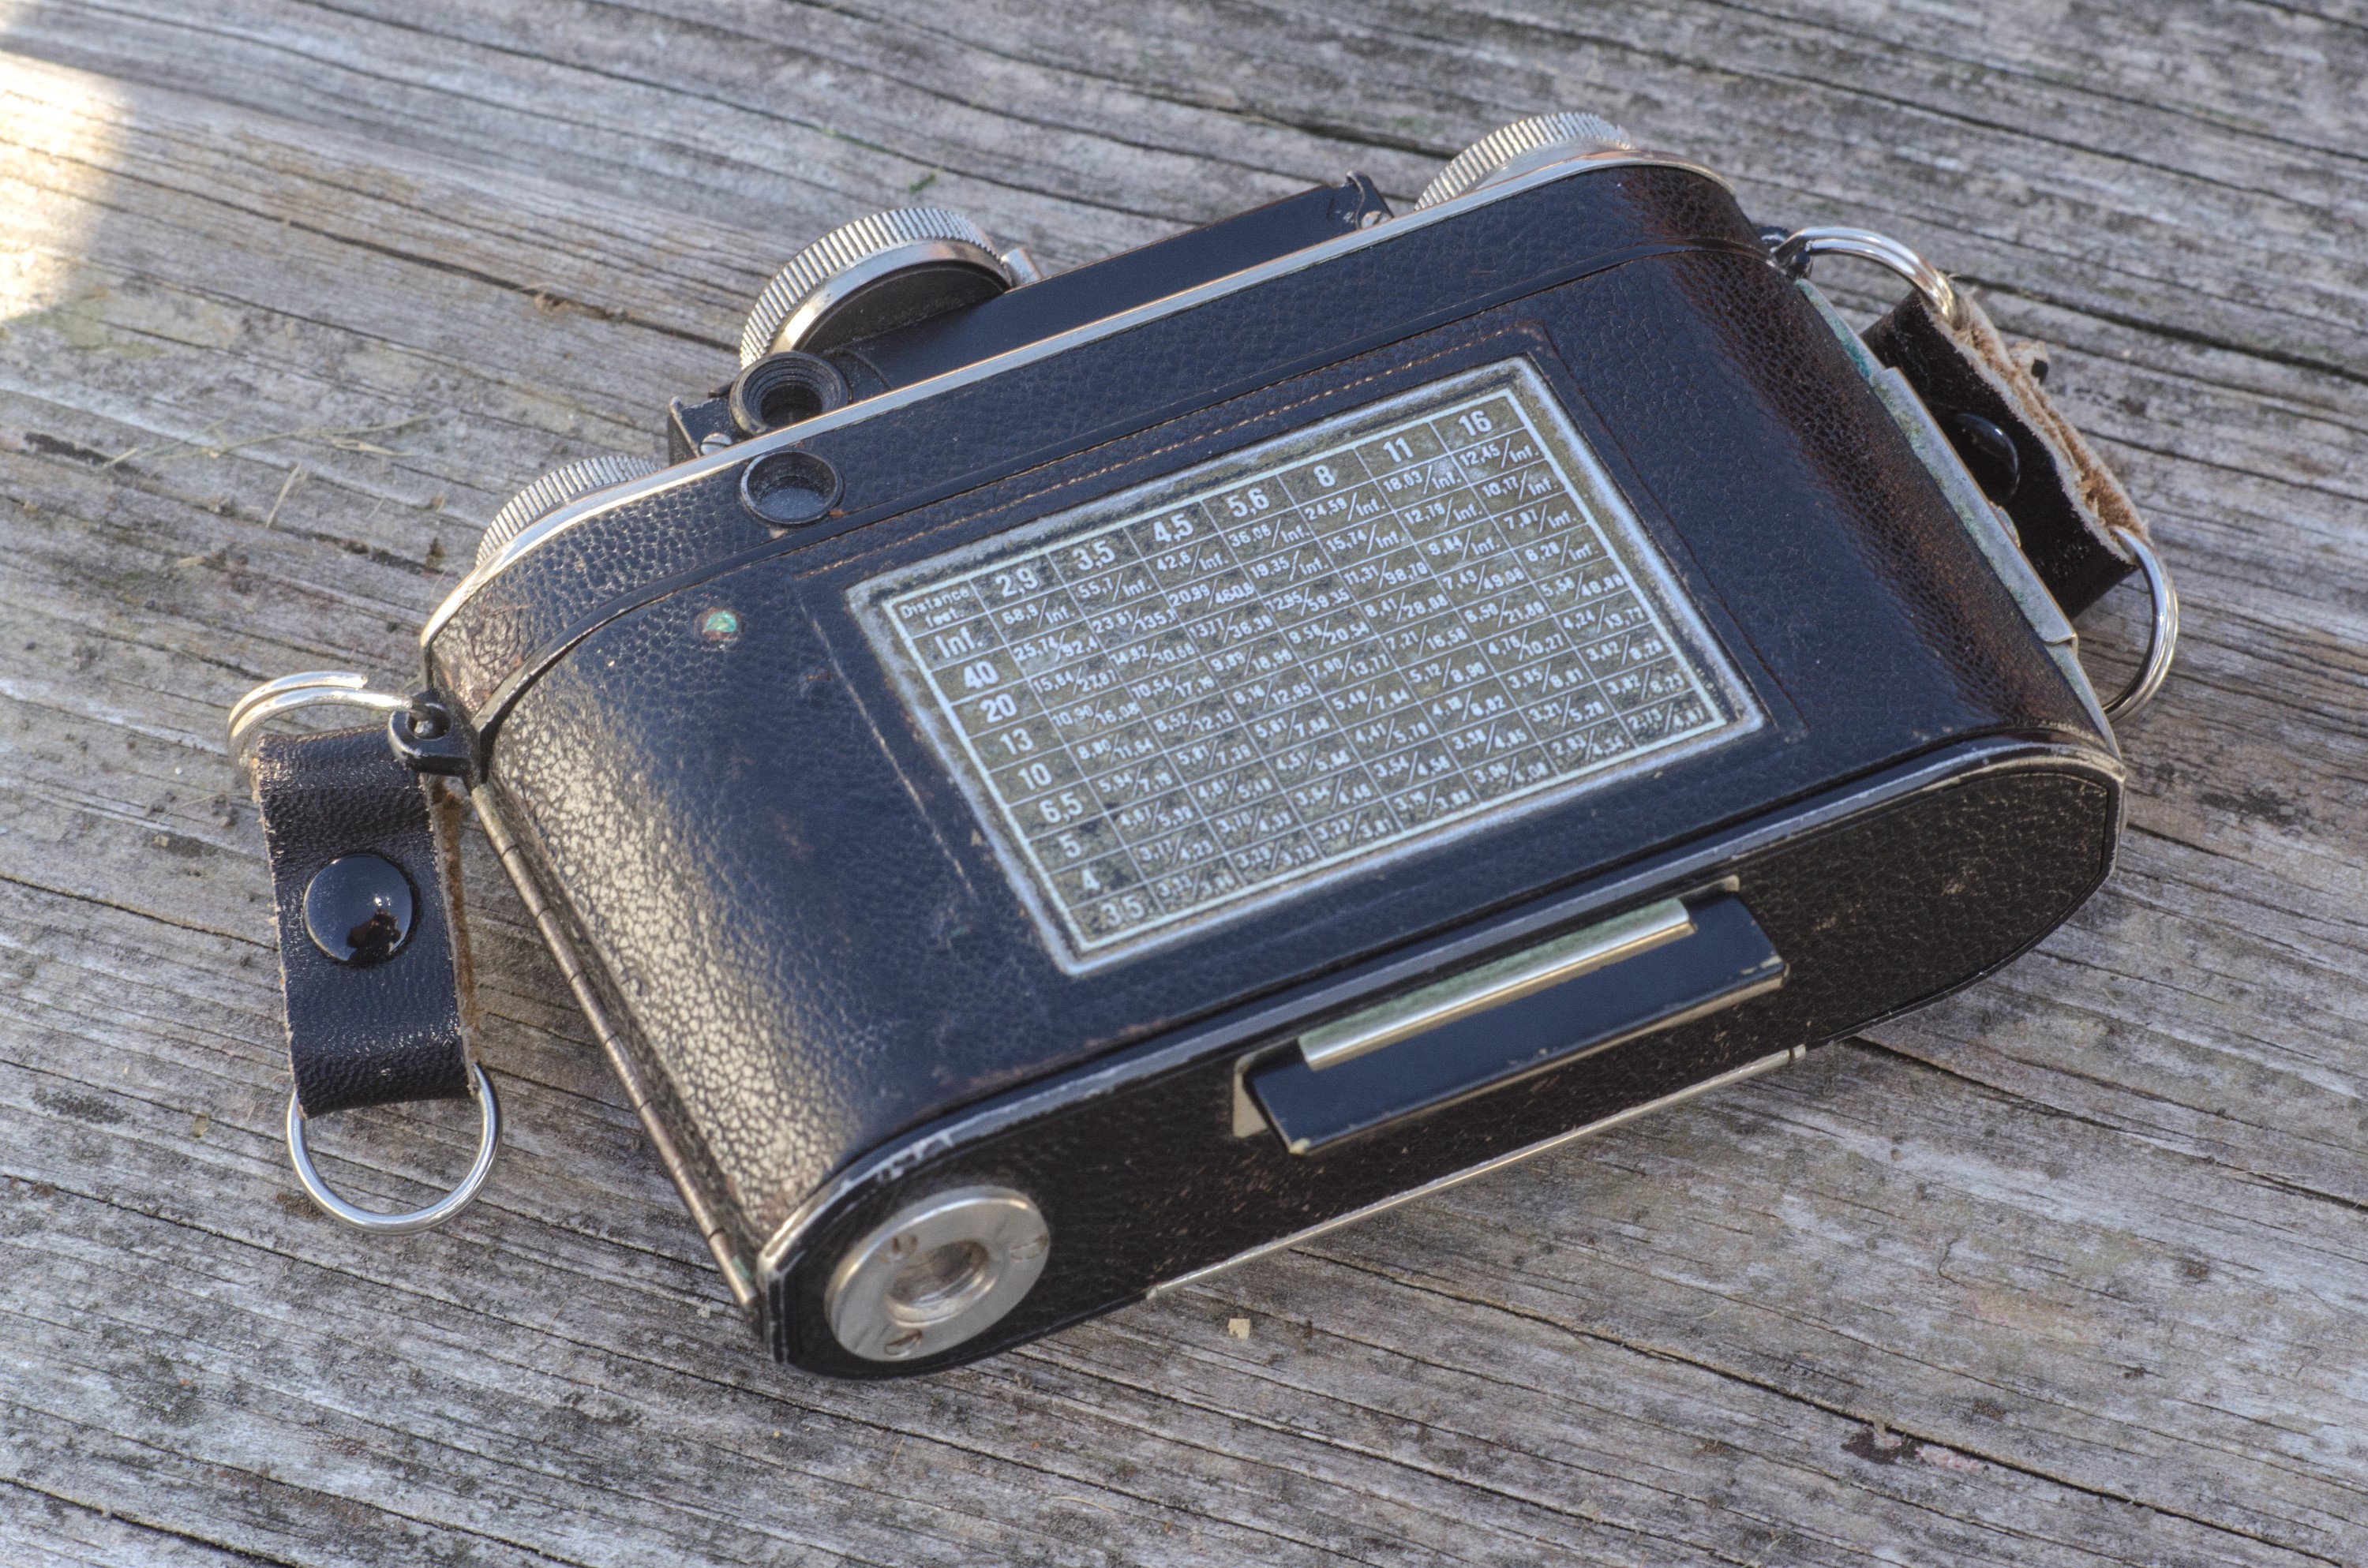
This camera predates any modern exposure aide by several decades, so exposure measurement is entirely manual. As with most cameras of this age, the Sunny 16 rule comes in handy here. Set your shutter speed to the inverse of your film speed, and then set the aperture accordingly to the lighting conditions you are in. Bright sunlight should be at f/16, hazy sunlight should be f/11, mostly shade should be f/8, and cloudy or overcast should be at f/5.6. This lens has a relatively bright maximum aperture of f/2.9, so it is capable of indoor photography, but that will require more precise measurements to expose the subject correctly. If you are new to manually measuring exposure on a camera like this, I recommend sticking to well lit outdoor photography.
Once you have the proper aperture and shutter speed selected, and the shutter is cocked, you are ready to fire your shot. Unlike most cameras, there is no shutter release on the top plate of the camera. The shutter is released by pushing the lever near the lower front part of the lens. This shutter release is both very awkward and easy to use. It is awkward in the sense that it is not in a logical place where you’d hold your finger. But it is very sensitive to movement, so if you tap it at the wrong moment, you can accidentally fire the shutter. Assuming everything is ready to go, gently tap the shutter release and the shutter will fire.
Like many cameras with a leaf shutter, the shutter is extremely quiet. If you are shooting in a location with even a little bit of ambient noise, you may not hear that the shutter has fired. Your only indication that you took your picture is that the cocking lever will no longer be in the cocked position.
Another thing to keep in mind is that since the film advance is not coupled to the cocking mechanism, you must manually advance the film to the next frame separately from cocking the shutter for the next shot.
The original manual for the Dollina recommends not cocking the shutter until you are ready to take your next shot because it can cause extended stress on the springs that control the shutter. However, I do recommend always advancing the film to the next frame immediately after your previous shot. This moves the film into position for the next frame so that you don’t have to worry about it later. Regardless of whether you advance your film after a previous shot or before the next shot, make sure you are consistent about this. If not, then you risk double exposing your shots or advancing an unused frame of film. To the left is one of my double exposed shots from my first roll.
My Results
As with any vintage camera, shooting with the Dollina takes patience, but it is this patience that is one of the biggest appeals for using old cameras. If I wanted a perfectly exposed and perfectly focused shot on every frame, I would just use a modern auto focus camera. The mere fact that a nearly 80 year old camera like this can produce shots comparable to a modern camera is simply amazing to me.
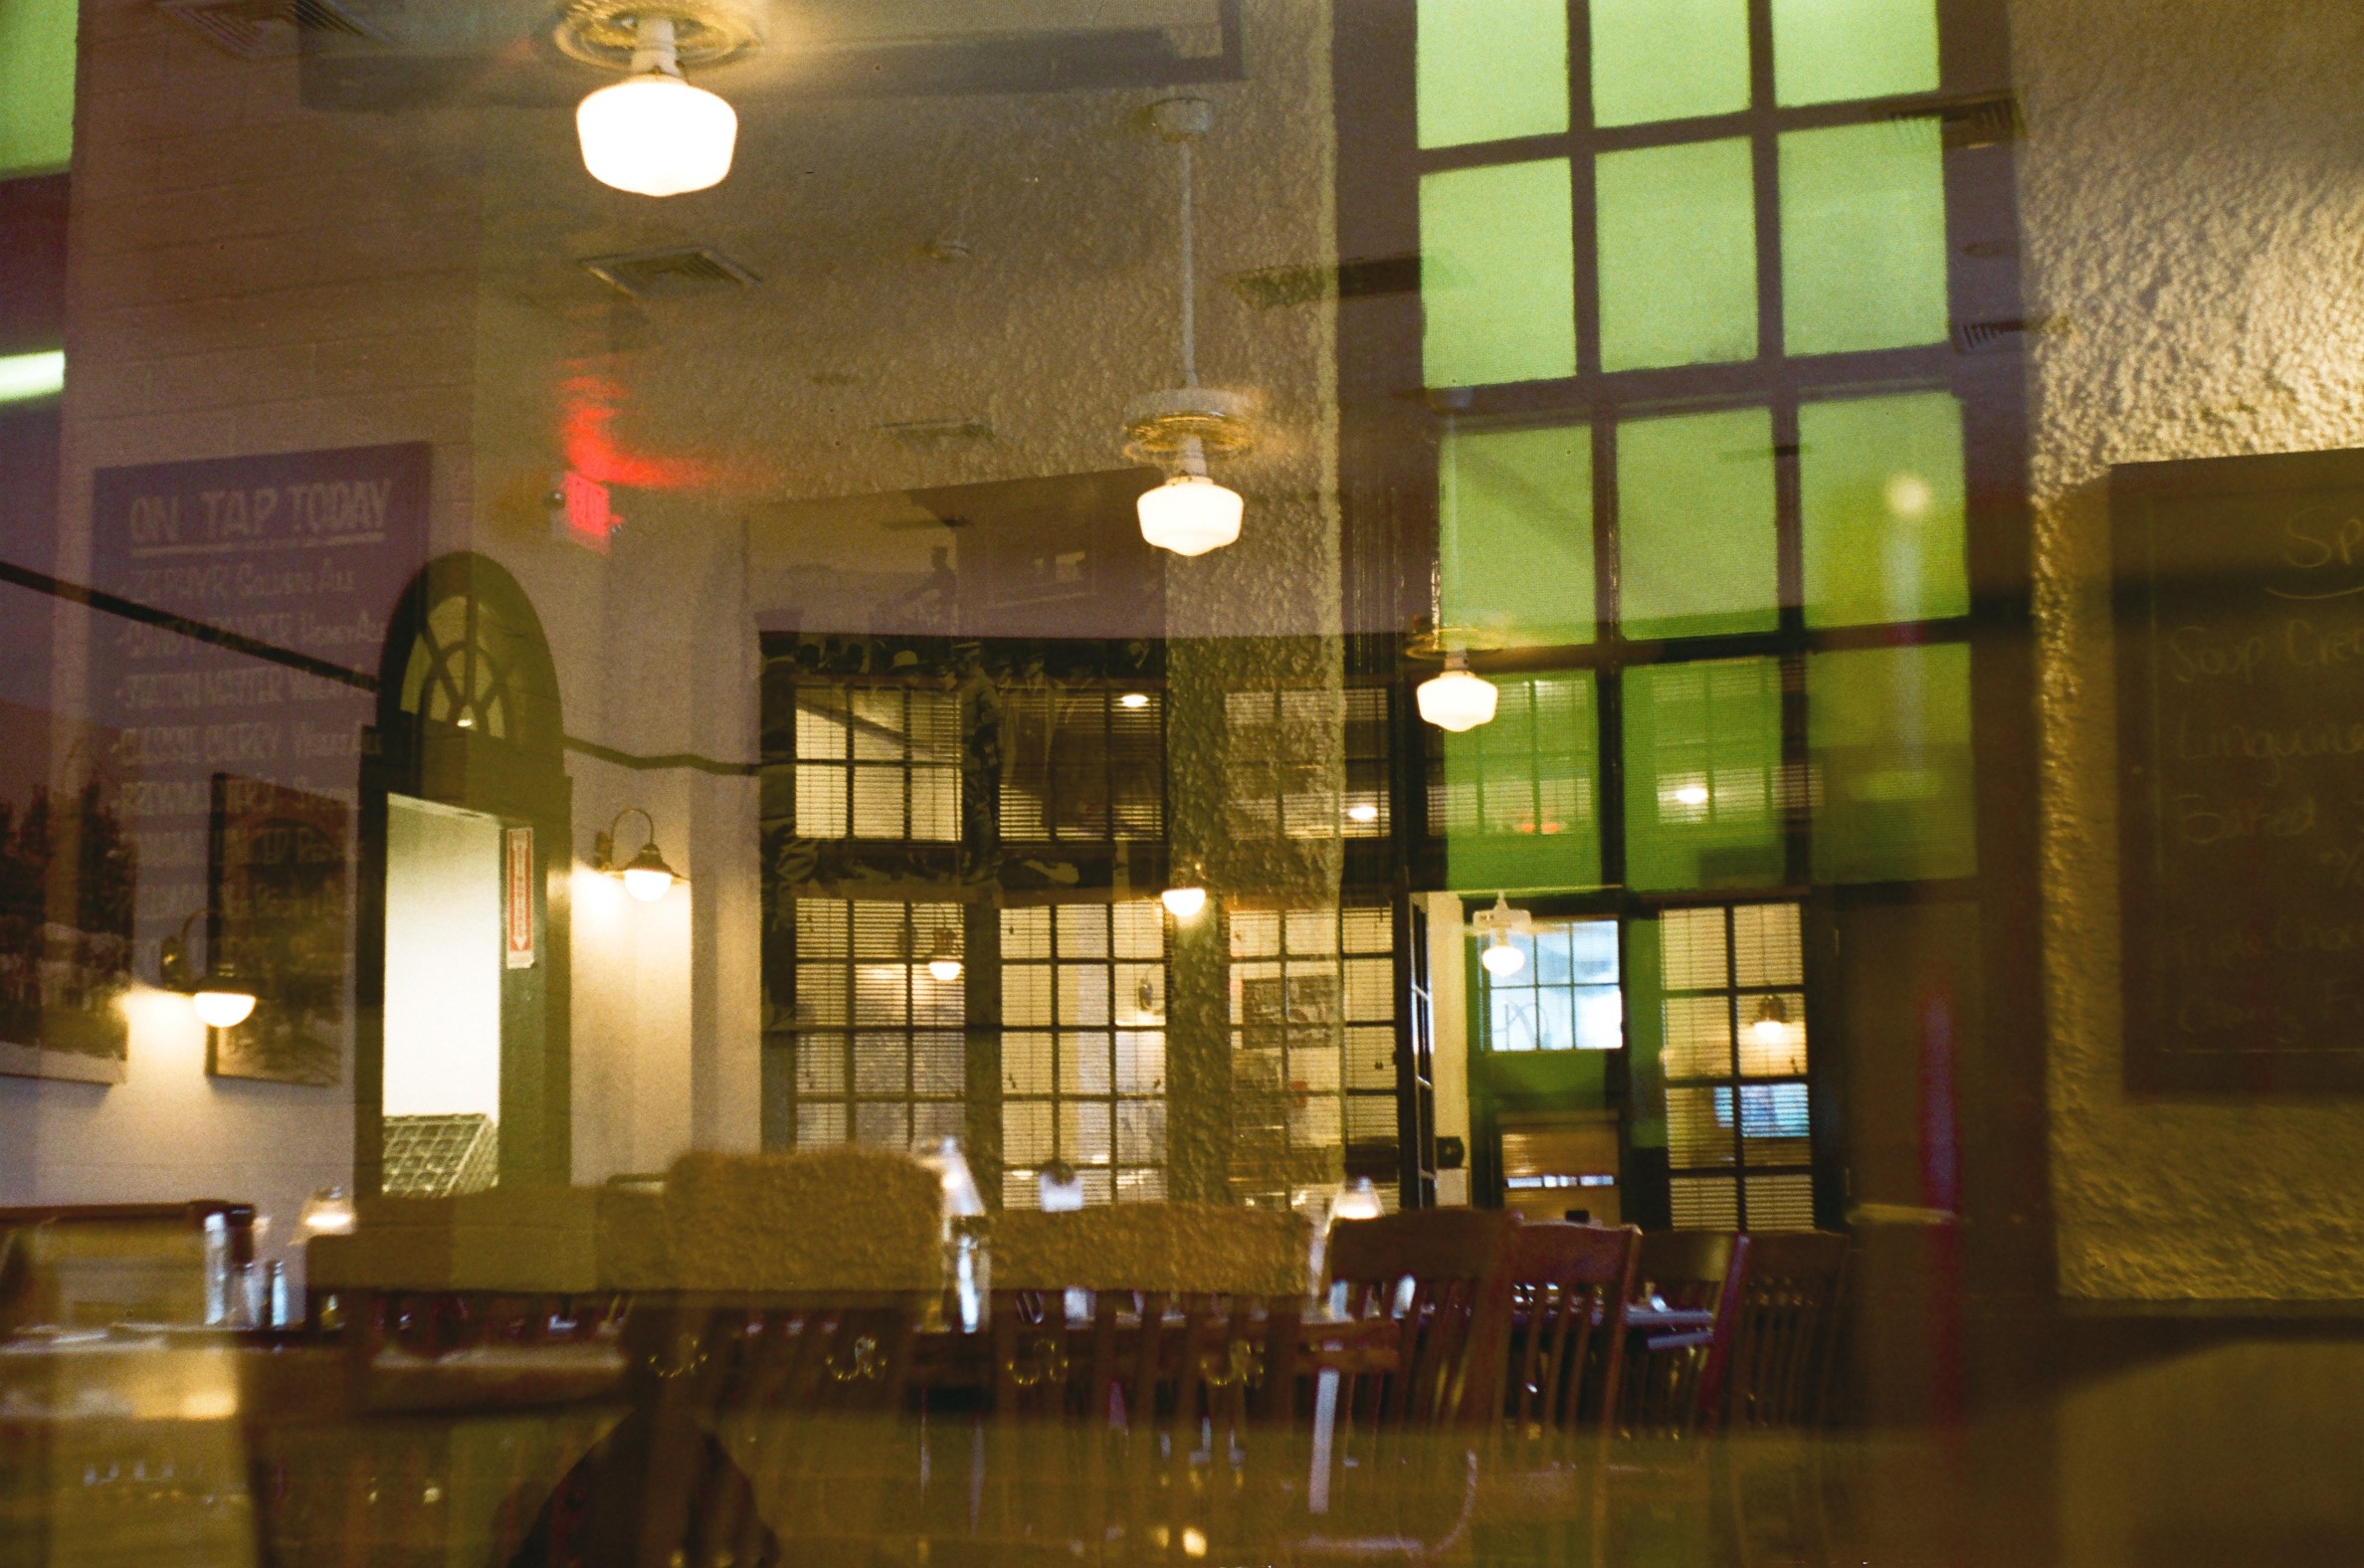
The first images I took with this camera were quite ambitious as I shot them during the winter of 2015. I took it with me to a local brewery and shot about half of the roll indoors.


To my surprise, many of the shots came out properly exposed and accurate. The rangefinder is accurate in low light, and I had no problem guesstimating distance in brightly lit snow scenes. The colors were a tad muted, but a combination of film stock, the uncoated Radionar lens, and the drab winter scenery all contributed to this. I look forward to seeing what this camera can do on a bright and colorful spring day.
Dollinas are certainly not common, and I would guess that very few of them are still in use in the world today. I cannot express how happy I am that this particular camera wound up in my hands and I was not only able to restore it to good working condition, but that I was able to get these shots from it. In the coming months, I plan on taking my Dollina out and getting some more outdoor shots. If anyone reading this post has an opportunity to shoot with a Dollina, I wholeheartedly recommend it. If the film advance is frozen, it is very easy to fix, contact me and I’d be happy to share with you my experience.
Additional Resources
http://camerapedia.wikia.com/wiki/Dollina
http://camera-wiki.org/wiki/Dollina
http://thecameracollection.blogspot.com/2013/01/certo-dollina-ii.html
http://licm.org.uk/livingImage/Certo_Dollina1.html
Mike,
Thank you very much for making your knowledge about this camera available to others. Well-written, detailed, and helpful describe your posting. I just acquired a Certo Dollina II with a very low body number, and it is fully functioning in my hands–now that I understand all of the controls. Best regards.
Greg,
I am glad you found it informtative. The Dollina is one of my favorite cameras because it’s design, history, and the condition mine is in. I wish the rangefinder was a little more accurate, but otherwise this camera is a gem to use and I cannot wait to shoot another roll in it.
Thanks for the kind words! The pictures of the brewery are of Flossmoor Station Brewery and Restaurant, in Flossmoor, IL. The snowy pictures are both from my hometown, Steger, IL. I regret that almost a whole year has done by without me shooting another roll in this camera, I definitely plan on doing it again someday! 🙂
Thanks for the great detailed info on these cameras. One of your pictures from the Dollina, the street/houses/snow looks a lot like my old neighborhood in Minneapolis. Where was it taken?
Man, I just found one of these at an antique store in Bay St. Louis. The only thing wrong with it after I fixed a jam in the rangefinder cam is that the slow shutter speeds do not work, although I have not yet collimated it. I also had to pull outwards on the film release button to get it to start catching consistently.
I’ve got a theory: I think when folding cameras were a fairly new invention, they made the bellows really well, but by the 40’s and 50’s they just made them as cheaply as possible. See, the Dollina is my oldest working camera, and the bellows is soft, light-tight and crisp. I have two 100-something year old early rollfilm cameras that I use as bookends (they actually work too but the film formats are dead) and they don’t have any leaks either. I have 50’s Kodaks, though…. man, light leaks all over the place.
Recently found one at a garage… Pretty good cosmetic condition however at least one of the viewfinder glass covers has come off inside the rangefinder housing and is loose inside. At attempting to try to see if it can be reattached I managed to remove the rangefinder itself from camera but I can’t remove the cover housing, looks to me like two metal piece bonded solid together… Thus imposible to take it apart without breaking it and rendering useless… I’ve seen pictures posted in another blog with the cover removed intact but no description avail. I would appreciate if anyone can point me to the right information or give me any ideas on how this can be accomplished? Nice article by the way. Thanks in advance.
Amy, I ran into the same challenge as you with the Dollina’s rangefinder. You can get the sides off pretty easily, but the cover seems to be welded or pressed into place. I’ve come across two of them over the years, and I was unable to get either open. One of them the rangefinder was OK, but the other had a missing piece of glass. I just left it alone, but if you ever figure it out, please come back here and let me know!
Hi Mike, thanks for replying, Unfortunately I was unable to sep them apart as I attempted to start from the corner base but I noticed that the base itself was starting to bend and I did not wanted to compromise the mirror assembly. So what I did is I located the side where the window glass was loose from and realized that something else was also loose inside besides the glass and that was the clip that holds it in place then with a very tiny set of tweezers I managed to hold it and screw it back in place, not an easy task!!! Then I just cleaned the other windows and the dry white stuff as much as I could and put it back together and it looks good now and I can see clearly thru its lens. I noticed that it is even focusing right, maybe not so accurately but it does match the image!
I’m in stage 2 of the restoration process now… and have the lenses and shutter pieces all over my workbench and no idea where to start!!! At least I know you have excellent guides for when I get motivated and the time comes… I’ll keep you posted on the progress. Thank you kindly!
Hello Mike, I have just checked my lens number, 374743, which doesn’t add up, its a 2.9 csssar. The camera is working fine, I found I had to glue the piece of leather where the sliding tab for the frame reset is down , it seems fine now.
The body number is 38 071 with a gap between 8 and 0. I have 396 in pencil on the back of the camera next to the Certo Dresdon transfer.
It’s marked in feet,and is in excellent condition. It has no leather case, someone looked after it in the past.
The depth of field scale is one of the easiest to understand I have seen in a long time.
Thanks for the heads up article, it’s been a great help.
Kind regards Andy Bennett