

 What is it?
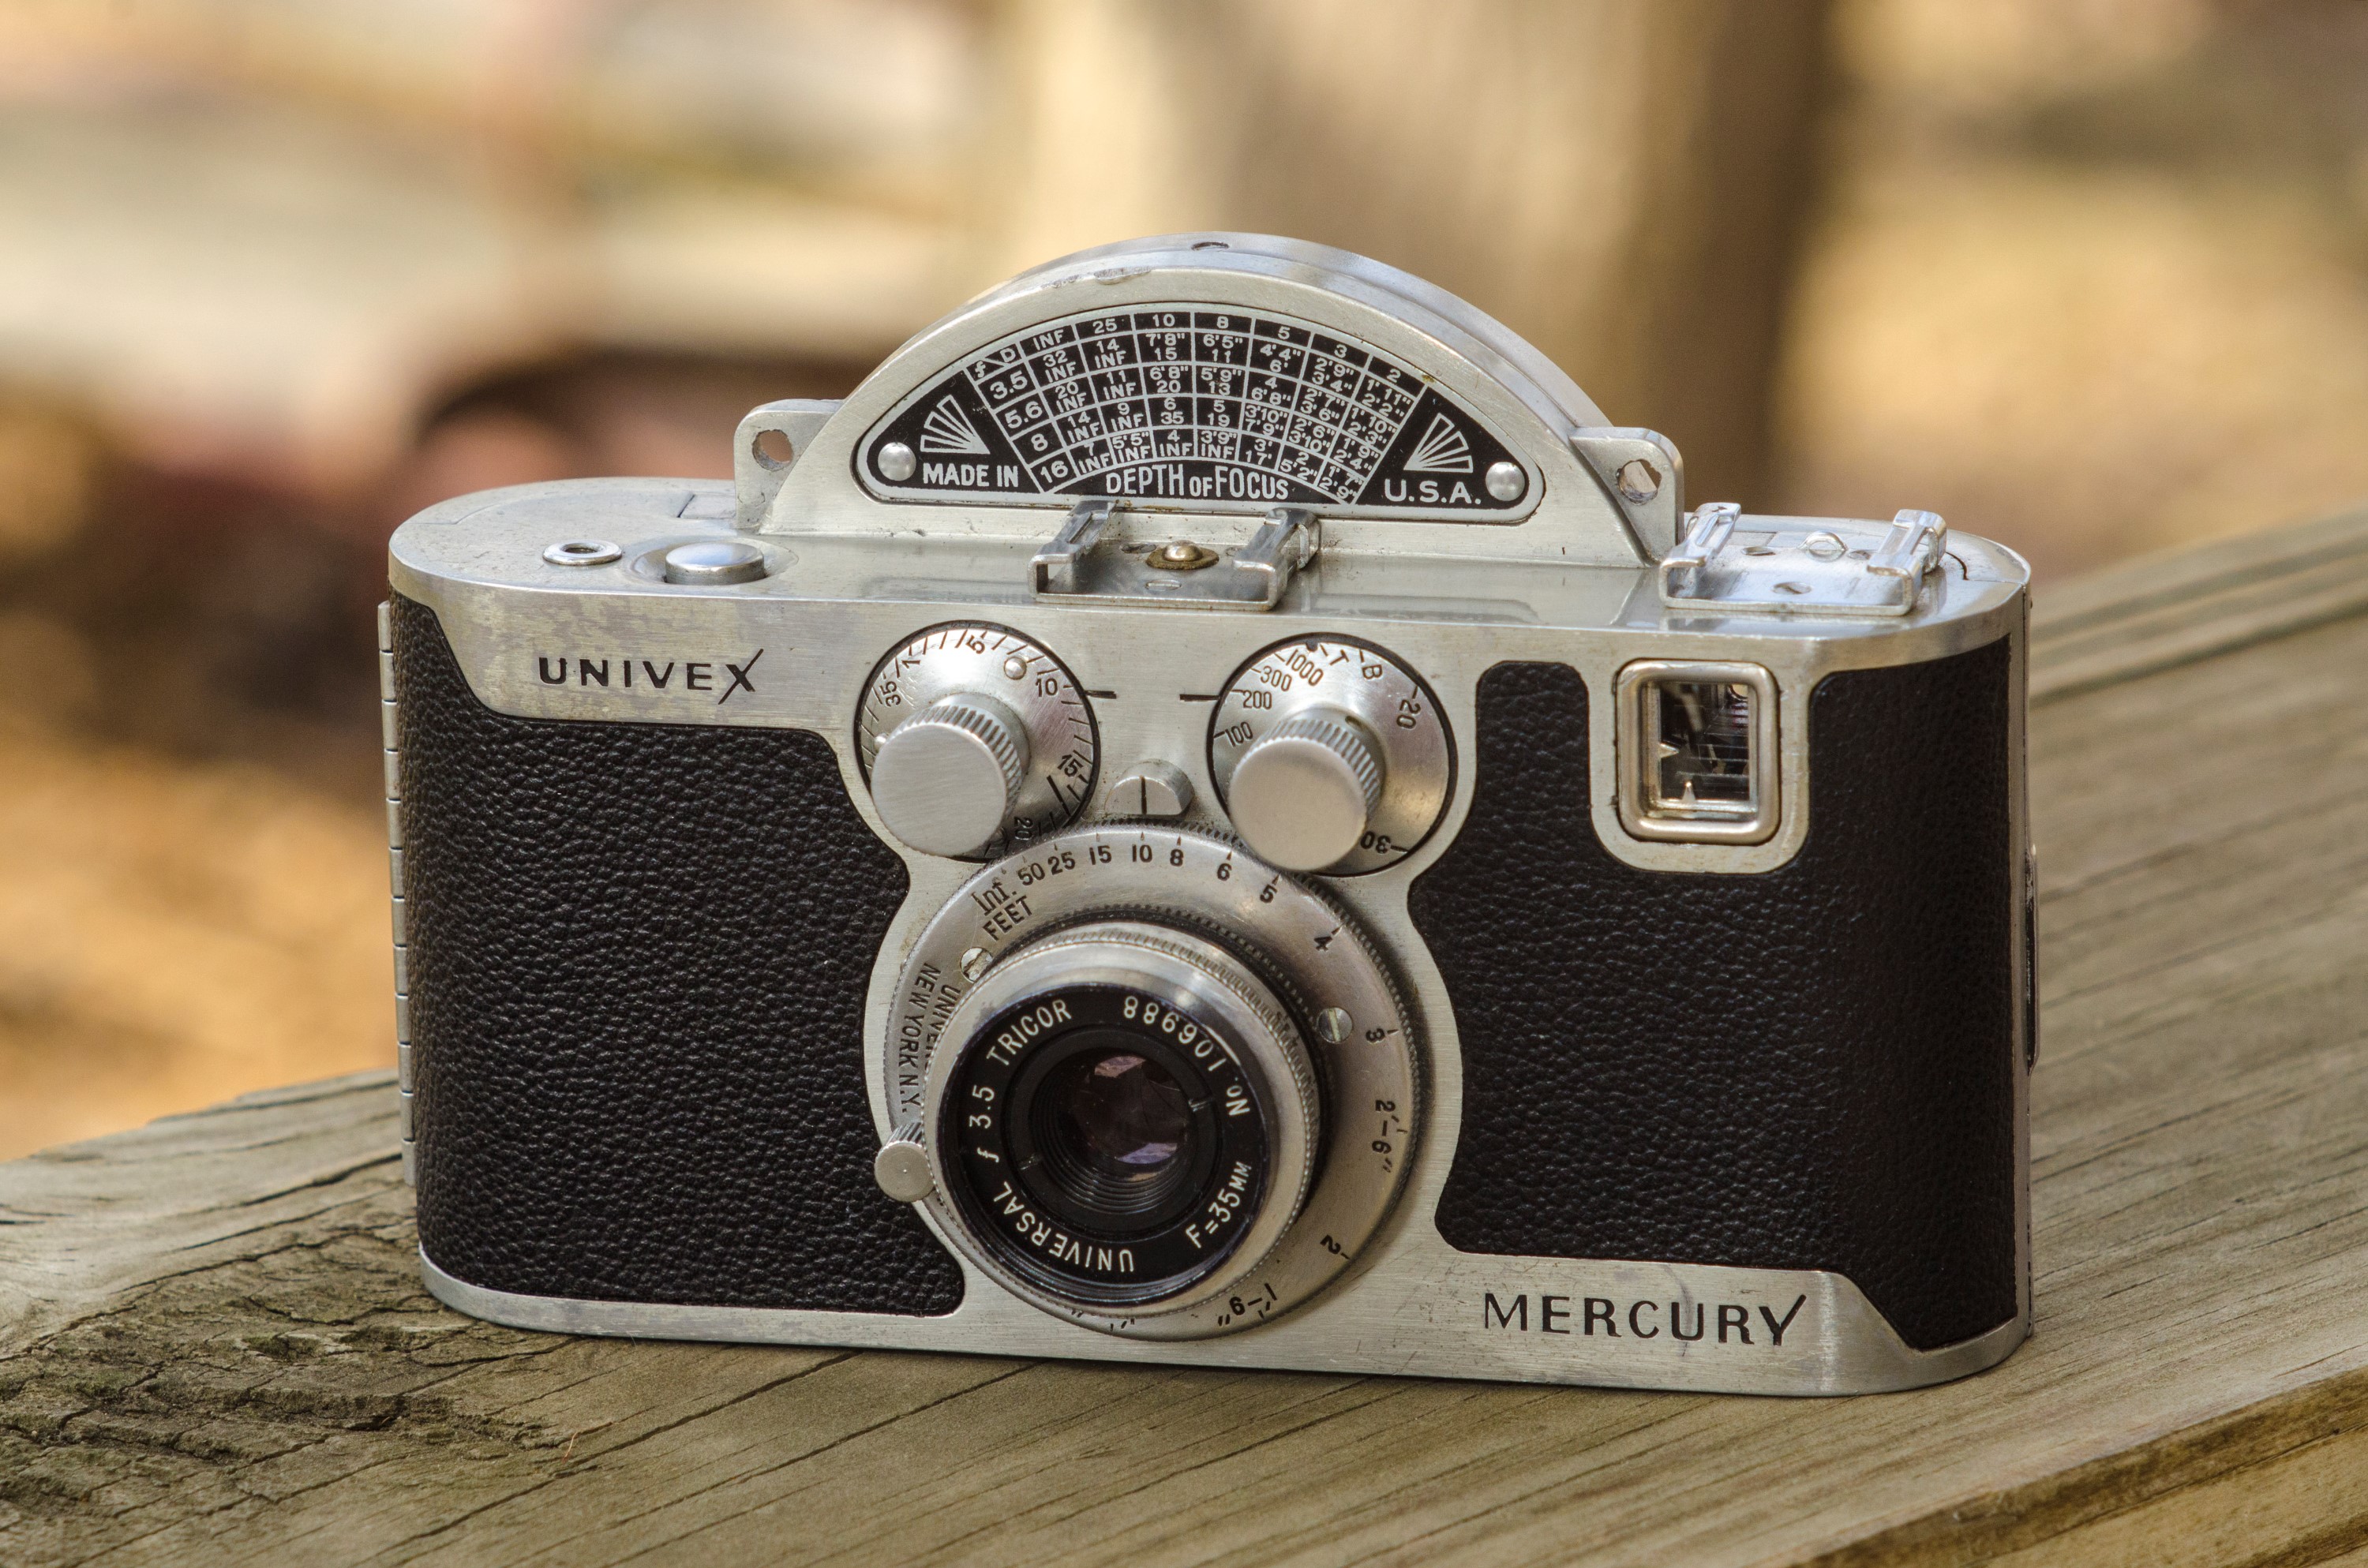
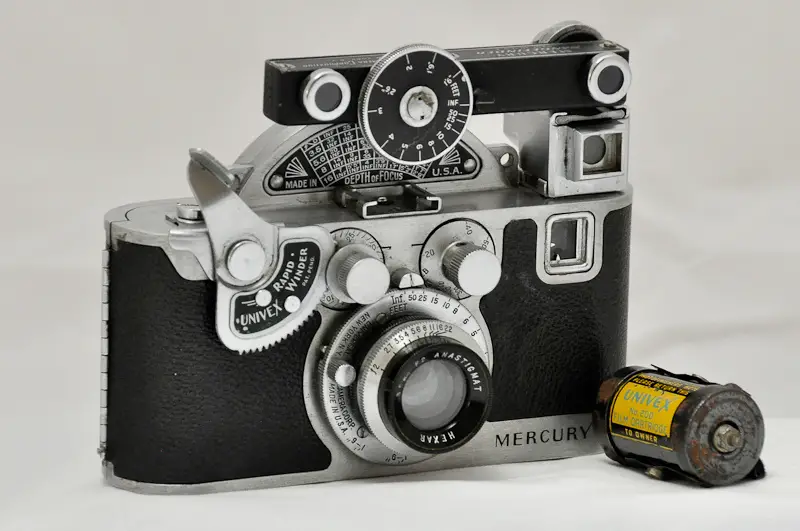
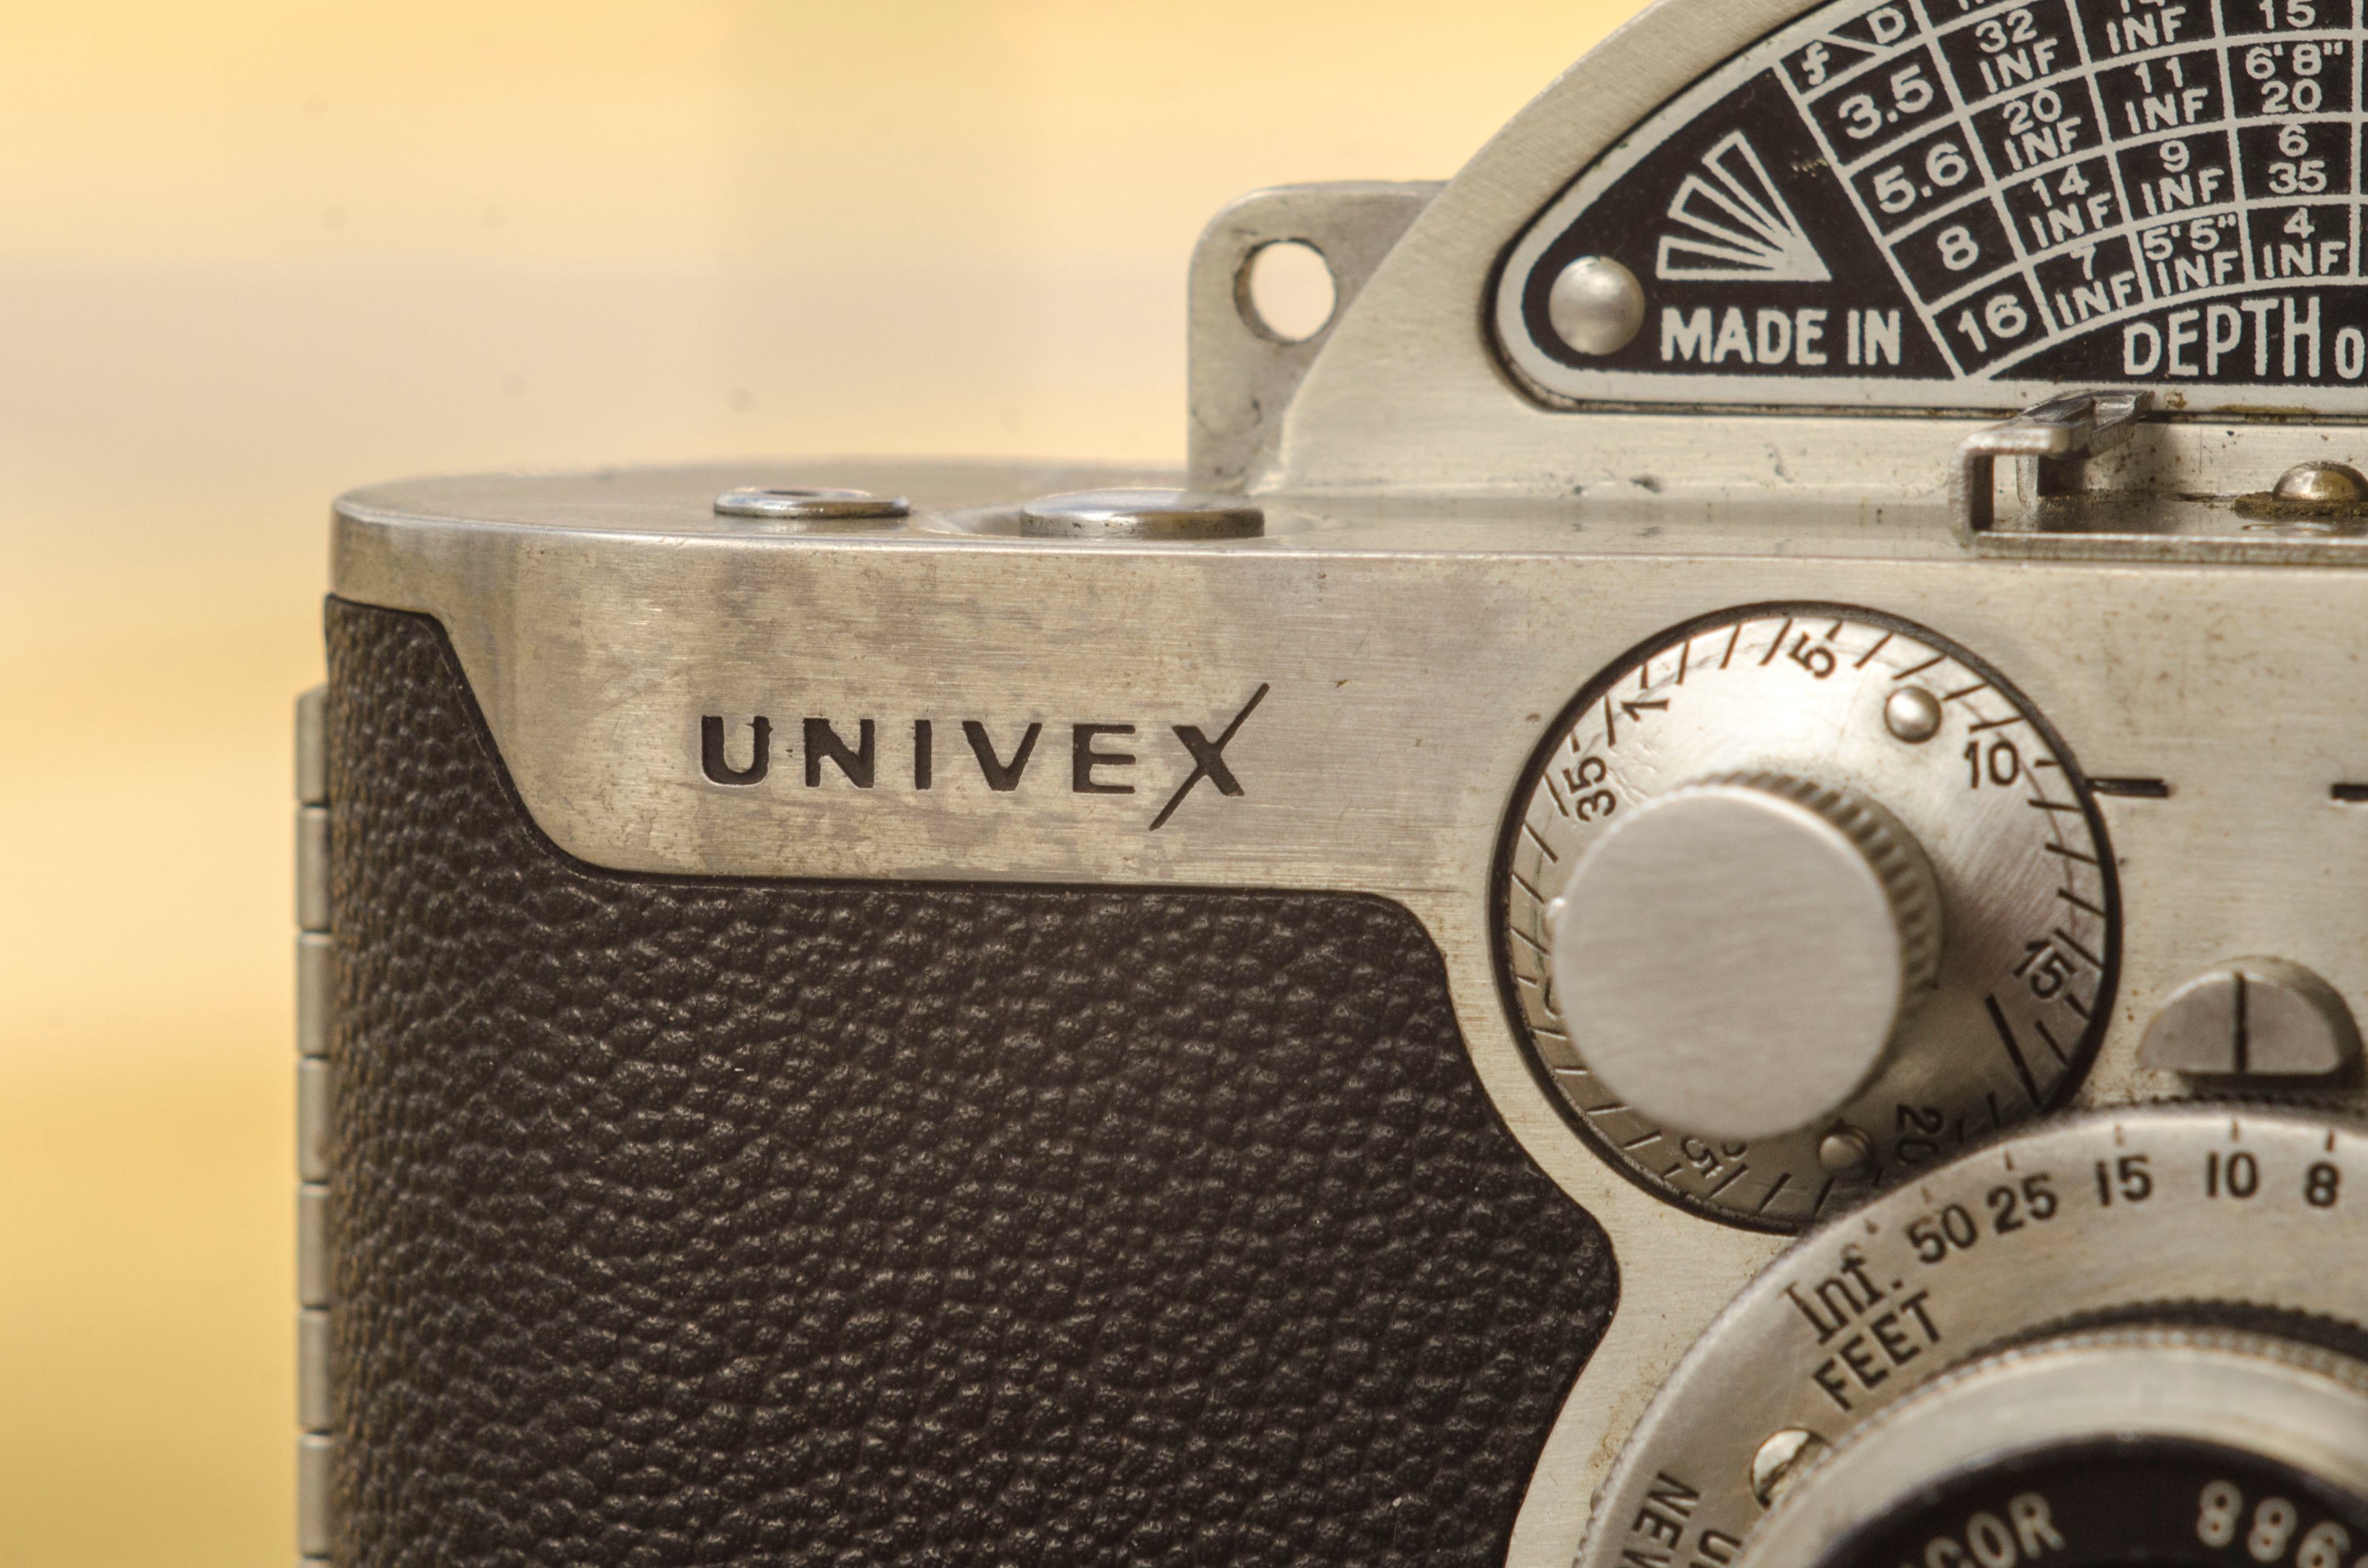
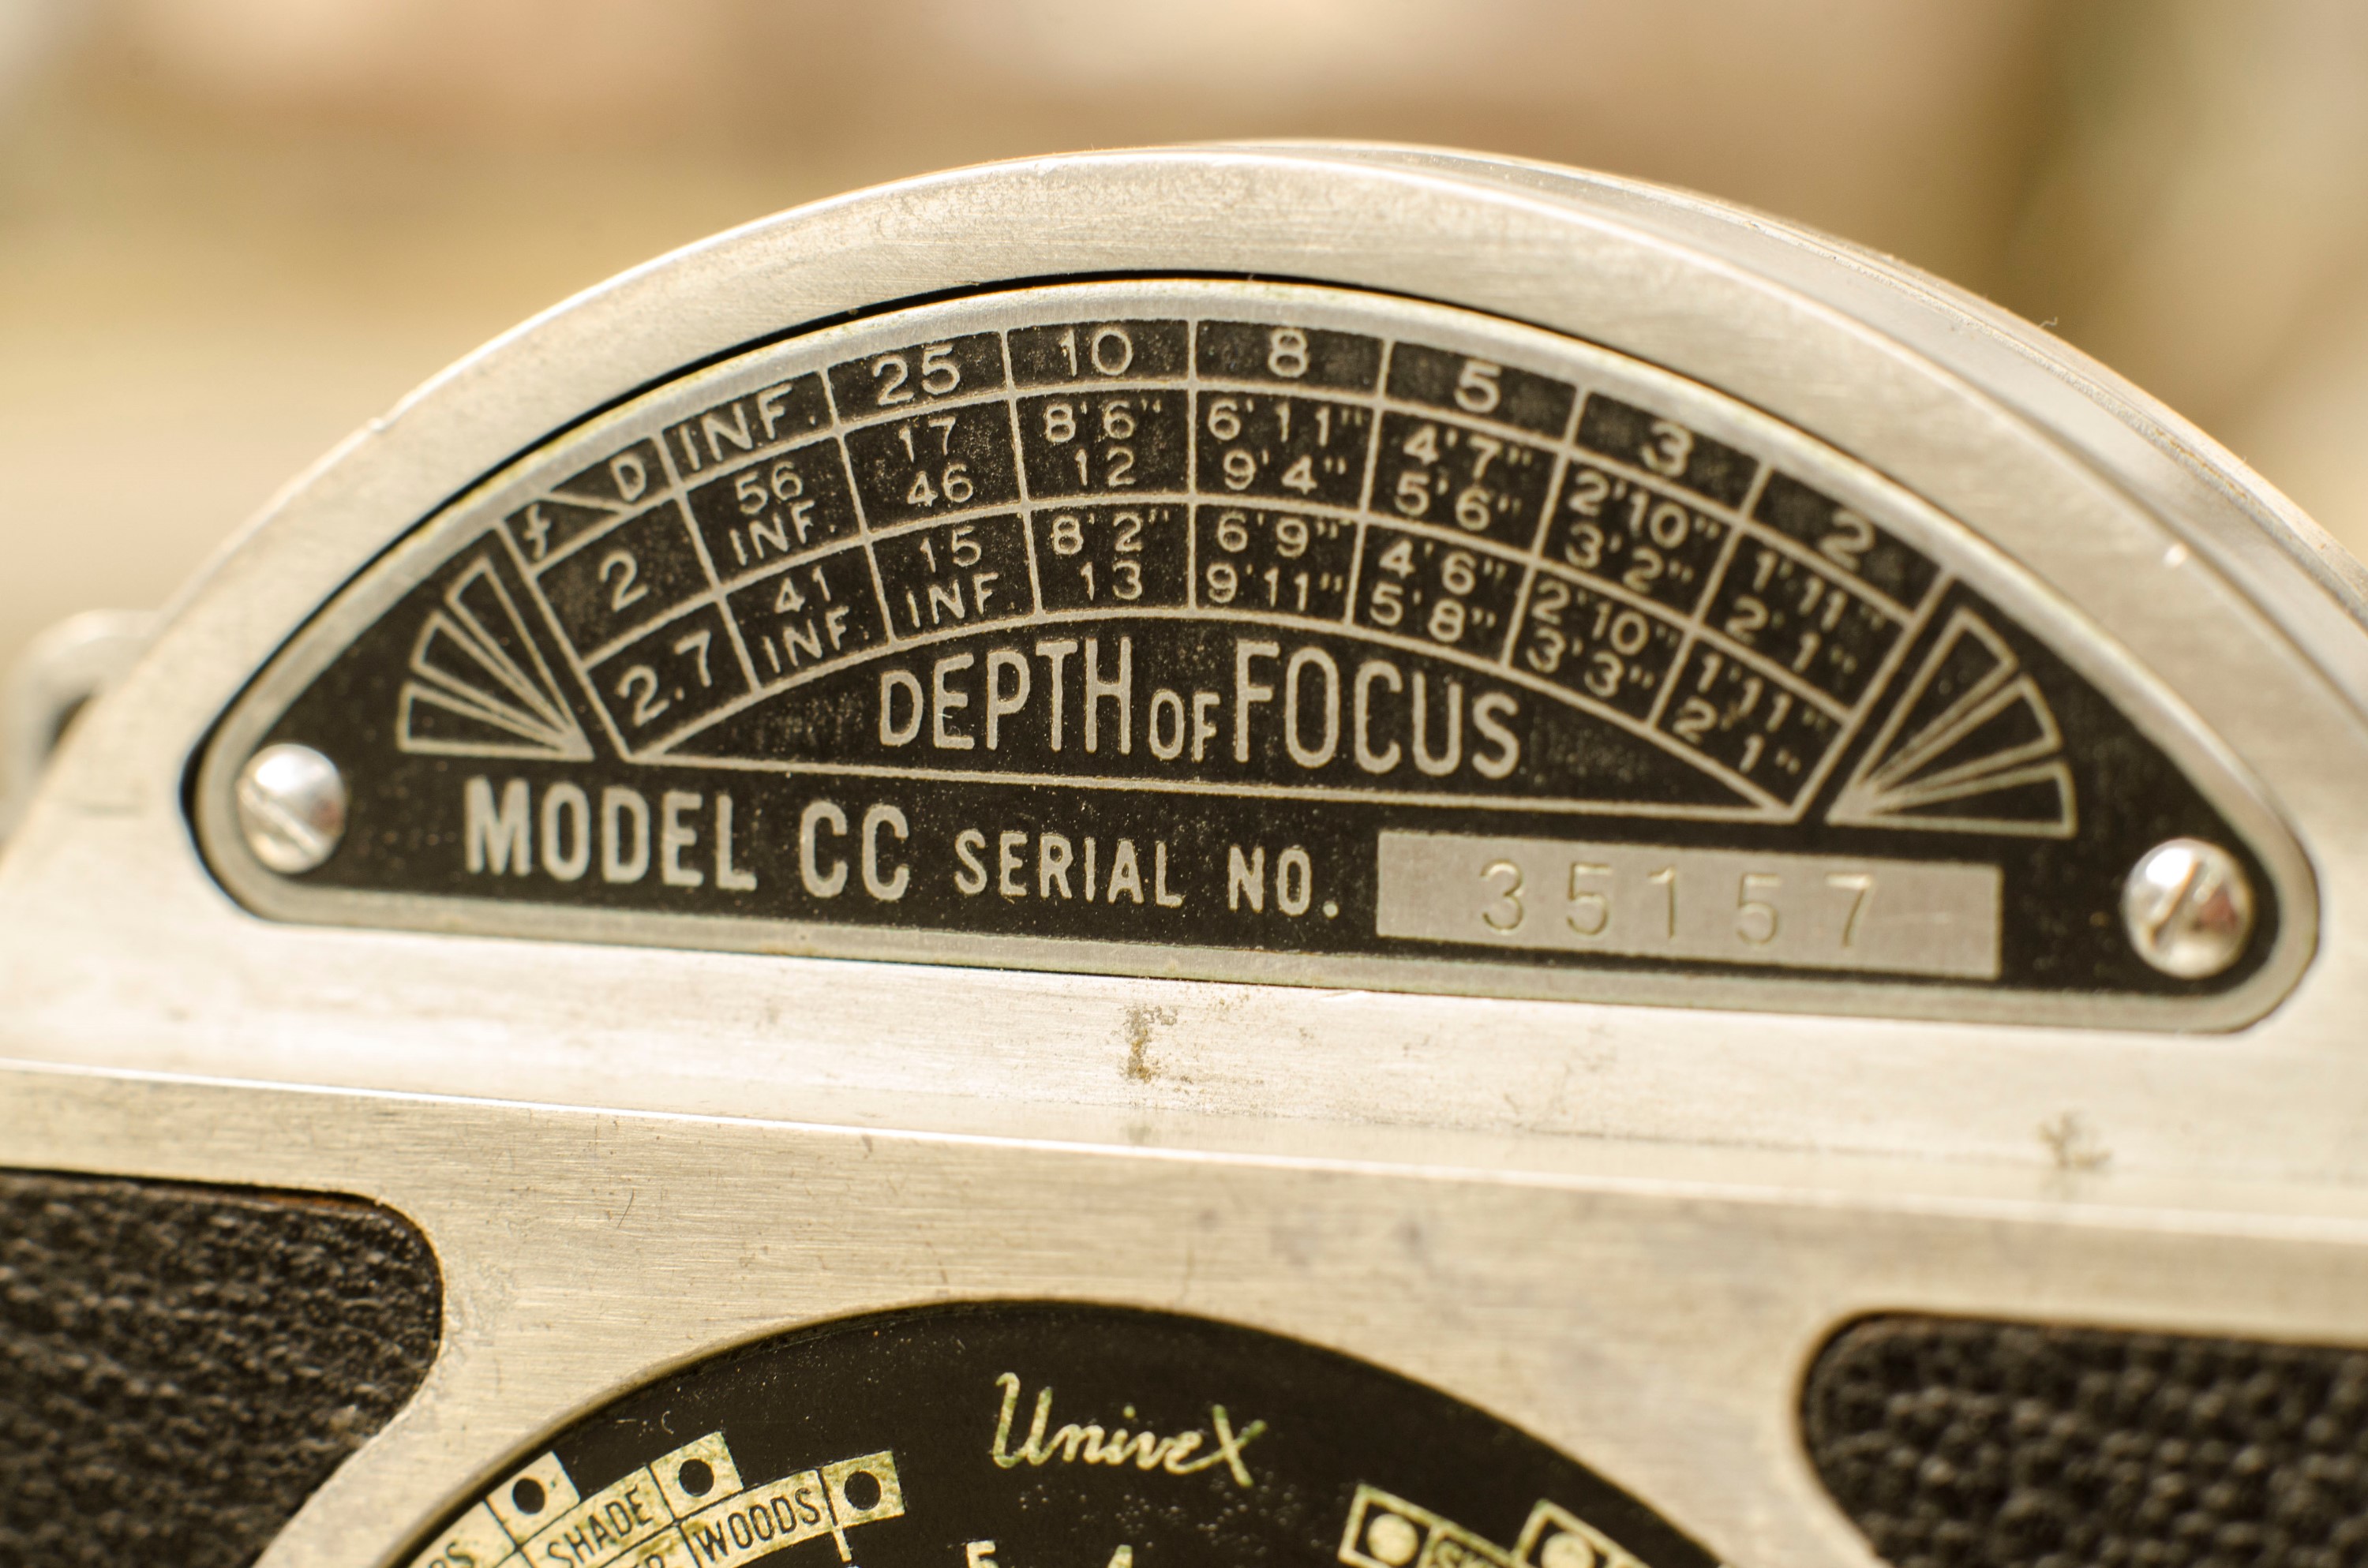
This is a Univex Mercury Model CC camera made by the Universal Camera Company out of New York, NY in 1938. The Mercury was a historically significant camera in that it was the first time a US camera maker produced a camera capable of speeds of 1/1000 and sold at a cost starting at $25. It achieved this through creative engineering of a motion picture rotary shutter into a solid aluminum body. Although an unorthodox design, the rotary shutter was proven to be extremely reliable and most copies surviving to this day are as accurate as the day they were made. Although technically a 35mm camera, the Mercury used a proprietary type of film known as Universal #200 that was only made before WWII. As a result, this camera is not compatible with “regular” 135 format 35mm film, although it is easily adaptable.
Film Type: Universal # 200 35mm film
Lens Mount: Universal Screw Mount (~30mm)
Lens: 35mm f/3.5 Wollensak Tricor uncoated 3 elements
Focus: 1’6″ to Infinity
Shutter: Rotary Metal Focal Plane Shutter
Speeds: T, B, 1/20 – 1/1000 seconds
Exposure Meter: None
Battery: None
Flash Mount: Hotshoe
Manual: http://www.cameramanuals.org/pdf_files/univex_mercury.pdf
History

This camera’s history is about as interesting as it’s design. The Universal Camera Corporation (sometimes also referred to by the name Univex) was founded in 1932 in New York City. They made a variety of lower end cameras that used a proprietary Univex film. Their best selling camera in the 1930s was the all plastic Univex Model A which sold new for 39 cents. Universal wasn’t really known as either a high quality or innovative company, and while their products weren’t bad, there were just many other alternatives for consumers to choose from.
In the 1930s, photography was still a rather expensive hobby and there was a limited need for entry level cameras for the general public. For the professional photographer, more and more of the higher end cameras were coming from Germany. German manufacturers like Leitz and Zeiss-Ikon were able to build high quality cameras with interchangeable lenses, excellent fit and finish, extremely accurate optics, and shutters with speeds as fast as 1/1250 sec. American companies however, were still making cameras with shutter speeds that topped out around 1/200 – 1/300 sec. While this was fine for casual photographers, the more demanding professionals were buying their cameras from overseas.
In 1937, Universal decided it wanted to design a new style of camera that could compete with the Germans, but at a much lower price. Brand new, a Leica III cost around $200 and a Contax III was a whopping $285 which when adjusted for inflation, is equal to $4882 today! As comparison, the Argus C3 sold in 1939 for $25 making it one of the more popular American cameras of its day. Universal had the lofty goal of creating a camera that could compete with the Germans in terms of quality, but they wanted it to sell at the same price as the Argus.
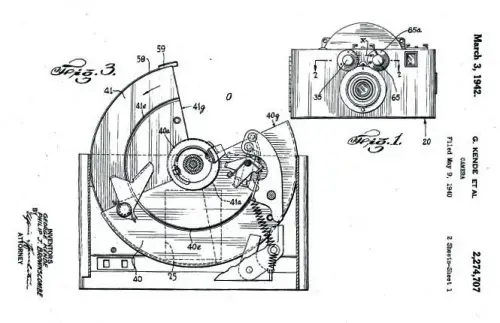
Since Universal wasn’t known as a premiere maker of cameras, they knew they wouldn’t have the design and production capabilities to make a Leica or Contax clone, so they knew they had to come up with a much cheaper way to accomplish their goals. For this, they turned to a man named George Kende. Two years prior, in 1935 Kende had designed an 8mm motion picture camera for Universal called the Univex Cine 8. The Cine 8 had a rotary shutter that could keep spinning at a fixed speed to allow the camera to shoot at a specific frame rate necessary for motion pictures. He used this knowledge of rotary shutters in motion picture cameras to design a spring loaded rotary shutter for Universal’s newest still camera. This rotary shutter is responsible for the large curved hump on top of the camera. This hump is not just for looks, it conceals the two discs that make up the rotary shutter.
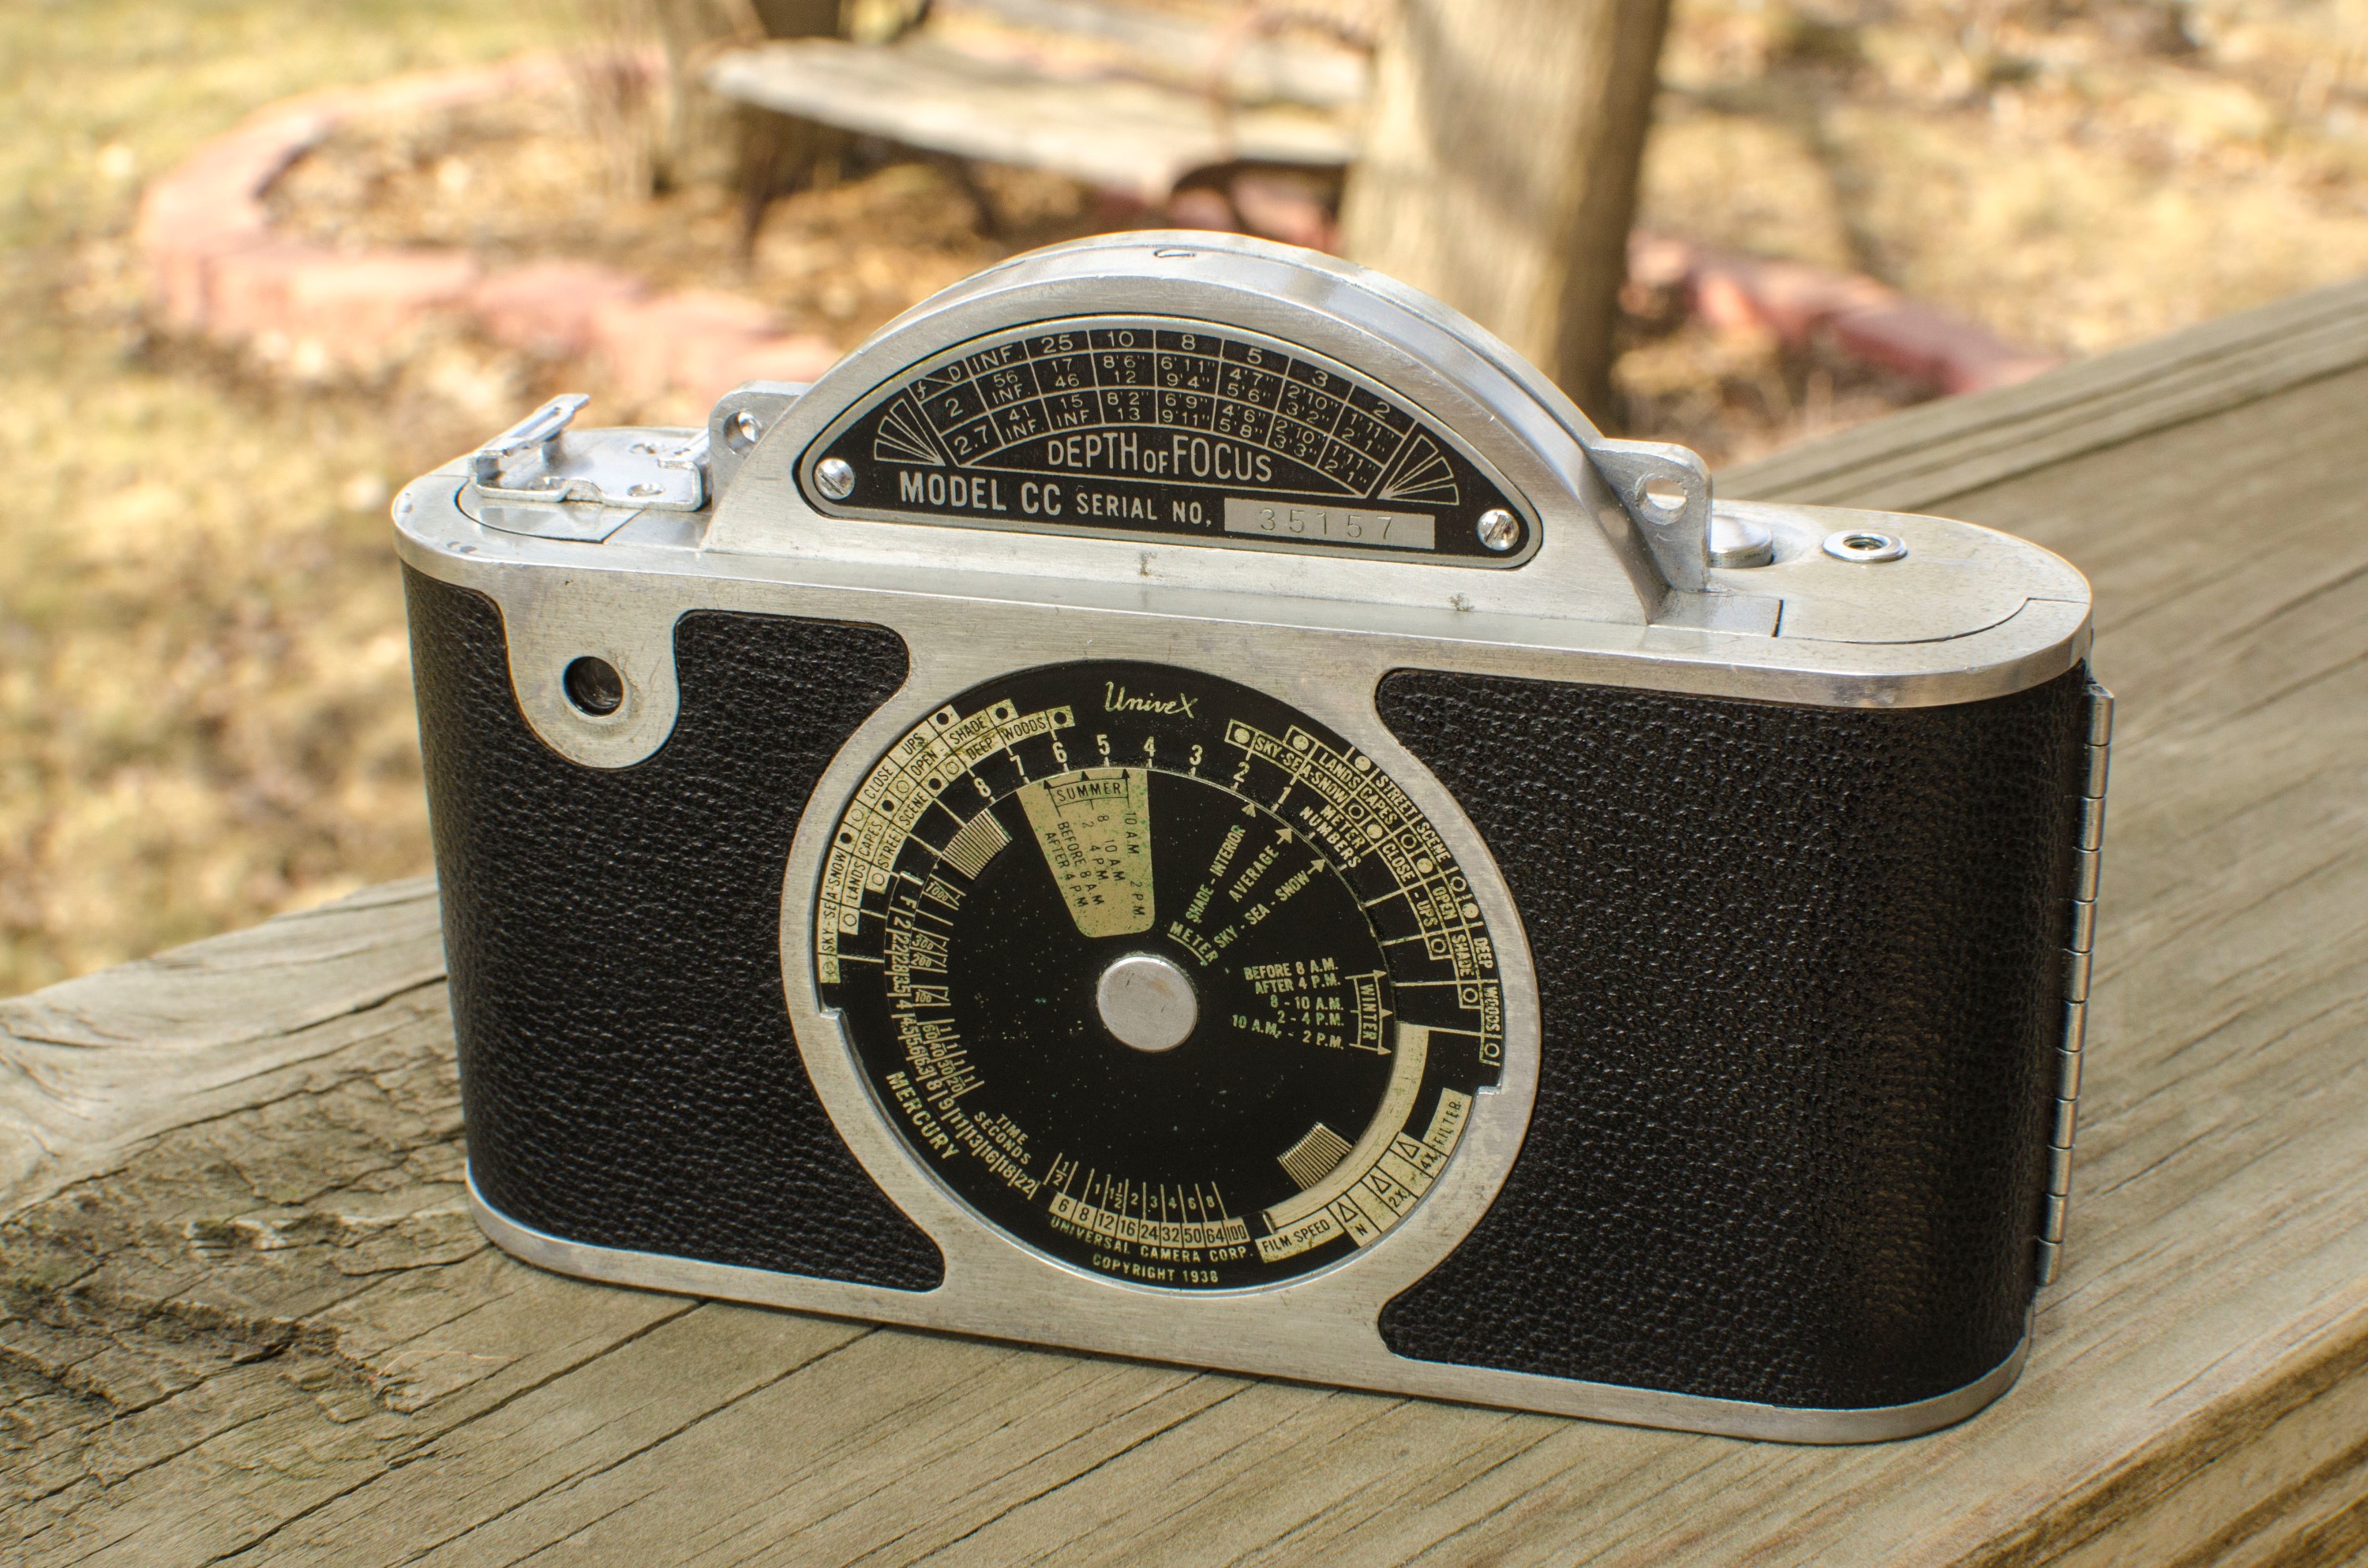
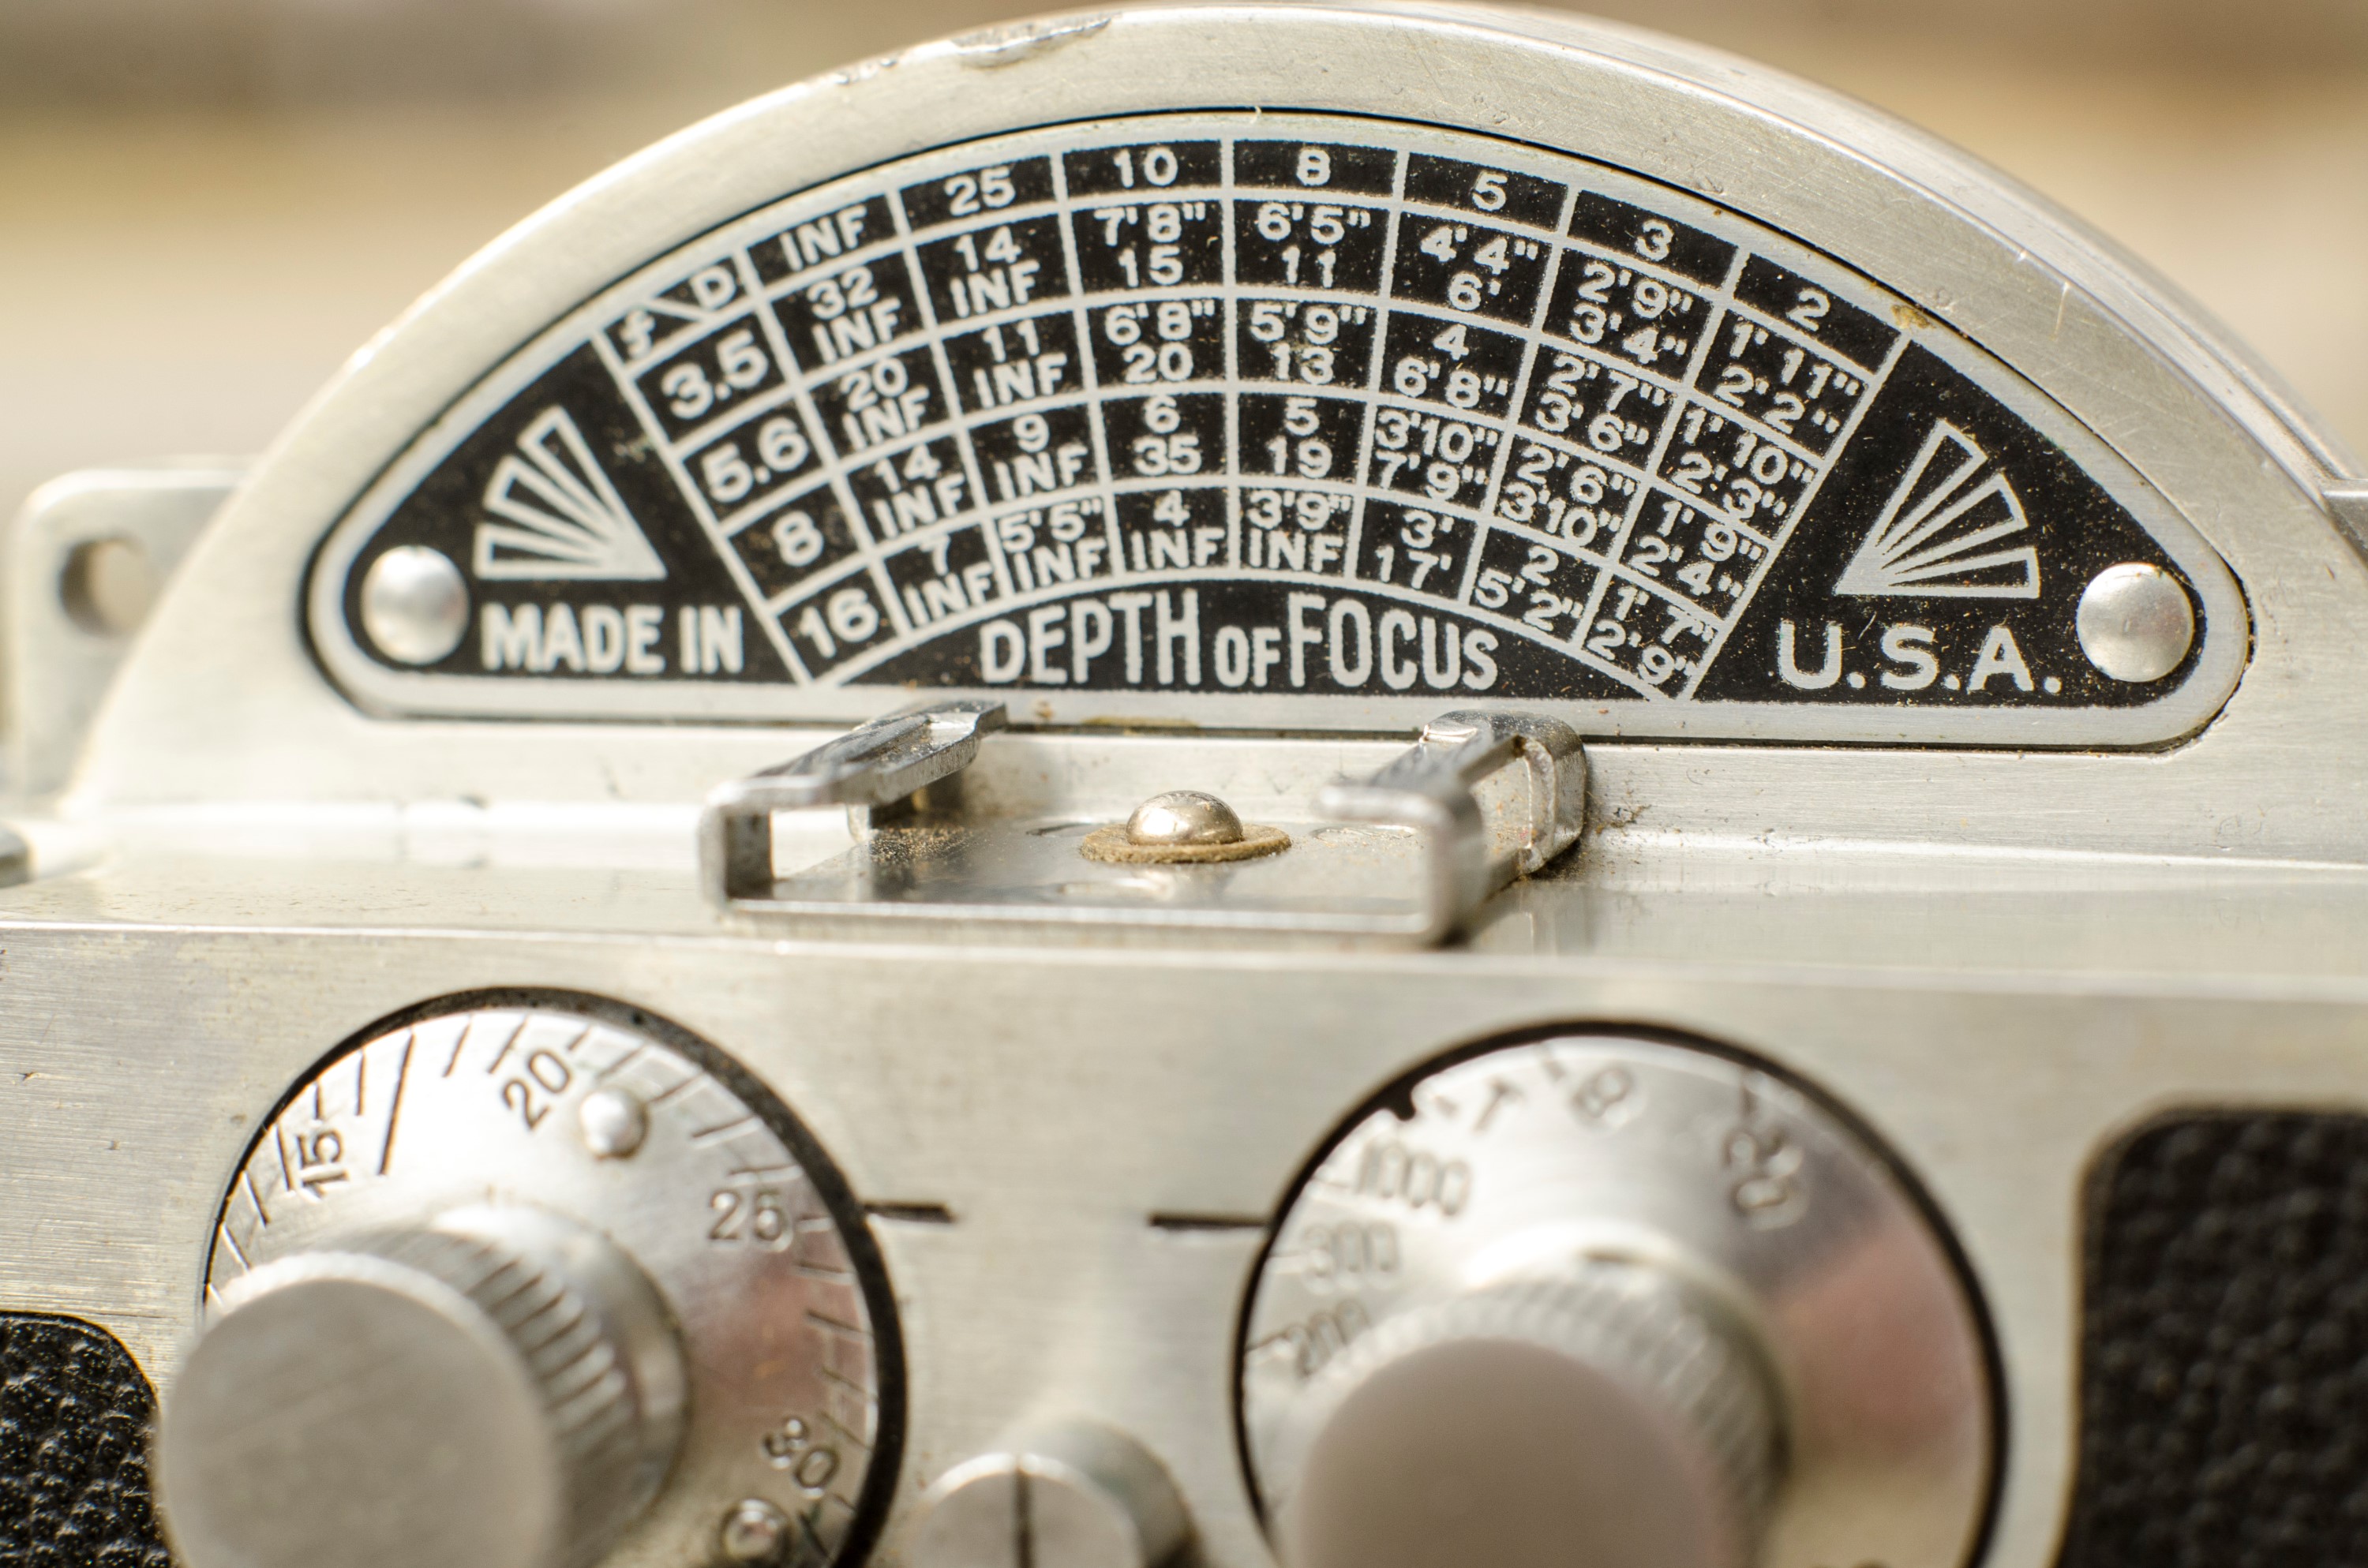
The body of this new camera, which was going to be called the Mercury CC (for Candid Camera), would continue the rotary theme on the back of the camera with a very unique looking exposure calculator. This calculator was really just a spinning disc that the photographer would move to align several points to coincide with the type of shot they were aiming for, time of day, and type of light. This exposure dial is so complex that it takes 5 full pages in the camera’s manual to explain.
Another design element that Kende wanted in the Mercury CC was in-body flash synchronization. At the time, the only type of flash sync was with external sync ports that required wires or cables to link the camera to an external flash. Kende’s design incorporated the very first use of a hot shoe on top of the camera that would directly connect the camera to the flash without any wires. The hot shoe on this camera was so well designed that Universal later added the feature to other cameras that they made. Hot shoes are still used to this very day as an attachment point between a camera and an external flash.
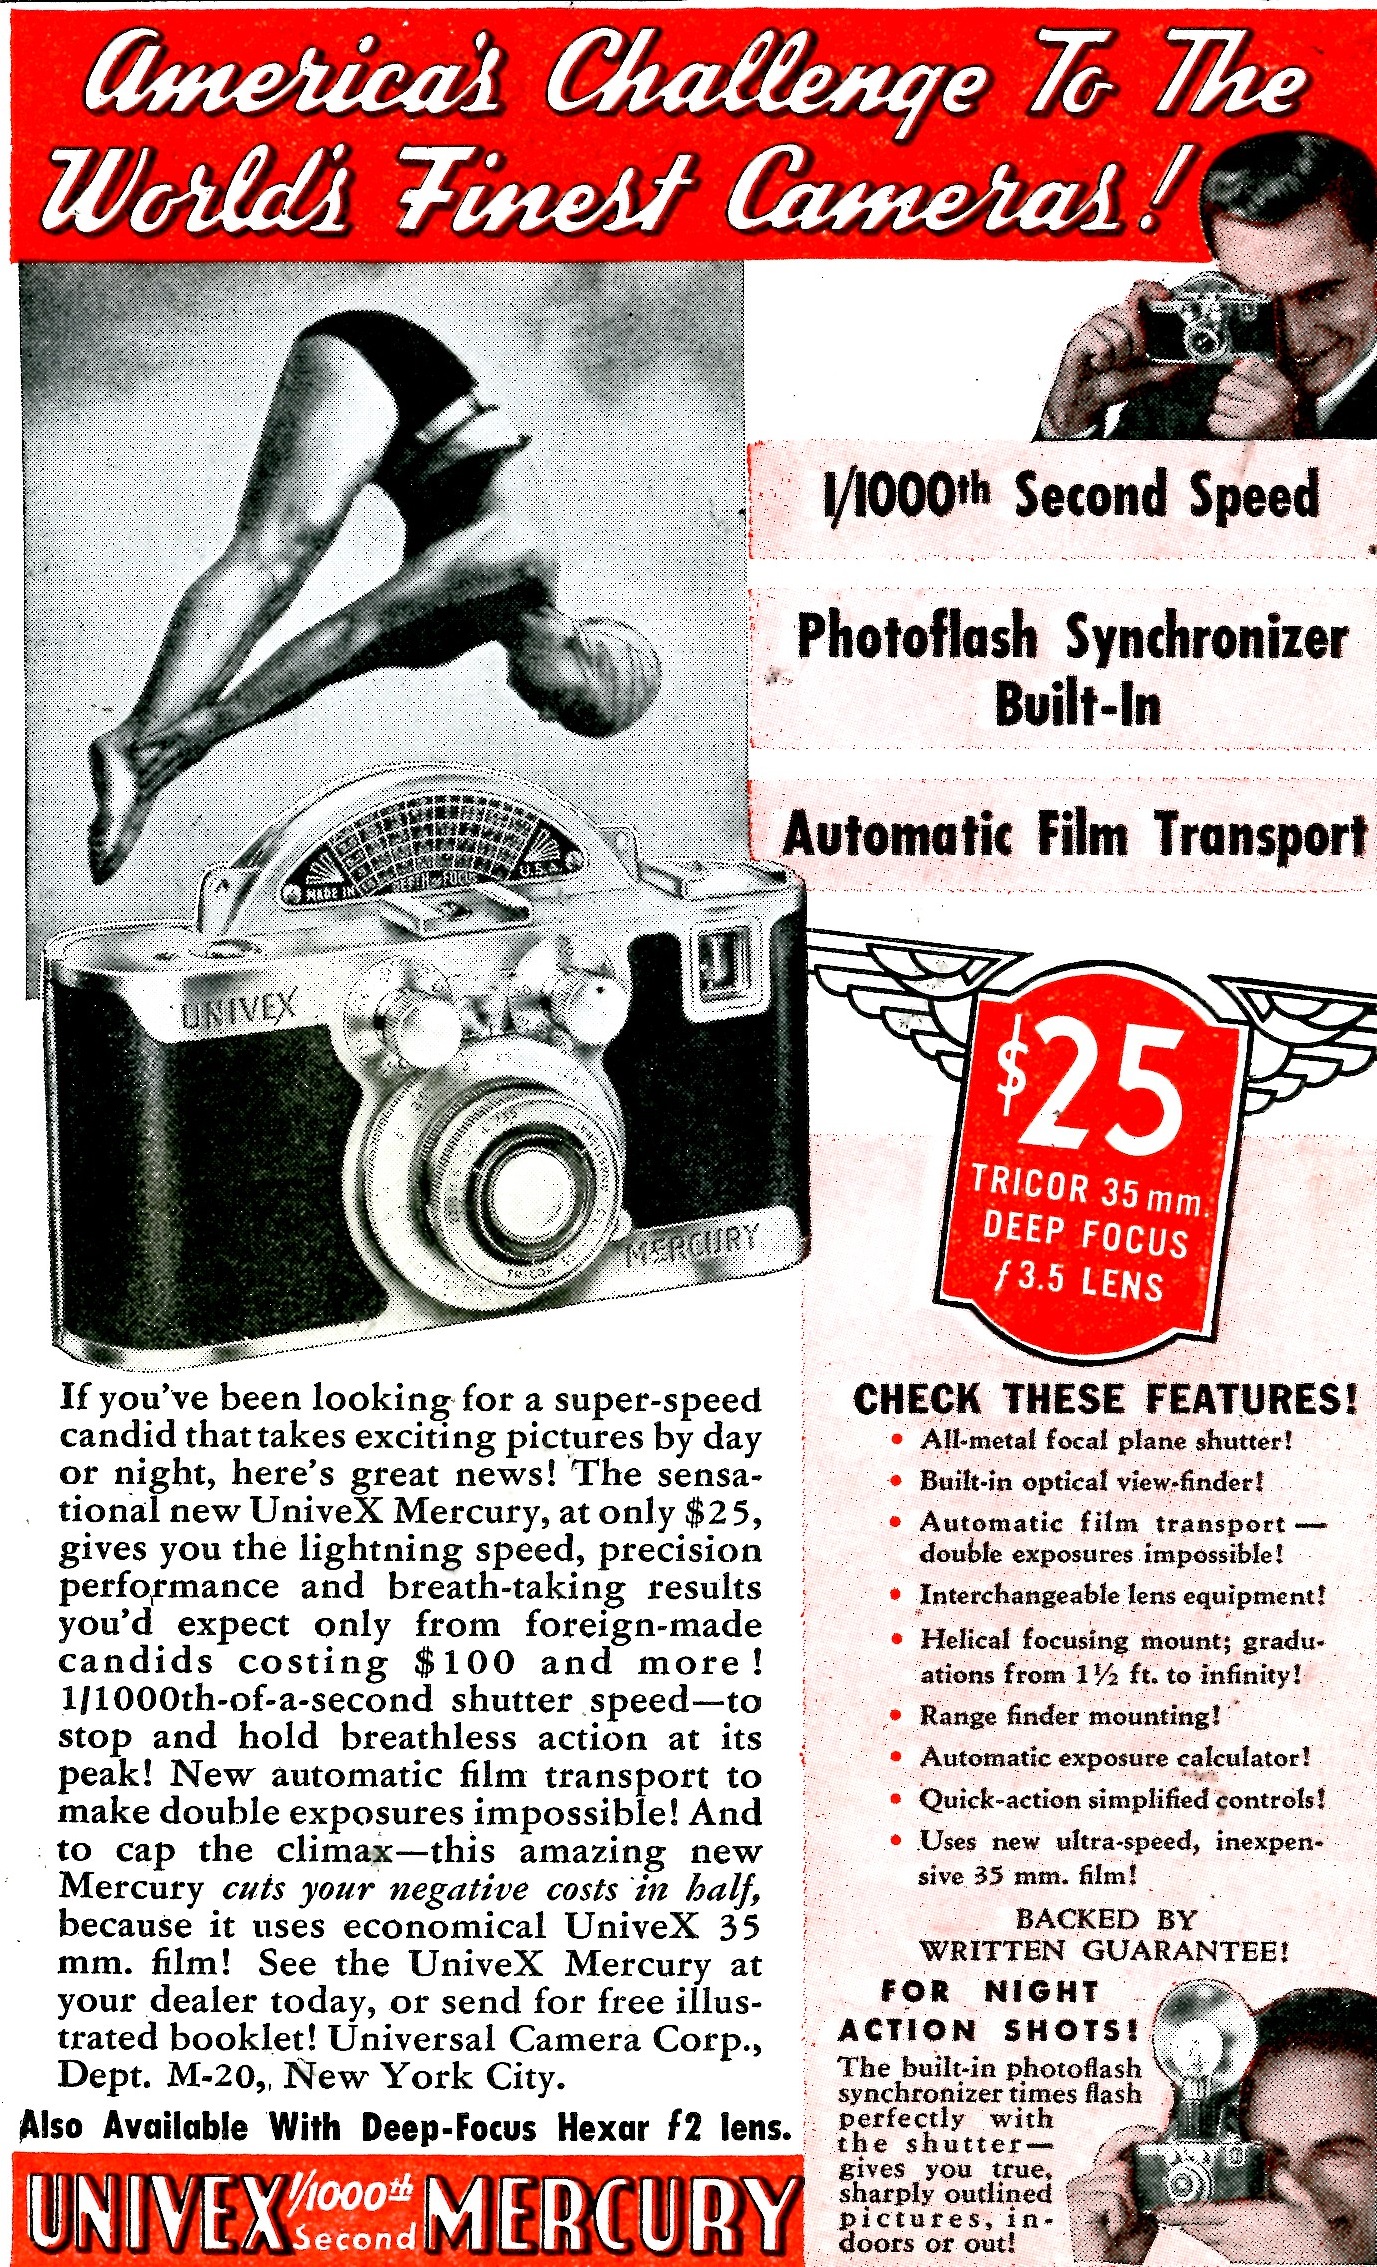
Finally, the last major obstacle to overcome in the design of this new camera was to build it cheaply so that Universal could hit its $25 goal. An added benefit to the design of Kende’s rotary shutter was that it had far fewer parts than the typical leaf or focal plane shutters used by other manufacturers. Aluminum and zinc die-cast parts were used to keep the number of precision parts to a minimum. This was done in an effort to employ unskilled laborers who would work for less. Universal outsourced the lens design and some of the accessories to other American companies to keep costs low. The lens was made by the American company Wollensak who already had knowledge of designing inexpensive interchangeable lenses.
In 1938, the Univex Mercury CC was released to an unsuspecting public who viewed Universal as a forgettable company that made cheap cameras. It boasted the worlds first rotary shutter in a still camera that could reliably hit speeds as fast as 1/1000th of a second. It was the only camera in the world with an on-body flash synchronized hot shoe, and it was built in an attractive lightweight aluminum alloy body. As for the price? Universal delivered on their promise that this camera would sell for $25, which was equal to one week’s pay of the average American worker in 1939.
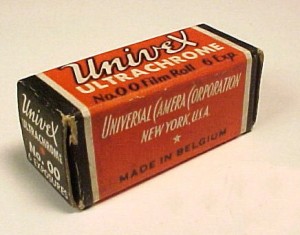
Universal had one more trick up their sleeve to guarantee profits. All Univex cameras used proprietary “00” films that they sold exclusively for their cameras. The idea is similar to how smartphones are sold today. The camera would be sold as a “loss leader” with the expectation that people would have to keep coming back to buy film, which was where the company could continue to receive profits from.
The camera was an immediate hit and sold well. Amateurs liked the camera because of its low price, and pro photographers liked it for its fast shutter speed and hotshoe flash synchronization. Universal’s profits soared 25% from 1938 to 1939, and the Mercury CC was mainly responsible for the entire Universal corporation’s profits.
Although the Mercury CC’s fastest shutter speed of 1/1000 tied it with the Leica III, the Contax III of the era boasted an even faster shutter speed of 1/1250. As a result, a higher end version of the CC, called the CC-1500 came out in 1939 with a revised spring in the shutter that maxed the top speed at 1/1500 seconds to beat the Contax. An estimated 3000 CC-1500s were made, and they were only available for one year so they are very hard to find today. Sadly, when these do show up for sale, many of them are no longer capable of the top 1/1500 speed because the more tightly wound spring is much more likely to fatigue or fail over time. While regular Mercury cameras with the 1/1000 top shutter speed almost always work, the same is not true for the CC-1500 model.
The Univex Mercury was designed to be a “system” camera with a variety of accessories. There was of course the dedicated flash for the hot shoe which supported flash sync at all speeds. There were auxiliary viewfinders and a rangefinder that would mount to the accessory shoe on the side of the top plate, but in my opinion the most interesting feature was a rapid winder. The rapid winder would mount to the cable release socket and was connected to the shutter cocking knob/frame counter and would allow the photographer to quickly advance the camera to the next frame with a press of a finger. The image to the left shows a Univex Mercury with the rapid winder, auxiliary viewfinder, and rangefinder all mounted at the same time.
Finally, since the Mercury had an interchangeable lens mount, there were a couple of different lenses available. The two most common were Wollensak designed 35mm f/3.5 and f/2.7 triplets, but there was also a 35mm f/2 Hexar lens. Despite the name, this Hexar was not made by Konica, but rather was another Wollensak design. The f/2 lens was most commonly available with the CC-1500 model from 1939 and is very rare today. There were also 75mm and 125mm telephoto lenses available, but these are also very rare. The vast majority of surviving Mercury cameras are equipped with either the f/2.7 or f/3.5 lenses. Pre-war Mercury lenses did not have any color-coating on them, but most post-war ones did.
From 1939 – 1941, the Mercury CC continued to sell well and became one of the most popular American cameras of the day. But starting in 1941, the Universal corporation became involved in World War II and transitioned its manufacturing to making binoculars and other optics for the war effort.
Once the war was over, Universal decided to get back to making cameras, but they had a problem. Until this time, all of Universal’s cameras used a proprietary film that was unique to their cameras. This film wasn’t actually made by Universal, but instead by a company in Belgium who had the expertise of making film cheaply. After the war, getting anything made cheaply from a company in war-ravaged Europe would have been impossible, so Universal knew they had to redesign the Mercury CC to accept a different kind of film. This new camera would be called the Mercury II (the name ‘Univex’ was dropped from the name of the new model).
In the late 1930s and early 40s, 35mm 135 film was gaining popularity with still camera manufacturers. It was cheap, readily available, and well liked by the public. Universal knew that if they were to regain their status as a premiere camera maker, the newly redesigned Mercury II needed to use 35mm film.
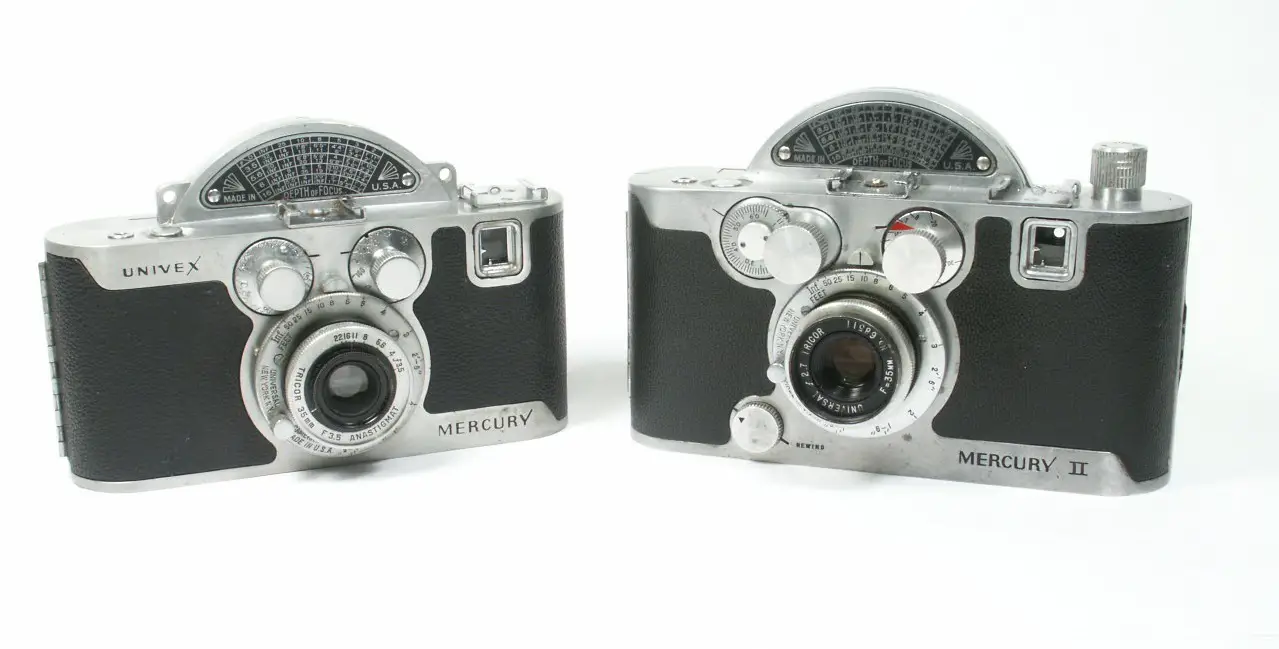
Universal’s proprietary film had different sprocket holes and was about 1mm narrower than 35mm film, so in order to incorporate the hardware to accept 35mm film, the entire body of the Mercury had to be redesigned. If you compare a Mercury CC with a Mercury II side by side, the Mercury II is both slightly taller and wider.
In order to stay in line with other 35mm cameras, the new Mercury II needed to have an easy way to rewind the film, so a rewind knob was added to the top, and a film advance knob was added to the lower front of the camera. The larger body also allowed for a film reminder dial on the back of the camera, and a new frame counter which was separate from the shutter winding knob. To keep costs low, the new body was made from an aluminum-magnesium alloy as opposed to the all aluminum design of the Mercury CC.
The Mercury II would remain a popular American made option for photographers looking for a high spec camera for less than what could be imported from Europe. Although the prices rose dramatically from the original $25 price tag for the Univex Mercury, the Mercury II was still a relative bargain considering it’s solidly built body and accurate shutter with a top speed of 1/1000th of a second.
Sadly, Universal was never able to build off the success of both Mercury models. Later models were poorly designed and sold even worse. The company would scale back production of cameras starting in 1948 and would struggle financially until going bankrupt in 1952 at which time camera production completely stopped. The Universal company name would linger around until the early 60s, before being completely dissolved.
Today, both Mercury models are sought after by collectors due to their unique looks, history, and ease of use. While the first model is more compact and is less likely to exhibit tarnish on the body, you cannot get film for them anymore, so the Mercury II is generally preferred by people wishing to shoot with one. If you want to try your hand at shooting with a Univex Mercury, you have to be a little creative.
Repairs
The Mercury CC had a very sluggish shutter, even worse than the one in my Mercury II. Unlike the Mercury II where I tore it down following PF McFarland’s instructions on Flickr to completely CLA the camera, I decided to take a simpler (and lazier) approach and just douse the entire shutter in Ronsonol.
Literally, douse.
I removed the lens from the camera, and removed the plate on the back of the hump and then just poured Ronsonol all over the shutter. The entire thing is 100% metal and there is nothing in there that could be damaged by the lighter fluid, so I figured it was worth a shot. The worst case scenario would be that the Ronsonol wouldn’t free up the shutter and in that case, I already knew how to tear down the camera to fix it the right way, so what could possibly go wrong?
Well, to my delight, it worked! After several liberal dousings of Ronsonol, the shutter returned to normal operation. All speeds seemed to be accurate, so I made sure everything was dry and I wiped down the lens and the rest of the camera and put it back together!
After cleaning the shutter, I made a short video showing normal operation of the Mercury. The following video is me going through the motions of cocking the shutter and firing it at a couple of different speeds. I do not speak during the video, but I typed some captions that explain is happening throughout the video, but due to some strange flaw with YouTube, the captions only show if you watch the video on a computer. They won’t show on a smartphone.
Edit (2/18/2019): When I first created this video in early 2016, I added text annotations explaining what I was doing, but YouTube has since removed this feature, so the text is lost. I’ll leave this video here as it’s still pretty obvious what I’m doing, but one of these days I’ll have to create a new one.
Loading 35mm Film
The Mercury CC was designed for Universal # 200 film which hasn’t been made since before World War II. Finding unused film like this is not only very hard, but the likelihood that it would even be usable is extremely small. Your only option to use the Mercury CC is to find a way to retro-fit modern film into the camera. The good news is that the film stock used by Universal is very similar to 135 format 35mm film. The film had the nearly the same width and the sprocket holes were also very similar. The biggest difference is in the cassette itself as Universal’s system was a cassette to cassette system similar to what AGFA did with their 35mm film used in the Karat.
Universal actually made reloadable cartridges for the Mercury which allowed the owner to roll bulk motion picture film into the camera, however these spools are very rare, and I did not have access to one.
As long as you have at least one Mercury CC spool, you can use regular 35mm film but you’ll need to cut the film leader and load it in a dark room. The following steps are what I did to load my first roll of film into my Mercury CC.
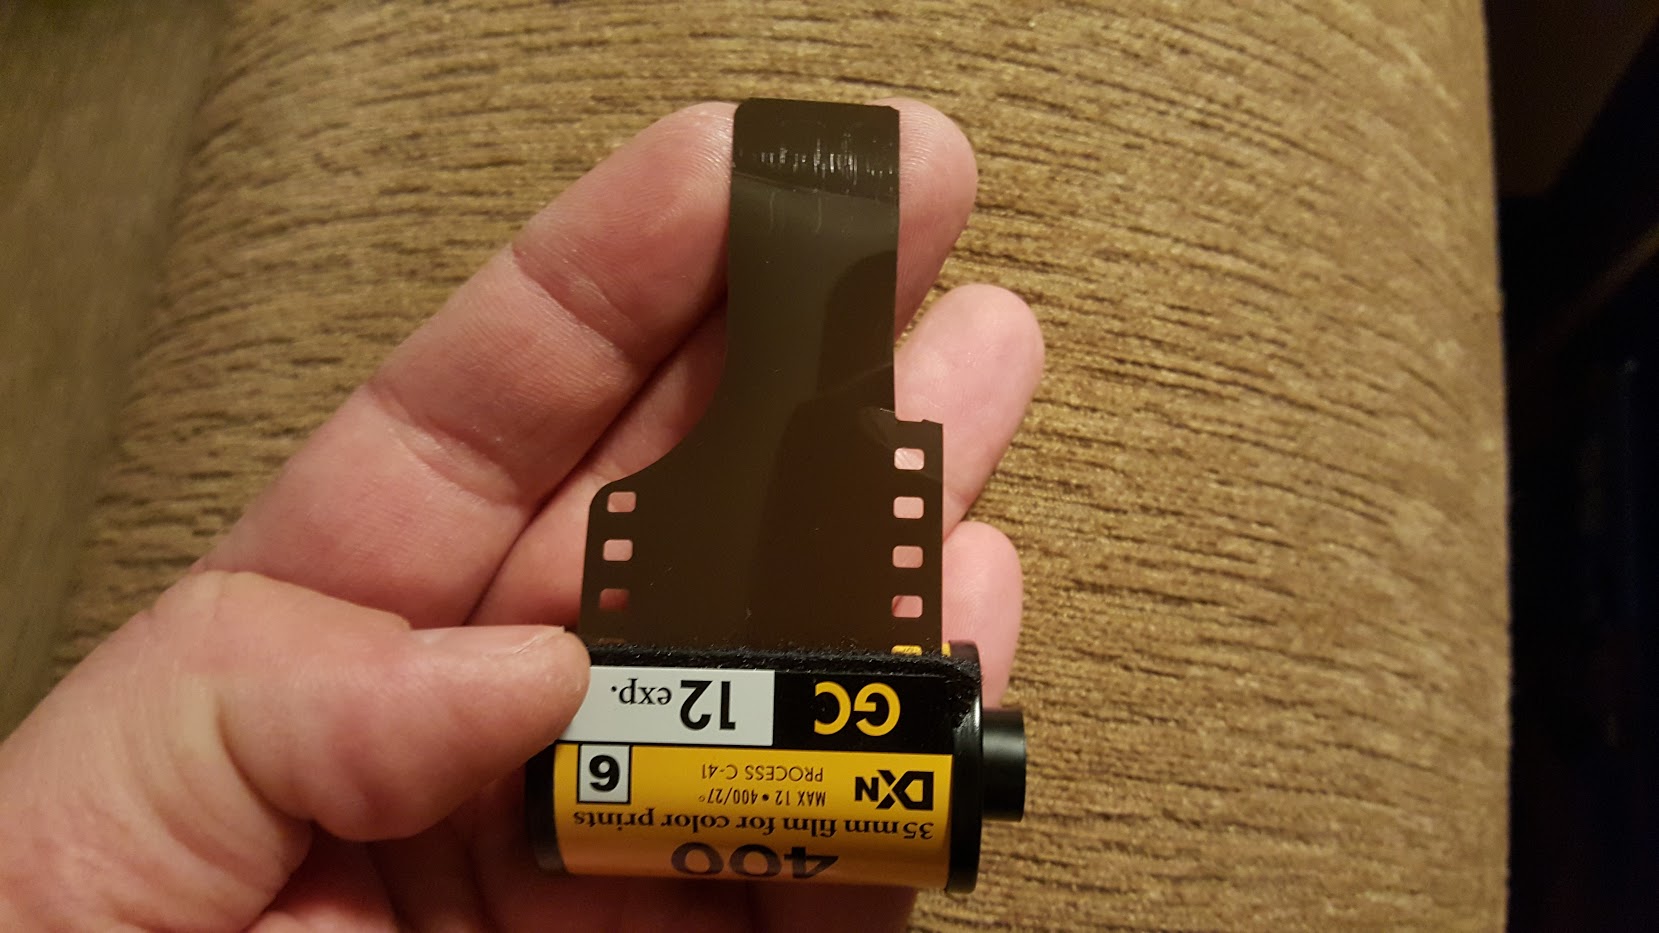 Step 1: Cut the film leader so that it looks something like the image to the left. The notch in the take up spool is in the middle of the spool, so you wont be able to thread an unmodified film leader into it without cutting it. You can do this part in daylight as it only requires you to see the leader which is normally exposed anyway.
 Step 2: Thread the film leader into the take up spool and make sure it is tight. You may need to pull extra film out of the cassette to make sure it is tight. Since you have to do the rest of the process in complete darkness, you don’t want to risk the leader becoming loose while loading the camera.
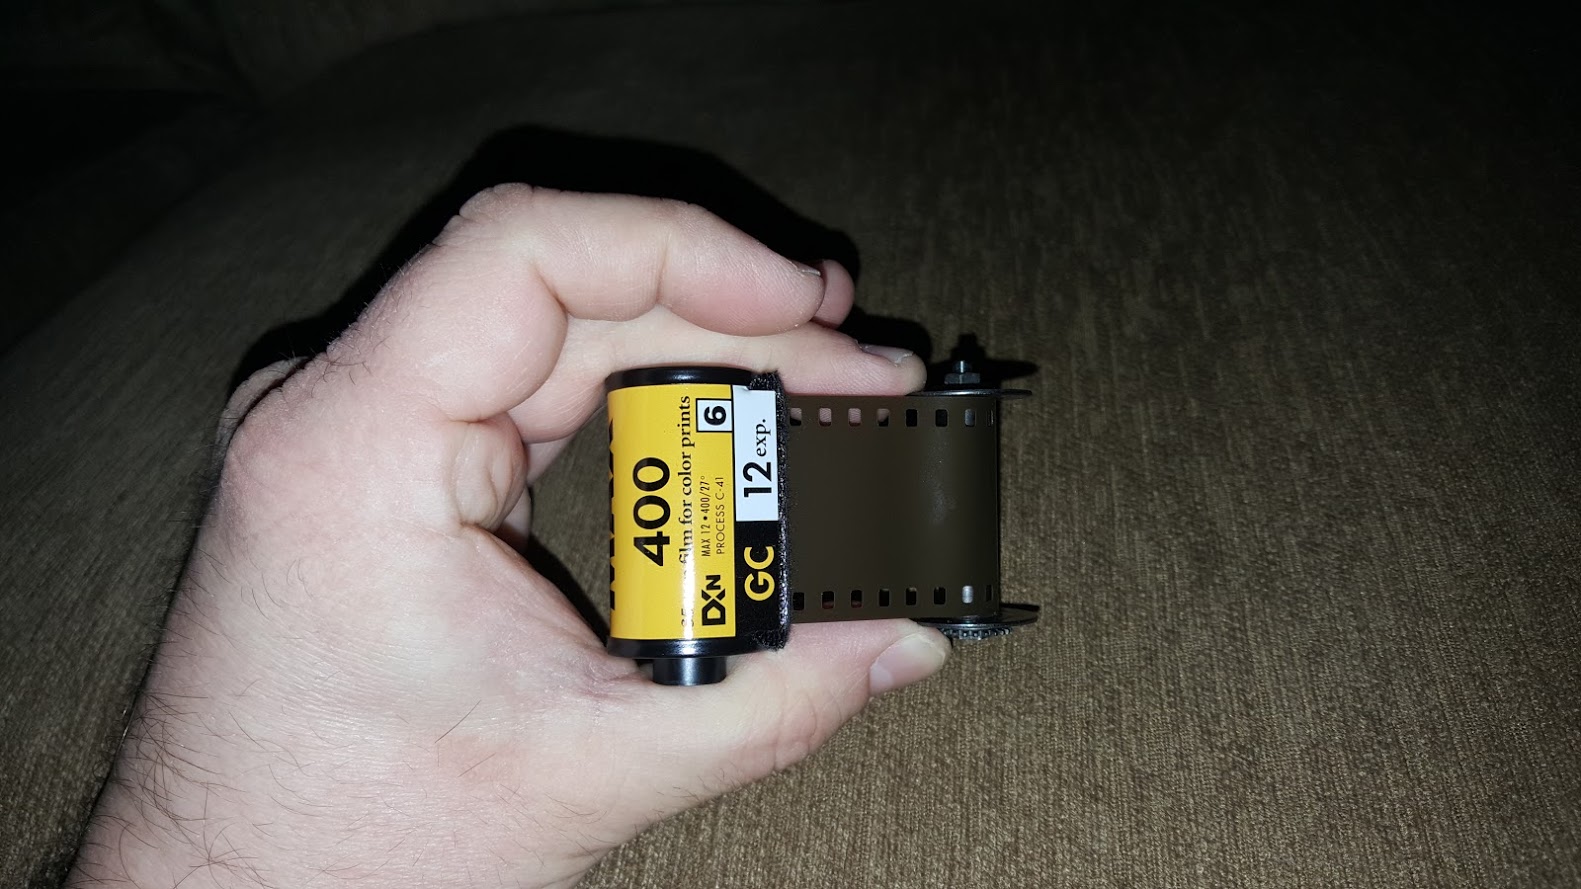
Step 3: This next step is optional, but something I recommend the first time is to load the take up spool into the camera first, with the rest of the film still in it’s original cassette. The Mercury CC take up spool has a toothed gear on the bottom that must be engaged, or the film advance wont work correctly. Look at the next picture to see what this looks like with the lights on.
 Step 4: The rest of the process needs to be done in complete darkness or in a dark room because you are going to pull the entire length of the film out of the cassette. Since the Mercury CC is a half-frame camera, I used a roll of 12 exposure 35mm to keep it short. You could use a 24 exposure roll as well, but there will be more to pull out. I would avoid a 36 exposure roll as it’s not only very long, but it would take you forever to shoot the entire roll of half frame pictures.
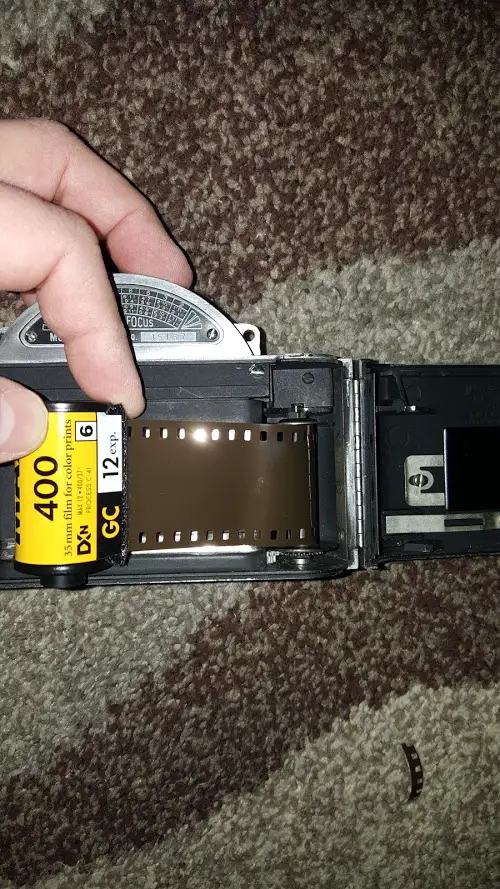
The image to the left shows the take up spool mounted inside of the camera before I pull it out of the cassette. At this point, you are in total darkness, so with one hand, make sure you prevent the take up spool from popping out of position, and also make sure your film stays tightly wound on the spool.
With the other hand, pull the film completely out of the cassette. Most likely, the film will be securely taped inside of the cassette, so pulling it completely out will be difficult, so for this I recommend a pair of scissors to just cut it at the end.
It’s also worth noting that you should try to avoid touching the emulsion side of the film as much as possible as oil from your skin can damage it. It’s ok to touch the back (shiny) part of the film, just don’t touch the non-shiny side. If you are worried, you can use film changing gloves while doing this. Since the film tends to curl inward, you really shouldn’t need to touch it at all, but its better to be careful.
Now that the entire roll of film is loose, roll it up into a shape roughly as tight as it was when it was in the cassette and just push it into the supply side of the film compartment. Shut the film door while feeling to make sure the film hasn’t popped out of the camera. When shooting the camera like this, it is important to pay attention to the exposure counter as there won’t be any way to “feel” the end of the roll. Since the film is loose in the camera, it will just run out without any way of letting you know you’ve reached the end of the roll.
My original plan was to manually thread the exposed film back into the original cassette, but when I tried to do this, it wouldn’t go in. So instead of using the film cassette, I kept the black plastic container that the film originally came in and used that. In either case, make sure you save either the empty film cassette or the black plastic container because you will need some way to transport the film back to the lab for processing. If you have someone else develop your film, I would write a note and attach it to the film to let them know that the film is cut.
While I feel pretty confident that this method should work fine, there’s always the chance that the film could get damaged inside of the camera since it won’t be protected, but it’s unlikely anything bad would happen to it. Maybe some extra dust, but that’s a small price to pay to use a 75+ year old camera that hasn’t had film made for it in 70+ years. There is also a chance of light leaks from the door on the supply side of the camera, but from what I’ve seen with both of my Mercury cameras, the door seems to be pretty light tight. If you are really worried about it, a piece of black electrical tape along the seam of the door should guarantee no light gets in.
My Thoughts
The Mercury II was one of my earlier acquisitions in late 2014 and I really liked it. The unique feel and sound of the shutter, plus the beautiful all metal body really appealed to me. I even tore mine down to do a complete CLA, including sanding the body to remove the oxidation and recovering it in saddle tan leather. My Mercury II is a very unique camera and something I doubt I’ll ever sell.
At the time, I never considered the original model because I figured I had the best of both worlds, a Mercury that accepts regular 35mm film. It wasn’t until I saw one in person that I realized how much smaller the original model is compared to the Mercury II. While I’d never say the Mercury II is a large camera, you really can see where they had to stretch the length and height of the camera to accommodate the larger film. The original Univex Mercury has a symmetrical and svelte design that is beautiful. I thought the Mercury II was a good looking camera, and it is, but the Univex Mercury is absolutely gorgeous. The smaller size really fits well in your hands. Its neither too small, nor too big to hold in your hand and stick in a pocket.
After having one of each model, I can say that the Univex Mercury is without a doubt my favorite of the two. Sure, its a bit of a pain to load film into, but the fact that regular 35mm is so close in size to the original Univex film, its definitely not a deal breaker. You just have to be willing to cut open a 35mm cassette, load it in the dark, and then have a lab that accommodates loose film.
Using either Mercury camera is pretty similar to any scale focus camera. You adjust the focus by rotating a large knob around the lens. The aperture is changed by a ring around the lens element, and the shutter speed is changed by the knob on photographer’s left side of the camera. You must press “in” on the knob to change it. The amount of force to change the shutter speed on the Univex Mercury is much greater than that of my Mercury II. I do not know if this is due to some design change, or if that’s just a difference between my two particular models, but its worth mentioning.
The film advance and cocking of the shutter is done simultaneously by rotating the knob on the photographer’s right side of the camera. Unlike the film speed knob, you do not need to push in on this knob, just turn it until it doesn’t turn any more. The shutter release is in a predictable and comfortable position on the right side of the top plate. The viewfinder is on the photographer’s left side of the camera, and although small, is usable with prescription glasses. Within the viewfinder are two parallax correction marks that indicate what will be in frame at close focus.
Despite it’s unique experience, shooting with the Univex Mercury is not unlike any other scale focus camera of the era. The rotary nature of the shutter makes for a unique sound while firing the shutter, but otherwise there are no surprises while using this camera.
Once I was happy that the camera was in working condition and my Ronsonol bath had done the trick, I loaded a 12 exposure roll of Kodak 400 into the camera using my instructions above. After completing the roll I carefully removed the film from the camera in a film changing bag in a dark bedroom. I rolled the loose film into an empty black film container and then wrapped the whole container in a large piece of aluminum foil. I sent my film to Dwayne’s Photo in Parsons, KS like this with a note on it explaining what it was. They had no issue developing the roll, but did charge me $5 extra to scan the half frame sizes.
My Results
Knowing what to expect from the Mercury II, I had high hopes for the images from this camera. After all, the lenses should be identical in terms of sharpness and coverage. I felt pretty optimistic that my method for loading the loose film would work, but was the body light tight enough to keep light leaks off the film? After all, the Mercury has no type of foam, yarn, or cloth light seal. Its just a black painted metal chamber.


If I were to just show you these images without telling you what camera they came from, you might just think that they’re pretty ho-hum. Considering these are all half frame ~18mm x 24mm images with half the detail of a regular 24mm x 36mm negative, and the hoops I had to jump through to roll expired 35mm film into a camera that was designed for film that hasn’t been made in over 70 years, you’d probably be a lot more impressed. I know I am.
I truly expected to have major light leaks all over these prints and issues with film flatness. While shooting with the Univex, the film advance was not smooth. It felt like the film was binding at times, and I expected mangled negatives and scratched prints, none of which happened. Taking into account the expired 35mm film and the half size frames, I think these shots are pretty great. I managed to get 23 exposures from the roll of 12 (the very last shot was cut off by the end of the film) and of the 23, 10 were out of focus. While I am disappointed that more didn’t turn out sharp, I am still ecstatic that I got 13 good shots with this camera. I can’t prove it, but I would be willing to bet these are the first 13 good shots shot with a Univex Mercury in quite some time from anyone in the world.
I don’t know how often I’ll go through the effort to load film into this camera, but it really is a nice camera to hold. It feels so solid in your hands, and the compact size fits perfectly into my hands. While I had many good things to say about the Mercury II, the Univex Mercury is even better. I want to say that I wish Universal had designed the Mercury to shoot 35mm all along, but then it would have never been this small. Like Kodak’s doomed 828 format, the size of these wonderful cameras makes them very compact and portable. If you are willing to spend some extra time cutting and loading 35mm in a dark room, and are willing to go through the necessary steps to get the film safely developed, this camera is a joy to use and one I wholeheartedly recommend.
My Final WordHow these ratings work |
The Univex Mercury is one of the most unique looking and best looking American camera ever made. It has a very unique and historically significant shutter shared only by the Mercury II. It was an early attempt at American innovation to combine high spec features like a fast shutter, flash hot shoe, and interchangeable lenses at a fraction of the cost of European models. Although you can longer get film for this camera, you can very easily shoot regular 35mm in it with some extra effort. The camera is a beauty to hold and look at, its ergonomics are quite excellent, and the aluminum body makes it light weight. While its not a camera I would use every day, it is one I am pleased to have in my collection and one that I strongly recommend to anyone with an interest in old cameras, American cameras, or any kind of camera at all. | ||||||
| Images | Handling | Features | Viewfinder | Feel & Beauty | History | Age | |
| 0 | 1 | 0 | 0 | 2 | 2 | 40% | |
| Bonus | +1 for its unique and well designed shutter, solid aluminum body, and overall uniqueness | ||||||
| Final Score | 8.0 | ||||||
Additional Resources
http://camera-wiki.org/wiki/Mercury
https://oldcameras.wordpress.com/tag/univex-mercury/
http://www.collectorsweekly.com/articles/cool-cameras-the-univex-mercury/
http://www.cosmonet.org/camera/mercury_e.htm
http://www.jitterbuzz.com/indcam.html#univ
Thank you for an inspiring and detailed article. I just got a Mercury (older model) and its shutter did not work. So after reading your sentence: “I decided to take a simpler (and lazier) approach and just douse the entire shutter in Ronsonol,” I tried the lighter fluid. Nothing. Then I read your next sentence: “Literally, douse.” So I did exactly that (and again and again) and it worked. I feel like a genius. Love that camera and funny sound of its shutter. Unlike any other shutter I know of. What an amazing camera. Hard to believe that is almost 80 years old.
Mike, thank you for the kind words, and I have to say your reply made me smile. Its probably my favorite response to any article thus far on this site. I mainly write these reviews for myself, but theres a small part of me that hopes I help, or in some way inspire someone else to get these old cameras working. It defies common sense to pour lighter fluid all over an 80 year old camera to make it work, but it does. Both Mercury cameras are entirely made of metal, so theres nothing that can possibly be damaged by it.
If you end up doing this more than once, you’ll find that lighter fluid can get expensive. If you go to your hardware store, you should be able to buy a gallon can of “Naphtha Oil”. It will be in the same section where you’d buy paint thinner and Mineral Spirits. I actually refill my yellow Ronsonol bottle with the naphtha oil because it helps to have a squeeze bottle with the nozzle instead of pouring it out of a metal can.
The last tip I have for you is that while naphtha oil evaporates pretty quickly, you should let the camera completely dry in a well ventilated area before trying to stick film in it. My review also has instructions showing how to load regular 35mm film into the original Univex model. Its a great camera and like you said, that shutter sound is awesome! Good luck!
Hi, I’m Maurizio from milano, I’ ve just got one mercury first one week ago, very nice condition and still working, beautyfull camera well made, therthies taste, one more piece for my collection… thank you for your information and site.
Maurizio Bernardi
sorry for my english