

 What is it?
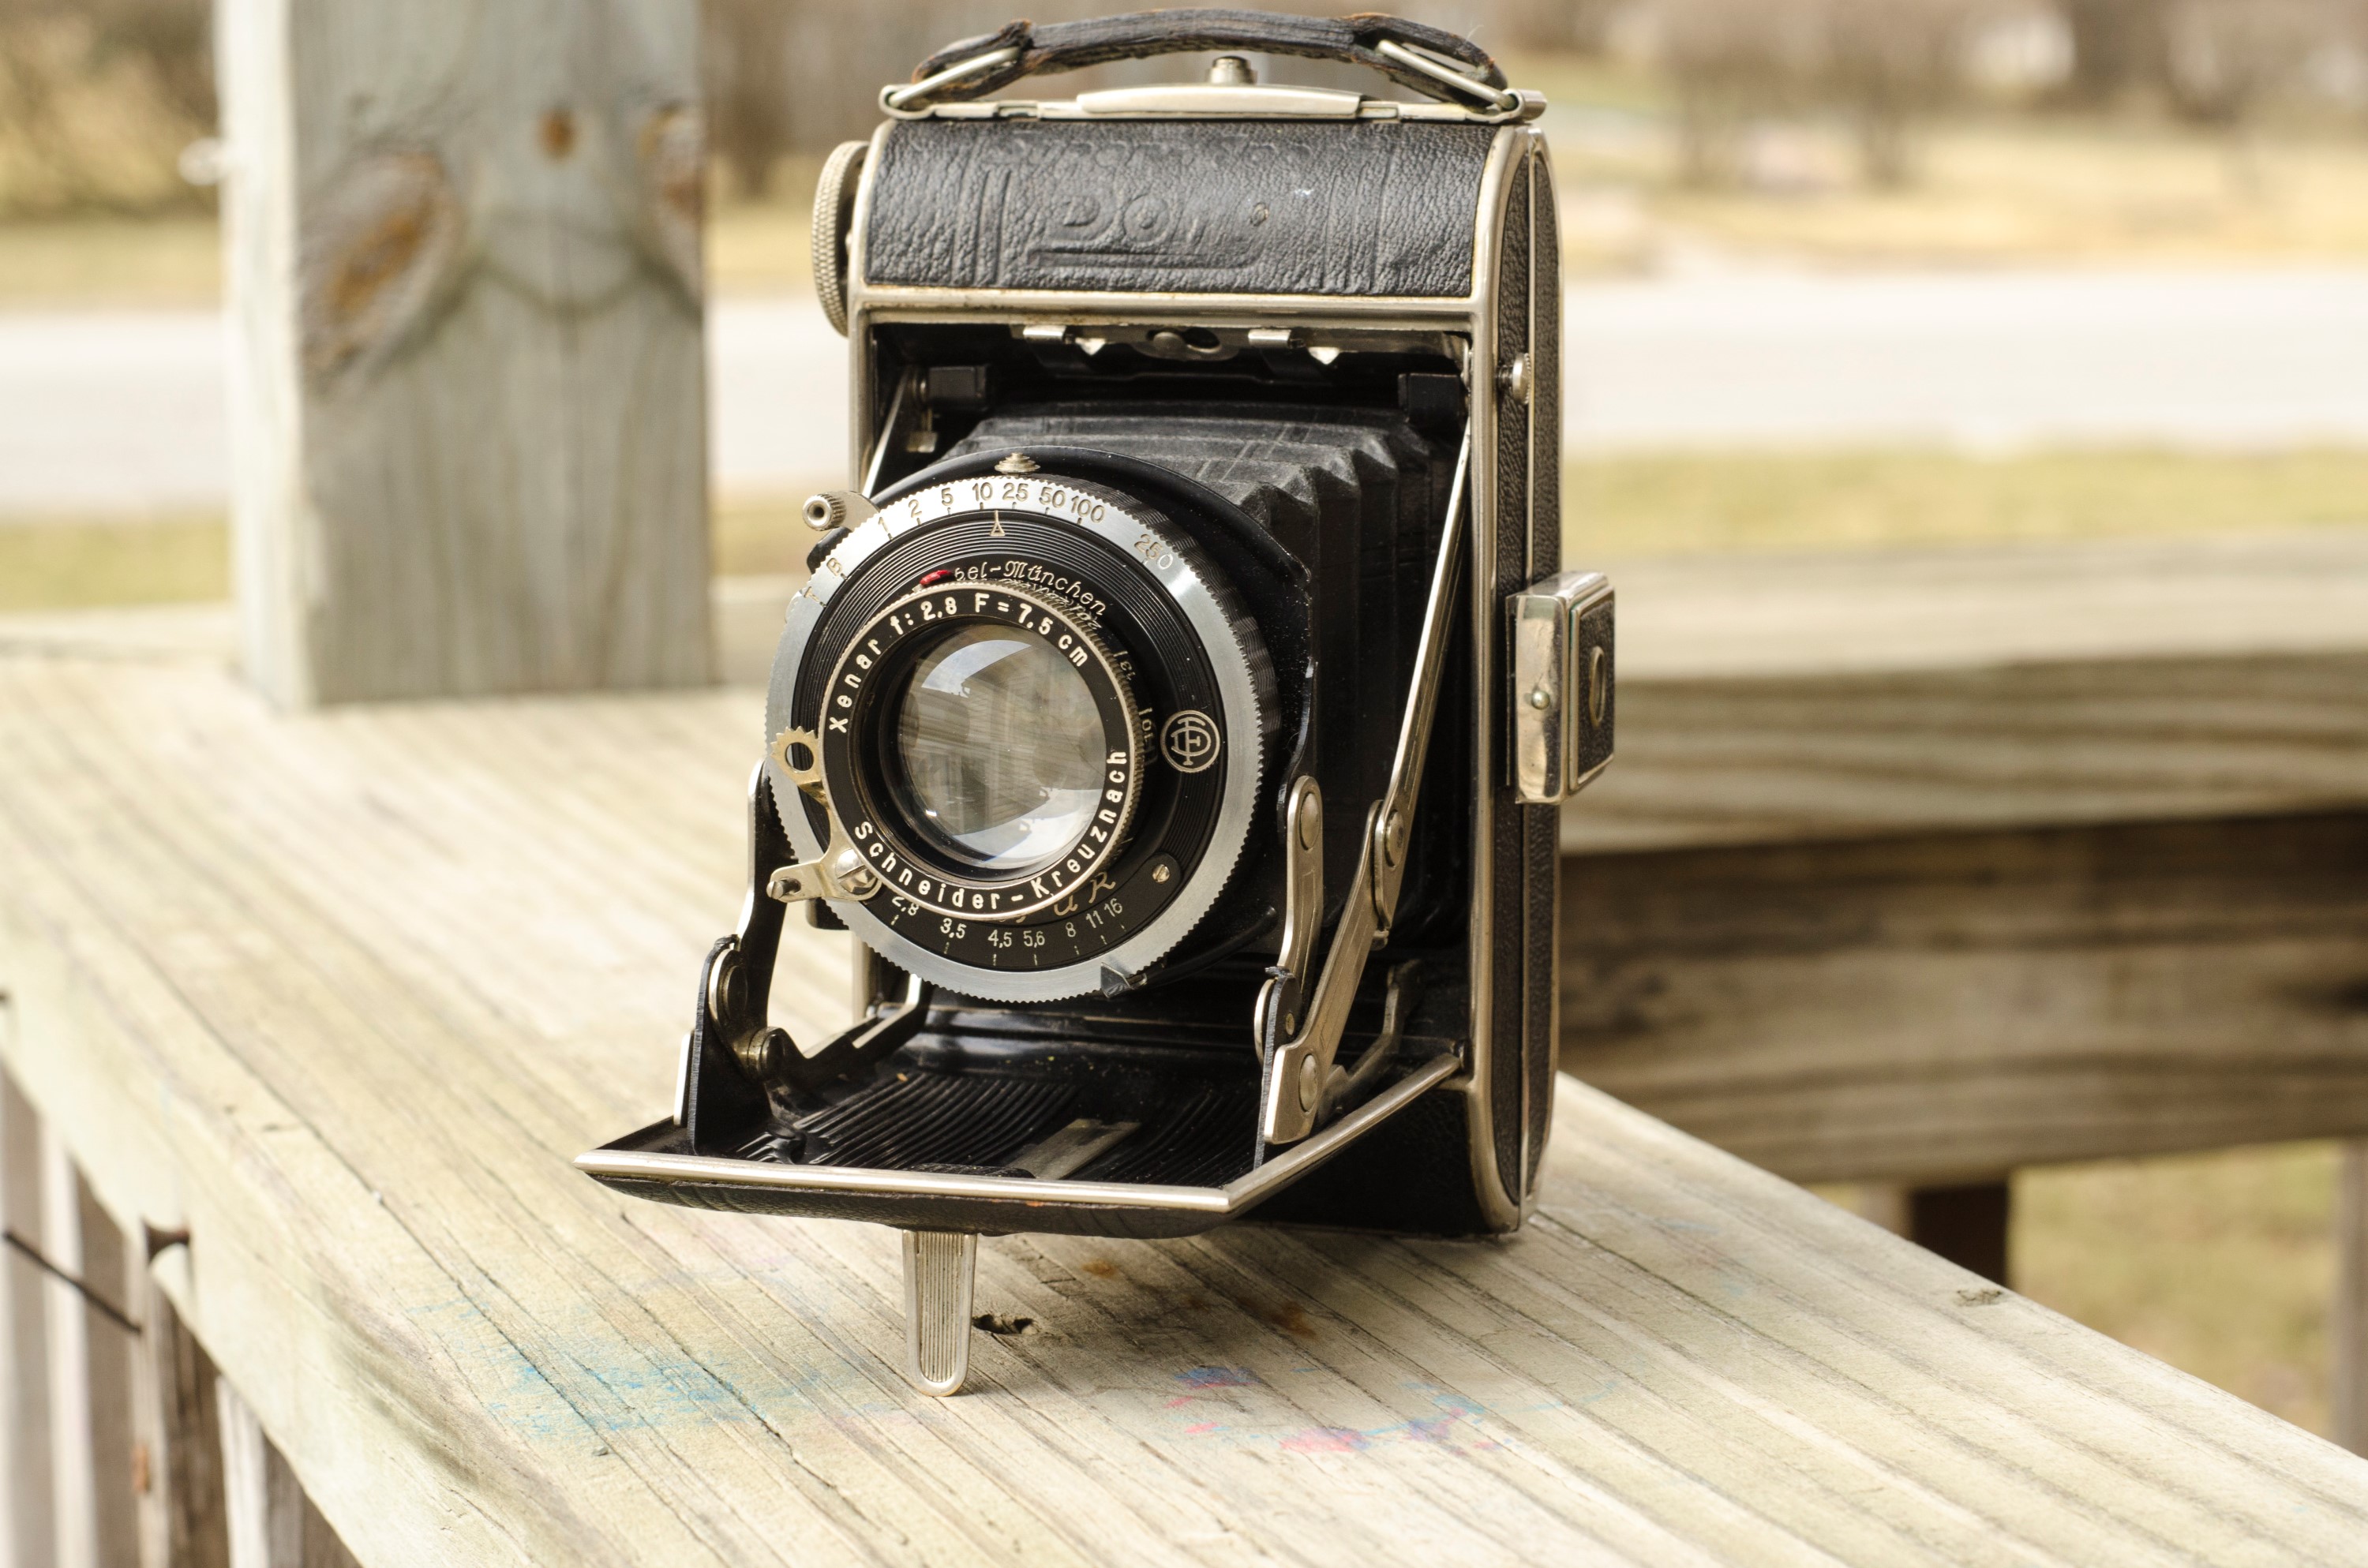
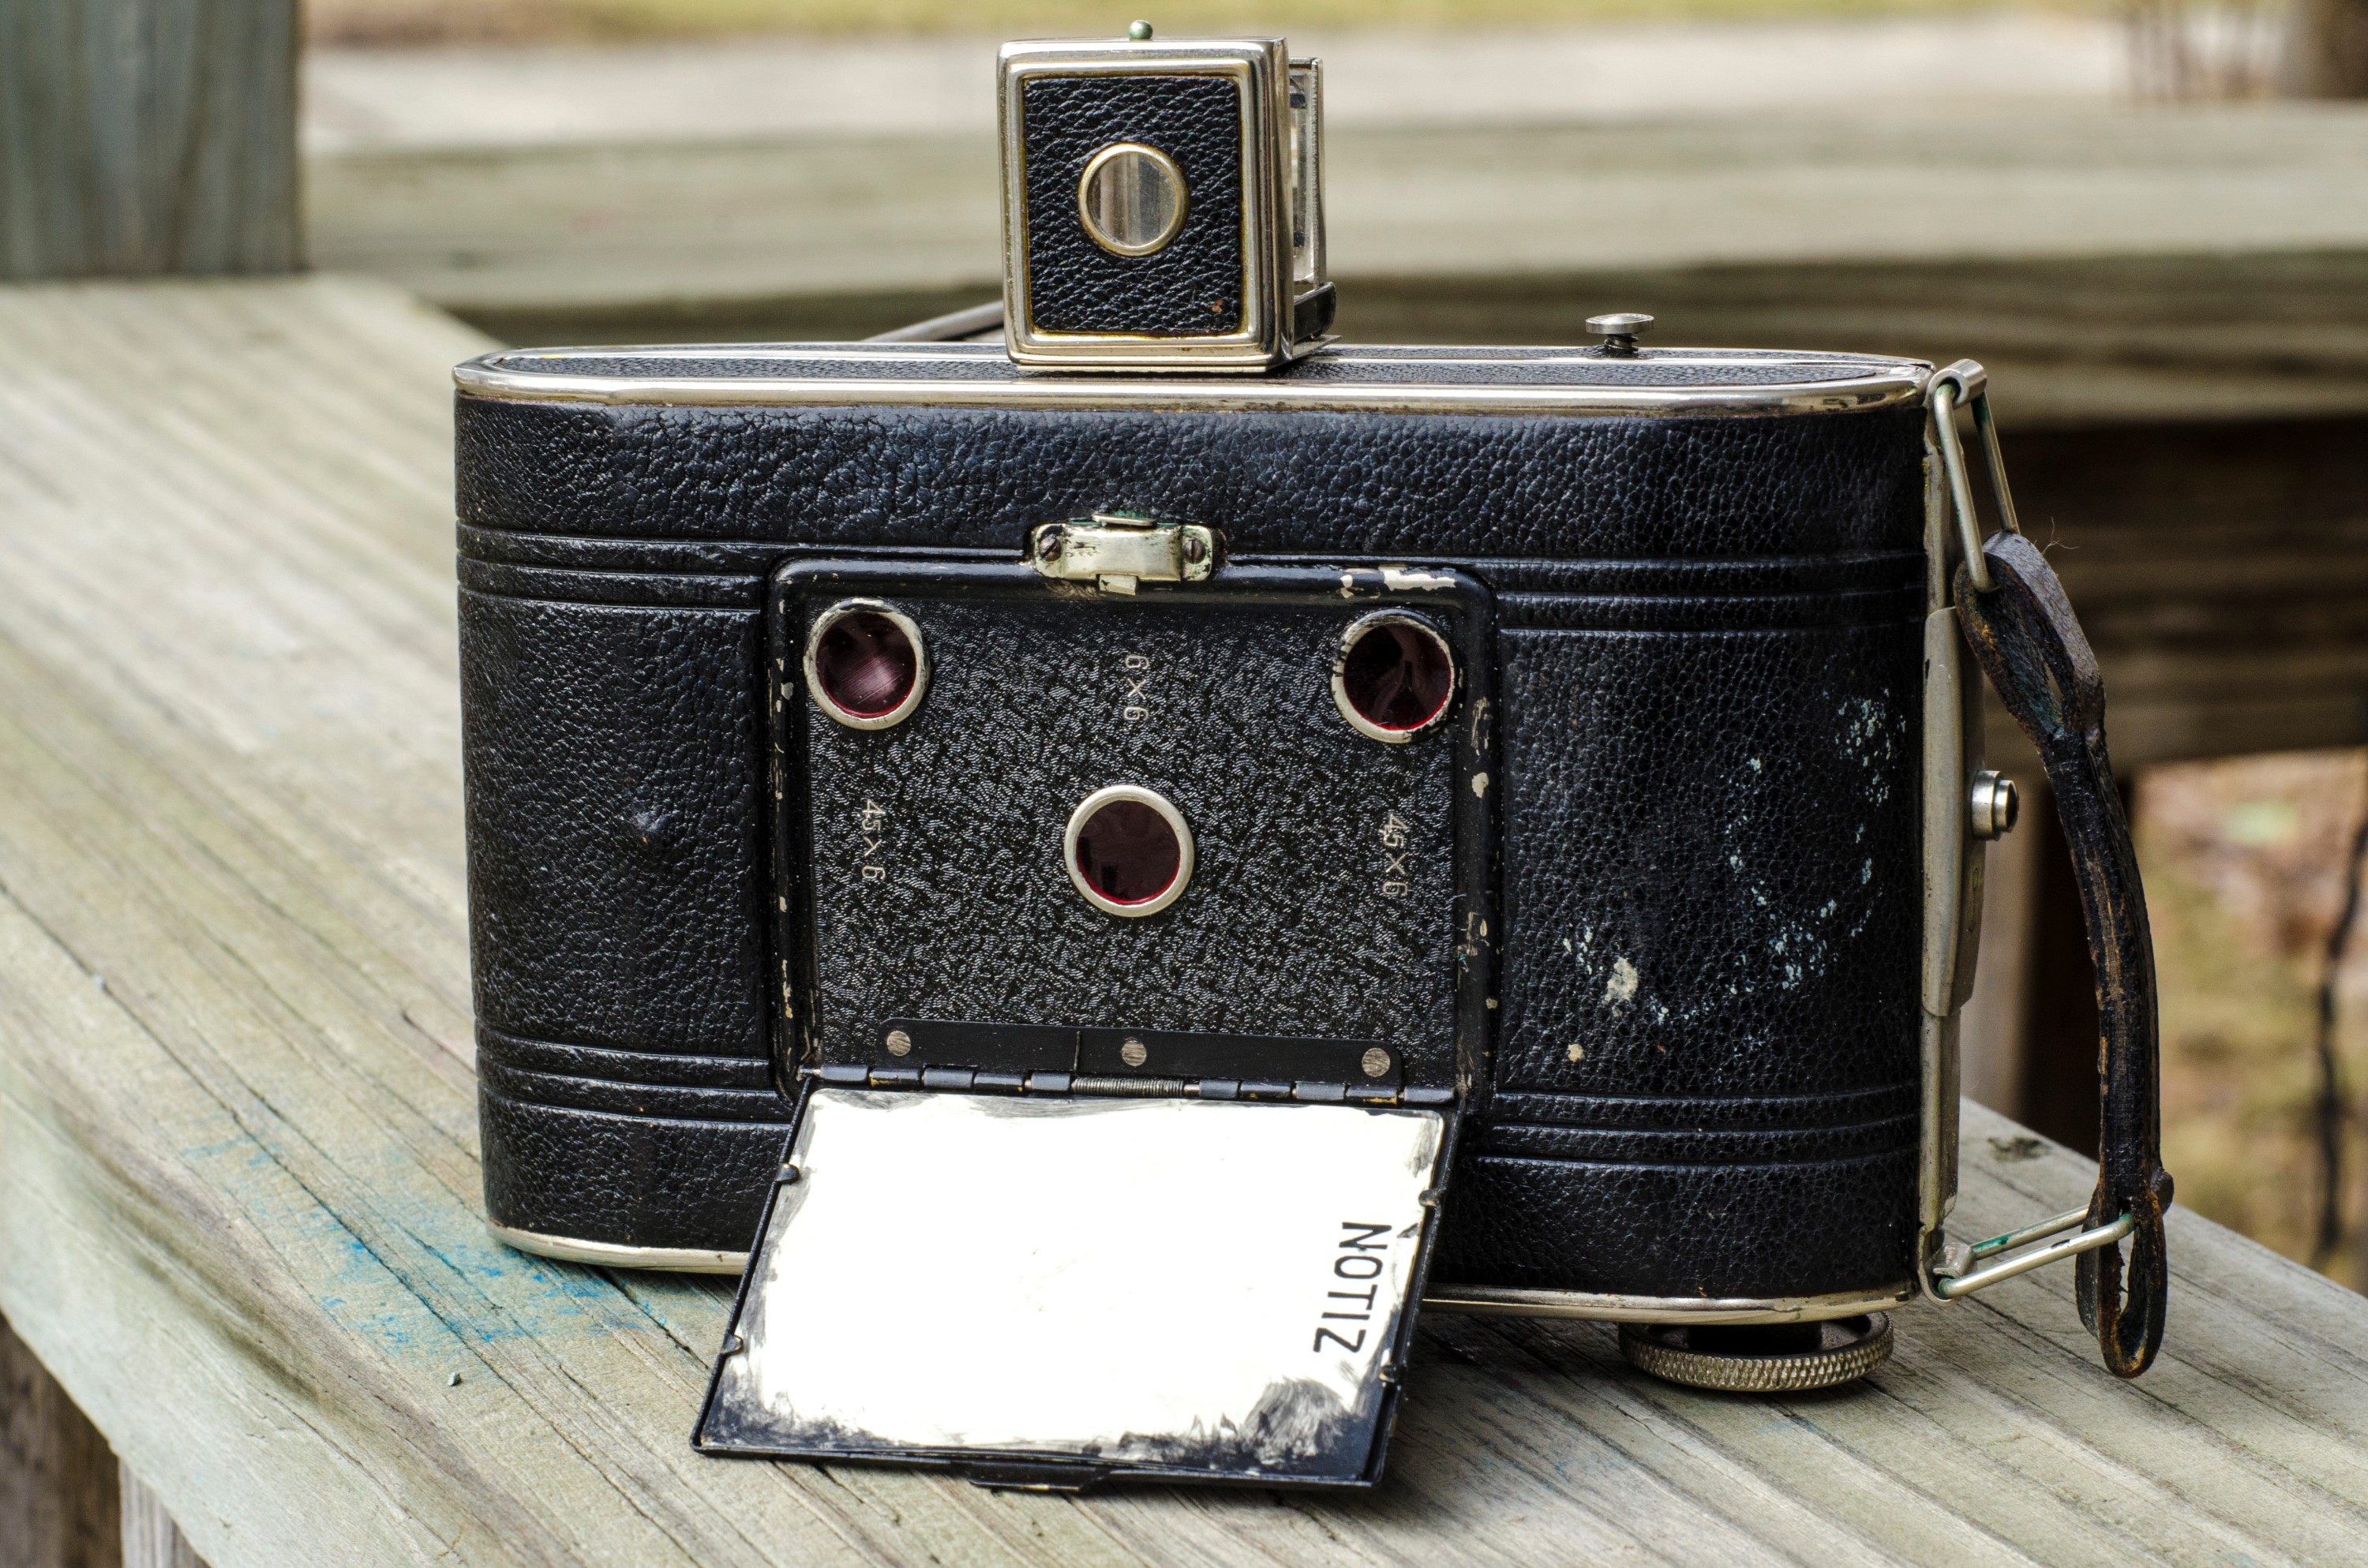
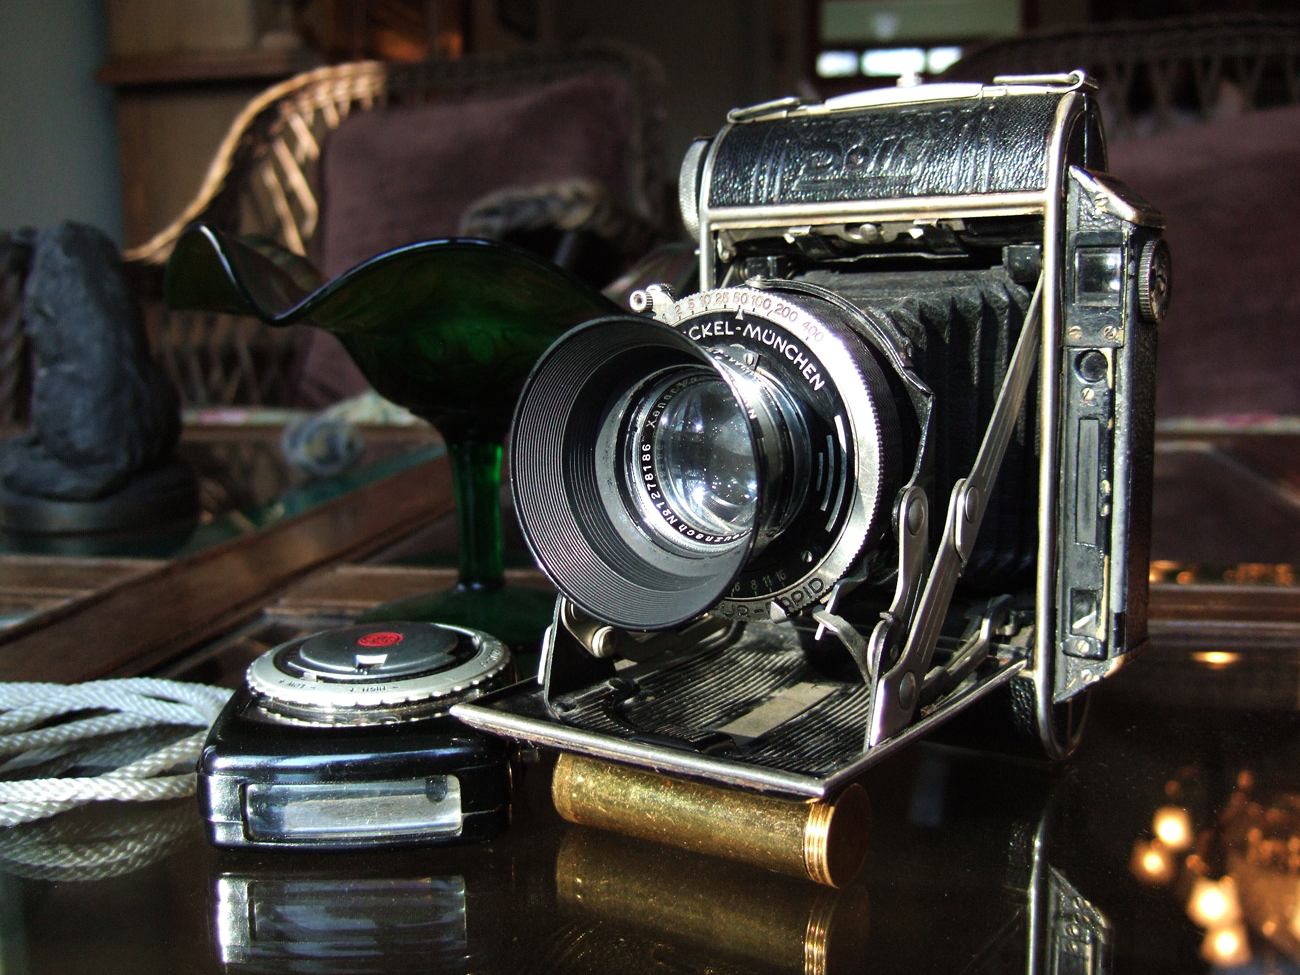
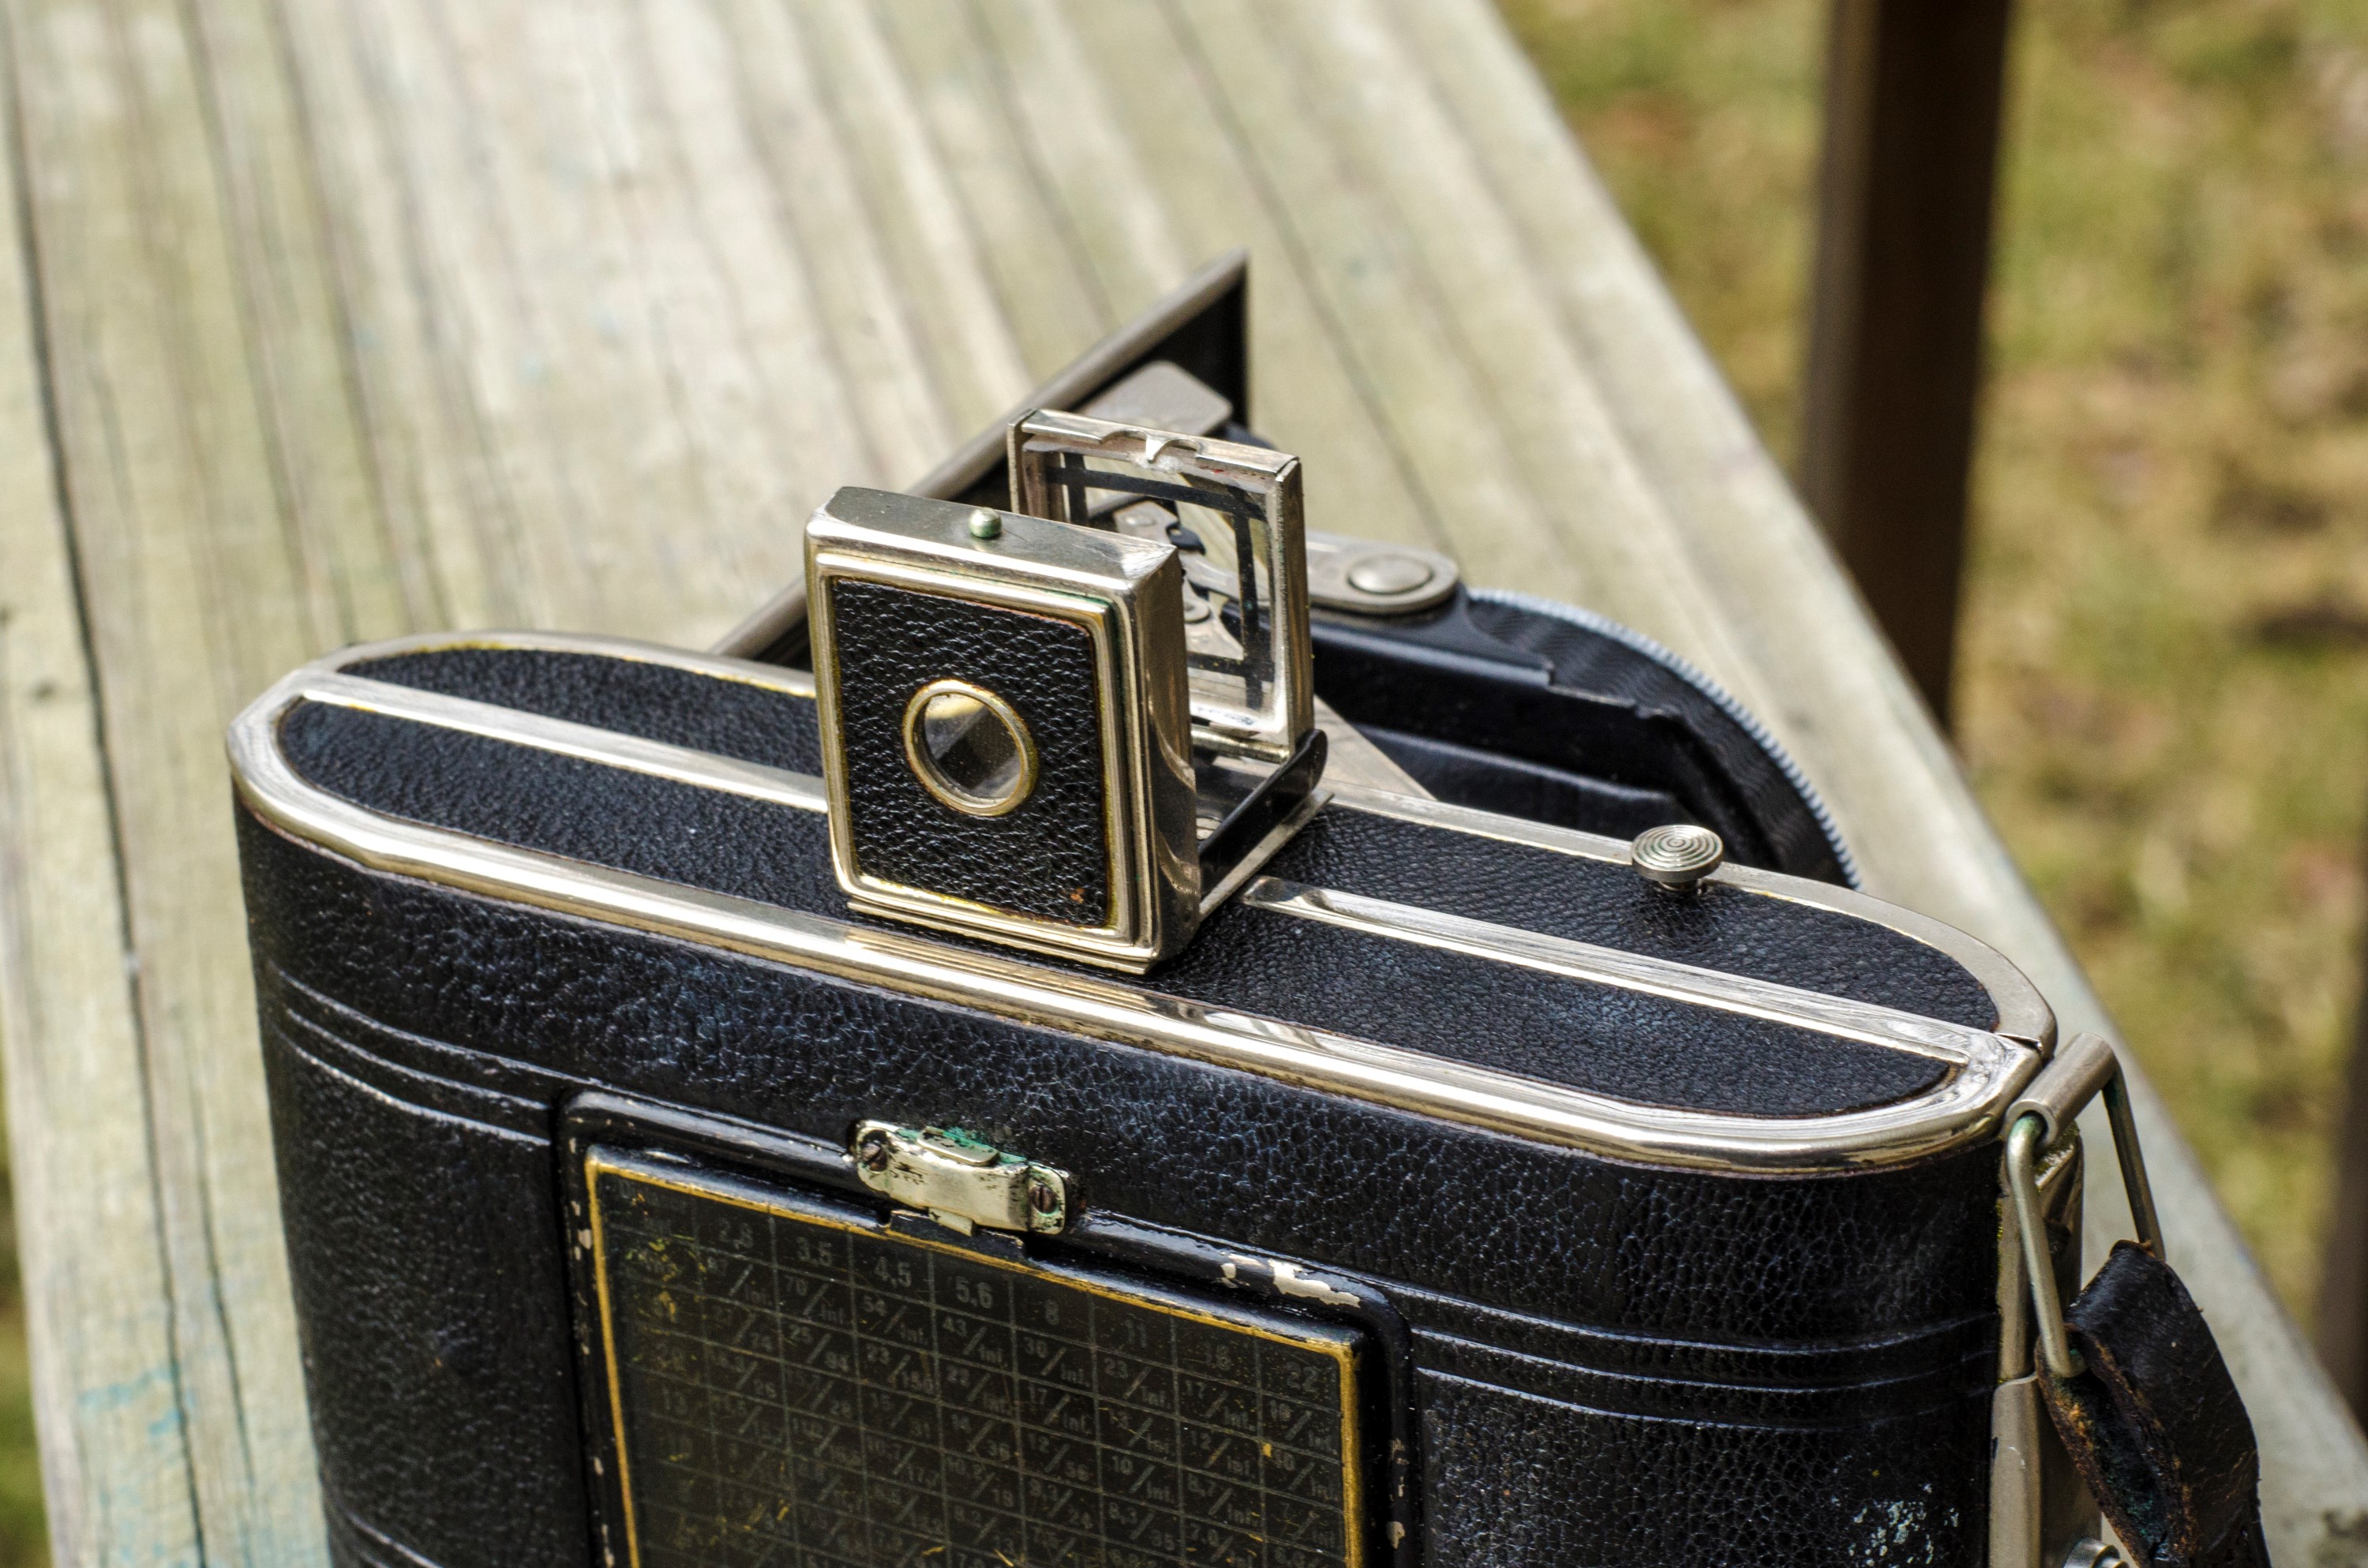
This is a Super Sport Dolly medium format camera made by Certo Camera Werk out of Dresden, Germany. Certo was a maker of medium to high end folding cameras who saw it’s greatest success prior to World War II. They had a long line of medium format folders before venturing into smaller 35mm cameras in the mid 1930s. The Super Sport Dolly was a high end camera that came with a variety of quality German lenses and shutters. There were several variants of the Super Sport Dolly, some with coupled rangefinders and even ones with interchangeable lenses. This is the basic scale focus only model, but it does have the medium spec Schneider Kreuznach Xenar lens (a Zeiss Tessar was also available as the top of the line lens). It is a very well built camera that supported both 6 x 6 cm or 6 x 4.5 cm shots through the use of a mask. It also had a unique folding notepad on the back of the camera which could be used for note taking by the photographer.
Film Type: 120 roll film (dual format 6cm x 6cm or 6cm x 4.5cm with optional mask)
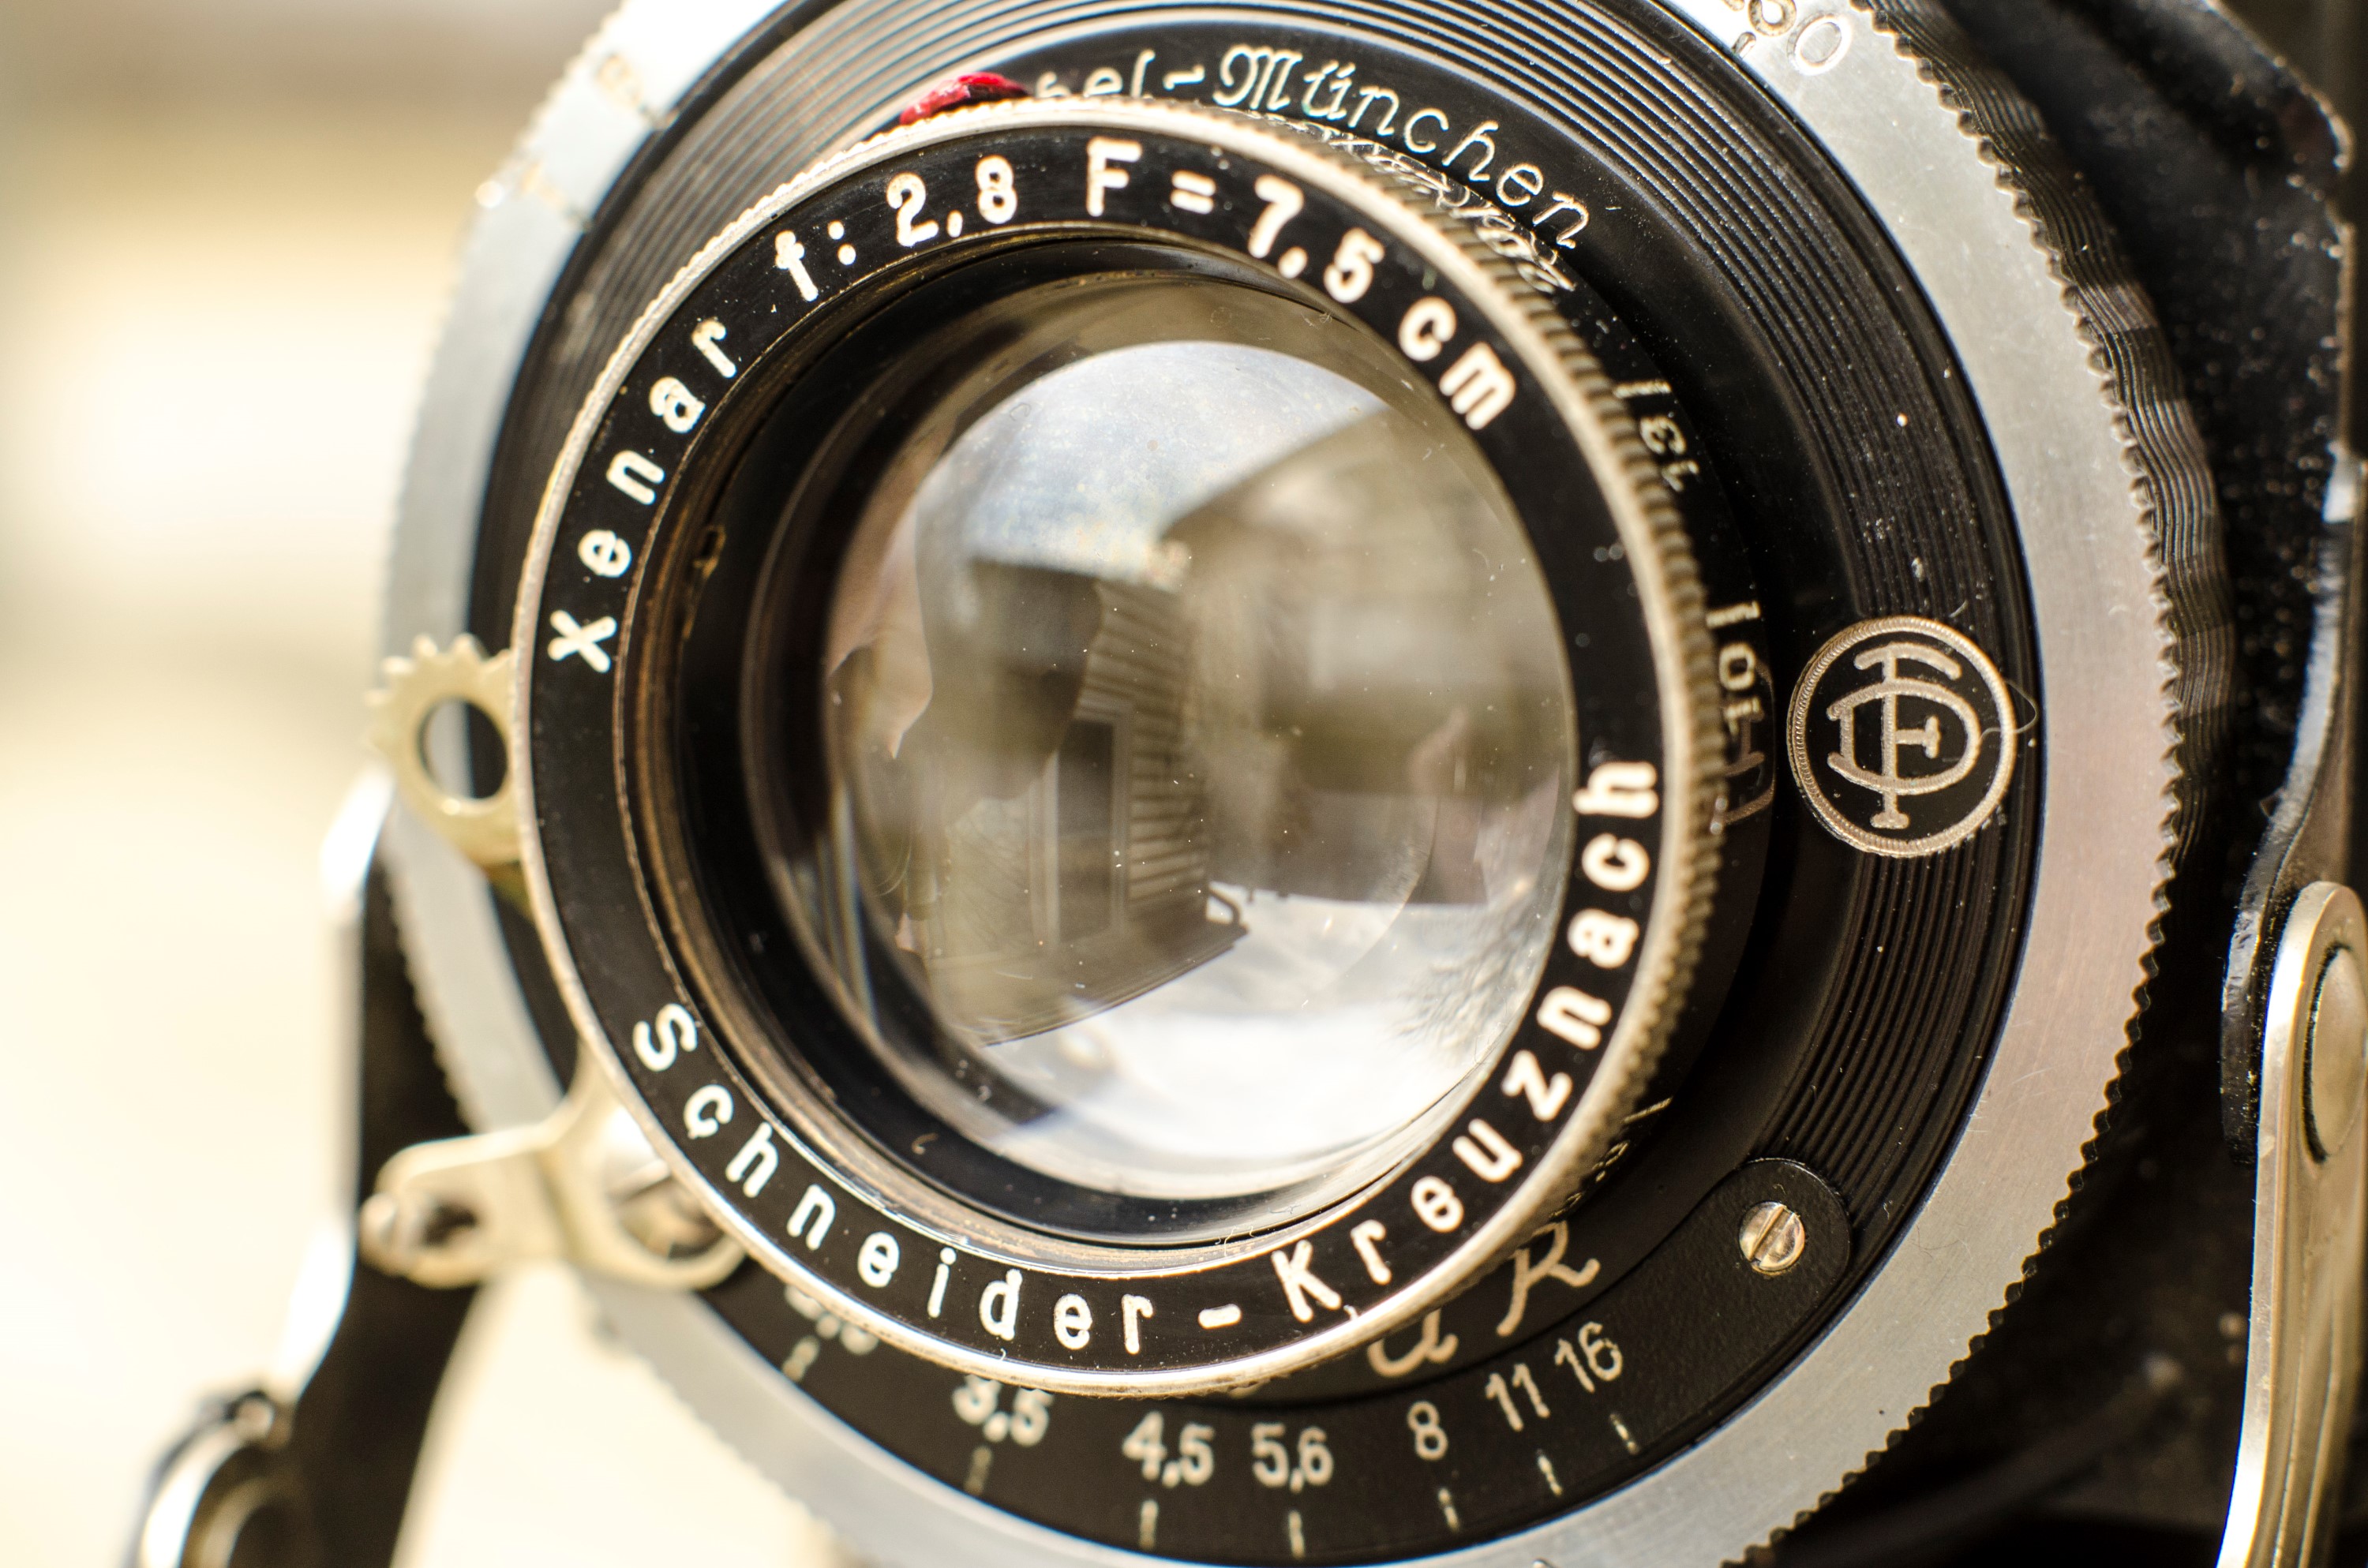
Lens: 7.5 cm f/2.8 uncoated Schneider Kreuznach Xenar 5-elements
Focus: 1m to Infinity
Type: Scale Focus
Shutter: Compur
Speeds: T, B, 1 – 1/250 seconds
Exposure Meter: None
Battery: None
Manual: https://www.flickr.com/photos/century_graphic/sets/72157594408212146/
History
There probably aren’t many people that have ever heard of Certo Camera Werk. Unlike other German camera makers of the time such as Leitz or Rollei who continued to have success well after World War II, Certo barely survived, releasing a small number of models before being acquired by Pentacon in 1968, and was completely dissolved by the early 80s.
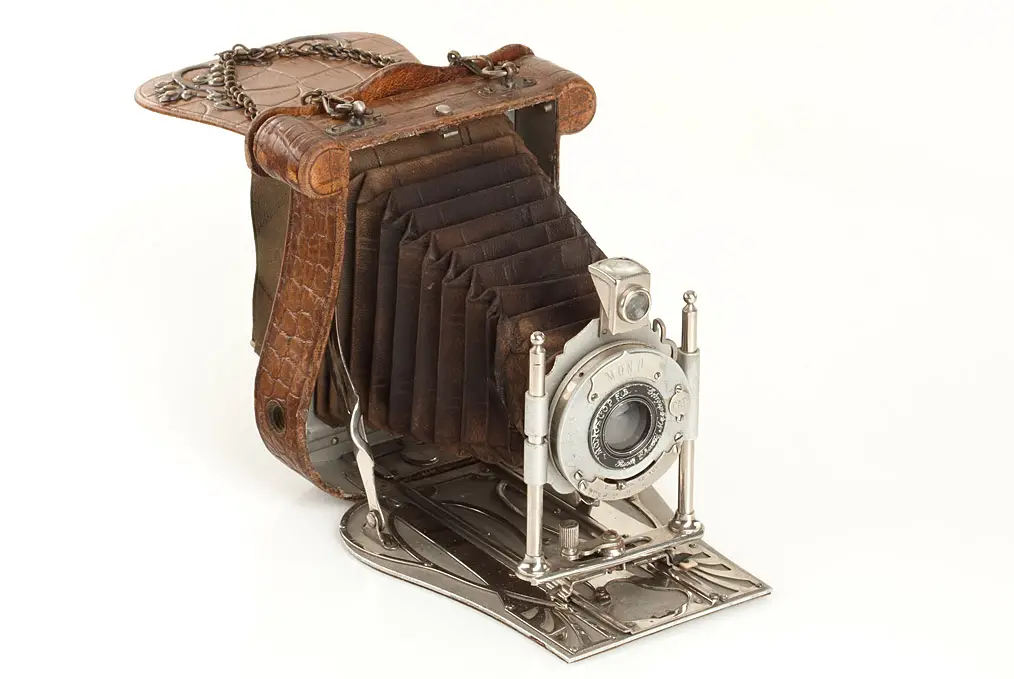
The company was founded in 1902 by Alfred Lippert and Karl Peppel who were both German engineers. They adopted the name Certo which is Latin for “safe and reliable”, and released their first camera, the Certo No. 0, in 1905. Their second model was a very elegant camera known as the Damen-Kamera or “Ladies Camera” which was a 6.5×9 plate camera covered in alligator skin and designed to look like a ladies purse. Very little is known about this camera other than less than 6 are known to exist.
In the company’s first few years, the majority of Certo’s business was making compact plate cameras. These cameras were simply called “Certo” followed by a roman numeral, such as Certo No. I, No. II, No. III, and so on.
In the early 1920s, Certo started giving more marketable names to their cameras. The Certo No. 0 was renamed Certosport, and the Certo No. 1 was renamed Certorex. In 1925 or 1926, Certo would release it’s first camera to use roll film, which they called the Certonet. This camera shot 6×9 images on 120 film and it’s design was very similar to folding cameras made by Kodak and Voigtländer of the era. In the late 1920s and into the 30s, Certo would expand their model line to include cameras with names like Certoruhm, Certotrop, Certoplat, Certochrom, and Certokunst.
This period in the late 20s and into the 30s was Certo’s most successful time. In 1928, they would expand their workshop and workforce to include as many as 150 employees. Certo enjoyed a positive reputation as a maker of good mid priced cameras. Their models were neither cheap or top of the line. Their products were comparable to Welta and Balda who were two other German camera manufacturers of the time.
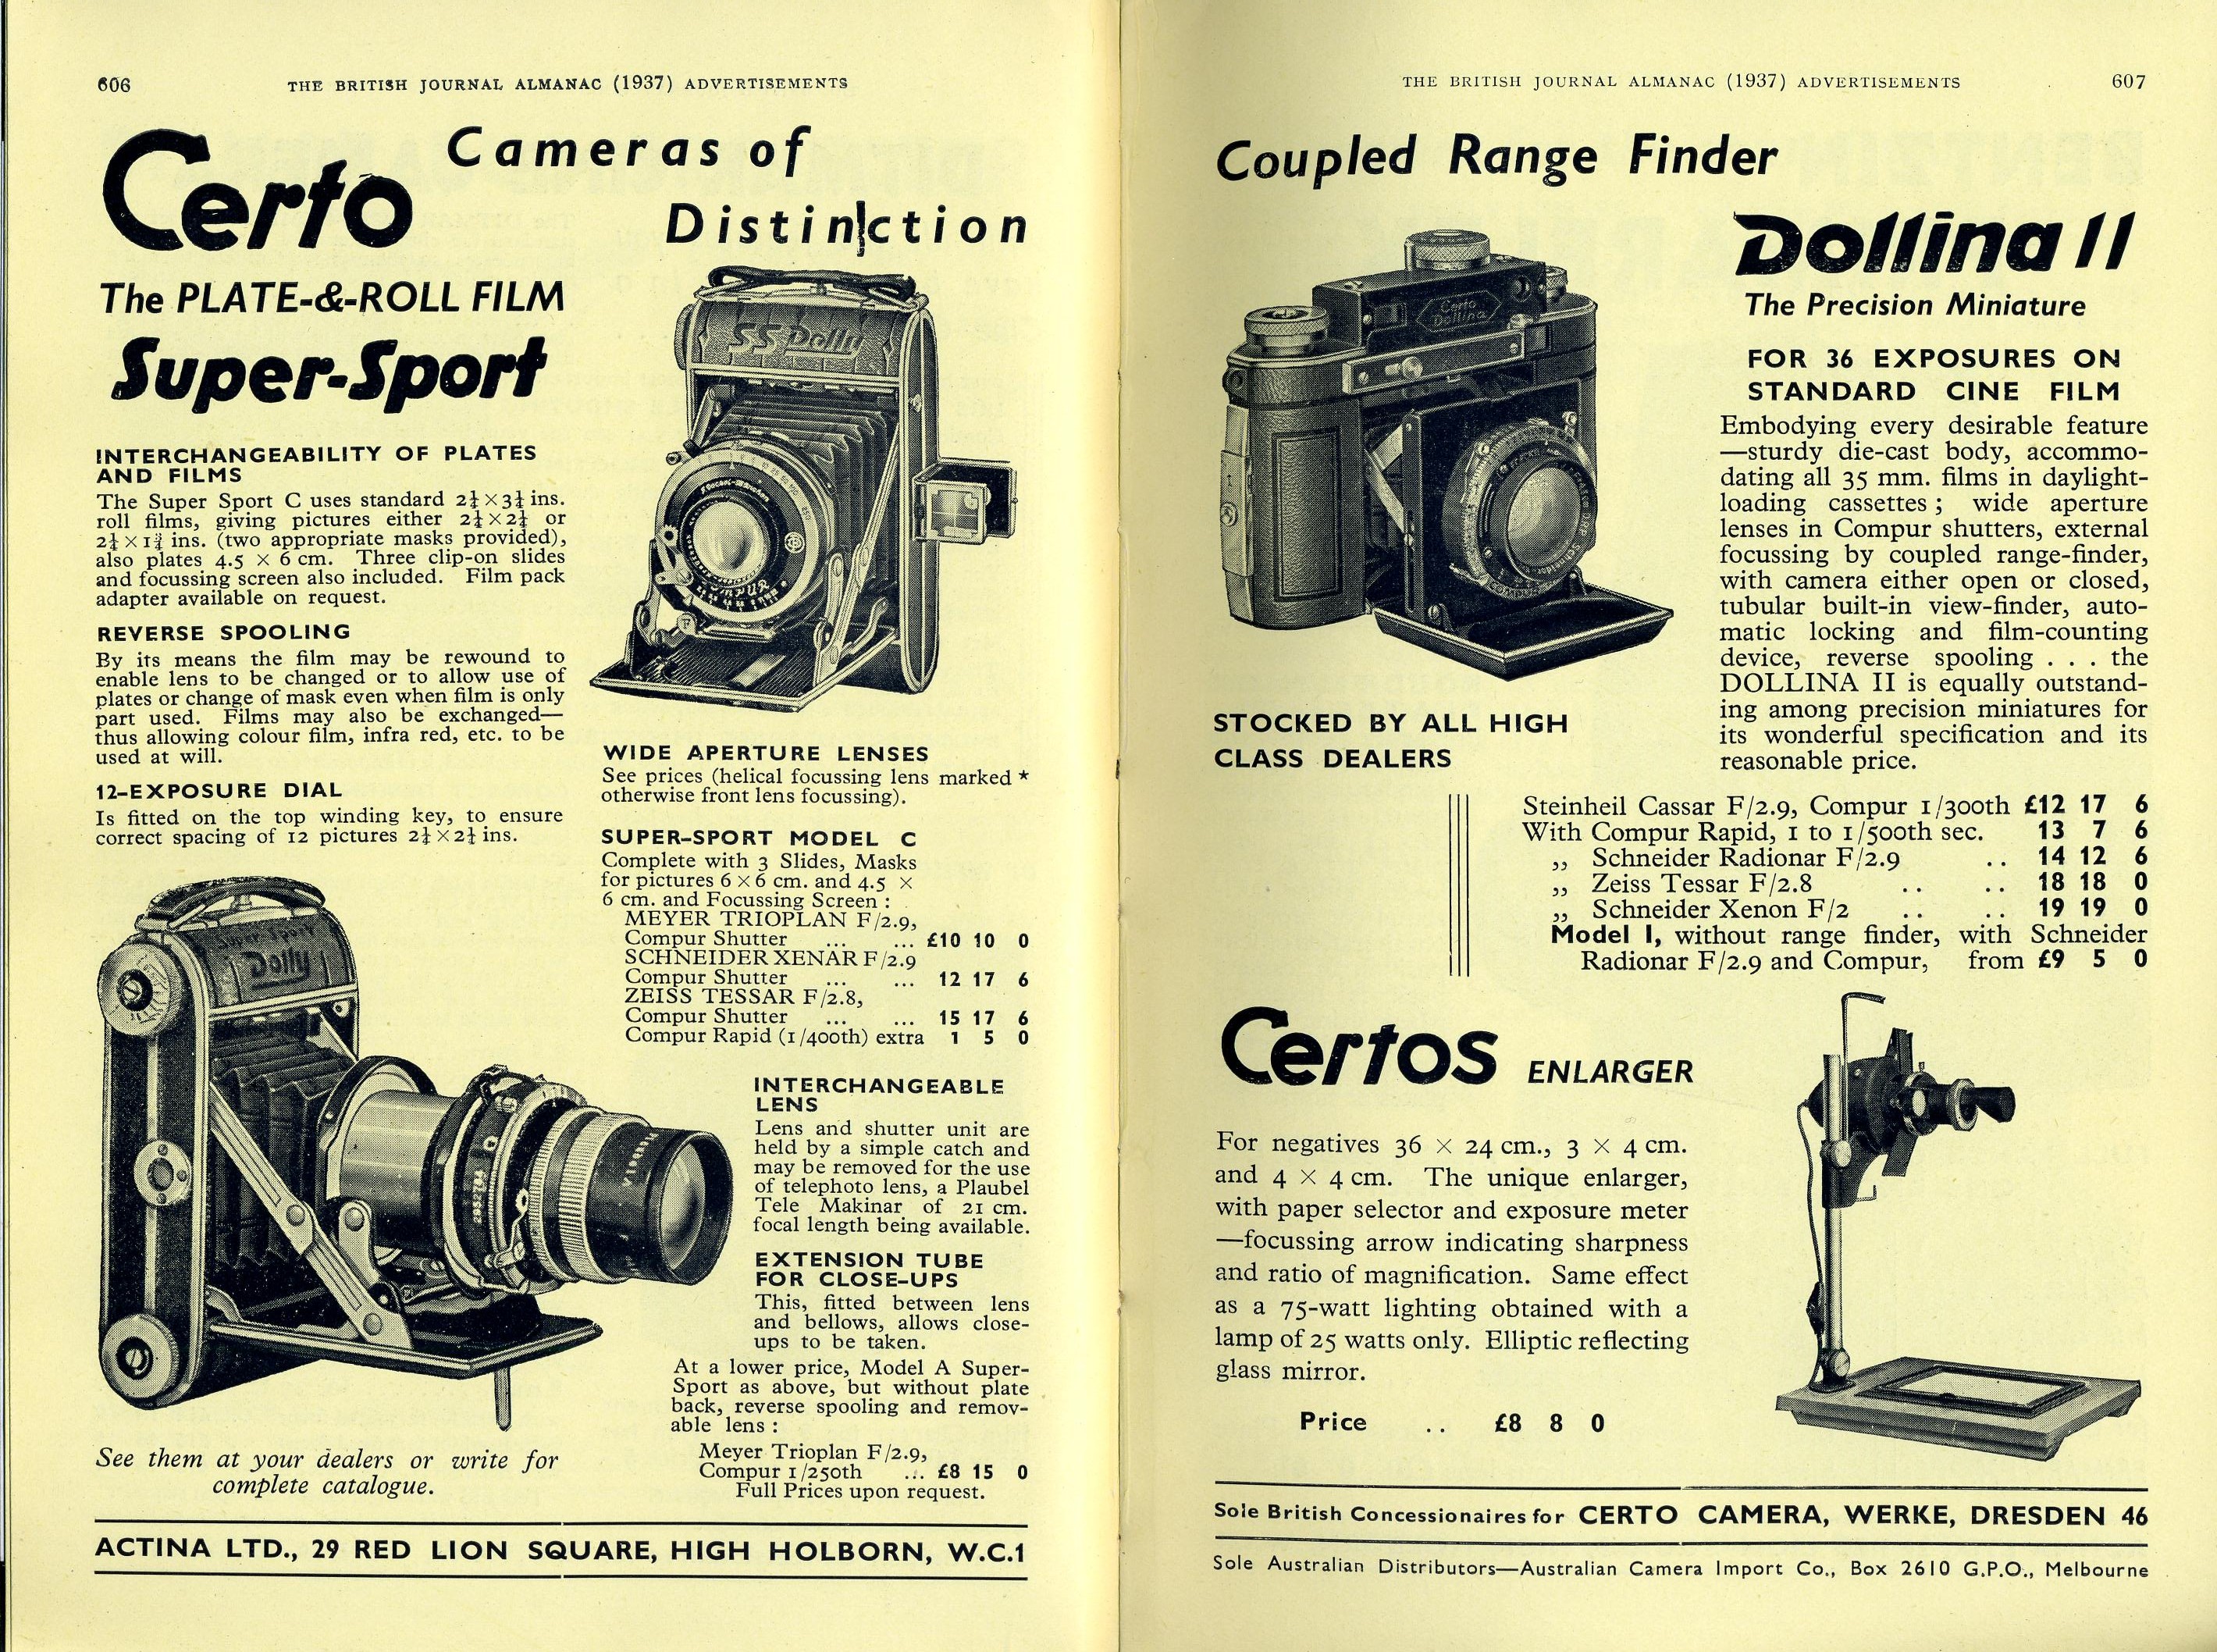
In the 1930s, Certo would release a compact camera using 127 format film called the Pocket Vest Dolly, or just Dolly for short. This camera would signal a change in direction for the company to build good quality and compact cameras instead of the larger plate and rollfilm cameras of the previous decade. Around 1935, Certo would release two new models, the first was the Dollina which was one of the first cameras to use Kodak’s new 135 format 35mm film. The other was Certo’s most ambitious model, the Super Sport Dolly. A high spec, but compact folding camera that used 120 roll film and was compatible with plate film and roll film at the same time. The Super Sport Dolly was made from about 1935 until Germany’s entry into World War II. Sadly, the model would not reappear after the war.
According to McKeown’s, the Super Sport Dolly was released with 3 significant model variations, each with their own sets of lenses and shutters. All Super Sport Dollys could shoot 6cm x 6cm or 6cm x 4.5cm images on 120 film with the use of removable baffles. In order to accommodate the different frame spacing for 6×6 and 6×4.5, the rear of the camera has 3 red windows for the different frame sizes.
The camera in my collection is the most basic, the Model A. Later models would include the ability to insert a plate holder for plate film and the ability to remove the entire front lens and shutter assembly so that an extension tube could be installed for closeup shots. With the extension tubes installed, the Super Sport Dolly could focus as close as 27 cm (~10.6 inches). In 1937, a rangefinder version of the camera would be released, and some would even include an extinction meter. The last model even had the ability to rewind the film back onto the supply spool so that the photographer could swap between roll film and plates mid roll.
Despite mine being the “basic” Model A, it is still a very well built camera with a higher spec Schneider Kreuznach Xenar f/2.8 5-element lens. The Super Sport Dolly was available with at least 6 different lenses, and two different shutter combinations. The Xenar was the second highest spec lens available, only to the Carl Zeiss Tessar f/2.8 lens. All Super Sport Dollys were sold with the baffle for 6×6 and 6×4.5 images, but sadly, the my 6×4.5 plate is missing. It is very rare to find one with both baffles included. It is worth noting that the camera must have one of the two baffles installed, otherwise the film will not sit flat against the film pressure plate. Make sure if you buy one of these cameras, that at least one of the baffles is included, otherwise none of your images will come out in focus.
Today Certo still enjoys a reputation as a maker of fine pre-war cameras. The Dollina and Super Sport Dolly are without a doubt their most desirable models and in good condition can fetch upwards of $100 or more, especially for a rangefinder model. I was able to score this Super Sport Dolly for $30 due in large part to it’s frozen shutter which I talk about in the next section. I have long been a fan of the nickel and leather look of pre-war German folders, and the Super Sport Dolly is one of the finest examples of this design.
Repairs
The Dolly arrived in good condition and everything worked OK despite the camera being sold to me in As-Is condition so I was pretty happy about that. So while the camera technically worked, it suffered typical problems of a nearly 80 year old camera in that the shutter speeds were sluggish and all moving parts were very sticky. The focus ring was difficult to move and changing shutter speeds required a lot of effort. I knew a good cleaning would be in order.
I’ve had a lot of success cleaning shutters on old Japanese and German folding cameras. I’ve found that its best to completely remove the shutter and lens assembly from the camera for cleaning. Not only does this make cleaning a lot easier, it allows better access to other parts of the camera for cleaning.
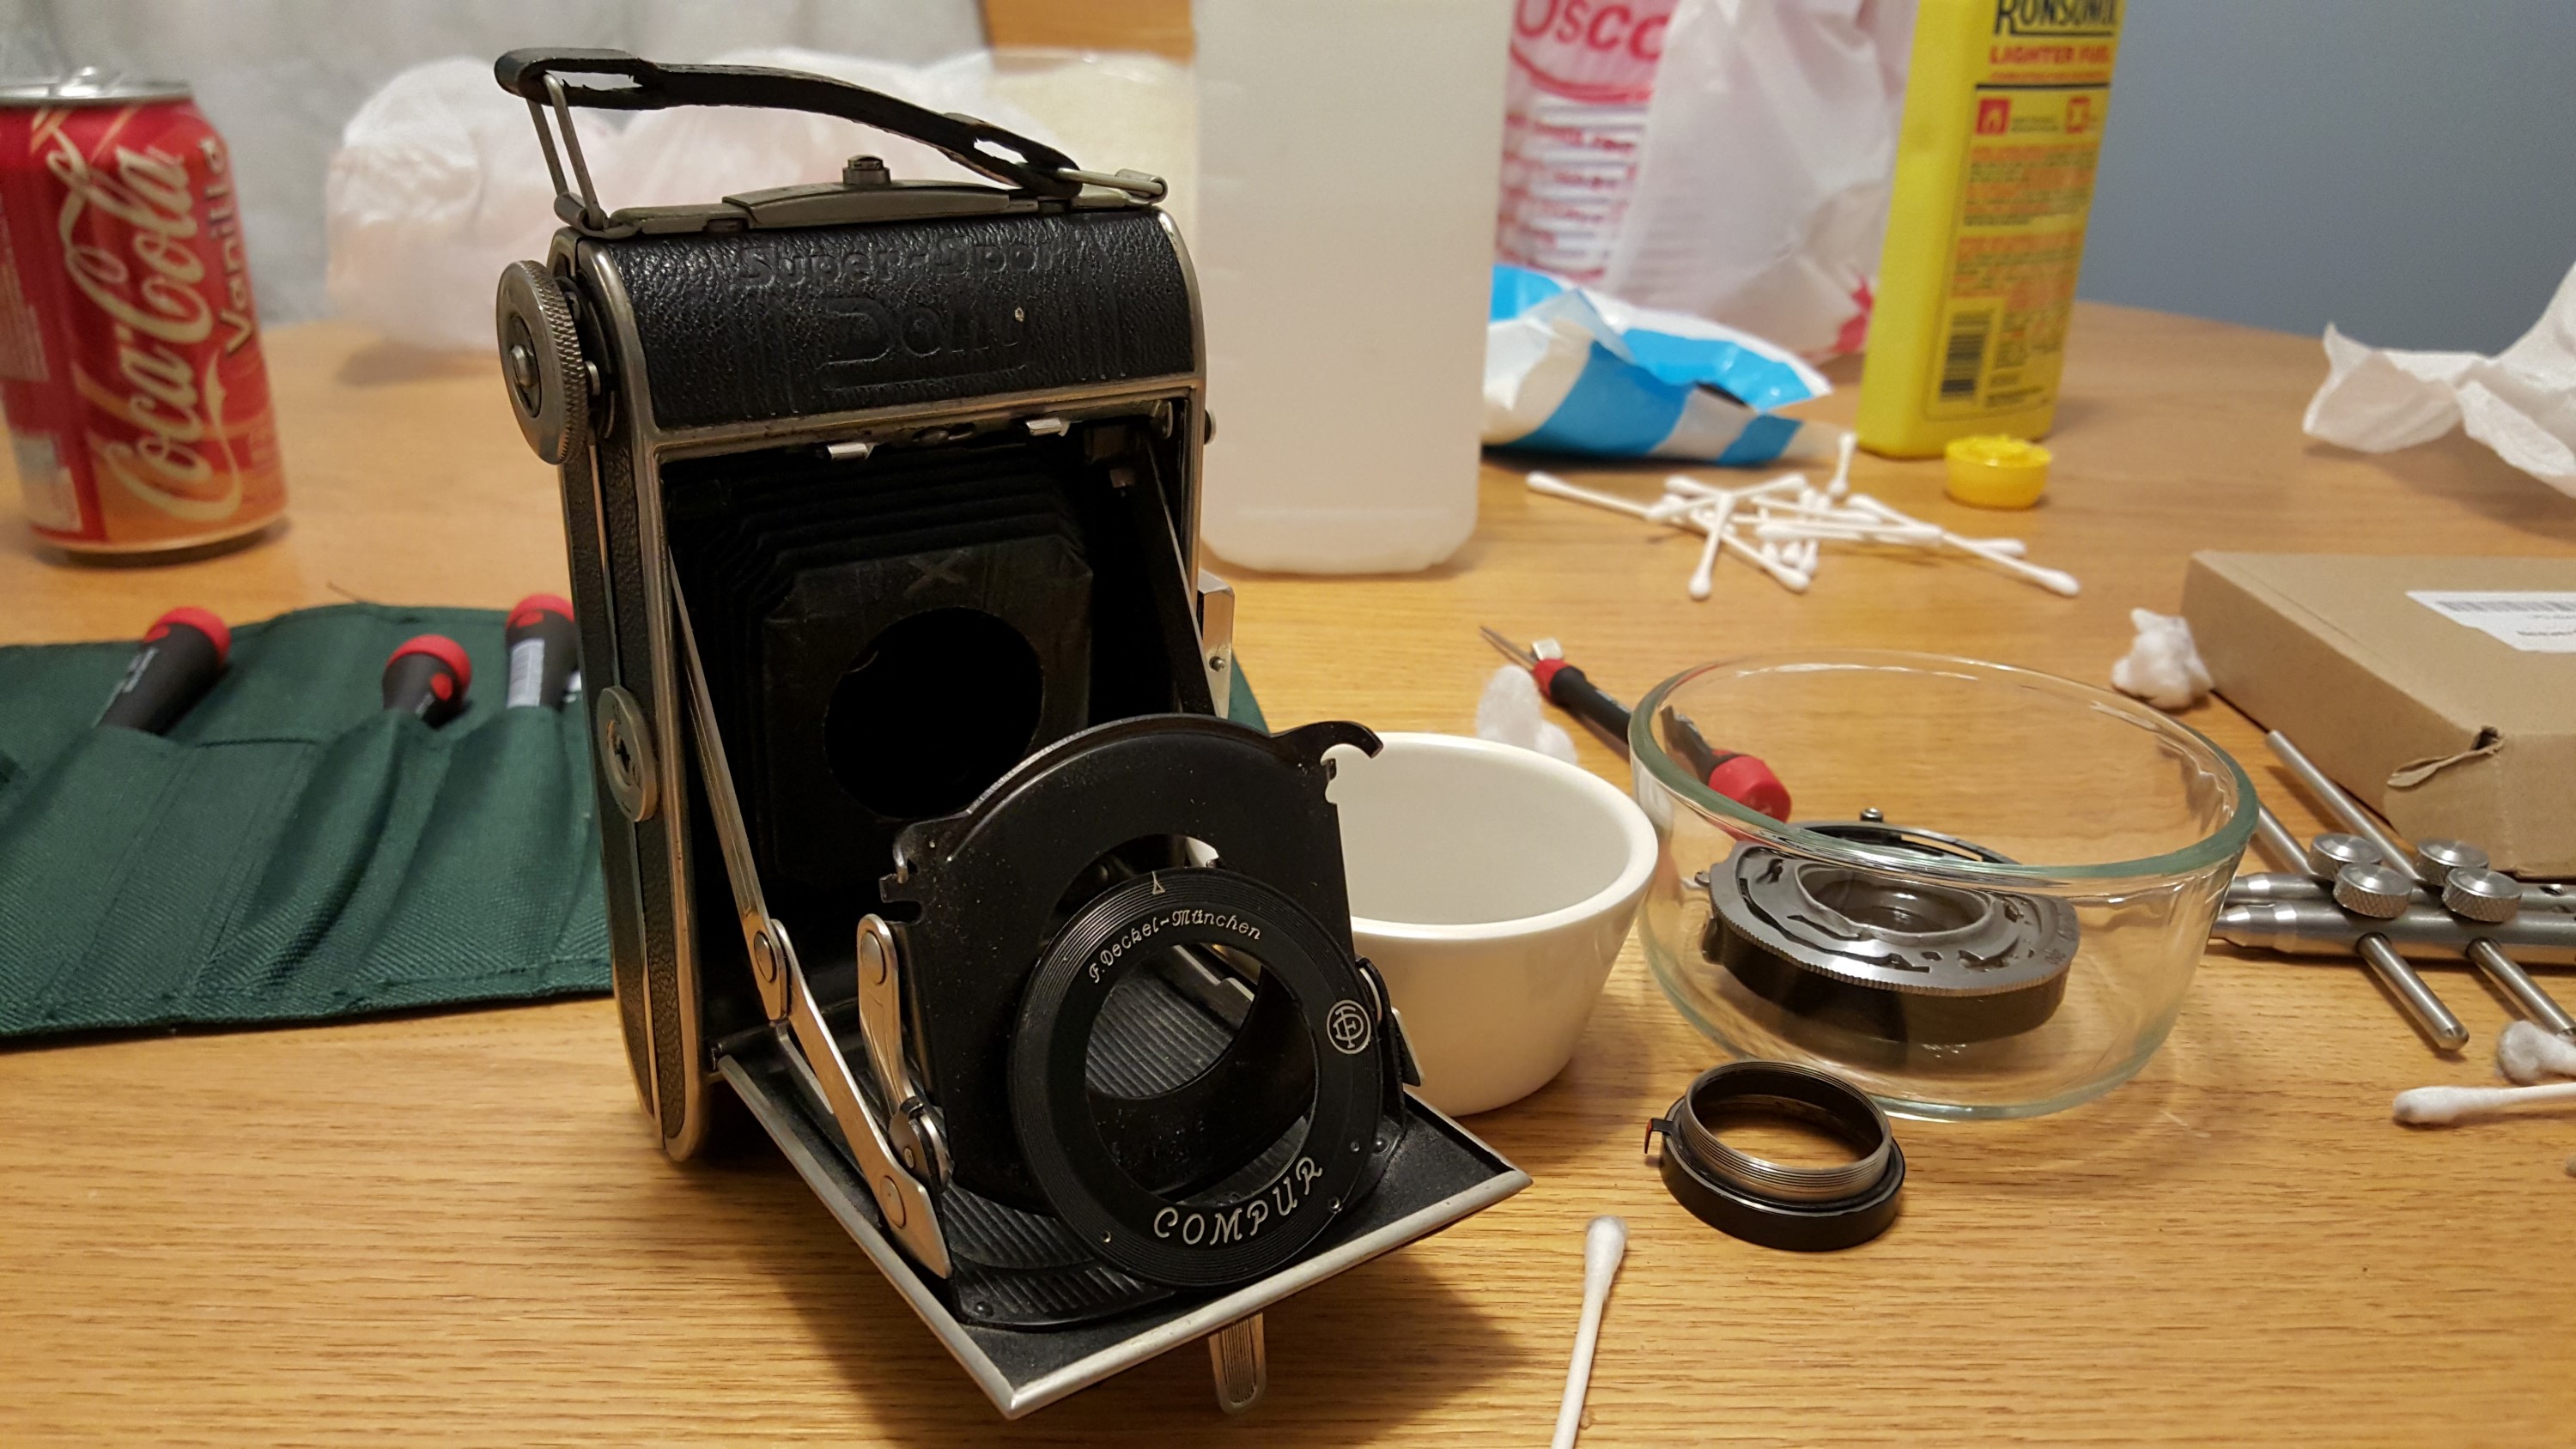
Removing the shutter from the Dolly was incredibly easy. This camera does not have any type of cocking rack or top plate shutter linkage. Everything is entirely contained on the shutter itself, and it is not connected to any other part of the camera other than by a ring inside of the film compartment. I used my lens spanner tool to unscrew this ring and the entire shutter and lens assembly came out in one piece. Be careful when using a lens spanner inside of the film compartment so that it does not scratch either the rear lens, or the bellows. I took this opportunity to clean the inside of the camera. This is the first time I ever encountered cobwebs inside of a camera!
Any time you want to clean a shutter, you want to remove as much glass as possible. Not only does this make cleaning the glass elements easier, but it allows you to completely douse the shutter in lighter fluid for cleaning. Thankfully, removing the 3 groups of elements from the Compur shutter was very easy. The rear element screwed out by hand, the front element needed to have the two focus posts unscrewed, and then it unscrewed by hand, and the middle element unscrewed by hand as well. Its amazing to me that after all of these times, all 3 groups screwed out so easily.
Once you have the glass elements out and in a safe location so they don’t get scratched, you need to start to disassemble the shutter. Unlike my work on the Wollensak Alphax that was in my Ciroflex D and my Argoflex EF, the Compur shutter is far more advanced, and I don’t feel comfortable tearing down the shutter all the way. My opinion here is to remove as little as possible from the shutter so that I can give it a good soak in lighter fluid and leave it at that. Looking at the Compur, I fear that if I went in too deep, I’d never be able to get it back together. So if this is your first time taking one apart, stick to my instructions and you should be OK.
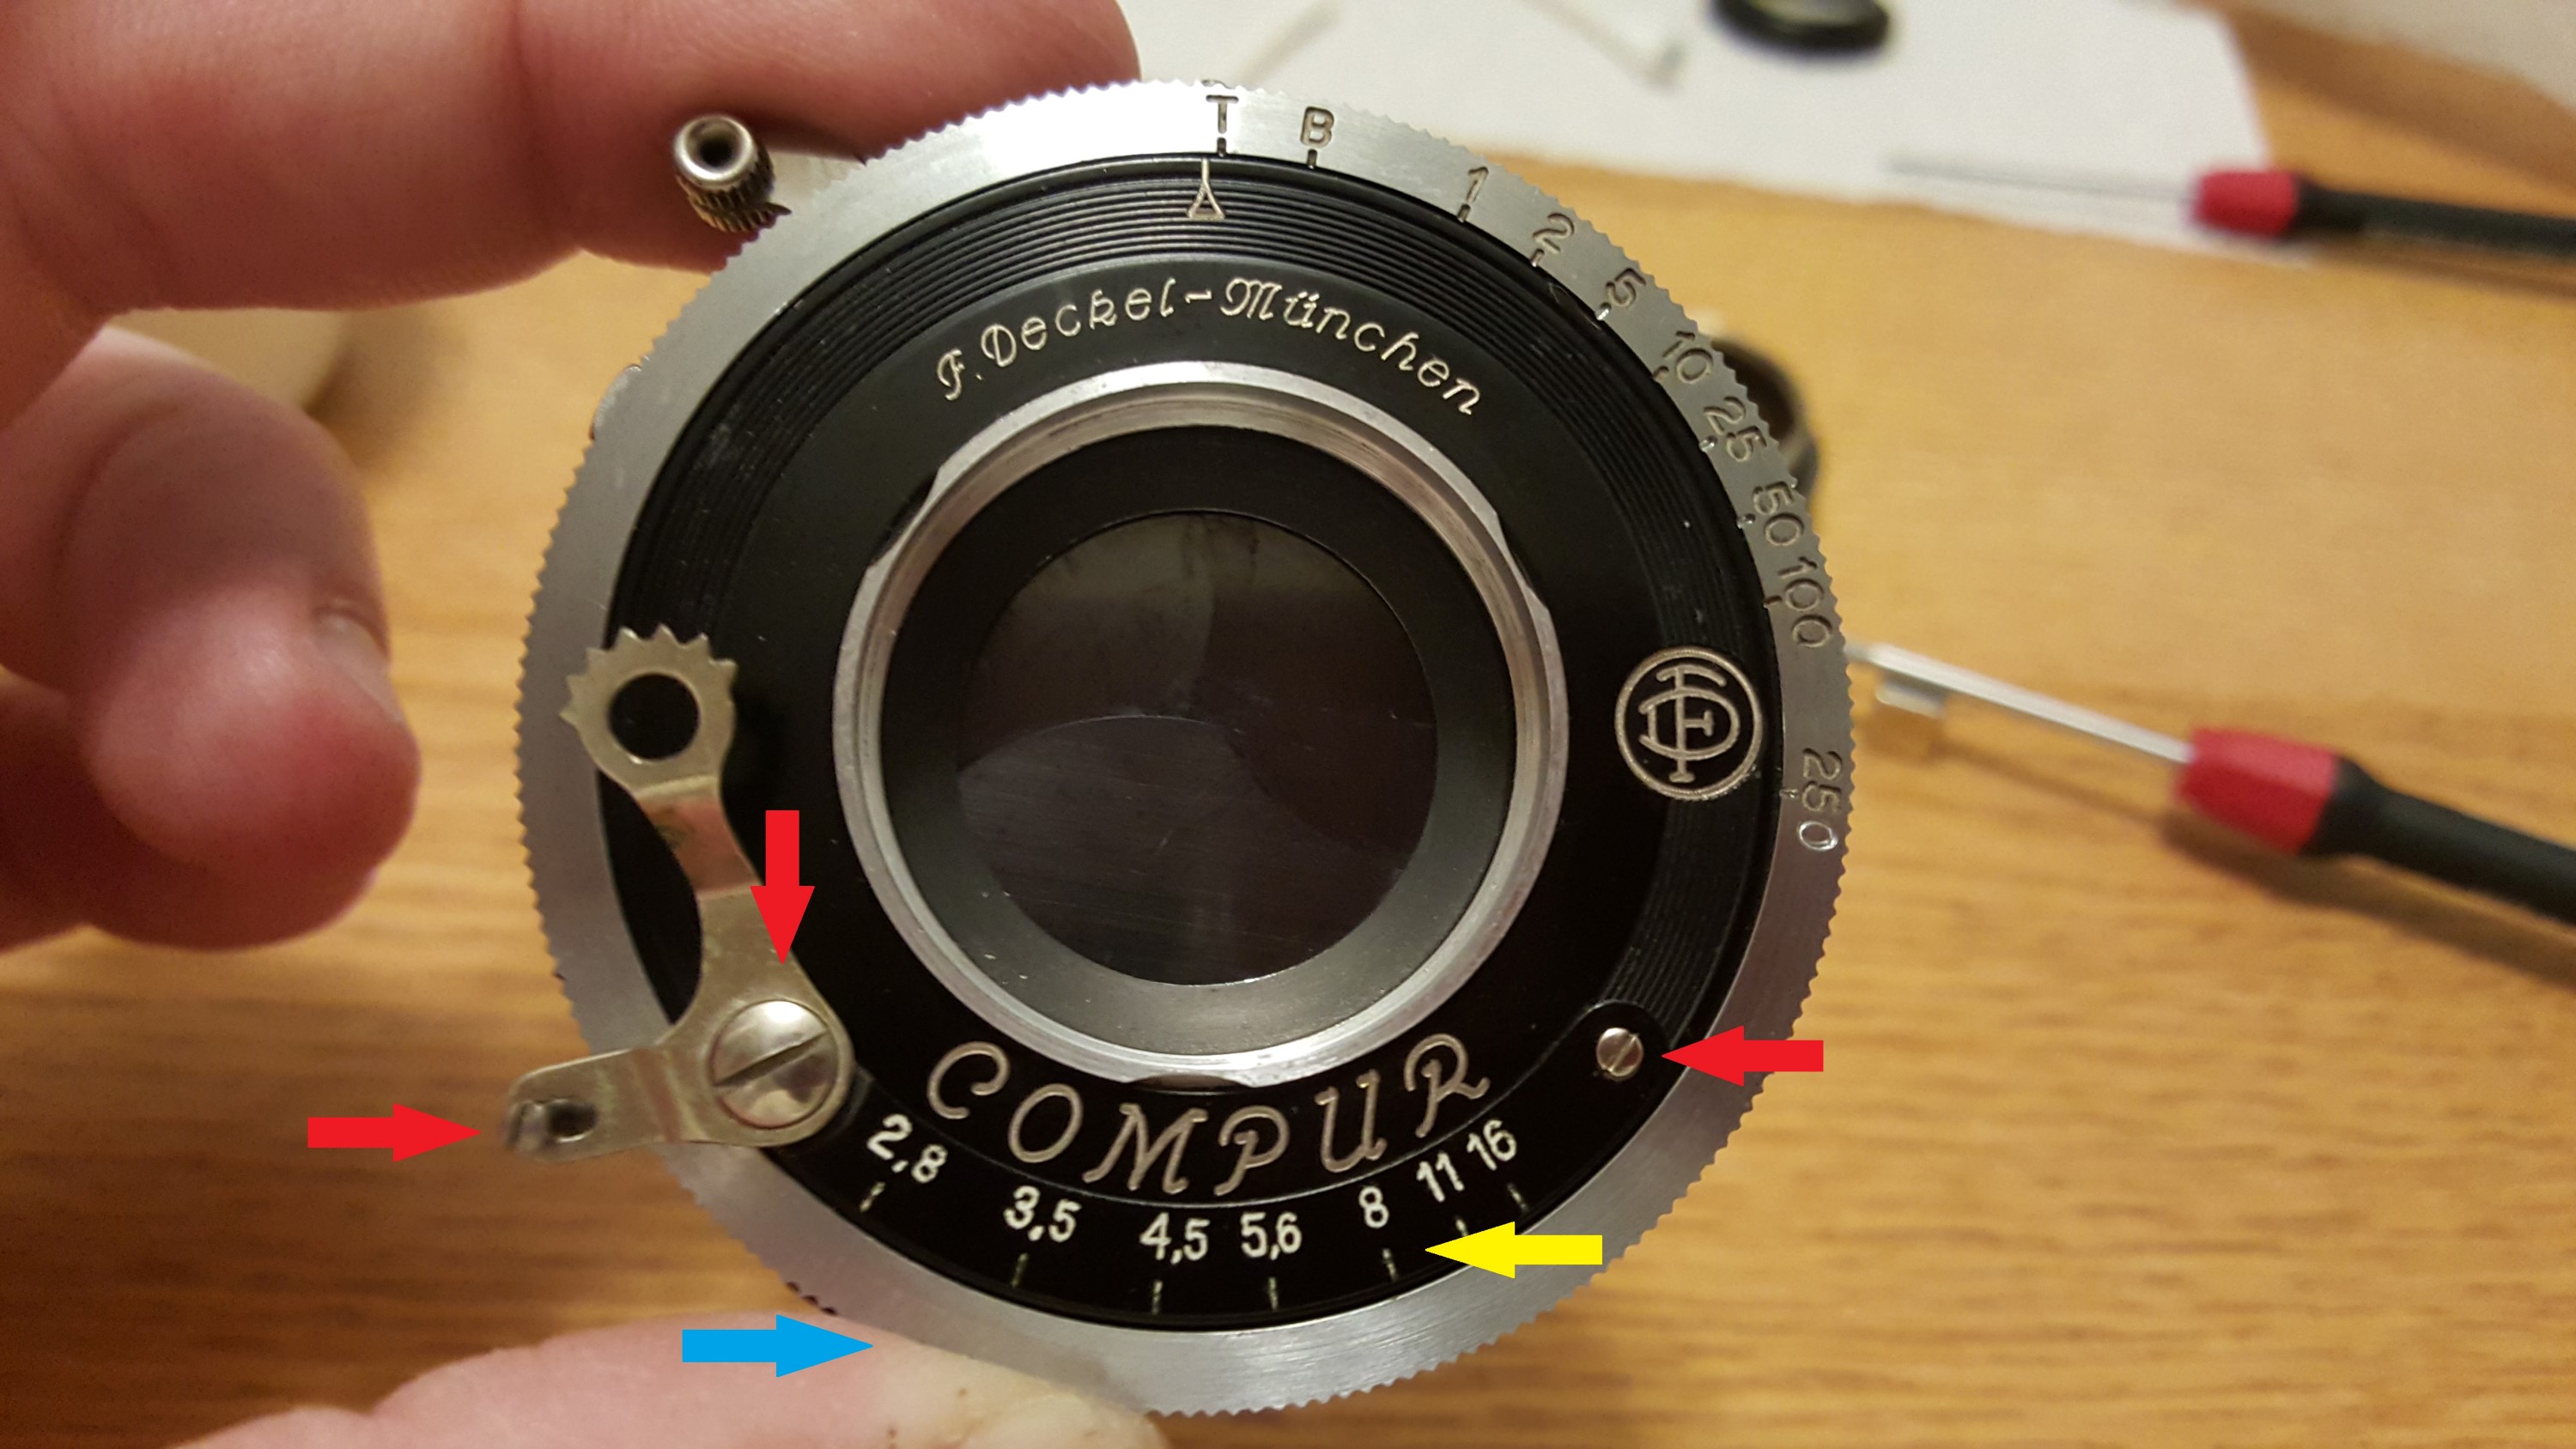 Looking at the face of the Compur, you’ll need to remove the 3 visible screws indicated by red arrows in the image to the right. As you take parts off the shutter, be sure to put them in a safe location for later.
After removing the first 3 screws, the curved metal plate with aperture numbers on it will come off and reveal a 4th screw underneath where the yellow arrow is. Remove this as well.
There is a 5th screw that is on the side of the aperture selector which is under my finger. You can’t see it in the picture to the right, but its about where the blue arrow is. Remove this and the aperture selector will come apart into two pieces.
Finally, the last step is to remove the black Compur fascia. You’ll notice that there are 3 curved “notches” in the chrome ring around the shutter blades. These correspond to 3 tabs that are in the black fascia that need to be lined up. You will need to rotate the black Compur fascia clockwise until these notches line up and then the fascia can simply be lifted off. This is a bit hard to explain in text, but if you look at it, you should see what I mean.
Once the fascia has been removed, wipe it down and put it somewhere safe. You should now see something that looks very simiar to the first image in the gallery below. Pay very close attention to how your shutter looks before going any farther! The chrome ring that has the shutter speeds marked on it simply lifts off, but this ring is also holding some parts of the shutter together. Although you can still cock and fire the shutter like this, the shutter speeds won’t select properly without this ring in position. Do not attempt to cock or fire the shutter without this ring in place. You may need to lift it off to clean it, but make sure you put it back into the correct position before attempting to cock or fire the shutter. For your reference, pictures 2 and 3 below show two different angles of the shutter with this ring removed. Use the first 3 images below for reference and take some images of your own shutter for reference in case you need them when putting things back together!


Use some Q-tips soaked in lighter fluid to clean any surface gunk off the shutter. If you removed the speed selector, make sure you put it back on before soaking the shutter as you will want to turn it upside down at times, and you don’t want to risk something falling out of the shutter. Take a look at the Q-tips and cotton swap in the 5th picture above to see how much gunk I got out of my shutter. Once you are sure you got as much as you could with Q-tips, its time to soak the entire shutter. If you have access to a small glass dish like the one in the 4th image, I highly recommend you get one. Squirt in enough lighter fluid to submerge at least half of the shutter. Don’t be stingy, lighter fluid isn’t that expensive!
Generously squirt the lighter fluid all over every part of the shutter. There is no way to hurt anything by doing this. Just keep squirting. Practice cocking the shutter and firing it while it is wet. The shutter blades will spray lighter fluid all over the place, so make sure you are wearing old clothes and have a lot of working space.
When I was doing this, I would gently swish the entire glass dish with the shutter in it for about 30 seconds, then fire it 10-20 times in a row. Then I’d let it sit for about 10 minutes, then I’d repeat the whole swish, fire, and sit process several times. In total, I would say I had the shutter in the lighter fluid for about 2 hours. Your results may vary. You probably don’t need to do 2 hours, but just do whatever you think is good for your particular situation.
You may also want to gently drag some Q-tips over the surface of the shutter and aperture blades to remove any gunk that gets stuck to the blades. Like always, be careful as the blades are fragile. As long as you move your Q-tip in a direction to go in the same direction as the blades you are fine. If you attempt to drag a Q-tip in the wrong direction across the blades, it will snag.
Once you are satisfied that you’ve bathed and cleaned the shutter enough, you need to let it dry for at least 24 hours. Remove the shutter from the lighter fluid and let excess fluid drip out, then place the shutter upside down on a clean paper towel in a well ventilated area and let it dry.
After about 24 hours, check to make sure no additional gunk has settled anywhere on the shutter and if not, fire it at all speeds, including T and B. If you are satisfied that everything is working correctly, you put it back together in the opposite order how you took it apart.
There is some debate as to whether or not you need to lube anything inside of the shutter in order to make it work correctly. Some guys will tell you that a couple of very small drops of watch or gun oil in strategic places is a good idea, I am of the belief that shutters were meant to be dry. A member of the Vintage Collectors group on Facebook suggested that Compur shutters will work dry or lubricated, but the service life is reduced when it is dry. My belief is that it is so easy to over oil a shutter, that its not worth the risk of trying at all. I’d rather err on the side of not enough oil. I have cleaned many shutters this way and while I can’t speak for any long term durability, I have not encountered any problems so far.
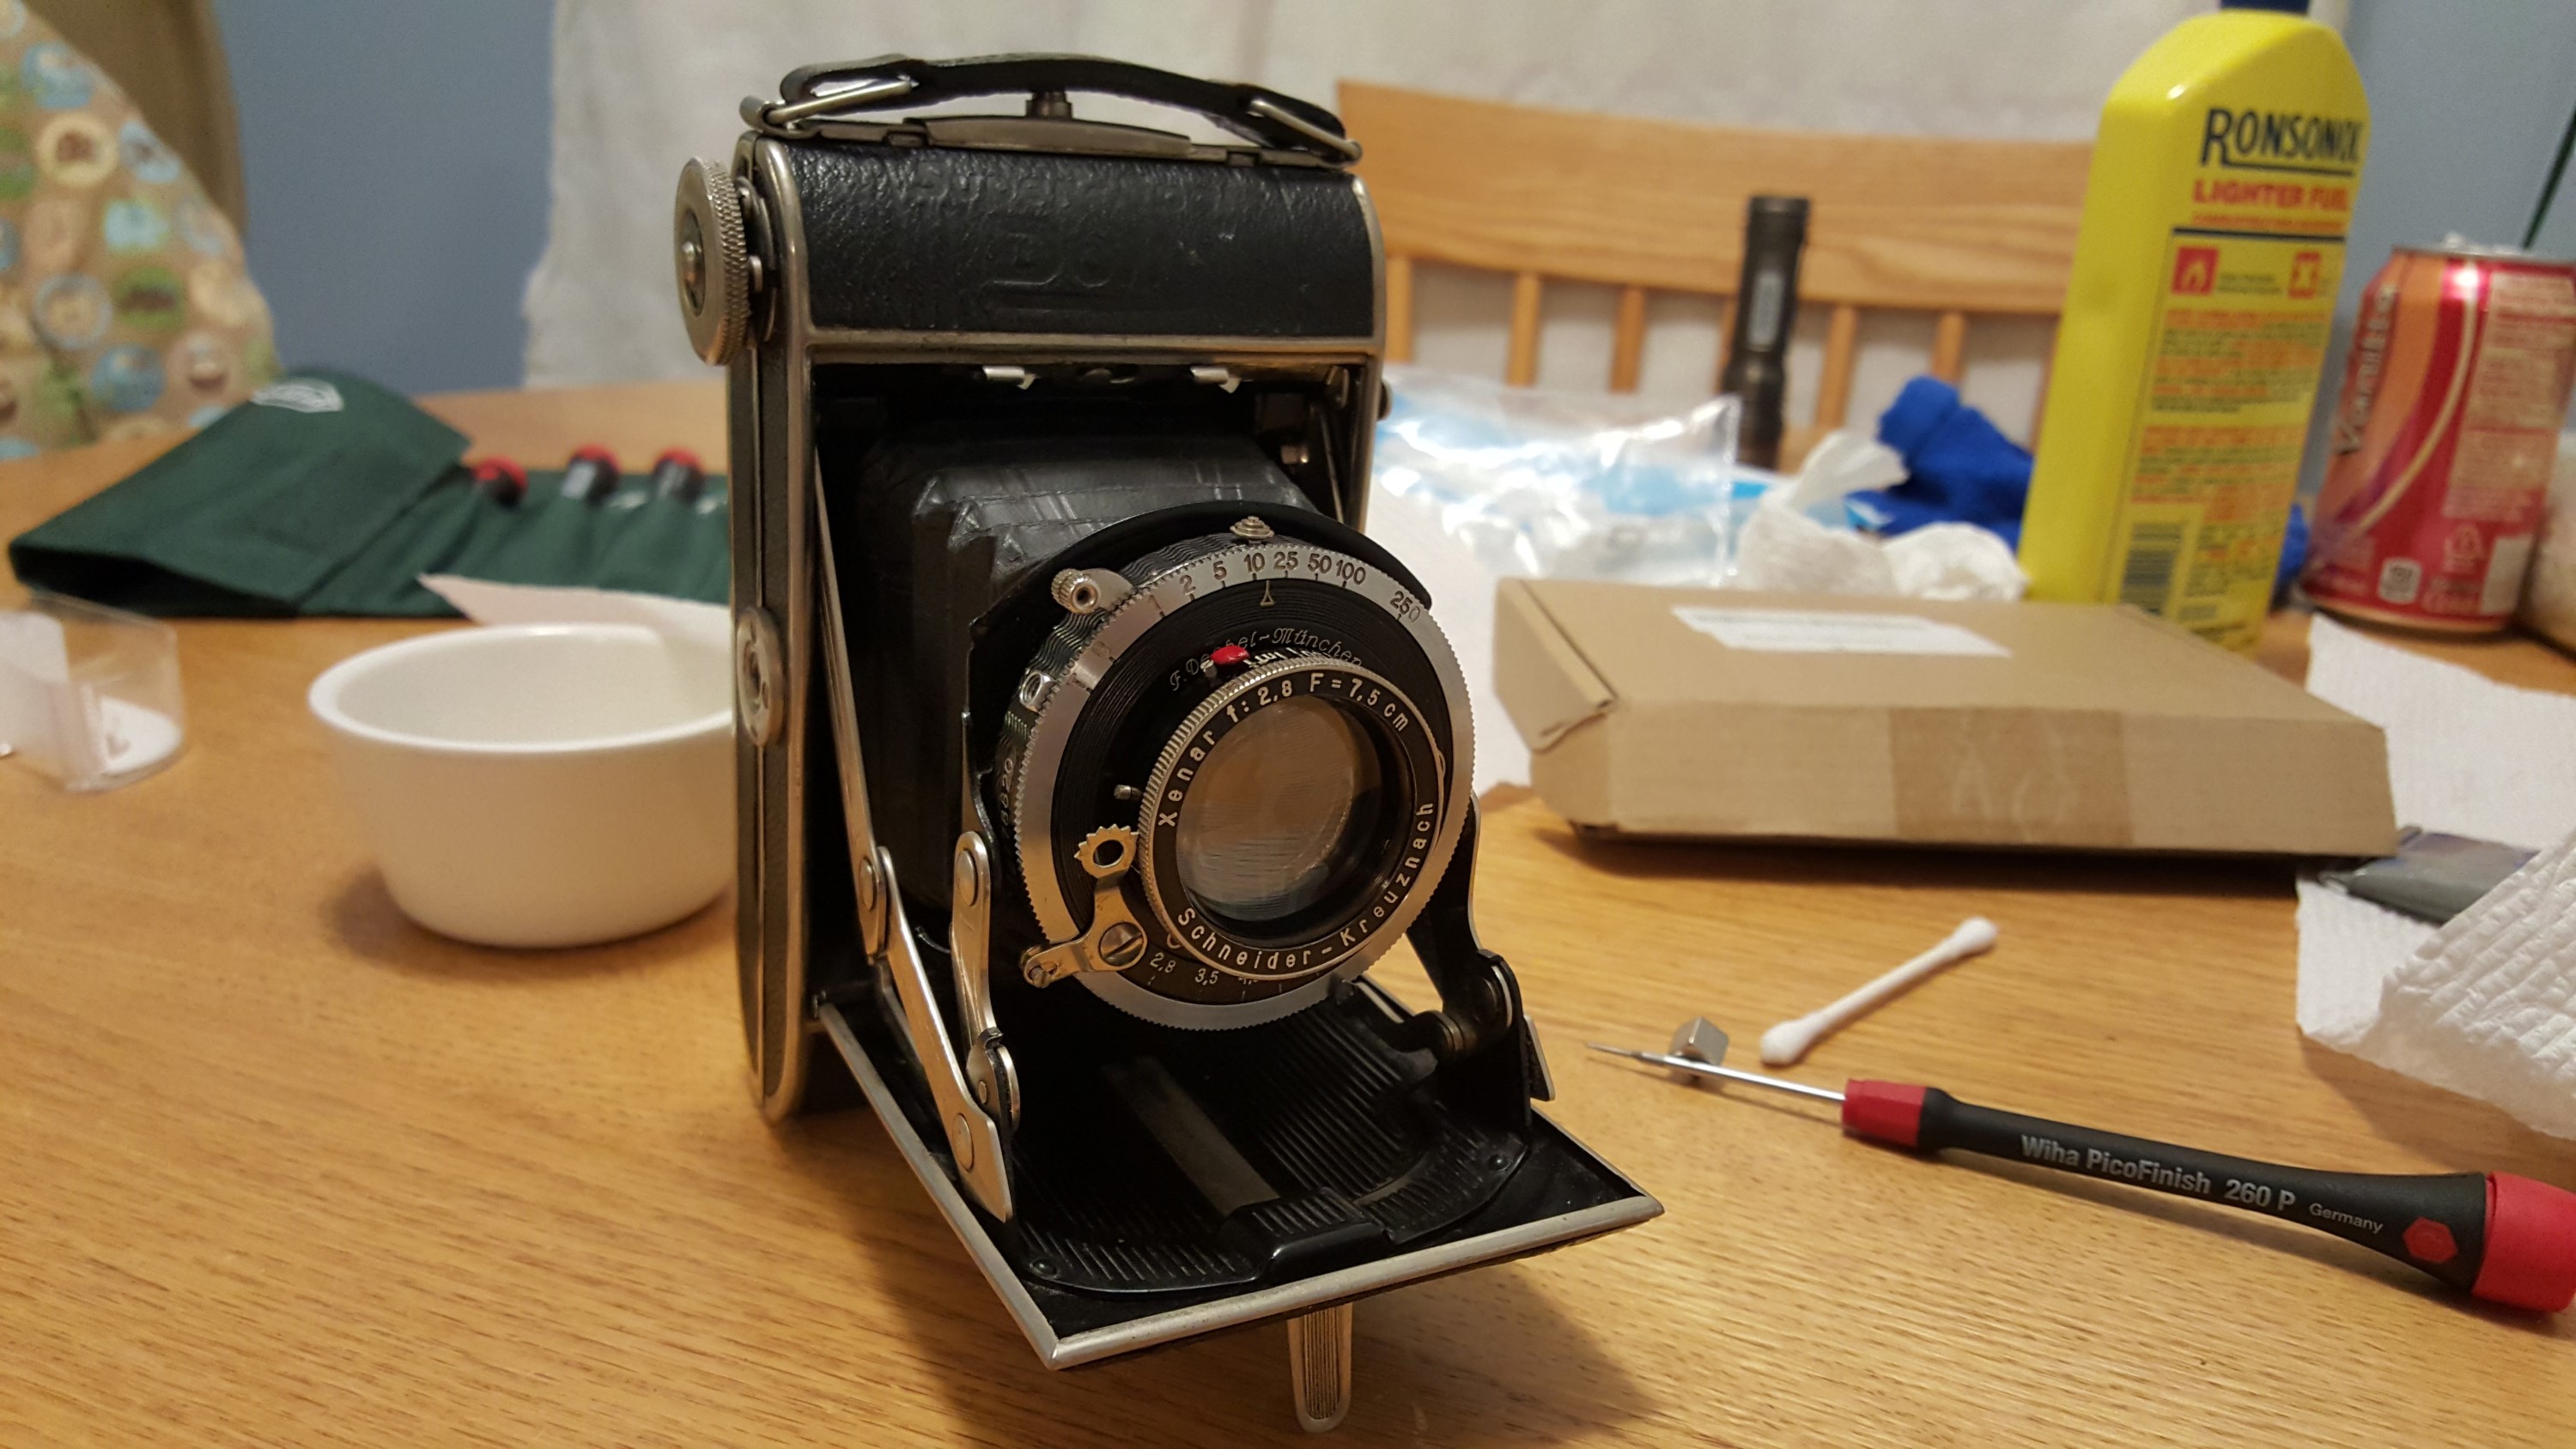
When reassembling the camera, you will want to clean the threads underneath the front cosmetic ring that is around the front element. This ring is removed by backing off 3 set screws that are around it’s perimeter. Do not actually remove the set screws, just loosen them enough so that you can remove this ring. Under the ring are the threads for the focus ring. On mine, these threads were coated in a green sticky mess which is why the camera was so difficult to focus. I used a lighter fluid soaked Q-tip to clean off the old oil and I used a couple of very small dabs of white lithium grease to lubricate these threads.
Once everything is back together, I highly recommend collimating the lens to check for proper focus. While it might have been worth the effort to mark the exact positions of all the lenses and rings before taking them apart, so that you could get everything back exactly into the same position as they were, my opinion is that it is highly probably that after 80 years, the focus could benefit from being adjusted, so this is something I had planned to do anyway. The side benefit of this is you can disassemble and reassemble the camera without any regard of having to restore focus. If you have never collimated a lens before, it is really easy and something you should learn yourself. I plan on typing up a tutorial on here soon to refer back to for anyone who wants to learn.
So now that everything is back together, the lenses are clean, the shutter is working correctly at all speeds, and you’ve made sure your focus is right, its time to load in some film and go shooting!
My Thoughts
I first learned about the Super Sport Dolly as I was doing research for my review of the Certo Dollina II. I saw the picture to the left on a variety of sites and thought to myself, “Wow, that’s pretty”. Sadly, these cameras don’t come up for sale often and when they do, the prices are often very high. I put the thought of acquiring one on hold for a couple of months and it was dumb luck that I saw Roberts Camera in Indianapolis had one for sale. I threw out a Make an Offer price of $30 which they accepted.
Being a reputable camera shop, they put a little more effort into describing the condition of the cameras they sell compared to the “I don’t know anything about cameras” type seller that is so common these days. Roberts correctly described this as having a sticky shutter, and when I received it, it certainly was sticky. Thankfully, the rest of the camera was in quite nice shape. Having some experience cleaning Compur shutters (and their clones) was able to fully clean the shutter and lenses and get it back in tip top shape.
As mentioned above, there are three sub-models of the Super Sport Dolly called the Model A, B, and C. Mine being a Model A, it does not have the ability to remove the lens, change to plate film, or rewind the film, but that’s OK. This is still one of the best looking cameras in my collection. I love the compact design of 6×6 German folders, plus with the pre-war nickel plated metal and leather body, this is a real looker! This camera’s beauty is much more than skin deep as well. The f/2.8 Xenar lens is huge and when firing the Compur shutter, it makes a very loud and solid “CLUNK”. This is without a doubt the loudest leaf shutter camera I own. I don’t necessarily think that’s a bad thing, because the sound is confidence inspiring, rather than annoying.

The viewfinder is a pop up design similar to the ones on my Kodak 35 and Monitor cameras. I prefer this style of viewfinder on scale focus cameras as they are very bright and easy to use with prescription glasses. One strange design element of the viewfinder is that when holding the camera in landscape orientation (which really isn’t landscape at all since this is a 6×6 camera), the shutter release is on the bottom of the camera. It can be a bit awkward to use and in use, I found it difficult to locate the shutter release without looking at the front of the camera. This limits the camera’s ability to capture quick and spontaneous shots, but I guess if I used it enough, I would get used to the location. I can’t help but think that the viewfinder should have been on the other side, but then I saw the picture to the right. The Super Sport Dolly to the right shows the viewfinder on the opposite side of the camera as mine. This means the shutter release is now right on front of the viewfinder. Although that means your hand could partially block the viewfinder, it would at least be a lot easier to locate. I should investigate to see if its possible to swap the sides of my camera.
I didn’t get around to finishing the CLA until mid winter, which is my low period of creativity, so it took a while before we had a semi-nice weekend in February with good sunlight, when I took this, along with 5 other cameras downtown Chicago for a photo shoot. For my first roll of film, I tried a roll of Kodak Portra 160. The 160 speed should work quite nicely with the Compur’s range of shutter speeds when using Sunny 16. This is a beautiful camera to display, it has what looks to be an excellent 5-element Xenar lens, and a really solid Compur shutter that is firing at the right speeds, so this has all of the signs of being an awesome camera to shoot with.
My Results
I had really high hopes for this camera considering the large and bright 5-element Schneider Xenar f/2.8 lens and my confidence that the shutter should be firing at mostly accurate speeds. My first venture with this camera was a trip to Chicago on a weekend in February in which the weather was an unseasonably warm 60 degrees out. That day I took with me 5 other cameras in addition to the Certo, one of which was the Kodak Monitor Six-20. You can read my review for the Kodak Monitor here, and in that review, I comment about the extremely sharp and colorful shots that the Kodak Anastigmat Special lens gave me. Although that camera had some pretty major light leaks, there was enough of the image that you could still tell the lens and shutter were working great. All I needed to do was cure those light leaks.
Well, I was disappointed to see that my results were nearly identical with the Certo Dolly. Once again, the shutter and lens delivered some amazingly sharp and colorful images, but they were all marred by some pretty significant light leaks.


Unlike the Monitor whose leak is most likely coming from somewhere in the bellows, I think that the light leak on this camera is coming from the door hinge. The light pattern is consistently the same on every single image. The width and consistency of the leak tells me is most likely is not coming from the bellows.
After getting the film back, I inspected the film compartment closely and I didn’t see anything that seemed bent or out of sorts on the hinge or anywhere in the film compartment for that matter. I think I will try to apply some adhesive black felt which I use to repair SLRs and rangefinders from the 60s and 70s. Although this camera never needed any type of felt like this, its possible that due to age, it needs a little more help.
If the door seal is in fact the only issue, this is a very easy problem to correct and one that makes me excited to use this camera again. I was really happy with the images I received otherwise. Center and edge sharpness is pretty consistent. I do not see any significant softness near the corners, and vignetting is kept to a minimum as well. I believe that this is the greatest benefit of a 5-element lens as opposed to a 4-element one. Not that anyone really needs to confirm that the Schneider Xenar is a great lens, but I’ll just say once again that barring any other technical snafu, you should always get very pleasing results from this lens on any camera.
I’ve said it in other reviews that I generally prefer cameras with a 6×4.5 aspect ratio, but 6×6 has its place as well. This is a camera you could take out if you are in the mood for square images, but need something more portable than a TLR. Plus as I said earlier, this camera was designed to shoot 6×6 and 6×4.5, I just need the mask to do it.
So, while I walk away from this first roll disappointed in the light leak, I really think this one will be an easy fix and will not require a bellows replacement like the Monitor will. Is the Certo Super Sport Dolly super or sporty? I don’t know about sporty, but it definitely is “super” in my book! Once I have an opportunity and time to shoot another roll with this camera, I will be certain to update this review with some more examples and my thoughts on a completely light-tight experience.
My Final WordHow these ratings work |
The Certo Super Sport Dolly is one of the most beautiful examples of 1930s nickel and leather German folding cameras. It has a flip up viewfinder that is bright and easy to use. The Xenar lens and shutter are very capable and produce excellent images. I had an issue with the orientation of the shutter release, but otherwise using the camera is consistent with other medium format folding cameras of the era. My Certo is the basic Model A version, but if you can come across a Model B or C with the removable lens, a rangefinder, and optional plate film holders, you’d have a very unique and capable camera that’s unlike any others of the era. Still, the Model A is a really cool camera that is as beautiful sitting on a shelf as it is something you can take out and make photographs with. | ||||||
| Images | Handling | Features | Viewfinder | Feel & Beauty | History | Age | |
| 2 | 0 | 0 | 1 | 2 | 0 | 40% | |
| Bonus | +1 for inexplicable “cool” factor, I thoroughly enjoyed using this camera and the results that I got for it make me excited to use it again | ||||||
| Final Score | 8.0 | ||||||
Additional Resources
http://camerapedia.wikia.com/wiki/Super_Sport_Dolly
http://camera-wiki.org/wiki/Super_Sport_Dolly
https://mikeeckman.com/photovintage/vintagecameras/dolly/index.html
http://www.120folder.com/certo_ssd.htm
https://filmosaur.wordpress.com/2014/06/22/meet-the-camera-certo-super-sport-dolly/
http://connealy.blogspot.com/2011/03/certo-dolly-super-sport-rf-model.html
http://www.dresdner-kameras.de/firmengeschichte/firmen/firmen.html#Certo