

 What is it?
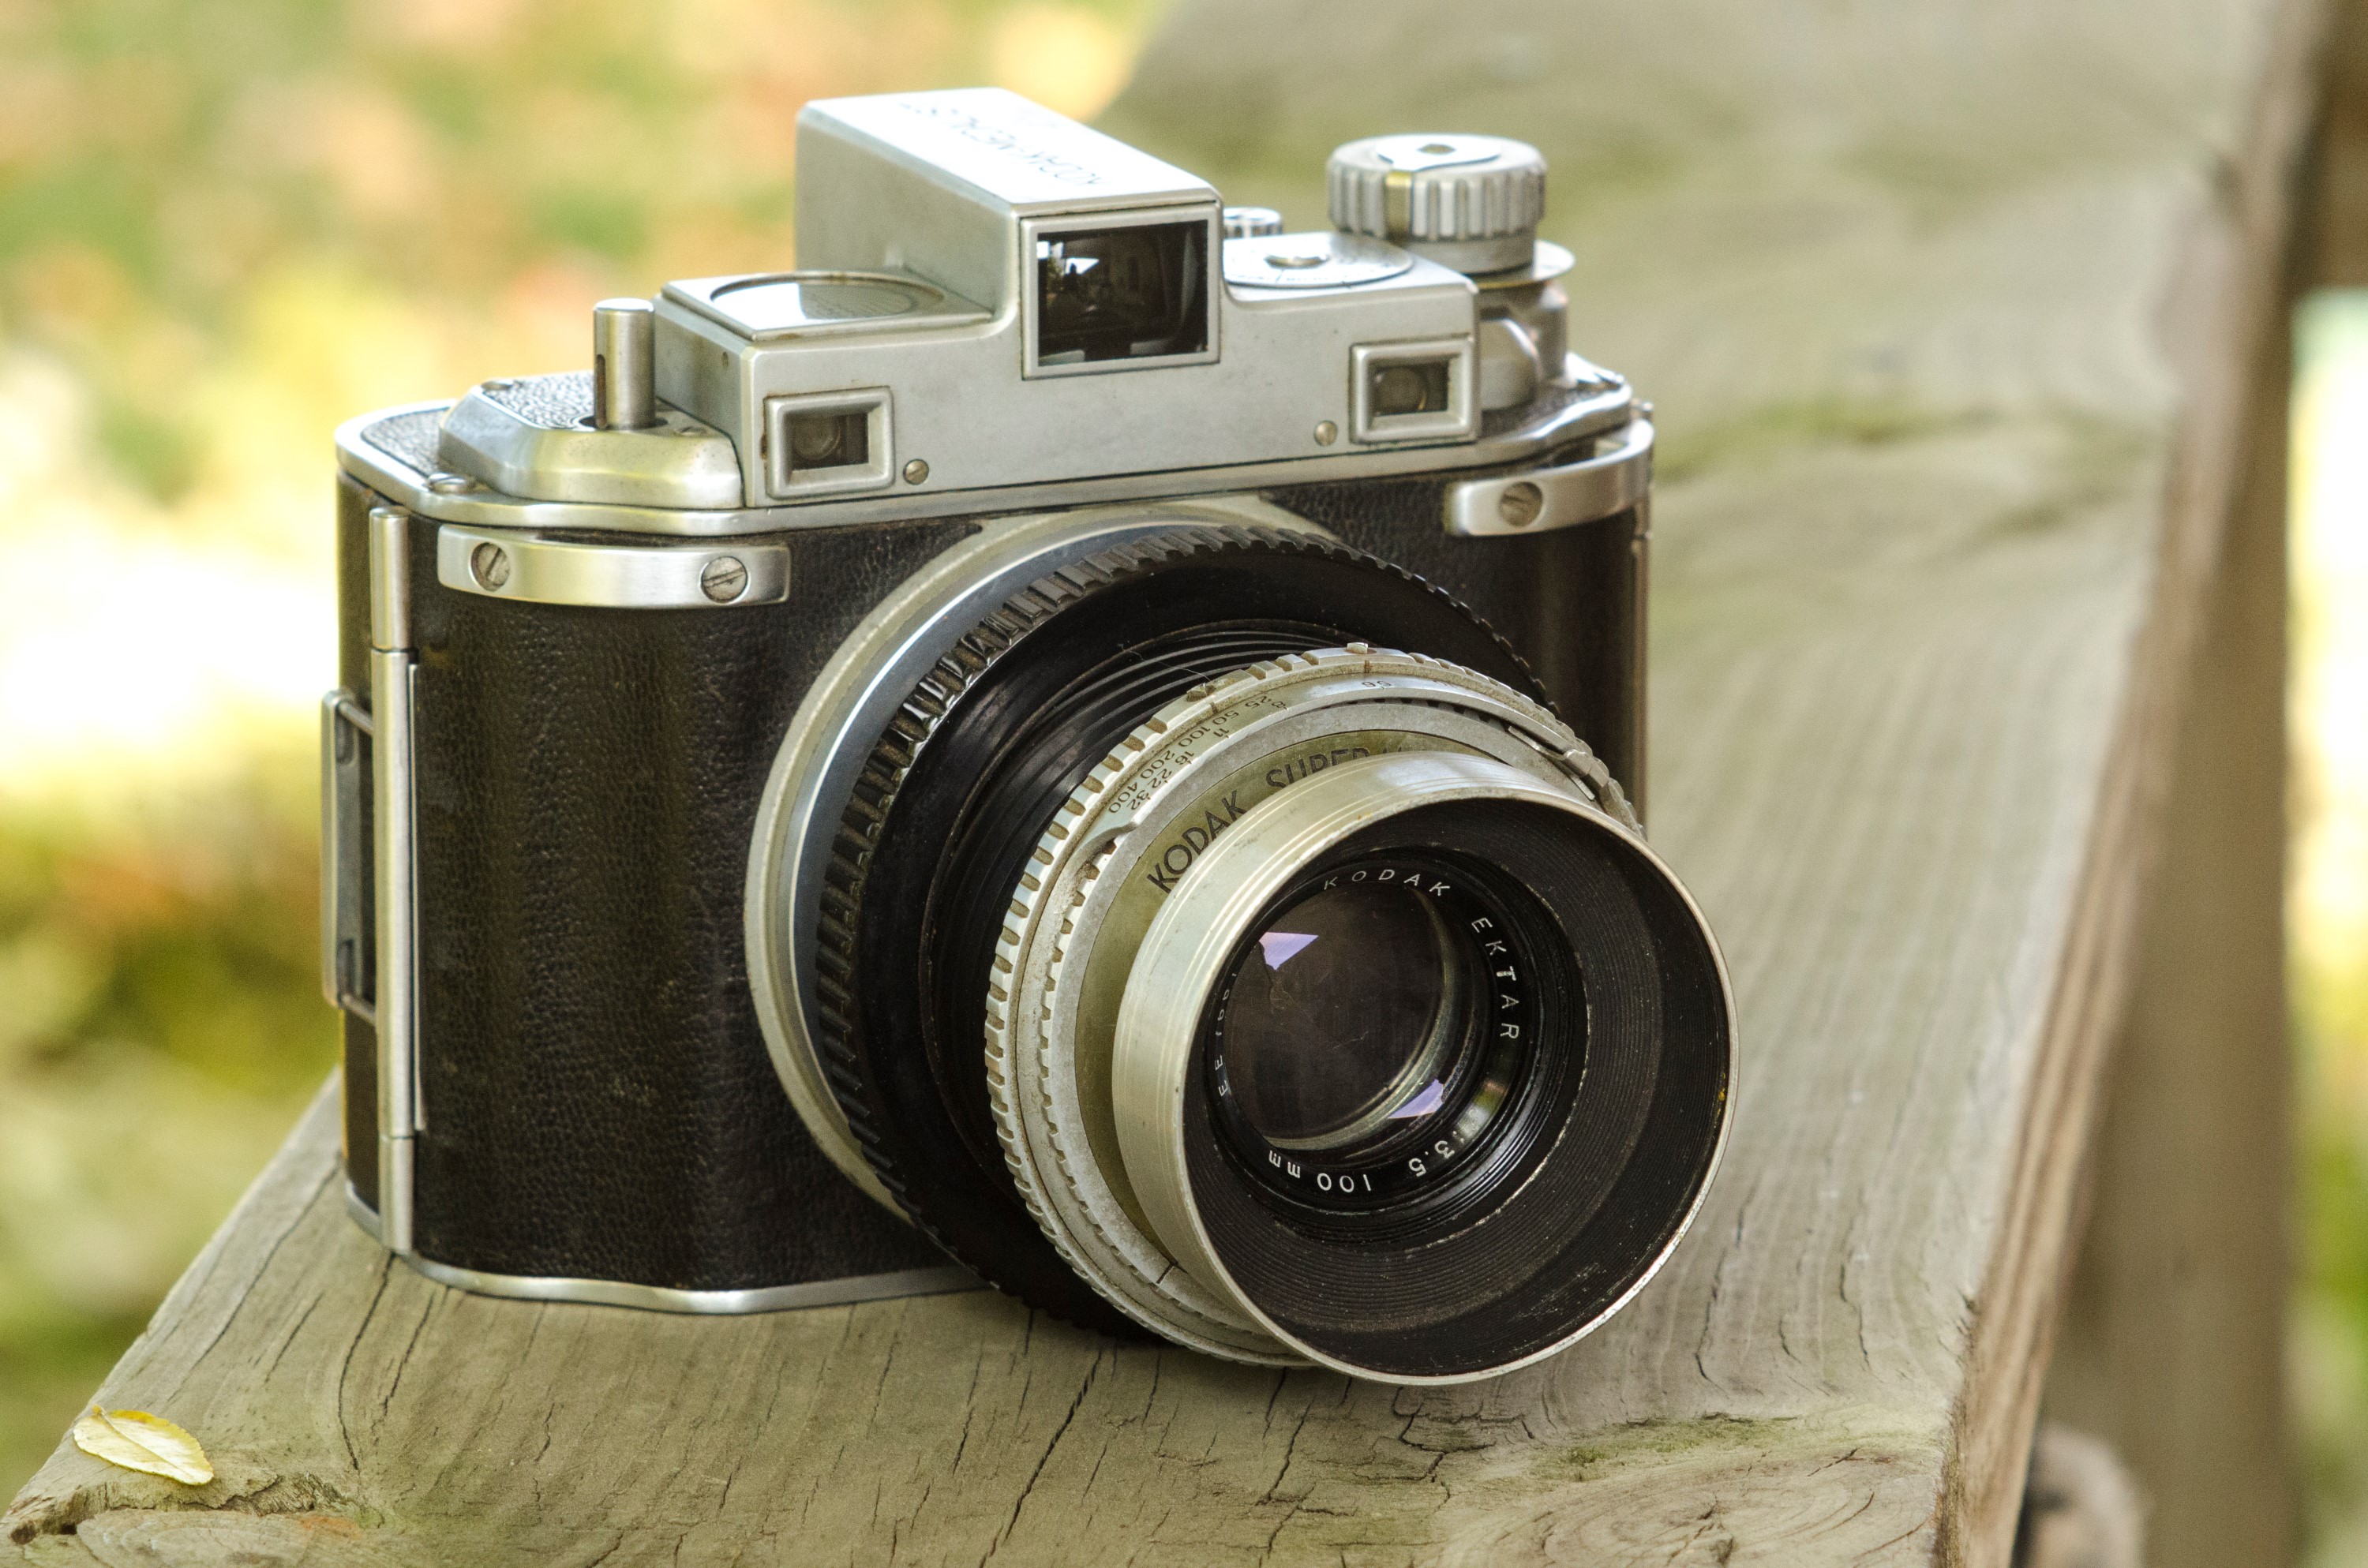
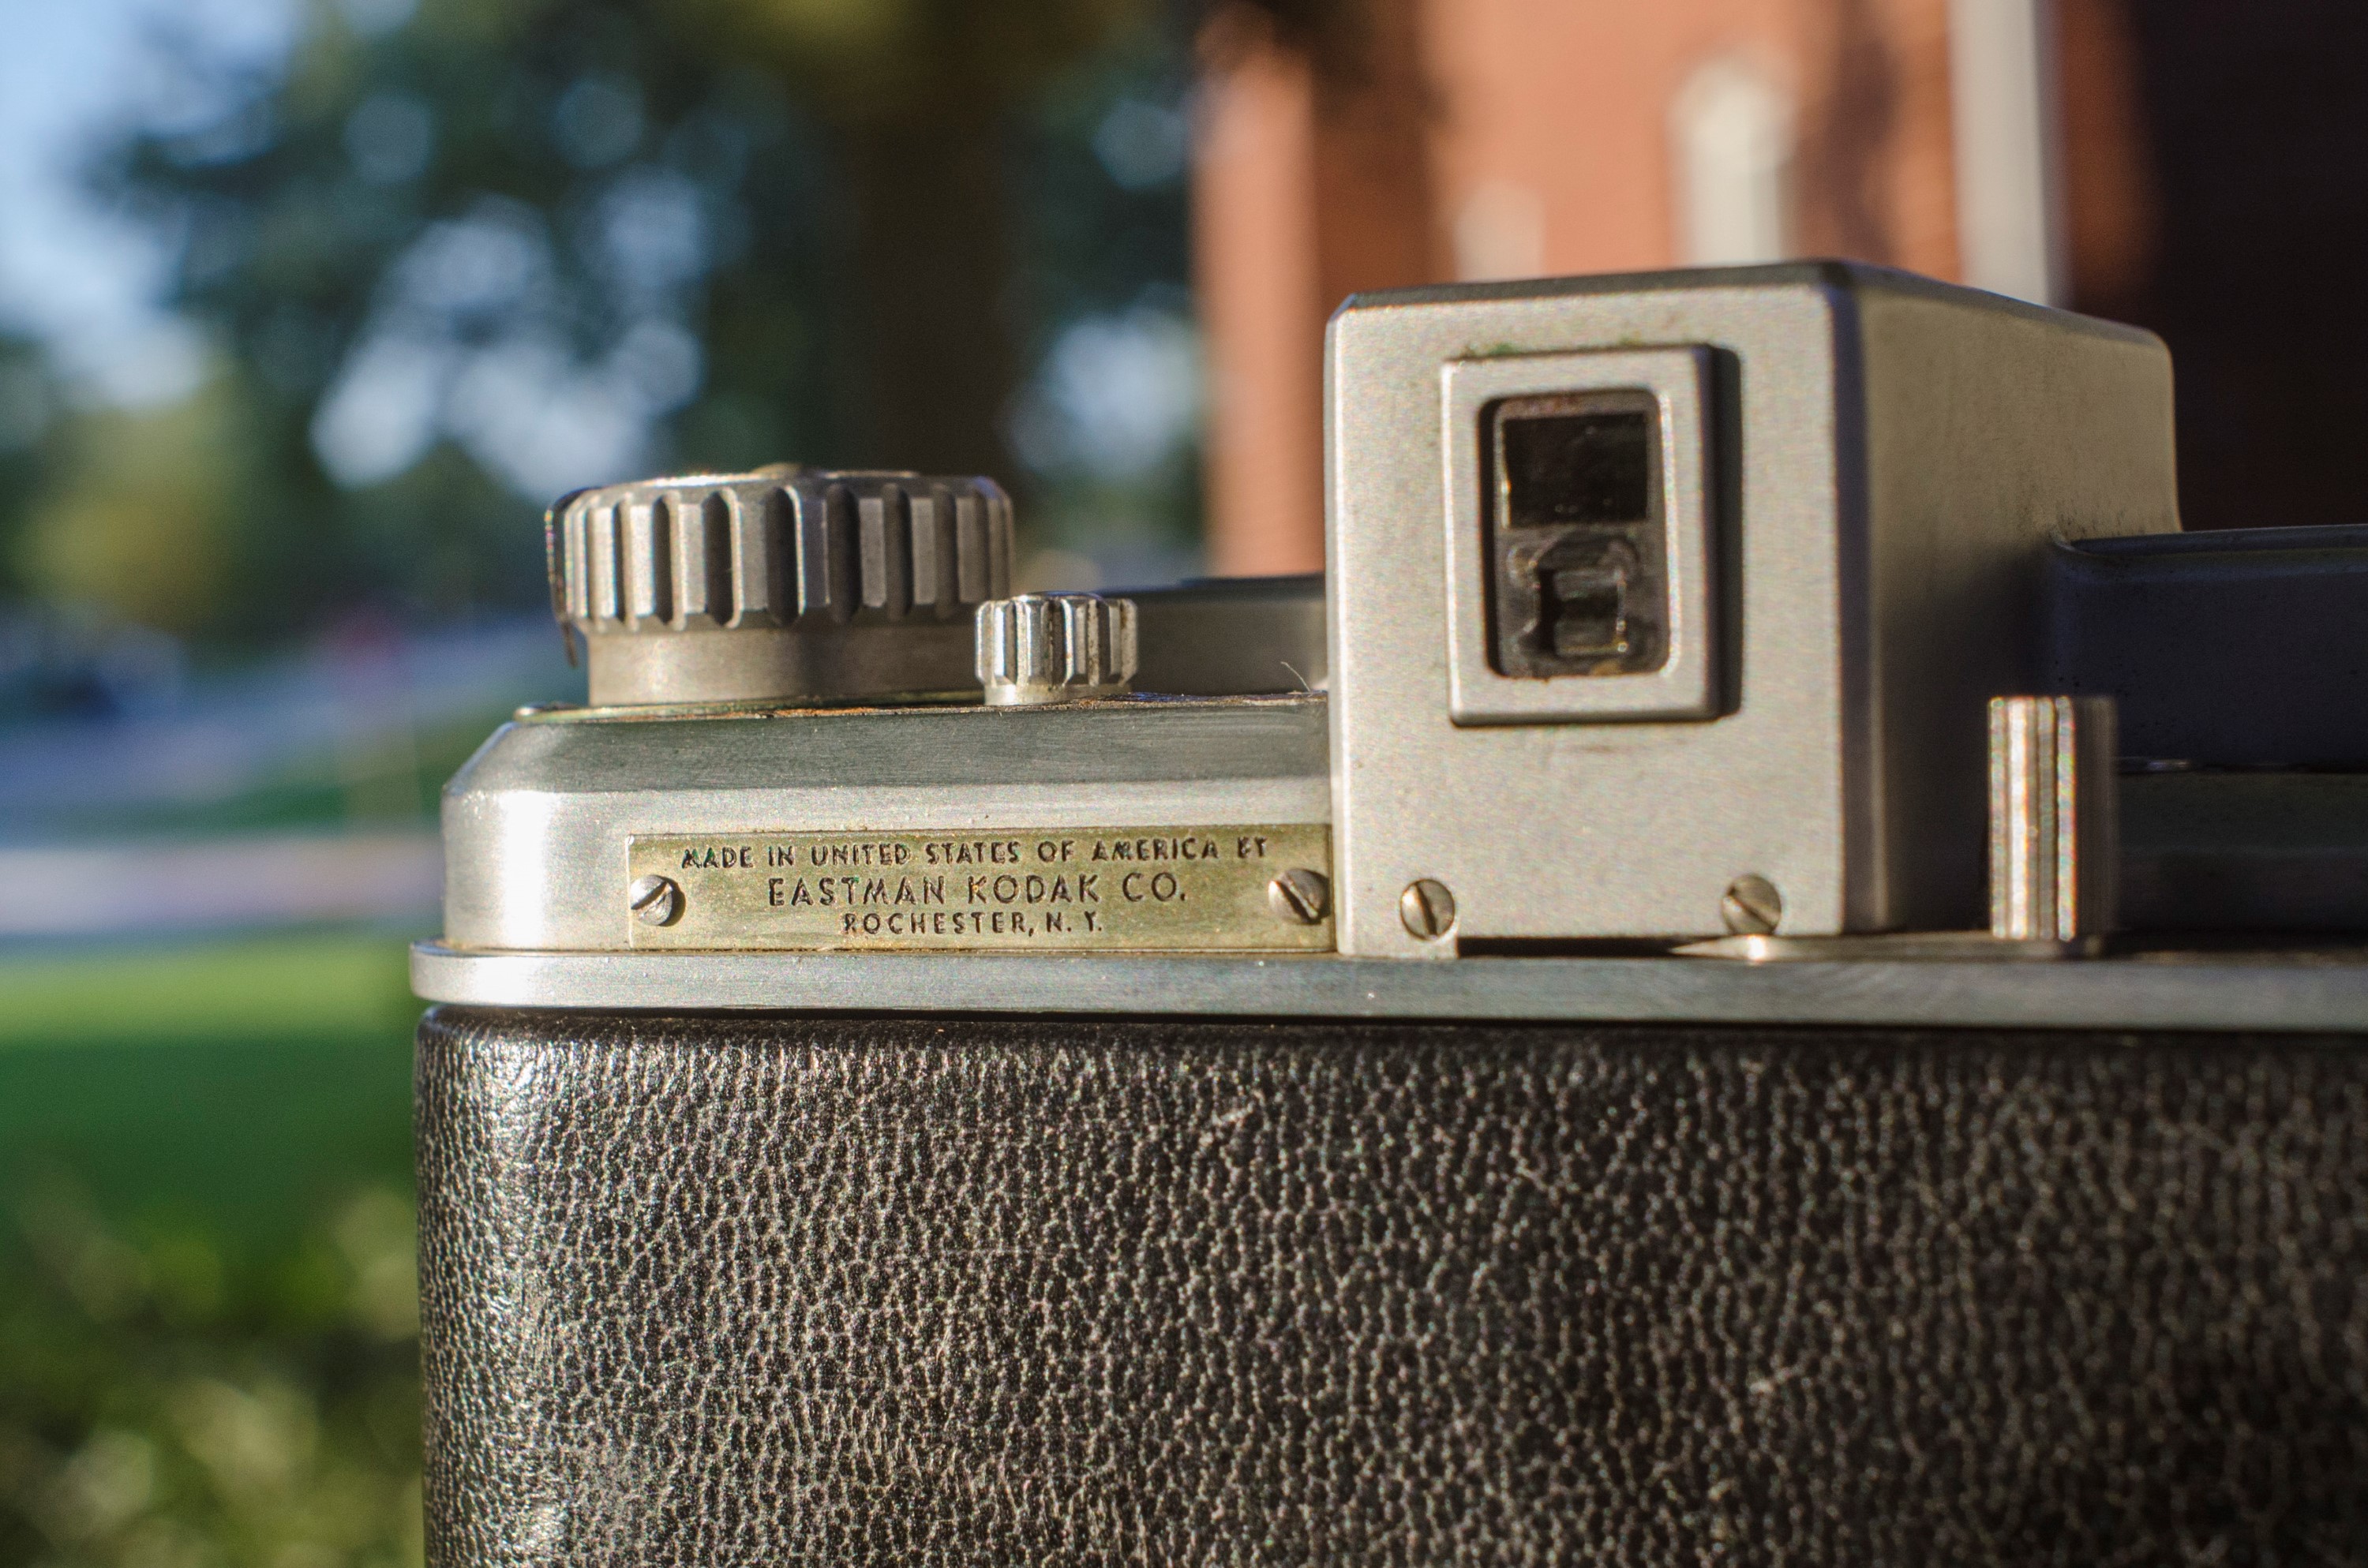
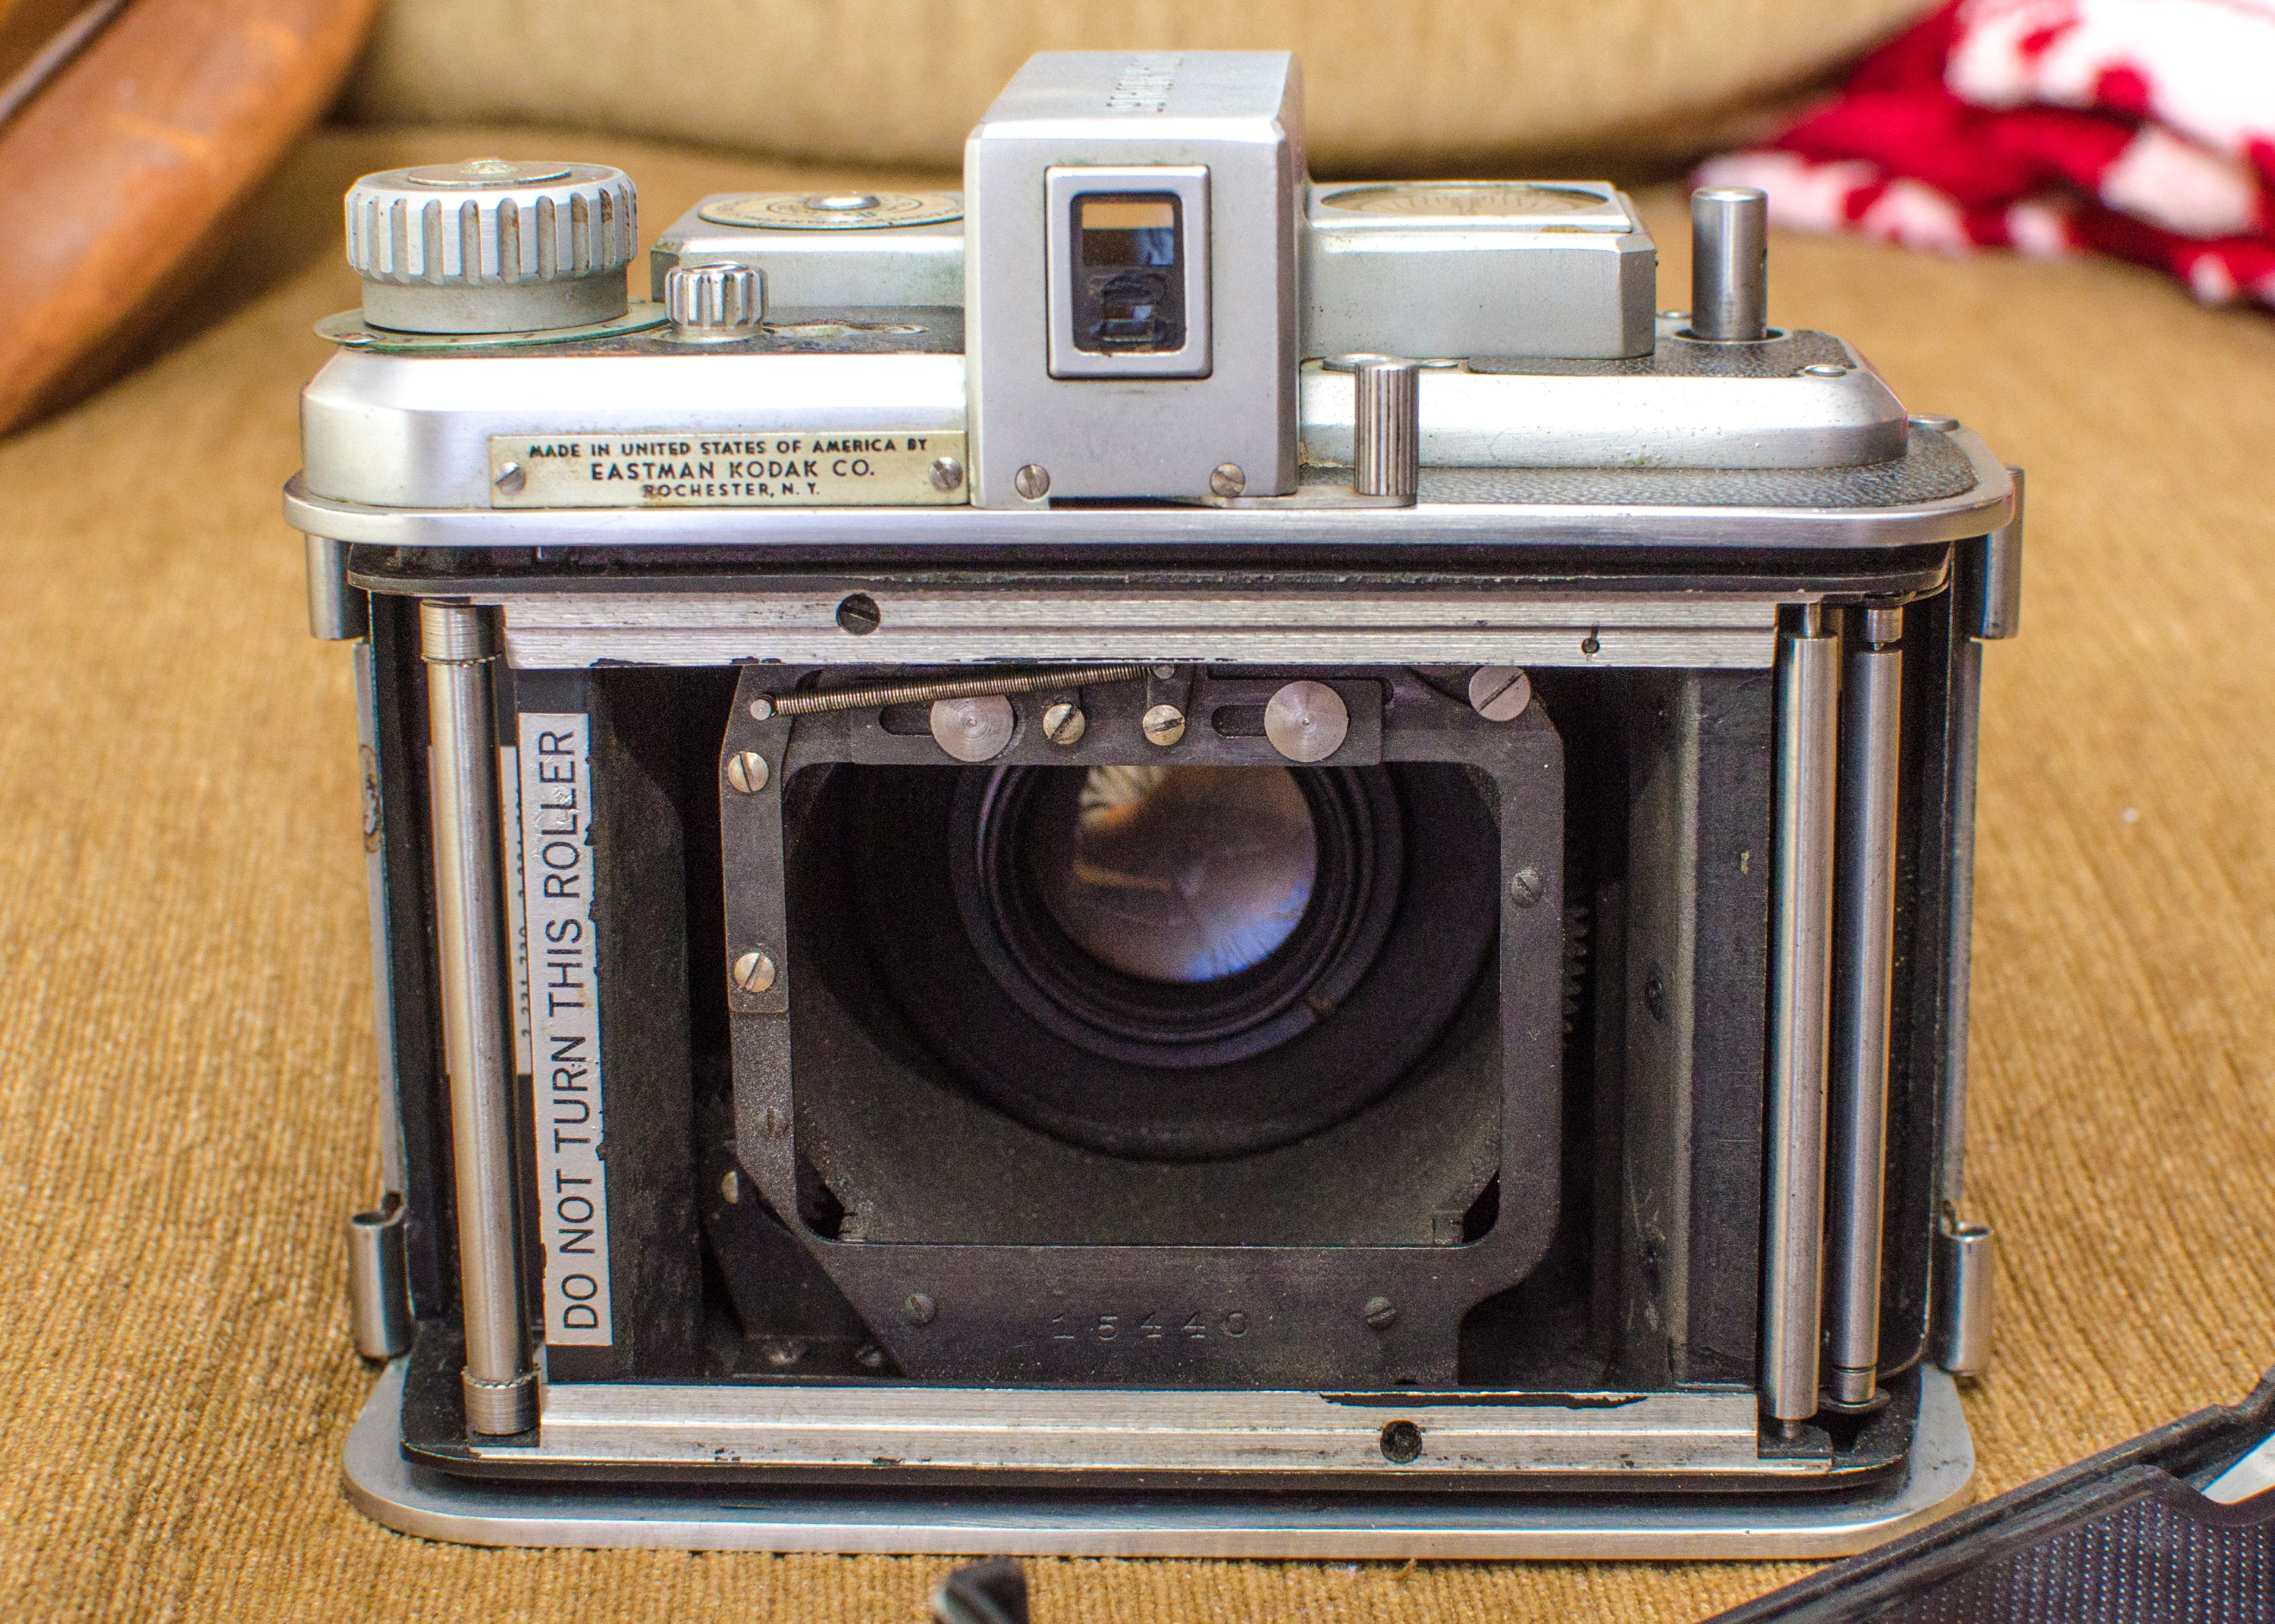
This is a Kodak Medalist rangefinder camera made in 1944 by the Eastman Kodak company out of Rochester, NY. This camera is considered by many to be the pinnacle of American camera manufacturing. Other highly regarded Kodak cameras were actually made in Germany, but not this one. This is a 100% American made camera made for the US military during World War II. It is one of the very few cameras that were manufactured and sold during the war making it the only camera in my collection from the year 1944. It has a well built Ektar lens that is extremely sharp even by today’s standards, and a mirror-less prism based rangefinder for incredibly accurate focus. The Kodak Medalist is considered by many to be the most sought after antique American camera ever made.
Film Type: 620
Lens: 100mm f/3.5 Kodak Ektar coated 5 elements
Focus: 3′ 6″ to Infinity
Type: Coupled Rangefinder
Shutter: Kodak Supermatic No. 2 Leaf
Speeds: B, 1 – 1/400 seconds
Exposure Meter: None
Battery: None
Flash Mount: None
Manual: http://www.cameramanuals.org/kodak_pdf/kodak_medalist.pdf
History
By the mid 1930s, tensions in Europe were rising and it was clear that war was getting closer. As photography became more and more advanced, the need to take photographs on the battle field was a growing need for the military of the United States and other European countries.
In order for a camera to be effective in a war, it must be rugged, reliable, have excellent optics, and portable. If there was one country that was already good at making cameras like this, it was Germany. The problem is that Germany was the country that was on the other side of the looming conflict, so being able to rely on their technology was not going to happen.
The options that existed in the late 1930s which would meet the requirements of a “war camera” were very limited. There was an abundance of large format plate cameras that had great lenses and could produce excellent images, but they were very big and not portable. Plus, their increased size and complexity meant they would not stand up to the abuse that a camera might encounter during a war.
There were folding, box, and TLR cameras that all could use medium format roll film and were relatively small, but each of them had their own sets of challenges. Box cameras almost never had good lenses, folding cameras were fragile, and TLR cameras were awkward to use in fast action situations.
We had small 35mm cameras, but most quality 35mm cameras in the 1930s were made in Germany. The few that were produced in the USA were very basic Bakelite cameras like the Argus A and C series, and the Kodak 35.
So with no better option, Kodak set out to design a camera that could shoot medium format film, was rugged, had an excellent lens, and was portable.
Since 1927, Kodak had employed an independent industrial designer named Walter Dorwin Teague to help design some of their products. Teague’s company, WTDA, had come up with designs for many products such as automobiles, Steinway pianos, gas station equipment, cars, radios, and many more.
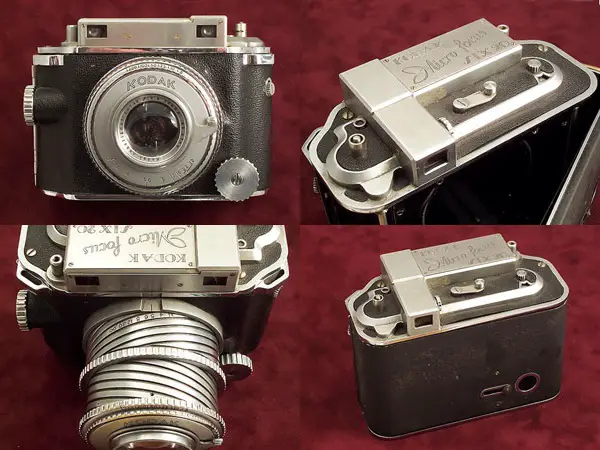
It was Teague that designed the original Kodak Micro Focus Six 20. It was a large bodied aluminum camera that had a rangefinder on top, a 100mm Kodak Ektar lens, a shutter with a top speed of 1/400 seconds, and a unique collapsible lens design with an exposed helical. Although the camera wasn’t exactly small, this lens design allowed for the lens to collapse into the body minimizing it’s space when not in use.
The Micro Focus Six 20 was merely a prototype and was never sold to the public. No production records were kept, so there is no way to know how many were made, but that number has to be very small. For unknown reasons, the design of the camera would change before it was released as the Kodak Medalist. The top plate and rangefinder were completely redesigned, and a couple of knobs were put in different locations, but otherwise the two cameras shared many of the same design elements.
The earliest examples of the Kodak Medalist did not have an anodized helical, but this was quickly changed to have a black anodized finish which was a requirement as many of these cameras would be used by the US Navy and exposed aluminum would quickly oxidize due to the high amounts of salt water in the air. The later Medalist II would still have an anodized finish on the helical, except it would be silver, not black like on the first Medalist.
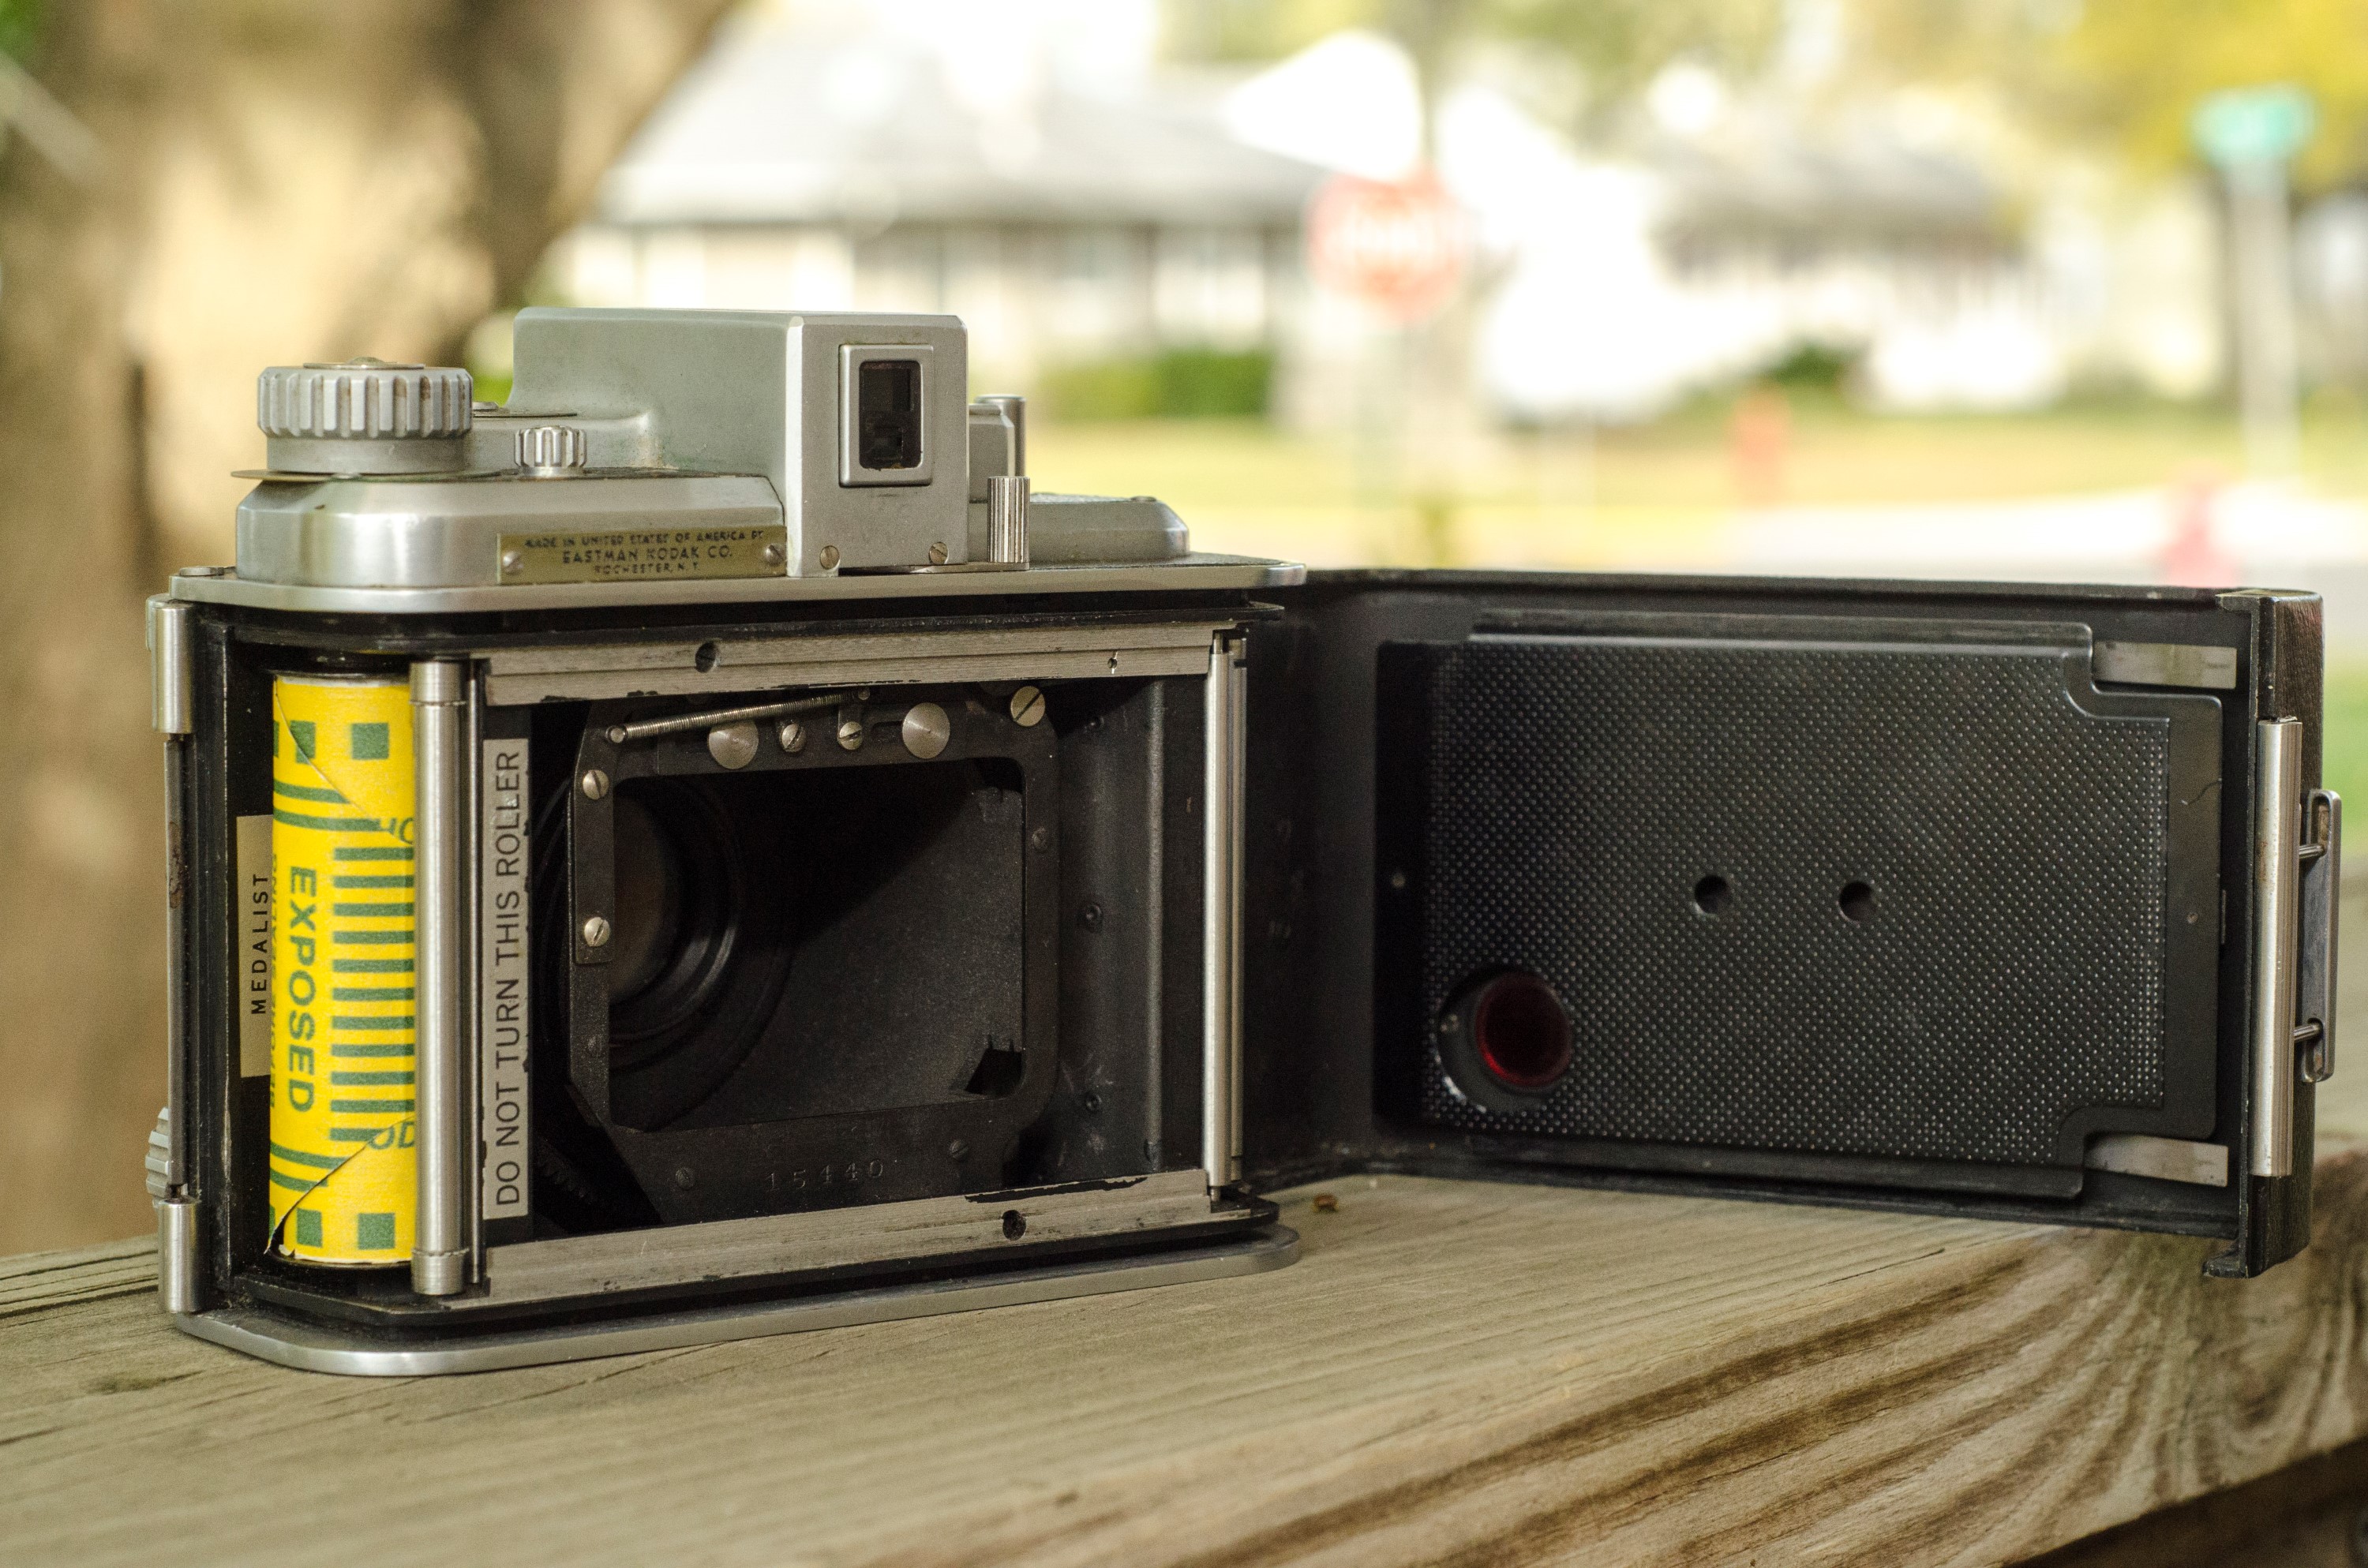
When it was released, the Kodak Medalist was a state of the art camera with many features that were not found on other cameras. One feature was the dual hinged removable film back. There were spring loaded hinges on both sides of the camera which allowed the door to be opened either to the left or to the right, or removed altogether. When removed, an accessory ground glass film black could be installed which allowed for the use of film packs, instead of roll film. This was the only camera that I am aware of which had the ability to use multiple types of film during the 1940s.
The viewfinder was also pretty unique. From a distance, it looks like there is only one window on the back of the camera. On the contrary, the rangefinder window and the viewfinder window are actually separate. The viewfinder window is on top and the rangefinder directly below it. By having both windows so close together, if you positioned your eye in just the right spot, you could see both images at the same time. This would be the closest thing to a combined image rangefinder/viewfinder until well after the war.
Another cool fact that isn’t outwardly obvious is that there are no mirrors inside of the Medalist’s viewfinder. Everything is done with prisms, which means that the images were quite a bit brighter and easier to see than other cameras of the era. Yet another great thing about prisms, is that now in 2015, nearly 70 years after these cameras were made, there is no risk of desilvering of the mirrors like is often found on other vintage cameras. Assuming the camera is clean, peering through the viewfinder of a Medalist in 2015 would be just as bright and clear as it would have when it was new.
The Medalist had an automatic frame counter which would stop the film before the next frame, allowing a photographer to not have to worry about peering through a red window when advancing the film. There was still a red window with a spring loaded door, it would only have to be used when loading in a new roll. The photographer would only need the window to find the first frame, and then the camera would handle the rest of the roll.
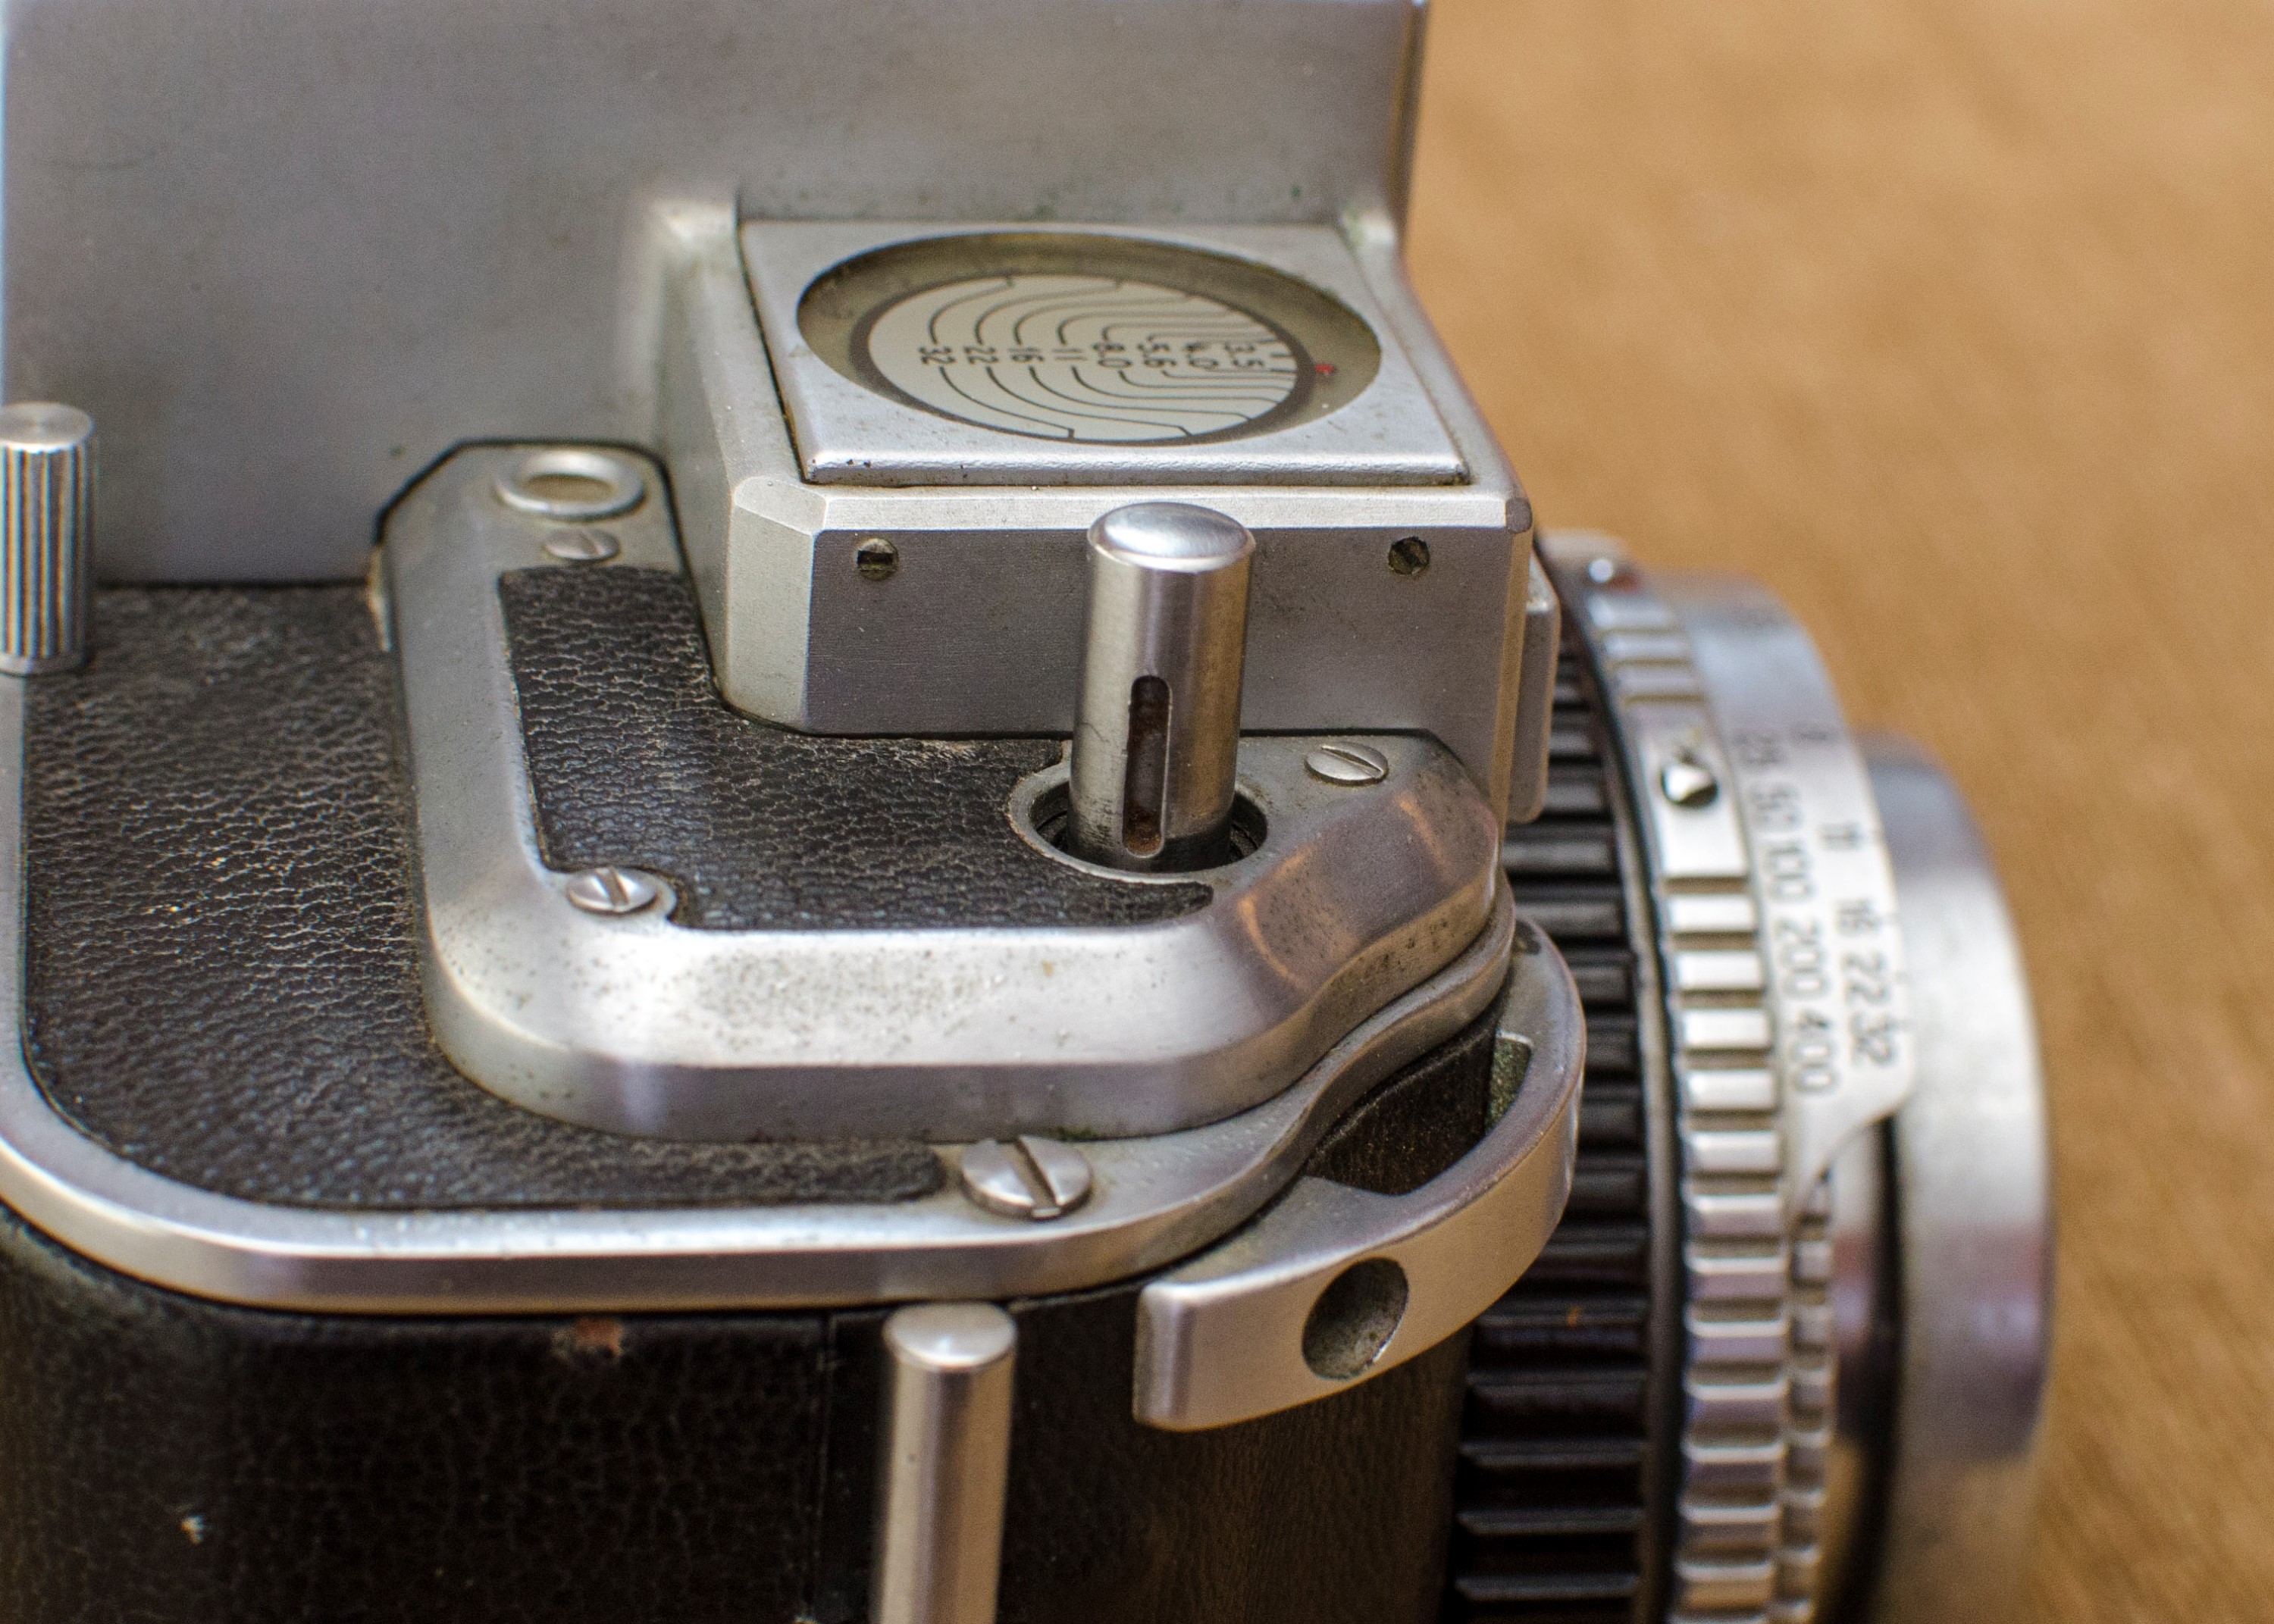
It also had a pretty unique (if not very accurate) depth of field indicator on the top plate which would spin indicating what would be in focus depending on the position of the lens.

Finally, and perhaps the best feature of the Medalist was it’s lens. Although many German made lenses were considered to be very good, the 101mm 5-element Kodak Ektar lens was out of this world. This lens is so sharp that it’s ability to resolve fine detail rivals that of the best lenses made today. The need for an incredibly sharp and accurate lens is what made the Medalist so useful for the military. This camera could be placed on boats and airplanes and used to take aerial or otherwise very far away shots of enemy territory, and the negatives could be enlargened to show great detail.
The US Navy stripped some 200 Medalists of their lenses to be used with stereoscopic aerial reconnaissance cameras. Even the British Air Force used Medalist cameras for their war effort. Although there is no way to prove this, but I truly believe that had the Medalist not existed, it could have possibly changed the outcome of the war.
The entire production of the Kodak Medalist was used for military purposes, and little to no models were sold for civilian use. As a result, there is no information about retail cost or even how the camera would have been marketed.
By the time the war ended, the Kodak Medalist II was released which had some new features and lost two others. The differences between the Medalist I and II are:
- Flash sync capability was added to the Medalist II, which took the place of the fine focus adjustment wheel. This made flash photography considerably easier on the new model.
- The new flash sync capability necessitated the removal of the self-timer, apparently the camera couldn’t fit both features into the body.
- A new Lumenized coating was put on inner and outer lens elements. My research says that there is a coating on the Medalist I, but it is not as obvious. The front element does not have a blue/purple glow like on most coated lenses.
- Silver coating on the helical in place of the black coating on the Medalist I. The purpose of the black coating was to prevent the aluminum from oxidizing while subjected to salt water from the sea. Kodak intended this camera to be used by the Navy, so this was a welcome feature. I have read that the very first Medalists were uncoated, so its possible to see a Medalist I without the black coating.
- A revised Kodak Medalist II logo on the top plate and a slightly different design to the depth of view dial.
- Removal of the shutter lock collar around the shutter release for timed shots. The Kodak Medalist can have the shutter locked open for long exposures. This feature was removed from the Medalist II because it didn’t work too well and would often jam the shutter.
- Finally, there was an internal change to the film transport mechanism. I am not sure exactly what was changed, but it is believed that Kodak made some improvements to the Medalist II which greatly reduced the chance that the film transport / frame counter could fail. Apparently this was a common problem with the Medalist I.
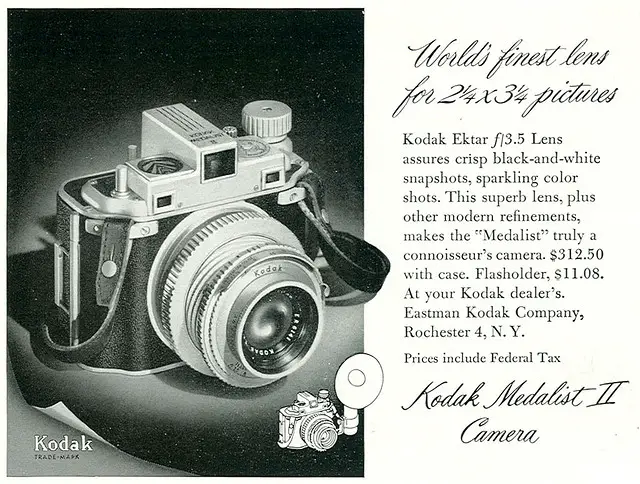
The Medalist II was sold with a leather case in 1947 for $312.50, which when adjusted for inflation, is over $3300 in 2015 dollars. Despite the very high price, the Medalist II still sold reasonably well. Kodak took advantage of it’s reputation as a “war” camera, and marketed that it was better than Germany’s finest. I have not been able to find any kind of production numbers, but based on how often they come up for sale today, I would have to believe that at least 10,000 or more were made.
The US military would continue to use the Medalist cameras even after the war. According to a post on the Vintage Camera Collectors Facebook forum by member, Rick van Nooij, Medalist cameras remained in military inventory all the way up to the Vietnam war.

In addition to the interchangeable film backs, there were a fair number of accessories made for the Medalist. The front lens element used Series VI hoods, filters, and caps. There was a custom flash attachment and of course the leather case.
Although the majority of the world was using 120 format film for medium format photography, Kodak was using their own 620 format which had thinner spools, but was otherwise identical to 120 film. It’s worth noting that it is physically impossible to insert 120 film into the camera because the 120 spool is too big. Over the years, this created an aftermarket to adapt the Medalist to accept 120 film, and there are even some reports that 828 film was used as well.
620 film has been out of production since 1995, so for collectors today, their options are to either find expired 620 film, re-roll 120 film onto 620 spools which I will cover later in this article, or pay to have their Medalist modified to accept 120 spools. Ken Ruth from Bald Mountain Antique Camera and Optical Instrument Repair offers a conversion to grind out the inside of the Medalist (I or II) to accept 120 film. Ken has a couple of different options for modifying the Medalist. You can optionally only have the supply side modified or have both the supply and takeup sides modified. Prices vary depending on which Medalist you have and which conversion you get.
After the war, American patriotism was at an all-time high. Americans were proud to own American made products, especially ones that were actually used by the war effort. The Kodak Medalist camera not only was made in America, but it had a reputation as a truly world class camera. Although expensive, it was extremely highly regarded.
The original Medalist remained in production until 1948, and the Medalist II until 1953. In 1953, Kodak released the Chevron which replaced the Medalist as their top of the line medium format camera. The Chevron would have a body nearly identical in size and also featured interchangeable film backs, but it had a new rangefinder, and a wider 78mm Ektar lens. Like the Medalist, the Chevron was also very expensive, but by this time, there was less demand for a very expensive medium format American rangefinder, and as a result, the Chevron sold poorly, and would eventually be discontinued in 1956.
Today, the Kodak Medalist I and II still enjoy the same level of respect as they did 70 years ago. Because of their role in World War II, they have cross appeal to people who collect both cameras and war memorabilia. These cameras are highly sought after and often can sell for several hundred dollars, even in average condition. The Medalist IIs generally fetch slightly higher prices than the original models. If you find a Medalist II in excellent shape that has received a recent service and is film tested, you can expect to pay several hundred dollars for one in great shape.
My Thoughts
The first time I saw a Kodak Medalist, I knew I had to have one. The problem is, many people feel the same way I do, and there is a lot of demand for them. Of any camera in my collection, this one is probably the most sought after, and therefore, the most expensive.
I would follow a couple of them for sale on eBay, but the prices would quickly escalate out of my reach. While I absolutely think the Medalist is worth every penny of the prices they go for, I just cannot afford to spend several hundred dollars on a hobby.
As fate would have it, a lady that posts on a Vintage Camera group which I am a member of, made a post that she had acquired a large collection of old cameras from a relative. Of all then models she listed, a Kodak Medalist was one of them.
I contacted her and asked what her lowest price was, and she and I agreed on a fair price that was within my budget. Although I had favored the Medalist II, I was not picky since I knew they were consistently out of my price range. I paid her and a couple of days later, the package arrived.
The Medalist arrived in good shape. It certainly wasn’t mint. The body showed some signs of oxidation, but was in otherwise good condition. Most importantly, the lens was clean and free of scratches, fungus, or haze.
The viewfinder was dirty, so I took off the top plate to clean the viewfinders. For as complicated as the Medalist is, getting the top plate off is surprisingly easy.
First, you must make sure that the lens is fully retracted into the body. Pay attention to the position of the needle in focusing scale.

Next, unscrew four screws, two on the front of the camera next to the two rangefinder windows, and two more on the back immediately below the viewfinder. Once the 4 screws are removed, the top of the viewfinder simply lifts off.
You must pay special attention to the focusing scale as the scale will come off with the top plate. I have seen a repair manual for a Medalist II that suggests the focus scale is not attached to the top plate. This may be true for the Medalist II, but it was not the case with my Medalist I. The entire scale is fully encapsulated in that top plate. Its only connection is by a gear that connects to the camera. When lifting off the top plate, pay special attention to not move this gear or your scale may be off.
With the top plate off, you should have access to the rangefinder and viewfinders. The first thing you’ll notice is that everything is done with prisms. There are no mirrors or beamsplitters inside of the Medalist like on most rangefinders. This is good because mirrors can desilver over time making them difficult or even impossible to use. When clean, the prisms in the Medalist should be as clear and bright as the day the camera was made.
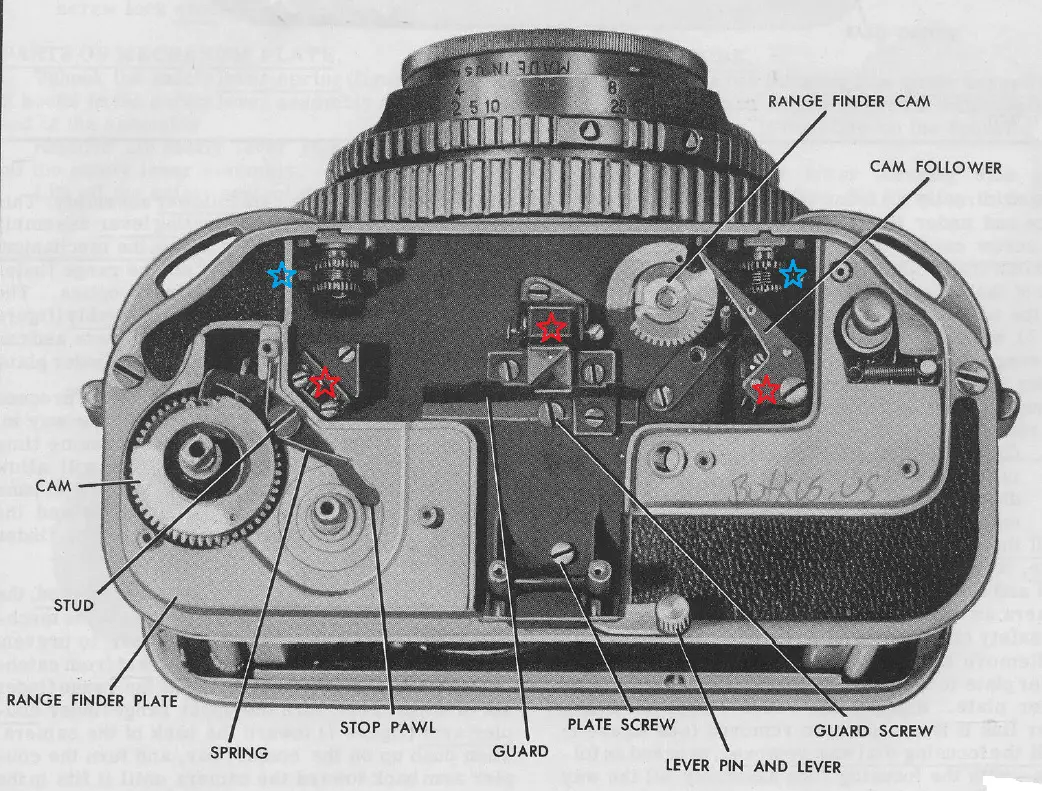
There is a black “accordion” piece of metal that acts as a cover to the viewfinder which can also be unscrewed which will make access to the viewfinder glass and inner prism easier. You can see this piece in the picture above.
Clean the two round pieces of glass (indicated by blue stars), and the 3 prisms (indicated by red stars) with Q-tips and your choice of 91% or higher rubbing alcohol or lens cleaner. Notice that the middle prism has two pieces and is very sharp. Be careful not to snag your Q-tip. In this image, the prism on the right is spring loaded and moves when you focus the camera. Be careful not to pop it out of position when cleaning it. The prism on the left is rigid.
If you discover that your rangefinder is out of adjustment, this is when you would make that adjustment, but thankfully, mine was accurate, so I did not have to mess with it. I simply cleaned the glass and prisms as best as I could and put everything back together, paying special care not to allow the focus scale to move.
If you find that the front lens element is dirty or has dust in front of the shutter, you can remove the whole front lens assembly by unscrewing it. I was able to unscrew mine using only hand strength. On many vintage cameras, the shutters might need some cleaning, but mine had accurate shutter speeds. I do not know if I am just lucky, or if that the Medalist was such a well built camera that the shutter is less likely to gum up over time. In either case, if you needed to clean the shutter, you can easily access it by removing the front lens element.
Once I had my viewfinder/rangefinder clean and I wiped down the lens and the body, my Medalist was ready to go shooting! Well…almost.
The Kodak Medalist was designed to use 620 film which was discontinued in 1995. Other than finding expired rolls at garage sales or on eBay, you will not be able to find any 620 film anymore. The good news is that the 620 film is exactly the same as 120 film, the only difference is in the spool. 120 spools are both longer and have a larger diameter than 620 spools.
There are some 620 cameras like the Argus 75 which can accept 120 spools on the supply end, but the Kodak Medalist is not one of them. You cannot simply shove a 120 spool into a Medalist. Don’t attempt it as not only will it not work, but you could actually damage the camera in trying to do so.
There are places which can modify the Medalist to accept 120 film, but this requires grinding out the film compartment to allow for the larger spools. One such place is Bald Mountain Antique Camera and Optical Instrument Repair. If you send your camera to them, they can make the modification for you, but its not cheap to do. To convert both the take up and supply side of a Medalist I, the cost is in excess of $400 and that does not include any type of shutter cleaning, or return shipping. To get the full conversion, plus a CLA, and pay for shipping both ways, you are looking at close to $600. If you are like me, this isn’t an option, you will need to find some other way to use 120 film in your Medalist.
Some people will tell you that there are 3 options when it comes to using 120 film in 620 cameras, but one of those options involves grinding and cutting the 120 spool to make it a similar size as a 620 spool. I think this is a very bad idea and something I would definitely not recommend. For one, you risk not only damaging the film as you are grinding away at the spool, but the plastic shavings could very easily get inside of the camera and cause more trouble than its worth. So that leaves you with 2 options.
Both of the two options that remain involve taking 120 film and rolling it onto a 620 spool. The process to roll 120 film onto 620 film isn’t all that difficult, but it does require that you own at least 2 blank 620 spools and have a darkroom or some place where you can do this in total darkness.
If you want to spool your own film, there is a good article and video on brownie-camera.com which shows you one way to do it. I disagree with one aspect of this tutorial because they unspool the film onto nothing, and then take the unspooled film and roll it onto a 620 spool. I prefer to use 2 spools and never leave the film unspooled. The reason for this is that by always keeping the roll on spools, the proper tension is always on the film and there is no chance that it could roll incorrectly.
Here is a different video which shows my preferred method using 2 spools. In the video, he also talks about how to handle if there is a bubble, or bump where the film is taped to the backing paper. As illustrated in the video, the most important part is to make sure this is done in darkness and that you keep the film taught while rolling it back onto the 620 roll. You also have to be very careful to “catch” the end of the film and tuck it in place when rolling it onto the 620 spool. If you’ve never done this before, it might be in your best interest to sacrifice one roll of 120 and try this in daylight so you can see how it goes. It really isn’t hard, and even if none of my instructions make sense, if you just try it once, you should get the hang of it after one try.
If this seems to be too difficult to do, or you just do not trust your abilities to work in total darkness, you can buy 620 film that someone else has already spooled for you. B&H Photo and the Film Photography Project both sell 120 film on 620 spools. Prices start at $14 per roll and go up from there.
Once you have some film on 620 spools and start shooting, make sure whatever lab you use to develop your film will return your spools to you. I have had good luck with Dwayne’s Photo in Parsons, KS who has no problem returning my spools. Used spools go for $5 and up on eBay, so once you acquire a few, you do not want to lose them.
Loading Film
Often, I write reviews which include information covering interesting quirks that you may encounter while using that camera, but there is no camera in my collection that requires such a unique process for loading film and shooting with it, than the Medalist.
I’ve received a lot of feedback from many experienced vintage photographers who say that they like to refresh themselves by reading the manual each time they load a new roll into the Medalist. I also recall reading a story about a guy who took his Medalist into a camera repair shop to be cleaned, and the first thing the repairman said was “Nice camera”, and the second thing he said was “Read the manual”.
So, with that in mind, I encourage you to read the manual. Although I have provided a link to the Medalist’s manual at the top of this page, I’ll include it a second time:
http://www.cameramanuals.org/kodak_pdf/kodak_medalist.pdf
The steps to load a Medalist I and II are almost exactly the same. The only difference being that the Medalist I has a shutter lock feature which can prevent normal operation of the camera. On a Medalist I, it is very important to make sure that the shutter release button is in its fully upright position before doing anything on the camera. When loading film into a Medalist I and when shooting with a Medalist I, you must make sure EVERY TIME that the shutter release is in its fully upright position. This feature was removed from the Medalist II so therefore, it is not a concern.
The Medalist is a wonderful camera, but these steps must be followed exactly. Assuming you’ve already read the whole manual, please read each of these steps very carefully. This is definitely a time where you can not be too prepared.
Step 1
Make sure the exposure counter is at ‘0’. The film counter can be manually rotated by gently pressing down on the metal ring around the knob and rotating it. When you see the number zero in the window, pull up on the metal ring while gently wiggling it. You must make sure that the ring is properly seated in the ‘0’ position. When this happens, the ring will not continue to rotate.
Step 2
Open the back of the camera by squeezing both sides of the film release catch and removing the whole door. You don’t have to completely remove the film door to load film, but I find it easier with the door completely removed.
Step 3
Load the film on the right side (supply side) of the camera. There is a metal roller that slightly swings out while inserting a fresh roll. If you’ve ever loaded any type of roll film before, loading the film is pretty straightforward, although doing it in the Medalist is rather tight. You must make sure you are inserting the roll perfectly straight, otherwise it will not go in. I have found that by resting the new roll of film on the roller and then using both thumbs, gently press the roll of film into the chamber using even pressure. It should “snap” into place.
Thread the paper leader onto an empty 620 spool and insert that into the left side (take up side) of the camera. Once again, this process should be pretty similar to any other roll film camera. You could thread the paper leader into the take up spool while it’s already loaded into the camera, but I find that it’s much easier to do with the spool out of the camera. After you load the film, make sure the paper backing is straight across the film plane, and that it is pulled somewhat tight. Once you are sure the film is properly loaded, replace the door and make sure both pins on both sides of the film door pop back into position.
Step 4
Open the latch for the red door by holding it to the left, and start advancing the film using the film advance knob until the number ‘1’ is visible in the red window. If the film advance knob does not want to turn, make sure the exposure counter is in the ‘0’ position as indicated in Step 1. I have read that some Medalists have a broken or jammed film advance. If you are sure the exposure counter is at ‘0’ and you still cannot advance a new roll of film, it is possible something is internally damaged in your camera. Luckily, I did not have this problem. Once the number ‘1’ is visible in the red window, release the latch covering the red window and make sure it is completely closed. You will not need to open the red window for the remainder of this roll.
Step 5
Press down on the metal ring around the film counter knob just like you did in Step 1, but this time, rotate it until you see the number ‘1’ in the exposure counter. Once the number ‘1’ is visible in the window, pull up on the metal ring while wiggling it to make sure it is properly seated. Like in Step 1, once the number ‘1’ is visible in the window and the metal ring is properly seated in its full upright position, you should not be able to keep rotating the knob.
Step 6
Rotate the film advance knob clockwise (not the frame counter knob) until it locks into position. This should happen almost immediately. You should only be able to turn this knob maybe 1/10th of a full rotation. If you are able to continually advance the film while the exposure counter is in the ‘1’ position, something is wrong with your camera. If this happens, you may be able to still use your Medalist, but the automatic frame counter will not work. You will have to rely on the red window to advance to the next frame.
Step 7
The last step is to manually cock the shutter using the lever beneath the rear viewfinder. Swing the lever as far to the left as it will go. If you are loading a roll of film immediately after removing a previous one, it is possible the shutter has already been cocked. In this case, you should still complete this step, but you will not feel the tension of the shutter cocking. This step should only be required once before shooting the first exposure. After you have shot your first exposure, advancing the film to the second frame will automatically cock the shutter for the next frame. The only other time you would ever use this lever is if you are intentionally trying to double expose a frame.
If you have made it this far, congratulations, you have successfully loaded film into a Kodak Medalist! The first time I did this on mine, I read the manual along with some other instructions I read on another site, and in total, it took me 30 minutes.
The Kodak Medalist is an amazing camera, and it is incredibly well built, but it is definitely not a camera for someone looking to quickly fire off 8 frames. This is a camera that requires patience and attention to detail. If you do not follow these instructions, you can damage the camera. Although it is possible to get a Medalist repaired, there are only a few select repair shops in the world, and I am quite sure the prices are very high for any type of repair, so you definitely want to make sure you take good care of your Medalist.
Using the Camera
Loading film into the Medalist has some unique steps for sure, but shooting with it is surprisingly similar to other vintage cameras. There are only a few things you really need to know.
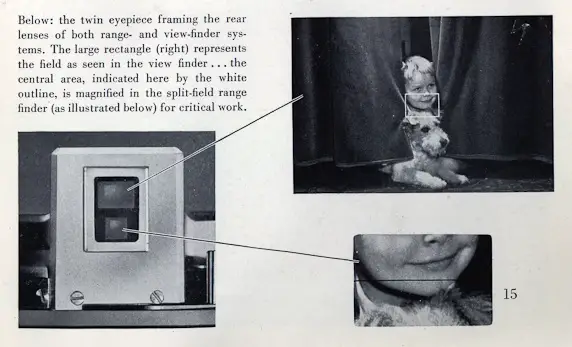
The first is using the rangefinder. The Medalist’s user manual does a pretty good job of explaining what you will see in the dual viewfinder/rangefinder window.
It is possible to see both images at the same time, although it does require a precise positioning of your eye. The bottom window is the rangefinder and is a highly magnified crop of the center of whats in the top viewfinder. This rangefinder works like any split-view rangefinder on any other vintage camera, but because its a small crop of the main image, it may require you to reposition the camera to see a vertical object that you can use to focus on.
It is also possible to scale focus the camera using only the focusing scale on top of the camera, but I don’t know that I would exclusively trust that until you have some experience with your particular model.
On the Medalist I, there is a smaller precision focus wheel in the bottom front corner (from the photographer’s view) of the camera. This wheel was replaced by a flash sync port on the Medalist II. I have read that many people did not like this precision focus wheel, but I found it easy to use on mine. It is a lot easier to turn the smaller wheel than the huge focus collar around the lens. I found that on occasion, when my hand reached for the focus collar around the lens, I would accidentally change the aperture ring instead. Unless you are really interested in the flash sync capability of the Medalist II, I find that having both options for focusing the Medalist I is a nice convenience.
Finally, you should also be aware that infinity is achieved right up to the moment where the lens starts to retract back into the body. There is no “stop” that you can feel when you have reached infinity. You will need to pay attention that you haven’t turned the focus wheel too far and have started to retract the lens into the body. The Medalist is supposed to prevent the shutter from firing if the lens is retracted into the body, but this is not something I would want to put to the test.
When you are sure your subject is in focus, and you have the composition you need, you take the exposure by pressing down on the shutter release button on top of the camera. The shutter release is activated about 3/4th of the way down, so there is a lot of travel before firing the shutter. I didn’t find the shutter release on the Medalist to be especially difficult to activate, but care should still be taken to stabilize the camera at slower speeds.
The Medalist user’s manual recommends that the photographer position their right thumb on the bottom of the camera and fire the shutter with the index finger, making a sort of pinching motion with your hand. This should help stabilize the camera to reduce motion blur on fast to medium shutter speeds.
Earlier in this article, I mention that the Medalist I has a shutter lock for timed exposures that was removed in the Medalist II because it could cause the camera to jam. The issue is that if the shutter release is in the down (locked) position, you cannot advance the film, and if you’re not careful you can damage the camera if you attempt to advance the film while the shutter release is down. If you are shooting with a Medalist II, you have no need to worry, but if you have a Medalist I like I do, you must be very careful to check that the shutter release button has come all the way back to the up position.
Edit 2/25/2016: It took me a while to realize that the shutter lock mechanism around the shutter release had been removed from my Medalist. Perhaps this is why I had so much luck with it. I do not know who did this, but it probably saved this Medalist’s life. Many people recommend getting a Medalist II over the first model because it never had this feature to begin with. Since mine had it removed, it in essence, upgraded the camera.
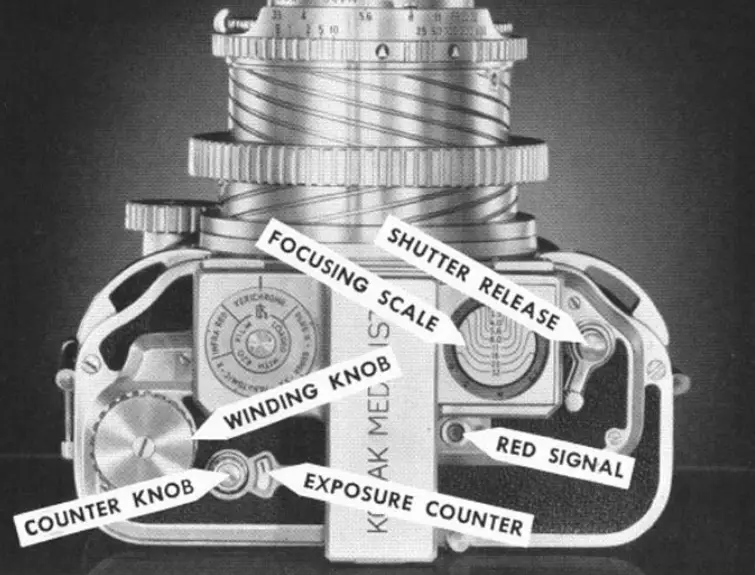
Like all leaf shutter cameras, the shutter is pretty quiet on the Medalist. Despite it’s size, there is no “ka-chunk” sound of a focal plane shutter. All you get is a mere click of the blades. If you are shooting with the camera in a noisy environment, it can be difficult to hear the shutter firing. As an aide to assist the photographer, there is a little window on the top plate behind the shutter release which will show a red signal after the shutter fires.
When this window is red, it means the shutter has fired and the camera needs to be wound to the next frame before it can be fired again.
Winding the camera to the next frame is a pretty straightforward affair. Turn the winding knob clockwise until it stops at the next frame. It’s worth noting that there are a lot of things happening inside the camera while winding, and you can feel and hear a lot of creaks and groans from inside, but assuming the frame counter is working and the shutter properly cocks, all of these noises are normal.
Keep shooting until you’ve used up all 8 frames and after that, wind the film until you reach the end of the paper backing and remove the film from the camera. You’ll notice that the exposure counter has automatically returned to the ‘0’ position. The Medalist will only allow you to continue winding the film when the counter is in this position. If the exposure counter is at any number other than ‘0’, it will keep stopping when it thinks you are ready for the next exposure.
My Results
Wow.
I could probably stop right there and I’d feel I gave you an accurate representation of what its like to use a Medalist. I remember the first time I saw one on the Vintage Camera Collector’s group on Facebook, I fell in love with the huge, bulbous size. The exposed helical is a work of art. The massive size is impressive, yet elegant at the same time. The reputation of the Ektar lens is through the roof. People commonly say that the Ektar lens is as good as anything made today.
In terms of size, the Medalist is the largest non-TLR camera in my collection, but as much as I keep talking about it’s size, the Medalist isn’t as heavy as you might think. Weighing in at just under 3 lbs, the Medalist weighs less than my Nikon D7000 DSLR with a 18-200mm VR lens attached. Kodak must have realized that the weight could get out of control easily, so they wisely constructed the majority of the camera out of aluminum, instead of brass like most cameras of it’s day.

There is a lot of information out there regarding people’s thoughts about the Medalist, and I’ve already covered a great deal about the model’s history along with how to use the camera. In terms of a pure review, one of the most interesting ones I’ve found was published in the May, 1978 issue of Modern Photography. Since the only version that I’ve been able to find online is in the form of a JPG, I have attached an image of the whole article to the left. Click on the image and maximize it in your browser and it should be large enough to read.
The article was written by Jason Schneider and offers an interesting perspective of the Medalist from a time when film photography was still in it’s prime. Retro wasn’t cool in the 70s, and I doubt there were many “vintage” collectors back then, so its a fascinating look back at the Medalist over 30 years after it’s release. It’s interesting to hear Mr. Schneider lament about some no-longer available 620 film formats. Imagine what he might say about available film formats if he was writing this same article in 2015!
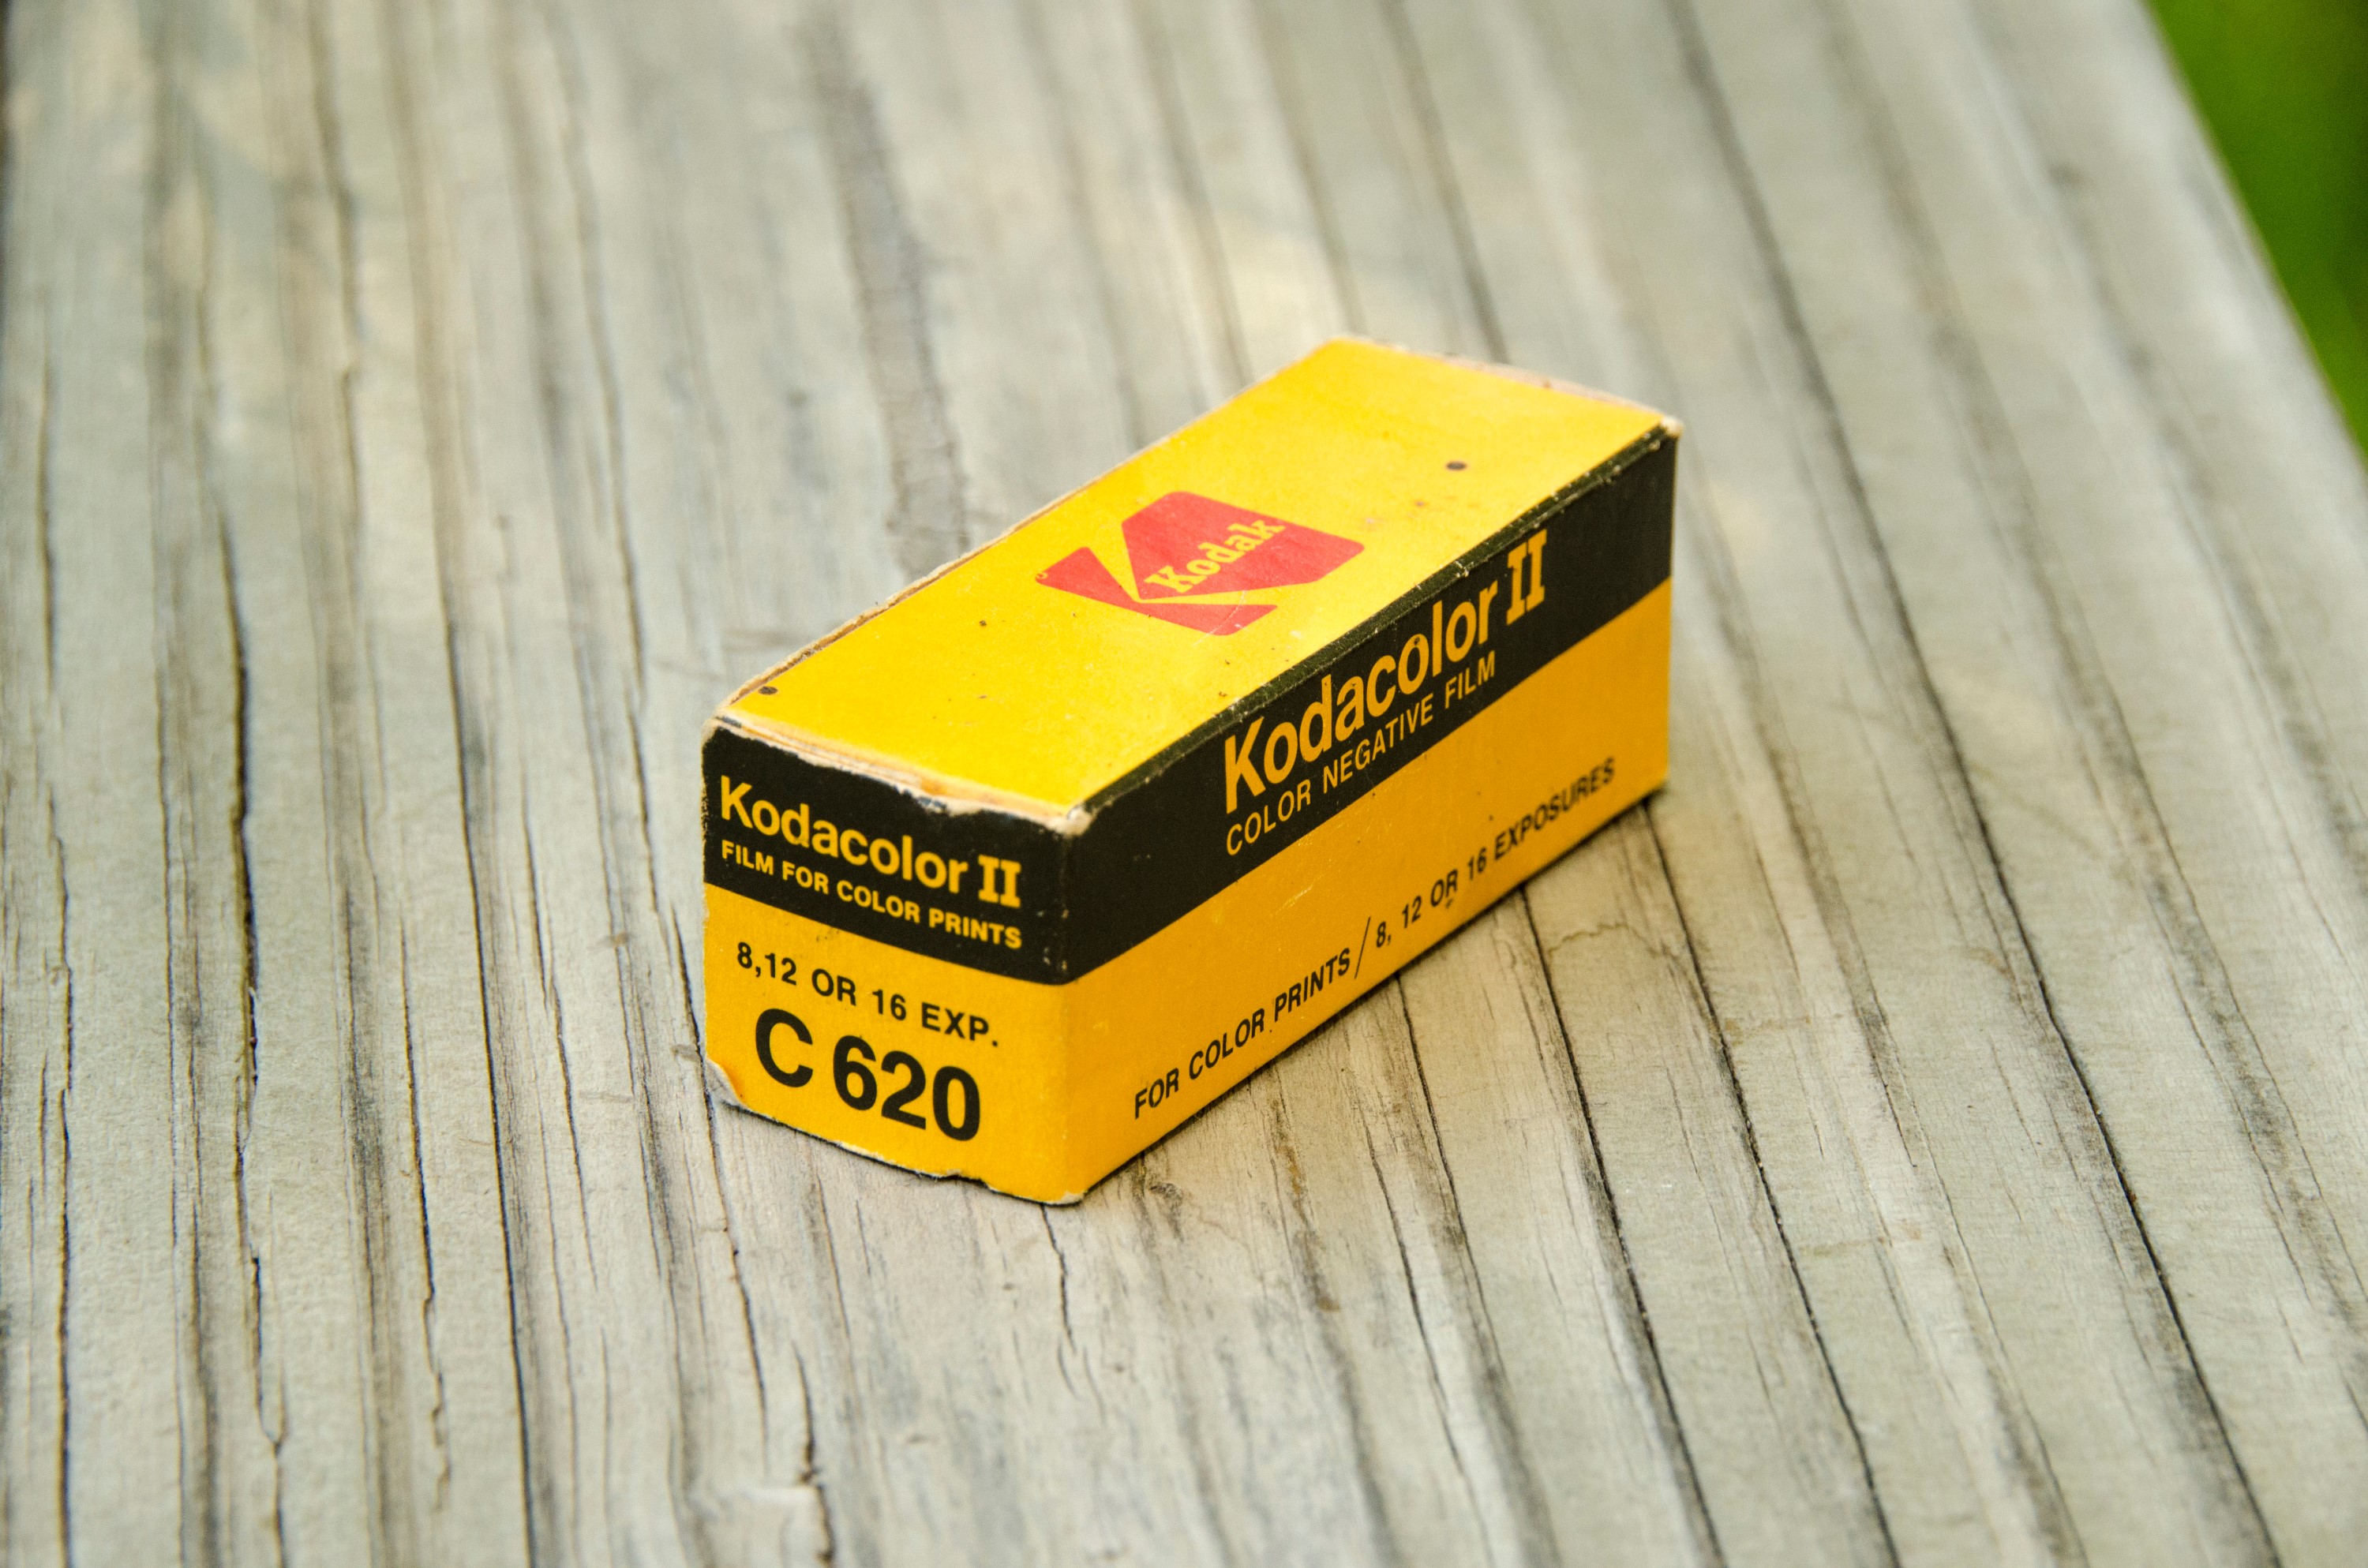
The first time I took out the Medalist, I brought with me two rolls of film. The first was a roll of Kodak Portra 160 that I had re-spooled onto a 620 spool. My second roll however, was an actual unopened roll of Kodacolor II 620 film that I found at a garage sale (pictured above). The film had an expiration date of 1983, and sadly, it had been kept in this guy’s garage for an unknown amount of time, so who knows how well the film had been preserved.
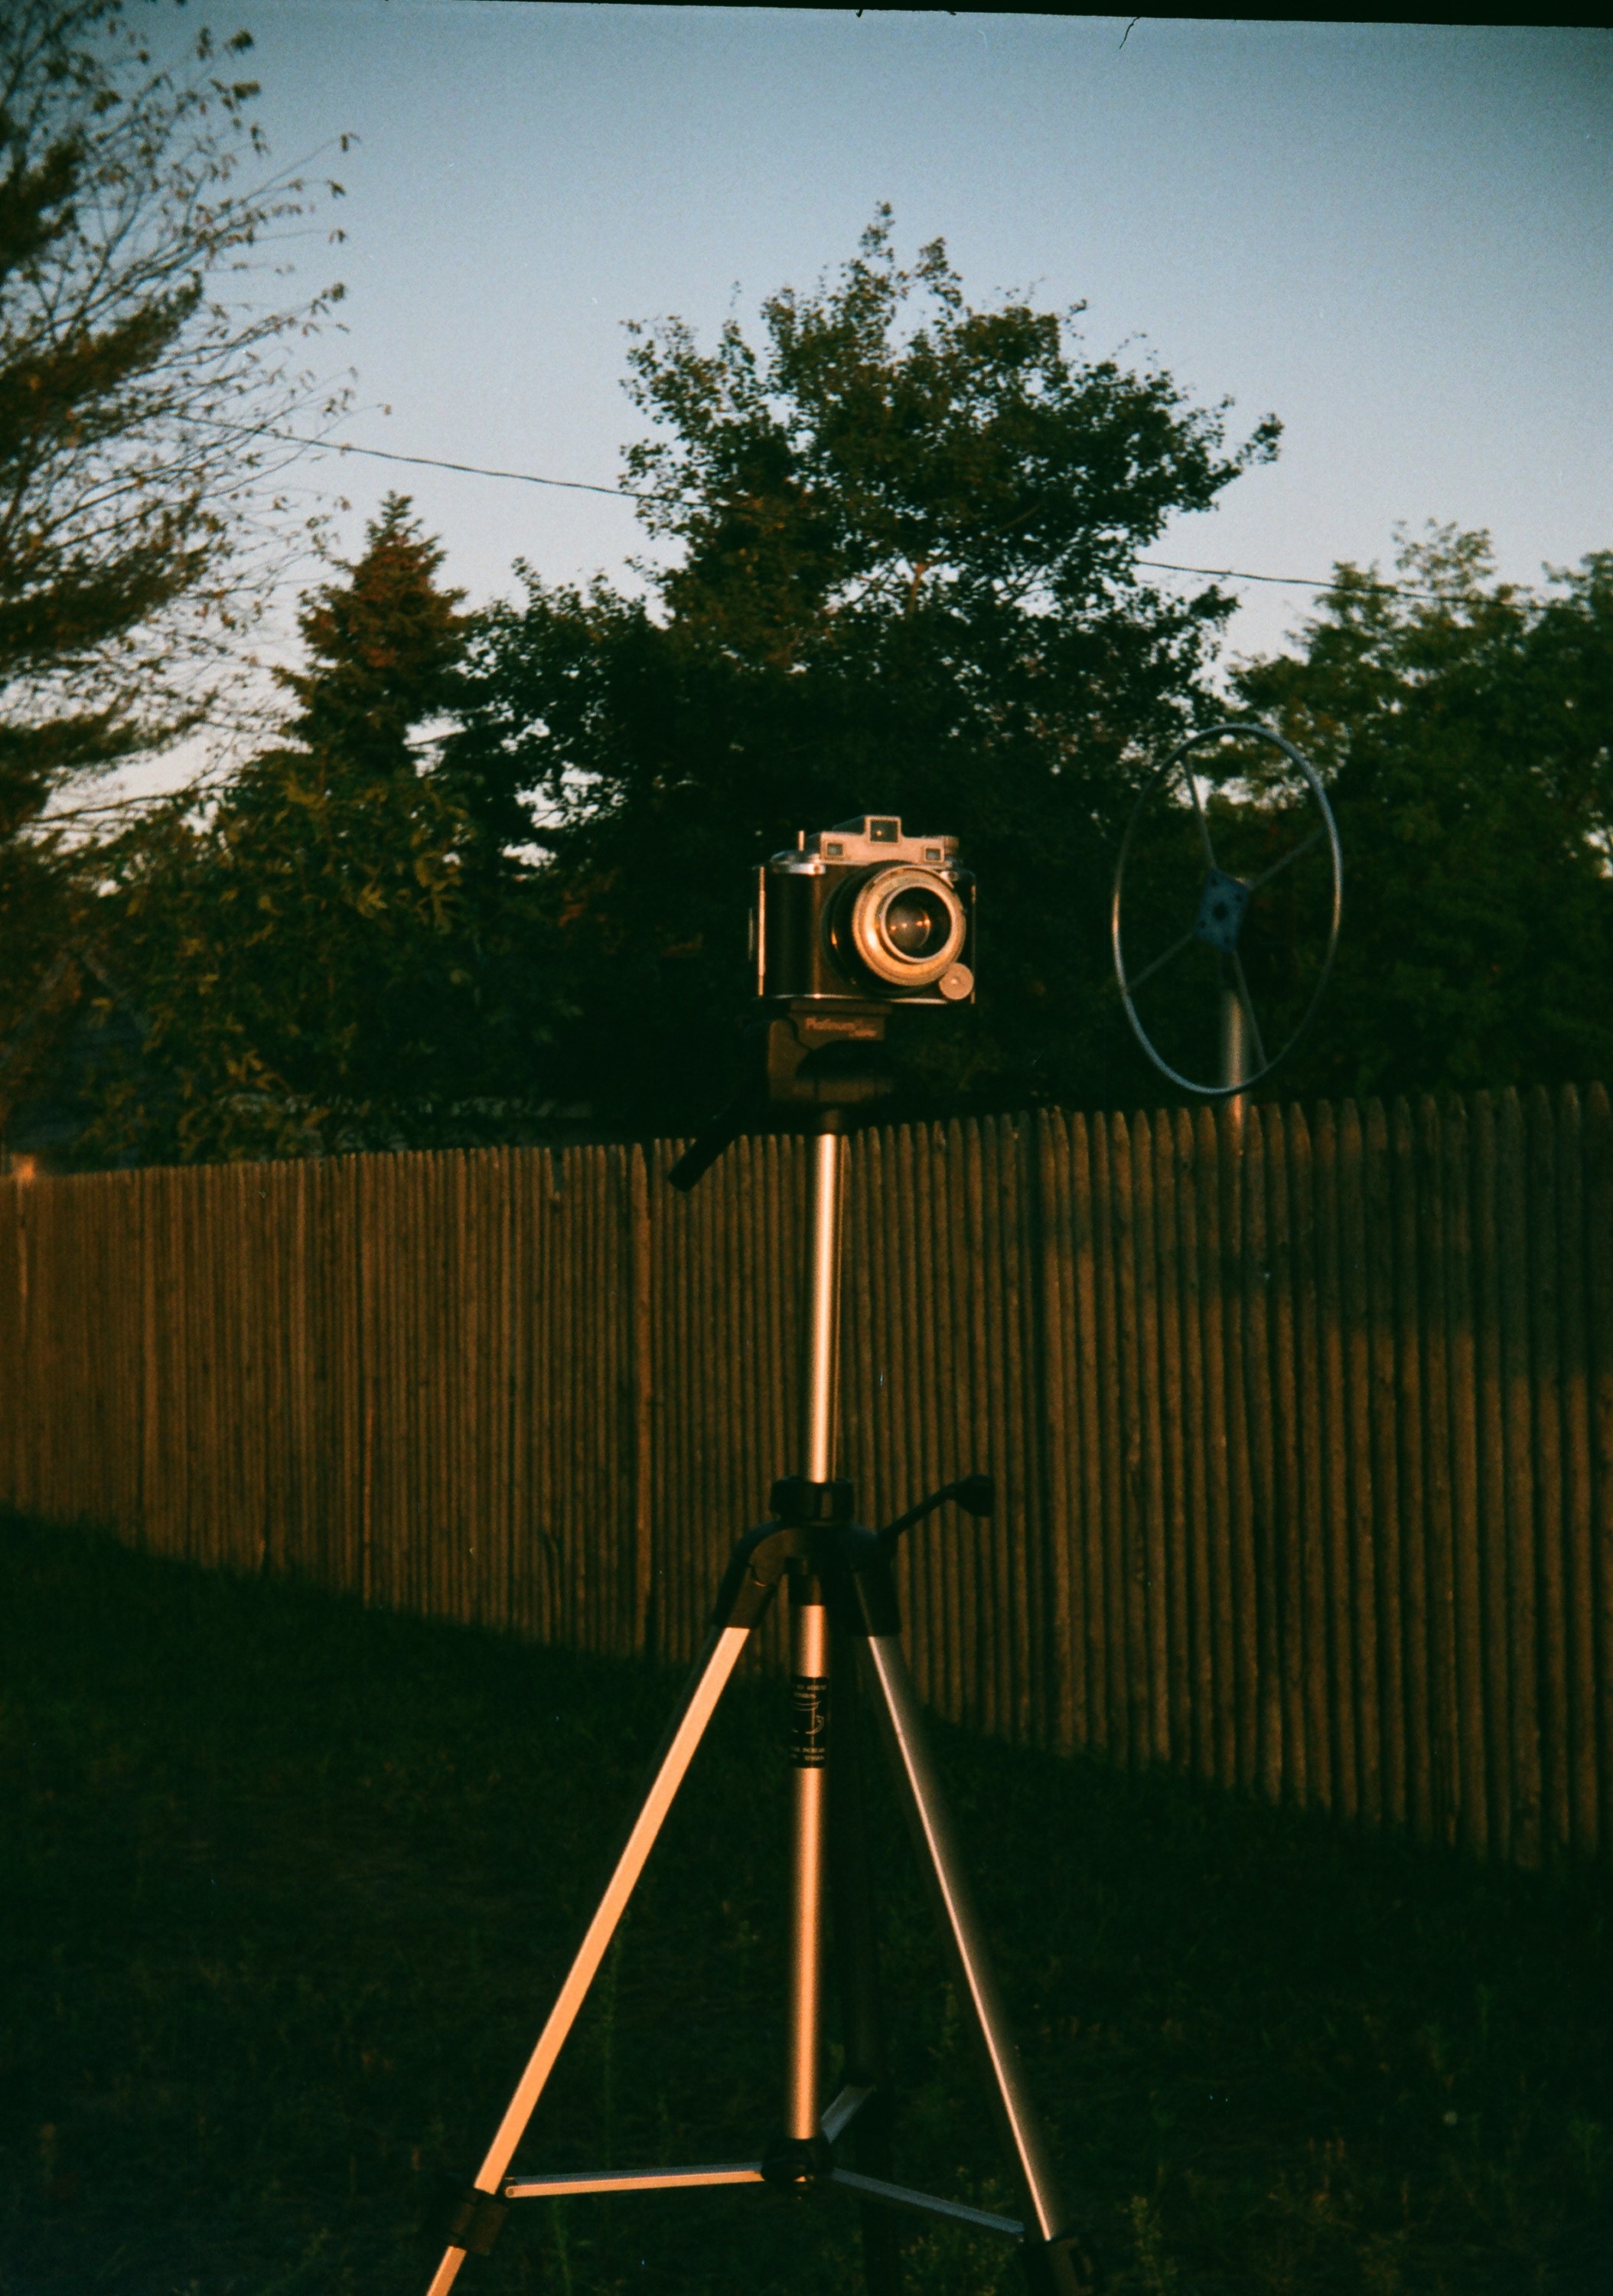
During this film shoot, I brought with me a tripod so that I could stabilize the camera as much as possible. Every shot here was done with the camera on the tripod, but frankly, the camera could be shot handheld. I read on one site that someone recommends holding the camera with your right thumb on the bottom plate of the camera, and squeezing the shutter release with your index finger. The shutter release on the Medalist is very smooth and does not require a lot of force, so camera shake should be minimal, especially at faster speeds.
I took a chance with a family portrait (not pictured below) with this camera and tried out the self timer. Considering this was the first time I had ever used this camera and I had no idea if the timer even worked, this was a lot to ask of the camera, but I am pleased to report that not only did everything work as expected, the shots came out wonderful.


One of the best advantages to medium format photography is that the negative is so much larger than that of a 135 format 35mm negative. Compared to a single frame of 35mm film with a negative size of 36mm x 24mm, a single frame of 120 film used in a 6 x 9 camera like the Kodak Medalist is 6.25 TIMES larger. If we were talking about digital cameras, it would be like comparing an image captured by a 12 megapixel camera to that of an image captured by a 75 megapixel camera! There is 6.25 times more information there.

There’s a pretty big catch though, and that catch is whether you have the ability to scan in that detail and actually see it. A digital picture can not get any better or show any more detail than the sensor allows. You can’t just make more pixels appear with more information. With film however, you can use better scanners to detect more detail in the film. The lab I use to develop and scan my film has only one level of scanning, and while it’s certainly adequate, the resolution of the images I get back aren’t very high. I’ve asked them if they can scan my 120 film at a higher resolution and they said they cannot.
The reason I mention this, is that for how impressive these scans look right now, I am not actually seeing all of the detail that the Medalist actually captured. There is more there to see, but the digital scan of the film negative wasn’t good enough to see it all. Still, what is there is breathtaking. The sharpness, the color clarity, the contrast is all perfect. What amazes me is that the Ektar lens in the Medalist I supposedly has inferior coatings to the Medalist II. Everyone talks about the Lumenized coating on the updated Ektar lens is so much better, but seriously, how could it really be any better?
The pictures above are from the roll of Kodak Portra 160 film which I rolled onto a 620 spool. But I also shot a roll of Kodacolor II 620 film that expired in 1983. How did that roll turn out?
Its worth mentioning that shooting expired film is a gamble. You’ll most likely get something, but what you get will vary wildly based on the type of film, how old it is, and most importantly, how well it was cared for. Slower speed films tend to hold up a bit better. C41 color films hold up better than many black and white films, and if the film was kept refrigerated, the effects of time should be reduced. I found this film in some guy’s garage, so I had to assume it was not stored well throughout most of those 33+ years.
As film gets older, it loses it’s sensitivity to light. It is commonly believed that for every decade past an expiration date, the film loses half of its sensitivity. On color films, some colors will be affected more than others. Its possible to have film that still reproduces reds okay, but blues and greens might be muted. In most cases, contrast will drop too. Since we know that the film loses half of its sensitivity to light every decade, you need to double the amount of light that exposes it to get the same exposure as new film. You can do this by either increasing the aperture, or slowing down the shutter. Both work, but it depends on the situation you are shooting in. Since I was using a tripod for all of these shots, I chose to use a combination of aperture and shutter speed to get my 3 stops of over exposure.
Kodacolor II from 1983 is ISO 100. If I was using new 100 speed film and I was calculating exposure using Sunny 16, I would keep my shutter at 1/125 seconds, and use f/16 in bright sunlight, f/11 in mostly sunlight, f/8 in overcast skies, and f/5.6 in shade. Since I need to overexpose by 3 stops, I can use any combination of a larger aperture or slower shutter speeds. Most of the shots were taken with overcast skies, so instead of f/8, I used f/5.6, and instead of 1/125, I used a 1/30 second shutter speed. Having the camera on a tripod helped prevent camera shake.
So enough already, lets see the results. In the gallery below, I show you the original scans, along with the results after I tweaked them in Photoshop CC 2015.


I’ve already spent enough time praising the Medalist, but I have to give a lot of credit to this Kodacolor II film. Even though the shots had some definite red-shift and the contrast was low, I was able to boost things in Photoshop and salvage a pretty nice shot out of them. The picture of the dog came out really nice. Even the Photoshopped picture still has a very vintage look to it. Sure, I could have used some crazy “vintage” filter using my smartphone, but I got that look using actual film, no filters needed!
So there you have it. The Kodak Medalist is an awesome camera. It looks cool, it has a cool history, its fun to use, and it takes spectacular photos. Due to its size and impracticality of shooting 620 film, it won’t be my go to camera for family trips to the zoo, but when I have an opportunity to take my time, and really immerse myself in photography, this will be a camera I come back to.
Edit (5/23/2017): I shot another roll through the Medalist, this time expired Kodak Portra 800. These aren’t my most inspired compositions, but they are further reminders of the capabilities of this fine camera.


| My Final Word | The Kodak Medalist is an incredible camera with a lens to match. It is a large beast that isn’t easy to lug around, but when you do, it makes it worth while. Although it doesn’t support interchangeable lenses, it supports a couple of different film backs, and it has a very bright and easy to use prism-based rangefinder making it very easy to focus. It also played a very significant role in World War II and has a fascinating history, which means this camera appeals to almost everything I like about vintage cameras. The Medalist earns one of the highest scores of any camera I’ve reviewed and I look forward to shooting with it some more. | ||||||
| Images | Handling | Features | Viewfinder | Feel & Beauty | History | Age | |
| 2 | 0 | 1 | 2 | 2 | 2 | 40% | |
| Bonus | +1 for its role in WWII by the US Navy and other military organizations, +1 for the overall impressive design and over the top dedication to quality – this could very well be the highest quality American made camera ever. | ||||||
| Final Score | 14.6 | ||||||
Additional Resources
http://camera-wiki.org/wiki/Kodak_Medalist
http://blog.timesunion.com/chuckmiller/welcoming-the-kodak-medalist-ii/21899/
http://elekm.net/pages/cameras/medalist_ii.htm
http://blog.baquephoto.com/?p=92
Thank you for this very excellent article. After living without a Medalist II (and missing it), this past
Saturday I purchased a mint Medalist II, shutter’s accurate, original leather case, hood, filters,
even the instructions are mint. I processed a roll of B&W last night and it operates like new.
The reason for my excitement is the lens – I’ve shot over the years view cameras, Rolleiflexes, etc.
but nothing has ever been quite as satisfying as the images coming from that lens. I’m encouraged
to see that young people are interested in film as there is that wonder of producing beautiful
images from something so well made and from a different time in history. And, kids are loving
the whole idea of developing this B&W film in caffenol.
Don Ferguson
Corvallis, Oregon
Thanks for the kind words, Don. Sounds like you have yourself a real fine example of this outstanding camera. Mine isn’t the nicest to look at from a cosmetic standpoint, but it works perfectly, and thats all that’s important. I agree, that 5-element Ektar is a fantastic lens and its a shame that Kodak couldn’t have gotten this lens on other cameras of the era as it would have improved many cameras that relied on German optics.
Thank You for this wonderful review of what I feel was Kodak’s one and only “screw the rules of Kodak” camera. (The rules being “a camera that is cost-approachable by a significant amount of people”.) In a company where many of the cameras were Brownies, or Monitors and Vigilants with Kodets, Anastigmats, and the occasional Anastigmat Special, the Medalist and its Ektar seem to be both a display of Kodak’s might when pushed / provoked to show what they’re capable, as well as a means of showing the military that the USA had a competent medium-format camera system that could keep up with the Germans. In fact, I wonder if Kodak shot themselves a little bit by making a cameras / lens setup so good that 75 years on, it’s still holding a reputation of being one of the sharpest medium-format configurations that someone can get.
That being said, I wonder if the Chevron was an acknowledgement that the Medalist and Medalist II were “completely purpose built” cameras, whereas the Chevron traded some of the absolute reliablility (and a LOT of the hideous) for a more “civilian-attractive” camera that had faster shutter speeds, but also cost Kodak less to make (and sell). On the other hand, the Signet 35 was a military camera (there are black ones, and olive ones with various US military branches emblazoned on them). Much like the Signet 35 was for Kodak’s 35mm line, the Medalist (and Medalist II) could be considered examples of Kodak “flying too high”. They were the peaks of their formats, and were unrivalled by other Kodaks.
I love your review of the Medalist, and I love what the Medalist can do, particularly with modern films that make better use of the resolving power of the Medalist’s lens. If only Kodak could figure out how to get the Chevron’s and Tourist (f/4.5 Anastar version) shutter to work reliably, and there was a retrofit to get 1/800 speeds onto the Medalist, the Medalist would be an even more viable camera with modern films. (But then, we’d lose the charm of slower speed film; reduced grain.) I can’t wait to take my Medalist II out now… and see what she’s made of.
Thanks for the kind words Jason! I too agree that the Medalist is the single best example of what Kodak was capable of when they went full steam ahead and did the best they were capable of. Maybe you could argue the Ektra was as well, but from everything I’ve read, the camera is really difficult to use. I find the Medalist’s various quirks to be “not that bad” in use.
I also agree in that the Chevron was clearly an attempt to simplify the design and make something a little cheaper and more accessible to the every day photographer. The lens is a 4-element design instead of the 5 in the Medalist, and the helix uses a single helicoid instead of the double in the Medalist. Theres other changes too of course, but overall, the Chevron is still a great little thing too. The one I reviewed on this site was a loaner to me, and Im always on the lookout for an inexpensive one to add to my permanent collection!
Hello,
Thank you for this very interesting article!
I have two Kodak Medalists and I like their stealth performance. The only thing what I would add – a good right hand grip.
I was browsing internet for some time, but couldn’t find any hint of where to order or how to build this custom grip.
Any advice from you would be appreciated.
Regards
Konstantin
Konstantin, I am glad that you enjoyed the article! I still love my Medalist and can think of many ways to describe it, but I must say that stealth isn’t an adjective that comes to mind! In all seriousness, its a great camera and it sounds like you are enjoying yours.
Sadly, I know of no one making a hand grip for these, but agree it would probably be useful. My guess is that something would have to be custom 3D printed. If you know someone with one of those and is good as design, perhaps they could build something for you!
I wanted to add to my perspective on the Medalist. I had a Medalist II completely overhauled by Dan Daniel in Burlington, VT (https://www.dandanielcameras.com). He’s doing 120 conversions as well since Ken Ruth retired. I kept mine 620. He also does rangefinder calibrations as well.
The more I shoot this camera, the more it makes me wonder about other “halo Kodaks” such as the Ektra, the Super Six-20, the 3A Special (and other “specials” from the early days of Kodak), and the perspective that Kodak could have been an “optics house” on par with Zeiss, Leica, Angenieux, etc., if they so desired. They were very willing to work with Graflex before, during, and after Graflex being owned by Kodak (Ektar lenses were found on Speed Graphics and Crown Graphics), and those lenses are also regarded as top-shelf for 4×5 photography from a vintage perspective. As for the previous examples, the only “halo” model that was a success was the Medalist, and I will agree that a good chunk of it must have been from the fact it was a military camera and post-war economic nationalism was at an all-time high.
But back to the camera. I’m a big fan of prism’d rangefinders for the reason you said. They don’t desilver. A bit of cleaning, some calibration, and they’re back to good. Also, they’re very bright, and as far as I’m concerned, easier to work with than a mirror. I also like the weight of the camera. It’s technically a folder insofar as the lens barrel (bellows) does collapse, but there’s no sheetmetal to be found. The quality of it in itself is an ergonomic perk in what is otherwise a brick. I also find that the viewfinder, if you can wing it, is brilliant. Aim at what you want, focus in the bottom, and without moving, you can get the shot. It makes “F/8 and be there” feasible without having to get a Graflex. (I can’t develop my own film anymore, so anything larger than 6×9 is going to be met with allergic reactions to chemicals).
My next Kodak I’m looking at is a 3A special. It shoots 122. Some I’ve heard use it as a panoramic camera shooting with exposures 1, 3, 5, and 7. f/6.3 from the late 1900s. But for now, I’ll just stick to my Medalist II and Brownie No.2 Model F, and prep a “comparo” between the two.
Jason
The Kodak medalist is a 2.25” x 3.25” format camera. It even states this in the owner’s manual. I’m not sure why everyone calls this 6x9cm format. Right, it’s close-ish, but it simply is not, and it bothers me to keep reading this, as this is how internet fallacy, rumors, myths keeps spreading. 2.25 x 3.25 is closer to 6×8, and if you actually measure the film gate in the Medalist, it is 57mm x 81mm.