

 What is it?
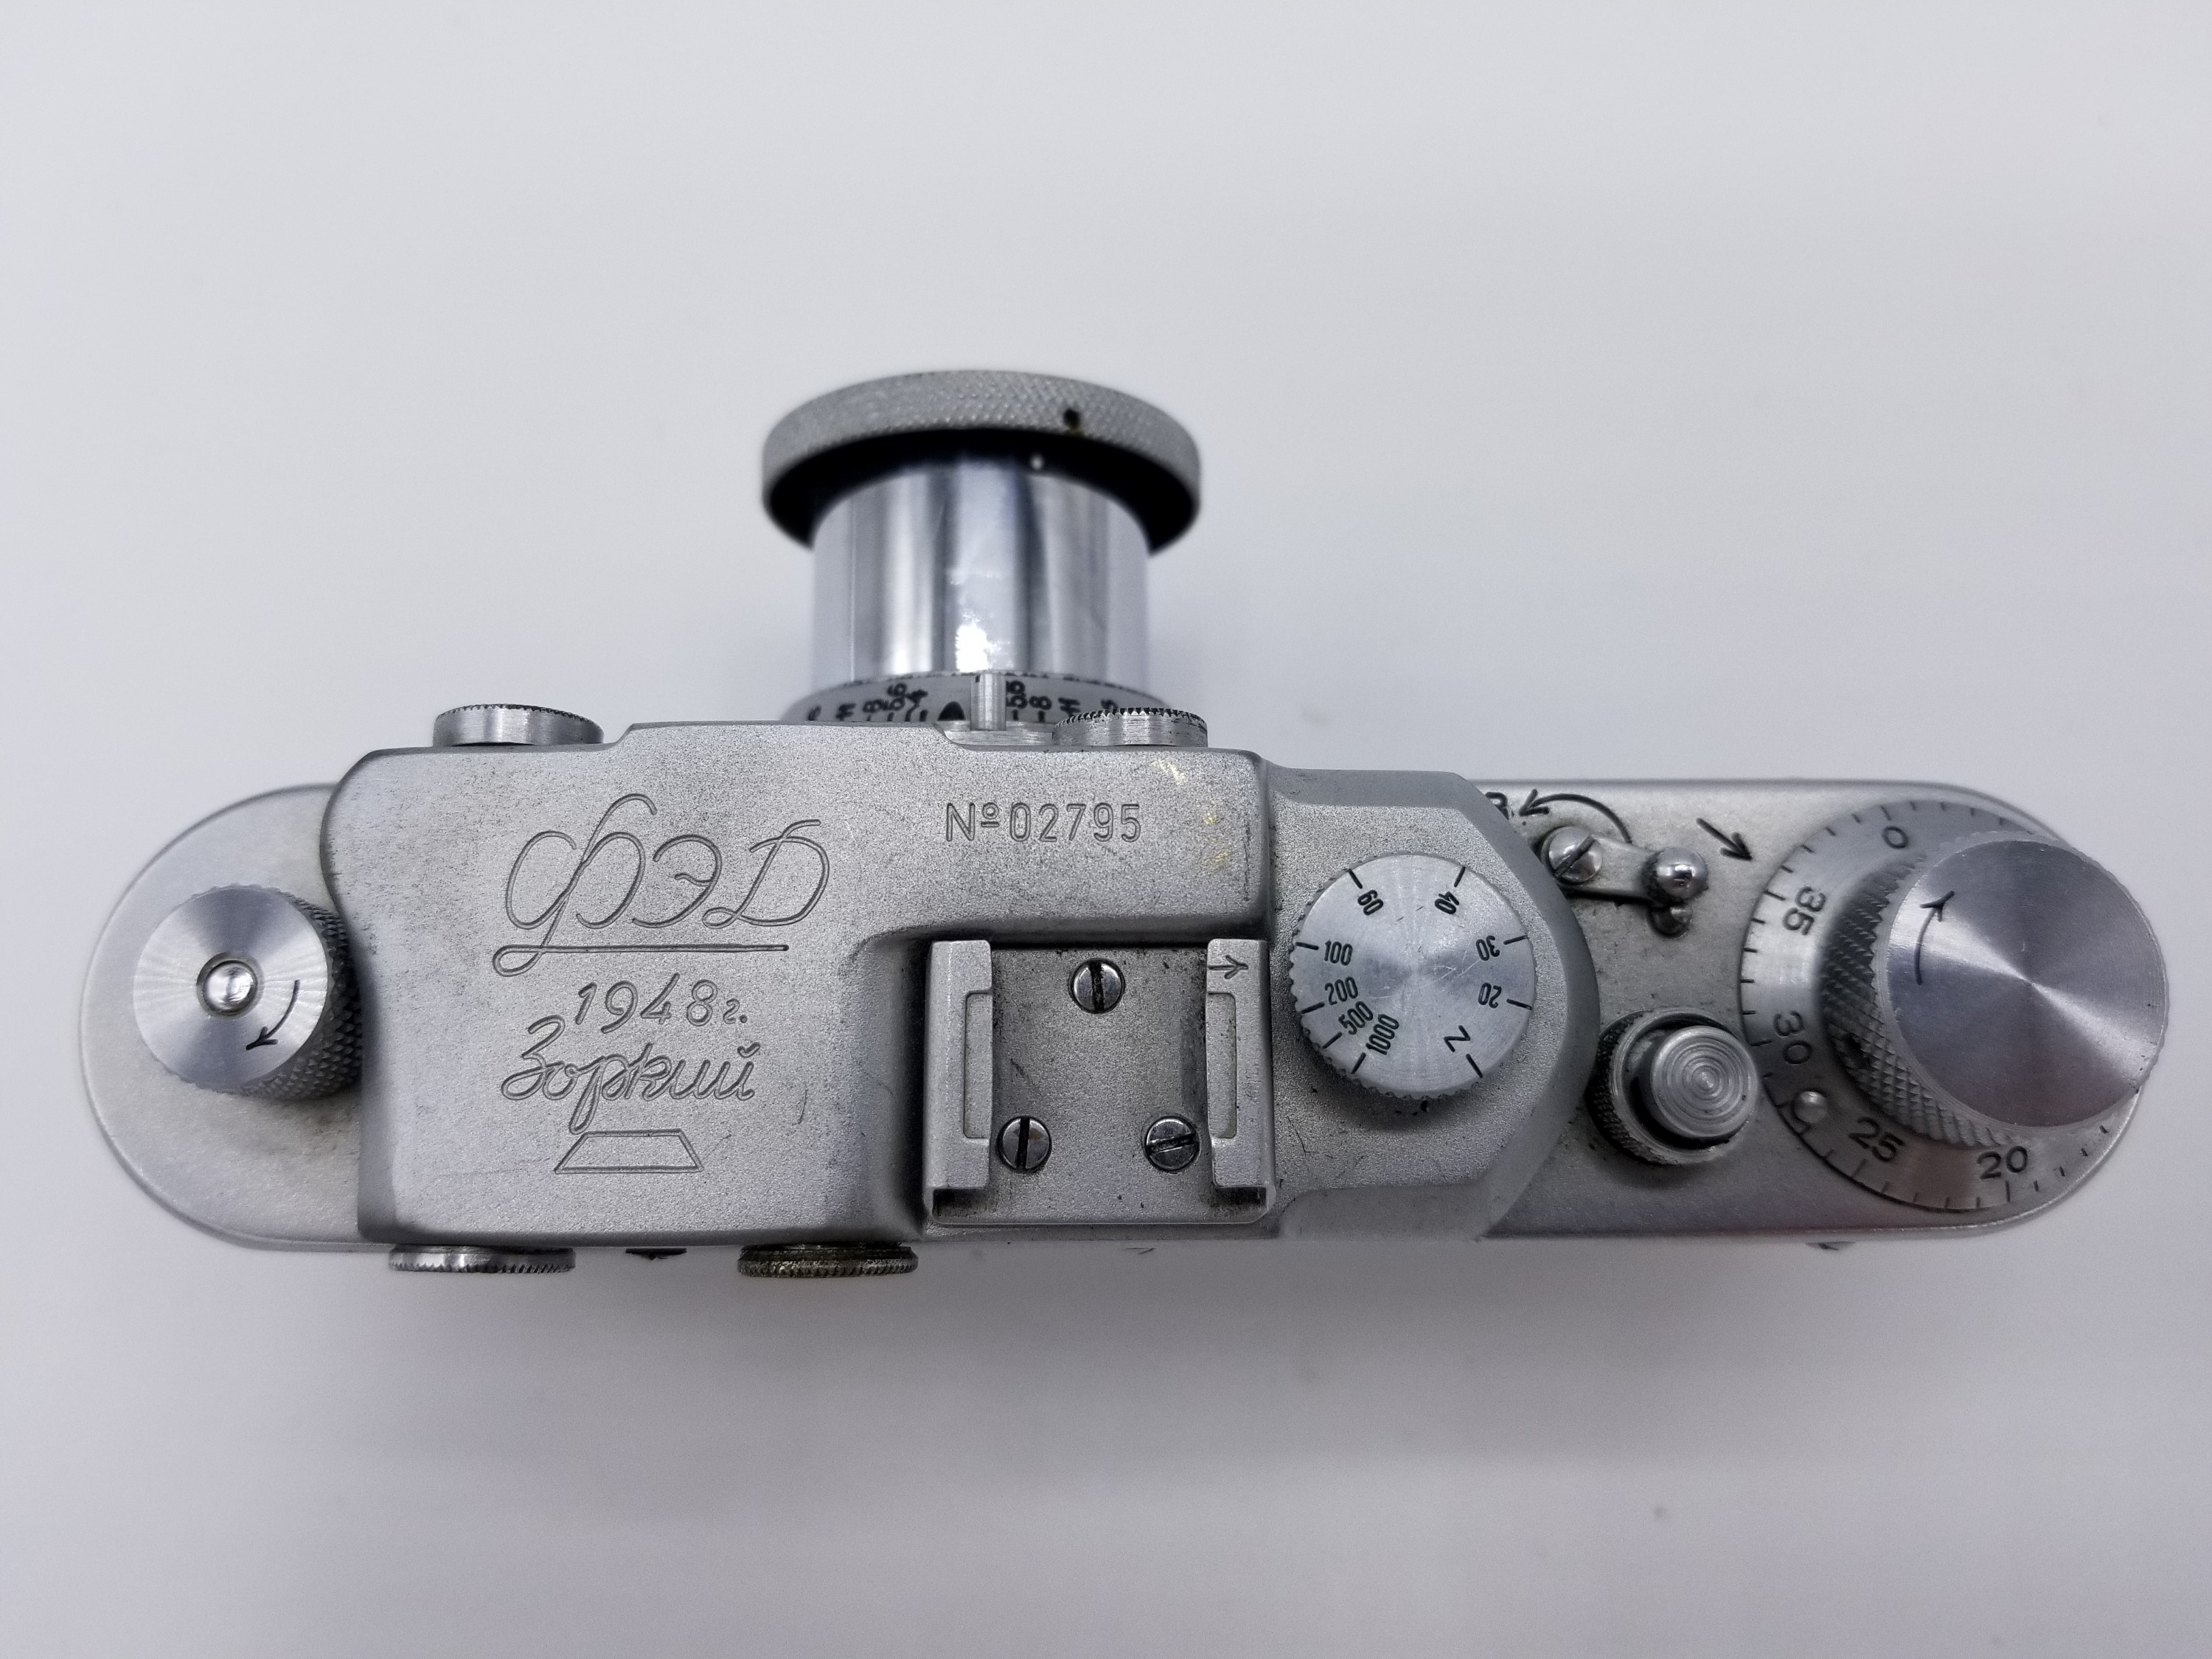
This is a Zorki 4 rangefinder made by Krasnogorsk Mechanical Factory (KMZ) in Moscow, Russia. The first Zorkis were built by KMZ in 1947 after the FED factory in Ukraine was damaged in WWII. These first Zorkis were near identical copies of the original FED rangefinder which itself was a near identical copy of the Leica II. In the years that followed, both FED and KMZ made 35mm rangefinders, but each factory would begin changing the design and adding their own unique features to each camera and as each new model was released, the two cameras looked less and less alike.
Film Type: 135 (35mm)
Lens: Industar 26M 50mm f/2.8 coated 4 elements and Jupiter-8 50mm f/2 coated 6 elements
Mount: M39 Screw Mount
Focus: 1m to Infinity
Type: Coupled Rangefinder
Shutter: Cloth Focal Plane
Speeds: B, 1 – 1/1000 seconds
Exposure Meter: None
Battery: None
Flash Mount: Coldshoe and PC Sync
Manual: http://www.cameramanuals.org/russian_pdf/zorki_4.pdf
History
The story behind how the Soviet Union started making cameras is quite interesting and something I covered in my review for the FED 2. If you’re interested in the Soviet Union’s pre-war story, I recommend reading the first few paragraphs of that review and then coming back here.
If you haven’t read my review of the FED 2, the only thing you need to know is that from 1930 up until the start of World War II, a labor factory in Kharkov, Ukraine started manufacturing near identical copies of the German Leica II rangefinder camera. These copies were known as the FED camera.
During the war, the Soviet Union was invaded by the Germans, and many of their factories were either damaged or in German territory, so the Soviets moved a lot of their manufacturing capabilities closer to Moscow which was not at risk of German occupation.
Krasnogorsk, Russia was chosen because it had already been the location of a former manufacturing plant, so many of the machinery and workers remained. This factory was named Krasnogorskiy Mechanicheskiy Zavod or Krasnogorsk Mechanical Works in English. The abbreviation KMZ was used to refer to its Russian name. KMZ began producing optical products such as scopes, binoculars, and recon cameras in 1942 for the Soviet war effort.
Immediately after the war, KMZ continued making photographic lenses based off Carl Zeiss designs which were confiscated as war reparations from the Ikon-Zeiss plant in Jena, Germany.
Around this time, the FED plant in Kharkov was still heavily damaged from the war and was not able to resume camera production. In 1947, KMZ began producing cameras based off the design and machinery of the FED camera from before the war. The KMZ variant of the FED camera was given the name “Zorki” which loosely translates to “sharp-sighted” in English.
These first Zorki cameras were nearly identical to the pre-war FEDs and even shared some FED markings. The picture to the right shows an original FED/Zorki from 1948 showing both logos.
It would be almost two full years after KMZ started making the Zorki before the FED plant was able to resume production in 1949. At this time, both KMZ and FED made what was essentially the same camera with only very minor differences. The original Zorki would remain in production until 1956 receiving incremental updates along the way.
In 1951, KMZ would release the Zorki 3 which had some significant changes to the earlier Zorki (there actually was a Zorki 2, but it was released later in 1954 and was basically a Zorki 1 with some minor upgrades.)
The new Zorki 3 featured a slow speed dial on the front of the camera and a revised top plate with a much larger viewfinder and a combined “coincident image” rangefinder instead of separate rangefinder/viewfinder windows like on the earlier models. An adjustable diopter made the camera easier to use for people with prescription glasses, and the entire back of the camera was removable for easier film loading.
As with all Soviet era cameras, several different variants of the same camera would be produced concurrently, and there would be “sub-models” such as the Zorki C, 2C, 3M, and 3C (the Zorki 3C would have most of the features of the Zorki 3, but with the top plate of a Zorki 4).
In 1956, KMZ would discontinue the original Zorki, the 2, 3, 3M, and 3C models (but not the C or 2C models) and would release the Zorki 4. The Zorki 4 continued with some of the advancements of the Zorki 3, but refined the design and was more user friendly than the earlier models. The Zorki 4 was in production until 1973 making it the longest produced single model in the entire Zorki line. It was also the first Zorki to be heavily exported to western countries such as the United States.
Like all previous models, the Zorki 4 would receive incremental changes and updates throughout it’s production run, but there would be 2 significant sub-models. The first was the Mir from 1959 – 1961 which was not labeled as a Zorki at all, despite being almost identical to the Zorki 4 minus the top 1/1000 shutter speed. It was marketed as a lower cost alternative to the Zorki 4 and was not regularly exported. The second was the Zorki 4K from 1972 which was a primarily export-only version of the Zorki 4 with a film advance lever instead of a knob.
The Zorki 4 would remain in production until 1973 and the Zorki 4K until 1978. There was also a Zorki 5 from 1958 – 1959, and a Zorki 6 from 1958 – 1966, but they featured top speeds of 1/500 second (like the Mir) and very different top plates.
By the 1970s, rangefinder cameras were falling out of favor to more popular SLR designs, and as a result, the Zorki line of rangefinders would be discontinued in 1978. KMZ would focus on their Zenit line of SLRs, and in the 80s would introduce several low end point and shoot models.
After the fall of the Soviet Union in 1991, KMZ would continue to manufacture cameras and other optics related products in limited numbers. The company still exists to this day making small numbers of rifle scopes, night vision scopes, binoculars and other optical products.
Today, Zorki rangefinders are very popular among a wide variety of collectors. Some people like their “red curtain” history, others like them because they are still very similar in appearance and usage to a Leica yet significantly cheaper, and others like them because they actually are pretty good cameras. While a Zorki may look great sitting on a shelf, it is also a very capable camera.
Of all the Zorkis made the 4 and 4K are the most popular primarily because of how many were made and of those, how many were exported. Although there isn’t any information about how many were exported, according to sovietcams.com there were over 2.24 million of them made between 1956 and 1978.
Unlike the Kiev rangefinder which is also a great FSU camera inspired by a great German rangefinder, the Zorki uses the M39 screw mount which was used by a wide variety of other manufacturers. Canon, Leitz, Voigtländer, and Minolta are just some of the manufacturers who used a similar size lens mount. Although all have a diameter of 39mm, there were some very subtle differences in flange depth and thread pitch which means that some 39mm lenses are not compatible with all models that used the M39 mount. Still, with a Zorki body, there is a huge variety of lenses to choose from, some of which have excellent optics.
My Thoughts
Of the three FSU cameras in my collection, this Zorki was the last one for me to acquire. First was the Kiev which I fell in love with but that first one was broke, so I got another that had received a CLA by someone in the Ukraine. Then on an eBay whim I got a FED 2 from an American seller who “didn’t know anything about cameras”. That one was in nice physical shape, and I managed to shoot an entire roll in it, but then that one broke too. I have since acquired another FED 2 that appears to work fine, but I haven’t had a chance to shoot with it yet.
Then there is this Zorki. I had always known that the Zorki 4 was a great rangefinder due to it having one of the brightest viewfinders of any of the FSU rangefinders, but finding one in good enough shape was a challenge. As with all FSU cameras, getting them cheaply and in good condition is very hard to do, especially in the US. As fate would have it, I got this in a “two-fer” deal with my second FED 2 and an M39 Jupiter 8 lens. Both cameras looked to be in great shape, so I took a chance and bought it.
Upon receiving the camera, I was able to confirm that it was in great shape as the seller had described. Upon cycling through several test shots without any film in it, everything seemed to be in good working order. The Jupiter 8 lens that came with it was also in great shape. The glass showed typical dust and specks of a vintage lens, but there were no scratches, haze, or fungus.
Looking through the viewfinder, the image was indeed bright. Comparing it to the viewfinder in the FED 2, the Zorki is large and bright, whereas the FED is tiny and dark (and slightly green). The Zorki’s rangefinder patch is quite a bit larger than the one in the FED and moved easily when rotating the lens barrel.
The Zorki has the largest and brightest viewfinder of any FSU camera in my collection. The main viewfinder window has a slight blue tint to it, which makes the rangefinder patch easy to see. The rear eyepiece opening is small like on other FSU cameras, and can be a little difficult to use with prescription eyeglasses, but at least the Zorki has that nice diopter adjustment lever (the FED 2 has it too) which is strangely absent on almost every other film camera I own. Compared to the Kiev 4 in my collection, the Zorki’s viewfinder is brighter and easier to use, and also isn’t easily blocked by your hand when holding the camera to your face.
I still had the Industar 26M that came with my original FED 2, so armed with two different lenses to test and a reasonable assumption that everything was in good working order, I put in a roll of Kodak 400 and went shooting.
Repairs
Normally when I receive a camera that needs to be repaired, its pretty obvious as soon as I get it. Maybe the shutter is stuck, or the camera is so dirty it’s hard to use, or the focus mechanism is so stiff that it’s hard to turn.
In this case, everything indicated that all was well with this Zorki until I got my first roll back. It turns out that EVERY image was badly double, triple, and quadruple exposed. It looked as though the film transport was only turning the film 1/8th of a frame in between each exposure. The Zorki has double-exposure prevention, so I was sure that I wasn’t just using it wrong.
Looking through my results, not a single image had a single exposure, but at the very least, I could see that many of the images were sharply in focus. This meant that the rangefinder was at least accurate, and the Jupiter 8 lens was rendering sharp images. It also looks like at least most of them were properly exposed which means that the shutter speeds were close to accurate.
Take a look at some of the samples below. In each, you can make out multiple frames in focus.


So, upon seeing these results, I began to “fiddle” with the camera. Looking back, I honestly don’t know if I messed something up, or if this was just a powder keg waiting to explode because the problems just kept coming. First, when test firing the camera, I got the shutter stuck at 1 second. The first shutter opened, and I could hear the slow speed governor moving, but then the second shutter didn’t close.
Then, as I tried to unstick the shutter, I ended up getting the first shutter stuck partway open. I probably violated the “First Rule of FSU Cameras” and changed the shutter speed without cocking the shutter. I honestly can’t be sure at this point.
In the end, I ended up with a camera that was completely jammed. No shutter speed worked. I could no longer turn the film advance, and pressing the shutter release didn’t do anything. The camera was completely inoperable.
Upon doing some research online about shutter issues on Zorkis, the one and only solution that kept coming up was that the camera needed to be disassembled to free the shutter, and no matter how much I read, it seemed less and less likely that I would get this thing working without surgery…
Previous to this Zorki, I had attempted to repair a FED 2 that had a torn shutter curtain. I ordered replacement curtains from Russia and attempted to repair the camera myself. Sadly, I was unsuccessful, VERY unsuccessful.
I came to the realization that its one thing to clean and perform simple repairs on an old camera, but anything that involved tearing down the camera and removing internal parts was beyond my skill level, so it was with great hesitation that I decided to take apart this Zorki.
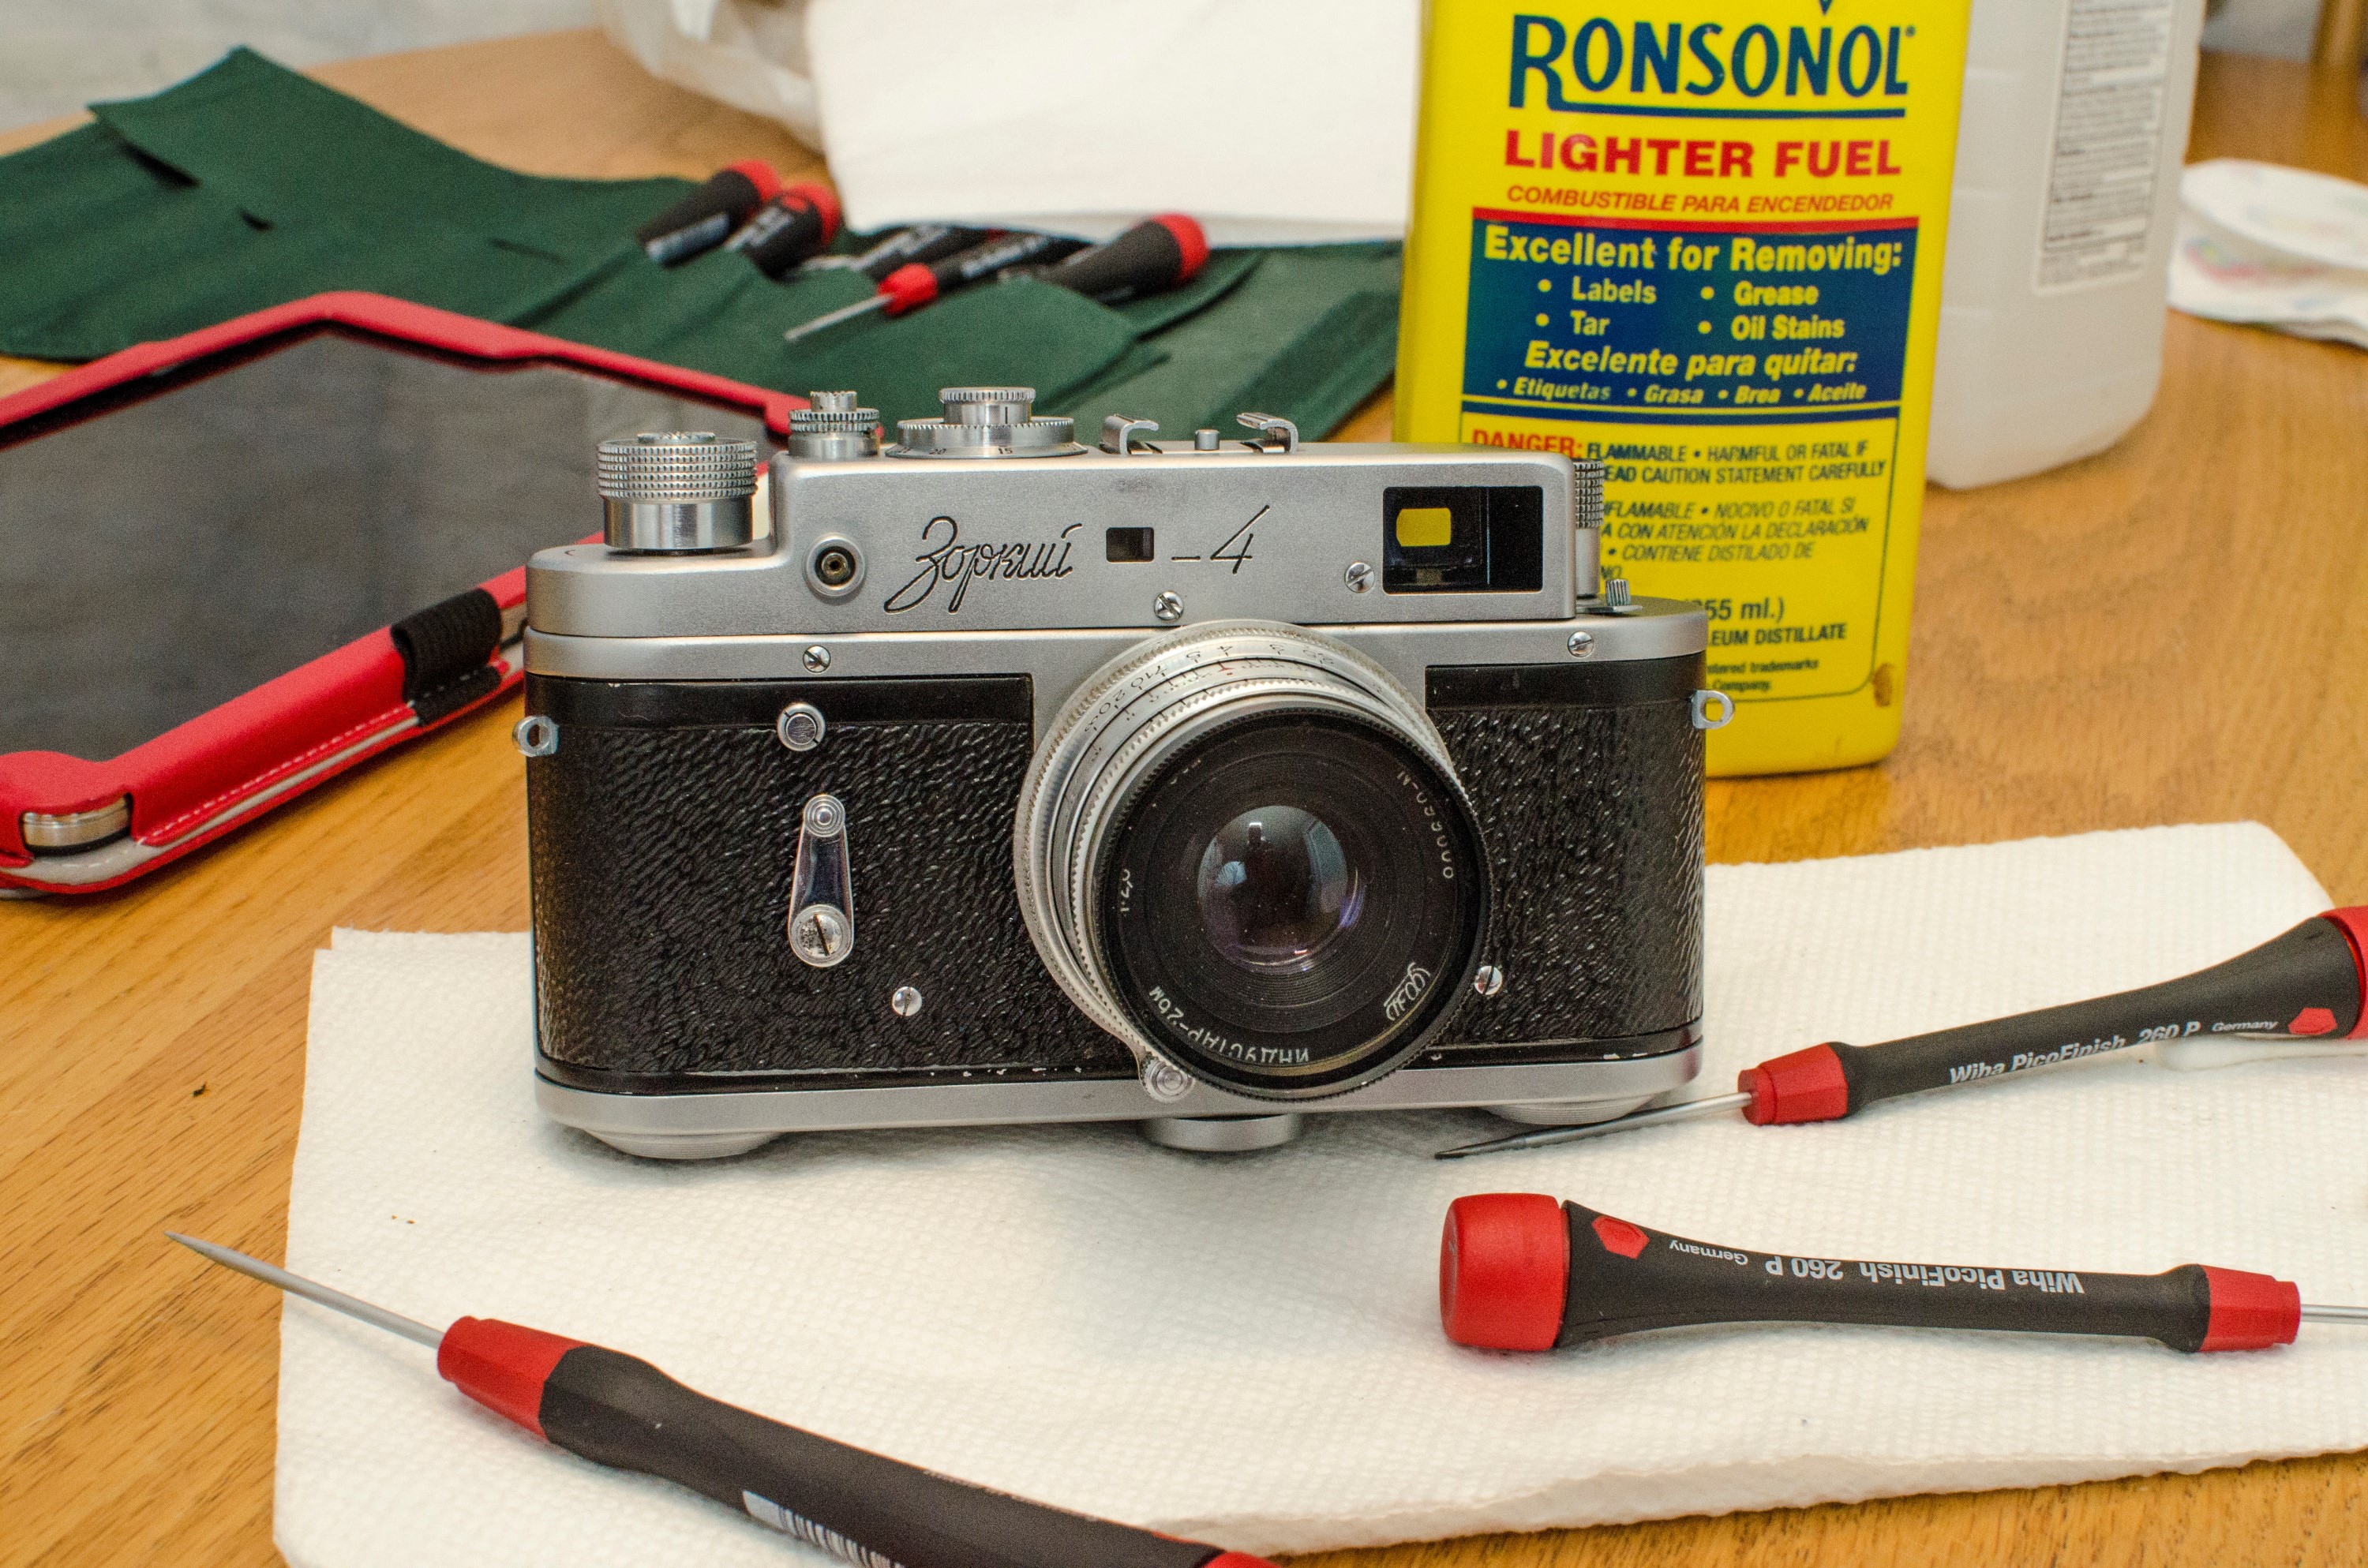
When deciding to disassemble any camera, it really helps to do your research and read any information that is already out there. Thankfully, there was already a Zorki CLA thread over at rangefinderforum. Here is a link to that thread. Although this walkthrough is specifically for the Zorki 4K, most of it was the same.
Tearing down the camera is the easy part, but there are definitely things you can do to make it easier on yourself. Before taking apart any camera, I strongly recommend these reading these tips:
- Find a well lit and spacious working area. I use my kitchen table because I don’t have many other options, but any place with a lot of room to spread around is ideal.
- Get one of those Sunday – Saturday pill boxes, a tackle box, or any type of container with many small compartments to help you organize the screws and various small pieces that will come out of the camera.
- Use good tools. I have a set of precision screwdrivers made by Wiha. I bought them from Amazon and cannot tell you enough how much a good set of screwdrivers makes a difference. The most common sizes when taking apart the Zorki are the 1.0mm, 1.5mm, and 2.0mm flat head drivers. There were no Philips screws in this camera. On many cameras you also need a lens spanner tool like this one. Note that the description for that tool says it is for DSLR cameras, but I assure you, it works fine on any film camera. For this particular repair, I did not need to use this tool, but it comes in handy for a variety of other repairs.
- A really strong magnet like one from a computer hard drive is very useful for magnetizing the screwdriver. This can help hold screws on the tip of your screwdriver when putting them back in, or even when extracting a fallen screw out of a tight crevice. The benefit to using an actual magnet is that you can take it off the screwdriver to demagnetize it.
- Get a shallow plastic pan or plastic tub to work in. This is especially useful when disassembling the camera because sometimes a screw or spring may unexpectedly pop out of the camera, and its a lot easier to find inside of a plastic tub than it is on your floor.
- For cleaning, Q-tips and cotton swabs are essential. I’ve found that the brand name Q-tips are better than the generic ones because they are often wound tighter and are less likely to fray.
- Get some 91% or higher rubbing alcohol for cleaning. You can use a higher concentration, but don’t go below 91% because the more dilute the rubbing alcohol, the more water is in it, and you do not want to get water inside of a camera. The generic stuff is fine, you do not need a name brand.
- Ronsonol lighter fluid or naphtha oil is very useful for cleaning gunk out of a camera. It can be used to free sticky shutters or tight pivot points. The benefit to using this for cleaning is that lighter fluid evaporates quickly and leaves no residue or moisture behind. This is essentially when working with the precision parts inside of a camera.
- Most camera repairs to not require anything to be lubed. As a matter of fact, in most cases, lube is your enemy simply because it can get to places where it shouldn’t be. For specific repairs that do require lubrication, I’ve found that White Lithium Grease is the best. You can buy some at any auto parts store. It usually comes in a small 1-2 oz tube. Whatever you do, NEVER use WD-40 or any other kind of oil based penetrant or lubricant, and especially do not use graphite powder as these will always get where you don’t want them and they will do more harm than good!
- Assuming your work area is not near your computer, bring a tablet, laptop, or even print out the directions and keep them handy so you can reference them while working on the camera. I personally use an Android tablet that I constantly reference while working. Another benefit to using a tablet is that I can use the camera on the tablet to take pictures of my progress if I see something that I need to remember during reassembly. It is a lot easier to put something back together if you have a picture of what it looked like before you took it apart!
- Finally, the last tip is to always TAKE YOUR TIME! Repairing a camera is never anything that you should rush. Many times, if you lose a screw or damage something, there are no modern replacements other than just getting another camera, so its very easy to lose something or do something incorrectly that renders your camera irreparable.
If you are reading this article with the intent of taking apart your Zorki to resolve a shutter issue, I should be very clear what problem these following steps will resolve and more importantly, what it won’t resolve.
If you have any kind of problem with the actual shutter curtains themselves such as holes in the cloth or a broken shutter ribbon, this will not help you. If you have a problem with the second curtain “capping” the first one, this will not help you. If you have a problem with any kind of curtain tension, this will not help you. Frankly, any problem that involves going through the bottom of the camera or into the shutter box itself is beyond the scope of this article.
Now, the things that this article MIGHT be able to help you with are a jammed shutter. If you press the shutter release and nothing happens, or if only the first curtain moves but not the second one, this MIGHT help. If the shutter is working, but the speeds seem to be way off, like 1/500 sec acts like 1/2 second, or Bulb acts like 1/500 second, this MIGHT help. If turning the shutter selector to the slow speeds does not trigger the slow speeds, this MIGHT help. Finally, if there appears to be some obstruction preventing you from selecting some speeds, this MIGHT help.
I keep saying MIGHT because I want to be clear that I am not a Zorki expert. I am not even a camera repair technician. I am merely a guy who likes old cameras and has a reasonable ability to follow directions and look at something and figure out how it works. I am a guy who is willing to accept the reality that I might break the camera even more than it was, and never get it back together. I have only done this once, and it took me a week to get it back together. There is no way that one successful repair of one Zorki means that I can diagnose all problems that someone could encounter. There have also been many subtle variations in Zorkis over the years, so you may encounter something slightly different than what I did, or your camera might have more than one problem that isnt covered here.
Now that all of that is out of the way, are you ready to fix your Zorki like I did?
Not so fast. There are two possible “gotchas” that seem to be relatively common with these cameras that are easy to check for and don’t even require any disassembly.
The first is a common problem where the rewind knob is partially engaged which locks the shutter and causes the shutter release not to fire. All you have to do to check this is to rotate the collar around the shutter release clockwise into the rewind position. You should notice that the collar moves into a lower position in this mode and the shutter release becomes locked. This is how you rewind an exposed roll of film back into the canister. Rotate the collar counter clockwise back into “forward” mode, and repeat this a couple of times. Sometimes, after 40-50 years, this can get a little sticky and cause the shutter to remain locked even in forward mode. On my Zorki, I notice that when you rotate the collar counterclockwise into forward mode, I have to back it off ever so slightly to “release” the shutter. You can hear a very subtle click when I do this. It is entirely possible that your “stuck” shutter is just this being out of position.
The other thing that might have happened is that the shutter speed selector might be out of position. There are many warnings out there to never, ever change the shutter speed dial without first cocking the shutter. If this happens, things get out of position, and that can cause incorrect shutter speeds, or the shutter not to fire at all. Sometimes all that needs to be done is to move it back into position. Since there is no way to actually tell what speed the camera is in if this happens, I recommend trying to cock the shutter and select every speed and try to fire it. Start with 1/30, then Bulb, then 1/1000 and work your way (if you can) to 1 second. This might not be possible depending on the situation, but I have heard some instances where a Zorki was jammed, and all that was required was fiddling with the speed selector and it eventually resolved itself.
If neither of these things help, then most likely, removal of the top plate is required.
The very first step is to read the Zorki 4K CLA sticky over at rangefinderforum. This post was made in 2007 and the attached images are very small. The information can be a bit hard to absorb after one read, so I strongly advise you read the instructions several times. Look at the pictures. Read the instructions again. They’re not hard, there’s just a lot of info here. Some of the replies to that Sticky have some additional information from other members which may be useful as well.
Here I will include some duplicate information and pictures here that should help you when taking apart your camera since the images in the CLA sticky are so small, but you really need to read the original instructions in addition to mine.
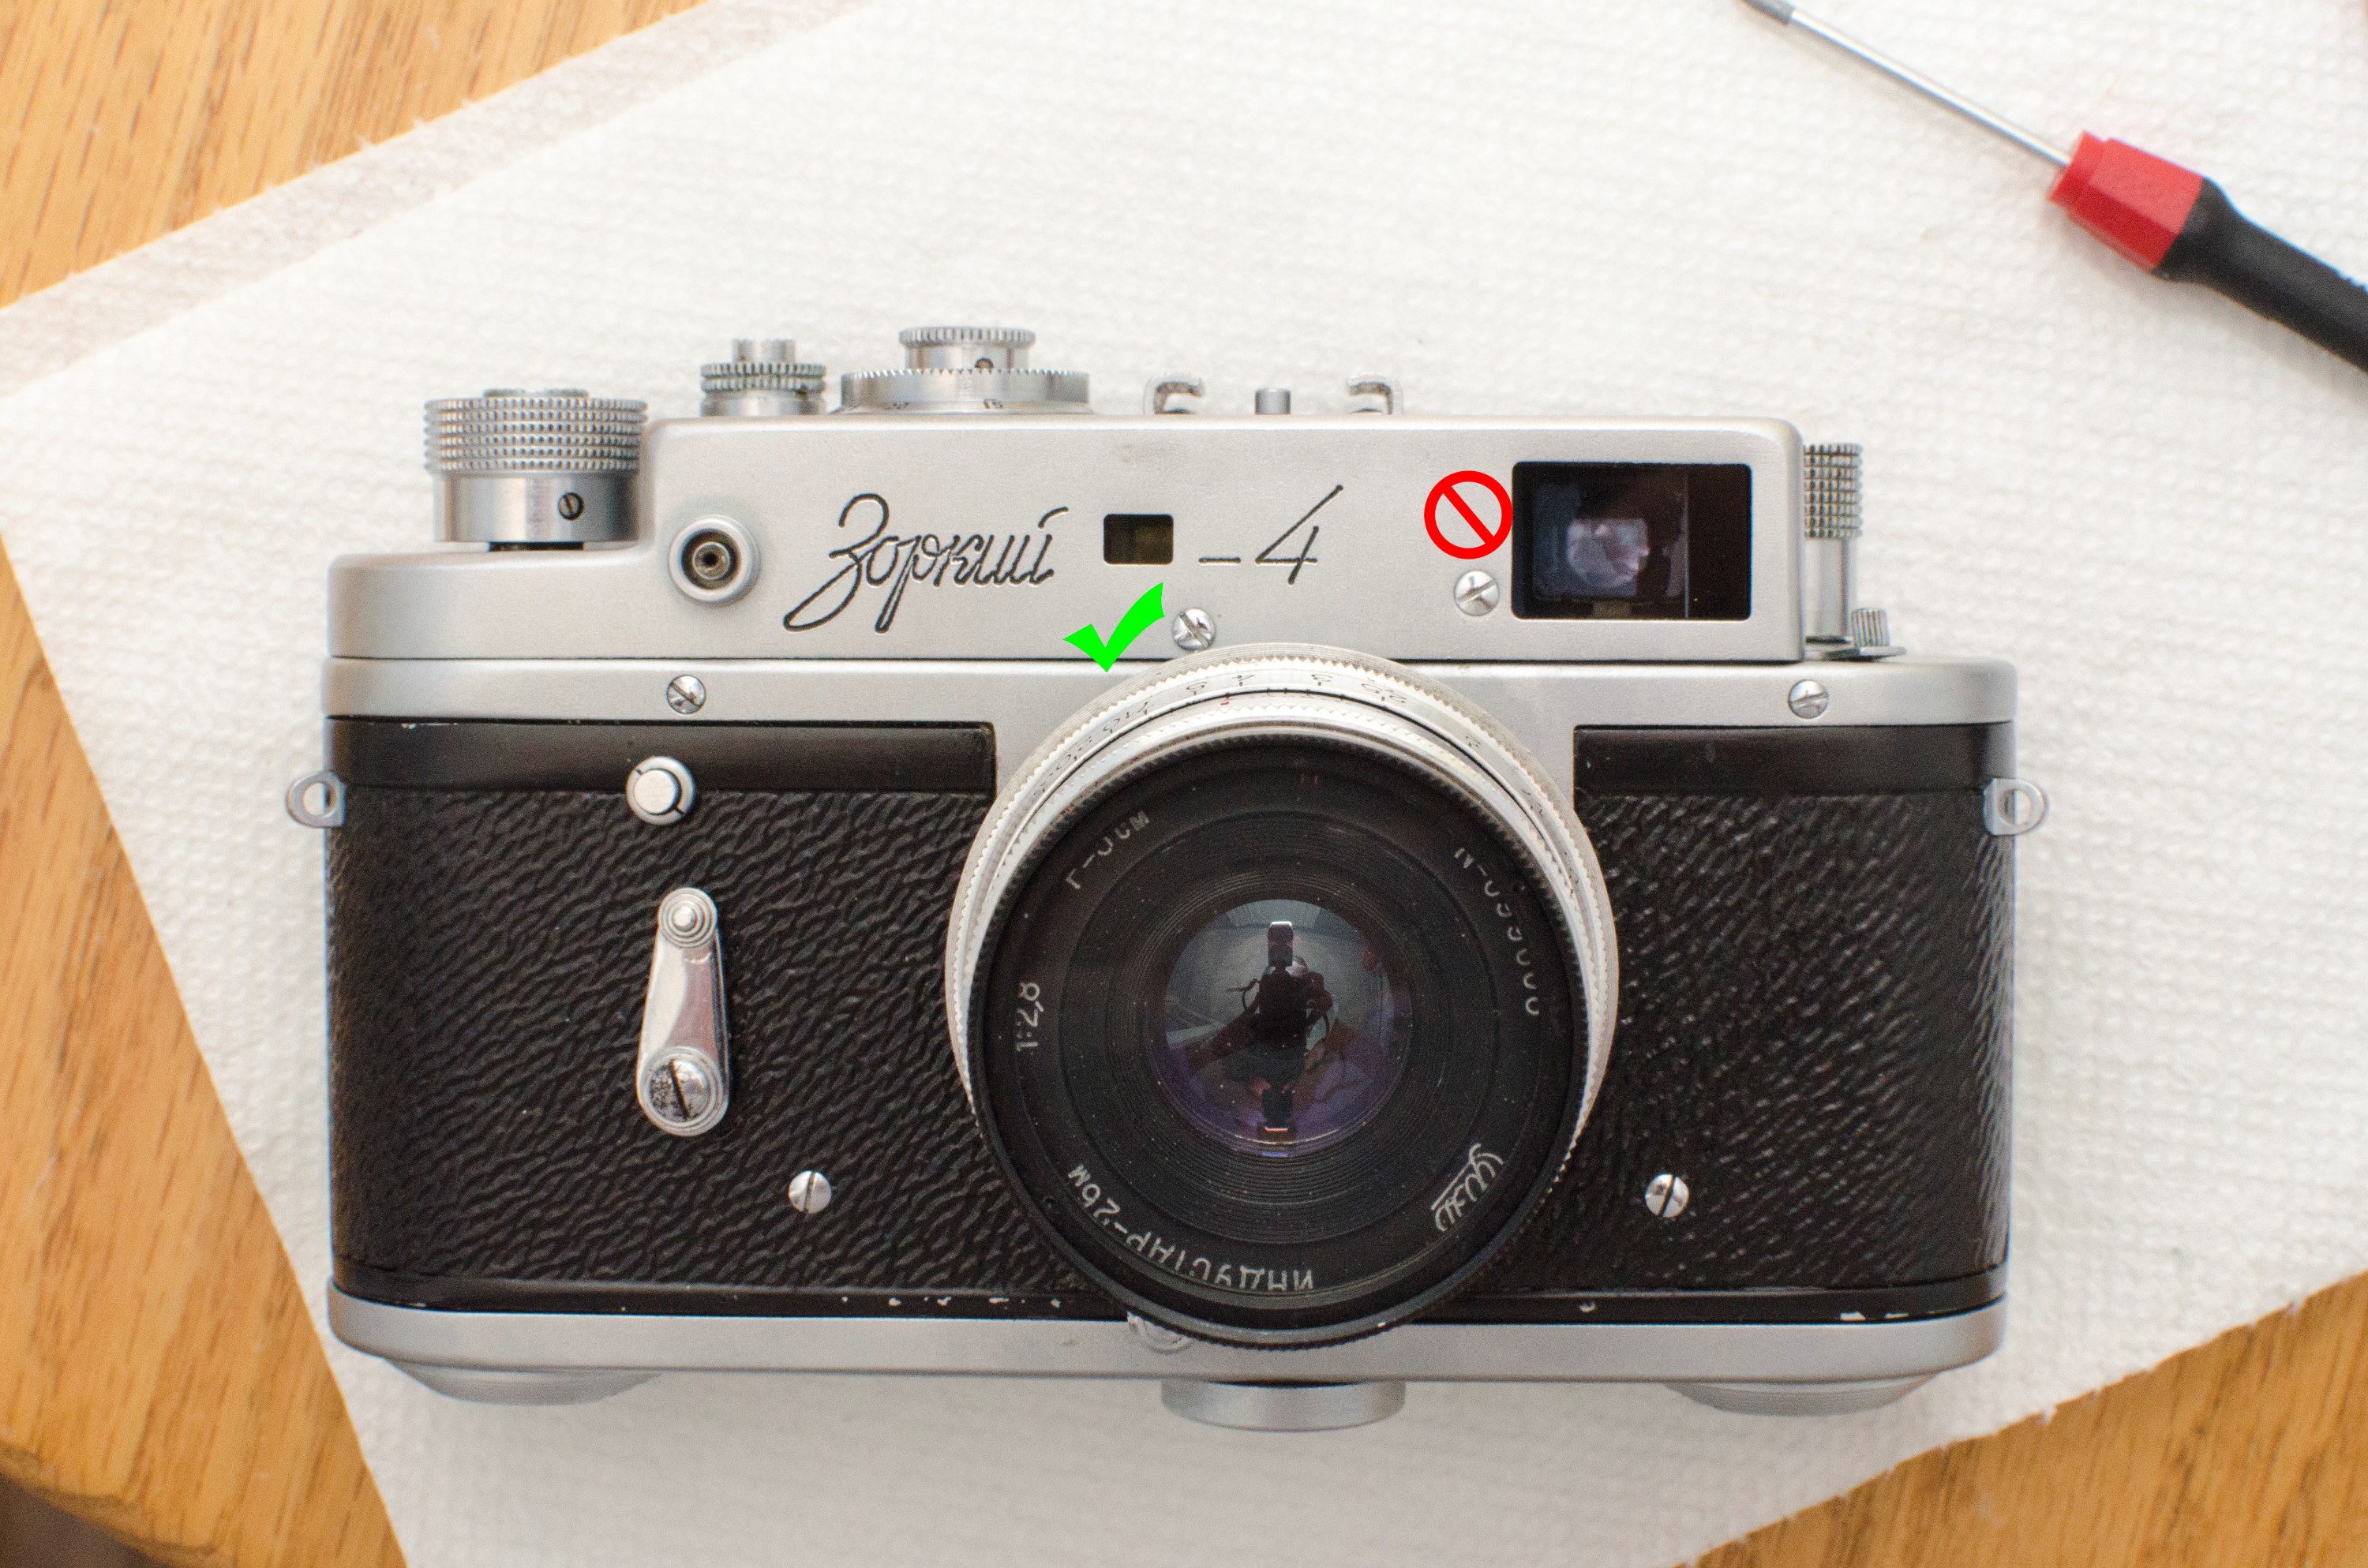
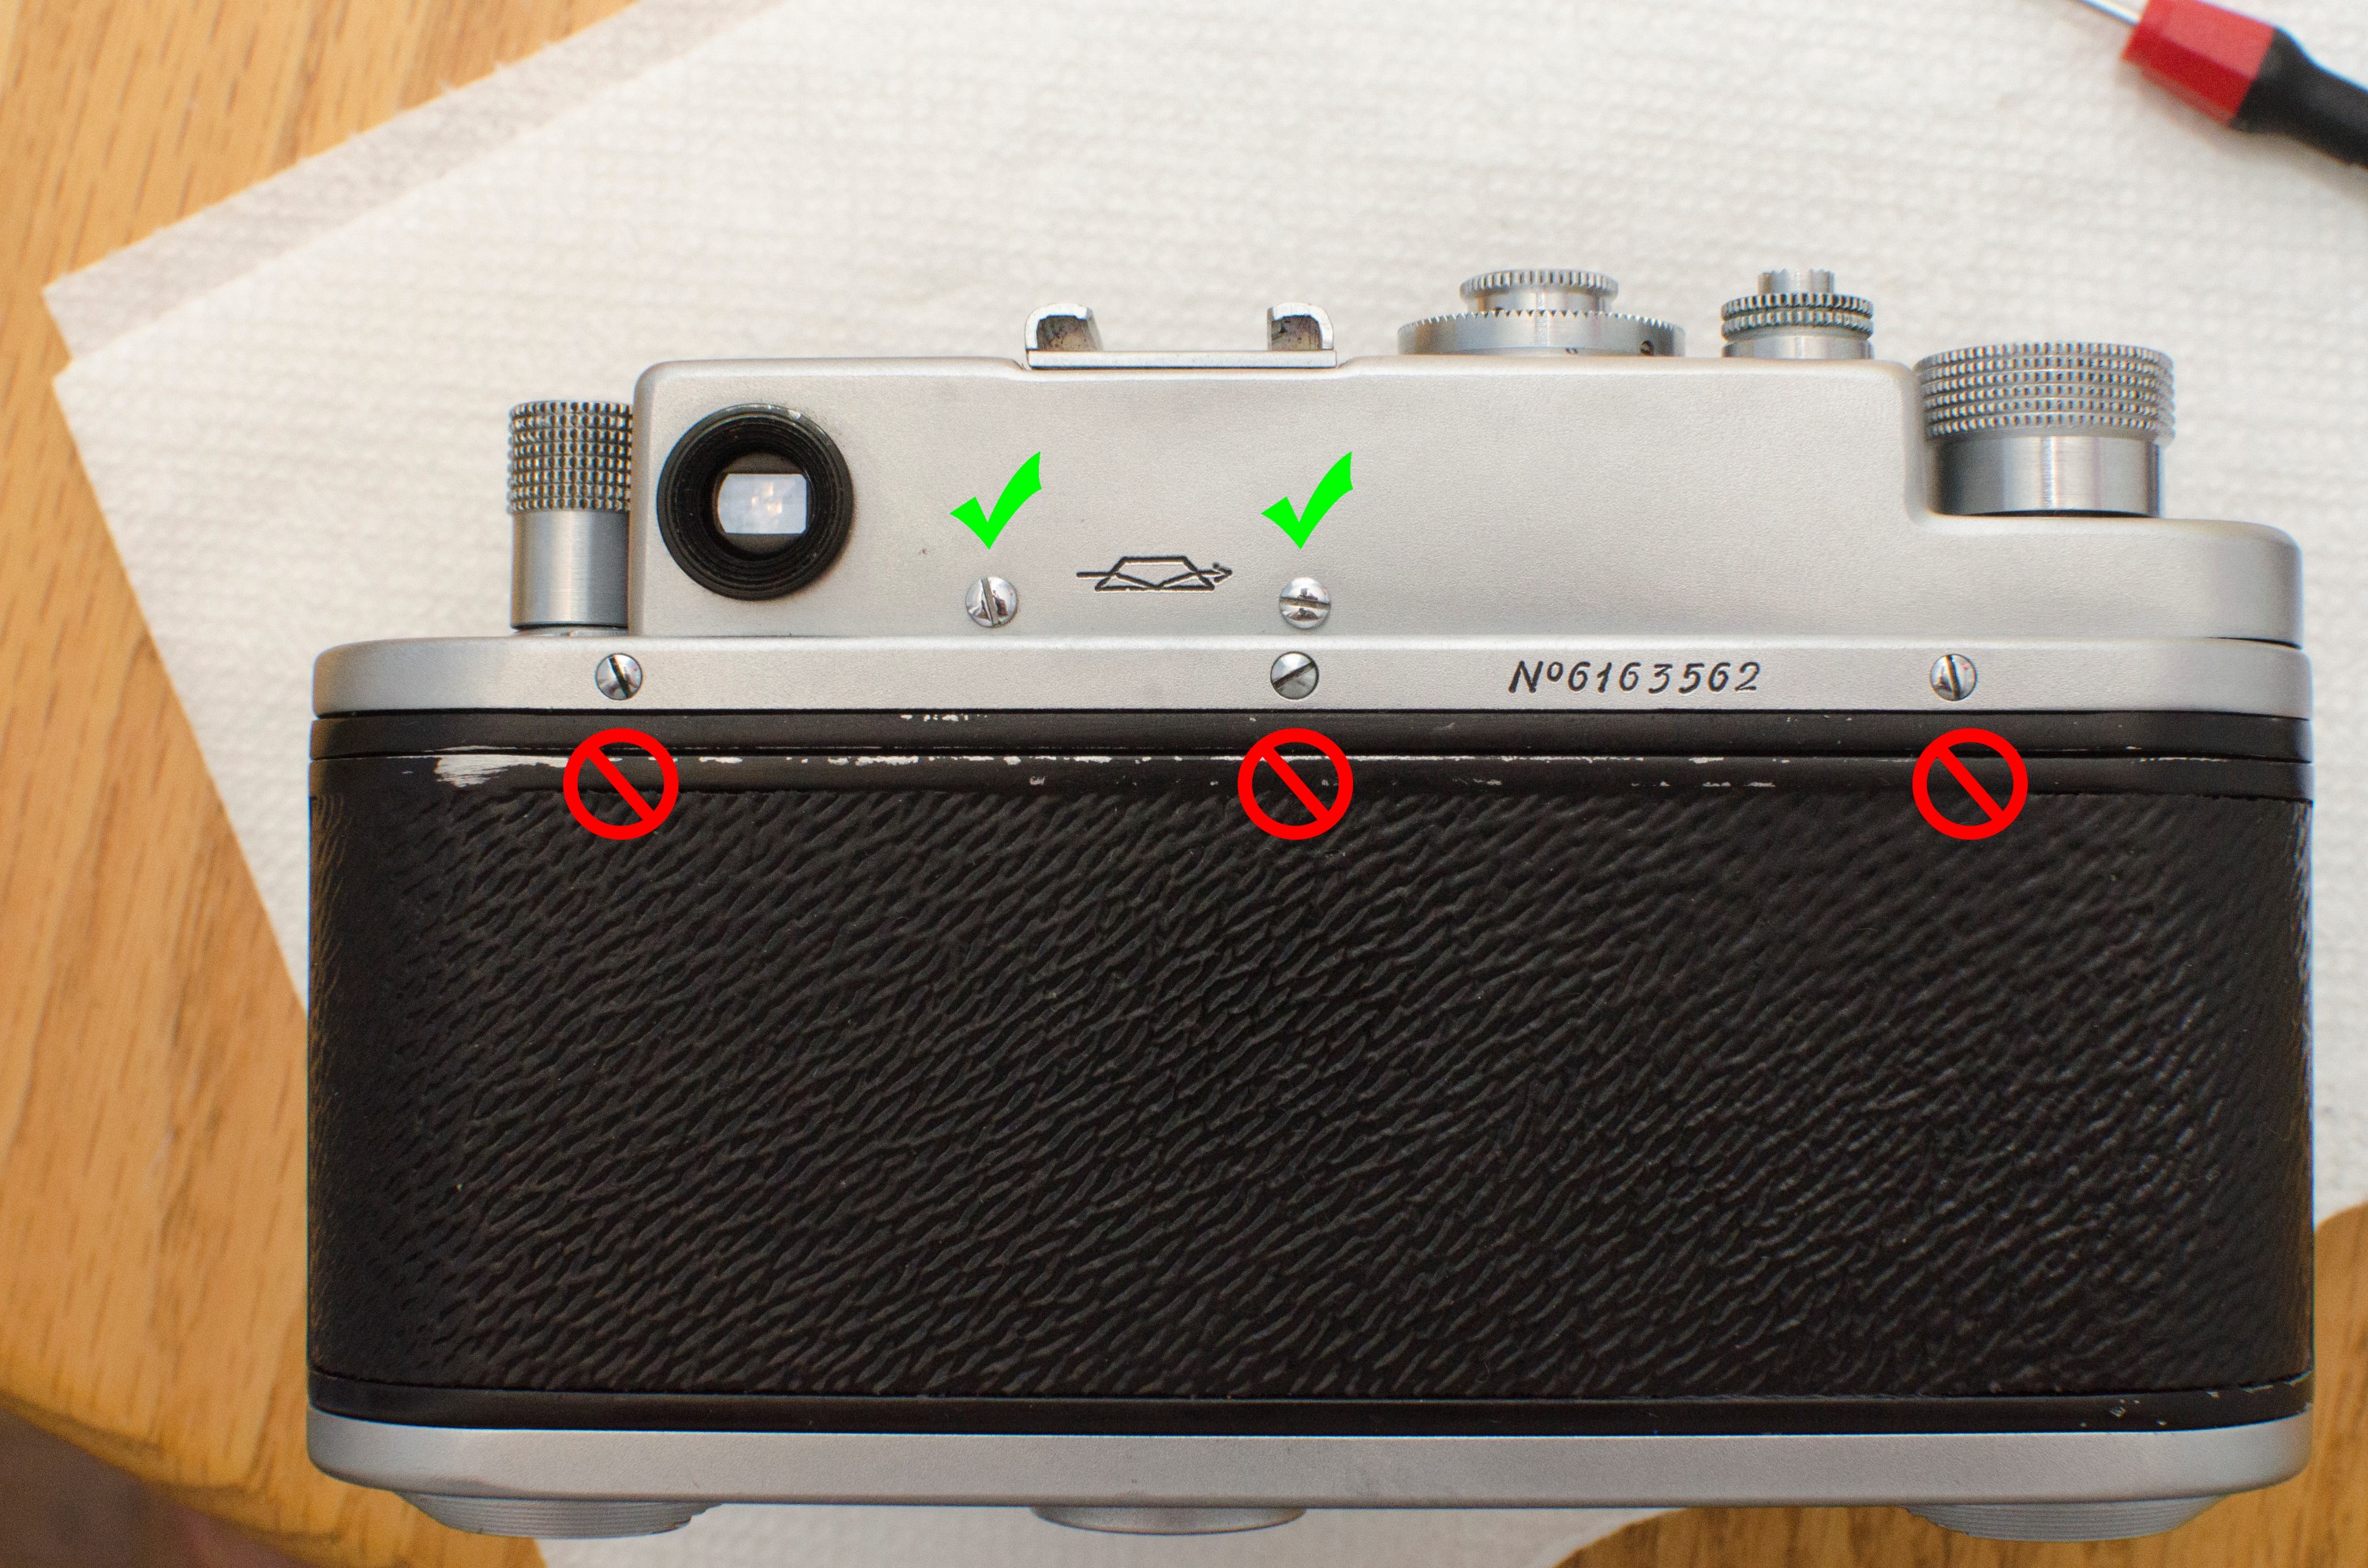
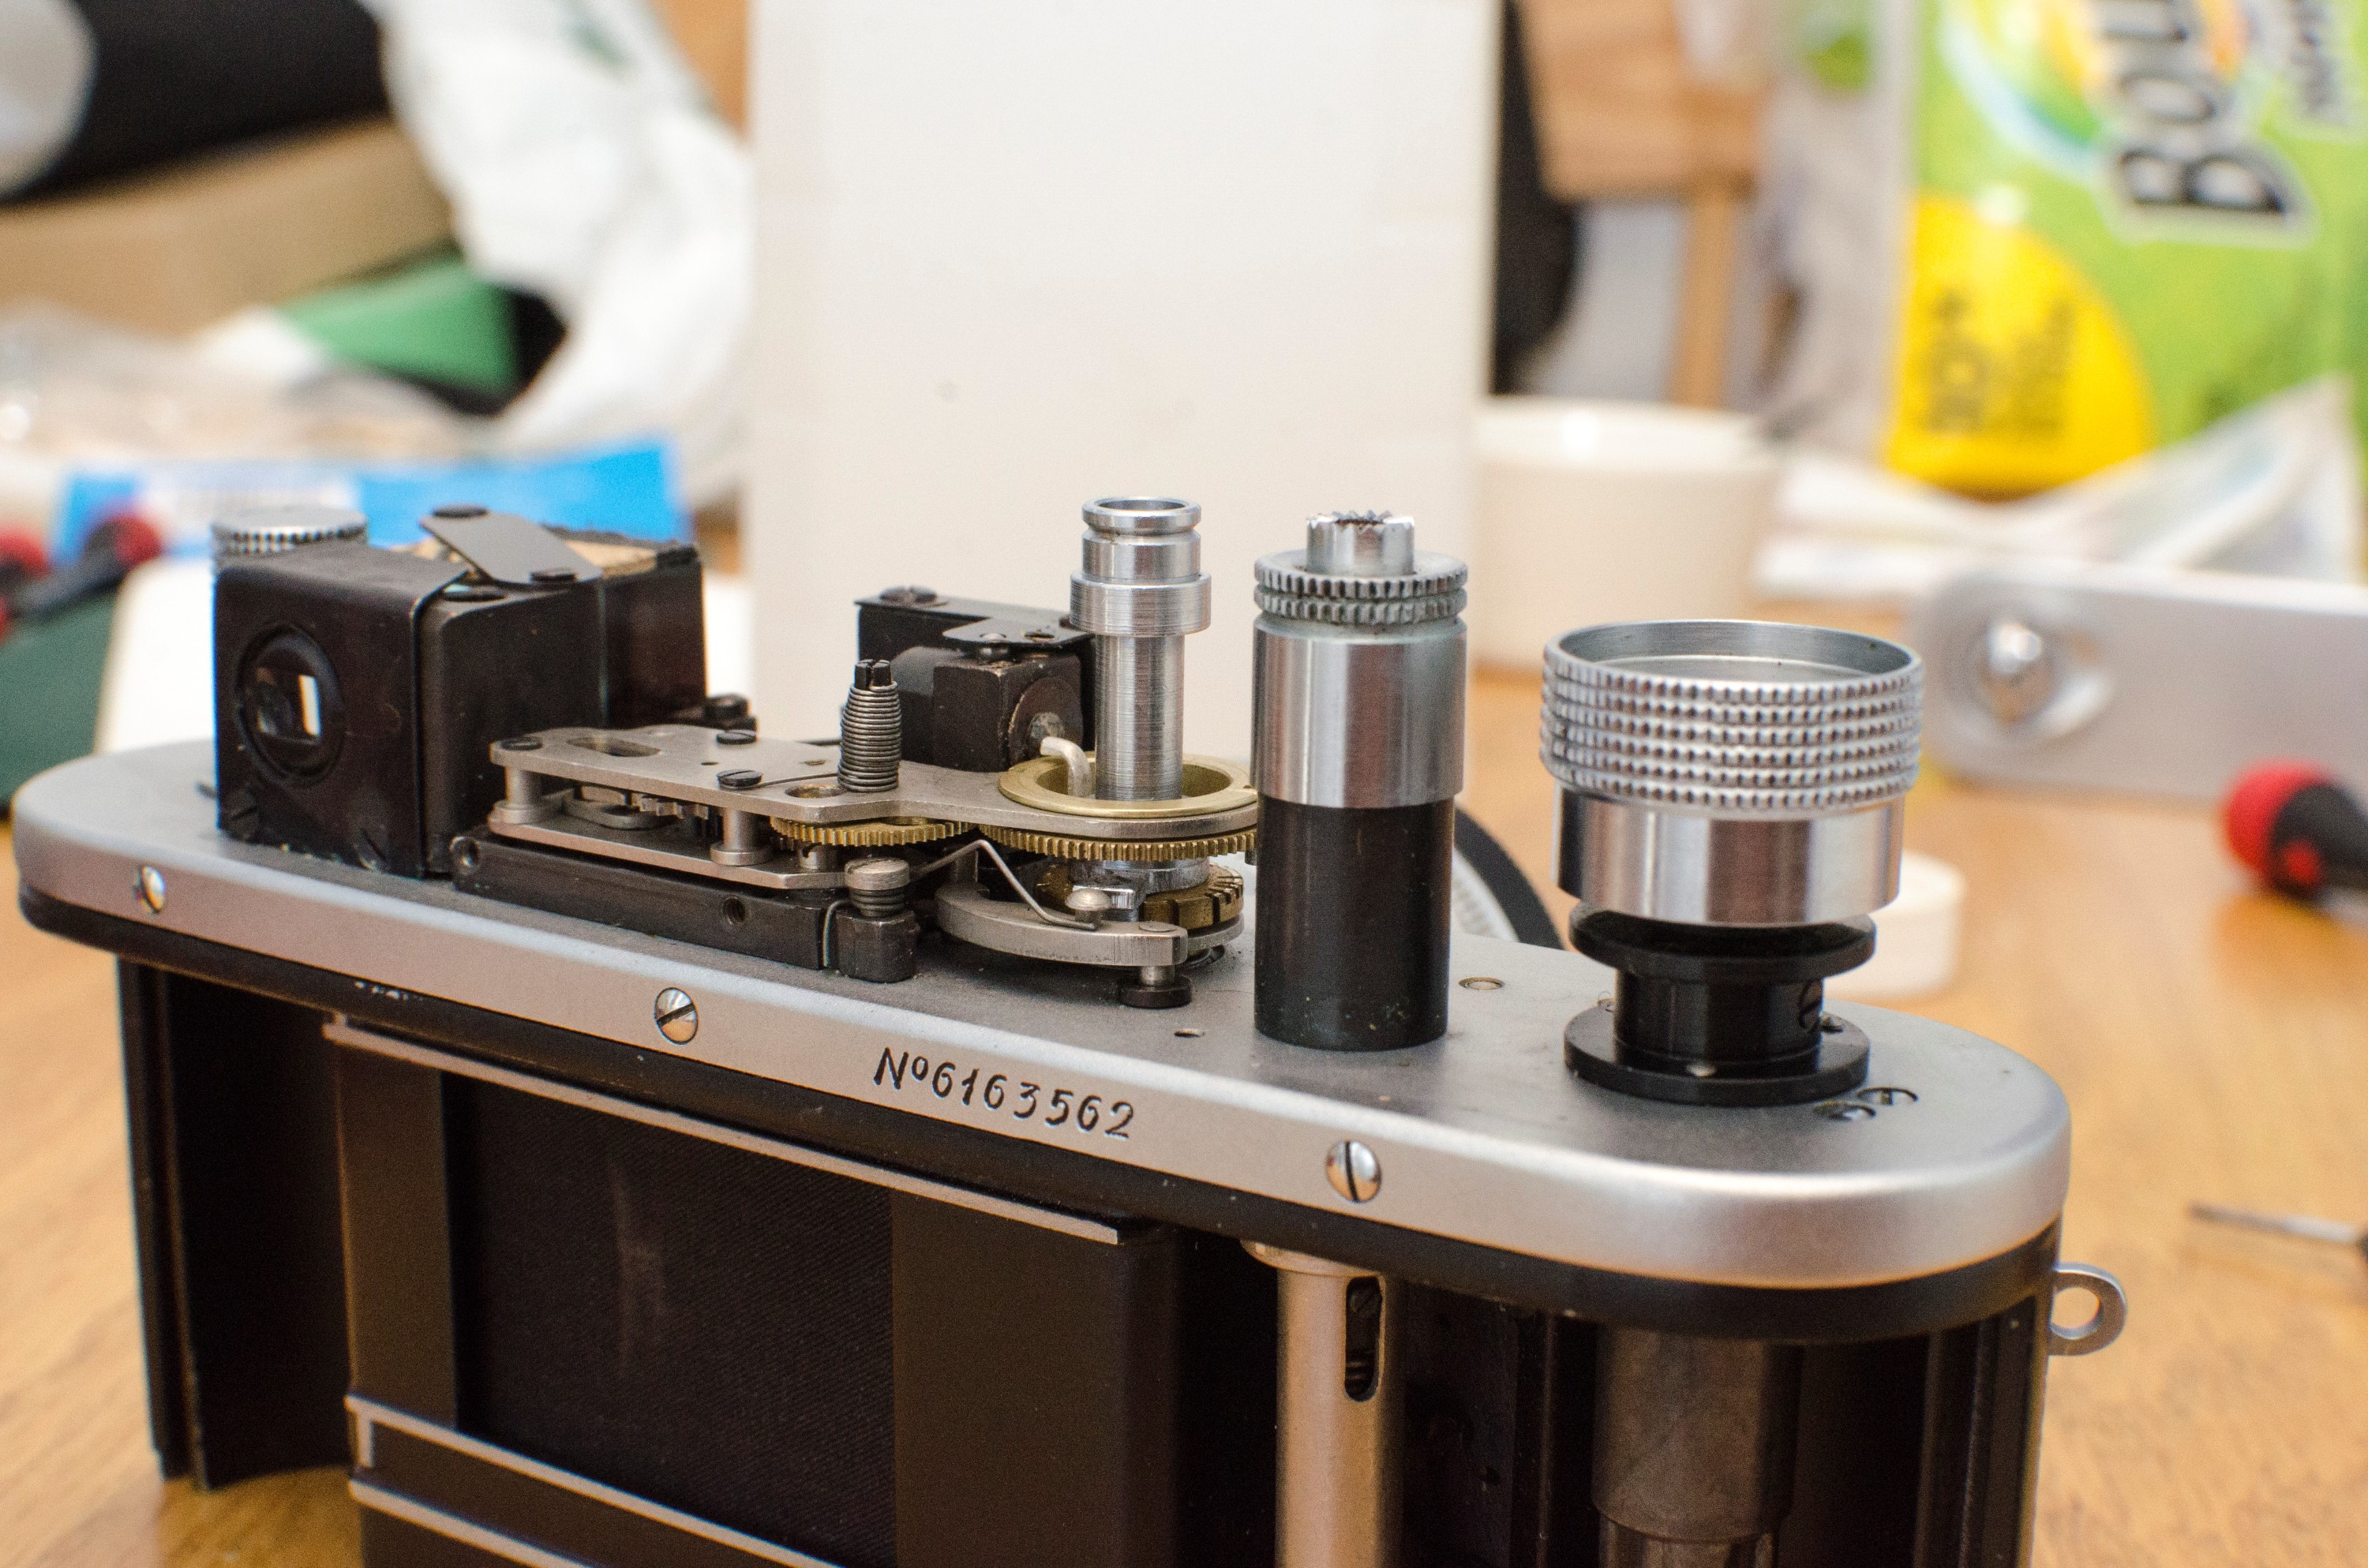
Step 1: Remove the screw in the front of the camera directly above the lens. You do not need to remove the screw right next to the rangefinder window. This is merely an adjustment screw and does not hold the top plate on. Also remove the two screws on the back of the camera on both sides of the KMZ logo. Some Zorkis will not have a KMZ logo here, but the screws should be in the same place. Do NOT remove the 3 screws on the back of the camera on the trim piece above the door.
Step 2: Back out the set screws in the following locations: 1 on the film advance knob, 2 on the shutter speed selector, and 1 on the flash sync dial. Since these are all set screws, you do not need to actually remove them. Merely back them out one turn. Its wise to keep them in position so you don’t lose them. The two on the shutter speed selector might require a little upward force on the shutter speed selector to see them.
Step 3: Remove the screw on top of the film advance knob which holds the frame counter in position. Once this screw is out, the frame counter disc and a star shaped washer will come out. Put these in a safe location. Remove the film advance knob by unscrewing it counterclockwise and put it aside. You will need to screw it back on with the top plate off. It’s also worth noting that if you have a Zorki 4K, the film advance is a lever instead of a knob and the instructions to take it off are different. See the CLA sticky mentioned above which shows you how to do this.
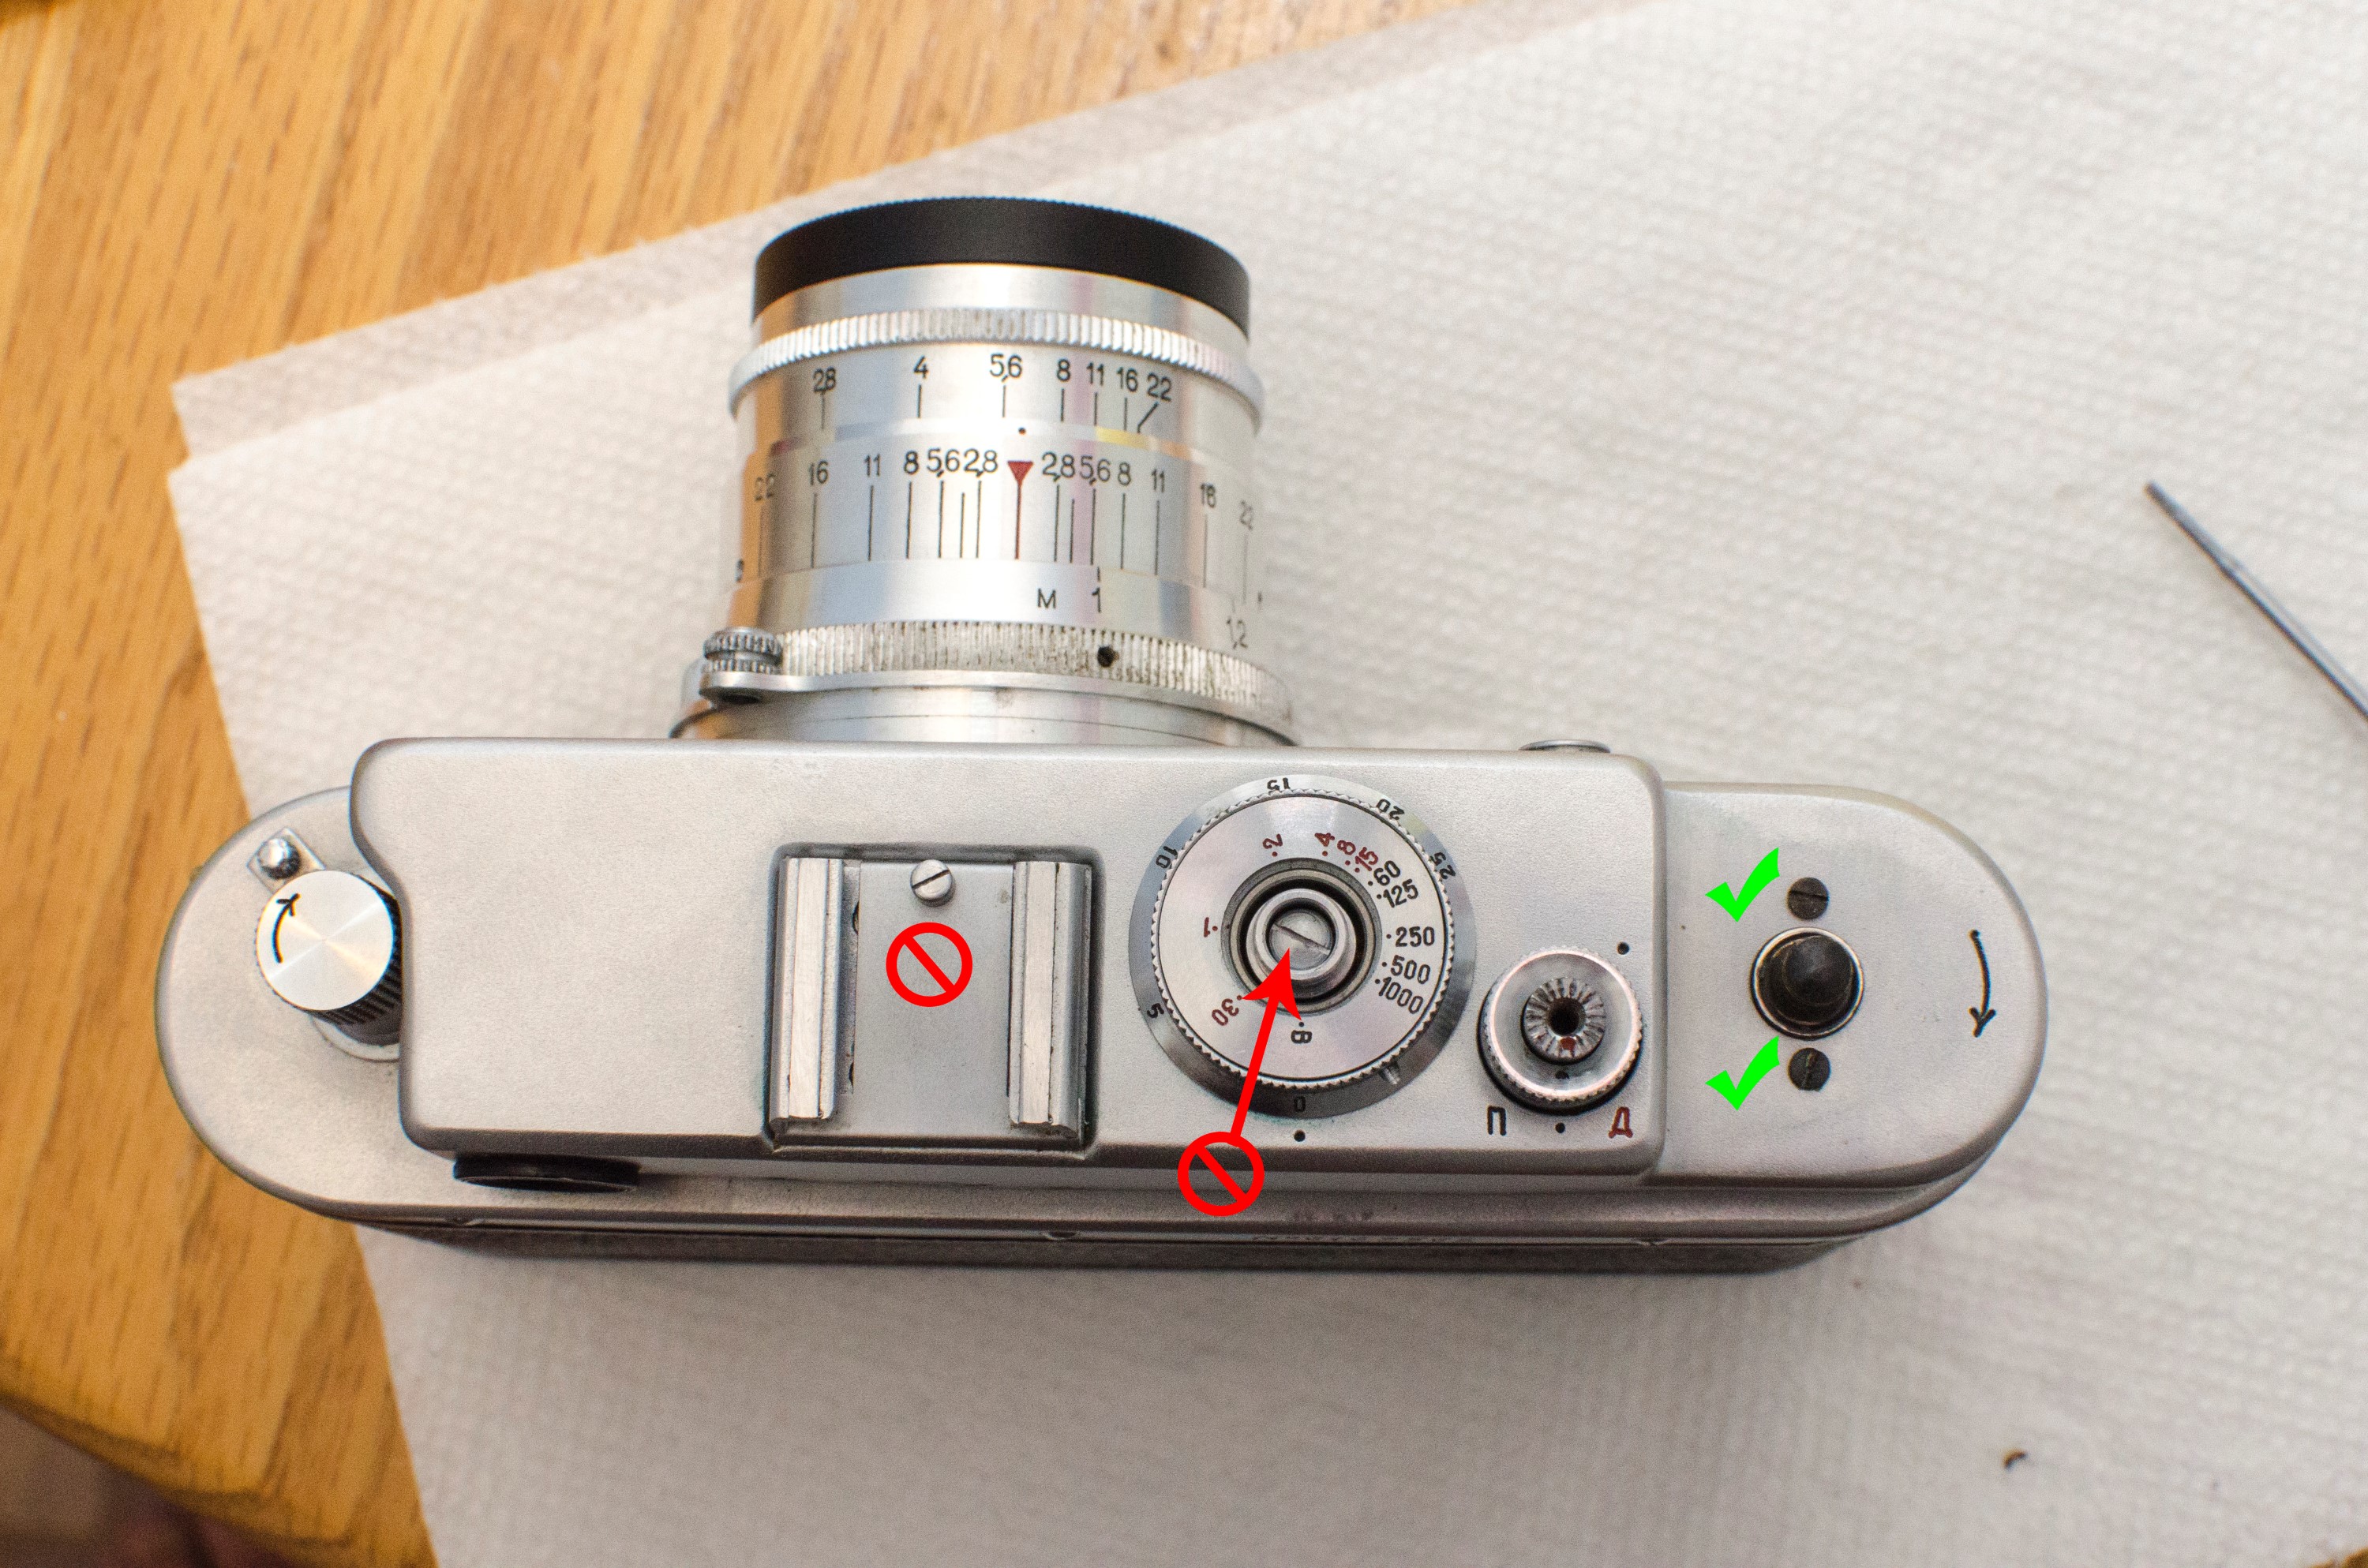
Step 4: Remove the two black screws that were under the film advance knob. On mine, these were very tight and needed an extra bit of persuasion to get out. You do not need to remove the post/screw in the accessory shoe. This screw does not hold the plate on. You also do not need to remove the larger screw in the center of the speed selector.
At this point, the top plate is ready to come off. Gently wiggle it off. Depending on how much grime is on your camera, it might take a bit of wiggling. It is also possible that the front PC flash port can catch, but I assure you, it will come off.
Step 5: This next step is probably optional, but makes troubleshooting the camera much easier since it involves winding the camera many times. Reinstall the film advance knob and tighten it’s set screw. You do not need to reinstall the film counter, just put the knob back on and make sure it is tight.
Step 6: Remove the flash sync assembly. In the CLA sticky, it says there are only 2 screws holding this on, but on mine there were 3. Two were near the front of the camera and one was behind it. Unless you plan on using flash photography with your Zorki, you won’t need to do anything with this other than give it a good cleaning. Pay attention to its orientation before removing it because it will need to go on exactly in the same way it came off. Sadly, I forgot to take a picture of mine with this in place, but there are pictures in the CLA sticky. Remove the 3 screws and slip the entire assembly off the speed selector and put it safely aside.
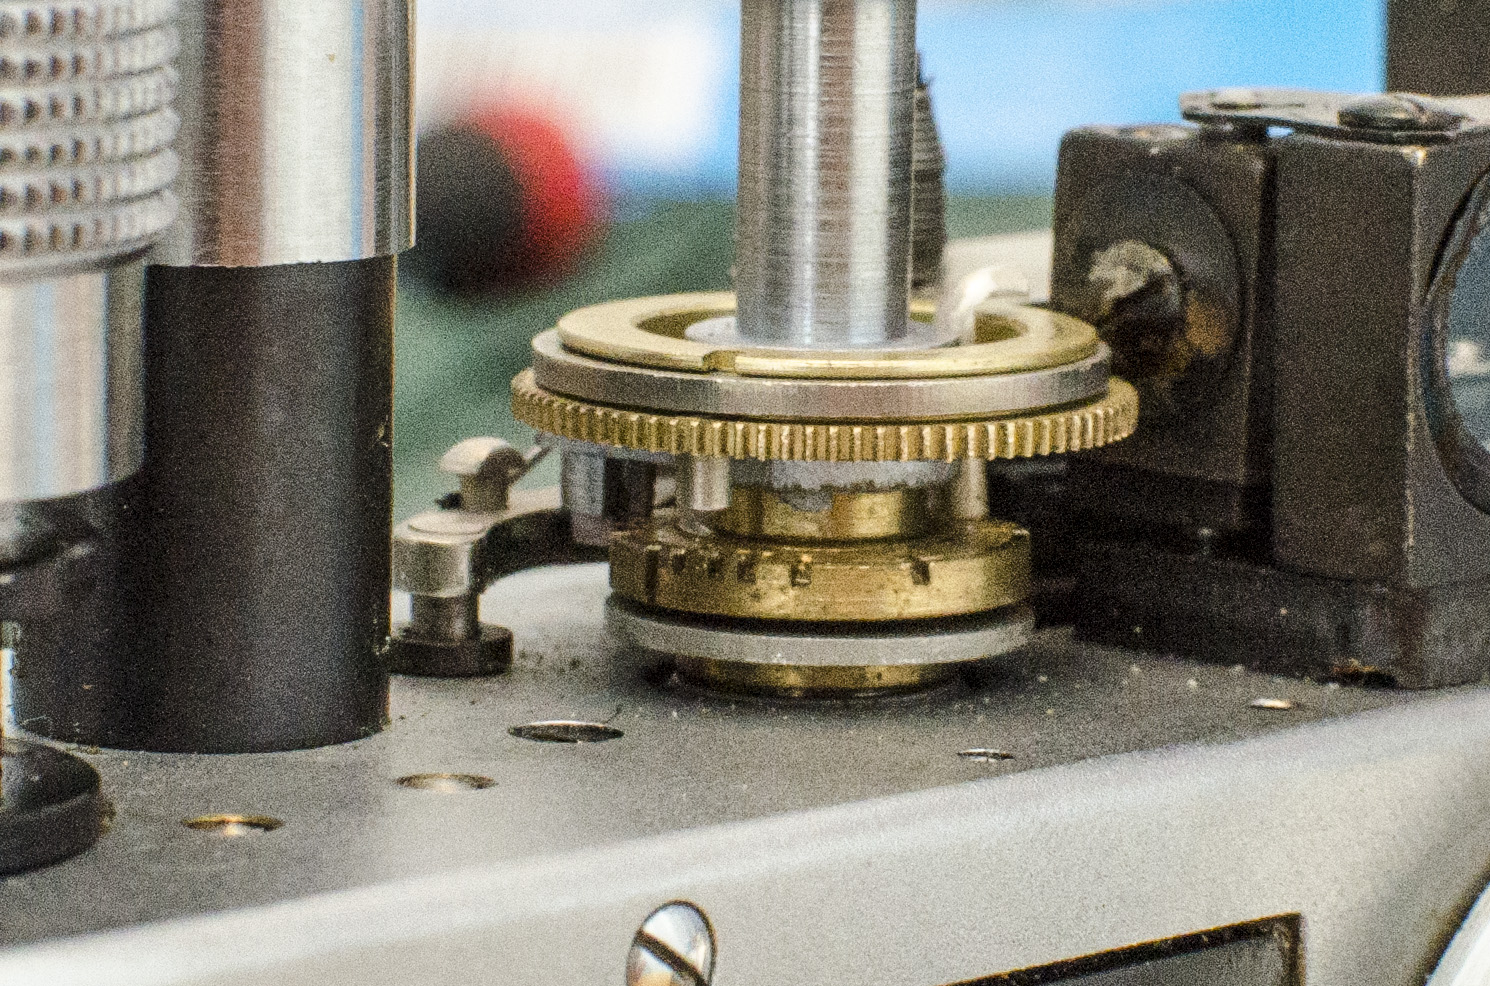
Step 7: At this point, here is where the troubleshooting begins. There are two areas you will direct the majority of your attention to. The brass colored thing with a bunch of gears on it is the slow speed escapement. From this point forward, I will call this entire thing “the governor”.
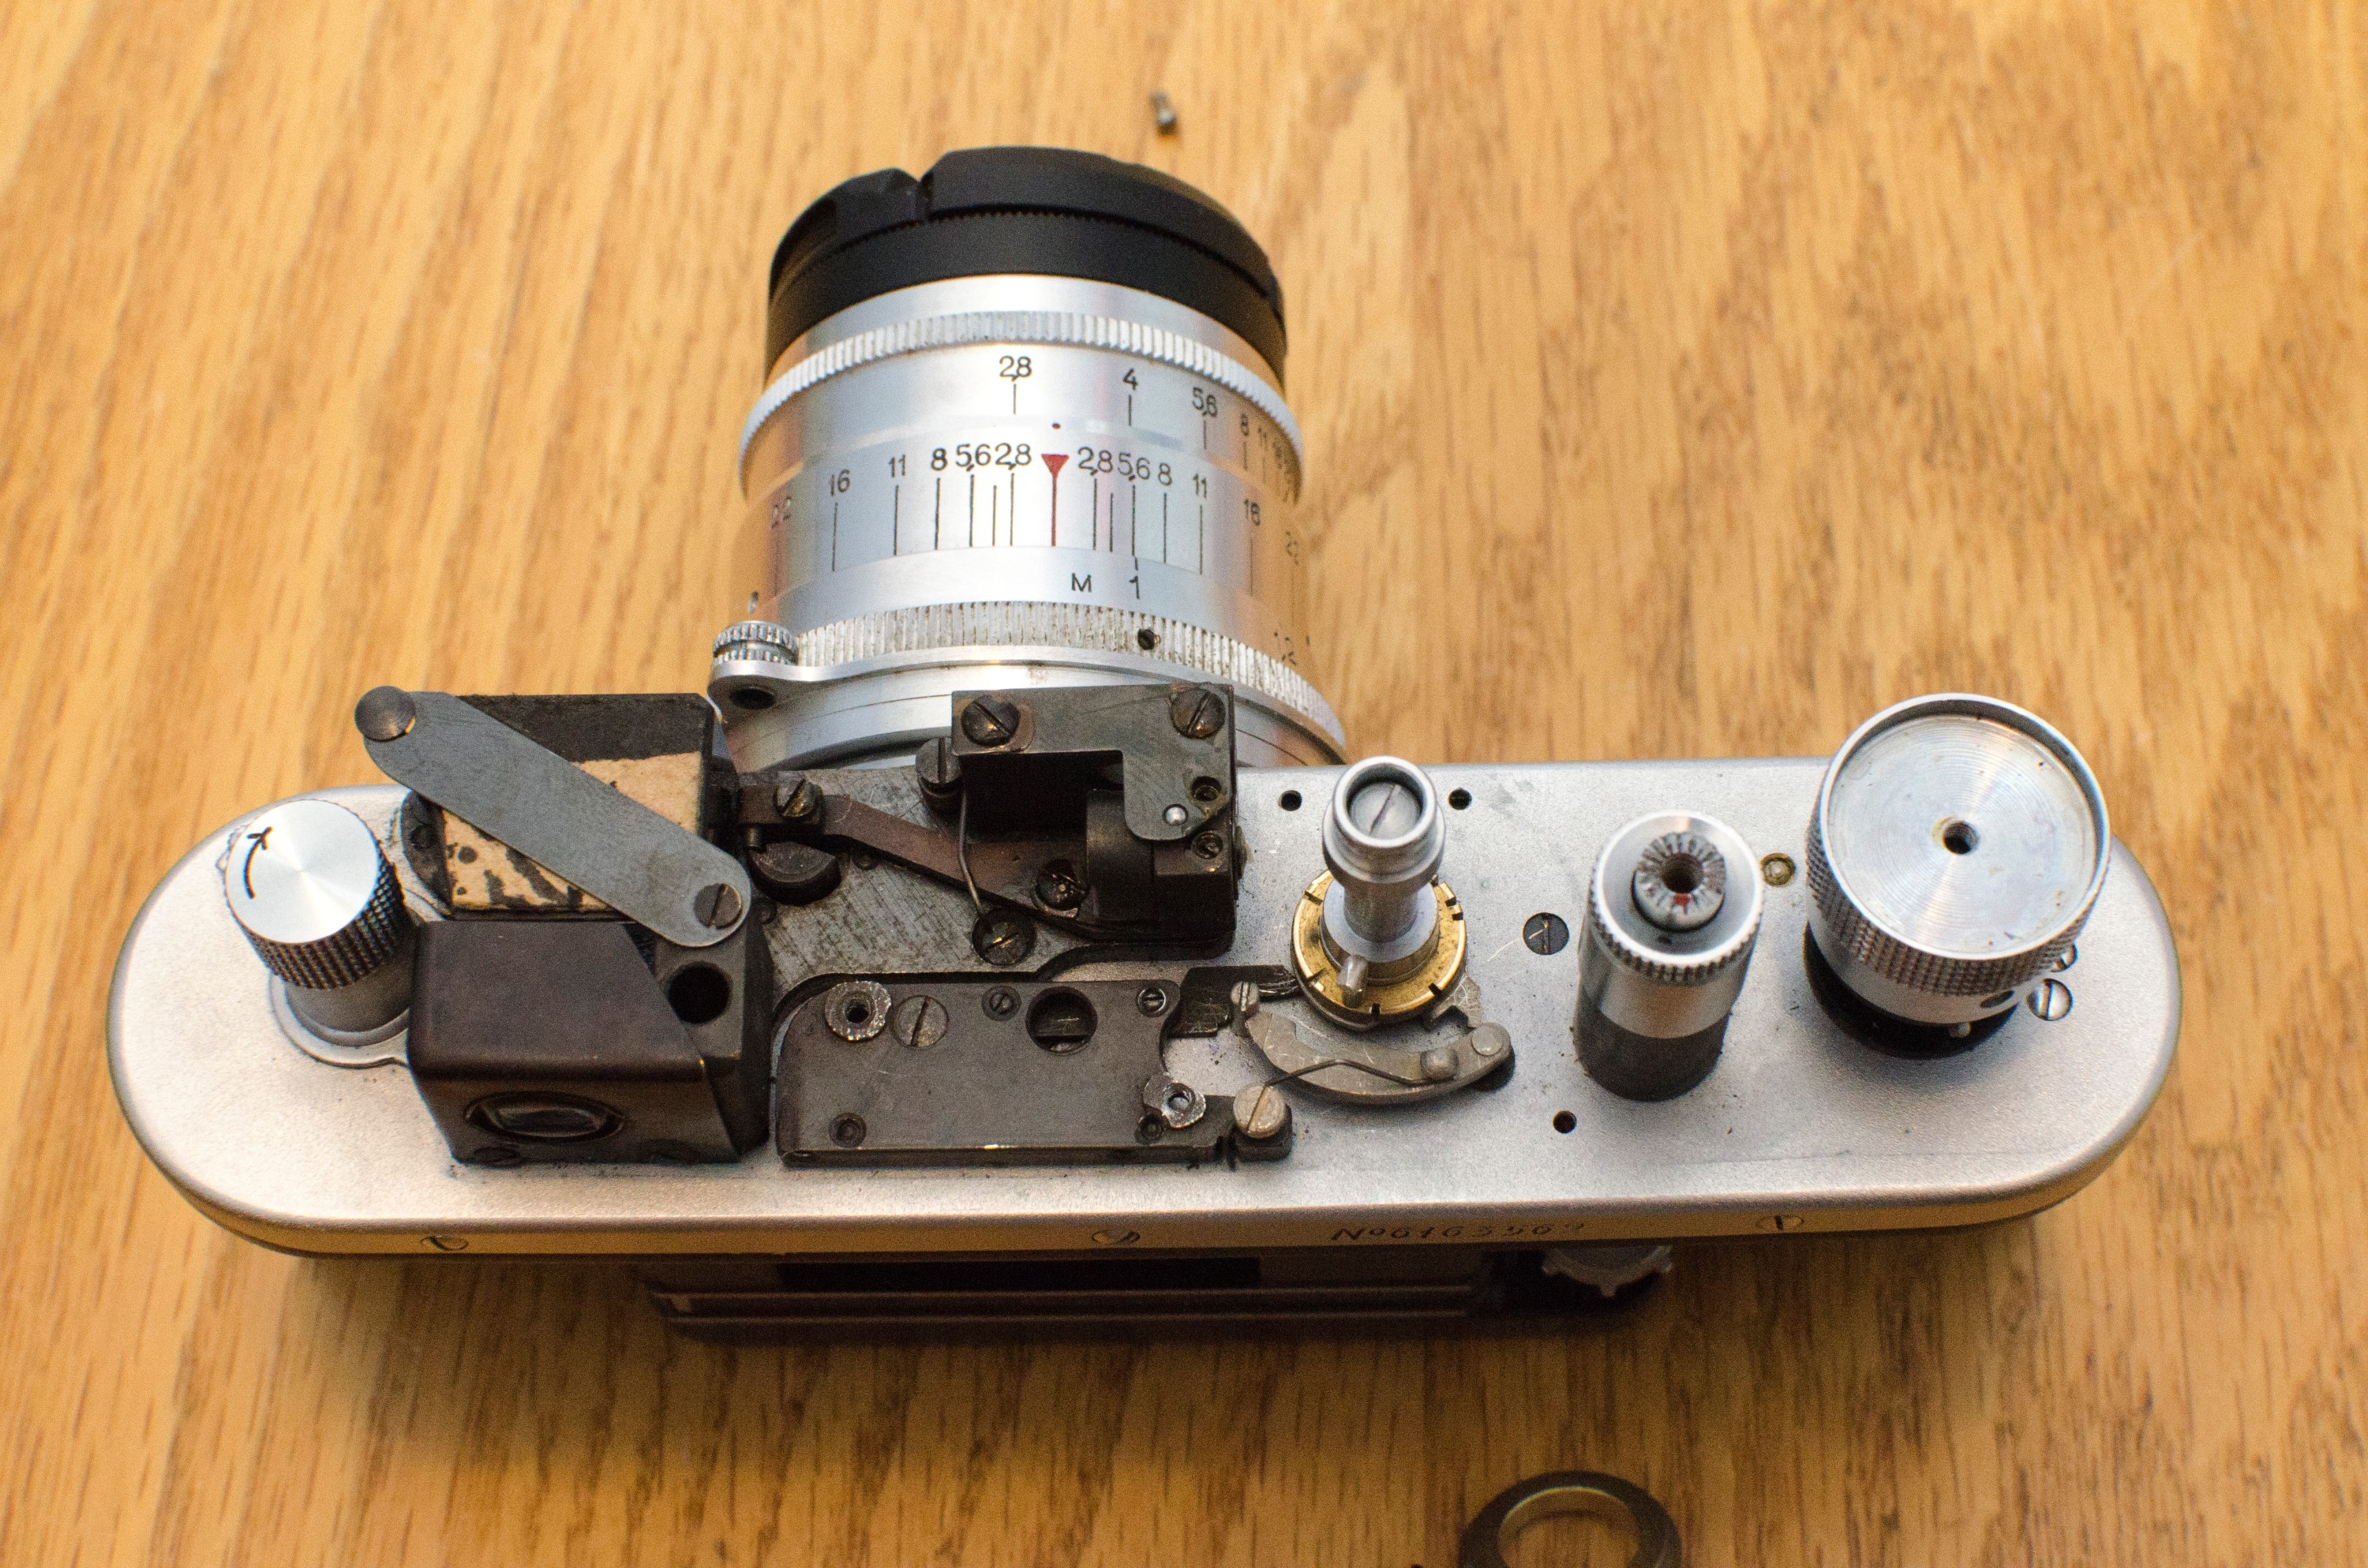
The first thing I would do is determine whether the shutter is cocked or not. You can tell whether its cocked by the position of the L shaped metal hook that sticks up through the governor’s large gear (the governor has already been removed in the two pictures to the left and right). In the picture to the left, this L shaped hook is a little bit past the 6 o’clock position. This means the shutter is not cocked. If this L shaped hook is in the 9 o’clock position like in the image to the right, then it is cocked. You will have to remove the governor and it is a lot easier to do when the shutter is not cocked.
If the shutter is cocked and pressing the shutter release does not work, you will have to manually release the shutter. In order to do this, you need to use a small screwdriver and physically move a black sliding lever out of position. It is REALLY hard to see with the governor installed, so I will show you a picture of where this black lever is with the governor already removed.
I am pointing to this sliding lever with my screwdriver. You will not be able to access it like I do in this picture with the governor installed, but you can get to it from the front of the camera. From the front of the camera, you will need to slide it in the direction of the viewfinder.
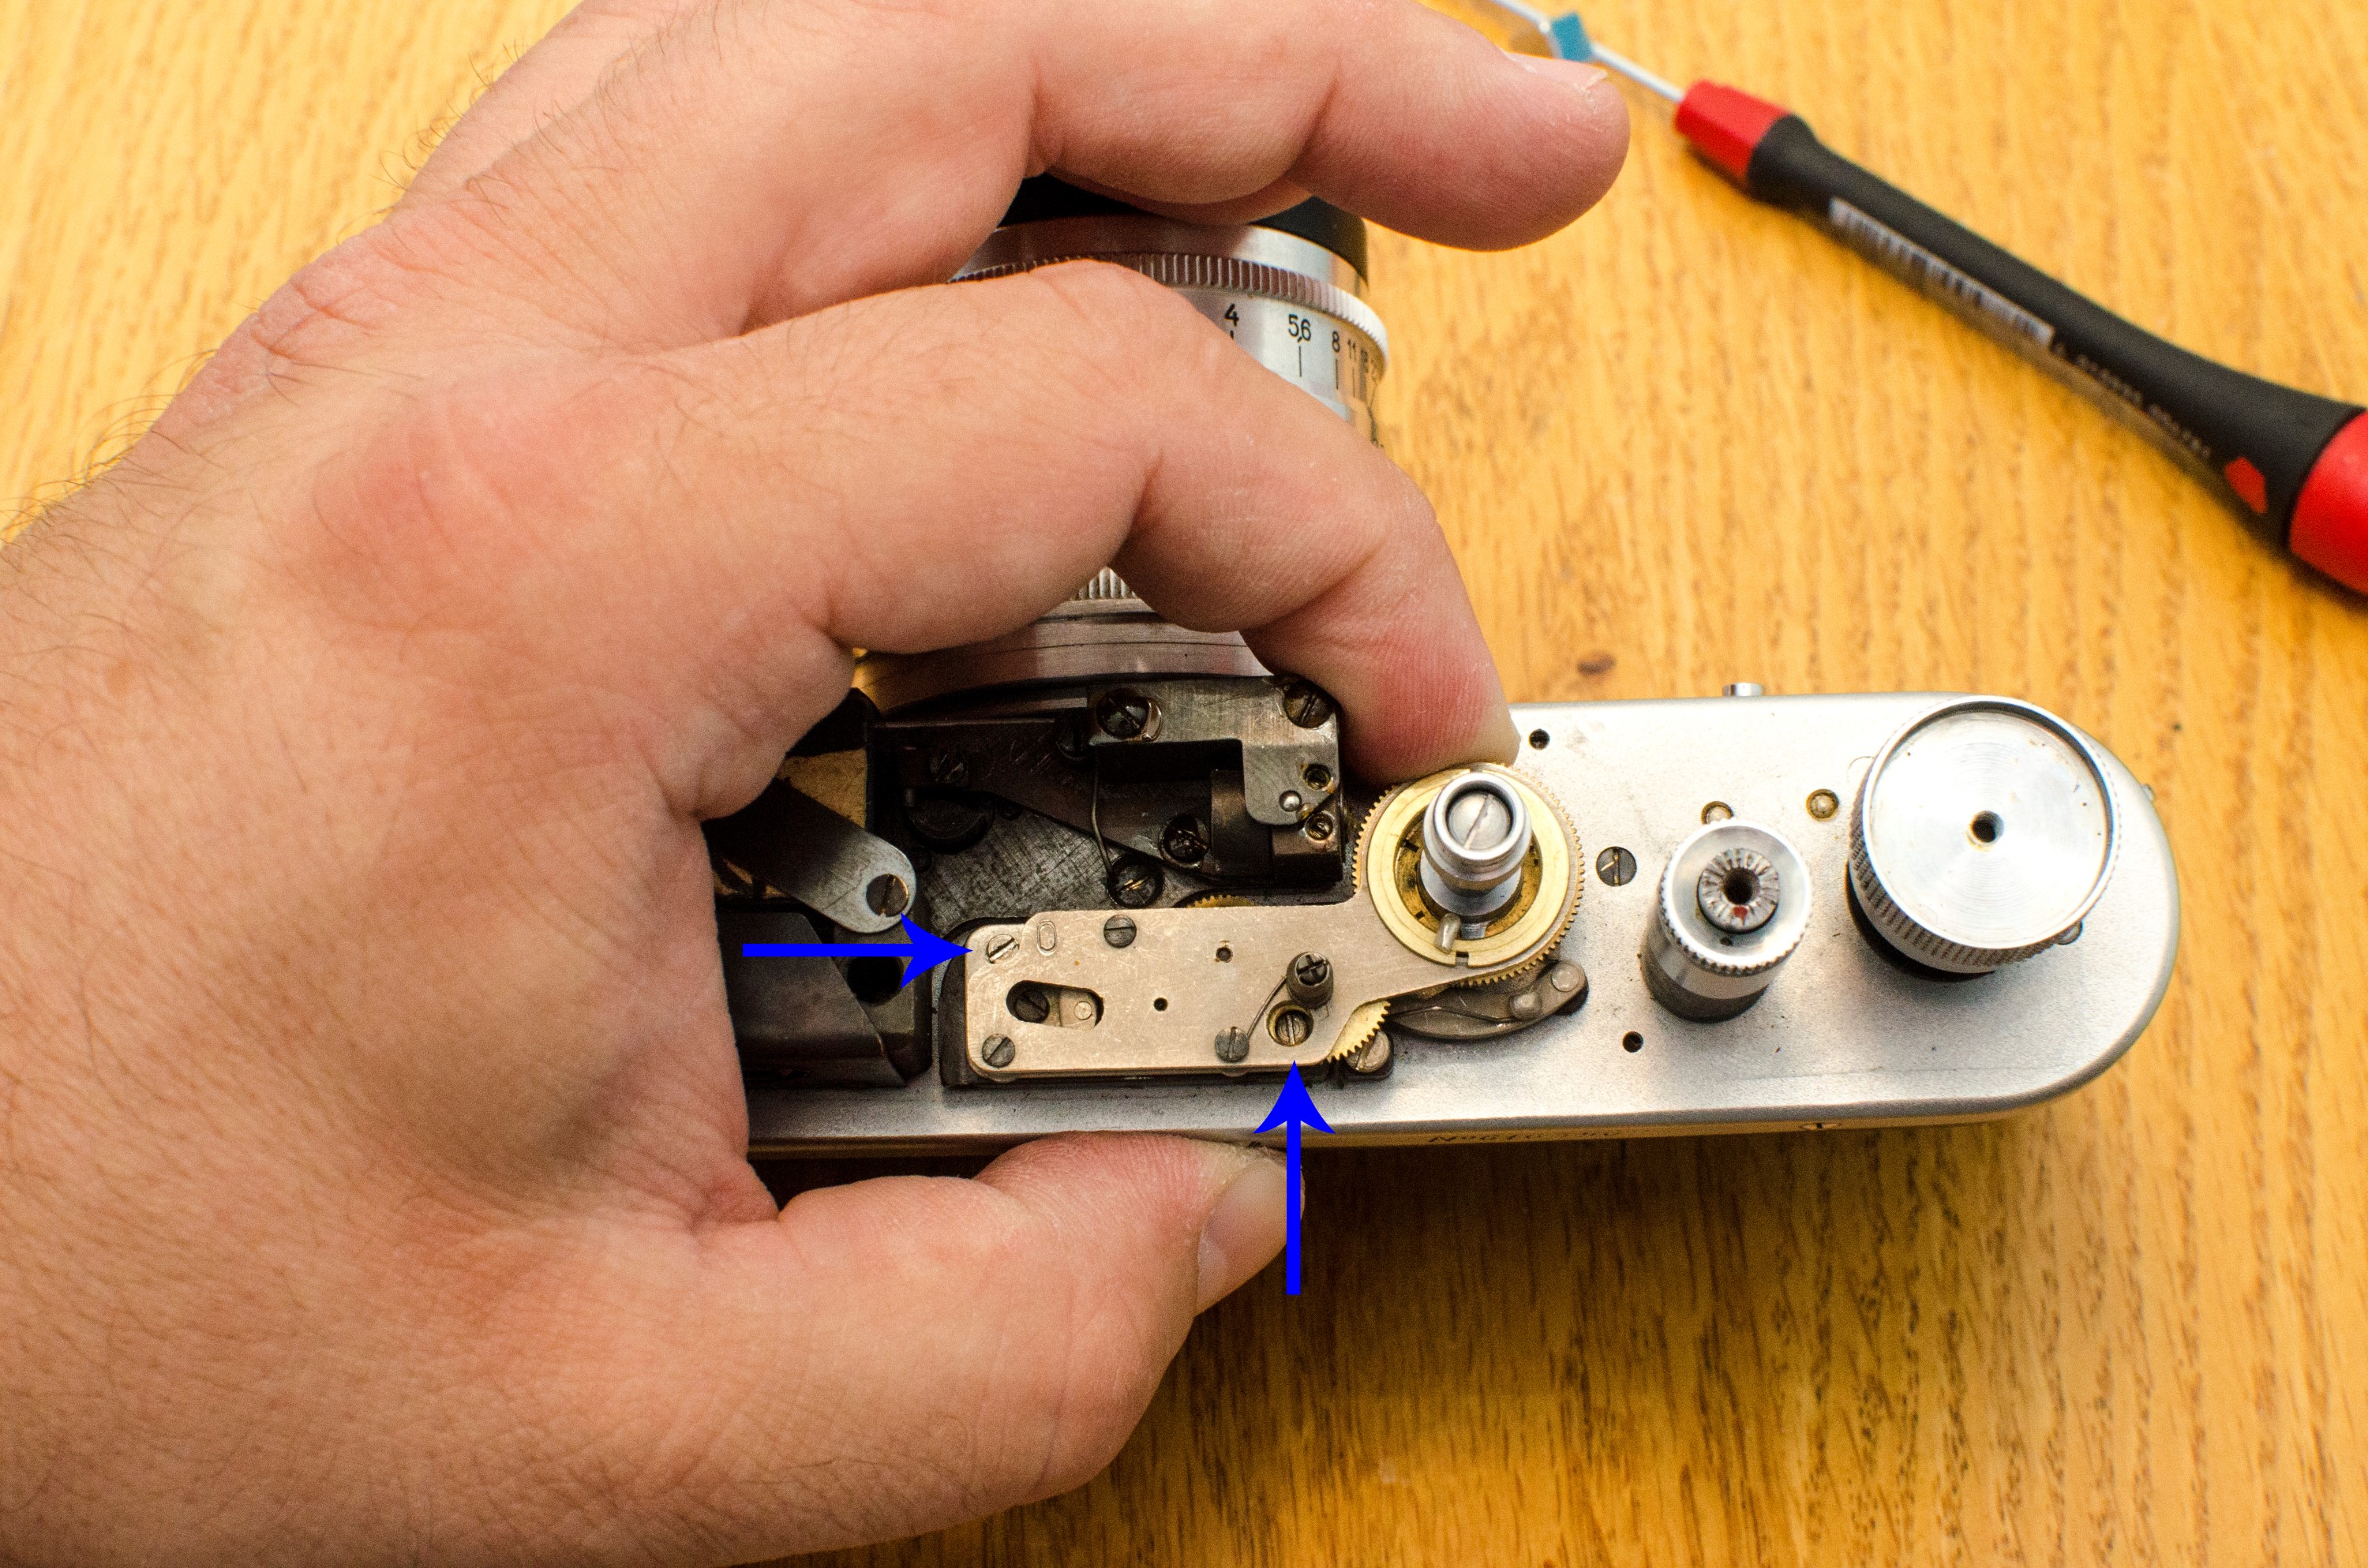
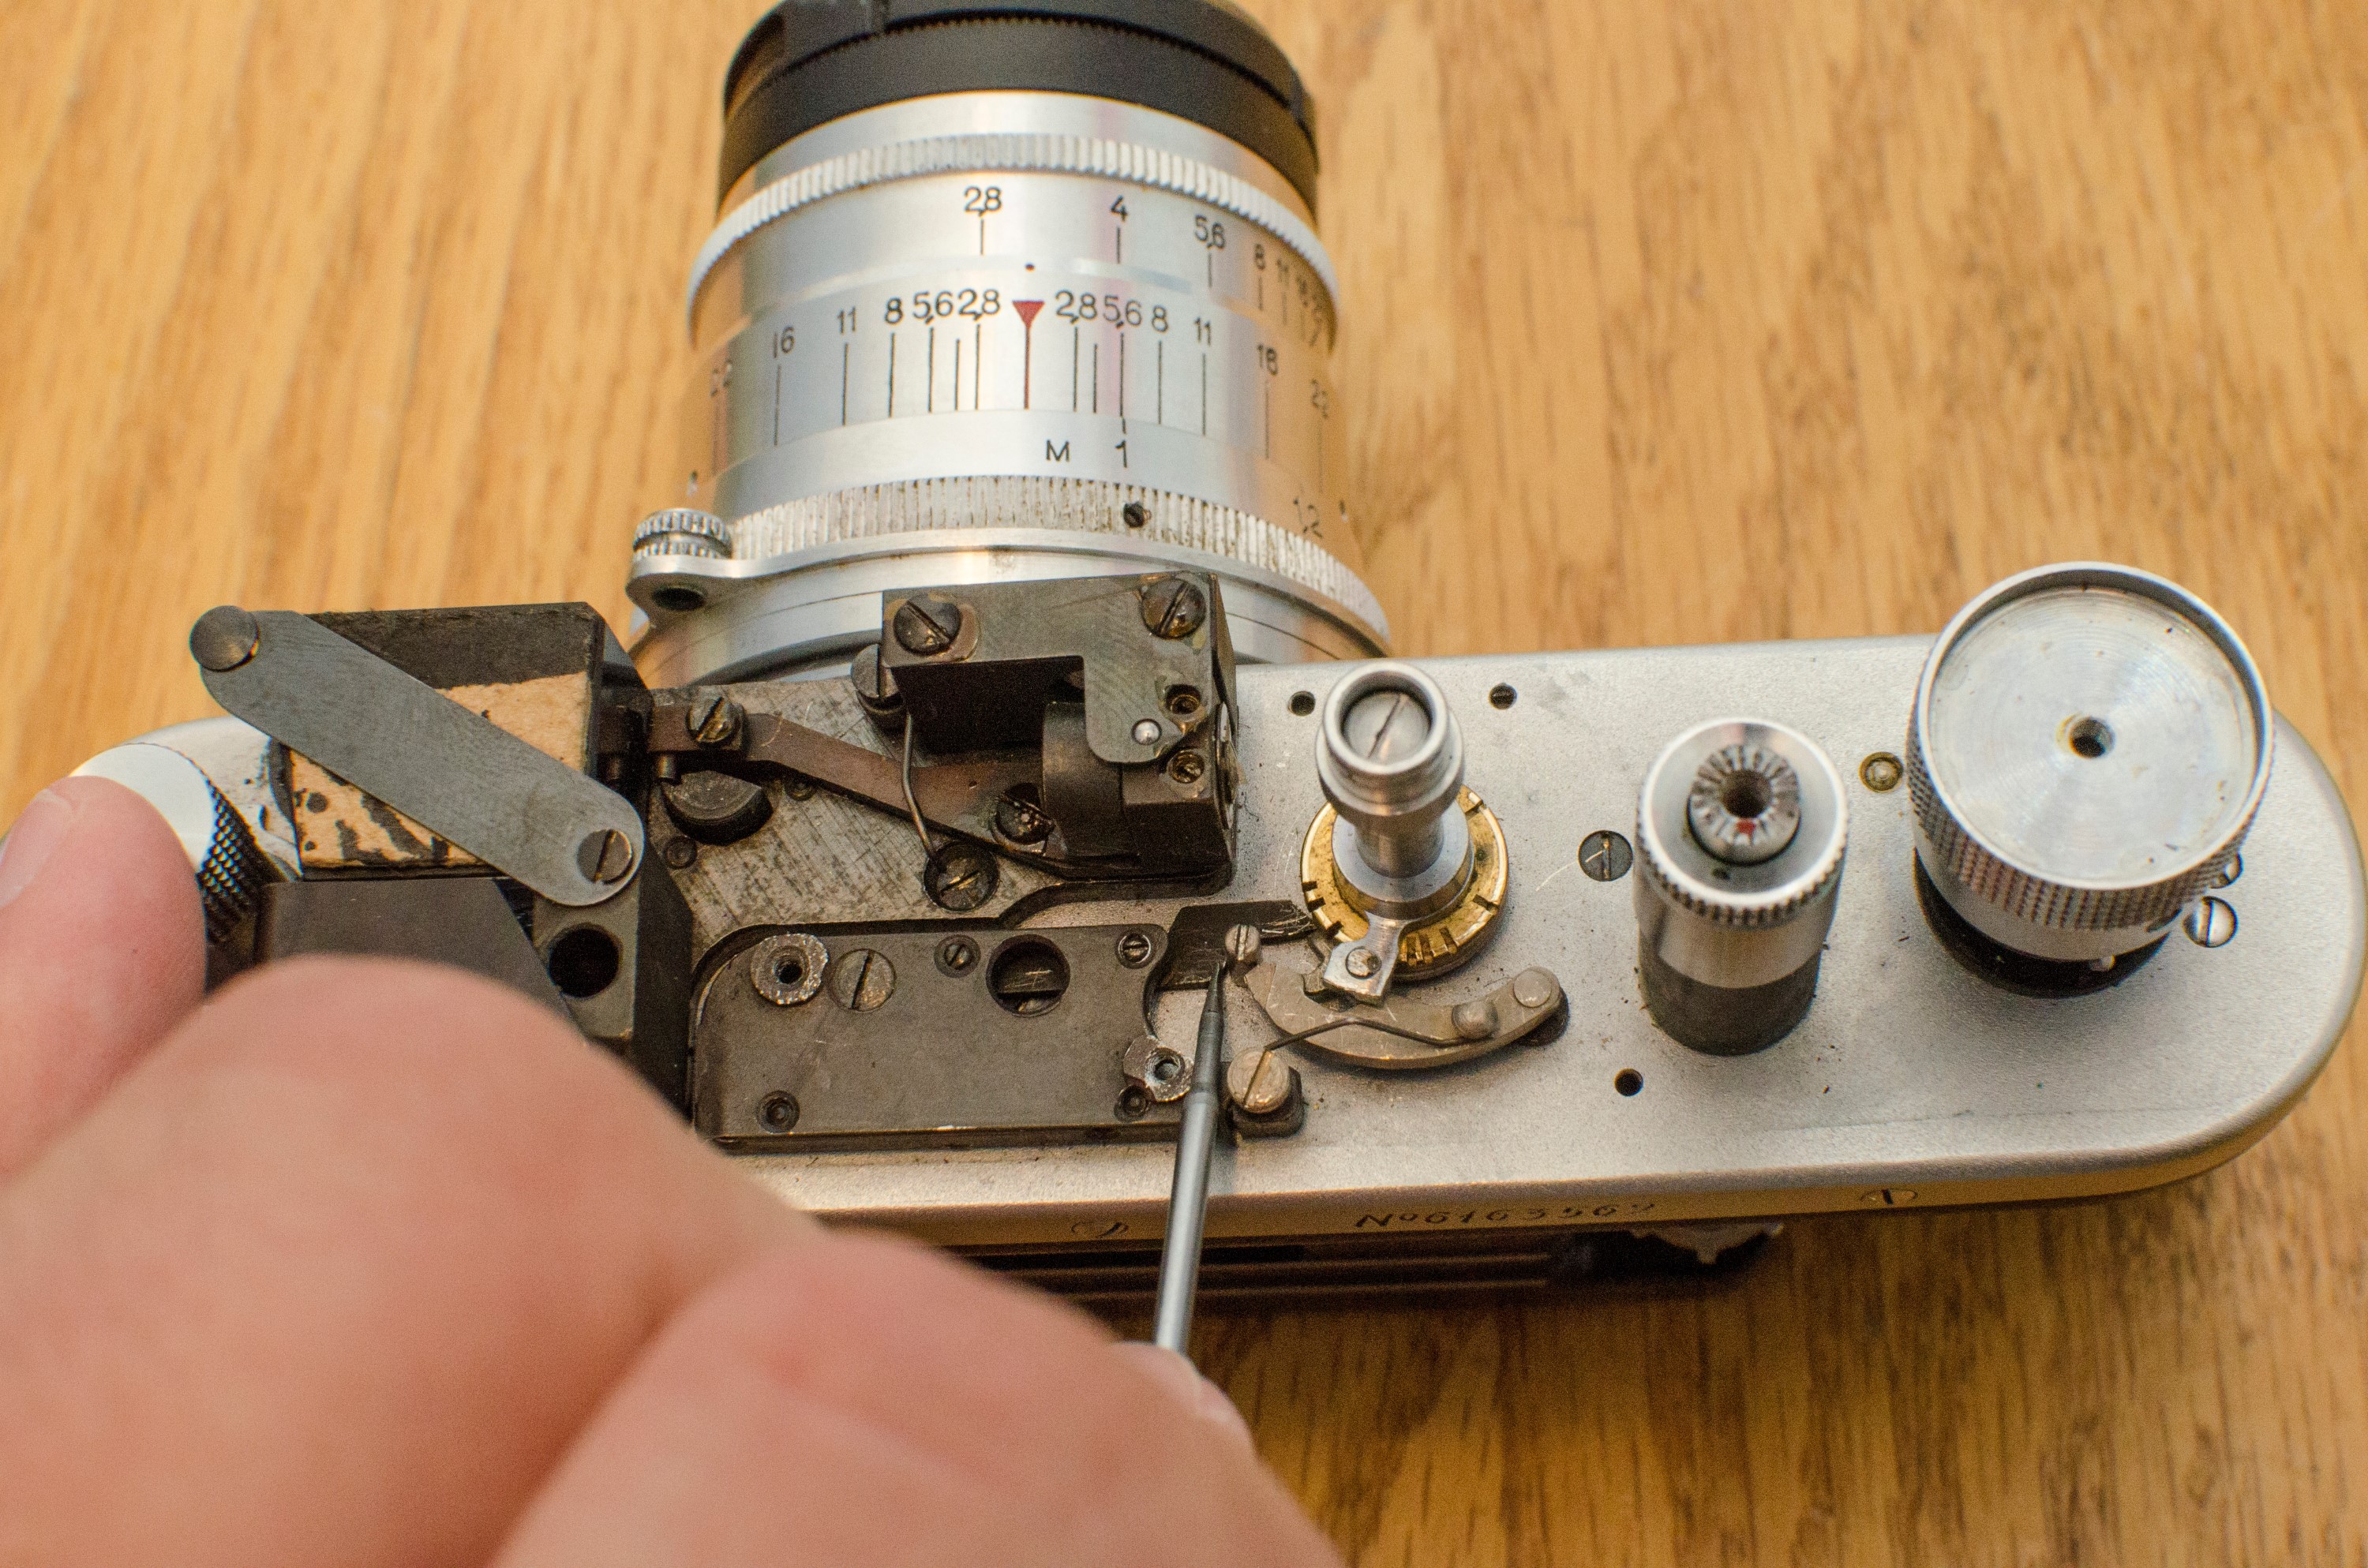
Assuming you have been able to release the shutter and get that L shaped hook into the uncocked position, you need to remove the two screws holding the governor in place (indicated by blue arrows). The first screw is easily accessible in the upper left corner. The second screw may or may not be hidden depending on the orientation of the gears. In the picture to the left, I am holding the gears in a position so that this screw is visible. It can be tricky to hold the gear while removing the second screw, but if you have patience, it will come out. Do not remove any other screws on the governor. Once both screws are removed, you can slip off the governor off the speed selector. You will hear the governor make an unwinding noise, this is OK.
From this point forward in this article, all references to the orientation of the L shaped hook or the brass speed selector will be with the shutter cocked.

Step 8: This next step is more of an educational step, but you need to direct your attention to the speed selector and learn how it works. The speed selector is a brass disc with several notches in it, located near the base of the speed selector post. Each notch represents a different shutter speed. At this point I encourage you to play with the camera by repeatedly cocking the shutter, changing speeds, and releasing the shutter. Since the camera is in pieces, you do not need to worry about the warning of changing speeds without cocking the shutter. Feel free to pull up on the speed selector shaft and rotate it so that the pin falls into each notch.
Each time you fire the shutter, the second curtain will get stuck every time. This is actually normal when the governor is removed. The reason for this is that black lever that I mentioned in Step 7. You will need to keep pushing it in the direction of the viewfinder to release the second curtain. Thankfully this is much easier to do with the governor removed.
The purpose of this lever is to hold open the second curtain on slow shutter speeds. When the camera is working normally, this lever will be held back on fast speeds, but allowed to stop the second shutter on slow speeds. If you look at the notches in the brass speed selector, you’ll notice that some are deeper than others. The deeper ones are the ones in which the governor is not engaged. 1/30, B, and 1/1000 – 1/125 are all deep. 1/60 – 1 second are shallower.
For the purposes of this tutorial, I won’t go into any more detail on how the Zorki shutter works, or why 1/30 is not considered a slow speed even though its slower than 1/60. Its not really necessary to go that deep, plus I don’t completely understand it myself. If you really would like more information, I recommend you read Rick Oleson’s detailed explanation of how FED and Zorki shutters work.
If you are unable to change shutter speeds, or you still cannot cock or release the shutter with the governor removed, then your camera has more serious issues and you should stop now. Another potential cause for alarm is if the black lever does not move back into position. There is a very small spring that is beneath that lever that might be missing if someone disassembled the camera and lost it. The camera will never resume normal operation if this black sliding lever is not functioning normally. Do not remove any of the screws in the black thing covering this lever. If anything, you might want to check and see if they’re loose, and if so, tighten them.
Step 9: Assuming you’ve made it this far, and you can confirm that your shutter is no longer stuck, and you can confirm that the black lever slides back and forth correctly, you should clean some things. Take some Ronsonol or naphtha oil and squirt some into a small dish and submerge the governor in here. You might want to swoosh it around a couple of times to make sure that you get any gunk or dried lube out from between the gears.
Take some Q-tips and with a combination of rubbing alcohol and possibly even Ronsonol, clean up any gunk that is in this area of the camera.
The CLA sticky has more detailed information about what to re-lube when you are ready to put things back together, so this is a good time to read that and use your white lithium grease and apply very small drops using a toothpick.
Also, if you want to clean or adjust the viewfinder or rangefinder, this is a good time to do that. You can generally use any glass cleaner or rubbing alcohol to clean the front and side of the prism and any glass surfaces EXCEPT for the small diagonal mirror. This mirror has a very fragile reflective surface that can be very easily wiped off. If there is any dust on this mirror, try blowing it off first. If that doesnt work, very gently drag a dry Q-tip over the mirror’s surface to sweep away any dust particles that remain.
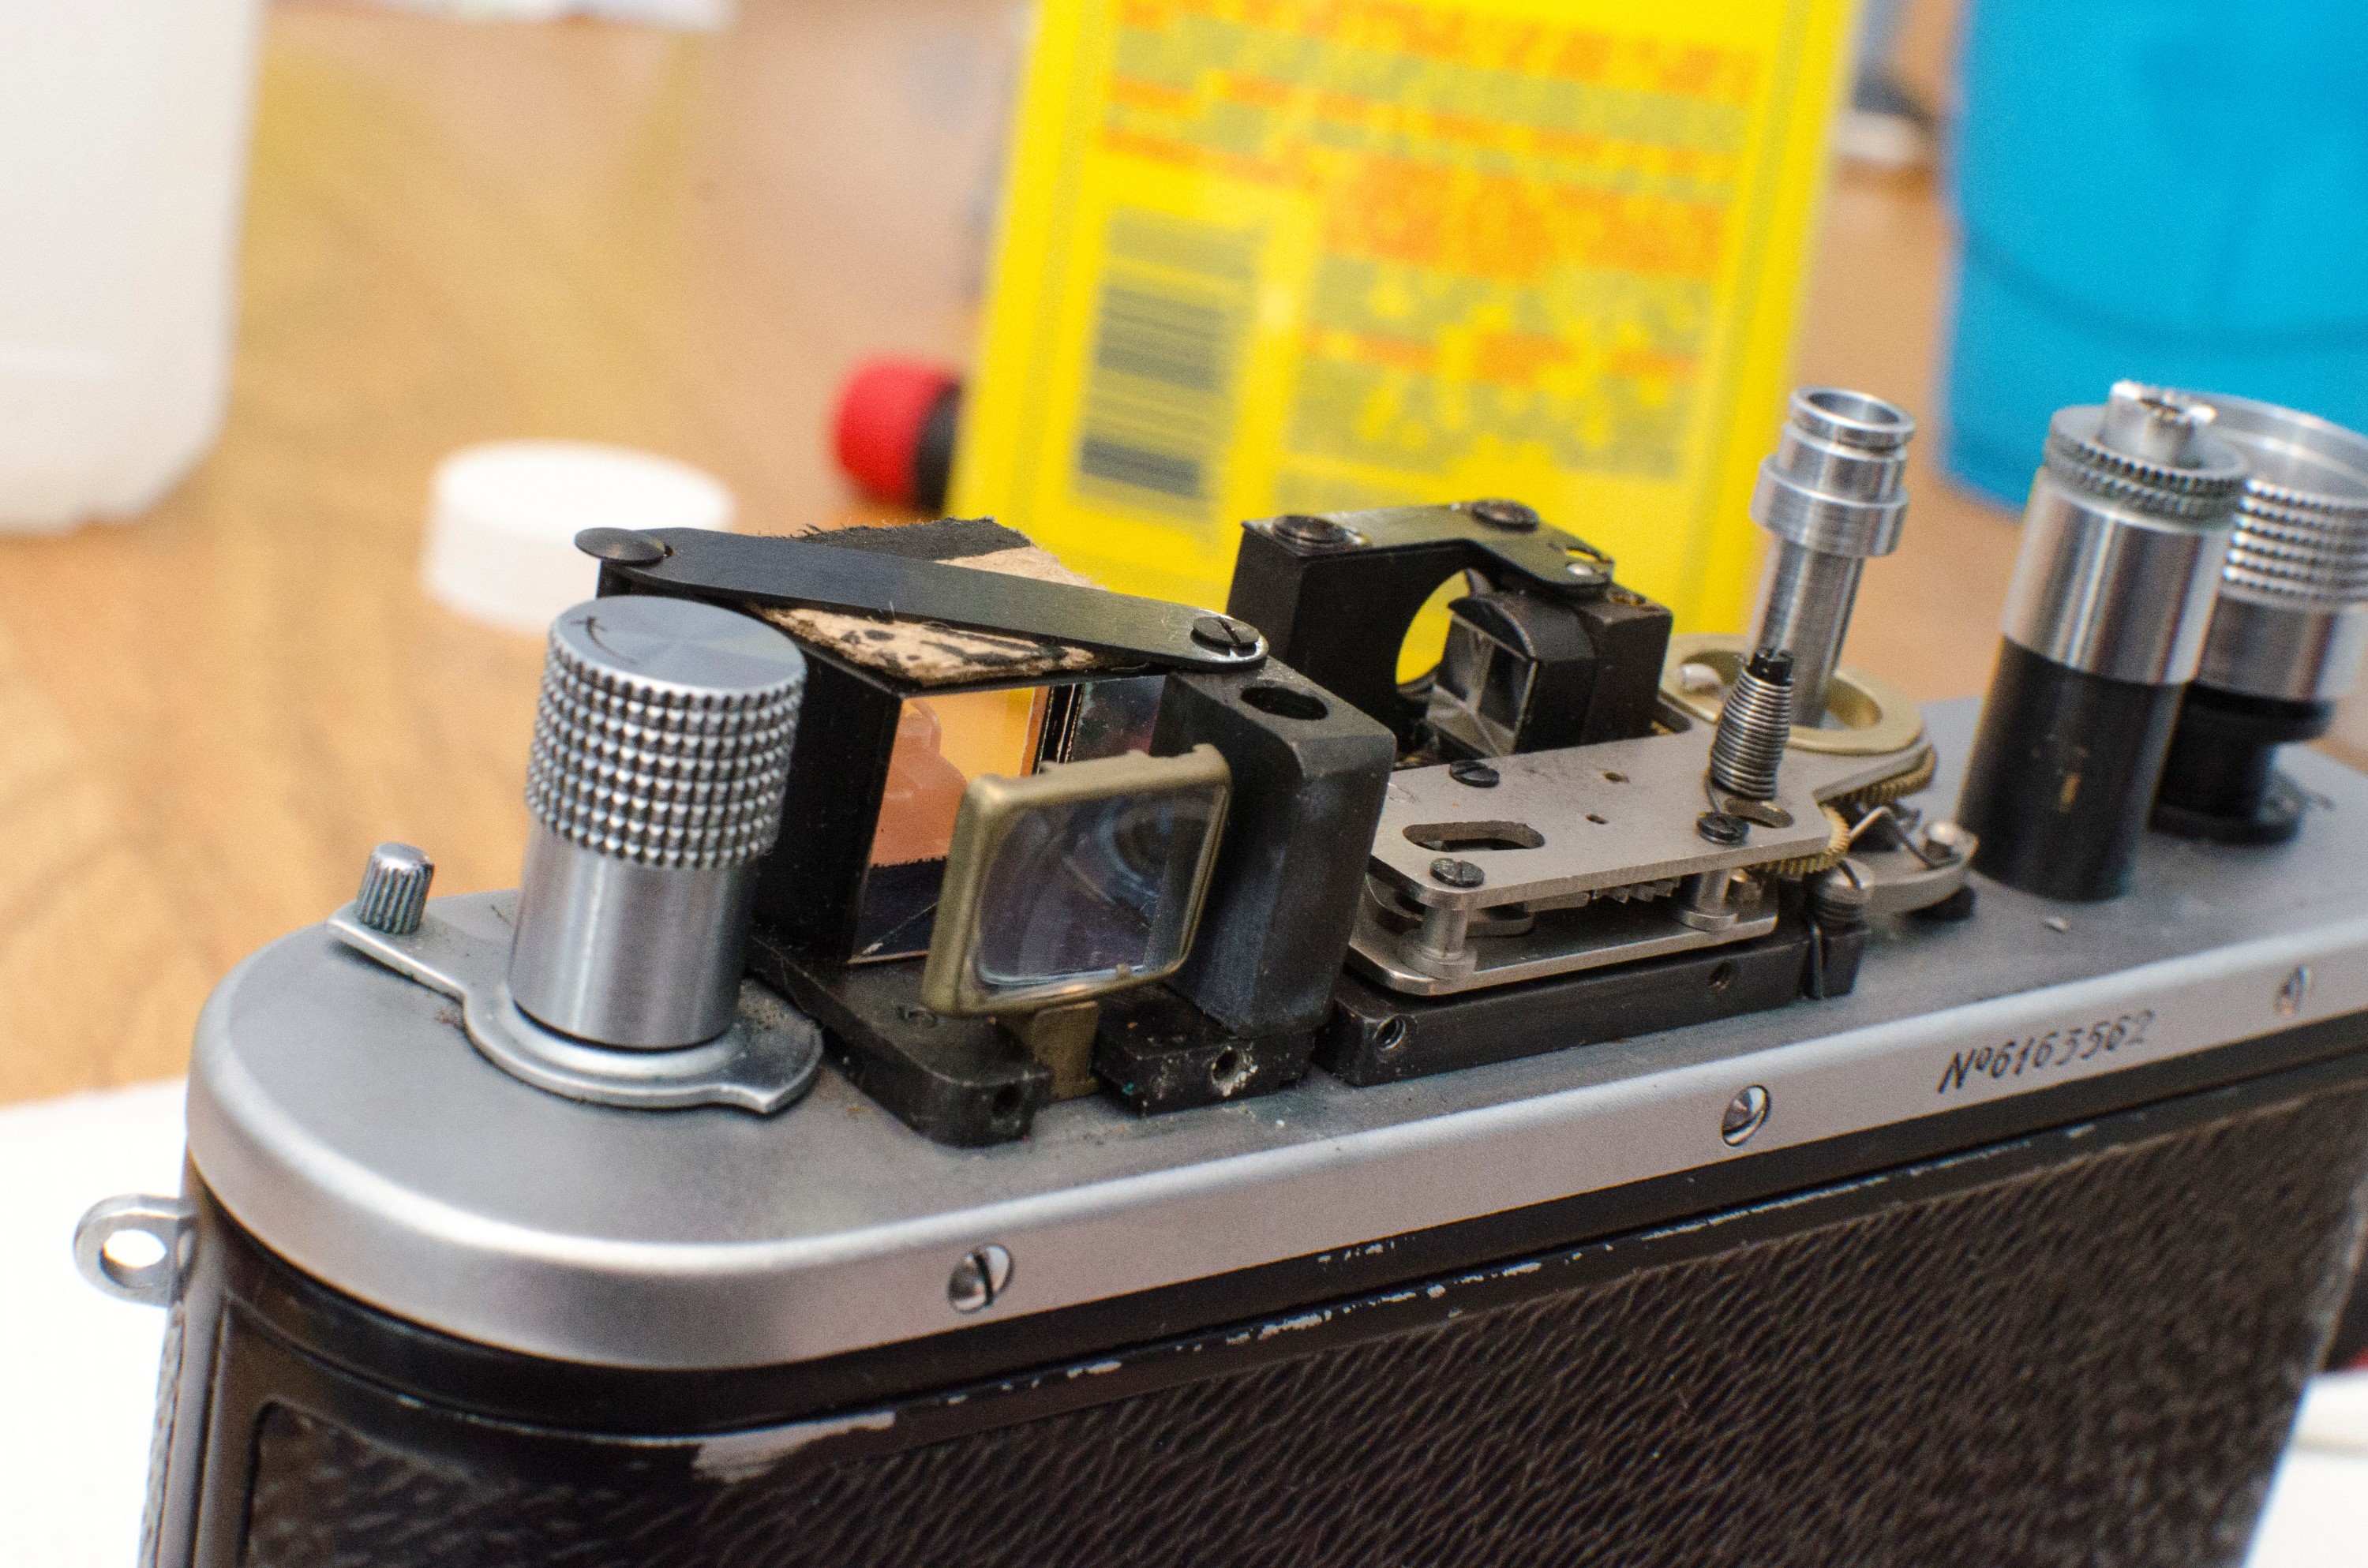
If you clean the prism and it still looks like there is some dust in the eye piece, it might be directly behind the rear eye piece. There are two black screws below the rear eye piece. Unscrew these and a black bracket comes off revealing a much larger lens. Use your Q-tips and cleaner to clean both surfaces of this glass.
Once you are happy with the viewfinder cleanliness, you are ready to put things back together.
Step 10: Whether you are reading this tutorial for informative purposes, or if you are following along with your Zorki, I am sorry to tell you that up to this point, things were pretty easy. Getting the camera apart, cleaning it, and learning how things work wasn’t hard. Putting everything back together in a way where everything is lined up is the hard part. When I did this, I spent the vast majority of my time on this one step.
The hardest part is that the orientation of the shutter speed selector and the governor is critical to proper operation of the camera. The good news is that reinstalling the governor is only a matter of screwing down two screws, so if you mess it up, there’s only two screws to remove so you can start over.
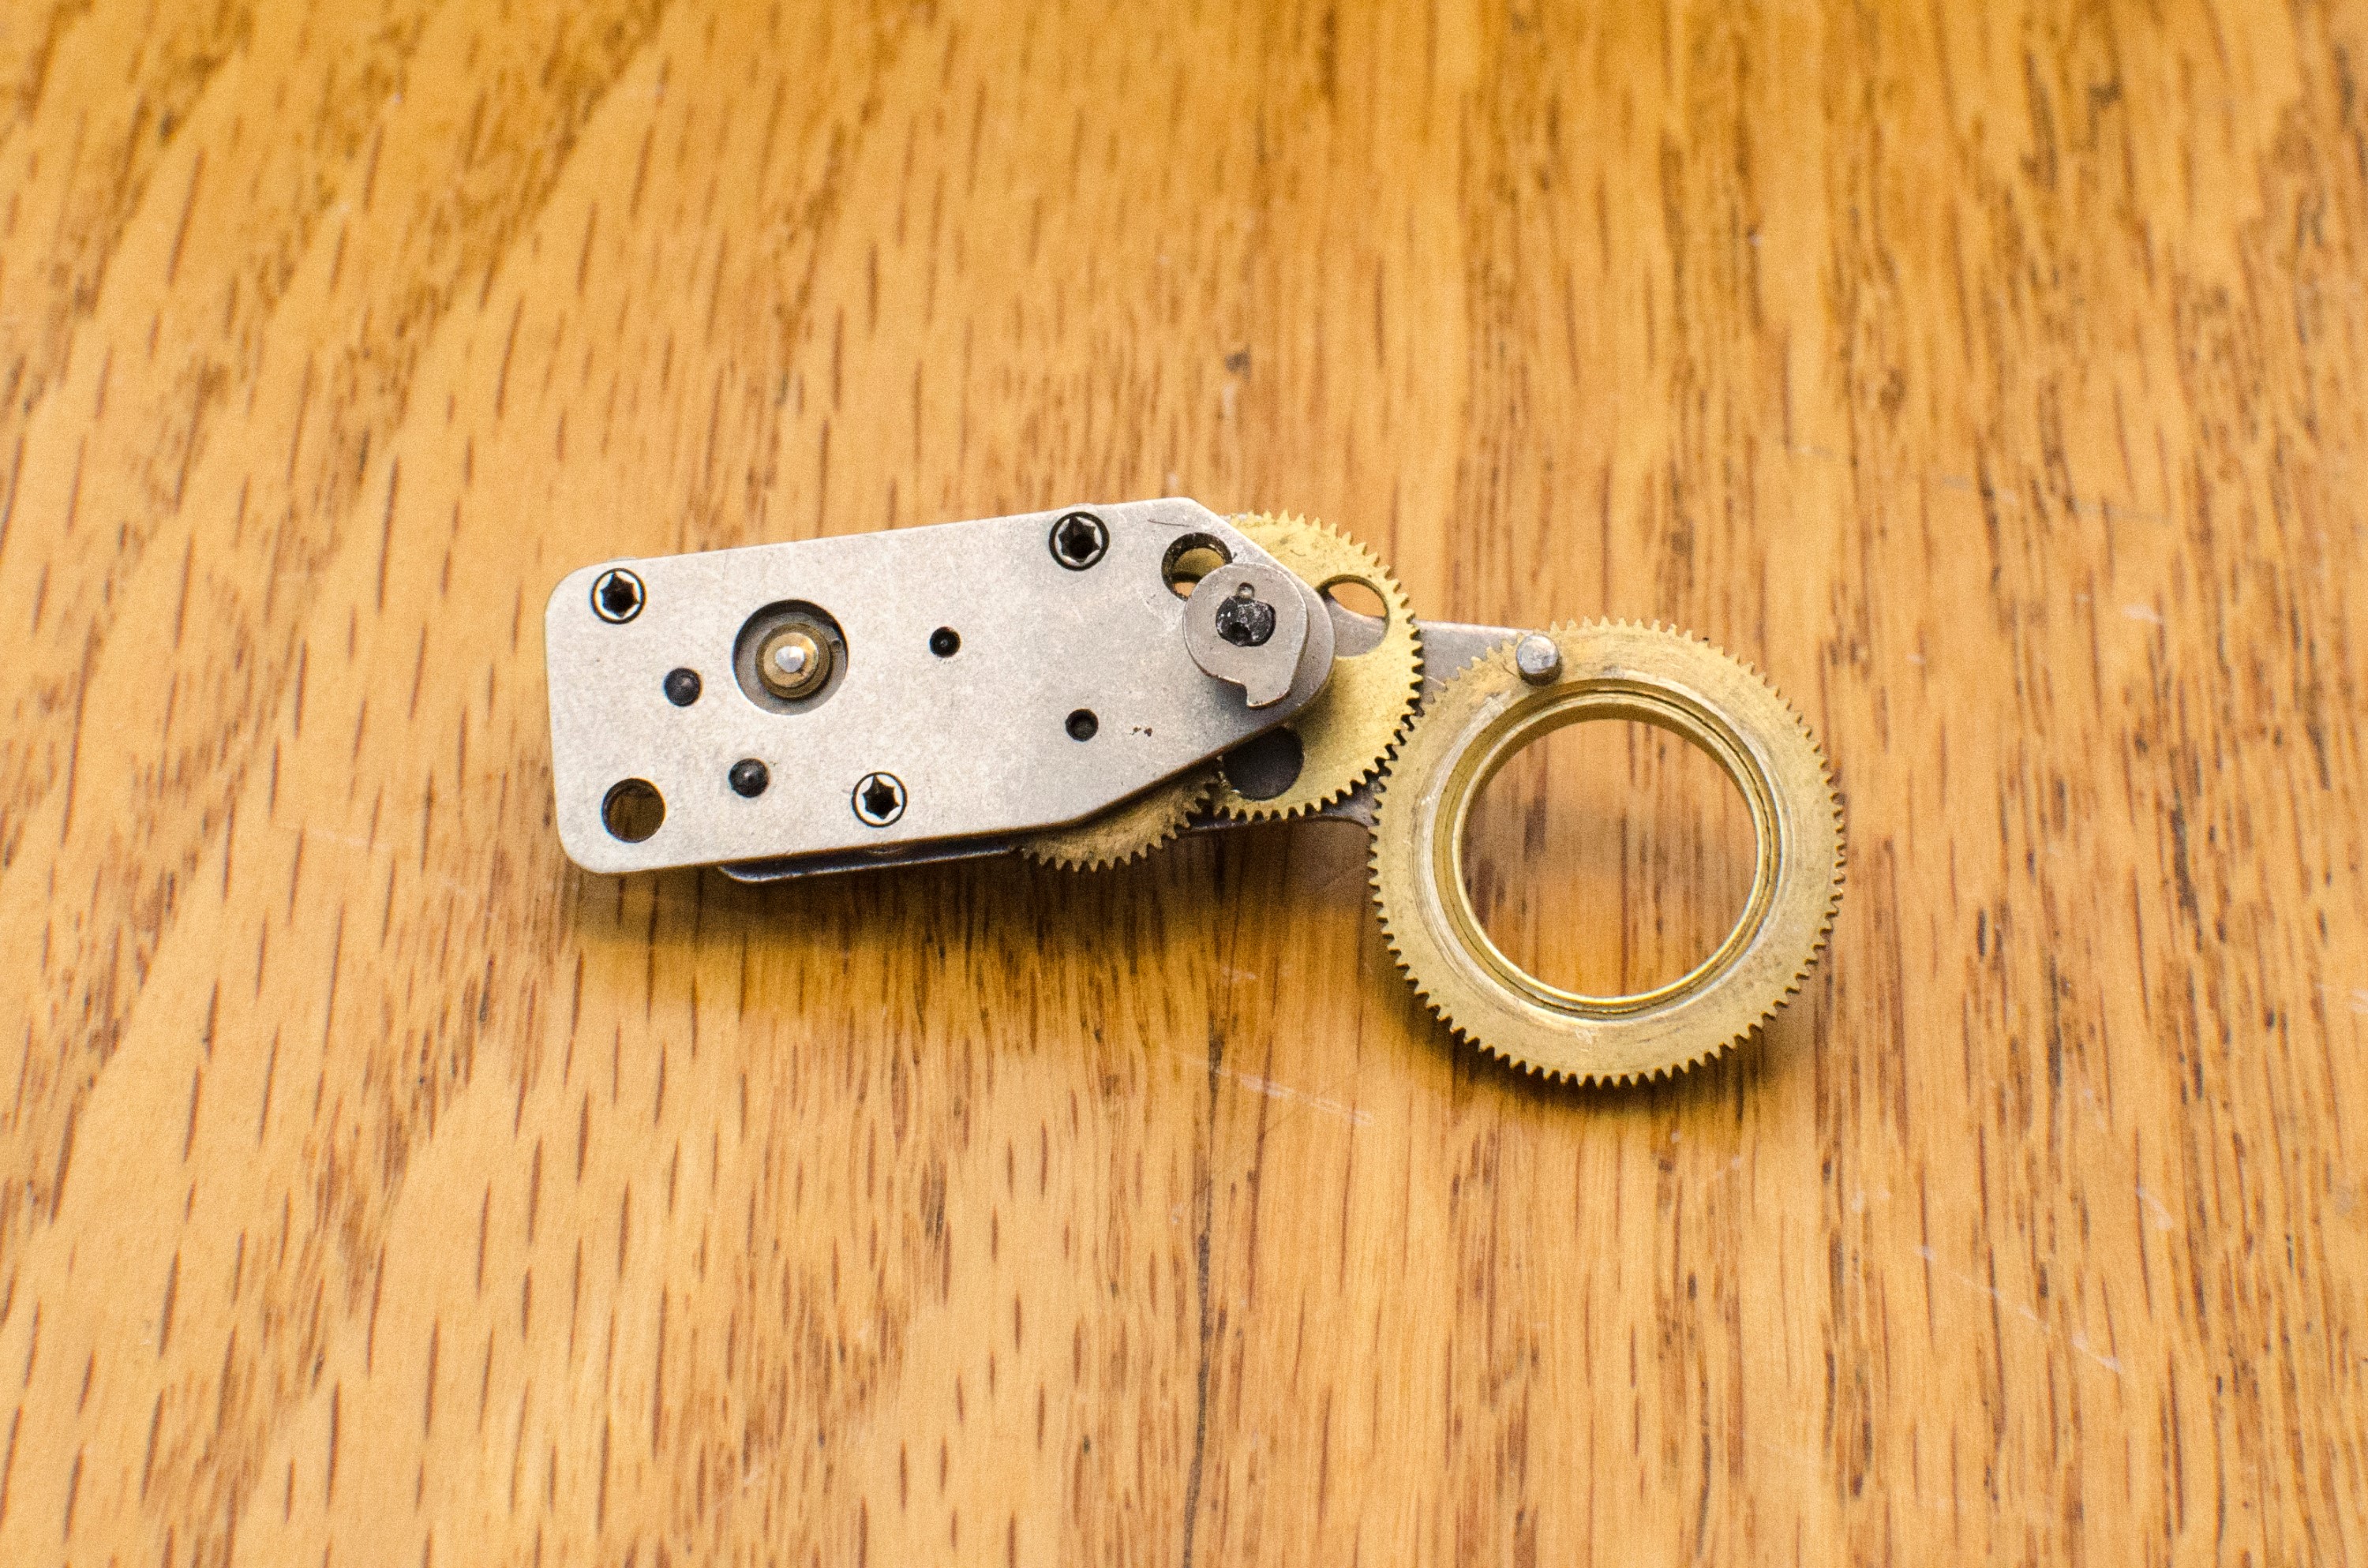
Before we put the governor back in its position, you should examine the underside of it. You’ll notice that on one of the gears is a “comma” shaped piece of metal. We’ll call this the “finger”. This finger’s purpose is to move that black metal lever mentioned in step 7, back and forth. This finger should only allow the lever to move when a slow shutter speed is selected, so getting it into the exact correct position is really important.
When reinstalling the governor, you have to position this finger in the exact position where its just about to slide that lever towards the viewfinder, but hasn’t actually begun to do so. If this finger is in any other position, it will not work.
When looking at the underside of the governor, another important part to be aware of is the small metal post on the underside of the large gear. This post is what comes in contact with the spring loaded pin that moves into the notches of the brass speed selector when slow shutter speeds are selected. When a speed of 1/125 – 1/1000, B, or 1/30 is selected, this post does nothing. When 1/60 or below is selected, this post winds the gear.
One tip that I came up with on my own is to take your screwdriver and scrape a mark into the top part of the large brass gear directly above this metal post, so you can easily tell where it is once you are trying to install the governor.
Now you should be familiar with the role of the finger and the post on the underside of the governor, so its time to attempt to install it.
The first thing you need to do is cock the shutter and set the camera to 1/125. Remember that 1/125 is the last deep notch in the speed selector before the shallow notches begin. With the shutter cocked and the speed selector pin at 1/125, it should be roughly around the 3 o’clock position.
Next, you need to wind the governor 2 complete turns to put tension on the spring. Look at the mark you scraped into the top of the large brass gear to know where the metal post is. You will want to install the governor with this mark near the 2 o’clock position so that it is just before the speed selector pin which is at the 3 o’clock position. If you quickly look under the governor, this should also be the position just before that finger makes contact with the black sliding lever. You may need to wind the gear a little bit past 2 full turns to get your mark in the 2 o’clock position, if so, that is OK.
Next, you’ll need to install the governor onto the speed selector post, but the problem is, this is very difficult to do with the shutter completely cocked because that L shaped hook gets in the way. If you cannot get the governor into position, go ahead and fire the shutter. The second curtain will stick open. Manually slide the black lever towards the viewfinder to release the second curtain. Cock the shutter halfway so that the L shaped post is near the 12 o’clock position and the speed selector pin is near the 6 o’clock position and while still holding tension on the governor and your mark still at the 2 o’clock position, slip it over the post and hold it into position. With your other hand cock the shutter the rest of the way so that the L shaped post is near the 9 o’clock position and the speed selector pin is near the 3 o’clock position.
While still holding all of this, you need to reinstall both screws into the governor. The first one is easier to do, but the second one will most likely require a little bit of movement of the large gear to allow the hole in the smaller gear to lineup with the screw hole.
Assuming you’ve been able to make it this far, and you’ve gotten both screws in the governor into position, you can release tension on the large gear. You should hear the governor unwind only a very small amount. If it unwinds all the way, then something went wrong and you need to start all over again.
Turn the camera so the camera lens is facing your right arm and then look at the speed selector. Assuming the shutter is still cocked, you should still see the speed selector pin near the 3 o’clock position which is the spot for 1/125 second. In the image to the left, I have moved the speed selector pin away from 1/125 to make the image easier to see. The metal pin on the underside of the governor should be approximately in the 2 o’clock position. Look at the image to the left to see the metal pin in it’s correct position.
With the shutter still cocked, pull up on the speed selector post and change the shutter speed to 1/60 second. The speed selector pin should now start making contact with the pin under the governor. It might even wind it just a tad bit, which is OK.
Assuming everything looks correct, you can release the shutter. You should feel tension from the governor on all slow speeds (except 1/30). If you haven’t already, you can remove the back of the camera and watch the shutter open and close with each speed. Test all of the speeds including 1 second. Remember that even with your cleaning, this is still a 50+ year old camera, so getting the shutter speeds perfectly correct isn’t realistic, but they should be close.
If everything is working like it should, you just need to reassemble everything in the opposite order of which you took it apart. There shouldn’t be any surprises here. Make sure any cleaning you did is still clean. Sometimes while working on other areas of the camera, you could get fingerprints on some of the glass.
Using the Camera
Although both FED and Zorki started out as “Leica” clones, I feel that by the third and fourth generations of each model, enough had changed to where you can’t really say this camera has anything to do with Leica. Not only do they not look much alike, but quality control between a real Leica and a FSU copy are very different.
I do not own any Leicas, but one thing I read over and over again is that when you hold a Leica, it “FEELS” solid. Supposedly you could handle 100 different Leicas and they’ll all have a similar feel of quality about them. FSU rangefinders aren’t exactly cheap feeling, but they do creak and have different tolerances between different models. I’ve held two different FED 2s, both made 1 year apart, and they each handle differently. One has a very loose wind knob, and its extremely tight on another.
From a user standpoint, there is nothing wrong with a Zorki or a FED. Get one in good working order with a clean lens, and it will take photographs that are indistinguishable from one taken with a Leica. But like with any luxury item, its about the journey, not the destination.
With that in mind, using a Zorki is pretty easy. Of all the FSU rangefinders that I have used, the viewfinder in the Zorki 4 is hands down the largest and the brightest. This is especially useful for someone like me who wears prescription glasses. In fact, I’ll go as far as to caution people from using Kievs and FEDs because the sharp metal ring around the tiny viewfinder can actually scratch your glasses if you let it touch (which you need to do to see into the viewfinder). The Zorki 4’s viewfinder is large enough to where you can see the whole image, even while wearing glasses, without having to press your face up against the back of the camera.
The Zorki 4 viewfinder has a nice bluish tint to the main screen and the rangefinder patch is a large and bright rectangle in the center of the image. The viewfinder is so bright and easy to use, I would say it compares to that of a Yashica Electro (which has one of the best viewfinders of any rangefinder).
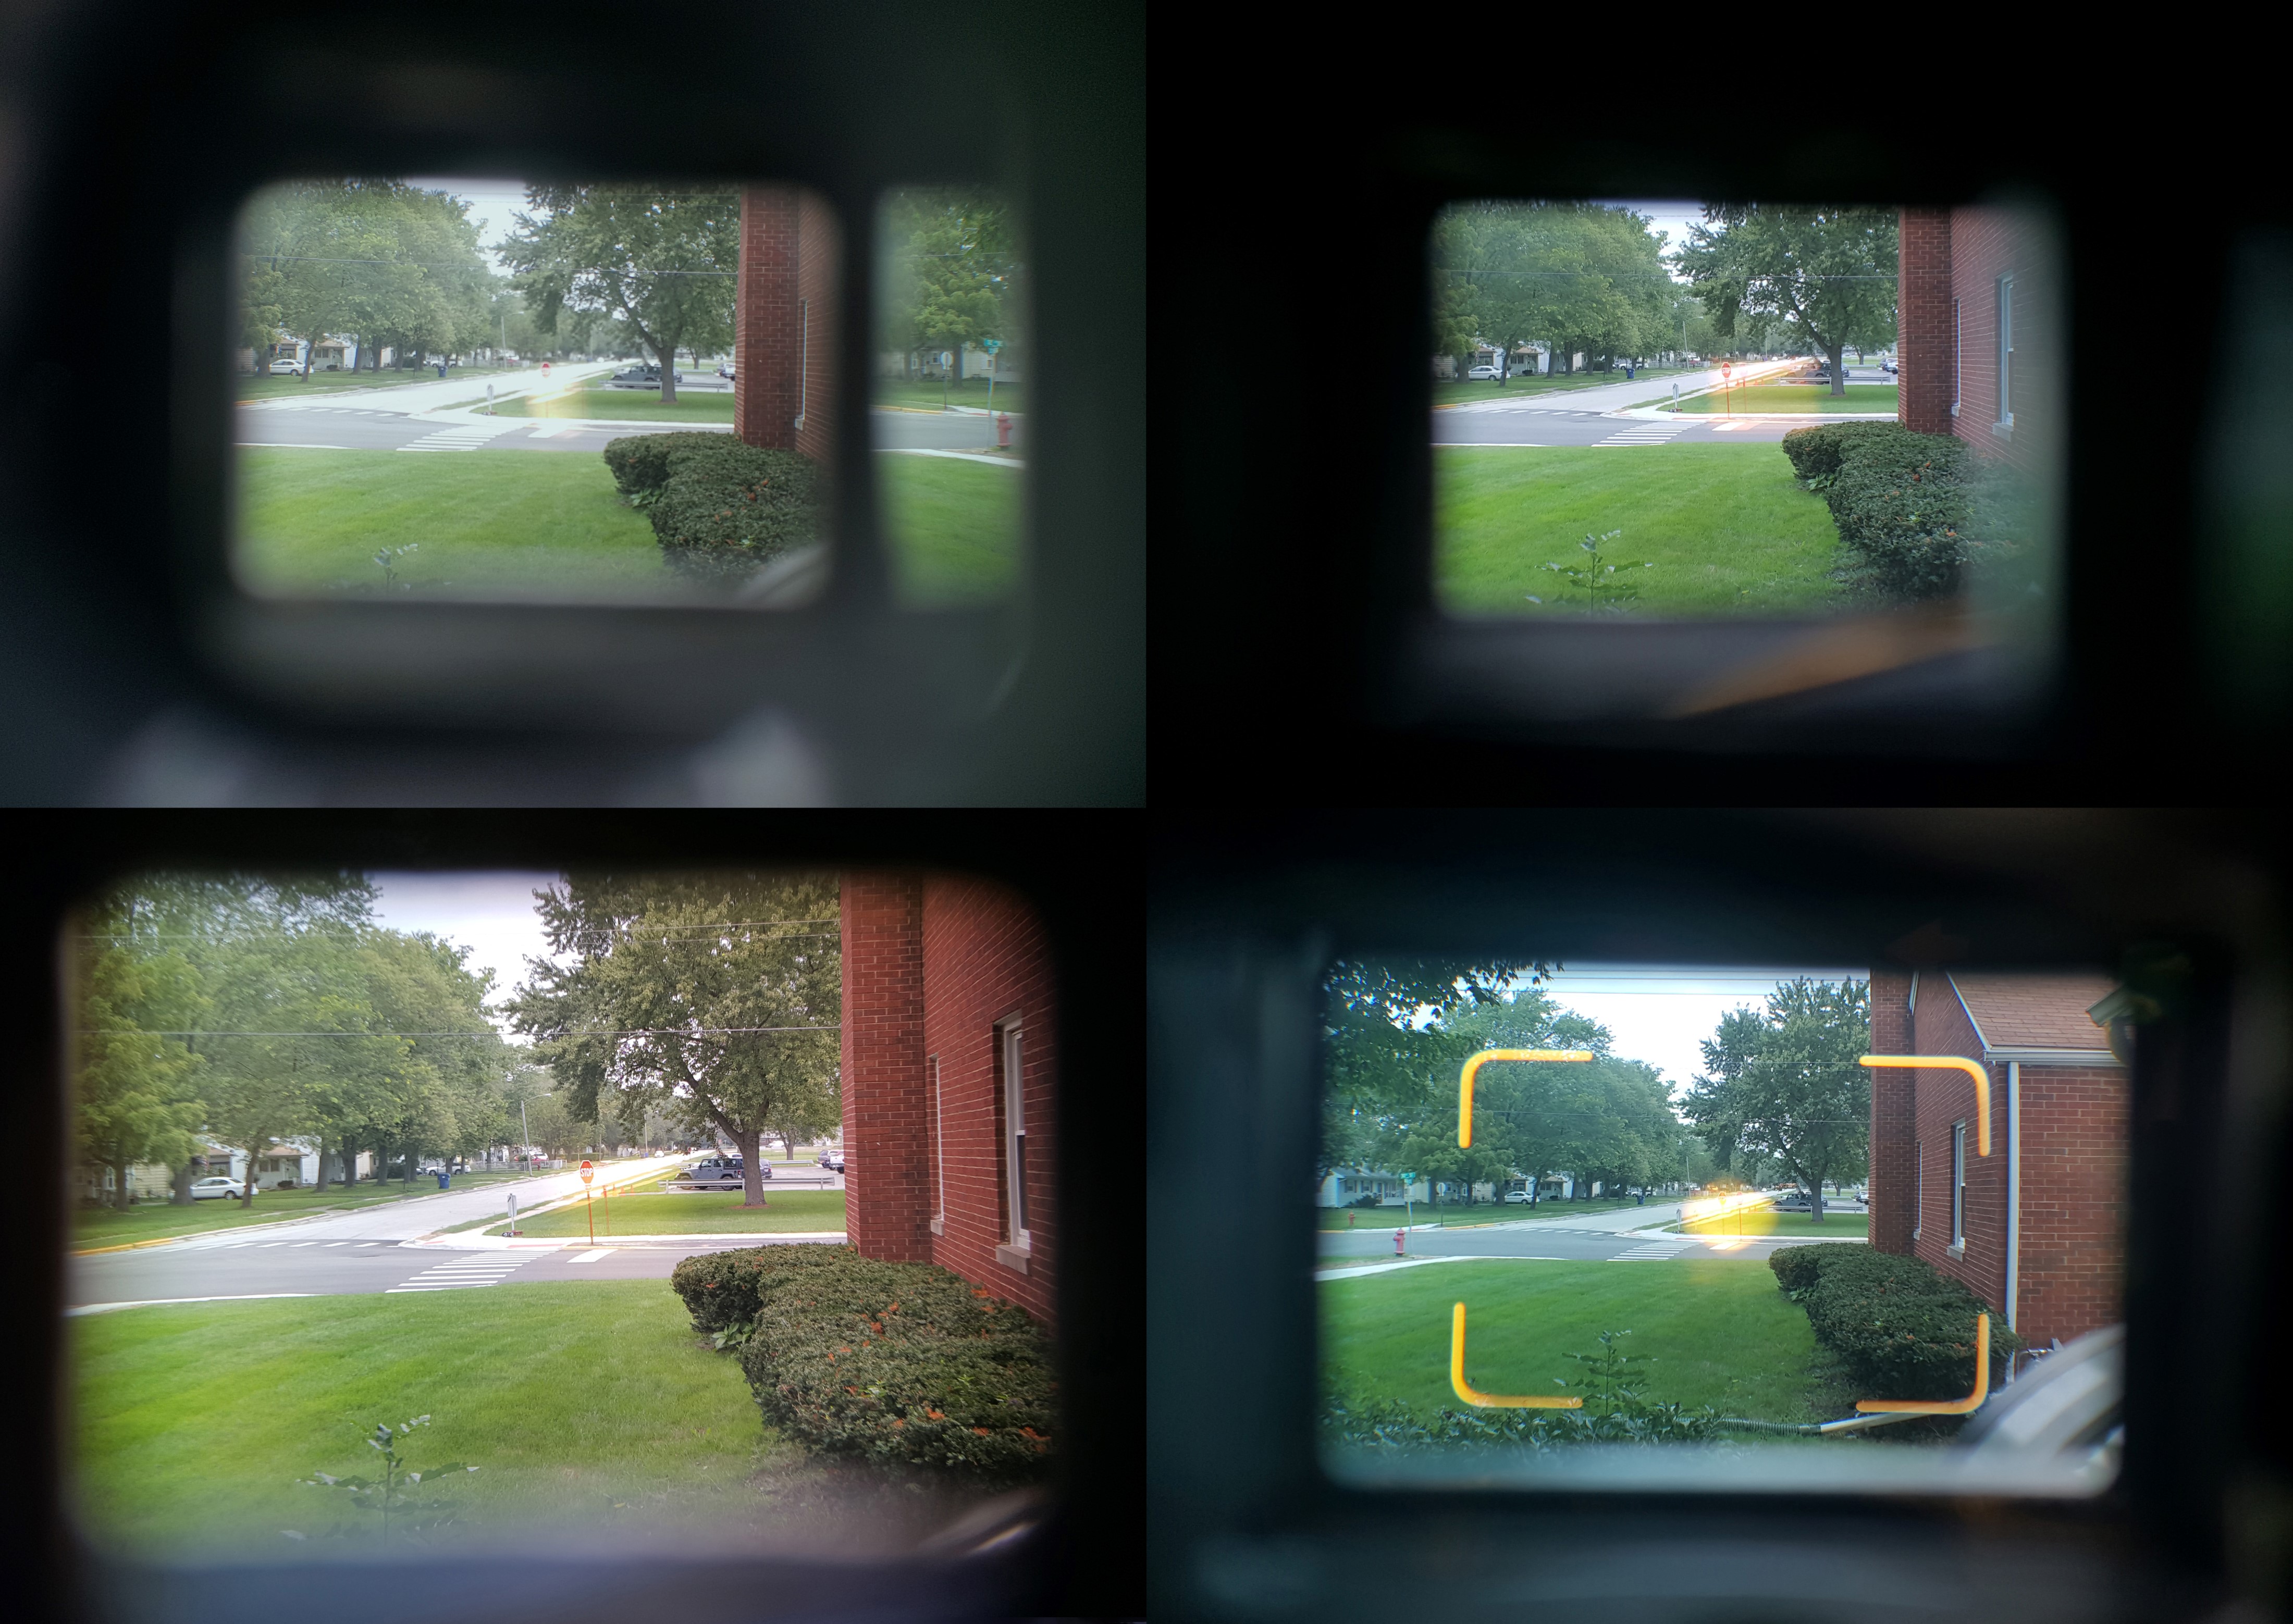
The image to the left shows the viewfinders of 4 different cameras. Starting in the upper left corner and going clockwise, they are the FED 2, Kiev 4, Yashica Electro, and Zorki 4. Please note that these were all taken with a cell phone pressed up against the viewfinder of the camera. These pictures only give a partial representation as to what you actually see.
The FED 2 is by far the darkest, but the Kiev 4 is not far behind. The Kiev 4 slightly edges out the FED 2 as its square rangefinder patch is larger and easier to see than the round one in the FED 2. The FED 2 does offer an adjustable diopter though, which the Kiev does not. Both the FED and Kiev cameras are impossible to use correctly while wearing prescription classes.
The Zorki clearly is the largest, but it does not offer parallax correction like the Yashica does. The whole image of the Zorki is the 50mm frame as compared to the Yashica in which only whats in the brightlines is the 50mm image which means what you see in the Yashica is smaller. The Yashica has a slight blue tint compared to the Zorki, but both are acceptably bright. The Yashica’s diamond shaped yellow rangefinder patch stands out more, but the Zorki’s larger rectangle is a bit easier to see.
As you can see, the images are all different from another, and while none of them are terrible. Both the FED 2 and Kiev 4 are very similar. The Zorki 4 is hands down the best of the FSUs and compares very favorably to the Yashica Electro which I consider to have a very good viewfinder.
As for everything else, if you’ve read this whole article, you already are well aware of the ramifications of not changing the shutter speed before winding/cocking the shutter. If you skipped the Repairs section above, I’ll just summarize here, don’t do it. On the Zorki 4, you really need to cock the shutter before changing shutter speeds.
The Zorki has an interesting feature that I applaud the Russians for implementing, even though its nothing I would ever use, which is an adjustable flash sync delay. Typical cameras from this era would have a lever or a switch that would alternate from M (flashbulb) or X (electronic flash) sync. The reason this is necessary is that the old style flashbulb did not fire instantly. From the moment electricity would flow through the flash bulb, it would take a fraction of a second for the bulb to reach it’s maximum brightness. Electronic flashes (which is what all modern cameras use) reach maximum brightness almost instantaneously. So back in the 50s and 60s when both were readily available, a camera would need to have a switch to adjust the delay depending on which type of flash you would use.
The Zorki doesn’t have such a switch, but instead a rotating collar around the speed selector which would delay the flash sync depending on the type of flash you used. While this adjustability might have been useful to fine tune the flash sync, it probably over complicated things for most people who wouldn’t know what delay they needed. The Zorki manual attempts to explain it, but I really think an M/X switch would have been more useful, but hey, who am I to judge. In the end, I don’t use flashes with old cameras, so its not an issue for me.
Loading film into the Zorki is pretty straightforward, assuming the take up spool is there. Like most FSU rangefinders, the takeup spool can be removed from the camera. Although this does make loading film slightly easier, it does run the risk of losing the spool if you are careless. If you are looking to buy a Zorki 4 (or any FSU camera for that matter), make sure the takeup spool is included.
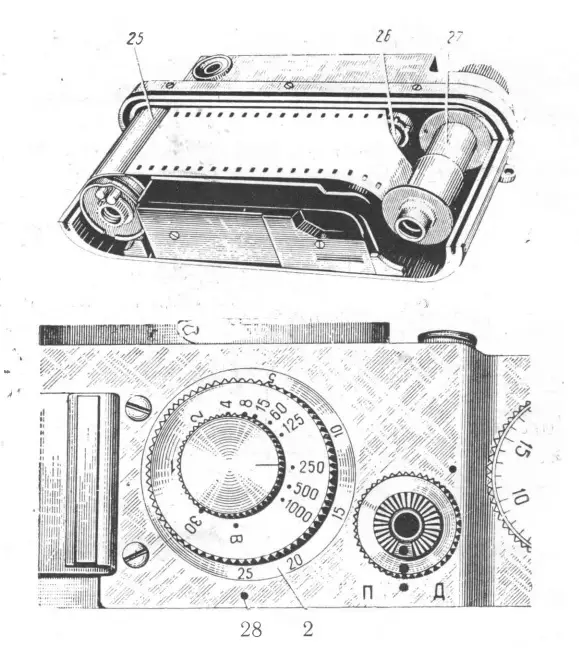
The first step is to make sure your camera is not in rewind mode. There are two symbols beneath the shutter release on the top plate of the Zorki 4.
П – The symbol to the left is the Cyrillic letter for “Pe”. In Russian, “rewind” is translated to “перемотка” in Cyrillic. When the collar around the shutter release is turned to this position, the camera is in rewind mode and the shutter release button is locked.
Д – The symbol to the right is the Cyrillic letter for “De”. In Russian, “forward” is translated to “дальше”. When the collar around the shutter release is turned to this position, the camera is in normal picture taking mode and the shutter release is not locked.
Next, remove the back of the camera by loosing the two half circle locks beneath the “feet” of the camera and put the back aside.
Load your film, making sure that the leader is securely fastened to the takeup spool, and then replace the back. The Zorki 4’s takeup spool rotates clockwise (under) when advancing the film. Dry fire 2 blank shots and dont forget to reset the frame counter to ‘0’ (the Zorki 4 pre-dates automatic resetting frame counters), and you are ready to go.
Shoot the camera as you would any rangefinder. I keep saying it, but its important. Don’t change the shutter speeds until after cocking the shutter! The shutter release is threaded for a shutter release cable if you wish. There is also a self-timer on the front of the camera for delayed shots.
After you are done with your roll, turn the collar around the shutter release to П and rewind your film back into the canister.
My Results
After the above repairs were made with the Zorki, I took the camera out for it’s first “post CLA” roll. I am pleased to say that the camera works wonderfully now. The film advance is no longer an issue, the shutter fires correctly (at least close enough) at all speeds, and the viewfinder is as clear as the day it was made.
I cannot say enough about how bright and easy to use the viewfinder is on this camera. It is so large compared to almost anything else I own. I don’t know what the magnification is, but it has to be near 1:1. The rangefinder patch is large and easy to see. This being an interchangeable lens camera, you have a wide variety of excellent glass to choose from. I shot these rolls with the Jupiter 8, but if you have any other rangefinders that use M39 screw mount lenses, you can use those. I may one day do a comparison with the lenses for my Canon P.
The only bit of bad news about my first test roll has nothing to do with the camera itself. In my infinite stupidity, I opened the back of the camera one day forgetting that there was still a roll in it which caused me to lose about 5 shots at the end of the roll. Very disappointing, but the rest of the pictures all came out great. Here are some highlights from the first roll. I love this camera and will definitely shoot with it again, so I will update this gallery as I get back more rolls.


| My Final Word | The Zorki 4 is my favorite FSU rangefinder, and it’s my second favorite rangefinder (behind the Yashica Electro). The viewfinder is massive and the rangefinder patch is easy to see. For someone like me with poor vision, this is a huge plus, and you can easily use it with prescription glasses. It has an M39 lens mount which means there is a huge selection of quality lenses that will work with it, but the Jupiter 8 that I have is one of the best already, so there’s not much incentive to get another. The camera is well built, and after my CLA, works perfectly. It is entirely mechanical, feels comfortable in your hand, and all of the controls are where you expect them to be. Other than needing to remember to cock the shutter before changing shutter speeds, not much thought is needed to make excellent photos with this camera. | ||||||
| Images | Handling | Features | Viewfinder | Feel & Beauty | History | Age | |
| 1 | 1 | 1 | 2 | 2 | 2 | 30% | |
| Bonus | none | ||||||
| Final Score | 11.7 | ||||||
Additional Resources
http://www.sovietcams.com/index.php?-629362375
http://www.rangefinderforum.com/forums/showthread.php?t=33914
http://www.commiecameras.com/sov/35mmrangefindercameras/cameras/zorki/index.htm
http://vk.com/topic-66177816_29450364
https://en.wikipedia.org/wiki/Zorki
http://camerapedia.wikia.com/wiki/Zorki-4
http://mattsclassiccameras.com/zorki_4.html
Fantastic lecture. Thanks!
Easy to find Zorki 4 in refurbished, like new shape. A little pricey – but guaranteed. Russians have 3 “hobbies” Chess, Vodka and Cameras. Most Russians have several 35mm and 16mm movies cameras. Their famous K-3 16mm with Meteor 17-69/1.9 zoom lenses (one of the world’s best). I’ve never had any problems with Russian/Ukraine eBay sellers. Only those from the US!
Russia has the best space stations and space telescopes. The cameras/lenses follow suit.
.
KMZ plant produced and continues to produce a lot of things for military and since – from tank sights & medicine equipment to space optics.
Cameras and lenses were always a by-product and never any near main area.
Also few years ago KMZ introduced new photo-lenses produced for different camera systems including 50mm f1.2, plus new editions of old well-known lenses like Helios-40 and others.
Thanks for the additional information, Ruben!
It’s not an M39 mount as it is not metric. 39mm mount is fine. “… Carl Zeiss designs which were confiscated…” Russia already “owned” the land, therefore CZ designs became theirs. Russia didn’t really have to take anything as that part of Germany was given to them. Fortunately for us, Russia was into cameras before all this so all was not lost. Just bustin’ yer chops, Mike. LOL
How do you get your photos digitally from a film roll?
Sammi, the images in this actual article are from when I had my film developed by Dwayne’s Photo in Parsons, KS. I had them scan the images and send them to me on a CD. Since then however, I have begun developing and scanning my own images. I use an Epson V550 flatbed scanner. It’s not the best, but it works fine.