

 What is it?
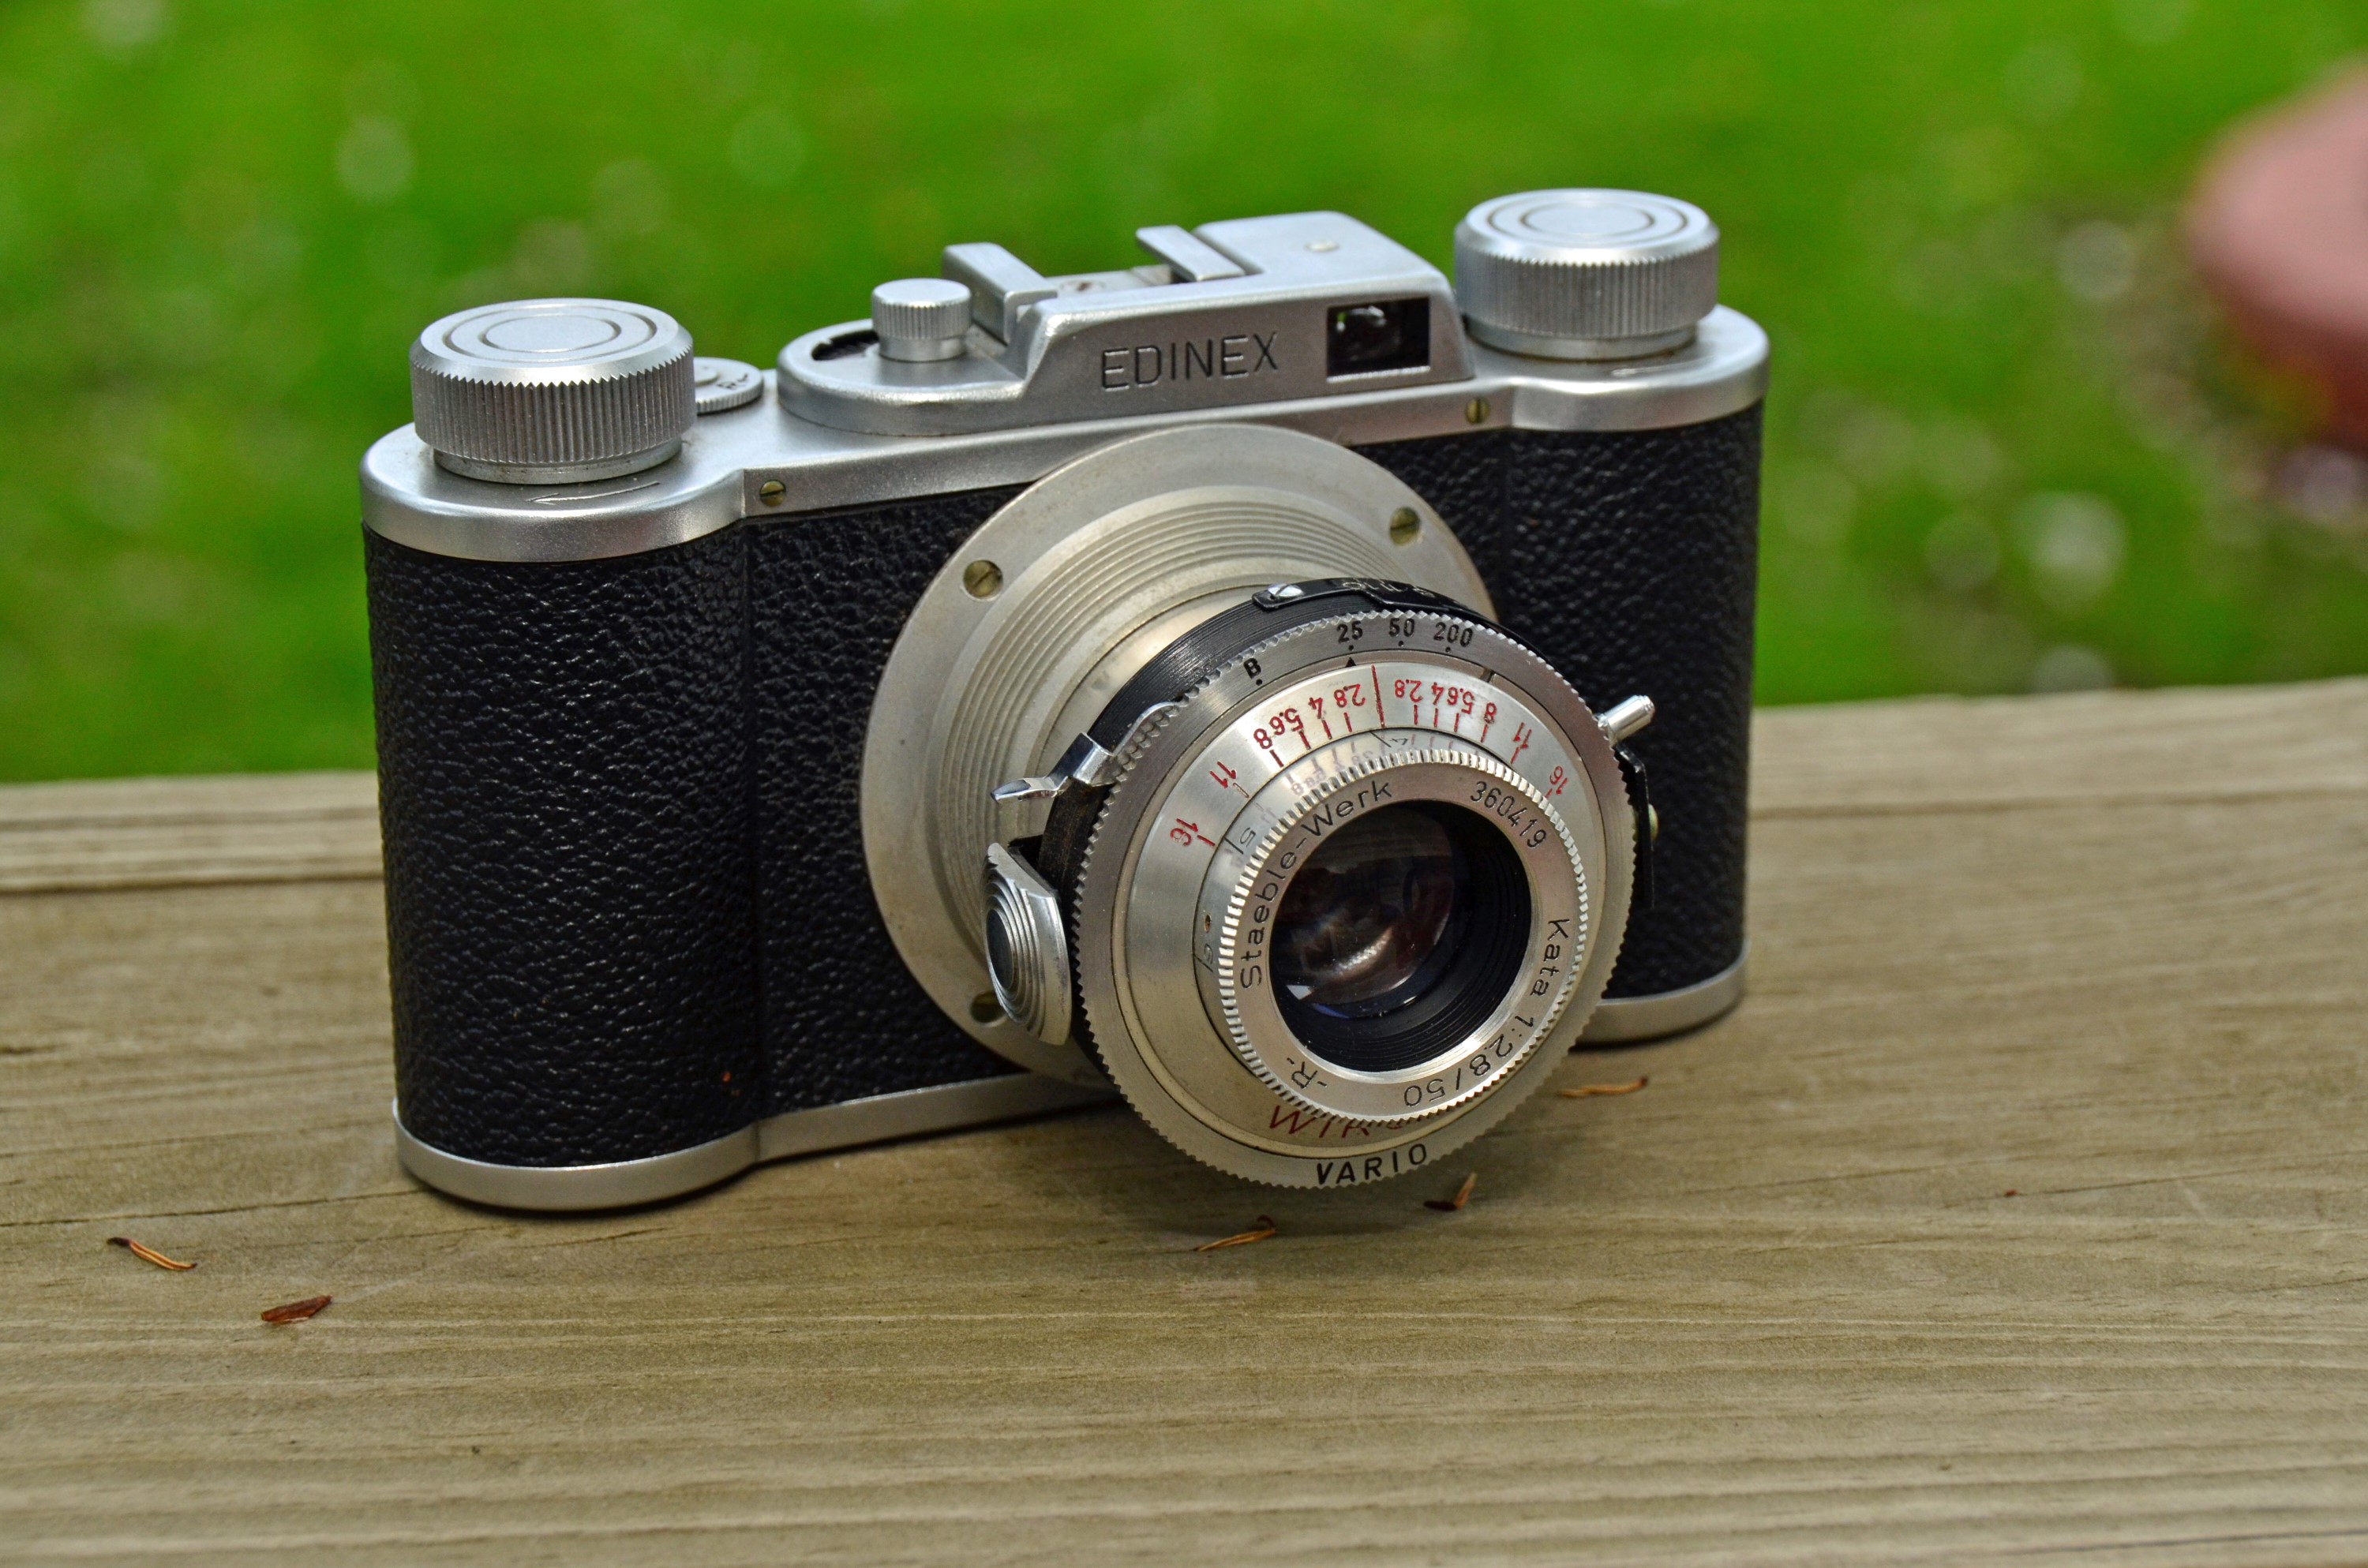
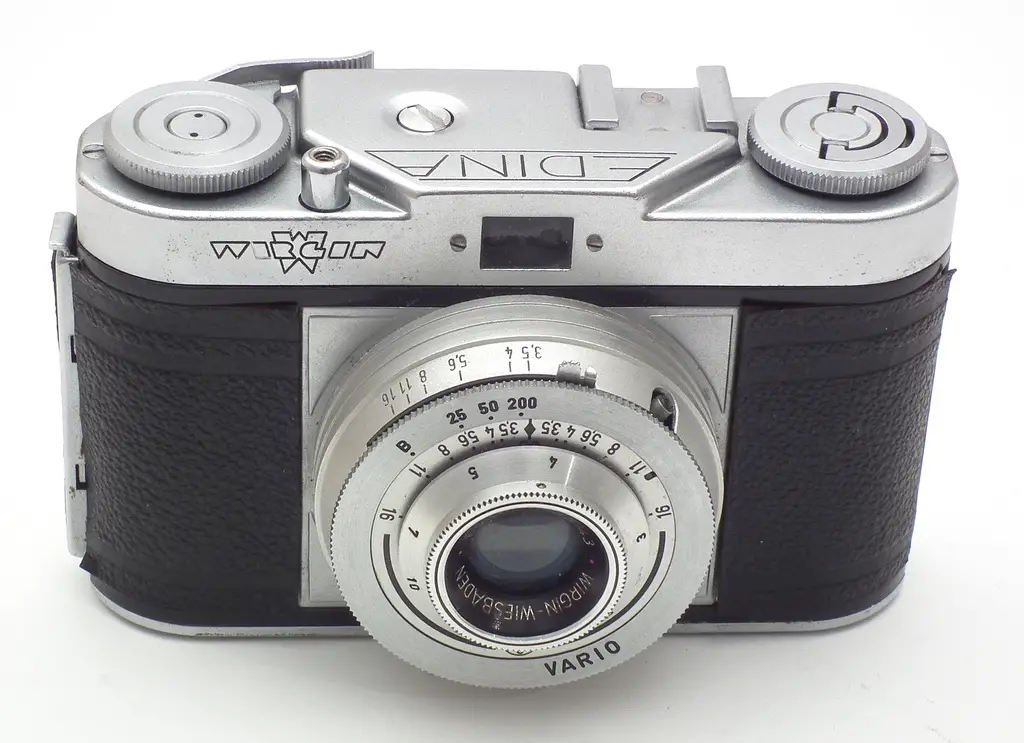
This is a Wirgin Edinex II from 1951, built in Wiesbaden, West Germany. It is a scale focus 35mm camera with a relatively simple 3 speed + bulb shutter, and a relatively fast f/2.8 50mm lens. The Wirgin camera company has a confusing, but fascinating history that is rather hard to follow, but as best as I can tell, made Edinexes from either 1927 or 1935 through 1952. Regardless of which year is correct, it has the distinction of being one of the very first 35mm cameras ever released.
Film Type: 135 (35mm)
Lens: Staeble-Werk Kata 50mm f/2.8 3-element
Focus: Viewfinder / Scale Focus
Shutter: Wirgin Vario
Speeds: B, 1/25, 1/50, and 1/200 seconds
Exposure Meter: None
Battery: None
Flash Mount: PC Sync
Manual: http://www.cameramanuals.org/pdf_files/adox-edinex_1953.pdf
History
Wirgin was a camera company based out of Wiesbaden, West Germany, and was founded in 1920 by Jewish brothers Heinrich (Henry) and Josef Wirgin. At the time, Henry was 23 years old and had a business background with some expertise in manufacturing. Josef was his younger brother and had a lot more knowledge in the technical areas. Together, their original goal was to import cameras into Germany and sell them under the Wirgin name. At some point later, two more Wirgin brothers, Max and Wolf joined the company. Max had a chemistry background and Wolf took care of the finances.
Before I go any further, just let this sink in for a moment. Jewish brothers….Nazi Germany….
It’s probably no surprise that digging up accurate information regarding the history of Wirgin is a bit difficult. Both the Wikipedia and Camerapedia articles are almost word for word the same. Most other sites that mention any part of their history usually recite facts from these same articles. Further complicating matters is that in 1938, the Wirgin brothers fled their home country due to increasing anti-Jewish harassment, and sold their entire business (another site says the factory was confiscated, not sold) to another German camera company called Adox, but bought it back after the war. I’ll do my best to combine all of the information I’ve found here, in the hopes that I get at least part of the history correct.
During my research into the history of Wirgin, I came across a couple of other German language sites with more information than what was available on either Wikipedia or Camerapedia. A particularly interesting one was the German language site by Leif Johansen. Since my only knowledge of the German language comes from playing Wolfenstein video games and watching Indiana Jones movies, I had to rely on Google’s translate feature to translate most of the site to English.
 According to Johansen, in 1926 Wirgin released their first cameras which were a variety of 6.5 x 12 and 9 x 12 folding plate cameras sold under the names Gewir and Metadux. He then goes on to state that Wirgin would release a much smaller camera in 1927 that used motion picture 35mm film called the Edinex. Although I have found reference to this 1927 Wirgin on other sites, the more I dig into the company’s history, the more I doubt that this date is correct.
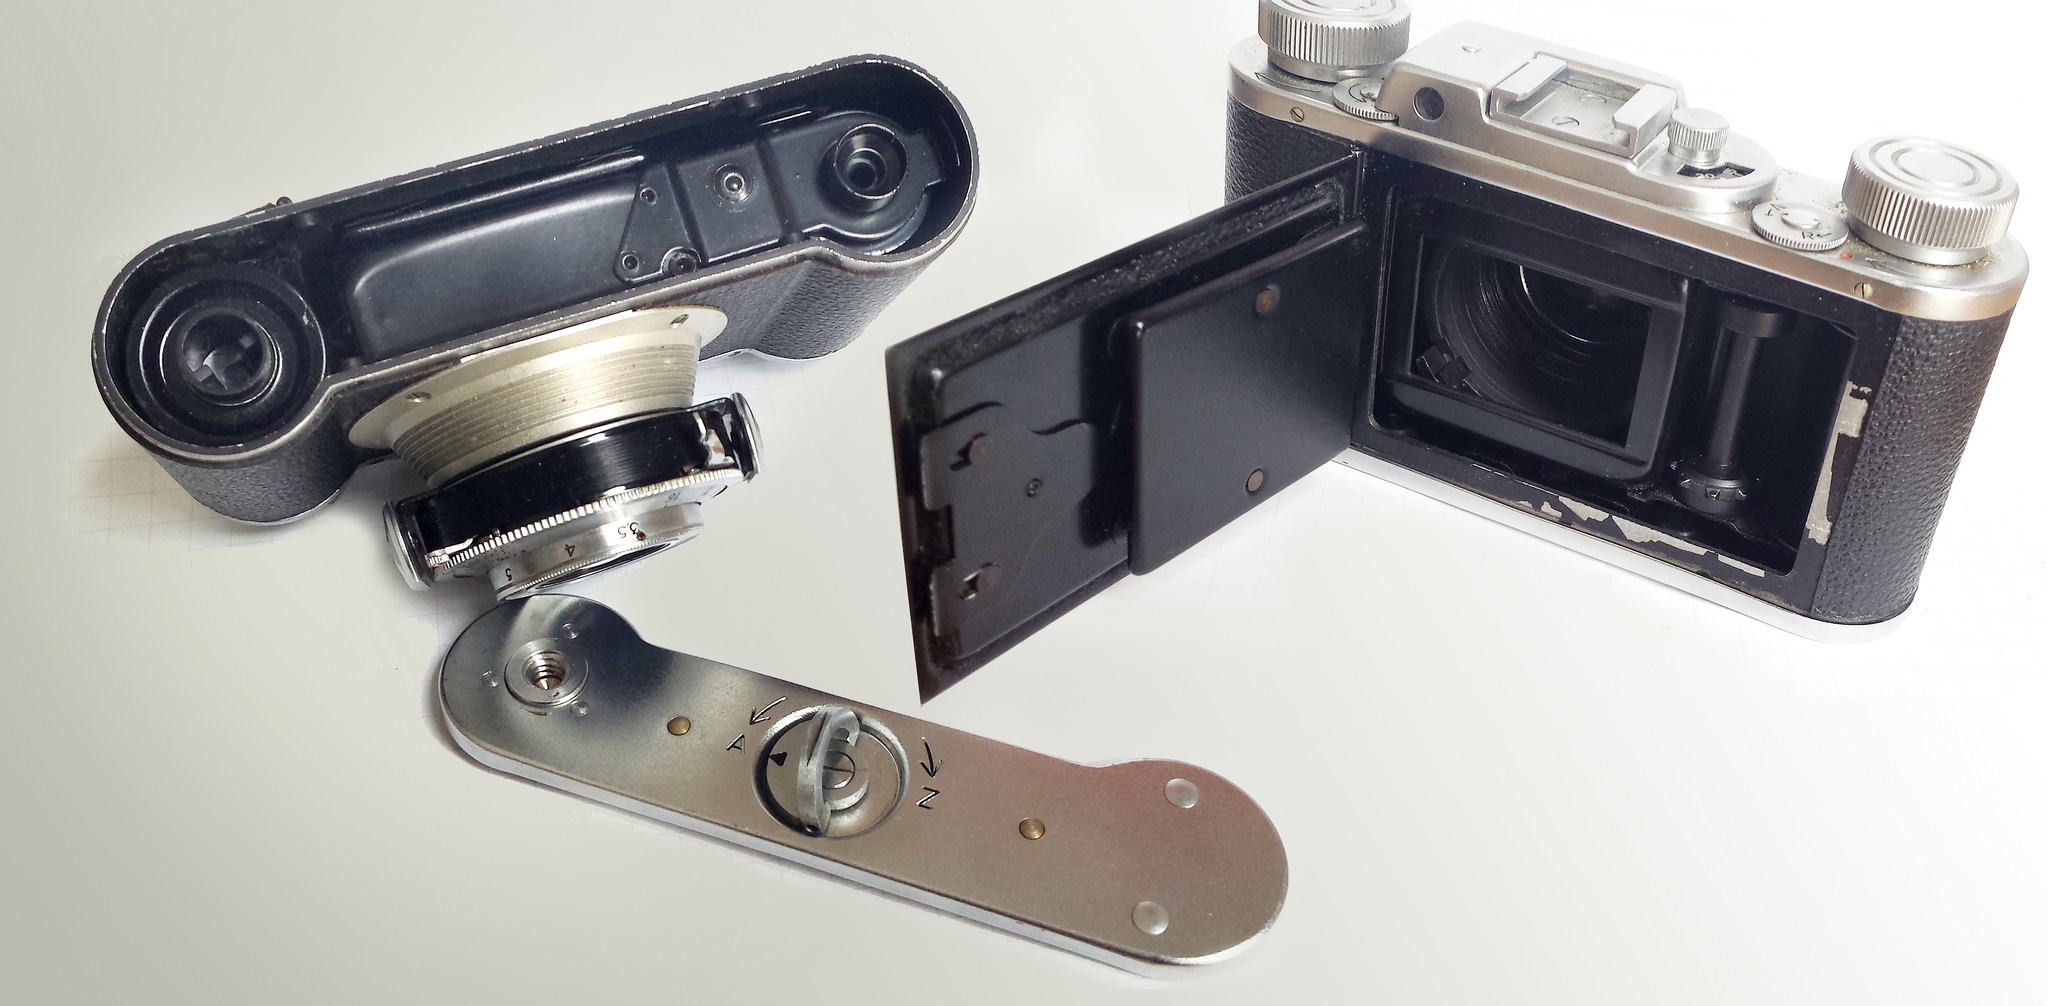
If true, this camera would have been released only 2 years after Leitz released their first 35mm Leica I camera. I should mention that the type of film we now consider to be 35mm film wasn’t introduced until 1934 when Kodak released the first Retina camera. The film Kodak developed for the Retina is called 135 format 35mm film. The 35mm film that would have been used by Leitz and possibly Wirgin was an early type of roll film based off 35mm motion picture film. Although this film used the same 24mm x 36mm frame size, it did not have the sprockets or the daylight loading cassette that has become standard with 135 format film. Like the Leica, the first Edinex shared a removable plate on the bottom camera which is where you would load film. The back plate of the camera was not removable and featured a “Depth Sharpness Table” which acted as a focus scale for various distances and apertures.
Despite multiple references to the first Edinex from 1927, I can’t seem to find any pictures of a model this old. Furthermore, since modern 135 format 35mm film was not introduced until 1934, and the later Edinexes are capable of using 135 format film, in order for the camera to pre-date 135 format film, at some point in the 1930s, the design of the camera would have had to been changed.
Another nail in the coffin for a 1927 Edinex is on page 1001 of McKeown’s Guide to Classic Cameras, where it says that the Edinex was not released until 1935. This makes much more sense since the camera would not have needed to be redesigned from an earlier type of 35mm roll film to accept the daylight loading cassettes of the 135 format when it was released a year earlier, in 1934.
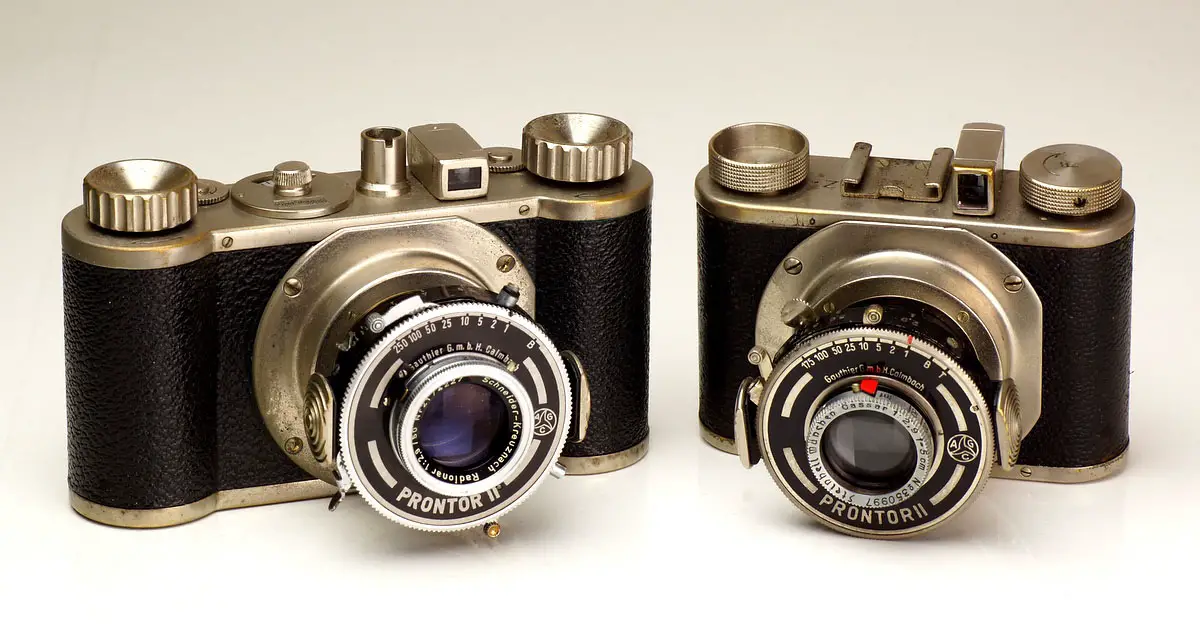
Edinexes from the 1930s look like the one to the left. Throughout the entire life of the Edinex line, it was very common for the camera to come with a variety of different lenses and shutters so dating them is incredibly difficult.
As best as I can tell, all pre-war Edinexes have rounded sides that form a sort of “grip” on both sides of the front of the camera, a round accessory “post” on top of the camera (in lieu of a standard cold shoe), a black leatherette skin, and a nickel finish that would look slightly bronze over time.
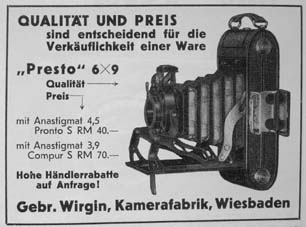
Throughout the 1930s, Wirgin released several other 120 and 127 format roll film cameras. Examples from this era were available in a variety of different body styles from a simple box camera, to several lines of spring loaded folding cameras, and even a TLR. Some of the names used for these models were Presto, Trump, Baky, and Wirginex.
One of the more popular 127 film cameras was called the Gewirette (shown above) which produced 16 4cm x 3cm exposures on a single roll of 127 film and was released in either 1932 or 1933. The Gewirette shared many of the same design cues with the Edinex and was one of the most compact medium format cameras of it’s day.
If you go with the assumption that the Edinex was not released until 1935, it makes more sense to think that Wirgin would release a compact 127 format camera and several 120 roll film folders before the compact Edinex, not after.
In 1938 when Heinrich Wirgin fled Germany and the factory was taken over by Adox, the Edinex was renamed the Adox Adrette. The Adrette is almost indistinguishable from the Edinex other than a small Adox logo stamped into the top plate right above the frame counter. Neither the Wirgin or Adox cameras ever had the name Edinex or Adrette stamped anywhere on the camera itself.
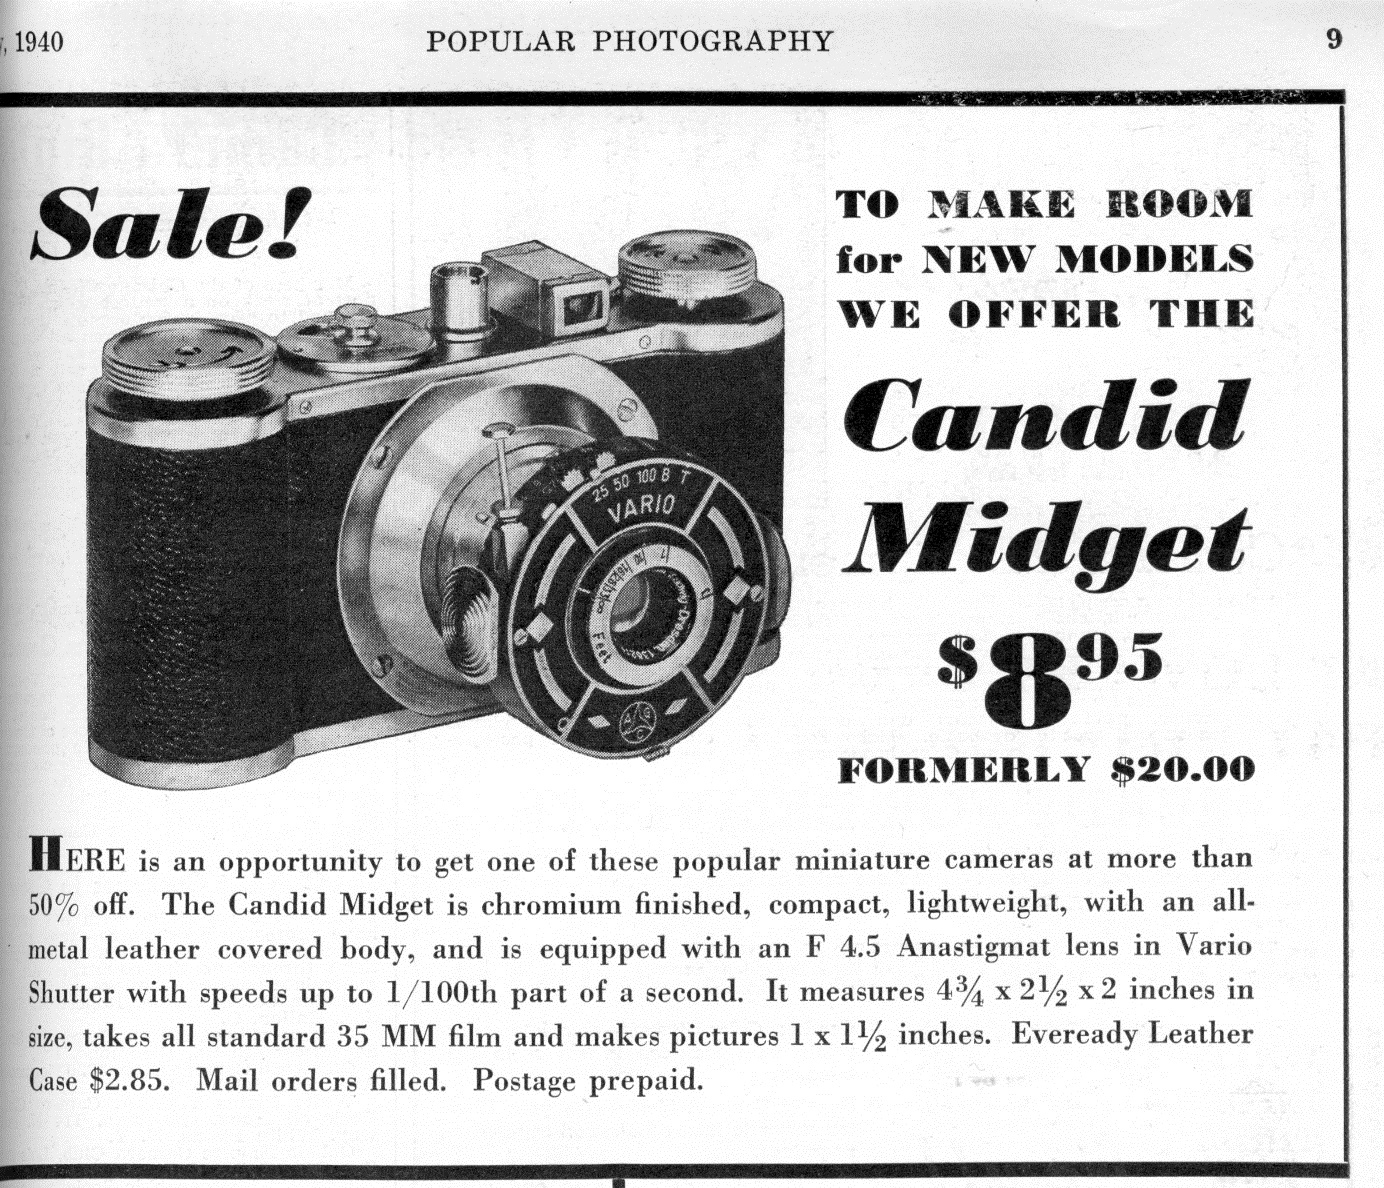
Perhaps contrary to the reputation of other German companies, Wirgin cameras were not high end, precision models with advanced features. Although Wirgin cameras could be paired with high speed Compur-Rapid shutters and fast f/2 glass, most of them were relatively basic models that aimed for the lower end of the market. In May of 1940, imported Wirgin Edinexes (called the Candid Midget in the United States), sold for $8.95 with a basic Vario shutter and 50mm f/4.5 lens.
After arriving in the United States, the Wirgin brothers continued to work in the camera industry for other companies, but I cannot find any record of any Wirgin labeled cameras made in the United States, so I would assume they lended their expertise without receiving much credit.
When World War II started, the Wiesbaden factory (now owned by Adox) had turned to manufacturing for the German war effort and camera production was halted. During the war, the factory was heavily damaged by Allied bombing and was in a state of disrepair by the end of the war. Wiesbaden was located in what would become Allied-controlled West Germany, so it became safe for the Wirgin brothers to return from the United States. They proceeded to buy back the factory and rebuild it so they could resume making cameras. According to one site, there is a rumor that Henry Wirgin bought back the Wiesbaden factory for 33 cartons of American cigarettes. Who knows if this is true or not, but it makes for a good story!
Knowing that Germany surrendered in 1945, and it probably took a couple of years to rebuild the Wiesbaden factory and replace or repair all of the machinery, I think it is safe to assume that camera production did not resume immediately. I cannot find any conclusive evidence of when Adox stopped making the Adrette and when Wirgin resumed with the Edinex, but at least a couple of sources say the Edinex resumed production in either 1948 or 49. I believe the first few models were nearly identical to their pre-war models, but Wirgin was working on a re-designed model with several improvements.
By 1949 or 1950, Wirgin released the new Edinex (nicknamed the Edinex v2 on some sites but this was not official). Although the new model shared a very similar body design and still featured a collapsible lens, the new Edinex was now called the Edinex I and for the first time featured the name “EDINEX” stamped on the front of the camera.
In addition to the new name, the following changes were made to the Edinex I:
- All metal was chrome plated instead of nickel plated as was used on the pre-war models.
- An all new integrated viewfinder on the top plate of the camera which also featured the more common accessory cold shoe instead of the round accessory post of the earlier models.
- The frame counter was revised to work with the new top plate.
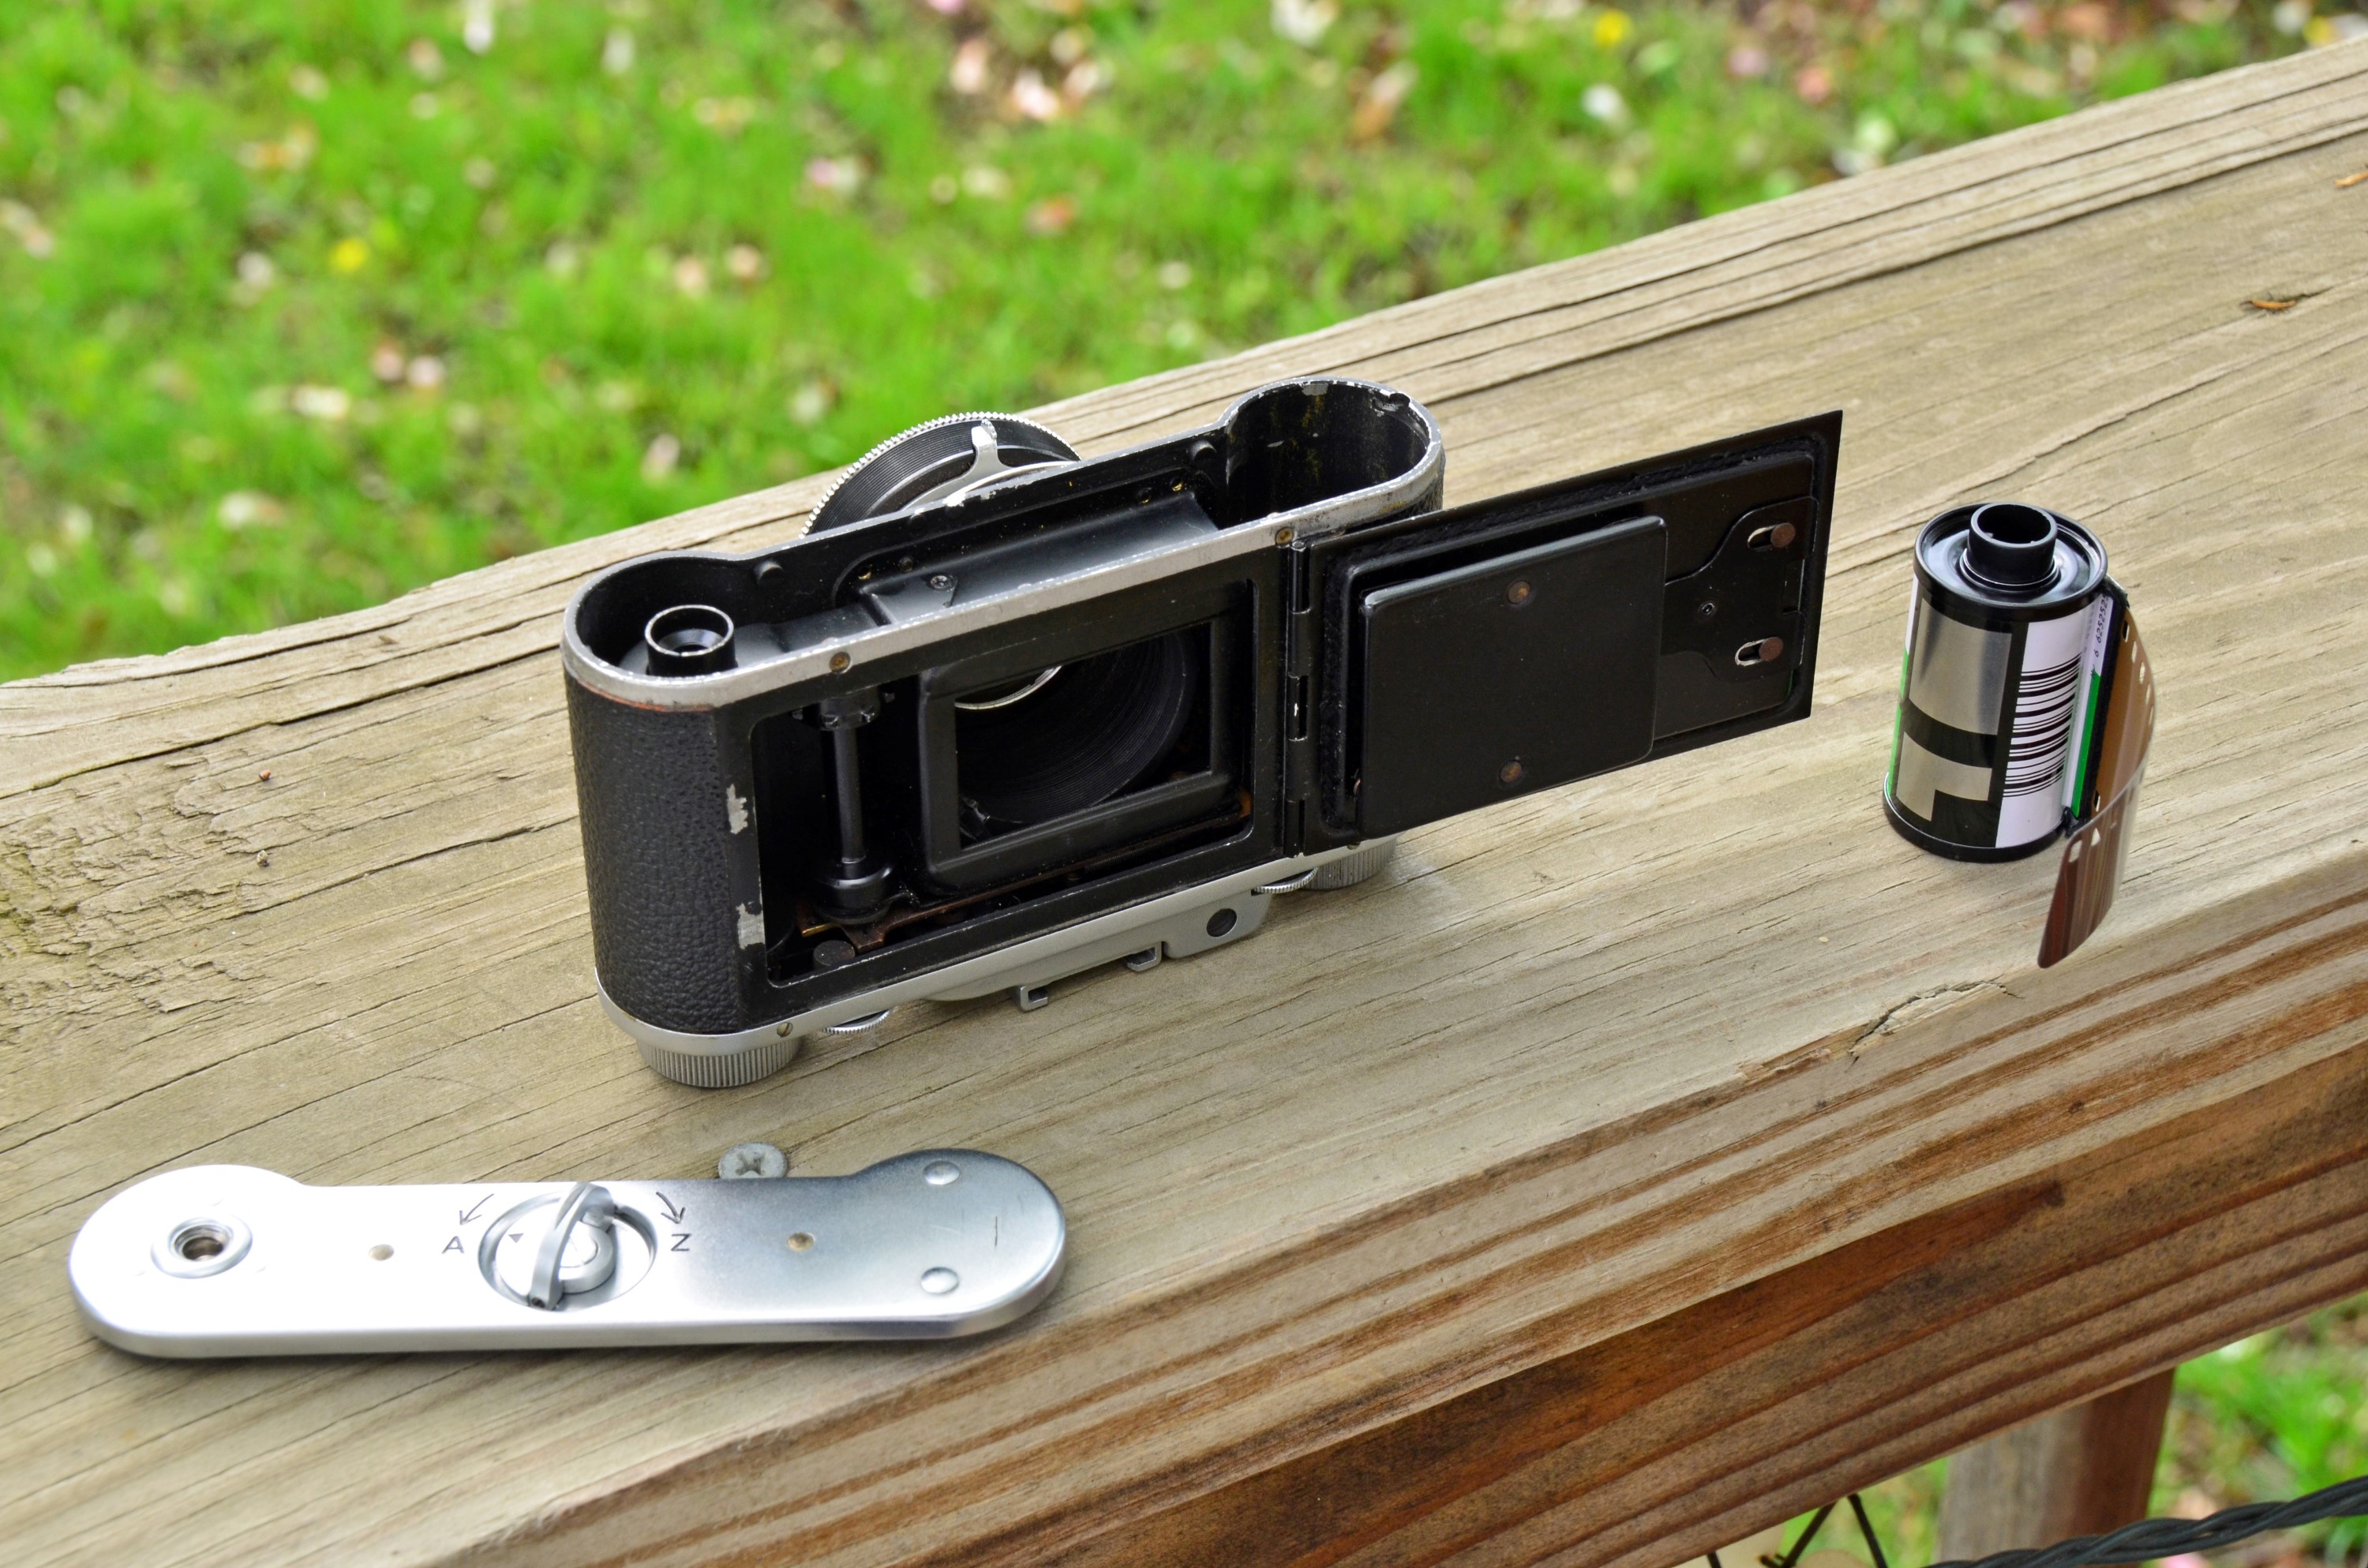
- Although the Edinex kept the bottom loading method for loading film, the back of the camera featured a door which when opened, made loading film much easier. Film was still inserted into the bottom of the camera, but with the door open, you could more easily guide the film onto the take-up spool and make sure the sprockets were aligned correctly. As a side benefit, this door also allows for the lens to be collimated to infinity if such an adjustment is needed. I’ve seen some reports that this door was not available on all post-war models. Although this may be true, I have yet to see any evidence of a post-war model without the door.
- Finally, the last change was an all new shutter release button on the top plate of the camera. All pre-war models had a shutter release on the shutter itself.
Leif Johansen’s site mentions the existence of a model called the Edinex II as early as 1936, but this is the only site with this information. I cannot find any evidence that there were any variants of the Edinex prior to the war. Based on my research, it seems as though the Edinex II wasn’t released until 1951. To make things even more difficult, there didn’t seem to be any consistency between labeling of these cameras. Post War Edinex Is and IIs sometimes would have their model number included in the front plate, sometimes they wouldn’t. I’ve seen models that physically say Edinex I and Edinex II on the front plate, but there’s many that just say Edinex like mine. I believe the differentiating factor between an Edinex I and II was whether or not the shutter release was on the top plate of the camera. The Edinex I had it, the Edinex II did not.
A third variant called the Edinex III was released around the same time as the Edinex II that had a coupled rangefinder on top of the camera. The Edinex III had a lens mounted shutter release and actually had the name Edinex III stamped into the front plate of the camera.
In either 1952 or 1953, the Edinex was revised to drop the collapsible lens in favor of a fixed design. This version is known as the Edinex S although it does not have that printed anywhere on the camera itself. The only models I’ve ever seen with the fixed lens did not have a shutter release on the top of the camera, so I assume these models are all Edinex IIs, although the top plate only says Edinex. It is possible there was a fixed lens version with a shutter release on top or even one with the rangefinder, but I have not seen one.
During this time, the Edinex cameras sold well and were a success for the company as there was a huge demand for soldiers coming home from the war who wanted a compact 35mm camera that was easy to use and had a wide selection of shutters and lenses available. Despite the success of the camera, it was based on a design that was rapidly approaching 20 years old, so Wirgin decided to discontinue the Edinex name, and release a completely redesigned camera called the Edina I.
 The Edina I continued with the compact size of the Edinex but had a completely redesigned top plate with a lever wind film advance lever and a fixed mount lens like the last of the Edinexes. Another significant change was the adoption of a rear loading film door. No longer did the film have to be loaded from the bottom of the camera. There was also a second model called the Edina II that had a coupled rangefinder instead of scale focus. Although the rangefinder was coupled to the focus lever, it was not integrated into the main viewfinder. This meant that the photographer would look through two different windows on the back of the camera, one for focusing, and the other for composition. Both the Edina I and II had a shutter release on the top plate of the camera.
Shortly after the Edina I and II’s release, Kodak sought legal action against Wirgin because they felt the name Edina was too similar to Kodak’s own German designed 35mm camera, the Retina. Fearing consumer confusion, Wirgin was forced to rename the cameras to Edixa. I believe this all happened during the first year of production, so there exist 1953 Edinas and Edixas that are basically the same camera.
In 1956, a small number of Edixas were made with an uncoupled selenium light meter, but these models are very rare and I have never seen a picture of one. As best as I can tell, in 1957 the Edixa I and II were discontinued, perhaps to allow for Wirgin to focus on their new SLR designs. The Edixa name was brought back in 1962 on a completely different line of compact 35mm cameras and once again on a line of SLR cameras.
Wirgin continued to make a variety of lower end SLR cameras throughout the rest of the 1950s and 1960s. While moderately successful, Wirgin was never a high end marquee with any level of prestige. I can’t find any reason for the company’s collapse in the very early 70s, but I can only assume that they could not compete with the influx of high-quality brands from Japan and the rest of Germany.
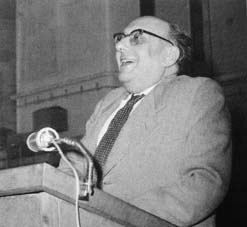
In his later years of life, Henry Wirgin focused his work on repairing relations between Jewish and non-Jewish Germans. He served as chairman of the Society for German-Jewish co-operation until his death in 1989.
Today, Wirgin does not have a huge following among camera collectors, but there are just enough people out there who like them for their small size and fascinating history. Although Wirgin cameras were never top of the line, they were well designed and simple enough that many of them are still in good working order 60+ years after they were made.
Although the pre-war models have a unique look with the nickel plating and primitive cylindrical accessory post, they are rather difficult to shoot due to the bottom loading film design. Leica cameras of this era also have a similar design, but….they’re Leicas, and people will pay an arm and a leg for one. Not so with these. On the used market, Edinexes don’t come up for sale often, but when they do, they rarely fetch a high price. If you want one and plan on actually shooting it, I highly recommend getting a post-war model with the door on the back.
My Thoughts
The Edinex is one of those cameras you don’t know you want until you hold it. This is one of the smallest and lightest weight cameras in my collection. Its also the only camera I own with both a collapsible lens and removable bottom.
Beyond the design elements, there isn’t a whole lot that is special about this camera. Its a scale focus all manual camera, so there’s all the regular things you have to remember when shooting it, but add in the one additional step of having to remember to pull out the lens, otherwise you will have badly out of focus shots.
Using a camera like this can be a very rewarding or a very frustrating experience, it all depends on your take of it, and how much patience you have. While a camera like this is “easy” in the sense that you can load in a roll of 35mm film and immediately go out shooting, you do need to take your time and make sure you get your settings correct. This is definitely a camera where the saying “its all about the journey, not the destination” applies.
The Edinex has a couple of uncommon design attributes which may be confusing to someone trying to use the camera. Although I listed a link at the beginning of this article to a user manual for the Edinex, it does not appear to be an official user manual from Wirgin, and more of a quick reference pamphlet made by an American distributor.
So, in an effort to properly document using this camera, here are the steps for loading film and using the camera.
 Open the camera:
The bottom of the camera has a latch with the letters “A” and “Z” on them. The manual doesn’t specifically state it, but A could be short for “auf” which is an informal way of saying “open” and Z could be short for “zurück” or “zusammen” which mean “back” or “together”, which loosely could mean “close”.
Lift the curved bar and rotate the latch so that the arrow points to “A” to unlock the bottom plate and then gently pull the bottom plate away from the body of the camera. Depending on how long this plate has been attached to the camera, it might be a little snug, so just gently tug on each side of the plate until it comes off.
 Loading film:
If this is your first time loading film into the bottom of a camera, don’t stress out about it, its really not that hard….as long as you have a post war Edinex with the rear door. If you are trying this on a prewar Edinex without the door, it is going to be considerably more difficult.
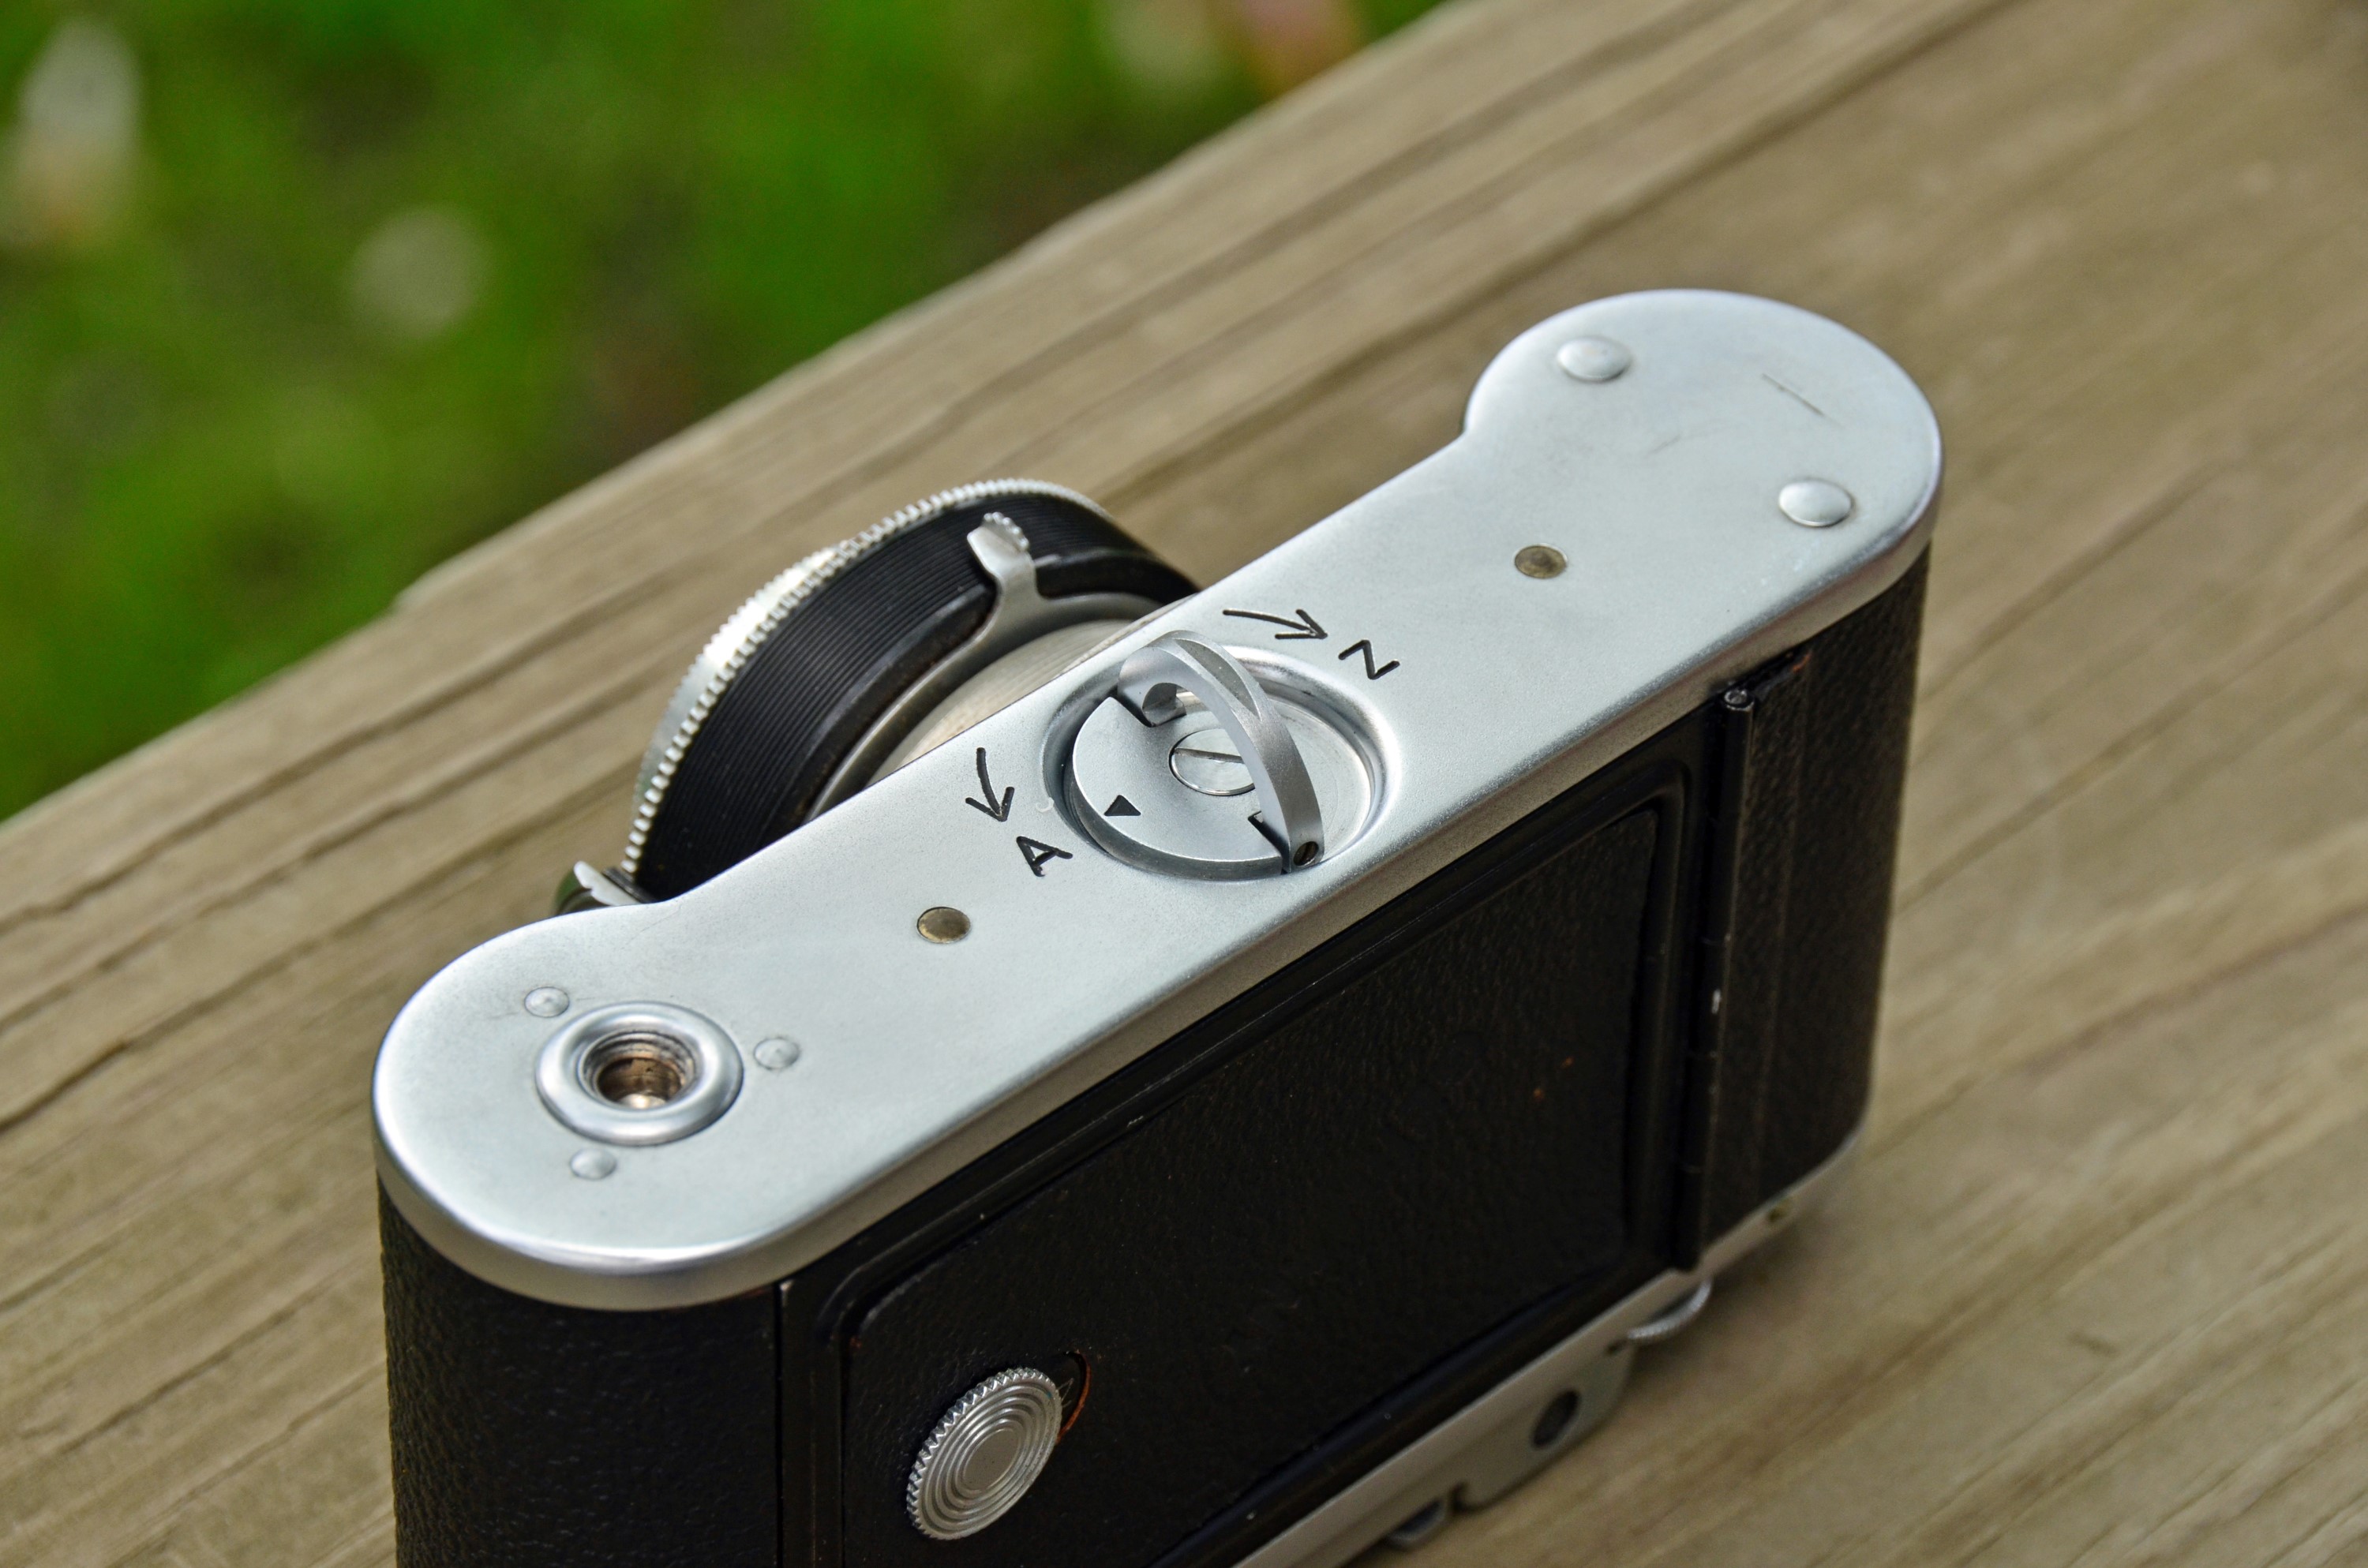
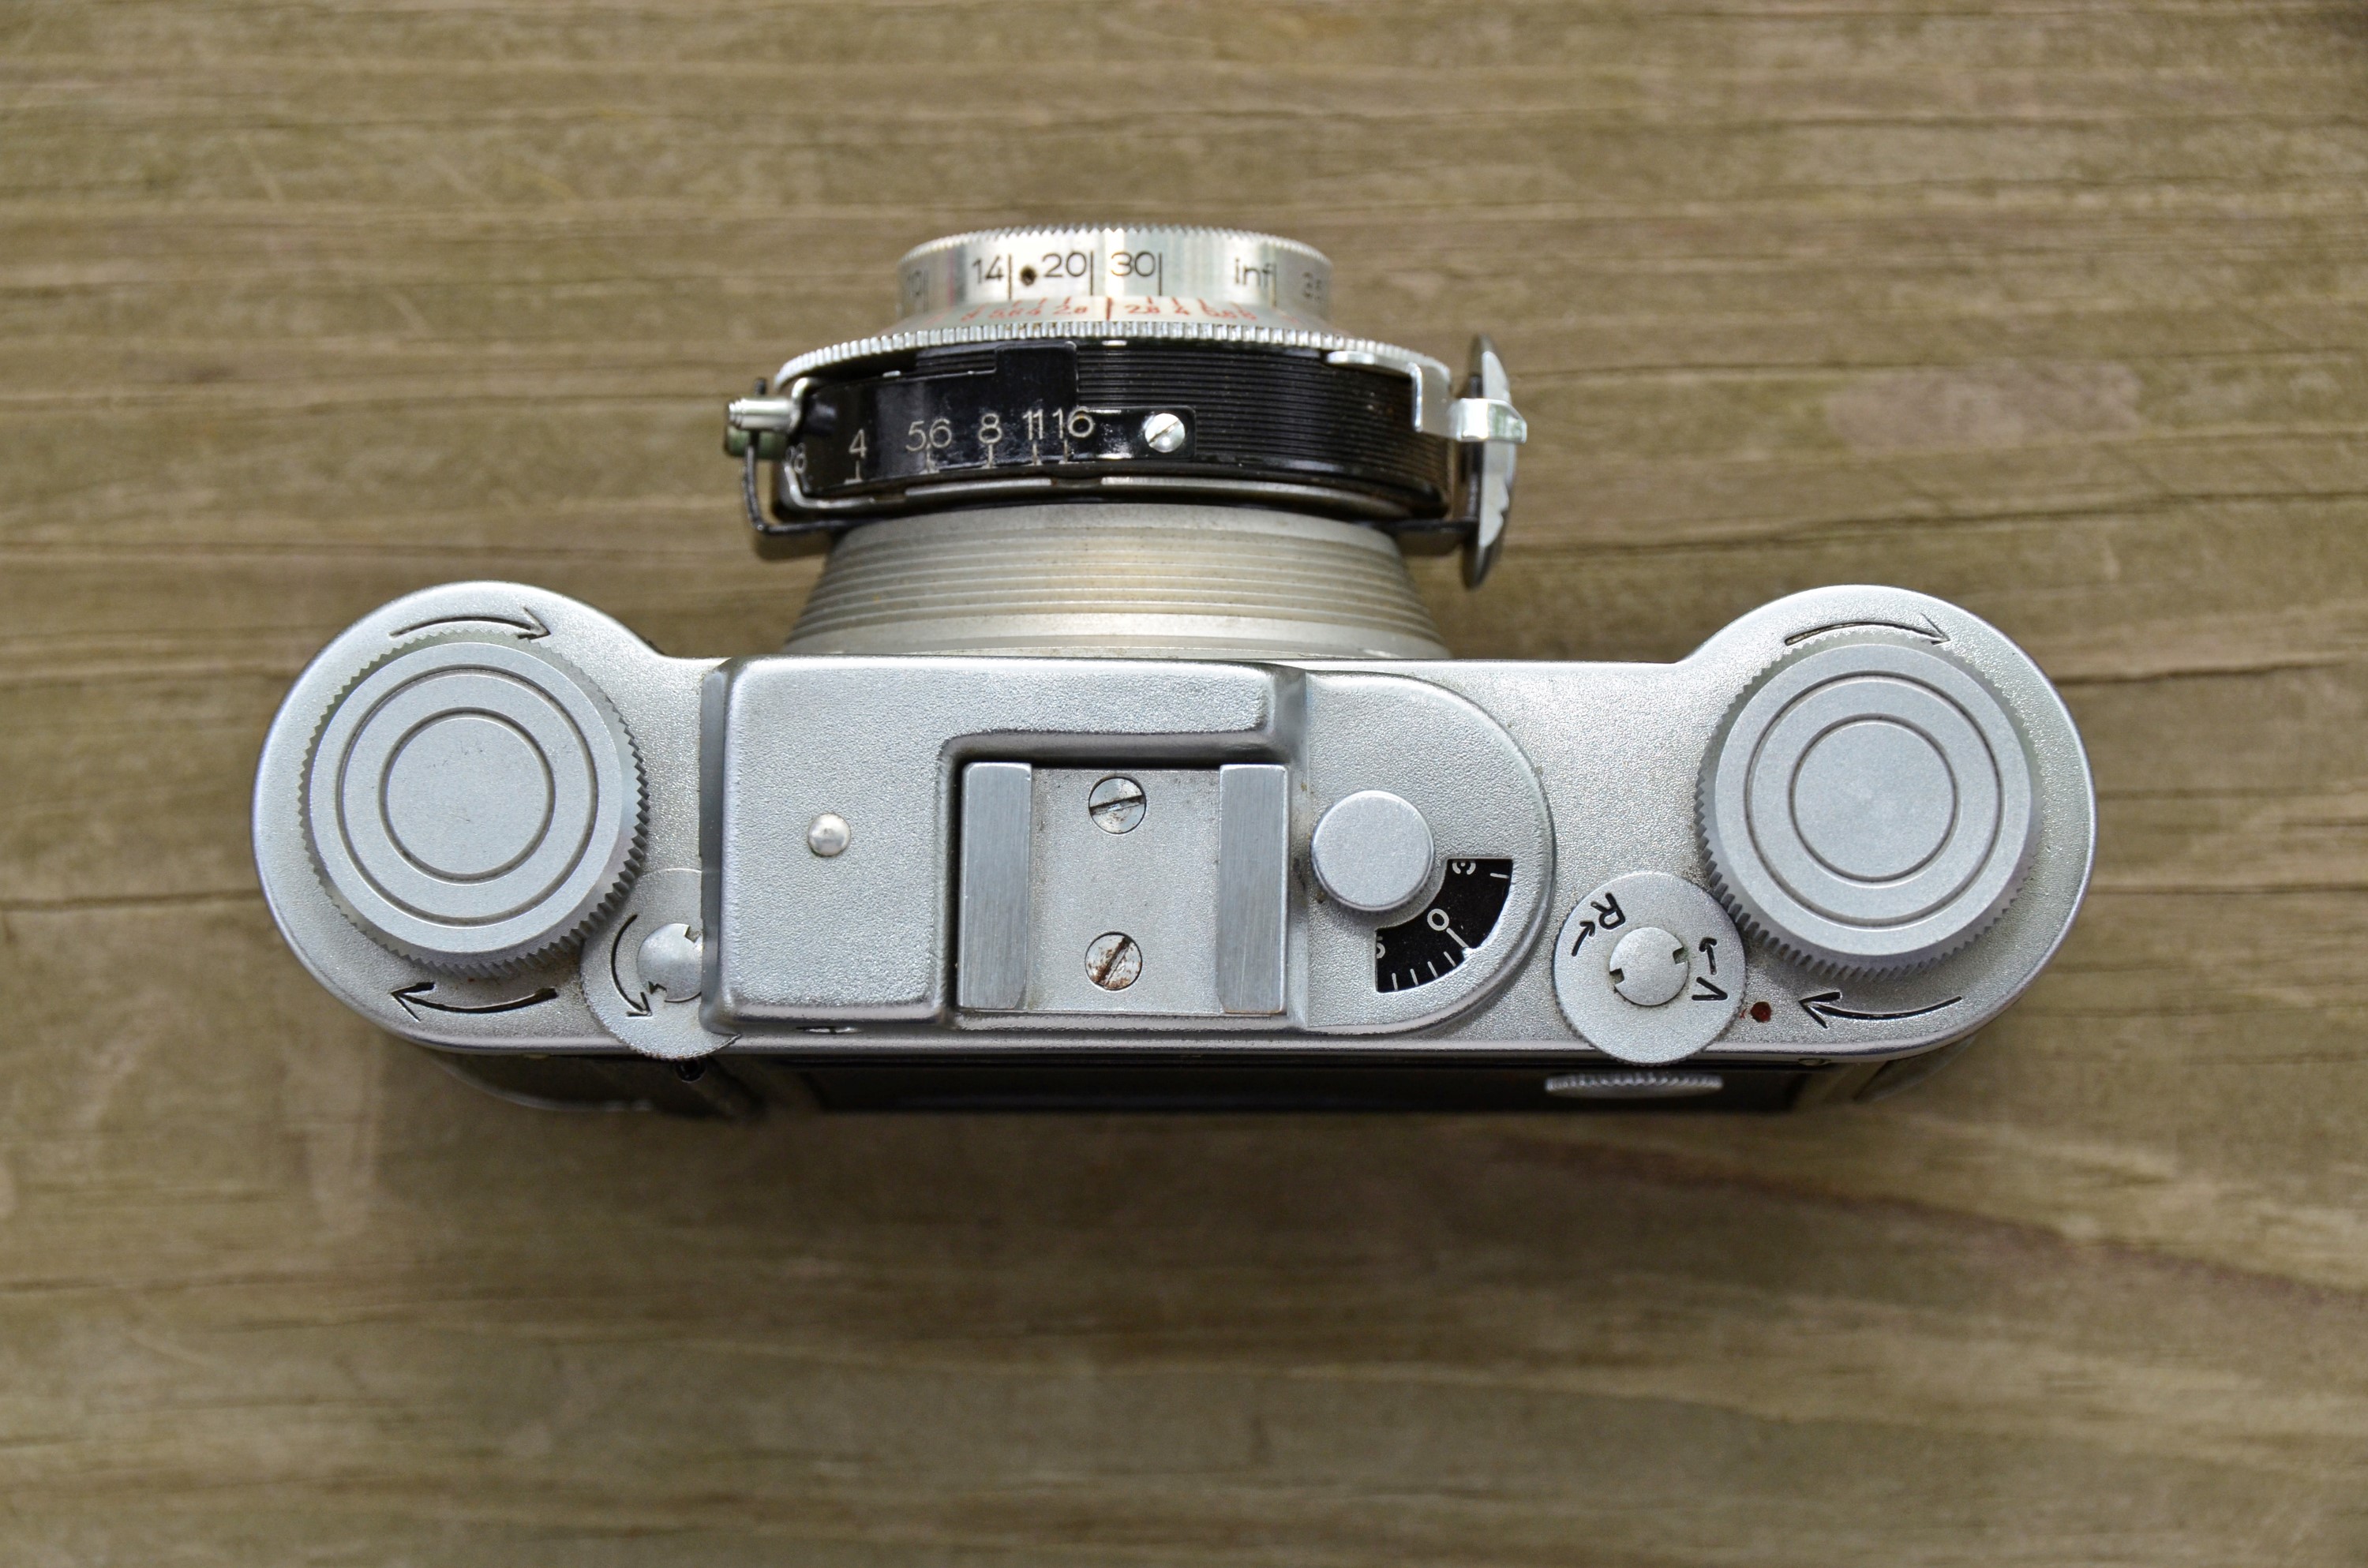
The very first step is to rotate the dial on top of the camera with the letters “V” and “R” into the “R” position. “R” is most likely short for the German word “rückwärts” which translates to “backward” and “V” is short for the word “vorwärts” which translates to “forward”. There are arrows on this dial indicating which direction to turn it, but they’re counter intuitive to use. When you want the camera in “R” mode, turn the dial until the letter “R” is next to the red dot. Putting it in this position allows the film sprocket to rotate freely, making it easier to load the film.
Looking at the bottom of the camera with the top facing the floor and the lens facing you, the film cassette goes on the left side. The normal amount of film leader that usually is exposed on a new roll of film is usually enough to get it started. You shouldn’t have to pull out any additional film.
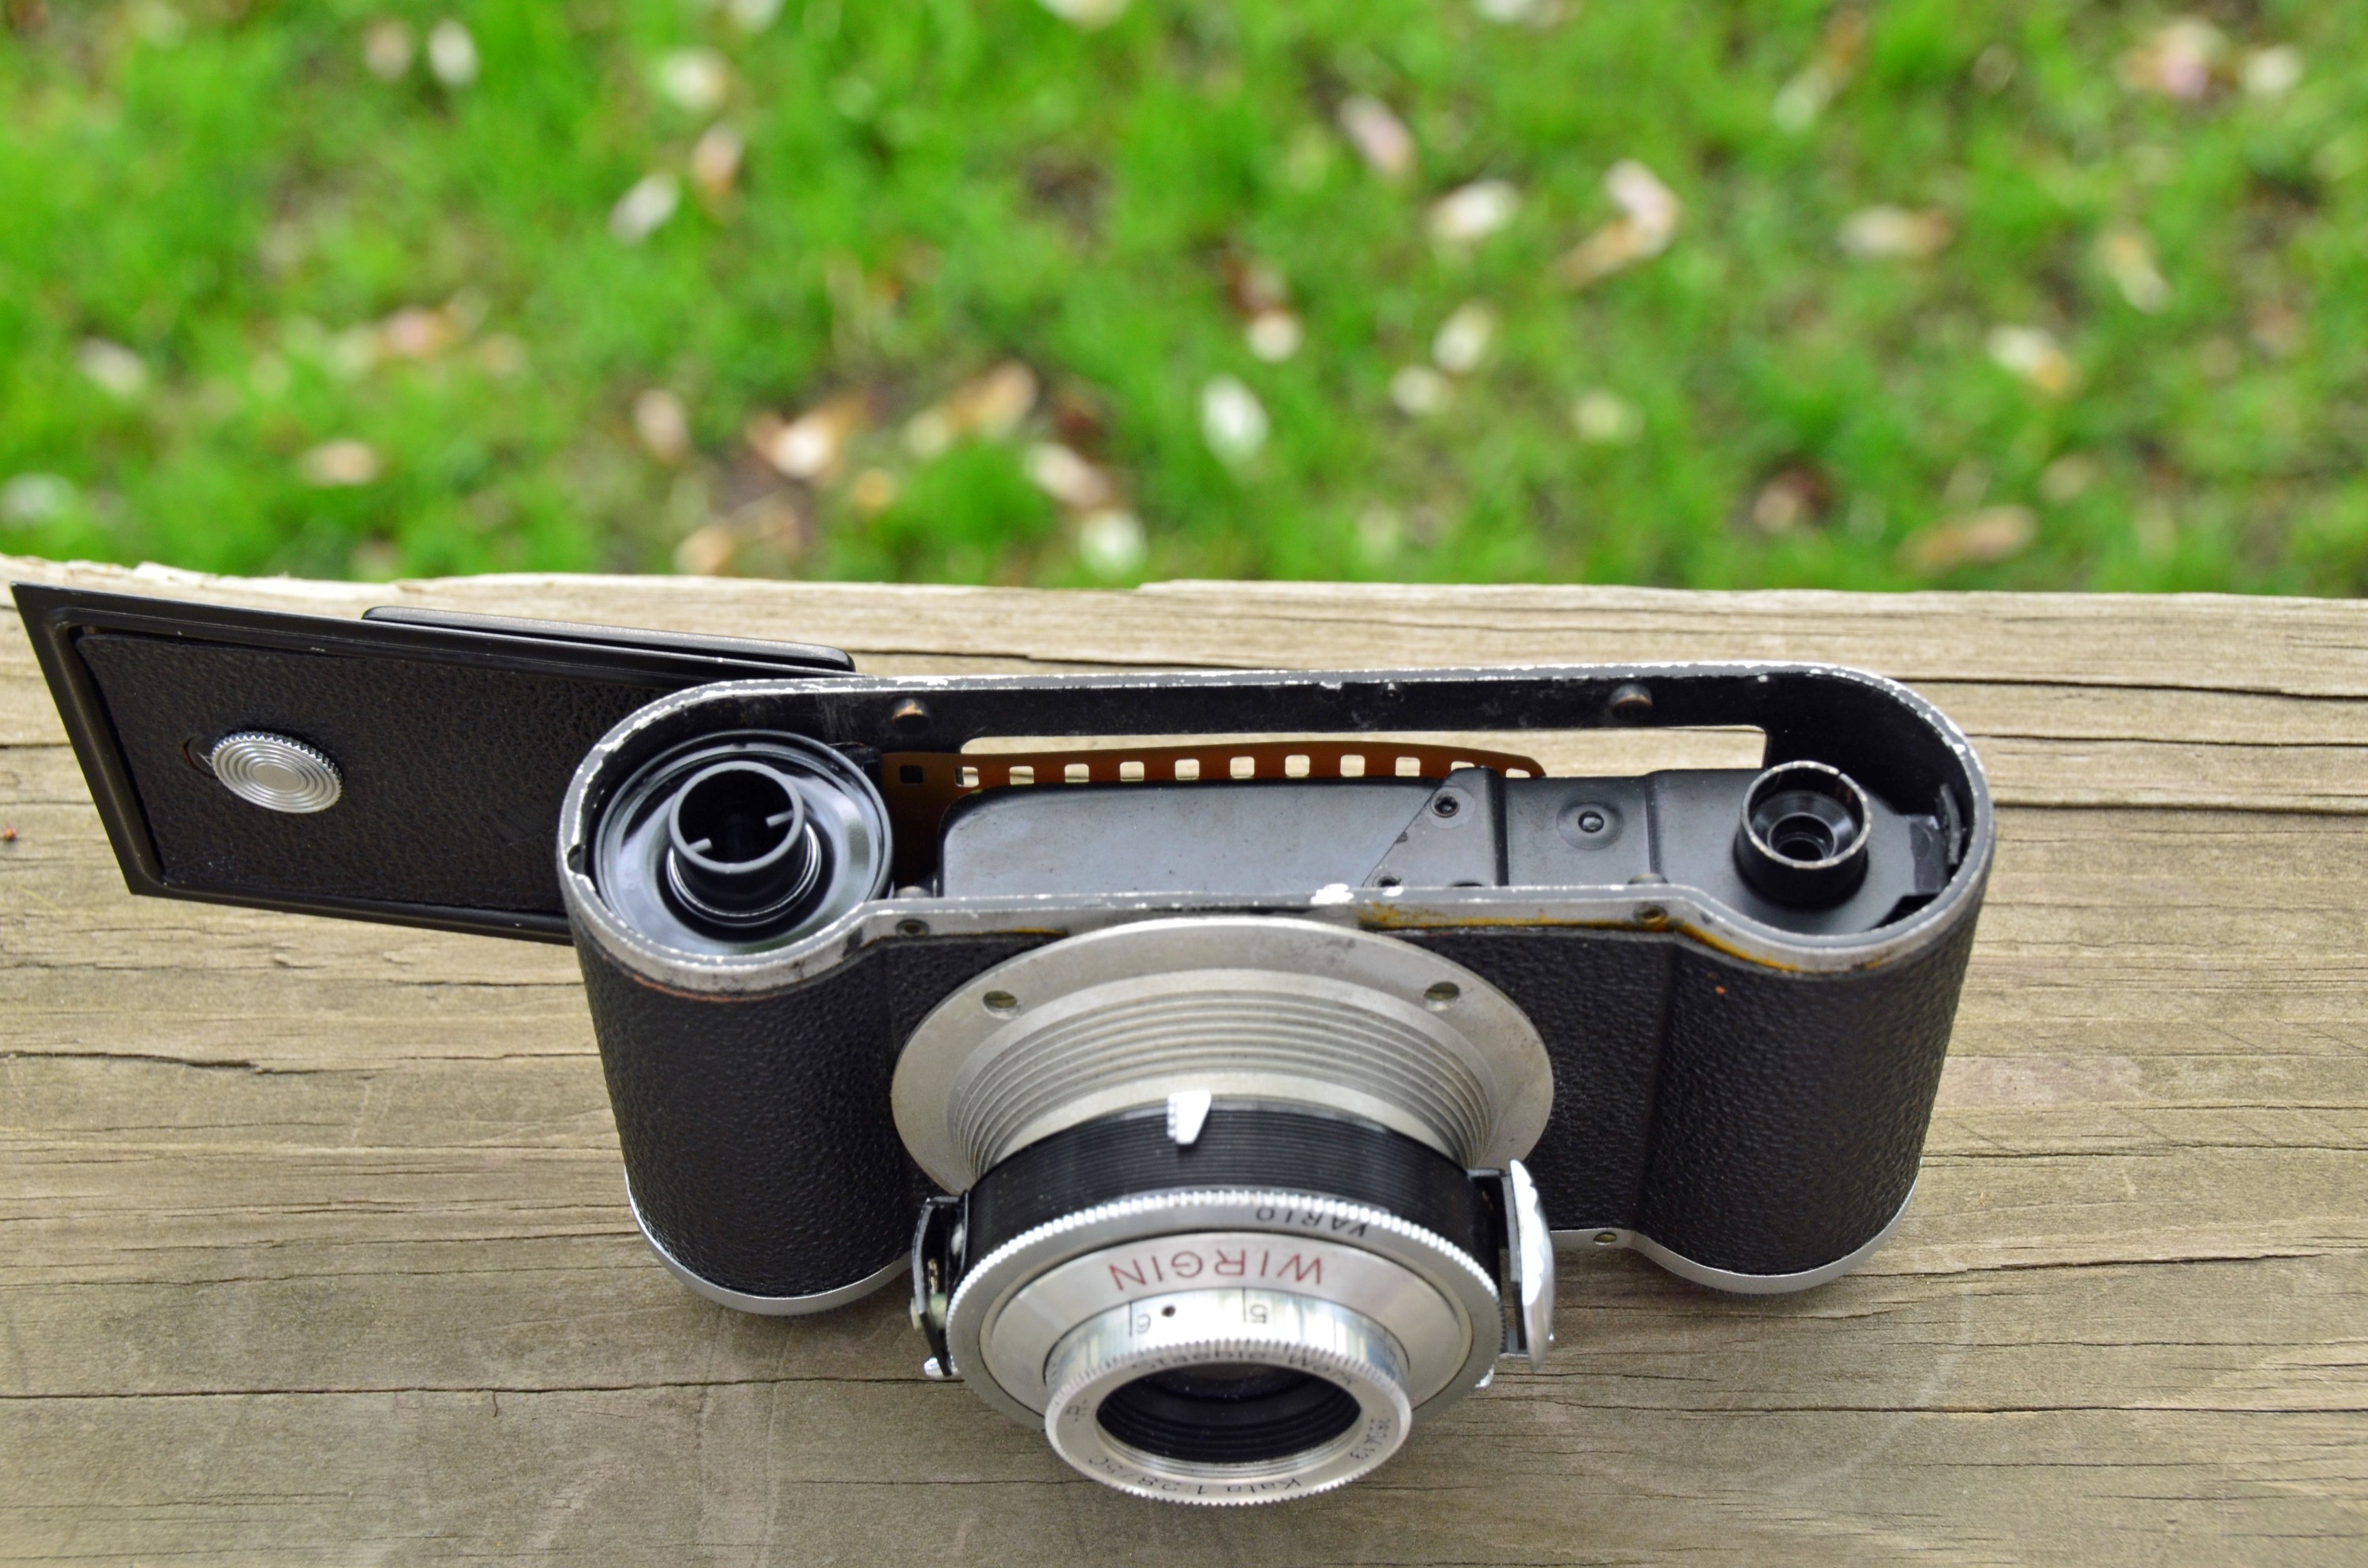 Gently line up the exposed film leader in between the outer body of the camera, and the inner film box. The goal here is to slide both the film cassette and the film leader into position all at once. If the film leader is getting caught up on something, don’t force it. If you are struggling to figure out where the film needs to go, temporarily try inserting just the tip of the film leader into the camera and look through the open door to see when it comes through. Once you can see the tip of the film through the open door, you know exactly where it needs to go. Line up the cassette again and gently guide the film leader into position.
Once the cassette is all the way in, reattached the plate to the bottom of the camera, and turn the latch to the “Z” position and fold down the curved bar. When rotating the latch back to the “Z” position, you should notice that the tension increase as you get close to the “Z” position. This means the camera is tightly latching, assuring no light leaks. If you don’t notice any additional effort when turning the bar to “Z”, check to make sure the plate is properly lined up.
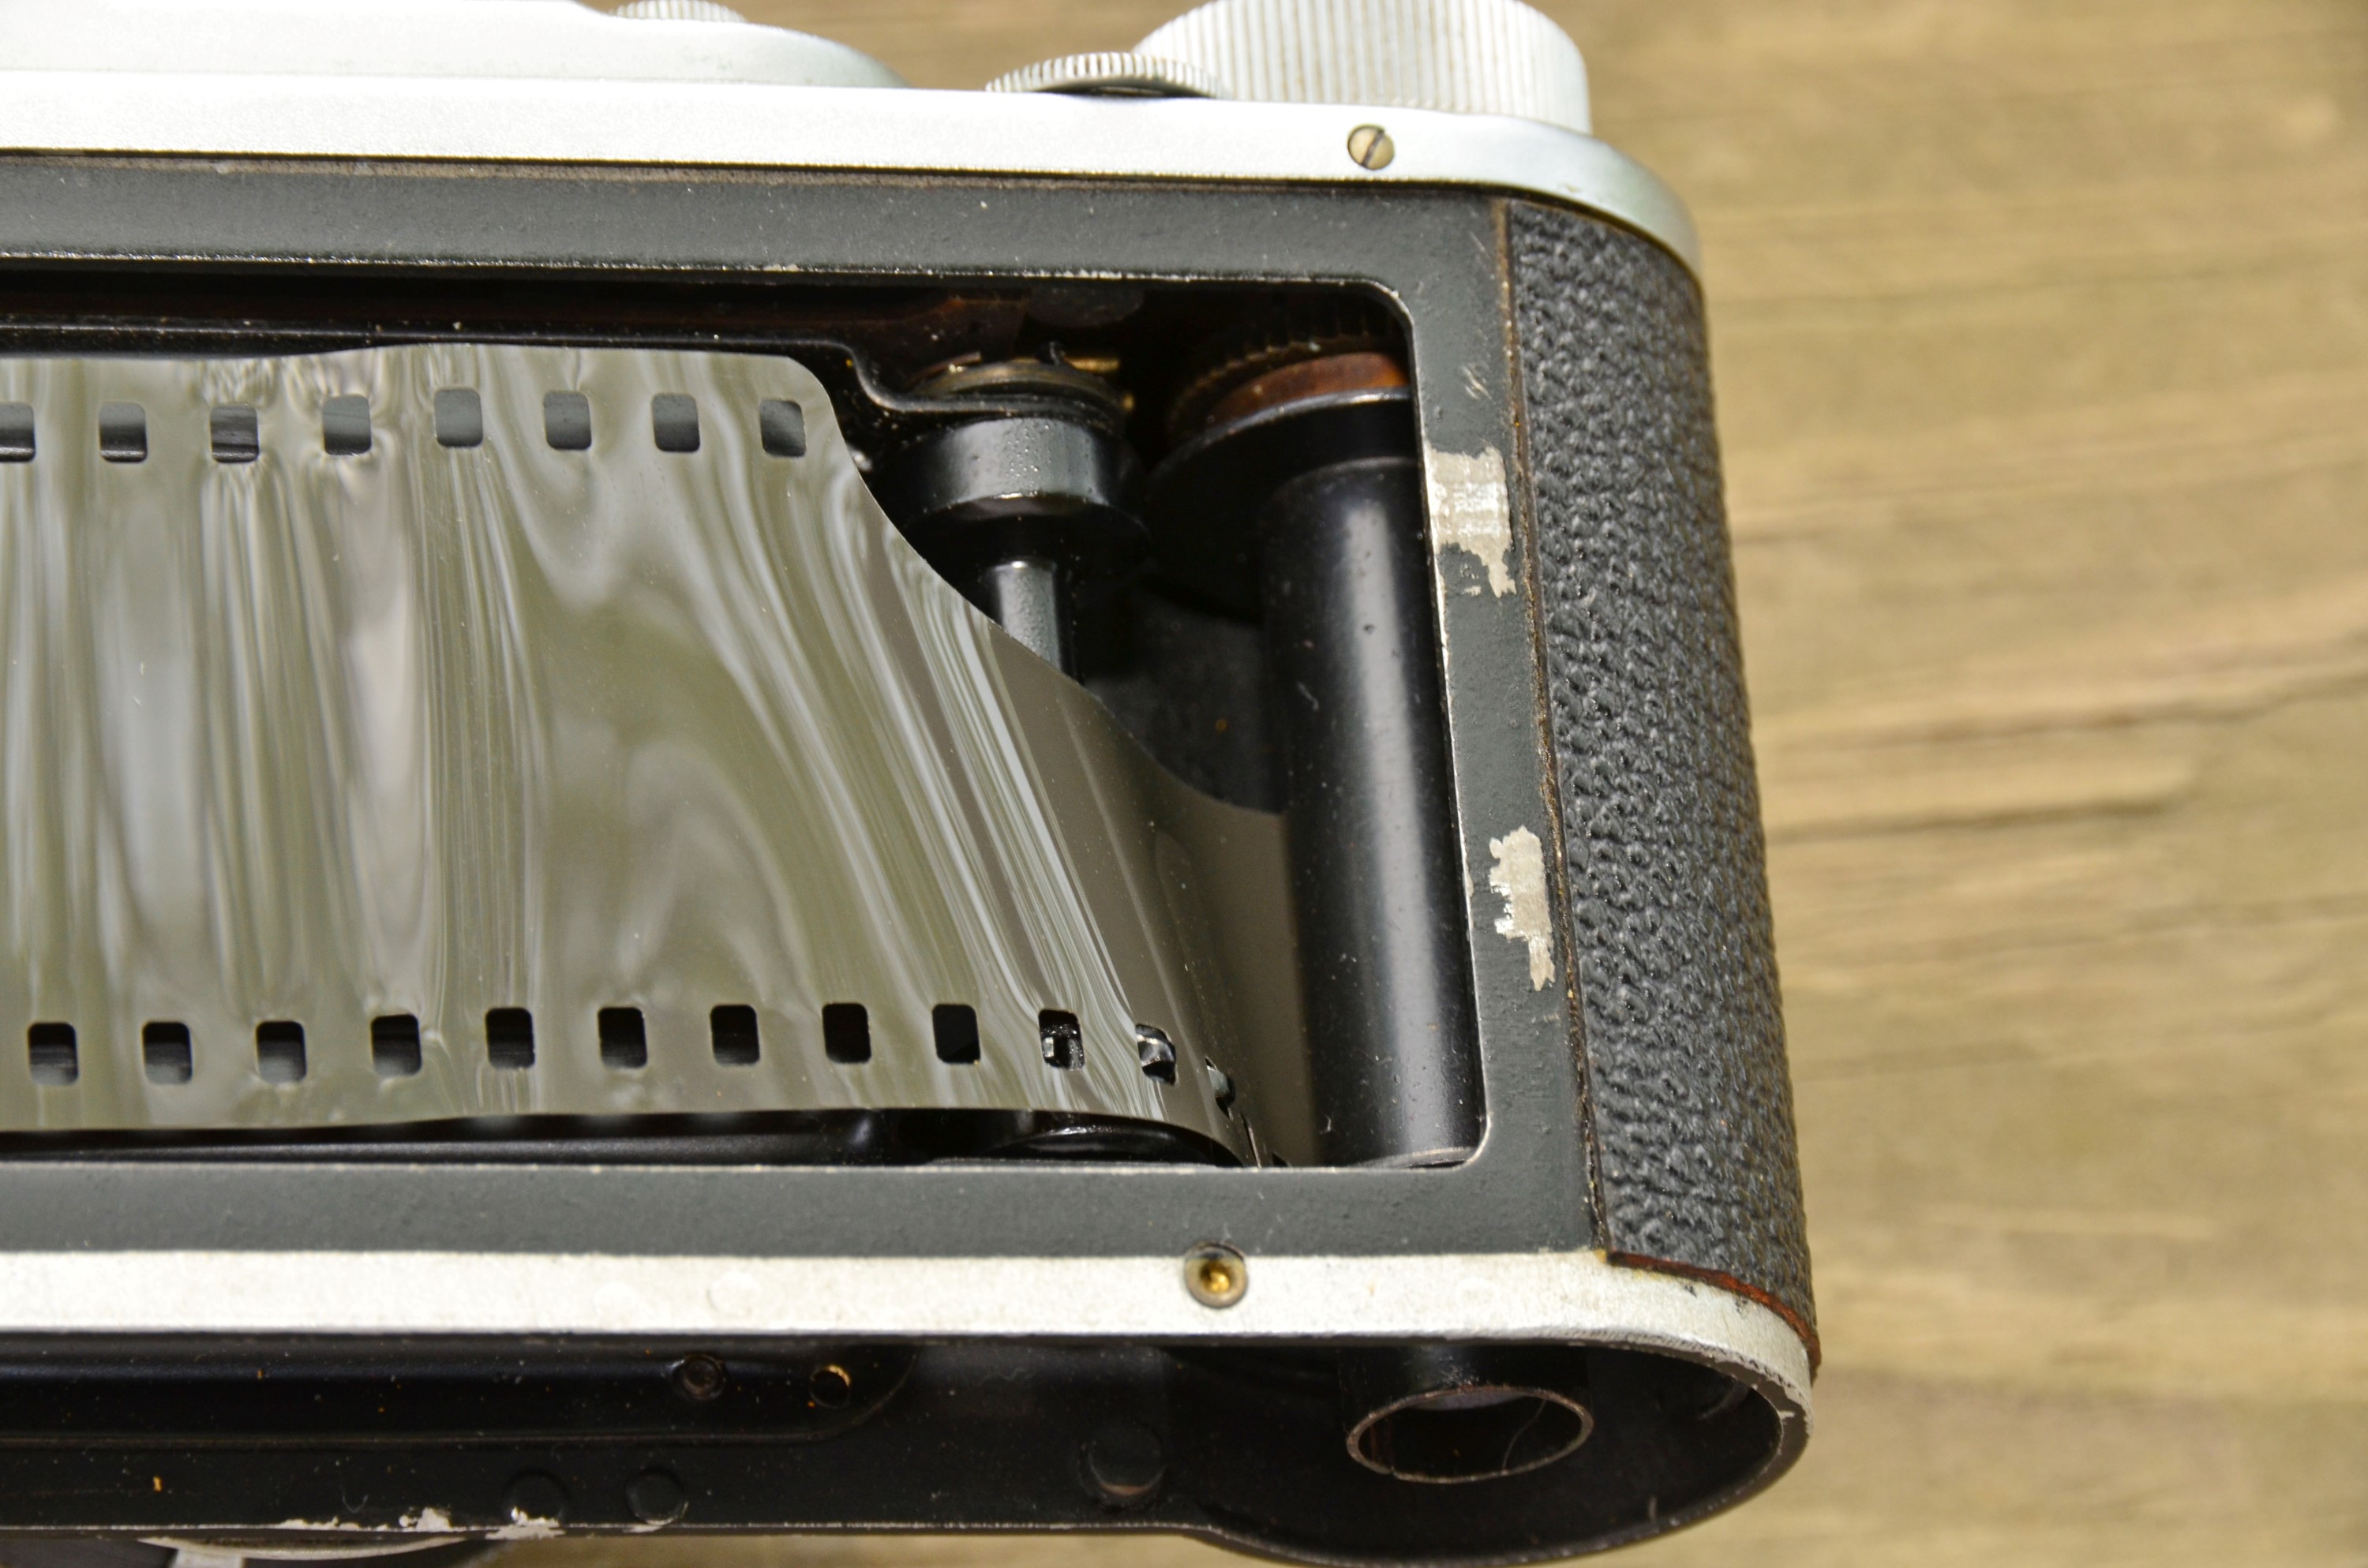 Once the bottom plate is attached, point the lens towards the floor and look through the back door of the camera and using your fingers, gently position the tip of the film leader into the slit of the take-up spool. When advancing the film, the take-up spool spins clockwise (direction of the arrows), so keep that in mind when threading the tip of the film into the slit in the take-up spool. Once the tip of the film is in position, gently line up the sprocket holes of the film so that they line up with the teeth on the film shaft. Using your left thumb, apply a very small amount of pressure where the film makes contact with the toothed shaft and take-up spool, and then using your right hand, advance the take-up spool clockwise until you are sure the film is caught.
With the door still open, gently turn the rewind knob clockwise (direction of the arrows) to take up tension inside of the film cassette. Stop when the film starts to move back into the film cassette, but do not actually allow the film to rewind. Your goal here is to simply tighten up the unexposed film inside of the cassette. Once the tension has been removed, and you are sure that the film is properly caught on the take-up spool, close the rear door and make sure it is latched shut.
After closing the rear door and assuring it is latched correctly, turn the dial with the letters “R” and “V” into the “V” position. Remember that “V” means forward, which is normal camera operation. Turn the dial until the “V” is next to the red dot.
 Advancing the film:
Like any 35mm camera, you should advance the film 2 complete frames to assure that you are past any exposed film and ready for frame 0. In order to advance the film on the Edinex, you have to release the film “catch” which is the little round disc on the top left side of the camera, to the right of the rewind knob.
If you have ever used an Argus C3 or a Certo Dollina, the film catch on the Edinex works in very much the same way. You need to turn the film catch disc counter clockwise (direction of the arrow) as far as it will go to release the catch, while simultaneously turning the film advance knob clockwise (direction of the arrow). You only need to maintain pressure on the film catch to get the film advance knob to start moving. Once you have begun to rotate the film advance knob, you can release your tension on the film catch, and continue advancing the film until it won’t go any farther.
While rotating the film advance knob, pay attention to the rewind knob. If you successfully removed all of the tension inside of the film cassette, you should see the film rewind knob spinning in the opposite direction of the arrow. When this happens, it means that the film is properly traveling from the film cassette onto the take-up spool. If you notice that advancing the film is not making the rewind knob turn, then its possible that the film leader has become detached from the take-up spool. You will need to open the rear door and attempt to secure it again. Do not continue to use the camera if you do not see the rewind knob turning when you advance the film. Doing so will mean that none of your shots will actually be captured on film.
Assuming you were able to successfully advance the film one frame, repeat the process a second time. Release the catch on the left side of the camera long enough to get the advance knob moving again, then release the film catch and continue rotating the advance knob until it stops. Once it has stopped a second time, you are at frame 0, and ready for your first shot.
The frame counter does not automatically reset to 0 like on modern cameras, so you’ll need to manually reset it yourself. Manually turn the knob until the frame counter is at 0.
As a side note, many people will want to play with a new camera to get a feel for its operation before loading any film into it. If you are pretending to follow this process without actually loading film, you should know that the film catch will not work without film in the camera. The reason for this is that the toothed film sprocket and the take-up spool are not coupled. If you are trying to engage the film catch manually, you need to rotate both the toothed film sprocket and take-up spool with your fingers to get it to engage. Also, keep in mind that the film catch also will not work in the “R” or “rewind” position. It must be in the “V” position.
Using the camera:
Shooting with the Edinex is not unlike any other viewfinder camera of the era in that the shutter must be cocked manually, and the film advanced separately. If you have successfully completed all of film loading steps above, you are already at frame 0 and you do not need to advance the film before your first shot.
Since the Edinex came with several different combinations of shutters and lenses, the physical layout of the shutter will be a little different than the one I am showing you here, but they should all work similarly.
The first thing you need to do is extend the lens tube. The tube only extends about three quarters of an inch from the body, so do not pull too hard. On my particular example, once the lens tube is extended all the way, you can lock it into position by rotating it slightly counter-clockwise. It doesn’t turn far, but once its in the locked position, the lens tube can’t accidentally be pushed back into the body.
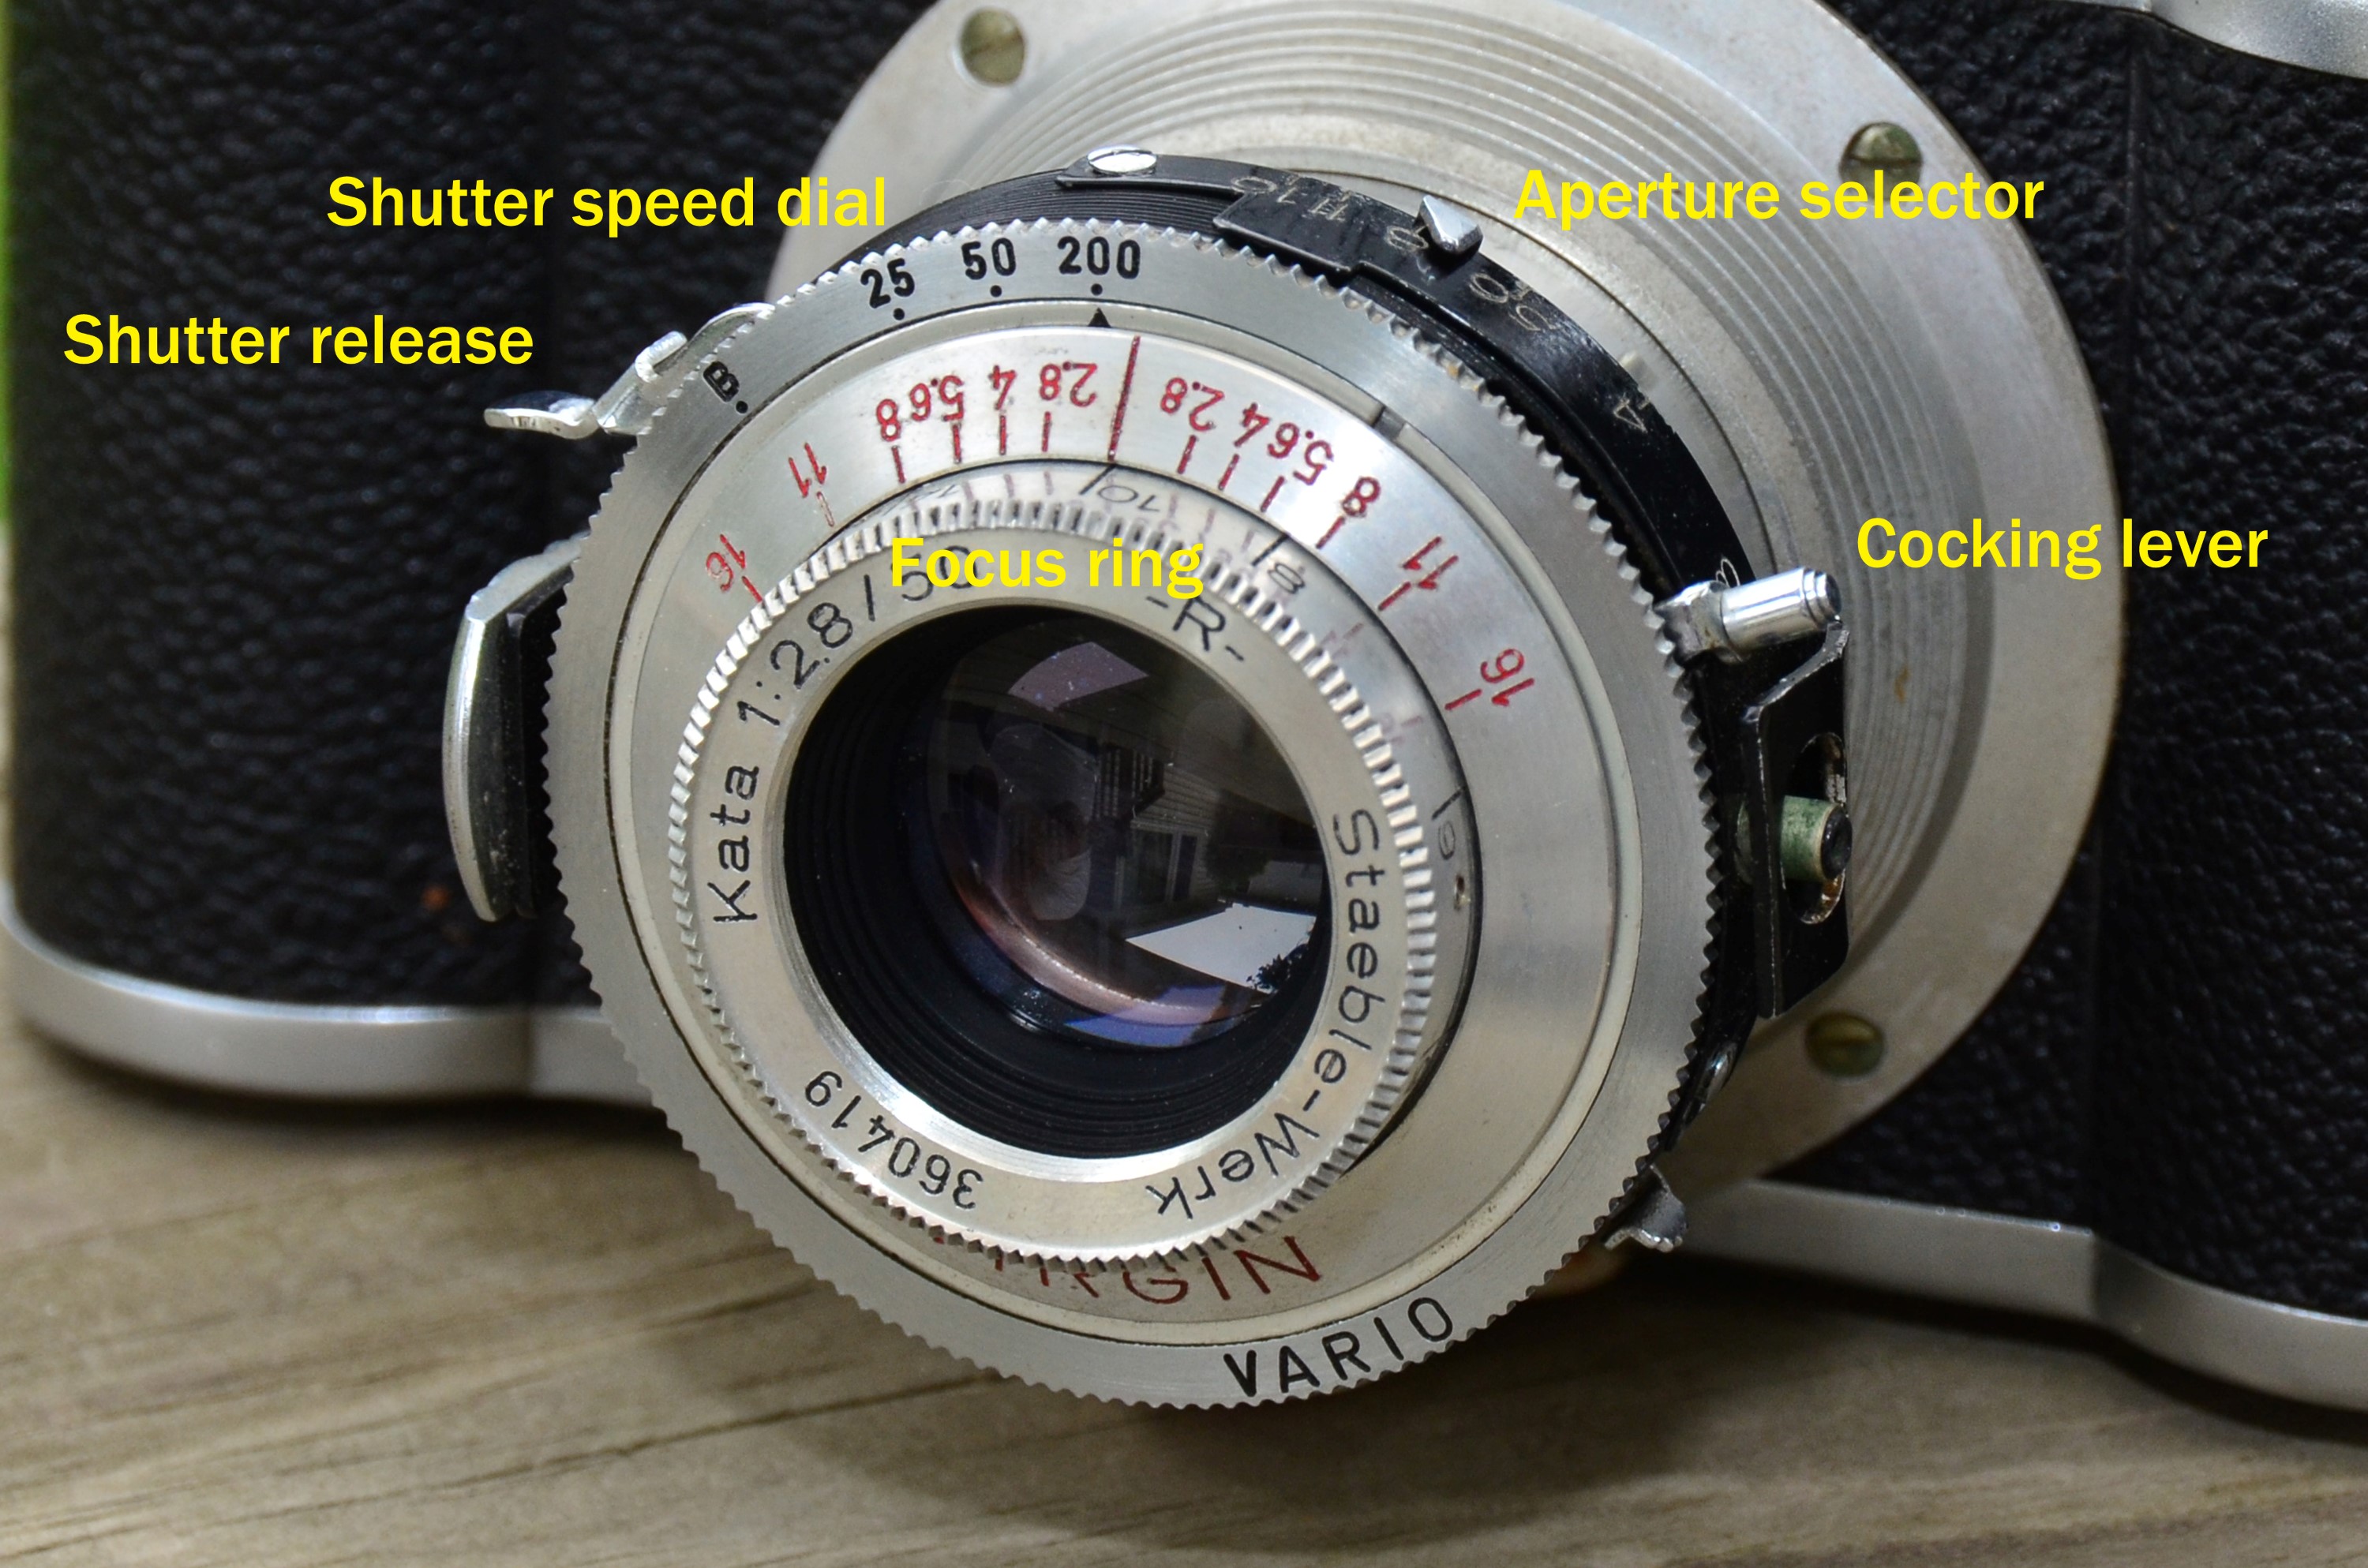 Set your desired aperture size and shutter speed by rotating the corresponding levers and rings. On the Vario shutter, the aperture selector is on the top of the shutter, and the shutter speed is controlled by the knurled ring around the entire shutter assembly. My shutter only has 4 positions, B, 1/25, 1/50, and 1/200. In the picture to the left, the camera is set to 1/200 sec and close to f/8.
Unless you have an external light meter, or are an expert at manually determining exposure, I recommend the Sunny 16 rule. Since this camera already has a 1/200 sec shutter speed, I would use ISO 200 film and shoot outdoors in bright sun using f/16, partial sun at f/11, and shade at f/8. If you feel that your shutter is slow or sticky, you need to determine how off it is. If the shutter is just barely off, you can probably compensate using a different aperture setting, but if it is off by too much, you might need to clean the shutter to restore it to proper operation. You’ll know for sure after you get back your first roll. I am fortunate that the shutter on my example was in excellent condition.
Once you have your shutter speed and aperture selected, the next step is to cock the shutter. Holding the camera with the lens facing away from you, cock the shutter by sliding the cocking lever from left to right until you hear it click.
Your camera is now ready to shoot. Assuming you are using a shutter speed close to 1/200 sec and an appropriate outdoor aperture size, you should have no problem shooting the camera handheld without introducing any motion blur. Take pictures of some objects close up, some a medium distance, and some far away.
This is a scale focus camera, which means there aren’t any focus aides like a rangefinder on it. If you are lucky enough to have an Edinex III, you can use the built in rangefinder to determine focus. My Edinex II has no such aide, so I just have to estimate focal distance. Its easiest to shoot things far away and leave the lens set to Infinity, but you should at least make an effort to shoot some things closer to you to determine how accurate the lens is.
At this point, it’s probably a good idea to double check that the lens tube is still extended all the way and in the locked position. If you are rushing yourself, or handling the camera in between shots, its possible that the lens tube could accidentally get pushed back in, which would throw off your focus.
Assuming everything is set to the way you like it, release the shutter by pressing the small lever on the bottom right part of the lens. The Edinex has a leaf shutter, and leaf shutters are often extremely quiet. If you are outdoors in a noisy environment, you might not even hear that the shutter has fired. If you are uncertain, you should be able to tell for sure by checking the position of the cocking lever. If it has returned to its original left-hand position, then you know it has fired.
After taking your first shot, you need to advance the film to the next frame. You can choose to either advance the film immediately after taking the previous shot (which is what I recommend) so that it is ready for your next shot, or you can wait to do it before the next shot. Whichever you decide, make sure you do it consistently. Its very easy to forget whether or not you already advanced the film if you dont consistently do it the same way each time, and if you do that, you risk the chance of either double exposing the previous frame (if you didn’t), or wasting a frame by advancing past an unexposed frame that you had already advanced. I guess its better to waste a blank frame, than ruin a previously exposed frame, but either way is a waste of film and money.
Unloading the film:
Once you’ve reached the end of your roll of film, you need to rewind and unload the film. The process is pretty much the exact opposite of loading the film.
Turn the dial with the letters “R” and “V” into the “R” position for “backwards” or “rewind” and then turn the rewind knob in the direction of the arrow until you feel that all of the film has been wound back into the film cassette. You’ll notice that the rewind knob is much easier to turn once the film is done rewinding. This is like on pretty much any other 35mm camera with a manual rewind crank.
Once you are sure the film is completely rewound, remove the bottom plate by turning the latch to the “A” position and pull up on the plate.
With the bottom plate removed, put your hand over the opening where the cassette is, and turn the camera right side up and give it a gentle shake and the film cassette should fall into your hand.
If you plan on immediately loading a new roll, finish the same loading procedures, but if the camera is going to be stored for a while, replace the bottom plate and rotate the latch back to the “Z” position.
My Results
I am no stranger to 1930s designed cameras. This makes 3 cameras in my collection from this era, the other two being the Argus C3 and the Certo Dollina. Although all 3 cameras look very different when placed side by side, they do have similar characteristics.
For one, they were all pioneers of the newly available 135 format of 35mm film. They were all compact cameras designed to fit in small spaces (maybe not so with the Argus), and they were all relatively inexpensive at the time. Although my Edinex does not have a rangefinder, cameras from this era had separate viewfinder and rangefinder windows. Each of them require the shutter to be manually cocked separately from advancing the film. This means that in order to prepare for your next shot, you must perform each step separately. If you forget to do both, you will double expose your previous shot. So while the mechanics of all 3 cameras are very different from each other, they all require the same mental process of composing your shot, measuring focus, measuring exposure, advancing the film, cocking the shutter, then firing the shutter, and repeating it all over again.


For the sake of saying it a another time, you have to remember to advance the film! I have double exposed a shot on each of my 3 cameras like this, the Argus, the Certo, and this Wirgin. Sometimes while shooting, I can’t remember if I advanced the film prior to shooting, so I always feel it is better to waste a blank exposure rather than ruin a previously captured shot that you might not be able to recreate.
I didn’t know what to expect when I got this camera. It came in a box free with some other stuff I got, and when I first got it, I put it on a shelf for over 6 months without touching it. After taking it off that shelf and playing with it, I thought the bottom load design was kind of cool, and I didn’t have any other cameras with a collapsible lens, so I loaded in some film and shot a roll.
Although my expectations were low, I was completely shocked at how well this camera performs. It only has 3 speeds for chrissakes! The sharpness and color definition of the shots from this camera blow away my C3. Despite it being a scale focus camera, it was very easy to shoot. Four of the sample shots above are of my son who was less than 2 years old at the time they were taken. It is hard enough capturing a shot of a moving toddler with any camera, let alone a scale focus one from 1951!
The shot of the yellow flowers has an out of this world glow to it. It almost looks like it was a digital photograph, but I assure you it is not. The other flower shot is the sharpest of any shots I took that day with multiple cameras. The one of the scoreboard and the motorcycle are perfectly exposed without any murky shadows. Even the interior shot of my son in my kitchen turned out great (although I did adjust the levels in Photoshop of that one).
I do not know if my Wirgin is representative of all Wirgins, or if I am just incredibly lucky, but based on these results, this is a brand that people should not dismiss. I truly thought this would be a one-roll-wonder and I would just put it on a shelf somewhere, but considering the excellent results, ease of use, and very compact size, I will definitely be shooting with this camera again.
Additional Resources
http://www.cjs-classic-cameras.co.uk/wirgin/wirgin.html
http://camerapedia.wikia.com/wiki/Wirgin_Edinex_series
There were Wirgin brand cameras produced in the US. One of the Wirgin brothers stayed in New York, and ran a company that imported Wirgin cameras, and also sold a Wirgin branded Craftex Hollywood reflex, and a folding camera that seems to have been produced by the same tooling as the Vokar folding camera, it was called the Wirgin deluxe, even though some versions were far from deluxe and had box camera shutters. They also sold a tiny little chrome and enamel extinction light meter.
Eliminating double exposures: with any camera with a double action shutter, cock first then shoot, get in the habit of winding the film immediately after taking each picture. That way, no doubles.
I really love my Wirgin Edinex. I have an antique camera store near where I live and I think I only paid $35 for it with the case. It takes absolutely wonderful pictures. I do have about 85 cameras that I collect all from the 30s 40s and 50s but this one is particularly fun to shoot. I have an altix that loads from the bottom as well and it also has the back door so after using both of these cameras loading film is really not that hard. The main difference is my altix is a 24 x24 so it takes 50 frames off of a 36 exposure 135. If any of you out there thinking of getting a point shoot camera in 35 m m this Edinex is the one that I would try to find. Lot of people like the C3 bricks but this is more fun . It’s small, and has some weight to it and is very well built. You really can’t go wrong with this.