


As my collection of old cameras grows, I feel as though I have learned a few things along the way. There are many sites on the ‘net from people like me who collect and talk about their cameras, so I thought it might be beneficial for anyone considering getting into this hobby to hear my thoughts on how to start building your own collection.
As with any hobby, its important to know that this can get addicting…and expensive! There have been thousands and thousands of different models of cameras made over the years, and many of them are available on the used market, but the prices fluctuate wildly.
So, lets begin!

Contents
Types of Film (and What to Avoid)
Camera Skill Levels
Types of Cameras
Buying Cameras on eBay
Problems You May Encounter
First Things to Do After Getting a New (Old) Camera
Developing
My first bit of advice is to figure out whether or not you want to buy and use these cameras, or simply display them on a shelf. The number of people shooting film has significantly decreased in the last 15 or so years, but there is still enough of a loyal following that it is still possible to get film cheaply. You have to decide if you want to be one of those people who just hoard cameras and keep them on a shelf, or if you’ll plan on taking them out every once in a while and using them for their intended purpose.
…my first bit of advice is to figure out whether or not you want to use these cameras, or simply display them on a shelf.
If you have no interest in actually using old cameras, then by all means go hog wild and just buy anything you think looks cool. However, if you want to shoot film, you need to be a little more discriminate.
Types of Film (and What to Avoid)
Not including instant film formats like Polaroid and a couple very obscure formats that are hard to find and extremely expensive, there are two primary formats of film that are still readily available.
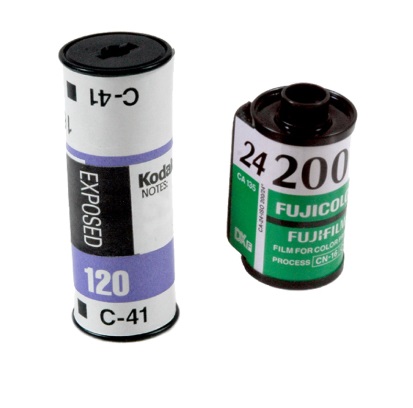
35mm film (also known as 135 format film) – This is the most common and most popular type of film ever made. It was released by Kodak in 1934 and has been used in millions of cameras sold all over the world. When it was released, it was revolutionary because it gave photographers a foolproof way to easily load film into cameras in daylight, and the film remained protected in a felt lined cassette after it was exposed.
You can usually find 135 format film locally at places like Walmart and some drug stores. Single rolls of 135 film usually sell for $3 each and you can often find 4 packs of it for about $10 – $15. For the rest of this article, any time I say “35mm film”, I am referring to this 135 format.
120 roll film – Of all the different types of roll film made over the years, 120 film is the one that still survives today. Originally introduced by Kodak in 1901 for use in their No.2 Brownie box camera, it came on a metal (now plastic) spool backed with paper allowing it to be loaded into a camera in daylight. Roll films have the advantage of not having a set aspect ratio, so depending on the camera used, exposed negatives can be in a variety of aspect ratios, including square. 120 film is often referred to as “medium format film” since it is larger than 35mm film, but smaller than the original plates of film used in “large format” cameras. A single 6×9 frame on 120 film has an exposed negative size that is 56mm x 84mm, which is over 5 times the size of a single negative on 135 format film, thus allowing for much more detail in the exposed image.
120 roll film is less common than 35mm film, but it is still readily available from Amazon, Adorama, B&H, or pretty much any online site that caters to photographers. These places typically charge between $6 – $10 per roll.
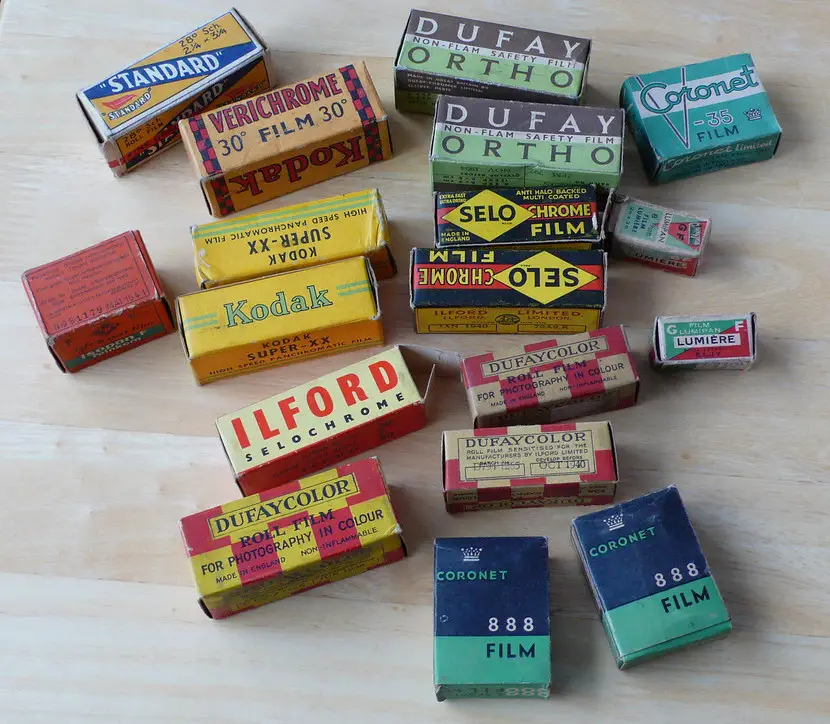
Over the years, there have been many formats of film which are either no longer made, or extremely hard to find today. If properly stored in a cool environment, many types of old film can still be used well after it’s expiration date, and you can still find some extinct formats of film on eBay. For the purposes of this article, we’re going to focus only on cameras designed for 35mm or 120 format films.
Wikipedia has an excellent list of all types of still film formats which have been used over the years. Rather than repeat the entire list here, I’ll focus on the more common types that you’ll encounter when searching for old cameras.
110 cartridge film – This film was often used in very small pocket cameras and children’s cameras in the 70s and 80s. It was a type of 16mm film that came in a cartridge that you would insert into the camera. The cameras that used this type of film were often very basic and uninteresting, and not very appealing to collectors.
116 / 616 roll film – This was a popular type of roll film used by many companies in the early part of the 20th century. Many Kodak box and folding cameras used this film and can be converted to use 120 roll film with an adapter. 616 film is almost the same as 116 film except it came on a thinner spindle for use in smaller cameras. If you are creative, you can use 120 film in cameras designed for 116 or 616 film, but it requires either making an adapter, or rethreading new film onto old spindles in a dark room.
126 roll film – This was one of the largest formats of roll film used in early folding cameras and it was discontinued in the late 1940s. Cameras designed for this type of film are display pieces only.
126 cartridge film – I have no idea why two completely different types of film were released with the same name, but in the 1960s, an easy load format of film was introduced as 126 Instamatic film. Inside was regular 135 format film, but it came in a plastic cartridge similar to 110 film and was designed for small, cheap, and relatively uninteresting cameras.
127 roll film – This type of film is still available today, but it is a boutique format often hand rolled film cut down from other film stock onto 127 spools and is only available online. As of this writing, rolls sell for about $12 each. While you would still be able to shoot a camera designed for 127 film, since its so uncommon, supplies could disappear suddenly and become extinct again. There are also some 127 cameras such as the Yashica 44 TLR which can easily be adapted to use 35mm film with a couple of small modifications.
220 roll film – 220 is actually the same exact thing as 120, except the rolls are twice as long and it doesn’t have backing paper. Because of the lack of backing paper, 220 cannot be used in cameras designed for 120 as the film compartment needs to be completely sealed from stray light. As far as I know, any camera that could take 220 film, could also take 120 film, so you would just use that. There are a couple of places online that sell 220 film, but its easier to just use 120.
APS or 240 film – APS (or Advantix) film was introduced in 1996 as a smaller and more advanced replacement for 135 film. Its biggest benefits were that it supported a variety of aspect ratios including panoramic, and it was supposed to be easier to store as the developed film would remain in the container as opposed to 135 film which wasn’t. The biggest problem with APS film was that 35mm had been around for so long, photographers didn’t immediately embrace it, and by the time it barely started to get popular, digital photography was on the rise and there was no longer a need for a replacement for 135 film. APS film was officially discontinued in 2011. Since the oldest APS cameras are still only 15 years old, they generally are not very collectible.
620 roll film – Like 220, 620 roll film is basically the same thing as 120 roll film, except it came on thinner spools. Kodak used 620 film on many of their cameras in the middle of the 20th century. Since the only difference is the spool size, it is possible to use 120 film in cameras designed for 620 film by cutting down the 120 spool to make it fit. There are a few 620 cameras like the Argus Seventy-Five which can accept 120 spools on the supply side, but not the takeup side. If you have an empty 620 spool, you can shoot a roll of 120 in the camera without having to modify anything. I have successfully respooled 120 film onto 620 spools, but you need 2 empty 620 spools to do this. Otherwise, 620 film is no longer available.
828 roll film – 828 uses the same exact film stock as 135 format film, except that it is a roll film format with no sprocket holes and it is wound on spools instead of in a cartridge. It was also much shorter than a typical roll of 135 film, typically allowing for only 8 exposures per roll. 828 film was used in mostly lower end cameras in the 1940s and 1950s, but by the 1960s it had fallen out of popular use. It is possible to respool 135 format film onto 828 spools in a dark room, but the sprocket holes will be visible in the exposed images.
An alternative to re-spooling 35mm film onto 828 spools is to cut 120 film (or any other larger roll film) down to 828 size. Fellow camera enthusiast Adam Paul explains this process on his site.
Disc Film – In the 1980s, a disc based film format was introduced in which 15 images could be exposed on a round disc of film. The film was self contained in a plastic cartridge which greatly simplified loading. This format was often used in children’s cameras, and was not a serious film competitor. This format of film would otherwise be considered an oddity, except that it was relatively popular, so many disc based cameras are still available for sale, and some collectors may desire them because they remember them from their childhood.
Plate, Sheet, or Large Format Film – The earliest types of cameras made in the 1800s used plate film in which a single frame is contained on a piece of glass. Later cameras that used single sheets of film are also known as Large Format cameras, and while these are very neat cameras, they are very large, extremely expensive, and not easy to use. While there is definitely a dedicated group of people who collect large format film cameras, it is not something I have ventured into, and therefore is beyond the scope of this article.
Half Frame 35mm – Half frame cameras such as the Universal Mercury II or Olympus Pen series do not use any special type of film. These cameras use regular 135 format 35mm film, but the shutter opening is about half the size of a standard 35mm exposure. This means that you can get more exposures per roll of film. The total amount of exposures is usually a little less than double the normal amount of exposures because of the space needed for frame spacing between each frame.
So now that we’ve covered the common types of film that you’ll most likely encounter when searching for an old camera, we need to decide what type of camera you buy.
…cameras are just tools. It is up to the photographer to capture a great picture.
First, you must decide your level of skill in operating a specific camera. I have invented my own skill level system which measures the appropriate skill level you’ll need to operate the different types of cameras that are out there. It is important to distinguish the difference between the skill level of a camera, and the skill level of the photographer because cameras are just tools. It is up to the photographer to capture a great picture. A skilled photographer can capture just as great of a picture with a Level 0 camera as he or she could with a Level 5 camera.
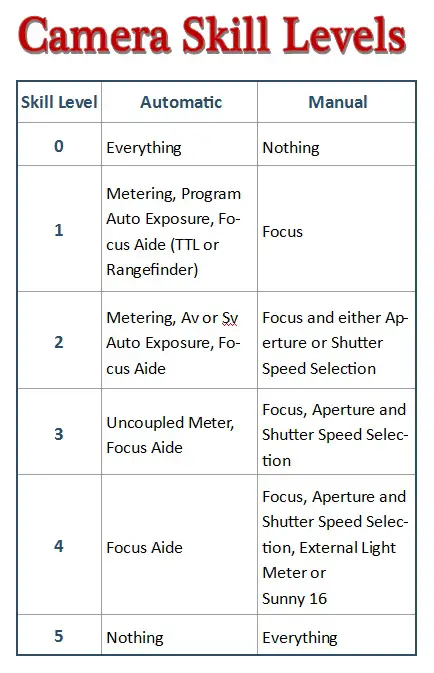 Level 0 – I would consider any modern digital or any film camera with Auto Focus to be skill level 0. Auto Focus cameras first became available in the early 1980s. Using electronic sensors inside of the camera, the camera has the ability to detect the subject of your shot and automatically adjust the lens so that your image is in focus. These cameras have fully Automatic modes which measure exposure, set shutter speed and aperture size for you, they decide if a flash is needed or not, and in the case of digital cameras, they even set the white balance for you. Level 0 cameras may have manual modes which allow you to disable many of the automatic features of the camera, requiring you to choose the correct settings.
Examples: All digital and point and shoot cameras from the 80s and 90s
Level 1 – A level 1 camera is one without the ability to automatically focus, but everything else is done for you. Manual focus cameras that still measure exposure and everything else are often called “Program” cameras. Program cameras allow you to disable many of the automatic features, but otherwise the camera does everything other than focusing for you. When you have to manually focus a camera, it slows down the process of shooting a picture as you need to spend more time to make sure your exposed image is going to look good.
Examples: Nikon FG and FA, Canon A-1 and AE1 Program, Pentax Super Program, Olympus OM-2S Program
Level 2 – These cameras have the ability to automatically set shutter speed or aperture size, but not both. The earliest type of auto exposure cameras came out in the 1960s and used some type of light meter inside of the camera to measure exposure. The camera would take the information from the light meter and automatically set aperture size or shutter speed. Cameras that automatically set aperture size are called ‘Shutter Priority or Sv Mode’, and cameras that automatically set shutter speed are called ‘Aperture Priority or Av Mode’. Even though these cameras greatly help the photographer get the exposure correct, they still require some understanding of shutter speeds or aperture sizes to complete the process of taking the picture. Many cameras made between the mid 60s and the late 70s fall into this category as they had some type of light meter on them, but weren’t capable of fully automatic Program modes.
Examples: Olympus OM-2, Nikon FE and EL2, Canon AE1, AV1, Canonet Rangefinders, Yashica Electro 35
Level 3 – This level of camera has a light meter which can still measure correct exposure, but the camera cannot automatically set anything on its own. A level 3 camera either uses a moving needle, called a match needle, or on later models a series of LEDs which are visible in the viewfinder that will tell you if your choice of aperture size and shutter speed will result in an accurately exposed shot. Sometimes the meter is uncoupled, which means that the reading coming off the meter is independent of the aperture or shutter speed setting on the lens. Level 3 cameras are often the most basic camera with any type of electronics in them. Often, Level 3 cameras only need a battery for the meter, but will still function with a dead or missing battery. Some cameras have a light meter that uses selenium cells which don’t require any power at all, and as such do not need a battery for anything.
Examples: Nikon FM, Pentax K1000, Yashica TL Series, Yashica Mat 124-G, Kodak Retina III
Level 4 – These cameras do not offer any type of exposure metering at all. Level 3 cameras with broken or inaccurate meters would fall into this category as well, since the light meter is useless. When you’re using a camera of this type, you must rely either on an external light meter, or something called the “Sunny 16” rule which is a set of guidelines that help you estimate the correct aperture and shutter speed settings. It sounds complicated, but for me, this is where antique cameras get interesting. 50-100 years ago, photographers didn’t have any modern aides to help them set things like focus or exposure and they needed to rely on their experience to get the right shot. I think that part of the appeal of using an old camera is trying to simulate the same conditions that photographers of these eras had.
Examples: Argus C3, Kodak Retina I, Yashica Mat, Leica and Contax clones of the 40s and 50s
Level 5 – A level 5 camera is the most basic type of camera there is. It offers absolutely no type of help whatsoever, not even focus, to get the shot correct. SLR and TLR cameras allow you to look through a lens to “see” what the film will see, and you use that image to set your focus. Rangefinder cameras have a system of moving mirrors which help you set the correct focus, but when you get to a Level 5 camera, there is nothing, nada, zip. You have to rely on pure experience, or a measuring tape to measure how far away your subject is from the camera, and then you set the focus on the lens. This type of focus is often called scale or viewfinder focus. Taking pictures with a Level 5 camera is an overwhelming prospect for novice photographers, and something that you can only learn with experience.
Composing your shot, measuring focus, and setting the correct exposure on the camera takes time, and there is a high chance you won’t get it perfect. Making things worse, since we’re talking film here, you won’t even know if you got it right until you get your film developed. The appeal of a Level 5 camera however, is in the reward you get when you receive your developed film and you get the shot right. While it is always satisfying to take a nice photo using any level of camera, when you get that perfect shot with a Level 5 camera, you really feel like you accomplished something!
Examples: All Box and most Viewfinder and Folding Cameras
If you choose to go with an easier to use camera and think that the prospect of owning a higher level camera seems intimidating, give it time. As you master your camera, you might find yourself looking forward to the challenge of a higher level camera. As I mention in the Level 5 description, a huge part of the appeal of using old cameras is the satisfaction you get when you receive your film back and you get some nice pictures out of it.
Also, despite what you may think, film is extremely forgiving. Although it would seem that mastering shutter speeds and aperture sizes is a requirement to get a properly exposed shot, you would be surprised at how much variance you can have and still get a nice shot. Black & White film is even more forgiving than color, so as long as you’re in the ballpark with your exposure settings, your pictures will still look nice.
…film is extremely forgiving. Although it would seem that mastering shutter speeds and aperture sizes is a requirement to get a properly exposed shot, you would be surprised at how much variance you can have and still get a nice shot.
Now that you know what types of film to look for, and you have an idea as to what skill level of camera is right for you, you need to decide on which type of camera to buy.
 SLRs – The first SLR camera was released in 1936 by a German company called Exakta. These early SLRs bore very little resemblance to a “modern” SLR as they lacked a prism for eye level viewfinders, and required a manual reset of the mirror before and after taking your shot. SLRs remained a small niche type of camera until the mid to late 1950s when Miranda, Asahi Pentax, Zeiss-Ikon, and eventually Nikon released more advanced features that brought them more in line with what is now considered to be an SLR camera. By the late 1960s and early 1970s, they became the camera of choice for many professional and amateur photographers. The SLR style of camera continues to this very day in digital form as the choice of camera for people wanting more features than a simple point and shoot camera offers.
The primary design element of an SLR camera is a mirror inside the body of the camera behind the lens which reflects the image from the lens towards a single viewfinder in the back of the camera centered above the lens. Whenever you hear the term “reflex” when talking about a camera, it means there is a mirror involved. All but the earliest examples of SLRs have a prism behind the viewfinder which corrects the orientation of the reflected image so that the photographer sees an exact replica of what the lens sees. This allows the photographer to see through the lens (often abbreviated as TTL) and get an accurate representation of the focus, exposure, and framing of the image before the shutter is released.
SLR cameras almost always feature interchangeable lenses which made them very appealing to professional photographers in the 60s and early 70s. Of any camera company, Nikon has the longest running mount of any interchangeable lens maker. Nikon’s F-Mount lens system was designed in 1959, and is cross compatible with almost every camera they’ve made ever since. You could buy a brand new 2015 model DSLR, and attach a Nikon lens from the 1960s and it would physically work. Although Canon has had a successful range of SLRs over the years, a change to their mounting system in the 80s renders older lenses incompatible with their newer models.
If you are looking for your first film SLR, I recommend starting with one of the following Level 2 SLRs:
Canon AE1 or AV1 – These two cameras are very similar except the AE1 is a shutter priority model with full manual capability, and the AV1 is aperture priority with limited manual capability. Both are from the same era, accept the same lenses, and are capable of the same quality of shots. The AE1 is significantly more popular so you’ll have an easier time finding one, but because people know they’re popular, they can often go for higher prices. Despite the AV1 being just as good of a camera, not as many people want them, so when they show up, they often sell for less, so you have a better chance at scoring an AV1 for cheap.
Nikon EM, FE, or EL2 – All 3 of these cameras are aperture priority auto exposure models made by Nikon. Of the 3, the EL2 is the oldest, but it has features like mirror lockup and compatibility with non-AI lenses that you might appreciate later. The EM model was considered an entry level camera in its day, and although it was very successful, prices for them are still very low. The FE was probably the most popular of the 3 and as such, the most of them will be available. All 3 of these cameras are easy to use, capable of great shots, and can use pretty much any Nikon lens ever made (except DX digital lenses).
Minolta XG or XD Series – In 1977, Minolta released a new series of compact manual focus SLRs called the XG and XD series. The XD was a higher end series and offered more advanced features, but even the basic XG7 is a great little shooter. I personally own one and find it just as capable of a shooter as the already mentioned Canon and Nikon SLRs from the same era. Stay away from older Minoltas as they lack auto exposure modes and need mercury batteries. These cameras aren’t as popular with collectors, so there is a really good chance you should be able to find one for really cheap. Make sure you get one with a lens as there aren’t as many Minolta mount lenses to choose from.
Olympus OM-2 /2N and OM-4 – When Olympus released the OM series cameras in the early 70s, they were revolutionary because of their small size and excellent viewfinders. The OM-2 was released in 1975 and was the first one with aperture priority automatic mode. The camera was re-released with some new features as the OM-2N a couple years later. Then in the 80s, the top of the line OM-4 was released and while thats a great camera too, it usually sells for a bit more. If you can find an OM-2 or OM-2N in good shape for cheap, buy it!
Most SLRs were designed for 135 format 35mm film, but there are some higher end models that use 120 film. Most SLRs have interchangeable lenses, but otherwise are still a solid bodied camera. There were a few exceptions to this, like those made by Mamiya, Bronica, and Hasselblad which are completely modular. These cameras can not only swap lenses, but the viewfinder and film backs are interchangeable, which offers a large combination of camera designs and features.
SLR cameras most commonly are Level 0 – 3 cameras, although the very first models would have been a Level 4 camera. Because of their widespread popularity, ease of use, and robust supplies on the used market, a classic film SLR is often a good starting point for someone entering this hobby.
 Rangefinders – A rangefinder camera is any camera that uses a device called a rangefinder to assist the photographer in measuring the distance to an object. Rangefinders can come in coupled and uncoupled varieties, but the coupled are much more common. The concept of a rangefinder dates back to naval navigation devices used in the 1700s. They use a system of moving mirrors to measure distance between two objects.
Rangefinder cameras are considered to be any solid bodied camera with a rangefinder added. A solid body camera without a rangefinder is called a viewfinder camera. There was a time when rangefinders were added to folding cameras, but I will cover that later.
Initially, rangefinders were an accessory that was usually fitted to the ‘shoe’ on top of the camera. Cameras with integrated rangefinders began to appear in the 1930s. In these early days, cameras were often sold with and without a rangefinder, the latter being the higher end model. They maintained their popularity as the dominant type of camera until the 1970s, eventually falling out of favor to SLRs. Although rangefinders are still made today, they’re more of a niche product.
Rangefinder cameras have been made which use many different types of roll film and 35mm film. You’ll need to make sure that the model you are considering utilizes a format of film still available.
Despite some opinions that rangefinders are a “lesser” style of camera compared to SLRs, they still offer several advantages. Since a rangefinder neither needs a mirror or a prism inside of the body, rangefinders are often smaller and easier to handle than SLRs of the same era. In addition, the lack of a moving mirror means they are often quieter. Inside an SLR, there are sounds from several moving parts each time the shutter is released, whereas a rangefinder only has the sound of the shutter moving. Furthermore, since most rangefinders have “leaf” shutters, they are often very quiet when firing, which is helpful when the photographer is trying to be discreet.
Yet another advantage of not having a mirror is that you will never lose sight of your subject before, during, and after you release the shutter. In an SLR, the mirror blocks the viewfinder at the moment the shutter is released. This means in an SLR, you cannot see your subject at the instant the photo is captured.
Finally, most rangefinders, especially the later models, have viewing windows that are large and bright. This makes them much easier to focus than SLRs, especially in low light. Shooting indoors in poor light is much easier using a rangefinder than looking through an SLR and trying to “see” focus.
One downside to rangefinders is that many of them have fixed lenses with no zoom capabilities. This means that you are stuck with a set focal distance, and if the lens is of poor quality, you are stuck with it. For the rangefinder models that did have interchangeable lenses, the selection is often small, and they require an accessory viewfinder for composing the shots accurately.
Another downside is that because the rangefinder isn’t actually looking through the lens, what you see when you focus and compose your shot, isn’t what will actually be exposed on film when you release the shutter. This isn’t a big deal when shooting objects more than a few feet away from the camera, but when doing closeup work, special care must be taken to accommodate the difference between the viewfinder window and the camera lens. Also, because composing does not involve looking through the lens, a common mistake is that photographers will forget to remove the lens cap, or they may partially block the lens with their hand while taking pictures.
If you’d like to try a rangefinder (and you should), a good place to start is with one of these models:
Yashica Electro 35 (G, GS, GSN, GT, GTN) – There are several variants of the Electro and they’re basically all the same with only minor changes. All of them feature the same extremely sharp f/1.7 Yashinon lens and excellent viewfinder. The biggest knock to the Yashica Electro is that it requires an unavailable mercury battery, so you need to buy an adapter so that you can use a modern 6v battery. Once you have a working Yashica Electro, you have yourself a camera that is easy to use and takes excellent pictures. While there are many articles online proclaiming how good these cameras are, they still go for relatively cheap prices online. You can very easily find one in good working condition for under $50, and sometimes even $25.
Canonet Series (S, QL17, QL19) – Canon released a series of excellent rangefinders and gave them the name Canonet. The QL17-III is the holy grail of the series, and as a result, sells for the highest price. If you’re looking for a bargain, look for the older S model, or even the QL19 which has a f/1.9 lens instead of the f/1.7 in the QL17. Both lenses are capable of great shots and are easy to use.
Konica Auto S2 and S3 – Both of the S2 and S3 were excellent examples of late 60s / early 70s rangefinders and these models are even less popular than the Yashica Electro and Canonets, so you should have no problem finding one for cheap. The S3 is a more compact model, so if you have smaller hands, you may prefer that one more. Both the S2 and S3 use mercury batteries, but unlike the Yashica Electro, no adapter is needed, just get a PX625 (for the S2) or PX675 (for the S3) equivalent and you’re ready to go.
Rangefinder cameras belong in Levels 2 – 4, the most common of which are 2 and 3. Most people who were born in the 1970s or later have never used a rangefinder. They may find them appealing to use because they are different enough from any camera they’ve used before, but still can be extremely easy to use. Many of the later rangefinders also came with sharp lenses that are capable of excellent shots. In my review for the Yashica Electro 35 GS, I state that the camera is so easy to use, that you could hand it to a stranger, give them a 30 second tutorial, and they’d be able to immediately take great shots.
 TLRs – TLRs predate the modern SLR by about 20 years and were the first cameras designed to utilize the concept of Through the Lens (TTL) photography where what you see through the viewfinder is what you’ll get on film. They sold well through the 1960s, by which time SLRs claimed the interest of professional photographers.
Although the name Twin Lens Reflex makes it sound like a TLR would look similar to an SLR, the opposite is true. TLRs are often large rectangular cubes with a viewfinder on top of the camera and two lenses prominently located on the front, directly on top of one another. Due to their size, TLRs can be very heavy. The Mamiya C33 from the mid 1960s weighs almost 5 lbs without any accessories. Most TLRs did not have interchangeable lenses, but there were some exceptions.
The photographer usually holds the camera at waist level and composes their shot while looking down into the viewfinder from above. Holding the camera at waist level gives the photographer a different perspective than holding it at eye level. Since we are accustomed to seeing the world through our eyes, pictures taken at waist level add a uniqueness to scenes that otherwise would look ordinary. This is especially useful when shooting pictures of animals or small children who are closer to the ground.
When looking through the viewfinder, the image is inverted on the Y-axis which means left is right and right is left. This can be a little difficult to get used to the first time you use a TLR, but you should get the hang of it quickly. Some TLRs did come with eye level viewfinders, but due to their larger size and increased weight, they can be difficult to hold at eye level for long periods of time.
Most European and Japanese made TLRs were designed for 120 roll film, but some models used 127 film. You can usually tell if a TLR uses 127 film if it has the number ’44’ in the name. This indicates that the camera takes smaller 4cm x 4cm pictures. Also, some models had adapters which would allow 35mm film to be used, but these adapters are not common. Most Kodak and some other American designed TLRs were made for 620 film.
Like SLRs, the biggest advantage of a TLR is that what you see in the viewfinder is what you’ll get on film…almost. Unlike an SLR which uses a moving mirror to reflect the image from the lens to the viewfinder, the mirror in a TLR does not move. When the photographer looks through the viewfinder, he sees an inverted version of the subject coming through the top (or viewing) lens. When the shutter is released, the light entering the bottom (or taking) lens is exposed to film. Since both lenses are physically connected to one another, changing focus moves both lenses equally, which is how the shot is composed, but since the viewing and taking lenses are actually different lenses, very small differences can appear on film. Since most TLRs are not capable of extreme closeup work, this isn’t much of a problem, but it can be on cameras like the Mamiya C-series which is capable of macro photography.
Many of the advantages of a TLR are similar to the advantages of a rangefinder in that they usually use very quiet leaf shutters with few moving parts. The photographer can always see the subject of their shot before, during, and after firing the shutter without a moving mirror temporarily blocking out their subject. Also, because there is no mirror, when the photographer presses the shutter release button, the shot happens almost instantaneously. There is no “shutter lag” due to the mirror like in an SLR. Because the photographer is looking down into the camera, rather than at a subject, TLRs are useful when shooting a subject that you don’t want to know is being photographed. Another cool use for TLRs is that you can hold the camera above your head and shoot above an obstacle like a crowd at a concert.
During the prime of their popularity, TLRs were almost always expensive higher end cameras with limited appeal to the average person, so as a result there are far less examples out there on the used market. TLRs remain popular with collectors today because they are very distinct looking and shooting with them is unlike shooting with any other style of camera. Finally, since these cameras were often high-end cameras, they usually came with excellent lenses, and since they use roll film with larger negatives, they are capable of extremely detailed photographs.
When people start collecting cameras, a TLR usually is not the first type you buy, but they can often be the second or third. Finding a good TLR for a cheap price can be difficult, so I won’t bother recommending Rollei or Mamiya based TLRs, but there are still many other ones out there that are just as good. Yashica made an excellent line of TLRs starting with the Yashica D. They made a whole line of Yashicamat TLRs that are excellent shooters. The most popular is the Yashica Mat 124G. This was the last model they made and the “G” means that all electronic components are gold plated. As you might imagine, this drives the prices up pretty high, but the 124G really isn’t any better than the other models. I recommend reading this site to learn about the differences in all of the Yashica TLRs.
Since TLRs were aimed at higher end photographers, they didn’t need to rely on electronic aides such as auto exposure control, plus they were already starting to fall out of favor by the time these technologies became common. Only the later models had exposure meters, but none that I know of had auto exposure control, so that means TLRs fall into skill levels 3 – 4.
 Viewfinder or Scale Focus – There can be a little bit of confusion as to what is technically considered a viewfinder camera. I consider it to be any solid bodied camera that isn’t an SLR or TLR, and does not have a rangefinder for focus assistance. Folding cameras could also be considered viewfinder cameras, but since they do not have a solid body, I consider them as part of their own category.
These type of cameras use scale focus which is basically a fancy way of saying “its up to the photographer to measure the distance to the object being photographed.” Viewfinder cameras were common from the 1920s through the 50s. Many viewfinder cameras were still made well after the 1950s, but these usually came with fixed focus lenses aimed at the very low end of the market, or children.
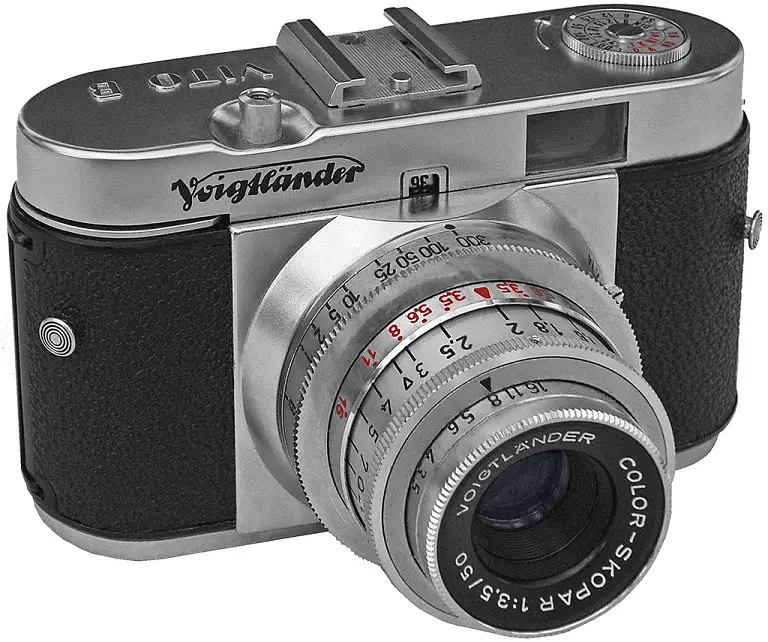
Just because a non rangefinder camera is considered to be a viewfinder, does not mean they were all low end. In fact, some viewfinder cameras contained some of the best lenses available. The Rollei 35 is an excellent example of a high end viewfinder camera. Many German companies like Zeiss-Ikon and Voigtlander made several models of viewfinder cameras with state of the art shutters and lenses.
While these cameras don’t have the benefit of automatic anything, some viewfinder cameras did have an uncoupled light meter, but none that I know of had automatic exposure so that means that viewfinder cameras are either Skill Level 3 or 5.
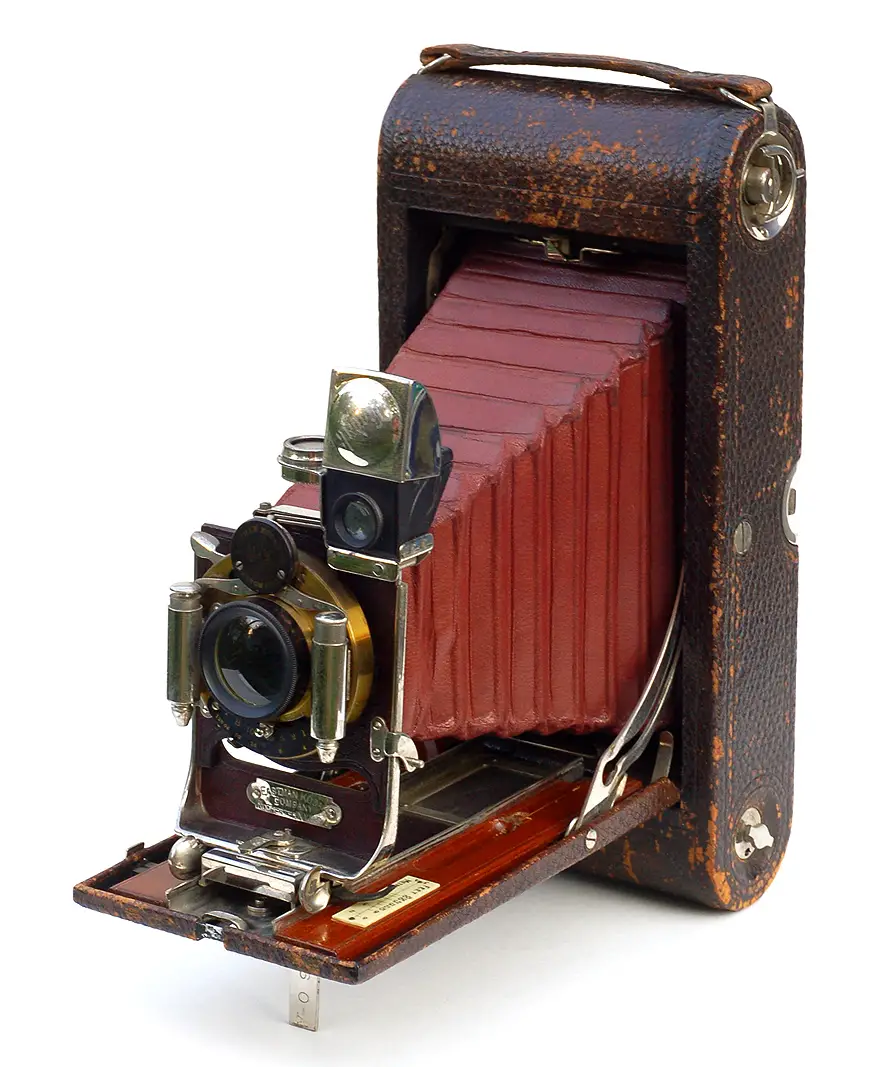 Folding Cameras – Folding cameras came in many shapes and sizes and span a large range of years. The two attributes of a camera which define it as a “folder” is that it must fold, and that it must have some type of bellows system to retract the lens or lens assembly.
Some of the earliest cameras from the end of the 19th century were folding cameras. Kodak, ANSCO, and Agfa released many types of them over the first few decades of the 20th century. With the release of 135 format film in 1934, folding cameras decreased in size and remained popular through the 1960s.
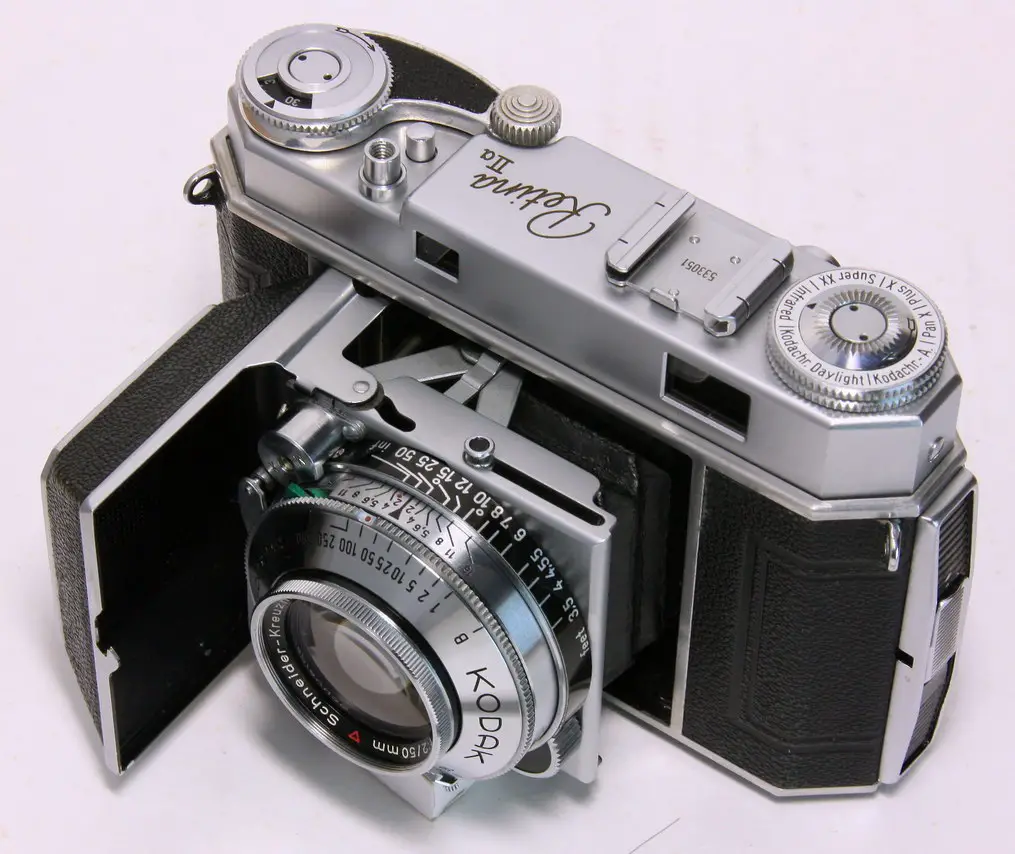
Starting in the 1930s, some folding cameras came with rangefinders to aide in focusing. These rangefinders were often uncoupled, which means you would use the rangefinder to determine the distance to your subject, but you would still need to manually change the focus on the lens by hand. Later folding rangefinders did have coupled rangefinders, but these were typically German made 35mm cameras like the Kodak Retina and the Certo Dollina.
A benefit of folding cameras, especially the 35mm ones, were that when they were folded, they were very compact and fit easily into a pocket or a purse. A folded Certo Dollina, which was introduced in 1935, is smaller than pretty much every camera made with the exception of the Rollei 35 from the 60s, and point and shoot compact cameras of the 80s and 90s.
 The earlier folding cameras were often very basic models with two element lenses. They usually had primitive shutters with one or two speeds. While their optics do not compare to later cameras, they are still capable of good pictures. Due to their age however, folding cameras often are in various states of disarray, especially the bellows which often degrades over time. Cameras with leather bellows usually are in better shape than the ones that came with cloth or other synthetic materials, but the good news is, there are still places that make replacement bellows for most antique cameras.
The later folding cameras however, could have top of the line shutters and great lenses, so there is a huge variety in this style of camera.
Folding cameras remain popular with collectors due to their antique appearance. Many old folders were originally designed for extinct film types, but people enjoy them as display pieces. For the ones that use 120 and 135 format films, they are a fun type of camera to shoot with. The later German made ones are capable of just as good of shots as any other camera mentioned here.
Since some folding cameras do have rangefinders on them, they are both a skill level 4 and 5 type camera.
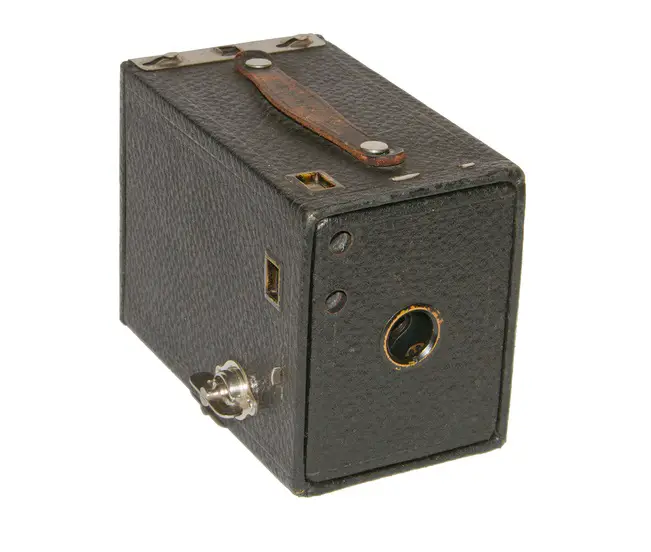 Box Cameras – We tend to think of cameras as pretty advanced devices with precision optics, gears, levers, and other things. On the contrary, all a camera really has to do is focus light onto film, and that can be accomplished by a box, a hole, and some film.
Box cameras were common in the late 1800s through the 1930s. They get their name because, well, they look like a box! Some early examples were even made out of cardboard.
Box cameras usually have two viewfinders, one for shooting vertically, and one for shooting horizontally. A box camera almost always has a primitive shutter with an “instant” speed, and a “bulb” mode which allows the photographer to keep the lens open for longer exposures. The shutter is usually nothing more than a spring loaded flap of metal. Inside of the box camera is a chassis made out of wood or metal that holds the roll film spools. There is usually going to be a crank or a knob on the outside of the camera for advancing the film.
As primitive as they sound, shooting with a box camera is actually not that difficult. The photographer looks through one of the viewfinders to compose their shot. Because most box cameras use a single element lens, focusing is not required. Anything within a specified range of distance will always be in focus. The photographer estimates light using a chart that usually would come with the camera. Once everything is set, the shutter release exposes the film and then the photographer advances the film to the next frame.
Although many companies made box cameras, hands down, the most common are the Kodak Brownies. Kodak used the “Brownie” name on many cameras over the years, but the earliest examples are all box cameras.
As you might guess, box cameras are 100% manual and are a level 5 camera.
While I could probably subcategorize some of these major types, or even include some other obscure camera formats, these are the major types you’ll find out there. As a general rule, stick to the camera skill level you feel comfortable with and decide on the type of camera you want from there.
Now that you have an idea of what film types to avoid, what skill level of camera you need, and the major types, the next step is to actually find one. Before you begin your search, one thing you really need to keep in mind is that ALL vintage cameras will have some type of issue. It could be something very minor like a scuff on the leather, or some dust inside of the lens, but it is unrealistic to get any old camera in truly mint condition. Even if you found a camera that has never been used, and is in its original packaging, the oil used to lubricate the insides of the camera probably has thickened over time causing things to move stiffly.
While you’ll probably hear stories of the rare estate find, or the guy who found a $1000 camera at a garage sale, the most common way to buy an old camera is through an online auction site like eBay.
For the purposes of this article, I am going to assume you have a basic understanding of how eBay works. I assume that most people have at least tried it once and understand their feedback system.
…you should decide what is the maximum amount you are willing to spend before you make your bid. Once you have a dollar amount in mind, place your bid and then walk away.
eBay has two categories for old cameras, they are:
Electronics -> Cameras & Photo -> Film Photography -> Film Cameras
Electronics -> Cameras & Photo -> Vintage Movie & Photography -> Vintage Cameras
eBay has a bad reputation with many people for a variety of reasons, but the selection of cameras that are constantly available is overwhelming. At any given time, you can find almost any model of camera ever created for sale. If the model you want isn’t listed, just wait a couple of days and check again, and the odds are it will show up for sale. As I am writing this, there are 38,895 in Film Cameras and 35,877 in Vintage Cameras for sale. That’s over 74,000 different cameras all for sale at once.
A common reason for why some people do not like eBay is because they feel the prices are too high. This is definitely something that I see a lot. The appeal of an online auction for some people is getting things for a good price, but those same people often lack the self control to stop bidding when the prices get higher than they originally wanted to spend.
My personal belief is that you should decide what is the maximum amount you are willing to spend before you make your bid. Once you have a dollar amount in mind, place your bid and then walk away. Don’t sit there staring at the auction. If you win it, you win it, but if not then that means someone was willing to pay more than you. As I said earlier, if an auction gets away from you, just keep looking for another. In most cases, there are many other auctions with the same camera for sale.
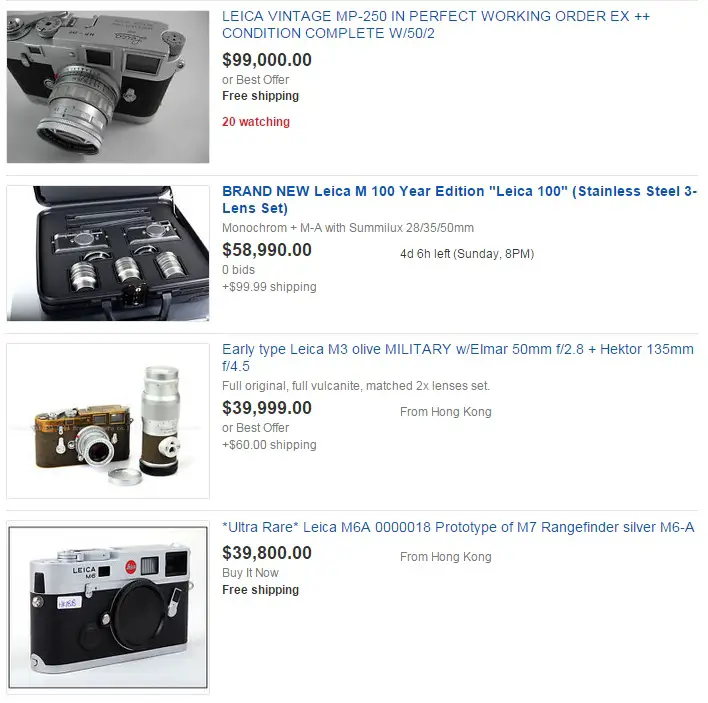
I want to take a moment for a small reality check here. I started off this article saying that buying old cameras can get expensive, and that prices fluctuate wildly. While many makes and models of cameras are available for bargain prices, there are a few brands that for one reason or another, are extremely expensive no matter what.
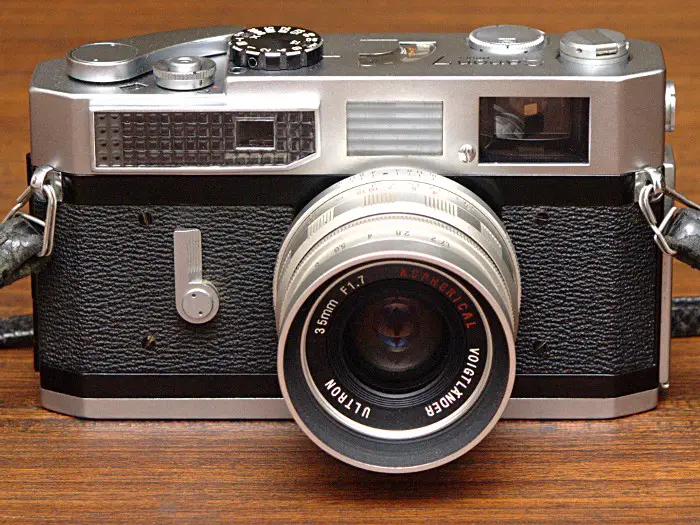
Leica, Contax, Rollei, and Hasselblad cameras always sell for crazy high prices. Many variants of these cameras like the original Nikon S-series and the Canon 7 are also ridiculously expensive as well.
There are some collectors who probably won’t agree with me, but in my opinion, while these are all examples of well made cameras, their price does not justify the results you’ll get with them. These are “luxury” cameras that you buy to add prestige to your collection. If you were to print out 10 pictures taken with a top of the line Leica and 10 more with a Canonet QL17 and asked 10 people to tell you which ones were the Leica and which were the Canon, I bet they wouldn’t be able to do it.
I would never tell anyone how to spend their own money, but in my opinion, its best to focus on other brands and not even think what you might be missing by not having a Leica in your collection.
One last tip about price, is that when you spend more on an old camera, keep in mind that it is still old. Unless the seller has guaranteed that it works or that it has been professionally serviced with a CLA, spending $10 on a 50 year old camera carries the same risk as spending $1000 on a 50 year old camera.
Contrary to what a lot of people say, I believe that the vast majority of people selling things on eBay are honest people who are not trying to rip you off. Buying an old camera on eBay is not any different from buying anything else on eBay. I’ve found that eBay sellers fall into one of three categories.
The Knowledgeable Seller – The knowledgeable seller knows what they are selling. Either it is a camera they’ve personally used, or they’ve tested it and can vouch that everything in the listing is accurate. This type of seller often takes the time to post several high quality pictures of the camera being sold, along with a detailed description of its condition, including any problems it may have.
Sometimes a Knowledgeable Seller will state that a camera has had a CLA. CLA stands for “Cleaned, Lubricated, and Adjusted”. Its a common term used with camera collectors to indicate that a camera has had a professional servicing, and you can be reasonably sure that the camera is in good working order. While a camera with a CLA is a good thing, it often increases the selling price of the camera by a large amount.
Buying a camera from a knowledgeable seller is almost always a safe bet. The downside is that because they know a lot about the camera they are selling, they usually know what its worth and will ask an appropriate price. What you lose in terms of bargain pricing, you will gain in the peace of mind that you are getting a camera that’s exactly as advertised. You’ll be able to use it immediately, and assuming you didn’t over pay, you are getting a camera for roughly what it is really worth.
The “I Don’t Know Anything About This Camera” Honest Seller – This is the most common type of seller on eBay. Old cameras are rarely ever sold by their original owners. Even if an old camera has stayed in the family of the original purchaser, often the person selling it never used it. If they did, its likely that they haven’t done so in a long time. Because there are so many different types and models of cameras, very few people who sell online have the knowledge level to fully operate or test a camera. Plus, the only way to truly verify a camera is 100% operational, requires someone to take the time to shoot a roll of film and develop it, which just isn’t something the average seller is going to do.
Most sellers of this type will do their best to describe the camera as much as possible and will post nice pictures. However, due to their lack of knowledge about the camera, sometimes they get their facts wrong. Often, a seller will copy and paste information they found from a similar camera, but the specs might not match the camera they are actually selling. I’ve seen cameras listed with incorrect info about the lens, or facts about a different variant of the same camera, or even the wrong name of the camera altogether. This doesn’t necessarily mean the seller is dishonest or trying to rip you off, it just means they don’t know any better. If you have any questions, just contact the seller and ask. A good seller will respond back to you with clarifying info. If they do not respond, then there’s a chance they are hiding something. Sometimes you can use these errors to your favor if their error undersells the features of the camera.
I have no problem buying a camera from a seller like this if they put some effort into the listing. Plus, this is where you use eBay’s feedback system to your advantage. Use common sense and look at the rating of the seller. If you see that they have hundreds or even thousands of positive feedback from other buyers, chances are, they’re not going to rip you off. eBay requires that if a seller sells something that is in working condition, that they offer to accept returns. I have had two examples where I bought a camera from a reputable seller and when I received it, it wasn’t as I felt it was described. In both instances, I contacted the seller and explained what was wrong, and both times the seller refunded 100% of my purchase price, including shipping, and they let me keep the bad camera.
The biggest problem with this type of seller, is that their price ranges can be all over the place. While it is possible to score a camera for a cheap price, often this type of seller will list the starting price on a camera considerably higher than what they are worth. I’ve seen dirty and heavily worn Argus C3s selling for $50 – $100. Ive seen Yashica Electros and Canon AE1s in fair to poor shape start at more than $100. All 3 of these cameras are extremely popular and can easily be bought in good condition for $25 – $50, sometimes even cheaper.
When trying to determine an appropriate starting bid for a camera, it really helps to search for sold auctions for your type of camera and see what other people have paid. If you see that a camera has a selling price considerably higher than what others have sold for, don’t buy it. Cameras come up for sale so often, its highly likely that there is another you can bid on.

The Scam Artist – Sadly, there are people like this out there. Sometimes the scam artist isn’t necessarily lying in the description, but they are hiding behind the principle that they can play dumb and there’s not a whole lot you can do about it.
This type of seller may purposely leave off things they know are bad about a camera. They’ll either post out of focus, or poorly lit images of the item they are selling with little to no description. They’ll say the camera is “As Is” with no statement of warranty. You can still buy a camera from a seller like this, and its possible the camera will work fine, but you should do so at your own risk. If you see an auction that looks suspicious, but its a rare model you really want to try out, only spend as much as you’re willing to throw away in the event the camera doesn’t work.
Some auctions qualify for eBay’s Hassle Free Returns policy, but the seller does not have to allow this. Even if they don’t, you may still return the camera, but only if what you received is not as described in the listing. If you buy a camera that is not in the condition the description said it was, you can attempt to recover your money from eBay by filing a complaint, but this can take a while.
Even with the most reputable sellers on eBay, there is always an element of risk. One thing working in your favor is that many of the more popular cameras were built to last and can still function decades after they were made. The vast majority of times, I receive cameras in good working condition. Even when a camera does have an issue, its usually not a dealbreaker and they are still capable of taking good shots.

While it is important to remember that a camera listed as being in good condition may not work when you get it, the opposite is true as well. Many times when an honest seller says the camera doesn’t work, it’s because they don’t know how to use it. On some cameras, the shutter may not fire because it needs to be cocked, or in the case of the Mamiya C-series, the shutter won’t fire if there is no film in the camera. Kodak Retinas have a frame counter that counts backwards, so often a seller will list that the frame counter is broken, when in reality, it has reached ‘1’ and needs to be reset.
Many cameras made in the late 1960s and later had electronic shutters that will not work without a good battery. Many cameras from this era used mercury batteries which are no longer made. Although there are almost always modern equivalents to these mercury batteries, they are not readily available, so a seller may list a camera as not working simply because he or she does not have the correct battery to test it.
As you become more familiar with the different makes of cameras, you’ll know what their common issues are, and if you find a listing where the seller describes something as broken or missing, you may be able to use this to your advantage to get a good deal on the item.
Fake Leicas
It is kind of ironic that there is a market for fake cameras out there when so many cameras of the 30s, 40s, and 50s were copies of other cameras. Perhaps the most copied camera of all time is the 1930s and 40s Leitz Leicas, specifically the Leica II and III models. Camera makers from the former Soviet Union, Japan, United States, England, and even China all made cameras heavily designed (and in some cases nearly identical) to those original Leica models.
All of these copies had the same 5 characteristics as the original Leica:
- Solid body camera with a coupled rangefinder
- 39mm diameter screw lens mount with approximately 1 mm pitch (often referred to as the Leica Thread Mount)
- 28.8 mm film to lens flange distance
- Uses 35mm 135 format film
- Cloth focal plane shutter
So while many of these “Leica copies” are genuine cameras made by their corresponding manufacturers, in recent years a black market of “Fake Leicas” has spawned. Most of the time, these fake Leicas are either early FED or Zorki cameras modified to look like Leicas. The problem is, that these counterfeiters have gotten pretty good at copying the look and feel of a real Leica. It’s to the point where many people have been fooled into buying a real Leica, when in reality, it was a fake.
There are several articles out there helping collectors identify a real Leica from a fake, including this one by Rick Oleson. And while there are many minute details that you should look for to 100% confirm an authentic Leica, I can tell you that from experience, there are usually two very easy ways to tell if you have a real Leica or not.
- Engravings with things like ‘Luftwaffe’, ‘Berlin 1936’, ‘Berlin Olympics’, swastikas, or any other Nazi markings on the top or front plate of the camera. No Leica ever came from the factory with any of these kinds of markings. They are all done by counterfeiters later to capitalize on German Nazi history. These cameras are almost always Soviet made Zorkis or FEDs who have had their top plates sanded smooth and new engravings added.While it is plausible that one time, one person took a real Leica and engraved a swastika or something of the sort into the camera, this would have been a one off by some miscreant and would probably have been done by hand. The engraving would look sloppy and unprofessional, and it would be highly unlikely that person would actually remove the real Leica markings from the camera.These fakes often have a ‘raw brass’ or polished brass look to the body and lens as well, and while it is possible to encounter a real Leica that has had it’s original chrome plating stripped away, its far more likely that any non-chrome Leicas are probably fakes.Finally, Leicas of this time period almost always still have their original Vulcanite covering. If you see any with red leather, wood veneer, or snakeskin body coverings, they are almost always fake. Yes, its possible to re-cover a real Leica, but most anyone with the real thing who wanted to restore their Leica would choose something much more original looking and not something like lizard skin.
 Fake.
Fake. Fake.
Fake. ….yep, its fake.
 -
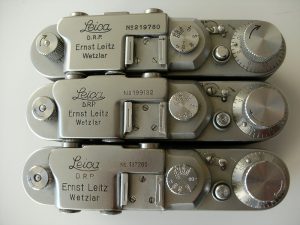
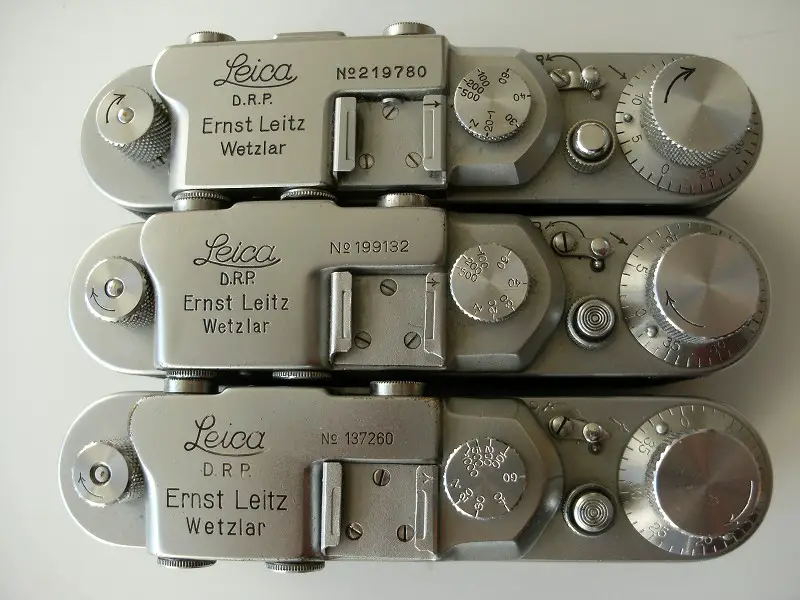
Only the top camera is a real Leica. The other easy way to tell if a Leica is real or not is to look at the top plate. There are often two very glaring differences between fake and real Leicas that can be spotted by a novice. They are the gap between the accessory shoe and the top plate, and the top ridge on the front of the camera right above the middle rangefinder window.
On real Leicas, the gap between the accessory shoe and top plate is very narrow and tight. On Zorkis and FEDs, this gap is much larger and more curved.
On real Leicas, the top ridge is always straight across where the top plate meets the front plate right above the middle rangefinder window. On Zorkis and FEDs, the top plate bulges out a bit.
Look at the picture to the right and you can see that only the top camera is a real Leica. Notice that gap is narrower and the top ridge is straight.
Of course there are other tell tale signs as well, such as the inconsistency of the engraving between the Leica logo and the serial numbers. Notice on the middle and lower cameras to the right, the serial number is not only a different font size, but the engraving itself does not appear to be consistent.
Sometimes the serial numbers themselves do not even match up with the body style that the camera is trying to be. There are differences in the size of the viewfinder windows, and the position of some of the controls such as the focus lever on the lens, and the selection of shutter speeds, but these often require the careful eye of a Leica expert to truly see.


I have no doubt that fake Leicas will continue to be made, and the counterfeiters will probably get better and better at disguising the identity of the original cameras, so its possible that one day it is much harder to tell the difference, but I feel safe in saying that the two things mentioned above are good enough giveaways to identify the vast majority of fakes.
One last thing I should add is that while its a travesty that people try to pass off these fakes as the real thing, that even the fakes themselves still do have some value. The Zorki and FED cameras that these fakes are based off, were actually decent cameras to begin with. Rarely do any of these counterfeit modifications impact normal usage of the camera. You could very well take any of the fakes shown above, put some film in them, and still use them to shoot some wonderful pictures. Just because something is fake doesn’t mean it can’t still be used, but the buyer should be forewarned and informed of what it is before plunking down money for one.
As you start collecting cameras, it is inevitable that some of them will have problems. The good news is that many of these problems are easy to correct. A slow or sticky shutter might just need to be fired a couple hundred times to loosen it up. As a camera sits for decades, the original lubrication can thicken, and in some cases, all it needs is to be used and it will loosen back up. In the event a camera does need some extra TLC, many simple repairs can be done by someone with no experience repairing cameras.
The Argus C3 has the nickname of the “Ford Model T” of cameras because of how easy it is to disassemble and repair. I can vouch for this as I completed a full CLA of my own C3 and now it works perfectly. I successfully disassembled and repaired a Certo Dollina II with a jammed film advance using nothing more than a set of precision screwdrivers, Q-tips, and rubbing alcohol. There are many collectors of these old cameras, and if you do a basic level of searching, you can often find advice on how to fix common problems. Many times, a simple wipe down and detailing of the camera is all they need to be in good working condition.
…is it completely unrealistic to expect any old camera to be flawless. There are going to be some problems.
While there is a wide range of problems that cameras could have, I’ll break those problems down into the most common types, what you should look for, and whether they’re a deal breaker or not.
Dust, haze, scratches, mold, or fungus in the lens – Any time you look at an old camera, you should try to get some information about the state of the lens. As I said earlier, is it completely unrealistic to expect any old camera to be flawless. There are going to be some problems. Almost all lenses will have some degree of dust, haze, or scratches on or in them. The majority of external dirt or smudges can be wiped off using a soft cotton cloth and some lens cleaner. If you see some dirt particles inside of the lens, don’t worry about them. Most small pieces of dirt or dust will not show up on the exposed picture. Several of my cameras have dust inside of the lens, and they still take excellent pictures. Haze is a little more tricky depending on where in the lens it is. External haze can usually be wiped off just like dust, but other times it can be in between two lens elements.
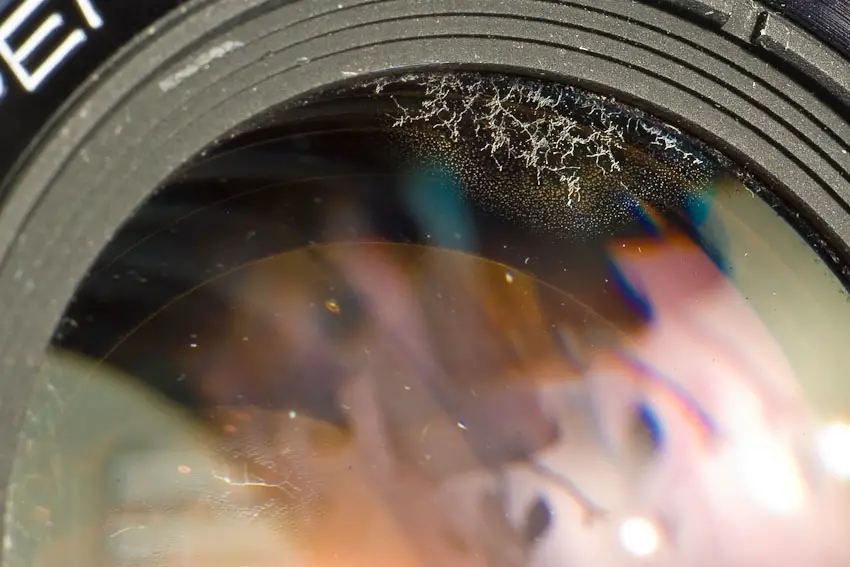
Mold and fungus however, is more critical. Lens fungus looks like little pieces of hair “growing” inside of the lens, usually starting at the outer rim of the lens and working its way inward. Fungus can also grow in spots on the surface of the glass as well. All mold and fungus is very difficult to clean because it involves opening up the lens to get to the inside elements. Even if you are successful at opening the lens and cleaning out the fungus, most fungus etches the outer coating of the lens away, leaving traces of it forever. While small amounts of mold or fungus may not show up on exposed negatives, both are caused by moisture getting into the camera. This is almost always caused by the camera not being stored properly. If the lens shows signs of mold or fungus, chances are that the camera will have other moisture related issues. I generally stay away from cameras with lenses that have mold or fungus.
Slow or sticky shutters – There are two primary types of shutters, the leaf shutter and the focal plane shutter. Leaf shutters have several blades that look like flower petals inside of the lens. A focal plane shutter is made out of metal or cloth, and it is right in front of the film window in the back of the camera. Most SLRs and all Leica or Contax rangefinders (original and copies) have focal plane shutters and everything else has a leaf shutter. Although leaf shutters have a higher chance of being slow or sticky, any kind of old camera can suffer from this problem.
The reason a shutter becomes slow or sticky is almost always because the original oil used to lubricate the shutter mechanics has thickened into a sticky goo that causes the shutter speeds to be off. This is almost always more noticeable on slower shutter speeds, like those under 1/30 of a second. You can usually buy a camera with sticky slow shutter speeds and use them outdoors with faster shutter speeds of 1/50 a second and higher with no problem. It’s not until you get into indoor and low light photography where this will become a problem. If you buy a camera where only the slow speeds are off, but everything else about the camera is in good condition, you can probably just keep using it and remind yourself to never select those slow speeds.
If the camera has a leaf shutter and you find that all shutter speeds are off, or if the shutter continually sticks open after it should have closed, it is possible that there is dirt or goo on the shutter blades themselves. This is a common problem on the Canonet series of rangefinders and can only be resolved by disassembling the lens and cleaning the shutter blades directly using lighter fluid or naphtha oil. Although this isn’t as hard as it sounds on many cameras, it’s something that many people don’t want to attempt, so if this is the case with your camera, you’ll either need to have it professionally serviced, or avoid buying it altogether.
In minor cases, sticky shutters can resolve themselves simply by using the camera, but when this doesn’t work, the only way to truly correct the problem is by disassembling the camera, cleaning off the old lube, and replacing it with something new. This is often beyond the scope of most people, so if you are truly invested in using your particular camera, you’ll need to have it professionally serviced.
Damaged Cloth Shutters – Many Rangefinder and SLR cameras from the 1930s through the early 1980s came with a focal plane shutter made out of a rubber coated cloth material. Minor wrinkles in the curtain material usually won’t pose a problem, but over time holes and cracks can appear in this material causing light to leak through the shutter. This is common with older Leica clones, especially Former Soviet Union cameras like FEDs and Zorkis.
Sometimes, small holes or cracks can be repaired using black fabric paint but this is only a temporary solution. The only true repair of a damaged curtain is to replace it, which can be cost prohibitive depending on the model and make of the camera.
Another problem with cloth curtains is that they are attached to rollers inside of the camera using fabric ribbons which can break. A broken curtain ribbon is usually easy to detect because the curtain will fall out of position or become crooked inside of the camera.
If the camera you are considering has a cloth shutter, you should ask about the condition of both the front and rear curtains. Sometimes the front curtain is OK, but the rear curtain is damaged, so you need a statement about the condition of both curtains.
Inaccurate or non working exposure meters – Cameras with a skill level of 0 – 3 have some type of electronic exposure meter in them. Older models will have a selenium meter which does not require a battery while newer ones will have a CdS meter that is battery powered. Selenium meters are notorious for losing their ability to detect light over time. If you get a camera that has a selenium meter, there is a very high chance it doesn’t work. Even if the needle moves when pointed at a light source, chances are the readings are so far off they are not useful to you. CdS meters however, have a much higher chance of working. If you buy a camera with a CdS meter, you can easily test it using a modern digital camera. Set both cameras side by side pointing at the same subject. Set the film speed on the digital camera to match the film you are using in the film camera and then compare the settings that the digital camera selects to that of the film camera. If they are close, then your meter is working correctly, or at least ‘good enough’.
The sad thing about light meters is that if they are not working, chances are they are not repairable. If you buy a camera that has a selenium meter, you should consider it as good as not having one at all. Your skill level 3 selenium light metered camera is now an unmetered level 4 camera. The good news is that any camera that originally had a selenium meter, will work 100% without the meter. You just need to manually measure exposure.
If you have a camera with a CdS powered light meter that is not working, it could indicate other electrical problems with the camera that could cause the shutter not to fire. Many electronic cameras like the Yashica Electro and many electronic Nikons will still work with a dead battery, but only at one speed.
In any case, a non working meter could be a deal breaker for a newer camera that might indicate other electronic problems, or in the case of an older selenium metered camera, it might not be an issue at all. You need to decide for yourself.
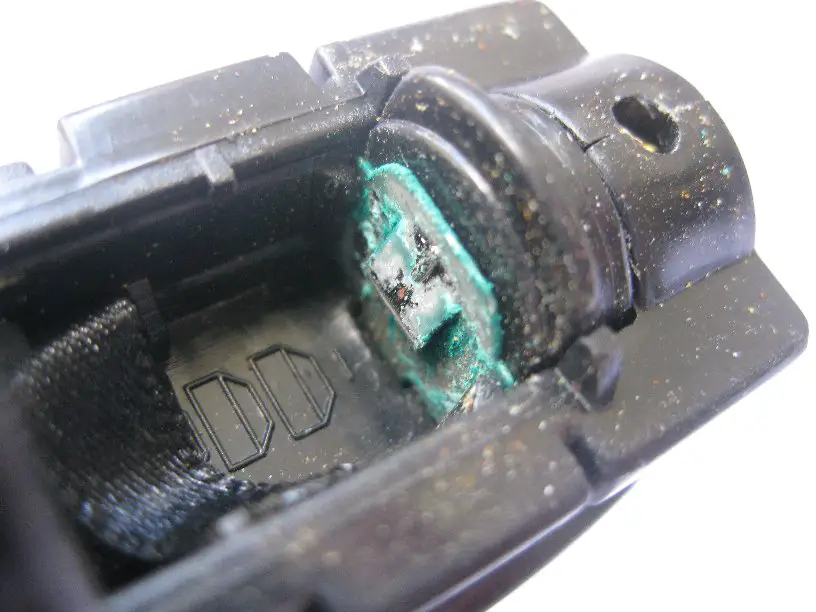
Corroded battery compartments or other electronic gremlins – This obviously only applies to cameras that use a battery. Most cameras from the 1960s and 70s had mercury batteries which were exceptionally prone to leaking. Even cameras that were designed for other types of batteries could have corroded battery compartments as well depending on how long the battery was left in the camera. A good rule of thumb for any type of battery powered device, is to remove the battery if you plan on not using it for a long period of time.
Sadly, many people didn’t heed this advice, and old cameras are often stored for years or even decades with the original batteries in them. In minor cases, small amounts of corrosion can be cleaned off with Q-tips and vinegar, but in extreme cases, the corrosion has leaked inside of the camera and has damaged other electronics inside. If you are buying a camera with a battery compartment, you want to look for the seller’s statement that the battery compartment is free of corrosion. If there is a small amount, its probably not a big deal, but you should avoid anything with more than light surface corrosion.
Mercury batteries – Going along with the issue of corrosion, simply buying a camera that was designed for a mercury battery has its own issues. While almost all old mercury powered cameras can accept modern alkaline, silver oxide, or lithium batteries, each of these batteries operate at a different voltage than the original mercury battery. All mercury batteries operate at 1.35 volts per cell as opposed to all other kinds which are 1.5 volts per cell. So if your camera had 2 cells, it was 2.7v, or in the case of the Yashica Electro, the original battery was 5.6v instead of the common equivalent of 6v.
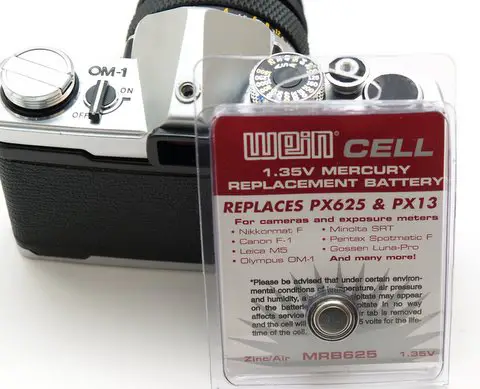 Most cameras will still work fine despite this voltage difference as they can handle the increased power of newer batteries. The only area where you may see a variance is with auto exposure cameras. The increased voltage can throw off the camera’s ability to accurately measure light and your pictures may be over or under exposed. Making things worse, the amount that it is off won’t be consistent, so there is no easy way to “compensate” for the inaccuracy unless you are willing to spend extra money on mercury replacement batteries like the Wein Cell which is a battery with a special voltage reducing diode soldered onto the battery itself. Wein Cell batteries typically sell for $6 – $10 each.
Peeling or Damaged Leather / Zeiss Bumps – Most cameras were covered in either leather, synthetic leatherette, vinyl, or vulcanite, which can develop cosmetic problems over time. While these are all cosmetic problems which would have no impact on the functionality of the camera, they can make it ugly. While there is a certain level of expectation that an old camera should show some signs of aging, horribly damaged leather just looks bad.
The Minolta XG series of SLRs from the late 1970s had a soft synthetic leatherette material that was prone to shrinking over time, so many examples of these cameras have leather which is peeling away from the edges.
If the leather is only peeling on a small section of the camera, usually a small mount of adhesive is enough to restore the camera’s appearance. Use a soft adhesive like Pliobond for leather repairs. Never use Super Glue, modeling glue, or anything comparable on your camera.
In many cases, the leather is in such a bad state, no amount of repair will make it look good. In this case, you can replace the leather using premade sheets from one of several camera re-leathering companies. Camera Leather, Aki-Asahi, and Camerarefurb all make pre-cut leather skins in a variety of colors for many old cameras. If they do not carry a skin for your camera, they can usually sell you whole sheets of uncut leather that you would need to cut yourself.
Zeiss bumps is a nickname given to hard bumps in various places on the back of many types of cameras. Although named after Zeiss-Ikon brand cameras, they are commonly found on many other types of cameras, usually ones made in Germany and the Soviet Union, but some American and Japanese cameras can have them too.
Zeiss bumps are formed by a chemical reaction between rivets that usually hold the film flex plate to the door of the camera, and the glue used to hold the leatherette onto the camera. In many cases, the bumps can be removed by peeling back the leather and sanding the corrosion away. To prevent the bumps from coming back, a thin application of clear nail polish over the heads of the rivets will do the trick.
Cloudy or Dirty Viewfinder, Rangefinder, or Mirror – Over time, it is highly likely that at some point either the viewfinder window, rangefinder window, or both will become cloudy or dirty. If you are buying an SLR or TLR, the mirror can be dirty as well. This is something you will encounter with almost every camera you buy unless it has been recently serviced. In most cases, this is an extremely easy fix that you can do with Q-tips, a set of small screwdrivers, and some glass cleaner or rubbing alcohol.
When you receive the camera, you should always give it a once over with some Q-tips and microfiber cloths. I typically use 91% Isopropyl Alcohol on the body and lenses. In some cases, I had cameras with adhesive from a sticker or some other sticky substance on the outer part of the camera that I cleaned with acetone. In hindsight, acetone is a terrible product to use clean a camera. Now that I know better, I would recommend using a lighter fluid such as Ronsonol which contains naphtha instead of acetone.
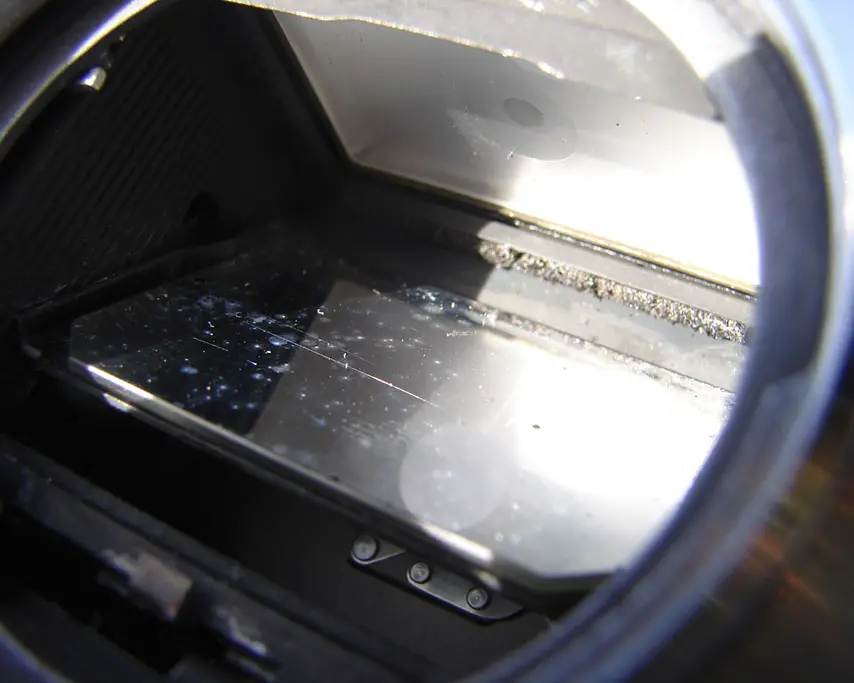
SLR and TLR mirrors can be cleaned in the same way, but it is very important to be very gentle with the surface of the mirror. Unlike bathroom mirrors where the reflective silver surface is behind the glass, the reflective surface on camera mirrors is on the front of the glass and can be easily scratched off if you are not careful. Start by blowing on them with compressed air. If that does not work, very gently, use a dry Q-tip and drag it across the surface of the mirror and see if that removes the debris. If the dirt is actually stuck on the mirror, use a very small amount of glass cleaner or rubbing alcohol and gently wash it off.
In extreme cases, sometimes the silver layer of the mirror has already started to come off. This doesn’t necessarily indicate misuse, sometimes mirrors lose their reflective surface over time. When a mirror loses parts of it’s reflective surface, this is called de-silvering and is not repairable. Your only course of action is to replace the mirror, which is often a difficult job. In SLRs and TLRs, the mirrors are only used for composing your shot, so they have no effect on the exposed image. You can still use a camera with a partially de-silvered mirror and the images will turn out fine.
If either of the viewfinder window or rangefinder windows are dirty, try cleaning them from the outside and see if that does the trick. If after you cleaned the outer windows, you still see haze or dirt inside of the glass, you’ll need to partially disassemble the camera to complete the process.
Whenever disassembling a camera, it is a very good idea to get some kind of flat plastic tray. A cheap small storage bin from a dollar store is good enough. The purpose of the tray is to hold in any small washers, screws, or springs that might fall out of the camera. Plus, if they do fall out, they’re much easier to see inside of a plastic bin, than on your carpet.
On most rangefinder or viewfinder cameras, the top plate comes off easily. Although every camera is different, there are usually visible flathead screws on the sides of the top plate. Remove any screws that you see. There is almost always a screw going through the center of the film advance and rewind knobs. These need to be removed as well. On most cameras, in order to remove the screw going through the rewind knob, you’ll need to open the back of the camera and stick something in between the fork that engages the spool, to prevent it from moving while you are trying to loosen the screw. Sometimes when removing these knobs, a small washer or spring may come out. Pay attention to where this washer or spring was so that you can put it back during reassembly.
In most cases, once you have all visible screws removed, and the rewind and film advance knobs removed, the top plate of the camera comes off easily. If not, do a search online for your particular model camera, and chances are that someone else has done this before and has posted instructions.
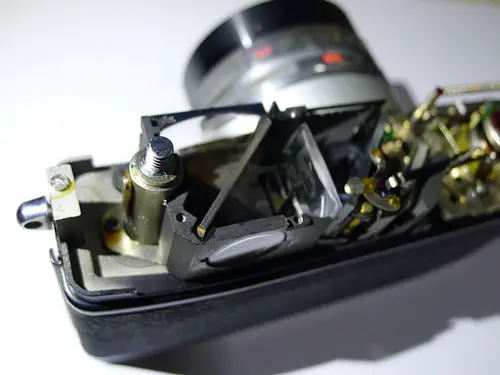
With the top plate removed from the camera, the lenses and mirrors that make up both the viewfinder and rangefinder should be visible. These can be cleaned with a Q-tip and some glass cleaner.
On the picture to the left, you can see the front, rear, and side lenses. There is also a diagonal piece of glass in between the front and rear lenses which is called the beam splitter. On most cameras, the beam splitter has an extremely fragile semi-transparent reflective surface that can be removed very easily. It is recommended to never try to clean a beam splitter with anything but compressed air. If you accidentally remove the reflective layer from the beamsplitter, the rangefinder will no longer work, so be very careful.
Once you have the interior viewfinder and rangefinders clean, reassemble the camera and you are good to go.
Decaying Light Seals – When film is loaded into the back of a camera, special care must be taken to assure that no unwanted light reaches the film. When this happens, white (or sometimes pinkish red) streaks will show on your developed film. To help seal out light, most cameras have some type of light seal around the back door of the camera. On cameras made prior to the 1960s, yarn or wool was usually used to seal out the light. In most cases, these seals are still doing their job and no repair is necessary.
However, starting in the 1960s and especially the 1970s, most camera companies switched to a foam or sponge material to accomplish the same task. While this was fine for the first 10-20 years of the camera’s life, over time this material can harden and crumble away, or on some cameras, turn into a black, sticky, gooey material. This is bad for two reasons. One, the degraded light seal is no longer able to do it’s job and may allow light leaks to expose your film, and two, pieces of the crumbling seal can get inside of the camera and damage other components. When light seals fail, it is very important to replace them.
On SLRs, the outer edge of the mirror often has a foam or sponge “bumper” that helps soften the movement of the mirror when the shutter is released. Although this piece of foam has nothing to do with sealing light out of the camera, it can decay and needs to be replaced as well.
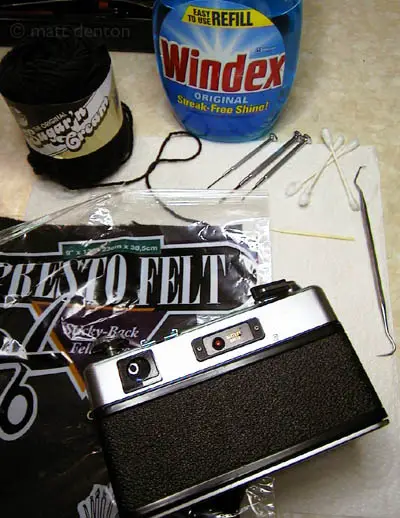 Since this is common with pretty much all cameras from the 1960s and on, this is something you should expect to do, unless the seller specifically tells you it has already been done.
Replacing light seals is not difficult, but it is tedious and messy, so while its definitely not fun to do, it is something that the average person should be able to accomplish themselves. Matt Denton has an excellent write up on his site on how to do this. Rather than repeat the entire process here, I’ll just give a quick summary, but I recommend reading his entire tutorial.
Materials Needed:
Many Q-tips
Many Flat wooden toothpicks or something similar like bamboo skewers
Windex or some other alcohol based cleaner
100% cotton or wool black yarn (do not use acrylic yarn)
Adhesive backed black felt
Some type of rubberized adhesive like Pliobond or contact cement (do not use Crazy Glue or anything similar)
Piece of paper or masking tape cut to the size of the film opening on the back of the camera
Scotch tape
(Optional) A metal pick or small flat head screwdriver
The very first step is to protect the shutter and lens opening in the back of your camera. Cut a small piece of paper to the size of the opening and use your tape to seal it off so that no debris can get inside of the camera.
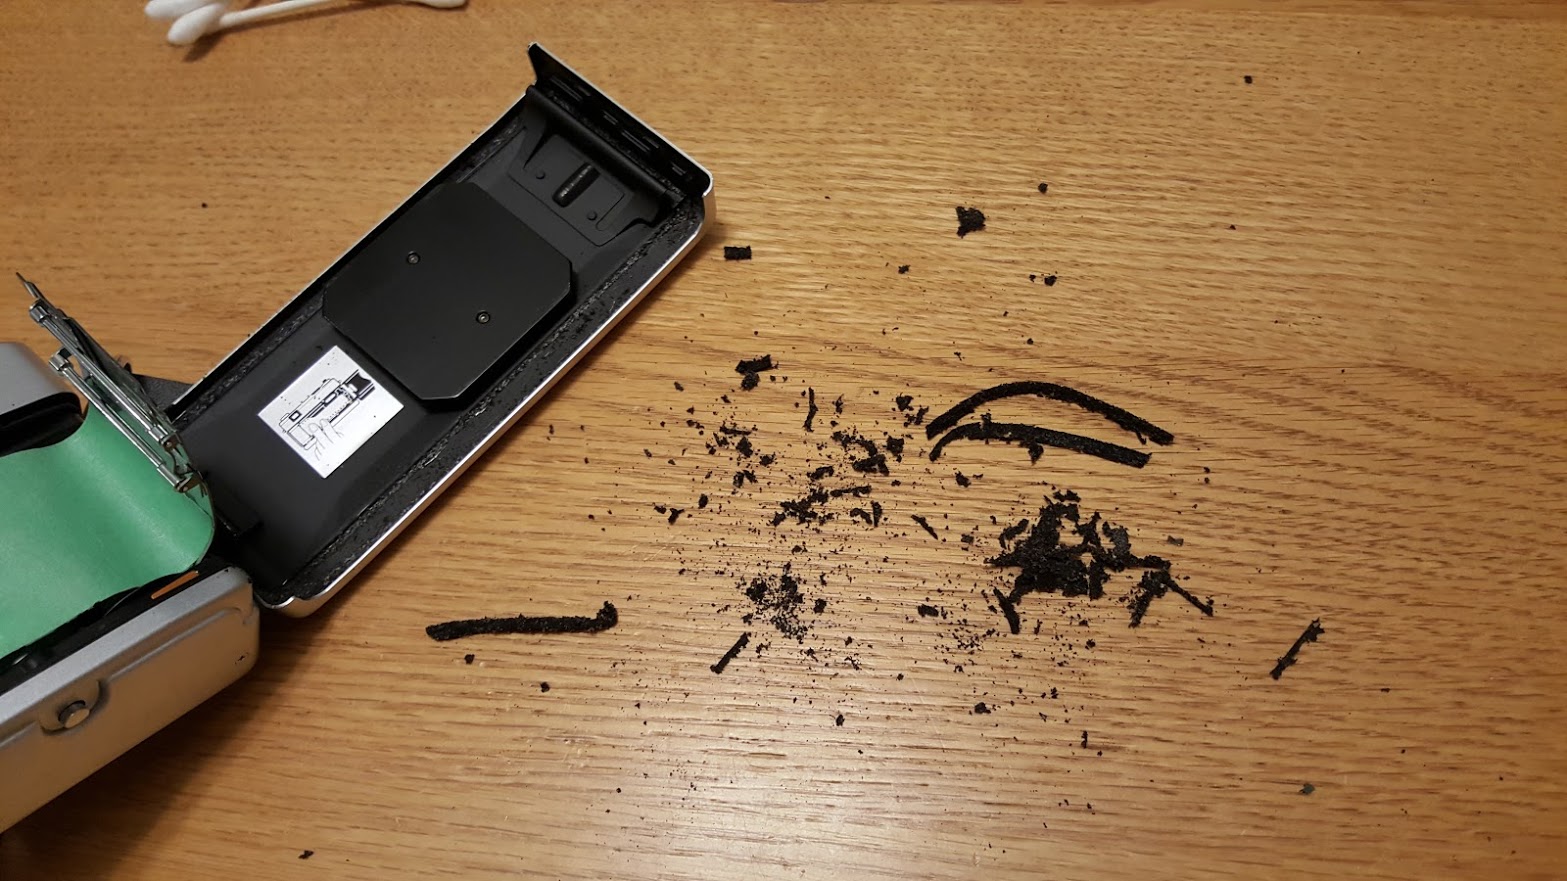
Using your flat wooden toothpicks, or for the really tough stuff, use a pick or small flathead screwdriver to remove all of the old material. Try to use the wooden toothpicks as much as possible as the metal scrapers may scrape away some of the black paint inside of the film compartment. Keep going back and forth between scraping and cleaning with the Q-tips. Like I mentioned earlier, this is tedious, so take your time. Its better to do it right than rush the job and screw it up.
Many cameras have a felt or velvet strip on the outer edge of the door that is still in good shape. If yours has this strip and it doesn’t look damaged, leave it alone. If it is damaged or peeling, then you’ll want to replace it with a piece of black adhesive felt. Cut the felt to approximately the size of the old piece and stick it in the same location once the old material is completely cleaned off.
Once everything is clean, cut a piece of the yarn to the length of the channel in which it will be inserted. You’ll probably need to use one of your toothpicks to help shove the yarn into the channel. To assure that the yarn stays still, you want to use a couple of drops of Pliobond (or comparable adhesive) on the ends of the yarn to keep it in place. You do not need to glue the entire length of yarn down. Just a drop on each end is enough to do the job. If you ever need to redo this, you’ll appreciate only having a small amount of adhesive to clean off.
Most cameras have a small metal tab inside of the top light seal channel that resets the film counter when the door is opened. If your camera has this, you’ll need to cut the yarn to go under this tab. Do not cover it up or else it may prevent proper operation of the film counter.
For the SLR mirror, clean off the old stuff using Q-tips and Windex. Remember the mirror is very fragile, so do not use force. It may be unavoidable to put a couple of scratches in the mirror where you are cleaning the old material off, and if that happens, its not a big deal since that part of the mirror is not used when composing your shots, so just be careful. One the mirror is clean, cut a piece of the self adhesive felt to the same size as the old stuff and stick it in position.
Now that you have everything in place, close and reopen the film door a couple of times to help seat the new material. You may notice that the door is a little more difficult to close than before. It is OK if its just a little bit tighter, but if you find that you have to use excessive force to close the door, or if the door won’t stay latched, then you may need to trim some of your new felt or yarn.
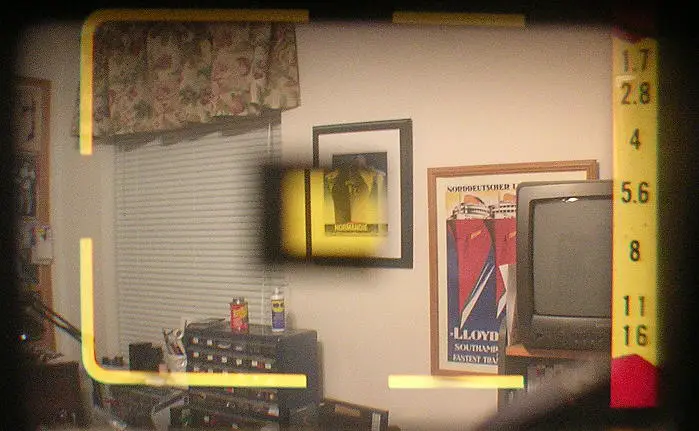
Rangefinders Out of Adjustment – Rangefinders involve a series of moving mirrors that can become misaligned over time, or from being dropped. Most cameras have some sort of adjustment screws that you can use to adjust the rangefinder horizontally or vertically.
On the Argus C3, there is a round metal plate on top of the camera that unscrews to reveal two adjustment screws.
On many cameras like the Voigtlander Bessa, the adjustment screws are beneath the hotshoe.
The Kiev 4 has horizontal adjustment screws behind the front plate that covers the rangefinder window.
Many other cameras have the screws in different locations on the back, front, or even inside of the film compartment. If you notice that your rangefinder is not accurate, even at infinity, you can try adjusting it yourself. Search the Internet for information about your particular camera, and most likely you’ll find something that will help you.
Other Camera Specific Issues – Although this list covers the most common issues that apply to a wide variety of cameras, sometimes there are common issues that apply to just one camera. Here are a few that I have personally encountered.
Canon Squeal – Canon SLRs from the late 70s and early 80s like the A-1, AE1, AE1 Program, and AV1 may develop something nicknamed the ‘Canon Squeal’ when firing the shutter. The squeal comes from some gears in the shutter mechanism that have lost their lubrication over the years. The noise is only heard when firing the shutter, and usually does not effect normal use of the camera. Since the lubrication is dried up, it is possible that over time, the camera could totally fail, so if you plan on using this camera for a long period of time, you may want to look into fixing it. There is a lot of information online on how to fix this.
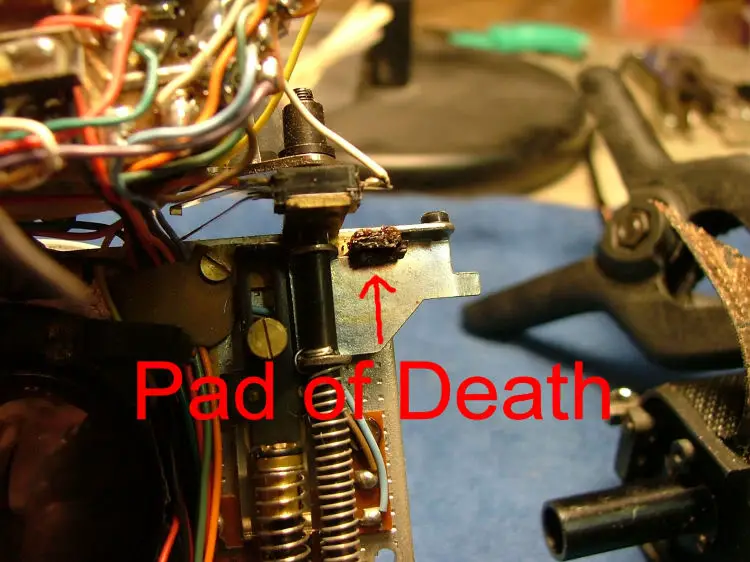 Yashica Electro Pad of Death – The Pad of Death is a nickname given to a common problem with Yashica Electro 35 (all variants) cameras. The original design for the camera included a small rubber pad under the top plate which softened the movement of the film advance mechanism. Under normal operation, the camera makes an audible clunk noise when advancing the film. Over time, the pad can become brittle and break away or disintegrate. When the pad is missing, a pin that is needed for normal operation of the camera moves out of position causing the film advance to not work. Replacement of the pad isn’t difficult to do, but it does require some very fine precision work under the top plate of the camera. There are many tutorials online showing you how to do this.
Slow Shutter Speed Problems on Soviet Rangefinders – Cameras made in Former Soviet Union countries are especially prone to shutter speed problems for a variety of reasons. The most common of which is the type of lubrication used when the cameras were made. This lubricant seems to be worse than whatever was used by other camera makers, because over time it not only thickens, but it can actually turn into a sludge like material causing the shutter to not work at all. There isnt any easy fix for this other than a complete internal cleaning of the camera. Former Soviet Union cameras are often based off complicated German designs, so they are not easy to repair. I’ve learned first hand if you are interested in a FSU camera, you are much better off getting one that has already been cleaned and serviced.
Damaged Cloth Curtains on Leica rangefinders and their Clones – The Leica cameras were one of the first cameras to have a focal plane shutter when they were released in the 1930s. In order to achieve the super fast shutter speeds that these shutters were capable of, the shutters were made from a fabric resembling canvas coated in a black rubber material to block out light. Over time, the shutter curtain may crack or develop holes allowing light leaks through the shutter. Sometimes holes can develop in a cloth shutter by allowing the lens to be pointed directly at the sun for too long of a period of time. The lens acts like a magnifying glass burning a hole through the fabric. There is no fix for this other than a complete curtain replacement which is not easy. This would be best done by an experienced professional.
This list is not intended to be a comprehensive guide to fixing all camera problems. There are many other problems a camera could have which can be corrected by a professional repair person. Like I’ve said a couple of times already, many old cameras still work decades after they were made. As a general rule, if you look at a camera, and it doesn’t have any of the obvious problems mentioned here, and it looks like it was taken care of, most likely, it will work fine.
First Things to Do After Getting a New (Old) Camera
By this point, you are ready to buy your first camera. When bidding on eBay, its important to not let the emotion or excitement of the auction make you pay more than you should for something. Most cameras are easy to find and if the price on one you are watching gets too high, don’t keep bidding. Just wait and another one will come along.
After you receive your camera, the first thing you should do is head on over to Mike Butkus’ huge collection of camera manuals. He has PDF scans of manuals for almost every single camera ever made. This information is extremely valuable when learning how to properly use your camera.
When you receive your camera, you may want to do some research to learn more about it’s history. Many cameras have incredibly fascinating histories which adds to the appeal of collecting them. When I receive a new camera, I will try to find more information about the camera, including the year it was made. There is a surprising amount of info about old cameras, and sometimes you will have no problem dating an old obscure camera, but then you’ll find little to no info about another. I was able to safely conclude that my Certo Dollina II was made approximately in the first half of 1937 by dating the serial nunber on the lens, but I can’t narrow down when my Nikon FM was made, despite it being made at least 40 years later.
Many times, production records were never kept, or if they were, they were lost, so the only evidence about a camera’s history is through the surviving specimens in private collections. If a model was made for a period of time, often there are subtle changes that occur through it’s production run that help you narrow down the date of manufacture.
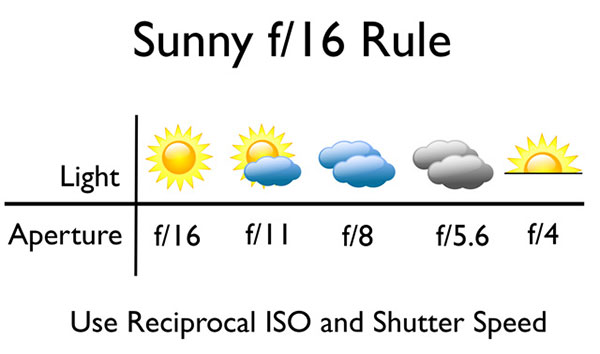 Depending on your skill level as a photographer, you may have never used a manual camera before, or if you have, you may be rusty, so the next thing you should do is familiarize yourself with the Sunny 16 Rule.
The Sunny 16 rule is a set of guidelines that you can use to set exposure when shooting outdoors without an exposure meter. Even if your camera has an exposure meter, there is a chance it is not accurate so this is something that is useful when using cameras with a Skill Level of 3 through 5.
The basic principle of this rule says:
On a clear and sunny day, if you set your shutter speed to the reciprocal of your film speed, and set your aperture to f/16, your shots will be properly exposed.
As the lighting changes, you do not change your shutter speed, but change your aperture (f/stop) to a lower number.
If the sun is hazy or slightly cloudy, use f/11.
If the sky is overcast, use f/8.
If the sky has heavy clouds, use f/5.6.
If you are in complete shade, or the time is near sunrise or sundown, use f/4.
Some versions of the Sunny 16 rule say if you are shooting in the sun on a bright snowy day, you use f/22.
Lets say you have 100 speed film in your camera. The reciprocal of your film speed would be 1/100 seconds. Most film cameras do not have a shutter speed of 1/100 seconds, so you would pick whichever one is closest, which would be 1/125 seconds. So that means on a bright sunny day, if I am using 100 speed film and I set my aperture to f/16 and my shutter speed to 1/125 seconds, my shot will be correct.
Lets try another example. If you have 400 speed film and you are shooting outside on an overcast day, you would set your shutter speed to 1/500 since its the closest to 1/400, and you would set your aperture to f/8.
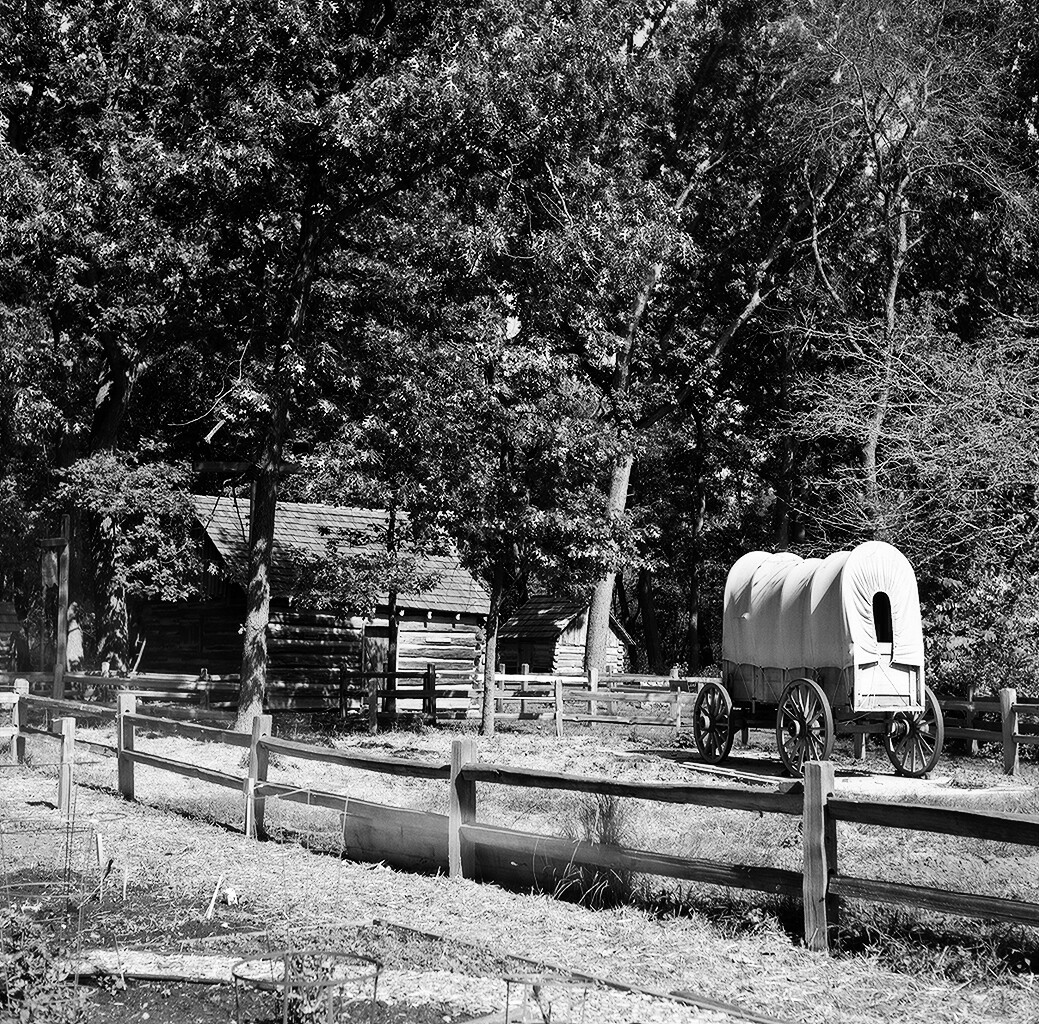
That’s pretty much the basics of it. I find it amazing that this actually works. If you are skeptical, go ahead and try it yourself. If you don’t want to sacrifice a roll of film to try out the Sunny 16 rule, get a digital camera that is capable of full manual mode. Set the camera to something like ISO 200, set your shutter speed to 1/250 and your aperture to f/16 and shoot something in direct sunlight. You’ll be amazed at the results!
One more tip about shooting outdoors, is if you are in varied or constantly changing light, just use f/8 all the time. As I’ve said a couple of times in this article, film is extremely forgiving, so you don’t have to get exposure perfect to get good shots. Another advantage of shooting at f/8 is that almost all lenses are sharpest around f/8, so with that aperture setting you have the greatest chance of pictures with razor sharp focus.
There is a lot more to learn about exposure and how you can slide the scale to allow for greater depth of field or to freeze moving objects, but thats for another day. If you want to read more about the Sunny 16 rule, there are many great articles about it online. I particularly like the Ultimate Guide to the Sunny 16 Rule by Emanuele Faja.
I usually take a day or two to familiarize myself with a new camera by going through the motions of using it, but without any film. I’ll dry fire the camera several dozen times, open up the film compartment, test all of the moving parts, and make sure they work properly. If anything needs to be fixed or cleaned, I do that now.
Cleaning a camera is mostly just common sense. Don’t use any harsh chemicals on the lens or any internal components of the camera. Assuming the camera is just dirty and not in need of any repair, you can clean off most dirt, grime, or dust with a damp cotton cloth and some Q-tips. I use 91% generic rubbing alcohol to clean glass and lenses, but you can also use a glass cleaner like Windex. If there is mild corrosion in the battery compartment, use a mixture of warm water and white vinegar on a Q-tip to get it off. For more stubborn grime or grease, Ronsonol or any other type of lighter fluid which contains naphtha works well. To clean the body of the camera, you can start with a solution that is 50/50 rubbing alcohol and water with one or two drops of dish detergent mixed in. Use a soft terry cloth or microfiber cloth and gently wipe all of the surfaces of the camera. Never submerge any part of the camera or subject internal electronics to excessive cleaner.
Once I’ve cleaned a camera and I feel pretty confident about using it, I put a roll of film in it and go shooting! I recommend taking several shots in a variety of conditions so that you can see if any particular shot causes problems for the camera. Take pictures in bright sunlight, in shade, and indoors. Take some of objects close up, some 10-20 feet away, and some at infinity. Try a few with the lens wide open and see how out of focus backgrounds look. Try one or two on a moving object and see if you can get action shots.
Another suggestion is to bring with you a notepad and make a note of any issues you encounter. The first time I used my Argus C3, I had problems advancing the film, and I ended up wasting a bunch of shots. On older cameras that do not have double exposure protection, I double exposed a couple of shots, so I had to remind myself to always advance the film immediately after taking a shot. On my Yashica Electro, I blocked the lens with my hand on several shots. I had a Nikon EL2 with a broken film tension plate that caused most of my shots to be out of focus.
While you can hope to get some nice shots from your first roll, its more important to learn the intricacies of your camera and overcome any quirks it may have, so that future rolls look nicer.
Once you have shot a couple of rolls, its time to get them developed. If you are rediscovering film after shooting digital for the past decade like I was, you may remember going to your local drug store and dropping off your film at the One Hour Photo kiosk. Sadly, most of these One Hour Photo places no longer exist. I was amazed to learn how hard it has become to find local places to develop film. Of the places near my home that say they develop film, most do not do it in house anymore, instead they ship it to a lab.
Furthermore, the prices are a lot more expensive than they used to be. The Walgreens near my house charges almost $15 to develop and scan pictures to a CD.
Because of these reasons, I’ve found that I prefer one of the reputable labs online where I can send my photos to and have them developed and scanned. The advantage of these places is that they are operated by film professionals who still care about your shots. Having film developed by a local drugstore that sends your film to an unknown lab could produce poor results.
So far, I have experience with two different online labs. I’ve used The Darkroom in San Clemente, CA and Dwayne’s Photo in Parsons, KS. Each lab has its pros and cons.
 The Darkroom – I am located in Chicago, so sending my pictures to CA is farther than KS, but the advantage of the Darkroom is that once they scan your pictures, they immediately post them to a special members area of their website where you can login and view your pictures. This allows you to get scans of your photos pretty quick. The scans they post online are the same exact ones they will send to you on CD. If speed is your highest priority, Darkroom is the better of the two.
The Darkroom also has a huge variety of novelty items where you can have your pictures printed on posters, coffee mugs, T-shirts, and many other things.
My complaints with The Darkroom is that their basic scans are pretty low quality. 35mm scans come back to you with a resolution of 1545 x 1024 which is equivalent to about 1.5 Megapixels. 6×6 120 film scans are 1039 x 1024. Plus, I found that all of my photos had a very high degree of edge enhancement making them look harsh. The Darkroom offers two higher levels of scans which I have never tried, but they charge an additional fee for this. Which brings me to the topic of price.
Their basic develop and scan price for a single roll of 35mm or 120 film is $11, other formats are $3 extra. If you have panoramic or half frame film, they charge $10 additional for each roll. Shipping to them is free, but return shipping is $5.95 per order regardless of how many rolls.
Lets say you were to send 5 rolls of film to The Darkroom, 4 of them were normal rolls, and the fifth was a panoramic roll. The charge to develop and scan these five rolls would be:
$55 basic develop and scan + $10 panoramic surcharge + $5.95 return shipping = $70.95 ($14.19 / roll)
 Dwayne’s Photo – These guys seem to be more of a ‘mom & pop’ shop but they do an excellent job as well. They do not have all of the extra services like The Darkroom and they do not have a website where you can see your photos as soon as they are scanned, so the total amount of time is longer before you get to see your pictures. What they lack in speed, they make up for in better basic scans and price.
As of January 2015, The basic charge for developing a single roll of 35mm or 120 film is $3.99 plus an additional $2.99 per roll to scan the negatives to a CD bringing the per roll total for developing and scanning to $6.98. This is significant because if you already have a film negative scanner, you can just pay them the $3.99 per roll and save extra money. The Darkroom doesn’t have a separate charge for developing and scanning. You pay $11 per roll even if you don’t need the scans.
They also support 110, 220, and APS film for this same price, but do not offer any other formats. Their 35mm scans are done with a resolution of 2376 x 1576 which is equivalent to 3.7 Megapixels. While this doesn’t compare to modern DSLRs, you can see a heck of a lot more detail in a 3.7 MP scan than a 1.5 MP scan, plus the Dwayne’s Photo scans don’t suffer from the same edge enhancement issues as the Darkroom scans. Dwayne’s only offers one level of scanning, so although their basic resolution is higher than The Darkroom’s, they do not have any higher resolution options.
I did notice that on a few of my pictures taken in low light, there were a few streaks in the scans, but they did not appear in every picture, so I am not sure if this was the result of the camera scratching the negative, or something they did.
In my last batch of film, I sent in a roll of half frame film from my Universal Mercury II and they did not charge me anything extra to develop and scan that roll. Their order form also does not mention anything about a panoramic surcharge like The Darkroom does.
Dwayne’s Photo does not offer free shipping, so you must pay for shipping both ways. They charge $4.50 for the first roll and 50 cents for each additional.
Using the same example as above for the 5 rolls of film, one of which is panoramic, the cost at Dwayne’s would be:
$34.90 develop and scan + $5.25 shipping to KS + $6.50 return shipping = $46.65 ($9.33 / roll)
Edit 2/18/2016: Since writing this article, Dwayne’s Photo has increased their prices to $9 for developing and scanning. They still have an option to develop only which is less expensive, but even with the price increase, they are still the least expensive mail order option that I have found.
Despite the large difference in price, I wouldn’t rule out The Darkroom. Their website is not only convenient, but offers a much faster way to see your pictures. They offer a much wider range of products, and if you really need a high resolution scan, their Super Scans come in at a mighty 6774 x 4492 resolution. For everyday photos that you want to take and post online, or if you own your own film negative scanner, Dwayne’s Photo is a much more cost effective solution and their scans aren’t bad. Plus, they’re not exactly slow. From the moment I send off my pictures, I usually have them back a little more than a week later.
For those of you who really want to jump into photography, there’s always the option to develop your own film at home. This would further save you money and time since you’d be able to get the images back right away. I have never tried my own developing, but in the time I have been collecting cameras, I’ve seen several tutorials online that made it look “less than difficult”. This is something I may try some day.
So, that’s it. When I started typing this guide, I had intended it to only cover things you should look for when searching for old cameras online, but it just grew from there. There is a ton of info here, but remember this is a hobby, and hobbies are supposed to be fun! Take your time, learn as you go, and maybe one day you’ll be posting your own guide! 🙂
Fantastic write up on the history, buying, repair and using of old cameras – lots of practical advice. I agree with your assessment of ebay sellers, and your advice on selecting cameras in either 135 or 120 – if you want to use them……
I too have started using film after about 8 years of Nikon DSLRs and recently bought my first collectable – a 1917 Kodak No. 1 Autographic Special (Model A). Last night I patched a few holes in the bellows and will put a roll of FP4 in it next weekend. I also have been given a Bronica GS-1, and have shot both Provia and B&W in it over the past year.
Lots of info – I will bookmark and read again – Thanks.
Thanks for the compliments Chris! I own a c.1929 No. 1A Autographic Kodak that was designed for 116 film. I had to make an adapter that allowed me to use 120 in it and it works well. I wish I had a No.1 like yours which was specifically designed for 120, and maybe one day I’ll pick one up, but pretty happy with my No.1A. One day I’ll write a full review of it with some of my sample pics.
Thank-you for a very informative & interesting website. I have only recently been bitten by the vintage camera bug, though I have various old cameras kicking about, and you have been a great help!
Re: developing – I used to “help” develop (B&W) film with my Dad when I was a kid (Um, Lots of years ago!) and I remember that feeling of wonder when the picture magically appeared on the paper you were swishing in the tray of liquid.
You’ve inspired me to try again:-)
Mandy, Im glad this article helped reignite your interest in old cameras. I own several DSLRs and have nothing against digital photography, but find that taking a step back to film where you have to pay attention to your shots and make every one of them count, helps you improve as a photographer!
Nice job condensing al that information and experience. Like you, I’ve had a lot of fun with the Mercury II.
Thanks Lee! If you have any scans of shots from your Mercury II, I’d love to see them!
Mike, 220 roll film may not always be usable in cameras that have a “red” window in the back of the film loading door, this type of camera requires the film to have a paper backing, further, 220 was designed for cameras that have a positives latch advance system, Most of the older folding cameras in 120 roll film are of this nature…
Great info Andrew! I’ve never actually used 220 film, so I have no experience with it and tried to include as much relevant (and correct) info as possible! I am always glad to receive feedback to make this article better! 🙂
Hi Mike,
After about a year I decided to shoot a few rolls of film again and also look to get a few old rolls developed. To my horror all the local 1 hour places had gotten rid of their C-41 processing. They’ll send it out of course, but you’ll lose the negative (no thanks). Luckily I found a few online places similar to what you mentioned (I used MPIX which sounds similar to The Darkroom). I say horror because the prices and wait time went up drastically.
I have been shooting 10 year past expiration film (it’s the stockpile we have laying around) and I started to look into buying new film. Prices have jumped there too with some rolls going for $12 each. The cheapest seems to be ISO 400, but that doesn’t cut it for a lot of cameras that have a max shutter speed of 1/200.
I am now concerned that film is actually dying, killed off by the free market. I’m guessing in about 2 years even simple C-41 color negative films will cost over $35 to buy and develop due to supply, demand, and competition.
I like shooting old cameras for fun, and am sad to think that fun will become very expensive – prohibitively so.
Thanks for putting together this great info, I know how much work it is. I’ll be on the hunt for a TLR and rangefinder this summer at yard sales, flea markets, and junk shops. I have found some cool stuff for great prices there. Fingers crossed. 🙂
Shawn, thanks for the comments! I agree with you that it is unfortunate how expensive and inconvenient film developing has become, especially with local options. Most local labs not only don’t return your negatives, but the scans are often very low-res digital scans of your prints. I highly recommend an online lab like Dwayne’s Photo, The Darkroom, Old School Photo Lab, or any of the other places.
While I do share your concerns that this hobby will continue to get more expensive, I’m a little more optimistic about film’s future. I see companies like Ilford that are opening new developing centers, Impossible making new instant film, and the commitments from other “homegrown” films, that I think film will be around for quite a while.
If I’m wrong, that makes it even more important to enjoy these cameras now as much as you can! As you know, many of the quality models from the past are still in great operating condition and capable of amazing shots!
Friends,
Come to Bulgaria (EU). Here analogue photography was revived. Only in Sofia already has at least 10 laboratories, where for about $ 8 will occur, scan the negatives to a CD and print your 35 mm film (36 exp.)
I `m not joking. 🙂
Regards
Great site, you really capture the fun of reviving and shooting with vintage cameras. I’m another fan of Dwayne’s, there have been occasional problems but they are the best overall. Local developing disappeared in 2014 so mail-order is my only practical alternative.
Thank you for sharing your collection.
Having recently acquired a film camera again after many years, this piece is fantastic. Thanks.
Hi Mike,
I’m a fellow collector+user who feels very ashamed to have only now discovered your AMAZINGLY informative site. Very well-done sir!
Concerning the increasing cost of film photography, I’m just starting to investigate a promising option for DIY B/W developing called “Caffenol.” You basically make your own inexpensive “green” film developer from instant coffee, vitamin-c crystals and washing soda. And many Caffenol practitioners use regular B/W fixers, but a few are trying highly saturated solutions of ordinary iodized salt.
I used to have my own B/W chemical darkroom, but found the fumes irritating. So I’m blown away by the results others are achieving with coffee… and am gathering materials for my first tries.
The whole thing originated at (I believe) the Rochester Institute of Technology with a professor and small group of eager students… and has grown worldwide. There’s even a “Caffenol Bible” PDF of recipes and procedures available online. And some practitioners seem to actually prefer long-expired B/W films for both their lower cost AND their Lomographic, wabi-sabi imperfections!
Perhaps you might also like to try Caffenol and post your results (if you haven’t already)?
Sorry Mike…I need to add a correction. It’s not the “Caffenol Bible,” but the “Caffenol Cookbook.” Tryin’ to be accurate here!
Dave