

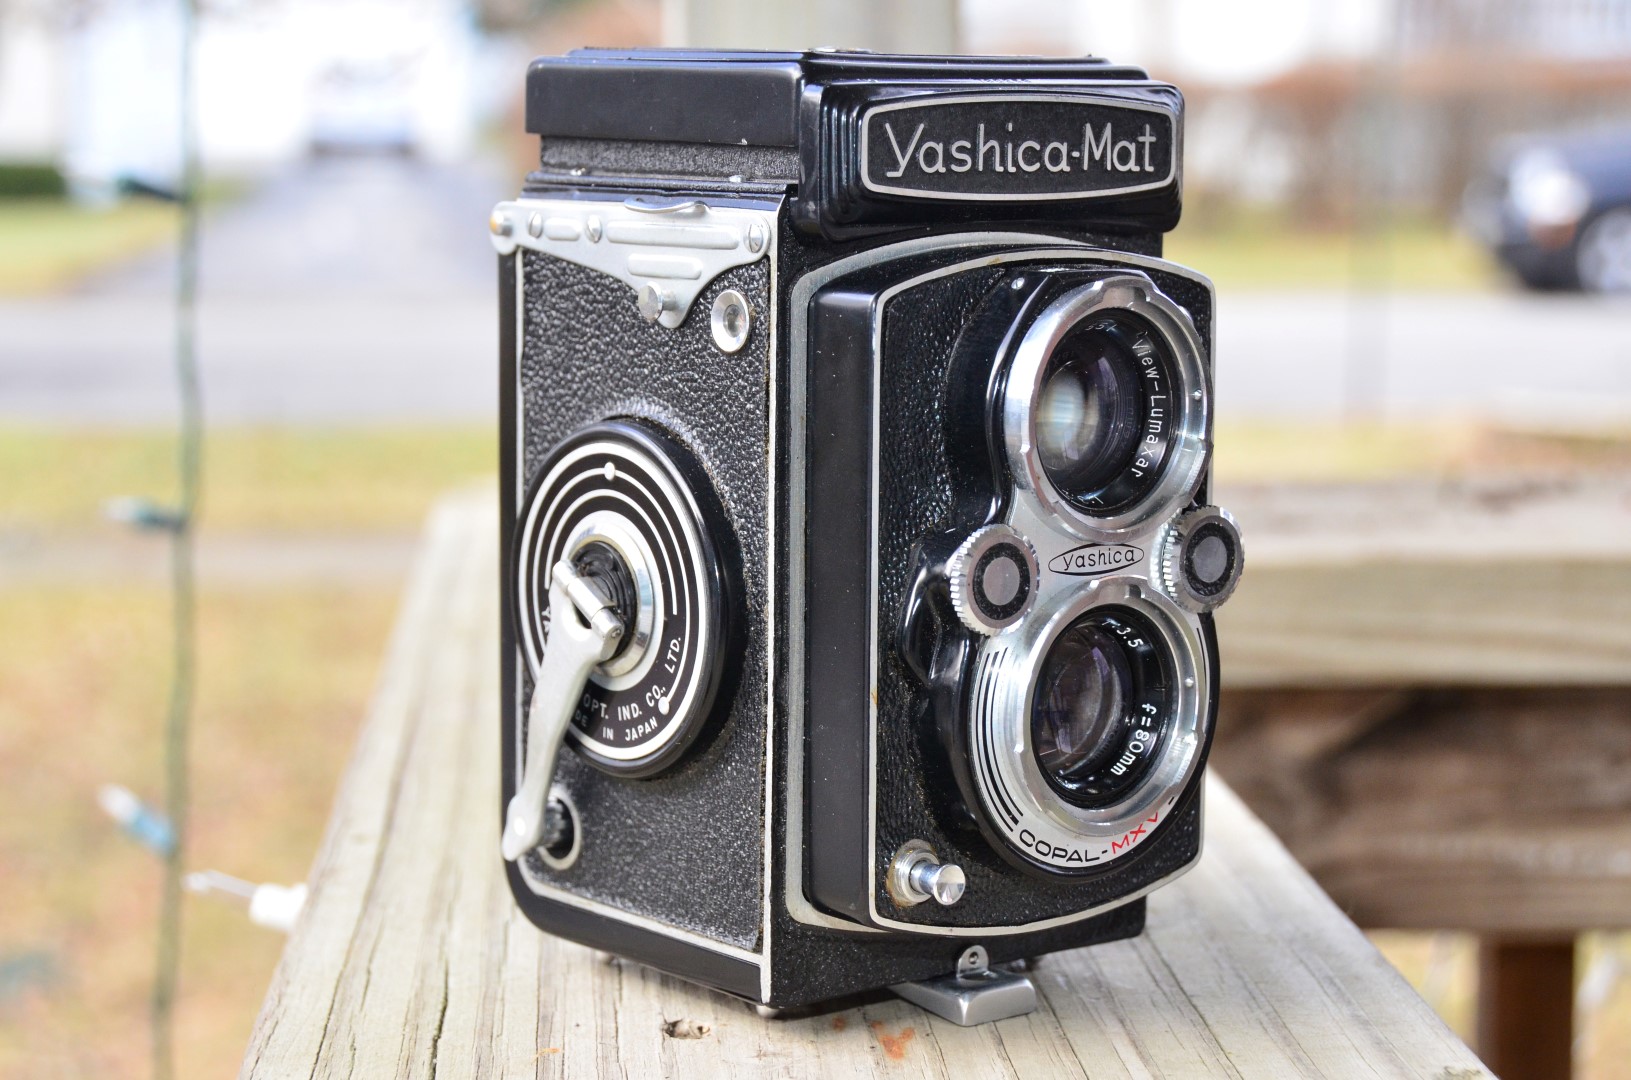
This is a Yashica-Mat twins lens reflex (TLR) camera made by Yashima Optical Company in 1957. Although not considered to be a direct copy, the Yashica-Mat took a lot of design and features from the German Rolleiflex TLR such as the auto-cocking shutter and folding advance lever. It uses 120 roll film and produces twelve 6×6 (56mm x 56mm) frames per roll.
 Film Type: 120 Roll Film (twelve 6cm x 6cm exposures per roll)
Lens (Taking): 80mm f/3.5 coated Lumaxar 4 elements
Lens (Viewing): 80mm f/3.2 coated View-Lumaxar
Focus: 3.3 feet to Infinity
Viewfinder: Coupled Waist Level Reflex Viewfinder
Shutter: Copal MXV Leaf
Speeds: B, 1 – 1/500 seconds
Exposure Meter: None
Battery: None
Flash Mount: PC port M and X Flash Sync
Weight: 1094 grams
Manual: https://www.cameramanuals.org/yashica_pdf/yashica_mat_66.pdf
History
I go into a somewhat detailed narrative of the history of the Yashica company in my review of the Yashica Electro 35 GS, so rather than repeat myself, I’ll only mention the part that pertains to this camera.
The Yashima Seiki Company started making cameras in 1953. Their first model, called the Yashimaflex borrowed heavily from the German Rollei TLRs of the time. The Yashimaflex was quickly followed up with a model called the Pigeonflex. It is hard to find information about these two cameras as they did not sell well, especially outside of Japan. Copies in good condition are extremely rare these days.
Throughout the 1950s, Yashima (Yashima wouldnt adopt the corporate name Yashica until after their takeover of Nicca in 1958) made several models of TLR cameras called the Yashicaflex, sticking with this style of camera as it was a popular design of it’s day. SLRs hadn’t quite made a splash yet, and rangefinders were already pretty common.
Although the Yashima TLRs were nice cameras that were capable of great shots, Yashima struggled with sales of these models, especially outside of Japan as the world was not yet ready for a Japanese made camera based off a German designed camera.
In 1957, Yashima released the Yashica-Mat, which was it’s first attempt at a “premium” model. It borrowed features from the higher end German Rolleiflex such as an auto-cocking shutter, wind lever, and frame counter. Combined with a state of the art (for it’s time) Copal MXV shutter, the Yashica-Mat was a pretty nice camera and really helped open the eyes of the rest of the world to Japanese made cameras.
The Yashica TLR site has a huge amount of information about the different models of Yashima TLRs and it suggests this model went on sale in April 1957 and was sold through March 1973. If true, this means that Yashima/Yashica had over a dozen different TLR models in production at the same time. This must have been pretty confusing for buyers trying to decide which model to buy.
Later Yashica TLRs added features such as the ability to use 24-exposure 220 film, and even some had adapters to use standard 35mm 135 film. Some even had light meters. The earliest ones came with selenium based light meters and eventually battery powered CdS meters were used. Yashica continued to make TLRs into the 1980s way past their peak of popularity.
From my research, some Yashima/Yashica TLRs are more desirable than others. The Yashica-Mat is near the top of the more desirable models to buy. Some of it’s strengths are that it had the more advanced features like the film counter, auto cocking shutter, frame counter, and it was made entirely of metal. Later Yashica TLRs had more plastic parts making them less rugged. Also, the Yashica-Mat was made at a time when light seals were still made out of yarn, as opposed to black foam which degrades over time and needs to be replaced. As a result, if you can find a Yashica-Mat in good condition, other than wiping it down to get the dust off, there is likely nothing else that needs to be done to it before you can start shooting.
Today, TLR cameras are very popular with collectors because of their unique design. They don’t look like any other style of camera ever made and they make great conversation pieces. Another reason for their collectability, most TLRs use 120 roll film which is still commonly available today. Some TLRs used discontinued 127 film, and Kodak made a line of TLRs that used discontinued 620 film, but otherwise, most TLRs from the 50s and 60s can still be used today.
 My Thoughts
When I first got into old cameras, I saw a couple of Rollei TLRs and loved the design. What I didn’t love was the price. No matter how much I looked, I could not find one in good condition for under $100. Rollei makes great cameras and they deserve the high prices they fetch, I just wasn’t willing to pay that much for an old camera that I knew little to nothing about.
After learning more about TLRs, I discovered Yashica. These were high quality, Japanese made cameras, that came from an era when Japan was still recovering from World War II. I was intrigued that I could find a camera similar to the Rollei, but for much cheaper, so I started looking for Yashica TLRs. As I mentioned earlier in this review, Yashica made many different models and some are more desirable than others. I didn’t start out looking for a Yashica-Mat, but I am happy that I wound up with the one I have.
This was my first 120 film camera and I was eager to not only try out a cool looking camera, I also wanted to try out rolling my own film. It is easier than it sounds, but there is still a bit of a learning curve to get the film loaded correctly. Another intriguing factor was that 120 has the capability of taking pictures with a MUCH higher level of detail than any 35mm film camera can.
When 120 film is used in a 6×6 TLR such as the Yashica-Mat, it produces a negative that is 56mm x 56mm for a total area of 3136 sq mm. Comparatively, 35mm film has a negative that is only 36mm x 24mm, or 864 sq mm. That means that the negative on 120 film has an area 3.6 times larger than that of a negative on 35mm film. Having a larger negative means that more detail is captured in the film, and therefore capable of larger prints. To put that into modern terms, if you compared a digital camera with a 12 Megapixel sensor to one with a sensor 3.6 times larger, you would need a digital camera with a 43.5 Megapixel sensor.
 Another great feature of this camera is that it was built in an era where things were made to last. Unlike some other vintage cameras, there really aren’t any common problems with Yashica TLRs. Other than making sure that the camera is in good physical shape, the shutter still fires, and the lenses aren’t scratched or full of fungus, there is very little that needs to be done to shoot film in these cameras. On mine, a simple wipe down of the body, the viewfinder, and the lenses, and mine was ready to go.
The unique look of TLR cameras, combined with their larger negatives and therefore more detailed pictures, means that these cameras are still very desirable, especially the higher end ones. If you search eBay for Yashica TLRs, the Yashica-Mat 124G is the most popular. It has modern features like a battery powered CdS light meter, a flash hot shoe, and all of the internal electrical contacts are gold plated. This makes it much more expensive however. If you manage to find a Yashica-Mat in nice condition, I would take the Yashica-Mat for it’s all metal design, yarn light seals, problem-free design, and lack of electronics any day.
My Results
The Yashica-Mat is an entirely mechanical camera with no electronic aids like a light meter or automatic anything. You have to set your aperture size, shutter speed, and manually focus. This all might sound intimidating to someone who is used to modern cameras that do all of this for you, but something I’ve started to really learn is that film is pretty forgiving. It is not really all that critical to get everything perfect. Get it close, and 9 out of 10 times, your picture will turn out fine.
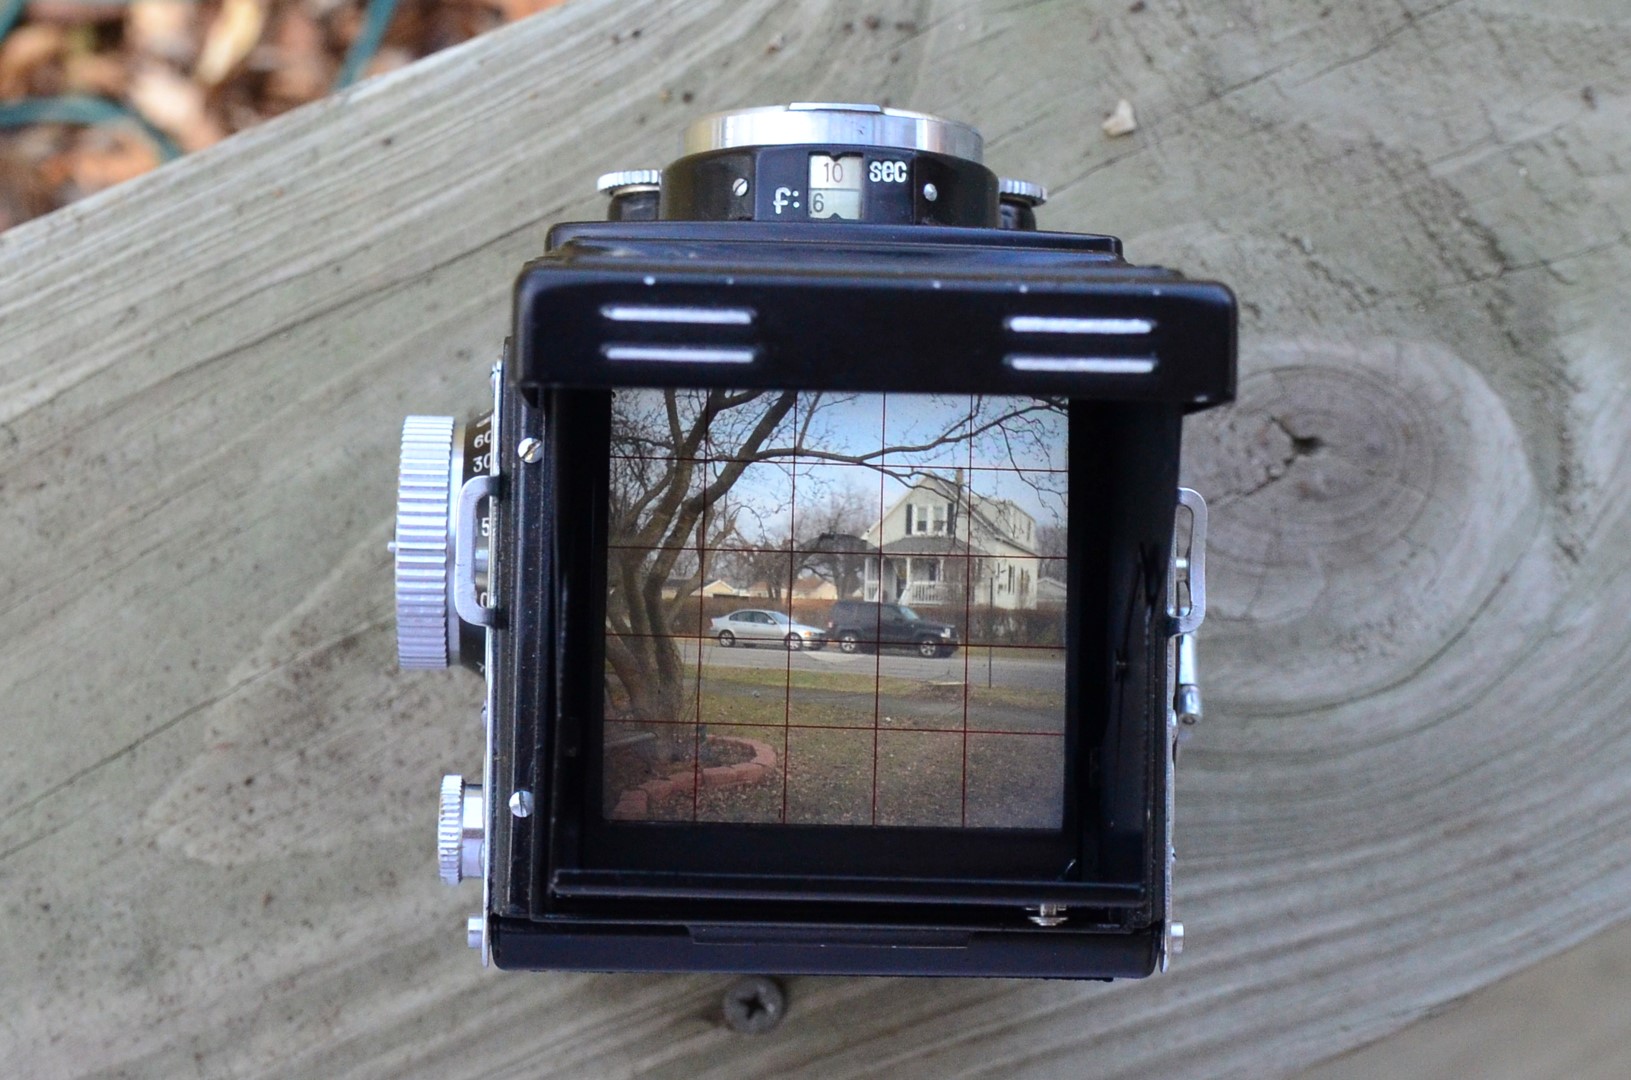 Focusing the TLR is in some ways like an SLR. You set your focus and frame your image through the viewfinder which is on top of the camera. The top of the camera folds out and reveals a screen inside of the camera.
When you rotate the focus wheel on the left side of the camera, both the viewing and taking lenses move together. The whole reason a TLR has two lenses in the front is that the top lens is what the viewfinder sees, and the bottom lens is the taking lens which is what exposes the film. So even though you are not looking through the taking lens like on an SLR, you are seeing approximately what the film will “see”.
You have a couple options to set the exposure. If you are a pro, you can probably guess. I imagine that people who have been doing this for many years can probably just look at a situation and get it right.
Since I am nowhere near that level, I needed other options. There are external light meters that you can buy that will measure the light in a scene and give you the correct camera settings that you should use for your shot. While this is a very good way at measuring exposure, external light meters aren’t cheap. You can try to get a used vintage one on eBay, but you run the risk of the same problems that old camera light meters have, in that they might not be accurate.
So, if you’re not good enough to guesstimate the proper exposure and you’re not willing to invest a couple hundred dollars on a new light meter, another option you can use is a digital camera. Any digital camera will work, as long as it shows you the aperture and shutter speed settings of a shot before you take it. When you are composing a shot with your TLR, take your digital camera and hold it right in front of the taking lens of the TLR, point it at your subject and see what it recommends for aperture and shutter speed. There are even apps on modern smartphones that use the camera on your phone to give you this same information. As I mentioned earlier, film is pretty forgiving, so it is not critical to get the settings perfect. Just get them close and your pictures will be just fine.
There is one more method called the “Sunny 16” rule. This is the method I like using the most. This rule is more of a set of guidelines that allow you to approximate correct shutter and aperture settings of any outdoor shot without using any external equipment. As easy as it might be to use a digital camera or your smartphone to estimate exposure, it still requires another gadget. If you master the Sunny 16 rule, you can shoot outdoors without the distraction of fuddling around with another device.
 There are a lot of websites out there that explain the Sunny 16 rule, but the most comprehensive one (perhaps too much) is the Ultimate Guide to the Sunny 16 Rule. There are two parts to the guide, only part 1 is relevant to amateurs. You can skip reading part 2.
My incredibly basic interpretation of the rule is that when shooting outdoors, take the inverse of your film speed and that becomes your shutter speed. So if you are shooting with 100 speed film, your shutter speed should be 1/100 sec. 200 speed film should be 1/200 sec. Not every camera will have the exact shutter speed you need, so just pick whatever is close. For example, if you are shooting 200 speed film, and your camera has 1/250 sec, use that. If you have 400 speed film and the closest is 1/500, use that.
The other half of Sunny 16 says that at the inverse of your film speed, on a bright sunny day with no clouds, proper exposure is at f/16. So if you have 100 speed film in your camera, the settings of 1/100 sec and f/16 will get you a perfectly exposed shot in bright sunlight.
- If your scene has a hazy, or partly cloudy sky, change aperture to f/11
- If your scene has an overcast or mostly cloudy sky, change aperture to f/8
- If your scene is entirely in shade or near sunrise or sunset, change aperture to f/5.6
It sounds incredibly basic, and in some ways it is. There is no need to over complicate exposure because it doesn’t really need to be. If you follow these simple guidelines, you should be able to get properly exposed shots 90% of the time outdoors. Obviously these rules are designed for outdoor shots, so they don’t help as much indoors. I recommend sticking to outdoor only shots if you are new at this, but if you really must get some indoor shots, I recommend using an external aide.
Two additional tips that I’ve learned when shooting outdoor photography without a light meter:
- If ever in doubt about which aperture to set, it is better to slightly overexpose than underexpose
- f/11 and f/8 are the apertures you will use the majority of the time
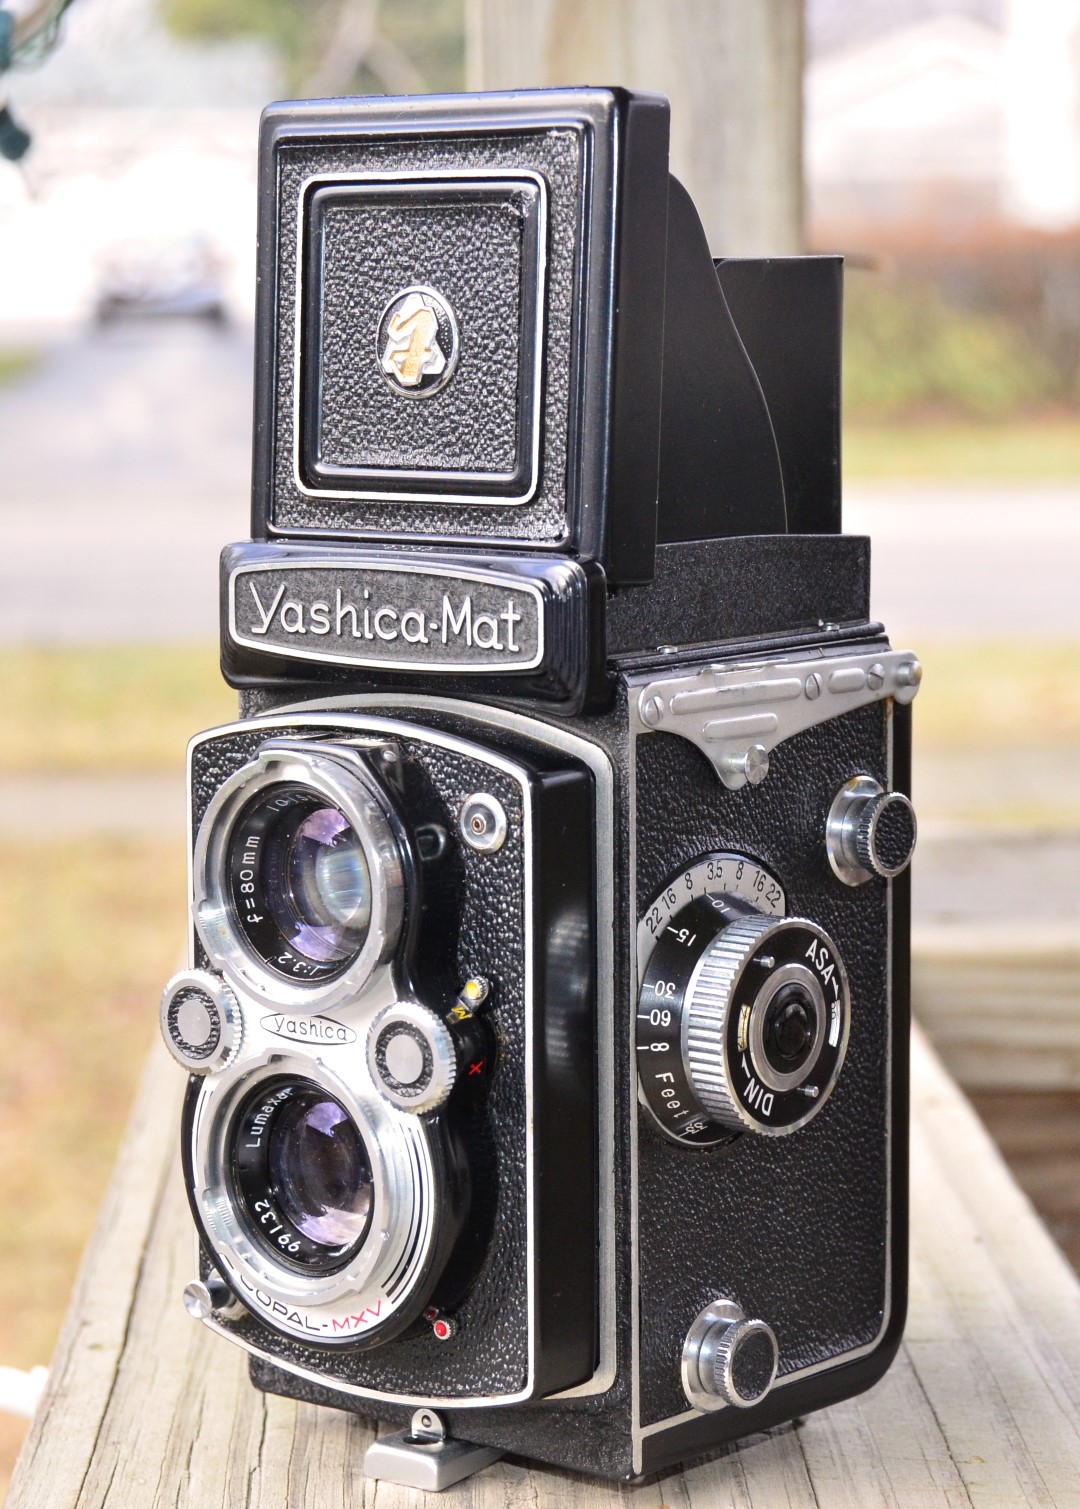
 Now that you have your image composed and in focus and you’ve set an appropriate exposure using one of your options, you are ready to take your picture. Like most cameras of the period, the Yashica-Mat must be wound and the shutter cocked. Earlier I said this camera has an advanced feature that auto-cocks the shutter. All you have to do is wind the film advance lever. To do this, you first fold it out, then wind it clockwise until it stops, then wind it counterclockwise until the handle is 180 degrees opposite of the recessed hole, then fold the handle back into it’s stored position.
Doing this simple step not only advances the film and cocks the shutter, but it also advances the film counter which is another convenient feature of this camera. Older TLRs have a round plastic red window on the back of the camera that allows you to see number markings on the back of the film. While this works fine, it is rather primitive and on some cameras, the red window isn’t completely light tight, which can lead to light leaks on your film.
 After the film is advanced and the shutter is cocked, you fire the shutter by pressing the button on the front bottom right corner (facing the camera away from you). When you have taken a shot, it is advised to not advance the film to the next frame until you are ready for your next shot. Leaving the shutter in a cocked position can cause the spring to weaken and fail.
As a testament to how easy this camera is to use, the picture on the left of me sitting in the recliner was the very first frame of the very first roll of film shot with this camera. My wife took the picture, and even though it is an indoor shot, it came out wonderfully.
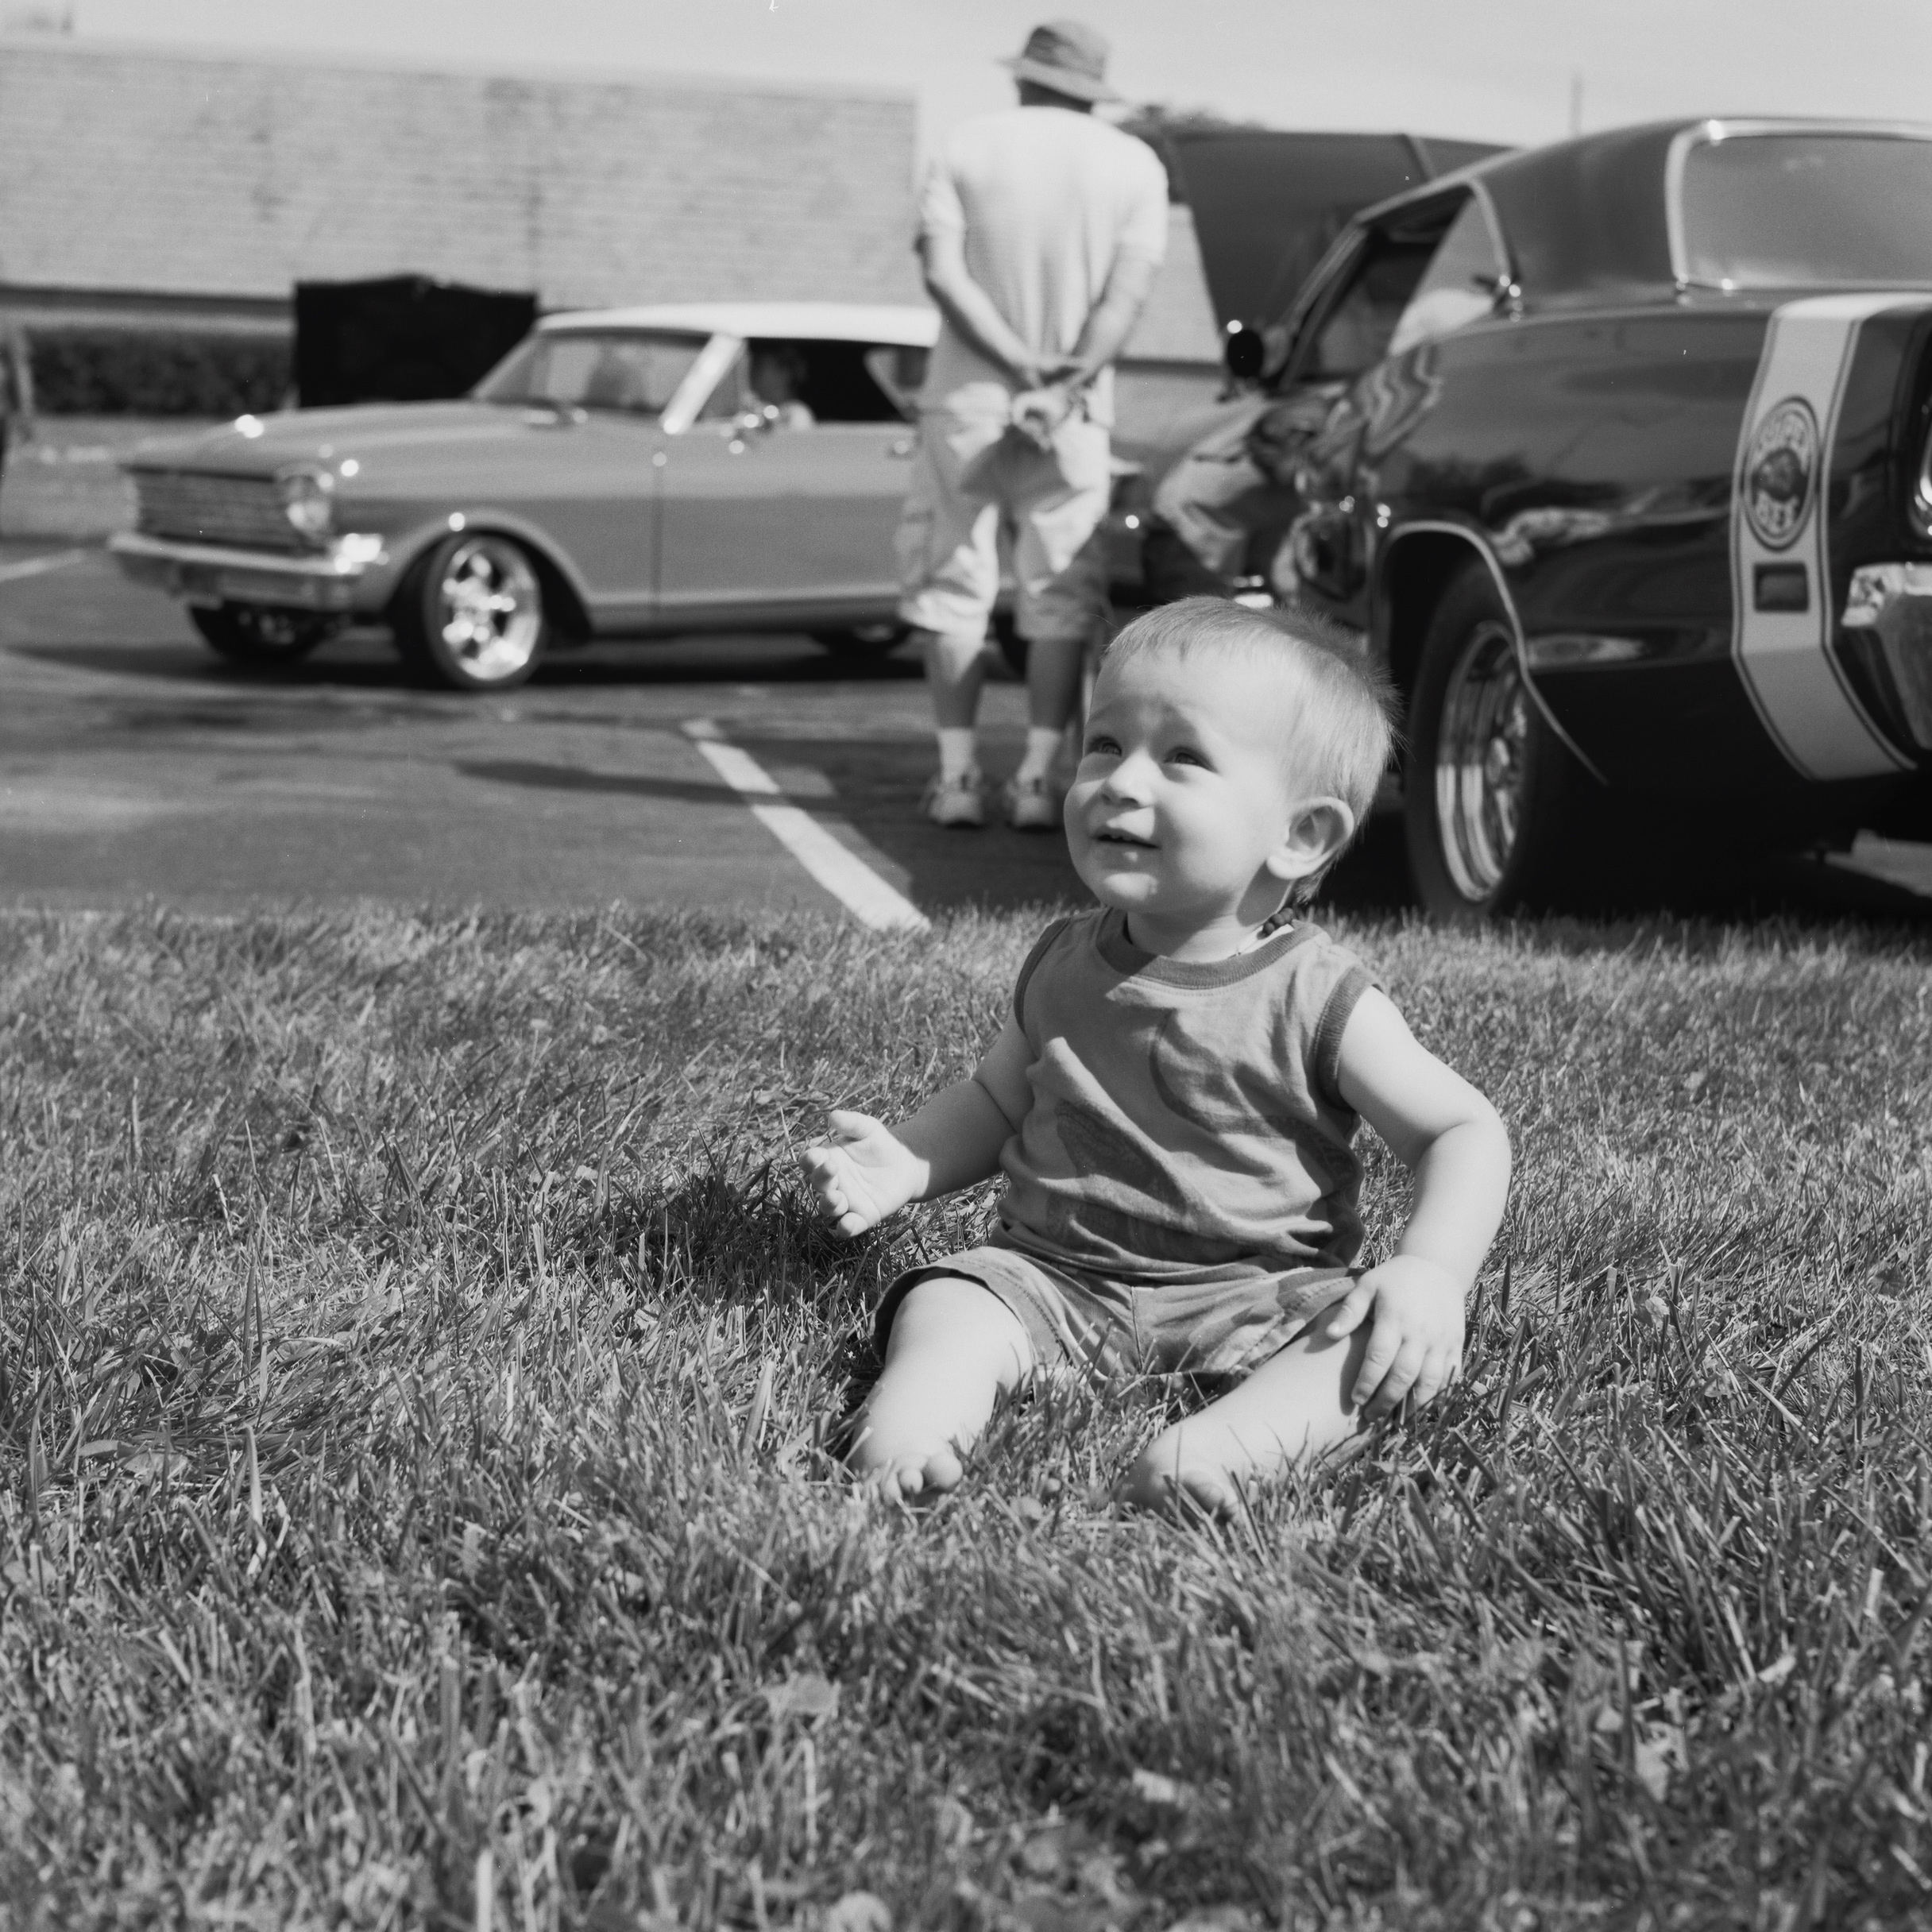
The Yashica-Mat can take both color and B&W film, and although I haven’t yet tried a roll of color film, I have been very happy with the results in B&W. The sharpness and detail of the lens is as good as any other camera I own. I can’t say enough how easy it is to get good shots out of this camera. But even more important, shooting with this camera is a fun experience. The unique style and method of looking down through the top viewfinder is great. If you take this camera to a public place and take some shots with it, you will definitely draw some attention from younger people who have never seen a TLR.
If you enjoy old cameras, I highly recommend getting a TLR of any kind. The Yashica-Mat is as good as any out there, and doesn’t have features you don’t need. There’s no need for a hot shoe for flash photography, and I wouldn’t trust any light meters that were made when these cameras were new, so their omission takes absolutely nothing away from the experience. As a matter of fact, in my personal opinion, I think the light meters look a little out of place and take away from the classic aesthetic of the camera.
Additional Resources
http://www.yashicatlr.com/index.html
http://www.tlr-cameras.com/japanese/Yashica.html
http://camerapedia.wikia.com/wiki/Yashica_6%C3%976_TLR_%28crank_advance%29
http://www.frugalphotographer.com/info-YashicaTLR.htm
https://mikeeckman.com/photovintage/vintagecameras/yashicamat/index.html
Hi Mike!
Another great article and an excellent review. I believe anyone would be able to “shoot like a pro” using your info on exposure settings. You are correct, the Yashica-Mat is an excellent camera and well worth the time and money finding a good one if you were to own just one TLR. The Yashica LM (first LM 1956) is a great TLR and has a built-in exposure meter. Another inexpensive (now) TLR is the Yashica EM (another with a super simple built-in exposure meter).
On your early history of Yashima… check out Paul’s outstanding site again (www.yashicatlr.com) to put the Pigeonflex first and then the Yashima Flex. Small detail but Paul’s site is the best Yashica TLR site on the planet. Check it out.
I enjoy your blog and will check back often. Well written and presented.
Thanks a lot for your review ! I own the same Yashica Mat now !
It produces really nice picture and I’m having a lot of creative fun with it.