

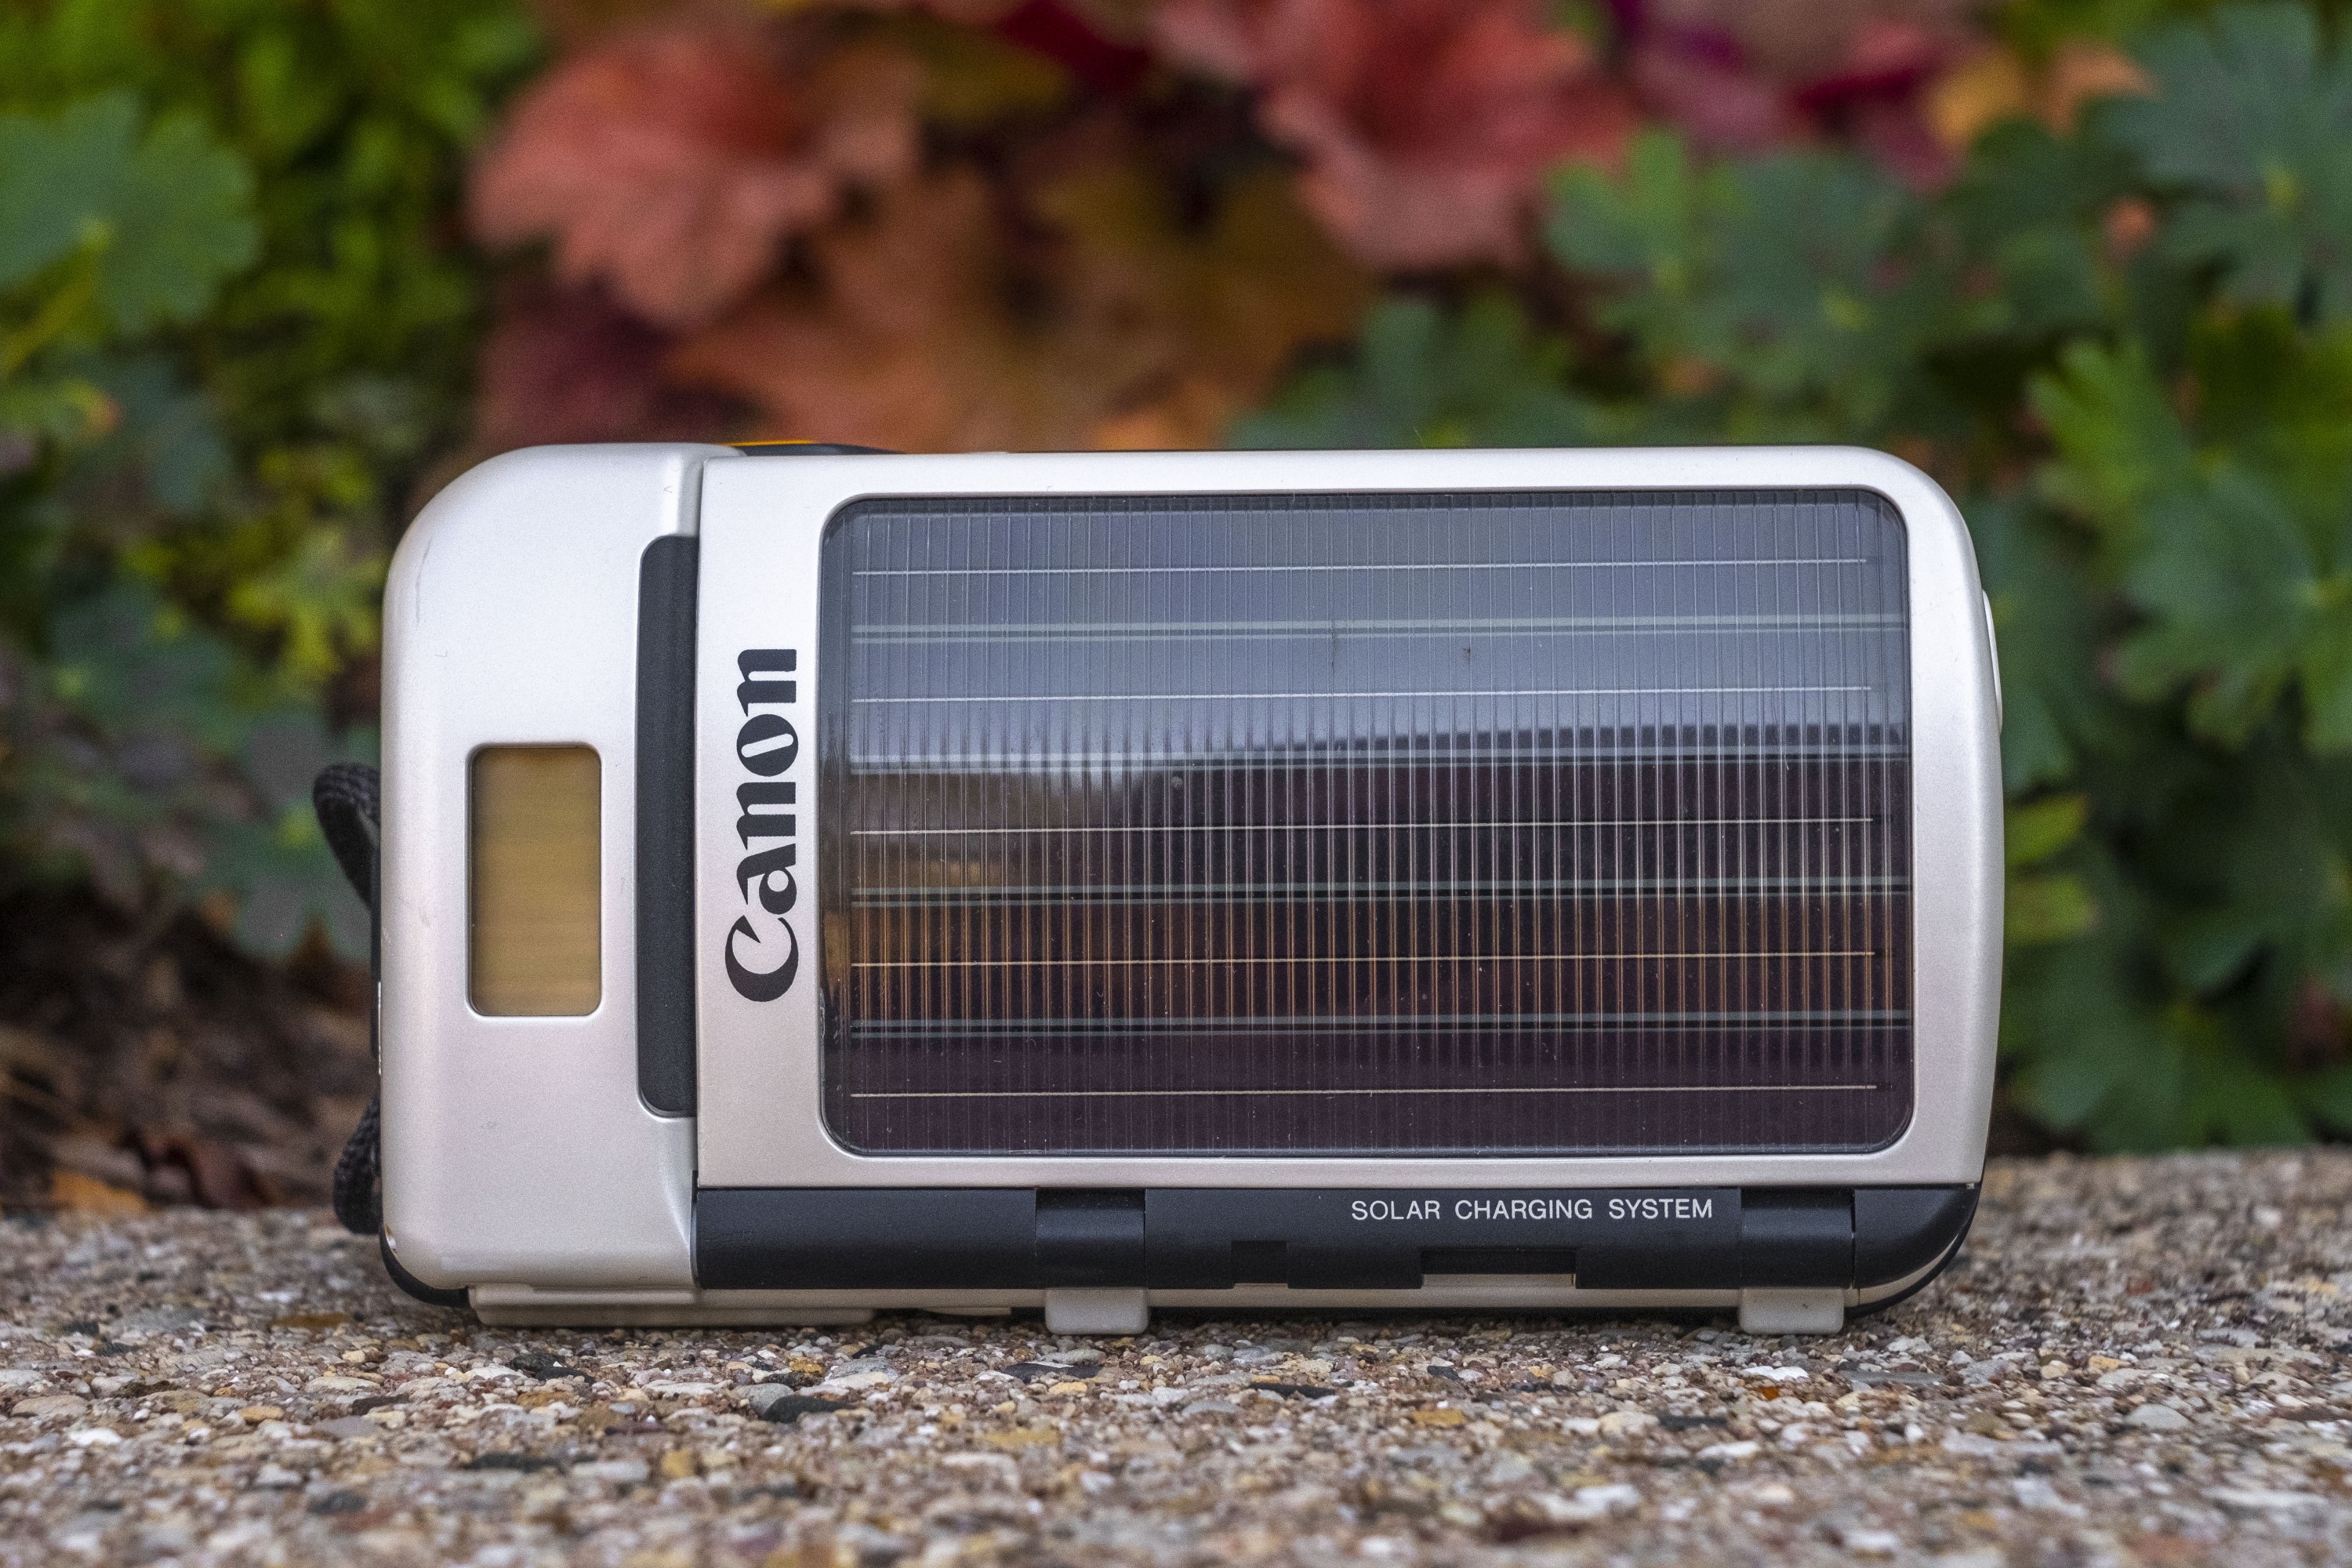
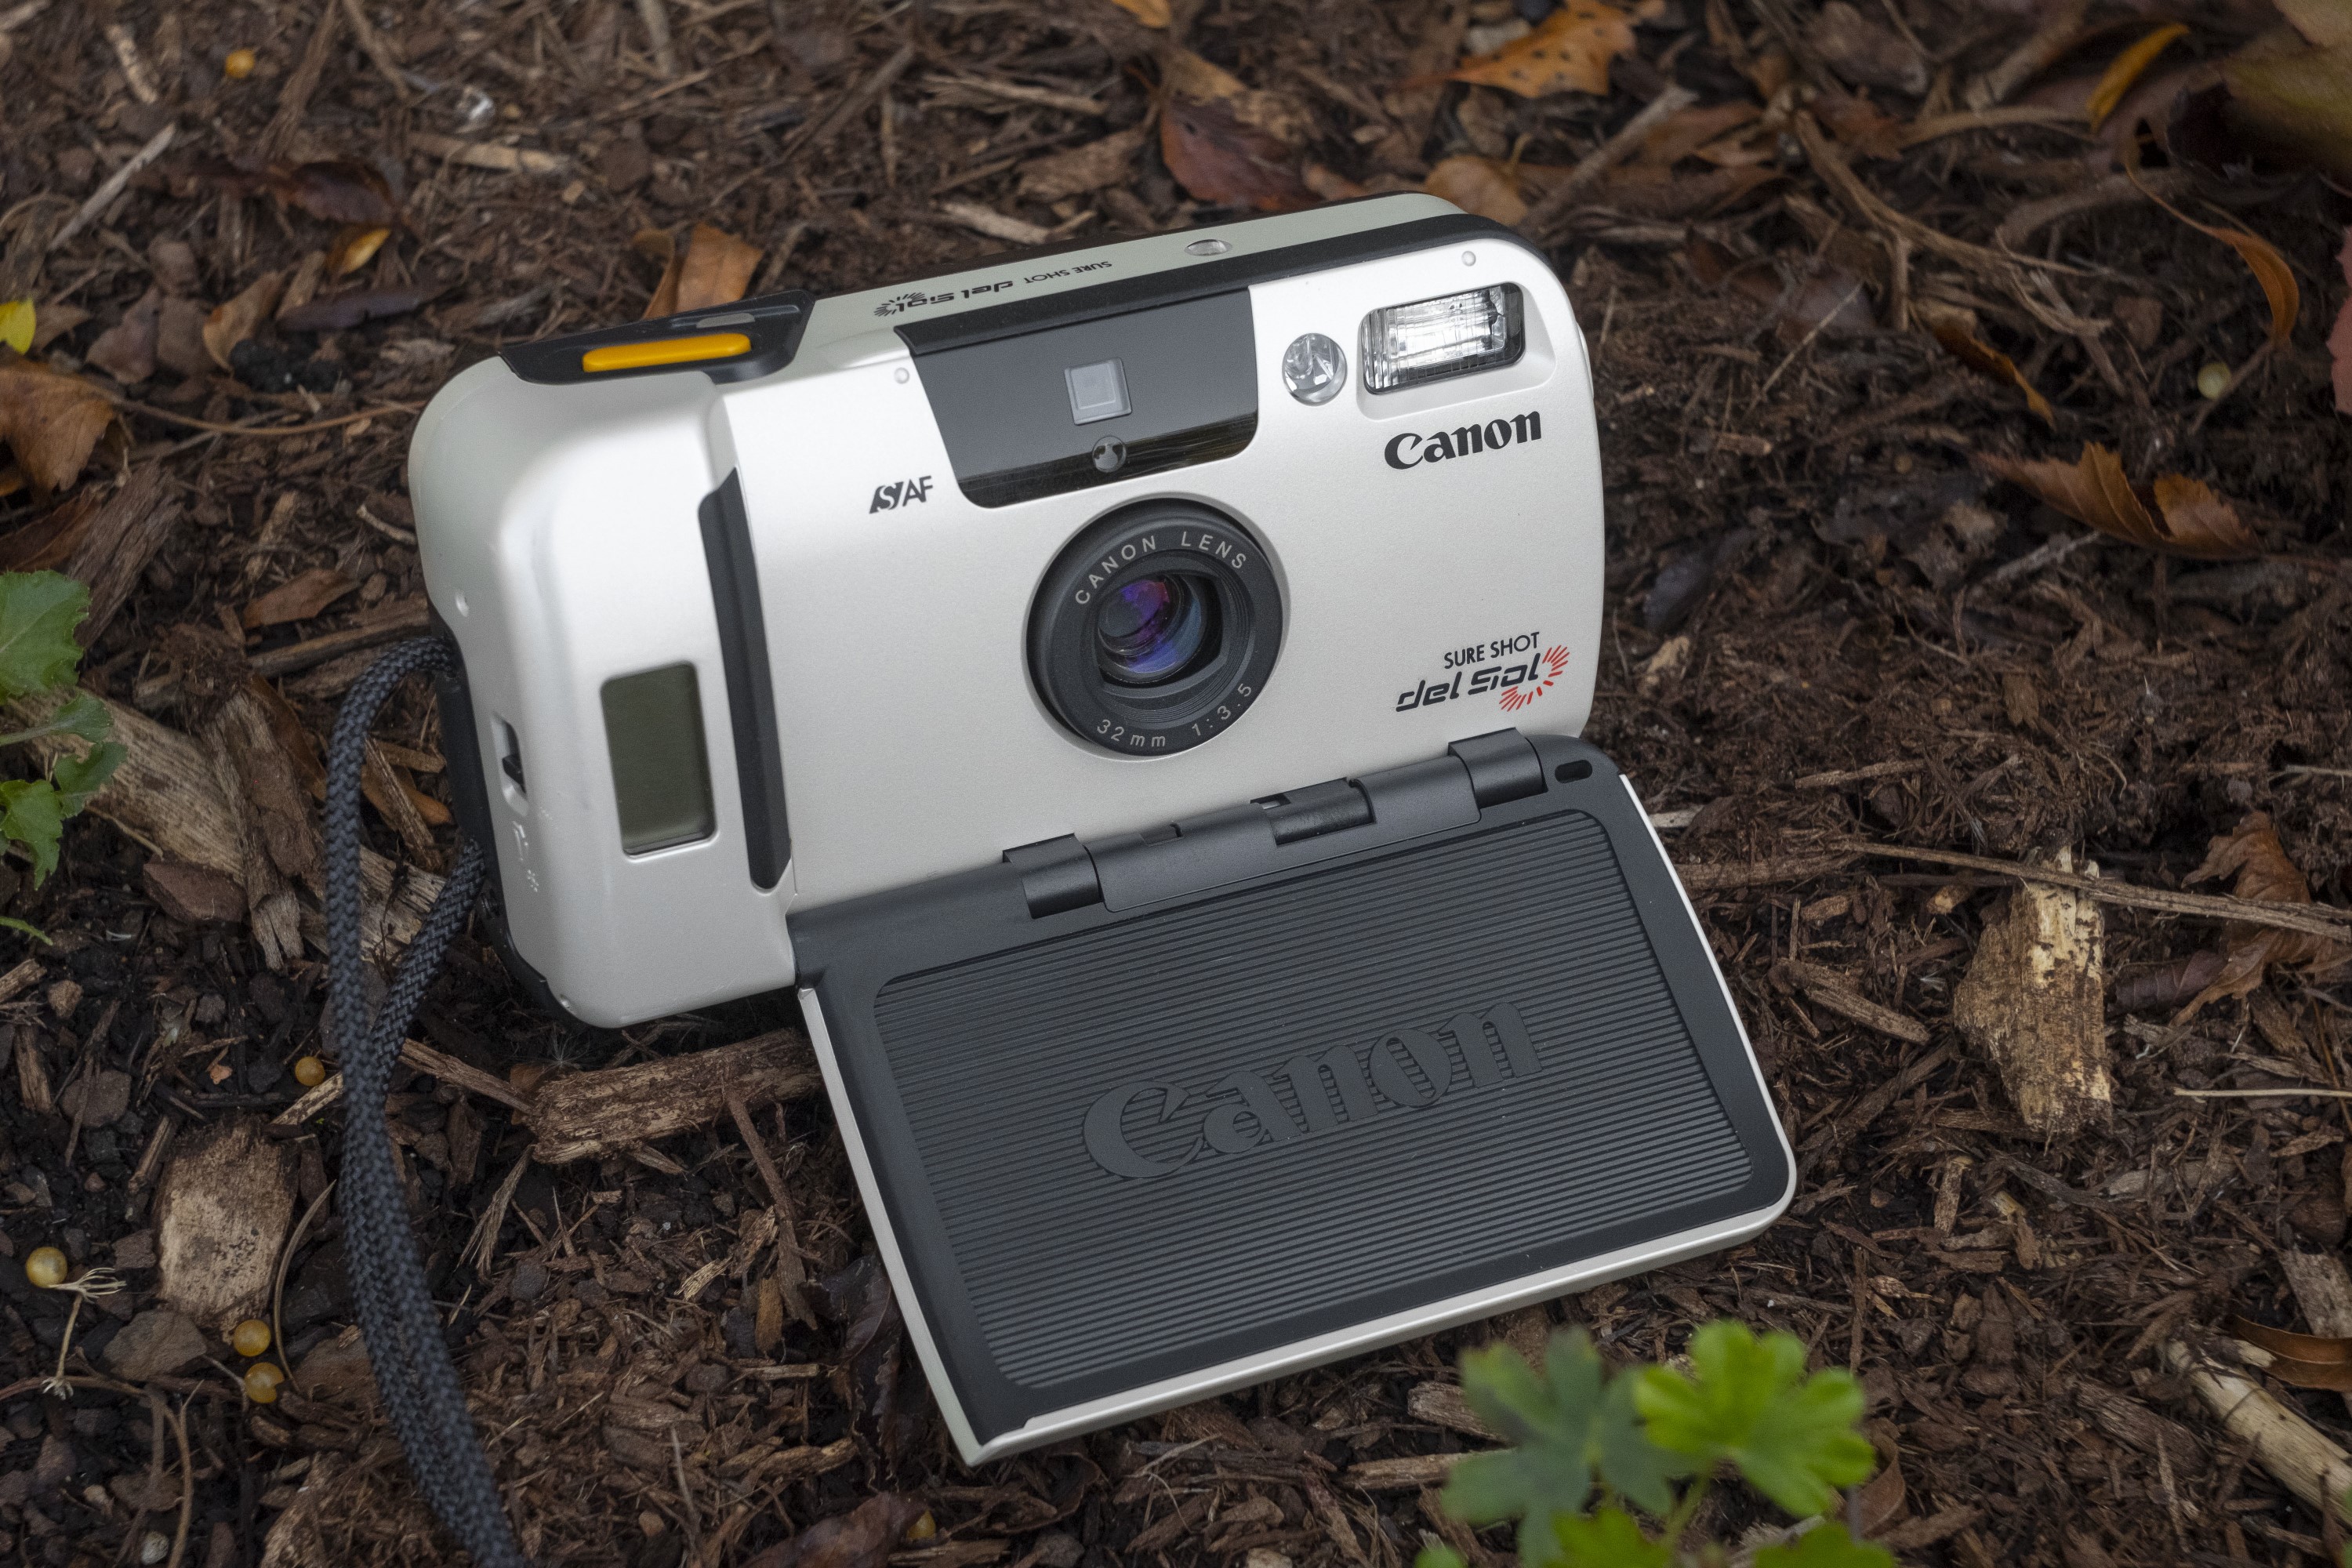
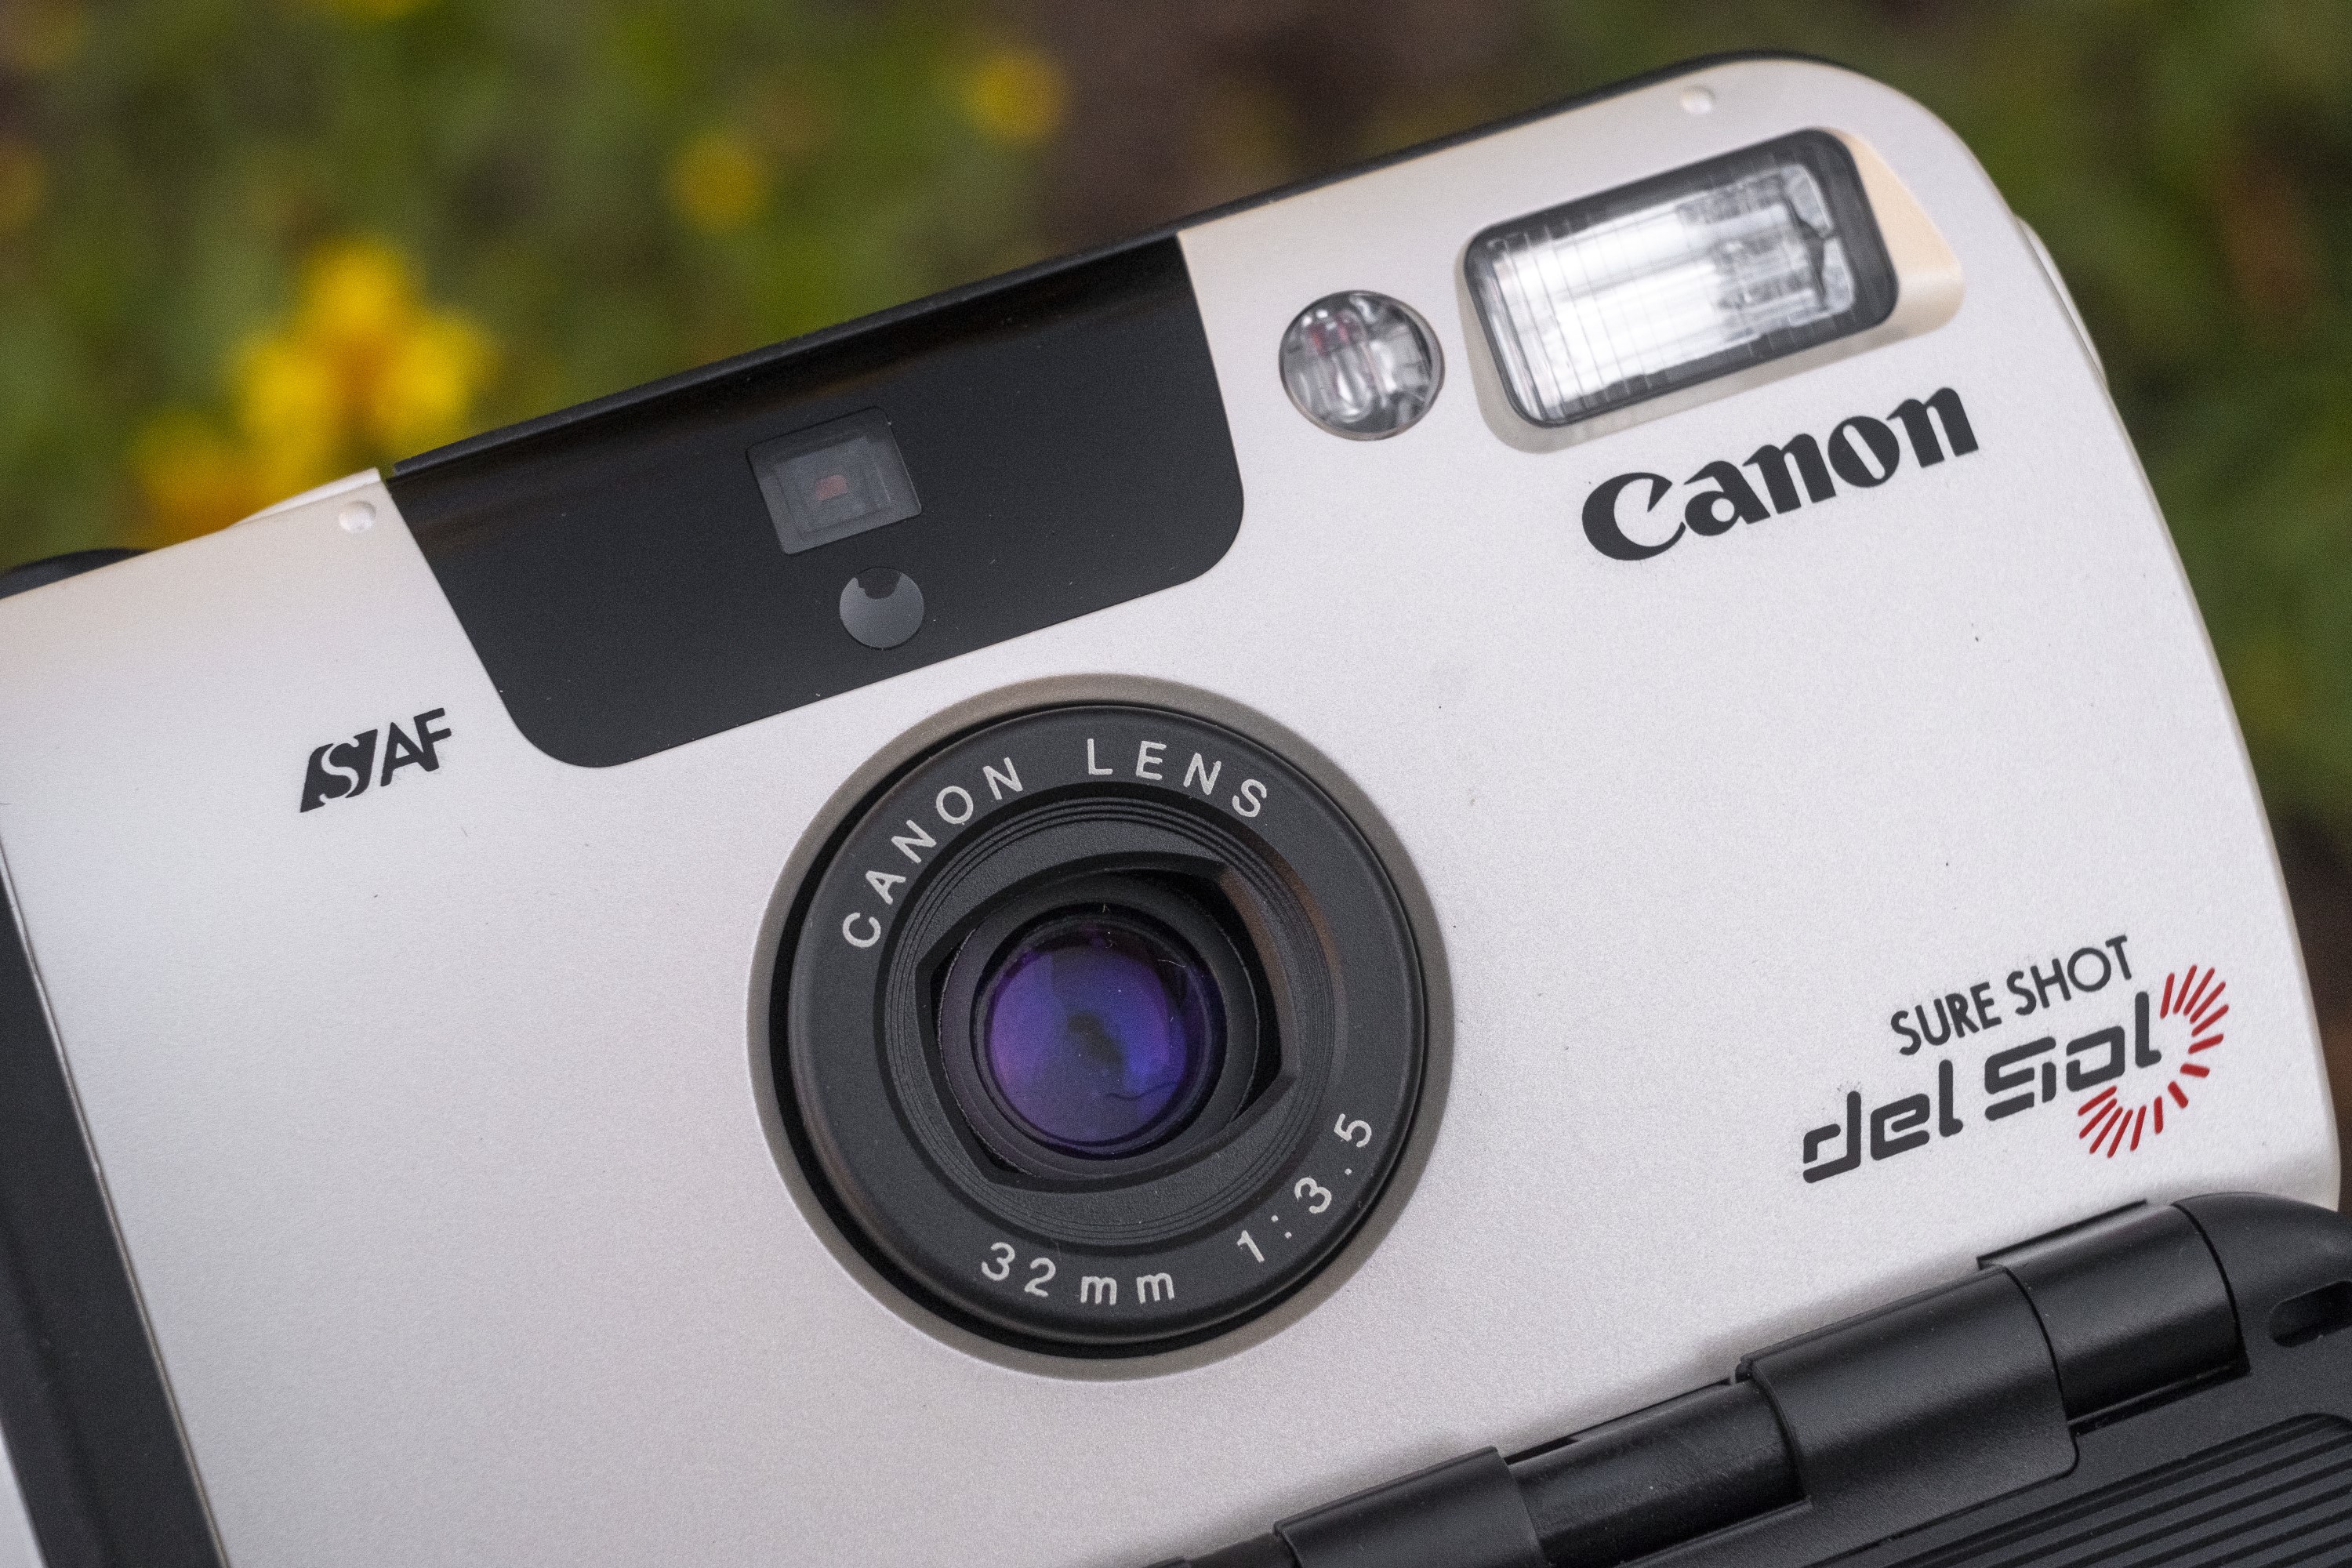
This is a Sure Shot del Sol made by Canon starting in March 1995. The del Sol was part of Canon’s highly successful Sure Shot series and is notable as being the very first completely solar powered camera. Using a large fold down tandem amorphous solar panel that covers nearly the entire front of the camera, the camera’s rechargeable lithium battery would charge when exposed to sunlight. The name “del Sol” is how it was branded in the US, but it was also called the Prima Sol and Autoboy SE in Europe and Japan.
 Film Type: 135 (35mm)
Lens: 32mm f/3.5 Canon Lens coated 3-elements
Focus: 3-point Smart Autofocus, 0.45 m to Infinity
Viewfinder: Direct View with Projected Frame Lines with Masks for Close Focus and Panorama
Shutter: Electromagnetically Controlled Leaf
Speeds: 1 – 1/250 seconds, Fully Automatic
Exposure Meter: Silicon Cell, Fully Programmed AE
Power Source: Tandem Amorphous Solar Panel
Battery: Rechargeable 3.7v Lithium Ion US14500
Flash: In-Body Flash w/ Slow Speed Sync and Red Eye Reduction
Weight: 260 grams
Manual: https://mikeeckman.com/media/CanonDelSolManual.pdf
How these ratings work |
The Canon Sure Shot del Sol is the world’s first completely solar powered point and shoot camera. It’s signature feature is a large folding solar panel covering nearly the front of the camera, but behind it is a rather mundane, but capable point and shoot camera. I found it to be easy to use and it’s three element lens captured some really terrific images. I quite enjoyed using the little camera, but it’s solar panel is simply a gimmick. If you’re in a market for a capable little compact camera and like the idea of solar power, this is the camera for you, just don’t expect it to be something it’s not. | ||||||
| Images | Handling | Features | Viewfinder | Feel & Beauty | History | Age | |
| 2 | 2 | 1 | 1 | 1 | 2 | 0% | |
| Bonus | none | ||||||
| Final Score | 9.0 | ||||||
History
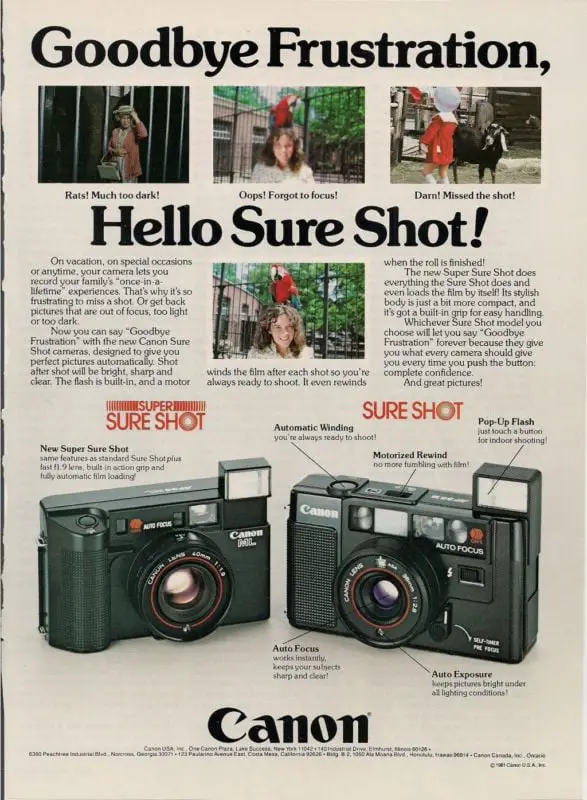
In November 1979, Canon would release it’s first compact 35mm camera with a near infrared Auto Focus system called the Canon AF35M. In Japan, this camera was known as the Autoboy, and in the United States, sold as the Sure Shot.
This camera was significant for a number of reasons, not just the technological leap forward that auto focus brought to the point and shoot segment, but it would be the first in a huge number of Autoboy and Sure Shot models that Canon would continue to release until 2005 when they stopped making film cameras.
Over the course of the next several decades, Canon Sure Shot cameras would be at or near the top of the point and shoot segment with each new model. Canon’s reputation as a quality camera maker with good to great performance cemented their place as an industry leader, a reputation that they still enjoy today.
Despite how great Canon cameras were by the mid 1990s, nearly everyone else had their own competing models that had all of the same features and performed nearly as good as Canon. Sure, they relied on their brand name to continue to sell new models, but if you were shopping for a quality compact camera in 1995, you had dozens to choose from that were all really good. Nikon, Minolta, Pentax, Olympus, and many other companies all had capable and easy to use fully automatic point and shoot cameras.
I have no evidence of this, but I imagine someone at some board room meeting at Canon headquarters solicited ideas on something new they could try out with their next camera, and there likely was some environmentally conscious person who said, “We should make a solar powered camera!”
In March 1995, Canon’s new solar powered camera would go on sale in various markets all over the world. In the US, it was known as the Sure Shot del Sol, in Europe as the Prima del Sol, and in Japan as the Autoboy SE. In the US, the camera carried a retail price of $285 which likely no one ever paid as catalogs for places like B&H Photo had the camera listed for $148.95 by Christmas of that same year.
Edit: After posting this article, several people pointed out that the first solar powered camera was the Ricoh XR-S from 1981. Upon further research, yes, the XR-S did have a solar panel on the side of the pentaprism, it only supplemented power to the metering circuit and did not power the entire camera like in the del Sol. Furthermore, in the event of insufficient solar power, the meter had a backup 1.5-volt SR44/LR44 power source unlike the del Sol which is only powered by the battery charged by the solar panel, which allows the del Sol to still have the distinction of being the first “completely solar powered camera”.
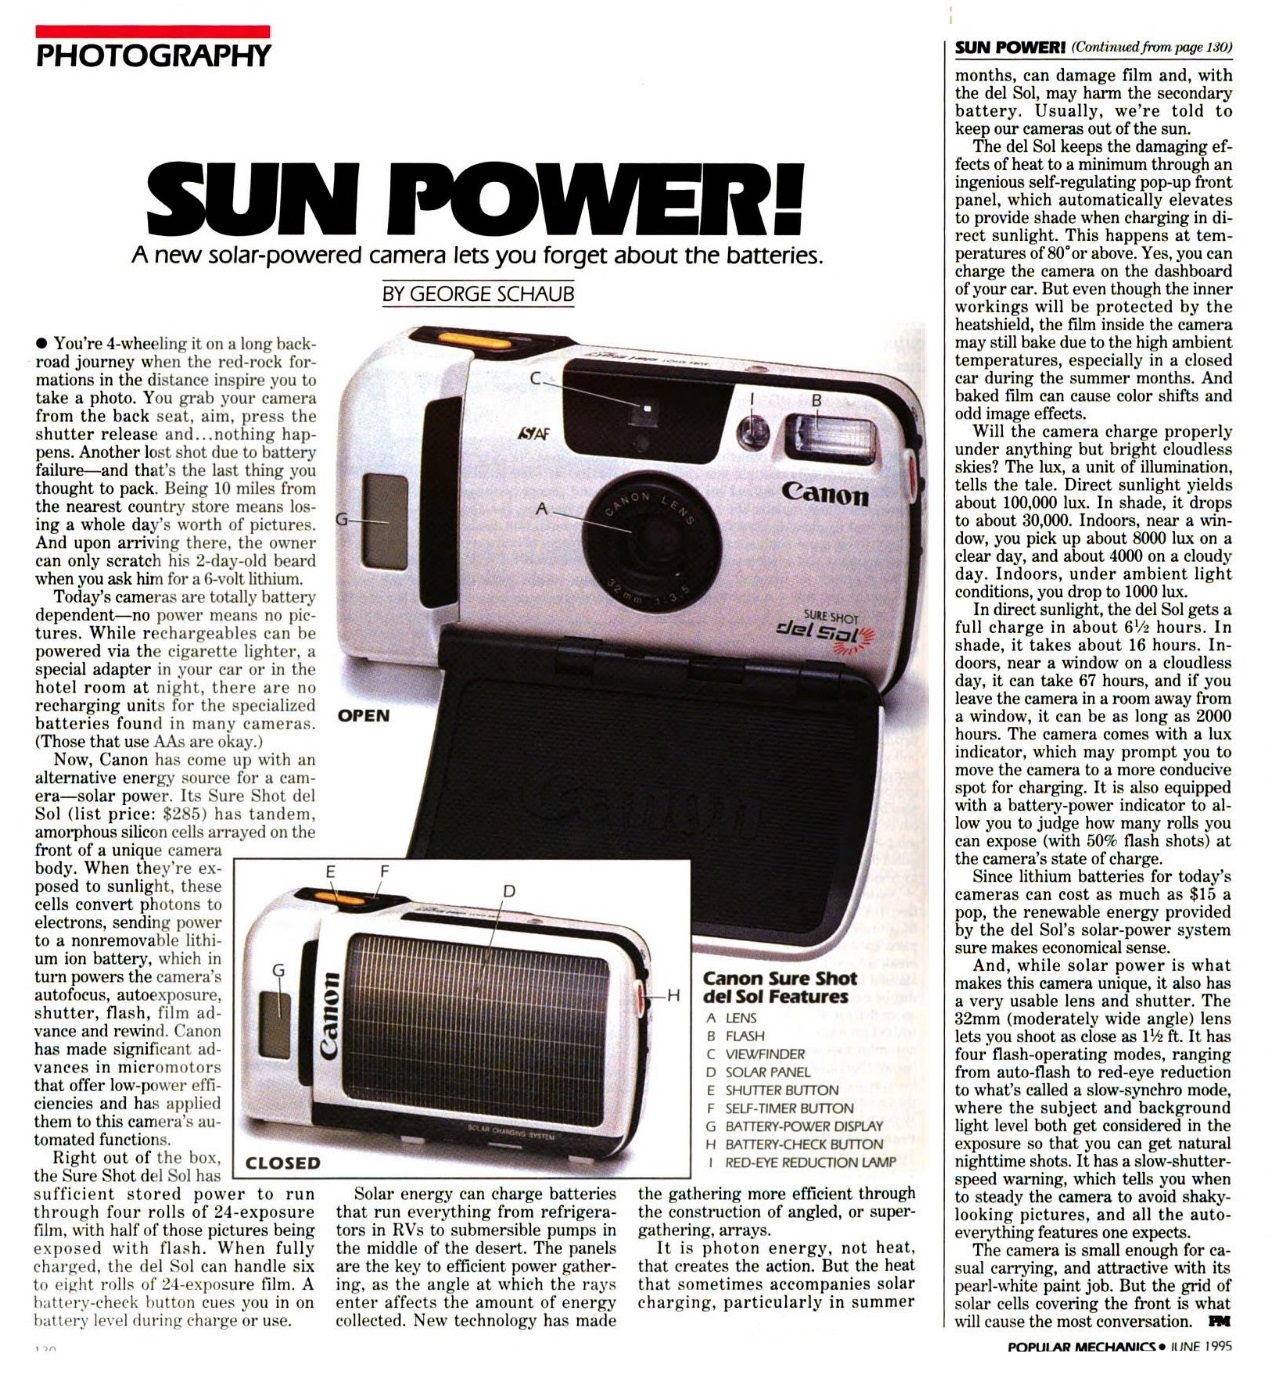
It is clear that the camera was heralded for it’s “tech appeal” rather than it’s performance as reviews such as the one to the left from the June 1995 issue of Popular Mechanics, only discuss the merits of solar power, and barely touch on the performance of the camera which is a shame as the 32mm semi-wide angle f/3.5 prime lens is a decent performer and should be capable of nice images.
It is impossible to say how well the camera sold, but the fact that it seems to have disappeared from all US photo catalogs as quickly as 1996, and neither Canon, nor any other company ever made another solar powered camera like this, suggest that not many were sold.
Although the solar powered aspect of this camera was a gimmick, today’s cameras are no stranger to gimmicks. If you browse through the new releases sections of photography magazines and websites today, you’ll see long laundry lists of gimmicky features such as smile detection, digital sepia and ambrotype filters, and various other Bluetooth or near-field communications protocols, none of have any impact on the photo making abilities of the camera.
Today, the Canon Sure Shot del Sol is a curious relic of mid-1990s techno wizardry. At it’s core lies a pretty capable little camera that is part of Canon’s excellent Sure Shot series. These cameras are not common, at least not in the US, and if you find one today, it is very unlikely that the battery will still hold a charge, but if you like camera curiosities, it doesn’t get much better than this!
Repairs
The Canon Super Shot del Sol came out in the mid 1990s at a time when high powered rechargeable batteries were still quite expensive. Common rechargeable batteries of the era were still made out of a material called Nickel-Cadium (NiCd for short). While NiCd batteries were plentiful, they had a slower discharge rate and a lower voltage that was unsuitable for the sensitive electronics inside of the camera.
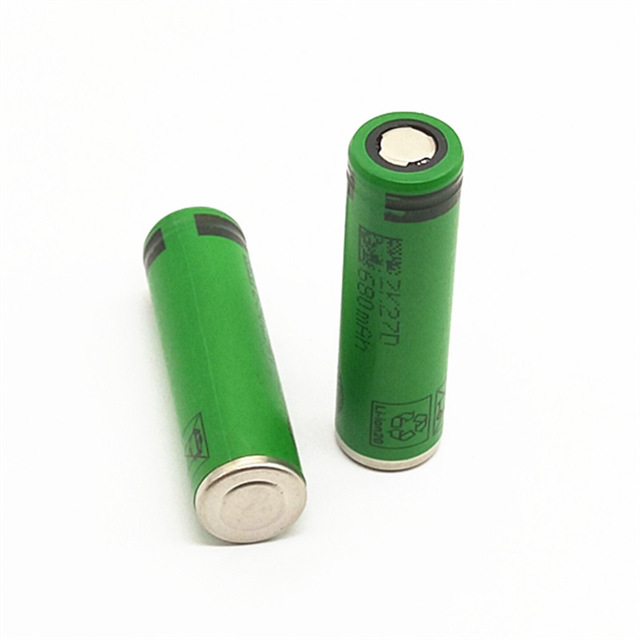
As a compromise, Canon went with an industrial style 3.7v Lithium-Ion type US14500 battery. The one in this camera was made by Sony, but I assume there were probably other suppliers out there too. While the US14500 battery certainly was up to the task of handling the power supply demands of the camera, it was not designed to be user replaceable. You couldn’t simply run down to the hardware store and pick up another, but frankly, you really didn’t need to. At least that was the thought of Canon engineers when this camera was being designed.
You see, this camera was produced in the era of “planned obsolescence” in which things were meant to serve their purpose for a short time, and then discarded. This is in contrast to the many wonderful mechanical cameras in the early to mid 20th century which were designed by precision craftsman to work for a lifetime. The usable lifespan of a lithium battery was between 5 to 10 years, so Canon probably figured that there would never come a day when someone would need to replace it.
Of course, they never considered that one day this thing called the Internet would become popular, and bloggers like myself would be writing reviews on them more than twice the lifespan of that battery later.
I don’t know how long the del Sol was in production, but it probably wasn’t long. My guess is most were made in 1995 or a year or two after, meaning that nearly every single one of them by now should have a dead battery. They weren’t designed to be user replaced, so the only way to get one to work is to open it up and hope for the best…which is exactly what I did.
Thankfully, replacement batteries are still available and replacing it only requires rudimentary soldering skills and a single small screwdriver. A quick Google search turned up several US14500 batteries for under $10 shipped. Most of them had flat tops, but some have tabs soldered on them. I chose to go with ones with tabs as I am terrible at soldering and thought the tabs would make it easier.
After locating a replacement battery, you need to remove some parts of the camera.
Step 1:
Start with the bottom plate. Remove all five visible screws and peel back the long thin strip of black rubber and the bottom plate comes off. The five screws are not all the same length and must go back into the same locations you removed them from. In the inset image below, the long screw is indicated with a RED arrow, the short screw with a YELLOW arrow, and three medium length screws indicated with BLUE arrows.

Step 2:
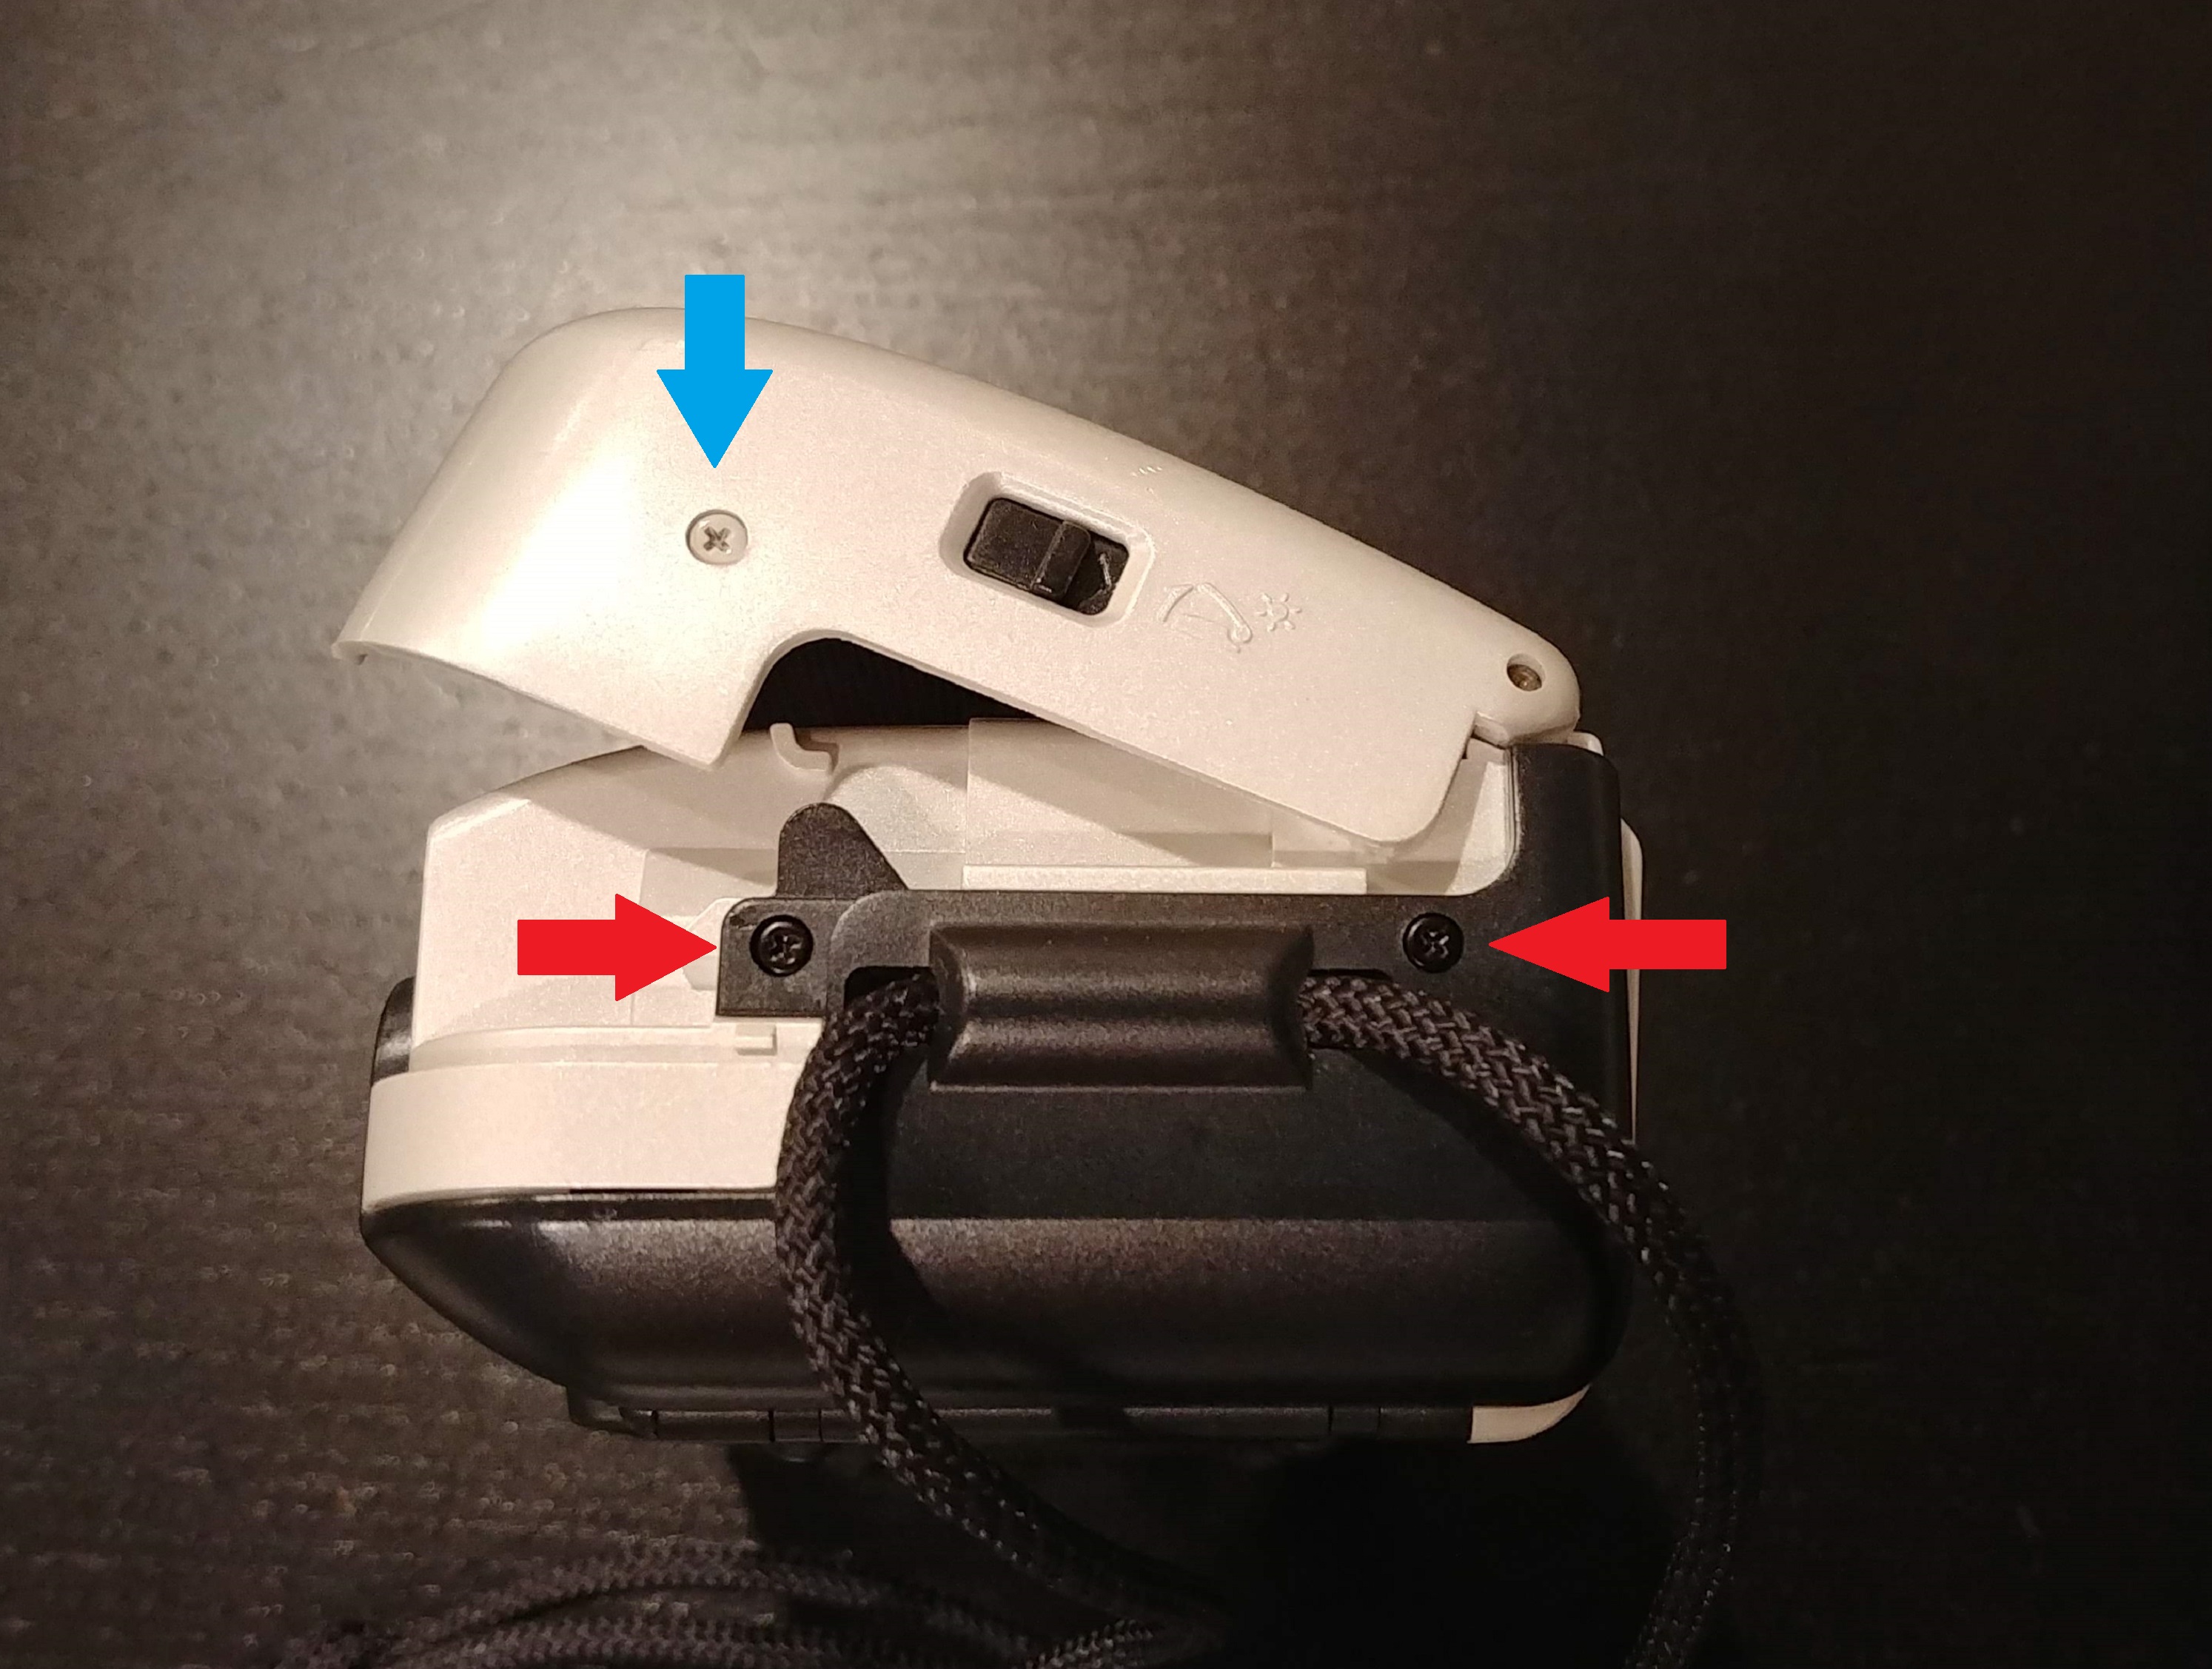
On the side of the camera that the wrist strap is attached, remove the two black screws holding the black side panel which covers the battery. These are indicated with RED arrows in the picture below. There is a third white screw, indicated with a BLUE arrow which does not need to come off. When you remove the two black screws, the black panel will swing up as it is attached to the film compartment door shaft. Open the rear film compartment and slide out the metal shaft holding the door in place. The shaft should easily slide out through the bottom.

Step 3:
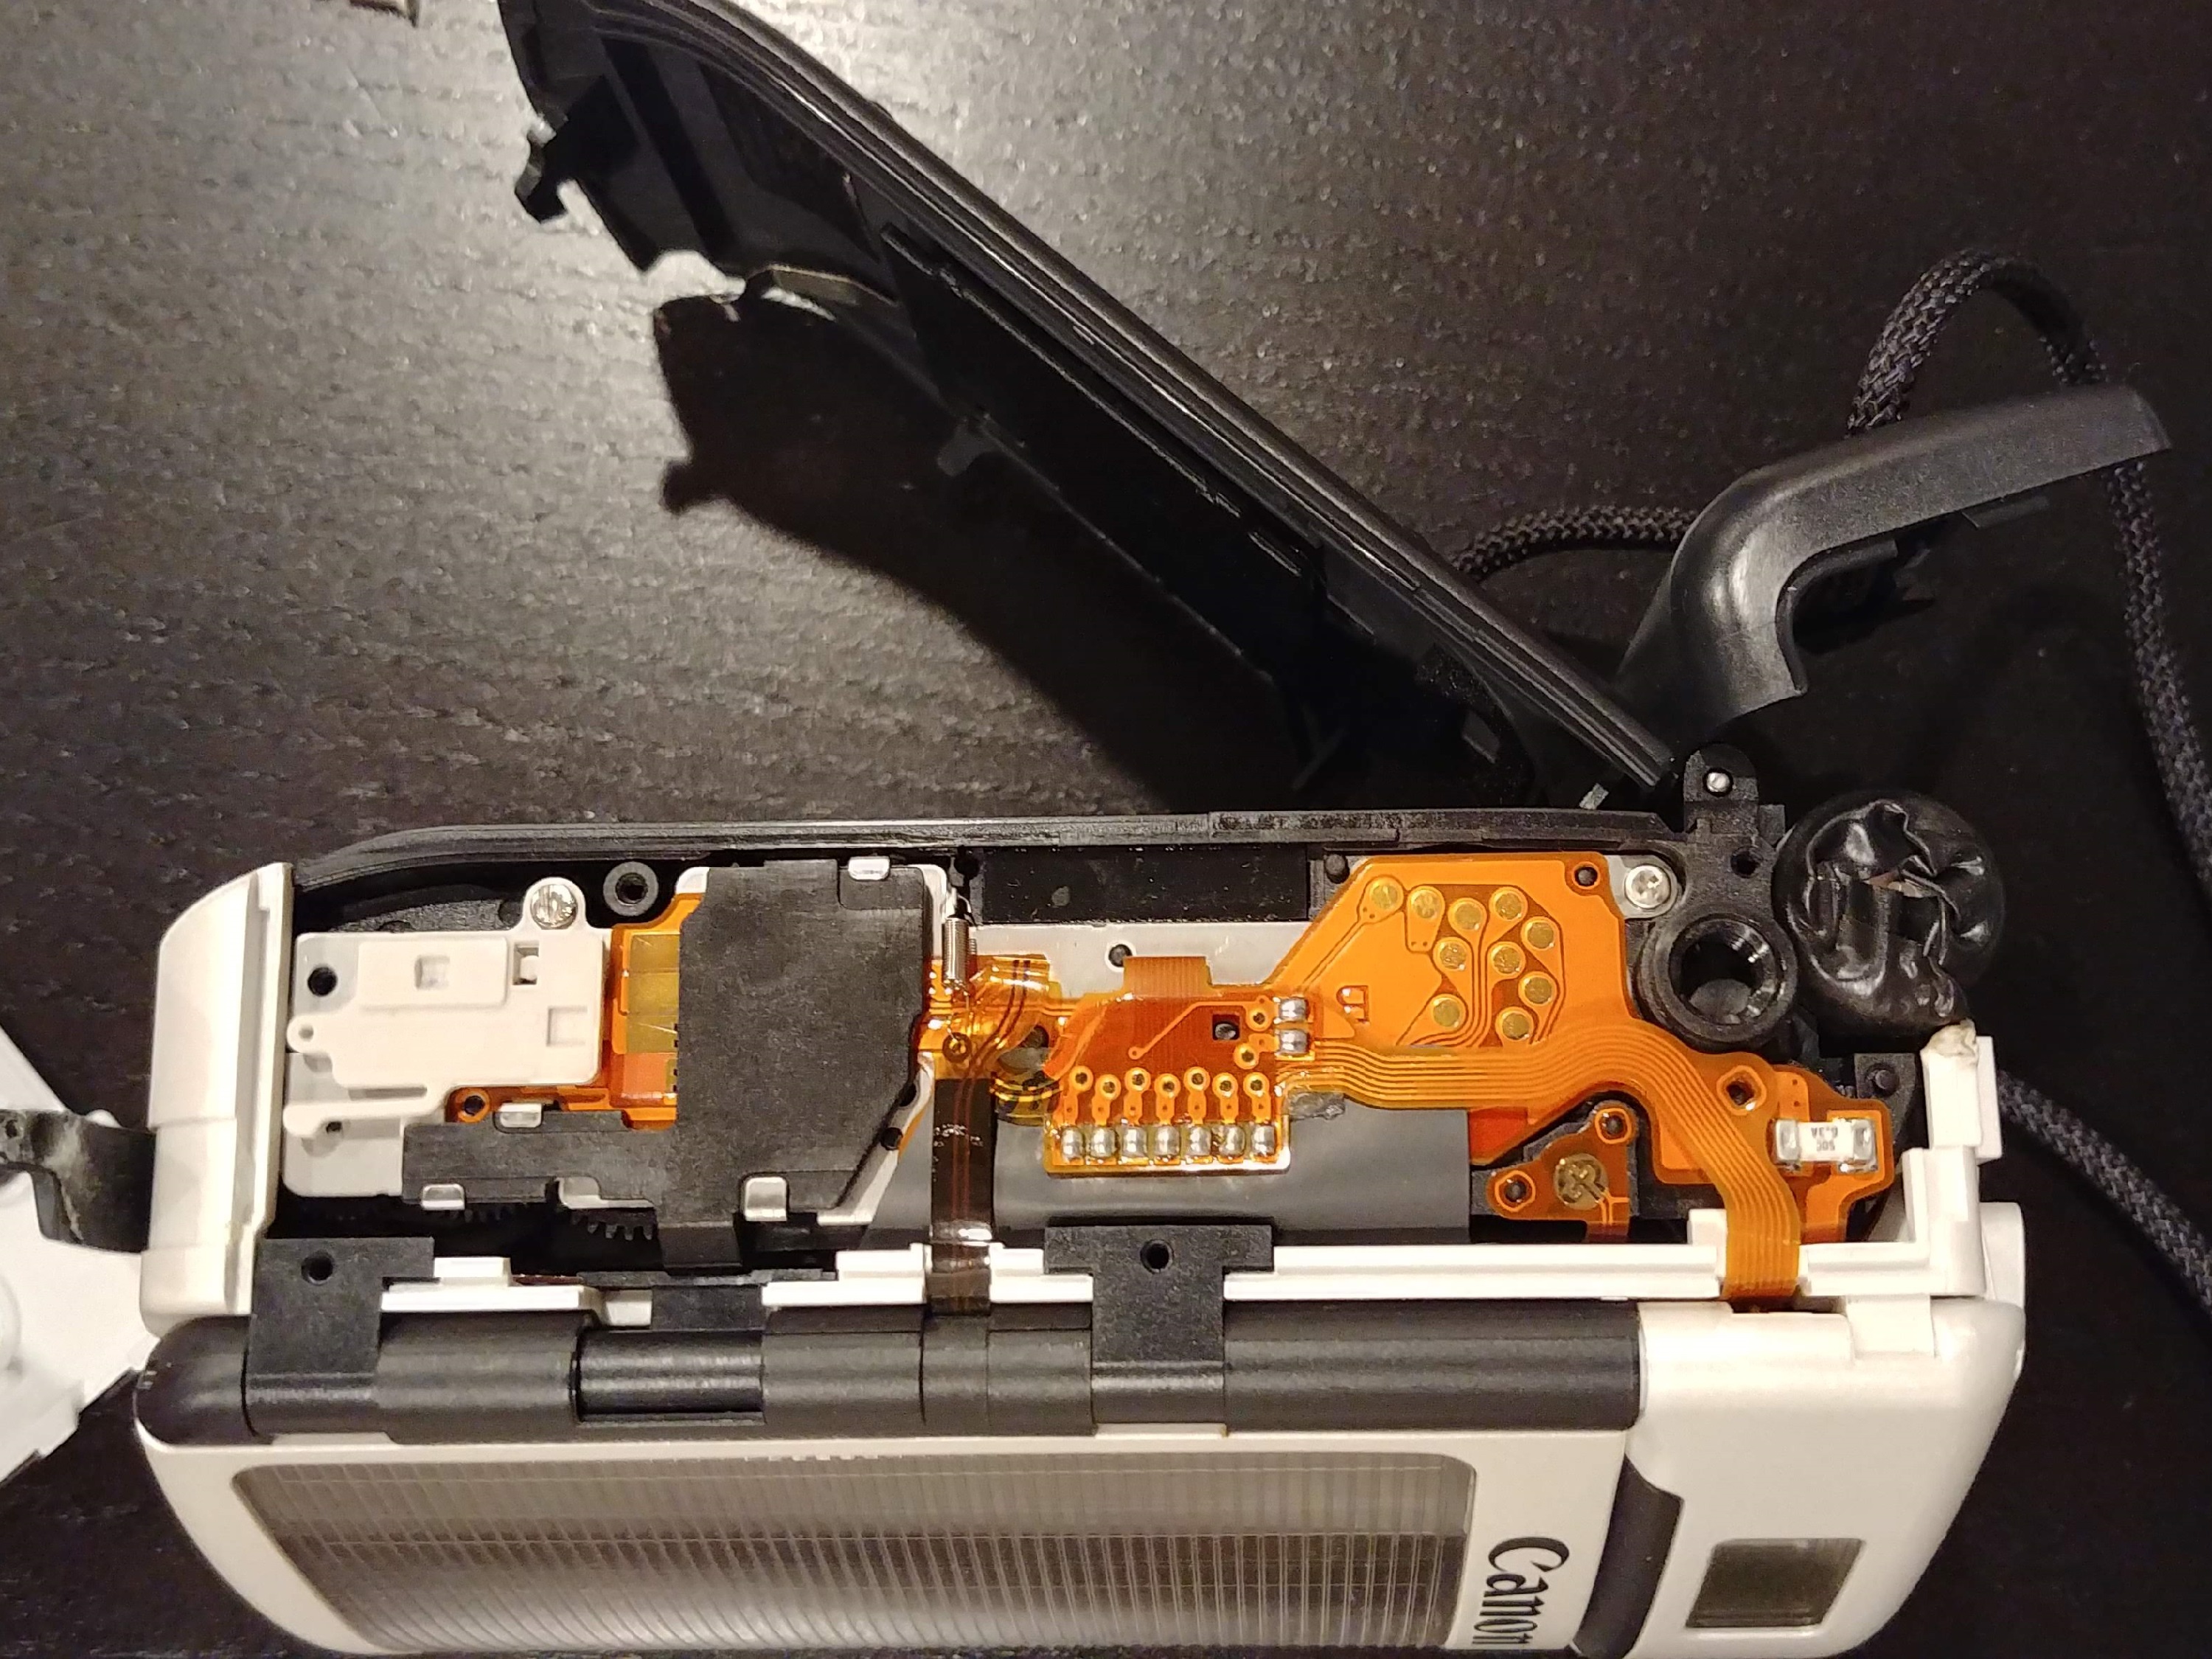
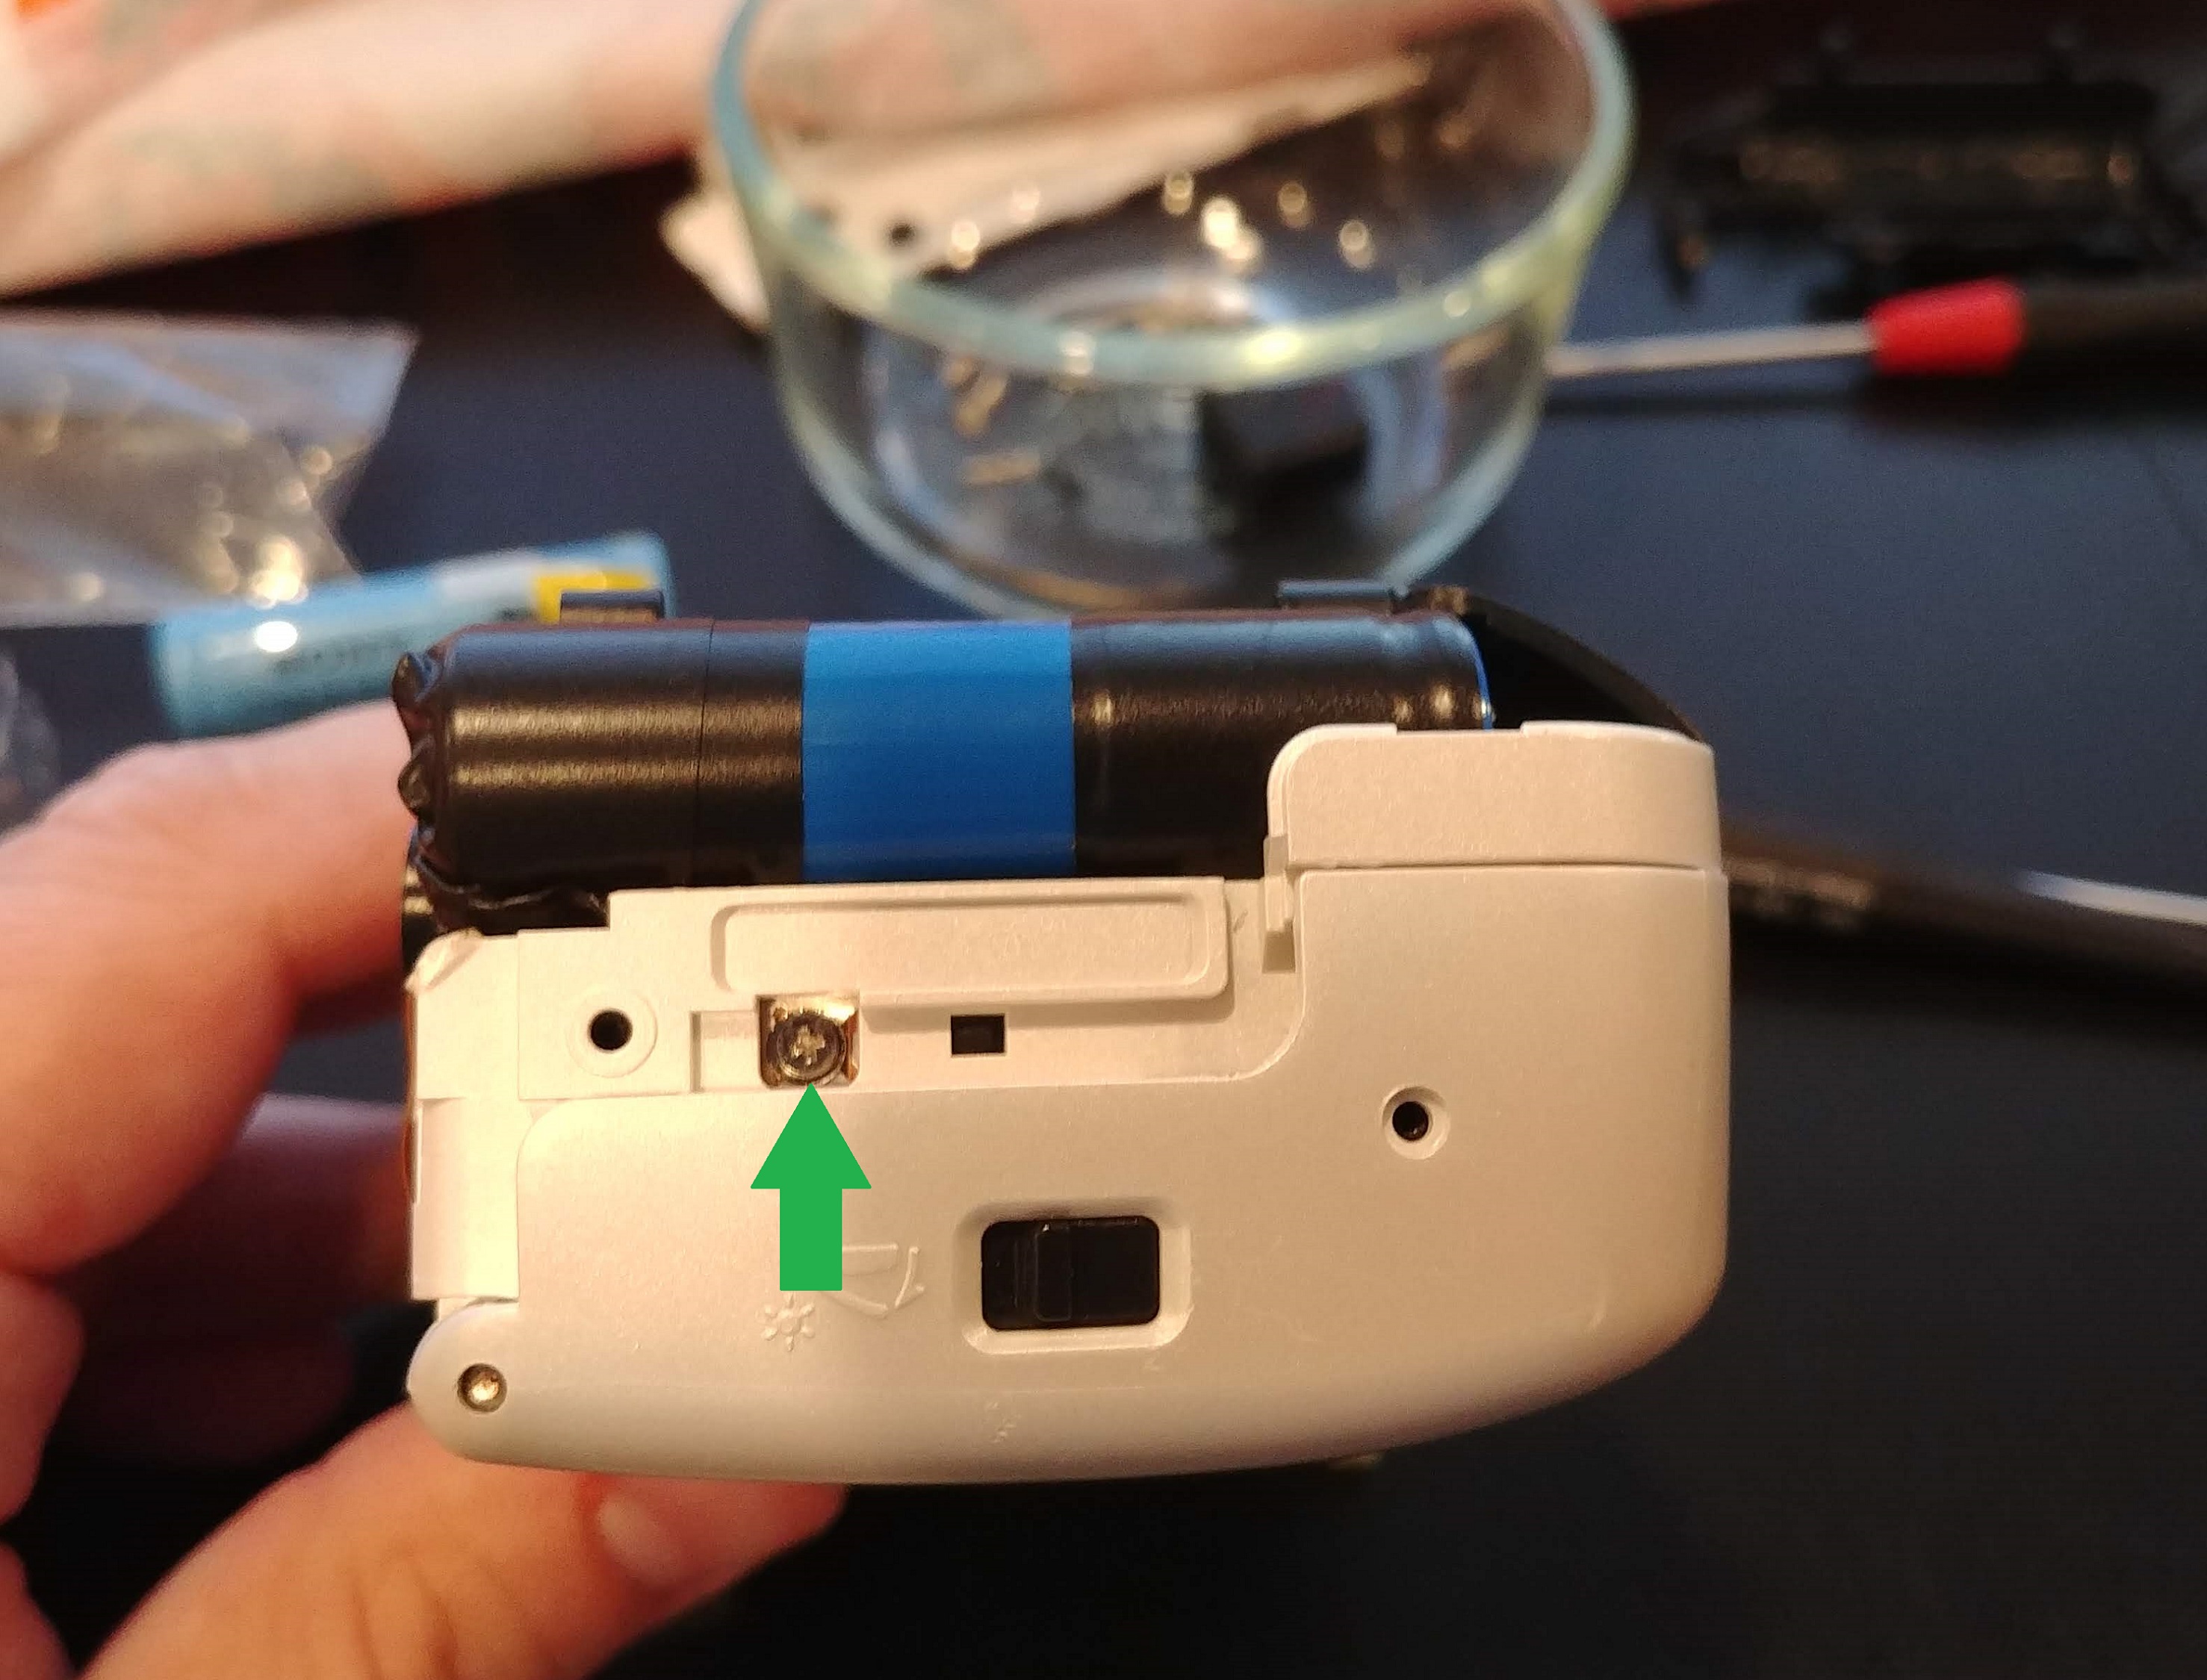
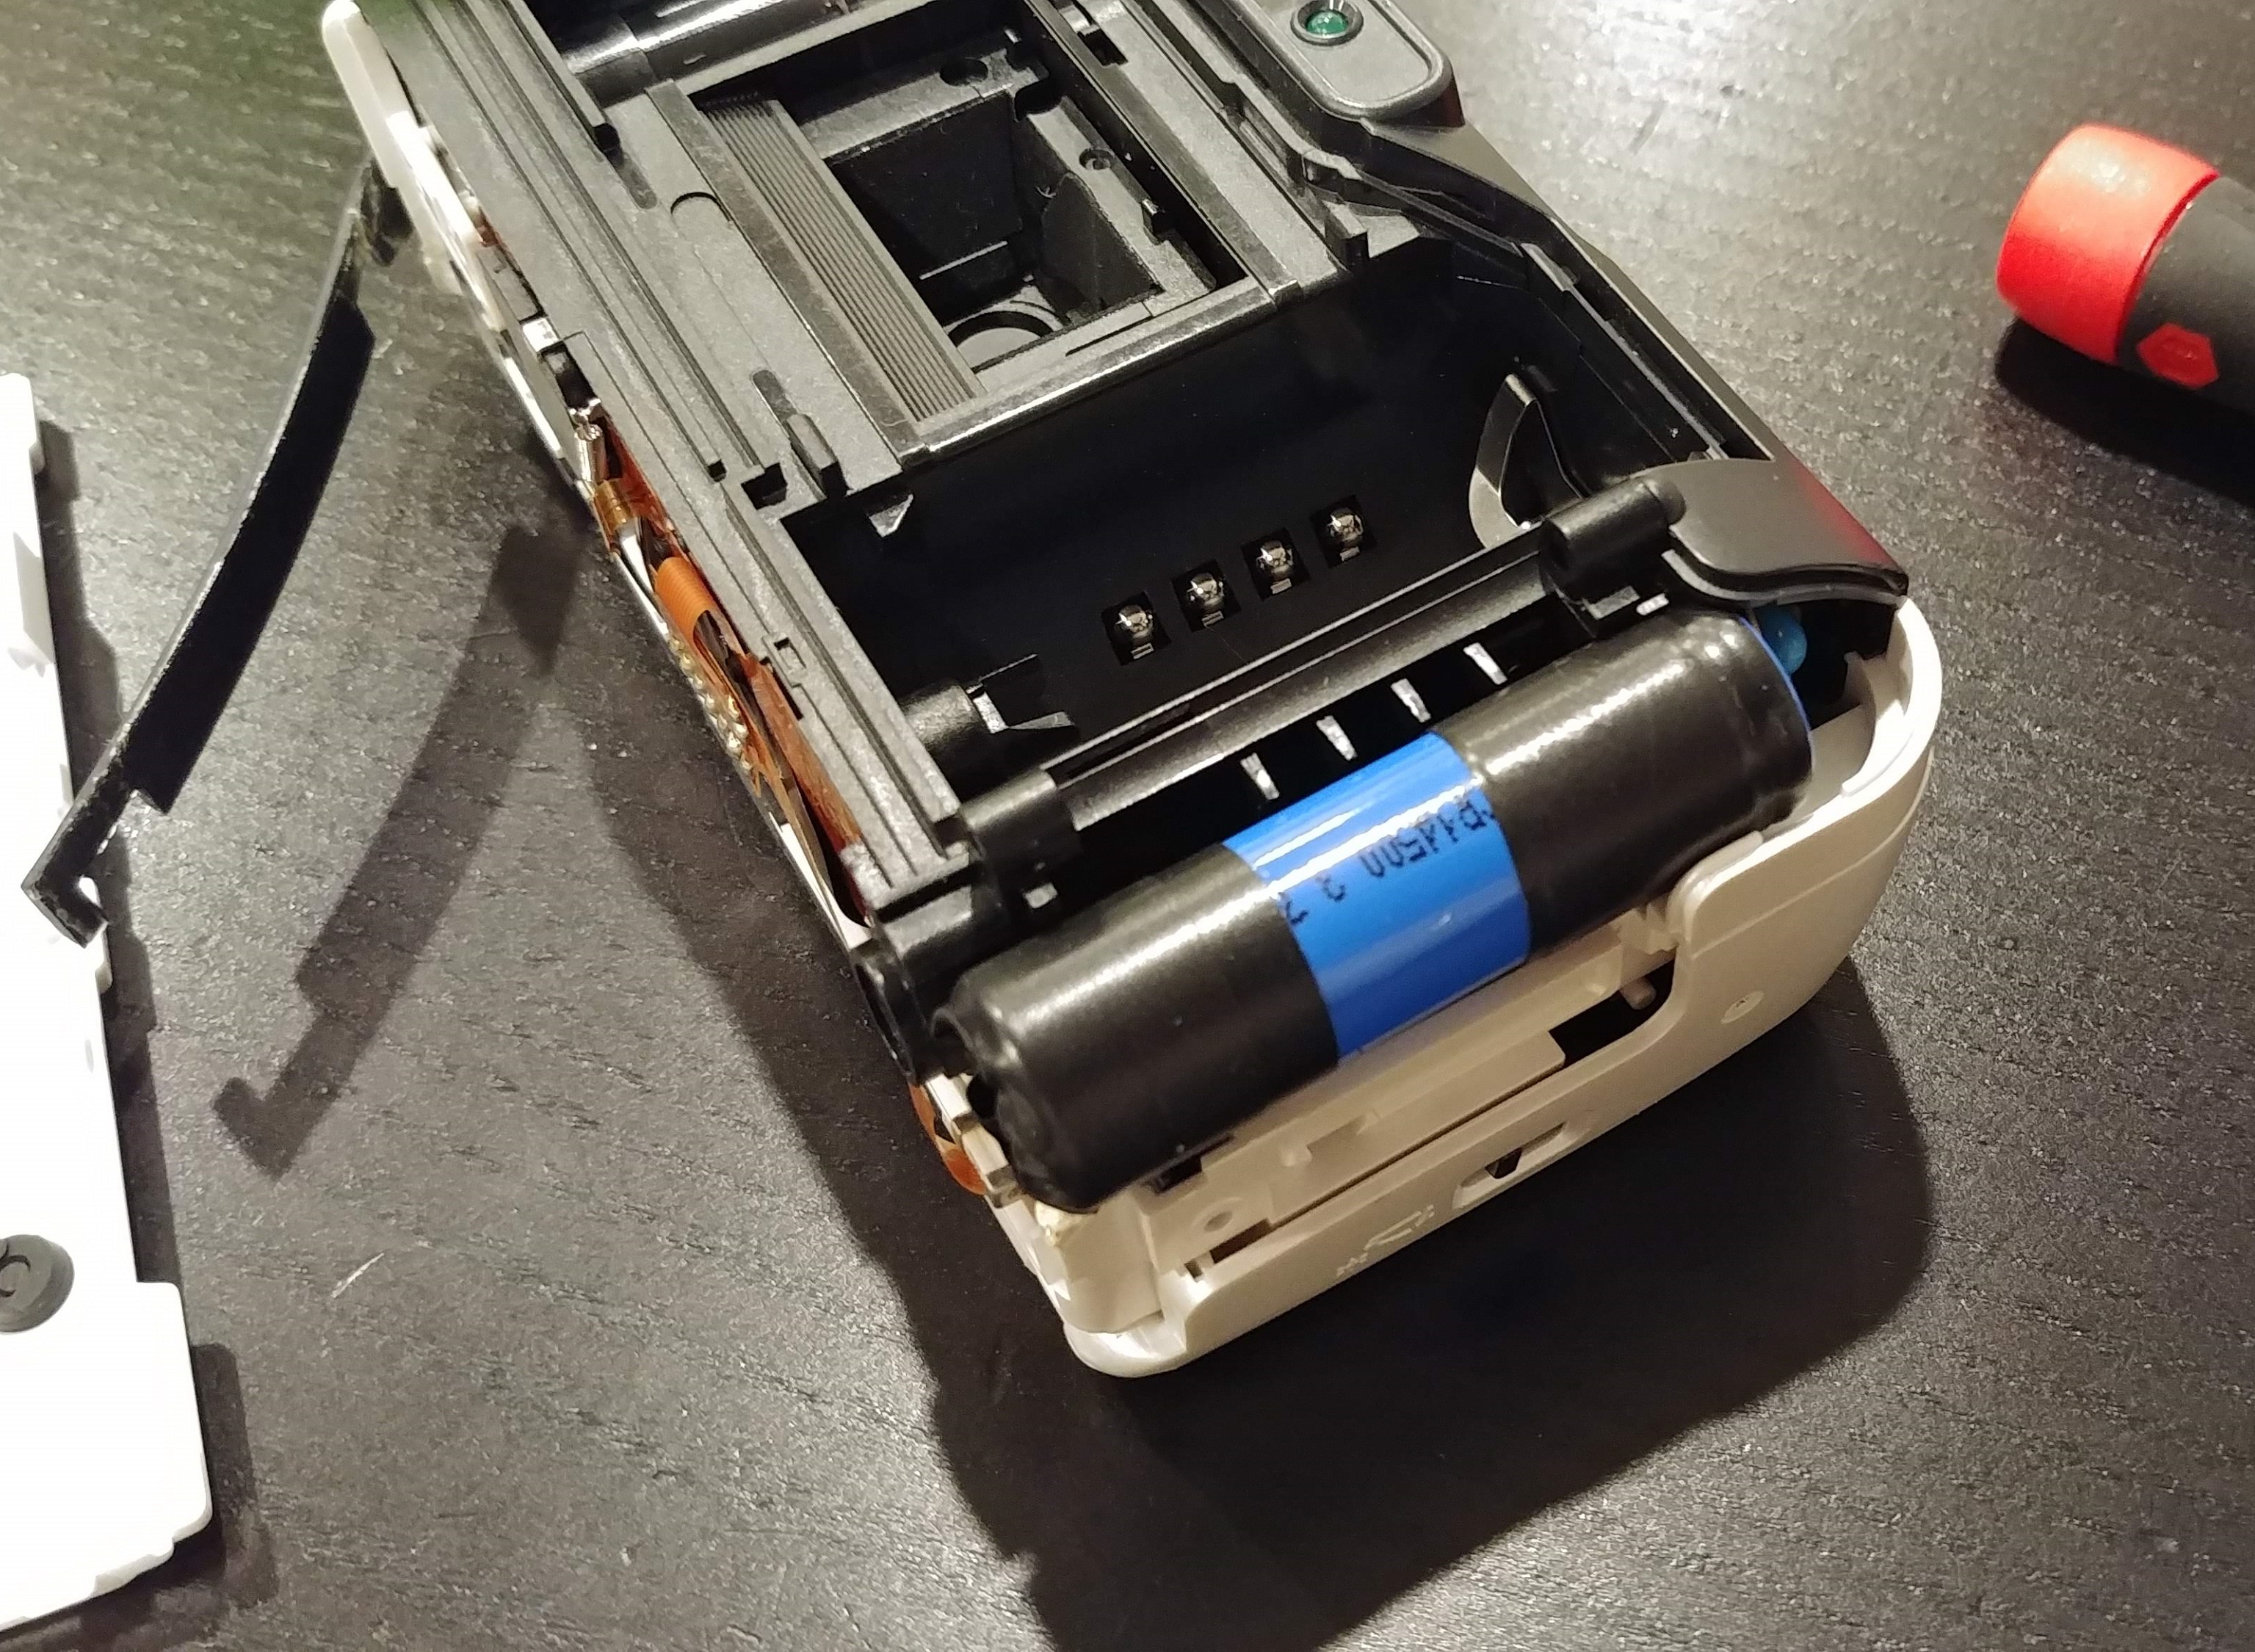
On the side of the camera where the black panel was, there is a third screw that can be seen through a small square hole. This screw is indicated by a GREEN arrow and holds the electrical contact for the battery to the camera. Remove this and the battery will come out. The bent metal contact that connects the battery to the camera is soldered to the end of the battery. You’ll need a soldering iron to de-solder it. Take care not to damage this bent piece of metal and do not lose it, as you’ll need it with the new battery!
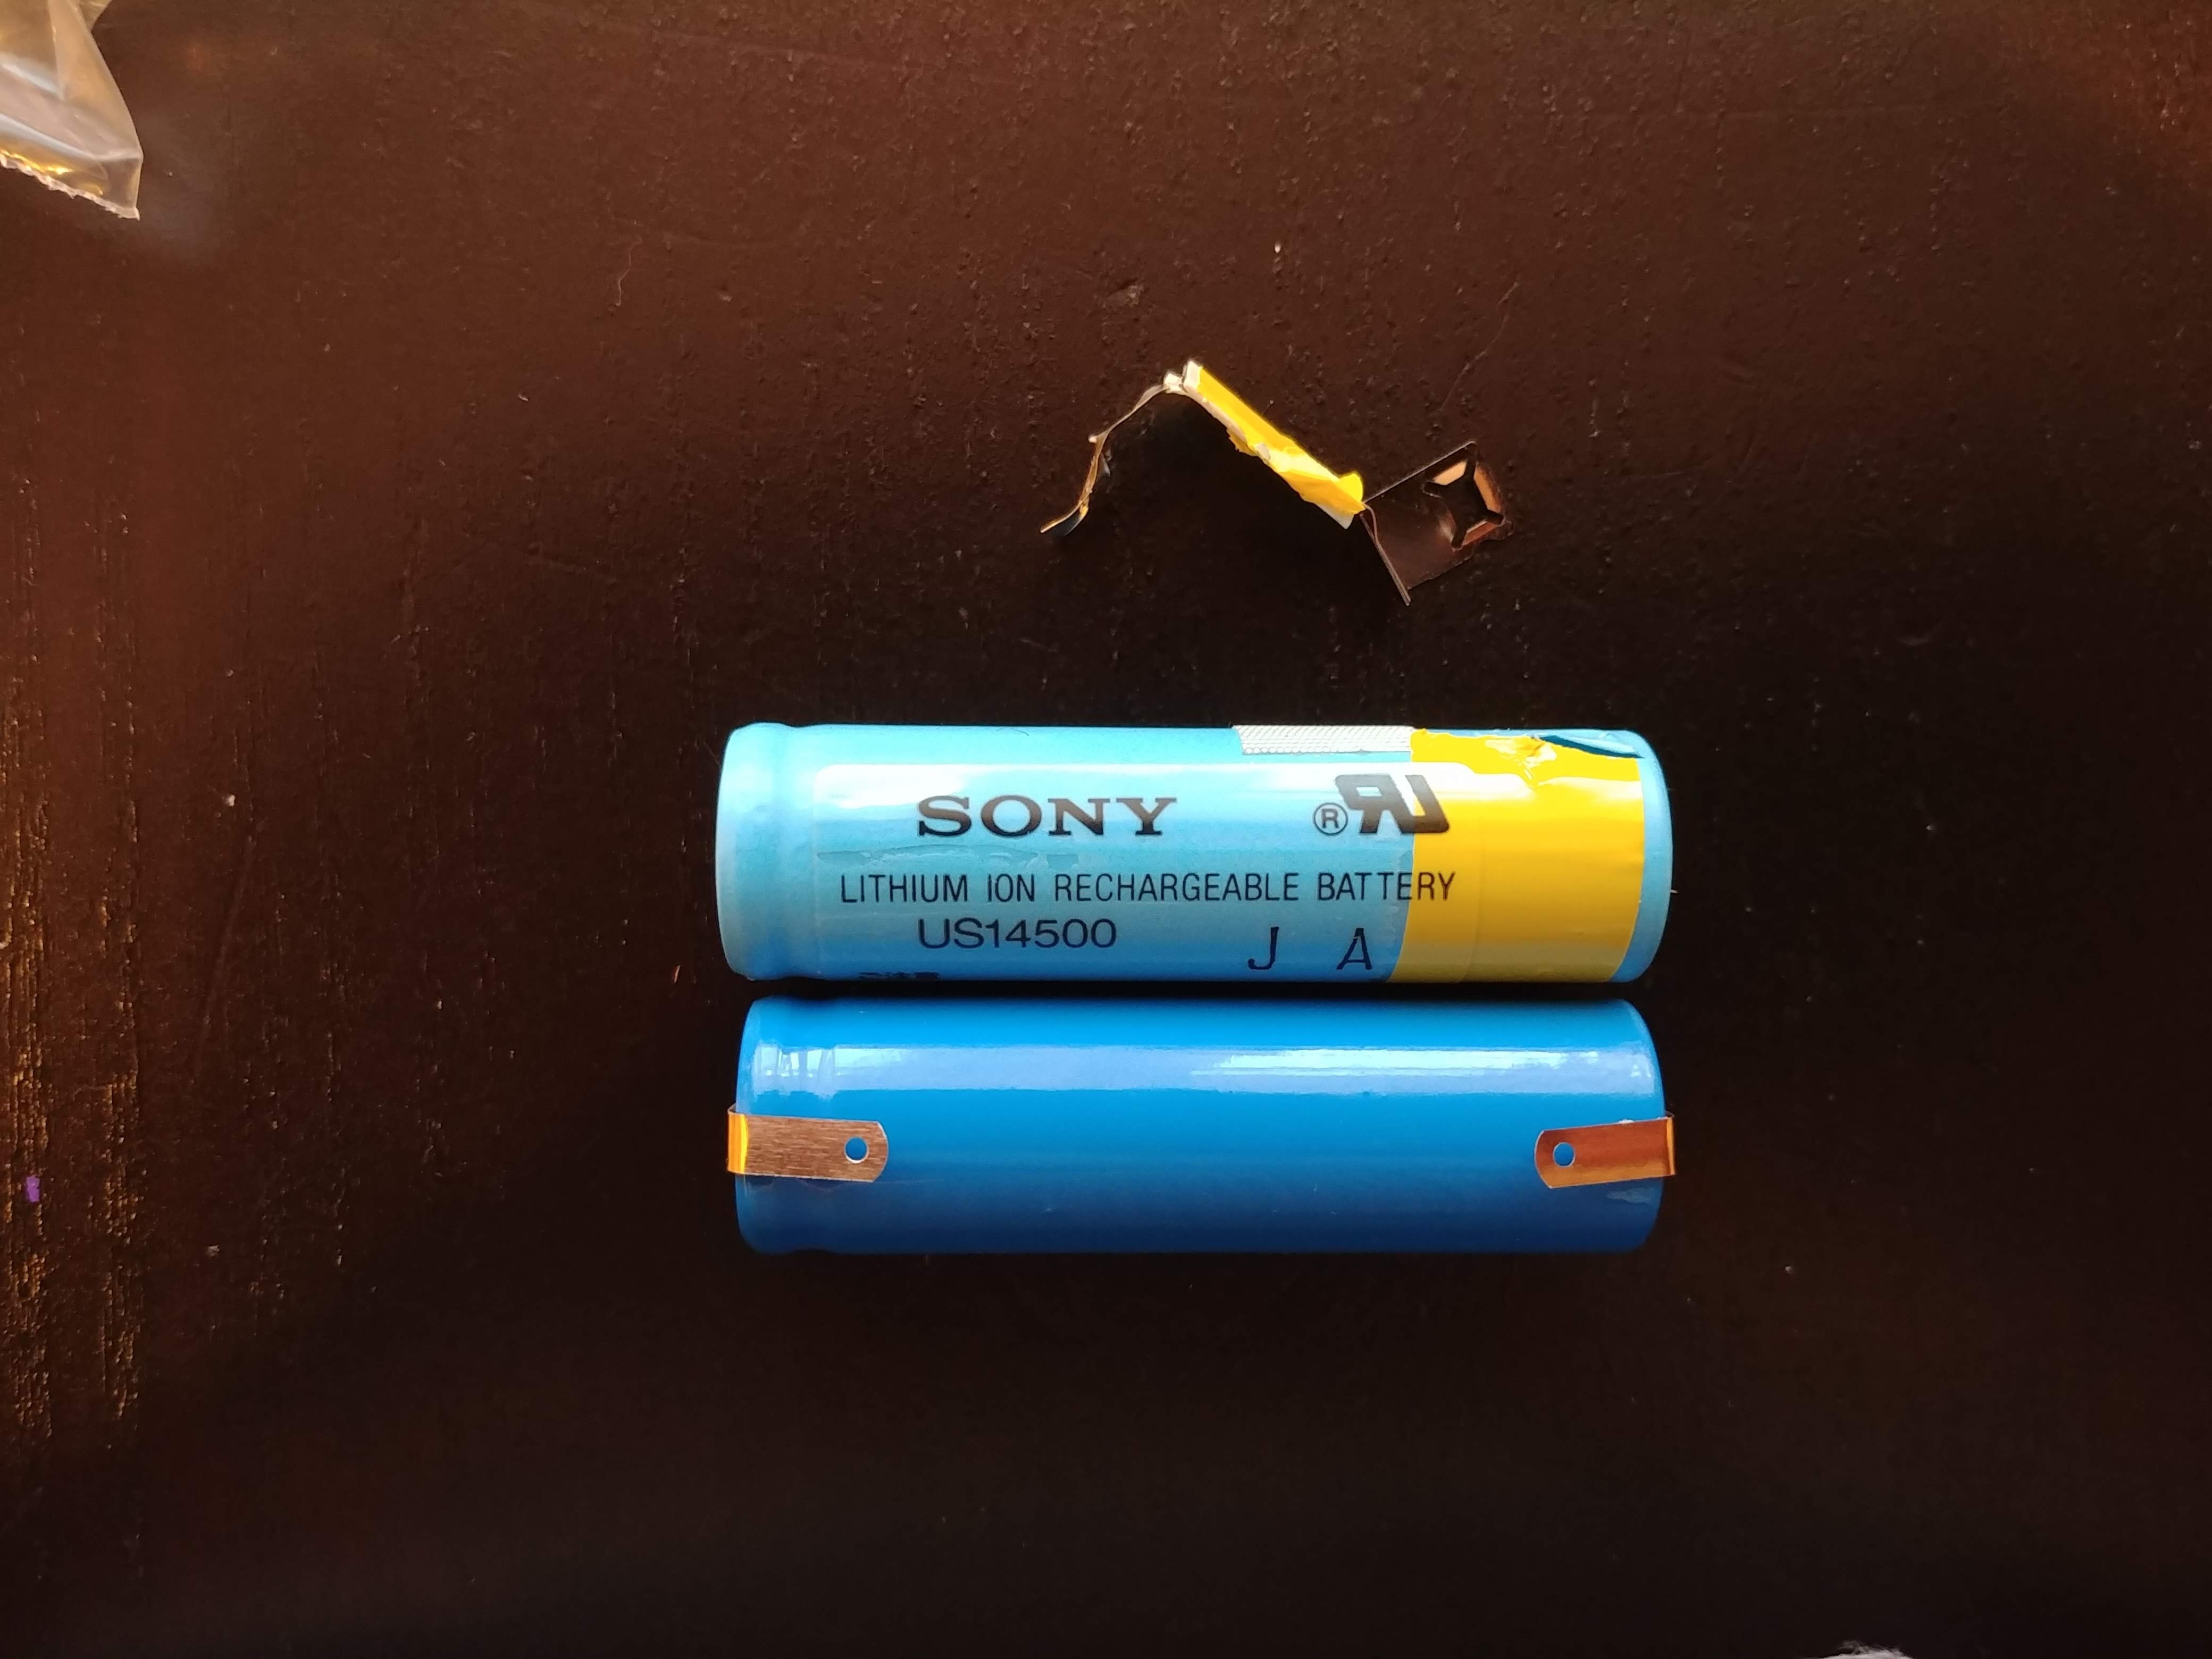
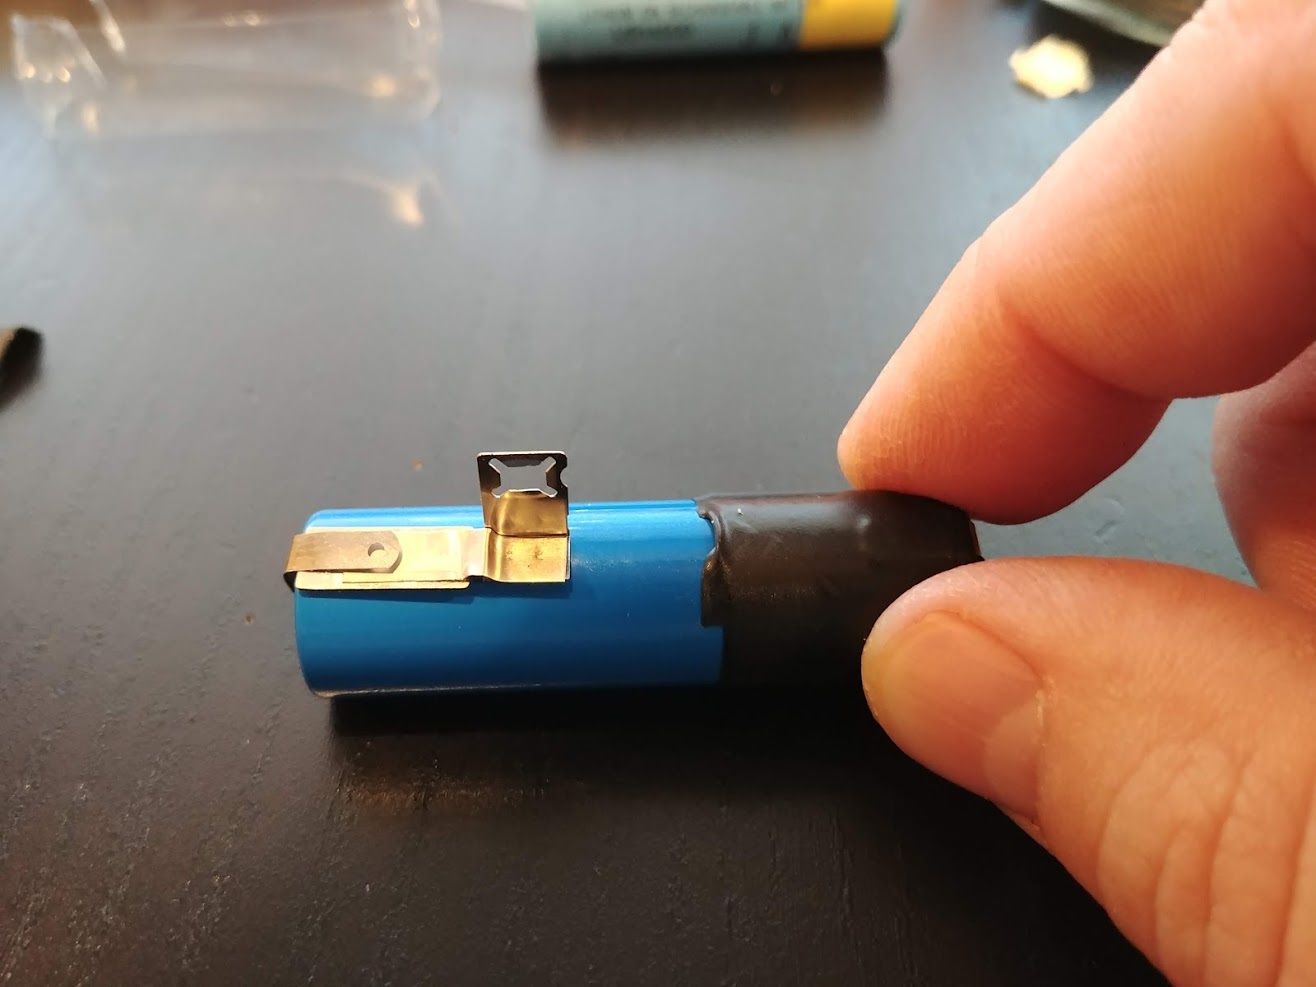
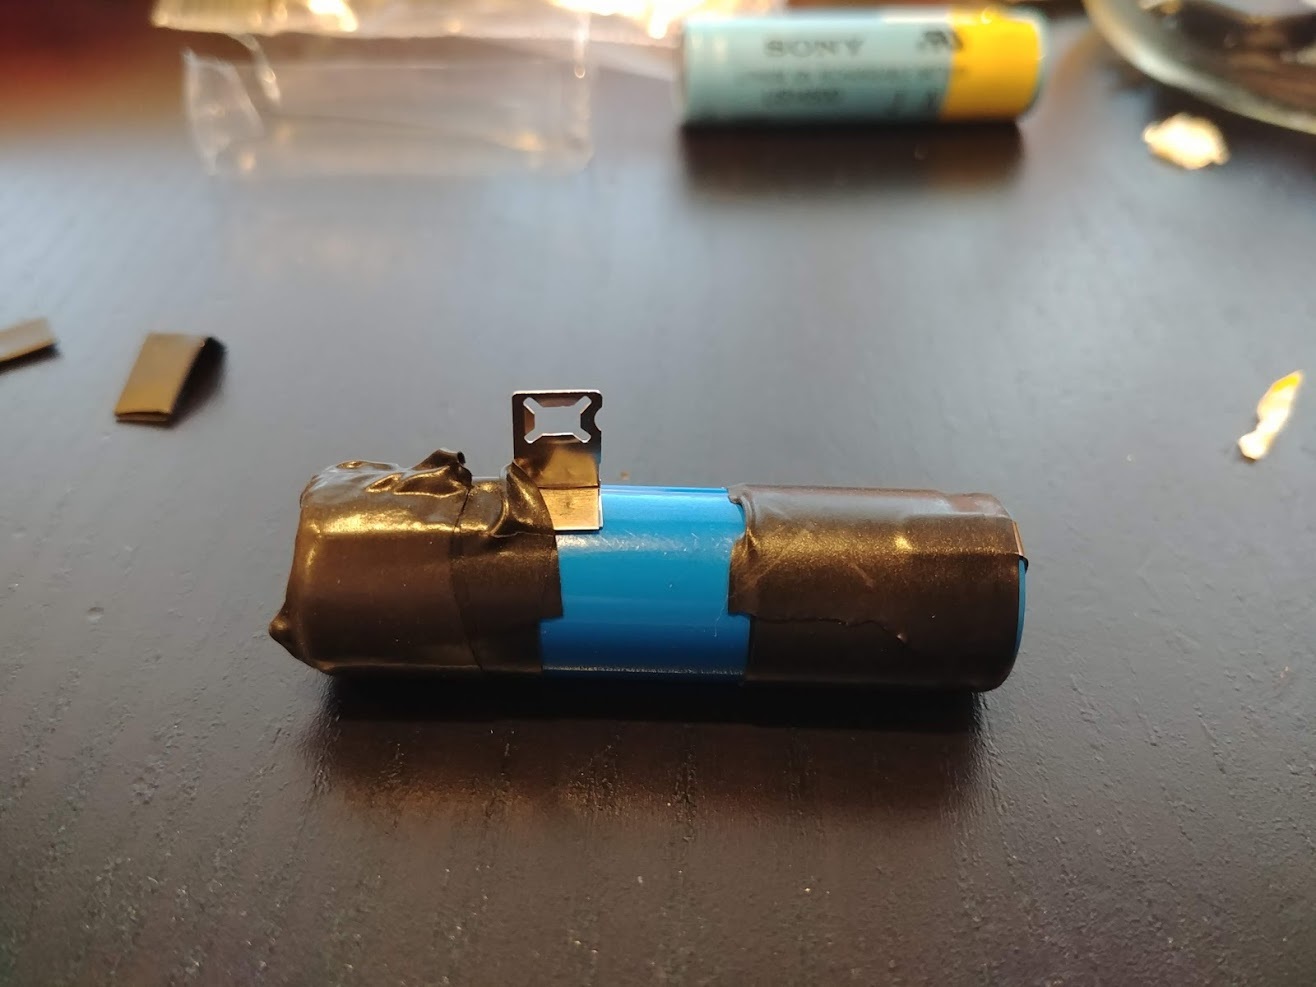
The first image below was taken with the replacement battery already in. The original will not have black electric tape on it. In the second image, we see the original Sony branded battery with my generic replacement along with that bent metal contact from the original battery. Your battery may not look exactly like mine, but as long as its a US14500 3.7v lithium battery, it will work.
Step 4:
At this point, the rest of the steps are just the opposite of the first 3. You’ll need to reconnect that bent metal tab to the new battery and install it back into the camera in the same way it came out.
Warning: Neither the old or new battery had any indications of polarity, but they each had a small indentation on one end. Make sure you insert the battery back into the camera with the correct polarity!
I am not good at soldering, especially directly to a battery, so I utilized the metal tabs that came with my new battery and simply taped them down so that the bent metal contact was underneath the tab. With the tape holding it together, it should always make contact. If you are better with a soldering iron than I am, it’s probably a good idea to give this a permanent connection, but I didn’t and it worked fine. In the images below, I used too much electrical tape and it made it difficult to put the new battery back into the tight compartment, so after taking these pictures, I had to take some of the tape off.
Step 5:
 With the new battery installed back into the camera, put all of the screws back into the same locations as they came out, making sure to get the different length screws on the bottom plate into their respective holes. If you struggle with the black cover over the battery, it is still possible you have too much tape around the battery, so you might need to trim it.
Even though this was a new battery, it came to me mostly charged, so upon opening the front solar panel, I was ecstatic to hear the camera power up and see the LCD charging display light up.
My Thoughts
Canon sold millions of cameras in their point and shoot Sure Shot series, and while I am sure that most of them are fine cameras, there was never one in that series that I thought was interesting enough to write about…then I saw this.
A solar powered camera you say?! Count me in!
Strangely, although I was aware this camera existed, I never made much of an effort to find one, and then one day while browsing a bulk lot of cameras from Roberts Camera in Indianapolis, I saw this little guy sitting there in the background. I only picked up the lot because of something else (of which I can’t remember at the moment) I was more interested in.
When the camera arrived, it quickly proved to be the most interesting item in that box, but as predicted, it was dead. I figured that whatever battery was in there just needed to be replaced, and with my set of precision screwdrivers, I began the process of opening up the camera to replace the battery. You can read about that process above.
Once I had everything back together and saw the camera was in working condition, I couldn’t resist the urge to shoot with it. Oddly, the solar powered feature of the camera has absolutely no impact on shooting this camera, yet it was still far more exciting to handle than whatever Prima Mini / Autoboy F / Sure Shot Esprit that it was based on.
The top plate features the automatic resetting exposure counter, the bright orange shutter release, and beneath it a button for the 10 second self-timer. This being a fully automatic point and shoot camera, there are no manual controls anywhere on the camera.
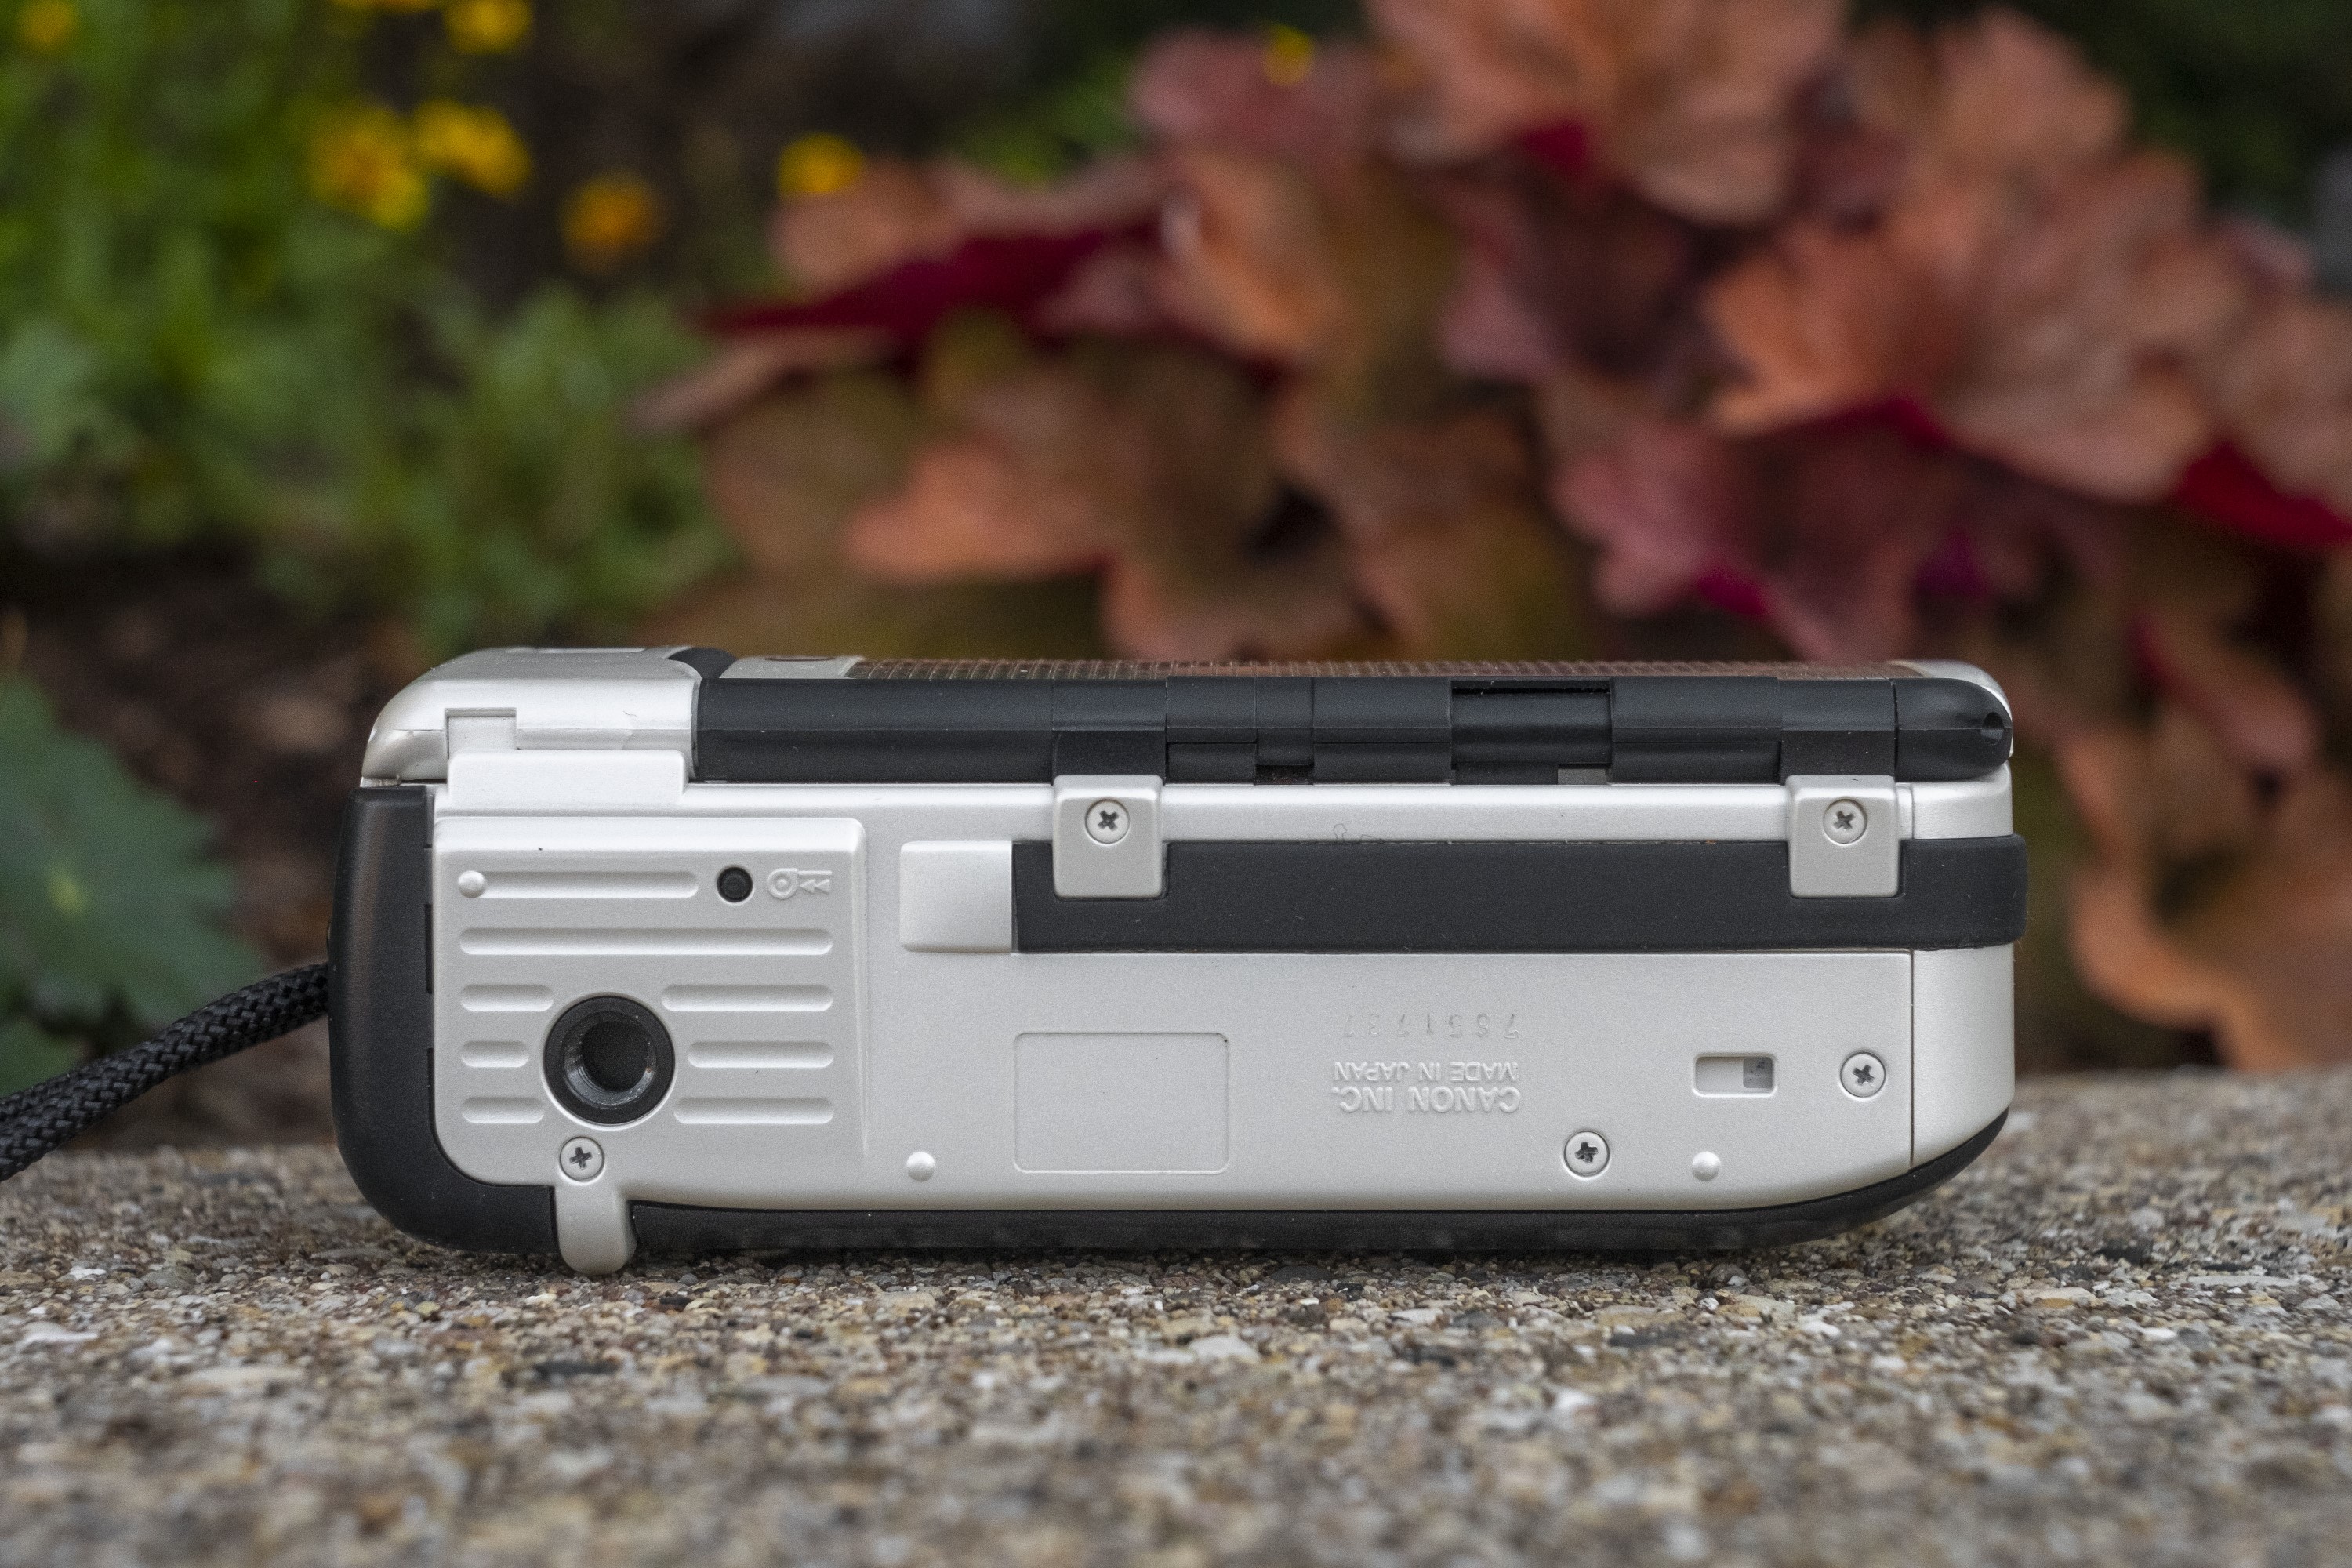
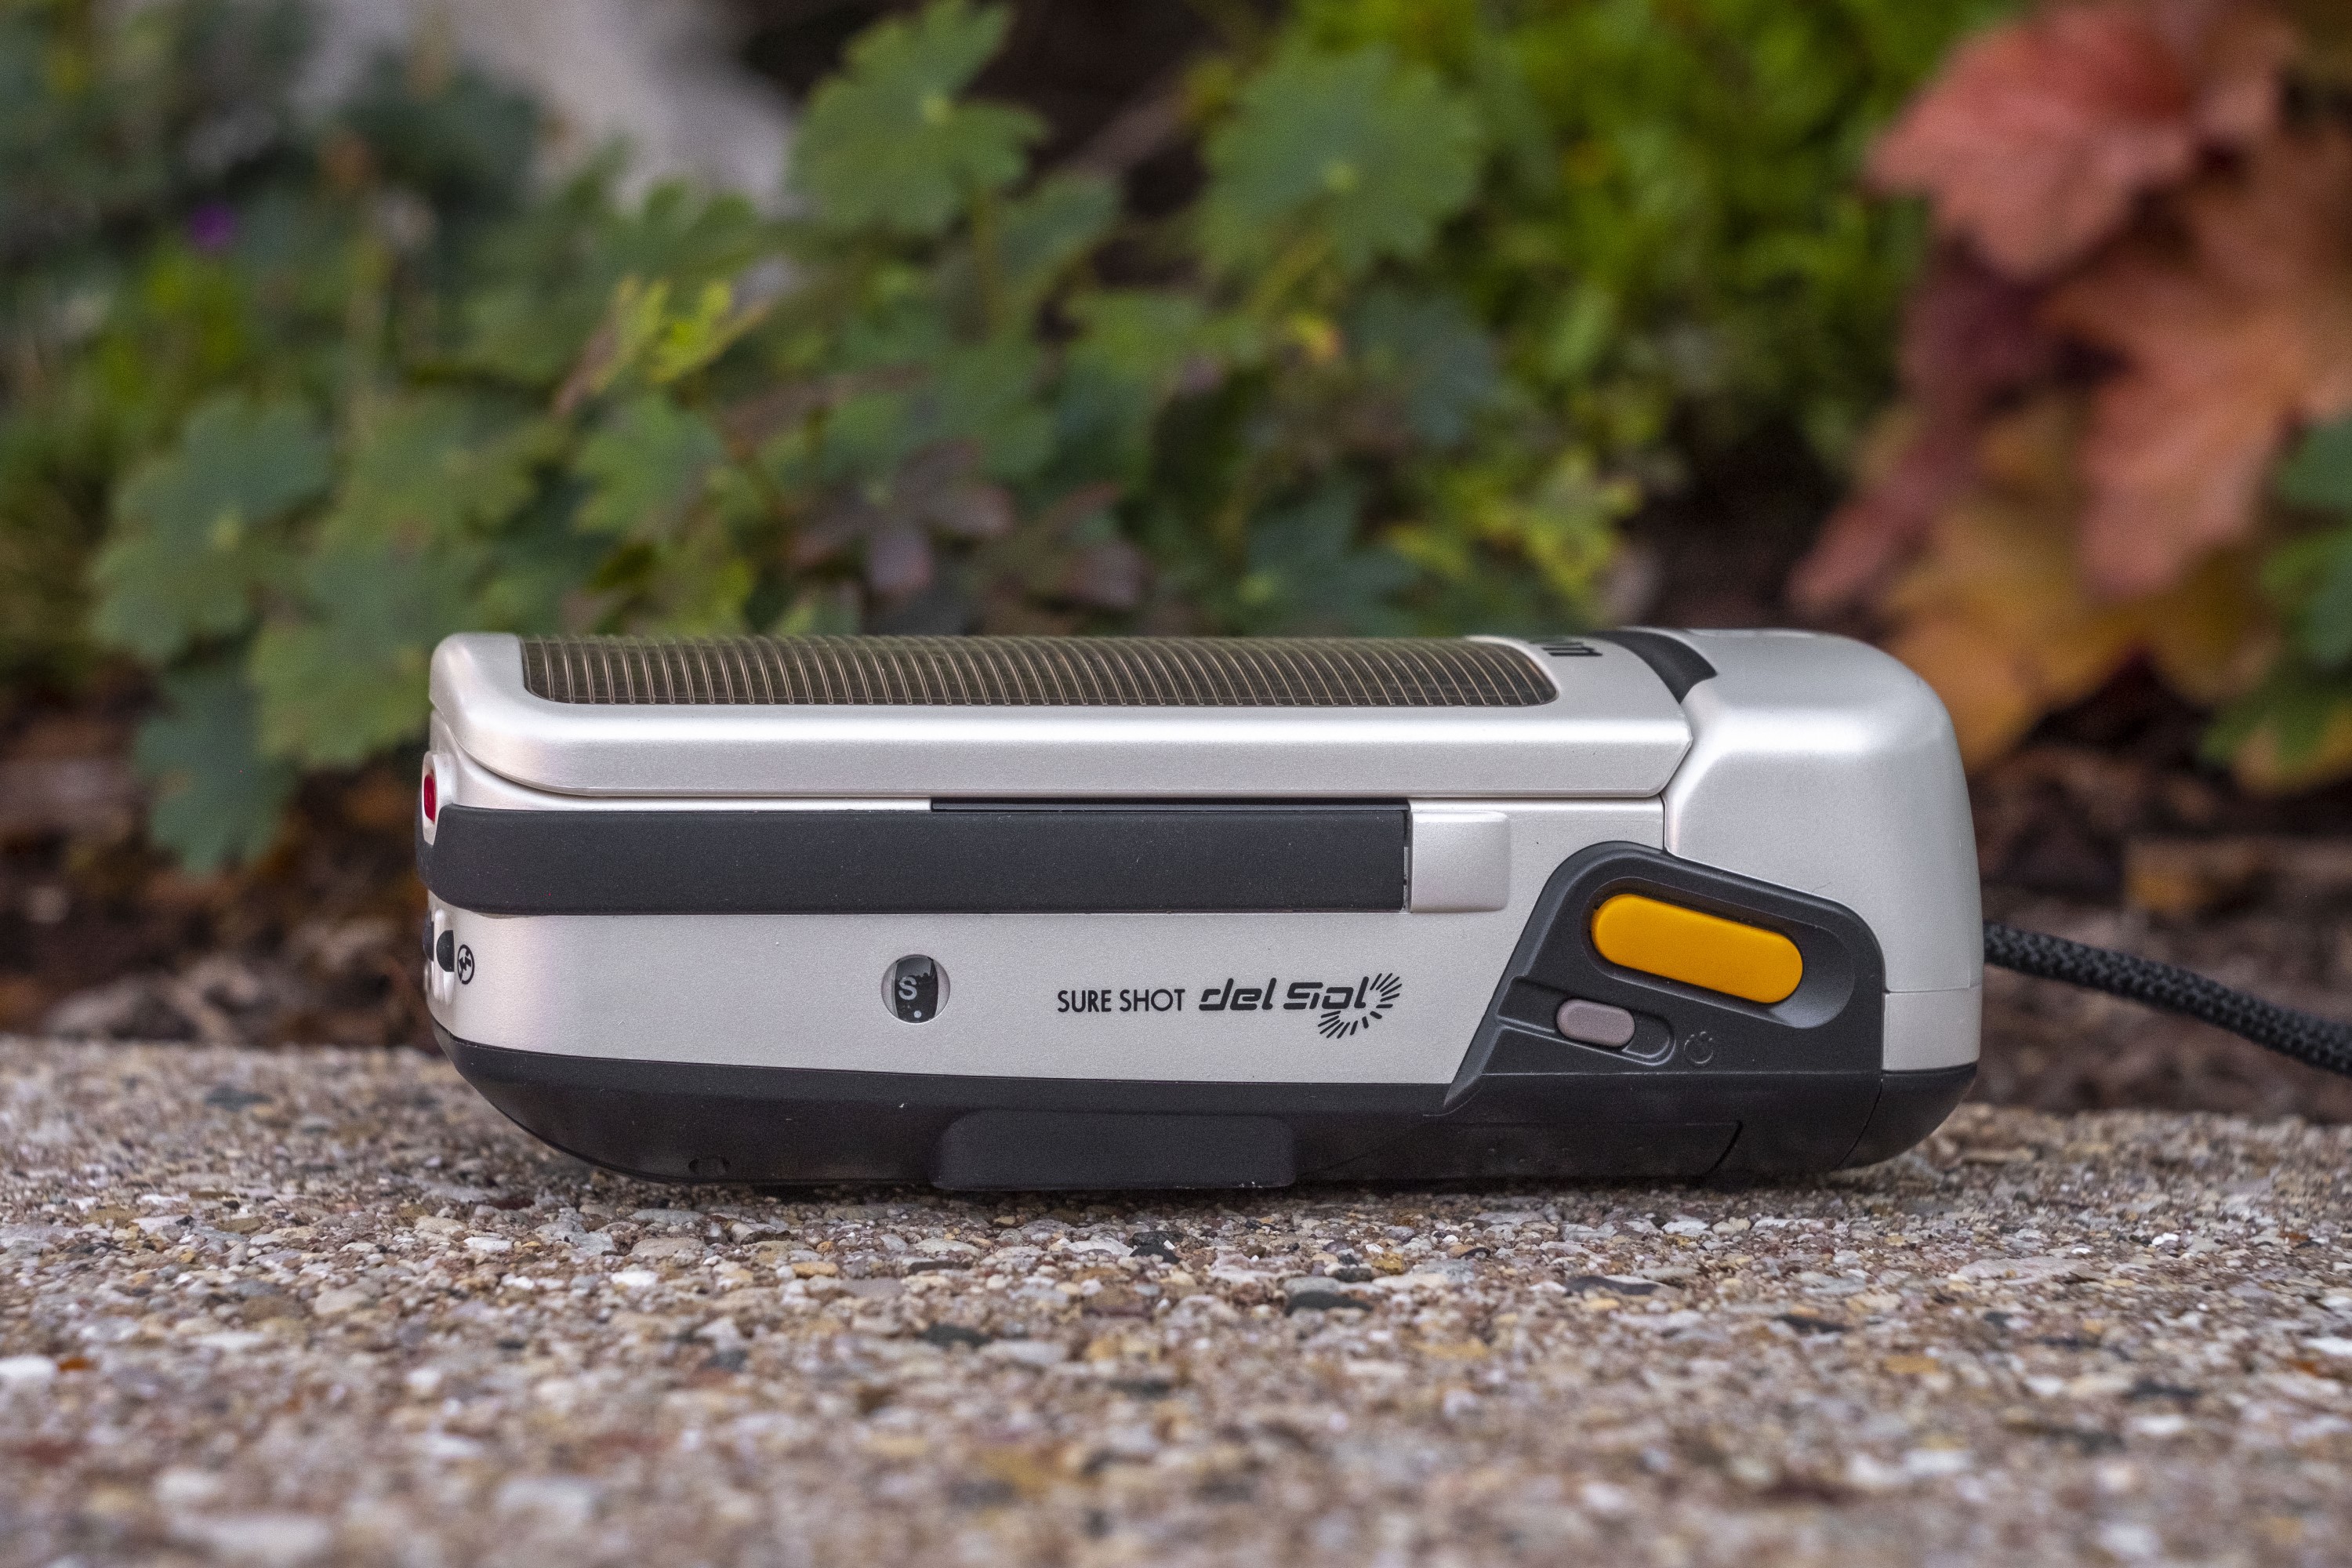
Since the signature feature of this camera is the solar panel and non-removable rechargeable lithium battery, the bottom of the camera has no compartment for a battery like you’d see on other cameras. There is a standard 1/4″ tripod socket which is surprisingly made entirely of metal, something that wasn’t always a given in the era this camera was made. Next to the socket is a small recessed button used to manually rewind the film before the end of the roll.
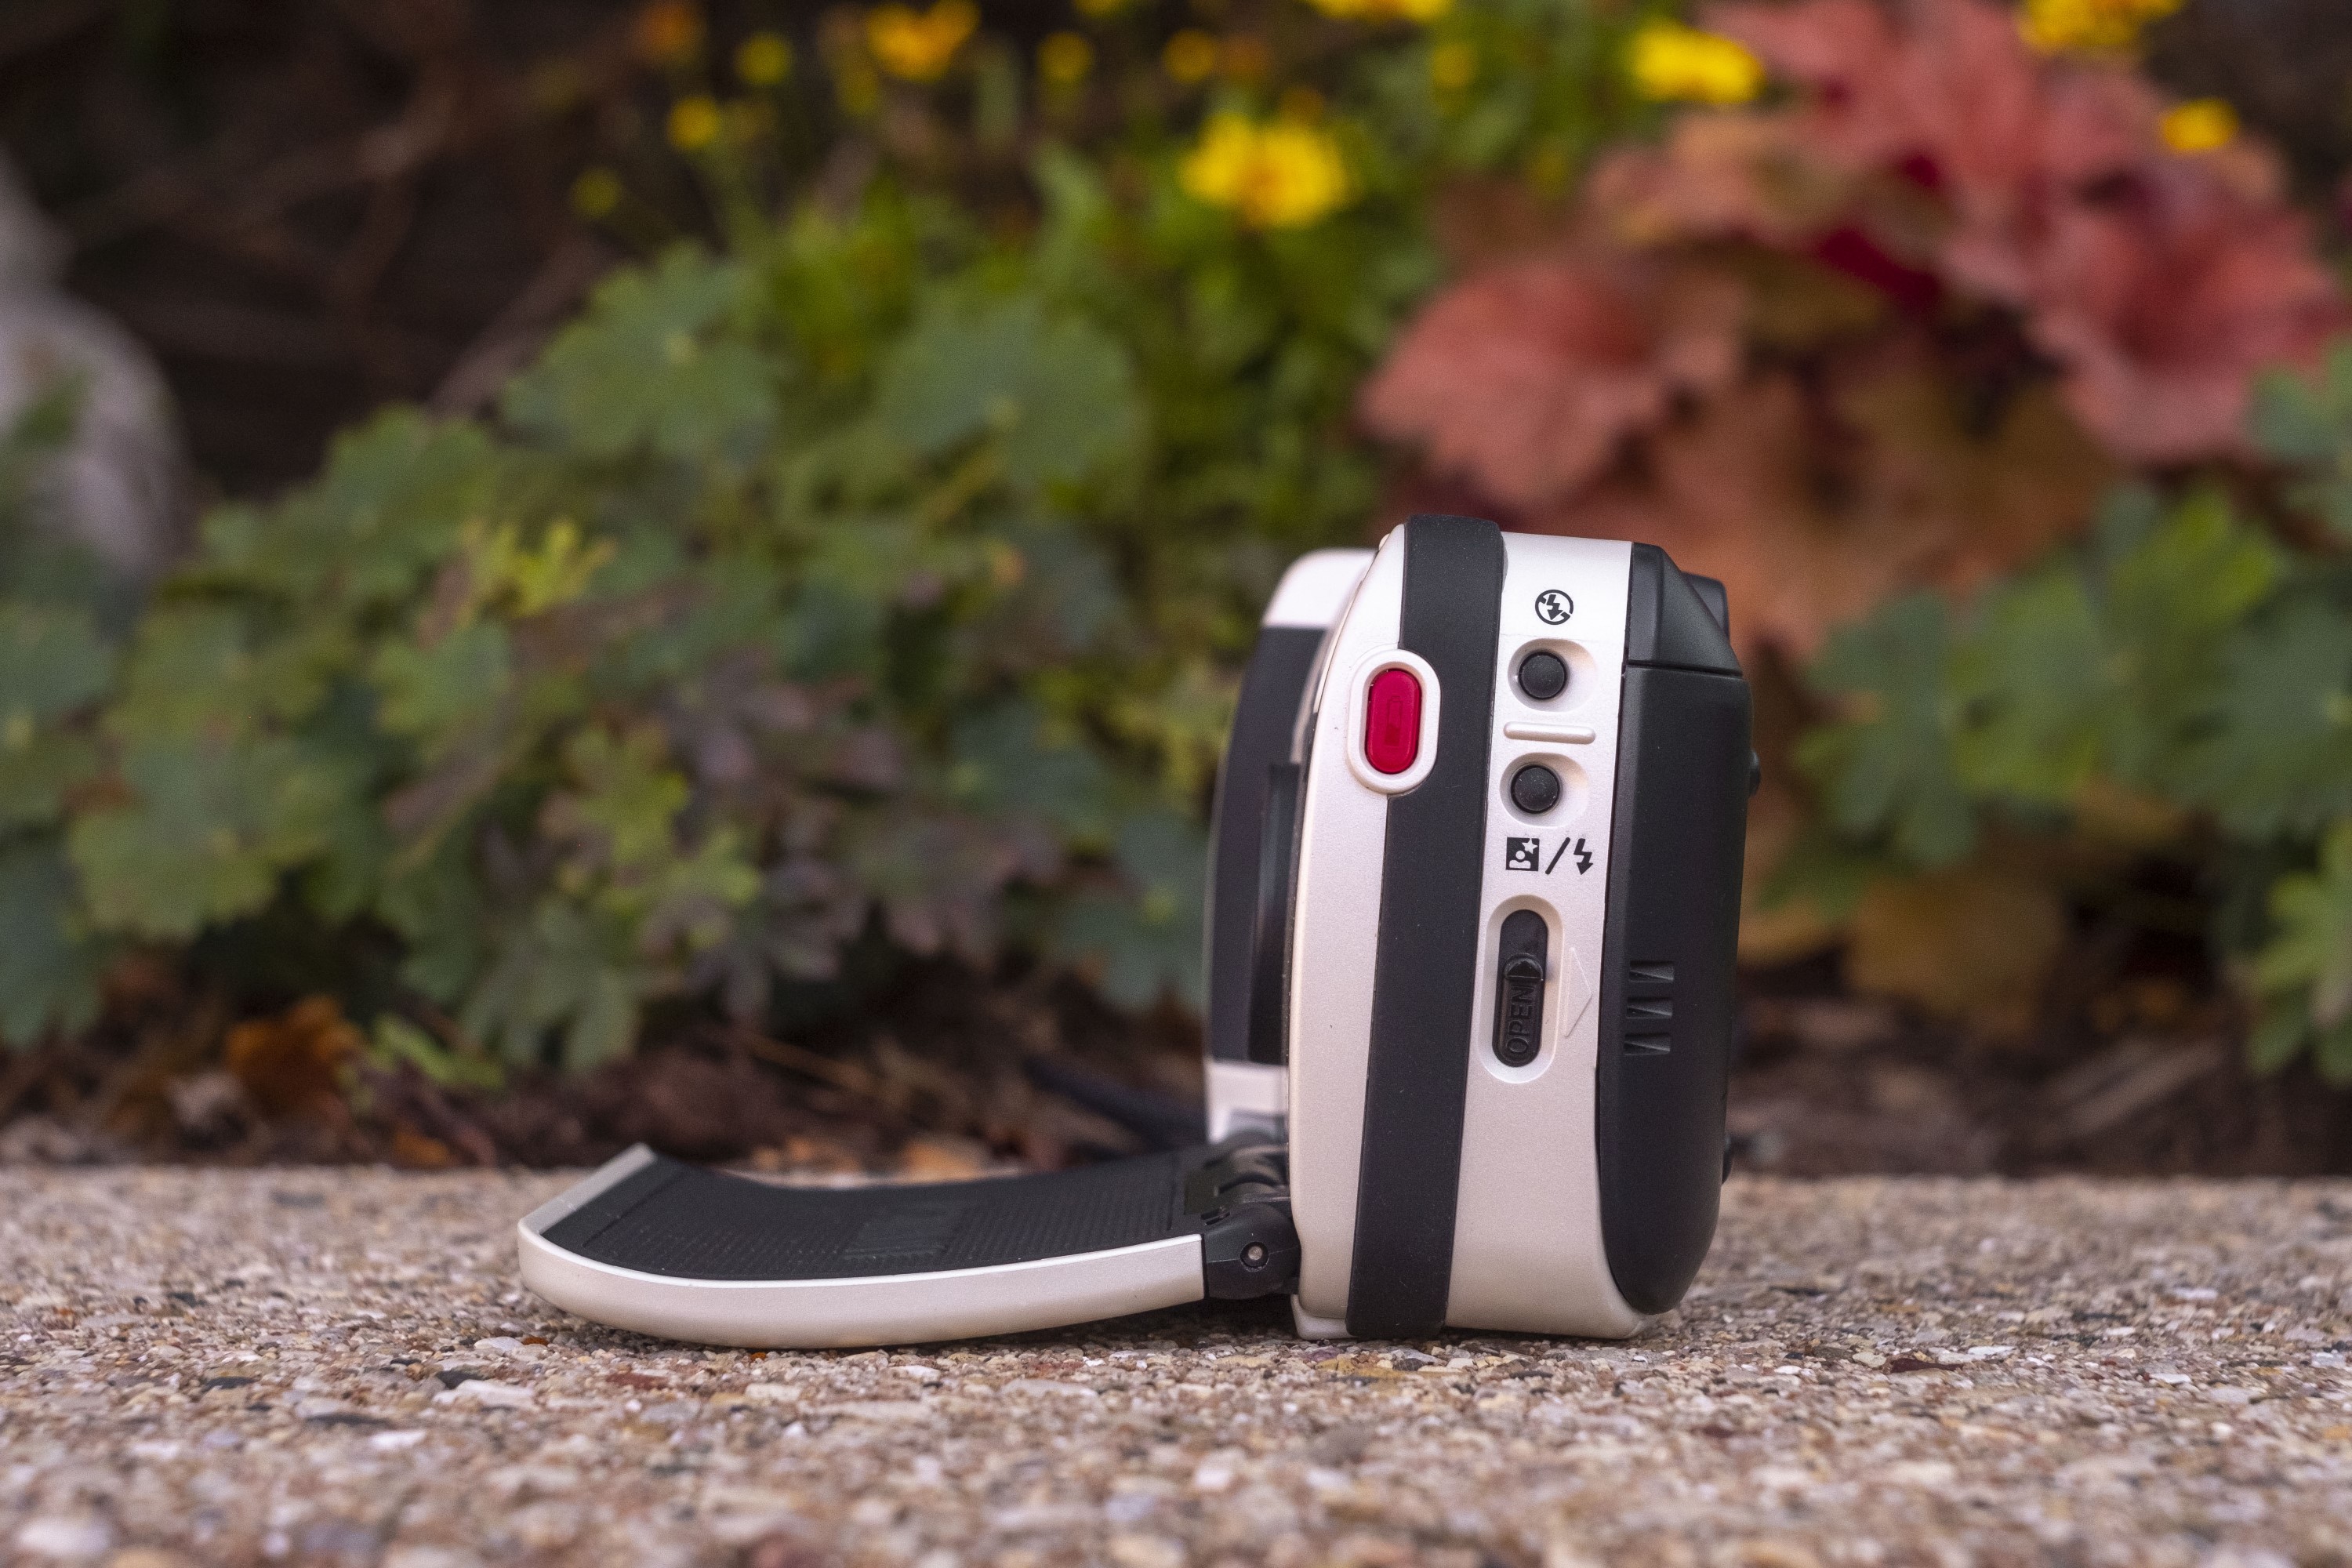
The camera’s right side has two buttons for flash control, the top overrides the flash and forces the camera to use a shutter speed as long as 1 second for low light photography, and the other toggles between a flash on mode to act as a fill flash in outdoor scenes, and a slow-synchro mode which activates the flash with a slower shutter speed to help boost background lighting in dark scenes. Beneath these buttons is the door release for opening the film compartment.
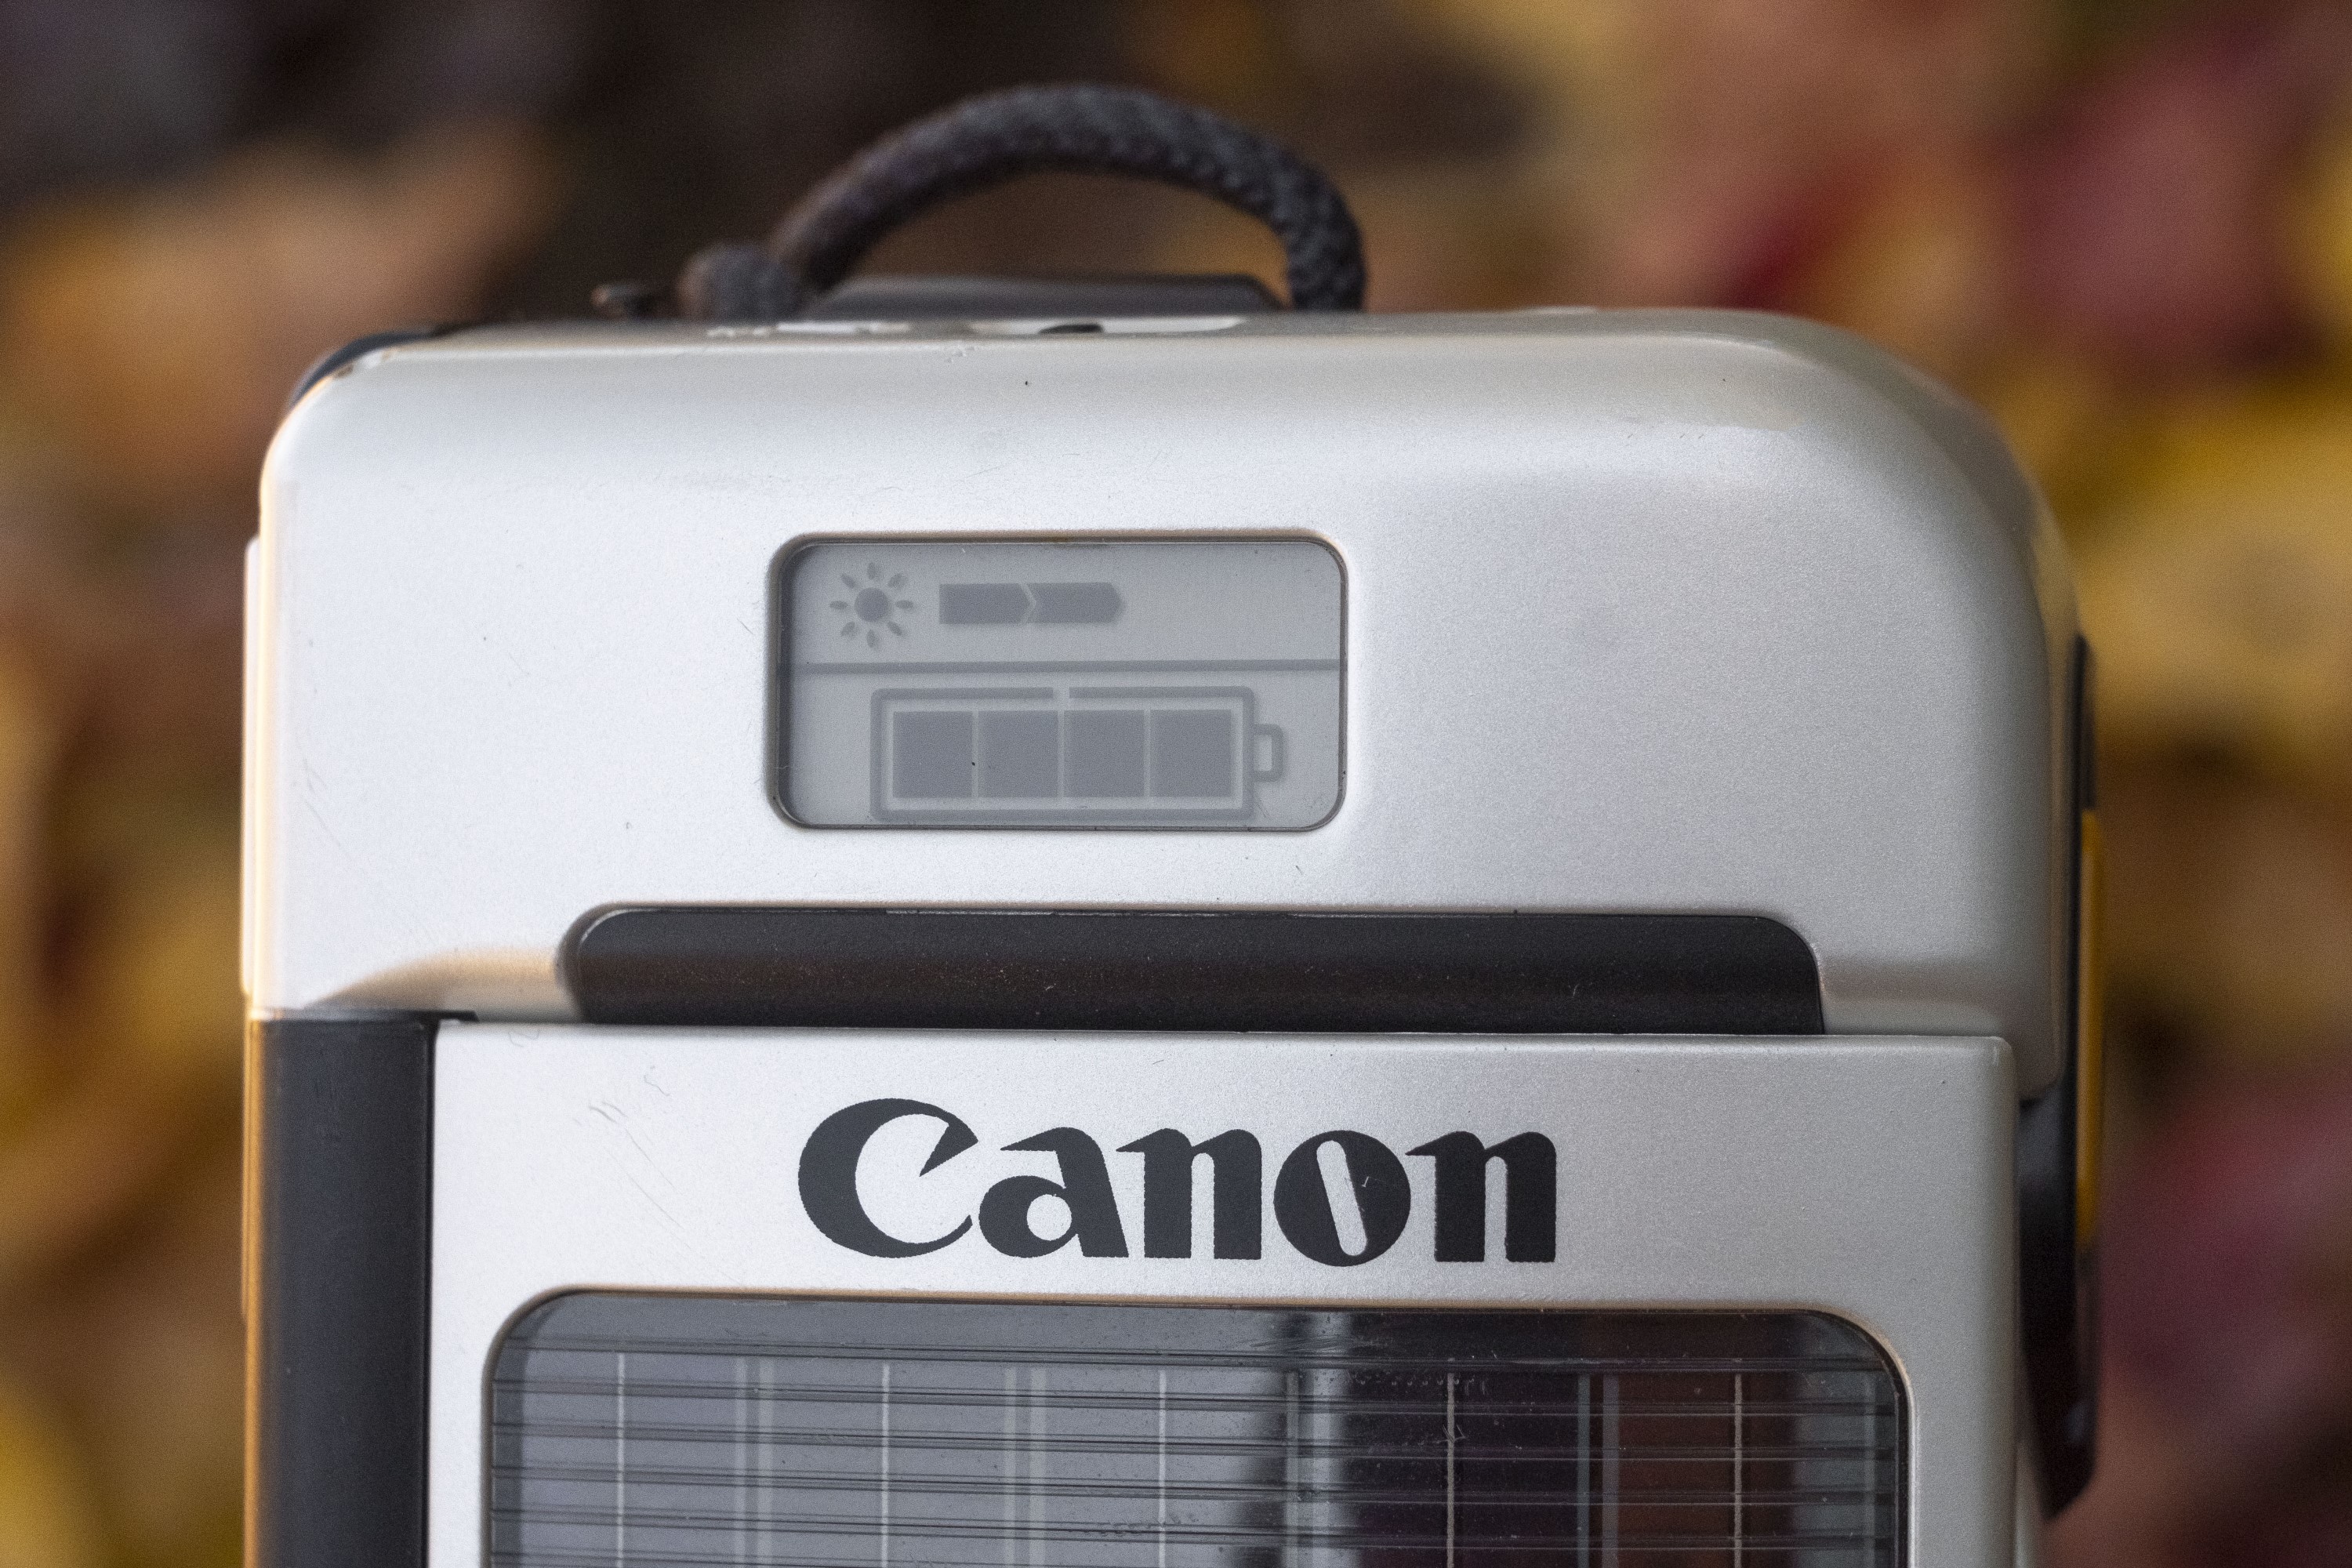
In front of the flash buttons is a large red button for activating the LCD charge display on the front of the camera. With this button pressed, you’ll get a 4-segment readout of how much of the battery charge is left. According to the manual, with a full charge, the camera can shoot five 24-exposure rolls of film with 50% flash. Use the flash more or less and this changes. As the battery discharges the segments will disappear and will eventually start to flash to indicate that charging is necessary.
Above the battery readout is a bar indicating the charging status of the front panel. In direct sunlight, all 4 segments should illuminate, indicating the fastest charging possible. Canon says that a dead battery can be fully charged in direct sunlight in six and a half hours. With less than 4 segments, the battery will still charge, just slower.

If the thought of placing your camera in direct sunlight for six and a half hours might heat up the camera, potentially damaging it or the film inside, Canon implemented a clever cooling mode in which the solar panel will automatically pop up at a 30 degree angle separating it from the main body of the camera if it detects the internal temperature of the camera to be too high. Although the camera’s user manual does not specify at which temperature this feature is activated, the Popular Mechanics article above says it happens at 80 degrees F which seems awfully low.
 The user manual offers a few tips for getting the most effective charge including not leaving it in a closed automobile, or outside where rain or other moisture could damage the camera, and this gem, which is my all time favorite warning that I’ve seen in any camera manual.
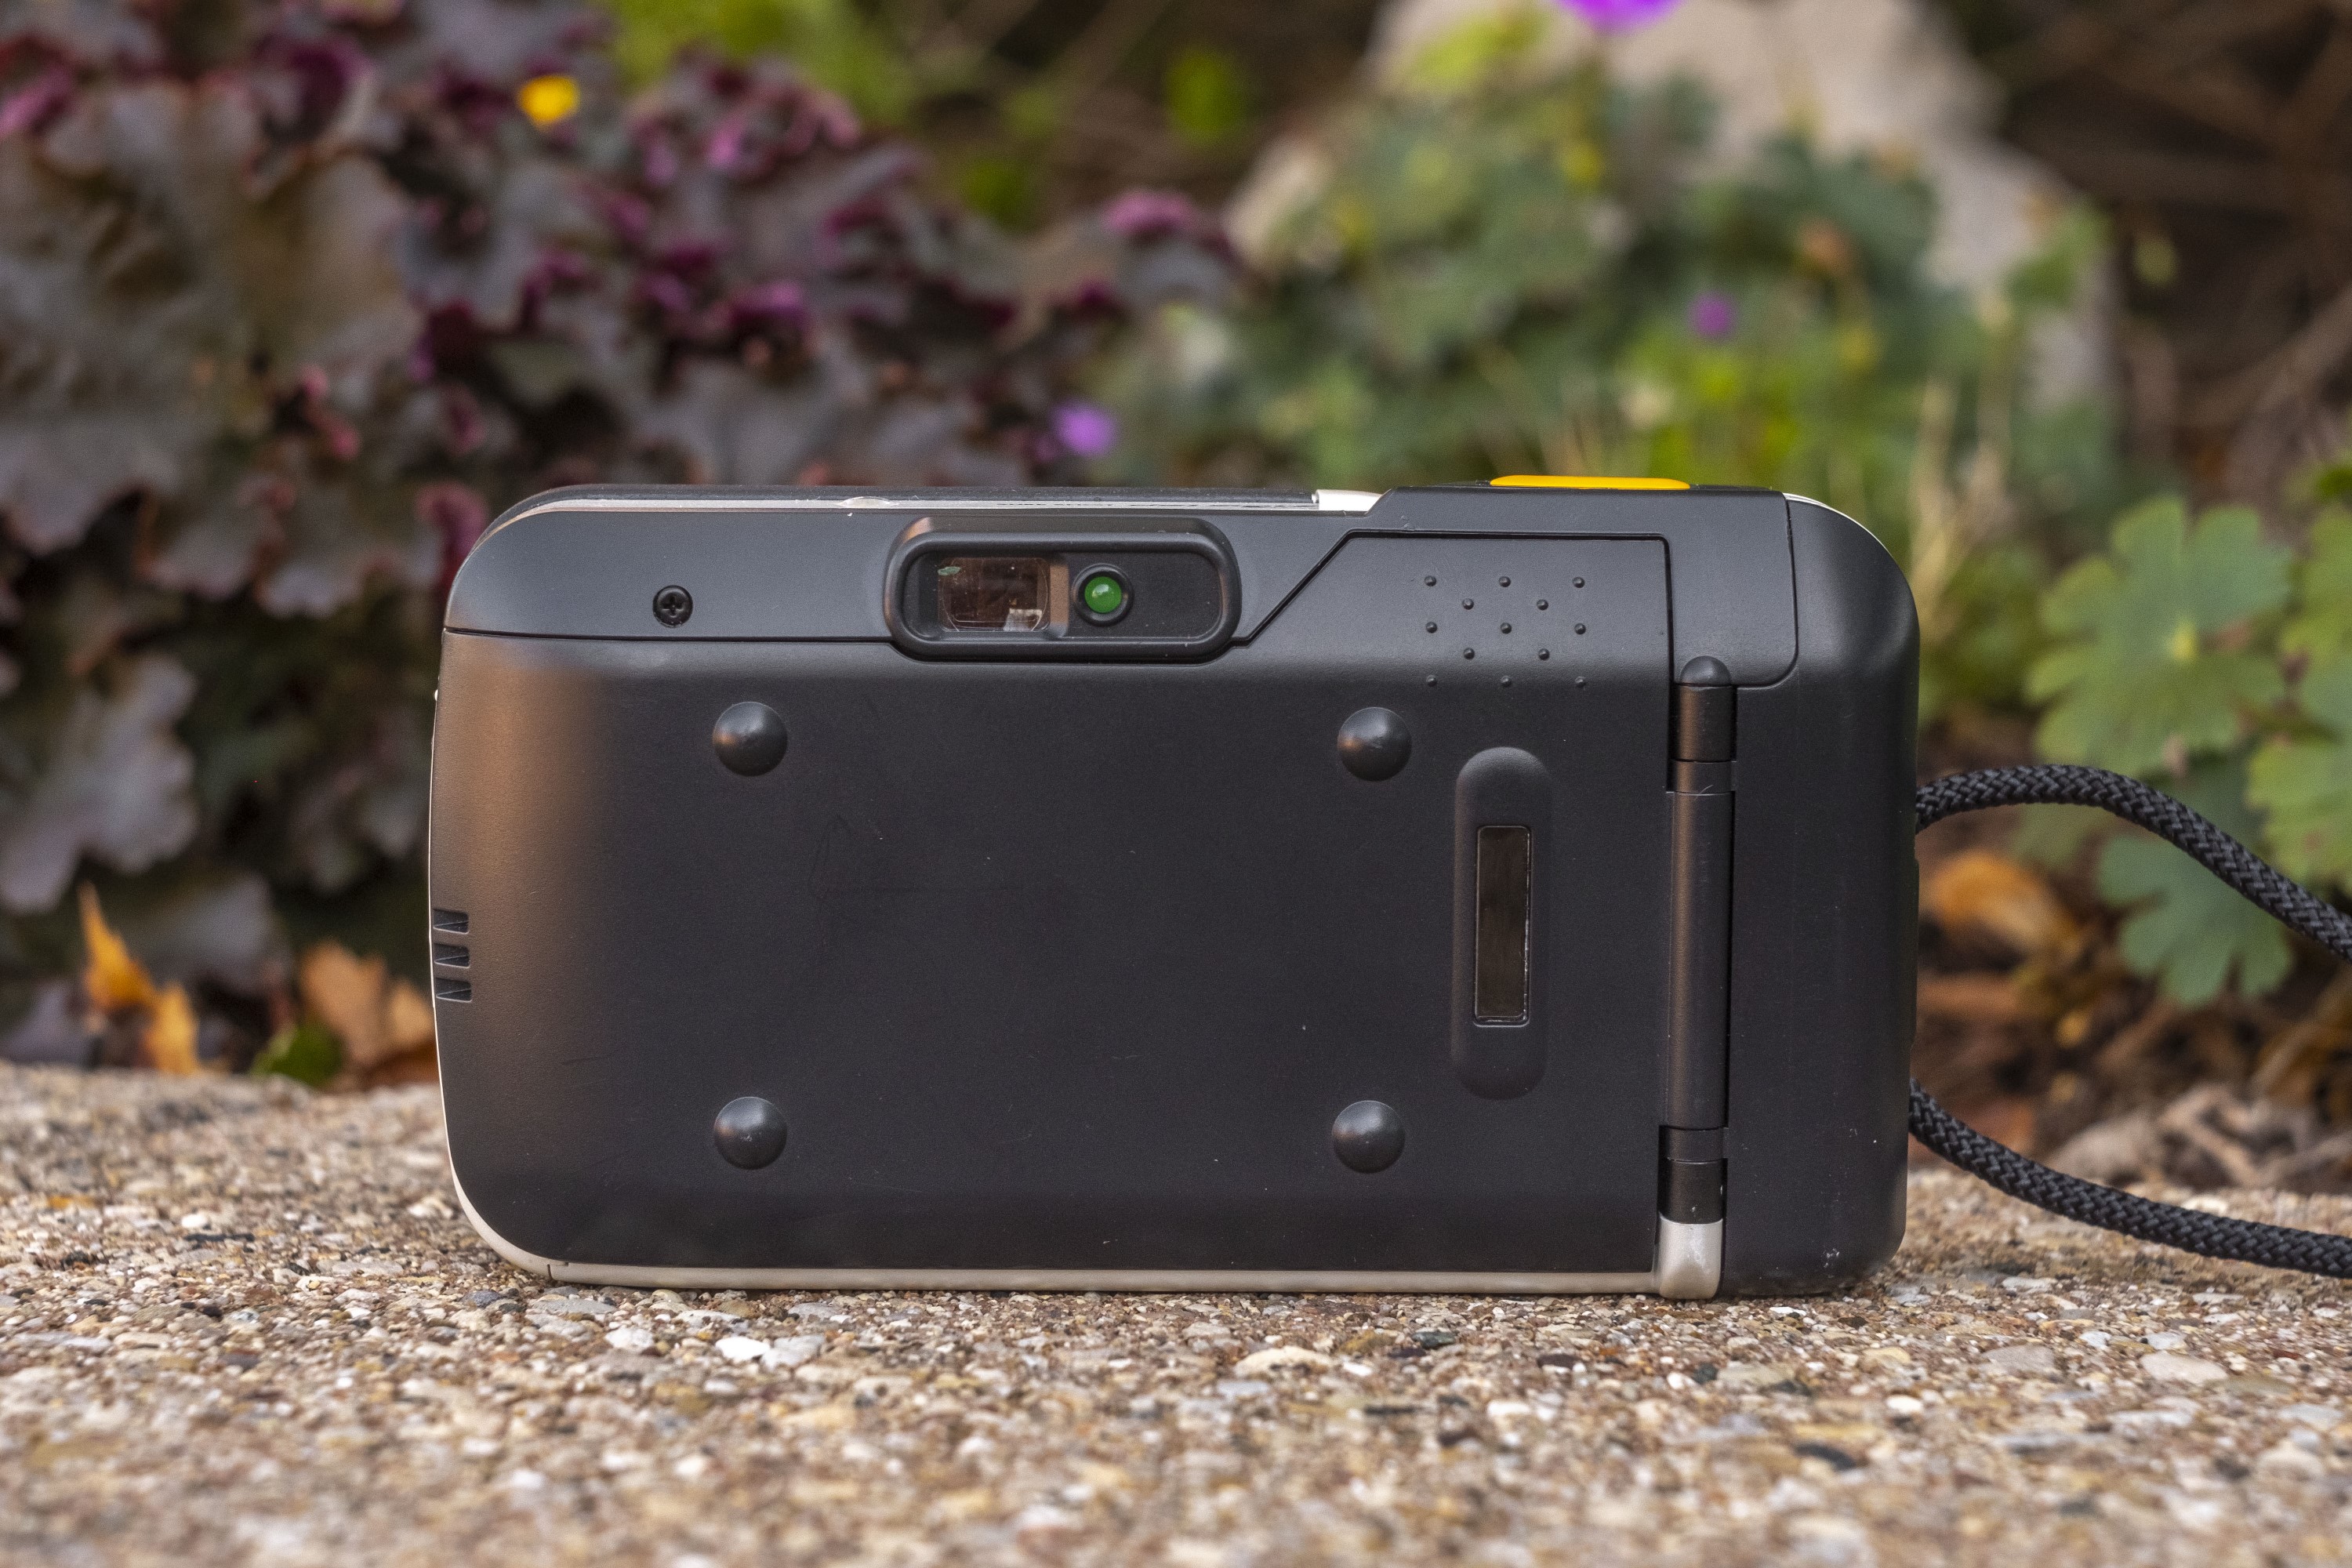
The back of the camera has the eye piece for the viewfinder which is sufficiently large for a point and shoot camera. Looking through the viewfinder, there is no information about exposure or focus distance detected. The only things you see are two central brackets indicating the auto focus area, and two parallax horizontal lines near the top of the image indicating where the top of the exposed image will be at close focus.
Next to the viewfinder window is a green focus confirmation light that illuminates when the camera has detected focus, and it will also blink to indicate a slow shutter speed is to be used. The door of the camera has a peep window that allows you to read what kind of film is loaded in the camera, and four raised divots that act as feet to stabilize the camera when laying on it’s back while charging.
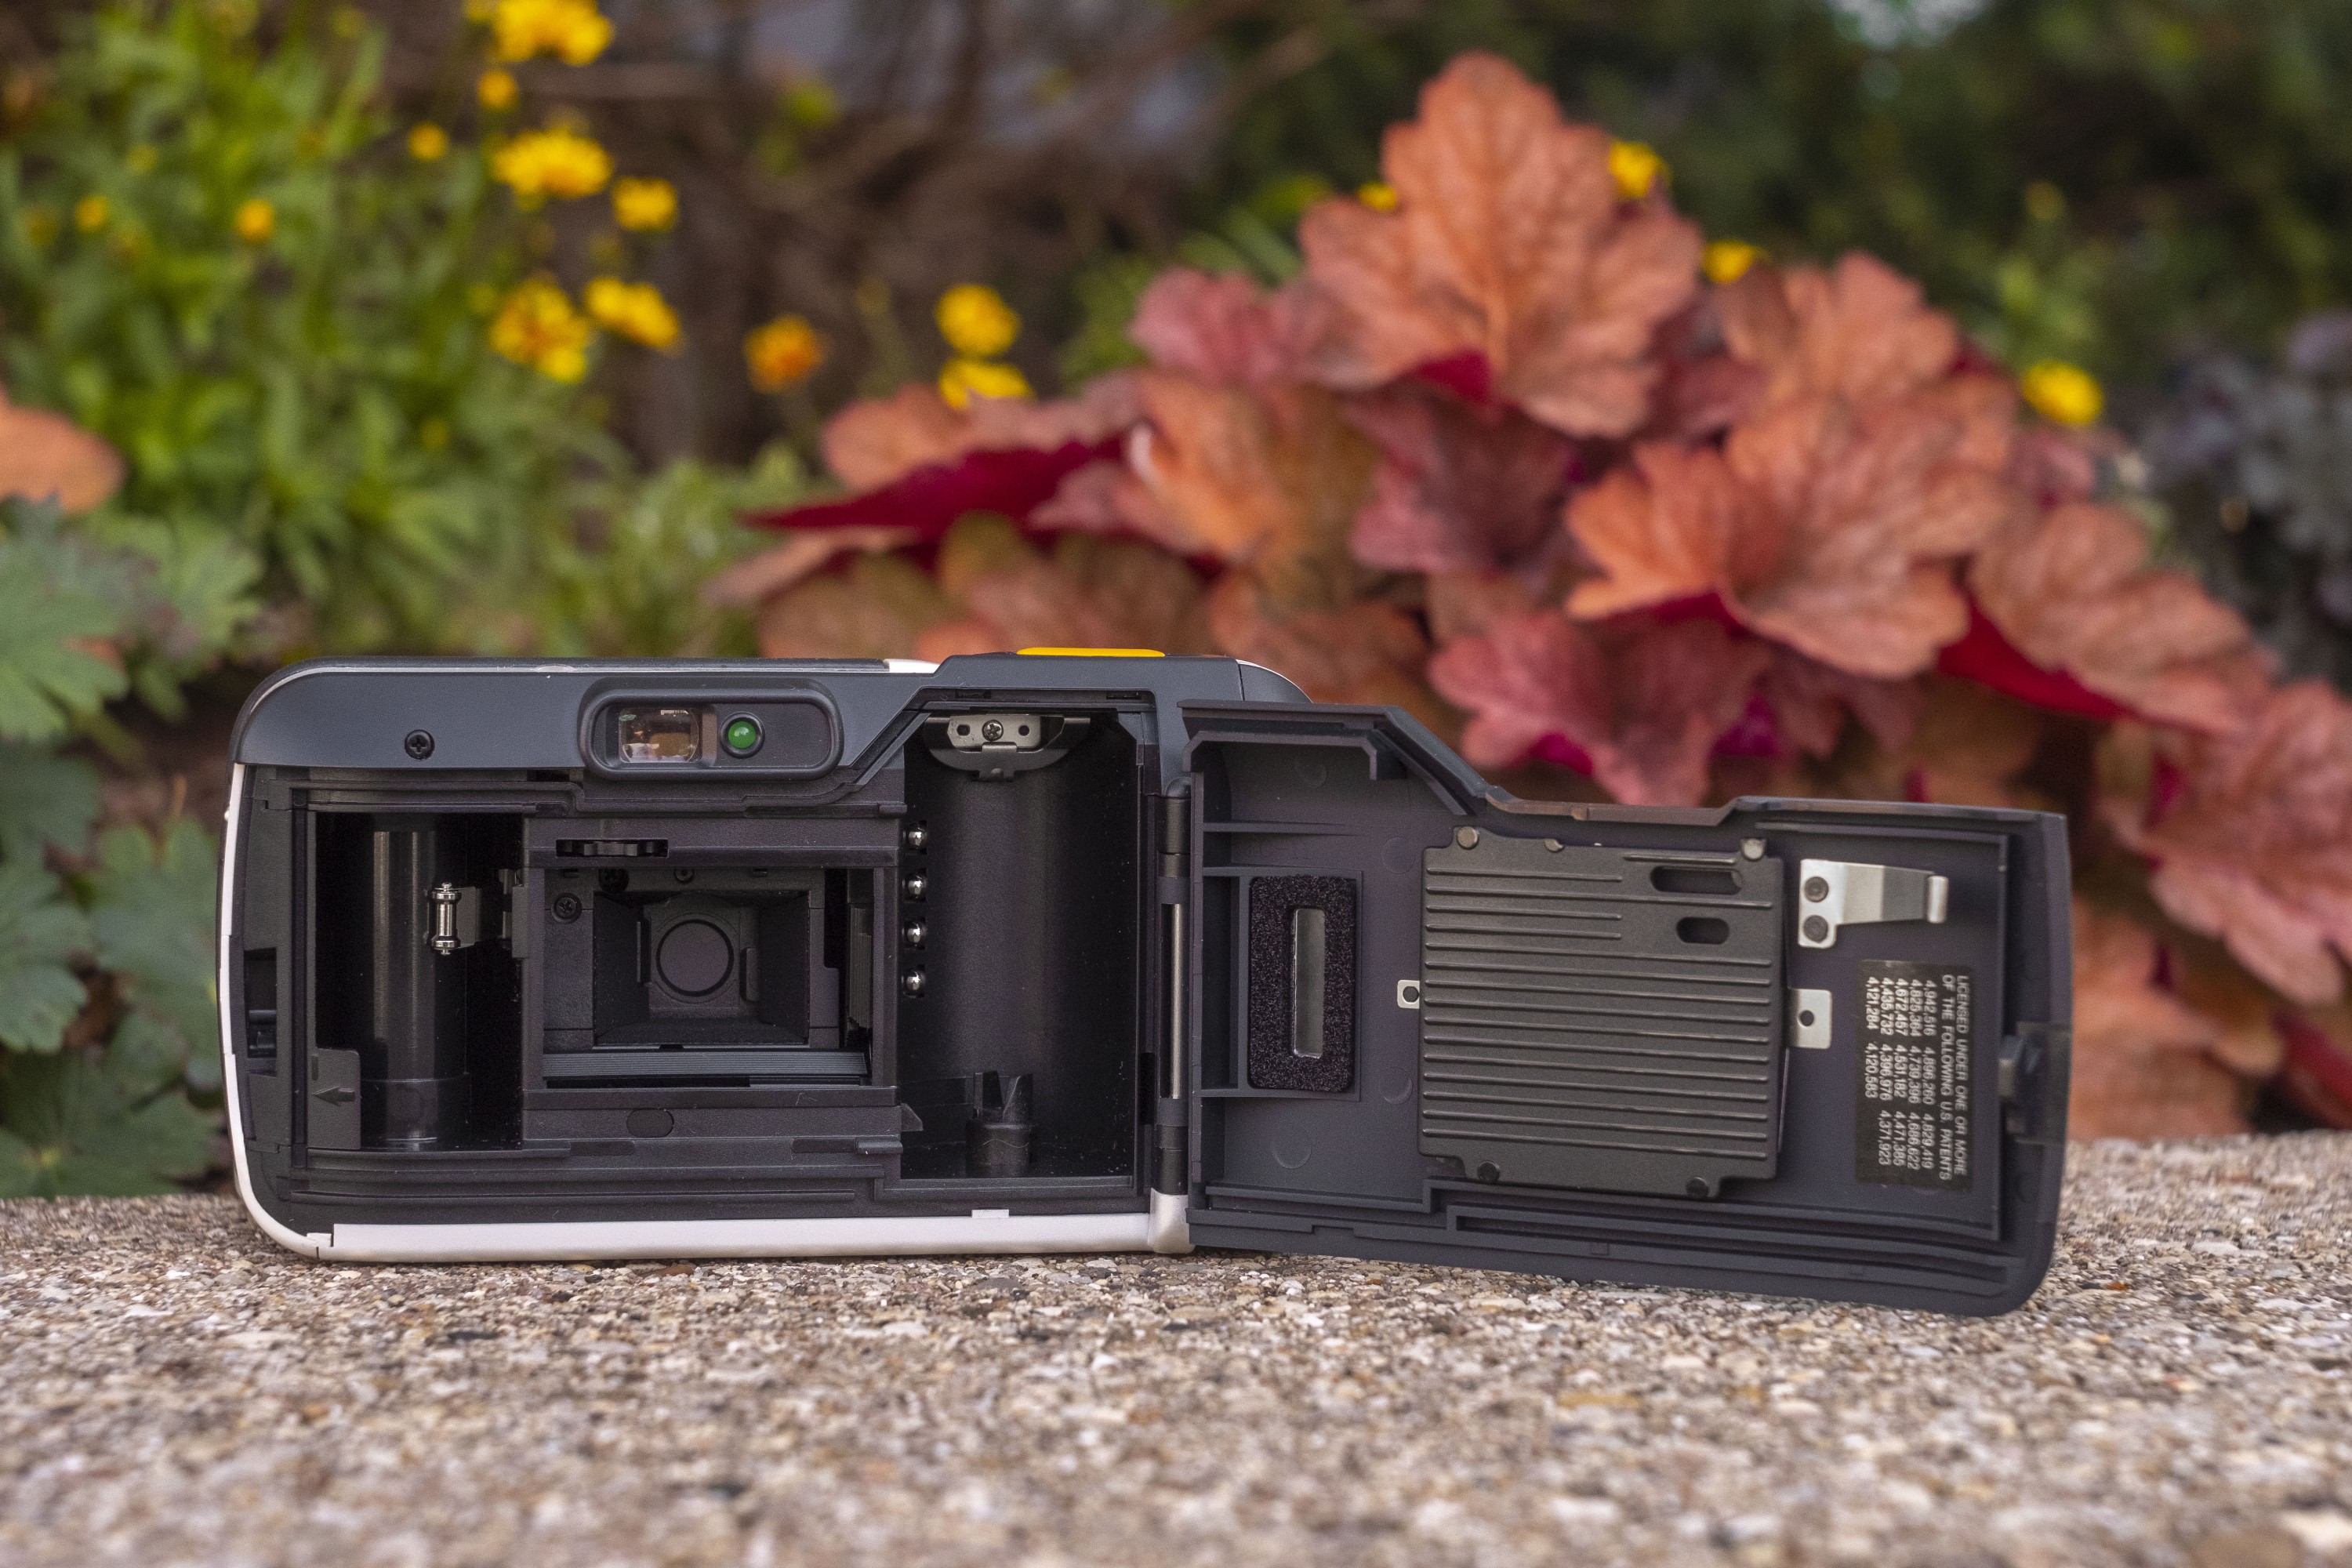
Film loads from right to left and like you’d expect from a mid 1990s camera, is fully automatic. Extend the leader to the tip of the arrow in the bottom left corner, close the door, and the camera does the rest. The cameras supports DX encoding at speeds from ISO 25-3200. The manual does not specify what the camera will set if you try to use non DX-encoded cassettes, but it probably sets it to 100 like most cameras did.
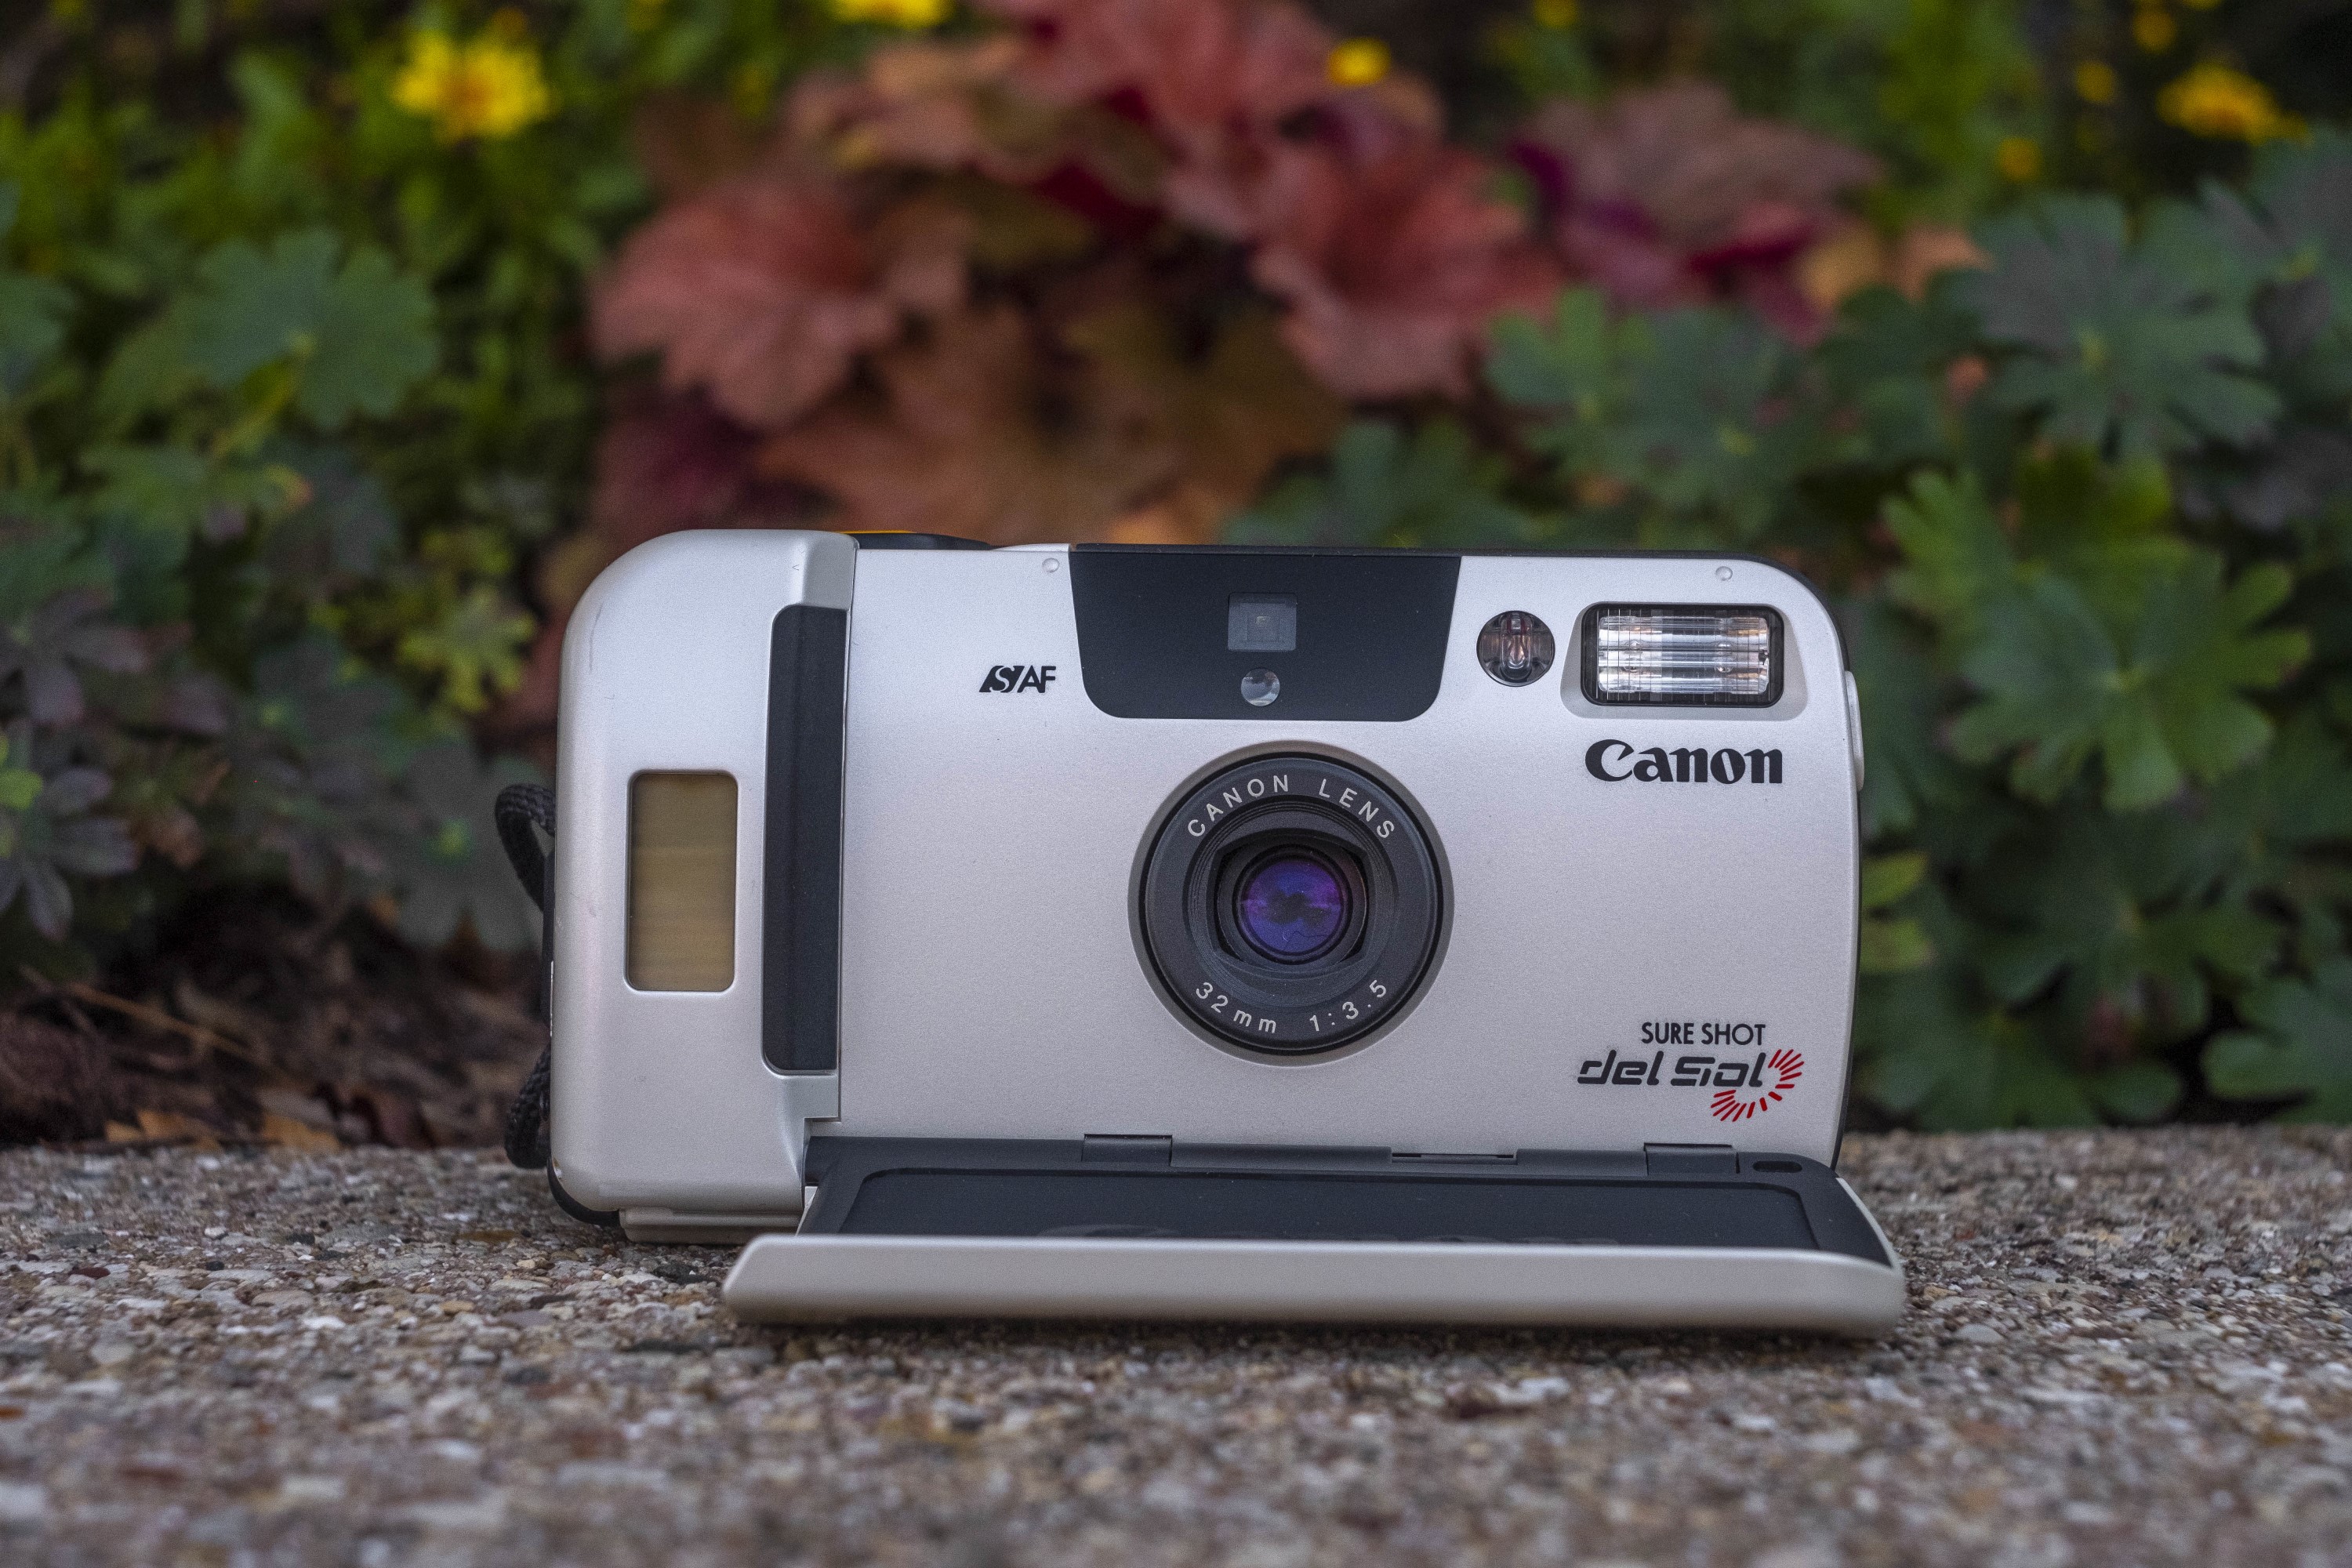
When you are ready to shoot the del Sol, the camera is turned on by simply folding open the solar panel. There is no release button for the panel, it simply folds down with a gentle push of a finger. Upon folding the panel down, the lens will move forward a little into it’s taking position and the camera is ready to shoot.
When you are done shooting the del Sol, simply fold the solar panel back up and the lens will retract and the camera powers down. Although the lens retracts quickly, you should not slam the panel shut with too much force as it may make contact with the lens before it has a chance to fully retract.
In use, there’s really not much to the del Sol, after all, its just a mid 90s point and shoot camera with an alternate power source. But what kinds of images is it capable of?
My Results
For the first roll of film in the del Sol with it’s new battery, I used an old standby, Fuji 200. Since I knew this camera was designed to work in the sun, I wanted a color film that I knew performed well in sunlight. Fuji 200 isn’t quite as vivid or distinct as Kodak Ektar or Portra, but it’s safe, and it’s predictable, just like Canon Sure Shot cameras were.


Is the Canon Sure Shot del Sol a good camera? Yes, it is. The images came out great, it’s easy to use, it’s compact, and the fact that the original owner should never have had to replace the battery is pretty convenient, but ultimately, the solar charging feature is nothing more than a gimmick. It was Canon’s way of putting something out there that stood out from what everyone else was doing. By the mid 1990s, people had become more environmentally conscious than ever before and a solar powered camera likely helped win them some “green” points.
The problem with a solar powered camera is that cameras (especially point and shoots) usually spend most of their life sitting in a camera bag. No one purposely leaves their camera sitting out in the sun when not in use to make sure it has enough of a charge when you need it. For the causal user who might only take their camera out for special family events a couple of times of year, might find that when the time comes to use the camera, that it has no charge, and without a backup power source there’s nothing you can do until the sun comes back out to recharge it. According to Canon, 6.5 hours of direct sunlight or 16 hours of shade are required to fully recharge the battery. (Just please don’t put it in a microwave!)
There is a reason that this was Canon’s only solar powered camera, and to my knowledge the only solar powered camera made by anyone, ever. The solar panel is neat, but it solves a problem that no one ever asked to be solved.
Of course, you wouldn’t be reading this site if you didn’t like learning about strange and quirky old cameras, and the del Sol, although not all that old, is certainly a unique camera. It worked quite well and gave me some really terrific shots, and I honestly don’t think that had it not had the solar panel, I would have ever picked it up, so I guess Canon’s attempt at doing something different back in 1995 is still proving to be a worthwhile endeavor.
Related Posts You Might Enjoy
External Links
http://camera-wiki.org/wiki/Canon_Sure_Shot_Del_Sol/Prima_Sol/Autoboy_SE
https://cameragocamera.com/2018/09/10/canon-prima-sol-sure-shot-del-sol-autoboy-se/
https://www.collection-appareils.fr/x/html/camera-10087-Canon_Prima%20Sol.html
Mike, I don’t recall seeing anything about this camera. Quite new to me. What a great find. I can imagine you were doubly elated when, having gone to the trouble of finding and replacing the batteries, you found the solar panel was still working, too. And the images don’t look too bad, either.
Yes, the instant I connected the new battery, the lens popped out to it’s taking position and that was a moment of great excitement for me!
Check out the Ricoh XR-S, a 35mm mechanical shutter SLR with small solar panels atop the prism housing, that feed some current back into a permanent-installed battery that can power the metering circuit. (User-replaceable LR44 batteries normally power the exposure circuit.) The camera dates to the early 1980s and (like most Ricoh SLRs of that era) has a PK bayonet lens mount. Other than this solar charging circuit, the XR-S is pretty unremarkable, on a par with the KR7.
Thanks for the clarification Roger. You, and several other readers alerted me to the XR-S, so I have edited the review to comment that the del Sol was the first completely solar powered camera.
Hi Mike. I’m trying to repair my Prisma Sol camera. I think that could be the battery and this is the only complete guide that I’ve found. Thanks! But there are some mising images. I don’t know if you can reupload them or send them to me troutgh my email. I would be gorgeous if you can help me with this. Thanks again Mike, have a nice day.
Hi Daniel! I have this camera as well (it was my dad’s) and when I got it, the lens wouldn’t come “out”… is that what is happening to you? I thought something had broken until I put it under the sunlight for a whole day and everything worked perfectly again. Btw, do you speak spanish? (just asking because of your name haha I speak spanish and if you do too maybe that way we could discuss it better). Have a good day!
Thanks for the guide! Just fixed mine Prima SOL.
I was trying to find a manual for this camera – I have found one in the belongings of my late father in law, and don’t know what position the power lock switch is supposed to be in for it to charge – I have a paper manual but it is water damaged and if the switch position is referred to anywhere in there I haven’t been able to find it. Any ideas? I would like to try getting it working if possible.
Howard, looking at the switch with the panel facing down so the serial text is read properly, move the switch to the left position to allow charging. This switch was called the “presale switch” in the manual.
I just found this camera this weekend while in the Oregon coast at a thrift shop. The person said make offer. Got this and another 35 mm for $12. Doesn’t turn on so I’m guessing will need a new lithium battery
It absolutely needs a new battery. These cameras are approaching 30 years old and there’s no way the original battery would last that long. Follow the instructions in the post and they’re very easy to change!
Hello! I just bought the Canon Sol and so far I Love it! the design the pictures everything! I have just one problem. And you are the only person who documented this camera so here I am. When I press the big red button only the battery shows on the display. not the light indecator. Do you know whats wrong? do I just need a new battery? It works fine it just doesnt show the indecator and I dont know if its charging.
Hi Felix! The original batteries in these cameras were not intended to last decades. If your camera isnt powering on, and only showing the low battery indicator then it definitely needs to be replaced. Under normal operation, even with a low battery, the charging indicator should light up. Follow the instructions in my post and you should have no problem bringing that camera back to life! Good luck!