

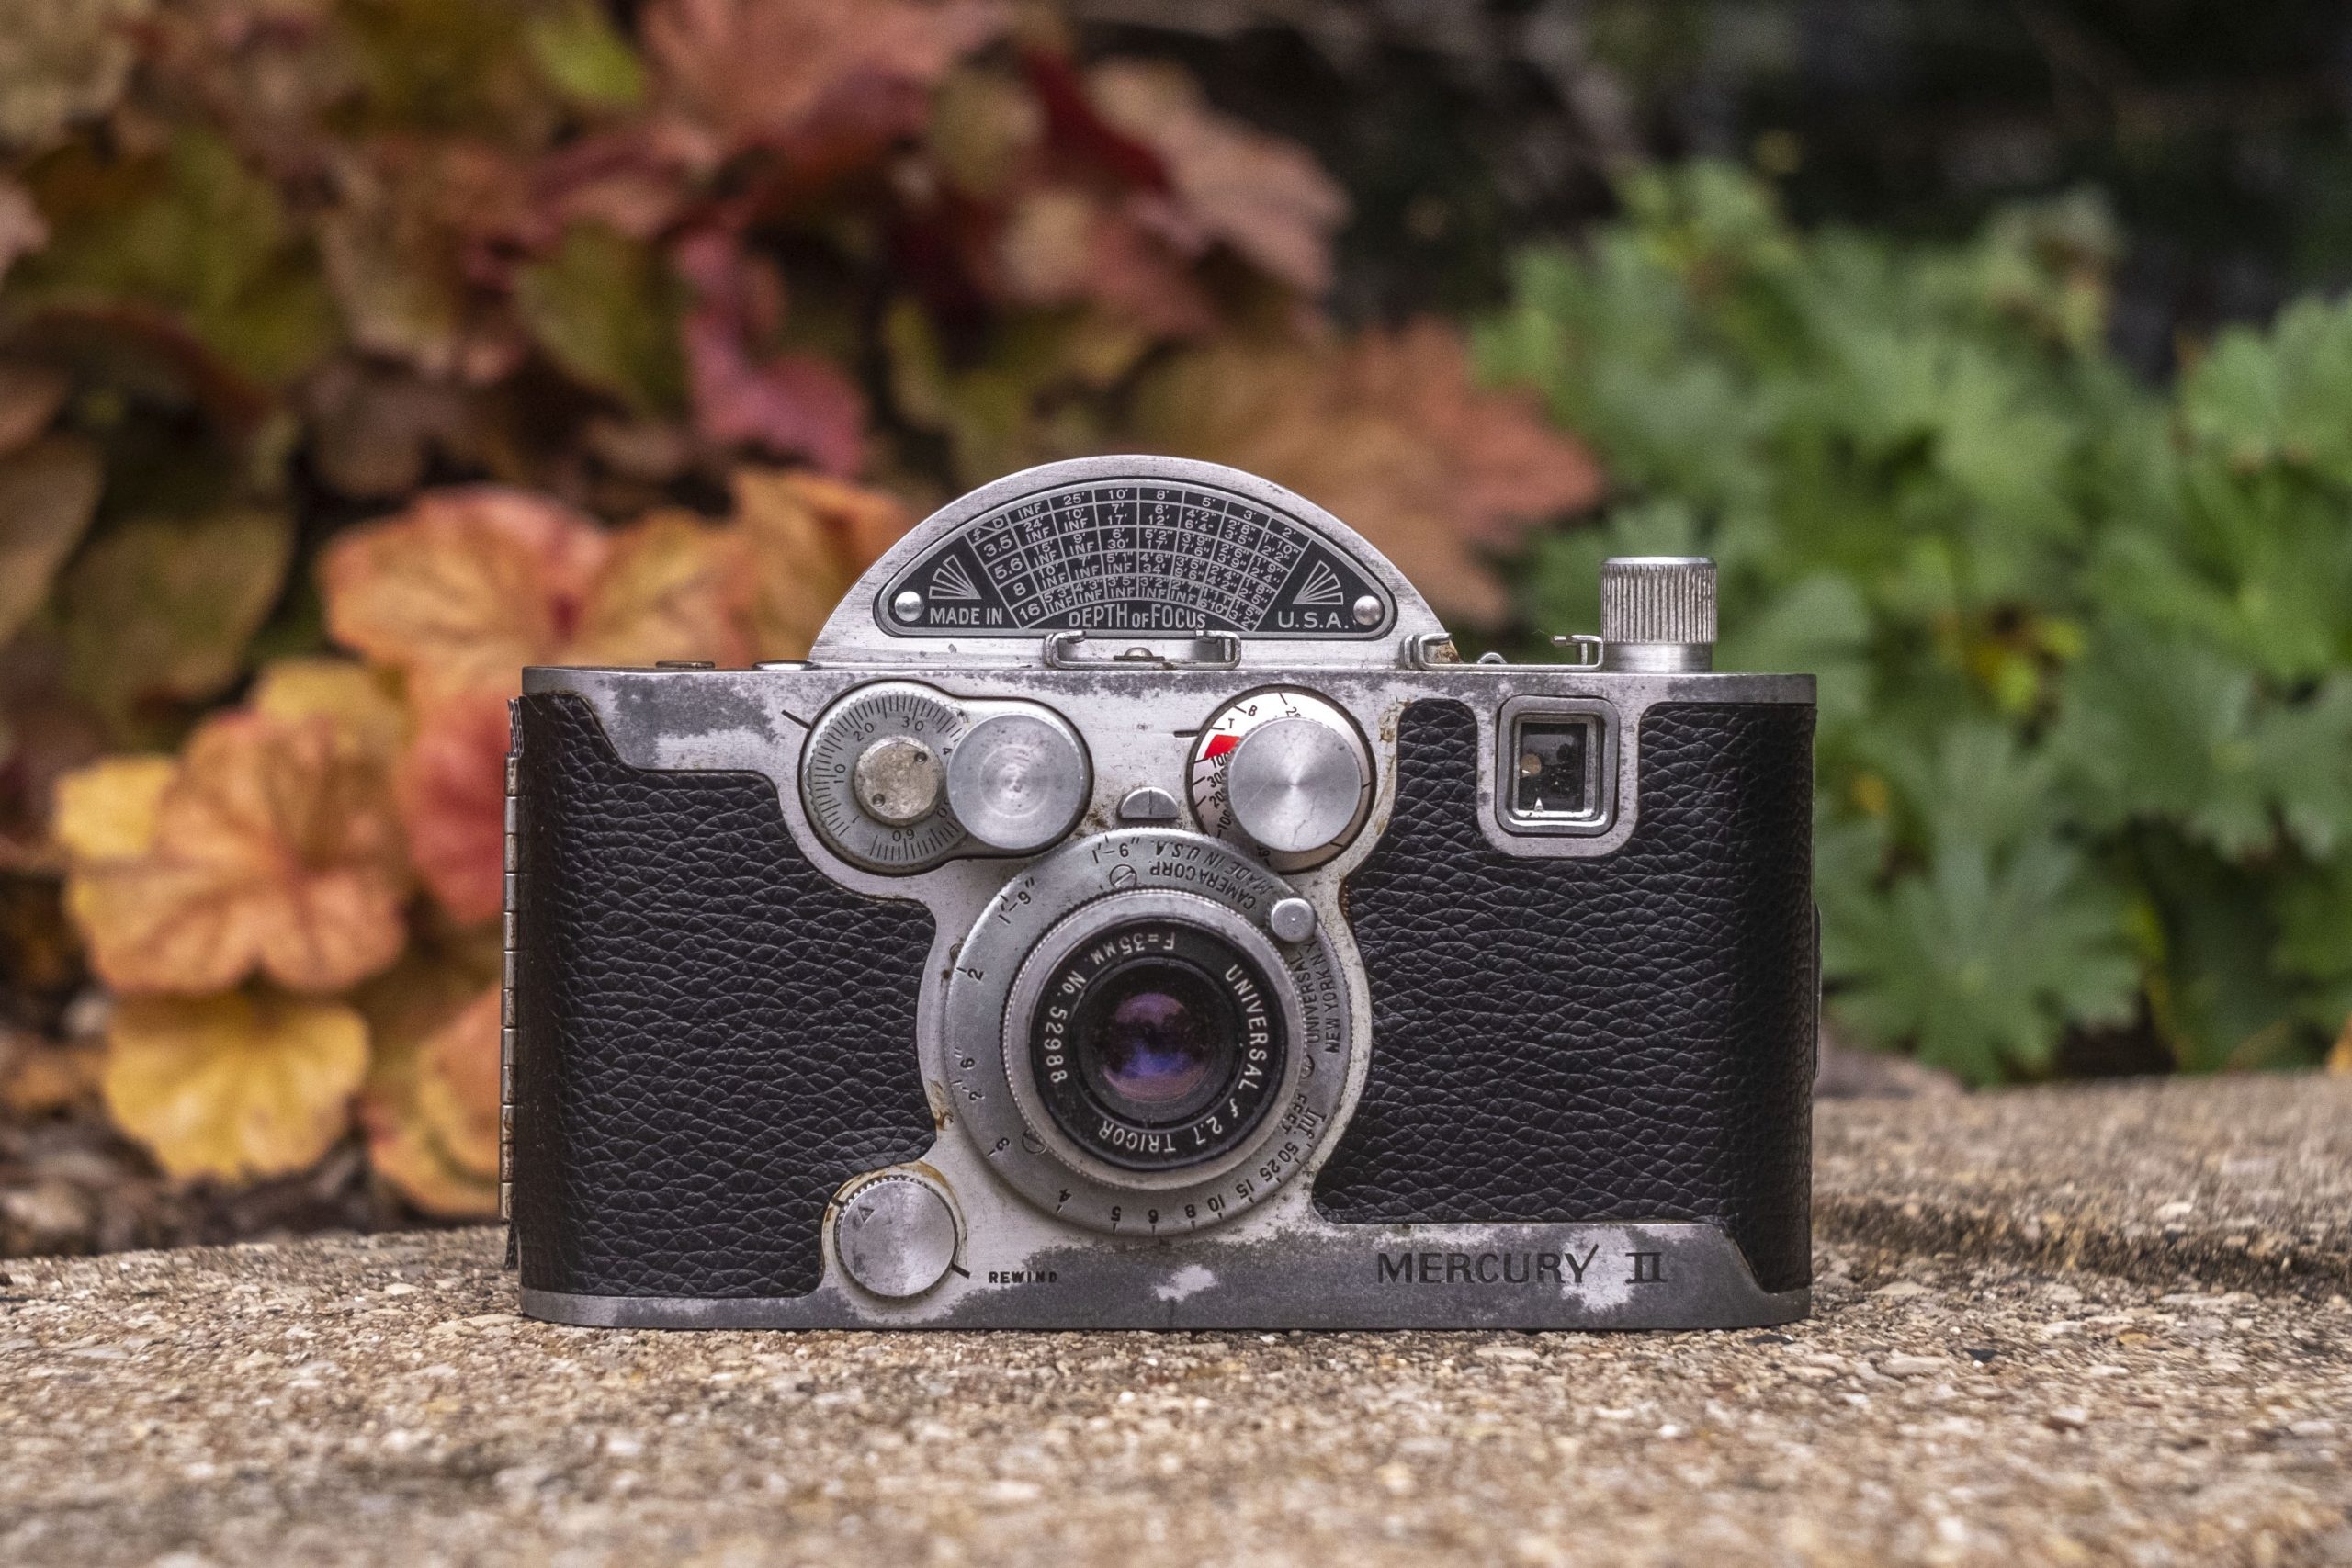
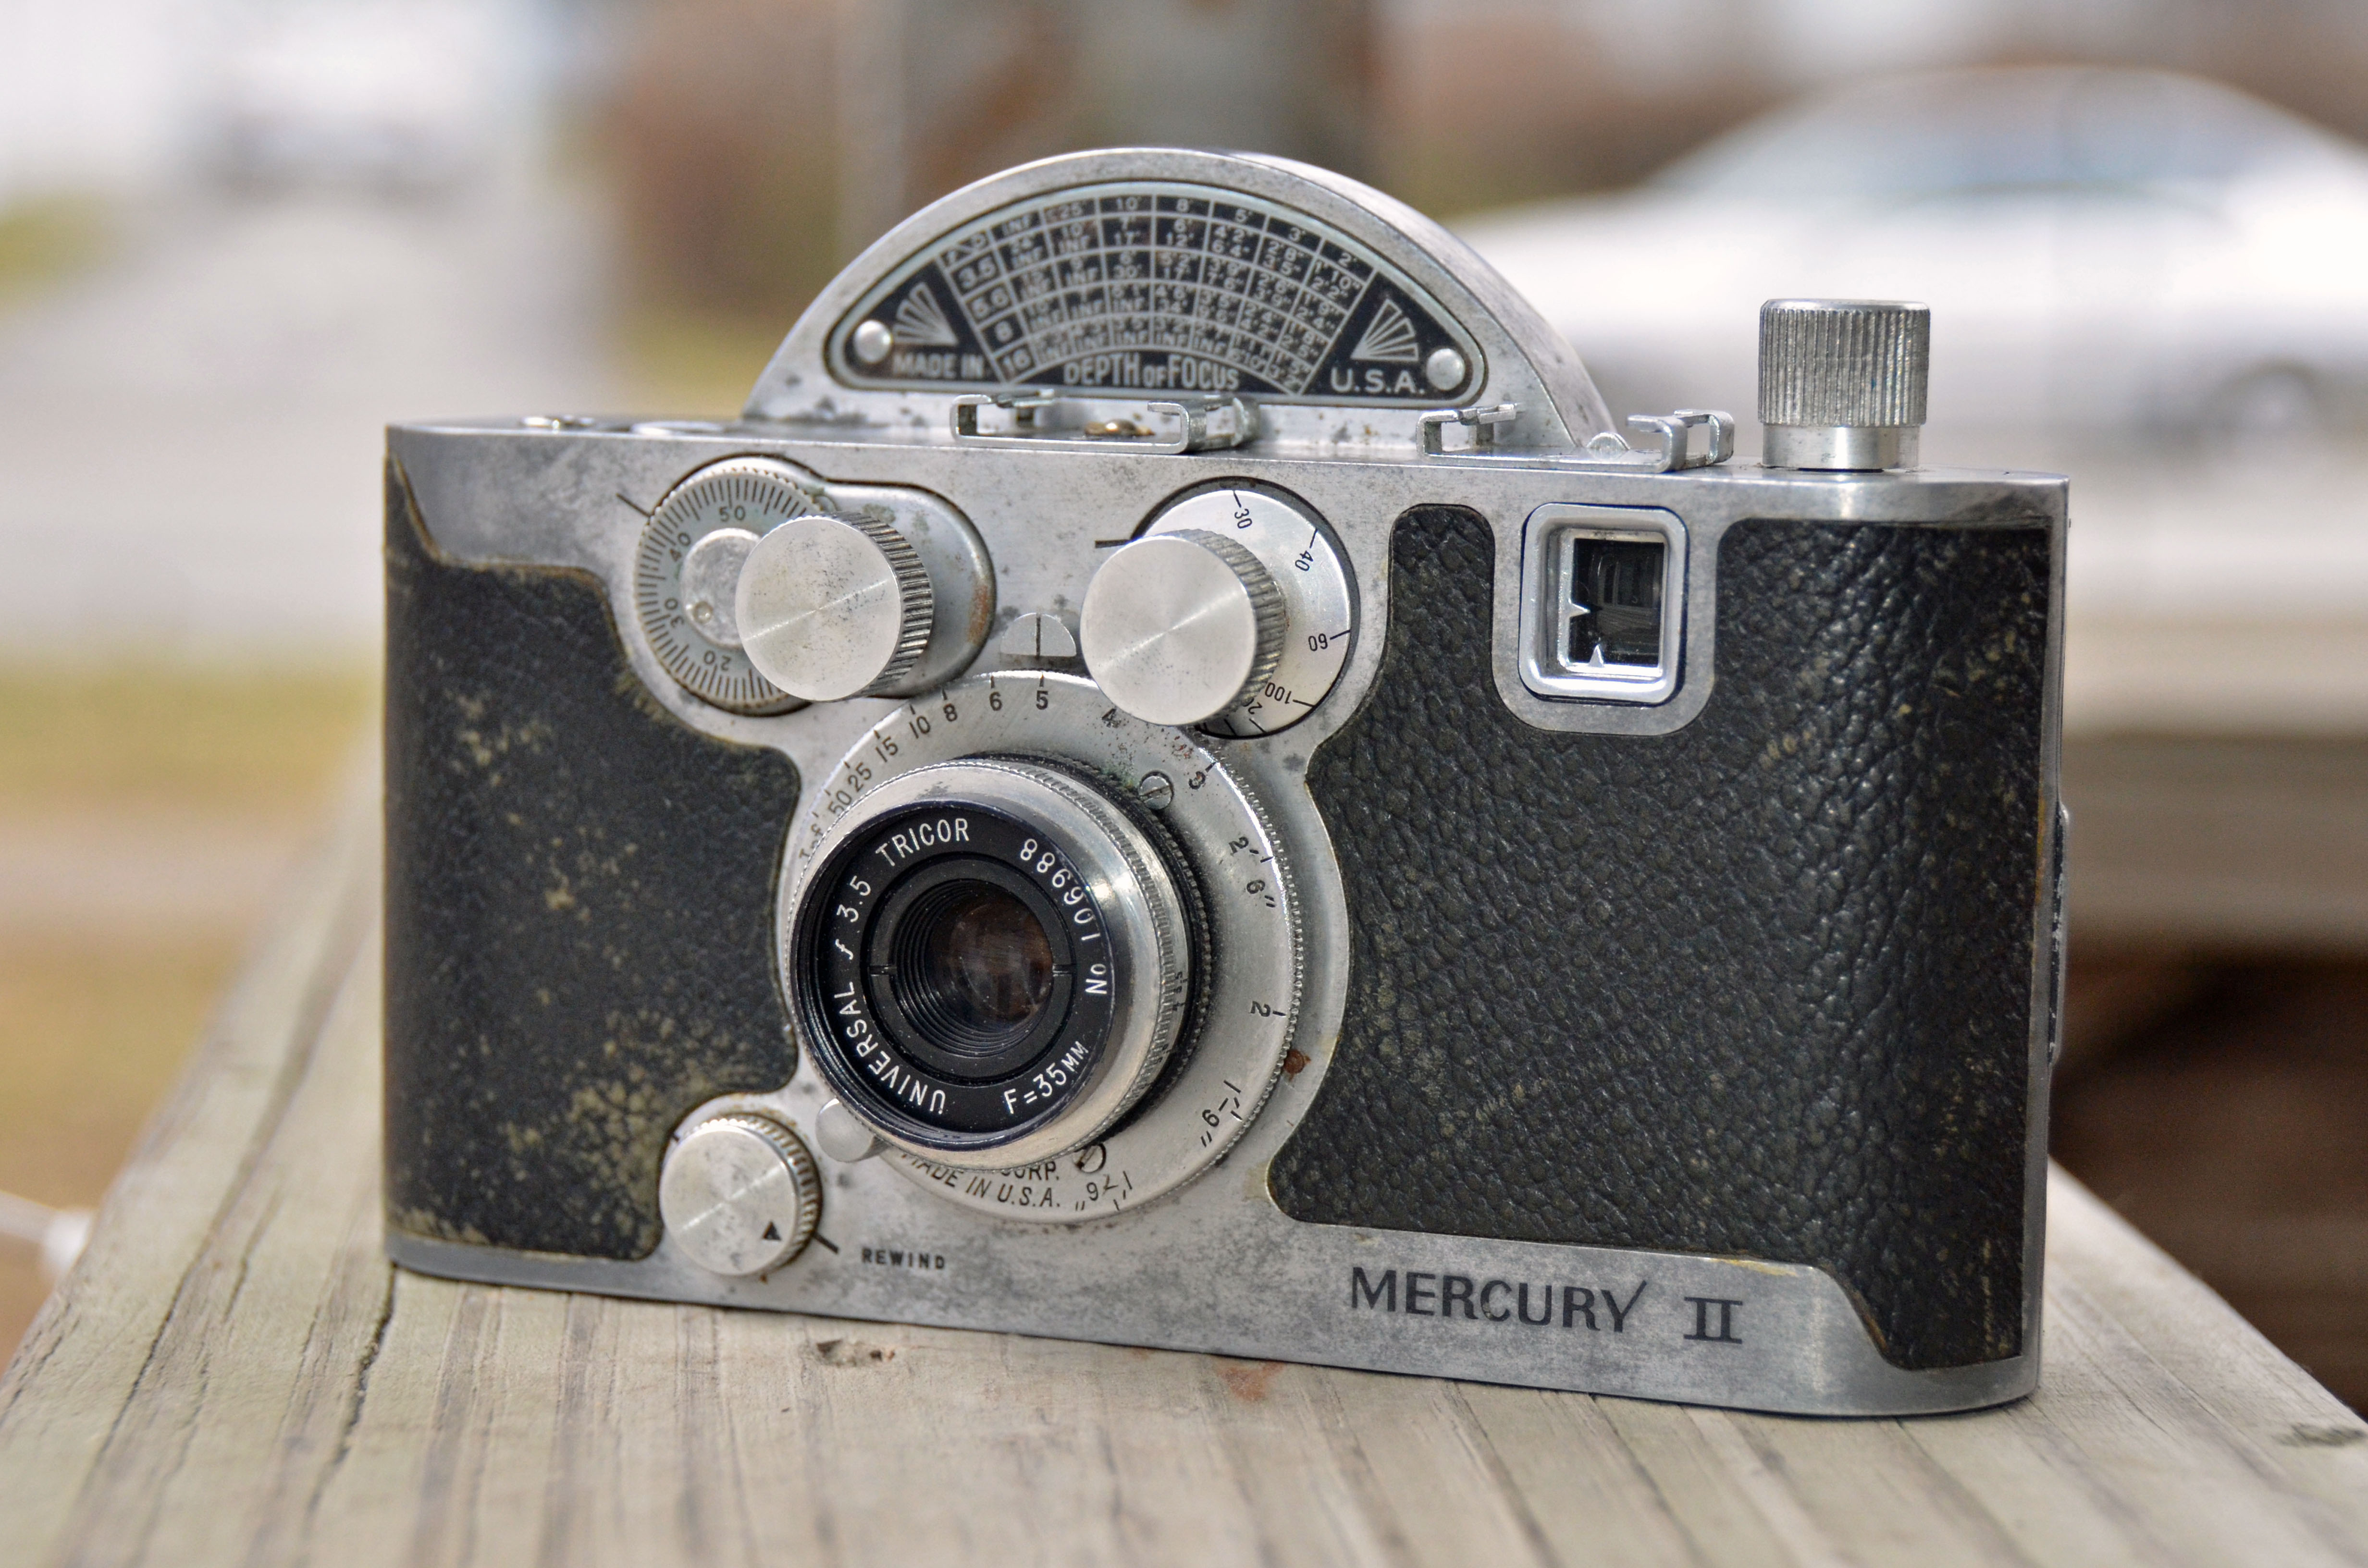
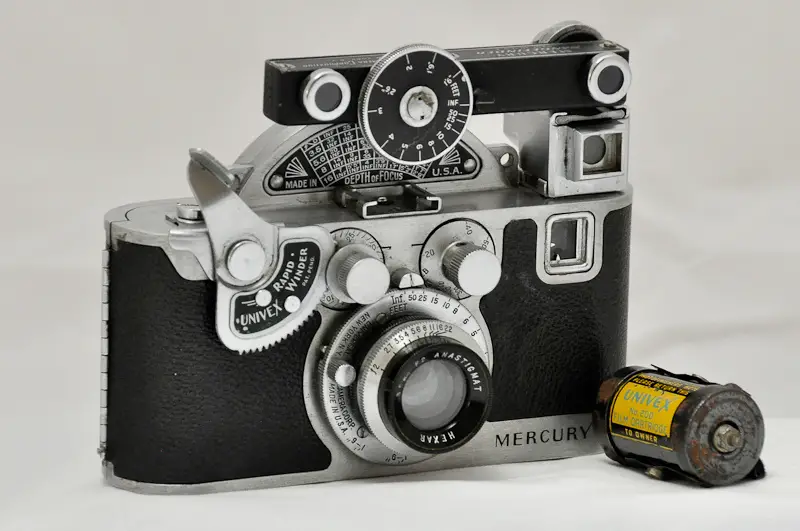
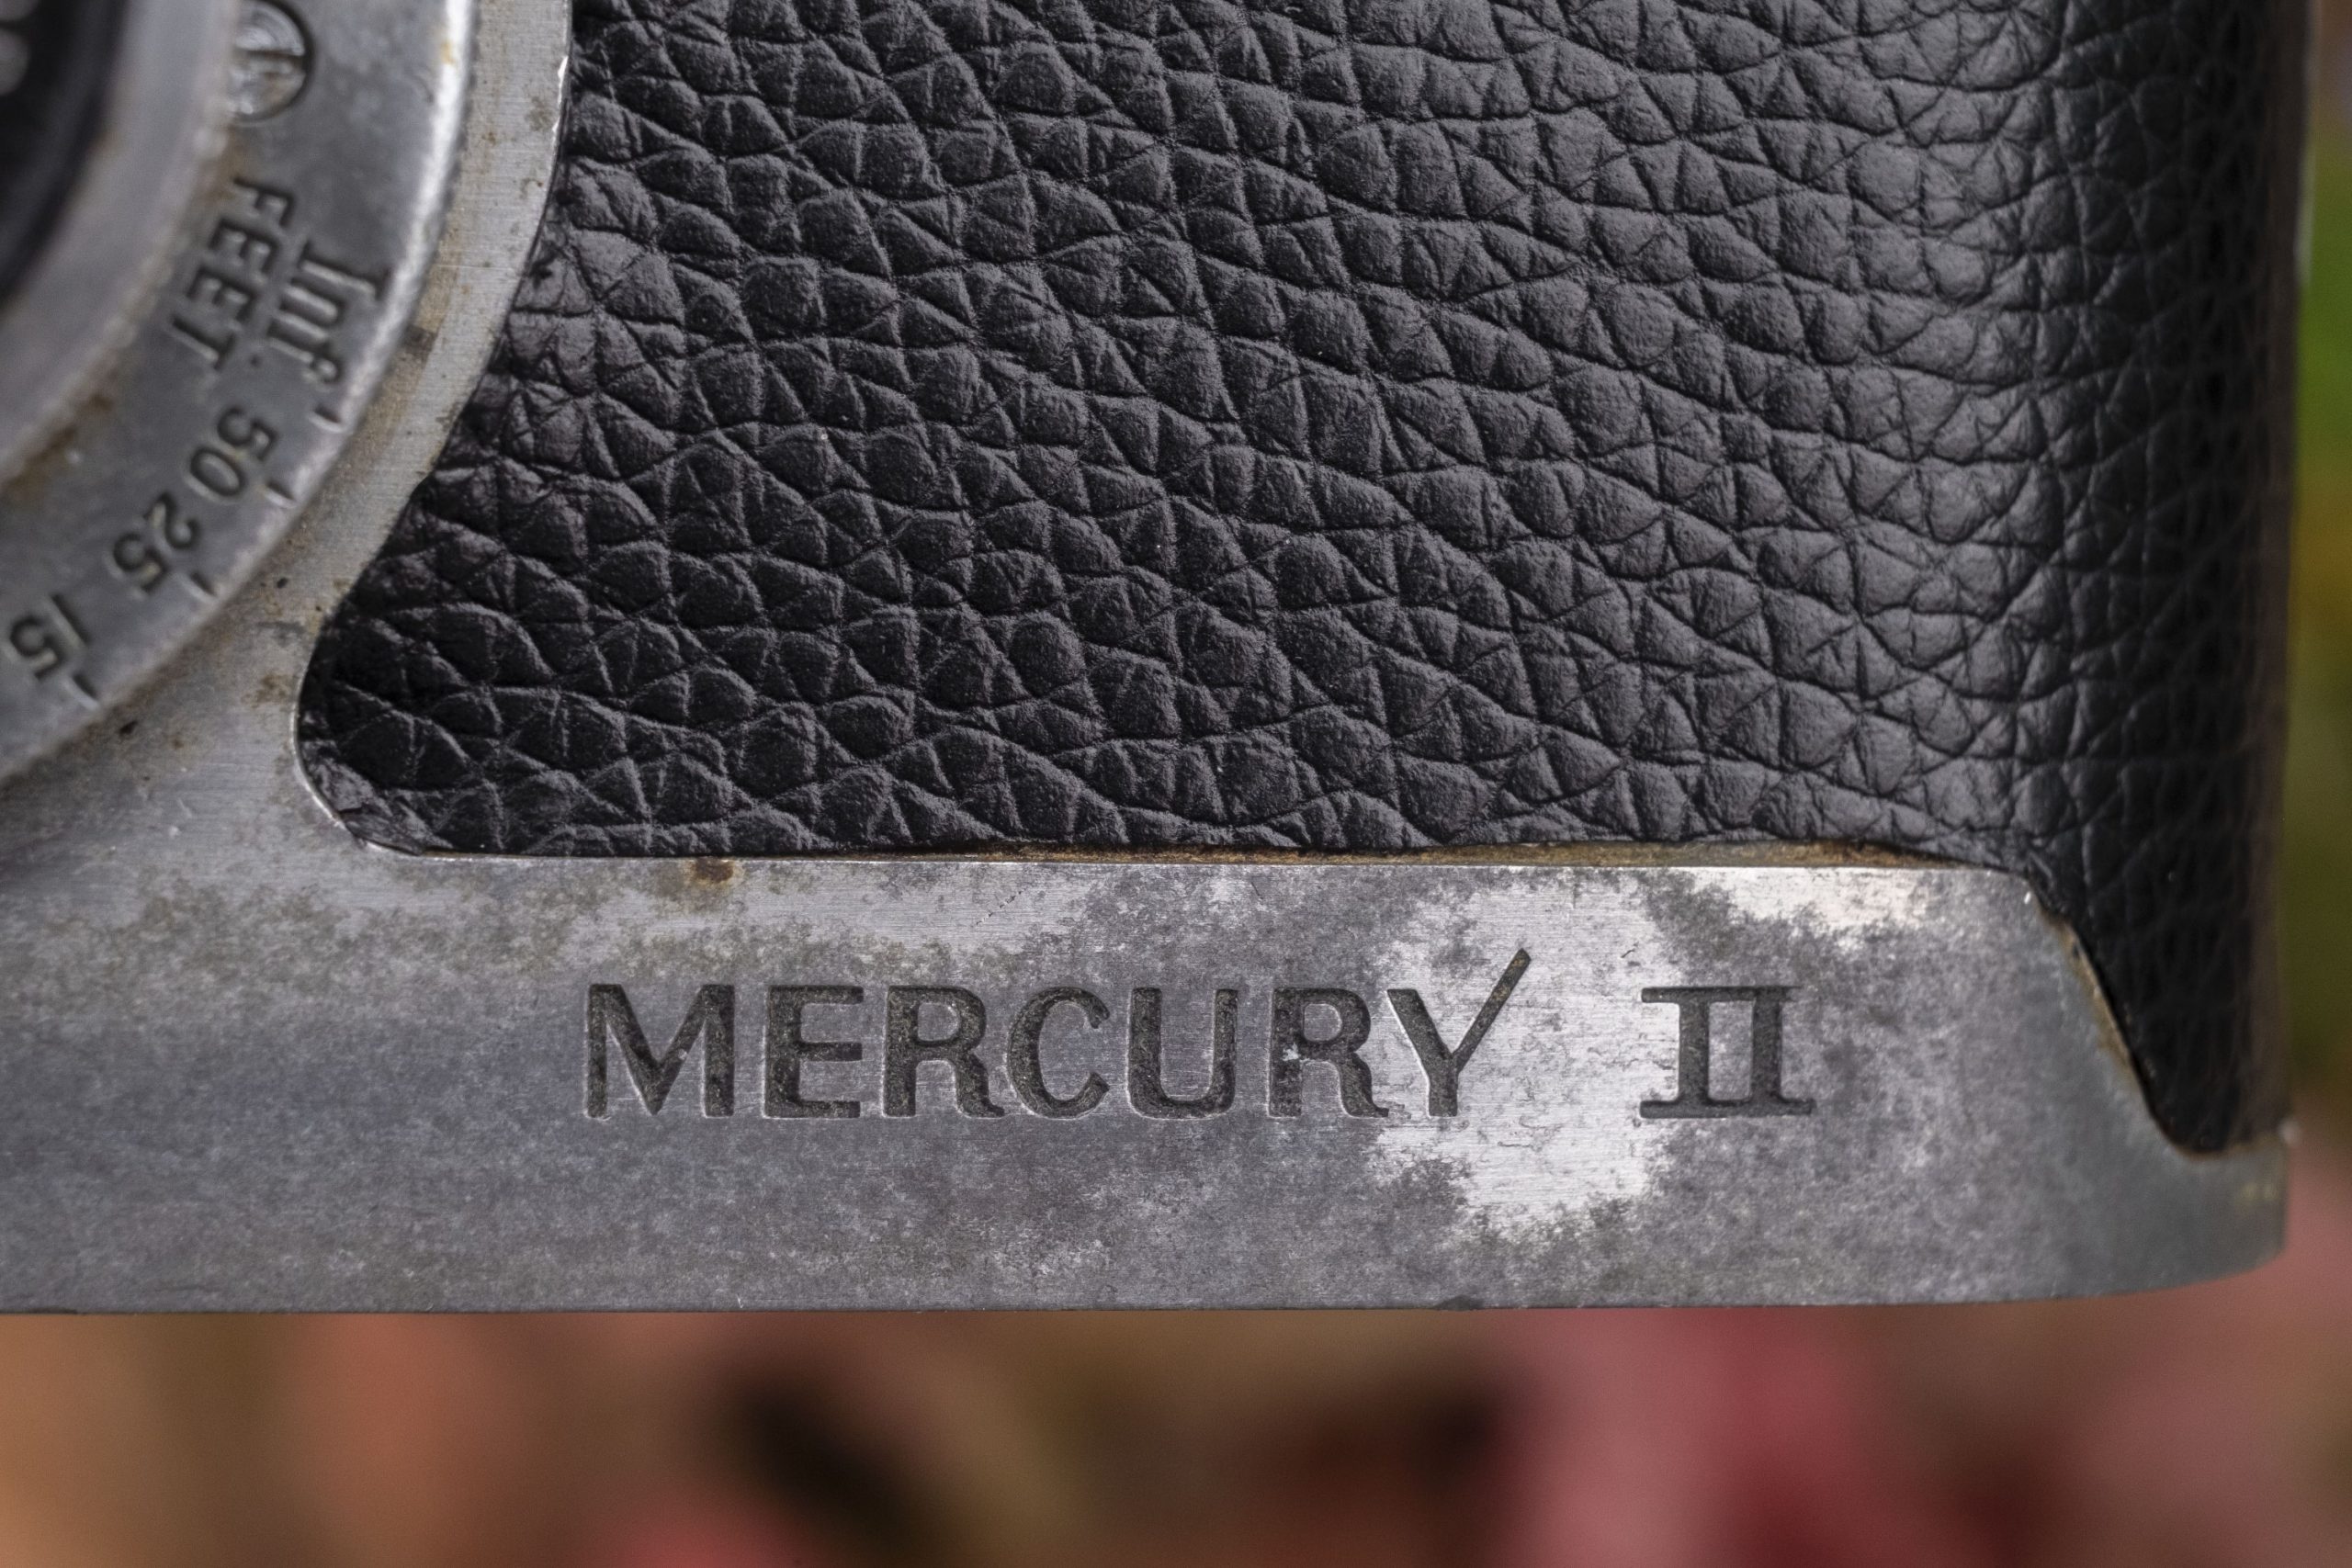
This is a Mercury II Model CX half-frame 35mm camera made by the Universal Camera Company out of New York, NY. The Mercury II was an update to the original Mercury Model CC that added support for normal 35mm film rather than the proprietary Univex film used in the original. Both Mercury cameras were unique in that they used a rotary focal plane shutter that allowed it to reach a maximum shutter speed of 1/1000 second while keeping costs low.
 Film Type: Half Frame 135 (35mm)
Lens: 35mm f/3.5 coated Wollensak Tricor 3 elements
Lens Mount: Mercury Screw Mount
Focus: 1′ 6″ to Infinity
Viewfinder: Scale Focus Viewfinder w/ Parallax Hash Marks
Shutter: Rotary Metal Focal Plane Shutter
Speeds: T, B, 1/20 – 1/1000 seconds
Exposure Meter: None
Battery: None
Flash Mount: Mercury Flashbulb Hot Shoe, synced at all speeds
Weight: 535g (body only), 576g (w/ lens)
Manual: http://www.butkus.org/chinon/univex/mercury_ii/mercury_ii.htm
My Final WordHow these ratings work |
The Mercury II is one of the most unique looking and innovative cameras of all time. In addition, it was also a very capable design with a good lens and very reliable shutter. Despite it’s odd appearance, the camera is easy to use and has good ergonomics while shooting. I don’t recommend trying to make sense of the exposure dial on the back, as Sunny 16 works good enough, but in use, the Mercury II delivers satisfying shots that also has the added benefit of getting nearly twice as many exposures out of a single roll of film. Whether you are a collector of odd cameras, American cameras, or just like film cameras, a Mercury II is deserving of being in every collection. | ||||||
| Images | Handling | Features | Viewfinder | Feel & Beauty | History | Age | |
| 1 | 2 | 1 | 0 | 2 | 2 | 30% | |
| Bonus | none | ||||||
| Final Score | 10.4 | ||||||
December 2019 Update:
This month marks the 5th anniversary of this site’s first camera review. To commemorate this milestone, I’ve gone back and updated some of the site’s very first reviews, including this one for the Mercury II. Although that original review contained a lot of great information, my style of writing has changed dramatically over the past 5 years, so what follows is an updated review.
Most of the information from that original review is still present, with some additional historical information, more artwork, all new images of some later Mercury II cameras that I acquired after that original one, and two new galleries.
History

The Universal Mercury’s history is about as interesting as it’s design. The Universal Camera Corporation (sometimes also referred to by the name Univex) was founded in 1932 in New York City. They made a variety of lower end cameras that used a proprietary Univex film.

Their best selling camera was the all plastic Univex Model A which sold new for 39 cents. A more advanced model, called the AF sold for a mere dollar with new rolls of film only costing 10 cents. Universal wasn’t known as either a high quality or innovative company, and while their products weren’t bad, there were many other alternatives for consumers to choose from.
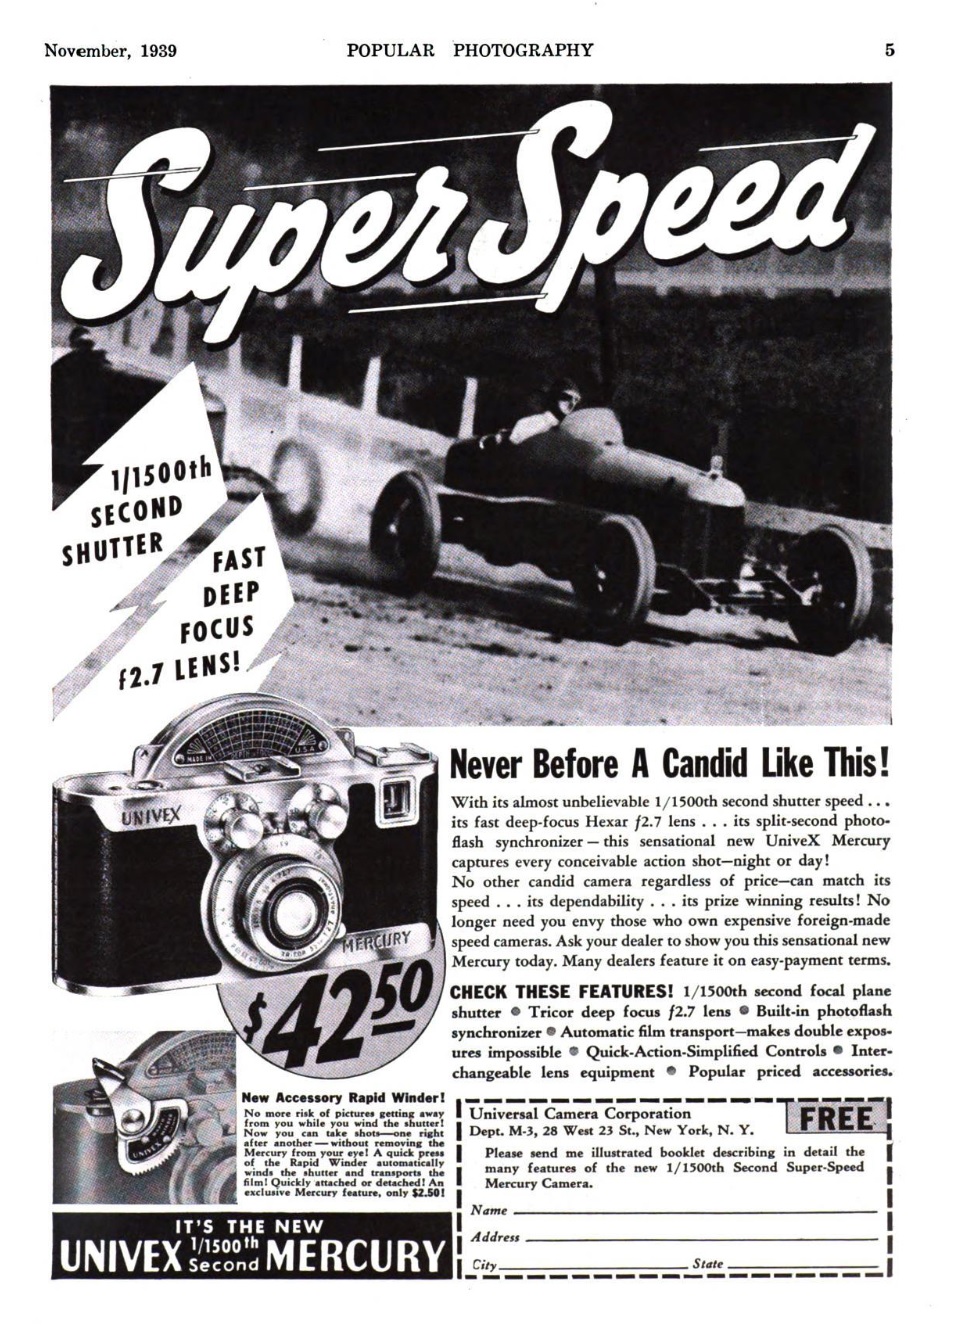
In the 1930s, photography was still a rather expensive hobby and there was a limited need for mid to high end cameras for the general public. For the professional photographer, more and more of the higher end cameras were coming from Germany. German manufacturers like Leitz and Zeiss-Ikon were able to build high quality cameras with interchangeable lenses, excellent fit and finish, extremely accurate optics, and shutters with speeds as fast as 1/1250 sec. American companies however, were still making cameras with shutter speeds that topped out around 1/200 – 1/300 sec. While this was fine for casual photographers, the more demanding professional was buying their cameras from overseas.
In 1937, Universal decided it wanted to design a new style of camera that could compete with the Germans, but at a much lower price. Brand new, a Leica III cost around $200 and a Contax III was a whopping $285 which after inflation, is $5162 today! As comparison, the Argus C3 sold for $25 making it one of the more popular American cameras of it’s day. Universal had the lofty goal of creating a camera that could compete with the Germans in terms of quality, but they wanted it to sell at the same price as the Argus.
Since Universal wasn’t known as a premiere maker of cameras, they knew they wouldn’t have the design and production capabilities to make a Leica or Contax clone, so they knew they had to come up with a much cheaper way to accomplish their goals. For this, they turned to a man named George Kende. Two years prior, in 1935 Kende had designed an 8mm motion picture camera for Universal called the Univex Cine 8. The Cine 8 had a rotary shutter that could keep spinning at a fixed speed to allow the camera to shoot at a specific frame rate necessary for motion pictures. He used this knowledge of rotary shutters in motion picture cameras to design a spring loaded rotary shutter for Universal’s newest still camera. This rotary shutter is responsible for the large curved hump on top of the camera. This hump is not just for looks, it conceals the two discs that make up the rotary shutter.
Also like a cinema camera, the Mercury exposed images that were 18mm x 24mm instead of a double frame size like the Leica. In the years that would follow, the Leica’s image size of 24mm x 36mm would become the standard size for 35mm, and 18mm x 24mm cameras would be called “half-frame” cameras, but in the 1930s when the Mercury was first released, 18mm x 24mm was just the normal size. Compared to the images the Leica made, the Mercury would be able to shoot approximately double the number of exposures on the same length of film, all the way up to 65 frames.
The body of this new camera, which was going to be called the Mercury CC (for Candid Camera), would continue the rotary theme on the back of the camera with a very unique looking exposure calculator. This calculator was really just a spinning disc that the photographer would move to align several points to coincide with the type of shot they were aiming for, time of day, and type of light. This exposure dial is so complex that it takes 5 full pages in the camera’s manual to explain.
Another design element that Kende wanted in the Mercury CC was in-body flash synchronization. At the time, the most common type of flash sync was with external sync ports that required wires or cables to link the camera to an external flash. Kende’s design incorporated the very first use of a hot shoe on top of the camera that would directly connect the camera to the flash without any wires. The hot shoe on this camera was so well designed that Universal later added the feature to other cameras that they made. Hot shoes are still used to this very day as an attachment point between a camera and an external flash.
Finally, the last major obstacle to overcome in the design of this new camera was to build it cheaply so that Universal could hit its $25 goal. An added benefit to the design of Kende’s rotary shutter was that it had far fewer parts than the typical leaf or focal plane shutters used by other manufacturers. Aluminum and zinc die-cast parts were used to keep the number of precision parts to a minimum. This was done in an effort to employ unskilled laborers who would work for less. Universal outsourced the lens design and some of the accessories to other American companies to keep costs low. The lens was made by the American company Wollensak who already had knowledge of designing inexpensive interchangeable lenses.
Universal had one more trick up their sleeve to guarantee profits. All Univex cameras used a proprietary “00” film that they sold exclusively for their cameras. The idea is similar to how smartphones are sold today. The camera would be sold as a “loss leader” with the expectation that people would have to keep coming back to buy film, which was where the company could continue to receive profits from.
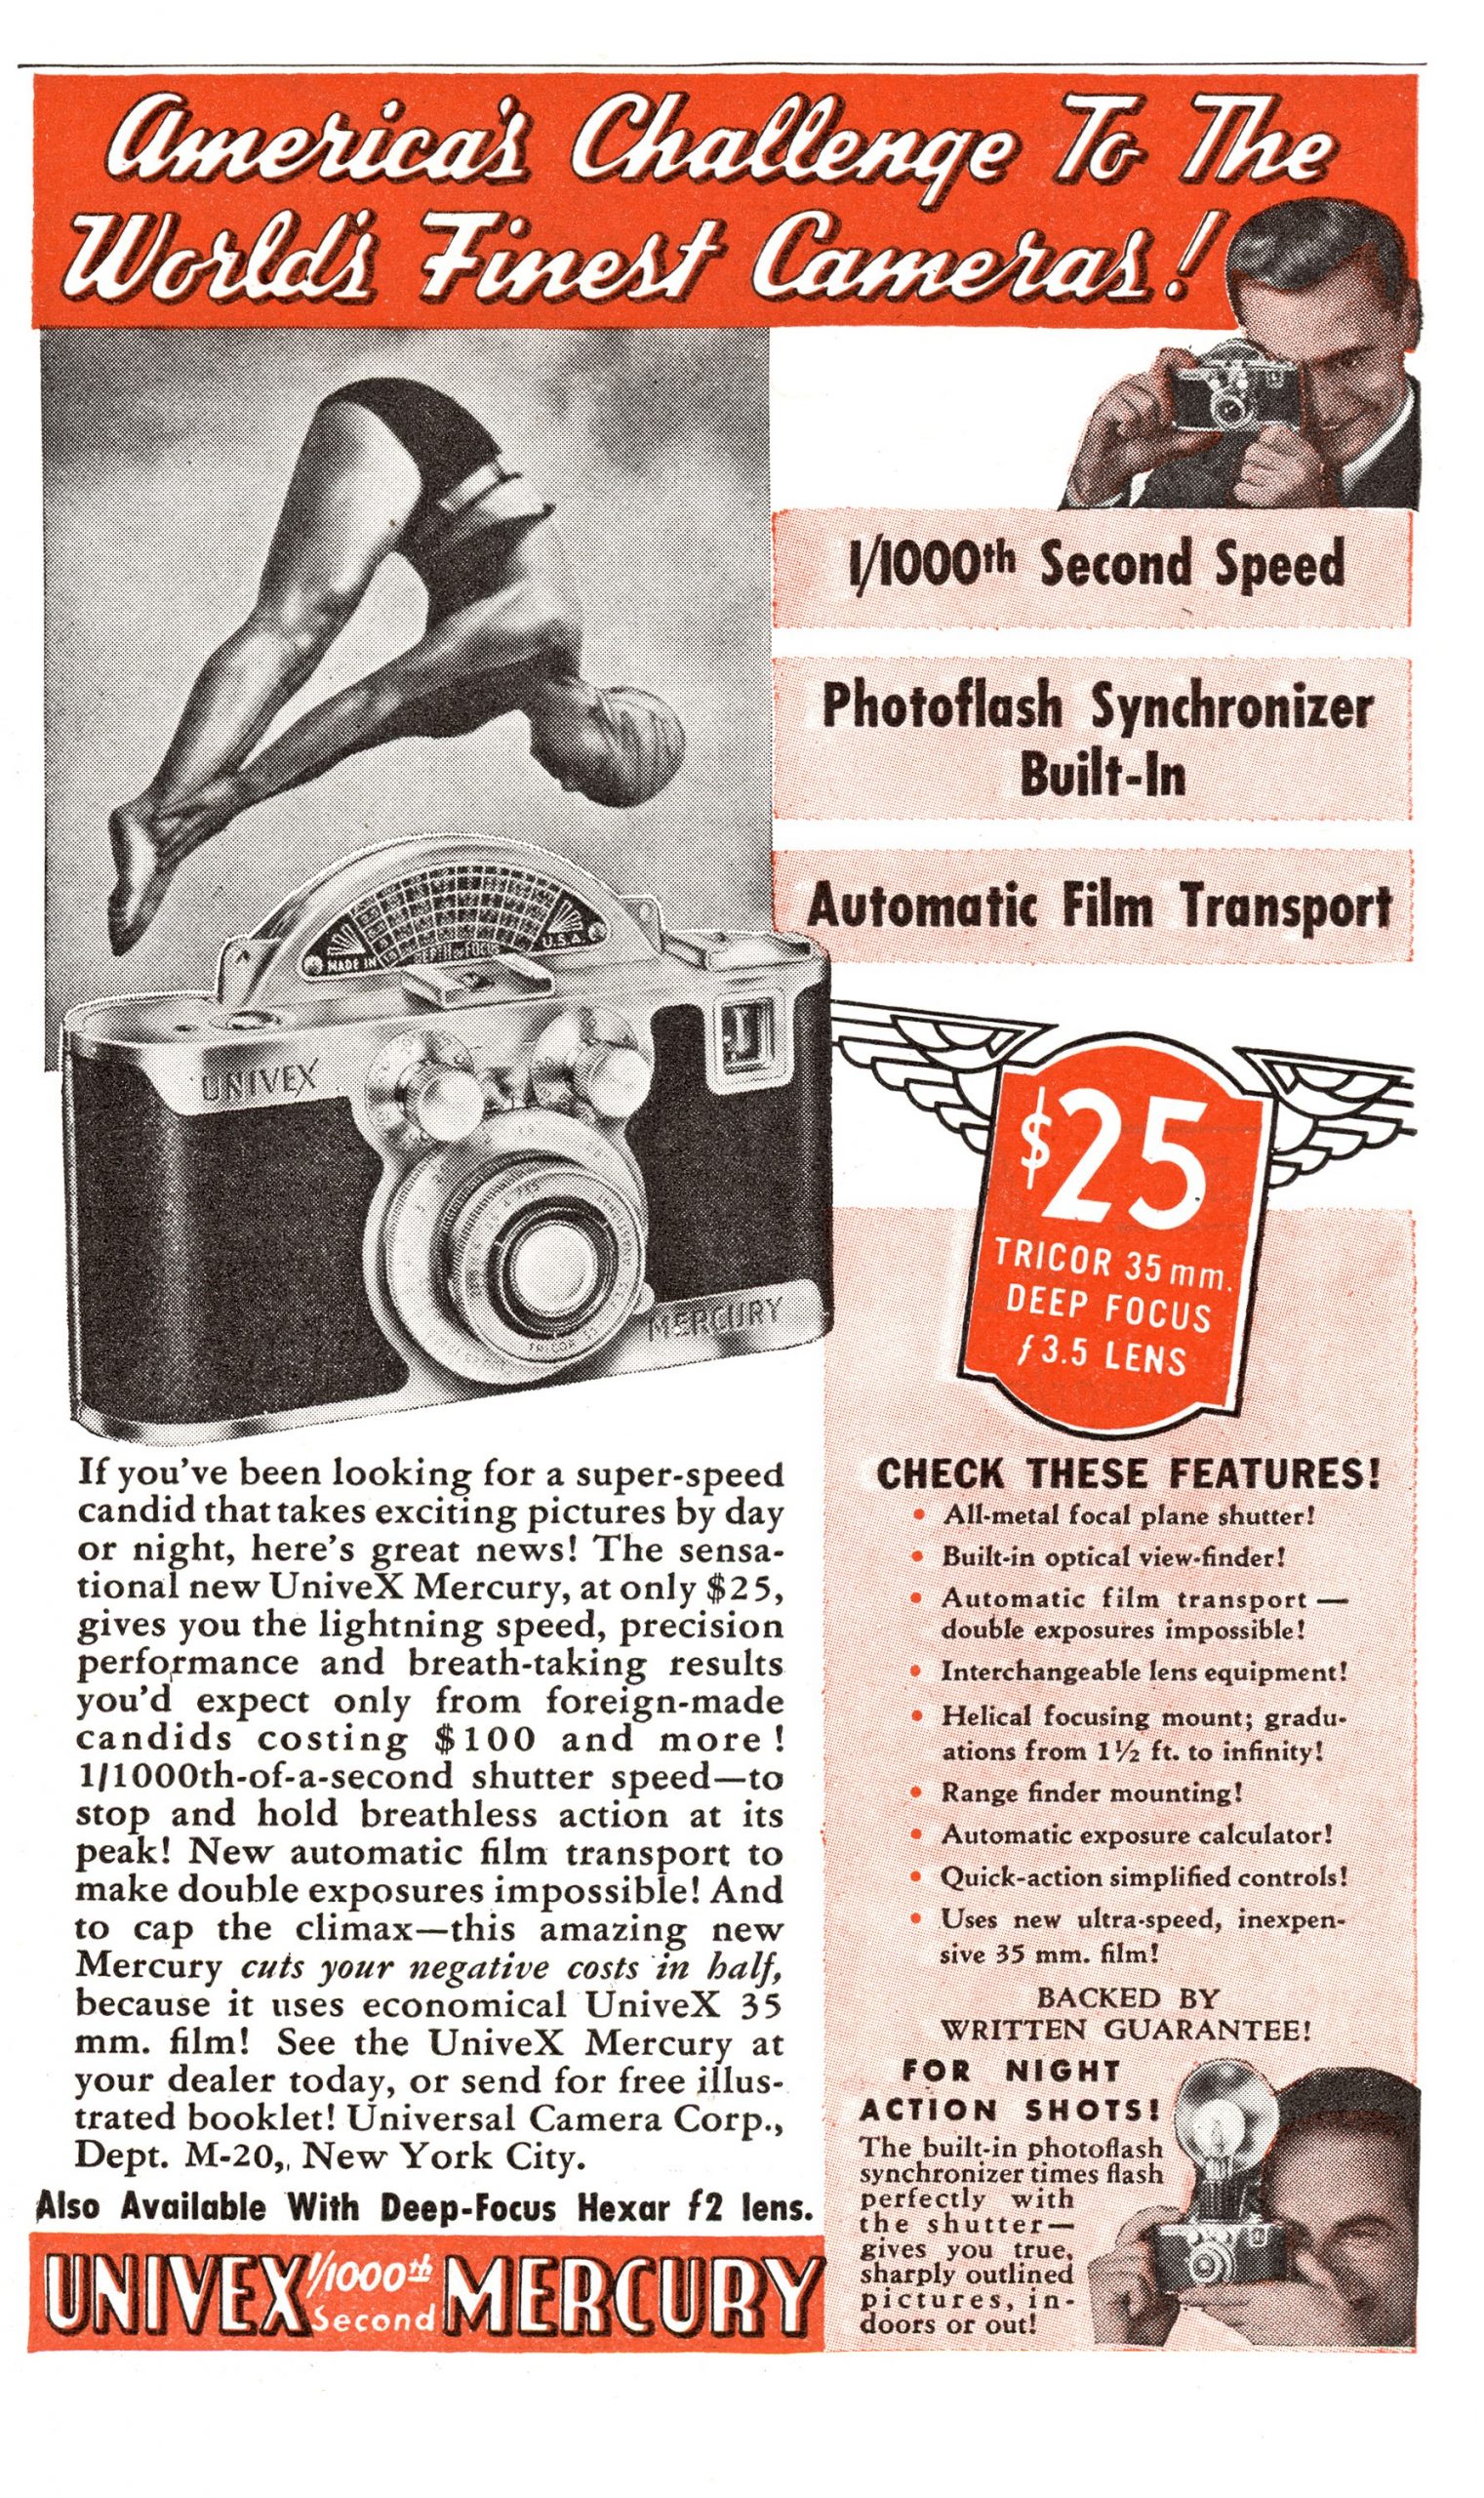
In 1938, the Univex Mercury CC was released to an unsuspecting public who viewed Universal as a forgettable company that made cheap cameras. It boasted the worlds first rotary shutter in a still camera that could reliably hit speeds as fast as 1/1000th of a second. It was the only camera in the world with a flash synchronized hot shoe on the camera, and it was built in an attractive lightweight aluminum alloy body. As for the price? Universal delivered on their promise that this camera would sell for $25, which was equal to one week’s pay of the average American worker in 1939.
The camera was an immediate hit and sold well. Amateurs liked the camera because of its low price, and pro photographers liked it for its fast shutter speed and hot shoe flash synchronization. Universal’s profits soared 25% from 1938 to 1939, and the Mercury CC was mainly responsible for the entire Universal corporation’s profits.
Although the Mercury CC’s fastest shutter speed of 1/1000 tied it with the Leica III, the Contax II and III of the era boasted an even faster shutter speed of 1/1250. As a result, a higher end version of the CC, called the CC-1500 came out with a revised spring in the shutter that maxed the top speed at 1/1500 seconds to beat the Contax. The CC-1500 is a very rare camera as an estimated 3000 were made.
From 1939 – 1941, the Mercury CC continued to sell well and became one of the most popular American cameras of the day. But starting in 1941, the Universal corporation became involved in World War II and transitioned its manufacturing to making binoculars and other optics for the war effort.
Once the war was over, Universal decided to get back to making cameras, but they had a problem. Until this time, all of Universal’s cameras used a proprietary film that was unique to Universal cameras. This film wasn’t actually made by Universal, but instead by a company in Belgium who had the expertise of making film cheaply. After the war, getting anything made cheaply from a company in war-ravaged Europe would have been impossible, so Universal knew they had to redesign the Mercury CC to accept a different kind of film.
In the late 1930s and early 40s, 35mm 135 film was gaining popularity with still camera manufacturers. It was cheap, readily available, and well liked by the public. Universal knew that if they were to regain their status as a premiere camera maker, they needed to use 35mm film in the Mercury.
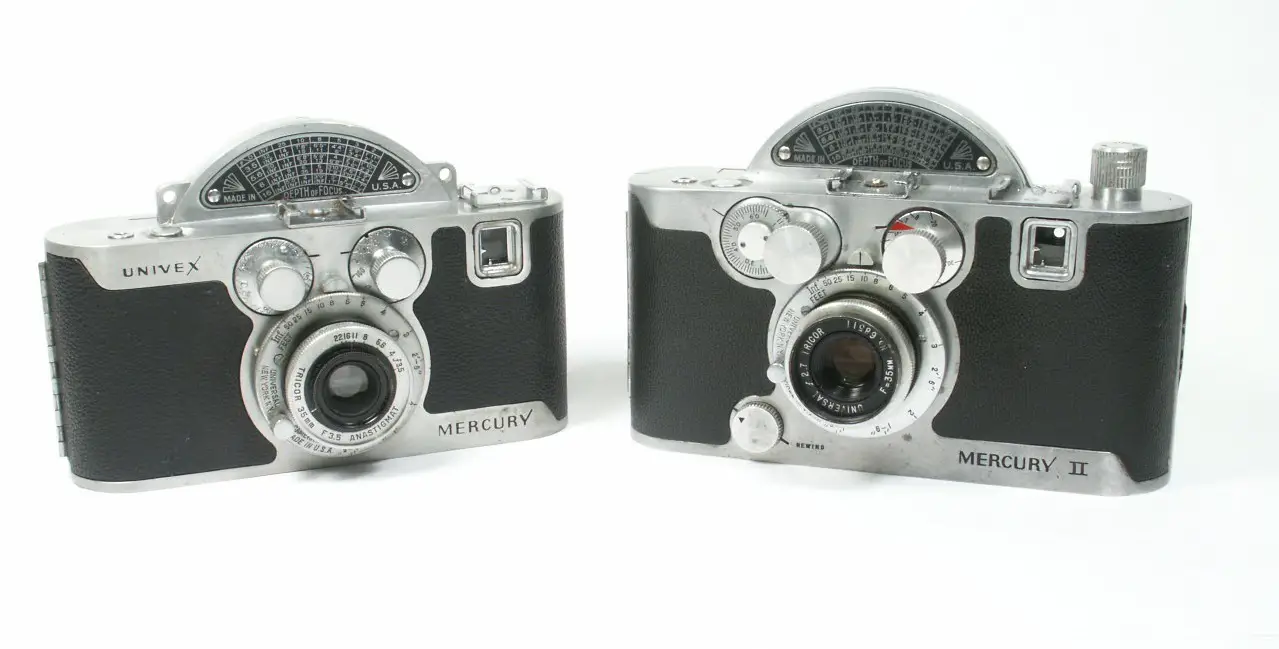
Universal’s proprietary film did not have sprocket holes and was narrower than 35mm film, so in order to incorporate the hardware to accept 35mm film, the entire body of the Mercury had to be redesigned. If you compare a Mercury CC with a Mercury II side by side, the Mercury II is both slightly taller and wider.
In order to stay in line with other 35mm cameras, the new Mercury needed to have an easy way to rewind the film, so a rewind knob was added to the top, and a film advance knob was added to the lower front of the camera. The larger body also allowed for a film reminder dial on the back of the camera, and a new frame counter which was separate from the shutter winding knob. To keep costs low, the new body was made from an aluminum-magnesium alloy as opposed to the all aluminum design of the Mercury CC.
The lens received some upgrades as well. Color photography was getting to be more common in the 40s, so the lenses available for the Mercury II received a new coating on the glass which made them less prone to flare on color film.


The Mercury II (Universal dropped the Univex name for this camera) was released around Christmas of 1945 and once again, was an immediate hit. Universal’s upgrades and switch to much more popular 35mm film allowed it a much wider range of film speeds which matched well with the Mercury’s fast shutter.

In addition to post war inflation, the redesign of the Mercury with it’s additional parts increased the cost of the camera. No longer could Universal to afford to sell the camera at it’s original $25 price and by 1947 had jumped more than three times to $82.90 with the coated Tricor f/2.7 lens. Although a large increase by today’s standards, when taking into account inflation, a $25 Mercury CC in 1938 would cost $459 in today’s dollars, and a $82.90 Mercury II in 1947 would cost $923 today. Still a large jump, but not the 3x price that it seems.
The Mercury II continued to sell well into the early 50s, and it seemed as though the camera could maintain its popularity, but despite its success, the Universal Camera Company’s finances were in shambles. The company was mismanaged and went bankrupt in 1952. Production of the Mercury II was halted around this time, and the fate of the company went into limbo for another 10 years before finally being dissolved in the early 60s.
Since Universal held several patents for the rotary shutter and hot shoe flash synchronization, no other company attempted to copy the Mercury’s design. By the 50s, camera technology continued to advance, and prices continued to fall. By then, it wasn’t as necessary to have such a unique design to achieve such fast shutter speeds, so more traditional shutter and camera designs prevailed. As a result, no other competitors tried to mimic the Mercury’s unique design, thus sending the Mercury CC and Mercury II into the history books as one of the most distinct looking cameras of all time.
Today, both the Mercury CC and Mercury II are desirable by collectors due to their very unique design and history. Since the Mercury CC uses film that hasn’t been made in over 60 years, copies of the CC are sought after simply as display pieces, however the Mercury II uses 35mm film which is still available today. In addition, the Mercury’s rotary shutter was so good, that many examples still work great nearly 70 years after they were designed. Unlike other shutter designs that can become sticky and inaccurate over time, most Mercury IIs are still as accurate as the day they were made.
Repairs – Updated 5/27/2015
My original Mercury had a problem where the shutter would jam if it was fired while the camera was pointed towards the floor and is something I’ve heard other owners observing on other Mercuries as well. This issue is most likely caused by some internal parts rubbing together causing friction which prevents the shutter from fully rotating. Using instructions by PF McFarland on Flickr, I began the process of tearing down my Mercury and servicing it. It took me about 3 months to complete this process in my free time.
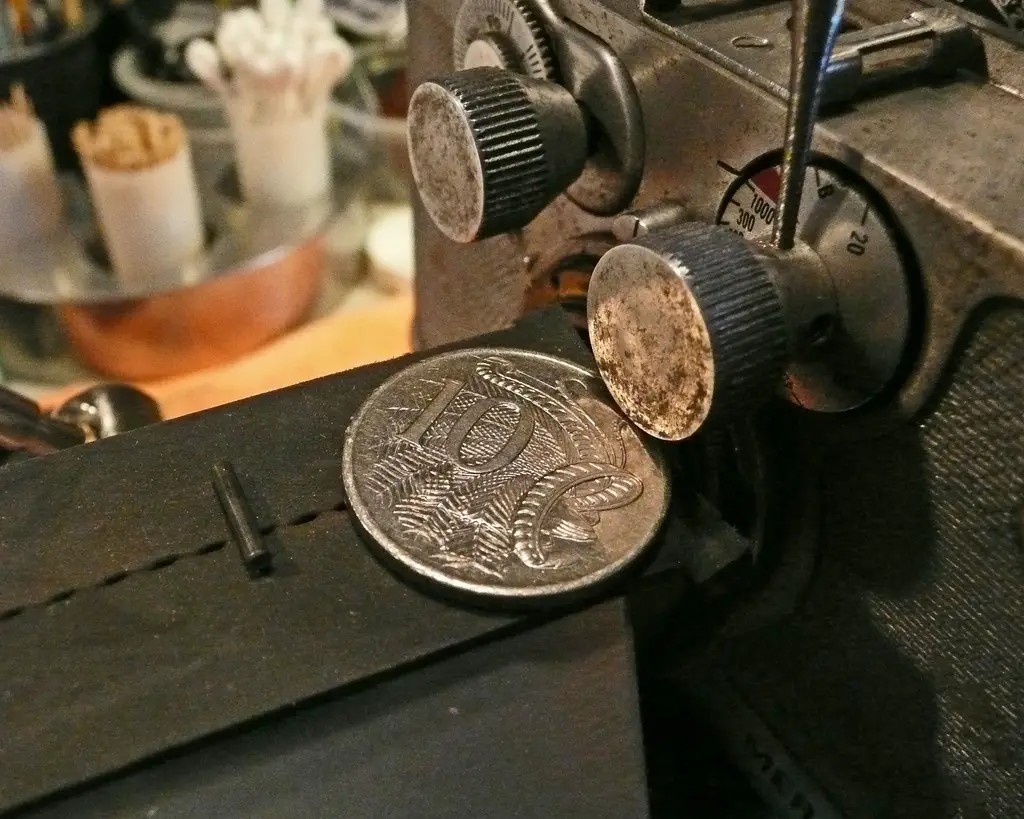
A set of flat head precision screwdrivers and a lens spanner tool is all that needed to remove most of the front lens elements and shutter assembly. The shutter speed knob is the one exception and requires a bit more finesse. The knob is held on by a .050″ Allen head set screw and a solid metal retaining pin. Getting the set screw out is simple enough, but the retaining pin can be very tricky to remove. The picture to the left shows how PF McFarland supported the shaft using a bench vise and a coin. Removing this pin requires hitting the pin punch several times with a hammer or mallet, and you want to support the knob and shaft so that it does not bend. I was only able to drive the pin out a little more than half, but was able to remove it the rest of the way using pliers. Once the set screw and pin are removed, the knob comes off the shaft by pulling on it.
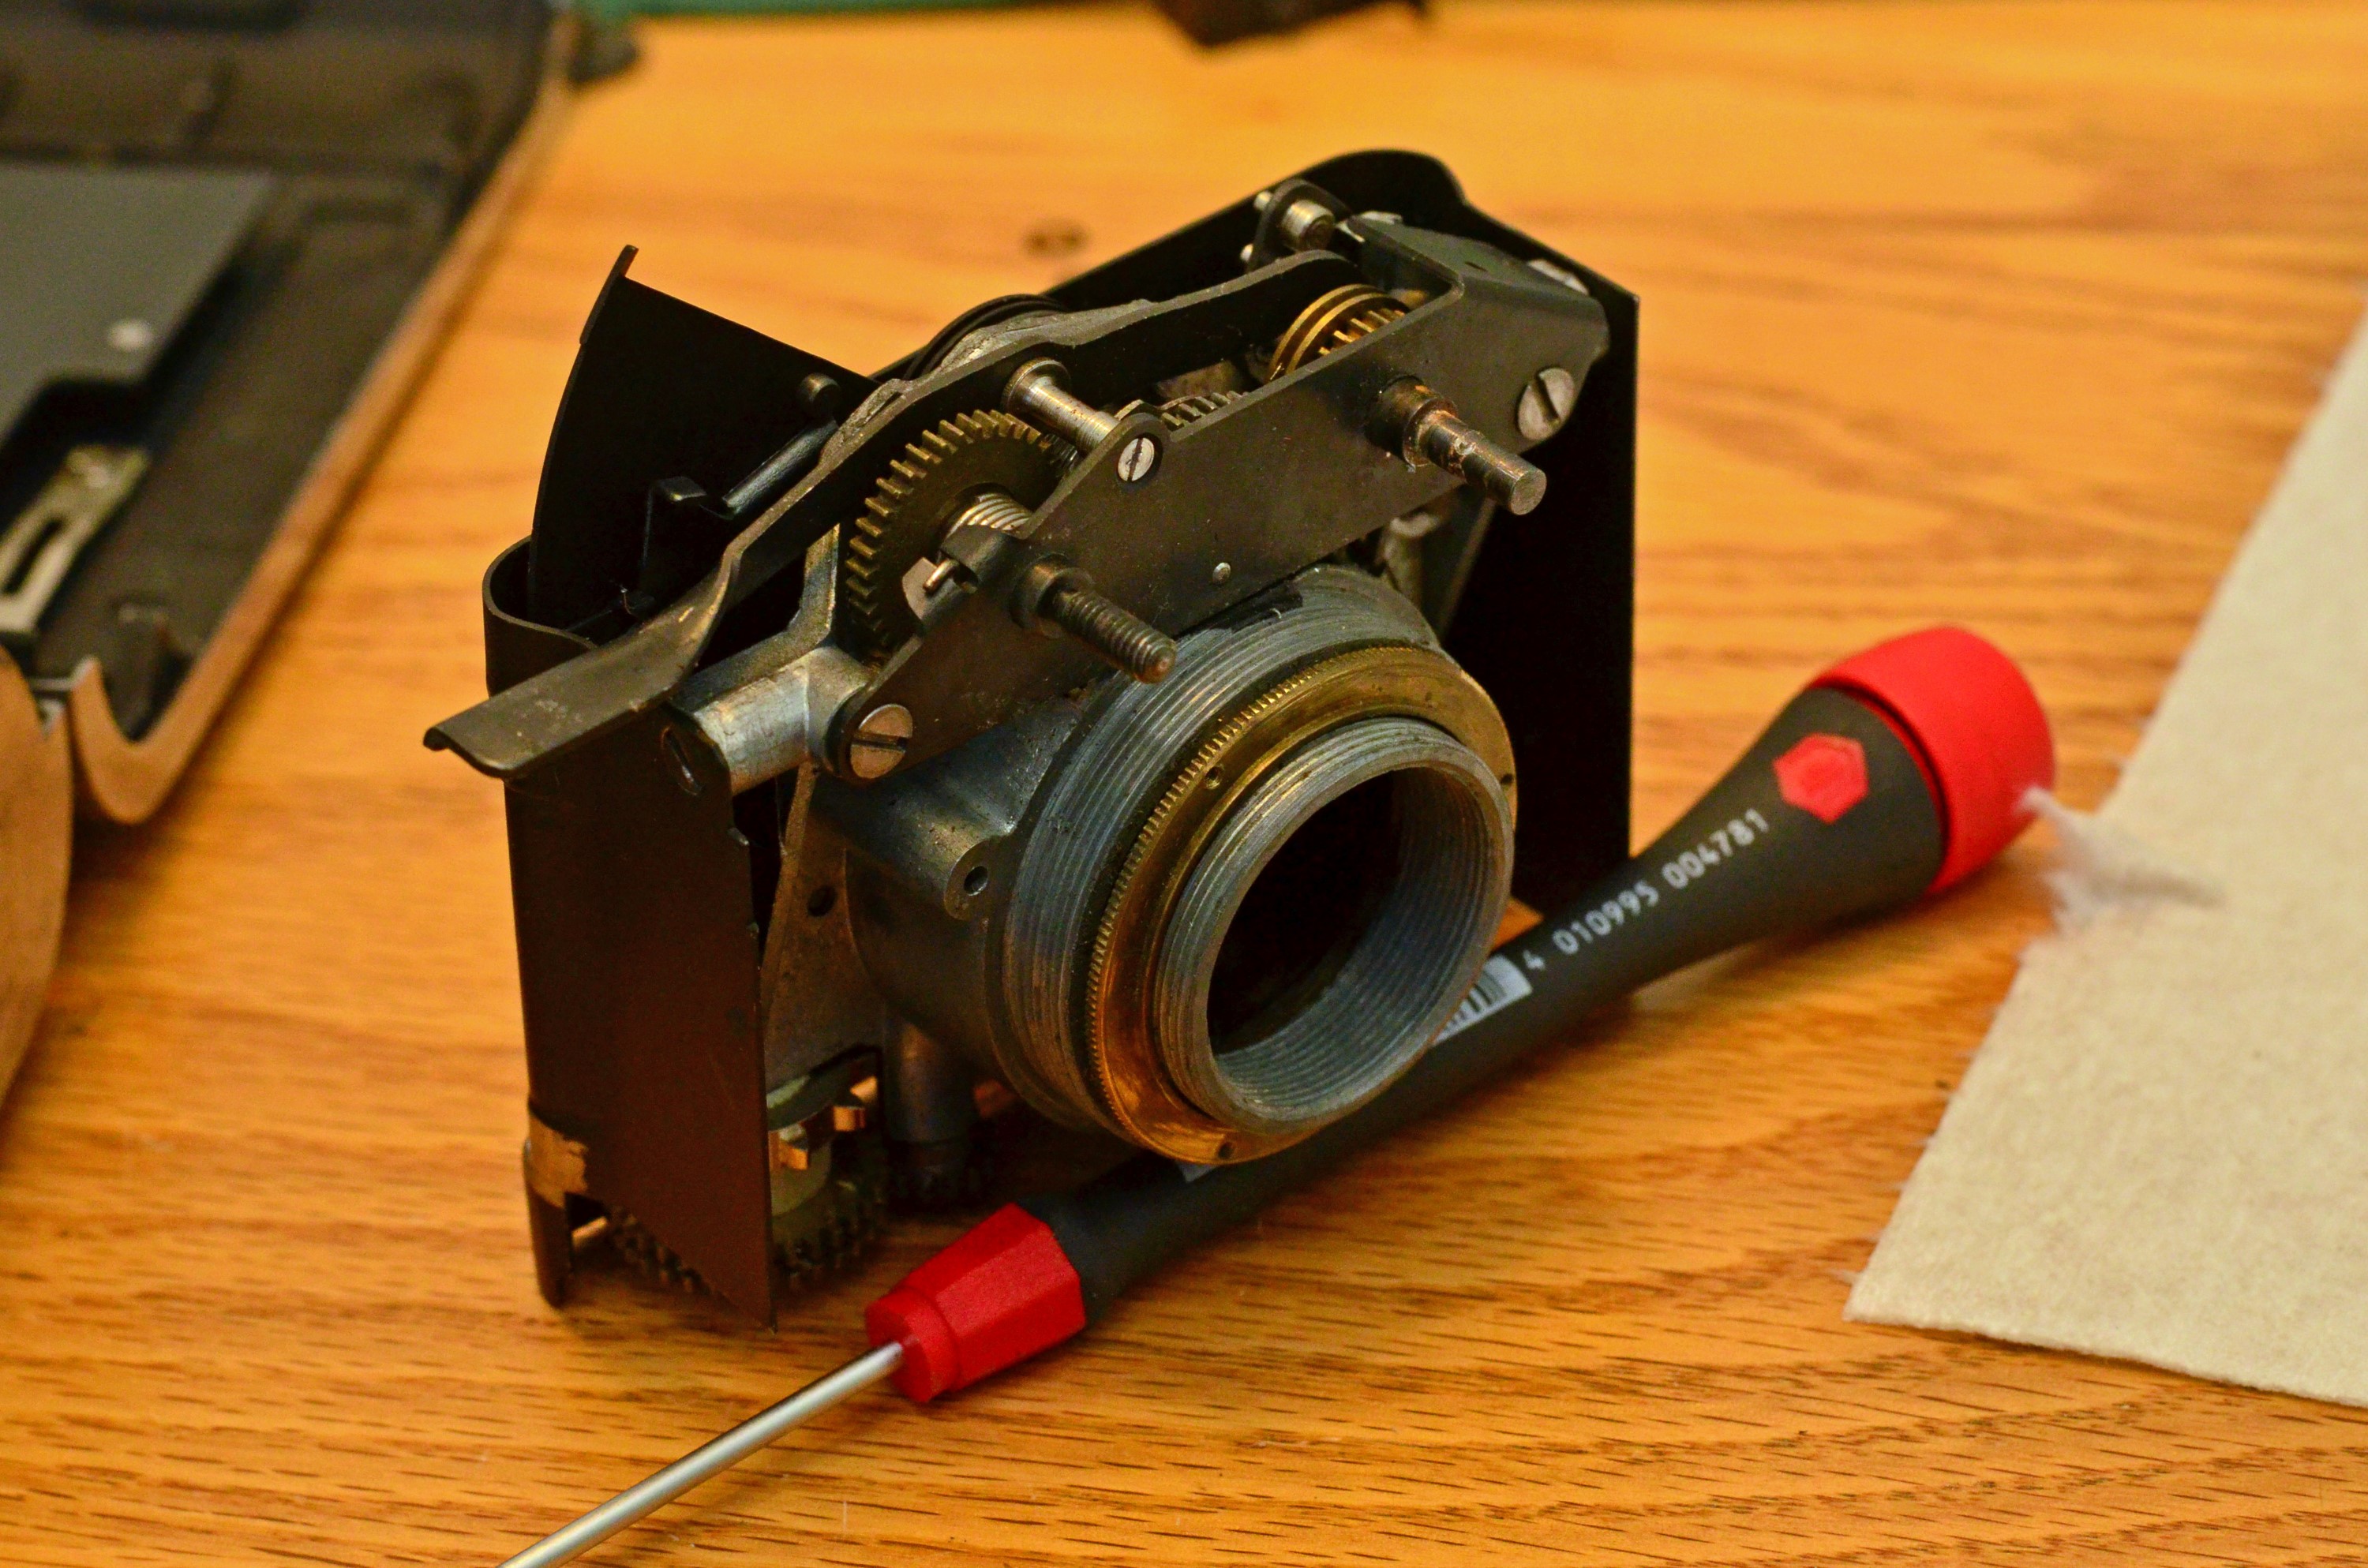
Following the rest of PF McFarland’s instructions, I was able to remove the shutter assembly and take a good look at how this camera works. In some ways, the design of the rotary shutter is pretty simple, but still genius. Its interesting that no one thought to do this with any other camera.
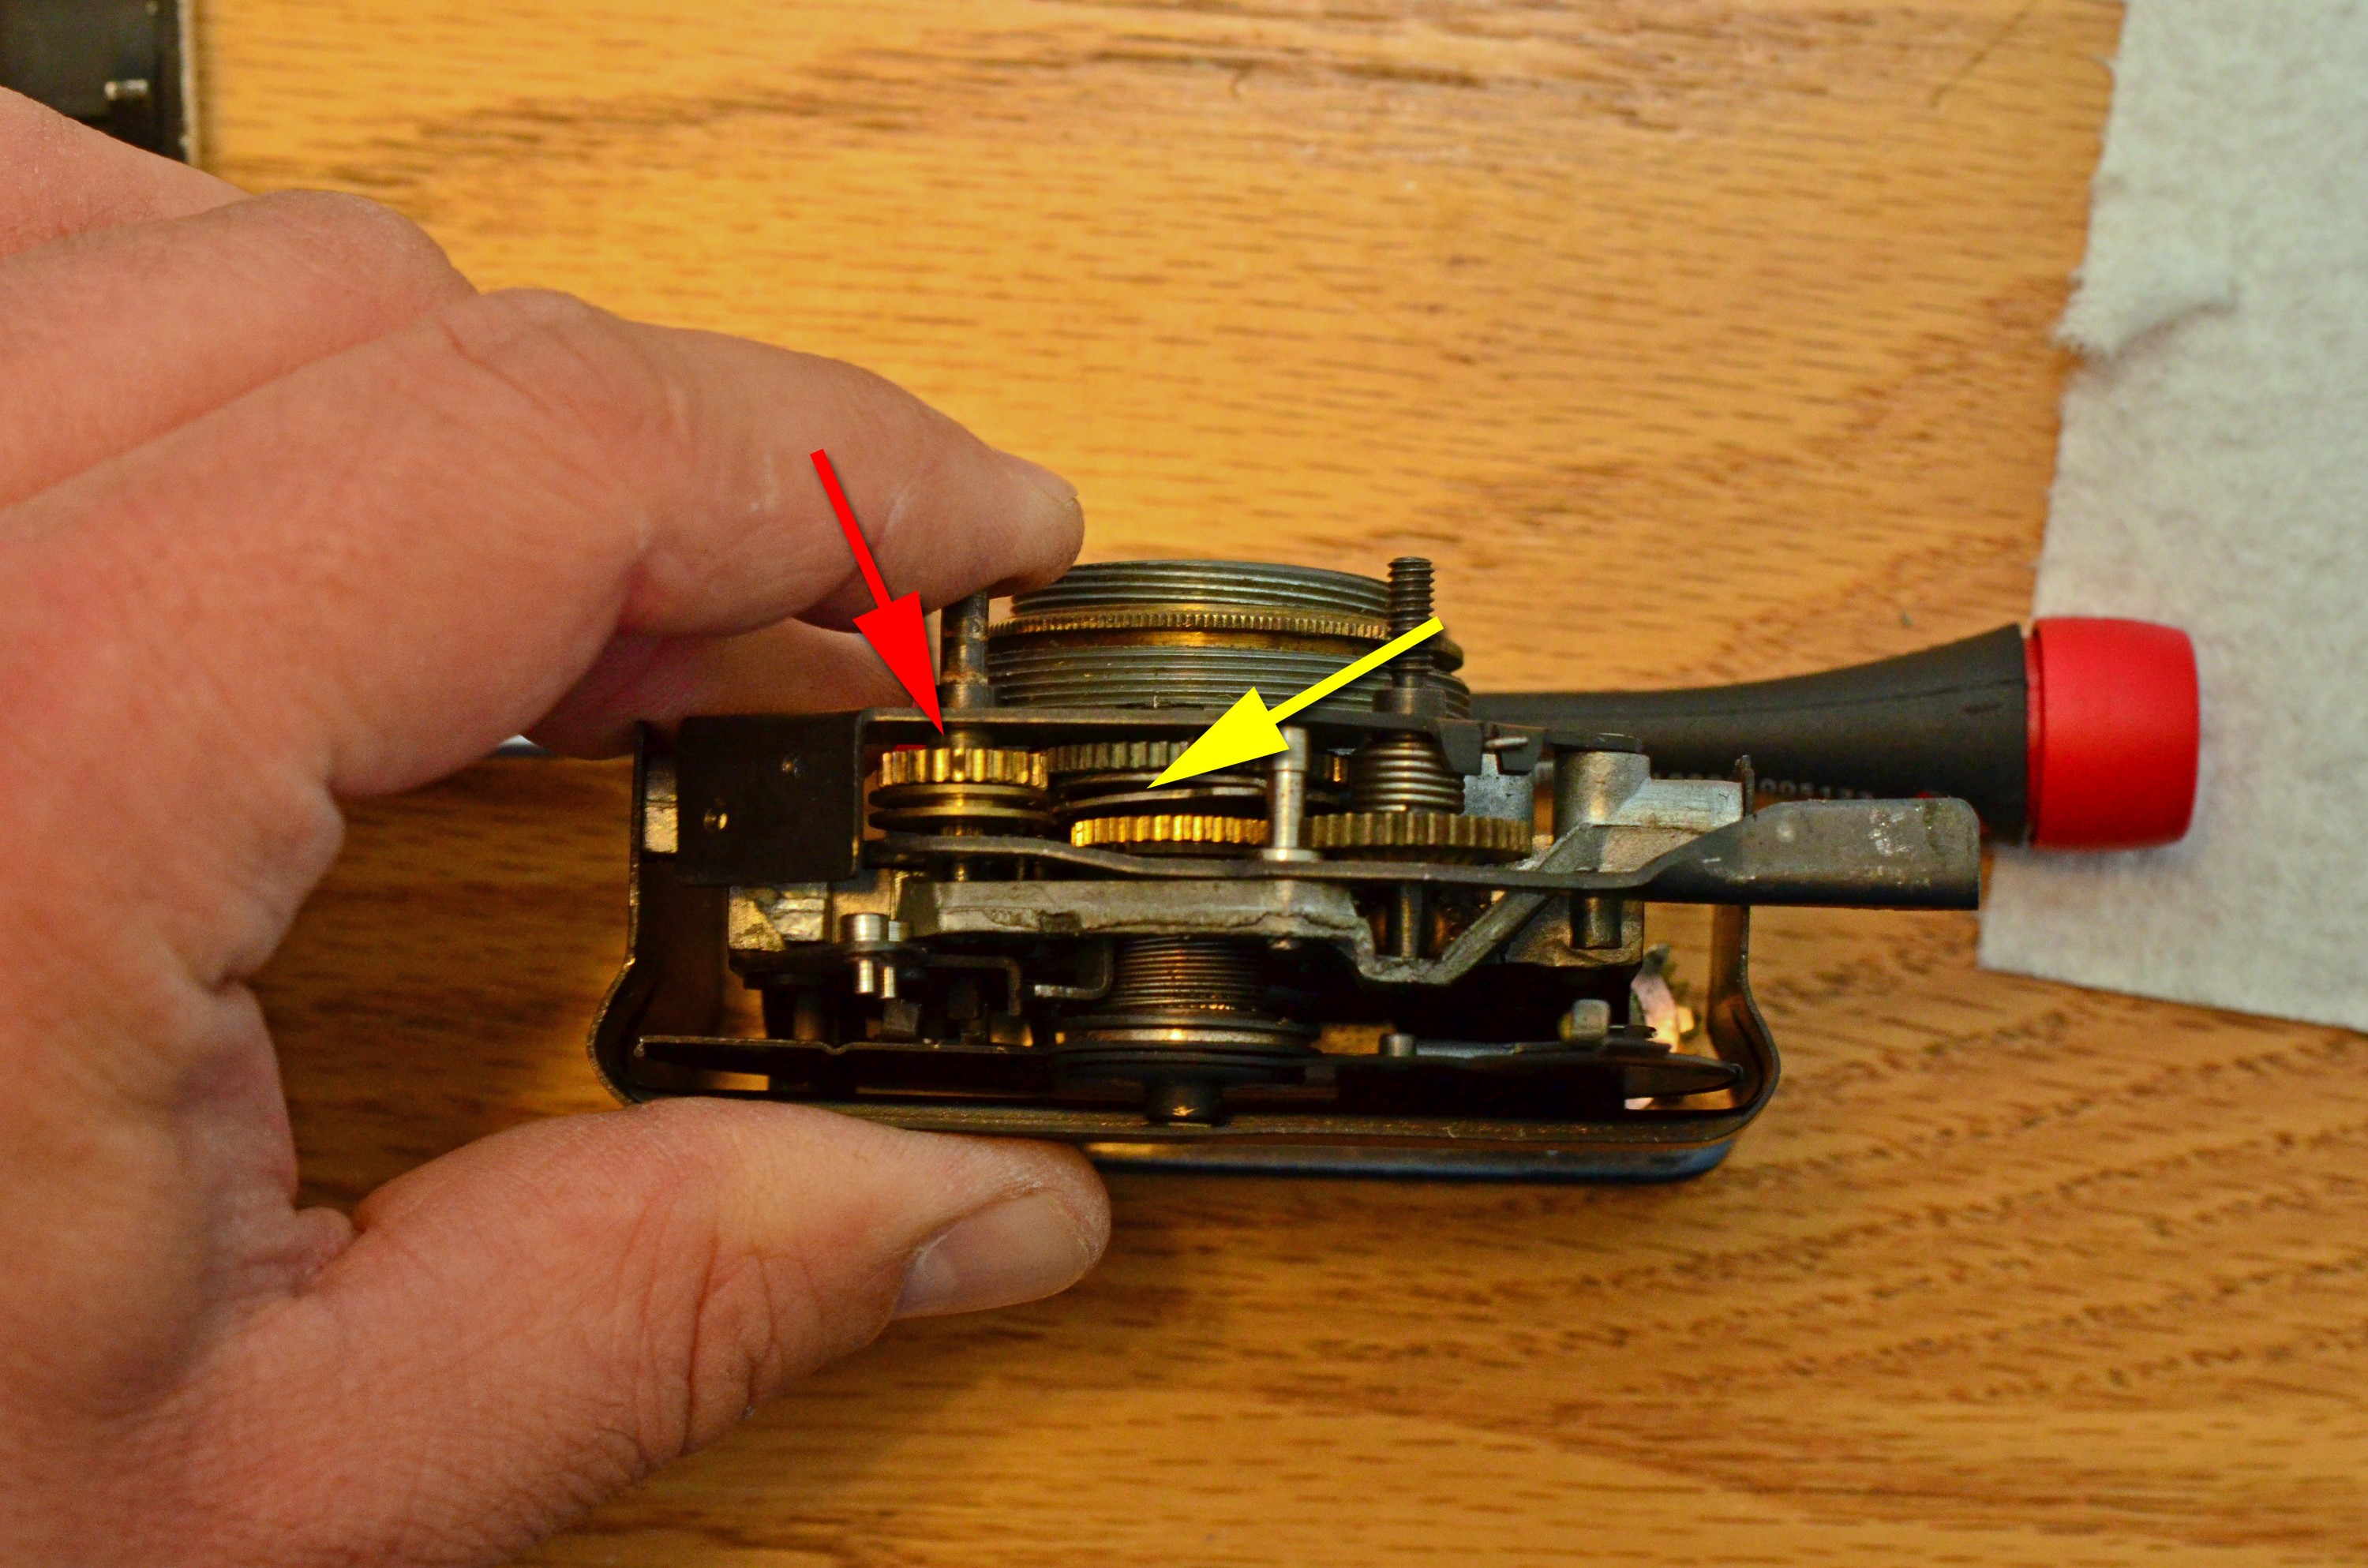
I bought some white lithium grease from the auto parts store and lubed the shaft directly behind the shutter speed selector (red arrow) which is where I believe the camera was getting hung up when it was being pointed towards the floor. I also applied a bit of lithium grease in between the two pieces of metal that move when the shutter speed shaft is pressed in (yellow arrow).
I did not have the problem that PF McFarland with a pin backing out of position, but I followed the rest of his directions and removed as much of the old gunk and film bits as possible and lubed everywhere he recommended.
Once I had the camera lubed and cleaned, I focused my attention on the metal finish. I peeled off the old leather and used painters tape to cover the things like the exposure calculator, film speed reminder dial, and viewfinder since these can’t easily be removed.
Once I had everything covered up and the entire front lens assembly removed, I was focus on the finish of the metal body. When I started, I was undecided if I wanted to go for a mirror polish, or keep the brushed metal texture. I decided to go with the brushed look, not just because it requires less steps, but I actually think it looks better. One of the charms of this camera is how the metal tarnishes. I wanted to find a happy medium between removing the bulk of the tarnish, while keeping some of the imperfections.
I used medium grit black sandpaper for the bulk of the work, and then bought a fine grit sanding wheel for my Dremel. The Dremel was good for the hard to reach areas, and then I used the sandpaper to give everything a horizontal brushed texture. I did this over the course of a couple of months and would keep coming back to it a little bit at a time until I was happy with the look of the metal.
A word of note is that the curved piece of metal that is behind the film counter and cocking knob has a very fine metal plating that sands away very easily. I learned this the hard way and ended up completely removing the metal plating of this one piece. It has a brass finish now, and while it doesn’t match any other part of the camera, I don’t think it looks that bad, so I left it as is. Maybe one day I’ll find a parts Mercury and can replace that piece.
Moving onto the leather, the original was not reusable and I was not able to find any pre cut camera leather skins online, so I bought an uncut sheet of saddle tan leather from aki-ashi.com and made my own templates.
Edit 12/2019: Since I wrote this, I’ve found that Hugo Studio sells pre-cut skins for the Mercury CC and Mercury II, although they do not come with adhesive. I have not personally tried these, but I have heard good things about some of their other products.
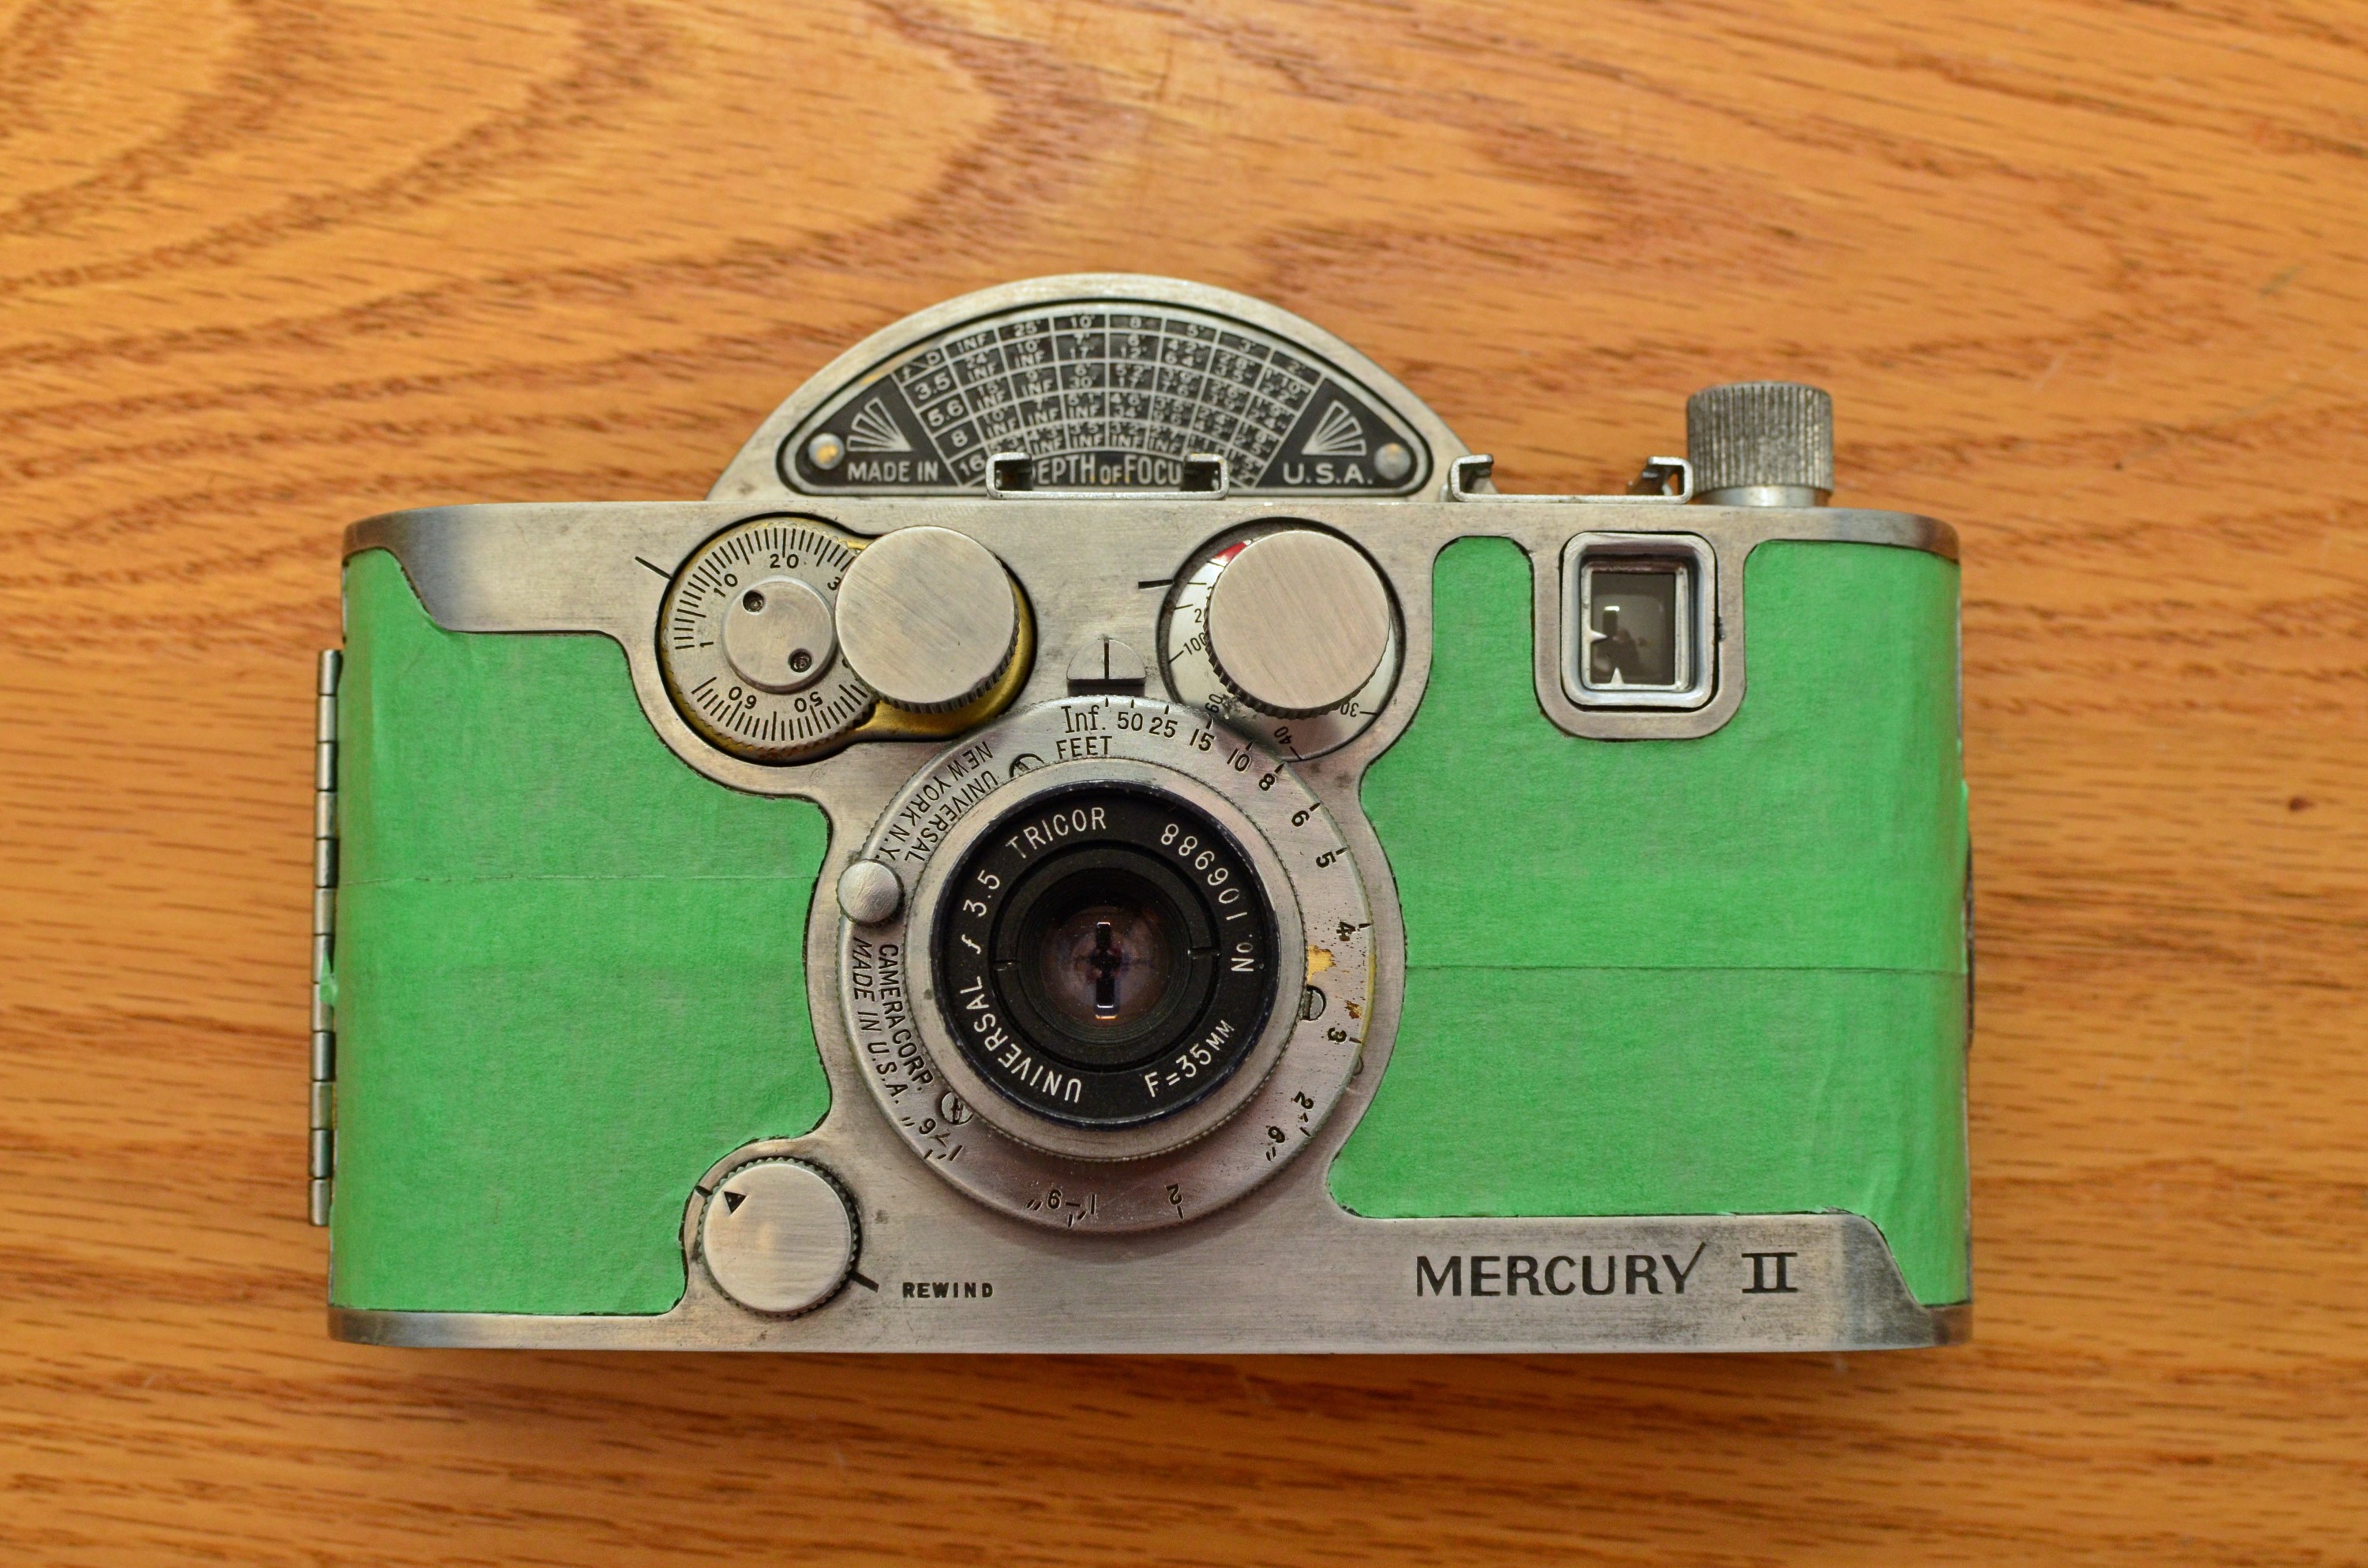
Its worth mentioning that I am not very good at precision work. I just do not have enough patience or a steady enough hand to do it really well, but I figured anything would look better than what I had, so I gave it a shot. I made templates by using green painters tape and putting it on the body of the camera and then using a hobby knife to cut the tape exactly in the same of what the leather would need to be.
Once I had the tape cut to the exact shape, I removed it from the camera and applied it to the top of the leather and then cut around the tape like a stencil. It helps to do this with an extremely sharp pair of scissors, but the end result came out OK. There are a few spots I could have done better, and maybe I’ll redo it again in the future, but for now I’m happy with how it looks.
After getting all 4 pieces of leather on the camera, I put everything back together following PF McFarland’s instructions. I ran into a bit of trouble with the metal disc that has the shutter speeds marked on it. It appears this is just press fit onto the back of the shutter speed knob. I couldn’t get them to go back together, so I used super glue to attach it.
My Thoughts
The first time I saw a Mercury II, I knew I had to have one. The problem though, is that despite their popularity in the 1930s and 40s, copies in working condition are hard to find these days. Adding to the problem is that Universal went out of business in the early 50s, so there is no legacy to build on. Unless you are a collector or someone who is still alive who shot film in the 1940s, most people have never heard of Universal Camera Company or the Mercury cameras.
I initially became discouraged with the selection on eBay and moved onto other cameras. One day I saw one for sale at $20 and I took a chance at it and won the auction. The copy I received was in what I would consider to be above average condition. The body shows the typical signs of oxidation and tarnish that other Mercury IIs have. The leatherette, while in tact, was damaged and would need to be replaced. My copy came with the base level 35mm f/3.5 Tricor lens. There was an f/2.7 Tricor and f/2.0 Hexar also available. The good news was that the optics of my camera were good, and the shutter still worked.
The Mercury II is a pleasant camera to hold. It is rather compact and the rounded edges on the cast metal body make it seem smaller than it is. At a weight of only 576 grams, you can easily fit this into a large pocket or small handbag with little fuss. Neither the II nor the original model have strag lugs, so unless you have the original ever ready case, your only option for a strap would be a bottom tripod mounted one.
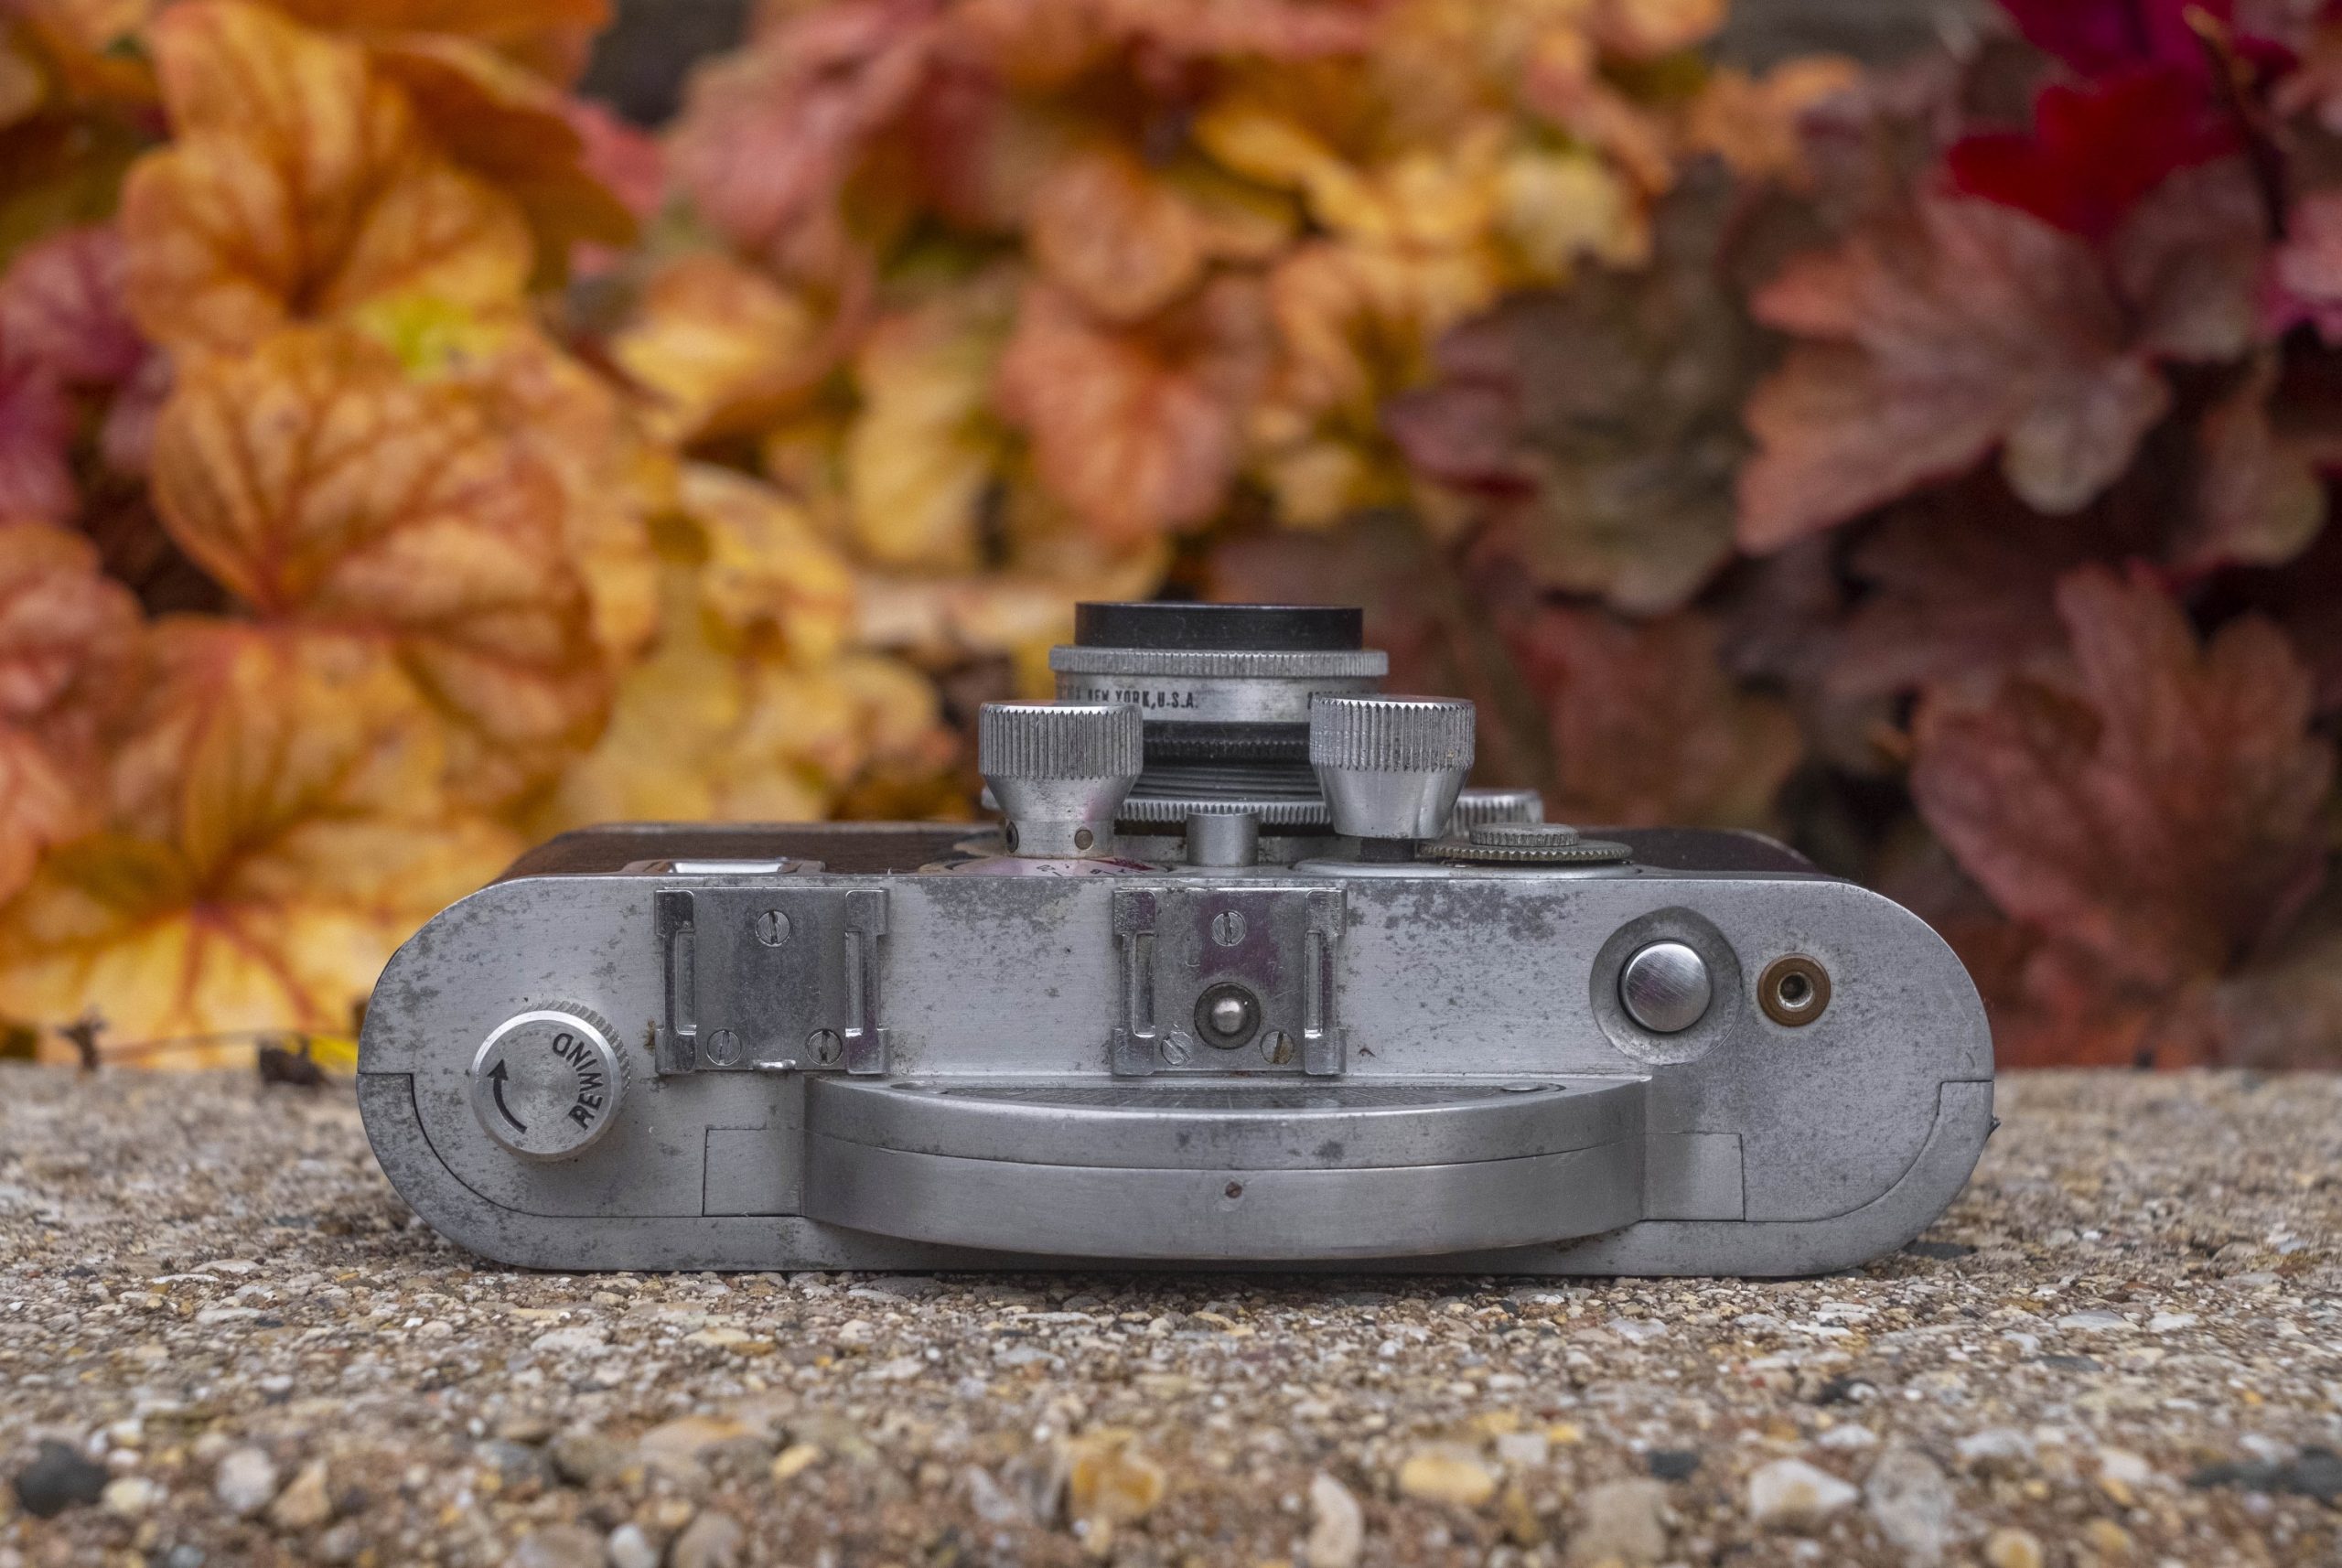
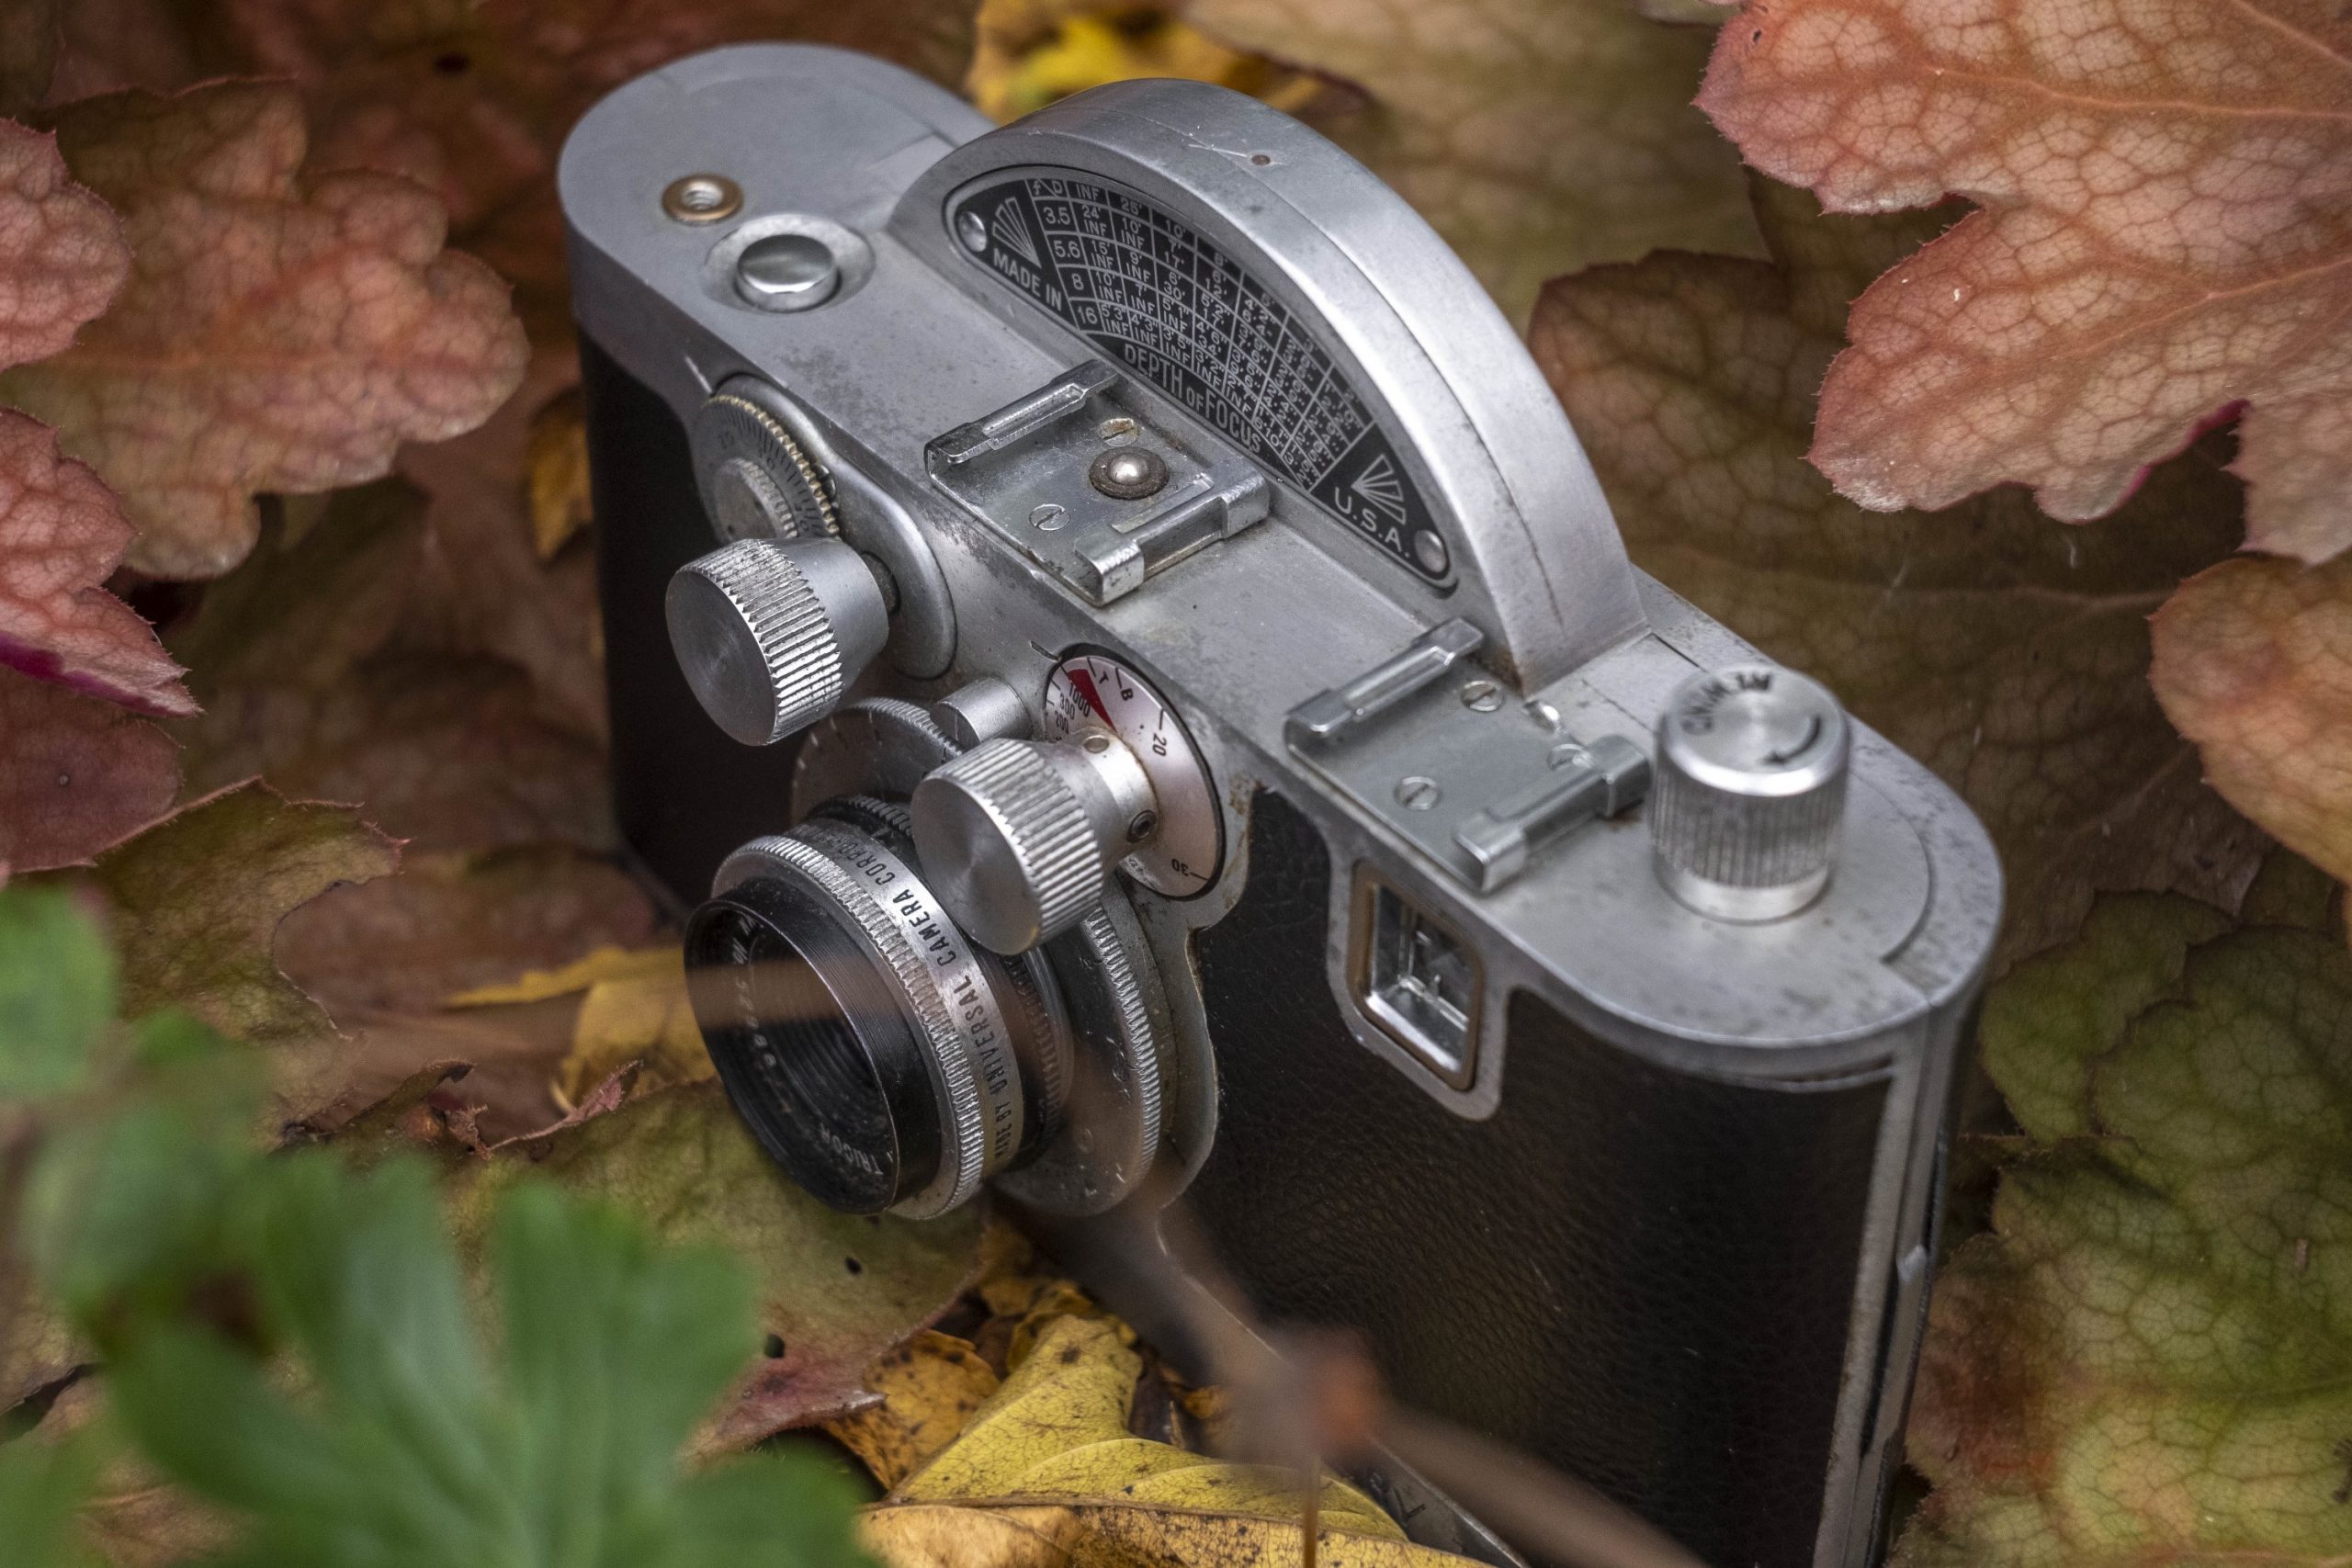
The top plate has from left to right, the rewind knob, an accessory shoe for the optional Mercury extinction meter or a rangefinder of some type, and next to it, a very similar looking hot shoe for the Mercury flash. Although this shoe has a similar electrical contact in the center like a modern flash, the contact is raised up enough to where a modern flash wouldn’t fit (I tried). To the right of the flash shoe is the smooth metal shutter release button with a screw in shutter release cable hole to it’s right. The location of the shutter release button is quite comfortable and the smooth metal feel of it lends a bit of luxury as your finger rests on it.
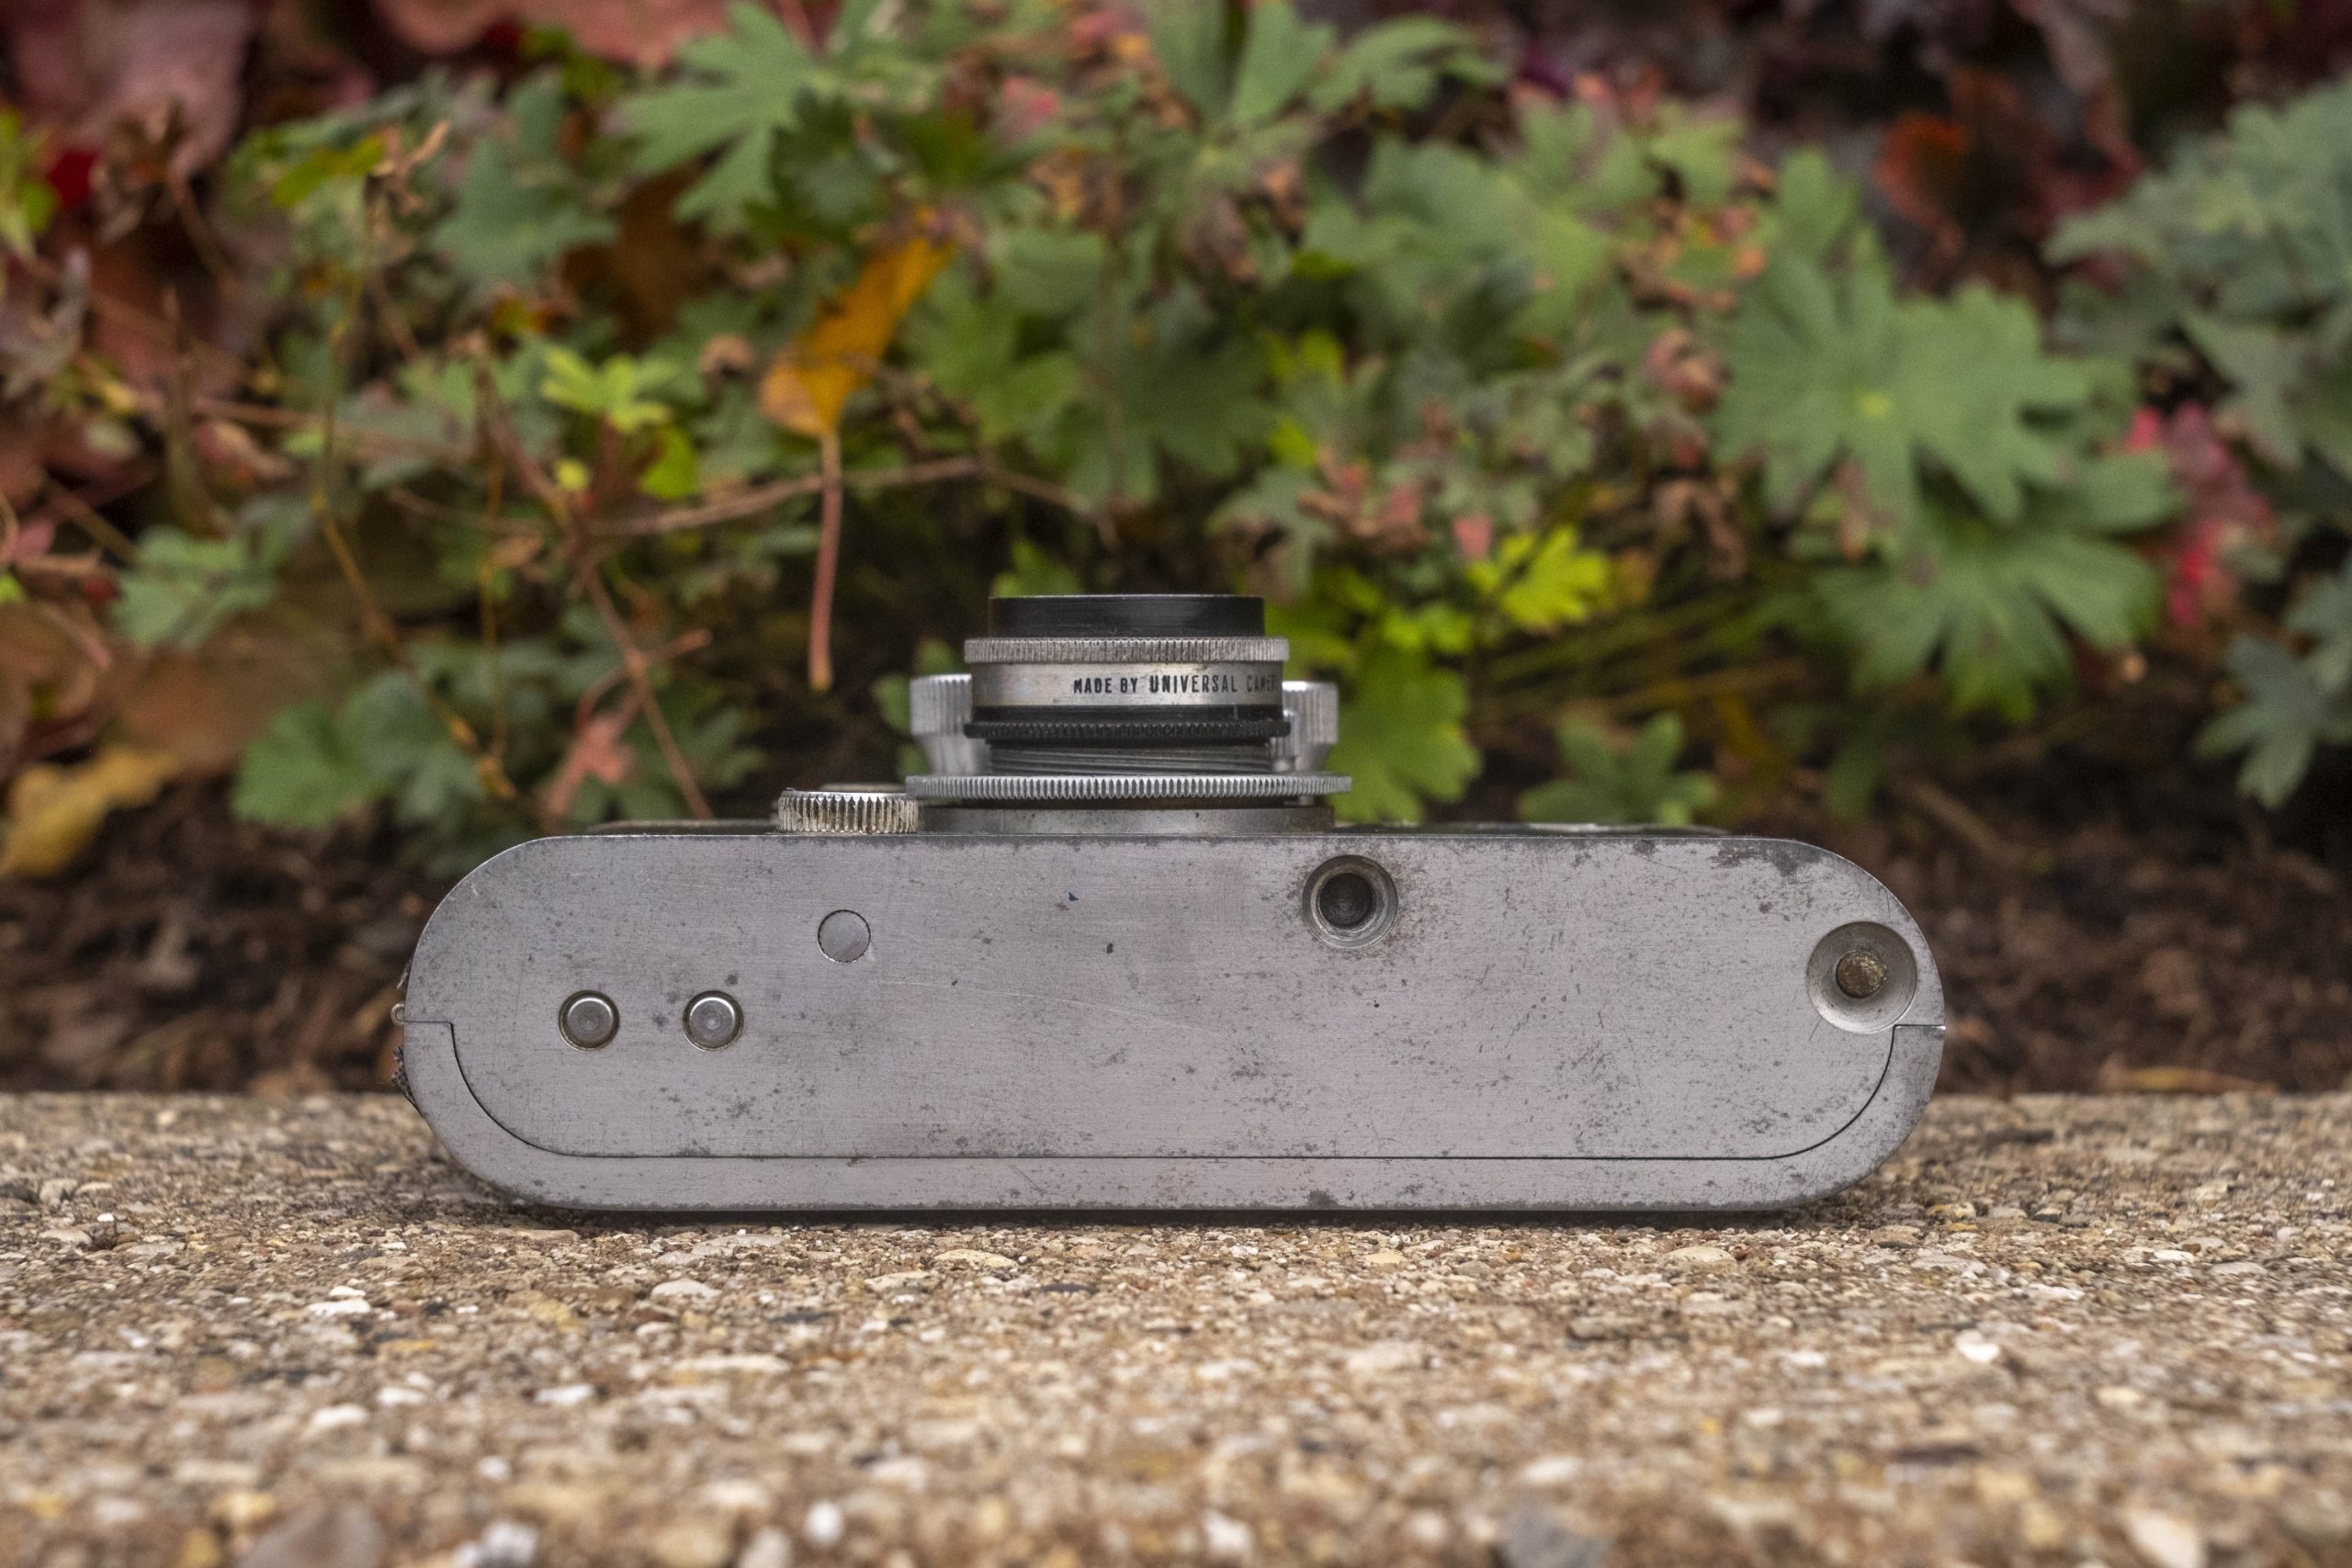
On the bottom, the mostly flat surface has three casting circles on the left which don’t do anything, an offset 1/4″ tripod socket, and on the far right the rear film door release button. This particular Mercury II is serial number 76,702 which makes it an earlier model. Later cameras with serial numbers above 100,000 received three small “feet” on the bottom plate of the camera. I am unsure of exactly when this change was made, but it’s only the later cameras that come with the feet.
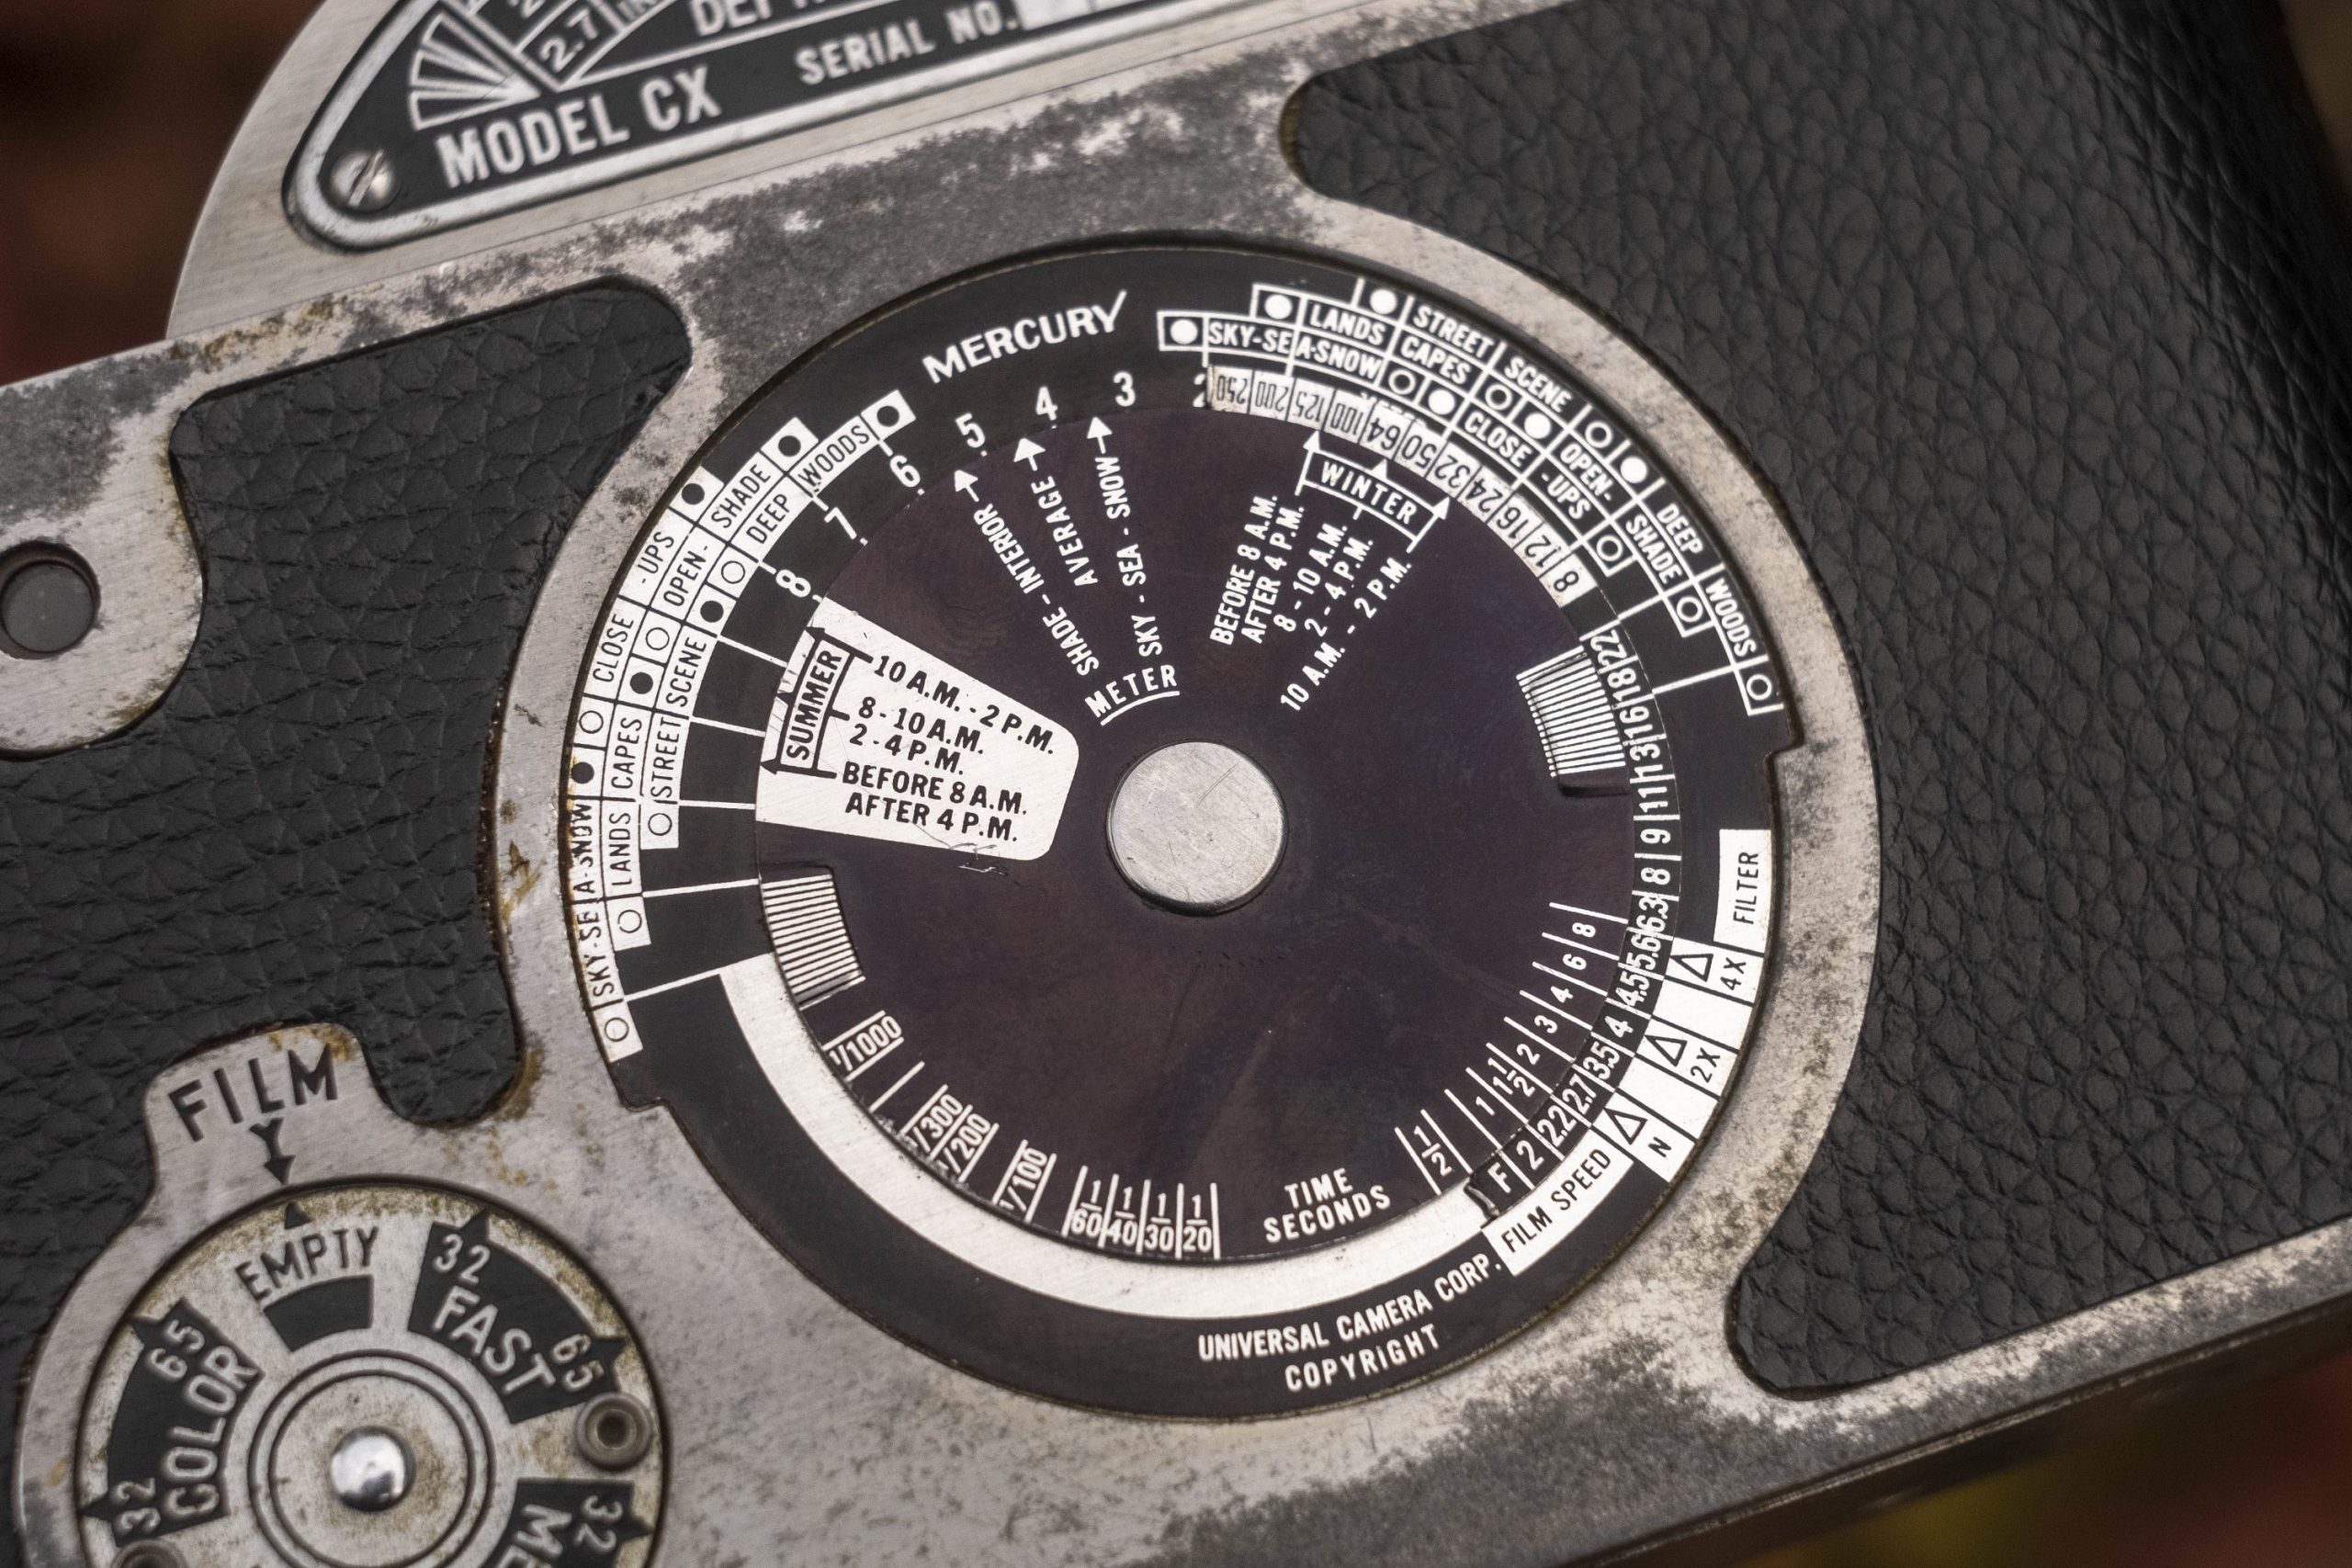
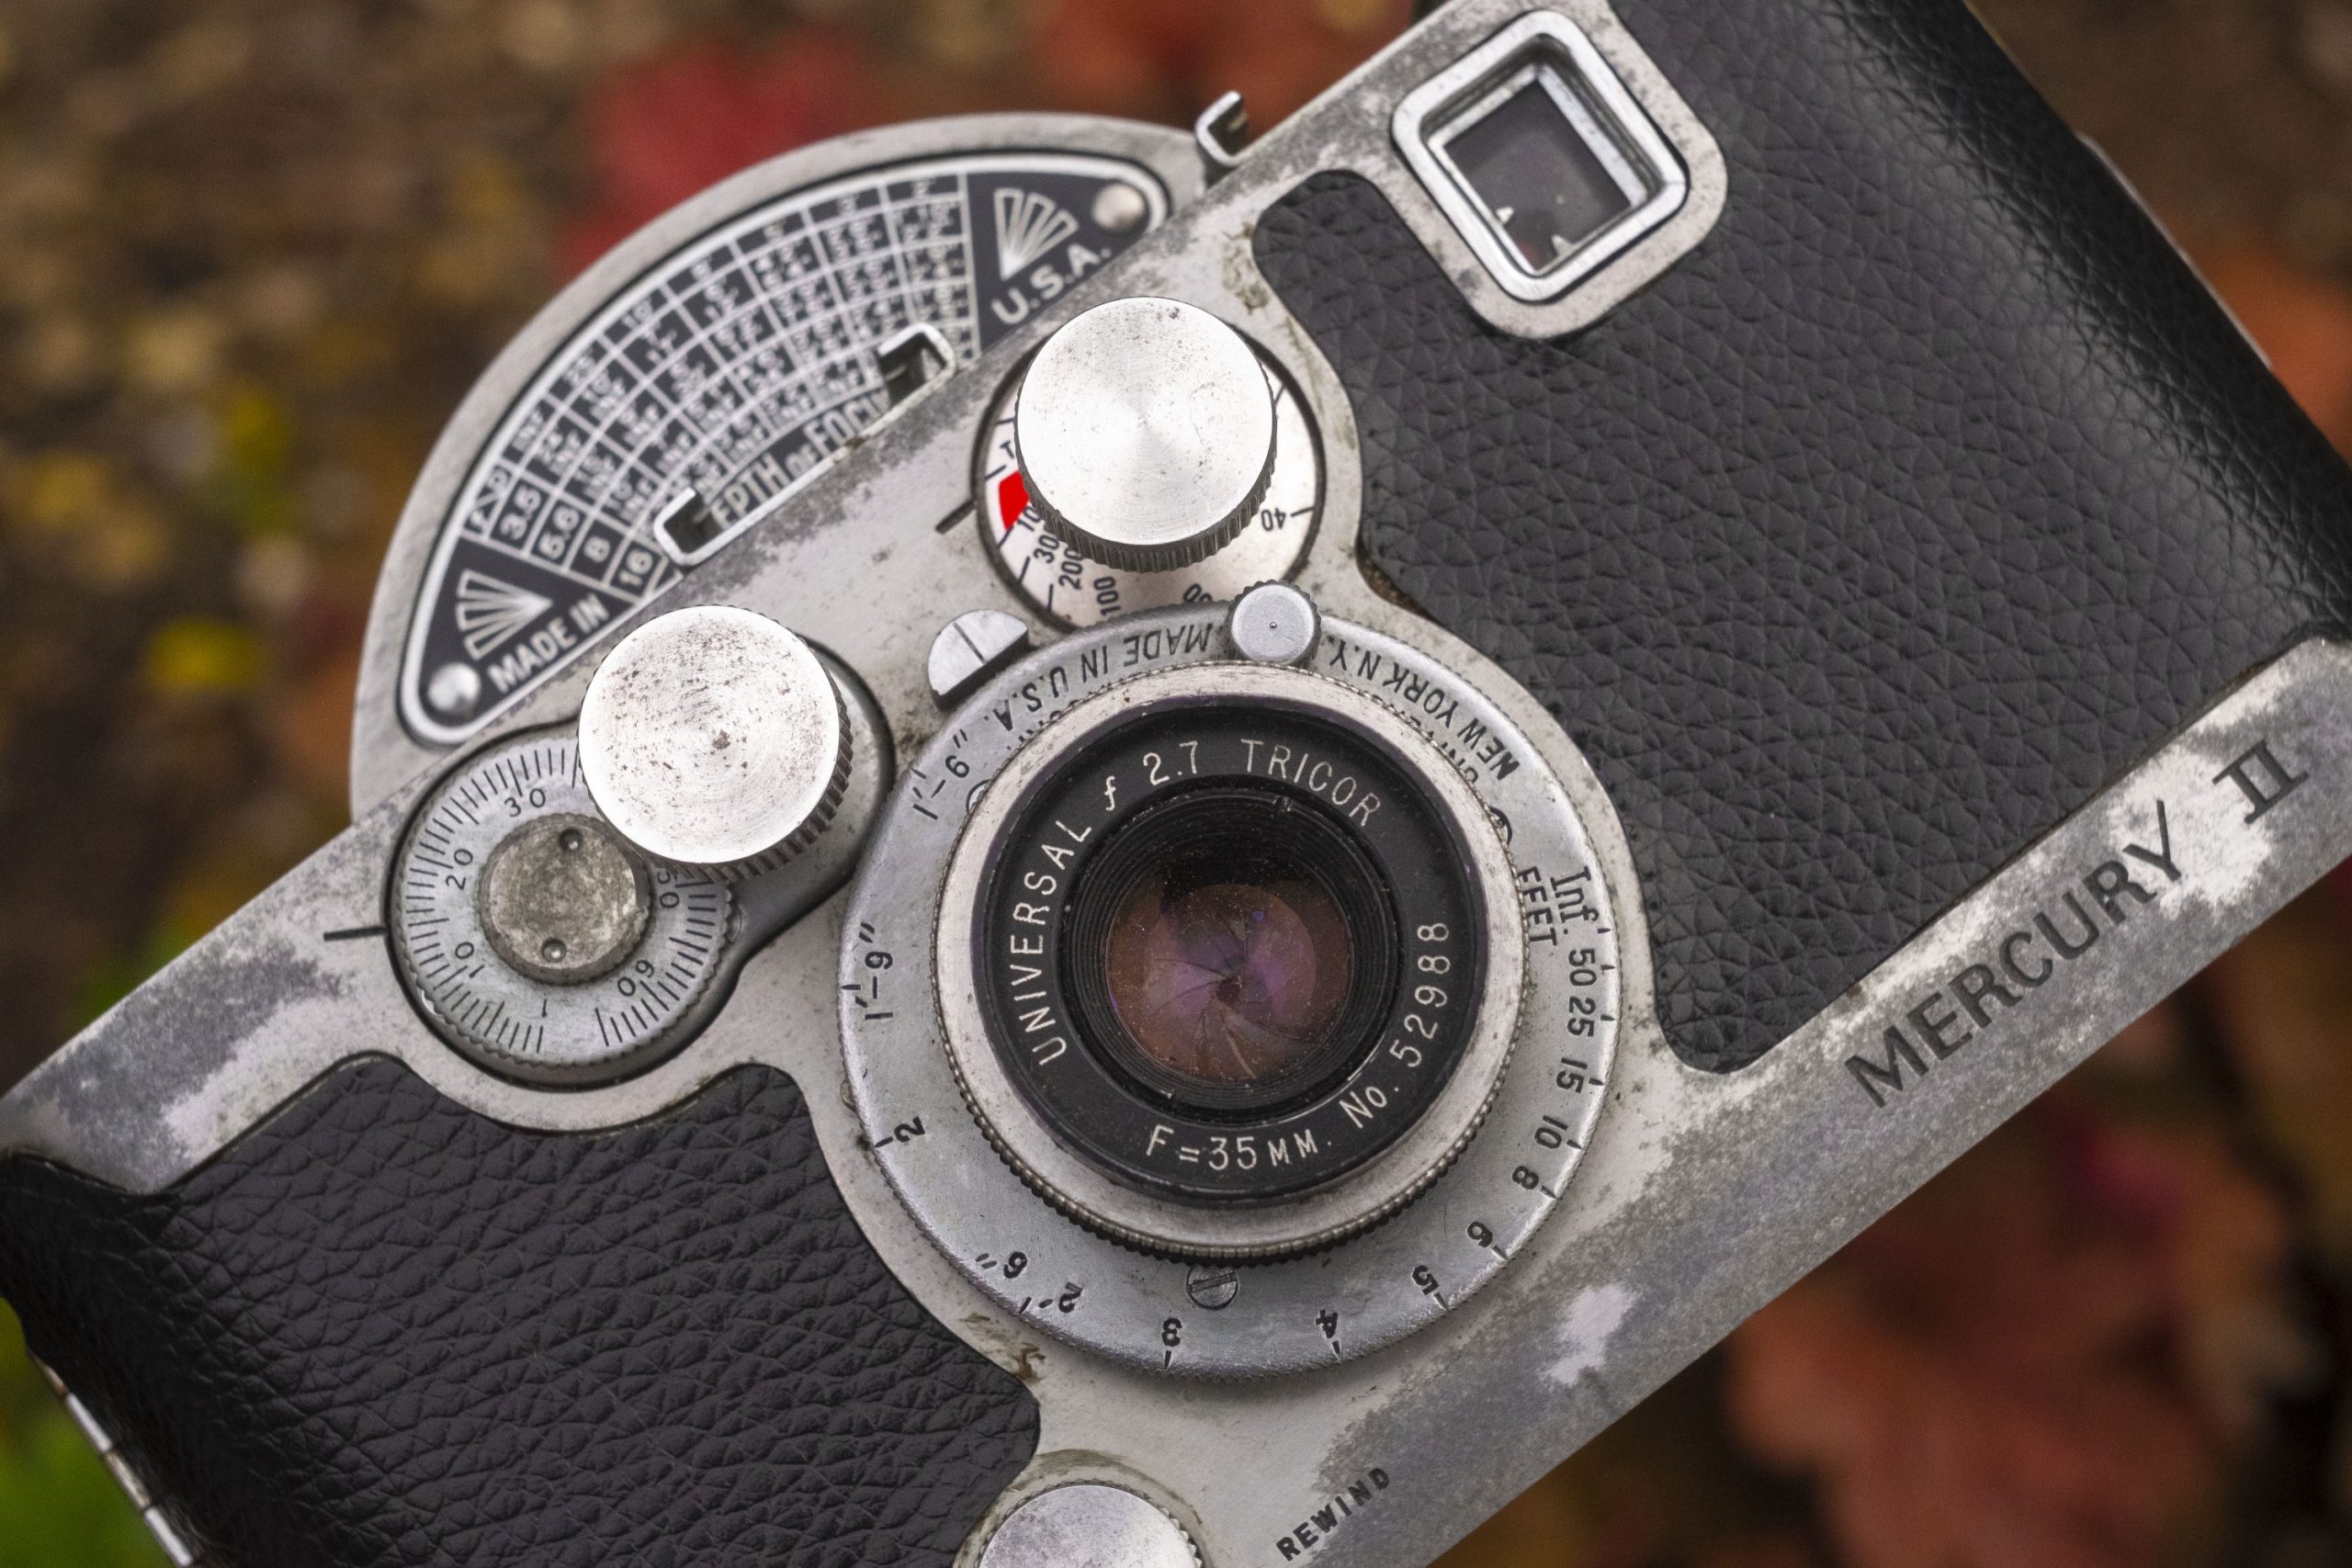
The back of the Mercury II has one of the largest and most gloriously complicated circular exposure calculators I’ve ever seen on a camera. Calculators like this were common on American cameras of the era. Companies like Detrola and Perfex included them on their cameras as a way of helping the user pick an appropriate shutter speed and f/stop for the time of day and time of year, based on available lighting. The Mercury II’s user manual devotes five full pages to what is essentially a Sunny 16 calculator. While I appreciate the effort, I have to wonder how many people ever used this.
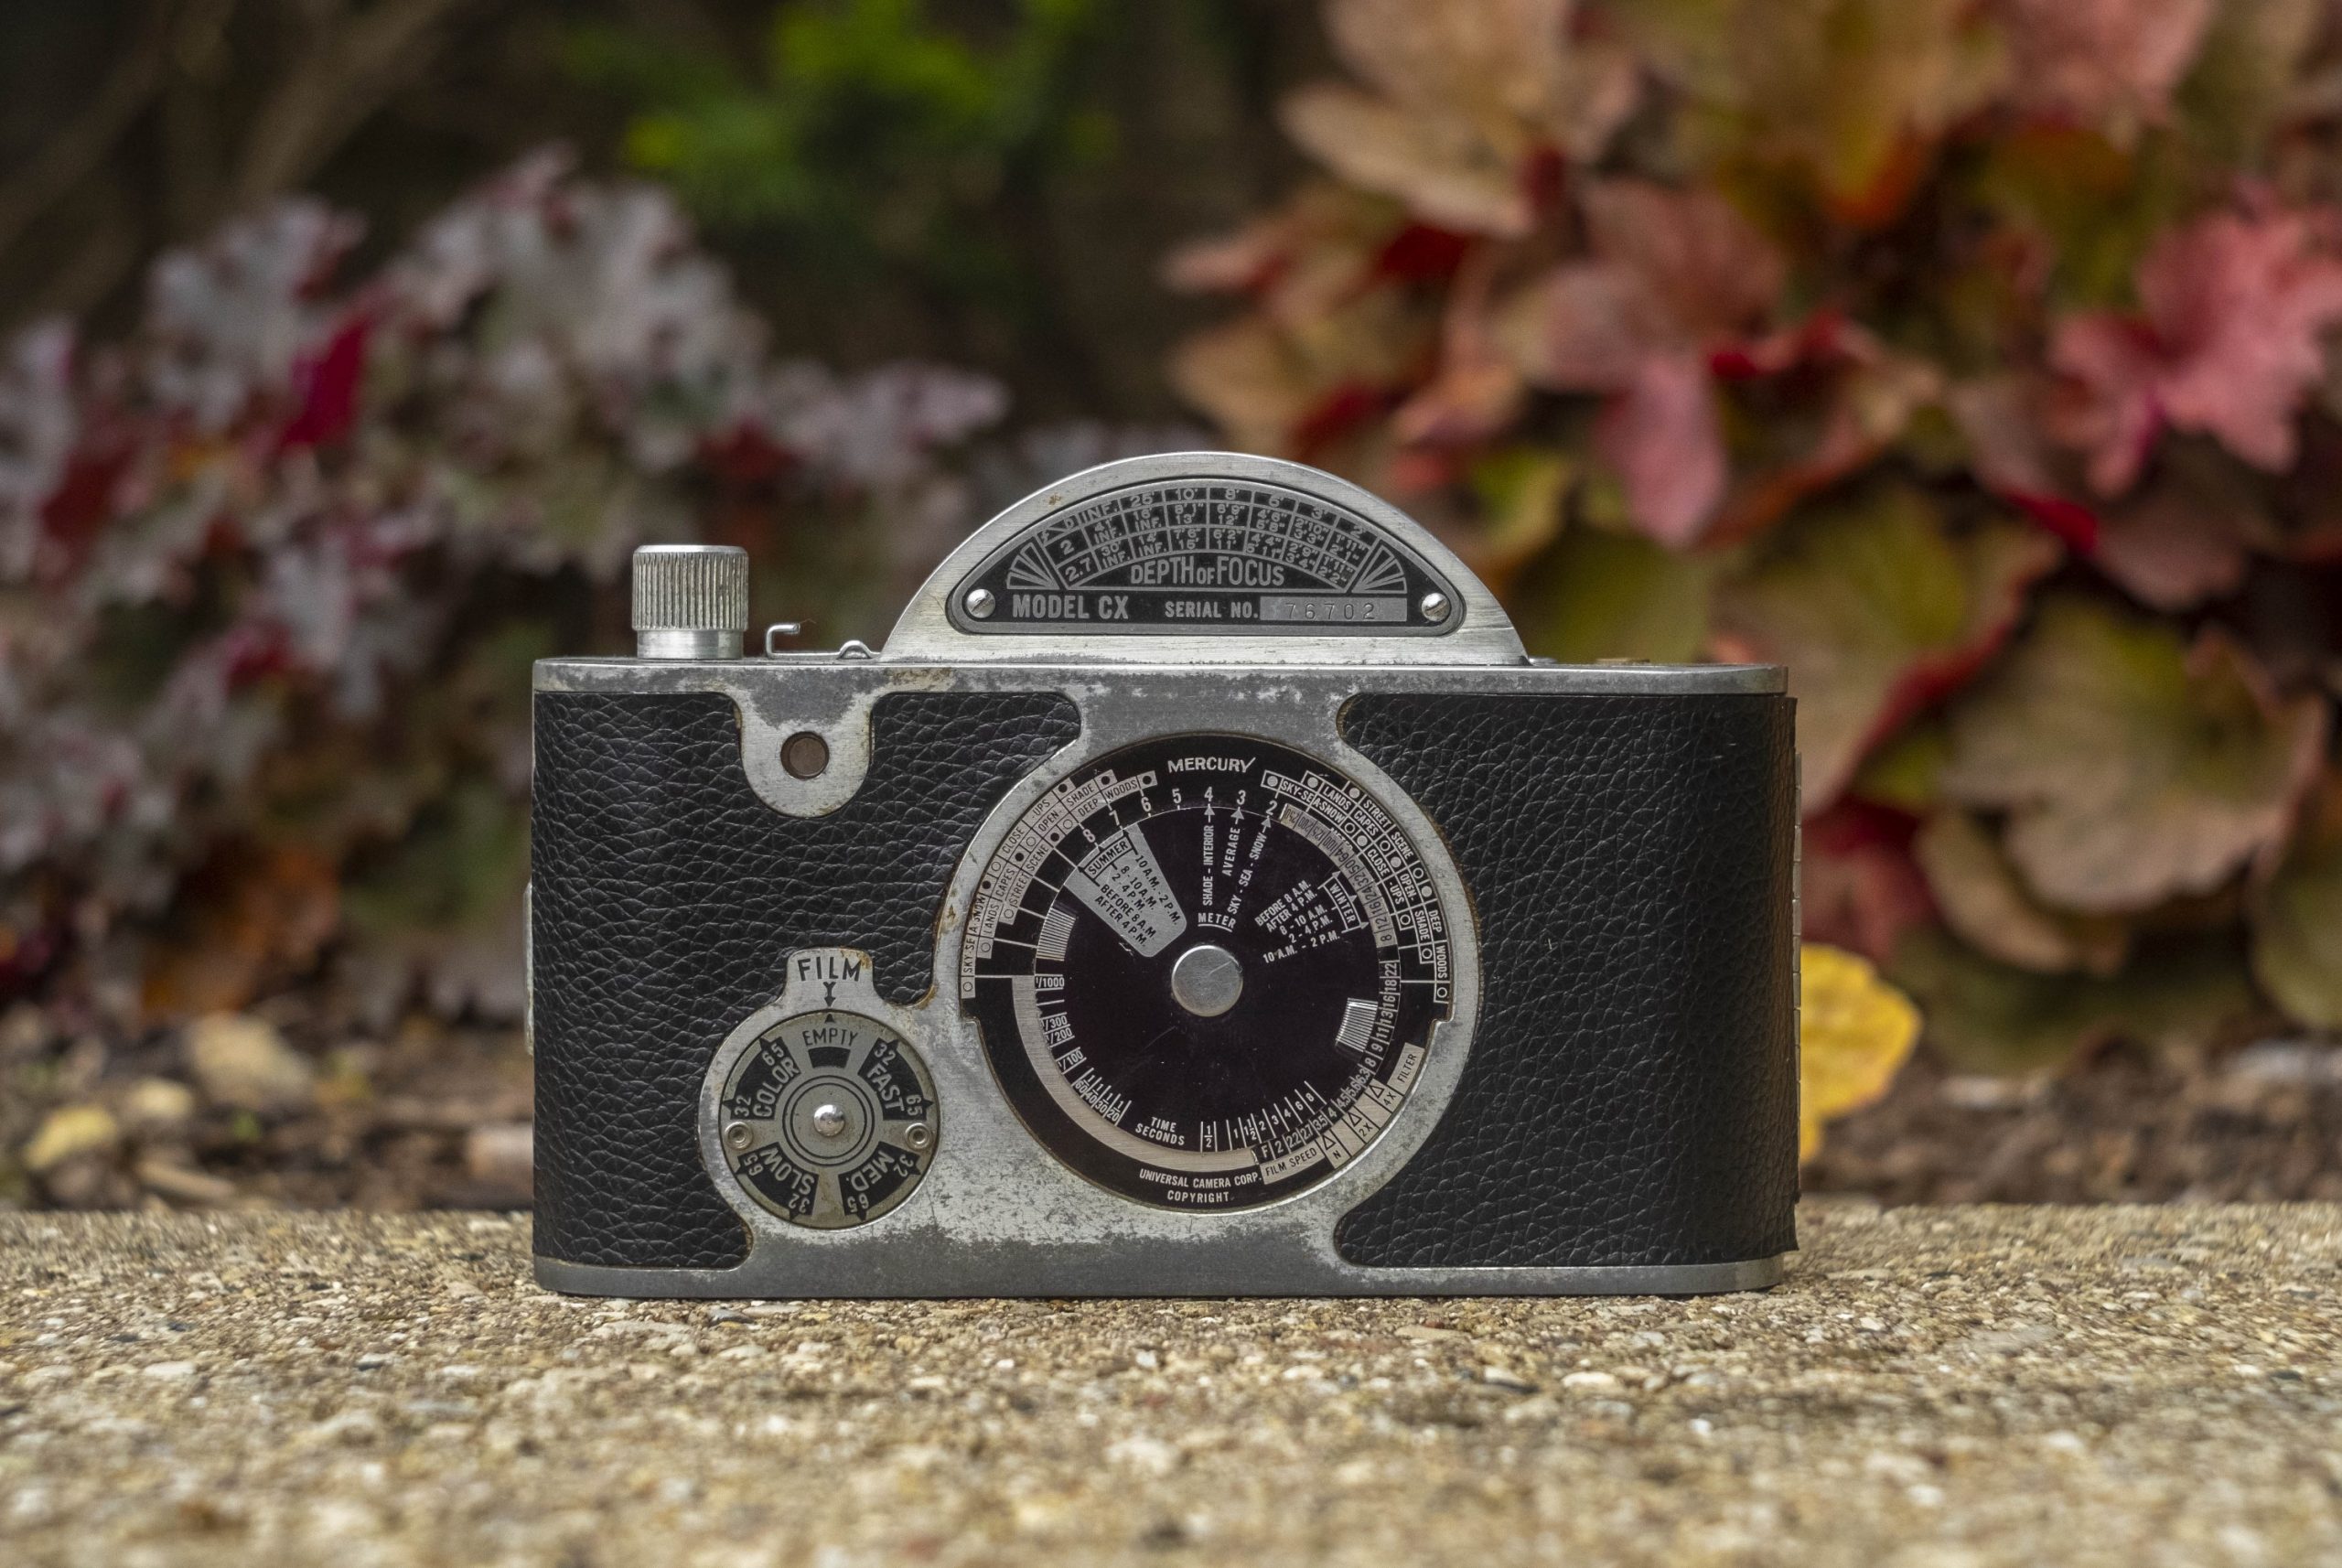
The rest of the back has the tiny peephole for the viewfinder in the upper left corner, then immediately below it a film reminder dial which is new to the Mercury II, and then on the back of the hump above the exposure calculator is a Depth of Focus chart for the f/2 and f/2.7 lenses. The chart continues on the front of the camera for f/3.5 through f/16.
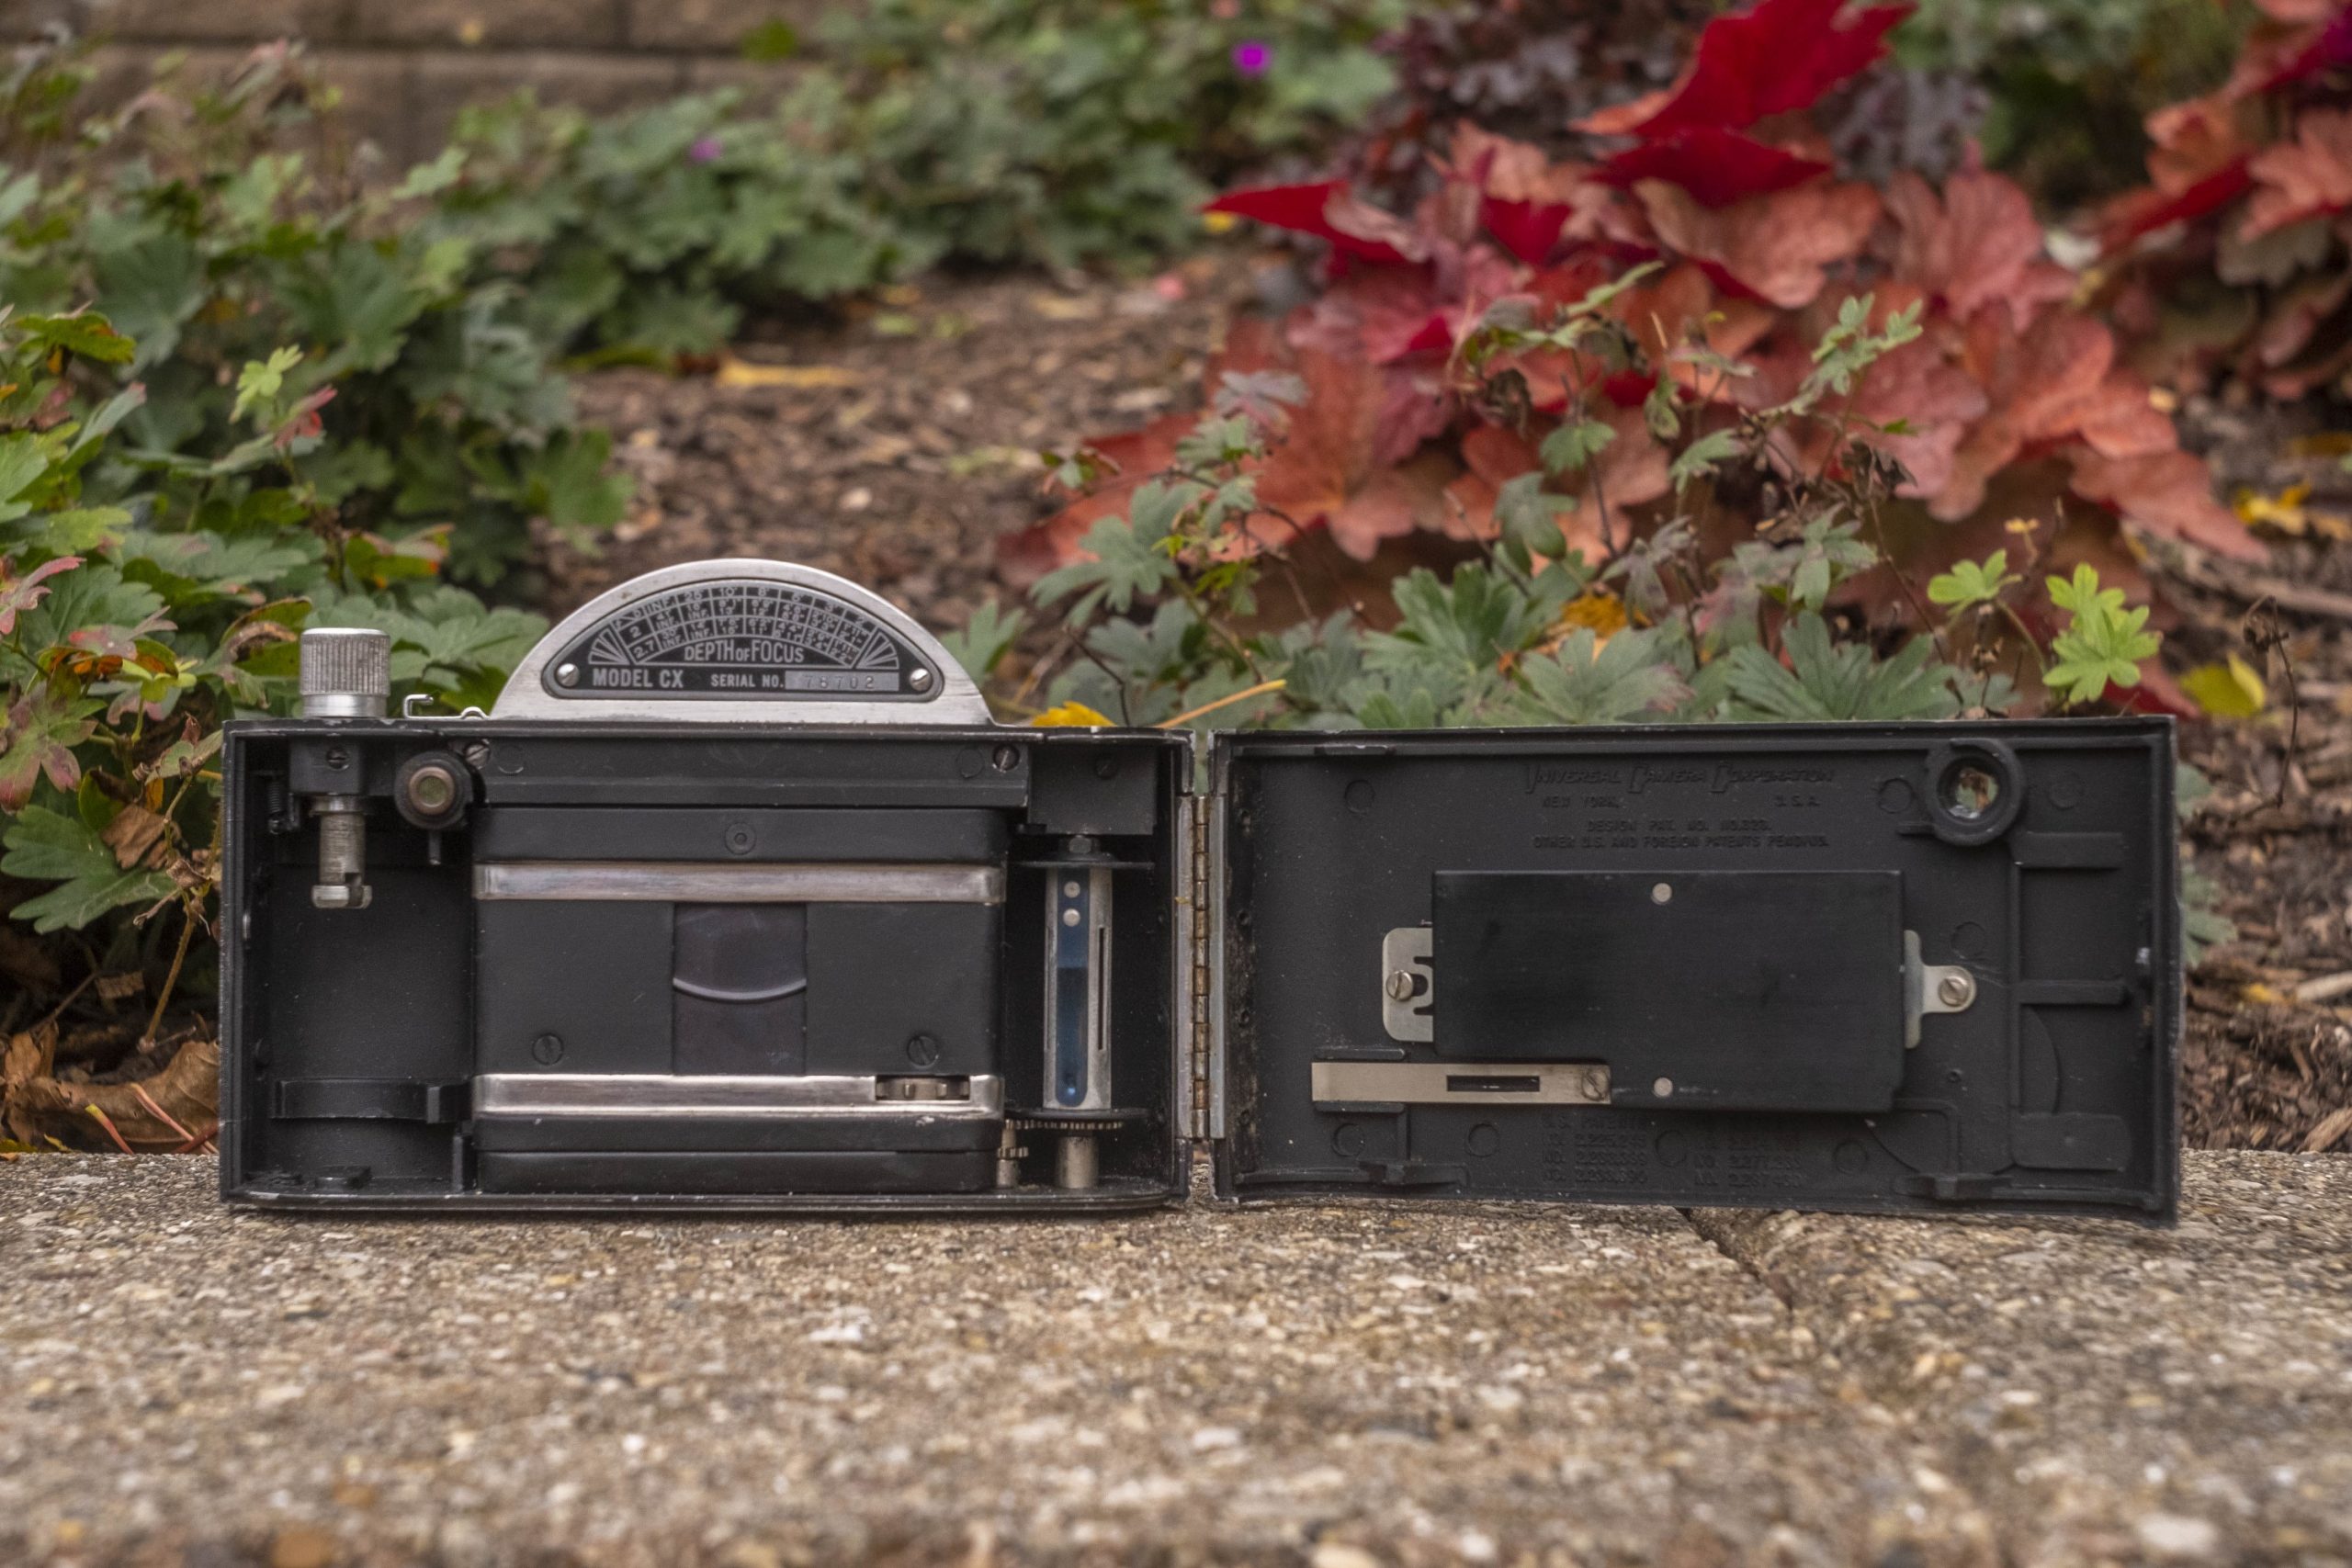
Inside the film compartment is where we see the biggest changes from the Mercury CC since the camera can natively support standard type-135 Kodak 35mm cassettes. (It’s worth noting that you can still use regular 35mm film in the original Mercury CC, but you have to hand spool it onto proprietary spools.)
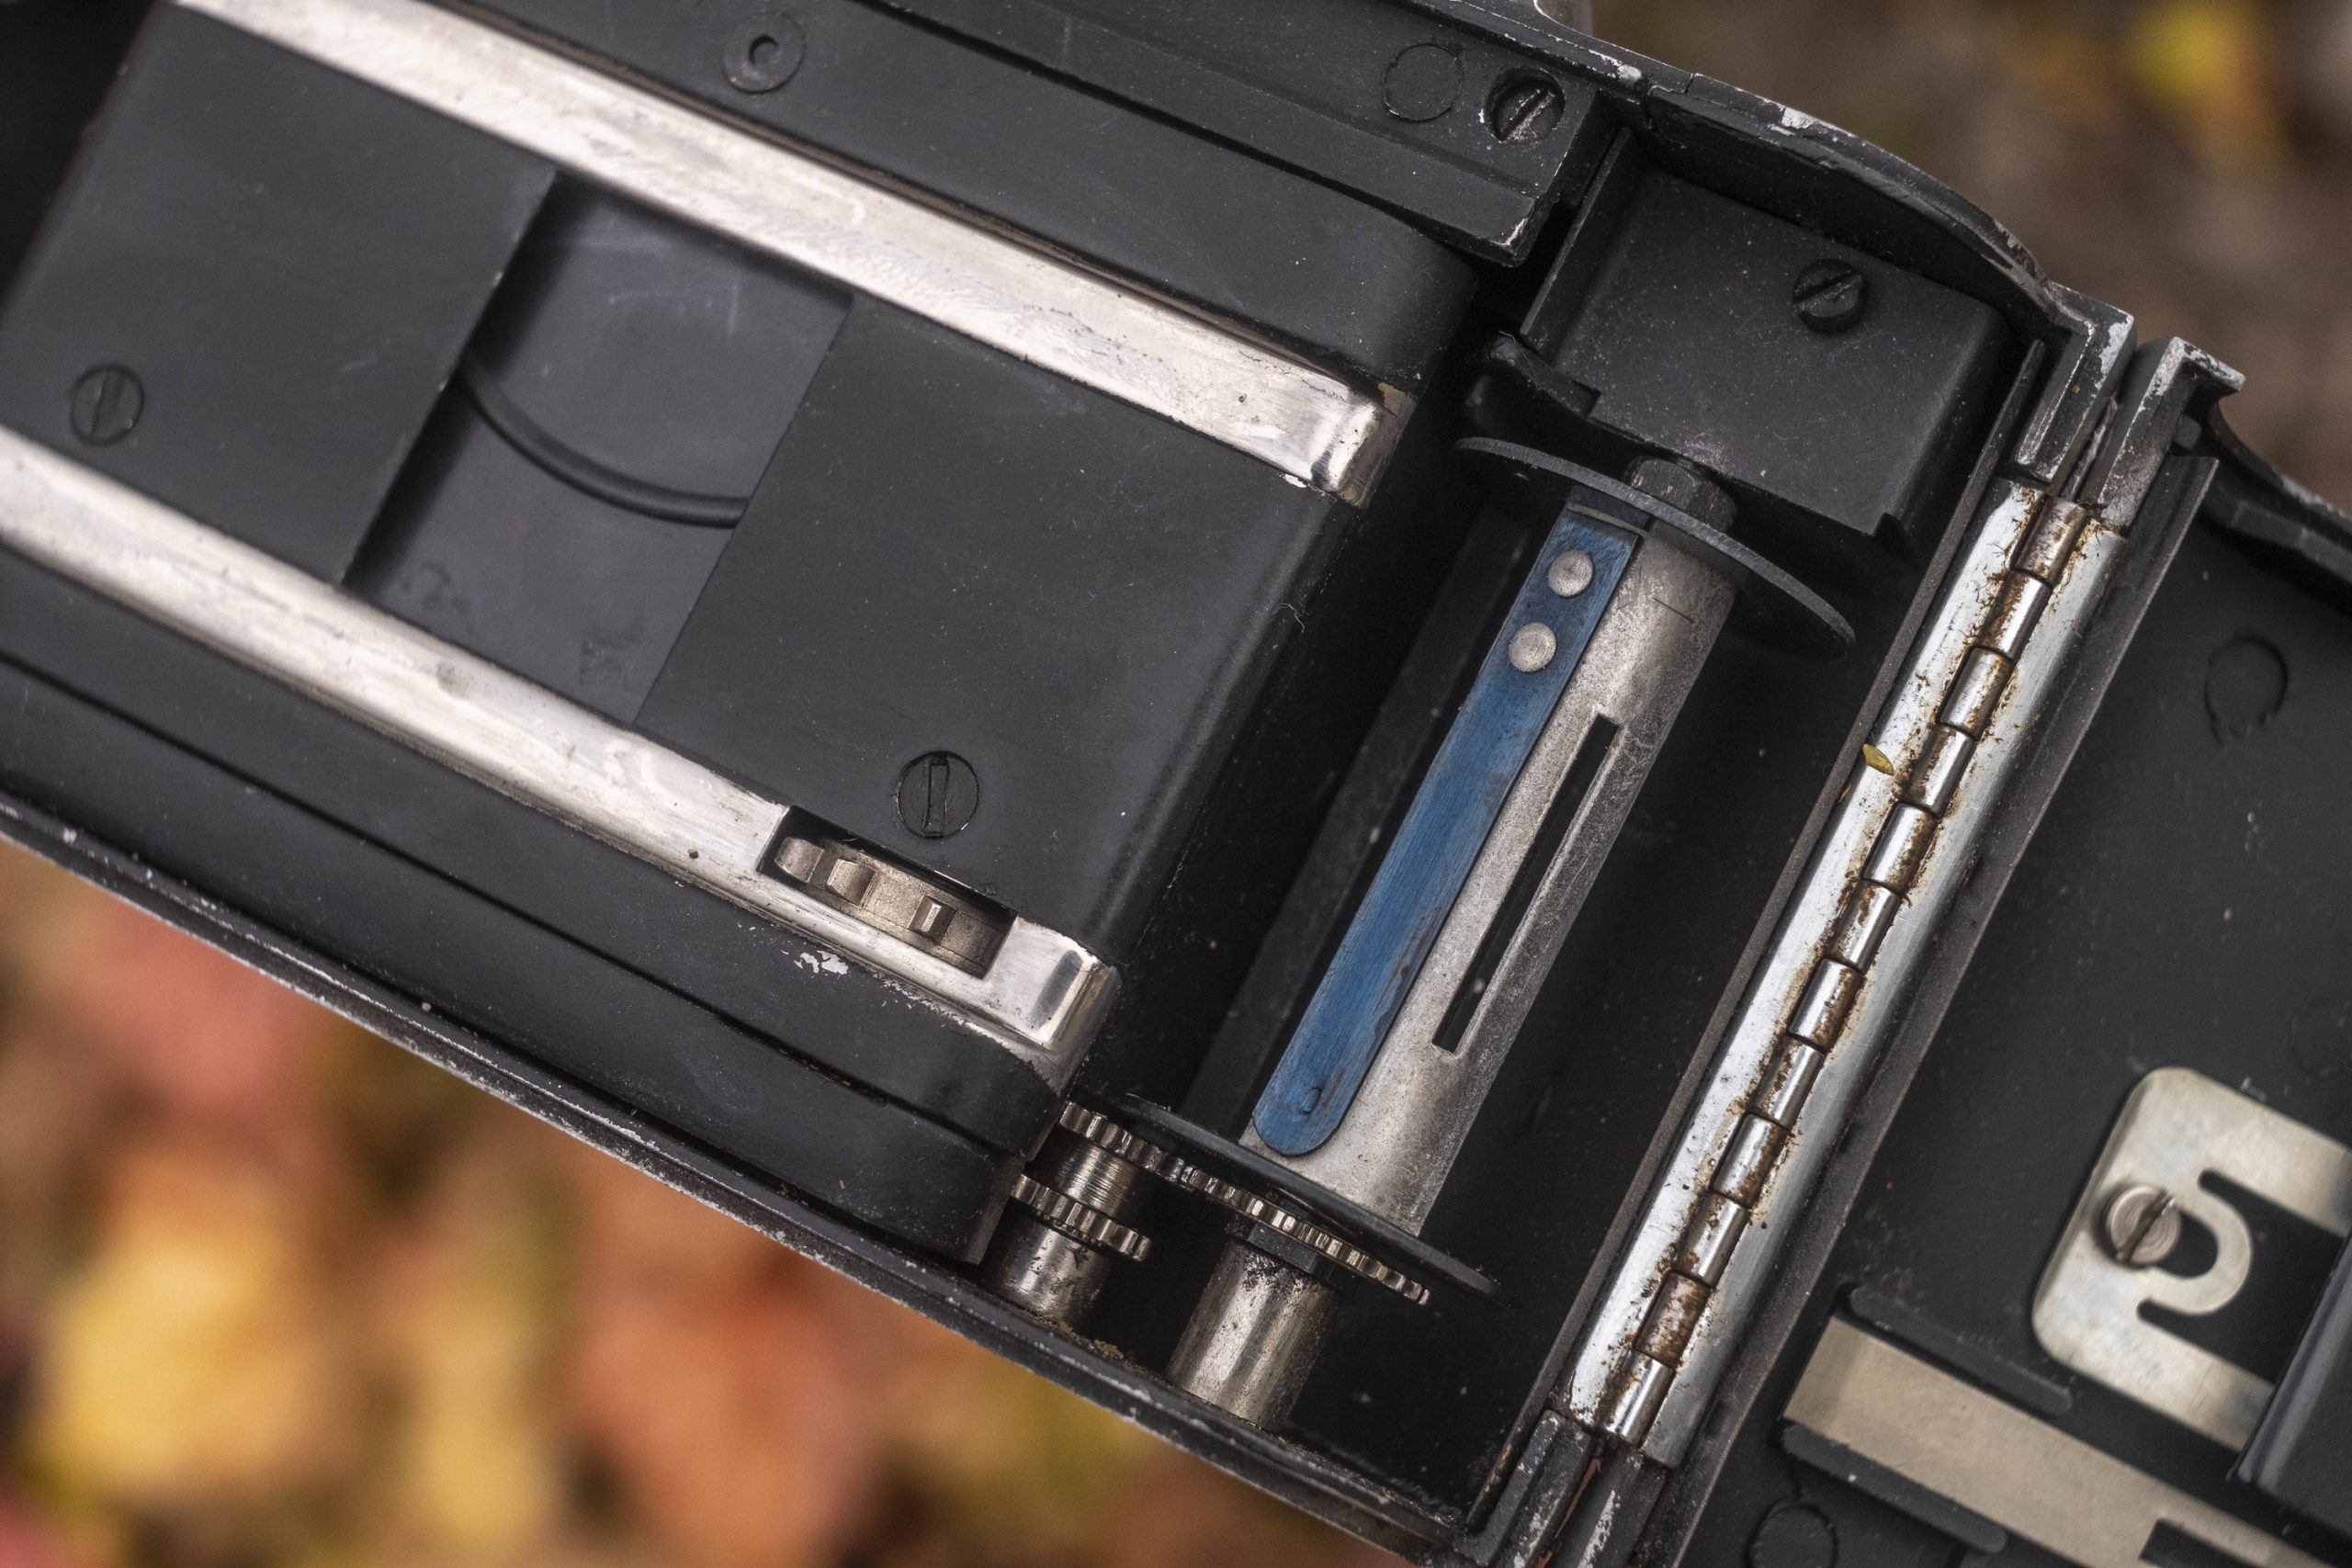
Film transport is from left to right onto a fixed take up spool with a bluish metal clip. Attaching film requires folding the leader under this clip and then manually rotating the spool by hand so that the film securely wraps around it a couple of times. Although the film compartment has no obvious light seals, the channels around the door are deep enough that I’ve never seen any light leaks on film shot in any of my Mercury cameras.
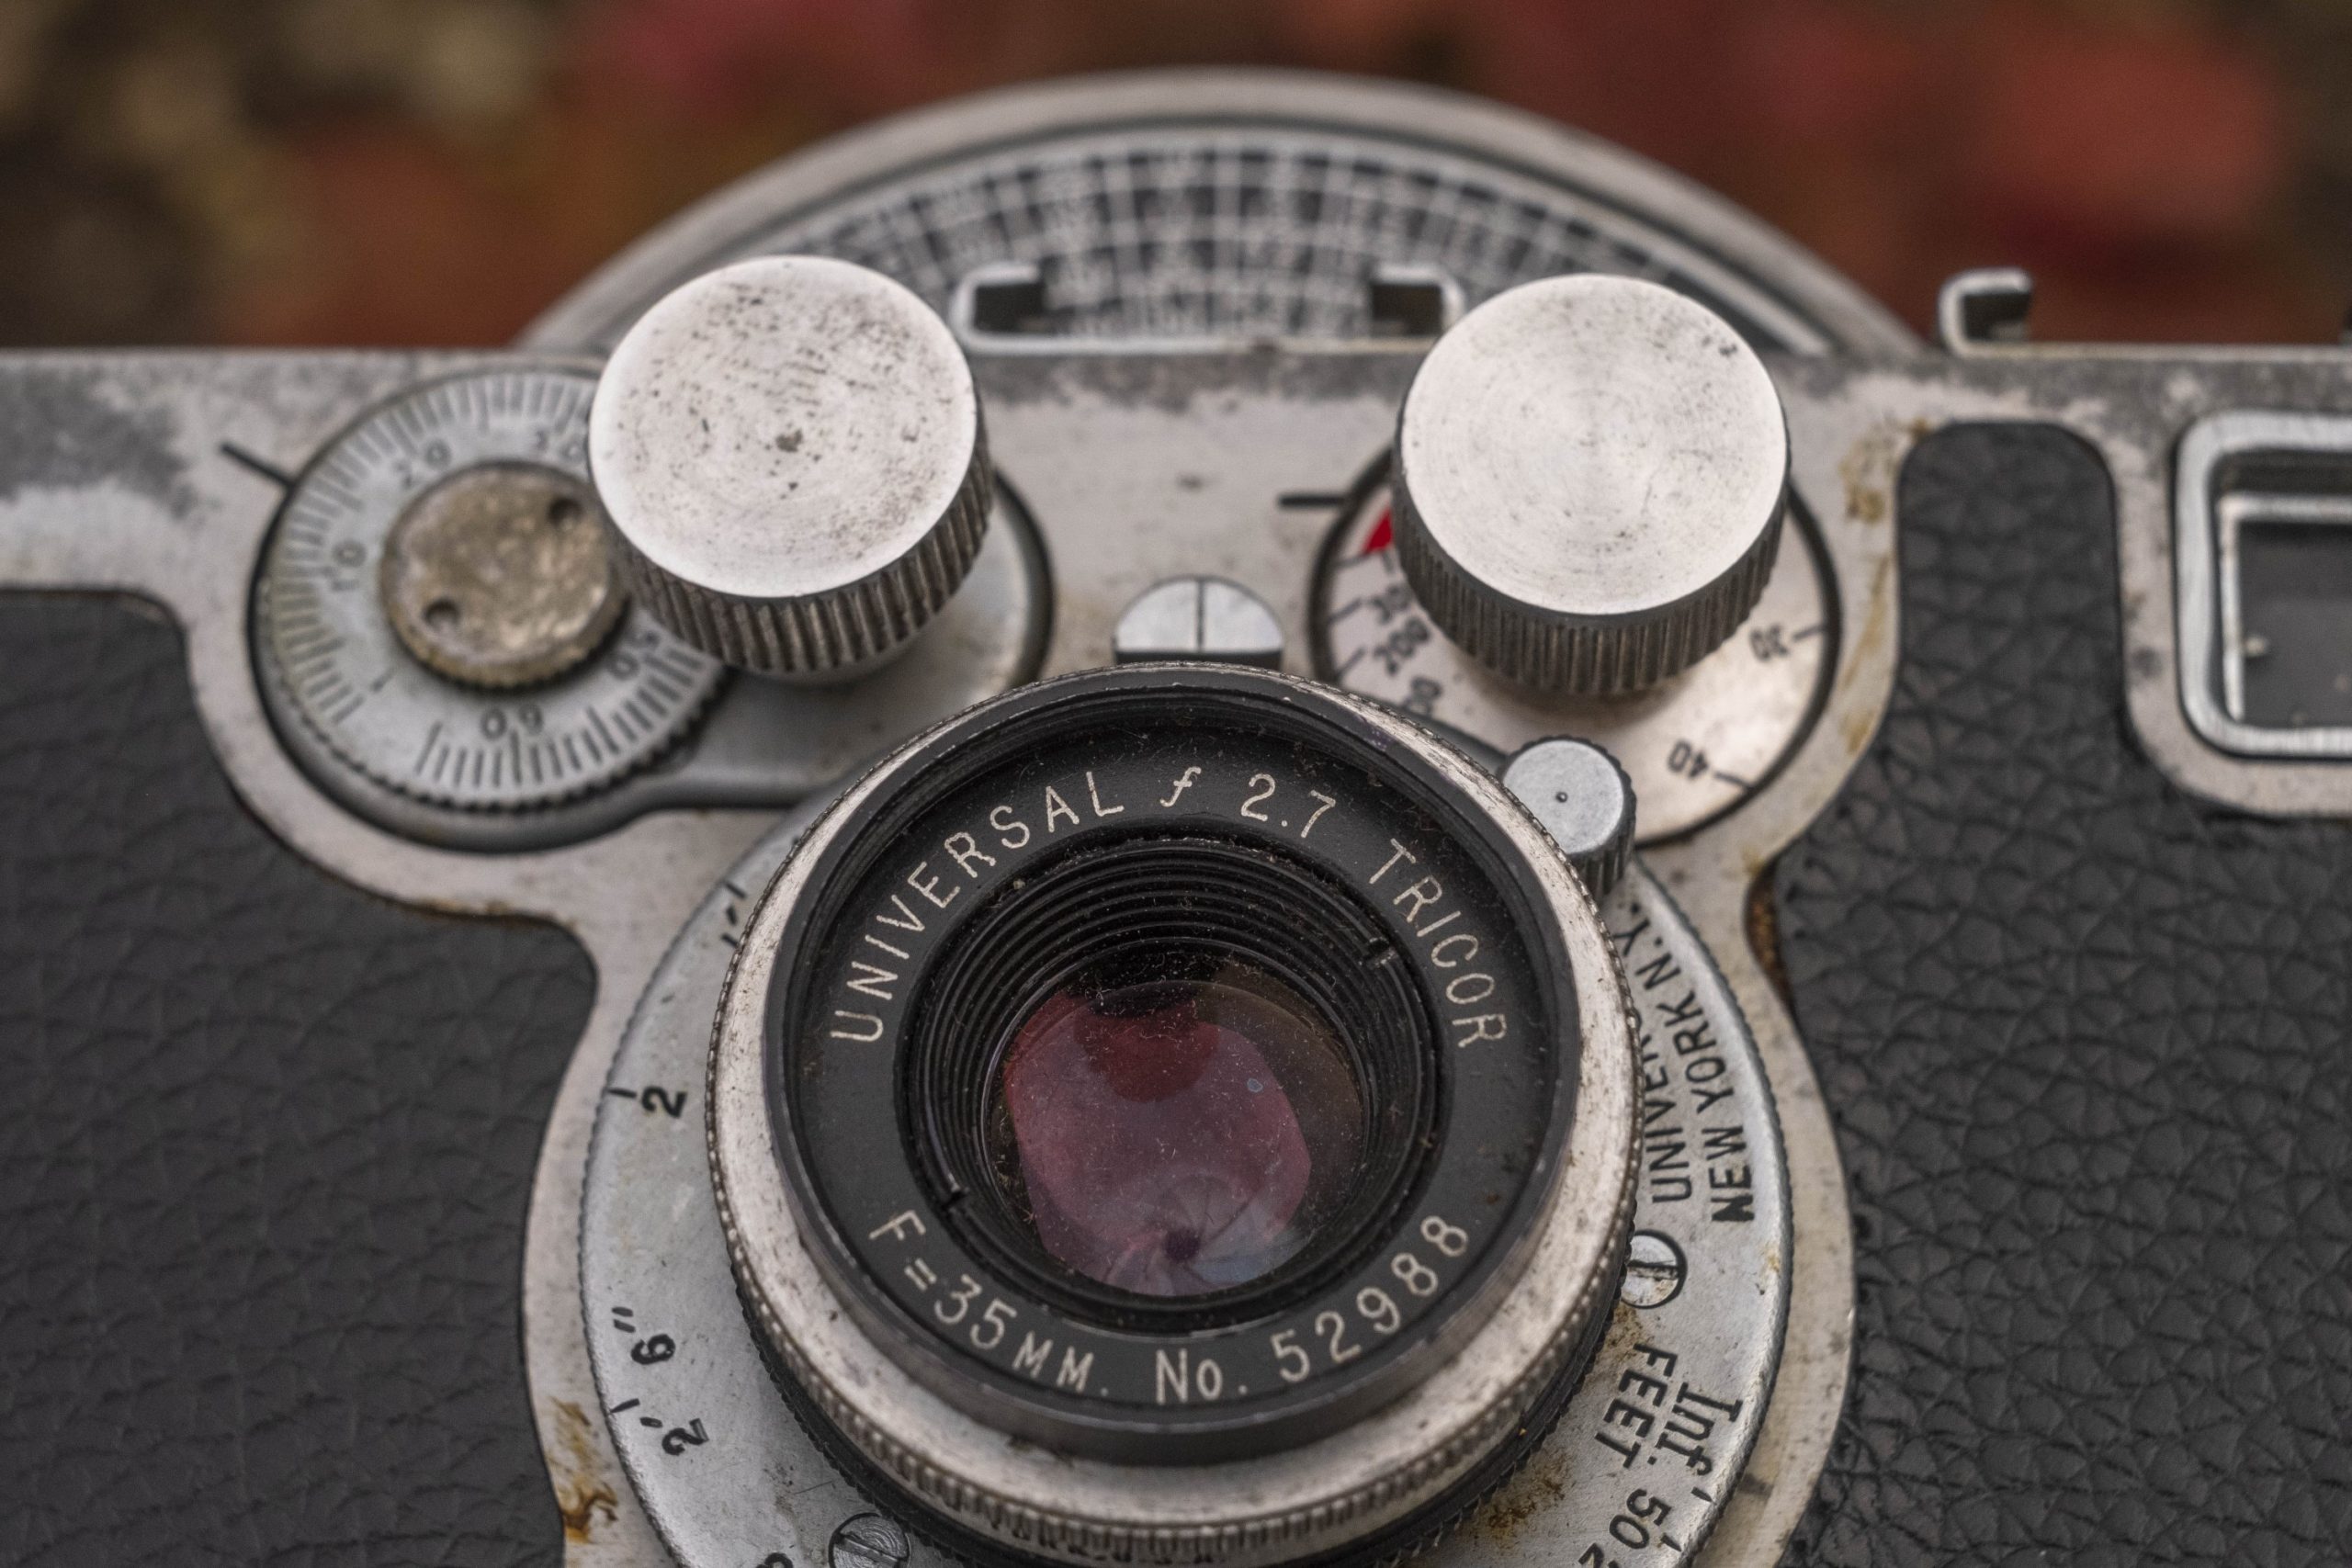
Around front, above the lens are two metal knobs. The one closest the shutter release is used for cocking the shutter. Rotate the knob clockwise until it stops to cock the shutter. Next to this knob is the exposure counter, which because the Mercury shoots half frame images, goes up to 65. To the right is the shutter speed selector which has speeds from 20 to 1000. Changing speeds requires you to press in on this knob while turning it to your desired speed.
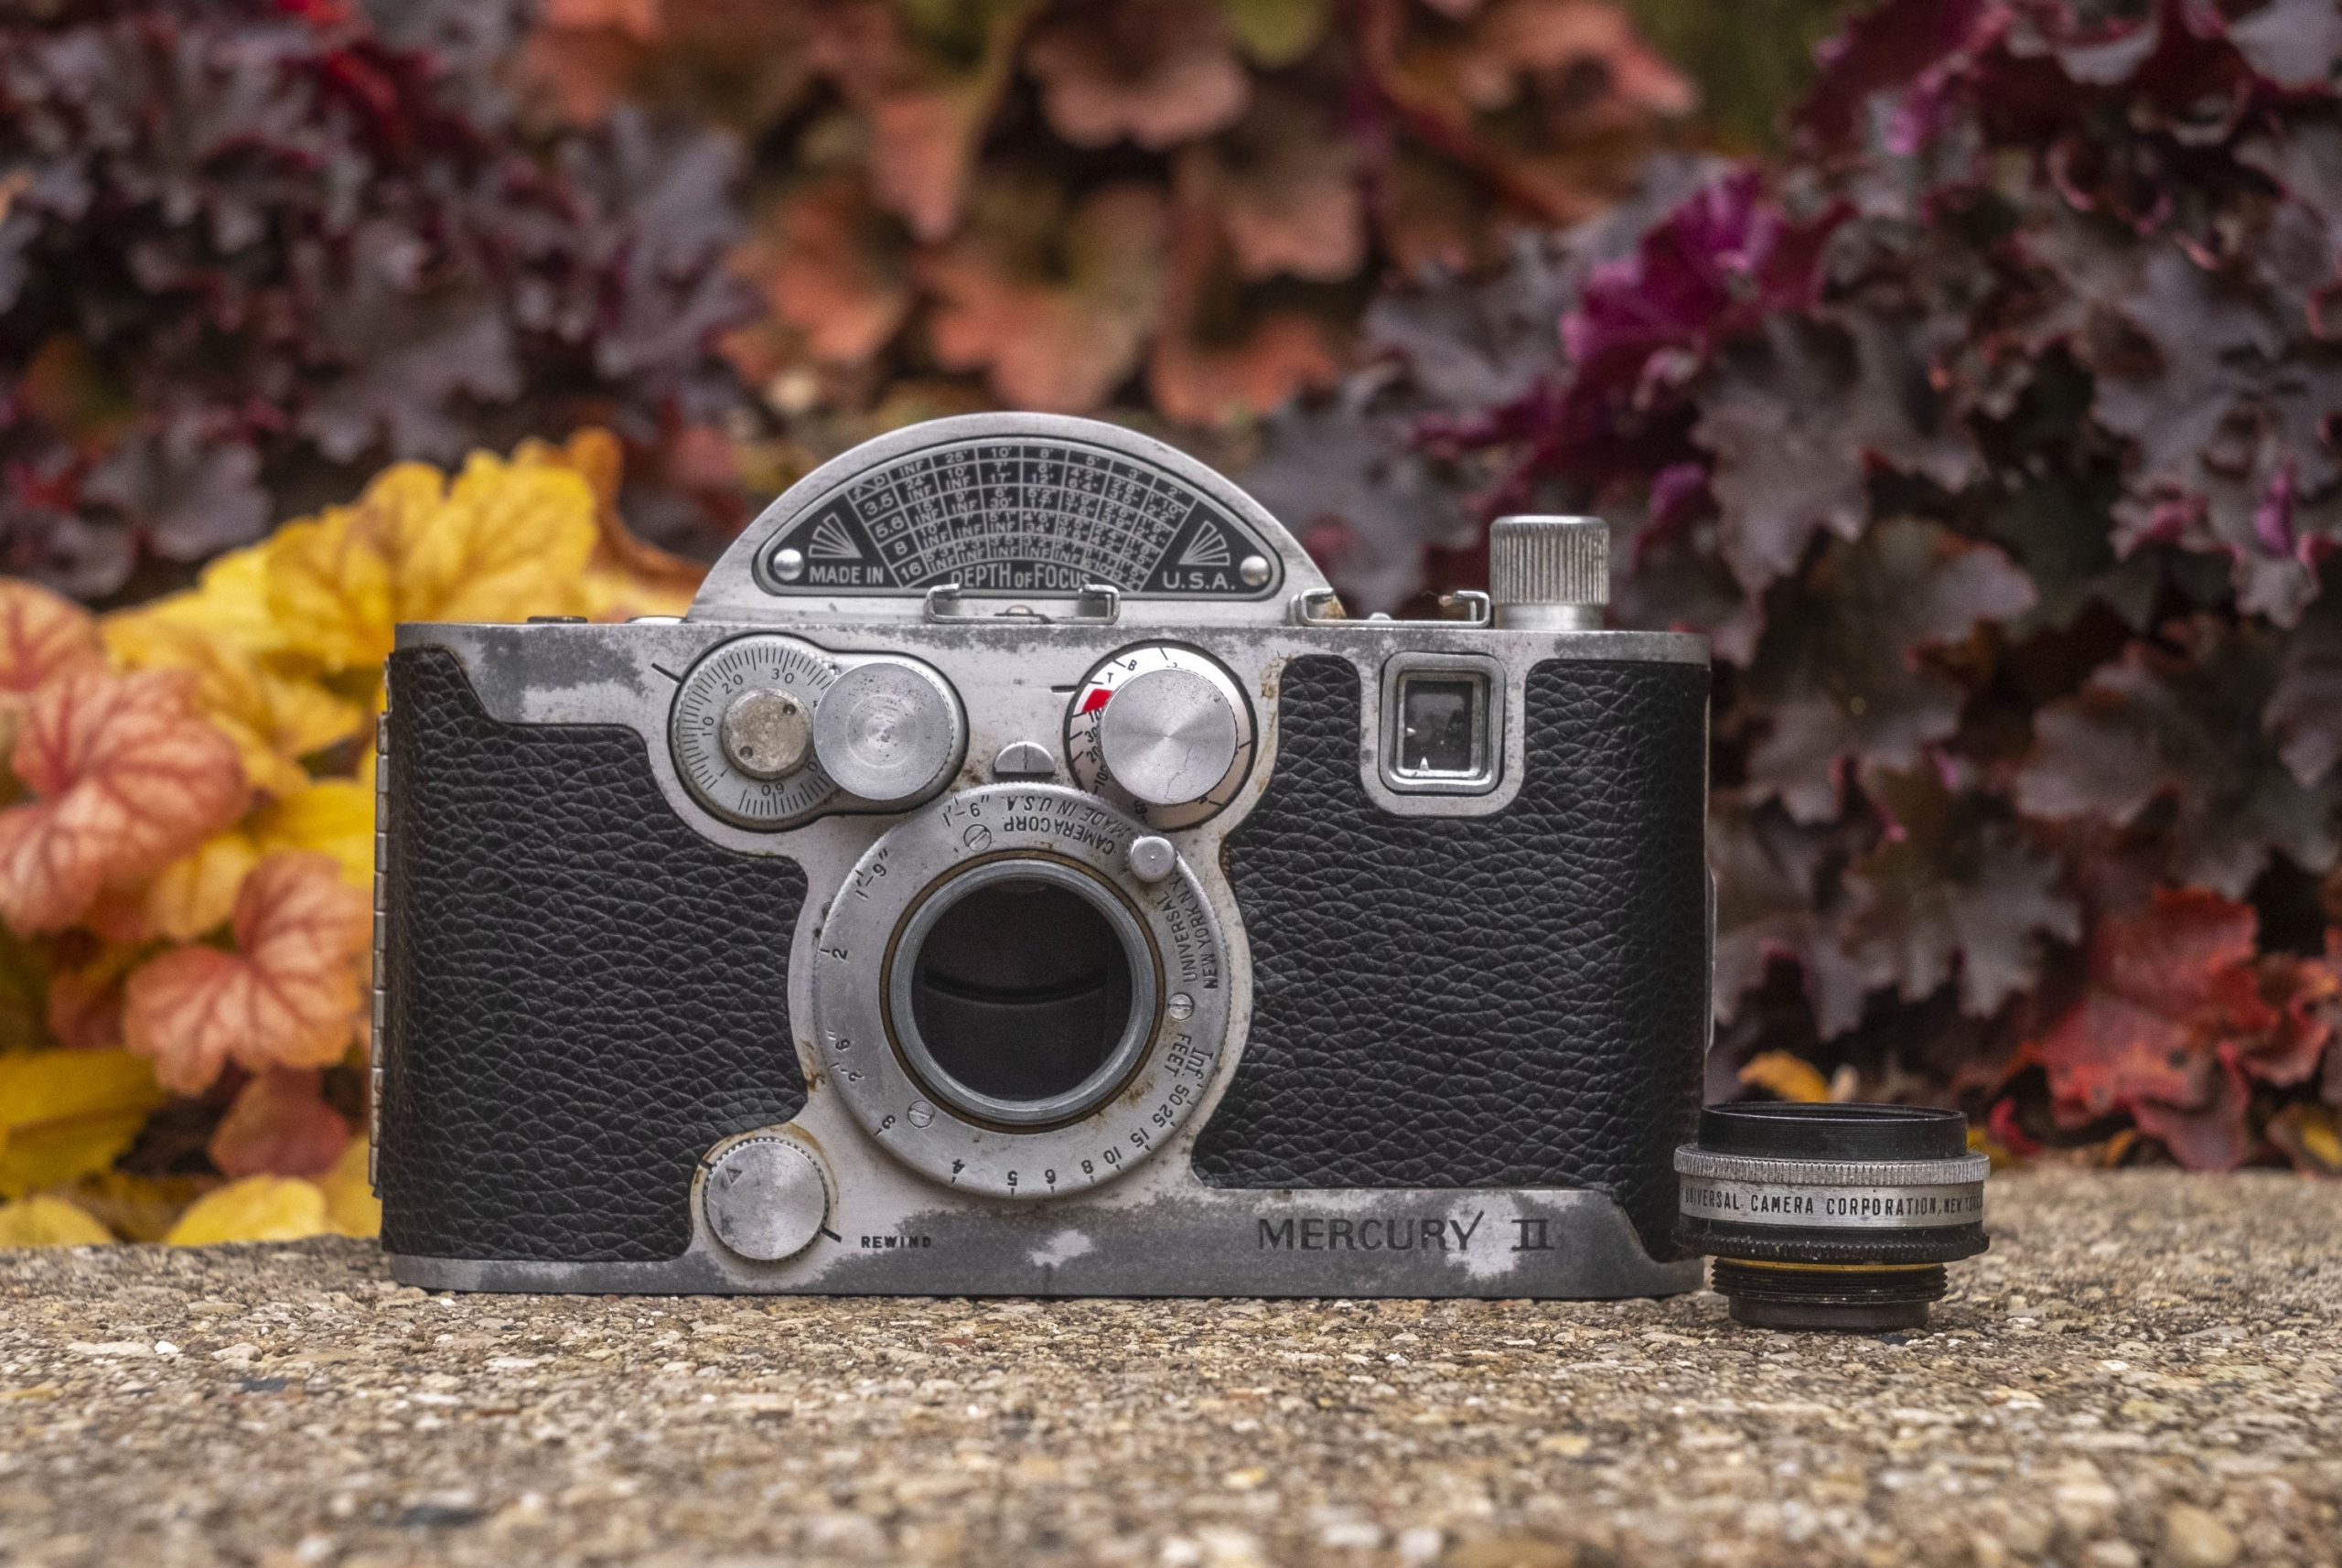
The Mercury cameras both share the same proprietary screw mount which I’ve never found a measurement of it’s diameter, but it’s very close to the 25.4mm diameter of the C-mount commonly used on 16mm motion picture cameras. Considering the motion picture roots of the Mercury’s rotary shutter it would make sense that Universal created a lens mount comparable to that of a motion picture camera. I do not believe Mercury lenses are compatible with C-mount lenses, as I’ve never tried it. The Mercury has a focusing helix in the mount, so there is no need for one on the lens, making them very small. Mercury lenses are some of the smallest I’ve ever seen on a still photo camera.
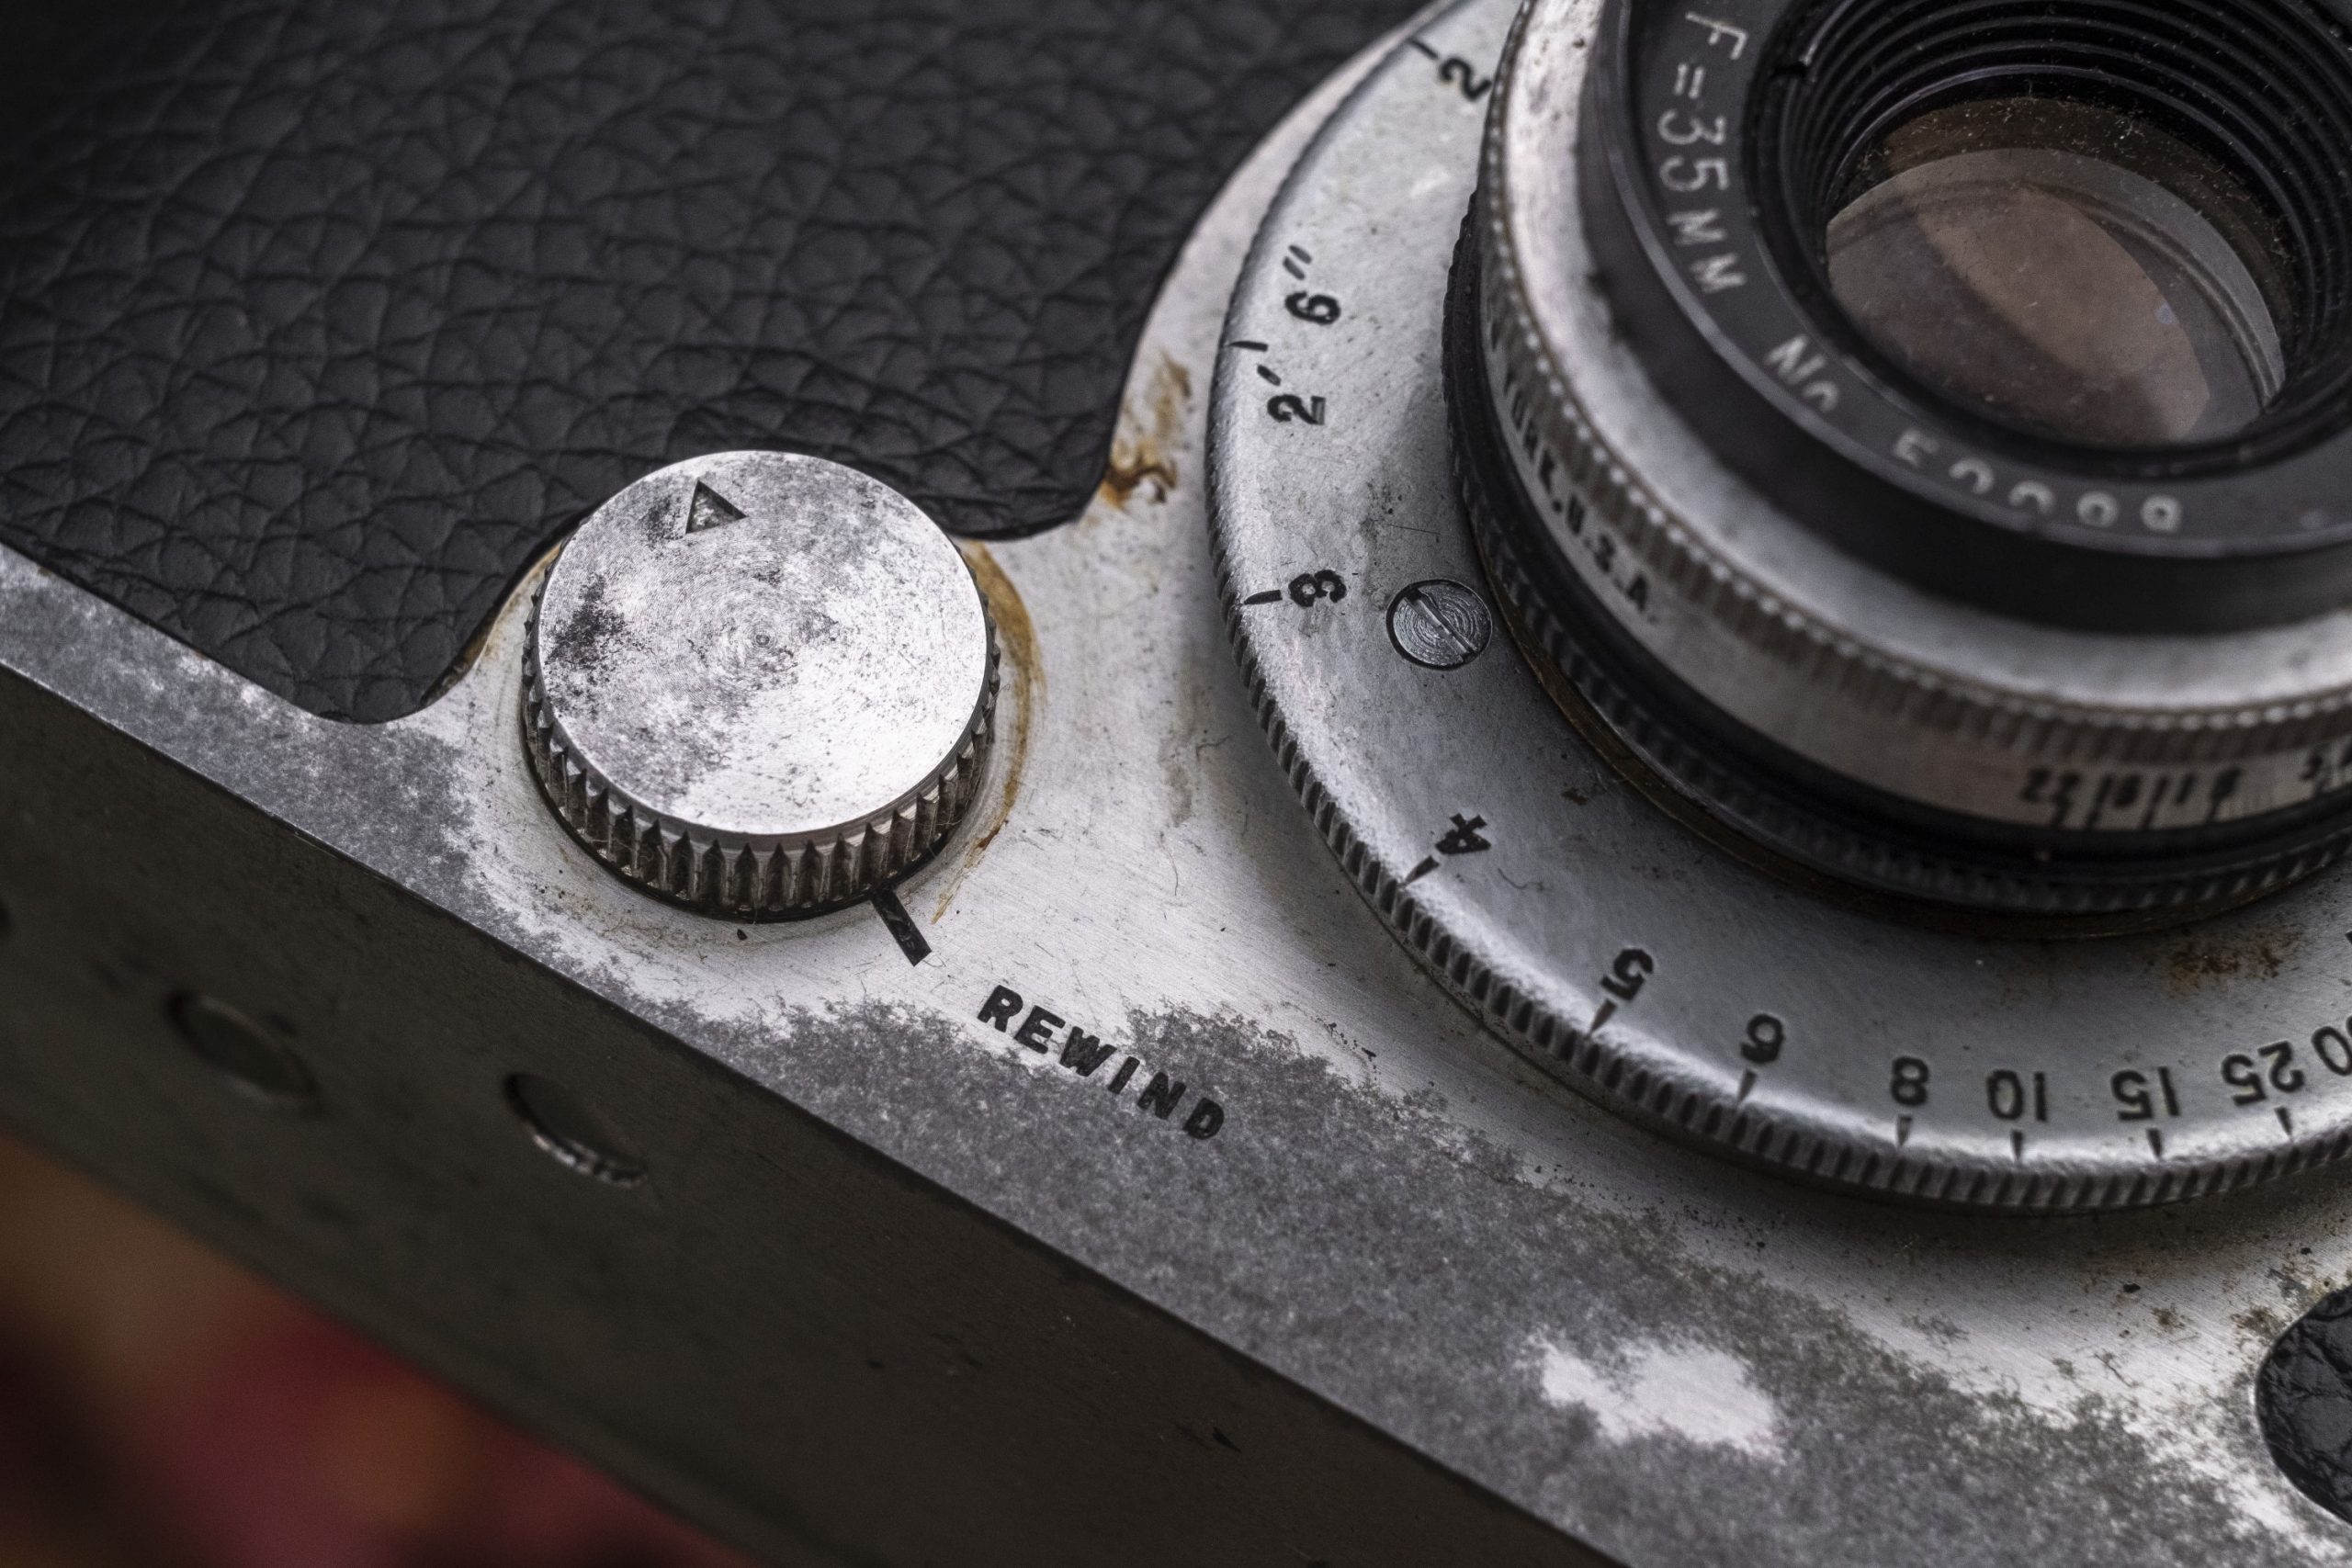
Near the 8 o’clock position around the lens mount is a dial for activating Rewind mode on the camera when you reach the end of a roll of film. With the knob turned away from the Rewind indicator, the camera transports film normally.
The Mercury viewfinder is predictably small, but accurately reflects a vertical half frame with parallax correction hash marks which are used to indicate lens coverage at the camera’s 1 foot 6 inch minimum focus.
For being made by a company whose primary experience with inexpensive cameras, the Mercury is not only a technical marvel, but it quite well designed. The spec sheet is quite impressive for a camera first released in 1938 and it has pretty good ergonomics.
My favorite part of using this camera is in the zzzzziiippp sound the shutter makes as it fires. The rotary shutter on the Mercury makes a sound unlike any other camera ever made. If you’ve never had an opportunity to hold a Mercury, I highly recommend looking for one and firing the shutter a few times, it’s pretty dang cool.
Of course a camera was built to make photos, and not make cool sounds, so what kinds of photos can it make?
My Results
The first Mercury I originally reviewed in December 2014 had a quirk where the shutter didn’t work properly if the camera is tilted at a downward angle, so you had to make sure you are holding the camera perpendicular to the ground or else it wont fire correctly. I knew I was taking a risk shooting a roll of film in this camera without doing any work to it, but I figured what the heck. I loaded in a fresh roll of Fuji 200 film and went shooting.
When I got my photos back, I was speechless at how many of them came out great. I will admit, I didn’t take many risks with this camera and shot most everything at infinity. Since this camera is not a rangefinder, there is no focusing aid on the camera. This is what is called “scale focus” where you just guess how far away your subject is, and then rotate the focus wheel on the lens to match the focal distance. Once you fire the shutter, you have no idea whether or not you got it right until you see your developed film.
Below is a gallery of shots from my first roll. As I mentioned above, this is a “half frame” 35mm camera which means that the exposed shots on the film are smaller than that of a normal 35mm camera. This means you can get more shots than you would with any other 35mm camera. On a 24 exposure roll, its good for 44 shots, but I was getting excited about seeing my results, so I never actually made it through the entire roll. I think after 38 shots, I just took the film out and sent it in for developing.
")
")
")
")
")
")
")
")
")
")
")
Below is a second gallery I shot in October 2019 with a second Mercury II with the Tricor f/2.7 lens on heavily expired Kodak Gold 100 developed using the Film Photography Projects Unicolor C41 Kit.


Finally, here is a third gallery shot by my friend Anthony Rue on his Mercury II on Kosmo Foto Mono 100 film, developed in HC-110 Dilution B.


My comments in the original version of this review from 2014 commented at how impressed I was with the results from the Wollensak f/3.5 lens on fresh Fuji 200 film. In the second and third galleries, my second Mercury and Anthony’s both had the Wollensak f/2.7 lens and to be honest, I don’t see any bit of difference. Other than being roughly 2/3rd of a stop faster wide open, both the f/2.7 and f/3.5 lenses are capable of excellent images with no traces of obvious optical anomalies. If you own a Mercury II with the f/3.5 lens, don’t think you’re missing anything by not having the f/2.7 lens.
Something that’s fun to think about is that in the 1940s when this camera came out, color still photography was in its infancy. Color film was extremely slow back then and speeds as high as 200 or even 100 which are common today, weren’t even heard of. In addition to this, the ability to develop or “resolve” the level of detail that can be extracted from film negatives was nowhere near as advanced as it is now.
Although these cameras are over 70 years old now, these shots are considerably better than anything that could have been shot when this camera was originally made. I know absolutely nothing of the history of my particular cameras. Who owned them? Where did they live? How often did they use this camera? How long had it sat on a shelf or in a box before I received it? Who knows!
What I think is cool is that these shots you are looking at are the best shots that this camera has likely ever made. Over 150,000 Mercury IIs were made between 1945 – 1952 and it took all this time for this specific one to end up in my hands and shoot pictures that are comparable to modern cameras made today.
Now that I know my Mercury II not only works, but takes pretty good shots, I cannot wait to shoot more film in it. I would like to do more work to restore the camera and make it look nicer, but I go back and forth about whether or not I should buff and polish the metal body to bring back the shine. I have seen examples of Mercury IIs that have been completely restored and they do look nice. However, I think that the oxidized “patina” of the camera is part of its appeal. This camera looks like this because Universal used a new type of metal alloy that did this. Universal never intended this camera to still be in use over 70 years later, but it is, and I think that the look of the metal gives it charm. When you see those antique shows where people get their old stuff appraised, you often hear the appraisers say that attempts to polish or clean up an old piece of metal, often degrades it’s value. I’m not keeping this camera for its value, rather its history and charm.
Related Posts You Might Enjoy
External Links
http://camerapedia.wikia.com/wiki/Mercury
https://photojottings.com/mercury-ii-35mm-f-2-7-review/
http://www.collectorsweekly.com/articles/cool-cameras-the-univex-mercury/
http://rick_oleson.tripod.com/index-25.html
https://mikeeckman.com/photovintage/vintagecameras/mercury2/index.html
Hi,
I have a Mercury model cxserial number123246 it is in a leather case and not sure how to remove it?
Hi Hope! The Mercury CX is the same as the Mercury II, but sadly, neither of my two Mercury cameras came in their original case, so I am not sure exactly how they attach, but most vintage leather cases attach to the tripod socket at the bottom of the cammera. There should be a metal knob on the bottom of your case that unscrews lefty-loosey. If it has been attached for a long time, it might be stuck, but it should come off just by twisting it. If you still need help, you can email me some pictures of your case and I can try to help by looking at a picture. My contact info is on the front page of this site.
I have a Mercury CC (Model 1) can you tell me where I can obtain a repair manual? Thanks, Aaron
Hi Aaron, unfortunately, I doubt a repair manual was ever made for either Mercury models. There is a series of images with descriptions on flickr done by a guy named PF McFarland. He shows a complete teardown and cleaning of a Mercury II. Although the Mercury II has some changes to your original model, they are both very similar. I recommend looking through his images and you should have most of what you need to clean and repair a Model CC.
Here is the link:
https://www.flickr.com/photos/7699588@N07/sets/72157629636471949
Thanks for the response. This should get me started. I heard that a gentlemen name Ed Romney wrote a tech manual on the Mercury I and II but it is difficult to fine a copy. I will try to track it down. Thanks
Thanks for the great article. I was considering tearing mine apart until I read your article and now I’m absolutely convinced to leave it alone. My Mercury II is in really good shape with no tarnish and the simulated leather is in excellent condition as well. I am always looking for any information I can find on a new camera that I collect. Haven’t found out much about serial numbers however on this. Mine is 98802. It’s obviously 1945 or later but I’m just not sure what year. Anyway a great article keep up the good work.
Thanks for the compliments, Bill. It is definintely not common to find a Mercury II in great shape with little tarnish in the metal. As you likely read in my review, I never started out going that in depth with it when I started! Its worth mentioning though that if the only issue with your Mercury is a sluggish shutter, you can do what I did on my Univex Mercury CC. That review is also on this site. In that case, that camera was in excellent shape, but had a sluggish shutter and all I did was remove the back of the hump by taking out two screws, unscrewing the lens, and then dousing it with lighter fluid. The entire camera is made of metal and exposing it to lighter fluid will not hurt anything. Just keep it well ventilated and let it drain over night and repeat that 2-3 days in a row and you’ll likely discover that the shutter begins to shoot at the correct speeds again, all without having to go too deep into the camera.
In terms of the serial number, to this very day, I have not found any kind of definitive serial number list for the Mercury II. Mine has a serial of 86xxx which I assumed was probably made between 1946-48. Although the Mercury II was in production until 1952, it’s sales significantly dropped off by the end of the 40s, so a bulk of the production happened in the first 2-3 years after the war. I know serial numbers can go as high as 150xxx, so despite yours still being a somewhat high number, it’s likely that it was made close to when mine was made, but yes, it was definitively after WWII.
My Mercury II CX has serial number 183645′ finis h looks new, must have been a late model. Just picked it up for $10, still has film in it. Plan to shoot a few with sunny 16 rule and get developed. Thanks for your article.
Bennie Peacock
How much would a Mercury 11with serial number 124014 be worth it is in great working condition. The leather is original and also in great condition.
I’m sorry Madelyn, but I don’t appraise cameras. If you would like to get an idea of the value of your camera, I recommend checking sold prices of similar models on eBay. Good luck!
Helle Mike, I just found my parents camera, can you possibly give me a idea on age or a web site to find this out. mercury 11 serial number 46655 model CX I hope you can help Thanks
Hi Barry. Your serial number suggests a very early model, probably built in late 1945 or 1946. This camera sold very well in the first few years after the war, but by 1948 started to slow down due partially to more advanced cameras coming out, but also disorganization within the company that made it.
Thank you for the quick response, I see its not valued as alot just think it is cool, will sit on a shelf real nice !!
No it’s not a real expensive camera but very few German cameras made in the 1950s are outside of a Leica or Rollie. I use mine all the time and get comments from it by people that have never seen one. It takes great color pictures albeit a lot of them so when I’m ready to go on a picture taking trip I snap pictures as if it was a digital camera with no cost. I very rarely ever take more than one roll of film with me. Mine has the optional flash attachment which really amazes people indoors at gatherings. Of course mine is the model II which takes DLC135 film, so of course film is readily available.
Hey there,
I have a Merc II and love it. I live just outside of Shanghai, China and found 4 of them, sitting on the back part of a shelf in a used camera story. I got the pick of the litter and consider it in above average condition. I am however wondering if there is any way to improve the metal finish on these? If so, would love to hear how it’s done. Thanks in advance.
Mark Lent
Xi’an Jiaotong-Liverpool University
Suzhou, China
I’s very interesting an I have a question:: how to transpose the “numbers” of the camera’s extinction meter to the one om nits back? Could you please help?
Thanks for the feedback Riccarso. To be honest, I have never used the extinction meter for the Mercury camera. I would definitely recommend checking out the user manual for more information.